FUBA RULEBOOK VERSION
|
|
|
- Horatio Park
- 5 years ago
- Views:
Transcription


1 FUBA RULEBOOK VERSION
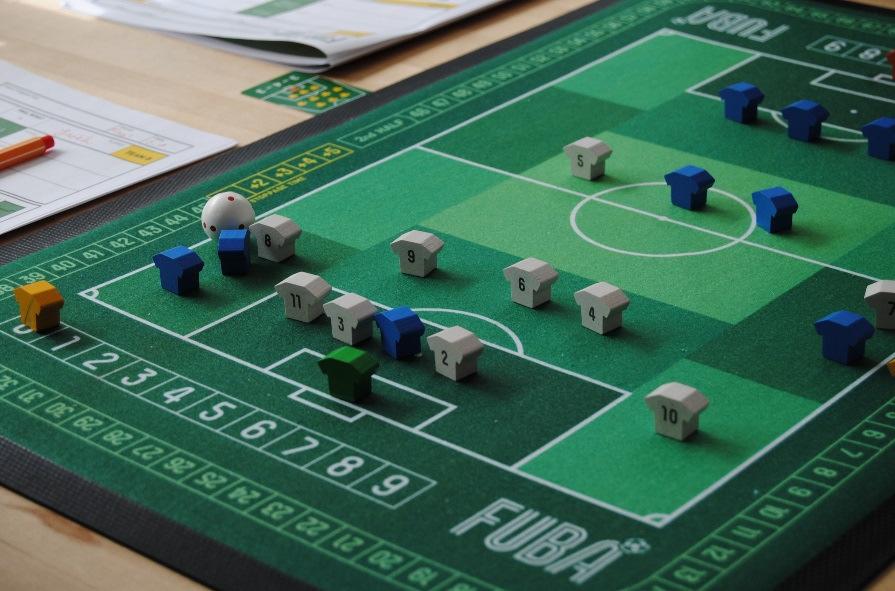
2 Introduction FUBA is a board game, which simulates football matches from a tactical view. The game includes its most important details. The players take roles of the head coaches and thus the game focus is in the team formations and their ability to move in the pitch rather than individual player details. FUBA is played in turns, with an average of 20 turns per each half. The player controlling the ball chooses the action his team will go for, then both players roll the dice to see the outcome. After this, both teams performs actions for example move their team according to the formations they have chosen. There is always a small chance of random events such as an injuries, cards etc. The game board is divided in 13 large areas rather than many little squares. This makes game faster and also realistic from the head coach view, which can give general instruction players role and positions in the game, but not control exact movements during the game. For same reason the player pieces are not numbered. The moves does not simulate a move of a certain player, but a team s ability to move and react in the pitch in chosen formation. The first version of FUBA was published 2013 which after the rules has been modified according the feedback. The game development will continue also in future if something need to be fixed to improve the game or playing balance. Thanks for all players who has send feedback and comments to help develop the game better. Components Ball die The ball die is a round die with numbers from 1 to 6. The number on the top shows how well the controlling team controls the ball. The lower the number, the better the ball control: 1 is excellent, 6 is poor Game board The game board (rubber mat) is divided into 13 areas, 4 on each side and 5 in the middle. Each area has a slightly different colour. The centre area with the centre circle counts as one large area, despite the half way line. Also the penalty area counts as one area including the goal area. Teams The game contains two teams. Both teams have 10 players and one goalkeeper. In advanced rules both team have also 3 substitute players and 10 condition point markers. The game contains three referees: one to mark game time, two to keep track of the score. Dice The game contains two ordinary six-sided dice. Cards The game contains 16+1 cards. Both teams have 8 formation cards that are used to choose formation for the team. The backside of these cards is yellow so can also be used as yellow cards. The red card is only for fun, and can be shown to the opponent in case a red card occurs. 1.0 TERMS 1.1 Player and team In these rules player refers to a player piece on the game board. Team is used when referring to the person playing the game. The goalkeeper counts as a player unless the rules state otherwise. 1.2 Controlling and passive team The team controlling the ball is referred to as controlling team (CT) and the opposing team as passive team (PT). These roles and terms are reversed immediately a team loses ball control to the opponent. The team in control of the ball immediately becomes the controlling team. 1.3 Zones The playing area is divided to three zones: midfield, defence and attack. Each zone contains several areas Midfield zone The midfield zone contains the five areas touching the halfway line Attack zone The attack zone contains the four areas which are on the opponent s side of the pitch and do not touch the halfway line. The attack zone is also the opponent s defence zone Defence zone The defence zone contains the four areas which are on the team s own side of the pitch and do not touch the halfway line. The defence zone is also the opponent s attack zone. 1.4 Goal line The goal lines are the edge lines in the shorter edge of the pitch from the corner to the corner (not just inside a goal). 1.5 Half way line The half way line is the line which goes through the centre circle and splits the pitch into two halves. Referees
3 2. TEAM PREPARATIONS Before the match begins both teams must choose a formation for the game. The formations are basic three line formations (defence midfield forwards). Teams can also choose to use optional rules for advanced formations. 2.1 Selecting the formations Both teams choose their formation for the game by secretly selecting a formation card. After both teams have selected their formation, the cards are revealed simultaneously. The formation consists of three numbers. These indicate how many defenders, midfielders and forwards the team has. Teams can use any formation they want, but the ones defined in formation cards are recommended. If a team wants to use some other formation, secretly write this formation down on a piece of paper. (The total number of outfield players must still be 10.) Example: Heidi selects formation for her team. She now has 4 defenders, 4 midfielders and 2 forwards Formation changes in the half time In the half time teams can change position of one player in their formation. 3. MATCH PREPARATION Before play begins the gaming mat has to be set up. The teams roll a die to determine who will start with the ball. Then referees, players and ball are placed on the pitch. 3.1 Deciding who kicks-off Both teams roll a die. The team with the higher result chooses which team will start with the ball. The team starting with the ball is the controlling team. 3.2 Team setup process The teams are setup in the following order: 1. The controlling team sets up its players. 2. The passive team sets up its players. 3. After the passive team has set up its players the controlling team is allowed to adjust their starting position by moving 0-2 players up to one area from their initial starting area (i.e. they can be moved to any area adjacent to that which they are currently in). The player s new position must still fill the setup rules. Kick-off takes place at the beginning of each half and after each goal. The controlling team must place two players in the middle area (the centre circle). Other outfield players can be set up in any area that is at least partly in the team s half of the field of play. The goalkeeper is placed in the team s penalty area. The passive team s players can be placed in any area that is at least partly in that team s half of the field of play. Their goalkeeper is, again, placed in the team s penalty area. The ball is placed on the centre circle with 1 as the initial ball die value. 3.3 Referee (time marker) setup One referee is set up on square 1 of the time track (and on square 46 in the second half of the game). Two others are setup on the goal tracks, on square 0 of each track. 3.5 Setup required markers Depending the advanced rules used in the match, both teams setup the required markers as substitution player markers and condition point markers. See advanced rules A2 and A3. Example: Match preparations Heidi and Otto begins the game. Both roll a die. Heidi gets 5 and Otto 3. Thus Heidi decides who will start as a controlling team. She choose to start as a controlling team and thus Otto s team starts as passive team. (In second half Otto will then start as a controlling team). Heidi must setup her team s players first. She setups four players to the middle area, which is more than required minimum one. Full setup is shown below. Then Heidi announce she is ready and then Otto must setup his team. After Otto s setup is ready, then Heidi has chance to move two players. She choose to move two players from centre to strengthen the side, because her plan is start the game by playing the ball to that side are. After teams are ready, then the referees are setup. One for each goal track to mark the number of goals. The third referee is setup to the time track square. Also condition point markers and player substitution markers are setup to their own tracks in the cards. The selected formation (4-4-2 etc.,) does not affect the way players initially set their team up for kick off Kick-off setup rules These rules are used in addition to the setup process defined in chapter [3.2].
4 4. GAME TURN Just like a real football match, the game is divided into two halves. Each half contains approximately 20 turns, though the exact number varies. Each turn represents 1 to 6 minutes of game time. Each half lasts for a minimum of 45 minutes. The game is played in turns. One turn includes actions by both teams. A turn contains seven stages which must be completed in the order shown above: TURN ORDER TABLE 1 Controlling team chooses and move the ball to the target area. 2 Ball value modifications 3 Dice rolling 4 Time adjusted 5 Control check + new ball value 6 Team A stage * - Goal attempt (optional) - Player movement - Ball value adjustment - Player substitution (optional) 7 Team B stage * - Goal attempt (optional) - Player movement - Ball value adjustment - Player substitution (optional) * The teams, A and B, are determined separately in each turn. After the turn is completed a new turn starts unless the half ends as defined in chapter Controlling team chooses target area The controlling team chooses an area to play the ball into. The chosen area can be any area where the team has a player or an area adjacent to such an area. The team can also play the ball within the same area as it is currently located. The chosen area is called the target area and the area where the ball begins the turn is called the start area. The controlling team cannot choose a target area where it has a player in an offside position or where it has no players and all its players in adjacent areas are in offside positions in accordance with chapter Offside A controlling team s player is in an offside position if it is in the passive player s half of the field (not including the centre circle) and in an area that is closer to the opposing team s goal line than the area in which the passive team s second closest player to that goal line (including the goalkeeper) is located. The controlling team s players are not offside if they are in an area that is at least partly at the same level as the area in which the passive team s second closest player is. Neither the players are offside if those are in an area at least partly at the same level as, or closer to, their own goal line than the start area containing the ball. The offside rule does not apply when: a goal kick is taken a corner kick is taken Difficult situation If the ball value is 6 then the target area can be chosen only among the area where the ball exists or adjacent areas Ball movement and value modification After the controlling team has chosen a legal area to play the ball, the ball is moved into that area. The ball value is modified in the following cases and in the following order Target area without a passive team s player If the passive team has no player in the target area and the controlling team has at least one player, then the ball value is adjusted to Advanced off-side See advanced rule A Start area without a passive team s player One is reduced from the ball value if the passive team has no players in the ball starting area. This reduction is not used when a free kick, corner kick or a goal kick is taken Long pass The value is increased by one for each area between the area where the ball starts and the target area. If the value would be adjusted over 6, then the ball movement is illegal and the controlling team must choose another target area. A long pass modifier is ignored if the ball is moved through one area and that area contains at least twice as many players of the controlling team players than the passive has in that area. The controlling team can choose the path of the ball (the area which the ball is moved through). 4.2 Dice rolling Both teams roll a die (D6). Players must remember these results throughout the entire length of the turn because they are used during other of stages of the same turn. 4.3 Time The time marker (referee) is moved as many squares (minutes) forward as the difference of the teams dice scores. Example: Time Heidi rolls 4 and Otto rolls 2. The initial value difference is 2 so the time marker is moved 2 minutes forward.
5 If the dice difference was 0 the time marker is moved equal to the thrown die score (one die, not both). I.e. if the dice result was 3-3, then time is moved 3 squares forward. If the time marker reaches the first stoppage time square, it stops there even if it should continue further according to the dice difference result. Stoppage time begins Stoppage time During stoppage time the time marker is moved only one square per turn. If the dice difference in stage 2 is smaller than the current stoppage time (yellow number in the square where the time marker begins the turn), the half ends immediately. The rest of the stages are not played. When the time marker reaches the +5 square the half is finished at the end of turn. Example: : Stoppage time The time marker is on the +2 square. Heidi rolls 3 and Otto rolls 2 at the dice rolling stage so the difference of dice scores is 1. This is less than the current stoppage time (+2), so the half ends immediately End of the half When the first half is finished, the second half starts. The team that started the first half as the controlling team now starts as the passive team and vice versa. Move the time marker referee to square 46. Repeat the team setup for kick-off (see chapter [3.3]). When the second half is finished, the game is over. 4.4 Control check The control check determines whether the controlling team retains ball control or loses it to the passive team. To check for ball control the controlling team s die value (rolled in stage 2) is compared to that of the current ball value. If the die value is higher than the ball die value, the controlling team remains in control of the ball. If the die value is lower than the ball die value, possession is turned over and the passive team gains control of the ball. The passive team immediately becomes the controlling team and vice versa. If the die value of the controlling team s die equals the ball die value, a special event is rolled immediately before solving the control check Target area without the controlling team s players If after the control check the team with the ball control does not have any players in the target area it must move its closest player to the target area. The team which started the turn as a passive team, but got the ball control, can choose to move their second closest player if the goalkeeper is currently the closest player. The player is moved at the ball movement stage, but this move is not deducted from the number of moves the team is allowed to make at the player movement stage. The move does not otherwise limit movement options Special events If a special event occurs, both teams roll a die. The passive team s die value is subtracted from the controlling team s die value and the special event occurs according to the special event table. SPECIAL EVENT TABLE -5 Two free movements for the passive team immediately after the ball movement -4 Failed control check, ball remains in the start area -3 One free movement for the passive team immediately after the ball movement for ball value after the new value setup -1 Free kick for CT. PT must roll for a yellow card 0 Both team s action stages are skipped If the target area was a corner area, then a corner kick occurs (awarded to the team for whom the zone is the attack zone). If the die scores were 1 or 2 then add one condition point to both teams (in the zone where the target area is). If the die scores were 6, both teams suffer an injury, see chapter [A.4] 1 Free kick for PT. CT must roll for a yellow card 2-1 for ball value after the new value setup 3 One free movement for the controlling team immediately after the ball movement 4-2 for ball value after the new value setup 5 The passive team may not choose defence movement option this turn The event is recorded immediately and all PT/CT effects affect the team which is currently the PT/CT, even if these roles change later in the turn. The controlling team retains ball control after a special event, unless otherwise noted. If a free kick is given to either team, the game continues according chapter [5.1] with a new setup. The team rolling for a yellow card must roll a die to determine the result: 1-2: No card 3: Yellow card if the target area is at least partly on that team s side of the pitch. 4-5: Yellow card 6: Yellow card, +1 for the red card test; opponent suffers an injury, see [5.6] If the team gets a yellow card and already have at least one yellow card or if the yellow card test result was 6, then the team must also roll for red card, see chapter [5.3].
6 4.5 New ball die value The ball die value is changed after the control check. The new value is the die roll value of the passive team (rolled in stage 2). If the control check failed then the new ball value is the die result of the new passive team.

7 4.6 Teams action stages Each team has its own action stage in which the team can make a goal attempt, move players, try pressing the ball control and make player substitutions. The team which has higher number of players in the target area takes the first action stage. If the player numbers in the target area equals, then the passive team takes the first action stage. The player numbers are counted at the beginning of the turn, expect the special event results are taken account. After the first team has finished its action stage, then the second team plays its action stage. A team must choose to play exactly two actions in an action stage. The two actions cannot be same, but must be different type. Players movement Ball value adjustment Pressing (only passive team) Goal attempt (only controlling team) Players substitution (advanced rule) The first action is played normally, but the second action is called as a secondary action and gets following disadvantages: Pressing: +1 modifier for pressing die roll result (but not for new ball value) Movement: -1 for number of moves Ball value adjustment: -1 modifier for the number of the team's players in the area. Goal attempt: -1 die roll modifier for goal attempts The disadvantages for second actions simulate the opponent team ability to react for the events and thus make the second action less effective than the first action. 4.7 Goal attempt The controlling team can attempt to score if it has the ball in any of the areas that are located entirely in the passive team s side of the pitch. If the controlling team decides to try to score a goal, the team rolls a die and adds the modifiers defined in the Goal Attempt Modifiers Table. If the modified die value exceeds the current ball die value, the team scores a goal. The ball is moved to the centre circle and new team setups for kick-off are carried out according to the setup process rules in chapter [3.3]. The scoring team becomes the passive team. If the modified die value equals the current ball die value, a corner kick occurs. See chapter [5.2]. If the modified die value was one less than the current ball value and the controlling team has at least one player in the penalty area, a rebound occurs. See chapter [4.7.3]. Otherwise the shot is a miss. The game continues with a goal kick. See the rules for goal kicks in chapter [5.3]. The passive team becomes the controlling team and vice versa Difficult goal attempt The team can attempt a goal even if the die result required to score is more than six. The team rolls a die according to the goal attempt rules. If the result is 6, the team rolls again. The team scores a goal if the second die roll is higher than the area modifier for the goal attempt. If the second die result equals the area modifier, then a corner kick occurs. Otherwise the shot is a miss Goalkeeper not in the penalty area If the passive team s goalkeeper is not in the penalty area then a goal attempt can also additionally be made from any of the areas touching the halfway line. -6* -6* * * A goal attempt can only be made from these areas if the goalkeeper is not in the penalty area. GOAL ATTEMPT MODIFIERS TABLE +1 if the controlling team has more players than the passive team in the area from where the attempt is made. (1) -1 if the passive team has more players than the controlling team in the area from where the attempt is made. (1) +1 if the controlling team has more players than the passive team in the passive team s penalty area. (2) -1 if the passive team has more players than the controlling team in the passive team s penalty area. +4 if the passive team s goalkeeper is not in the penalty area. -0/2/4/5/6 depending on the area where the goal attempt is made from (see picture).
8 -1 Goal attempt from a free kick (1) The modifier is not counted if the goal attempt is made from the penalty area. (2) Players in offside positions are not counted in the calculation Rebound When a rebound occurs both teams roll a die and add the number of their players in the penalty area where the rebound occurs (the passive team s goalkeeper is not counted for the purposes of this calculation). If the controlling team s result was higher the team scores a goal. If the result was equal, a corner occurs. If the passive team s result is higher, then the passive team regains possession of the ball control and immediately becomes the new controlling team. The new ball value is the die score the new passive player rolled for their rebound roll.
9 4.8 Player movement The movement of players simulates how teams change positions according to the tactics they operate, rather than the actual movements of individual players. The team has three different options for movement: defence movement, midfield movement or forward movement. The team must choose one (only one) option and make all moves according to the chosen option s rules. A same player piece cannot be moved twice during the game turn Midfield movement The team can move as many players as it has midfielders in its formation. The position of the players on the pitch does not affect whether or not they can actually be moved. Each of these players can be moved one area, i.e. to an area adjacent to the one they are currently in. The players can however only move sideways or diagonally, not straight forward towards the opposition goal line or straight backwards towards their own goal line Forward movement The team can move as many players as it has forwards in its formation. A player can move only straight forward. No sideways or diagonal movement is allowed. A player using forward movement can move more than one area in the same move, but must stop the move if it enters an area where the opposing team has more players (before the moving player enters that area) Defence movement The team can move as many players as it has defenders in its formation. A player can move only straight backwards. No sideways or diagonal movement is allowed. A player using defence movement can move more than one area in the same move, but must stop the move if it enters an area where the opposing team has more players (before the moving player enters that area) Goalkeeper movement A goalkeeper can be moved like any other player, but it cannot move more than two areas if it is using forward or defence movement Movement restrictions for offside A player cannot be moved into an offside position. A player can be moved into an area that is at least partly at the same level as the area where the opponent s second closest player (including the goalkeeper) to their own goal line is located. This restriction does not apply if the player is moved straight backward Free movements All players, except goalkeepers, that have not yet moved and are in an area touching either goal line, can be moved at the end of the action stage straight forward/backward one area away from the goal line even the team did not choose a movement action. These moves are carried out after the team has completed all of its actions. A player using this free movement cannot however move to an area where the ball is currently located. A goal keeper adjacent own penalty area can move back to the penalty area. The players moved by free movement does not block opponent defence or forward moves in the same turn Moving with ball The ball can be moved (dribbled) with a moving player from one area to an adjacent area once in the movement stage, but only if this movement starts from an area where there are no passive team players. The dribbling player can move only one area even it performs forward of defence movement Controlling team s player with ball The controlling team must always have at least one player in the same area as the ball after the team has finished its moves. 4.9 Ball value adjustment A ball value adjustment action simulates a situation where the ball is played with short passes when defending team does not try aggressively to take ball off. Either the controlling team can improve its position (when ball value drops) or its space is reduced for further option (ball value goes higher) The ball value is adjusted in accordance with the number of players in the same area where the ball is located. If the controlling team has more players than the passive team in the area with the ball, then the ball value is reduced by the difference between the number of players, but only by a maximum of 2. If the controlling team has fewer players than the passive team in the area with the ball, then the ball value is increased by the difference between the number of players, but only by a maximum of Pressing A pressing action simulates a situation where the defending team tries to get ball control quickly off from the opponent. If the pressing fails the controlling team usually can take advantage from it. The passive team may perform a pressing action if it has at least equal number of players than the controlling team in the area where the ball exists. In a pressing action the team roll a die. If the die value is lower than the ball value, then the team gets the ball control and becomes as a controlling team. The die value (rolled for the pressing) becomes then a new ball value.
10 If the die value is higher than the ball value, then the pressing is failed and the ball value is reduced by two. 5 SPECIAL SITUATIONS 5.1 FREE KICK The team awarded a free kick immediately becomes (if it is not already) the controlling team. When a free kick occurs the ball is moved to the target area of the current turn and the ball value is adjusted to 1. If the target area was the passive team s penalty area a penalty kick is awarded instead of a free kick. See chapter [5.5] The teams then carry out a new setup procedure in accordance with the setup rules in chapter [3.2] and taking into account the specific free kick setup rules in chapter [5.1.1]. The controlling team can choose to continue the turn from stage 6 if they decide to make a goal attempt, in which case that team takes first action stage and the goal attempt must be the first action. If the team decides not to attempt a goal a new turn starts. The controlling team taking the free kick can choose the start area as a target area only if there are at least two players from the controlling team in that area Free kick setup rules These free kick setup rules are used in addition to the setup process rules outlined in chapter [3.2]. The controlling teams must place at least one player in the area where the free kick is awarded. All other players can be set up without restriction Quick free kick If a free kick is awarded an area which is at least partly in the new controlling team s side of the pitch, then it is counted as a quick free kick and no new setup is made. The controlling team may make immediately as many moves as wanted and combine all movement types. Then the passive team can make up to as many movements as the controlling team made. After the movements game continues with a free kick. 5.2 CORNER KICK When a corner kick is awarded the teams carry out a new setup procedure in accordance with the setup rules in chapter [3.2] also taking into account the specific corner kick setup rules in chapter [5.2.1]. The ball die value is adjusted to 1. After the setup a new turn starts and the game continues from stage 1. The corner kick is taken from the corner of the pitch, which, for the purposes of corner kicks only, is counted as a separate area. I.e. there is one area between the penalty area and the start area (where the corner kick is taken from) Corner kick setup rules These corner kick setup rules are used in addition to the setup process rules defined in chapter [3.2]. One player from the controlling team must be placed in the corner to take the corner kick. All other players can be setup without restriction. Once the corner kick is taken (at ball movement stage) the player who took the corner is no longer considered to be in the separate corner kick area. The player then continues the game normally. 5.3 GOAL KICK A goal kick takes place from the penalty area. The ball is placed there and the ball die value is adjusted to 1. The rest of turn is played as normally before the goal kick is taken. The passive team s players are not allowed to disturb or inhibit the goalkeeper and thus those cannot try to press the ball control off before the goal kick is taken. The controlling team cannot move the ball with a player [4.8.8]. After the turn is finished, the next turn begins normally by choosing a target area (for the goal kick). The order of action stages are determined normally according the previous turn moves Slow goal kick The controlling team may choose to take a slow goal kick. If this option is chosen the controlling team may make as many moves as wanted and combine all movement types. Then the passive team can make up to as many movements as the controlling team made. After the movements game continues with a free kick. 5.4 YELLOW AND RED CARDS If a team receives a yellow card and has already had one previously in the game that team must roll a die. If the die roll result is lower than the number of yellow cards team currently has (including the latest one), the team receives a red card and must immediately remove one player from the game. Two of the yellow cards will be changed (removed) into a red card, unless the die result was 1 in which case only one yellow card is discarded (direct red card). Red cards have no effect on the formations selected in chapter PENALTY KICK When a penalty kick is awarded, the teams carry out a new setup procedure in accordance with the setup rules in chapter [3.2] also taking into account the specific penalty kick setup rules in chapter [5.5.1] Penalty kick setup The team awarded the penalty kick (the controlling team) sets up the ball and one player on the penalty

11 spot. The passive team sets up the goalkeeper on the goal line. No other players can be placed or moved into the passive team s penalty area Taking a penalty kick The goalkeeper hides a die behind their hand and secretly chooses their option for the goalkeeper s dive: 1: Goalkeeper will dive to his left 2-5: No guess. Goalkeeper remains in the middle of the goal. 6: Goalkeeper will dive to his right After the passive player (goalkeeper) has made his decision, the controlling (shooting) player chooses his shooting spot: left, middle or right. The goalkeeper then reveals the hidden die. The shooting player rolls a die to check whether the penalty is successful. A goal is scored if the die result is the same or higher than the value shown in the table. If the penalty kick fails, the game continues with a goal kick. The passive team immediately becomes the controlling team after the failed penalty kick. Example: Goal Kick Heidi s team is awarded a penalty kick. Otto decides his goalkeeper will dive to the left and secretly choose 1 for the die. Then Heidi announces her player will shoot to the left. According to the table she needs to roll 2+ (2, 3, 4, 5 or 6) to score. She rolls 1, failing to score the penalty kick. Otto s team becomes the controlling team and the game continues with a goal kick.
12 ADVANCED RULES A1 ADVANCED FORMATIONS PLAYERS ROLES Teams can use more advanced formations by using the special player roles outlined in this chapter. Using these advanced formations has an effect on the number of condition points available per area (defence, midfield, forward). Teams can specify their formations are using the following player types. Attacking and defending midfielders Teams can additionally specify their midfielders to be either attacking or defending midfielders. For each attacking midfielder one point is removed from the midfield condition and added to the forward condition. For each defending midfielder one point is removed from the midfield condition and one point is added to the defence condition. Attacking centre back Teams can specify 0-1 defender as an attacking centre back. One point is removed from the defence condition and added to the midfield condition. Withdrawn striker Teams can specify 0-1 forward as a withdrawn striker. One point is removed from the forwards condition and added to the midfield condition. Offensive wing backs Teams can specify 0-2 defenders as offensive wing back(s). One point is removed from the defence condition and added to the forward condition for each offensive wing back designated. Example: Selecting advanced formations Otto selects formations, but wants strengthen forwards, so he chooses to use advanced formations and specifies 3 midfielders as attacking midfielders. At the beginning of the match team has following number of condition points, which are marked on the condition point tracks: Defence condition points = number of defenders Midfield condition points = number of midfielders Forward condition points = number of forwards Example: Condition points Heidi has the formation and thus her team has four defence condition points, four midfield condition points and two forward condition points. Otto s would have four defence condition points, five midfield condition points and one forward condition point, but as he specified three attacking midfielders, then three points are moved from midfield to forward. Thus his team has four defence condition points, two midfield condition points and four forward condition points. A2.1 Using a condition point In a team action stage the team can choose to use condition points. A condition point can be used for following purposes to boost an action: Move action: +1 for number of moves. The extra move can be different type than the chosen movement type. Ball value adjustment: +1 modifier for the number of the team's players in the area. Pressing: -1 for a pressing die roll result (but not for ball value) The condition point must be used from the same zone than the target area. The use of condition point must be announced before the action is made. Only one condition point per action can be used to improve it. A2 CONDITION POINTS & TIREDNESS Condition points are used to mark the physical condition and tiredness of the team s different parts: defence, midfield and forwards. These points can be used during a match to increase the team s ability to move. Condition points are lost as your team tires during the course of the game, but a team can increase their number store of condition points by performing player substitutions. Both teams have a set number of condition points allocated to each part of the formation: defence, midfield and forwards. A2.2 Tiredness test If the time marker is moved 5 or more squares in a turn, then both teams must make a tiredness check to see if their players become fatigued. Each team makes their own tiredness test. Each team rolls a die. The die result is multiplied by 10. If the result is higher or equal to the current game time, including the time adjustment for the current turn, then that team passes the tiredness test. If the tiredness test is failed then the team loses one condition point and must roll another die. The die result is multiplied by 10 and added to the previous result. If the result is again lower than the current in game time, then a second condition point is lost and
13 the procedure is a repeated third time. A team can lose 0-3 points in one tiredness test. The first point must be reduced from the zone (defence, midfield or forward) in which the target area is located unless there are already no points any longer available for that zone. If a team runs out of condition points then that team starts suffer tiredness, which will affect the rest of the match even the team would recover some condition points. Example: Tiredness test It is currently the 78 th minute of the game and the teams must take a tiredness test. The first team rolls a 5, which results in a result of 50 (5 multiplied by 10). This is not however enough to pass the test (79 is required). Therefore the team rolls another die and this time the result is 3. So the total dice score is now 8 (5 carried over from the first roll plus 3 from the second roll), which, after being multiplied by 10 comes to 80. The result is higher than 78 and team therefore passes the test, but one point is lost from its condition die for the area of the team concerned (defence, midfield or forward). A2.3 Tiredness Tiredness affects movement. One players is deducted from each position of the original formation (defender, midfielder, forwards). This reduction affects the maximum number of moves in chapter [4.8] including the minimum value in [4.8.9]. Example: Tiredness If a team with a starting formation suffers tiredness, then the effective formation in terms of the maximum number of players that could be moved would be reduced to A3 PLAYER SUBSTITUTIONS A team can perform a player substitution up to three times during a game. Substitutions are made as an action. In a same action team can perform more than one player substitutions (the number of substitutions must be announced before first is made). When the team makes a substitution it can choose one of the following options: Formation change The team can change the position of one player in its formation. These changes take effect at the beginning of the next turn. * Remove one yellow card One of the players with a yellow card is substituted in order to avoid a red card. Fresh player introduced onto the field The team rolls two dice and multiply the result by 10. If the result is higher than current game time, then the team gets one condition point.. Otherwise the team gets two condition points. ** * A formation change does not affect the available number of condition points. If the change is done in the second half, then one condition point is added to the area where the formation is strengthened. ** Condition points cannot be increased above 6 in any zone. A4 INJURIES If a team suffers an injury it must immediately remove one player from the game and must make an injury roll. It rolls once die with following effects. 1: The player returns to the game at the beginning of the next turn s movement stage. The player is returned to the game in the area containing the centre circle. 2: The player is out of the game for the next turn. It then returns to the game at the beginning of the following turn s movement stage. The player is returned to the game in the area containing the centre circle. 3: The player is out of the game for the following two turns. It returns to the game at the beginning of the movement stage two turns thereafter. The player is returned to the game in the area containing the centre circle. 4+: The player cannot return to game. The team can choose immediately to make a player substitution after the injury roll unless the team has already made all three of their allowed substitutions. If the change is made in the second half the team gets one condition points, otherwise the substitution has no other effects. A5 ADVANCED GOAL KEEPER Goal keepers can have two positions in their own penalty area, inside or outside of the goal keeper s area (the inner rectangle in the penalty area). A goal keeper can freely change the position when the team makes movements if the goal keeper is not otherwise moved. If a goal keeper is positioned in the goal keeper s area (inside the inner rectangle), then the normal rules apply. If the goal keeper is outside of the goal keeper s area it will give -1 modifier for pressing die roll, but the opponent team will get +1 die roll modifier for goal attempts. A6 AGGRESSIVE PRESSING In an aggressive pressing the defending team plays hard, usually close or beyond the boundary of the rulebook, when it tries to get the ball control, for example performing a tackle.
14 An aggressive pressing can be used instead of a normal pressing and it can be used even the passive team has less players in the area with ball than the controlling team. To make an aggressive pressing action team must spend one condition point from the zone where the ball exists. If the controlling team has not at least two more players than the passive team in the area with the ball, then the passive team can roll two dice and discard higher one. Otherwise one die is used like in a normal pressing action. If an aggressive pressing fails, the opponent is awarded by a free kick and the pressing team must roll for a yellow card. A7 ADVANCED OFF-SIDE The existing offside rules apply with following additions: If a target area contains a controlling team and that area is closer to the opponent edge of the pitch but partly in same level than the area where the opponent team's second lowest players is, then the ball value is increased (if lower) to equal to the number of the passive team players in an area(s) where the second lowest player exists. The number of the players is limited by the number of defenders in the formations (i.e. if the team players with and have four player such on area, only three players are counted for advanced offside rule). A8 SKILLS Team can choose equal number of skills for a match (recommendation 1-3). The chosen skills are kept secret from the opponent until used first time. The first use is free, but after the skill is revealed it cost one condition point use it. The condition point is reduced from the target area zone. Trained formation change A team can change position of two players in the formation at the end of its action stage. This can be used only once per game. The use of this card does not require to use condition points. Wide player material Each time a team makes a player substitutions to change fresh player to the pitch, reduce 2 from dice result which determines number of condition points. The use of this card does not require to use condition points. High condition Instead a normal movement action, a team roll a die and can make as many moves as the die result (minimum the number of players in formation in the corresponding zone). All moves can be any type (defence - midfield - forward). Off side trap An opponent team must make offside check if the target contains its players and also a second lowest player of the defending team. This skill can be played after the opponent has chosen the target area. Short passes If the target area is in the midfield then the controlling team can reduce one from the ball value after its movement action if the chosen movement type was midfield and the opponent has not more players in the target area. Fanatic fans At the beginning of the team's actions stage, roll a die: 1: Add one for ball value (only if PT) 2: +1 modifier for pressing roll 3: Team can make three actions 4: Reduce 1 from ball value (only if CT) 5: +2 moves (any type) 6: +1 modifier for goal attempts Sweeper keeper If the target area is in the defence zone of the passive team and the controlling team had no players in that area at the beginning of the turn, then the passive team goal keeper can move that area (or stay in that area) if it is an adjacent area. The move is free and done at the beginning of the action stage. The passive team then gets -2 modifier for pressing roll. This skill can be played at the beginning of the team s actions stages. Creative goal keeper If the controlling team s start area is its penalty area and its goal keeper is in that area the number of movements the opponent team can make in the next action stage is reduced by two. This skill can be played at the beginning of the turn. Skilled goal keeper The opponent must use two dice for a goal attempt. The highest result is ignored. For difficult goal attempts the two dice are used for first roll. The use of this skill costs 3 condition points. This skill can be played when the opponent announce a goal attempt, but before the die is rolled for the attempt. Tackle The passive team may roll two dice for pressing (also for aggressive pressing) in its defence zone and discard the highest die result. If the pressing is aggressive and the dice equals the opponent will get a free kick and the passive team must roll for a yellow card. Stopper The passive team player is counted as three players in a target area in a defence zone during the opponent actions.
15 This skill can be played at the beginning of the opponent action stage. Skilled fullbacks After successful pressing action in the defence zone, a new controlling team can choose to move the ball up to two areas. The ball value is increased by one for each area moved. Doubling The passive team can increase ball value by 2 (but not beyond 6) if after its movement action it has more players in the target area than the controlling team and the target area is its defence zone. This skill can be played at the end of the passive team s movement actions. Dribbling A controlling team can move the ball one area with a player if the area where the move starts contains more controlling team players than passive team players and the area where to move contains no passive team players. This skill can be played at the end of the control check stage. Clinical finisher +1 modifier for goal attempts in the penalty area. The use of this skill costs 2 condition points. This skill can be played before the goal attempt roll is made. Target man The controlling team player is counted as three players in a target area in an attacking zone during the opponent actions. This skill can be played at the beginning of the opponent action stage. Midfield pressing The passive team may roll two dice for pressing (also for aggressive pressing) in its midfield zone and discard the highest die result. If the pressing is aggressive and the dice equals the opponent will get a free kick and the passive team must roll for a yellow card. Creative midfielder If a controlling team has the ball in the area containing the centre circle it can choose to move the ball to an adjacent area as an action. Crossing If the start area is in the midfield zone and the target area contains a controlling team player the long pass modifier is ignored. This skill can be played after the target area is chosen, but before the dice are thrown. Midfield general If the target area is in the midfield zone, then a team can choose to change order of action stages. The use of this ability costs 2 condition points after first use. This skill can be played at the end of the control check stage. Actor When an opponent must roll for yellow or red card, they must roll two dice instead of one. The actor can choose which one to discard. If the dice equals, the original event will be ignored and the actor will get yellow card instead and the opponent will continue with a free kick. Goal poacher If the target area is in the penalty area and the team has a player there, it can choose to change the order of the action stages. The team must make a goal attempt as its first action then. The use of this skill costs 3 condition points. Controlling team only.
16 COMPETITION RULES C1 PLAYERS MISSED NEXT MATCH Reduce one condition point for next match in any following applies. The team can choose where the point is reduced. Team got at least one red card last match If the team got at least one yellow card, roll two dice. If the result is lower or equals the number of yellow cards team has got before the previous match, then one condition point is reduced for the next match. If the team got injury during the match, roll a die. With result 1 or 2, one condition point is reduced for next match. C2 PRIMARY FORMATION Each team must choose a primary formation before the tournament. If a team starts a match with another formation, it must reduce one condition point at the beginning of the match. The team can choose where the point is reduced. C3 SKILLS Each team can choose two skills to the tournament. At the beginning of a match team choose one of those to use for the game. C4 GAMING TIME The gaming time in a competitions are recommend to setup to 2 hours. If the game starts any reason 15 late from the schedule, then during the first half the time marker is moved one extra square in each time adjustment stage, except in the stoppage time. If the first half is not finished in 1 hour, then immediately after 1 hour the time marker is moved one extra square in each time adjustment stage, except in the stoppage time.
TACTICAL FOOTBALL GAME RULEBOOK fubatacticalfootballgame. Game design by Hannu Uusitalo
 TACTICAL FOOTBALL GAME RULEBOOK 2.0 Game design by Hannu Uusitalo www.fubaboardgame.com fubatacticalfootballgame 1 2 3 WHAT YOU NEED TO PLAY Game board The game board (rubber mat) is divided into 13 areas,
FUBA WORLD CUP TOURNAMENT RULES
 FUBA WORLD CUP 2018 - TOURNAMENT RULES Date: 1st 2nd of September 2018 Location: Helsinki, Oltermannintie 8 In this section term team refers to player who play the games and term player refers to a game
Northern SC U12 Playing Formats 8v8 (7 field players + 1 GK)
") Northern SC U12 Playing Formats 8v8 (7 field players + 1 ) This document outlines guidelines for increasing the consistency of playing formations and terminology we use with U12 players. As players of
Northern SC U12 Playing Formats 8v8 (7 field players + 1 ) This document outlines guidelines for increasing the consistency of playing formations and terminology we use with U12 players. As players of
Contact with your suggestions for this chapter. Chapter1 Standard 4 v 4
 Chapter1 Standard 4 v 4 All the following games will use the following standard 4 v 4 pitch in the diagram below unless a new diagram is shown. Win by 1 Normal game of 4 v 4 but you can never lead the
Northern SC U6 Playing Format 3v3
 Northern SC U6 Playing Format 3v3 This document outlines guidelines for increasing the consistency of playing formations and terminology we use with U6 players. As players of this age may have different
Soccer Study Guide. The Game
 Soccer Study Guide lgrotthuss football-focus.com.webloc www.outdoorfunstore.com/ sports/images/soccer.jpg The Game Soccer is played with 11 players per team High School varsity soccer with 2 equal halves
Lisandro Nembrini & Gonzalo Rodrigo. Version 3.0
 Lisandro Nembrini & Gonzalo Rodrigo Version 3.0 Rules First Recommendations 3 Game Components 3 Match Settings 3 Initial Hand 3 Starting Line Up 4 Discards 4 Match Length 5 Game orientation and direction
Small Sided Games SHARP SHOOTER
 Small Sided Games SHARP SHOOTER RECOMMENDED FOR 9-12 YEARS 1. Area of approximately 45 x 30m. Modify area depending on the number and age of. Split the pitch into 3 areas as shown below. 2. Two teams of
Soccer Manual. Rules, Regulations, & Training Information.
 www.soky.org Soccer Manual Rules, Regulations, & Training Information All Special Olympics Kentucky Soccer games and tournaments should be run according to FIFA rules. Any modifications to those rules
Practical Training for Referees, Assistant Referees and Team Work
 Practical Training for Referees, Assistant Referees and Team Work Referee Skills - Exercise 1 Referee to develop speed of reaction and concentration 1 R, 11 players The players try to surprise the R touching
Know the direction of play
 U7 ATTACKING Know the direction of play ACTIVITY: DRIBBLE TO THE CONE Understand that to score the ball must go towards the opposition goal Set up a 5 yard square area with a red cone goal at one end and
 AGE GROUP/PROGRAM: U14 TOWN WEEK # 1 THEME: AWARENESS/ARGENTINA Improve 1 st touch Speed of play Playing with the head up CORE GAME 1: PASSING LONG & SHORT 15 X 15 YARD AREA Switch the play Players on
AGE GROUP/PROGRAM: U14 TOWN WEEK # 1
 AGE GROUP/PROGRAM: U14 TOWN WEEK # 1 THEME: AWARENESS/ARGENTINA Improve 1 st touch Speed of play Playing with the head up Players on their toes, balanced and communicating. Good 1st touch out of the body
In this session we look at developing teams ability to defend as a unit.
 Defending as a unit In this session we look at developing teams ability to defend as a unit. What you tell your players the session is about: Working hard together to win possession. Pressing, supporting
62 - ABCD Finishing 2
 6 - ABCD Finishing Opposed Drills o. of Players: 40 x 0 yards 4 Cones, Goal 4 Outfield, Goalkeeper THE STEPS 4. Player dribbles and shoots at goal.. Player passes to Player and runs out wide to receive
5. Performance Phase Model Sessions
 . Performance Phase Model Sessions FFA National Football Curriculum - The roadmap to international success Chapter Page 68 Return to Model Sessions contents Page . Performance Phase Model Sessions Model
U11-U12 Activities & Games
 Passing/Receiving CIRCLE PASSING With cones, form a circle of about 15-20 yards in diameter Players are set up around the perimeter of the circle The player with the ball starts the activity by passing
Defend deep to counter-attack
 Defend deep to counter-attack Age: 14 - Adult Number of players: 18 (two teams of 9) Difficulty: Medium Area/Time: 80 x 50 yards (30-45 mins.) Drill objective (s): 1. Learn how to regain possession in
Traffic Lights. From the card 1. Red cone stop 2. Yellow cone change direction 3. Green cone speed up
 Traffic Lights In Pairs 1. Red cone run ball to partner + swap places 2. Yellow cone rehearse trick (players choice or coach led). Green cone partner runs into area and tries to regain ball from partner
Attacking & Defending. One versus one each player attacking and defending. 1 central gate:
 Attacking & Defending One versus one each player attacking and defending 1 central gate: Skill Work: 1v1 Attacking & Defending one gate 15 minutes Set-up area 10x10m as shown. Players are working in pairs.
Spring/Summer Session
 Spring/Summer Session Development Path U12+ C1 U12 + aged teams U11 Soccer The real game U9/10 Academy United In Development Recreational Content Sessions Structure of training 4 technical to one technical
 Age Group/Program: U14 Town Week # 1 Theme: Awareness/argentina Session Goals: Coaching Points: Understand Your Audience: Improve 1 st touch Speed of play Playing with the head up Players on their toes,
Active for Life: GAG Activity
 T Dribbling and finishing in 1v1 situations 15 minutes Two teams of three players in an area 20x10m. Two small goals at each end as shown. The attack alternates from each end. Take a long touch to start
Mahomet Recreation Soccer Soccer Buddies and Pee Wee Leagues Pre-K and Kindergarten
 Soccer Buddies and Pee Wee Leagues Pre-K and Kindergarten All games are played at Taylor (Baseball) Fields. Format: 1 Hour: Includes 1/2 hour of soccer fun and soccer games and 1/2 hour of soccer scrimmage
Soccer Terms. Arc the quarter circle at each corner of the field in which the ball is placed for a corner kick.
 Soccer Terms Advantage when a team quickly advances the ball down the field in an attempt to get its players near the opponent's goal before the defenders have a chance to retreat. See also Against the
Introduction To Shooting & 1v1 & 2v2 Situations
 Players will work on all aspects of their shooting game, from power shots to finishing with style. US coaches will teach various shooting techniques before putting players into scrimmage type games designed
Games for better team play Roger Keenan
 1 1. 30 Metre Foot pass Games For Better Team Play - Roger Keenan End Line 14m 21m 45m Variation: Gaelic/Rugby Ball a) 10 v 10 b) ½ pitch c) 1 ball d) Full rules e) Score awarded for 30 metre pass. f)
Active for Life: Warm Up #3
 Active for Life: Warm Up #3 Warm-Up: Dynamic Movement 1 15-20 minutes Using markers set up two channels 20m in length, as shown Form two groups with one group in each channel Players carry out the dynamic
HANDBALL. 1. Team Handball Basic Rules
 HANDBALL 1. Team Handball Basic Rules The Playing Court: The court measures 20 meters by 40 meters. The court is larger than a basketball court, but the length may be shortened when space is limited. The
Field Hockey Glossary
 Field Hockey Field Hockey Glossary All Terms General Terms Slang Terms A B C D E F G H I J K L M N O P Q R S T U V W X Y Z # 16 - Another name for a "16-yard hit," a free hit for the defense at 16 yards
STAGE 4 ACTIVITIES YEAR OLD PLAYERS
 STAGE 4 ACTIVITIES 12-14 YEAR OLD PLAYERS NSCAA Foundations of Coaching Diploma NSCAA Foundations of Coaching Activities Stage 4: 12-14 Year Old Players 3V2 TO 6V5 SMALL SIDED GAME This activity provides
Soccer Manual. Rules, Regulations, & Training Information.
 www.soky.org Soccer Manual Rules, Regulations, & Training Information All Special Olympics Kentucky Soccer games and tournaments should be run according to FIFA rules. Any modifications to those rules
Rules of Play REDZONE! I. DESCRIPTION OF THE GAME: II. EQUIPMENT INCLUDED: III. PLAY OF THE GAME: IV. HOW TO USE THE GAME EQUIPMENT: 1.
 REDZONE!. Game Dice: 06 Rules of Play I. DESCRIPTION OF THE GAME: [A] OFFENSIVE DICE (Black, White): to determine the total on these dice, add black die to the sum of the numbers on the white dice. The
Soccer. Construct and execute defensive plays and strategies.(11- 12)
") Soccer State Goal: 19A, 19B, 19C, 21A, 21B Outcome: The students will demonstrate, explain and identify basic strategies of offense and defense in soccer. Components: Construct and execute offensive plays
Soccer State Goal: 19A, 19B, 19C, 21A, 21B Outcome: The students will demonstrate, explain and identify basic strategies of offense and defense in soccer. Components: Construct and execute offensive plays
Hockey Decathlon A COMPETITION FOR BEGINNERS. Horst Wein. Page 1. International Educational Management Systems
 Hockey Decathlon A COMPETITION FOR BEGINNERS by Horst Wein Page 1 1. THE TUNNEL One player passes the ball, alternately with his front and reverse stick, through the tunnel formed by the legs of a second
CYSA Coach s Training Guide
 CYSA Coach s Training Guide Team Ideas 2 training players of the week based on hustle, listening, attitude, trying hard, etc at training Start the next game, Team Captains for the next game, lead team
5. Game Training Phase Model Sessions
 . Game Training Phase Model Sessions FFA National Football Curriculum - The roadmap to international success Chapter Page 0 Return to Model Sessions contents Page . Game Training Phase Model Sessions Similar
How about playing GATEBALL? English Manual
 How about playing GATEBALL? English Manual Number of Players 2 to 10 Set Description Game board 1 Ball markers 10 Shot dice 2 Turn die 1 Score board 1 Score markers 10 Game Setup This is a team-based game.
GLOBAL PREMIER SOCCER
 GLOBAL PREMIER SOCCER GPS SET PIECE S & RE-STARTS 11v11 GPS CURRICULUM METHODOLOGY U4 - U8 JUNIORS U9-U12 JUNIOR PREMIER U13-U18 PREMIER 18+ PREMIER Player Evaluation & Assessment FUN-Damental Practice
SSA Under 10 Practice Activities
 SSA Under 10 Practice Activities DRIBBLING MOVES AND ACTIVITIES TO INCLUDE IN WARM-UP (BEGINNING OF PRACTICE) CAN BE FOUND IN THE TECHNICAL WARM-UP DOCUMENT. Do This, Do That: Set-Up: Players stand side-by-side
SOCCER DRILLS AND PRACTICE PLANS
 SOCCER DRILLS AND PRACTICE PLANS VOLUME 2 1 SOCCER DRILLS AND PRACTICE PLANS VOLUME 2 by Coach Steve Parker SOCCER DRILLS AND PRACTICE PLANS VOLUME 2 2 Copyright Notice The material enclosed is copyrighted.
Develop Quick Attack from Defence
 Topic: Develop Quick Attack from Defence GAME 1: FAST BREAK Why play this Game: Scenario: In your match, you want your defence to break out quickly and counter attack. What activity could you use in training
Rules of Play REDZONE! I. DESCRIPTION OF THE GAME: III. PLAY OF THE GAME: IV. HOW TO USE THE GAME EQUIPMENT: 1. Game Dice:
 . Game Dice: REDZONE! [A] OFFENSIVE DICE ( Black,White,Yellow): to determine the total on these dice, add 0 times the number on the black die to the sum of the numbers on the white, yellow dice. The offensive
*This is a Recreational and Developmental league. The goal is to have fun and introduce them to soccer. WE DO NOT KEEP SCORE AT THIS AGE.
 U4, U5, & U6 Program Players on the field: 4v4 with NO goalies Roster Size: 6 8 Ball size: 3 Practices: no longer than 30 minutes per week Substitutions: Both Teams substitute at stoppage of play. Player
Active for Life: GAG Intro-Game
 Small-Sided-Game: 5v5 Dribbling Zone Game. 20 minutes Two teams of 5 Playing field of 50x30m. Markers to indicate the end zones 10m in from each end Two goals at each end End zones are no-go zones and
Johnston - Urbandale Soccer Club U9-U10. Coaching Curriculum
 Johnston - Urbandale Soccer Club U9-U10 Coaching Curriculum JUSC U9/U10 Theme: Slow Down! U9-U10 Topic Finder Click topic and jump there. Coaching Areas of Focus Game Thoughts #1 Dribbling to Create Space
RETREATING LINE INTRODUCTION
 INTRODUCTION This guide has been developed to help all clubs, coaches, club based referees, parents and players, who are participating in football games utilising the. You will find the rules and regulations
GRADE LEVEL STANDARD DESCRIPTION
 2018-2019 SOCCER SOCCER STANDARDS GRADE LEVEL STANDARD DESCRIPTION PE.2.M.1.5 PE.2.C.2.2 PE.2.C.2.5 PE.2.C.2.6 Dribble with hands and feet in various pathways, directions and speeds around stationary objects.
U10 Modified Rules US Youth Soccer Official Under 10 Playing Recommendations
 U10 Modified Rules US Youth Soccer Official Under 10 Playing Recommendations US Youth Soccer recommended modifications to the FIFA Laws of the Game. FIFA Laws of the Game - https://www.ussoccer.com/referees/laws-of-the-game
Goalkeeping Full Season Program
 Goalkeeping Full Season Program Copyright 1 Shooting Goalkeeping Full Season Program This in depth item shows every GK session from the 2008-09 season at a premiership academy. Conducted with the Under
1. 4 Corners Passing:
 1. 4 Corners Passing: - s must use controlled passing, communication, and speed to make supportive angles and keep control of the ball within the cones (10 x 10 yds) - Defender ( ) tries to intercept passes
Game Finder. Fun Soccer Games for 12 to 15 Year Olds
 Game Finder Page Game Players Age Range Difficulty* 1 Through the Gate 8 to 16 12-15 yrs 1 2 Prison Break 10 to 13 12-15 yrs 1 3 Connect Four 12 to 14 12-15 yrs 1 4 Triple Whammy 10 to 13 12-15 yrs 1 5
Generic Activity: Speed & Agility Soccer Theme: 1 v 1 A. WARM-UP
 Generic Activity: Speed & Agility Soccer Theme: 1 v 1 A. WARM-UP Yellows players take the ball and form a circle. Red players without a ball position themselves inside the circle. Yellow players with the
R U L E S O F P L A Y U N D E R 1 1 B O Y S F I E L D L A C R O S S E
 R U L E S O F P L A Y U N D E R 1 1 B O Y S F I E L D L A C R O S S E R E V I S E D M A R C H 2 0 1 8 T A B L E O F C O N T E N T S 1. Age Group... 3 2. The Game... 3 3. Teams... 3 4. Game Duration...
Thirteenth Annual Futsal Tournament January 2 3, Tournament Rules
 Thirteenth Annual Futsal Tournament January 2 3, 2016 Tournament Rules Welcome to Blackhawks Annual Futsal Tournament. The goal of the tournament is to promote futsal in an atmosphere that encourages friendly
1. Finishing/Defending in the Air:
 1. Finishing/Defending in the Air: a. b. - 2 servers near touchline. - Serve balls from opposite sides until all balls are in goals or out of bounds. - Continue play until goal is scored, ball goes out
PLAYER ROLES AND RESPONSIBILITIES ALL TEAMS GOALKEEPER
 PLAYER ROLES AND RESPONSIBILITIES ALL TEAMS GOALKEEPER ASSURED HANDLING, COMMUNICATION WITH BACK FOUR SHOW OUTSIDE/ INSIDE, GET TIGHT, CLEAR, TIME, COVER, DROP OFF, PRAISE, ETC COMMAND AREA CROSSES/ CORNERS
US Youth Soccer Official Under 10 Playing Rules
 US Youth Soccer Official Under 10 Playing Rules US Youth Soccer strongly recommends the 6v6 format for U10 s US Youth Soccer recommended modifications to the FIFA Laws of the Game. FIFA Laws of the Game
This is your guide to practical training sessions and warm up exercises for Match Officials in Ontario.
 This is your guide to practical training sessions and warm up exercises for Match Officials in Ontario. These sessions have been carefully selected for maximum impact. You may add degrees of difficulty
Simplified Rules of Soccer
 Simplified Rules of Soccer For those families new to soccer, and those who still feel new regarding the rules, the following "Simplified Rules of Soccer" should be a handy guide through the many years
Formation RD CD
 Formation -- GK RD CD LD RM CM LM S S Why this formation? 1. Has a player in every zone in Defenders, midfielders and strikers. Forces our team to play through the team and not direct. Wide players make
MAHOMET RECREATION - YOUTH SOCCER RULES
 MAHOMET RECREATION - YOUTH SOCCER RULES PreK 4 6 th Grade Based on FIFA Laws of the Game And US Youth Soccer Recommendations Revised 08/20/10 LAW 1- FIELD OF PLAY 1 1. All fields will be rectangular in
World Amputee Football Federation Laws and Rules Governing Amputee Football Play and Players
 World Amputee Football Federation Laws and Rules Governing Amputee Football Play and Players As adopted by the by the 1st WAFF General Assembly in Niteroi, Brazil, August, 2005; and as amended by Acts
Hockey practical examination support materials
 Hockey Curriculum Council, 2009 This document apart from any third party copyright material contained in it may be freely copied, or communicated on an intranet, for non-commercial purposes by educational
Transition Practical Sessions
 Transition Practical Sessions Three/Four team warm up Teams retain possession while moving around the area. Challenge for players TRY not to occupy the same box as a team-mate. Receive & travel to another
Are players looking for space as they move around the area? Are they using disguise to keep control of the ball?
 Activity 1 Ball Manipulation Players dribble around area performing Inside Cut, Outside Cut, Slap Cut Step Over & Turn and Cryuff Turn. Focus on moving into space and dribbling to penetrate. Area size
INTRODUCTION TO GOALKEEPING COACHING TECHNICAL INFORMATION
 INTRODUCTION TO GOALKEEPING COACHING TECHNICAL INFORMATION Welcome The Introduction to Goalkeeping Coaching Course (ITGKC) presents new or existing coaches with the opportunity to familiarise themselves
Pass. Tackle. Year 2. Save. Hockey. Goal. Turn. Shoot
 Pass Tackle Year 2 Save Goal Hockey Turn Shoot Hockey Objectives Hold the hockey stick correctly when passing and dribbling. Keep control when changing direction. Show awareness when in control of the
This exam is based on the Grade 8 Referee Course for testing all new and current Grade 8 Referees working games at the competitive youth level.
 This exam is based on the Grade 8 Referee Course for testing all new and current Grade 8 Referees working games at the competitive youth level. 1) If the goals are not securely anchored to the ground,
LAW 11 Offside Review
 LAW 11 Offside Review 1 An attacker got the ball several yards past the second-to-last defender, but the referee didn t call offside. Why? Offside position is not judged when a player got the ball, but
COACHING FUTSAL: NSCAA LEVEL 1 FUTSAL DIPLOMA
 COACHING FUTSAL: NSCAA LEVEL 1 FUTSAL DIPLOMA Excerpts from the NSCAA Level 1 Futsal Diploma Manual STAGE 3: 9-11 YEAR OLD PLAYERS CLICK HERE TO ORDER THE FULL Coaching Futsal: NSCAA Level 1 Futsal Diploma
GLOBAL PREMIER SOCCER
 GLOBAL PREMIER SOCCER SESSIONS 7v7 SESSIONS - Defending 1v1 situation Players work in pairs with one ball. One player has a the ball and dribbles around inside the area. Player 2 must follow player 1 and
GLOBAL PREMIER SOCCER
 GLOBAL PREMIER SOCCER GPS 204 CURRICULUM FUTSAL VACATION PROGRAM u - u4 GPS CURRICULUM METHODOLOGY U4 - U8 JUNIORS U9-U2 JUNIOR PREMIER U3-U8 PREMIER 8+ PREMIER Player Evaluation & Assessment FUN-Damental
SOCCER STUDY GUIDE. Soccer is played in 132 countries all over the world. It is the world s number one sport, played for both fun and fitness.
 Page 1 of 6 HISTORY: SOCCER STUDY GUIDE Soccer is the fasted growing sport in the world, and the most popular. Attempts have been made to trace soccer, known worldwide as football, to Greek and Roman origins.
ALAMOSA PARKS & RECREATION 2018 YOUTH COED SOCCER GUIDELINES 6 th - 7 th Grade (AGES 11-13)
") ALAMOSA PARKS & RECREATION 2018 YOUTH COED SOCCER GUIDELINES 6 th - 7 th Grade (AGES 11-13) FIELD OF PLAY Dimensions: Length = 210 feet x Width = 130 feet Goals: 7 x 21 feet Markings: Distinctive lines
ALAMOSA PARKS & RECREATION 2018 YOUTH COED SOCCER GUIDELINES 6 th - 7 th Grade (AGES 11-13) FIELD OF PLAY Dimensions: Length = 210 feet x Width = 130 feet Goals: 7 x 21 feet Markings: Distinctive lines
THE GAME BE PART OF THE EXCITEMENT
 Handball Basics 2 THE GAME Philosophy Handball is a team sport played by two male or female teams and is played with your hands. The objective of the game is to score goals and avoid giving goals away.
USSOCCER.COM LAWS OF THE GAME MADE EASY
 USSOCCER.COM LAWS OF THE GAME MADE EASY The field must be SAFE (the referee makes this decision). If the field is not safe, the referee will not let the game begin. If the field becomes unsafe, the game
U5/U6 MODIFIED RULES
 U5/U6 MODIFIED RULES 1. Substitutions: Players may be replaced according to the following with the permission of the Referee. At the start of any quarter, by either team. Each player must play at least
Natural Soccer User Guide
 [Hier eingeben] Welcome to Natural Soccer! Natural Soccer User Guide Natural Soccer is an arcade soccer game rather than an accurate simulation of the sport. That is, fastpaced action and fun gameplay
U14 CURRICULUM. S t o u g h t o n A r e a Y o u t h S o c c e r A s s o c i a t i o n. Page 9
 S t o u g h t o n A r e a Y o u t h S o c c e r A s s o c i a t i o n Page 9 STYLES OF PLAY: SPECIFIC MATCH OFFENSIVE STYLE All teams will be encouraged to display an offensive style of play based on keeping
NPL U12 Competitions 2019 Handbook
 NPL U12 Competitions 2019 Handbook Contents 1.0 Introduction... 3 1.1 Competition Rules... 4 1.2 Player Roster & Eligibility... 4 1.3 Composition of Leagues & Match Format... 6 1.4 Match Records & ID Cards...
U14 Modified Rules US Youth Soccer Official Under 14 Playing Recommendations
 U14 Modified Rules US Youth Soccer Official Under 14 Playing Recommendations US Youth Soccer recommended modifications to the FIFA Laws of the. FIFA Laws of the - https://www.ussoccer.com/referees/laws-of-the-game
*Version 1.1 for Neymar Jr s Five Subject to change
 *Version 1.1 for Neymar Jr s Five 2018 - Subject to change NEYMAR JR S FIVE RULES OF THE GAME* 1. OUTPLAY THEM ALL 2. THE FIELD OF PLAY 3. GOAL 4. THE NUMBER OF PLAYERS 5. THE PLAYERS EQUIPMENT 6. THE
Small Sided Laws of the Game
 Small Sided Laws of the Game March 7, 2017 Contents 1 Introduction... 2 Law 1: The Field of Play... 3 Law 2: The Ball... 4 Law 3: The Players... 5 Law 4: The Players Equipment... 6 Law 5: The Referee...
Warm Up. Technical Practice / Development 1
 Week: 1 Topic: Dribbling bjectives: Maintain close control of ball Change direction and speed, different surfaces, head up, attacking space. Ball each dribbling around the area; coach shouts commands to
Technical/Tactical Functions of Goalkeepers
 Technical/Tactical Functions of Goalkeepers Technical Functions Shot stopping and ball handling: on ground, below waist, above waist, diving, tip overs, parrying, catching and holding, body position. Crosses:
Fitness With The Football Tony Scullion
 Fitness With The Football Tony Scullion NB. ll drills to be done at full pace.. Warm Up. - Players line up facing the same direction. - Players start to run forwards, listening for commands from the coach.
Mission Statement. To deliver the highest standards of excellence in soccer development to everyone.
 NVFC DRILL DOCUMENT Mission Statement To deliver the highest standards of excellence in soccer development to everyone. INTRODUCTION NVFC is proud to present all Club coaches with a drill book which contains
SYAA Fall Soccer 2018 Guide for Volunteer Coaches
 SYAA Fall Soccer 2018 Guide for Volunteer Coaches The SYAA Board thanks you for coaching a soccer team! We know some of you have limited experience with soccer and/or soccer coaching do not fret! We have
KMSL Laws of the Game Quiz Fall 2012
 KMSL Laws of the Game Quiz Fall 2012 1. On a throw-in, prior to releasing the ball, which foot positions below are legal? a. A b. A & B c. A & B & C d. A & B & C & D 2. A teammate of the goalkeeper kicks
The International Coaches Association Advanced Passing Drills and Games
 The International Coaches Association Advanced Passing Drills and Games Manchester United Passing Drill Italian Passing Awareness Drill Liverpool Passing Game Juventus Reverse Passing Drill Burnley FC
Patrick Mc Garry. Soccer Coaching Sessions 2013
 Patrick Mc Garry Soccer Coaching Sessions 2013 PRINCIPLES OF ATTACK DEPTH PENETRATION WIDTH MOBILITY IMPROVISATION PRINCIPLES OF DEFENSE DEPTH DELAY CONCENTRATION BALANCE RESTRAINT Session # 1 Topic :
THE FA LAWS FOR 9V9 FOOTBALL
 THE FA LAWS FOR 9V9 FOOTBALL This guide provides the Laws for Under 11 and Under 12 versions of the game, with children playing a maximum of 9v9. These Laws are also appropriate for other age groups playing
Season By Daniel Mattos GLSA Futsal Director FUTSAL
 2016-17 Season By Daniel Mattos GLSA Futsal Director FUTSAL FA - Soul of Futsal US Soccer Federation - Futsal Benefits Soccer Pros born in Futsal Falcão - The Best Futsal Player in the World Repetitive,
PSV EINDHOVEN - YOUTH TEAM TRAINING SESSIONS. GED SEARSON.
 PSV EINDHOVEN - YOUTH TEAM TRAINING SESSIONS. GED SEARSON. P.S.V EINDHOVEN - SENIOR YOUTH TEAM (A1) TRAINING SESSION. SESSION - Friday the 13th of November 1998. Session started at 4:00. WARM-UP - Players
FOOTBALL SPORT RULES. Football. Sport Rules. VERSION: June 2018 Special Olympics, Inc., 2018 Allrights reserved
 Football Sport Rules 1 TABLE OF CONTENTS 1. GOVERNING RULES... 5 2. OFFICIAL EVENTS... 5 2.1 Individual Skills Competition (ISC)... 5 2.2 5-a-side Team (outdoor)... 5 2.3 7-a-side Team (outdoor)... 5 2.4
Speed Soccer Rules. Except as designated below, NCAA rules will apply.
 Speed Soccer Rules Except as designated below, NCAA rules will apply. Section #1 ELIGIBILITY 1. All players must meet the eligibility requirements of the USD Campus Recreation Department. a. Each player
OFFICIAL RULES FOR INDOOR SOCCER AT THE PLEX NORTH USSF/FIFA
 OFFICIAL RULES FOR INDOOR SOCCER AT THE PLEX NORTH USSF/FIFA Rules will be used with the following modifications All guidelines are subject to change at the discretion of the Plex. As of January 1, 2018
Spartans FC Youth Section Skills Program
 Spartans FC Youth Section Skills Program Introduction This skills program is designed to give the children the maximum ball contact with a view to becoming its master and with this, to become confident
Playing in a (Defensive midfield point)
") Playing in a 3-5-2 (Defensive midfield point) GK CD/SW RD LD RM DM LM OM OM CF CF Playing against a 4-4-2 flat 3 defenders 5 midfielders 2 forwards Mirror image on both sides of field Formation takes 1
Playing in a 3-5-2 (Defensive midfield point) GK CD/SW RD LD RM DM LM OM OM CF CF Playing against a 4-4-2 flat 3 defenders 5 midfielders 2 forwards Mirror image on both sides of field Formation takes 1