Assembling your 90B, 90KT, 110B & 110KT Gokart
|
|
|
- Kelly Harrell
- 6 years ago
- Views:
Transcription
1 Assembling your 90B, 90KT, 110B & 110KT Gokart NOTE TO USER: Fully read all instructions prior to first use or start up of your Gokart. 1) Generally most of the gokart batteries will need to have battery acid added. If your battery comes with a clear bottle that has clear liquid in it, then that means you will need to add battery acid to it. If not, then you have a jell battery and acid will not need to be added. NOTE: The only liquid that will come with your Gokart is Battery Acid. If you do not have a sealed battery, then you will need to add battery acid to your battery prior to charging. If you find a clear sealed container/bottle with your Gokart, this will be battery acid. It is NOT gasoline or fluids for anything other than the battery. If you do not know what the fluid is and you are unsure, DO NOT put it in your unit and contact Familygokarts immediately before proceeding further. TECH is tech@familygokarts.com or text (701) ) We recommend that you charge your battery with a trickle charger at 2 amps for 12 hours. 3) For the 90B, 90KT, 110B and 110KT, the fuel/gas line runs from the bottom of the gas tank to the carburetor. Hook up the gas line on the side of the carburetor that is closest to the seat. (There is a brass nozzle that sticks up about 1/2".) Also, make sure the gas/fuel line has an in-line fuel filter. If your gokart does not have a fuel filter, make sure you get one from a local parts store before you put any gas into the system and start the gokart. Your gokart may or may not have a fuel shut off value. If your gokart has a fuel shut off value, make sure that it is in the on position. The fuel line is the only hose you will need to hook up. The other hoses are breather tubes and should not be hooked up to anything. Make sure they are away from the exhaust and chain. 4) Choke: These gokarts have a black manual plastic choke up on the carburetor or a gold metal rod. Either of these manual chokes will have to be moved up before starting the gokart. You do not needed to choke the engine when the engine is warmed up. Choking is only needed for cold start ups. 5) Your gokart must be started in neutral. It will not start if it is in forward or reverse. 6) To start this gokart with the key you will need to first press down the brake pedal, and then turn the key to the start position. You may need to press down a little on the throttle/gas pedal/accelerator to start the kart. 7) If you are not able to start the gokart with the key then we will have to clear the remote system. We will do that two ways: A) With the key fob/remote in hand Press lock 2. Press unlock 3. Press lock again 4. press unlock again 5. Try starting the gokart with the key B) If that did not work Remove the battery from the remote 2. Disconnect the battery at the gokart (Either positive or negative) 3. Let the gokart sit for 12 minutes to clear the system 4. Put everything back together

2 5. Try starting the gokart Note: The "drain-plug" is on the bottom of the engine. The dip stick is where you add oil to the engine. The engine should have oil in it, BUT check before starting the Gokart. After you run the unit for 30 to 60 minutes, change the oil. In the winter use 10W-30 and in the summer use 15W-40. It will take about 1 quart of oil. Crate Kart


3 Remove Steel Crate Frame Rear Axle Bolted to Crate


4 Remove Non-Attached Items From Crate Nuts & Bolts Used for Assembly


5 Place Rear Shocks Bolt Rear Shocks on Each Side


6 Assemble Front Both Sides Assemble Front Spindle


7 Place Nut Top of Front Assembly


8 Tie Rod Assembly Rear Tires

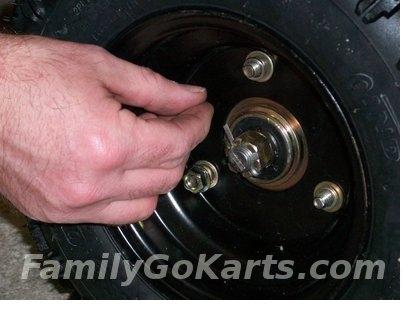
9 Rear Tires Front Tires


10 Front Tires Seat Belt Behind Seat


11 Seat Belt Side Placement Bolt in Seats


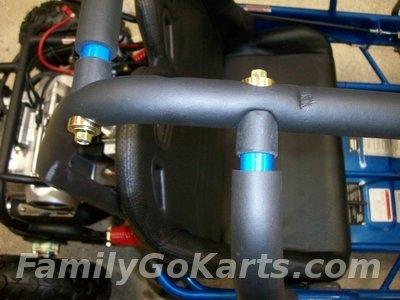
12 Dash Spacer Dash Spacer Used Each Side


13 Bolt Dash Down Completed Dash Assembly


14 Put on Steering Wheel Bolt Used For Top Bars

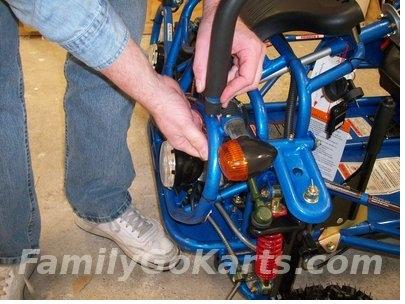
15 Top Bar Assembly Top Bar Assembly

16 Top Bar Assembly Top Bar Assembly

17 Rear Rack & Gas Tank Rear Rack & Gas Tank Mount


18 Fuel Line From Gas Tank Fuel Line at Carburetor


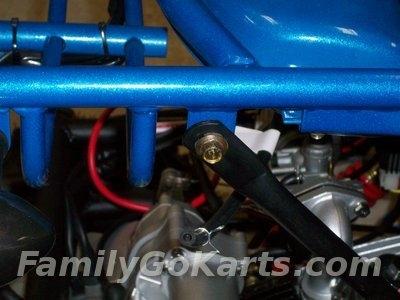
19 Carburetor Idle Screw Breather Tube (one end stays open)

 Manual")
20 Breather Tube Under Carb (end stays open) Manual Choke


21 Choke in UP Position Adding Battery Acid


22 Adding Battery Acid Battery Carrier


23 Strap & Square Box Top to Hold Battery Round Piece Goes on Steering Wheel Exhaust Breather Tube One End Stays Open


24 On & Off Hand Remote Speed Limiter (Behind Gas Pedal)

25 F-N-R Shifter
Assembling your 90B, 90KT, 110B & 110KT Gokart
 Assembling your 90B, 90KT, 110B & 110KT Gokart NOTE TO USER: Fully read all instructions prior to first use or start up of your Gokart. 1) Generally most of the gokart batteries will need to have battery
ATV 90 Y-12 YOUTH 2-STROKE RED (A2004ATB2BUSR) Page 1 of 52 A-ARM, FLOOR PANEL, AND BUMPER ASSEMBLY
 Page 1 of 52 A-ARM, FLOOR PANEL, AND BUMPER ASSEMBLY") 2004 ATV 90 Y-12 YOUTH 2-STROKE RED (A2004ATB2BUSR) Page 1 of 52 A-ARM, FLOOR PANEL, AND BUMPER ASSEMBLY 2004 ATV 90 Y-12 YOUTH 2-STROKE RED (A2004ATB2BUSR) Page 2 of 52 A-ARM, FLOOR PANEL, AND BUMPER
2004 ATV 90 Y-12 YOUTH 2-STROKE RED (A2004ATB2BUSR) Page 1 of 52 A-ARM, FLOOR PANEL, AND BUMPER ASSEMBLY 2004 ATV 90 Y-12 YOUTH 2-STROKE RED (A2004ATB2BUSR) Page 2 of 52 A-ARM, FLOOR PANEL, AND BUMPER
The following is a walk-around that should be done on each day of use before starting the airboat.
 Do not enter the cage area for any reason unless the key switch and battery switch are both in the off position. Audibly alert and visually check for people in the cage area, path of the propellers or
Thank you for purchasing a WIKE BOX BIKE!
 Thank you for purchasing a WIKE BOX BIKE! Contents Safety.....3 Front wheel.4 Kickstand..5 Handle Bar & Box 6 Seat post and Saddle 7 Final pre-ride check 8 Tools needed to assemble Bike: -High table or
Parts Manual STRIKER Striker 2840 Parts List - PN Printed in USA 03/18/08
 Parts Manual STRIKER 2840 Striker 2840 Parts List - PN 238155 - Printed in USA 03/18/08 Standard Parts Recommended General Wear Parts Ref No Part Description Qty Part No 1 Squeegee Hose Assembly
TECHNICAL DATA - CHASSIS 179
 TECHNICAL DATA - CHASSIS 179 Frame Fork Shock absorber Suspension travel (Supermoto) Front Rear Suspension travel (Supermoto R, Supermoto T) Front Rear Brake system Front Rear Brake discs - diameter Front
How to Replace Ball Joints
 How to Replace Ball Joints This is a big write up with a lot of pictures but I thought it would help some people. I know a lot of people have been having problems with ball joints so when I did mine I
K Page 1 of 48 Air Intake - Pg. 17
 K532-53168 Page 1 of 48 Air Intake - Pg. 17 Ref # Part Number Qty Description 24 25 041 06-S 1 Gasket, elbow 25 48 054 09 1 Elbow, air cleaner Discontinued not available at Kohler Co. 35 277116-S 1 Brace,
Congratulations, once again, on buying an E RIDER Model 18!!!!
 Congratulations, once again, on buying an E RIDER Model 18!!!! USER MANUAL We are sure you will be excited by the delivery of your brand new bike and you will be eager to start using your E RIDER as soon
E-trike Li Assembly Guide
 PREPARATION 1. Read this assembly manual BEFORE commencing assembly. 2. Carefully remove all the components and packaged hardware from the shipping boxes. 3. Unpack the contents of the large double box
KEY PART KEY PART NO. NO. DESCRIPTION NO. NO. DESCRIPTION
 1 874 78 04-10 Bolt, Fin Hex 1/4-20 x 5/8 12 532 13 09-86 Lens, LH 3 532 12 84-45 Bracket, Pivot Hood LH 13 532 13 09-84 Grille 4 819 09 10-16 Washer, Flat 1/4 21 532 12 69-38 Bumper, Hood 5 817 49 05-12
CRUZBIKE Quest 2.0 Assembly
 CRUZBIKE Quest 2.0 Assembly CRUZBIKE Quest 2.0 Assembly... 1 General notes on assembly... 2 Un box and evaluate the frame and major parts... 2 Unfold the rear swing arm and arrange the frame... 3 Rear
2018 Championship Enduro Series
 2018 Championship Enduro Series Sprint ENDURO Class Structure JUNIOR Sprint Classes NOVICE (Class 1) Age 7 thru 10 years. 225 lbs (a) Briggs Sportsman (225 lbs) briggs Animal-with carburetor restrictor
#59114 Rola 2-Bike Rack Carrier (Shown Assembled) (A) (C) (B)
 (A) (C) (B)") Use for Parts: #59114 Rola -Bike Rack System #59115 Rola 1-Bike Add-On TOOLS REQUIRED 10mm or 13/3 Socket & Wrench #59114 Rola -Bike Rack Carrier (Shown Assembled) Tray Attachment Hardware: (3) Plastic
Use for Parts: #59114 Rola -Bike Rack System #59115 Rola 1-Bike Add-On TOOLS REQUIRED 10mm or 13/3 Socket & Wrench #59114 Rola -Bike Rack Carrier (Shown Assembled) Tray Attachment Hardware: (3) Plastic
BackCountry ebikes 2019 MULE Assembly
 BackCountry ebikes 2019 MULE Assembly Required Tools: Cutting Pliers (to cut box poly strapping and heavy bike banding) Scissors (to remove bubble wrap) Allen wrenches (3mm, 4mm, 5mm, 6mm) Wrenches (10mm,
Top End Wheelchair Service Part List: FORCE G
 Frame Components Page 1 of 16 Frame Components 1145958 ADJUSTABLE BACK SUPPORT TUBE, FORCE & A 11/13/17 Pieces $15.00 FORCE G 1166254 BACKREST, FORCE G A 01/01/15 Pieces $250.00 - COLOR: - SEAT WIDTH:
HPIC D Hydrostatic Test Pump PRODUCT INFORMATION AND OPERATING INSTRUCTIONS
 WIDDER TOOLS HPIC-10000-D Hydrostatic Test Pump PRODUCT INFORMATION AND OPERATING INSTRUCTIONS Description: The WIDDER Hydrostatic Test Systems C Series is a portable, selfcontained, air driven hydrostatic
ES-701 INSTRUCTIONS FOR USE
 BIKE ES-701 MANUAL ES-701 INSTRUCTIONS FOR USE 1) The model ES-701 is designed to be used as a group cycle in fitness studios and health clubs. It has a fixed wheel driven flywheel and should only be used
SANTANA STOWAWAY TANDEM WITH AIRLINER SAFECASE AND FTS FOAM TRAY SYSTEM ASSEMBLY AND DISASSEMBLY
 SANTANA STOWAWAY TANDEM WITH AIRLINER SAFECASE AND FTS FOAM TRAY SYSTEM ASSEMBLY AND DISASSEMBLY Congratulations! You are now the proud owner of the world s most travel-ready, performance tandem. The following
REPAIR PART NUMBER NUMBER DESCRIPTION 0137 ELE 0136 ELE 12 VOLT SOLENOID
 PART REPAIR PART NUMBER NUMBER DESCRIPTION 0137 ELE 0136 ELE 12 VOLT SOLENOID 0203 WHL 0250 WHL WHEEL HUB 0251 WHL AXLE 0252 WHL DUST CAPS 0253 WHL TIRE - 210 SP 0204 WHL 0211 WHL TIRE & WHEEL - SP 0250
Assembly Instructions And User Guide
 EZ-1/EZ-CLASSIC QUADRIBENT By Blackbird Designs Inc. Mark 5.2 June 2011 Assembly Instructions And User Guide 1 The Quadribent is 2-seat, side-by-side, human powered vehicle that enables almost anyone to
S E R V I C E I IPL, LR10 36, LR Spare parts Ersatzteile Pièces détachées Reserve onderdelen Repuestos Reservdelar
 S E R V I C E I9400033 IPL, LR10 36, 1994-01 LR10 36 Spare parts Ersatzteile Pièces détachées Reserve onderdelen Repuestos Reservdelar 1 874 76 04-12 Bolt Fin Hex 1/4-20 x 3/4 8 873 68 04-00 Locknot W/lnsert
Quattrocycle BV. Quattrocycle. User Manual. Last update February Quattrocycle BV Bremkant EJ Middelbeers. User Manual Quattrocycle 1
 Quattrocycle User Manual Last update February 2010 Quattrocycle BV Bremkant 6 5091 EJ Middelbeers User Manual Quattrocycle 1 Table of Contents Page Chapter 1: Introduction 3 Chapter 2: Instructions for
Inside Front cover This page will remain blank.
 Owner s Manual Inside Front cover This page will remain blank. 1 Table of Contents Parts of the AirCAT...3 Assembling the AirCAT...4 Attaching the wheels to the stand...4 Attaching the battery box to the
TECHNICAL DATA - CHASSIS 185
 TECHNICAL DATA - CHASSIS 185 Frame Fork Shock absorber Suspension travel (990 Adventure) Suspension travel (990 Adventure R) Suspension travel (990 Adventure) Suspension travel (990 Adventure R) Brake
1650EXLT, ,
 1650EXLT, 96193008901, 2012-10 "CHASSIS, ENGINE & PULLEYS" - 000 00 00-00 W/O DESCRIPTION 1 B&S 21M307-0135-F1 FOR SERVICE & PARTS 1-800-233-3723 1 532 42 92-03 FRAME 1 2 532 15 04-06 BOLT 1 3 532 42 88-67
GEN20AD-GEN20AL-GEN18AN
 AD-- Parts List 02-August-16 This parts list is current as of the above revision date. See http://www.rheempartslists.net/92-42800-ad--.pdf for the current revision. Standby Generators Table of Contents
USER GUIDE TO POWER ASSISTED BIKES
 USER GUIDE TO POWER ASSISTED BIKES 1 PAGE CONTENTS Page. 3 Unpacking Page. 3-4 Easy steps to get started Page. 5 General Assembly Instructions Page. 6 Aligning H/Bars, Page. 7 Tightening pedals onto Crank
TECHNICAL DATA - CHASSIS 99
 TECHNICAL DATA - CHASSIS 99 20 TECHNICAL DATA - CHASSIS Frame (EXC F, EXC F SIX DAYS, XCF-W) (250 XC-F USA) (250 SX-F EU) (250 SX-F USA) Suspension travel offset (XCF W USA, XC F, SX F) marking marking
PRINTED: 3/29/2016 1:46:12 PM - THIS DOCUMENTATION IS OBSOLETE AFTER: 3/30/2016 1:46 PM
 1181377 Rev H.2016.03.14 Force G Parts Book Page 1 of 7 Top End INTED: 3/29/2016 1:46:12 PM - THIS DOCUMENTATION IS OBSOLETE AFTER: 3/30/2016 1:46 PM INTED: 3/29/2016 1:46:12 PM - THIS DOCUMENTATION IS
Havasu Wiring Outlaw Karts Rules
 Havasu Wiring Outlaw Karts Rules Revised 10/21/17 Safety Helmets: Must meet Snell or DOT certification Must fit drivers head Racing apparel Neck braces Racing suits mandatory Single Layer Neck braces or
SETUP INSTRUCTIONS SX-F EU 250 SX-F USA
 SETUP INSTRUCTIONS 2010 250 SX-F EU 250 SX-F USA Art. no. 3211544en INTRODUCTION 1 INTRODUCTION The work described in these setup instructions must be performed before the vehicle is delivered to the
Rocky Mountain Element Technical Manual. Rev B
 Rocky Mountain Element Technical Manual Rev B 1 Table of Contents Materials Required... 3 Suspension Pivot Torque Guide... 4 Small Parts Torque Guide... 5 Assembly Instructions... 6 1) Bearing Installation...
Congratulations on your purchase of a JC Series Performer trike! The Performer JC Series is designed for everything from touring to commuting and
 Congratulations on your purchase of a JC Series Performer trike! The Performer JC Series is designed for everything from touring to commuting and shopping in the city. The JC Series frames are made of
Rules Committee Philip Hamilton, Doug Medley, Darell Sprague, Benny Boudreaux, Micha McCall
 Gulf Coast Winged Mini Sprint Rules 2015 Gulf Coast Winged Mini Sprint Series will try to promote mini sprint racing as a fair and economical way to race and enjoy racing. We expect all members, non-members,
EZ-1 QUADRIBENT. By Blackbird Designs Inc. and Blackbird Sales. Mark May 2007 Assembly Instructions And User Guide.
 EZ-1 QUADRIBENT By Blackbird Designs Inc. and Blackbird Sales Mark 4.1 - May 2007 Assembly Instructions And User Guide 1 FOR TECHNICAL SUPPORT CONTACT: Blackbird Designs Inc. Jim Black, President 12721
Lectric Cycles Mid-Drive Electric Motor Installation
 Lectric Cycles Mid-Drive Electric Motor Installation This write-up describes the installation of a Lectric Cycles electric motor. The model is the e-rad Mid-Drive 750 Watt conversion kit, installed on
Rev C Force 2 Parts Book Page 1 of 7 Top End
 1181378 Rev C.2016.03.14 Force 2 Parts Book Page 1 of 7 Force 2: Fork Assembly Date: Customer: Ship to: PER BIKE DESCRIPTION 1 1166391 1 Fork, Force 2 (incl: fork, 4 bolts) -Serial# Required- Red Blue
3 BIKE STRAP BIKE RACK - SR3162
 3 BIKE STRAP BIKE RACK - SR3162 Adjustable hub assemblies Upper support frame 80" Strap Cam buckle Bike support arms Rubber bumper Lower support frame WARNINGS / LIMITATIONS Ensure that the hooks do not
Rev M XLT Pro and XLT Jr Parts Book Page 1 of 6 Top End
 17 1181381 Rev M. 2017.02.21 XLT Pro and XLT Jr Parts Book Page 1 of 6 Top End (800) 532-8677 (727) 522-8677 fax: (727) 522-1007 XLT & XLT Jr: Fork Assembly Date: PO#: SO#: ITEM PER BIKE DESCRIPTION 1
SECTION 1 UNPACKING INSTRUCTIONS
 ANDEAN USER GUIDE SECTION 1 UNPACKING INSTRUCTIONS 2 REMOVE PART BOX, ACCESSORY BOX AND SADDLE AND SEATPOST. SET ACCESORIES AND SEAT ASIDE FOR FINAL. PARTS BOX ACCESORY BOX 3 UNSTRAP WHEEL BLOCKS AND HANDLEBAR
Spare parts list ( ) Spare parts list high-pressure 9/20-4M *
 Spare parts list high-pressure 9/20-4M *") Spare parts list (5.971-969.0) Spare parts list high-pressure 9/20-4M * 05.05.2015 www.kaercher.com EN Page 2 Page 3 Page 4 Table of contents Spare parts list high-pressure 9/20-4M * (5.971-969.0)... 6
Spare parts list (5.971-969.0) Spare parts list high-pressure 9/20-4M * 05.05.2015 www.kaercher.com EN Page 2 Page 3 Page 4 Table of contents Spare parts list high-pressure 9/20-4M * (5.971-969.0)... 6
Introduction. Chassis
 Introduction The overall concept for the JMAX TROPHY CLASS is that the karts are to be run AS SUPPLIED. Competitors are able to make minimal adjustments to the setup of the kart using what has been supplied,
Important Note: Tighten lock nuts so the support tubes still swing freely see figure 2. There must be 1 2 threads of bolt past end of lock nuts.
 Kit Contents: DESCRIPTION QTY. DESCRIPTION QTY. 2 Shank Assembly 1 Support Tube Assembly 1 Side Tube - Short 2 1-1/4 Shank 1 Center Tube - Long 1 3/8-16 x 2.0 Carriage Bolt 2 5/16-18 x 2.25 Carriage Bolt
Ladies Shopper Bike Assembly Manual 28C03
 Ladies Shopper Bike Assembly Manual 28C03 Ecosmo Ltd 1 Know your bike 1. Wheel 2. Rear Derailleur 3. Chain 4. Crank Set 5. Pedal 6. Seat Quick Lock 7. Saddle and Post 8. Frame 9. Front Light 10. Front
Final Assembly Instructions Bikes with 16 Wheel Size
 Final Assembly Instructions Bikes with 16 Wheel Size Thank you for buying your new bicycle from L.L.Bean. Read these instructions carefully before beginning the final assembly. Prior to shipping, our expert
Rev D. Feb2012 Page 1 of 6
 Rev D. Feb2012 Page 1 of 6 www.topendwheelchair.com (800) 532-8677 (727) 522-8677 fax: (727) 522-1007 Force: Fork Assembly PART PER NUMBER BIKE 1 1145998 1 Fork, Force (incl: fork, 4 bolts) -Serial# Required-
LITERIDER 2&3 IMPORTANT WARNING. 2Bike (1x) Bolt (1x) Nut (1x) Small Hex Wrench (1x)
 Bolt (1x) Nut (1x) Small Hex Wrench (1x)") LITERIDER 2&3 3 Bike (1x) Bolt (1x) Flat Washer (2x) Nut (1x) Large Hex Wrench (1x) 2Bike (1x) wrench (1x) Small Hex Wrench (1x) keys (2x) Long Strap (1x) 2-Zip Strips (6x) 3-Zip Strips (9x) Wheel strap
LITERIDER 2&3 3 Bike (1x) Bolt (1x) Flat Washer (2x) Nut (1x) Large Hex Wrench (1x) 2Bike (1x) wrench (1x) Small Hex Wrench (1x) keys (2x) Long Strap (1x) 2-Zip Strips (6x) 3-Zip Strips (9x) Wheel strap
8-GAL PNEUMATIC OIL DISPENSER
 8-GAL PNEUMATIC OIL DISPENSER OWNER S MANUAL WARNING: Read carefully and understand all INSTRUCTIONS before operating. Failure to follow the safety rules and other basic safety precautions may result in
MAINTENANCE FOR THE MODEL 210B-2 SRA
 SAFETY PRECAUTIONS FOR THE System Under Pressure: Shut off air supply and disconnect air hose before disassembling or disconnecting parts. Flying Debris: During boring, chips may be ejected. Stay behind
To save this document, scroll up and select the download icon
 Thank you for purchasing a RustySpokes Softcruise. We know you are going to enjoy the bike, but if you had it shipped to you, there are a few things you need to do to assemble the bike. The seat, pedals
Final Assembly Instructions Bikes with Threaded Headsets
 Final Assembly Instructions Bikes with Threaded Headsets Thank you for buying your new bicycle from L.L.Bean. Read these instructions carefully before beginning the final assembly. Prior to shipping, our
HOME ASSEMBLY INSTRUCTIONS
 HOME ASSEMBLY INSTRUCTIONS This Papillionaire Bicycle now belongs to you. It will take you to work, wait patiently outside your local cafe, and carry your groceries home. This is the start of your long-term
Spare parts list ( ) Spare parts list HD 1.8/13 C Ed
 Spare parts list HD 1.8/13 C Ed") Spare parts list (5.972-842.0) Spare parts list HD 1.8/13 C Ed 26.05.2015 www.kaercher.com EN Table of contents Spare parts list HD 1.8/13 C Ed (5.972-842.0)... 6 10 Housing... 7 11 Housing... 8 12 Hand
Spare parts list (5.972-842.0) Spare parts list HD 1.8/13 C Ed 26.05.2015 www.kaercher.com EN Table of contents Spare parts list HD 1.8/13 C Ed (5.972-842.0)... 6 10 Housing... 7 11 Housing... 8 12 Hand
TECHNICAL SPECIFICATIONS CHASSIS» 76
 TECHNICAL SPECIFICATIONS CHASSIS» 76 CHASSIS 690 SUPERMOTO 2007 690 SUPERMOTO PRESTIGE 2007 Frame Fork Spring travel front Rear suspension Spring travel rear Front brake Rear brake Chromoly trellis frame,
Rev B. Mar 23, 2011 Page 1 of 5
 Rev B. Mar 23, 2011 Page 1 of 5 www.topendwheelchair.com Invacare Top End Sports and Recreation Products (800) 532-8677 (727) 522-8677 fax: (727) 522-1007 Force G: Fork Assembly 1 1166257 1 Fork, Force
Rev. F, July 2014 Page 1 of 6 Top End
 17 Rev. F, July 2014 Page 1 of 6 Top End (800) 532-8677 (727) 522-8677 fax: (727) 522-1007 XLT & XLT Jr: Fork Assembly Date: PO#: SO#: 1 1054197 1 Fork, XLT 1056850 1 Fork, XLT Jr 2 1054195 1 Footrest,
Rev B, 03/2012 Page 1 of 8
 Rev B, 03/2012 Page 1 of 8 www.topendwheelchair.com (800) 532-8677 (727) 522-8677 fax: (727) 522-1007 Force X: Fork Assembly 1 (Page 3) 1 Fork Weldment, Force X 2 1166337 1 Brake Caliper Set (Front & Rear)
UNPACKING AND ASSEMBLING YOUR DIAMONDBACK ROAD BIKE
 EMAIL SIGNUP BIKE REG SEARCH BIKES THE RIDE HEALTH FITNESS SKILLS SHOP MAINTENANCE CYCLING 101 RIDERS LIKE YOU TEAMS SUPPORT UNPACKING AND ASSEMBLING YOUR DIAMONDBACK ROAD BIKE 1. Begin by carefully cutting
Step 1: Block sand the transom to remove the seam joint. The end result should be a flat transom without a ledge where the seam joint is.
 WhiplashGV Instruction Manual Email: Brian@Blazermarine.com Phone: 513-598-1769 Step 1: Block sand the transom to remove the seam joint. The end result should be a flat transom without a ledge where the
Rev A. 10/2012 Page 1 of 6
 Rev A. 10/2012 Page 1 of 6 www.topendwheelchair.com (800) 532-8677 (727) 522-8677 fax: (727) 522-1007 Force CC Fork Assy Customer: Top End Sales Order: PART NUMBER 1 1166643 1 Fork, Force CC (incl: fork,
Technical Bulletin. Parts and Service News. LPG Lock-Off valve replacement procedures for 4.2 Liter Ford V6
 Equipment Affected Technical Bulletin LPG Lock-Off valve replacement procedures for 4.2 Liter Ford V6 Ford 4.2L V-6 powered tractors with LPG fuel systems. Part Description Discrepancy Fuel Pressure Lock-off
Final Assembly Instructions Bikes with Threaded Headsets
 Final Assembly Instructions Bikes with Threaded Headsets Thank you for buying your new bicycle from L.L.Bean. Read these instructions carefully before beginning the final assembly. Prior to shipping, our
Final Assembly Instructions Bikes with Quill Stems
 Final Assembly Instructions Bikes with Quill Stems Thank you for buying your new bicycle from L.L.Bean. Read these instructions carefully before beginning the final assembly. Prior to shipping, our expert
Stromberg Fuel Tee Replacement Michael Hartman Version 1.1 February 14, 2017
 Stromberg Fuel Tee Replacement Michael Hartman Version 1.1 February 14, 2017 The plastic fuel tee supplying fuel to the twin Stromberg 150CDs on my Sunbeam Alpine Series V had cracked and was spewing gas
Magnetic Bike. Model No: AENERGISER BODY WORX. Retain this owner s manual for future reference Read and follow all instructions in this owner s manual
 BODY WORX Magnetic Bike Model No: AENERGISER Retain this owner s manual for future reference Read and follow all instructions in this owner s manual Version A 1 EXPLODE DRAWING -02- PARTS LIST AND TOOLS
Assembly Tools. Assembly will take about an hour
 Assembly Guide Assembly Tools Included in your parts box: Pedals Toolkit (4+5mm combo Allen wrench, 13+15mm combo open-end wrench) Touch-up paint Spare fuses (for battery) Assembly will take about an hour
MiniMag. 1 of 8. The MiniMag scrubber s 2 recover drain are 80% larger than a 1.5, making the MiniMag scrubber s drain hose less likely to clog.
 MiniMag Scrubber tank doesn t bolt to the frame, and so is less likely to be damaged or risk to stripped out inserts. The heavy duty and thick walled poly tank, pivots on smooth bosses. The MiniMag scrubber
Reproduction. Not for 27" & 29" TWO STAGE INTERMEDIATE SNOWTHROWERS Parts Manual for M1227E M1227EX M1529E
 Parts Manual for 27" & 29" TWO STAGE INTERMEDIATE SNOWTHROWERS 2011 Model No. Description 1696001 M1227E 1696002 M1227EX 1696003 M1529E Briggs & Stratton Yard Power Products Group 535 Macon Road McDonough,
55DEHD 07 (63S5) 1F63S-561E1
 1F63S-561E1") 55DEHD 07 () 1F63S-561E1 ( ) 55DEHD PARTS CATALOGUE 2006 by Yamaha Motor Co., Ltd. 1st edition, November 2006 All rights reserved. Any reprinting or unauthorized use without the written permission of Yamaha
55DEHD 07 () 1F63S-561E1 ( ) 55DEHD PARTS CATALOGUE 2006 by Yamaha Motor Co., Ltd. 1st edition, November 2006 All rights reserved. Any reprinting or unauthorized use without the written permission of Yamaha
Attention. Chainguards. Cranks and Chains. Flywheel Sprocket
 Attention When ordering parts for newer Schwinn IC Pro cycles reference the following service bulletins to ensure you are ordering the correct revisions. Handlebar and sleeve Chainguards Cranks and Chains
comfort without compromising on performance and to fit your various needs on touring,
 Congratulations on your purchase of Goal-26X. Goal-26X is made to enhance comfort without compromising on performance and to fit your various needs on touring, shopping and communicating. Let s have fun
Pressure Dump Valve Service Kit for Series 3000 Units
 Instruction Sheet Pressure Dump Valve Service Kit for Series 000 Units. Overview The Nordson pressure dump valve is used to relieve hydraulic pressure instantly in Series 00, 400, 500, and 700 applicator
User Manual Important, read before use!
 EN User Manual Important, read before use! SMART Congratulations on your new rollator! Volaris Smart The Volaris Smart will make your life easier in many ways. We ask you to read carefully through this
Discount Parts 2018 Offer Coupon. off of a $100 purchase of TRP Chrome & Stainless Steel Accessories
 $100 off the purchase of TRP Fuel Tanks Y1866 $75 off the purchase of Kenworth Swaybar Y1810 $30 off the purchase of TRP Clutches Y1854 $30 off the purchase of Eaton Clutches Y1864 $25 off the purchase
PRO1030 Bi-Directional Assembly Replacement
 PRO1030 Bi-Directional Assembly Replacement 1. Remove both side covers using the Crank and Cover Removal procedure. Fig. 1 2. Disconnect both brake cables (not shown) from the brake (S3611). (Fig. 1) 3.
Rev A, 10/2012 Page 1 of 8
 Rev A, 10/2012 Page 1 of 8 www.topendwheelchair.com Rev A, 10/2012 Page 2 of 8 www.topendwheelchair.com (800) 532-8677 (727) 522-8677 fax: (727) 522-1007 Force RX: Fork/Cranks Assembly Date: Phone: Fax:
GTX. 1 of 9. The GTX scrubber s 2 recover drain and hose are larger than those on many other machines, making the GTX scrubber less likely to clog.
 The scrubber uses larger (8 stainless) hinges and bolt directly into the heavy gage steel frame. This provides better durability than other machines that use smaller tank hinges bolted to plastic tanks.
Assembly Tools. Assembly will take 1-2 hours
 Assembly Tools Included in your parts box: Pedals Quick release skewer Reflectors (if not already installed) Toolkit (4+5mm combo Allen wrench, 13+15mm combo open-end wrench) Helpful Tools: Scissors (for
Quad Cuff Handle kit (Pr) - Delrin Only-
 - Delrin Only-") Quad Cuff Handle kit (Pr) - Delrin Only- Page 2 = Fork Assembly, XLT & XLT Jr. Page 3 = Fork Assembly, XLT Pro Page 4 = Frame Assembly Page 5 = Wheels Assembly, XLT & XLT Jr. Page 6 = Accessories Rev E.
Quad Cuff Handle kit (Pr) - Delrin Only- Page 2 = Fork Assembly, XLT & XLT Jr. Page 3 = Fork Assembly, XLT Pro Page 4 = Frame Assembly Page 5 = Wheels Assembly, XLT & XLT Jr. Page 6 = Accessories Rev E.
OPERATOR S MANUAL & PARTS LIST
 OPERATOR S MANUAL & PARTS LIST PAS17BA (Base Unit Only) PAS17BA-BC (with Batteries and Charger) WARNING: OPERATOR MUST READ AND UNDERSTAND THIS MANUAL COMPLETELY BEFORE OPERATING THIS EQUIPMENT. Tacony
User Manual GRX- 1250Li
 User Manual GRX- 1250Li Your Cart Tek caddy cart was thoroughly quality control checked and road tested before being shipped to your address. We do everything possible to assure that your caddy is in perfect
! CAUTION! ! WARNING! General Information
 Great Plains Mfg., Inc. Installation Instructions Used with: 2SF24, 24-Foot Two-Section Drill General Information Two-Section, Hydraulic Folding Marker 2SF30, 30-Foot Two-Section Drill 2SBM30, 30-Foot
POWER ASSISTED BICYCLES OWNERS MANUAL
 POWER ASSISTED BICYCLES OWNERS MANUAL WE HAVE INCLUDED A BICYCLE OWNER S MANUAL WHICH YOU SHOULD REFER TO FOR ALL GENERAL CYCLE MAINTENANCE. CONTENTS Page. 3 Unpacking. Page. 3-4 Easy steps to get started.
Tooling List 3/8 Ratchet 3/8-10mm Deep Socket 10mm Wrench 3mm Allen Wrench #2 Phillips Screwdriver Large Jaw Pliers Needle Nose Pliers
 Thank you for purchasing the CorkSport Cold Air Intake System. Help your ND Miata breathe easy with the CorkSport Cold Air Intake System. The CorkSport CAI features a CAD designed ABS box and lid, billet
Spare parts list. ( ) Spare parts list HD 3.0/20 C Ea
 Spare parts list HD 3.0/20 C Ea") Spare parts list (5.972-551.0) Spare parts list HD 3.0/20 C Ea 24.06.2016 www.kaercher.com EN Page 2 / 51 Page 3 / 51 Page 4 / 51 Table of contents Order instructions Spare parts list HD 3.0/20 C Ea (5.972-551.0)
Spare parts list (5.972-551.0) Spare parts list HD 3.0/20 C Ea 24.06.2016 www.kaercher.com EN Page 2 / 51 Page 3 / 51 Page 4 / 51 Table of contents Order instructions Spare parts list HD 3.0/20 C Ea (5.972-551.0)
BELT DRIVE PREMIUM INDOOR CYCLING BIKE SF-B1509 USER MANUAL
 BELT DRIVE PREMIUM INDOOR CYCLING BIKE SF-B1509 USER MANUAL IMPORTANT! Read all instructions carefully before using this product. Retain owner s manual for future reference. For customer service, please
Rev D. May 12, 2011 Page 1 of 7
 Rev D. May 12, 2011 Page 1 of 7 www.topendwheelchair.com (800) 532-8677 (727) 522-8677 fax: (727) 522-1007 Force R: Fork/Crank Assy 1 1153309 1 Fork, Force R (incl: fork, 2 clamps, 4 bolts, 4 nuts) -Serial
MAGNETIC INDOOR CYCLING BIKE
 MAGNETIC INDOOR CYCLING BIKE SF-B1805 USER MANUAL IMPORTANT! Please retain owner s manual for maintenance and adjustment instructions. Your satisfaction is very important to us, PLEASE DO NOT RETURN UNTIL
AMP Oil Free Manual AMP 50-8-TC AMP 50-6-D AMP General User and Maintenance Instructions
 AMP Oil Free Manual AMP 50-8-TC AMP 50-6-D AMP 50-24 General User and Maintenance Instructions Silentaire Technology 8614 Veterans Memorial Dr. Houston, TX 77088 800-972-7668 Fax 832-327-0669 www.silentaire.com
Bradley Stand-On Hydro Drive Mower Owner s Manual
 Bradley Stand-On Hydro Drive Mower Owner s Manual TABLE OF CONTENTS About This Manual... 3 Warranty... 4 Safety Information Before Using Equipment... 5 Operation of Equipment... 6 Safety Information Decals...
Spare parts list. ( ) Spare parts list HD 3.0/20 C Ea
 Spare parts list HD 3.0/20 C Ea") Spare parts list (5.972-551.0) Spare parts list HD 3.0/20 C Ea 20.04.2016 www.kaercher.com EN Table of contents Order instructions Spare parts list HD 3.0/20 C Ea (5.972-551.0) 10 Housing 20 Pump set 21
Spare parts list (5.972-551.0) Spare parts list HD 3.0/20 C Ea 20.04.2016 www.kaercher.com EN Table of contents Order instructions Spare parts list HD 3.0/20 C Ea (5.972-551.0) 10 Housing 20 Pump set 21
Questions? SPX INDOOR TRAINING CYCLE ASSEMBLY MANUAL MODEL: VF803J
 SPX INDOOR TRAINING CYCLE ASSEMBLY MANUAL MODEL: VF803J Questions? As a quality home gym supplier wt' are committed to your complete satisfaction. 1[ you have questions, or find missing or damaged parts,
GX200 QX2 ENGINE, JPN, VIN# GCAE Page 1 of 34 AIR CLEANER (DUAL)
") GX200 QX2 ENGINE, JPN, VIN# GCAE-1000001 Page 1 of 34 AIR CLEANER (DUAL) GX200 QX2 ENGINE, JPN, VIN# GCAE-1000001 Page 2 of 34 Ref # Part Number Qty Description AIR CLEANER (DUAL) 1 16271-ZE1-000 1 GASKET,
GX200 QX2 ENGINE, JPN, VIN# GCAE-1000001 Page 1 of 34 AIR CLEANER (DUAL) GX200 QX2 ENGINE, JPN, VIN# GCAE-1000001 Page 2 of 34 Ref # Part Number Qty Description AIR CLEANER (DUAL) 1 16271-ZE1-000 1 GASKET,
INDOOR BIKE MANUAL
 INDOOR BIKE 91022 MANUAL 91022 INSTRUCTIONS FOR USE 1) The model 91022 is designed to be used as light commercial use or home use. It has a fixed wheel driven flywheel and should be used under professional
400H HARDMOUNT AIR COMPRESSOR KIT PART NO H HARDMOUNT AIR COMPRESSOR KIT PART NO
 400H HARDMOUNT AIR COMPRESSOR KIT PART NO. 40042 450H HARDMOUNT AIR COMPRESSOR KIT PART NO. 45042 400H 450H IMPORTANT: It is essential that you and any other operator of this product read and understand
Model ES50 HEADLIGHT. Num Code Description Quantity Price Measure Model Category
 Model ES50 HEADLIGHT 1 50QT-8C-050102.1 Headlight holder 1 each ES50 EC Headlight 2 GB15766.1-1995 Headlight bulb12v 18W 2 each ES50 EC Headlight 3 GB/T15766.3-1995 Sideleght bulb 12V 3W 2 each ES50 EC
Ersatzteilliste Spare parts list
 VIBRO FLEX 00 Ersatzteilliste Spare parts list Liste di pièce de rechange Tab. Spare parts list / VIBRO FLEX 00. Date: 00,0 Fig. Serial no. Part no. Pieces Notes 00 Central frame 0 Frame cpl. VF 000 Frame
PARTS LIST FOR CM MMB
 PARTS LIST FOR CM-4200-0MMB Displacement: 420 cc Pump Oil Grade: Mi-T-M Pump Oil #AW-4085-0016 Pump Oil Capacity: 13.4 oz. Nozzle Size: # 3.5 1 This Parts Listing has been compiled for your benefit. You
User Manual GRI- 1500Li
 User Manual GRI- 1500Li Your Cart Tek caddy cart was thoroughly quality control checked and road tested before being shipped to your address. We do everything possible to assure that your caddy is in perfect