comfort without compromising on performance and to fit your various needs on touring,
|
|
|
- Myles Hancock
- 6 years ago
- Views:
Transcription

1 Congratulations on your purchase of Goal-26X. Goal-26X is made to enhance comfort without compromising on performance and to fit your various needs on touring, shopping and communicating. Let s have fun with your new recumbent. When you receive your reucmbent, please make sure all parts referred to in the instructions have been included. Your new recumbent has been assembly 50%. Please refer to assembly guide for more details on individual steps.

2


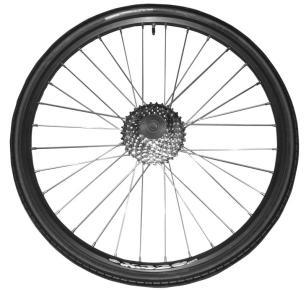
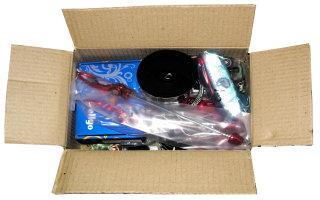

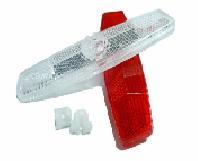
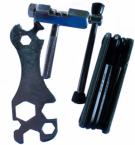

3 Goal-X parts in the carton Quick release Cable housing Pedal Rubber Reflector Tool Chain Brake wire Shifter wire Rear derailleur
... 9 CABLE FOR FRONT DERAILLEUR (AT LEFT SIDE)... 10 ADJUST DERAILLEUR... 10 BRAKE CABLE.")
4 Table of content ASSEMBLY GUIDE... 2 ASSEMBLY MAIN FRAME AND WHEELS... 2 ROUTING CHAIN... 3 ADJUST THE CHAIN LENGTH... 5 INSTALL BRAKE AND SHIFTER CABLE... 6 INSTALL HANDLEBAR... 6 ADJUST HANDLEBAR... 6 INSTALL BRAKE AND SHIFTER CABLE... 9 SHIFTER CABLE... 9 CABLE FOR REAR DERAILLEUR (AT RIGHT SIDE)... 9 CABLE FOR FRONT DERAILLEUR (AT LEFT SIDE) ADJUST DERAILLEUR BRAKE CABLE REAR BRAKE CABLE (AT RIGHT SIDE): FRONT BRAKE CABLE (AT LEFT SIDE) ADJUST BRAKE INSTALL PEDAL SEAT WARRANTY LIMITED WARRANTY DOES NOT COVER PROCEDURE
 2.")
 3.")
 4.")

5 Assembly guide Assembly main frame and wheels 1. Install rear derailleur (pic 1) 2. Install rear wheels on the main frame by rotating the quick release on rear wheel (pic 2) 3. Install front wheels on the main frame by rotating the quick release on front wheel (pic 3) 4. It is better to adjust rear derailleur first. Press derailleur leg inward. The leg needs to be parallel to the biggest sprocket Note: The spare paint on the fork dropout will lead to the difficulty of installing wheel. Please clean paint out when it happen. Pic 1 Pic 2 Pic 3 Pic 4-2-

6 Routing chain Normally, our recumbent is suitable for people with 165cm~195cm tall. As a result, we always make our front boom long enough to fit various peoples height. Some people need to cut boom shorter to find suitable position. Insert front boom to main frame then sit on seat and step vertically on pedal and move front boom in or out to adjust a comfortable leg length. No matter you decide to cut the boom or not, make sure the crank leg never touch the wheel when turning. If touched, that means the boom is too further in. Please move backward. When the boom can not be inserted further in frame tube and it is still far for your leg to reach pedal, you need to cut is shorter. When cutting the boom, don t forget to the reserve extra 10cm more on the boom to clamp in the frame. Once you find out a proper leg length, tighten front boom. (pic 5) Pic 5-3-

 4.")

7 1. Attaching the chain through the front derailleur cage (pic 6) 2. Run through the upper chain tube 3. Under big pulley and over the sprockets and down through rear derailleur (pic 7/8) 4. For Goal 26X: Put the rest of chain above small pulley and through the lower tube. For Goal X: Put the rest of chain through the lower tube. 5. Please don t cut or link the chain unless you find out the proper chain length. (Please refer to adjust chain length) Pic 6 Pic 7 Pic 8-4-
.")

8 Adjust the chain length The proper chain length is determined by the sitting place of rear derailleur (pic 9). When the derailleur cage is sitting too high, the chain is too long (pic 10). On the other hand, the chain is too short Pic 9 Pic Shift onto the smallest chainring in the front and shift down to the smallest cog in the rear 2. Pull the chain taut until the rear derailleur is extended like pic 9 3. Check the sitting place of rear derailleur 4. Use the master link to hold the chain together - 5-
 2.")

 Pic 11 Pic 12 USS Handlebar 1.")
9 Install Brake and shifter cable Install handlebar There are two handlebar options for Goal suspension recumbent. OSS and USS. OSS Handlebar 1. Place the Riser on the stem and tighten riser clamp (pic 11) 2. Align the riser to the front wheel 3. If the stem doesn t align to the front wheel, please adjust stem by loosing stem axle. 4. After alignment, tighten stem 5. Remove top cover from riser, place handlebar and tighten top cover (pic 12) Pic 11 Pic 12 USS Handlebar 1. Remove top cover from extension holder on the fork, place handlebar and tighten top cover 2. Align the fork to the front wheel 3. After alignment, tighten stem Pic 13-6-
10 Adjust OSS handlebar By adjusting stem To adjust the angle of handlebar, push the raiser forward and turn the backstop screw in or out. The backstop screw is close to the stem axle. Turing bolt in and out to let handlebar fold further back or up. Don t turn the screw out so far which will touch the top of stem when folded back. By spacer If the handlebar is too high to hold after you screw in so far. Please take apart the stem first then take out spacers from fork. There are 2~4 spacers with 1cm in width. The more spacer you take off the lower handlebar is. Most riders only need to take 2 spacers off and adjust the backstop screw. Please note that the handlebar should not touch your knees while riding. Afterward, install the stem and extra spacer you took off then tighten it. By fork If you want to cut fork shorter, the cutting distance is based on 1cm (spacer width) and it s multiple. You can contact with your local bike shop to cut for you, if you are not familiar with doing that. By Cutting riser In case you are still not comfortable with handlebar position, you can cut the raiser shorter. 1. Remove shifter and brake cable 2. Remove the top cap. 3. Loosen the riser clamp. 4. Take off riser from steer tube 5. Pull out riser 6. Cut the riser to the desired length. 7. Reassemble. - 7-
11 Adjust USS handlebar Loosen the screws of the handlebar clamping and turn the handlebar to your favorite position. Most riders are comfortable with a 45 angle. Make sure the stem clamps in the middle tightly. After handlebar adjusting, please re-thread brake and shifter cable to avoid sharp turns. - 8-


 3.")
12 Install Brake and shifter cable The routing way is not important, while sharp bends are avoided. If your hand shifter is twister, it has been installed on handlebar and been threaded shifter wire. As for bar-end shifter, please slide the shifter wire into the small hole of bar-end shifter first. Cable guides are on the front boom, rear chain stay or under the frame. Shifter cable Cable for rear derailleur (at right side) 1. String shifter wire into cable 2. Tuck cable into cable guide (pic14) 3. Thread shifter cable into rear derailleur, pull tightly and seal the end (pic 15/16) 4. Check the cable between the cable stop and derailleur, which shouldn t be slack Pic 13 Pic 14 Pic 15 Pic 16-9-


13 Cable for front derailleur (at left side) Repeat the same for the other side Pic 17 Pic 18 Pic 19 Adjust derailleur 1. Check whether the chain can shift to the largest and smallest cog. 2. If doesn t work, loosen L/H on rear derailleur. 3. When rear shifter won t go to the largest cog, you need to loosen the L. When it won t shift to the smallest cog, you need to loosen the H. 4. When front shifter won t go to the largest chainring, you need to loosen the H. When it won t shift to the smallest chainring, you need to loosen the L

 3.")
 5.")

14 Brake cable Rear brake cable (at right side): 1. Squeeze the brake lever to open it up and place the head of the cable into the lever. 2. String the brake wire into cable. (pic20) 3. Tuck the cable into cable guide. (pic 21/22) 4. Thread brake cable into brake arm.(pic 23) 5. When the wheel starts to drag slightly, adjust the brake pad relief by using the pad adjusting knobs. Pic 20 Pic 21 Pic 22 Pic 23 Front brake cable (at left side) Repeat the same for the other side - 11-
15 Adjust brake Performer recumbent is equipped with disc brake or rim brake. Please read the manual from brake manufacturer. Rim brake 1. Check brake pads, make sure they are aligned on the rim. 2. If not, turning the adjusting barrel on rim brake 3. Turning spring-tension adjusters to balance brake arms Disc brake 1. Spin the wheel 2. Rotor should run freely in the center of disc brake without any drag. 3. If not, turn the adjusting knob clockwise until the rotor is in the center 4. Lock the two bolts on disc brake - 12-
16 Install pedal Grease pedal and screw in right pedal clockwise and left pedal anti-clockwise. Make sure it s tight enough. Seat Install seat onto the seat bracket, once you find your prefer position. Lock seat clamp and headrests tightly. Please make sure the seat is completely tight, otherwise the loosed bolts on FRP seat will break the seat from the bottom after a period of time. Then, stick open cell foam on FRP seat. Guidance for safety use 1. Inspect your Recumbent before every ride. 2. Tighten every loosening parts 3. Find comfortable seat positions and seat angles for your ride. 4. The tires should be inflated to the pressure indicated on the rim. 5. Replace your tires before they wear out. 6. Be careful to ride in wet weather conditions. Ride slower through corners to avoid skid. 7. Equipped reflectors and a front and rear light to ride at night
17 Warranty Performer Bike warrants each new recumbent against defects in workmanship and materials for the Limited Coverage Periods listed below. Under this warranty we will repair or replace a defective frame, fork or part with the same or comparable model. The decision to repair and replace is at the sole discretion of Performer. This warranty coverage extends only to the original purchaser, and is not transferable. Limited warranty 1. Metal Frame: Five years from the date of purchase 2. Carbon Frame: Three years from the date of purchase 3. Non consumable parts and components: One year from the date of purchase (exclude tire, brake and shifter cable, grip, crankset, cog and chain) Does not cover 1. Normal wear and tear, improper assembly or maintenance, or installation of parts or accessories not originally intended for or incompatible with the bicycle as sold. 2. Any damage caused by crash, misuse or improper riding way and riding place. 3. If you elect to repair a defective product yourself or use the services of someone else than Performer, or if you use a replacement part not supplied by Performer, Performer will not be liable for any damage Procedure Please notify Performer in writing with attached picture of the frame showing damage to christine@performer.com.tw - 14-
Congratulations on your purchase of a JC Series Performer trike! The Performer JC Series is designed for everything from touring to commuting and
 Congratulations on your purchase of a JC Series Performer trike! The Performer JC Series is designed for everything from touring to commuting and shopping in the city. The JC Series frames are made of
CRUZBIKE Quest 2.0 Assembly
 CRUZBIKE Quest 2.0 Assembly CRUZBIKE Quest 2.0 Assembly... 1 General notes on assembly... 2 Un box and evaluate the frame and major parts... 2 Unfold the rear swing arm and arrange the frame... 3 Rear
BICYCLE ASSEMBLY INSTRUCTIONS. dutchcycles.com.au. Distribution Centre
 BICYCLE ASSEMBLY INSTRUCTIONS dutchcycles.com.au Distribution Centre Shed 68, 400-422 Somerville Road, Tottenham, VIC 3012 email: service@dutchcycles.com.au BICYCLE COMPONENTS KEY INTRODUCTION CONGRATULATIONS
UNPACKING AND ASSEMBLING YOUR DIAMONDBACK ROAD BIKE
 EMAIL SIGNUP BIKE REG SEARCH BIKES THE RIDE HEALTH FITNESS SKILLS SHOP MAINTENANCE CYCLING 101 RIDERS LIKE YOU TEAMS SUPPORT UNPACKING AND ASSEMBLING YOUR DIAMONDBACK ROAD BIKE 1. Begin by carefully cutting
Parts List. 7. Handlebars 8. Grips 9. Handlebar Stem 10. Front Brake 11. Front Wheel 12. Crank 13. Chain
 Woodworm Cruise Parts List 1. Free Wheel with Rear Hub 2. Fenders 3. Fender Stay 4. Quick Release 5. Saddle 6. Seat Post 7. Handlebars 8. Grips 9. Handlebar Stem 10. Front Brake 11. Front Wheel 12. Crank
Ladies Shopper Bike Assembly Manual 28C03
 Ladies Shopper Bike Assembly Manual 28C03 Ecosmo Ltd 1 Know your bike 1. Wheel 2. Rear Derailleur 3. Chain 4. Crank Set 5. Pedal 6. Seat Quick Lock 7. Saddle and Post 8. Frame 9. Front Light 10. Front
Have questions? Chat with us live at raleighusa.com or call us at , 8am 5pm PST
 1 2 Have questions? Chat with us live at raleighusa.com or call us at 1-800-251-8435, 8am 5pm PST The bicycle you have purchased is a complex piece of equipment that must be properly assembled and maintained
Santa Fe Cycles Assembly Guide Introduction
 Santa Fe Cycles Assembly Guide Introduction Congratulations on your purchase of your new Santa Fe bicycle. You have purchased a bicycle that has many features and qualities. Please take a few minutes and
MANTEL BIKE BOX: PACKING YOUR ROAD BIKE FOR TRANSPORT
 MANTEL BIKE BOX: PACKING YOUR ROAD BIKE FOR TRANSPORT ROAD BIKE COMPONENTS 1 Frame: a b c d e Top tube Down tube Seat tube Chain stay Seat stay 2 Saddle 3 Seat post 4 Seat post clamp 5 Rear brake 6 Front
Folding Dual Suspension MTB. Instruction Manual
 Folding Dual Suspension MTB Instruction Manual Introduction The Stowabike Folding MTB has been made to last and with proper maintenance, it will give you years of enjoyable rides and journeys. The following
Have questions? Chat with us live at raleighusa.com or call us at , 8am 5pm PST
 1 2 Have questions? Chat with us live at raleighusa.com or call us at 1-800-251-8435, 8am 5pm PST The bicycle you have purchased is a complex piece of equipment that must be properly assembled and maintained
Bicycle Owner's Manual Easy Access Bike
 Bicycle Owner's Manual Easy Access Bike AGE: FROM 9 YEARS OLD AND UP IMPORTANT Check bike after assembly or any adjustments. Consult bicycle retailer with questions. Always wear a helmet. Children should
Have questions? Chat with us live at raleighusa.com or call us at , 8am 5pm PST
 1 2 Have questions? Chat with us live at raleighusa.com or call us at 1-800-251-8435, 8am 5pm PST The bicycle you have purchased is a complex piece of equipment that must be properly assembled and maintained
Thank you for purchasing a WIKE BOX BIKE!
 Thank you for purchasing a WIKE BOX BIKE! Contents Safety.....3 Front wheel.4 Kickstand..5 Handle Bar & Box 6 Seat post and Saddle 7 Final pre-ride check 8 Tools needed to assemble Bike: -High table or
EZ-3 USX HD Supplemental Owner s Manual
 EZ-3 USX HD Supplemental Owner s Manual Find us online at SunSeeker.Bike Revised 2/2016 CONGRATULATIONS! Congratulations and welcome to the Sun Seeker family! You have selected one of the most comfortable
HELMETS SAVE LIVES!!! ALWAYS WEAR A PROPERLY FITTED HELMET WHEN YOU RIDE YOUR SCOOTER. DO NOT RIDE AT NIGHT. AVOID RIDING IN WET CONDITIONS.
 HELMETS SAVE CORRECT FITTING - MAKE SURE YOUR HELMET COVERS YOUR FOREHEAD. LIVES!!! ALWAYS WEAR A PROPERLY FITTED HELMET WHEN YOU RIDE YOUR SCOOTER. DO NOT RIDE AT NIGHT. AVOID RIDING IN WET CONDITIONS.
E-trike Li Assembly Guide
 PREPARATION 1. Read this assembly manual BEFORE commencing assembly. 2. Carefully remove all the components and packaged hardware from the shipping boxes. 3. Unpack the contents of the large double box
ASSEMBLY GUIDE AROUND THE BLOCK - 1, 3, 7, & 21 SPEED SIXTHREEZERO
 ASSEMBLY GUIDE AROUND THE BLOCK - 1, 3, 7, & 21 SPEED SIXTHREEZERO OUR COMMITMENT We want you to love your bike as much as we do. If you run into any issues, no matter how small, let us know and we ll
KMX Kompact Sports Trike
 KMX Kompact Sports Trike Assembly Instructions 1.0 Introduction Thank you for choosing KMX! When properly assembled and set up your KMX will provide many years of enjoyment. KMX Karts Ltd does its utmost
EZee Glider Manual. Tools needed for Assembly: Wrench (included) Philips Screwdriver (not included) Assembly Instructions
 Philips Screwdriver (not included) Assembly Instructions") EZee Glider Manual Congratulations on your purchase of the EZee Glider! Your glider is designed for years of nearly carefree use by your child. These instructions include how to set up your glider and
EZee Glider Manual Congratulations on your purchase of the EZee Glider! Your glider is designed for years of nearly carefree use by your child. These instructions include how to set up your glider and
HOME ASSEMBLY INSTRUCTIONS
 HOME ASSEMBLY INSTRUCTIONS This Papillionaire Bicycle now belongs to you. It will take you to work, wait patiently outside your local cafe, and carry your groceries home. This is the start of your long-term
Final Assembly Instructions Bikes with Quill Stems
 Final Assembly Instructions Bikes with Quill Stems Thank you for buying your new bicycle from L.L.Bean. Read these instructions carefully before beginning the final assembly. Prior to shipping, our expert
Final Assembly Instructions Bikes with Threaded Headsets
 Final Assembly Instructions Bikes with Threaded Headsets Thank you for buying your new bicycle from L.L.Bean. Read these instructions carefully before beginning the final assembly. Prior to shipping, our
Mini Glider Manual. Your Glider comes partially assembled. The front wheel and the handlebars require assembly.
 Mini Glider Manual Congratulations on your purchase of the Mini Glider! Your glider is designed for years of nearly carefree use by your child. These instructions include how to set up your glider and
SANTANA STOWAWAY TANDEM WITH AIRLINER SAFECASE AND FTS FOAM TRAY SYSTEM ASSEMBLY AND DISASSEMBLY
 SANTANA STOWAWAY TANDEM WITH AIRLINER SAFECASE AND FTS FOAM TRAY SYSTEM ASSEMBLY AND DISASSEMBLY Congratulations! You are now the proud owner of the world s most travel-ready, performance tandem. The following
TRAILMATE METEOR ASSEMBLY MANUAL
 TRAILMATE METEOR ASSEMBLY MANUAL (DISC BRAKE VERSION) The Trailmate Meteor recumbent has been designed for easy assembly. This means more time to enjoy the smooth ride with single speed, 3 speed coaster
Final Assembly Instructions Bikes with Threaded Headsets
 Final Assembly Instructions Bikes with Threaded Headsets Thank you for buying your new bicycle from L.L.Bean. Read these instructions carefully before beginning the final assembly. Prior to shipping, our
RADROVER REAR RACK INSTALLATION MANUAL
 RADROVER REAR RACK INSTALLATION MANUAL WWW.RADPOWERBIKES.COM We are here to help! Please contact us at SUPPORT@RADPOWERBIKES.COM or 1-800-939-0310 if you have questions. REV022216 Welcome Thanks you for
BackCountry ebikes 2019 MULE Assembly
 BackCountry ebikes 2019 MULE Assembly Required Tools: Cutting Pliers (to cut box poly strapping and heavy bike banding) Scissors (to remove bubble wrap) Allen wrenches (3mm, 4mm, 5mm, 6mm) Wrenches (10mm,
TABLE OF CONTENTS INTRODUCTION
 R3 DISC MANUAL TABLE OF CONTENTS Introduction... 1 Frame Features... 2 Fork Preparation... 3 Small Parts... 5 Frame Preparation... 6 Brake Housing Installation... 7 Mechanical Cable Routing... 9 Electric
model - CYPRESS DX W
 Contents model - CYPRESS DX W Maintenenace manual Read and Save these instructions Welcome Contents 1 Preparing Nothing makes us happier than seeing people out riding bikes. For over thirty years Giant
MODEL: COMMUTER / ROAD BIKE
 STEP BY STEP BUILD GUIDE MODEL: COMMUTER / ROAD BIKE TABLE OF CONTENTS TOOLS 1 LET S GET STARTED 2 INSTALLING THE QUILL STEM 3 INSTALLING THE FRONT FENDER 4 INSTALLING THE QUICK RELEASE 5 INSTALLING THE
FRAME FEATURES TABLE OF CONTENTS INTRODUCTION
 R3 MANUAL TABLE OF CONTENTS Introduction...1 Frame Features...2 Fork Preparation...3 Small Parts...5 Frame Preparation...6 Mechanical Cable Routing...7 Electric Cable Routing...9 Seatpost Assembly & Installation...11
Assembly Tools. Assembly will take 1-2 hours
 Assembly Tools Included in your parts box: Pedals Quick release skewer Reflectors (if not already installed) Toolkit (4+5mm combo Allen wrench, 13+15mm combo open-end wrench) Helpful Tools: Scissors (for
MODEL: FIXIE / TRACK
 STEP BY STEP BUILD GUIDE MODEL: FIXIE / TRACK TABLE O F CON TENTS TOOLS 1 LET S GET STARTED 2 INSTALLING THE HANDLEBAR 3 INSTALLING THE FRONT WHEEL 4 ALIGNING THE STEM 5 INSTALLING THE SEATPOST 6 OPTIMIZING
Item N o.: Item N am e:40cm Boys Rival Bike
 Item N o.:42272892 Item N am e:40cm Boys Rival Bike 9 bell 8 grip 30 crash pad 10 brake lever 26 wheel reflector 22 saddle 23 seat post 25 rear reflector 24 quick release 6 handle bar 7 stem 2 top tube
3. Fit. 1 Owner s manual
 3. Fit NOTE: Correct fit is an essential element of bicycling safety, performance and comfort. Making the adjustments to your bicycle which result in correct fit for your body and riding conditions requires
INTRODUCTION CONTENTS
 INTRODUCTION This manual contains information on how to properly adjust and operate your Lightning bicycle for maximum comfort, safety, and performance. The recumbent position and seat require alternate
1. General Safety Information. Silvio V2.2 Assembly Instructions Assembly. Adjust to the rider.
 Silvio V. Assembly Instructions support@cruzbike.com. General Safety Information WARNING to avoid serious injuries:. If you are unsure about fitting, testing and adjusting brakes or gearing on a bicycle,
We strongly recommend watching our video tutorial for the easiest installation process.
 Introduction We strongly recommend watching our video tutorial for the easiest installation process. GTRO is dedicated for all non-sports bicycles. Please, remember it has not been tested for heavy-duty
Item Name: 30CM GIRLS STAR THE UNICORN BIKE
 Item No.: 42333753 Item Name: 30CM GIRLS STAR THE UNICORN BIKE Contents 1. Parts identification 1 2. Safety precautions 2 3. Check list 6 4. Assembly 7 5. Adjustment 14 6. Repair and Service 15 7. Warranty
Special instruction of installation for SAINT FH-M800/RD-M800 and FH-M805/RD-M805
 Technical Service Instructions SI-5VB0E t RD-M805 / RD-M800 Rear derailleur Special instruction of installation for SAINT FH-M800/RD-M800 and FH-M805/RD-M805 A hub axle is an essential component for the
Shifting Lever. Dealer's Manual. RAPIDFIRE Plus SL-M2000 SL-M3010 SL-M4010. Thumb Shifter SL-TZ500. ROAD MTB Trekking. City Touring/ Comfort Bike
 (English) DM-MDSL001-01 Dealer's Manual ROAD MTB Trekking City Touring/ Comfort Bike URBAN SPORT E-BIKE Shifting Lever RAPIDFIRE Plus SL-M2000 SL-M3010 SL-M4010 Thumb Shifter SL-TZ500 CONTENTS IMPORTANT
SANTA CRUZ BICYCLES Cable Routing Procedure MY17
 SANTA CRUZ BICYCLES Cable Routing Procedure MY17 Copyright Santa Cruz Bicycles 2017 TABLE OF CONTENTS SAFETY INSTRUCTIONS... 3 CABLE ROUTING... 3 INTRODUCTION...3 TOOLS AND SUPPLIES...3 REAR DERAILLEUR
DM-MBST (English) Dealer's Manual. ROAD MTB Trekking. City Touring/ Comfort Bike. Shifting lever. EZ-FIRE Plus ST-EF500 ST-EF510
 Dealer's Manual. ROAD MTB Trekking. City Touring/ Comfort Bike. Shifting lever. EZ-FIRE Plus ST-EF500 ST-EF510") (English) DM-MBST001-00 Dealer's Manual ROAD MTB Trekking City Touring/ Comfort Bike URBAN SPORT E-BIKE Shifting lever EZ-FIRE Plus ST-EF500 ST-EF510 CONTENTS IMPORTANT NOTICE... 3 TO ENSURE SAFETY...
(English) DM-MBST001-00 Dealer's Manual ROAD MTB Trekking City Touring/ Comfort Bike URBAN SPORT E-BIKE Shifting lever EZ-FIRE Plus ST-EF500 ST-EF510 CONTENTS IMPORTANT NOTICE... 3 TO ENSURE SAFETY...
R3 RIM MANUAL EN. Version 1 I
 R3 RIM MANUAL EN Version 1 I 07.02.2017 TABLE OF CONTENTS Introduction...1 Frame Features...2 Fork Preparation...3 Small Parts...5 Frame Preparation...6 Mechanical Cable Routing...7 Electric Cable Routing...9
Rear Drive System SERVICE INSTRUCTION. Specifications SI-R670B
 - SERVICE INSTRUCTION SI-R670B t Rear Drive System Before use, read these instructions carefully, and follow them for correct use. In order to realize the best performance, we recommend that the following
Owner s Manual. The most comfortable upright bicycles ever made.
 Owner s Manual The most comfortable upright bicycles ever made. At Day 6, we hope you will enjoy riding our bicycles as much as we enjoy designing them. We have truly combined the best features of a recumbent
ASSEMBLY GUIDE: Izip & Ezip Electric Bicycles with Rack-Top Mounted Batteries ( RTMB Bicycles )
") ASSEMBLY GUIDE: Izip & Ezip Electric Bicycles with Rack-Top Mounted Batteries ( RTMB Bicycles ) Please Refer to your Owner s Manual for Detailed Setup Instructions Technical & Customer Service: 1-800-377-4532
ASSEMBLY GUIDE: Izip & Ezip Electric Bicycles with Rack-Top Mounted Batteries ( RTMB Bicycles ) Please Refer to your Owner s Manual for Detailed Setup Instructions Technical & Customer Service: 1-800-377-4532
Shifting Lever. RAPIDFIRE Plus 11-speed
 (English) DM-SL0005-04 Shifting Lever Dealer's Manual RAPIDFIRE Plus 11-speed MTB XTR SL-M9000 DEORE XT SL-M8000 CONTENTS IMPORTANT NOTICE... 3 TO ENSURE SAFETY... 4 LIST OF TOOLS TO BE USED... 7 INSTALLATION...
Final Assembly Instructions Bikes with 16 Wheel Size
 Final Assembly Instructions Bikes with 16 Wheel Size Thank you for buying your new bicycle from L.L.Bean. Read these instructions carefully before beginning the final assembly. Prior to shipping, our expert
Bicycle Owner s Manual for Montague, SwissBike, and Paratrooper Bicycles
 Table of Contents 1. Introduction 1 2. Owner s Responsibility 2 3. Parts of Your Bicycle & Location of Quick Releases 3 4. Assembly and Adjustment 4-11 Packing List 4 Operation of Quick Release Levers
Helios Separable Tandem Manual
 Helios Separable Tandem Manual This manual accompanies the Helios owners manual Introduction The separable kit fitted to your Helios tandem allows for even greater flexibility in the way you can enjoy
Bicycle Owner s Manual
 Bicycle Owner s Manual The following manual provides assembly and maintenance instructions, as well as a guide to safe usage of your new bicycle. WARNING Read the complete Owner s Manual before starting
Warning: Please read this entire manual before riding your Simbi. Failure to do so could result in serious injury or even death.
 Warning: Please read this entire manual before riding your Simbi. Failure to do so could result in serious injury or even death. Contents 1. OVERVIEW... 3 A. Thank You... 3 B. General Warning... 3 C. Important
Owner s Manual for Multi Speed & Freewheel Bicycles This Owner's Manual contains assembly, operation, and maintenance instructions.
 Your Model Number is: (write your model number here) Owner s Manual for Multi Speed & Freewheel Bicycles This Owner's Manual contains assembly, operation, and maintenance instructions. WARNING: - Check
Assembly Tools. Assembly will take about an hour
 Assembly Guide Assembly Tools Included in your parts box: Pedals Toolkit (4+5mm combo Allen wrench, 13+15mm combo open-end wrench) Touch-up paint Spare fuses (for battery) Assembly will take about an hour
USER GUIDE TO POWER ASSISTED BIKES
 USER GUIDE TO POWER ASSISTED BIKES 1 PAGE CONTENTS Page. 3 Unpacking Page. 3-4 Easy steps to get started Page. 5 General Assembly Instructions Page. 6 Aligning H/Bars, Page. 7 Tightening pedals onto Crank
FACTORBIKES.COM. Assembly Manual V2.20
 FACTORBIKES.COM V2.20 Introduction I Limited Lifetime Warranty On Bicycles And Framesets I Necessary Tools 01 Instructions 01 1 Seatpost 01 2 Di2 Cable Routing 03 3 Fork - Headset Barstem 05 4 Cutting
Performance & Sports Trike
 Performance & Sports Trike THE KMX KOLT THE KMX KOBRA THE KMX KOYOTE Assembly Instructions 1.0 Introduction Thank you for choosing KMX! When properly assembled and set up your KMX will provide many years
USER MANUAL. you pedal, something amazing happens
 TM USER MANUAL you pedal, something amazing happens THANK YOU! In our humble beginnings we ran a bike-powered smoothie booth at Northern California music festivals called The Juice Pedaler. We saw the
Lectric Cycles Mid-Drive Electric Motor Installation
 Lectric Cycles Mid-Drive Electric Motor Installation This write-up describes the installation of a Lectric Cycles electric motor. The model is the e-rad Mid-Drive 750 Watt conversion kit, installed on
RADON 237A: ASSEMBLY GUIDE. Revision Valid for MY2017 Radon
 RADON 237A: ASSEMBLY GUIDE Revision 3.0-05-29-2017 - Valid for MY2017 Radon RADON 237A: Table of Contents 1. Tools Needed and First Aid Kit... 3 2. Sizing Chart... 4 3. Seat Post Collar Assembly... 5 4.
Drive Belt Instructions
 Drive Belt Safety Do not roll, pry, twist, invert or bend the belt back on itself. Do not zip tie the belt. The acceptable temperature range for your belt drive is -53 C to 85 C. Do not lubricate the belt
R5 DISC MANUAL EN. Version 1 I
 R5 DISC MANUAL EN Version 1 I 30.04.2017 TABLE OF CONTENTS Introduction...1 Frame Features...2 Fork Preparation...3 Small Parts...5 Frame Preparation...6 Brake Housing Installation...7 Mechanical Cable
SECTION 1 UNPACKING INSTRUCTIONS
 ANDEAN USER GUIDE SECTION 1 UNPACKING INSTRUCTIONS 2 REMOVE PART BOX, ACCESSORY BOX AND SADDLE AND SEATPOST. SET ACCESORIES AND SEAT ASIDE FOR FINAL. PARTS BOX ACCESORY BOX 3 UNSTRAP WHEEL BLOCKS AND HANDLEBAR
Owner s Manual 700c Fixed Gear Bicycles
 Owner s Manual 700c Fixed Gear Bicycles This manual contains important safety, assembly, operation and maintenance information. Please read and fully understand this manual before operation. Save this
BICYCLE OWNER S MANUAL
 BICYCLE OWNER S MANUAL IMPORTANT: This manual contains important safety, performance and service information. Read it before you take the first ride on your new bicycle, and keep it for reference. Additional
Front derailleur. Dealer's Manual SORA FD-R3000 FD-R3030 CLARIS FD-R2000 FD-R2030. ROAD MTB Trekking. City Touring/ Comfort Bike DM-RBFD001-01
 (English) DM-RBFD001-01 Dealer's Manual ROAD MTB Trekking City Touring/ Comfort Bike URBAN SPORT E-BIKE Front derailleur SORA FD-R3000 FD-R3030 CLARIS FD-R2000 FD-R2030 CONTENTS IMPORTANT NOTICE... 3 TO
2019 MADONE ASSEMBLY MANUAL
 2019 MADONE ASSEMBLY MANUAL 2019 MADONE Rim brakes and Di2 drivetrain Rim brakes and mechanical drivetrain Disc brakes and Di2 drivetrain Disc brakes and mechanical drivetrain TABLE OF CONTENTS Common
9-speed super narrow. chain such as. CN-7701 / CN-HG93 8- / 7- / 6-speed narrow. chain such as CN-HG50 / CN-IG51
 - Technical Service Instructions SI-5VH0B t RD-M600 Rear derailleur General Safety Information WARNING The ST-M600 DUAL CONTROL lever is used for both gear shifting and braking operations. Make sure that
FACTORBIKES.COM. Assembly Manual DISC V1.05
 FACTORBIKES.COM V1.05 Introduction I Limited Lifetime Warranty On Bicycles And Framesets I Necessary Tools 01 Instructions 01 1 Seatpost 01 2 Cut the cable housing to the correct length 03 3 Di2 Cable
BIKE TO GO - USER MANUAL - MODEL#: JBTG24
 BIKE TO GO 24 - USER MANUAL - MODEL#: JBTG24 GET ACQUAINTED WITH YOUR 24 BIKE TO GO Congratulations on your new Jetson 24 folding bicycle! The Jetson 24 Bike to Go is an innovative and fun personal transportation
DM-MBRD (English) Dealer's Manual. ROAD MTB Trekking. City Touring/ Comfort Bike. Rear Derailleur SLX RD-M7000 DEORE RD-M6000
 Dealer's Manual. ROAD MTB Trekking. City Touring/ Comfort Bike. Rear Derailleur SLX RD-M7000 DEORE RD-M6000") (English) DM-MBRD001-04 Dealer's Manual ROAD MTB Trekking City Touring/ Comfort Bike URBAN SPORT E-BIKE Rear Derailleur SLX RD-M7000 DEORE RD-M6000 CONTENTS IMPORTANT NOTICE... 3 TO ENSURE SAFETY... 4
(English) DM-MBRD001-04 Dealer's Manual ROAD MTB Trekking City Touring/ Comfort Bike URBAN SPORT E-BIKE Rear Derailleur SLX RD-M7000 DEORE RD-M6000 CONTENTS IMPORTANT NOTICE... 3 TO ENSURE SAFETY... 4
Preparation/Maintenance Manual
 Preparation/Maintenance Manual It is essential that you read this manual in its entirety before riding your bike for the first time to ensure that your bike is properly assembled and safe to ride. It is
Dealer's Manual ROAD MTB Trekking City Touring/ URBAN SPORT E-BIKE Comfort Bike Front derailleur ALIVIO Non-Series
 (English) DM-MDFD001-02 Dealer's Manual ROAD MTB Trekking City Touring/ Comfort Bike URBAN SPORT E-BIKE Front derailleur ALIVIO FD-M4000 FD-M4020 Non-Series FD-MT400 CONTENTS IMPORTANT NOTICE... 3 TO ENSURE
Front derailleur. Dealer's Manual DURA-ACE FD-R9100 ULTEGRA FD-R FD ROAD MTB Trekking. City Touring/ Comfort Bike DM-RAFD001-03
 (English) DM-RAFD001-03 Dealer's Manual ROAD MTB Trekking City Touring/ Comfort Bike URBAN SPORT E-BIKE Front derailleur DURA-ACE FD-R9100 ULTEGRA FD-R8000 105 FD-5801 Procedures for cable tension adjustment
Bicycle Owner s Manual Children s Bicycles
 Bicycle Owner s Manual Children s Bicycles The following manual provides assembly and maintenance instructions, as well as a guide to safe usage of your new bicycle. WARNING - Read the complete Owner s
Using Your Bike Friday : Folding Rear Rack
 Using Your Bike Friday : Folding Rear Rack Green Gear Cycling, Inc. 3364 W. 11th Ave. Eugene, OR 97402 800-777-0258 USA & Canada +1-541-687-0487 Int l +1-541-687-0403 Fax www.bikefriday.com info@bikefriday.com
Co-Motion Co-Pilot Bicycles for travel
 Revised October 2014 Co-Motion Co-Pilot Bicycles for travel Packing and travel instructions Eugene Oregon USA Toll free 1-866-282-6336 www.co-motion.com Congratulations! A Co-Motion Co-Pilot is a great
CANYON WORKSHOP: CORRECT PACKAGING FOR TRANSPORT
 Whether you're travelling or sending your bike in for a service, the Canyon BikeGuard is sturdy and can be used several times. It is of course necessary that you retain all the packaging material delivered
Item N o.: Item N am e:southern Star 40cm Girls Cherry Bike
 Item N o.:42174868 Item N am e:southern Star 40cm Girls Cherry Bike Tighten them so they do not move and are horizontal. Check the handlebar is in good condition and the ends of the handlebar are
Item N o.: Item N am e:50cm GIRLS BELLA CRUISER BIKE
 Item N o.:42272847 Item N am e:50cm GIRLS BELLA CRUISER BIKE grip brake lever mudguard mudguard braket free wheel rear hub saddle seat post rear reflector seat clamp chain guard chain wheel crank stem
Thumb Shifter Plus Thumb Shifter
 (English) DM-SL0004-01 Dealer's Manual Thumb Shifter Plus Thumb Shifter Thumb Shifter Plus SL-FT55 SL-TX50 SL-TX30 Thumb Shifter SL-TZ20 IMPORTANT NOTICE This dealer's manual is intended primarily for
GALLIUM PRO 210A: ASSEMBLY GUIDE
 GALLIUM PRO 210A: ASSEMBLY GUIDE Revision 5.0-05-23-2017 GALLIUM PRO 210A: Table of contents Assembly overview...2-3 1. Frame inspection...4 2. Headset installation...5 3. Cables & housing installation...6-9
THIS INSTRUCTION BOOKLET CONTAINS IMPORTANT SAFETY INFORMATION. PLEASE READ AND KEEP FOR FUTURE REFERENCE.
 THIS INSTRUCTION BOOKLET CONTAINS IMPORTANT SAFETY INFORMATION. PLEASE READ AND KEEP FOR FUTURE REFERENCE. FOR SERVICE ASSISTANCE CALL KENT TOLL FREE 1.800.451.5368 Monday - Friday 9:00 a.m. to 4:00 p.m.
TABLE OF CONTENTS FRAME FEATURES INTRODUCTION
 S3 DISC MANUAL TABLE OF CONTENTS Introduction...1 Frame Features...2 Fork Preparation...3 Small Parts...5 Frame Preparation...6 Brake Housing Installation...7 Mechanical Cable Routing...9 Electric Cable
R5 RIM MANUAL EN. Version 1 I
 R5 RIM MANUAL EN Version 1 I 28.04.2017 TABLE OF CONTENTS Introduction...1 Frame Features...2 Fork Preparation...3 Small Parts...5 Frame Preparation...6 Mechanical Cable Routing...7 Electric Cable Routing...9
welcome to the family contents
 manual 2 trike anatomy welcome to the family Congratulations on your purchase of a Greenspeed Anura trike. We believe that you have purchased the finest recumbent tricycle available in the world today.
ES-701 INSTRUCTIONS FOR USE
 BIKE ES-701 MANUAL ES-701 INSTRUCTIONS FOR USE 1) The model ES-701 is designed to be used as a group cycle in fitness studios and health clubs. It has a fixed wheel driven flywheel and should only be used
Read Instructions carefully before use. Rollator is designed for indoor & outdoor use. Do NOT use as a wheelchair or as a transport chair.
 Charcoal Red Seat Height 500-10191 500-10195 19 500-10211 500-10215 21 500-10241 500-10245 24 User Manual Read Instructions carefully before use. Rollator is designed for indoor & outdoor use. Do NOT use
Owner s Manual for Coaster Brake Bicycles This Owner's Manual contains assembly, operation, and maintenance instructions.
 Your Model Number is: (write your model number here) Owner s Manual for Coaster Brake Bicycles This Owner's Manual contains assembly, operation, and maintenance instructions. WARNING: - Check operation
Good tread, no splits, cracks or holes, properly inflated. True, no missing or broken spokes, good rim. Secure, facing in right direction
 APPENDIX 1 Bike Check This is an M check. Start at the front of the bike and systematically work towards the back. Put a cross beside anything that is faulty. Note any faults you find. X FAULT Front tyre
DM-MARD (English) Dealer's Manual. ROAD MTB Trekking. City Touring/ Comfort Bike REAR DERAILLEUR XTR RD-M9100 RD-M9120
 Dealer's Manual. ROAD MTB Trekking. City Touring/ Comfort Bike REAR DERAILLEUR XTR RD-M9100 RD-M9120") (English) DM-MARD001-00 Dealer's Manual ROAD MTB Trekking City Touring/ Comfort Bike URBAN SPORT E-BIKE REAR DERAILLEUR XTR RD-M9100 RD-M9120 CONTENTS CONTENTS...2 IMPORTANT NOTICE...3 TO ENSURE SAFETY...4
(English) DM-MARD001-00 Dealer's Manual ROAD MTB Trekking City Touring/ Comfort Bike URBAN SPORT E-BIKE REAR DERAILLEUR XTR RD-M9100 RD-M9120 CONTENTS CONTENTS...2 IMPORTANT NOTICE...3 TO ENSURE SAFETY...4
SERVICE CALL TOLL FREE Monday - Friday 8:00 a.m. to 5:00 p.m. Pacific Standard Time
 SERVICE CALL TOLL FREE 800-222-5527 Monday - Friday 8:00 a.m. to 5:00 p.m. Pacific Standard Time 2 Congratulations on the purchase of your new Raleigh bicycle! With proper assembly and maintenance it will
Carried Standard: GB Owner s Manual. (Battery Type: Lithium Battery) Shanghai Leisheng Dynamics Technology Co.,Ltd.
 Shanghai Leisheng Dynamics Technology Co.,Ltd.") Carried Standard: GB17761-1999 Owner s Manual (Battery Type: Lithium Battery) Shanghai Leisheng Dynamics Technology Co.,Ltd. Address: No.5788, Huyi Road Jiading District Shanghai Phone:021-59583532 Website:
Carried Standard: GB17761-1999 Owner s Manual (Battery Type: Lithium Battery) Shanghai Leisheng Dynamics Technology Co.,Ltd. Address: No.5788, Huyi Road Jiading District Shanghai Phone:021-59583532 Website:
2012 K9100 COMPACT Worldwide Cycling Solutions Through Creative Innovations.
 Home Instruction Sheet Step-1Please check for any missing parts. Model K9100 COMPACT (Basic AirCaddy) aircaddy web page 20 04/03/12 98% (1) T3230-00 METAL WHEEL TRUCK Model K8350 (Aircraft Kit) (Optional)
Operator s Manual. All-Terrain Wheelchair
 Operator s Manual All-Terrain Wheelchair By Brandon Calavan Ana Groff Steve Benn Dylan Rinker Sebastian Pineo Team 1 Faculty Advisor: John Enderle Teaching Assistant: Sarah Brittain Client: Melody Kettle
SG-7R46 SG-7R45 BR-IM41-R CJ-7S40 WARNING CAUTION SERVICE INSTRUCTIONS. Inter-7 Hub. Inter-M Brake Cassette joint NOTE:
 t WARNING It is important to completely understand the operation of your bicycle's brake system. Improper use of your bicycle's brake system may result in a loss of control or an accident, which could
Safety. Xootr Swift Bicycles USER S MANUAL Revision of September Terminology
 Safety Terminology Xootr Swift Bicycles USER S MANUAL Revision of September 2008 WARNING: Bicycling can be a hazardous activity even under the best of circumstances. Proper maintenance of your bicycle