Trilogy Theory of Operation
|
|
|
- Roger McDonald
- 5 years ago
- Views:
Transcription

1 INSTALLATION & OVERVIEW... 2 Load Height... 2 Approach Angle... 2 Footprint... 3 Protrusion... 3 Mounting the... 4 General Torque Specs... 4 OPERATION OF BIKE RACK... 5 Loading Bikes... 5 Unloading Bikes... 6 BUS WASHING... 7 VISUAL INSPECTION... 8 Visual Inspection Checklist... 9 MAINTENANCE Day General Maintenance Inspection & Service

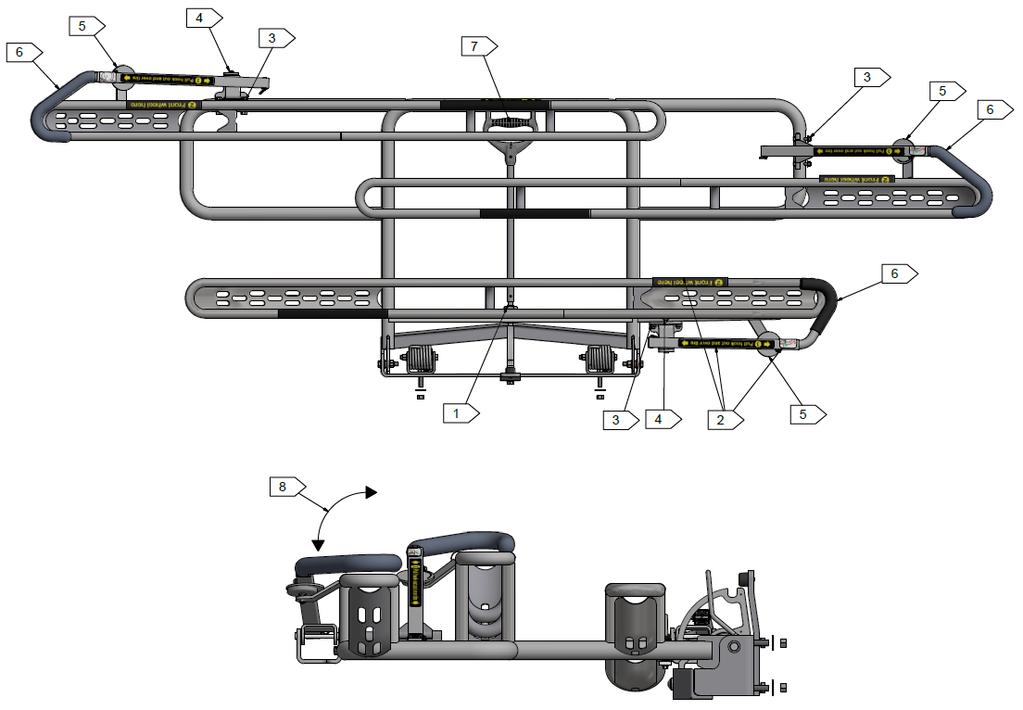
2 INSTALLATION & OVERVIEW The installation is crucial to the safety and performance of the Sportworks Bike-Rack-for-Buses system. There are several factors that need to be addressed when mounting the rack. These factors include the: Load Height Approach Angle Footprint Protrusion Carefully read and understand the following information regarding the positioning of the rack on the bus before beginning the installation process. Load Height The load height is the vertical distance a bicycle must be lifted for placement in a deployed bike rack. If the rack is mounted too high, some riders may have difficulty loading the rack. Approach Angle The approach angle is the angle created by a line from where the front tire contacts the pavement to the first obstruction ahead of the front tire. This obstruction would first touch the pavement on a very steep hill. The bike rack will limit the approach angle if it is installed on the bumper in a low enough position. The bike rack installer should be aware of this possibility. Investigate approach angle requirements in your area before mounting the rack. 2


3 Footprint The footprint is the outline of a bike rack against the front of the bus when the rack is in the stored position. Avoid obstructing headlights, hi-beam headlights and turn signal indicators. To change the position of the rack, remove the bike rack from the pivot plate. Remove the pivot plate from the C-Brackets or other bracket pieces and position the pivot plate up or down as required. Remount the pivot plate to the bracket pieces and the rack to the pivot plate. Some bracket assemblies may not have multiple height adjustment holes. If this is the case, the bracket assembly is designed for an optimum position in terms of minimal headlight interference and proper loading height. Height adjustment is not required. Protrusion Protrusion measures the distance from the front of the bumper to the front edge of the bike rack in the deployed position. Once the bike rack is mounted to the coach, the protrusion distance is fixed. Protrusion is a measurement that needs attention for three important reasons. 1) Many state DOTs (Departments of Transportation) have set limits for bike rack protrusion (e.g. California has a set limit of 36 inches). 2) The further a rack protrudes, the more likely it will affect a coach's approach angle and turning radius. 3) The rack protrusion affects the stowed position of the rack up against the front face of the coach where interference with windshield wipers and a coach driver's visual field should be avoided. 3

4 Mounting the The 3 Position Bike Rack mount to a Standard Pivot Plate. The Pivot Tab contacts the Pivot Plate in the Deployed position and the Frame contacts the Travel Stop Bar in the stowed position, shown below. 3/8 SS HHCS with Bronze Bushings are used to locate the Bike Rack onto the Pivot Plate. Torsion Springs are included. Torque Specifications are shown in the next section. General Torque Specs Most of our brackets are attached to the bus bumper using Grade 8 ½-13 HHCS. Our standard pivot plates are attached to the brackets using Grade 8 3/8-16 HHCS. Recommended torque values for pivot plate/bracket/bumper attachment: For ½-13 Grade 8 = FT-LB For 3/8-16 Grade 8 = FT-LB Recommended torque values for the bicycle rack pivot bolts: For ½-13 Grade 8 = 75 FT-LB For 3/8-16 Stainless = FT-LB 4

5 OPERATION OF BIKE RACK The Sportworks Bike-Rack-for-Buses has been designed to make as low an impact as possible on transit operations. All loading and unloading of bicycles can be done by the bicycle rider. Sportworks suggests that loading of children's bicycles be done by an accompanying adult, but the rack can be easily loaded by young children. These are the steps that should be followed when using the rack. Loading Bikes 1. Prepare your bike for loading. Remove water bottles, pumps and other loose items that could fall off while the bus is in motion. 2. Inform the bus driver that you will be loading your bike. You must load your bike from the curb or in front of the bus. Do not step into oncoming traffic to load your bike. 3. Squeeze handle up to release latch, then fold down the bike rack. You only need to use one hand to unlatch and pull the bike rack down, so you can hold your bike with your other hand. It is not necessary to lean your bike against the bus. 4. Lift your bike onto the bike rack, fitting wheels into proper wheel slots. Each wheel slot is clearly labeled for the front wheel. The purpose of the directional placement is to make the bike nearest the bus easier to unload. 5. Raise the Support Arm over the front tire. The Support Arm's number one purpose is to add lateral support for the bicycle when the bus is in motion or at rest. Many bikes will sit in the wheel well without the use of the Support Arm, but the rack must not be used without the Support Arm. Bikes with especially thin rims and tires will sway back and forth without its use. The handle should be placed as close to the front brake and head tube as possible to ensure safety and security of the bike, and in all cases the handle must be closer to the head tube than the highest point of the tire. 6. Board the bus and enjoy the ride! Choose a seat near the front of the bus to keep an eye on your bike. DON'T FORGET you have a bike with you when you get off at your stop. New riders often do! 5
6 Unloading Bikes 1. Inform the bus driver that you will be unloading your bike as you approach your stop. Use the front door to exit the bus. Unload your bike from in front of the bus or from the curb, not from the street. 2. Raise the Support Arm off the tire. The Support Arm automatically folds down to a secure position. 3. Lift your bike out of the bike rack. 4. Fold up the Bike-Rack-for Buses if there are no bikes on the rack and no one else is waiting to load their bike. The bike rack locks in place. 5. Step away from the bus with your bike. PLEASE NOTE THAT LOADING OR UNLOADING A BICYCLE FROM THE STREET SIDE MAY CAUSE INJURY OR DEATH. 6
7 BUS WASHING The Sportworks Bike-Rack-For-Buses has been designed to safely pass through bus wash facilities. Before taking a newly mounted bike rack through a wash facility, the operator should check to ensure that the wash facility is properly set up for washing the bus with a rack on it. Most wash systems use either a "top fixed" or "top and bottom fixed" spinning brush system. The Sportworks rack has been designed with round tubing and round edges so that the wash brushes address surfaces that will not catch or tear them. Four types of conditions may cause excessive wear or harm to the bike rack or the wash system. None of these conditions should exist when running a bus with a bike rack through the wash facility: 1. The brushes are spinning at too slow of an RPM. This condition may allow the brushes to hook on protruding objects such as rear view mirrors. If the axle of the brush assembly pushes deep against the rack or any part of the bus that has any sort of ledge, it may become caught there. 2. The bus is traveling too fast through the wash system. This may cause the same type of damage as stated in number one, above. 3. The brush density is too low. There is less than the recommended number of brushes on the brush arm assembly. This is usually found when well-worn brushes are used for too long of a period. 4. The brushes are being turned into the bus path. Make sure the brushes are spinning so that they tend to climb up and over any protrusions they could catch on. See Figure 1. The illustration shows the recommended rotation for the brush assemblies. If the brush assembly is fixed to the driver s side, the brush needs to rotate counter-clockwise, as viewed from the top. If the brush assembly is mounted on the curb side, the brush assembly would need to rotate clockwise. When operating the wash facility in the recommended way, one should find no deterioration above regular wear and tear to the bus, the bike rack and the wash system. If this is not so, take time to examine the rack setup on the bus and the setup of the wash facility. Please consult Sportworks at if you are experiencing any further problems. 7
8 VISUAL INSPECTION 8
9 Visual Inspection Checklist Sportworks recommends the following quick visual inspection to ensure an operable bike rack. Use this page as an inspection sheet for your transit operators. Examine the 7 items below before operating your coach. If the bike rack does not function properly, service it before putting it into operation. 1) HEX CAP IS TIGHT Tighten by hand (preferably by tool) if required. 2) INSTRUCTION DECALS ARE LEGIBLE (3 PLACES) Replace if missing or damaged. 3) BOLTS ARE PRESENT SECURE ARMS TO FRAME (3 PLACES) Replace missing bolts. 4) MAGNETS ARE PRESENT (3 PLACES) Replace if missing. These magnets stow the hook arms. 5) HOOK ARMS SLIDE IN/ OUT (3 PLACES) Hooks move smoothly in/out and self-stow on magnet. DO NOT LUBRICATE. 6) LATCH HANDLE WORKS Latch is easy to release and does not get stuck. 7) BIKE RACK SWINGS FREELY AND LOCKS IN TWO POSITIONS Rack pivots and locks in both the deployed and stored positions. 9
10 MAINTENANCE The Bike Rack and its accompanying brackets require very little service. suggested maintenance checks are included below. Regular 10
11 30 Day General Maintenance Inspection & Service Check every 30 days to ensure that: 1. The rack swings freely and smoothly between the deployed and stored positions. 2. The release latch easily unlatches and does not stick in the release position. 3. The release latch automatically locks the rack in place when moved to the deployed or stored positions. 4. Each support arm hinge allows the support arm to raise and lower without undue constraint. Inspect Support Arm Clevis Pin located at the lower end of the Support Arm. Inspect for wear in the area that the pin contacts the square Support Arm Housing and also near the Split Ring. If wear is evident replace pin, washers and the split ring. 5. Inspect Support Arm Clevis Pin located at the lower end of the Support Arm. Inspect for wear in the area that the pin contacts the square Support Arm Housing and also near the Split Ring. If wear is evident replace pin, washers and the split ring. 6. Each support arm magnet properly mates with and holds the support arm. 7. Each support arm hook pulls out smoothly, stops at the stop screw, easily slides back into the stored position, and properly self-stows on the magnet when it is released. 8. Both pivot bolt assemblies are tight. If you see excessive wear or cracks in the bronze oilite bushings you must replace them immediately. Some cutaway vehicles tend to cause the bushings to wear more quickly. You can replace the originals with our heavy duty pivot bolt kit P/N for longer life. 9. All fasteners are tight on the mounting bracket, including the hardware for the support strap, quadrant, pivot plate to bracket pieces, and bracket pieces to bumper or coach body. 10. Torsion Springs do not interfere with rack deployment. Check Torsion Spring Wear Pad for excessive wear or loose attachment to frame. Check that Torsion Spring Pivot Bolts are tight. 11. The instruction labels on the rack are intact. Replace if shredded, partially removed, nonreadable, or not adhering properly. Clean the rack surface thoroughly (isopropyl alcohol) before replacing. Pay particular attention to the chain guard sticker. 12. If surface rust develops on stainless steel use naval jelly to remove. 11
Apex 3 Theory of Operation
 Apex 3 INSTALLATION & OVERVIEW... 2 Load Height... 2 Approach Angle... 2 Footprint... 3 Protrusion... 3 Mounting the Apex3... 4 General Torque Specs... 5 OPERATION OF BIKE RACK... 6 Loading Bikes... 6
LITERIDER 2&3 IMPORTANT WARNING. 2Bike (1x) Bolt (1x) Nut (1x) Small Hex Wrench (1x)
 Bolt (1x) Nut (1x) Small Hex Wrench (1x)") LITERIDER 2&3 3 Bike (1x) Bolt (1x) Flat Washer (2x) Nut (1x) Large Hex Wrench (1x) 2Bike (1x) wrench (1x) Small Hex Wrench (1x) keys (2x) Long Strap (1x) 2-Zip Strips (6x) 3-Zip Strips (9x) Wheel strap
LITERIDER 2&3 3 Bike (1x) Bolt (1x) Flat Washer (2x) Nut (1x) Large Hex Wrench (1x) 2Bike (1x) wrench (1x) Small Hex Wrench (1x) keys (2x) Long Strap (1x) 2-Zip Strips (6x) 3-Zip Strips (9x) Wheel strap
VERSA BIKE RACK INSTRUCTIONS
 VERSA BIKE RACK INSTRUCTIONS Models #8, 8 Important This rack is designed for use with a or. receiver hitch. The rack is designed to hold a maximum of two bicycles. Do not use it for anything other than
BRONZE BUSHING REPLACEMENT PROCEDURE DN345 & NL450C
 1 BRONZE BUSHING REPLACEMENT PROCEDURE V.2 12/3/2014 DN345 & NL450C 2 Safety Instructions Removing Walking Beams 3 1. Position spreader on a flat concrete surface capable of supporting weight of spreader
Santa Fe Cycles Assembly Guide Introduction
 Santa Fe Cycles Assembly Guide Introduction Congratulations on your purchase of your new Santa Fe bicycle. You have purchased a bicycle that has many features and qualities. Please take a few minutes and
HoldUp Plus2. Safety Kit included: See additional instructions for installation. REAR WHEEL TRAY. BASE (1x) lock WASHER (1x) KEY (2x) SAFETY CLIP (1x)
 lock WASHER (1x) KEY (2x) SAFETY CLIP (1x)") HoldUp Plus2 InsTAll This product on 2" hitch version of the HoldUp Front WHEEL TRAY assembly (1x) REAR WHEEL TRAY assembly (1x) wrench (1x) BASE (1x) bolt (8X) Lock WASHER (8X) Washer (8x) KEY (2x) SAFETY
HoldUp Plus2 InsTAll This product on 2" hitch version of the HoldUp Front WHEEL TRAY assembly (1x) REAR WHEEL TRAY assembly (1x) wrench (1x) BASE (1x) bolt (8X) Lock WASHER (8X) Washer (8x) KEY (2x) SAFETY
Important Note: Tighten lock nuts so the support tubes still swing freely see figure 2. There must be 1 2 threads of bolt past end of lock nuts.
 Kit Contents: DESCRIPTION QTY. DESCRIPTION QTY. 2 Shank Assembly 1 Support Tube Assembly 1 Side Tube - Short 2 1-1/4 Shank 1 Center Tube - Long 1 3/8-16 x 2.0 Carriage Bolt 2 5/16-18 x 2.25 Carriage Bolt
Ladies Shopper Bike Assembly Manual 28C03
 Ladies Shopper Bike Assembly Manual 28C03 Ecosmo Ltd 1 Know your bike 1. Wheel 2. Rear Derailleur 3. Chain 4. Crank Set 5. Pedal 6. Seat Quick Lock 7. Saddle and Post 8. Frame 9. Front Light 10. Front
EZee Glider Manual. Tools needed for Assembly: Wrench (included) Philips Screwdriver (not included) Assembly Instructions
 Philips Screwdriver (not included) Assembly Instructions") EZee Glider Manual Congratulations on your purchase of the EZee Glider! Your glider is designed for years of nearly carefree use by your child. These instructions include how to set up your glider and
EZee Glider Manual Congratulations on your purchase of the EZee Glider! Your glider is designed for years of nearly carefree use by your child. These instructions include how to set up your glider and
E-trike Li Assembly Guide
 PREPARATION 1. Read this assembly manual BEFORE commencing assembly. 2. Carefully remove all the components and packaged hardware from the shipping boxes. 3. Unpack the contents of the large double box
#59114 Rola 2-Bike Rack Carrier (Shown Assembled) (A) (C) (B)
 (A) (C) (B)") Use for Parts: #59114 Rola -Bike Rack System #59115 Rola 1-Bike Add-On TOOLS REQUIRED 10mm or 13/3 Socket & Wrench #59114 Rola -Bike Rack Carrier (Shown Assembled) Tray Attachment Hardware: (3) Plastic
Use for Parts: #59114 Rola -Bike Rack System #59115 Rola 1-Bike Add-On TOOLS REQUIRED 10mm or 13/3 Socket & Wrench #59114 Rola -Bike Rack Carrier (Shown Assembled) Tray Attachment Hardware: (3) Plastic
U.S. Patent No. 7,922,246. Patents Pending
 U.S. Patent No. 7,922,246 Patents Pending 2 Table of Contents Page General Information... 3 Warnings and Cautions... 4 Tools... 6 SmartDock Parts... 6 Initial Set-Up and Adjustment... 7 Select Valve Retaining
Bike Rack and Tire Carrier
 Bike Rack and Tire Carrier OWNER'S MANUAL Rev: 10.26.2017 Page 1 Bike Rack and Tire Carrier Owners Manual TABLE OF CONTENTS System 2 Description 2 Prior To Operation 3 Manual Slide-Out Bike Rack Operation
CRUZBIKE Quest 2.0 Assembly
 CRUZBIKE Quest 2.0 Assembly CRUZBIKE Quest 2.0 Assembly... 1 General notes on assembly... 2 Un box and evaluate the frame and major parts... 2 Unfold the rear swing arm and arrange the frame... 3 Rear
Assembly Instructions. -Cantilever Boat Lifts
 Assembly Instructions -Cantilever Boat Lifts Winch Instruction Page Safety Information 1. The winch is built for the multipurpose of hauling and lifting operations. It is not to be used as a hoist for
Mini Glider Manual. Your Glider comes partially assembled. The front wheel and the handlebars require assembly.
 Mini Glider Manual Congratulations on your purchase of the Mini Glider! Your glider is designed for years of nearly carefree use by your child. These instructions include how to set up your glider and
Tru Trak Sulky Proline Mid Size Mower Attachment
 Form No. -7 Tru Trak Sulky Proline Mid Size Mower Attachment Model No. 00 000000 and Up Operator s Manual Domestic English (EN) Contents Page Introduction................................ Safety.....................................
InstallatIon and owner s InstrUCtIons
 InstallatIon and owner s InstrUCtIons Wall Mount Series Adjustable and Fixed Height Goal Systems table of Contents Safety Instructions... 2 Goal Specifications... 3 Frame Attachment... 4 Frame Assembly
2,500/4,000 LB Easy Riser Vertical Cable Feighner Lift
 2,500/4,000 LB Easy Riser Vertical Cable Feighner Lift CAUTION - PUT SAFETY FIRST 1. Before attempting to install or operate this lift, study and fully understand the proper operating procedures and safety
Only. Gives You the TechLock. System Advantage ASSEMBLY, DISASSEMBLY AND TROUBLESHOOTING INSTRUCTIONS FOR 3000 SERIES FONTAINE
 April 00 Only Gives You the TechLock System Advantage ASSEMBLY, DISASSEMBLY AND TROUBLESHOOTING INSTRUCTIONS FOR 000 SERIES FONTAINE C o n n e c t y o u r b u s i n e s s w i t h F O N T A I N E April
Assembly Instructions And User Guide
 EZ-1/EZ-CLASSIC QUADRIBENT By Blackbird Designs Inc. Mark 5.2 June 2011 Assembly Instructions And User Guide 1 The Quadribent is 2-seat, side-by-side, human powered vehicle that enables almost anyone to
Final Assembly Instructions Bikes with Threaded Headsets
 Final Assembly Instructions Bikes with Threaded Headsets Thank you for buying your new bicycle from L.L.Bean. Read these instructions carefully before beginning the final assembly. Prior to shipping, our
Thank you for purchasing a Porta-Dock product! *Please read and follow these instructions step by step*
 PG 1 OF 9 PORTA-DOCK, INC. 74A ABL/APW 1056 & 44A FLB APW 1056 PORTA-LIFT Thank you for purchasing a Porta-Dock product! *Please read and follow these instructions step by step* STEP 1. Separate and group
Parts List. 7. Handlebars 8. Grips 9. Handlebar Stem 10. Front Brake 11. Front Wheel 12. Crank 13. Chain
 Woodworm Cruise Parts List 1. Free Wheel with Rear Hub 2. Fenders 3. Fender Stay 4. Quick Release 5. Saddle 6. Seat Post 7. Handlebars 8. Grips 9. Handlebar Stem 10. Front Brake 11. Front Wheel 12. Crank
BackCountry ebikes 2019 MULE Assembly
 BackCountry ebikes 2019 MULE Assembly Required Tools: Cutting Pliers (to cut box poly strapping and heavy bike banding) Scissors (to remove bubble wrap) Allen wrenches (3mm, 4mm, 5mm, 6mm) Wrenches (10mm,
Parts: Included in the parts box: Inner Rear Tire Tray. Inner Front Tire Tray. Trail Doc Clamp. Pivot Assembly. Trail Doc Post.
 NV 2.0 2 Parts: Outer Front Tire Tray Inner Front Tire Tray Outer Rear Tire Tray Inner Rear Tire Tray Pivot Assembly Trail Doc Clamp Trail Doc Post Included in the parts box: 6mm Allen Wrench M6 Lock Washer
VL 2K LIFT D-L WINCH INSTRUCTIONS (Applies to P/Ns , , , , , )
") VL 2K LIFT D-L WINCH INSTRUCTIONS (Applies to P/Ns 3714022, 3714028, 3714034, 3714040, 3714043, 3714046) REIMANN & GEORGER CORPORATION MARINE PRODUCTS BUFFALO, NY P/N 6112103 04/09/18 1 SAFETY 1.1 INTRODUCTION
VL 2K LIFT D-L WINCH INSTRUCTIONS (Applies to P/Ns 3714022, 3714028, 3714034, 3714040, 3714043, 3714046) REIMANN & GEORGER CORPORATION MARINE PRODUCTS BUFFALO, NY P/N 6112103 04/09/18 1 SAFETY 1.1 INTRODUCTION
DM-MARD (English) Dealer's Manual. ROAD MTB Trekking. City Touring/ Comfort Bike REAR DERAILLEUR XTR RD-M9100 RD-M9120
 Dealer's Manual. ROAD MTB Trekking. City Touring/ Comfort Bike REAR DERAILLEUR XTR RD-M9100 RD-M9120") (English) DM-MARD001-00 Dealer's Manual ROAD MTB Trekking City Touring/ Comfort Bike URBAN SPORT E-BIKE REAR DERAILLEUR XTR RD-M9100 RD-M9120 CONTENTS CONTENTS...2 IMPORTANT NOTICE...3 TO ENSURE SAFETY...4
(English) DM-MARD001-00 Dealer's Manual ROAD MTB Trekking City Touring/ Comfort Bike URBAN SPORT E-BIKE REAR DERAILLEUR XTR RD-M9100 RD-M9120 CONTENTS CONTENTS...2 IMPORTANT NOTICE...3 TO ENSURE SAFETY...4
INSTALLATION INSTRUCTIONS
 KIT CONTENTS: INSTALLATION INSTRUCTIONS PART NUMBER: DESCRIPTION: E361SXA302 roof MOUNT BICycle CARRIER SINGLE Short Carriage Bolt 1x Long Carriage Bolt 3x Over-Molded Wrench 1x Button Head Screw 2x Washer
TRAILMATE METEOR ASSEMBLY MANUAL
 TRAILMATE METEOR ASSEMBLY MANUAL (DISC BRAKE VERSION) The Trailmate Meteor recumbent has been designed for easy assembly. This means more time to enjoy the smooth ride with single speed, 3 speed coaster
The Hub Bike Co-Op s Quick Guide to Winter Specific Maintenance and Riding:
 The Hub Bike Co-Op s Quick Guide to Winter Specific Maintenance and Riding: BEFORE winter begins Thoroughly clean the bike with a dry rag or soapy water Apply a frame polish or wax to help protect the
USER S MANUAL QUESTIONS? CAUTION. Model No. FMEX Serial No. Write the serial number in the space above for reference. Serial Number Decal
 Model No. FMEX81110.0 Serial No. Write the serial number in the space above for reference. USER S MANUAL Serial Number Decal QUESTIONS? If you have questions, or if parts are damaged or missing, please
Quattrocycle BV. Quattrocycle. User Manual. Last update February Quattrocycle BV Bremkant EJ Middelbeers. User Manual Quattrocycle 1
 Quattrocycle User Manual Last update February 2010 Quattrocycle BV Bremkant 6 5091 EJ Middelbeers User Manual Quattrocycle 1 Table of Contents Page Chapter 1: Introduction 3 Chapter 2: Instructions for
Final Assembly Instructions Bikes with Quill Stems
 Final Assembly Instructions Bikes with Quill Stems Thank you for buying your new bicycle from L.L.Bean. Read these instructions carefully before beginning the final assembly. Prior to shipping, our expert
model - CYPRESS DX W
 Contents model - CYPRESS DX W Maintenenace manual Read and Save these instructions Welcome Contents 1 Preparing Nothing makes us happier than seeing people out riding bikes. For over thirty years Giant
INSTALLATION INSTRUCTIONS
 INSTALLATION INSTRUCTIONS KIT CONTENTS: PART NUMBER: DESCRIPTION: E361SXA300 ROOF MOUNT BICYCLE CARRIER B9 TRIBECA Short Carriage Bolt Long Carriage Bolt 3x Over-Molded Wrench Button Head Screw 2x Washer
7130 Lancer Rear Drive Magnetic Commercial Indoor Cycling Bike
 7130 Lancer Rear Drive Magnetic Commercial Indoor Cycling Bike Owner s Manual Made in Taiwan INDEX IMPORTANT SAFETY INFORMATION... 1 EXPLODED DRAWING... 2 PARTS LIST... 3 ASSEMBLY INSTRUCTION... 4-9 USER
FIRST TEAM SPORTS, INC Storm Portable Series Assembly Instructions
 FIRST TEAM SPORTS, INC Storm Portable Series Assembly Instructions WARNING! WARNING! WARNING! THIS BASKETBALL SYSTEM IS SPRING LOADED AND SHIPPED UNDER TENSION. ATTEMPTING TO ASSEMBLE OR DISASSEMBLE ANY
Thank you for purchasing a WIKE BOX BIKE!
 Thank you for purchasing a WIKE BOX BIKE! Contents Safety.....3 Front wheel.4 Kickstand..5 Handle Bar & Box 6 Seat post and Saddle 7 Final pre-ride check 8 Tools needed to assemble Bike: -High table or
Retractable Security Cover for a Swim Spa
 Parts List Retractable Security Cover Kit 3" PVC pipe Leading edge Cover Track (pre-attached to Swim Spa) Optional cover pump (for outdoor installations) Rocky Roller Kit 2 Roller A-Frame Brackets 1/2"
Shoreline Cantilever Lift 2500lb Capacity Models: (108" inside width) - Part # (120" inside width) - Part #
 - Part # (120 inside width) - Part #") Shoreline Cantilever Lift 2500lb Capacity Models: 25108 (108" inside width) - Part # 1017402 25120 (120" inside width) - Part # 1017403 1. 2. 3. 4. 5. CAUTION - PUT SAFETY FIRST Before attempting to install
Shoreline Cantilever Lift 2500lb Capacity Models: 25108 (108" inside width) - Part # 1017402 25120 (120" inside width) - Part # 1017403 1. 2. 3. 4. 5. CAUTION - PUT SAFETY FIRST Before attempting to install
CLASS CYCLE P8000 OWNER'S MANUAL JOHNSON HEALTH TECH. CO., LTD.
 CLASS CYCLE P8000 JOHNSON HEALTH TECH. CO., LTD. No.26, Ching Chuan Rd., Taya Hsiang, Taichung Hsien 428, Taiwan, R.O.C. TEL: +886-4-2566700 FAX: +886-4-2560087 E-mail: sales@johnsonfitness.com http://www.johnsonfitness.com
Vac Bagger Wheelhorse 42 and 48 Mowers for Classic Garden Tractors
 Form No. -80 Vac Bagger Wheelhorse and 8 Mowers for Classic Garden Tractors Model No. 790 000000 & Up Operator s Manual Domestic English (EN) Contents Page Introduction................................
HOME ASSEMBLY INSTRUCTIONS
 HOME ASSEMBLY INSTRUCTIONS This Papillionaire Bicycle now belongs to you. It will take you to work, wait patiently outside your local cafe, and carry your groceries home. This is the start of your long-term
8MAY15 US RACK, Inc Falcon Drive, Madera, CA
 8MAY15 US RACK, Inc. - 2850 Falcon Drive, Madera, CA 93637-559-661-3050 INSTRUCTIONS for Bedrail-mounted MOTORCYCLE RACK, Model 2001-4TRA WARNING: Do NOT attempt to install or use this rack without following
SERIES 2 RAMP OWNER S MANUAL TOOLS REQUIRED: BEFORE YOU BEGIN... Read and understand these instructions before beginning a ramp setup.
 SERIES 2 RAMP OWNER S MANUAL BEFORE YOU BEGIN... Read and understand these instructions before beginning a ramp setup. Use caution and care for your back when lifting, pushing, pulling, folding or unfolding
Bike Rack and Spare Tire Carrier 1-1/4" Receiver
 Bike Rack and Spare Tire Carrier 1-1/4" Receiver OWNER'S MANUAL Rev: 11.15.2017 Page 1 Bike Tire Carrier 1.25 Owners Manual TABLE OF CONTENTS Safety Information 2 Product Information 2 Installation 3 Installation
BICYCLE TO MOTORCYCLE BICYCLE RACK
 BICYCLE TO MOTORCYCLE BICYCLE RACK Install Manual Warning: You are responsible for securing the rack to your motorcycle., checking the attachments prior to use and periodically inspecting the products
GRAVITY BIKE RACK ASSEMBLY & OPERATING INSTRUCTIONS
 GRAVITY BIKE RACK 94479 ASSEMBLY & OPERATING INSTRUCTIONS Due to continuing improvement, actual product may differ slightly from the product described herein. 3491 Mission Oaks Blvd., Camarillo, CA 93011
SG-7R46 SG-7R45 BR-IM41-R CJ-7S40 WARNING CAUTION SERVICE INSTRUCTIONS. Inter-7 Hub. Inter-M Brake Cassette joint NOTE:
 t WARNING It is important to completely understand the operation of your bicycle's brake system. Improper use of your bicycle's brake system may result in a loss of control or an accident, which could
Nautique Triton Clamping Board Rack V2
 w w w.ro swe l l marine.co m Nautique Triton Clamping Board Rack V2 Installation & Usage Instructions Part # C917-180045 Information: info@roswellmarine.com If you have any questions please call : 1-21-68-11
Have questions? Chat with us live at raleighusa.com or call us at , 8am 5pm PST
 1 2 Have questions? Chat with us live at raleighusa.com or call us at 1-800-251-8435, 8am 5pm PST The bicycle you have purchased is a complex piece of equipment that must be properly assembled and maintained
Final Assembly Instructions Bikes with Threaded Headsets
 Final Assembly Instructions Bikes with Threaded Headsets Thank you for buying your new bicycle from L.L.Bean. Read these instructions carefully before beginning the final assembly. Prior to shipping, our
OWNERS MANUAL. Foldable Topside Creeper Model ATD-8116F
 OWNERS MANUAL Foldable Topside Creeper Model ATD-8116F Please read and understand all safety advisories and operating instruction in this manual to ensure safe and productive operation of your new Topside
SETTING THE HANDLE HEIGHT ON THE ROLLATOR
 Model No: Maximum User Weight: 10910C (Lightweight) 10928C (Heavy duty) 125kg (20st) (Lightweight) 170kg (27st) (Heavy duty) Height of handles: 780-915mm (30.5-36 ) (Lightweight) 790-930mm (31-36.5 ) (Heavy
Navaro Buggy Instruction Manual INSTRUCTION BOOKLET
 INSTRUCTION BOOKLET Safety Thank you for purchasing your new Flexifoil buggy. If operated and looked after properly, your new buggy will serve you well. Before assembling and using this buggy, you must
INSTALLATION INSTRUCTIONS
 INSTALLATION INSTRUCTIONS Accessory P/N 08L07-E09-100 Application 2013 ODYSSEY Publications No. AII 13265 Issue Date AUG 2012 Put this information in the glove box with the vehicle owner s manual. PARTS
INSTALLATION INSTRUCTIONS
 INSTALLATION INSTRUCTIONS Accessory (ROOF) P/N 08L07-E09-100 Application 6 PILOT Publications No. Issue Date JUN 5 PARTS LIST 6 Washers Bicycle attachment 2 Brackets Hex wrench 4 Knobs 2 Keys 1 Rear Bracket
BELT DRIVE PREMIUM INDOOR CYCLING BIKE SF-B1509 USER MANUAL
 BELT DRIVE PREMIUM INDOOR CYCLING BIKE SF-B1509 USER MANUAL IMPORTANT! Read all instructions carefully before using this product. Retain owner s manual for future reference. For customer service, please
80 SERIES MOBILE-KARRIERS. The Specialist In Drum Handling Equipment OPERATOR S MANUAL FOR MORSE 80 SERIES
 OPERATOR S MANUAL FOR MORSE Model 80A and 80A-M for 55 gallon standard steel drums (22½ diameter) Model 80C for steel or fiber drums (21-23 diameter) Model 80i for 55 gallon steel drum (22-½ diameter).
VL PONTOON/TRITOON DECK BRACKET 13 INSTRUCTIONS
 VL PONTOON/TRITOON DECK BRACKET 13 INSTRUCTIONS REIMANN & GEORGER CORPORATION MARINE PRODUCTS BUFFALO, NY P/N 6112--- 01/08/14 TABLE OF CONTENTS CHAPTER TITLE PAGE 1 SAFETY... 1 1.1 Introduction... 1 1.2
Instruction Manual for ZY-021 Height adjustable Acrylic Backboard with Chain net
 Instruction Manual for ZY-021 Height adjustable Acrylic Backboard with Chain net WARNING: IMPROPER INSTALLATION OR SWINGING ON THE RING MAY CAUSE SERIOUS INJURY OR DEATH Notice to assemblers: All basketball
FRAME FEATURES TABLE OF CONTENTS INTRODUCTION. A guide to your Cervélo C Series frame.
 C SERIES MANUAL TABLE OF CONTENTS Introduction...1 Frame Features...2 Fork Preparation...3 Small Parts...5 Frame Preparation...6 Brake Housing Installation...7 Mechanical Cable Routing...9 Electric Cable
Operator s Manual. All-Terrain Wheelchair
 Operator s Manual All-Terrain Wheelchair By Brandon Calavan Ana Groff Steve Benn Dylan Rinker Sebastian Pineo Team 1 Faculty Advisor: John Enderle Teaching Assistant: Sarah Brittain Client: Melody Kettle
L810. Owner s Operating and. Maintenance Manual. For Standard Wheelchairs
 L810 Owner s Operating and Maintenance Manual For Standard Wheelchairs Introduction Standard wheelchairs are the result of extensive engineering research, and rigid quality assurance testing. Every new
TRANSIT TOUGH BIKE RACKS
 TRANSIT TOUGH BIKE RACKS WHY SPORTWORKS? Sportworks began designing and manufacturing the Bike-Rack-for-Buses over 23 years ago. Since then, we ve learned a lot about making these racks, safe, secure,
Have questions? Chat with us live at raleighusa.com or call us at , 8am 5pm PST
 1 2 Have questions? Chat with us live at raleighusa.com or call us at 1-800-251-8435, 8am 5pm PST The bicycle you have purchased is a complex piece of equipment that must be properly assembled and maintained
Final Assembly Instructions Bikes with 16 Wheel Size
 Final Assembly Instructions Bikes with 16 Wheel Size Thank you for buying your new bicycle from L.L.Bean. Read these instructions carefully before beginning the final assembly. Prior to shipping, our expert
Stand-N-Fish FULL DETAIL INSTALLATION INSTRUCTIONS
 1 Stand-N-Fish FULL DETAIL INSTALLATION INSTRUCTIONS Thank you for purchasing the incredible new Stand-N-Fish Kayak Fishing System. Once installed on your kayak the Stand-N-Fish will take your kayak fishing
RS Important Notes. Contact. Bicycle Maintenance Stand instructions manual. Warranty Period : 1 year (from the date of your purchase)
") Warranty Period : 1 year (from the date of your purchase) RS-1700 Bicycle Maintenance Stand instructions manual (ver.1.2 2016/12) For more details, read the attached "Minoura Limited Warranty Policy" card.
Warranty Period : 1 year (from the date of your purchase) RS-1700 Bicycle Maintenance Stand instructions manual (ver.1.2 2016/12) For more details, read the attached "Minoura Limited Warranty Policy" card.
FLEXI GATE WITH SMALL PET DOOR READ ALL INSTRUCTIONS BEFORE ASSEMBLY AND USE OF GATE. KEEP INSTRUCTIONS FOR FUTURE USE.
 OWNER S MANUAL MODEL: 1510, 1510HPW FLEXI GATE WITH SMALL PET DOOR! READ ALL INSTRUCTIONS BEFORE ASSEMBLY AND USE OF GATE. KEEP INSTRUCTIONS FOR FUTURE USE. www.carlsonpetproducts.com Carlson Pet Products,
MAGNETIC INDOOR CYCLING BIKE
 MAGNETIC INDOOR CYCLING BIKE SF-B1805 USER MANUAL IMPORTANT! Please retain owner s manual for maintenance and adjustment instructions. Your satisfaction is very important to us, PLEASE DO NOT RETURN UNTIL
HELMETS SAVE LIVES!!! ALWAYS WEAR A PROPERLY FITTED HELMET WHEN YOU RIDE YOUR SCOOTER. DO NOT RIDE AT NIGHT. AVOID RIDING IN WET CONDITIONS.
 HELMETS SAVE CORRECT FITTING - MAKE SURE YOUR HELMET COVERS YOUR FOREHEAD. LIVES!!! ALWAYS WEAR A PROPERLY FITTED HELMET WHEN YOU RIDE YOUR SCOOTER. DO NOT RIDE AT NIGHT. AVOID RIDING IN WET CONDITIONS.
Item N o.: Item N am e:southern Star 40cm Girls Cherry Bike
 Item N o.:42174868 Item N am e:southern Star 40cm Girls Cherry Bike Tighten them so they do not move and are horizontal. Check the handlebar is in good condition and the ends of the handlebar are
44in Side Discharge Mower for Wheel Horse XL 440H Lawn Tractors Model No Serial No and Up
 Form No. 5-8 in Side Discharge Mower for Wheel Horse XL 0H Lawn Tractors Model No. 790 Serial No. 5000000 and Up Operator s Manual Register your product at www.toro.com Original Instructions (EN) Contents
ALTERNATOR RACKS 135, 170 & 190 INSTRUCTIONS
 Figure A Item # Description Quantity 1 Alternator Rack 1 1 3 4 11 5 10 8 2 Lower Mount Kit (see detail) 2 3 16mm M5 Swivel-Mount Bolt 2 4 M7 Washer 2 5 M6 Lock Nut 2 6 Lock Washer 2 7 Swivel Mount 2 8
comfort without compromising on performance and to fit your various needs on touring,
 Congratulations on your purchase of Goal-26X. Goal-26X is made to enhance comfort without compromising on performance and to fit your various needs on touring, shopping and communicating. Let s have fun
Have questions? Chat with us live at raleighusa.com or call us at , 8am 5pm PST
 1 2 Have questions? Chat with us live at raleighusa.com or call us at 1-800-251-8435, 8am 5pm PST The bicycle you have purchased is a complex piece of equipment that must be properly assembled and maintained
user manual hard eddie
 user manual hard eddie Welcome to the family AT INTENSE, WE HAVE ONE GOAL - TO PROVIDE THE RIDE OF YOUR LIFE. Our team of designers, engineers and product experts are focused on one thing every day: your
Rhino-Rack Mountain Trail Bike Carrier (RBC035)
") Important: Please read these instructions carefully prior to installation. Please refer to your fitting instruction to ensure that the bike rack is installed in the correct locations. Check the contents
Important: Please read these instructions carefully prior to installation. Please refer to your fitting instruction to ensure that the bike rack is installed in the correct locations. Check the contents
Folding Dual Suspension MTB. Instruction Manual
 Folding Dual Suspension MTB Instruction Manual Introduction The Stowabike Folding MTB has been made to last and with proper maintenance, it will give you years of enjoyable rides and journeys. The following
Pressure Dump Valve Service Kit for Series 2300 Units
 Instruction Sheet Pressure Dump Valve Service Kit for Series 00 Units. Overview The Nordson pressure dump valve is used to relieve hydraulic pressure instantly in Series 00 applicator tanks when the unit
DM-RCWH (English) Dealer's Manual. ROAD MTB Trekking. City Touring/ Comfort Bike. Wheel Set. WH-RX31 SM-AX x12 SM-AX x12
 Dealer's Manual. ROAD MTB Trekking. City Touring/ Comfort Bike. Wheel Set. WH-RX31 SM-AX x12 SM-AX x12") (English) DM-RCWH001-00 Dealer's Manual ROAD MTB Trekking City Touring/ Comfort Bike URBAN SPORT E-BIKE Wheel Set WH-RX31 SM-AX720-100x12 SM-AX720-142x12 CONTENTS IMPORTANT NOTICE... 3 TO ENSURE SAFETY...
(English) DM-RCWH001-00 Dealer's Manual ROAD MTB Trekking City Touring/ Comfort Bike URBAN SPORT E-BIKE Wheel Set WH-RX31 SM-AX720-100x12 SM-AX720-142x12 CONTENTS IMPORTANT NOTICE... 3 TO ENSURE SAFETY...
GM-121: Container End Lock Anchor Wand Page 1 WINSAFE CORP. GM 121 CONTAINER END LOCK ANCHOR WAND OPERATING INSTRUCTIONS AND MAINTENANCE
 GM-121: Container End Lock Anchor Wand Page 1 WINSAFE CORP. GM 121 CONTAINER END LOCK ANCHOR WAND OPERATING INSTRUCTIONS AND MAINTENANCE US Patent No. 6834745 This equipment conforms to 0321 EN795:1996
C - SERIES. Height Adjustable Portable Goal Supports. Installation & Owner s Instructions C1000 C2000. Made in the USA
 C - SERIES Height Adjustable Portable Goal Supports C1000 C2000 Installation & Owner s Instructions Made in the USA This manual explains the proper installation, operation, and maintenance of your Schutt
Magnetic Bike. Model No: AENERGISER BODY WORX. Retain this owner s manual for future reference Read and follow all instructions in this owner s manual
 BODY WORX Magnetic Bike Model No: AENERGISER Retain this owner s manual for future reference Read and follow all instructions in this owner s manual Version A 1 EXPLODE DRAWING -02- PARTS LIST AND TOOLS
GM-120: Container Top Lock Anchor Wand Page 1 WINSAFE CORP. GM 120 CONTAINER TOP LOCK ANCHOR WAND OPERATING INSTRUCTIONS AND MAINTENANCE
 GM-120: Container Top Lock Anchor Wand Page 1 WINSAFE CORP. GM 120 CONTAINER TOP LOCK ANCHOR WAND OPERATING INSTRUCTIONS AND MAINTENANCE US Patent No. 6834745 This equipment conforms to 0321 EN795:1996
THOR 10 HAMMER CAGE INSTRUCTIONS
 75 " 7m 78 4" m 6" 8.8m 45 ".70m 4.9deg 6 4" 6m 44 4".67m 75 " 7m 9 4" 0m 44".m 497 4".64m The 70, Thor Hammer Cage, consists of four heavy duty aluminum net poles. The unique pole structure reduces the
Item N o.: Item N am e:40cm Boys Rival Bike
 Item N o.:42272892 Item N am e:40cm Boys Rival Bike 9 bell 8 grip 30 crash pad 10 brake lever 26 wheel reflector 22 saddle 23 seat post 25 rear reflector 24 quick release 6 handle bar 7 stem 2 top tube
Rocky Mountain Element Technical Manual. Rev B
 Rocky Mountain Element Technical Manual Rev B 1 Table of Contents Materials Required... 3 Suspension Pivot Torque Guide... 4 Small Parts Torque Guide... 5 Assembly Instructions... 6 1) Bearing Installation...
ST Shimano Total Integration. Technical Service Instructions. General Safety Information SI-6CT0B
 Technical Service Instructions SI-6CT0B t ST-4400 Shimano Total Integration Shimano Total Integration Features The Shimano Total Integration TIAGRA series features a dual action control lever which actuates
Fontaine Fifth Wheel Ultra LT Rebuild Procedures
 Fontaine Fifth Wheel Ultra LT Rebuild Procedures Disassembly Assembly Adjustments 800-874-9780 2010 LT-147 January 2010 Dissassembly Cover plate removed for clarity. Refer to exploded view of assembly
DM-RD (English) Dealer s Manual. ROAD Rear Derailleur RD-9000 RD-6800 RD-5800 RD-4700
 Dealer s Manual. ROAD Rear Derailleur RD-9000 RD-6800 RD-5800 RD-4700") (English) DM-RD0003-09 ROAD Rear Derailleur Dealer s Manual RD-9000 RD-6800 RD-5800 RD-4700 CONTENTS IMPORTANT NOTICE...3 TO ENSURE SAFETY...4 LIST OF TOOLS TO BE USED...6 INSTALLATION...8 Chain length...
(English) DM-RD0003-09 ROAD Rear Derailleur Dealer s Manual RD-9000 RD-6800 RD-5800 RD-4700 CONTENTS IMPORTANT NOTICE...3 TO ENSURE SAFETY...4 LIST OF TOOLS TO BE USED...6 INSTALLATION...8 Chain length...
Cantilever Brake. Dealer's Manual. ROAD MTB Trekking. City Touring/ Comfort Bike
 (English) DM-RCBR001-00 Dealer's Manual ROAD MTB Trekking City Touring/ Comfort Bike URBAN SPORT E-BIKE Cantilever Brake BR-CX70 BR-CX50 BL-4700 BL-4600 BL-R780 BL-R3000 ST-7900 ST-6700 ST-5700 ST-4600
Universal Elevator Mount Owners Manual Customer Service Center N53 W24700 South Corporate Circle Sussex, WI U.S.A.
 REQUIRED TOOLS AND MATERIALS: 2 Capable Adults Carpenter s Level 15 Tape Measure Pencil Universal Elevator Mount Owners Manual Customer Service Center N53 W2400 South Corporate Circle Sussex, WI 530 U.S.A.
Trike-Bike Assembly Manual
 Be sure to check our website for more instruction details, videos and photographs as well as a complete listing of each Nut and Bolt for the Trike Bike. www.trike-bike.com.au Go to the page marked ASSEMBLY
SPINNER RIDE GETTING STARTED GUIDE. Welcome to a personalized fitness experience for your members
 This addendum accompanies your equipment documentation and is additional information concerning the heart rate features for your equipment and console. Important The heart rate feature is intended for
310 SERIES TILT-TO-LOAD ROTATOR. The Specialist In Drum Handling Equipment
 OPERATOR S MANUAL FOR MORSE TILT-TO-LOAD DRUM ROTATOR SAFETY INFORMATION: While Morse Manufacturing Co. drum handling equipment is engineered for safety and efficiency, a high degree of responsibility
BELT DRIVE INDOOR CYCLING BIKE SF-B1712 USER MANUAL
 BELT DRIVE INDOOR CYCLING BIKE SF-B1712 USER MANUAL IMPORTANT! Please retain owner s manual for maintenance and adjustment instructions. Your satisfaction is very important to us, PLEASE DO NOT RETURN
Operation Manual Guillotine Cutter RC-5
 Operation Manual Guillotine Cutter RC-5 Technical Specifications General Safety/Operating Instructions Using the Guillotine Cutter/Crimper Blade Change Instructions Maintenance Instructions This is a detailed