8 free amigurumi patterns for beginners and intermediate crocheters.
|
|
|
- Alannah Holmes
- 6 years ago
- Views:
Transcription


1 8 free amigurumi patterns for beginners and intermediate crocheters. CROCHET PATTERNs BY
2 Table of contents Abbreviations in US terms Abbreviations...2 General instructions...2 Tutorial : the invisible finish (Inv.FO) and the invisible color change (INV.CC) Mad fluffy Bunnies...4 Tutorial : How to embroider details Valentine Bunnies Tinycorn TinyPegasus Ghosty, Casper s cousin Star Wars Lightsabers Minibuddies : girls Minibuddies : boys...19 st ch slst sc MR rep rnd stitch(es) chain slip stitch single crochet magic ring repeat previous round instructions round inc make 2 sc in the next stitch (increase) dec single crochet 2 stitches together (I use the invisible decrease technique but sc2tog would do just fine) hdc half double crochet dc double crochet dc2tog double crochet 2 stitches together dc3tog double crochet 3 stitches together BLO back loop only FLO front loop only FO fasten off inv.fo invisible finish of (see p3) Inv.CC Invisible color change (see p3) 9. Lil Agnes (Despicable me)...20 (...,...)*x repeat x number of times the instructions between brackets General instructions These patterns are worked in continuous round : do not join or turn unless stated otherwise. Mark the last stitch of the round with your stitch marker in order to check that you ve made the right amount of stitches in the round. You ll see that the increases and decreases of the patterns are shifted from one row to another. That s to avoid the small line that shows when you keep on making your increases and decreases at the same place. If you print this pattern, you can tick the to help you get your bearings. 2/25

. Skip a stitch and insert it in the next one from front to back (pic.2).")
.")
.")

.")
3 Invisible color change (Inv.CC) pic.1 pic.2 pic.3 pic.4 First, make an invisible finish (inv.fo) : break free from the yarn then thread it on your tapestry needle (pic.1). Skip a stitch and insert it in the next one from front to back (pic.2). Then, insert it back in the back loop of the stitch your thread came out from at first (pic.3). Pull the thread gently until your fake stitch has the same size as the others (pic.4). Wave in the end on the wrong side being careful not to pull the thread more. [video] How to make an invisible finish pic.5 pic.6 pic.7 pic.8 Then, introduce the new color : make a slipknot with the new color yarn (pic.5). Insert your hook through the slipknot and a stitch of your work (pic.6), then make a regular single crochet (pic.7)- this count as the first single crochet of the row. You can now carry on with the instructions of the pattern. [video] How to introduce a new color 3/25
- the weight doesn t matter it will only change the size of your bunnies.")
 A tapestry needle (or yarn needle) A stitch marker Stuffing (fiberfill) Black safety eyes (I used oval ones but round will do as well!")
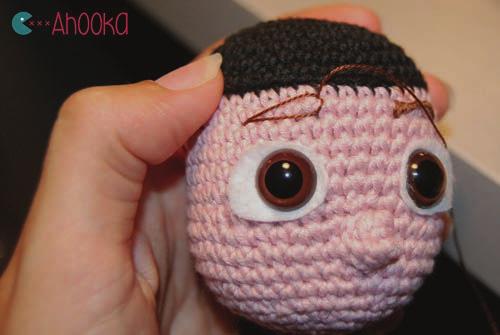
4 Mad Fluffy bunnies Skill level Beginner : You need to know how to single crochet, make a magic ring, how to increase, decrease, sew an open piece to a closed one. Materials The pattern 100% acrylic yarn (if you use cotton yarn you won t be able to make it fluffy)- the weight doesn t matter it will only change the size of your bunnies. A crochet hook adapted to the yarn you chose. I used a 3.25 mm hook (D) A tapestry needle (or yarn needle) A stitch marker Stuffing (fiberfill) Black safety eyes (I used oval ones but round will do as well!) A pet brush (or a comb if you don t have one) (Optional) Black and white acrylic yarn (to embroider the mouth), a white marker ( to add a white dot on the eyes) Body Rnd 1: sc6 in a MR(6) Rnd 2: inc*6 (12) Rnd 3: (sc, inc)*6 (18) Rnd 4: sc, inc, (sc2, inc)*5, sc (24) Rnd 5: sc in each st around (24) Rnd 6: rep (24) Rnd 7: rep (24) Rnd 8: sc5, dec, sc10, dec, sc5(22) Rnd 9: (sc9, dec)*2 (20) Start stuffing, then continue as you go. Rnd 10: sc4, dec, sc8, dec, sc4 (18) Rnd 11: (sc7, dec)*2 (16) Insert safety eyes between Rnd 10 and 11. Rnd 12: sc3, dec, sc6, dec, sc3 (14) Rnd 13: (sc5, dec)*2 (12) Rnd 14: dec*6 (6) FO, weave the yarn tail through the front loop of each remaining stitches and pull it tight in order to close off the head. Approx size : 7.5 cm high (3.inches) with a D hook (3.25mm hook) 4/25
 Rnd 4: rep (6) Rnd 5: rep (6) Rnd 6: rep (6) Rnd 7: rep (6) How")


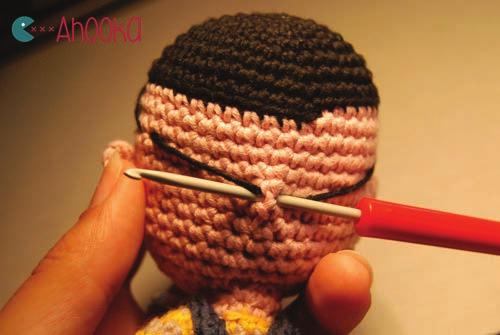
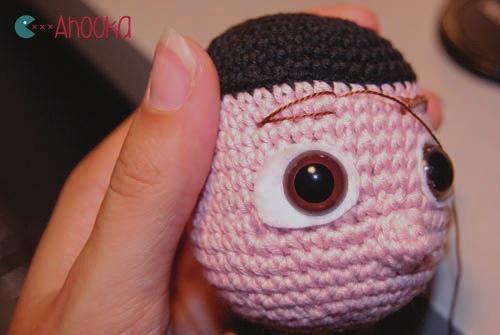
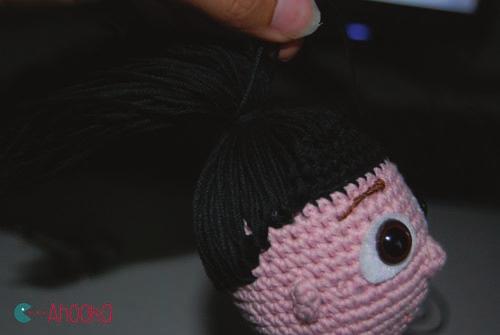
5 Ears (make2) Rnd 1: sc3 in a MR(6) Rnd 2: inc*3 (6) Rnd 3: sc in each st around (6) Rnd 4: rep (6) Rnd 5: rep (6) Rnd 6: rep (6) Rnd 7: rep (6) How to embroider details - Cut a long strand of yarn and insert it in your amigurumi from the back and let the yarn hang a bit. FO, leave a long tail for sewing. Tail You can add a little tail by making a little Pompom! They are plenty of tutorials to make them on the Internet. Here is one I found easy to understand : Pom-Pom - Pull your needle through your amigurumi to the starting point of the embroidery and embroider the detail you want (here, the mouth). - When you re done, go through your amigurumi again to reach the exact same place where your yarn is still hanging. - Tie in a knot and cut the excess of yarn. Assembling Brush the body and the ears with the pet brush in order to make them fluffy then sew the ears on top of the body. Customization ideas - Push the knot inside your amigurumi with your needle. Cut a little heart in the red felt then glue it or sew it on the body Try and change the eyes placement Add a white dot on the eyes to brighten the look Embroider different sorts of mouths (if you don t know how, check the tutorial on the right) Note: it s very important to get the yarn out at the exact same place it went in, or you won t be able to push the knot inside the amigurumi! 5/25


 Pink felt (for the ears) and red felt (for the heart) Textile or wood glue, or sewing thread and needle Cheek blush Sydonie The pattern Body (Sydonie")

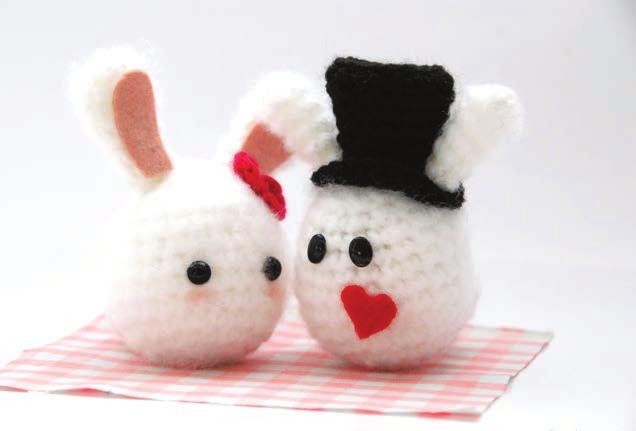
6 Valentine bunnies Edmond Skill level Beginner : You need to know how to single crochet, double crochet, make a magic ring, how to increase, decrease, crochet in the back loop or in the front loop only, sew an open piece to a closed one. Materials 100% acrylic white and black yarn, plus a bit of red (if you use cotton yarn you won t be able to make it fluffy)- the weight doesn t matter it will only change the size of your bunnies. A crochet hook adapted to the yarn you chose. I used a 3.25 mm hook (D) A tapestry needle (or yarn needle) A stitch marker Stuffing (fiberfill) Black safety eyes (round or ovals) A pet brush (or a comb if you don t have one) Pink felt (for the ears) and red felt (for the heart) Textile or wood glue, or sewing thread and needle Cheek blush Sydonie The pattern Body (Sydonie and Edmond) See page 5, their body is the same as the mad bunnies except for Sydonie s eyes which should be placed between Rnd 7 and 8 rather then between Rnd 10 and 11. Tail (Sydonie and Edmond) Rnd 1: sc6 in a MR(6) Rnd 2: inc*6 (12) Rnd 3: sc in each st around (12) Rnd 4: rep (12) FO, leave a long tail for sewing to the body. Edmond s ears (make 2) Approx size : 7.5 cm high (3.inches) with a D hook (3.25mm hook) See page 6, Edmond s ears are the same as the mad bunnies 6/25
 Rnd 2: (sc, inc)*3 (9) Rnd 3: sc in each st")
*3 (6) Rnd 7: sc in each st of previous round (6) Rnd")


 Rnd 2: inc*6 (12)")
 Rnd 5: sc in each st around (18) Rnd 6: rep (18) Rnd")
 Rnd 10: FLO : (sc4, inc)*3 (18) Rnd 11: (sc2,")


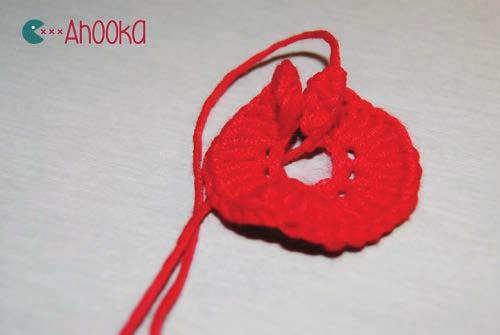
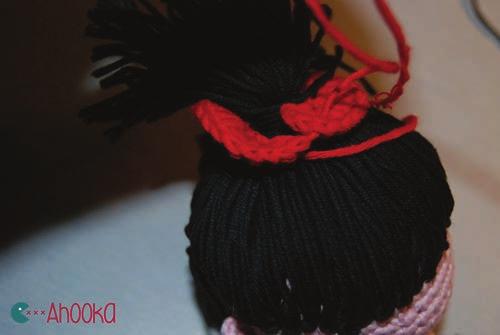
7 Sydonie s ears (make 2) Assembling (Edmond) Rnd 1: sc6 in a MR (6) Rnd 2: (sc, inc)*3 (9) Rnd 3: sc in each st around (9) Rnd 4: rep (9) Rnd 5: rep (9) Rnd 6: (sc, dec)*3 (6) Rnd 7: sc in each st of previous round (6) Rnd 8: rep (6) FO leaving a long tail for sewing to the body. Flatten them before sewing. Brush the ears and the body in order to make them fluffy then put Edmond s hat on and his ears over it (then sew into place). Then, sew his tail at the back of the body. - Cut a little heart out of red felt and glue it or sew it on. Edmond s top hat Rnd 1: sc6 in a MR(6) Rnd 2: inc*6 (12) Rnd 3: (sc, inc)*6 (18) Rnd 4: BLO : sc in each st around (18) Rnd 5: sc in each st around (18) Rnd 6: rep (18) Rnd 7: (sc4, dec)*3 (15) Rnd 8: sc in each st around (15) Rnd 9: rep (15) Rnd 10: FLO : (sc4, inc)*3 (18) Rnd 11: (sc2, inc)*6 (24) Assembling (Sydonie) Cut 2 shapes just a little bit smaller then her ears out of pink felt and sew them or glue them inside the ears FO, weave in the ends. Sydonie s bow - Pin the ears on the head and sew them on. Add her little bow and her tail In a magic ring : ch3, dc2tog, ch3, slst, ch3, dc2tog, ch3, slst. Pull tight and fasten off leaving a long tail for sewing. - Put some cheek blush below her eyes and that s it! 7/25
 A tapestry needle (or yarn needle) A stitch marker Stuffing (fiberfill) 7.5 mm safety eyes (0.")

 Rnd 2: inc, sc3, inc*3, sc3, inc*2 (18) Rnd 3: sc in each st (18) Rnd 4: rep (18) Rnd 5: rep (18) Rnd 6: rep (18) Rnd 7: inc*8, sc10 (26) Rnd 8: sc8,")
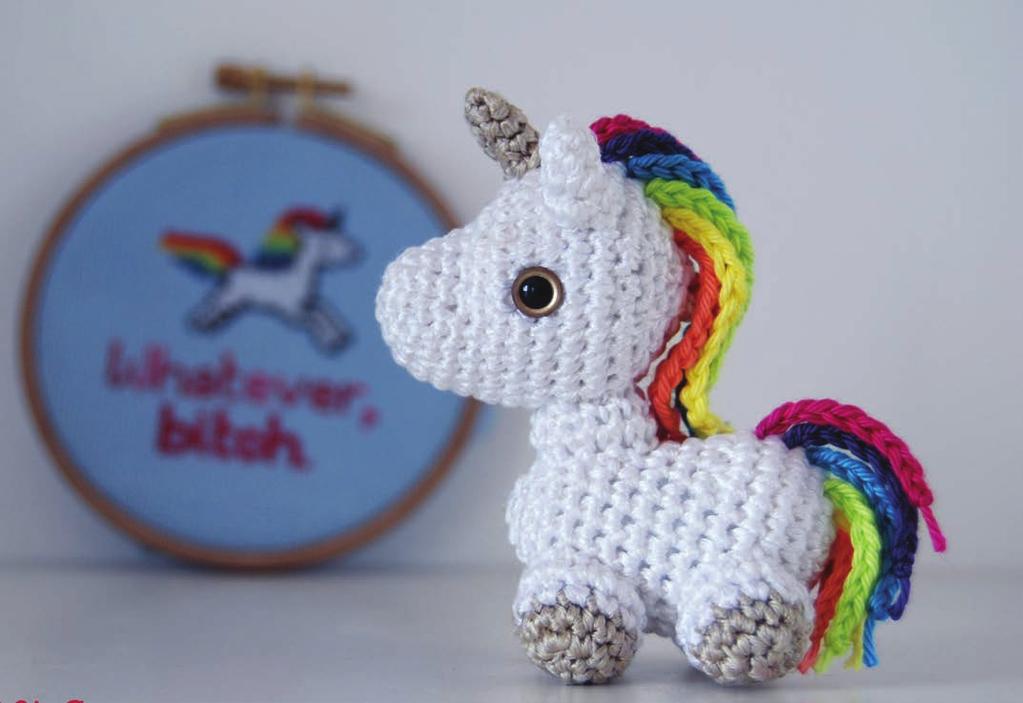
8 Tinycorn Materials White and golden sport weight yarn (I used Drops Cotton Viscose ) A little bit of rose, purple, blue, green, yellow, orange and red yarn (I used Phil Coton 3 ) A crochet hook adapted to the yarn you chose. I used a 2.5 mm hook (C) A tapestry needle (or yarn needle) A stitch marker Stuffing (fiberfill) 7.5 mm safety eyes (0.3 inches) Skill level Beginner : You need to know how to single crochet, make a magic ring, how to increase, decrease, sew an open piece to a closed one, change color. The pattern Approx size : 8 cm high (3.1 inches) Head With white yarn : Rnd 1: ch6, sc in the second ch form hook, sc3, sc3 in the last ch, on the other side of the chain : sc3, inc (12) (Please check my video tutorial how to crochet around a chain if you don t know how to do that) Rnd 2: inc, sc3, inc*3, sc3, inc*2 (18) Rnd 3: sc in each st (18) Rnd 4: rep (18) Rnd 5: rep (18) Rnd 6: rep (18) Rnd 7: inc*8, sc10 (26) Rnd 8: sc8, inc*4, sc14 (30) Rnd 9: sc in each st (30) Rnd 10: rep (30) Rnd 11: rep (30) Rnd 12: rep (30) Insert safety eyes between Rnd 9 and 10 and start stuffing. Rnd 13: (sc3, dec)*6 (24) Rnd 14: (sc2, dec)*6 (18) Rnd 15: (sc, dec)*6 (12) Rnd 16: dec*6 (6) FO, weave the yarn tail through the front loop of each remaining stitches and pull it tight in order to close off the head. 8/25
*6 (24) Rnd 5: sc in each st (24) Rnd 6: rep (24) Rnd 7: rep (24) Rnd 8: sc8, dec*4, sc8 (20) Rnd 9:")
 Rnd 2: inc*6 (12) Rnd 3: sc in each st (12) Inv.")

 Rnd 15: (sc, dec)*6 (12) Rnd 16: dec*6 (6) FO, weave the yarn tail through the front loop of each")
 Rnd 2: sc in each st (3) Rnd 3: rep (3) Rnd 4: rep (3) Rnd 5: rep (3) FO leaving a long")

 Rnd 2: sc in each st (12) Rnd 3: rep (12) FO leaving")
9 Body Legs (make 4) With white yarn : Rnd 1: sc6 in a MR (6) Rnd 2: inc*6 (12) Rnd 3: (sc, inc )*6 (18) Rnd 4: (sc2, inc )*6 (24) Rnd 5: sc in each st (24) Rnd 6: rep (24) Rnd 7: rep (24) Rnd 8: sc8, dec*4, sc8 (20) Rnd 9: sc in each st (20) Rnd 10: rep (20) Start stuffing and continue as you go. With golden yarn : Rnd 1: sc6 in a MR (6) Rnd 2: inc*6 (12) Rnd 3: sc in each st (12) Inv.CC to white yarn : Rnd 4: sc in each st (12) Rnd 5: rep (12) FO leaving a long tail for sewing, pin them to the body and sew them on. Horn With golden yarn : Rnd 11: sc8, dec*2, sc8 (18) Rnd 12: sc in each st (18) Rnd 13: rep (18) Rnd 14: rep (18) Rnd 15: (sc, dec)*6 (12) Rnd 16: dec*6 (6) FO, weave the yarn tail through the front loop of each remaining stitches and pull it tight in order to close off the body. Rnd 1: sc3 in a MR (3) Rnd 2: sc in each st (3) Rnd 3: rep (3) Rnd 4: rep (3) Rnd 5: rep (3) FO leaving a long tail for sewing, pin to the head and sew it on. Note : It might be difficult to do this for beginners or with very thin yarn. If so, you can make the horn with 4 single crochets rather than 3. Neck With white yarn : Rnd 1: ch12, join with a slst (12) Rnd 2: sc in each st (12) Rnd 3: rep (12) FO leaving a long tail for sewing, sew to body then stuff a little bit and sew the head to the neck. Ears (make 2) With white yarn : Rnd 1: sc4 in a MR (4) Rnd 2: (sc, inc)*2 (6) Rnd 3: (sc2, inc)*2 (8) Rnd 4: sc in each st (8) FO leaving a long tail for sewing. Do not stuff, give them their shape by pinching both sides together then sew to the head. 9/25


10 Mane Insert your crochet hook inside a stitch of the head, grab a piece of yarn, and make your first chain stitch, chain the number of stitches required then FO. - do hair From bottom to top : red: ch10 orange : ch12 yellow : ch13 green: ch14 blue : ch15 purple : ch16 rose : ch17 Tail Use the same technique as for the mane : From bottom to top : red: ch5 orange : ch7 yellow: ch8 green : ch9 blue: ch10 purple : ch11 rose : ch12 10/25
")

 A crochet hook adapted to the yarn you chose.")
 A tapestry needle (or yarn needle) 3.")


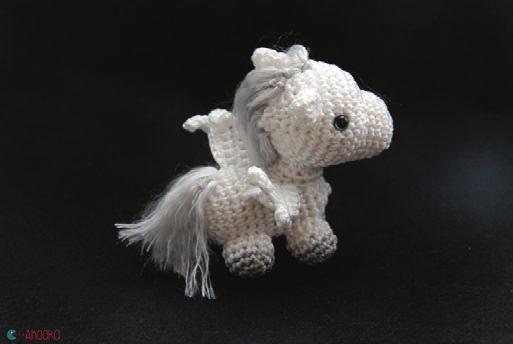
11 TinyPegasus The pattern The head, body, neck, feet and ears are made using Tinycorn s pattern (see page 9) Wings (make 2) Materials 1. Chain 5 2. sc in 2nd ch from hook and in the 3 remaining chains. White and silver sport weight yarn (I used Drops Cotton Viscose ) A crochet hook adapted to the yarn you chose. I used a 2.5 mm hook (C) A tapestry needle (or yarn needle) 3. ch1, turn, sc3, inc, ch4 4. 2sc in the 2nd ch from hook, 7sc A stitch marker Stuffing (fiberfill) 7.5 mm safety eyes (0.3 inches) 5. ch1, turn, sc6, ch4 6. 2sc in the 2nd ch from hook, 8sc Skill level Beginner : You need to know how to single crochet, make a magic ring, how to increase, sew an open piece to a closed one. 7. FO leaving a long tail for sewing then sew into place. Approx size : 8 cm high (3.1 inches) 11/25
 A tapestry needle (or yarn needle) A stitch marker Stuffing (fiberfill) 2 black pins and a wire cutter, or simply a black marker A tiny bit of white felt.")
12 Ghosty Materials Sport weight white cotton and a little bit of red (I used Drops Safran) A 2.mm hook (B/1) A tapestry needle (or yarn needle) A stitch marker Stuffing (fiberfill) 2 black pins and a wire cutter, or simply a black marker A tiny bit of white felt. Textile (or wood) glue Skill level beginner : You need to know how to single crochet, make a magic ring, how to increase, decrease, dc2tog, sew an open piece to a closed one. The pattern Approx size : 12 cm high (4.7 inches) Head With white yarn : Rnd 1: sc6 in a MR (6) Rnd 2: inc*6 (12) Rnd 3: (sc, inc)*6 (18) Rnd 4: sc, inc, (sc2, inc)*5, sc (24) Rnd 5: (sc3, inc)*6 (30) Rnd 6: sc2, inc, (sc4, inc)*5, sc2 (36) Rnd 7: (sc5, inc)*6 (42) Rnd 8: sc in each st around (42) Rnd 9: sc6, dec, (sc12, dec)*2, sc6(39) Rnd 10: (sc11, dec)*3 (36) Rnd 11: sc5, dec, (sc10, dec)*2, sc5(33) Rnd 12: (sc9, dec)*3 (30) Rnd 13: sc2, inc, (sc4, inc)*2, sc17 (33) Rnd 14: (sc5, inc)*3, sc15 (36) Rnd 15: sc in each st around (36) Rnd 16: rep (36) Rnd 17: sc2, dec, (sc4, dec)*5, sc2 (30) Rnd 18: (sc3, dec)*6 (24) Rnd 19: sc, dec, (sc2, dec)*5, sc (18) Stuff the head, don t FO and go on with the body instructions. 12/25
 Rnd 27: rep (36) Rnd 28: rep (36) Rnd 29: rep (36) Rnd 30: rep (36) Rnd 31: rep (36) Rnd 32: rep (36) Rnd 33: sc2, dec, (sc4, dec)*5, sc2 (30) Rnd 34: (sc3, dec)*6 (24) Start to")
*2, sc3(21) Rnd 36: (sc5, dec)*3 (18) Rnd 37: (sc7, dec)*2 (16) Rnd 38: sc3, dec, sc6, dec, sc3(14) Rnd 39: (sc5, dec)*2 (12) Rnd 40: sc2, dec, sc4, dec, sc2 (10) Rnd 41:")

13 Body Rnd 20: (sc5, inc)*3 (21) Rnd 21: sc3, inc, (sc6, inc)*2, sc3 (24) Rnd 22: (sc7, inc)*3 (27) Rnd 23: sc4, inc, (sc8, inc)*2, sc4(30) Rnd 24: (sc4, inc)*6 (36) Rnd 25: sc in each st around (36) Rnd 26: rep (36) Rnd 27: rep (36) Rnd 28: rep (36) Rnd 29: rep (36) Rnd 30: rep (36) Rnd 31: rep (36) Rnd 32: rep (36) Rnd 33: sc2, dec, (sc4, dec)*5, sc2 (30) Rnd 34: (sc3, dec)*6 (24) Start to stuff then continue as you go. Rnd 35: sc3, dec, (sc6, dec)*2, sc3(21) Rnd 36: (sc5, dec)*3 (18) Rnd 37: (sc7, dec)*2 (16) Rnd 38: sc3, dec, sc6, dec, sc3(14) Rnd 39: (sc5, dec)*2 (12) Rnd 40: sc2, dec, sc4, dec, sc2 (10) Rnd 41: sc in each st around (10) Rnd 42: rep (42) Rnd 43: (sc3, dec)*2 (8) Rnd 44: (sc2, dec)*2 (6) FO, weave the yarn tail through the front loop of each remaining stitches and pull it tight in order to close off the body. Arms (make 2) Rnd 1: sc6 in a MR (6) Rnd 2: (sc, inc)*3 (9) Rnd 3: (sc2, inc)*3 (12) Rnd 4: sc in each st around (12) Rnd 5: rep (12) Rnd 6: rep (12) Rnd 7: rep (12) Rnd 8: rep (12) Stuff lightly. Rnd 9: (sc2, dec)*3 (9) Rnd 10: sc in each st around (9) Rnd 11: rep (9) Bow tie In a magic ring : ch3, dc2tog, ch3, slst, ch3, dc2 tog, ch3, slst. Pull tight and fasten off leaving a long tail for sewing. Flatten the opening and sew closed before attaching to the body. Leave a long tail for sewing Eyes Cut out 2 ovals in the white piece of felt, and cut the base straight. Cut out the end of your pins with your wire cutter then pin them through the felt and through Ghosty s head, just above row 13, on the side where you made the increases on rnd 13 and 14. Secure them in place with a bit of wood or fabric glue behind the felt and along the pin. Note : if Ghosty is made for a little child, replace the pins by a black marker dot! 13/25
 : I used Phildar Phil coton 3 : gray, black, red and green and a 2mm (B/1) crochet hook A tapestry needle (or yarn needle) A stitch marker Stuffing (fiberfill) (Optional) You may also need")
 The pattern The base Skill level Intermediate : You need to know how to single crochet, half double crochet, double crochet, make a magic ring, how to")
 for the big one and 14 cm high (5.")
14 Lightsabers Materials For the big lightsaber (orange) : I used Phildar Cabotine : gray, black, red and orange with a 3mm (D/3) crochet hook For the little one (probably Yoda s!) : I used Phildar Phil coton 3 : gray, black, red and green and a 2mm (B/1) crochet hook A tapestry needle (or yarn needle) A stitch marker Stuffing (fiberfill) (Optional) You may also need some pipe cleaners to stiffen your lightsaber. But be mindful it s not recommended for little children use. (In that case, just stuff firmly) The pattern The base Skill level Intermediate : You need to know how to single crochet, half double crochet, double crochet, make a magic ring, how to increase, decrease, crochet in the back loop only, sew an open piece to a closed one, change color, embroider details (see p6). Approx size : 19 cm high (7.5 inches) for the big one and 14 cm high (5.5 inches) for the little one With gray yarn : Rnd 1: sc6 in a MR(6) Rnd 2: inc*6 (12) Rnd 3: BLO sc12 (12) Rnd 4: BLO, sc12 (12) Rnd 5: sc in each st round (12) Rnd 6: rep (12) Rnd 7: rep (12) Rnd 8: rep (12) Rnd 9: rep (12) Rnd 10: rep (12) Rnd 11: rep (12) Rnd 12: rep (12) Inv.CC to black yarn : 14/25
 Rnd 14: sc in each st around(12)")


*3 (9) Rnd 17: sc9 (9) Rnd 18:")
 Rnd 22: rep (9) Rnd 23: rep (9)")
 Rnd 27: rep (9) Rnd 28: rep (9) Rnd 29:")
 Rnd 33: rep (9) Rnd 34: rep (9)")
*3 (6) Rnd 1: ch19, turn Rnd 2: sc")
 FO leaving a long")

15 Inv. CC to gray yarn : Rnd 13: BLO sc12 (12) Rnd 14: sc in each st around(12) Detail 1 Rnd 1: ch13, turn Rnd 2: slst in the 2nd ch from the hook, slst*3, hdc, dc*2, hdc, slst*4 (12) FO leaving a long tail for sewing. Rnd 15: rep (12) Begin to stuff and continue as you go. If you wish to reinforce your lightsaber with pipe cleaners, twist 2 pipe cleaners together, and fold the ends. Put into the stick and stuff all around. Detail 2 Inv.CC to the color you choice for you lightsaber (here, orange) : Rnd 16: BLO (sc2, dec)*3 (9) Rnd 17: sc9 (9) Rnd 18: rep (9) Rnd 19: rep (9) Rnd 20: rep (9) Rnd 21: rep (9) Rnd 22: rep (9) Rnd 23: rep (9) Rnd 24: rep (9) Rnd 25: rep (9) Rnd 26: rep (9) Rnd 27: rep (9) Rnd 28: rep (9) Rnd 29: rep (9) Rnd 30: rep (9) Rnd 31: rep (9) Rnd 32: rep (9) Rnd 33: rep (9) Rnd 34: rep (9) Rnd 35: rep (9) Rnd 36: rep (9) Rnd 37: (sc, dec)*3 (6) Rnd 1: ch19, turn Rnd 2: sc in the 2nd ch from hook, sc17 (18) Rnd 3: sc in each st (18) FO leaving a long tail for sewing. Embroidered details Finally, embroider a gray line and a red button as shown in the pictures : Re-cut the pipe cleaners if necessary (don t forget to fold the end again), close with your tapestry needle, and FO. 15/25
 --color 51 : petrol (T-shirt#2) --color 17 : white (man shirt) --color 09 : navy blue (jeans) --color 16 : black (pants) A 2.")
 A 10mm pair of black safety eyes per doll Approx size : 9 cm high (3.")
 Inv.")
16 Minibuddies Materials Fingering weight yarn - I used Drops Safran in --color 21 : beige (skin color) --color 52 : dark brown (hair#1) --color 11 : strong yellow (hair#2) --color 13 : raspberry (T-shirt#1) --color 51 : petrol (T-shirt#2) --color 17 : white (man shirt) --color 09 : navy blue (jeans) --color 16 : black (pants) A 2.5 mm hook (C/2) A tapestry needle (or yarn needle) A stitch marker Skill level Intermediate : You need to know how to single crochet, make a magic ring, how to increase, decrease, crochet in the back loop only, sew an open piece to a closed one. Stuffing (fiberfill) A 10mm pair of black safety eyes per doll Approx size : 9 cm high (3.5 inches) Minibuddies : Girls Legs (make 2) With pants color : Rnd 1: sc6 in a MR(6) Rnd 2: inc*6 (12) Rnd 3: BLO : sc12 (12) Rnd 4: (sc2, dec)*3 (9) Rnd 5: sc in each st (9) Body/head Rnd 6: sc4 on the leg you are working on, then sc9 on the other leg and finally, sc5 on the previous leg again. (18) Inv.FO the first leg (see p3) but don t FO the second leg and go on with the body instructions. Rnd 7: sc18 (18) 16/25


 Rnd 9: sc18 (18) Inv.")
*5, sc (18) Rnd 28: (sc,")


 Inv.CC to skin color.")
 Rnd 16: inc*10 (20) Rnd 17: (sc4, inc)*4 (24) Stuff")
 With skin color : Rnd 1: sc6 in a MR (6)")
 Rnd 6: rep (6) Rnd 7: rep (6) Rnd 18:")
17 Start to stuff and continue as you go. The bottom of the legs should stay flat. Insert safety eyes between rnd 21 and 22, 6 stitches apart. Stuff the head and continue as you go. Inv.CC (see p3) to skin color. Rnd 8: BLO : sc18 (18) Rnd 9: sc18 (18) Inv.CC to T-shirt color. Rnd 27: sc, dec, (sc2, dec)*5, sc (18) Rnd 28: (sc, dec)*6 (12) Rnd 29: dec*6 (6) FO leaving a long tail to embroider the nose. Weave the yarn tail through the front loop of each remaining stitches and pull it tight in order to close off the head. Then, embroider the nose as shown in the pictures. Rnd 10: (sc4, dec)*3 (15) Rnd 11: sc in each st (15) Rnd 12: rep (15) Inv.CC to skin color. Rnd 13: (sc, dec)*5 (10) Rnd 14: dec*5 (5) Rnd 15: inc*5 (10) Rnd 16: inc*10 (20) Rnd 17: (sc4, inc)*4 (24) Stuff the neck firmly. Arms (make 2) With skin color : Rnd 1: sc6 in a MR (6) Rnd 2: sc in each st (6) Rnd 3: rep (6) Rnd 4: rep (6) Rnd 5: rep (6) Rnd 6: rep (6) Rnd 7: rep (6) Rnd 18: (sc3, inc)*6 (30) Rnd 19: sc2, inc, (sc4, inc)*5, sc2 (36) Rnd 20: sc in each st (36) Rnd 21: rep (36) Rnd 22: rep (36) Rnd 23: rep (36) Rnd 24: rep (36) Rnd 25: sc2, dec, (sc4, dec)*5, sc2 (30) Rnd 26: (sc3, dec)*6 (24) FO leaving a long tail for sewing to the body. Pin them into place and sew them on. 17/25
 Rnd 2: (sc, ch15, sc in 2nd ch from hook and in the 13 remaining")

*5, sc, inc in next st (pic.4).")
 Rnd 5: (sc4, ch12, sc in 2nd ch from hook and in the 10 remaining stitches, sc in the same stitch as")

*4, sc4, inc, sc3 (pic.5).")
*4, sc10 (36) Rnd 8: sc in each")
*11 (pic.6). Don t finish the round and Inv.")
18 Hair pic.1 With hair color : Rnd 1: sc6 in a MR (6) Rnd 2: (sc, ch15, sc in 2nd ch from hook and in the 13 remaining stitches, sc in the same stitch as the first sc)*5, inc in the last stitch (pic.1-2). Rnd 3: (sc, raise the piece of hair made on the previous round up and sc on the other side (pic.3), ch14, sc in 2nd ch from hook and in the 12 remaining stitches, sc again in the stitch at the base of the piece of hair you ve just made)*5, sc, inc in next st (pic.4). Rnd 4: (sc2, raise the piece of hair made on the previous round up and inc on the other side)*5, sc2, inc (24) Rnd 5: (sc4, ch12, sc in 2nd ch from hook and in the 10 remaining stitches, sc in the same stitch as the last sc4 )*5, sc3, inc Rnd 6: sc2, ch11, sc in 2nd ch from hook and in the 9 remaining stitches, sc in the same stitch as the last sc2, (sc2, raise the piece of hair made on the previous round up and sc3 on the other side, ch11, sc in 2nd ch from hook and in the 9 remaining stitches, sc in the same st as the last sc3 )*4, sc4, inc, sc3 (pic.5). Rnd 7: sc2, raise the piece of hair made on previous round up and continue on the other side, (sc6, raise the piece of hair made on previous round up and continue on the other side)*4, sc10 (36) Rnd 8: sc in each st (36) Rnd 9: rep (36) Rnd 10: sc4, (sc, ch10, sc in 2nd chain from hook and in the 8 remaining stitches, sc in next stitch)*11 (pic.6). Don t finish the round and Inv.FO + leave a long tail for sewing if you d like to sew the hair on the head, or weave in the ends if you d rather keep it as a wig. pic.2 pic.3 pic.4 pic.5 Note! Depending on the type of yarn you use, you might need to wet the hair a little bit and pin it in place while it dries so it don t get all messy. pic.6 18/25
 but don t FO the second legs and go on with the body instructions.")
19 Minibuddies : Boys Legs (make2) With pants color : Rnd 1: sc6 in a magic ring (6) Rnd 2: inc*6 (12) Rnd 3: BLO : sc12 (12) Rnd 4: (sc2, dec)*3 (9) Rnd 5: sc in each st (9) Inv. FO the first leg (see page 3) but don t FO the second legs and go on with the body instructions. Body/head Rnd 6: sc4 on the leg you are working onthen join with the other leg by sc9 on it and finally, sc5 on the previous leg again. (18) Rnd 7: sc18 (18) Begin to stuff and continue as you go. The bottom of the legs should stay flat. Inv.CC to T-shirt color. Rnd 8: BLO : sc 18 (18) Rnd 9: sc18 (18) Rnd 10: (sc4,dec)*3 (15) Rnd 11: sc in each st (15) Rnd 12: rep (15) Rnd 13: (sc, dec)*5 (10) Inv.CC to skin color. Rnd 14: dec*5 (5) Rnd 15: inc*5 (10) Rnd 16: inc*10 (20) Rnd 17: (sc4, inc)*4 (24) Stuff the neck firmly. Rnd 18: (sc3, inc)*6 (30) Rnd 19: sc2, inc, (sc4,inc)*5, sc2 (36) Rnd 20: sc in each st (36) Rnd 21: rep (36) Rnd 22: rep (36) Rnd 23: rep (36) Rnd 24: rep (36) Rnd 25: sc2, dec, (sc4, dec)*5, sc2 (30) Rnd 26: (sc3, dec)*6 (24) Insert safety eyes between rnd 21 and 22, 6 stitches apart. Stuff the head and continue as you go. Rnd 27: sc, dec, (sc2, dec)*5, sc (18) Rnd 28: (sc, dec)*6 (12) Rnd 29: dec*6 (6) FO leaving a long tail to embroider the nose. Weave the yarn tail through the front loop of each remaining stitches and pull it tight in order to close off the head. Then, embroider the nose as shown in the pictures (see p5). Arms With skin color : Rnd 1: sc6 in a MR (6) Rnd 2: sc in each st (6) Rnd 3: rep (6) Rnd 4: rep (6) Rnd 5: rep (6) Inv.CC to T-shirt color. Rnd 6: rep (6) Rnd 7: rep (6) FO leaving a long tail for sewing to the body. Pin them into place and sew them on. 19/25


 A 2.")
 sc4 (14) Rnd 3: inc*3, sc4,")
 Start to stuff and continue as you go, Inv.CC to yellow.")
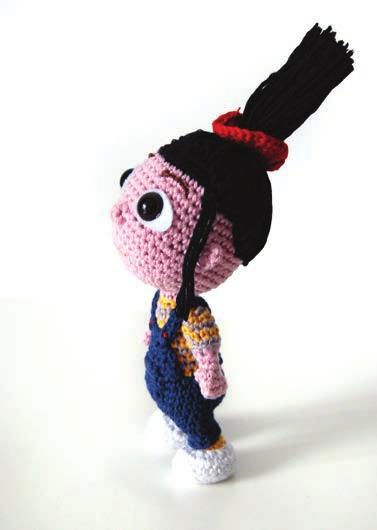
20 Lil Agnes Note : Fluffy unicorn (in the above picture) is made with a free pattern available on LittleYarnFriends blog Skill level Intermediate : You need to know how to single crochet, make a magic ring, how to increase, decrease, crochet in the back loop only, sew an open piece to a closed one. The pattern Approx size : 17 cm high (6.7 inches) Materials Fingering weight yarn in black, rose (skin tone), blue, red, yellow, gray and white yarn (I used Drops safran) A 2.5 mm hook (C/2) 12 mm safety eyes Feet and legs (make 2) With white yarn : Rnd 1: ch7 (7) Rnd 2: sc3 in 2nd ch from hook, sc4, 3sc in last ch, (on the other side of the beginning chain : ) sc4 (14) Rnd 3: inc*3, sc4, inc*3, sc4 (20) Rnd 4: BLO sc20 (20) Rnd 5: BLO sc20 (20) Rnd 6: sc9, (dec, sc)*3, sc3 (17) Rnd 7: dec, sc3, dec*6 (10) Start to stuff and continue as you go, Inv.CC to yellow. Rnd 8: BLO sc6, dec*2 (8) A tapestry needle (or yarn needle) A stitch marker Stuffing (fiberfill) A piece of electric wire White felt Textile (or wood) glue Brown and rose embroidery thread (+embroidery needle) 20/25
 Rnd 10: sc in each st around (8) Rnd 11: rep (8)")

 : sc24 (24)")
*3 (18) Rnd 24: Inv.CC to gray : (sc4, dec)*3 (15) Rnd 25: Inv.")
 Rnd 27: Inv.")
 Rnd 29: Inv.")
 Rnd 31: sc in each st around (12) FO,")

 Rnd 18: rep (32) Rnd 19: sc14, dec*2, sc14 (30) Rnd 20: sc3, dec)*6 (24) + sc6 in")
21 Rnd 9: sc in each st around (8) Inv.CC to blue yarn : Inv.CC to yellow : Rnd 21: BLO sc24 (24) Rnd 10: sc in each st around (8) Rnd 11: rep (8) Rnd 12: (sc, inc)*4 (12) Rnd 13: sc in each st around (12) Stuff, and continue as you go. Inv.CC to gray : First leg : FO, leave a tail for sewing the gap between the 2 legs. Second leg : don t FO and go on with the body instructions. Body Rnd 14: Join legs by crocheting around both legs together (see pic) : sc24 (24) Insert wire like so, and start to stuff : Rnd 22: (sc6, dec)*3 (21) Rnd 23: Inv.CC to yellow : (sc5, dec)*3 (18) Rnd 24: Inv.CC to gray : (sc4, dec)*3 (15) Rnd 25: Inv.CC to yellow : sc in each st around (15) Rnd 26: Inv.CC to gray : sc in each st around (15) Rnd 27: Inv.CC to yellow : sc in each st around (15) Rnd 28: Inv.CC to gray : sc in each st around (15) Rnd 29: Inv.CC to yellow : (sc3, dec)*3 (12) Rnd 30: Inv.CC to skin color : BLO sc in each st around (12) Rnd 31: sc in each st around (12) FO, leave a long tail for sewing. Stuff firmly and sew the gap between the two legs with the strand of yarn you left. Rnd 15: inc*2, sc8, inc*4, sc8, inc*2 (32) Rnd 16: sc in each st around (32) Rnd 17: rep (32) Rnd 18: rep (32) Rnd 19: sc14, dec*2, sc14 (30) Rnd 20: sc3, dec)*6 (24) + sc6 in order to start next round in the middle of her right hip. Head With black yarn : Rnd 1: sc6 in a MR Rnd 2: inc*6 (12) Rnd 3: (sc, inc)*6 (18) Rnd 4: sc, inc, (sc2, inc)*5, sc (24) Rnd 5: (sc3, inc)*6 (30) Rnd 6: sc2, inc, (sc4, inc)*5, sc2 (36) Rnd 7: (sc5, inc)*6 (42) Rnd 8: sc in each st around (42) Rnd 9: rep (42) 21/25
 Rnd 12: rep (42) Rnd 13: rep (42) Rnd")
*3, 3dc in next st, (sc2, inc)*3, sc8 (42) Rnd 18:")
*3 (36) Rnd 21: (sc4, dec)*6 (30) Insert safety eyes through")
*2 (9) Rnd 3: Inv.")
 Rnd 5: Inv.")
 Rnd 7: Inv.")
 Rnd 9: rep (6) Rnd 10: (sc, inc)*3")
 Start stuffing and continue")
*3 (27) Rnd 23: sc7, dec)*3 (24) Rnd 24: (sc2,")
 and sew head to body. FO.")
, ch3, sc in 2nd ch from hook, then slst in the")
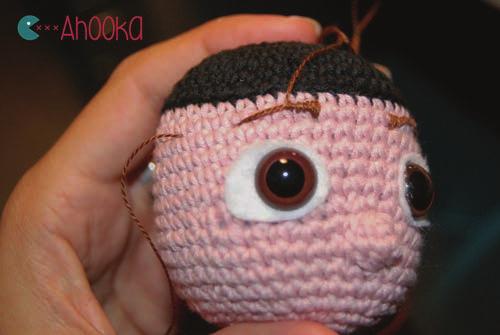
22 Inv.CC to skin color : Rnd 10: BLO sc in each st around (42) Rnd 11: sc in each st around (42) Rnd 12: rep (42) Rnd 13: rep (42) Rnd 14: rep (42) Rnd 15: rep (42) Rnd 16: (sc5, dec)*6 (36) Rnd 17: sc9, (inc, sc2)*3, 3dc in next st, (sc2, inc)*3, sc8 (42) Rnd 18: sc21, dc3tog, sc20 (42) Rnd 19: (sc12, dec)*3 (39) Rnd 20: (sc11, dec)*3 (36) Rnd 21: (sc4, dec)*6 (30) Insert safety eyes through white felt (previously cut in an oval shape), and then, between Rnd 15 and 16 Rnd 2: Inv.cc to gray : (sc, inc)*2 (9) Rnd 3: Inv.cc to yellow : sc in each st around (9) Rnd 4: Inv.cc to gray : sc in each st around (9) Rnd 5: Inv.cc to yellow : sc in each st around (9) Rnd 6: Inv.cc to gray : sc in each st around (9) Rnd 7: Inv.cc to skin color : BLO (sc, dec)*3 (6) Stuff. Rnd 8: sc in each st around (6) Rnd 9: rep (6) Rnd 10: (sc, inc)*3 (9) Rnd 11: sc in each st around (9) Flatten both sides and make 4 sc through both side together (see pic) Start stuffing and continue as you go. Rnd 22: (sc8, dec)*3 (27) Rnd 23: sc7, dec)*3 (24) Rnd 24: (sc2, dec)*6 (18) FO leaving a long tail for sewing. Insert electric wire (see pic) and sew head to body. FO. Add a thumb by introducing your crochet hook in a side stitch of the hand (see pic), ch3, sc in 2nd ch from hook, then slst in the first stitch. Sew to body. In order for your arms to be movable, sew by pulling your needle through the body (from a shoulder to the other) 3 or 4 times. Arms (make2) With yellow yarn : Rnd 1: sc6 in a MR (6) 22/25
 ch1, turn Rnd 2: dec, sc6, dec (8) ch1,")
 With blue yarn : Rnd 1: ch6, sc in 2nd ch")
 FO, leave a long tail for sewing.")
 With blue yarn : Rnd 1: ch9, sc in 2nd ch from")
 ch1, turn Rnd 4: sc in each st (4) Rnd 5: rep (4) Rnd 6: rep")

 With skin color yarn : Sew each parts of the overalls in")

23 Upper overalls (front) Overalls pocket With blue yarn : Rnd 1: ch11, sc in 2nd ch from hook, sc9 (10) ch1, turn Rnd 2: dec, sc6, dec (8) ch1, turn Rnd 3: dec, sc4, dec (6) ch1, turn Rnd 4: dec, sc2, dec (4) ch1, turn Rnd 5: sc in each st (4) With blue yarn : Rnd 1: ch6, sc in 2nd ch from hook, sc4 (5) Rnd 2: sc in each st (5) Rnd 3: rep (5) Rnd 4: sc, hdc, dc, hdc, sc (5) FO, leave a long tail for sewing. FO, leave a long tail for sewing. Upper overalls (back) With blue yarn : Rnd 1: ch9, sc in 2nd ch from hook, sc7 (8) ch1, turn Rnd 2: dec, sc4, dec (6) ch1, turn Rnd 3: dec, sc2, dec (4) ch1, turn Rnd 4: sc in each st (4) Rnd 5: rep (4) Rnd 6: rep (4) Rnd 7: ch11, sc10, slst*2, ch11, sc10, slst FO, leave a long tail for sewing. Trousers hem (make 2) With blue yarn : Rnd 1: ch12, sc in 2nd ch from hook, sc11 Sew on the bottom of the pants, just above her yellow socks. Ears (make 2) With skin color yarn : Sew each parts of the overalls in place like shown on the picture then embroider both buttons with red thread. Rnd 1: sc4 in a MR, pull tight to close. Rnd 2: Ch1, turn, inc*2, slst in nxt 2 sts. FO, leave a long tail for sewing, and sew to the head. 23/25

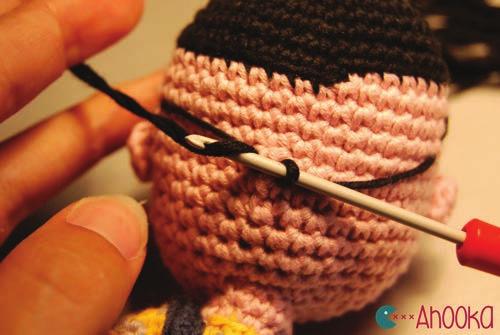
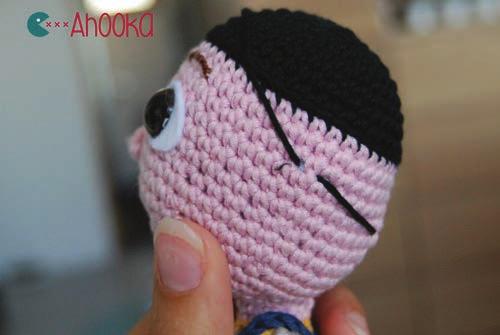
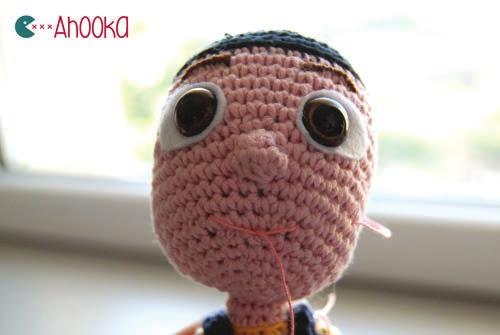


24 Eyebrows and mouth embroideries Embroider as shown in the pictures : Hair Mark the placement of the hair with a piece of yarn : Hair tie With red yarn : ch14, then 3dc in third ch fr hook and in each remaining stitches. Put the hair tie around the ponytail and sew it. Cut pieces of yarn as shown in the picture and start attaching them, piece by piece : 24/25
25 ... Aaaand, you re done! Congratulations! Free patterns + Tips&tricks Please visit me at : More patterns Ahookashop.etsy.com Ahookamigurumi.com/en Facebook.com/ahookamigurumi Show us your work! I would be glad to see your pics! 2015 Ahooka - All rights reserved - These patterns are for personal use only. The patterns (or parts of them) may not be reproduced, distributed or resold, translated, published, altered, shared or posted (for sell or for free) over the Internet or off-line. However, you can sell items from this pattern provided that they are handmade by yourself and by adding the following lines to your item description : this item is handmade by... from a design and pattern by Ahooka / ahookamigurumi.com 25/25
Bonnie W/ Ladybug Costume Pattern By: Havva Ünlü (Havva Designs)
") Bonnie W/ Ladybug Costume Pattern By: Havva Ünlü (Havva Designs) Page 1 Copyrights Statement This design is the intellectual property of Havva Ünlü and protected by international copyright laws and is
Bonnie W/ Ladybug Costume Pattern By: Havva Ünlü (Havva Designs) Page 1 Copyrights Statement This design is the intellectual property of Havva Ünlü and protected by international copyright laws and is
Mister Sock Monkey By Premier Yarns Design Team Level: Intermediate
 Mister Sock Monkey By Premier Yarns Design Team Level: Intermediate FINISHED MEASUREMENTS Small (Large) Height: 15 (20) MATERIALS Premier Yarn Premier Home Cotton Marls (85% cotton, 15% polyester; 60 gm/105
Bengali Babees. Ganesh
 Bengali Babees Ganesh When crocheted with yarn and hook specified, Ganesh measures 14 inches L, 13 inches around the belly, and a sitting height of 10 inches. Crown is 14 inches in diameter and 2 ¼ inches
Scissors, tapestry needle to weave in ends (I prefer crochet hook for weaving in).
.") And here is a tutorial for Block 6! I hope you will like it :) You will need: Yarn in 6 colors. I used yarn Cotton Light by DROPS (50g/1.76 oz., 105 m/115 yds.) Yarn weight: DK. Texture: 8 ply (11 wpi)
And here is a tutorial for Block 6! I hope you will like it :) You will need: Yarn in 6 colors. I used yarn Cotton Light by DROPS (50g/1.76 oz., 105 m/115 yds.) Yarn weight: DK. Texture: 8 ply (11 wpi)
Scissors, tapestry needle to weave in ends (I prefer crochet hook for weaving in).
.") Cal 8 You will need: Yarn in 6 colors. I used yarn Cotton Light by DROPS (50g/1.76 oz., 105 m/115 yds.) Yarn weight: DK. Texture: 8 ply (11 wpi) Crochet hook 3,25 mm (D) or size needed to obtain acceptable
Cal 8 You will need: Yarn in 6 colors. I used yarn Cotton Light by DROPS (50g/1.76 oz., 105 m/115 yds.) Yarn weight: DK. Texture: 8 ply (11 wpi) Crochet hook 3,25 mm (D) or size needed to obtain acceptable
Tony Stark might actually be on the cover of a magazine, so it doesn t seem
 Tony Stark might actually be on the cover of a magazine, so it doesn t seem as ridiculous and over-the-top this time, right? Hello and welcome to my Iron Man pattern! If you have any questions, notice
Scissors, tapestry needle to weave in ends (I prefer crochet hook for weaving in).
.") 7 You will need: Yarn in 6 colors. I used yarn Cotton Light by DROPS (50g/1.76 oz., 105 m/115 yds.) Yarn weight: DK. Texture: 8 ply (11 wpi) Crochet hook 3,25 mm (D) or size needed to obtain acceptable
7 You will need: Yarn in 6 colors. I used yarn Cotton Light by DROPS (50g/1.76 oz., 105 m/115 yds.) Yarn weight: DK. Texture: 8 ply (11 wpi) Crochet hook 3,25 mm (D) or size needed to obtain acceptable
Elephant. Pattern set includes patterns for elephant, bib and rattle.
 Pot Belly Babies Elephant Pattern set includes patterns for elephant, bib and rattle. When made with the specified yarns and hook sizes, elephant measures 14 inches L and 14 ½ inches around belly, with
Little Uns. T. Rex. When crocheted with yarns and hook specified, T. Rex measures 16 inches L with a standing height of 11 inches.
 Little Uns T. Rex When crocheted with yarns and hook specified, T. Rex measures 16 inches L with a standing height of 11 inches. This pattern is crocheted in the amigurumi style of continuous rounds beginning
Stitch Guide Ch chain Sc single crochet Inc increase Dec - decrease
 Giant Squid Pattern designed and created by Patricia Castillo. Pattern may not be copied, sold, or distributed on any publication without permission from owner. Size: Approx 40 length Materials: -Worsted
Free Crochet Pattern Lion Brand Wool-Ease Amigurumi Holiday Santa Pattern Number: 70705AD
 Page 1 of 5 Free Crochet Pattern Lion Brand Wool-Ease Amigurumi Holiday Santa Pattern Number: 70705AD A fun Christmas holiday decoration or tree ornament! Page 2 of 5 Free Crochet Pattern from Lion Brand
Free Crochet Pattern Lion Brand Vanna's Choice Amigurumi Holiday Penguin Pattern Number: 70703AD
 Free Crochet Pattern Lion Brand Vanna's Choice Amigurumi Holiday Penguin Pattern Number: 70703AD One of our menagerie of amigurumi animals, this cheery holiday bird with a Christmasstriped hat is sure
Free Crochet Pattern Lion Brand Vanna's Choice Amigurumi Reindeer Pattern Number: 70707AD
 Free Crochet Pattern Lion Brand Vanna's Choice Amigurumi Reindeer Pattern Number: 70707AD One of our menagerie of amigurumi animals, this reindeer is sure to be a favorite. Brighten your holiday with this
Pioneer Becky Doll. Pioneer-era Becky would look charming perched on a bed or dresser. Her pinafore is removable.
 Pioneer Becky Doll By Sheila Leslie DIRECTIONS Beginner SIZE 17 inches tall MATERIALS Worsted weight yarn (8 oz per skein): 1 skein each white, light plum, off-white and rust, small amount of brown, scraps
Free Crochet Pattern Lion Brand. Bonbons Holiday Stacking Toy Pattern Number: L20612
 Free Crochet Pattern Lion Brand Bonbons Holiday Stacking Toy Pattern Number: L20612 Free Crochet Pattern from Lion Brand Yarn Lion Brand Bonbons Holiday Stacking Toy Pattern Number: L20612 SKILL LEVEL:
Bear & Blanket. Ch, sl st, sc, hdc, dc
 Bear & Blanket EC00026 BEAR FINISHED SIZE 16" tall in a sitting position MATERIALS 6 oz. Cafe Au Lait #9334 (tan) Red Heart Light & Lofty Art. E708 by Coats & Clark or bulky yarn Small amount Coffee #365
P a g e 1. Crocheted Elephant Pattern. By Tracy Coldwell Design at. Button Beautiful
 P a g e 1 Crocheted Elephant Pattern By Tracy Coldwell Design at Button Beautiful P a g e 2 Crocheted Elephant Pattern By Tracy Coldwell Designs Materials When using Three Bears Yarn Affection 100% Aran
2 15 CUTE AMIGURUMI PATTERNS BY 12 GREAT DESIGNERS
 2 15 CUTE AMIGURUMI PATTERNS BY 12 GREAT DESIGNERS INCLUDES BASIC CROCHET INSTRUCTIONS COMPILED WITH CARE BY Zoomigurumi 2 15 cute amigurumi patterns by 12 great designers First published 2013 by Amigurumipatterns.net
Feathers McGraw presented by Speckerna
 Feathers McGraw presented by Speckerna Feathers McGraw is a creation by Aardman Animations Ltd. Do not sell this pattern or the finished product! Abbreviations & Material sc = single crochet * = repeat
Dedication. To Anielle and Acho
 Dedication To Anielle and Acho Huggable Amigurumi: 18 Cute and Cuddly Animal Softies 2016 by Shannen Nicole Chua Martingale 19021 120th Ave. NE, Ste. 102 Bothell, WA 98011-9511 USA ShopMartingale.com ebook
Crochet and Sewing Pattern. Mary the Elephant. LittleOwlsHut. Materials and tools. About this pattern
 LittleOwlsHut Crochet and Sewing Pattern By Galina Astashova Skill level: Experienced Mary the Elephant About this pattern The toy is crocheted in continuous spirals without joining the rounds. You will
Luna the African Flower Cat
 Luna the African Flower Cat By: JO s Crocheteria You will need: Crochet hook 2mm and 3mm Yarn needle Cotton filling Yarn: Catania 26 x 36= 4 70 g black 20 g grey 220 g white 150 g brown Pattern In total
Warm, woolen, winter blanket
 *This free pattern is available for unlimited personal use. You may print a copy of a pattern or keep a digital copy for personal use only. Do not reproduce or sell any of these patterns, either digitally
Chamonix Crochet Hat
 Chamonix Crochet Hat Materials for the child & adult are the same : The child's size will fit most 3-8 years olds & anyone older will want the Adult. *3 skeins bulky weight yarn for hat *1 skein yarn for
Inclination Wrap NURTURING FIBRES. Designed by Julme Conradie for Nurturing Fibres. Colours used: Cornflower, Mist, Paris
 Inclination Wrap Colours used: Cornflower, Mist, Paris Designed by Julme Conradie for Nurturing Fibres 1 P a g e I n c l i n a t i o n W r a p ( U S T e r m s ) w w w. n u r t u r i n g f i b r e s. c
Adding Sculpted Toes to a Cloth Doll Foot
 Adding Sculpted Toes to a Cloth Doll Foot by Sherralyn St. Clair, www.sherralynsdolls.com Many cloth doll patterns leave the doll's foot as a simple rounded shape. I have found that adding sculpted toes
*Heart* Pom-pom rug. 1, 2, 3... go! Zweigart & Sawitzki GmbH & Co. KG Fronäckerstraße Sindelfingen. - more than 3 hours -
 Pom-pom rug *Heart* - more than 3 hours - 1, 2, 3... go! Zweigart & Sawitzki GmbH & Co. KG Fronäckerstraße 50 71063 Sindelfingen Preparation: Arrange the material you need. The Zweigart Twist canvas (Item
Tess the Butterfly Pillow
 Tess the Butterfly Pillow By: JO s Crocheteria You ll need Yarn: Catania (x 50g) Tilda - 2 white 0105-2 fuchsia 0128 - Magneta 0251 - Violett 0113 - Orchid 0222-1 baby light blue 572 Crochet Hook nr 3
Easter Bunny Pompoms
 Easter Bunny Pompoms When I was younger I remember it taking ages to make pompoms because of constantly passing a ball of yarn through the middle of two cardboard circles. Well this method makes it a lot
Humpty Dumpty Crochet Puzzle Doll
 .3 Humpty Dumpty Crochet Puzzle Doll I'M A PUZZLE! Table of Contents Materials and Project Notes.2 Humpty Dumpty Pattern.3 6 Humpty Dumpty Printable Pattern......7 8 Additional Photos..9 10 Abbreviation
W640. Cascade 220. Celtic Cable and Rib Beanie & Mittens. Designed by Linda Medina
 W640 Cascade 220 Celtic Cable and Rib Beanie & Mittens Designed by Linda Medina Cascade 220 Celtic Cable and Rib Beanie & Mittens Designed By Linda Medina Skill Level: Intermediate Sizes: Hat: S/M-18"
Samurai Armor Set: Step by Step
 Samurai Armor Set: Step by Step Pack 6 Stages -5 Contents Stage Pages 7-76 The tasset plates and shoulder pad Stage Pages 77-8 The tassets, helmet and helmet lining Stage Pages 8-86 The tasset plates and
Cuddly Pony Lilly 2014 Marina Bachran
 Cuddly Pony Lilly For a cuddly pony you will need: a fatquarter (50x70cm) terry cloth for the back, the mane and the tail a fatquarter (50x70cm) cotton fabric for the body half a fatquarter (50x35cm) cotton
Stitchin for Kids The Doll Project
 Stitchin for Kids The Doll Project Presents Doll Hats Here are four hats to fit the 13 doll Corolle Les Cheries doll. All hats are knit in the round. The instructions were written as part of an effort
Macrame. Knots and Projects
 BCA160 Macrame Knots and Projects Prepared by the North Dakota 4-H Clothing Committee: Peggy Anderson Merry Green Rachel Vettern Gayle Gette Cindy Swenson Sue Wold Macrame is a creative art that can inspire
Pro Bow. .com. the construction. one using to use the. video. The. with. We would. love to hear others. Figure 1
 Pro Bow The Hand www.probowthehand..com Instructions for Small Hand 1 Ribbon Congratulations on your purchase of Pro Bow The Hand. This item truly revolutionizes the construction of bows. Never before
Featuring Coats Dual Duty XP. Supplies
 Halloween Black Cat Basket Technique: Designed By: Skill Level: Crafting Time: Finished size: Sewing, Fabric Crafting Linda Turner Griepentrog Intermediate An evening 6" (15.24cm) (at base) x 3 1 2" x
Shiel e d Kite t By B y Sam & Ca C rir King Ore r g e o g n o Kite t m e aker e rs s Retr t e r a e t t2013
 Shield Kite By Sam & Cari King Oregon Kitemaker s Retreat 2013 SAIL ASSEMBLY Your pre-cut sail pieces include half-inch seam allowances. This provides enough material to complete a 1/4 inch double rolled
THE AMERICAN BARN DOOR KITE
 THE AMERICAN BARN DOOR KITE Oregon Kitemaker s Retreat January 2007 Rod Beamguard 4104 NW 112 th Way Vancouver, WA 98685-3578 (360) 574-8050 home (360) 750-9833 office kytfevr@wa-net.com PLANFORM BARN
pompom ANIMALS MAKE Instructions for making birds, butterflies, ladybugs, and hedgehogs. Pompoms
 pompom MAKE ANIMALS Instructions for making birds, butterflies, ladybugs, and hedgehogs. Pompoms Contents 02 H ow to Make Pompoms Using Pompom Makers 06 H ow to Make Semicircular Pompoms Using Pompom Makers
Sails. Sails: extract from 'Super-detailing the Cutter Sherbourne' page 1 George Bandurek
 Sails There are many arguments for adding or omitting the sails on a model ship. There is no right answer and I decided to have a combination of set and furled sails on my model of HM cutter Sherbourne
Samurai Armor Set: Step by Step
 Samurai Armor Set: Step by Step Pack 3 Stages 9-12 1 Contents Stage 9 Pages 29-31 The cuirass side and tassets Stage 10 Pages 32-37 The shoulder plate and tassets Stage 11 Pages 39-41 The shoulder plate
National Child Safety Council Costume
 National Child Safety Council Costume Care & Use Guide Your NEW Safetypup Costume Your new Safetypup Costume is one of the finest costumes available to help law enforcement educate children & parents about
Fly Tying Tips from Hermann Fisher, Kamloops, Canada As Submitted by Lee Ann Ross
 Fly Tying Tips from Hermann Fisher, Kamloops, Canada As Submitted by Lee Ann Ross How to deal with a crowded head when tying flies: Use a piece of a bicycle inner tube and punch small holes in it. Slip
Project. Important notes that apply to all the Freestanding Lace Easter Baskets: Skill Level: Beginner
 Project Freestanding Lace Easter Baskets Embroidered baskets that will impress everyone including the Easter Bunny! Designs are digitized so that each stitch supports the next so that you may stitch on
Aliphatic Resin Wood Glue. 18" Fabric Parachute Part #PNC50 Part # Part #11700 Part #J0016. Launch Lug
 ADANCED * What you will need to build the Quest High-Q Hobby Knife * Straight Edge Pencil Aliphatic Resin Wood Sanding Sealer & Brush Spray Paint Parts and exploded view of the Quest High-Q Nose Cone 18"
Bottle Rocket Launcher P4-2000
 WWW.ARBORSCI.COM Bottle Rocket Launcher P4-2000 BACKGROUND: The Bottle Rocket Launcher allows for the exploration of launching rockets using commonly available materials such as plastic soda bottles and
Horse Handler Manual
 Horse Handler Manual Table of Contents I. The Role of a Horse Handler... 1 Promoting Independence... 1 II. Horse Handling... 2 Grooming... 2 Tacking up the Horse... 3 Leading in Class... 3 Arena Etiquette...
THERAPUTTY ACTIVITIES
 THERAPUTTY ACTIVITIES Theraputty activities will help to develop your hand strength and ability to control fine finger movements. Activities to be complete: (therapists to tick which activity you want
Tips for Grooming your Pet Pomeranian
 Tips for Grooming your Pet Pomeranian by Vyctoria Brock www.pomkins.com Please note - This article is for education purpose only, it is not an illustration of grooming for the show ring. Choice of shampoo,
CORN HUSK DOLLS. BUZZ SAWS Materials String Button or wooden disk with two holes drilled
 BUZZ SAWS Materials String Button or wooden disk with two holes drilled Procedure. If using a wooden disk, pre- nail the holes in the disk. Cut a length of twine/string approx 24 long. Thread the string
STEP 1 A. Lay the two Motor Mount Tubes on a flat surface with ends even and Glue them together with White Glue. Allow Glue to set before moving on.
 Prod. No. A51003 Skill Level Three QUEST AEROSPACE, INC PO Box 2409 Pagosa Springs, CO 81147 800-858-7302 Things You ll Need To Assemble this Kit: Pencil and Hobby Knife: White Glue: Aliphatic Resin glue,
Three Jelly Fish Felt Board Pattern
 Three Jelly Fish Felt Board Pattern Designed and Created by Kate McKnight Three jelly Fish is a wonderful set for learning about three counting down from three to zero and counting back up to three again.
How to Make Balloon Animals: Beginners Addition
 How to Make Balloon Animals: Beginners Addition Prepared by: Fred Scott, Peyton Steele, Sam Taggart, and Christian Tapia TEMC 2700.006 MWF 10-10:50 i Table of Contents Contents Table of Contents... ii
How Scott Builds a Fighter Kite, May 2011 Updated Sept 2018
 How Scott Builds a Fighter Kite, May 2011 Updated Sept 2018 MAKE A TEMPLATE 1. Draw half sail plan on 17x22 pad with 4x4 (1/4 inch) grid. Add ¼ inch extra on nose (for reinforcement) and plenty of extra
NAVIGATOR PROP BUILDING INSTRUCTIONS & PHOTOS
 NAVIGATOR PROP BUILDING INSTRUCTIONS & PHOTOS Science under the ice Ice sheet At regional competitions the ice is simulated by 8 ft x 4 ft ½-inch foam sheeting (Home Depot part #703990 [in store only],
MO Tech Challenge Info- Conference 2019
 MO Tech Challenge Info- Conference 2019 General Info Competition will consist of 5 events chosen from the following list Costume Quick Change Fold a Drop Props Shift Cable Relay Leg a Platform Thread a
Beginners Fly-Tying Notes
 Beginners Fly-Tying Notes SESSION 1 Tools Bobbin holder Threader (for dental floss!) Bodkin/ Dubbing needle (hat pins!) Vice 1 Check that: the jaws hold the sizes of hooks you want to tie on; and the stem
Bright Light Feather Wing
 Bright Light Feather Wing I am still finding little time at the vise, but the new fly tying room is coming along great. My wife just finished painting the trim around the window and door, next comes flooring.
overview 60s inspired top
 overview 60s inspired top www.sewdifferent.co.uk (1,1) -1-60's inspired top pattern.indd 27/03/2015 19:39 1cm 6cm Copyright Sew Different www.sewdifferent.co.uk 31cm 21.5cm While this pattern and tutorial
Natte Pullover. Originally Lovely. By Kaitlin Blasing
 Natte Pullover This boatneck sweater is worked flat in one piece starting at the left sleeve, working across the body, and back down the right sleeve. Intricate braided lace detailing and a unique construction
THE ROBERT GRAHAM FIT GUIDE
 THE ROBERT GRAHAM FIT GUIDE Measuring guide for CLASSIC, BIG & TALL FIT WOVEN SHIRTS. NECK Measure around the middle of your neck (at the Adam s apple), keeping the tape a bit loose.. CHEST Classic Fit
Patient Sleep Test Hookup
 Patient Sleep Test Hookup Dear Patient, The following information is designed to help you fit the apparatus for your sleep study. It is important that you follow the instructions carefully. 1. Preparation
2017 Winter Showcase Costume Information
 2017 Winter Showcase Costume Information **Below you will find detailed information that outlines the costumes, accessories, shoes and hair for each class for the Spring Recital Showcase. Each class/genre
Balloon twisting 101. August learning events. Lizbeth Kohler Lkohler.zoominternet.net
 Balloon twisting 101 August learning events Lizbeth Kohler e-mail: Lkohler.zoominternet.net basic info Balloons to be used Most sculptures are created using 260 balloons (2 inches in diameter and 60 inches
Module 3: Waist Deep
 Activity Book Module 3: Waist Deep Welcome to HSBC Family Literacy First, a program created to bring together parents and children to have fun while learning as a family. Developed by ABC Life Literacy
Your kit contains the following items. Additional Items You May Need. Pre- cut parts Propeller rigging and rubber Sandpaper Covering sheet
 Your kit contains the following items Pre- cut parts Propeller rigging and rubber Sandpaper Covering sheet The SkyFox offers great glide performance in a rubber powered plane due to its built up wing.
Hard-Knock Life: Broadway Bound, Miss Lily Shoes: Barefoot. Hair: Out of face and messy Notes: MAKING THEIR OWN, please show Miss Lily for Approval
 Hair, Shoes, Tights etc. Information Sheet! ** This is close to show order but NOT exact. Show order is still subject to change till one week til show. Thank you Please note: Bodytights only come in adult
Swing Your Partner. by Beth Hester. GH Productions, Inc. The Basket Maker's Catalog
 Swing Your Partner by Beth Hester GH Productions, Inc. The Basket Maker's Catalog Materials are available from your basketry supply store or contact: The Basket Maker's Catalog GH Productions, Inc. 521
EASTER PIT E ERY GIRL AND BOY TOY. ftesarti -
 EASTER PIT 1962 ftesarti - TOY E ERY GIRL AND BOY, 79002 CUDDLY BUNNY-12"x53/4" Perky little flirt of soft, cotton stuffed plush with satin lined ears; felt nose, eyes and tongue; pert whiskers and ribbon
How Do I Install My Garden Master Bucket Garden?
 How Do I Install My Garden Master Bucket Garden? 1. On the arrival of your Bucket Garden open the bucket and remove the 4 screws from the outside of the bucket rim and pull the 2 buckets apart. Check the
Zach King Digital Magician Naomi Davis ON SCREEN TEXT: Lifestyle Influencer. Naomi: Hey Zach. Zach: Hey, good to see you again.
 In the center of the screen there is an Easter basket containing a white bunny with green ears, a yellow polka dot Easter egg and a red Target logo envelope on a large red ball in front of a Target store.
Brushbot Kit Instructions: Parts
 Brushbot Kit Instructions: Parts or AG13 Googly eyes Additional Tools Needed: Scissors or snips, hot glue gun or some type of glue suitable for plastic (epoxy or super glue should be fine). Brushbot Kit
BOOK BUDDY HOW TO. Cut the excess thread, leaving just a tiny amount to keep the knot tight.
 BOOK BUDDY HOW TO These adorable bookworms are meant to encourage our younger readers to read often & with a friend! Not everyone has someone at home to read with, but kids still need to read out loud,
BMW Motorrad. Installation Instructions. BMW Motorrad Communications System for Schuberth C3
 BMW Motorrad Installation Instructions BMW Motorrad Communications System for Schuberth C3 Order No. 01 29 2 219 831 BMW Motorrad 05/2011 Be sure to read these instructions carefully and completely before
FISH NET REPAIR. By Alfred Carlson
 FISH NET REPAIR By Alfred Carlson 2 Contents 1. Contents 2 2. 3-Spot Repair (One Broken mesh) 3 3. V-Shaped Repair (Two Broken meshes ) 23 4. N-Shaped Repair (Three Broken meshes) 33 5. M-Shaped Repair
from Lands End. The logo will be monogrammed instead of pressed, to also assist in the
 May 2, 2014 Dear Parents and Legal Guardians, As mentioned in the MORE News on April 29, several weeks ago we met with a representative from Lands End to determine how we could give families more options
Stand-N-Fish FULL DETAIL INSTALLATION INSTRUCTIONS
 1 Stand-N-Fish FULL DETAIL INSTALLATION INSTRUCTIONS Thank you for purchasing the incredible new Stand-N-Fish Kayak Fishing System. Once installed on your kayak the Stand-N-Fish will take your kayak fishing
Ice Hockey. Equipment Fitting Guide - Fit to Play the Right Way. Brought to you by: follow
 Ice Hockey Equipment Fitting Guide - Fit to Play the Right Way Brought to you by: coachsafely.org www.helmetfitting.com follow us @coachsafely and @Helmetfitting YOUTH AGE GROUPS: 8-and-Under (mite), 10-and-Under
The Dunt Designed by Mr. Murdoch, early 19th century
 Dee Fly - The Dunt It seems like there has been an increased interest in Dee s lately, so I thought I would throw in. I tie and fish a number of different Dee s for both summer and winter run steelhead.
Mayfly Dun size 1-3. Use the TyinGuides, they will help you get the correct proportions.
 Mayfly Dun size 1-3 Please watch the videos before choosing a specific fly pattern, they explain how to use Detached body pins, Wingburners and Wingmaterials. And how to tie in Wings/Wing-buds and Nymph-legs/Nymph-backs.
Five Minute Flies Saltwater Fly Tying Instruction Manual Part 1 Part 1
 Five Minute Flies Saltwater Fly Tying Instruction Manual Part 1 Part 1 Congratulations, you are starting an endeavor that will serve you well the rest of your life. When you catch your first fish on a
Married Wing Purple/Claret
 Married Wing Purple/Claret I received some new winging material in the mail the other day and thought I'd give it a workout. It was kind of fun putting this fly together because I had no real plan as to
Magic Mini Camp: ROPE MAGIC
 Magic Mini Camp: ROPE MAGIC Brought to you by Brian Richards www.4aceproductions.com The Snap Knot The magician shows a rope without a knot on itʼs end. The magician snaps the rope a few times and as if
Ben Bangham Grayling Flies Feb15 Page 1 of 6 KVFDG
 Ben Bangham Grayling Flies Feb15 Page 1 of 6 KVFDG Grayling Patterns demonstrated by Ben Bangham at KVFDG 17Feb15 Featuring: Top tips: Dubbing methods o split thread loops o dubbing loops o dubbing onto
Semi Leopard Appaloosa 2
 Pg. 1 Supplies Needed: Prismacolor Pencils > White Dark Brown Matching or close in color to the body color This project horse is dark sable champagne. Matching pencil is Light Umber. Black Small artists
COSTUME: Black shirt any style, length or cut. Denim jeans or capri s. Green Sequin Polka Dot Dress. White T-Shirt Black Pants Purple Jacket
 4/24/17 STEPS Academy Recital Pictures Sunday June 4, 2017: Picture Info: Please arrive Ready 20 minutes early. LOCATION: Taylor YMCA in Elgin at 50 N. McLean BLVD Pictures are taken in dance studio 1
The Nutcracker 2018 Cast A
 The Nutcracker 2018 Cast A Dear Nutcracker Parents: Thank you for allowing your child to participate in Charlottesville Ballet s production of The Nutcracker. This packet provides you with detailed information
Duds to Dazzle Clothing & Textile Competition Information & Guidelines
 Duds to Dazzle Clothing & Textile Competition Information & Guidelines In the Texas 4-H Youth Development Program, 4-H members participate in the 4-H Clothing & Textile project to become knowledgeable
Sunseeker Multis Skylark Shawl
 DK375 Sunseeker Multis Skylark Shawl Designed by Shannon Dunbabin Sunseeker Multis Skylark Shawl Designed by Shannon Dunbabin Skill Level: Materials: Gauge: Intermediate Cascade Yarns Sunseeker Multis
How to Draw a Pikachu
 How to Draw a Pikachu Easy Fast The Pokémon franchise has been popular among children, teenagers, and even adults for over two decades, beginning with the release of the first Pokémon video game in 1996,
Children s University Tasmania Monthly Challenge Make your own Robo Wheel
 Children s University Tasmania Monthly Challenge Make your own Robo Wheel Have you ever spun a Top? A top is a flywheel, a spinning disc that stores energy. Once a flywheel gets going, the stored energy
Marine Corps Water Survival Qualification Preparation FORCE FITNESS DIVISION WATER SURVIVAL INTERMEDIATE 2 WEEK TRAINING PROGRAM
 Marine Corps Water Survival Qualification Preparation FORCE FITNESS DIVISION WATER SURVIVAL INTERMEDIATE 2 WEEK TRAINING PROGRAM Water Survival Intermediate 2 Week Training Program Objective This 2 week
Wing assemblyfinal Master 4/29/04 11:20 PM Page 1. Issued January 1, Sabre Aircraft. Assembly Manual. Sabre 16ss Wing
 Wing assemblyfinal Master 4/29/04 11:20 PM Page 1 Issued January 1, 2002 Sabre Aircraft Assembly Manual Sabre 16ss Wing Wing assemblyfinal Master 4/29/04 11:20 PM Page 2 1. 2. 1. Unzip the cover and remove
Approx. Trod* Mark A "REELY" RELIABLE PRODUCT
 Trod* Mark 9240 A "REELY" 79120 79100 LAYING DOWN RABBIT Size 9" x 9" Softly filled, colourful, print covered body, plush head, print lined ears, felt eyes, tongue and nose. Ribbon bow on neck. Packed
Assembly instructions nortik scubi 2 Recreational kayak
 Assembly instructions nortik scubi 2 Recreational kayak QR-Code assembly video: Assembly instructions nortik scubi 2 Dear Customer, You have purchased a nortik scubi 2, an innovative hybrid kayak for recreational
IMPORTANT UNIFORM AND GENERAL APPEARANCE INFORMATION
 UNIFORM Years 3-6 IMPORTANT UNIFORM AND GENERAL APPEARANCE INFORMATION At The Portsmouth Grammar Junior School uniform is an important part of our school ethos. Our bespoke uniform instils in our pupils
JMPI for the MODULAR AIRBORNE WEAPONS CASE (MAWC)
") JMPI for the MODULAR AIRBORNE WEAPONS CASE (MAWC) The Modular Airborne Weapons Case (MAWC) will be inspected in its entirety prior to inspecting the Reserve Parachute. The inspection of the MAWC begins
JMPI for the MODULAR AIRBORNE WEAPONS CASE (MAWC) The Modular Airborne Weapons Case (MAWC) will be inspected in its entirety prior to inspecting the Reserve Parachute. The inspection of the MAWC begins
Sewing. Simply. wild & free FRESH IDEAS WITH FABRIC. boy s shirt KEY. fast fat quarter LUGGAGE TAG. Lazy daisy stitch
 grainline Simply Sewing FRESH IDEAS WITH FABRIC HOW TO PRINT THIS PATTERN Print out this 30-page PDF on to A4 paper. Trim away the shaded border from each page and position the pages as below to assemble
3 SIZE NAGASAKI HATA
 3 SIZE NAGASAKI HATA MADE FROM MODERN MATERIALS By Peter (P-air) Stauffer June 2000 The kite and resulting plans and instructions, I have made because of a request by Uli Wahl and Rico Argent, as Rico