4-H Equine Series Exploring Horses Resource Levels 1 3
|
|
|
- Ambrose Harper
- 5 years ago
- Views:
Transcription

1 4-H Equine Series Exploring Horses Resource Levels 1 3 Introduction Have you ever wanted to learn about horses and how to ride them? Then this is the 4-H project for you! There are seven sections called Skill Builders. Each Builder will focus on a topic. This resource manual is meant to be used with Exploring Horses Levels 1, 2 and 3. Use the resource manual to help you complete the activities in your project book and to complete the skills in your skills checklists. The resource manual has lots of interesting and helpful information about horses. Meet Equus! Equus is a smart, safe horse that will appear throughout your manual to give you useful facts and safety tips on working with your horse. Equus is the Latin word for horse. Equus is also the scientific name for the group of animals that includes horses, donkeys and zebras. This symbol will appear throughout the resource manual. Check out the website ideas wherever you see it. These links will lead you to online content to help with your 4-H horse project. Table of Contents Introduction 1 Skill Builder 1 Safety & Stable Management Skill Builder 2 Groundwork Skill Builder 3 Grooming Skill Builder 4 Psychology Skill Builder 5 Health Skill Builder 6 Identification & Conformation Skill Builder 7 Riding - Revised Glossary 66 Dig It Do It Dream It Learning is 3D! To help you get the most out of your learning, each project meeting has the following parts: Dream it! Plan for success Do it! Hands on learning Dig it! What did you learn?


, directly behind them and under their head. Their hips also block their vision of their rump area. Speaking to your horse lets it know where you are at all times. 6.")
2 Skill Builder 1: Safety & Stable Management To be safe when you are handling or riding your horse: Start with a safe attitude Dress properly Use safe equipment Use sensible horse-handling methods 1. Do not run around horses. If horses see sudden movement without seeing the cause of it, they may kick, strike or bolt, causing injury. 2. When you are working around horses, wear protective footwear. Do not wear runners, thongs or go barefoot. 3. When you are riding or grooming do not wear anything that dangles. It can get hooked or broken. 4. When approaching a horse, always walk toward the shoulder; never from behind or ahead. Even in a stall, try to approach towards the shoulder. Always let a horse know you are approaching by talking to it. 5. Horses have three blind spots where they can t see you; directly between both eyes extending out approximately 10 inches (25 cm.), directly behind them and under their head. Their hips also block their vision of their rump area. Speaking to your horse lets it know where you are at all times. 6. Lead a horse from the left side, walking between the head and shoulder. This position gives you the best control while maintaining optimum safety. Place your right hand approx. 6 inches (15 cm.) down the shank, carry any excess lead rope in your left hand. 7. Never wrap the reins or lead shank around your hand or any part of your body so that if the horse were to bolt it would not wrap dangerously around you. 8. When leading a horse, turn it to the right (away from you) so it won t step on you. Push its head to the right using the lead shank, held in your right hand, and as you turn stay between its head and shoulder. 9. When the horse is tied do not go under the neck of a horse to get to the other side. If you do, you are passing through a blind spot and may frighten the horse. Go around the hindquarters, talk to your horse and keep hand contact on the horse as you walk around, so that it knows it s you when you pass through its blind spot. The closer you stand to a horse, the less likely you are to be injured if kicked. You may be shoved away, but not badly hurt. 10. When grooming the underside of a horse or working on the legs or feet, never sit or kneel. If the horse moves, you will not be able to get out of the way. A hand placed on the ground as you work can easily be stepped on. Always keep your feet on the ground and a hand on the horse so you can react quickly if needed.. 2
3 11. While handling or grooming do not drop grooming tools or equipment near the horse. Place them away from the horse so you will not trip on them, or they will not be stepped on by the horse. 12. When you are working around horses, wear protective footwear. Do not wear runners, thongs or go barefoot. When riding, always wear footwear with a heel. Gloves will help prevent rope burn. Do not wear anything that dangles when working with horses. 13. Do not mount your horse in a barn or close to the overhanging edge of a roof. 14. While handling or grooming do not drop grooming tools or equipment near the horse. Place them away from the horse so you will not trip on them, or they will not be stepped on by the horse. 15. Never ride a horse into or out of a barn or stable. 16. Tying Your Horse: When you tie your horse, tie it to a secure object (like a fence post secured in the ground) that will not break or move if the horse pulls back. Never tie a horse to the rail of a fence. It may break or the nails may pull out if the horse pulls back. 17. If possible, never tie below the level of the horses withers. Tie your horse, using a quick release knot. Tie the shank to the post so that it is short enough that your horse can not get a leg over the rope. Never tie a horse with reins. Always use a lead shank. 18. Keep a pocket knife handy where you tie your horse and in the horse trailer so that if you ever need to release your horse from its lead shank and you are unable to untie it, you can cut it. This may be necessary if a horse is frightened and pulls too hard on the lead shank. 19. When working around your horse (grooming, washing, saddling, and so on) maintain at least 90 degrees of space between your horse and any solid objects (fence or wall). Teach your horse to stand still at a 90 degree angle to where it is tied. 20. Avoid accidents by practicing safe management procedures. Keep all equipment in good repair. Maintain clean aisles and well constructed stalls and fences. Check equipment regularly to ensure a safe experience every time. Check your stalls for nails or splinters. Check your yard or pasture for loose nails, broken glass, wire etc. 21. Be sure to store shovels, forks, pails etc in a safe place. Pick up loose bale twines. 22. Feed should always be stored where your horse can not get into it. 23. If releasing your horse into a stall or field turn the horse around to face the door or gate before letting it go. Respect your horse s instincts. Any horse no matter how calm has a first INSTINCT for survival. Try to anticipate situations that may make him nervous, and get him used to them. Get to know you and your horse s strengths and weaknesses, and get help from a professional when you need it. 24. Always treat your horse quietly and firmly. Speak quietly and never surprise your horse. 3

4 Helmets Your club may have rules regarding the wearing of a helmet. The decision to wear helmets is an issue of personal safety. It is the responsibility of the rider and parent/guardian to ensure the proper use and fit of helmets. Some events or riding establishments have compulsory rules that require riders to wear helmets. Most events (including Western events) allow and even encourage the use of a helmet rather than a Western hat. Here are some things to consider, when making the decision whether or not to wear a helmet when you ride: head injury is the leading cause of death from riding accidents; compared to injuries from other childhood activities, riding injuries are severe; girls aged are in the highest risk group; most riders who died from head injuries were not wearing helmets most injuries are farm kids riding around for fun 4
5 Safety Sense Below are some important horse safety rules. Always speak to your horse before approaching or touching him. A red ribbon tied on a tail indicates a kicker! Keep back! When riding, wear boots with proper heels to prevent your feet from slipping through the stirrups. When saddling your horse, keep your feet back and well in in the clear. Reach forward to saddle your horse. Be sure to wear boots! Never wrap the lead strap, halter shank, or reins around your hand, wrist, or body. When your horse is frightened and tries to run, turn him in a circle until he stops. When walking beside your horse, use a long lead strap and both hands. Hold the excess lead strap into a figure eight style and hold it in your left hand while your right hand is held fairly close to the horse s head. If the horse rears up, release the hand nearest the halter. Slow down when riding on rough ground or in deep sand, mud, ice, snow or on pavement. Always be cautious where there is any danger of falling or slipping. Never tie your horse by the reins, as he may pull back and break the reins and tie post Know your horse s temperament and how he usually reacts to different situations. No matter what happens, control your temperament. Let your horse know that you are a firm, kind master. 5
6 The Riding Arena An arena is a fenced or covered rectangular area set aside for training and riding horses. When it is outdoors it may be called a riding ring. The track or rail is the part of the arena where the horses normally work. The outside track follows the walls or fence and the inside track is about 3 metres inside of the outside track. When you are riding on the track with your right side towards the centre of the arena, you are on the right rein. When you are riding with your left side towards the centre of the arena, you are on the left rein. Riding Arena Rules When riding in an arena with other riders it can become like a busy highway. It is important that you follow some basic rules to help keep the traffic flowing and to prevent accidents. 1. Riders must close the gates behind them when they enter or exit the arena in order to ensure that horses will not bolt out of the arena. It is a good idea for riders to DISMOUNT and lead their horses through the gate. 2. Be aware of others around you. Be careful not to cut anyone off. 3. Keep at least one HORSE LENGTH between riders. The rider following another should be able to see the heels of the horse in front of him. Keep out of bunches. 4. Horses moving slower are given priority for using the outside track. Riders working faster must move to the inside track. When riders are working in different directions, those riding on the left rein are given priority for using the outside track. Those working on the right rein would move to the inside track. This rule means riders know they will pass oncoming riders, left shoulder to left shoulder. 5. When working at the WALK, a rider should use the outside track to keep out of the way of faster horses, unless all of the horses are traveling at a WALK. 6. If you have to stop for any reason, move to the centre of the arena. 7. If you must stop on the rail or slow your horse down, make sure there is space behind you for riders to respond to your transition. 8. When exiting the arena, do not rush. Leave the arena at a WALK, in single file. 6

7 Hauling Your Horse Most 4-H members live some distance apart. This means that to have a group riding activity, the horses need to be transported. To avoid trailering problems, make sure that everything is in good shape. Regularly check your lights, hitch, ramp, tires and trailer flooring. Safety Guidelines 1. Try to distribute the weight evenly. If you are hauling only one horse, it is safest to load it on the left side. 2. If your horse cannot be sent into a trailer with a divider, you should lead your horse into the left side while you stand on the right side of the divider and vice versa. 3. It is not a safe practice to walk in front of your horse and lead it in. Never do this if there is no exit or escape door. 4. When you have loaded the horse, fasten the butt bar or chain before you tie the horse.(when you are unloading, do the reverse. Always untie the horse before you open the door. or unlatch the butt bar or chain. Ease the bar/chain down carefully so you do not bump your horse s legs.) 5. If you tie the horse in the trailer, use a quick release knot or panic snap. Allow enough length of rope that the horse can move its head to balance. 6. Double check that the doors are closed securely and fastened correctly. 7. Double check all connections such as the hitch, the signal and brake lights and the safety chains. 8. If you are hauling your horse a long distance you should stop and WALK your horse after four hours of driving. 9. Use shipping boots to protect your horse s legs and a tail wrap to prevent it from rubbing its tail. Equus says Learn how to prevent accidents before they happen. Your leader may show you the Trailer Loading/Unloading: section on disc one of the 4-H Horsemanship DVD collection. 7

 and someone to bring up the rear. 2. Wait until everyone is mounted before starting the trail ride.")


8 Other Trailering Safety Concerns: Tying (Outside) -Learn to tie your horse with the proper length of lead shank so that it can t caught on door handles or other things. Hay Nets - Tie up high with the bottom tied up so it will not drop down to leg level as the horse eats. Do not over fill the net or use hay with many stiff stems. Tie dangling ends out of the way. Window - Tie the horse so it cannot put its head out the window when travelling. If windows are wide or large, use heavy metal screening or metal bars over the window so it can be opened safely. Safety on the Trail 1. Have a designated lead rider (trail boss) and someone to bring up the rear. 2. Wait until everyone is mounted before starting the trail ride. If someone needs to stop, to adjust equipment etc., have everyone stop. This will prevent runaways as horses left behind may try to catch up to horses that have continued on ahead. 3. Always allow one HORSE LENGTH or more between yourself and the next rider. 4. When crossing roads, have everyone cross when the traffic is clear. 5. When crossing streams or rivers, be careful to cross where it is shallow and safe. Have someone remain behind to help any horses through that may not want to go. 6. If you are riding and get caught in a thunderstorm, avoid riding under trees, on hills or along streambeds. 7. Remember to bring along: - a halter and tie your horse in a safe place if you need to stop for awhile, - a HOOF pick in case a painful object gets stuck in your horse s HOOF, - a bottle of water, bug spray, - a whistle in case of emergency situations, and - a lasso or 22 ft rope to use in case of emergency situations. 8. Be sure that you tell someone else who is not coming on the ride where you are going, and when you expect to return. 8

9 Skill Builder 2: Groundwork Approaching A Horse When you walk up to your horse it will respond to how you move and your voice in other words, your body language. Horses can see in front or behind themselves, except in their blind spots. Always approach from an angle where he can see you. Avoid sudden movements Speak quietly so that he knows you are there. When you are close enough give him a gentle pat on the shoulder or neck When a horse is cornered and cannot run, his first INSTINCT is to kick, so never surprise him. Keep close to his body so there is LESS chance of you being kicked. Always work around a horse that is tied up. Never go over or under the lead rope. Halters and Lead Ropes Safety Tip: If catching a horse in a stall, close the gate behind you but do NOT latch it. Leaving it unlatched means that if something happens that you must leave the stall in a hurry you can do so quickly and safely. Halters come in many sizes and styles. Some of these include rope halters, nylon web halters and leather halters. Rope halters are often used for younger horses or horses that may pull. Rope halters designed for cattle should never be used on a horse since any pull on the lead rope causes a pulling down under the jaw and over the head. Lead ropes used for everyday should not have a chain on them. Chains are common on lead ropes used for showing, but are neither strong enough nor safe enough for daily use. Halter Care Leather products should be cleaned with saddle soap and oiled regularly. Cotton rope halters may shrink when wet or rot if not properly dried. 9


10 Haltering A Horse Halters should not be left on horses. Halters may catch on fences, brush or branches and cause the horse to panic and get injured. If halters are left on a loose horse they must be checked daily. Before you approach your horse to catch it, prepare the halter by: Unbuckling the crownpiece. Folding the lead rope in half and holding it over your left arm, making sure the end is not dragging where it can trip you. Slipping your left hand through the bottom of the noseband and resting the halter on your wrist. Reach out with your right hand to touch the horse 1. Approach your horse towards the left (near) shoulder and talk to it. 2. Stroke your horse and approach the head but don t go past it. You may need to hold your horse steady with your right hand under its neck. 3. Place your left hand under your horse s neck and your right hand over its neck. Reach with your right hand to grasp the lead rope you are holding over your left arm and pull the lead rope over your horse s neck. Move the lead rope to just behind the ears of your horse. 4. To hold the lead rope in place, wrap its loose end around the part of the lead rope attached to the halter. 5. Now hold the crownpiece of the halter in your left hand and reach under your horse s neck and place your right hand over its neck. 6. Grab the crownpiece with your right hand and move the left hand to the left check buckle, holding your horse steady with your right arm. 7. Slowly snag your horse s nose by using your left hand to maneuver the halter. 8. Pull the halter up in place and buckle the crownpiece and secure. 9. Slide the lead rope off your horse s neck. Equus says... A nervous handler causes a nervous unsafe horse. 10. Hold the lead rope with your right hand, about 12 cm (six inches) from the halter and fold any extra length into your left hand. 11. Check to see that the halter fits correctly. Here is a helpful video on how to properly halter a horse. or your leader may show you the Haltering section on disc one of the 4-H Horsemanship DVD collection. 10


 clearance between the metal buckles on the noseband and the cheekbones. 2.")
11 Rope Halters You may chose to use a rope halter instead of a leather halter. This picture shows the parts of a rope halter. Fastening a Rope Halter These picture show the correct way to fasten the rope halter. Be sure to fasten the later AROUND the EYE, not above it. Fitting A Halter Make sure the halter is the right size for your horse s head and fits it correctly. A halter that is too big will be dangerous and one that is too small will rub and irritate your horse. Adjusting the halter to fit properly will normally require simply adjusting the crownpiece. A halter is correctly adjusted and fits if: 1. There is a two finger (sideways) clearance between the metal buckles on the noseband and the cheekbones. 2.You can fit two fingers sideways between the noseband and the nose. 3.You can fit four fingers (sideways) under the throatlatch. Proper fit of a rope halter. 11
 side.")
12 Leading A Horse Horses walking on top of the handler during leading are one of the biggest and most common problems. The horse should stay back. A horse should learn from the very beginning that the handler has an area of personal space in which he is never allowed to enter unless asked. It is safest to lead a horse from the near (left) side. Always lead with a halter and shank because they provide better control. It is unsafe to lead a horse by just the halter or with just a rope around the neck. 1. Hold the lead rope with your right hand, approximately 12 cm (six inches) from the halter. Do not hold the chain if there is one on the shank. 2. The remaining length of the lead is folded and held neatly and safely in the left hand. Make sure there is not a sagging loop in the lead shank that hangs below your knees. Never coil excess lead shank around your hands. 3. Lead the horse from its left side, positioning yourself between its head and shoulders. Move with the horse, do not drag it. The ears and eyes of your horse tell you what it may be thinking, so it is important to watch the head as you lead a horse. 4. To move a horse forward, you may give the verbal command WALK. Give the horse a moment to understand the command, then walk forward yourself. Don t look at the horse as you move it forward, as this will often cause it to resist moving. 5. If the horse won t move, then try pushing it one step sideways before moving forward. 6. Don t lead the horse from behind the shoulder as you will have less control and could possibly be kicked. 7. To halt your horse, give a verbal command whoa and apply pressure on the halter back towards the horse s chest. If it fails to stop, give a stronger hand aid. 8. To BACK a horse, face the direction that you want the horse to move. Never stand directly in front of it as you could get injured. Don t change hands on the shank. Give a verbal command to BACK and apply slight pressure on the halter, on a give and take basis, towards the horse s chest. Walk with the horse as it BACKs. 9. To turn a horse to the right, push the horse s head to the right so that the horse is forced to turn on its haunches. For safety reasons, horses should always be turned to the right (away from you). This will prevent you from being stepped on or bumped by your horse if it is frightened while turning. 10.Sometimes it may be necessary to turn your horse to the left. To do this safely, take the lead shank in your left hand. Place your right hand on the ribs of your horse and, as you turn the horse s head towards you, apply pressure on the ribs to push his ribs and hind quarter away and keep your horse from stepping on you. Correctly turning to the left is an acceptable way to regain control of a horse that is excited or upset. Your leader may show you sections on disc one of the 4-H Horsemanship DVD collection that demonstrate leading, turning and backing. 12


13 Equus says When leading your horse... Do! Don t! When leading a horse through a doorway, make sure the door is open and will not close as you move through it. Slow down to a WALK and move ahead of your horse, but not directly in front of it. Walk calmly through the door then go back to your position at the horse s shoulder. If you have a aged horse that does not want to lead, be sure that you walk beside it. Walking in front of it and looking at the horse while leading it may make the horse more resistant to moving forward and can be dangerous. Have someone assist you by standing to the side of the horse and encouraging it to walk forward with a long whip, if necessary. Tying Your Horse Learn to tie the quick release knot correctly. Use it EVERY time you tie your horse. Visit the website below for an instructional video on tying a proper quick release knot. v=iz0zc2jschs Your leader may show you the Tying Your Horse section on disc one of the 4-H Horsemanship DVD collection. Safety Tip: You should tie a horse only with a halter NEVER with a bridle or a bit. Also, make sure that they are far enough away from other horses that they might fight with. 13


 and can move backwards and forwards one step.")


14 Tying to a Post Find a strong, secure object such as a post to tie your horse to. Never tie your horse to wire or anything that may pull loose. Tie your horse no lower than shoulder height. Use a quick release knot. A length of 2 feet between the horse and the post is usually considered safe. The rope snap should be attached to the bottom ring of the halter noseband, not on the sides of the halter. Cross Tying Cross ties are another common way to secure a horse. Cross ties are usually two ropes tied high up on each side of the walkway in the stable. Each rope usually has a snap or clip to attach to the SIDE rings of the halter noseband. Cross ties should be adjusted so that the horse can move his head from side to side about 8 inches (16 cm) and can move backwards and forwards one step. Horses who do not tie well to a post or who have never been tied in cross ties may become upset so be careful. Safety Tip It is a good idea to carry a pocket knife with you when working with horses. It is possible you may need to cut a rope to free a trapped horse. Moving Your Horse Sideways from the Ground (Dismounted) Never get into a small space between a horse and a solid object such as a fence. We should be able to move the horse that is tied. 1. Get the horse s attention. You will know you do if the ear on the side you are on is focused on you. 2. When safe for you to do so, a verbal command and light touch should move the desired part. Remember to speak horse. 3. If the horse does not respond by moving, DO NOT PUSH but instead ask your horse to move over by apply steady pressure using all your fingers and gradually increase this pressure until the horse moves. At first just touch lightly and then apply more pressure gradually until the horse moves. Remember to reward them for the slightest movement, so then eventually you will only have to touch them lightly and they will respond. Also it is important to use steady pressure and do not jab at the horse as this is ineffective and will not respond in your horse learning to move away from the lightest pressure. 14
15 Showmanship This section has a lot of information to help you prepare to show a horse in a halter or showmanship class, but some of it, such as The Quarters and Leading, is important for ALL horse handlers to know. Showing a horse at halter is an easy way to start showing. At home, you can use the same skills when taking pictures or showing your horse to friends or possible buyers. It demonstrates your handling skills and the training of the horse. Leading: Proper leading at all times keeps you safe and helps your horse understand that you are the leader. 1. Lead on the left side of your horse with the lead shank held 8-12 inches (20-30 cm) from the halter. 2. Hold the excess lead shank in a figure eight or a large circular coil for safety. 3. Stay halfway between the horse s head and shoulder. 4. Your horse should move easily with you. 5. All turns are made to the right with the EXHIBITOR walking around the horse. Setting Up: This activity teaches your horse obedience while showing off its good looks! 1. The horse should set up quickly, stand squarely and move backwards and forwards easily. (This takes a great deal of practice!) 2. The horse must be trained to pose by the use of the lead shank and soft voice commands, as you cannot touch its legs. 3. To change a back leg move the body accordingly forwards or backwards. 4. To change a foreleg, turn the head slightly in the opposite direction and shift the weight of the body accordingly. Turning the head slightly forces the weight onto the leg that is in position, freezing it in place and freeing the other leg for movement. 5. This is training that must be done at home long before the show. 6. In halter showmanship, the EXHIBITOR is expected to move from side to side freely. This is safe only if you have trained your horse well at home. 7. When the judge is viewing your horse, it is permissible for you to move between the judge and the horse, although you should only block his view momentarily as you move to the opposite side. You should step quickly and quietly. The Quarters: This system of showmanship is easy to remember. Although the terms judge and EXHIBITOR are used, YOU are the EXHIBITOR (even if you are at home) and the judge might be a vet or FARRIER or anyone else looking at your horse. It is important to hold your horse as described because it keeps the other person safe. 1. When the judge is viewing the front half of the horse, the EXHIBITOR should be on the opposite side. 2. When the judge is viewing the rear half, the EXHIBITOR should be on the same side. Divide the horse into four sections. A, B, C, and D. (See Next Page) The reason for this system is so that if the horse ever began to act up, the handler would be in the proper position to lead the horse away from the inspector. Your leader may show you the Safe Handler Position section on disc one of the 4-H Horsemanship DVD collection. 15
16 Diagram #1 When the judge is viewing the front of the horse in section A or B, the EXHIBITOR should be on the opposite side. This gives the judge a clear view of the horse. Diagram #2 The judge is now viewing the rear of the horse, section D. The EXHIBITOR moves to the same side as the judge. Diagram #3 While the judge is viewing the horse from the direct rear, the EXHIBITOR maintains his position. Diagram #4 When the judge moves into section C, crossing over the imaginary line directly behind the horse, the EXHIBITOR moves to the same side of the horse as the judge. Diagram #5 Until the judge crosses over the imaginary line, the EXHIBITOR remains on the same side of the horse as the judge. Diagram #6 As the judge move into section B, the EXHIBITOR moves to the opposite side to avoid obstructing the view of the judge. 16
17 The Horse s Appearance: 1. The hair coat should be smooth and glossy. 2. The horse should show hard, rippling muscles and have a clean healthy appearance. 3. It should be alert. 4. The feet should be clean and trimmed. 5. The mane and tail should be trimmed and combed depending on the breed style. 6. Have all your clipping and trimming freshly done. 7. The halter should be clean and fit the horse. Exhibitor s Appearance: 1. The EXHIBITOR should wear suitable Western or English attire, including a western hat or English helmet (or riding helmet as required or preferred), western long sleeved shirt or appropriate English jacket, long pants/ jeans or breeches/jodhpurs and western boots or English paddock boots with half chaps or tall boots. A vest or jacket may also be worn. In Western attire. Check the rules at each show as some may allow exhibitors choice of attire, English or Western, or may only allow one or the other. 2. Your hat should fit well, be clean and be shaped properly. 3. All clothing should be clean and well pressed. 4. Boots should be clean and shiny. A neat, well-presented EXHIBITOR and a shining horse will make an outstanding entry in any showmanship/halter class. In the Show Ring: 1. Be on time! Check to see if a pattern has been posted. 2. If no pattern is posted, enter the ring at the direction of the ring steward and follow directions. 3. When asked to line up, enter the line from the rear. 4. Line up evenly with the others and leave some space on either side of your horse. Do not crowd others! 5. Set your horse up quickly. 6. Keep one eye on the judge and one on the horse. You should always know where the judge is. This is necessary because it affects which side of the horse you stand on and how alert your horse should be. 7. If you are instructed to line up head to tail be sure to leave one HORSE LENGTH between you and the horse in front of you to avoid being kicked. 8. No matter where the judge is standing, always lead or back your horse from the left side. 9. Anytime your horse has to stop and stand, square up your horse s feet. 10. Don t overshow your horse. When the judge is looking at other horses, allow your horse to stand if it is posed reasonably well. Showmanship is a class that requires practice and patience. Both you and your horse must be physically fit. Practice leading correctly and setting your horse up quickly. A proper set up should only take a few seconds! A few minutes of practice each day will make you and your horse a confident entry at your next horse show! Equus says In showmanship classes the horse is not judged on CONFORMATION. The class is judged on the handler (exhibitor) and grooming of the horse. Always remember to SMILE when showing your horse. The judge is always watching you, and if they can see 17


18 Skill Builder 3: Grooming Why Groom? Regular grooming: improves a horse s appearance helps increase circulation stimulates the oil glands which make the horse s coat look shiny provides an opportunity to check for injuries, skin irritations or other health problems. The amount of grooming a horse needs will depend on how much you ride and where the horse is kept. A horse that is in a barn and/or blanketed needs to be groomed every day. Constant handling, grooming and patient care will work wonders to develop trust and confidence between a horse and handler. You will develop a positive relationship and your horse will stand more quietly and safely the more you work with it. Pasture horses do not need thorough daily grooming because they GROOM themselves. However, every horse should be groomed before and after each ride. Grooming Kit Every horse owner should have a grooming kit. A basic kit should contain: A hoof pick A plastic or rubber curry comb A dandy brush (has fairly long, stiff bristles) A body brush (softer bristles) Two sponges or two washing rags - in different colours for the different ends of the horse A long comb (not metal) A shedding blade (used to help remove winter hair or use the backside to scrape away water after bathing a horse). Grooming cloth How to Groom When grooming a horse, start at the top of his neck and work your way to his rear, then switch sides and repeat. Make sure your horse or PONY is safely tied. On the next page, you will find a chart that lists the names and proper use of each tool you should have in your grooming kit. 18


19 Rubber Curry Comb Dandy Brush Body Brush Mane Comb Sponges or Towels Hoof Pick Start with the rubber curry comb. Use a circular motion to loosen dirt that has settled under the hair. Be careful of bony areas and do not use on the legs or face. After the rubber curry combs lifts the dirt to the surface, use the dandy brush to flick the dirt away. Use this as though you were sweeping a floor. You should see a cloud of dust come off with each stroke. If you don t, you are likely pushing the dirt back under the hair, irritating your horse and you need to use a more flicking motion. Remember, always brush with the hair. The body brush smoothes down the hair and brings out the shine after removing dirt and scurf (dead dry flakes of skin) with the rubber curry and the dandy brush. Smooth the hair flat with this brush using long smooth strokes and pressure. This is the only brush that may be used on the whole body. Use a plastic (not metal) mane comb to gently comb the horse s mane. Use the dandy brush to brush the horse s tail. A comb may break the hairs. You may also use your fingers to remove as many tangles from the mane and tail as you can. Work slowly and gently to avoid breakage. Using one of your sponges or towels (keep one specifically for the head), clean around the eyes and nostrils. Wet it in warm water and wring it out. Untie and back your horse away from the fence. Using one corner, wipe near the eye and then use another corner for the other eye. Using the other end, clean the nostrils. Using different corners will help avoid spreading contamination. Retie your horse. Use the other sponge/towel to wipe the dock area under the tail, standing at your horse s side, not directly behind it. Clean out the hooves with your hoof pick. Always scrape with the hoof pick AWAY from you, as though you were peeling a carrot. Thoroughly clean out the hollow areas on both sides of the frog and around the SOLE of the foot. While doing this, inspect for loose shoes, foreign objects and THRUSH. Set the foot down don t drop it. A plain rag or towel should be used to wipe over the entire horse s coat to bring out the shine. Towel Shedding Blade You can use a shedding blade as a sweat scraper after your horse's bath or after a hard workout when they're pretty sweaty. There are teeth on it and you don't want to use it on the horse's face or back too far back in their abdomen near the genital region. Make sure you're going with the horse's hair coat. If you're going sideways on it or against the grain, your horse is going to find that to be pretty irritating because of the teeth pulling on the hair. 19


20 A video demonstrating how to groom a horse. or your leader may show you the Grooming section on disc one of the 4-H Horsemanship DVD Picking Up The Feet The value and lifespan of the horse depends on its ability to perform work. Without four SOUND feet it will be unable to do the things you want it to do. The most important details in the care of a horse s feet are to: Keep them clean Prevent them from drying out Trim them so they retain a proper shape and length Ideally, the feet of a horse should get daily care. Each day, clean the feet of horses that are shod, stabled or used. Front Feet: When you are picking up the feet of a strange or young horse start with the front left foot. Most horses are used to being handled from this side and are not as sensitive about the front as the back. Safety Tip: When you are working under a horse, do not sit or kneel. If the horse moves, you will not be able to get out of the way. A hand placed on the ground as you work can also be stepped on easily. 1. Talk to your horse as you move and work around it. 2. Stand beside your horse s front leg, facing the hindquarters. 3. Gently rub your hand from the horse s shoulder down the leg. 4. When your hand reaches the pastern area, gently grip the leg with your hand. 5. Gently pull up on the horse s leg until its hoof is in the correct position for cleaning. 6. Use a hoof pick to clean out the mud, stones, bedding or anything trapped in the m idle groove of the hoof. 7. Slowly set the horse s hoof back on the ground. 20


, then near hind, then off fore (right front), off hind.")

21 Hind Feet: To pick up the left hind foot: 1. Approach the horse from the front and place your left hand on its hip. 2. Move your right hand down, keeping your left hand on the hip to feel for tenseness of muscles. Lean your shoulder into the horse s thigh to force the horse s weight to the other side. 3. Grasp the back of the CANNON just above the fetlock and lift the leg forward. Stand as close to the leg as possible. If you stand very close and the horse strikes out at you, the kick will merely push you away. 4. When the horse is settled, move to the rear, keeping the leg straight and swing your left leg underneath the fetlock to help support the horse s leg. To pick up the feet on the far side use these same procedures but reverse your hand positions. Equus says... When holding the hooves, always keep your knees bent in order to avoid undue stress on your back. Cleaning Your Horses Feet: When cleaning your horse s feet, start with the near fore (left front), then near hind, then off fore (right front), off hind. ( Near refers to the left side and off refers to the right side.) Always clean from heel to toe so accidents can be avoided. If the horse jumps, the hoof pick would go up into the air rather than into the horse or yourself. Remember to be considerate of the horse when you have the foot up. Don t hold it too far away, too long a period of time, nor too high, making it uncomfortable. Pick it up for short periods, keeping the leg close to the horse and don t forget to reward your horse. Safety Tip: Standing closer to the horse when working with the feet is safer than being further away. If they kick at you, it will push you away rather than giving them room to fully extend their leg with a blow. 21

22 Parts of the Hoof Bars: The thickest raised portions of the wall near either side of the frog. Cleft of the Frog: The central groove of the frog Frog: The frog is an elastic tissue that divides the SOLE into two equal halves. It should be large and well developed with no moisture showing. The frog distributes pressure as the horse moves and the ACTION of the frog, when it makes contact with the ground, helps circulate the blood up the leg. The frog normally sheds several times a year. Heel: The back of the foot that hits the ground first as the horse travels. SOLE: The SOLE forms the bottom surface of the foot. The SOLE is concave from front to back and from side to side because it is not intended to support weight. Toe: The front of the hoof. Wall: The hoof wall is the outer portion of the foot. It is not an even thickness around the foot. It is thickest at the toe, where it is under the most pressure, and thins towards the back. White Line: The connection between the SOLE and the wall. Signs That A Horse Needs Its Hooves Trimmed: If the hoof wall is more than ¼ in. longer than the SOLE. If the hoof has chips, cracks, flares or a long toe. If the hoof is longer on one side than the other or the feet do not match. Equus says... Regardless of whether you show your horse or not, there are some basic grooming techniques that are good to know for health and safety reasons, as well as for showing. There are times when an injury needs to be clipped or cold hosed. A horse that is used to these things will be more relaxed if such an injury needs regular treating. 22

23 Bathing Your Horse For Showing or Achievement Note: Washing is not a good substitute for regular grooming since it removes the protective oil of the hair and skin. If you wash your horse to remove salt and sweat after a hard work out, bathe the horse with clear water. Generally, its it best to bath only before an important event like a show or achievement day. 1.Always move slowly and calmly around your horse. If you re using a hose, start with a slow trickle of water, using it on the feet first and gradually moving upward. As the animal becomes accustomed to the water, you can increase the flow. 2. Wet the horse all over using warm water if possible. Leave the head until last. 3. With a sponge, apply shampoo specially formulated for horses. (Some horses may react to other shampoos or soaps.) Work up a good lather using a mitt or a sponge. 4. Rinse well removing all soap. 5. Using a damp sponge and warm water, wash the head areas using little or no soap. Rinse well. Be very careful around the eyes and ears. 6. If the horse is very dirty, you may wish to give it a second shampoo. 7. Be sure to remove all traces of soap from the hair, the mane and tail. (Soap left on the skin can cause irritation to the horse and makes the hair appear dull.) 8. Use a sweat scraper to remove water from the horse s body. 9. If you re planning to show your horse, there are special products available to produce super shines. These are applied after the final rinse. Check with your local saddle shop. 10. After giving the horse a bath, put it back in the stall or in the shade to dry. If it s cool weather, use a blanket to prevent a chill. Basic Clipping and Trimming Whether you are a trail rider or have show ring interests, you want your horse to be healthy and look its best. Trimming a few hairs can make a world of difference in your horse s appearance. Blunt scissors may be used but electric clippers will produce a smoother result. It is also a good idea for your horse to be used to these procedures in case an injury requires emergency clipping. Electric Clippers: sms_ss= &at_xt=4d3db3d1171c5406%2c0 A video series demonstrating How to Bath Your Horse No matter how quiet the horse may be, it is always better to have a helper when using the clippers. Your job will also be much easier if you get your horse used to the sound of the clippers well in advance of ever needing to use them. 23
 on muzzle Remove all long hairs between bottom lip and throatlatch If you are planning to show your horse, the long guard hairs on the face should be trimmed.")
24 Trimming the Face: Hair around and sticking out of the ears Bridle path Remove long hairs (whiskers) around the eye, but not the eyelashes! Trim long hairs (whiskers) on muzzle Remove all long hairs between bottom lip and throatlatch If you are planning to show your horse, the long guard hairs on the face should be trimmed. This includes the long coarse hairs above and below the eyes (not the eyelashes) and the long hairs on the muzzle and under the jaw. Be very careful around the eyes. Clipping muzzle Clipping underside of jaw Trimming a Bridle Path: This is the small section of mane that is trimmed downwards from the poll (don t trim the foretop!). It makes haltering and bridling easier and also makes the throatlatch appear thinner. The length of the bridle path depends on: a. why you are trimming it b. the breed of the horse c. the thickness of the throatlatch For example, a horse with a short neck needs a short bridle path. However, a horse with a thick throatlatch will look thinner if it has a longer bridle path. If in doubt, trim a bridle path equal to the length of the horse s ear. Remember, you can always trim more but it takes a lot of time to grow out a mistake. 24


25 Brush the foretop forward and comb the mane to the side, out of the way. Using blunt scissors, trim the section you want as a bridle path, down to 1 cm (½ inch or less. Using your free hand, grasp the mane along the edge of the bridle path. This will prevent you from making a mistake. Trim forward toward the poll. Be careful not to trim any foretop. Clip the hair down to nearly skin level being careful not to let the clippers dig into the skin. To make the area smoother, clip the hair vertically along the sides of the bridle path. Then finish by running the clippers along the top. Clipping the Ears The amount of clipping will depend on whether the horse is kept inside. A horse kept outside must have hair left in the ear since this is its natural defense against insects and dust. You may wish to just neaten your horse s appearance by trimming its hair on the edge of the ear. These long hairs on the outside edge of the ear may be shortened without affecting the inner protection. Show horses kept indoors often have all the hair trimmed from the inside of their ears. Do not let clipped hair fall inside the ear! To trim the ear hairs, start from tip, and work to the base, holding the ear so it can be folded between your palm and fingertips length-wise as shown below. Any hair sticking out should be zipped off. Do not stick the clipper inside the ear to clip those hairs. As long as the ear looks clean and trim, you are fine. Trimming the inner ear: Trimming the outer ear: 25

26 Show/Achievement Day Trimming the leg: Most horses have long hairs in the fetlock area so that mud and water do not build up behind the pastern. When horses are being shown, the fetlock is cut short to give the pastern more shape and to create a clean look. The longer hairs on the back of the leg are also trimmed. Begin by running the clippers in the same direction as the hair, using long slow strokes with light pressure. All of the trimmed hair should blend in with the other leg hair. Hair is also trimmed away around the coronet band. This neatens the appearance of the hoof. 1. Wash or rinse any white legs or lightly sponge any areas needing it. If your horse has white legs you may wish to wrap them to ensure they stay clean. You may also touch up white areas with baby powder. 2. If your horse has frizzy hairs near the top of its tail head apply hairspray and a few wraps of vet wrap tape to smooth the hairs together. (Take the tape off just before you head to the show ring.) To avoid spooking the horse or accidentally spraying the region under the horses tail, you may wish to spray the comb first, and then work on the tail. 3. Be sure the hooves are clean both the wall and the SOLE. If you are applying gloss, the hooves must be completely dry. Dark hoof gloss may be used on black hooves and clear on white hooves. If gloss is used, scrub it off after the show as it has a drying effect on the hoof. Some owners prefer to apply hoof conditioner rather than gloss. It is your choice. 4. Brush your horse. Remember to flip the mane over and remove any visible scurf from the underside. 5. Brush the mane, tail and forelock. 6. Use clippers or a disposable razor to tidy up any whiskers on the horse s muzzle. (Note: While clipping your horse several days earlier allows any irregular spots to grow in a little the guard hairs will also grow back. These need to be trimmed on the day of the show.) 7. Use a sponge or damp rag to wipe the dock area. 8. Wipe the horse s body with a clean, soft cloth. 9. You may wish to apply a coat dressing to bring out the highlights in the horse s body, mane and tail. 10. Use a cloth to wipe any dust out of the horse s ears. 11. Use a sponge to clean around the eyes, nostrils and lips. A thin layer of Vaseline, baby oil or commercial grooming product may be wiped around these areas. (Note: Apply coat dressings and oils last because these products may attract dust. At shows where your horse may be tied to the trailer, be aware of dust from passing traffic or the horse pawing the ground.) Remove baby oil after the show because the horse s face may become sunburned. 12. Do a final check of the horse to see if anything was missed. You may wish to use a rag to wipe the horse s hooves one last time. (Don t forget to wipe the dust off of your own boots as well!) Equus says... If you band or braid your horse s mane for the achievement day/show, do it the night before the show. If you have a slinky (a mane cover made from stretchy material), put it on your horse to keep its mane neat and clean. This can save you time on the morning of the show. 26
27 Skill Builder 4: Psychology To handle horses successfully, you need to understand the way they react to situations. However, you must also remember that every horse is different. Most behavior can be predicted because it is caused by the characteristics of the horse but each horse has its own way of reacting. The more we understand the nature of horses (the way they think, how they act and react to different situations, what pleases them, what scares them) the easier it will be to ride and train them. The Nature of the Horse Herd Instinct Horses are gregarious animals - that is, they like to be in a group. In the wild state, the horse felt safety in numbers. Horses feel most secure in the centre of the herd. This instinct explains why a rider may have difficulty in getting his horse to leave a group of riders. The herd instinct causes horses within a group to do the same things. If one horse in the herd shies and runs, the others will no doubt follow. Order of Dominance Horses are herd animals. In large herds, they will develop smaller sub-herds, each with its own leader and followers. Life in a herd is a very comfortable and safe place once the herd has established its pecking order. Each member is either more dominant or more submissive to other members of the herd. Leadership of the herd usually falls to an older stallion or older mare. Authority, once established, is rarely questioned. This is commonly known as the pecking order. In the wild state, obedience to leadership meant survival. In the herds of today, horses earn their position in the group depending on how aggressive they are. The amount of fighting depends upon the lead horse. The pecking order is tested every time a new horse is introduced to the group. Each horse in the group will fight with the newcomer until its position in the group is accepted. Older horses tend to be more aggressive than younger horses. Sounds of Horses Horses can make a range of sounds to show their emotions. Knickers are usually friendly, soft and most submissive. Neighs are stronger and are more assertive. A horse will call out very loudly when panicking. Squeals are most often made when a horse first meets another horse. Mares and their foals can identify each other by the sounds they make. Snorts show apprehension 27
 exactly how it feels or what it wants.")

28 Body Language of Horses Horses communicate a lot with their body language. A horse s expressions and the way it moves will tell other horses and people (who know how to read this body language) exactly how it feels or what it wants. After spending time around horses, you will start to be able to read their body language. Start listening to your horse by looking at the position of the head and look of the eye, followed by how tensed the muscles are and the tail position. Body language is one of the fastest methods of finding out that a horse is sick. A horse that normally comes to you may not come to you at all. A horse with stomach pains may look at its side, roll, stretch, or lie down and refuse to stand. Horses that stand with a dropped head and/or have a dull eye may be sick. By recognizing that the horse is sick you will be able to treat it more quickly. Ears The ears are one of the easiest signs of a horse s mood. When the ears are flat back the horse is usually angry or stubborn and a kick may soon follow. Sometimes ears laid back means it is concentrating really hard, as in a racehorse, cow horse or show jumper making extreme efforts. If a horse is worried or uncomfortable, it may also lay its ears back. Bored Horse - ears tipped back Angry Horse - ears pinned, whites of eyes showing If a horse has its ears pricked forward it is probably curious or completely alert. A horse that flicks its ears around in different directions like a propeller is usually very attentive to what its rider is asking of it. When a horse has its ears relaxed and lop-sided it is resting. A horse s ears that are droopy and hanging to the side and respond slowly to sound usually indicate that there is sickness in the animal. Ears that are perked forward may mean that the horse is listening to or looking very hard at an object that he may mistrust and might be getting ready to spook. 28


29 Head An outstretched head and neck, with ears forward, denotes curiosity. When on the defensive or on alert, the horse lifts and arches its head and neck. Repeated nodding of the head may mean that the horse is impatient. Attentive Horse Alert Horse Ears tipped to listen Ears forward, alert expression Eyes Curiosity or alarm is shown with a wide eye. Wrinkles above the eye often show worry. A horse that is resting will have relaxed, droopy eyelids. Squinting is a signal of a horse getting ready to attack or react aggressively to something. Rolling eyes usually are a sign that the horse is in pain. Drooping eyelids may indicate a tired horse or one that has an ongoing pain. Concerned Horse Uncomfortable Horse Stiff ears, wide eyes and nostrils Pinched mouth, narrow eyes A horse can use binocular vision (both eyes on one area) to focus on distant objects by raising its head. 29
30 A horse with the head held vertical will use binocular vision to focus on objects near its feet. Back Before a horse bucks or shies away from something, it will tense and round its back. A horse that flinches or drops its back under pressure may have a sore back. Legs A horse rarely kicks out without warning. As a threat and warning, a horse will lift its hoof off the ground and pin its ears back. Horses often rest a foot by standing on just three feet. Tail The tail is also a useful measure of a horse s mood. When it is firmly clamped down, the horse is planning to be stubborn or is about to attack. When it is relaxed and swinging from side to side the horse is relaxed and happy. When carried up and somewhat away from his body, the horse is alert and/or curious. When held straight up in the air the horse is usually very high spirited and showing off, or he is frightened. When swishing from side to side can simply mean that the flies are being bothersome or he may be slightly annoyed. When the horse s tail lashes violently at his sides he is usually very angry or he is in a state of extreme distress - either physical or mental. The Runaway Horses are naturally curious, yet quite suspicious. Everything is scary until proven otherwise. They always want to flee from danger. With their good eyesight and very long legs, they are able to quickly run away. By educating and training horses, we take away some of their flight INSTINCT as they learn to trust. However, in a panic situation even well-trained horses will listen to their flight INSTINCT as a reaction to the fear. An open rein is often used on young horses where the rider opens the hand away from the neck (never back), on same side they wish the horse to turn into. This leads the horse into the turn. This rein is just a directional aid and has nothing to do with bending. It directs and encourages the horse instead of forcing him. Left Open Rein Left Direct Rein 30

31 One of the most important uses of an open rein is in the case of a runaway or any out of control horse. An open rein is used as strongly as necessary until the horse circles down and control is regained. It is important to have either a chin strap (Western) or CAVESSON or full cheek SNAFFLE (English) to prevent the bit ring from being pulled into the horse s mouth. If there is a runaway horse all riders should stop. A horse is a herd animal and will likely return to the group. Equus says... Did you know that if you have a group of horses, it is important to know the pecking order (which horse is boss ). It will affect your safety, especially during feeding time or if you re leading one of the horses through the herd. A timid horse may bolt if any of the dominant horses comes towards it. Horses may show two kinds of threat signals: In aggression, the head gives the first threat; ears are flattened, head thrust forward. When the tail lashes about and the mouth opens, the horse is probably going to lunge forward and bite! The defensive threats are usually given from the rear end. The horse turns its rump, the tail is flattened and the ears are back. The horse may back towards its object. If it lifts a back foot, it is threatening to kick! BE AWARE Your horse reads your body language and your mood just as you read your horse s body language. When you work with your horse be careful that your body language is not communicating a different message than you planned, without you realizing it. Be aware of the type of mood you are in when working with your horses as they will pick up on this very easily as well happy, angry, sad. It is just as important for us to understand and be aware of what our body language is communicating to our horses as it is for us to understand the horse s body language. You are always sending signals to your horse. Each time you handle him you teach him something sometimes good, sometimes bad. Always think about what you are doing and how you are sending signals to decide if you are making things better or worse with your horse. 31

32 Skill Builder 5: Health You feed and care for your horse because you want it to feel good and work for you. An important part of health in the horse is to learn what is considered normal. After you learn to recognize normal, it will be easy for you to spot an ABNORMAL health condition. The best way to learn this is to spend a lot of time with your horse. Often, your horse s attitude or behavior will change before you can see other signs of illness. Physical Appearance The hair and skin can tell us many things. A horse with parasites (an organism living on or in your horse) may have a rough, dull coat. Poor NUTRITION (feeding) will also make the hair dull and a fever will cause the hair to stand up. A horse in good condition will have a shiny, soft coat of hair. The summer hair coat will lie smoothly. Oil from oil glands on the skin gives the hair its shine. The skin should have a slightly shiny appearance with a minimum of dry flaking skin. Dandruff and skin irritations will damage hair in that area of the body. The skin should also have an elastic quality. If you pinch a fold of skin along the neck and release it, it should spring back into place almost immediately. Poor body condition or dehydration can leave a wrinkle that is slow to disappear. The ears should be forward and the eyes should be bright. The membranes around the coloured part of the eye should have a healthy soft pinkish colour and appear moist. If there is a lack of moisture these membranes become bright pink and inflamed. Poor blood circulation to the membranes (such as during shock) will cause them to appear almost white. During an illness the eyes may appear to sink back into the skull, usually due to dehydration. Behavior How your horse behaves will tell us how it feels. Behaviour will change before other signs of illness are visible. Usually your horse should be interested in anything new it sees or hears. The horse should be alert but relaxed under normal conditions. This will vary from horse to horse depending on its disposition. When an animal is feeling ill, it will change its behaviour. Some changes that may be observed include: Droopy and tired appearance (head down) Off feed and water. Healthy horses are always interested in feed. A lack of interest is often one of the first visible signs of serious illness. Dull eyes, watery eyes Coughing Nasal discharge Weight loss Change in breathing Flared and/or inflamed nostrils. Limping or posturing (standing in an unusual way) Diarrhea or does not pass manure for more than twelve hours. If your horse seems in pain, gets up and down repeatedly, rolls often, kicks at his belly or bites at his side, he may have colic. 32


 and flu. 8. Watch for signs of scratching that include bald patches and a poor coat. Your horse may have lice.")
33 Dental Health Signs that your horse may need some dental work done include: Mounds of partially chewed food are found in the manger. A large number of unbroken oats are found in the manure. It will cock its head, spill food from its mouth and obviously have difficulty eating. The horse is a social animal with a herd INSTINCT. Poor health can change this. It is common for a sick animal to leave the group completely or maintain a distance from the herd. In some cases, the horse will be unable to keep up to the herd and becomes separated. This is different from chronic problems such as LAMENESS or poor eyesight. With these types of problems, horses will often pair off for company. Keeping Your Horse Healthy 1. Avoid other sick animals. 2. Disinfect buildings twice a year and trailers every trip. 3. Do not allow anyone to bring germs from other sick animals on their shoes or clothing. 4. At fairs, shows, clinics, etc. use your own feed tubs and water pails. Try not to lend out yours without disinfecting it before using it again. 5. Feed your horse well. Healthy, well-fed horses are more resistant to disease. 6. For injections, use only disposable needles. 7. Ask your veterinarian to give your horse his annual (every year) injection for sleeping sickness (EQUINE ENCEPHALOMYELITIS) and TETANUS (LOCKJAW). Ask about also giving vaccinations for rhinopneumonitis (rhino) and flu. 8. Watch for signs of scratching that include bald patches and a poor coat. Your horse may have lice. This happens more often in the spring. Ask your vet about an appropriate treatment. 9. Check the heel and pastern of your horse for small scabs and scratches. Greasy heel (or scratches) is caused by bacteria that infect these areas. This condition is very painful and gets much worse without treatment. Equus says... The province of Manitoba has developed a Premises Identification Program to be used as a tool for the planning and management of animal health and food safety emergencies. This regulation requires the owner or operator of a premises to provide specific land and contact information. For more information contact your local MAFRD GO Office or e- mail traceability@gov.mb.ca. 33


34 Height And Weight To determine how tall a horse is, measure the horse, in inches, from the ground in a straight line up to the highest point of the withers. Divide this by 4. For example, 61 is 61/4 = 15 remainder 1. We say this horse is 15.1 HANDS high which means 15 HANDS 1 inch high. To determine your horse s weight, use a special measuring tape with pounds and kilograms on it. Measure around the heart GIRTH as shown in the diagram. Stall Cleaning The goal of mucking a stall is to remove the wastes for the health and comfort of your horse. Remove the horse from the stall. Use a mucking fork or pitchfork to fork large clumps into a bucket or wheelbarrow. Becoming familiar with a horse s stall will also allow you to monitor the waste as a quick health check. Don't take out more bedding than necessary. By sifting through the bedding, you'll be able to pick out the waste while leaving the clean bedding for another day. As long as the bedding is dry, it can stay. Check the walls for loose nails and at the door for loose hinges. Put some clean bedding in the stall, raking it through so it mingles with the older bedding. How much bedding depends upon how your barn is constructed. If your horse has an automatic waterer in its stall, you will probably need to clean it less than buckets, but algae can develop in those located in sunny areas. Check that the waterer is functioning properly, and scoop out any debris that may have accumulated. With the bedding maintained, fill the water buckets, leave a flake of hay in the clean stall, and sweep the aisle. You should occasionally strip your horse's stall down to the bottom for a thorough cleaning. First, sweep the floor and walls thoroughly. Then disinfect them. You can mix your own disinfectant by using a chlorine bleach and water solution. While you allow the flooring to dry, scrub your horse's feed bin with hot water and disinfectant. Remember to rinse everything completely. 34
35 Feed And Nutrition There are some basic rules for good feeding: 1. Feed a little and often. Your horse has a small stomach but a large body. Left alone, it will graze most of the day and night in order to get enough food. Eating too much at once can cause stomach problems. This means if your horse is kept in a stable it should be fed three or four times daily. 2. Feed plenty of bulk food (hay) so the horse s digestive system is well filled. Successful digestion cannot take place without enough bulk. 3. Feed GRAIN according to the amount of riding you are doing. Increase the amount of GRAIN as work is increased, reduce it if the horse is doing less work and stop if the horse is laid up for any reason. As GRAIN is decreased, you can increase the bulk food. 4. Do not make sudden changes in your horse s diet since it can make him sick. Let your horse become used to other feeds over seven to ten days. This includes putting horses out to pasture in the spring when the grass is very lush. 5. Feed at the same time each day. Horses are creatures of habit. Feeding your horse at the same time each day will keep it happy. 6. Feed only good clean hay. Moldy or dusty hay can cause health problems such as coughing, running noses or heaves. Light watering will reduce the dust in some hay. 7. Feed something succulent each day if possible, to compensate for the lack of fresh grass. Succulent foods include carrots, parsnips, turnips, apples and pears. About two or three pounds should be fed on a regular basis. Be sure to add these to your horse s diet slowly and in small portions because a sudden introduction, in quantity, to the diet may cause colic. A sudden introduction of a large amount of succulents to the diet may cause colic. 8. Do not ride your horse hard immediately after feeding. Allow at least one hour after feeding before working a horse and one hour after working before feeding. When the stomach is full, it affects the working of the lungs and heart. 9. Provide clean water at all times. An adult horse will drink up to gallons daily and almost double that amount due to hot weather, hard work and when it is nursing a FOAL. The size of the horse and the amount of dry food a horse is eating also affect how much water it needs. If water is not available at all times - horses should be watered three times per day before feedings. Purpose Of Food The food that our horses eat has to do several things. The main needs are: To keep the horse in good condition. To keep the horse warm, especially as it ages. To give the horse energy for the work that is required. To supply everything a young horse needs for bone growth and development. To aid in the production of milk (lactation). 35
36 Nutrients Feed can be divided into five main types of essential nutrients. Each type has a different job in the horse s body. The five types are: 1. Energy nutrients (carbohydrates and fats) 2. Proteins 3. Vitamins 4. Minerals 5. Water Horses living in the pasture for much of the year will get all the NUTRITION they need from the pasture. However, pastures that have been overgrazed or have weeds and coarse, tough grass won t have as much nutritional value. A horse s nutritional needs can be met through feeds such as roughages and concentrates. Roughage Roughage means bulky food, like grass, hay and some special feeds like BEET PULP, hay pellets etc. Good hay provides energy, protein, vitamins and minerals and plenty of fiber, which is necessary for good digestion. Grass Hays: Include timothy, brome, orchard grass, rye grass, prairie hay and others. These have more fiber and are less concentrated than other types of hay. Legume Hays: Include alfalfa and clover. LEGUMES are plants that produce seeds in pod, take nitrogen from the air and produce protein. Legume hays have more vitamins, protein and calcium than grass hays. Hay should not be dusty or mouldy (musty). Smelling the hay can help you to detect this properly. There should be a greater ratio of leaves to stems. Leaves provide the majority of nutrients so it is important that hay contains a high ratio of leaves. Smelling the hay can help you. Hay should contain only a small amount of foreign plants such as weeds and other undesirable grasses. It should be a clean green colour, not brown or black. Green colour shows that the hay was harvested at the correct growth stage, moisture content and that it was properly stored. It is also a good sign that it was able to cure without rainfall which can reduce the quality of nutrients Concentrates Concentrates have more nutrients packed into smaller amounts than bulk foods. Some examples include GRAIN (oats, corn, barley); mixed feed and feed pellets and supplements of vitamins and minerals. Horses need concentrates when they require more NUTRITION than they can get from hay or pasture. Grains usually have per cent more digestible energy per pound than hay. Salt Horses need salt to keep the proper chemical balance in their bodies. They lose salt when they sweat, especially in hot weather. The horse cannot get enough salt from their natural food. Feed in blocks or as loose salt. 36
37 Winter Care Cold weather can take the fun out of riding so the horse is often forgotten during the winter. Winter can be as hard on your horse as it is on you. Many horses are turned out on old pasture or cropland to forage for the winter. This may be enough feed in a mild winter, but not if it is a long, cold one. You need to be sure that your horse is well fed so that it can produce enough body heat to keep warm. Increasing the feed will help your horse stay in shape, have more energy and a better coat of hair that will shed out quickly in spring. Horses will also stay in better condition if they have water to drink. The water should be warmed slightly (2-3 C). A horse eating snow uses more energy and will feel the cold more than a horse that has water supplied daily. If you do ride in the winter, your horse will need extra feed. Be careful when riding in winter. The footing is not always solid and the horse can slip and fall. This makes the slow GAITS the safest. Travelling through snow is also hard on the horse. Even a horse in good condition will sweat. Do not turn the horse out until it is dry. If the horse is turned out damp it may catch a chill. Horses do not need to be kept inside during the winter but they do need shelter from the wind. Wind is a problem because it cools the horse down faster than cold temperatures alone. For horses being kept on pasture, trees and hills are good protection. Cattle shelters are also good. Some people do keep horses in the barn for the winter. These need to be turned out for exercise. Horses that are turned out during the day after being kept in the barn may be blanketed. The only problem with blanketing is that if the horse sweats under the blanket it may possibly become chilled because it takes so long to dry. Check out this website for more winter care tips: Barn Duties If your horse is kept in a barn, one of the most essential duties in your housekeeping routine is mucking out. If you neglect it, your horse s stall will become damp, smelly and dirty and that can quickly lead to: skin infections parasites THRUSH If the horse is kept in a stall equipped with a watering bowl, it needs to be kept clean and free of food. Also change and rinse out water buckets regularly. Standing water absorbs ammonia and other impurities from the air and becomes flat. 37
 along the sides and walls of the stall. This will help to prevent draught and to reduce the risk of the horse becoming cast.")

38 Bedding A stabled horse requires adequate bedding. Choices of bedding may include straw, wood shavings, sawdust or shredded paper. In many areas, straw is the most economical choice for bedding. Bedding may be banked (built up) along the sides and walls of the stall. This will help to prevent draught and to reduce the risk of the horse becoming cast. A horse is said to be cast when it rolls on its back and gets caught up against a wall so that it is unable to get its legs underneath its body. Bedding is essential in providing a healthy comfortable home for your animal. Inside or outside stabling both require bedding. Bedding is important because: It encourages the horse to lie down and rest. It provides insulation from the cold floor in the wintertime. It cushions legs, elbows and hocks against hard floors. It helps keep the horse clean. It absorbs moisture and odors. It helps keep feet dry, protecting them from THRUSH Illnesses Colic Colic is an emergency that requires immediate FIRST AID and a call to your veterinarian. Colic is another name for stomach pain that can range from minor upset to severe. It can be fatal in some cases. Signs of Colic: Horse stops eating. Looking at its barrel. The horse acts restless and may paw, curl up its upper lip or stretch as if to urinate. Biting at the flanks. Kicking at its belly. The horse gets up and down several times. In severe cases the horse may roll and thrash violently. Its pulse rate is higher and breathing heavy. May sweat. Sitting on hindquarters, supported by front legs. If you suspect colic: Keep the horse warm and lead it around quietly. Do not allow the horse to roll. If the symptoms are severe or continue for longer than an hour, call the vet. 38
39 Worms are the cause of 80 per cent of the cases of colic. Worms can cause colic by blocking the main blood vessel to the digestive tract. This will affect the health and the movement of the digestive tract. Colic can occur when a large number of worms migrate through the digestive tract at the same time because of natural causes or from the application of a dewormer. If you do suspect a large worm problem in a horse, a small dose of dewormer may be given to the horse several days before it is given a full dose. This removes a small number of the worms from the digestive tract. A young horse is more likely to get an impaction from worms because of the smaller diameter of its intestines. Colic may also be the result of a length of gut folding inside itself or an infection of the digestive tract (may be secondary to another illness). Common Causes of Colic: Overeating (GRAIN). An impaction caused by feed (poor quality, low digestibility, low fibre) Sudden change of diet. Lack of water A horse drinking large amounts of cold water when overheated Working a horse hard right after he has eaten. Swallowing sand along with feed or water. Damage to intestine caused by worms. (Gut twisting) Prevention of Colic: Keep extra GRAIN in a safe place. Do not give your horse spoiled or unsuitable feed (grass clippings or frozen grass). Feed your horse at regular times, and introduce changes in feed gradually. Have fresh water available at all times. Never give a hot horse a long cold drink of water. Allow a horse at least one hour after eating before riding. Do not feed hay or GRAIN on the ground. Deworm your horse at least twice a year. Parasites A parasite is an animal that lives off of another animal (host). The parasite uses the host to provide it with a home and food. It may eat the same food as the host or use fluid from the animal s body (often blood). The horse is the host to a variety of parasites, which we can put into two groups: 1. Internal 2. External 39


40 Internal Parasites Internal parasites (worms) live in the body of the horse. Most of them can be found in: a. Digestive tract b. Lungs c. Body cavity d. Muscle The Parasite Cycle: Characteristics of a horse with internal parasites include: a. A rough dull coat. b. The horse sheds out later in the spring than the other horses. c. A thin horse with a potbelly. d. Thin even though the horse is being fed well and the horse is no longer growing. e. Frequent colic or diarrhea. f. Stunted growth. g. Poor bone and muscle development in young horses. h. Pale membranes of the eyes and mouth. How do horses get internal parasites? The main source of parasite infection in horses comes from feces. When horses live in an area of a limited size, they may eat contaminated material. During summer and late fall, bot flies lay eggs on the hairs of horses, primarily around the forelegs, shoulders, chest, flanks, neck, throat, jaws and lips. When horses scratch the hairs, the eggs enter their mouth. How can internal parasites be prevented? Pasture rotation, not grazing large numbers of horses in small areas, and not overgrazing the pasture will help control internal parasites. One way to control the number of this parasite in your horse is to scrape the little yellow eggs off the hairs of your horse, before it ingests them. 40


41 Relative Sizes of Internal Parasites Large blood worm or Palisade worm STRONYLES Thread worm Pin worms Pinworms are 7 15 cm (3 inches to 6 inches) long when mature... So how long do you think the ASCARID is? Deworming Large Stomach Worms ASCARIDS Good worming practices will help control parasite numbers. The number of times you deworm depends upon your where your horse lives and your herd size. If you only have a few horses to do, it is a good idea to deworm 4 times a year. If your horse has a lot of space, it may only need a treatment in the spring before it goes out to pasture and in the fall after the first killing frost. Consult your veterinarian to determine the best deworming schedule for your horse. External Parasites Horses are also host to a number of external parasites (living on the outside of the horse). Frequent symptoms are: Irritation Scratching Restlessness Changes in hair and skin conditions. Examples of external parasites include lice, mites, ringworm, flies and mosquitoes. Mosquitoes spread the disease EQUINE Infectious Anemia (Swamp Fever) and EQUINE ENCEPHALOMYELITIS (Sleeping Sickness). Both of these can cause death. While sleeping sickness can be controlled by vaccination, blood tests can be done to identify both diseases. External parasites can be controlled with insecticides. Most come in liquid forms, which can be sprayed or wiped on the horse s coat. Watch your horse s skin and hair condition for reactions to this form of treatment. Some horses with sensitive skin cannot tolerate strong sprays. 41

42 Skill Builder 6: Identification & Conformation Important Terms Some breeds of horses change their age on January 1 st regardless of when they were really born. Here are some terms to describe the sex and age of a horse. FOAL: Either male or female, up to one year old Colt: male offspring, up to four years old, or until gelded FILLY: female offspring, up to four years old. MARE: mature female horse (over four years of age, or younger if bred) Yeld MARE: mature female horse that has never given birth Stallion: male horse that has not been castrated (gelded) Gelding: male horse of any age that has been castrated Yearling: one year old up to two years old Weanling: a FOAL that has been weaned - no longer has access to its mother s milk (usually at about six months of age) - up to 1 year old Aged: any horse, any sex, over 9 or 10 years old DAM: a FOAL s female parent SIRE: a FOAL s male parent four to A horse s height is expresses in HANDS. It is measured from the ground to the highest point of the withers. Hand measurements are broken down in inches, where one hand equals ten centimetres or four inches. Colours 1 hand=4 inches(10 cm) A good horseperson needs to know how to describe a horse by its colour and markings. You may have to describe a horse to someone to identify it when you are not there to point to it. When identifying the colour of a horse, the colour of the summer coat is used. In winter, the coat colours may be different. Albino - An animal that has no pigment in its eyes, skin, hooves or body hair. There are conflicting reports on albinism, some sources say there are no such things as true albinos they are really white horses. Bay - Body colour ranges from tan, to red, to reddish-brown. Points (mane, tail, lower legs and the tips of the ears) are black. Black - Body colour is true black without any light areas. Mane and tail are black. Brown - Body colour can be shades of brown or black with light areas at the muzzle, eyes, flank, and, or inside the upper legs. Buckskin - Body colour yellowish or gold. Mane and tail are black or mixed. Other markings can be the same as the dun but most have black on lower legs and ear tips Chestnut/Sorrel - Body colour ranges from light copper to reddish brown. Mane and tail are usually the same colour as the body, but may be flaxen (straw yellow or dirty white colour caused by a mixture of dark hair in with the white). 42
43 Grey - Mixture of white and coloured hairs. They are usually born solid coloured, or almost solid coloured, and become lighter with age. They always have dark skin underlying the patches of white hair. Grey includes dappled (variegated with round spots of white) and flea-bitten (small dark spots sprinkled over an animal s coat). Grulla/Blue Dun - Body colour smokey or mouse coloured to dark grey (not a mixture of coloured and white hairs, but rather each hair is mouse coloured). Usually they have darker lower legs and a DORSAL STRIPE. Palomino - Body colour is cream to golden yellow. Mane and tail are white. Pinto - Body colour can be any colour combination with white. Roan - Any coat colour mixed with white hairs. Common roans include black roan (also known as blue roan), bay roan (black legs, mane and tail) and red roan (has red colored mane, tail and legs). White - A true white horse is born white and remains white throughout its life. A white horse has snow white hair, pink skin and normally brown eyes. A site with colored pictures of common horse colors. Parts Of A Horse 43
44 Parts Of A Horse Barrel: The large area below the back in the general vicinity of the rib cage. This is where the heart, lungs and stomach of the horse are housed. Buttock: The muscled area below the dock and above the thigh. CANNON Bone: The long bone between the knee or hock and the fetlock joint. Cheek: Distinct rounded bones on the sides of the horses jaw. Chest: The muscled area at the front of the horse below the neck. Coronet/Coronary Band: Area at the bottom of the pastern where hair stops and hoof growth begins. Crest: The top line of the neck. CROUP: The area at the top of the rump and in front of the tail. It extends from the highest part of the hip to the tail. Dock: The solid part of the horse s tail, containing the tailbone. Ears: Two ears located on the top of the horse s head. Elbow: The joint at the top of the forearm. Eyes: Two eyes located on the sides of the skull. Fetlock: The joint between the long pastern bone and the CANNON. Flank: The region between the barrel and the hindquarters. Forearm: The upper part of the foreleg, between the elbow and the knee. GASKIN: A muscled area of the hind leg, above the hock and below the stifle. Head: Includes the area from the muzzle to the poll. Knee: The joint of the front leg below the forearm and above the CANNON bone. Loin: The short muscled area joining the back to the CROUP. Muzzle: Describes the area including the nostrils, chin and mouth. Neck: Muscled area from the poll to the withers attaching the head to the body. Nostril: The part of the muzzle through which the horse breathes. Pastern: The area above the coronet band and below the fetlock joint. Point of the Buttock: Is the highest point of the buttock at the extreme rear of the animal. Point of the Hip: The bony point lying just forward and below the CROUP. Point of the Hock: The most prominent part of the hock at the back. Point of the Shoulder: The bony point at the extreme lower end of the shoulder blade, just above and to the side of the chest. 44


45 Poll: A point between the ears at the top of the head where the head joins the neck. Shoulder: The area of the horse s front quarters where the front leg is attached to the body with muscles and tendons. Stifle: Is a joint at the front of the thigh in the flank area. Thigh: The large muscled area below the CROUP, below and in front of the buttock and behind the stifle joint. Throat Latch: The area behind the jaw where the head attaches to the neck. Withers: The prominent ridge near the base of the mane where the neck and back join. Markings The following diagrams show the markings commonly found on the head and legs of the horse, and the terms which are used to describe them. Face Markings SNIP - a small white spot on the nose. Stripe - a narrow white mark down the face anywhere between eyes and nostrils. Blaze - a wide white mark down the face from the forehead down to the nostrils. Bald Face - a very broad blaze - can extend out around the eyes and down to the upper lip and around the nostrils and, or past the eyes. Star - a small white mark on the forehead 45


46 Leg Markings Ermine - black or brown spots within the coronet band. Bird Catcher Spots - dime sized white spots on a horse s body. Heel - white spot on the bulb of the heel. Distal Spots - white spots on the coronet band. Coronet Heel or Half Coronet - white spot or partial coronet. Coronet - white strip covering the coronet band. Half Pastern - white extends up halfway on the pastern. Ankle/Pastern - white extends from coronet to and including the fetlock. Half Stocking/ Sock - white to halfway up the CANNON bone. Stocking - white up to the hock or knee 46


47 Horse Body Types All horses fit into one of the five following body types. Muscling is one way to tell what body type a horse is. The length and volume of muscling that the horse should possess is determined by the body type and the breed of the horse. Draft Type Clydesdale, Shire, Belgian, Percheron etc. Heavy muscles, large frame, large boned Mostly used for pulling and driving Draft type horses need more muscle compared to other horses because they are bred for strength and power. Saddle (Gaited) Type Stock Type Quarter Horse, Paint, Appaloosa etc. Well-muscled, deep bodied Mostly used for short-distance racing, ranch work, trail riding, roping, reining, cutting, pleasure and gymkhana events In the stock type horse, muscle is required for power and quick starts as well as speed and suppleness. Tennessee Walker, American Saddlebred, Standardbred etc. Long muscles, longer neck and body, higher set arching neck, higher tail carriage, often more animated movement Mostly used for pleasure, driving, endurance and trail These horses have a lot of muscle. They have long bodies that are needed for speed, endurance, and flexibility. Sport Horse Type Thoroughbred, Warm bloods, Hanoverian and Trakhener etc. Larger, longer bodies, deeper heart GIRTH and longer muscled Mostly used for racing, jumping, cross-country, three day eventing, dressage, pleasure, and endurance Muscle is needed for speed, endurance and suppleness in these types of horses. Pony Type Welsh, Shetland PONY, etc HANDS or less, usually resemble stock type or saddle type breeds Generally shorter neck and body Used primarily for children s mounts and driving These horses are primarily distinguished by their body height. 47

 and white, either over the loin and hips or the entire body. The Appaloosa is a specific breed with very clearly defined colour ranges.")

48 Breeds There are approximately 20 breed associations in Canada. The registration papers require identification of the parents of the horse, sketches or pictures and a description of the horse plus the horse s colour and markings and perhaps measurements. Some popular breeds of horses are: Appaloosa - The Appaloosa is descended from the Spanish horses bred by the Nez Perce Indians and is quickly recognized by its unique colour pattern. Irregular spotting of black (or brown) and white, either over the loin and hips or the entire body. The Appaloosa is a specific breed with very clearly defined colour ranges. They may have mottled skin (pink and black), striped hooves and may have a white sclera (white area around the iris of the eyes). There also may be Appaloosas with solid body colours. Appaloosa Coat Patterns include: Blanket - a solid or roan-coloured base coat, with a large, irregular patch of white over the hindquarters. Blanket with spots - like the blanket, but with scattered spots of various sizes. The spots may be the same colour as the base coat. Leopard - white base coat, with dark spots scattered over the body. Snowflake - dark base coat with white spots over the hindquarters and, or body. Solid or Solid with Regular Markings - may have mottled skin, white sclera and striped hooves. Arabian - Bred by the Arabs to carry them swiftly over long distances with a minimum of feed and water, the Arabian horse has an unsurpassed reputation for soundness and stamina. The Arabian is a very attractive horse with its distinctive, dished face and proud carriage. It is usually solid bay, chestnut, black or grey in colour. Belgian- Belgians range in height from 16 to 18 HANDS and weigh 2000 to 2600 pounds. In North America they are predominately sorrel or blonde in colour with flaxen to white manes and tails. Roan is the other common colour. Originally developed in Belgium to meet agricultural draft needs, the massive and powerful Belgians are known for their patience and docility. Canadian - A versatile horse exhibiting excellent CONFORMATION, working ability and durability combined with a kind and willing temperament. The Canadian measures between 14 h.h and 16 h.h. and weighs pounds. They are usually black but can be brown, bay or chestnut. Characteristics include a finely chiseled head, upright or arching back and abundant wavy mane and tail. They are used for riding and driving. 48


49 Clydesdale - The lightest of the draft horse breeds is the Clydesdale. It has been bred for style, power and ACTION. The breed originated in Scotland and averages 17 to 19 HANDS and 1800 to 2200 pounds. The Clydesdale is usually bay or brown in colour with white markings on the legs, face and body. The breed is recognized by the long silky hair, or feathering, that covers its lower legs and down over its hooves. (The Shire breed also has feathering). Connemara - The Connemara originated in Ireland. This performance PONY is noted for its CONFORMATION, tremendous agility and jumping ability. It is an excellent riding PONY, possessing great strength, free-going movement and superb balance. Spirited but sensible, courageous but kind, it is an ideal mount for children and adults alike. This PONY is predominantly grey or dun in colour, but can be black, brown or bay and occasionally chestnut or roan. Fjord - The Fjord horse, from Norway, has a dark cream body colour and a distinctive mane and tail which has black hairs down the middle and silver around the outside. They measure h.h. and weigh 1000 to 1400 pounds. Noted for its strength, soundness and quiet manner, it is used for riding and driving. Irish Draught The Irish Draught is a result of crossing Thoroughbreds with Irish Farm Horses. They are noted for their strength and substance, athletic ability, intelligence and kindness. Measuring h. h. They are suitable for light draft, riding and driving. They may be bay, brown, chestnut or gray. Miniatures - Miniature horses are horses under 34 inches high (pure miniatures are 32 inches and under). Morgan - The Morgan breed traces its beginnings back to a single stallion, Figure (This horse was later renamed after its owner - Justin Morgan). This stallion possessed extraordinary strength and speed. The breed s excellent disposition makes it the choice for mounted police and patrol work. The Morgan is compact and deep bodied, its legs are fine and strong and its head is carried high on a thick crested neck. The Morgan is usually dark brown, bay, chestnut or black in colour. Paint - The Paint Horse is characterized by a two coloured coat consisting of clearly defined areas of white and either black, red brown, chestnut, grey, dun or roan. It is basically stock in type with Quarter Horse and/or Thoroughbred parentage. Colour patterns vary in percentage of white to coloured portions. They are a pedigree registry with colour specifics. Very nice descriptions of Paint horse colours and patterns, 49


50 Three of the recognized patterns for the Paint are: Overo - Colour over the back and on the legs and lots of white on the head. Tobiano - White over the back and up the legs and a normally marked head. Tovero - Display of both Overo and Tobiano characteristics. Paso - The Paso has a natural, high stepping, four-beat lateral gait. The gait, known as termino, gives the rider a very smooth ride. They are tough, hardy and easy to handle. Weighing 900 to 1100 pounds, they measure h.h. They may be bay, chestnut, black, brown or gray. This horse is ridden in all parts of South America, with the most widely known type being the Peruvian Paso. Percheron - The Percheron stands from 16 to 18 HANDS high, weighs between 2000 and 2400 pounds and is usually black or grey in colour. Imported from France, the Percheron is noted for its considerable knee and hock ACTIONs and its unique walking style. Quarter Horse - The Quarter Horse combines speed, agility, intelligence, and excellent temperament and an inherent cow-sense, to earn a reputation as the most popular breed of pleasure horse in the world. Developed in North America, the Quarter Horse has a close-coupled and muscular CONFORMATION and an attractive head with prominent jowls. It may be of any solid colour, roan or gray. Saddlebred - The Saddlebred was developed in Kentucky during the 19th century by plantation owners, who were looking for a horse that provided a comfortable ride for plantation work combined with a stylish eye-catching ACTION in harness. With its high head-carriage and high stepping ACTION it is extremely elegant. Although it is best known as a show horse, the Saddlebred also makes a good general riding and driving horse. Shetland - The Shetland PONY comes from the Shetland Islands off Northern Scotland. It is thought to be descended from a dwarf Exmoor type. At a maximum height of 10.2 HANDS it is the smallest of the native breeds yet relative to its size it is the strongest PONY in the world. Its size makes it ideal for small children, though its headstrong and independent character demands firm, kind, handling to keep it under control. Standardbred - Standardbred horses are used primarily for harness racing, either as pacers (moving the front and hind legs of the same side together) or trotters (moving the front leg of one side at the same time as the hind leg of the opposite side). They also make good pleasure and driving horses. Tennessee Walker - The Tennessee Walking Horse is a gaited horse. It is most distinguished by its running WALK that is a four beat gait. This even gait is fast and comfortable to ride. This website has excellent pictures and information about many breeds of horses 50


51 Thoroughbred - The Thoroughbred horse has been bred for speed and stamina. Its long-bodied, deep-chested, angular CONFORMATION enables it to run long distances a fast speed. All Thoroughbreds descended from Arabian and Barb ancestors. at Warmbloods (Such as the Hanovarian, Oldenburg, Holstein, Westphalian, Dutch Warmblood, Trakehner, etc.) Developed in various parts of Europe, warmbloods are noted more for their strength than their speed, hence the many successes in dressage and show jumping. They were originally developed as allpurpose work horses. Warmbloods of all breeds are known for their clean cut lines, strong well-muscled bodies and well-formed hard hooves. Welsh - The Welsh PONY is a compact, sturdy PONY. They have arched necks with short, but very strong, bodies. Strength, hardiness and agility combined with a gentle temperament make it suitable for harness or riding. They are categorized by these sections based on height: Section A Welsh Mountain PONY less than 12 h.h. (smallest) Section B - Welsh PONY 13 h.h. and under Section C Welsh PONY of Cob type 13.2 h.h. and under Section D Welsh Cob Over 13.2 h.h. (largest) Hybrid Crosses Hybrid crosses between horses and donkeys are popular for pack horses, trail and pleasure riding. Hybrid crosses are sterile. Mule - The mule is a cross between a Jack (male donkey) and a MARE (female horse). Hinny - A hinny is a cross between a stallion (male horse) and a Jenny (female donkey). 51

52 Skill Builder 7: Riding Gaits The gait of a horse refers to the different patterns that a horse s feet make as they touch the ground. The common gaits for horses are the WALK, TROT, CANTER and GALLOP. Sometimes we use different terms for a particular gait. For example, the western horse jogs and lopes while the English trots and canters. Some breeds called gaited breeds pace and rack. For example: Standardbreds pace a two beat gait where the horse moves the legs on the same side together. Stride The term used to measure the distance covered between two successive steps of the same hoof in any gait. When a horse lengthens its stride it reaches further with each leg. Walk The WALK has a four (4) beat rhythm. The steps should be even and regular so that the rider can evenly count, 'one- two- three- four, one- two- three- four'. Each foot is picked up and set down in sequence. The horse always has two or three hooves on the ground. The WALK is the slowest natural gait. It is the steadiest and most comfortable. The horse s back is level at the WALK. The WALK should look calm, regular and purposeful. Jog/Trot The jog/trot has a two (2) beat rhythm. The rider can count, 'one-two, one-two, one-two'. This gait has a moment of suspension (time in the air) when all four legs are off the ground. DIAGONAL (opposite) front and hind feet move forward at the same time. This is called a diagonal movement. The horse s back has a regular up and down movement at a trot/jog. When trotting, POSTING can make it more comfortable for the rider and the horse. The trot should look and feel calm and rhythmic, but active. 52


53 Canter/Lope The CANTER/LOPE is a three (3) beat gait. The rider can evenly count, 'one-twothree, one-two-three, one-two three', with a silent moment between strides. This gait starts with the hind leg then leads to the front in a rocking motion. You sit the CANTER by keeping your seat in the saddle. The horse should look and feel light on his feet. When a horse lopes/canters it reaches further in front with one front leg which is called the lead. To be properly balanced on turns and circles, a horse naturally and/ or with training should pick up the inside lead. Hind legs should take the same leading ACTIONs as the front. When the front and hind legs are not on the same lead, it is called cross firing/cross cantering. A horse is said to be counter-cantering when he is cantering to the left with the right foreleg leading, or to the right with the left foreleg leading. Gallop The GALLOP is the horse s fastest gait and is a four (4) beat gait. This gait is similar to the CANTER, but the horse's legs move one at a time. The body of a horse is more stretched out when it gallops than with any other gait. Race horses GALLOP. When riding the GALLOP, raise your seat slightly out of the saddle, putting your weight in your heels. Visit this website to view some different horse gaits in moving images. Your leader may show you the saddling, bridling and unsaddling sections on disc one of the 4-H Horsemanship DVD collection. 53


54 Equus says Western saddles ALWAYS have a horn. English saddles NEVER have a horn. If ever you see a saddle, and are unsure exactly which is which, just keep that tip in mind. Tack Parts of a Western Saddle All equipment should be stored where it will remain dry and out of the sunlight. Check your equipment regularly for loose threads, weak glue and any screws or bolts that are coming out. 54

55 Parts of an English Saddle Headstalls and Bits Headstalls come in two main styles: Browband or Split-Eared. Unlike western bridles, English bridles include a noseband. Whether they are English or Western, there are basically three types of bits; the SNAFFLE, the curb and the Pelham. There are many variations of each. SNAFFLE Curb Pelham Use the softest bit in your horse s mouth that you can. He will work better for you and be happier. A thick SNAFFLE bit is the softest working bit you can use. With a curb bit, the higher the port and the longer the shank, the more severe it will be. 55


 work better than synthetic")
56 P=G2881 Saddling, Bridling and Riding the Western Horse Western Bridles English Saddle Blankets and Pads Saddle blankets and pads protect the horse s back, keep the lining of the saddle clean, absorb moisture and compensate for a saddle that does not fit well. English riders use a light pad called a Numnah which is the same shape as the saddle and flaps. Because Western saddles are heavier, a thicker blanket or pad is needed Numnah Western Saddle Pad Blankets or pads made from natural fibres (such as felt or wool) work better than synthetic fibres, but they are more difficult to clean and manage. 56


57 Saddling Tie your horse securely with a halter. Never tie a horse with the bridle reins. GROOM your horse well to remove all straw or other bedding from its hair. Always be sure to brush the back, withers and area where the GIRTH will be fastened. Shake out the saddle blanket or pad before you place it on your horse to be sure that there are no straw or twigs on it. Western Saddling 1. Set the blanket on your horse, ahead of where you want it and then pull it back into place, smoothing out the hair underneath. If using two blankets, place the top blanket back about 2.5 centimetres (one inch) from the front of the bottom blanket. This will help to hold the blankets in place. 2. On the saddle, lift the right stirrup and CINCH out of the way so that you don t have to lift the saddle as high and they won t get caught under the saddle. Hook the right stirrup on the horn of the saddle. 3. Lift the saddle by grasping the gullet and centre of the back of the saddle. Lift it high and set the saddle gently on your horse s back. Settle it into place by rocking it back and forth. Lift the blanket up under the gullet of the saddle to improve the ventilation under the blanket and check to see that the saddle blanket is even on both sides and has at least four to eight centimetres (two to four inches) in front of the saddle. 4. Go to the right side of your horse and set down the stirrup and CINCH, ensuring that the CINCH Reverse for right handed saddler is not twisted. Be careful that the CINCH doesn t fall down and bang your horse s leg. 5. Go back to the left side and lift the stirrup out of your way. Standing near the left shoulder of your horse, reach under the GIRTH of your horse to pull the CINCH towards you. Make two wraps with the latigo and tie (as illustrated) or buckle the CINCH using the tongue in the CINCH ring, be sure to lock it by pulling down on the top wrap of the latigo. Tighten it so you can fit three fingers (inserted flat) between the CINCH and your horse s belly. If you are tightening a CINCH on a strange horse watch for signs of uneasiness. A cinchy horse can be very dangerous (they will often throw themselves over backwards or sink to the ground in a panic attack). 6. If you have a back CINCH, always do it up last, fastened so two to three fingers will fit (inserted sideways) between the CINCH and your horse s belly. Check to ensure that a hobble strap is attached tying the back CINCH to the front CINCH. This keeps the back CINCH from flapping back into the back areas of your horse. 7. If you have a breast collar, attach it and tighten it so that a fist can fit between the breast collar and the point of shoulder. 8. Walk your horse and recheck the tightness of the CINCH before MOUNTING. 57


58 English Saddling 1. Make sure that the stirrup irons are pushed up and that the GIRTH is undone on both sides of the saddle and is lying on the seat of the saddle, dirty side up, with buckles pushed through the stirrups. Equus says... You must always run your stirrups up on an English saddle,. You cannot do it on a western saddle because of it s size, weight, and design, but an English saddle is meant to be compact and light. 2. Hold the saddle on your left arm with the pommel facing towards your elbow. 3. Stand at your horse s left shoulder and with your right hand, lay the saddle pad on the horse s withers, making sure that it is flat and that the straps are on top. 4. Slide the saddle pad into place by pulling it slightly towards the rear in the direction of the horse s hair. The saddle pad should be the right size for the saddle being used. 5. Grasp the saddle with your right hand on the CANTLE and your left hand on the pommel and place it on the saddle pad which is sitting on your horse. 6. Attach the straps of the saddle pad to the GIRTH straps on both sides of the saddle and check that the knee rolls and saddle flaps on both sides are flat. 7. Slide the saddle and adjust the pad so that there is no friction nor pressure on the withers, lifting the pad into the gullet of the saddle for ventilation. 8. Walk around the horse to its far side and fasten the end of the GIRTH to the GIRTH straps on the right side of the saddle. There are normally three billet straps on an English saddle. It is common to fasten the buckles to the two outside straps, leaving the center one undone. If a horse is built in such a way that the saddle slides forward, it is recommended to fasten the GIRTH buckles to the front two GIRTH straps on the saddle. 9. Return to the NEAR SIDE and stand at your horse s left shoulder. Face the rear of your horse and bend over to grasp the loose end of the GIRTH with your left hand. 10. Pull the GIRTH through the loop of your martingale or breastplate (if you are using one). Any such loops should be positioned at the center of the GIRTH. 11. Bring the GIRTH up, well back of your horse s elbow, buckle it in the same manner as the OFF SIDE, tightening it slightly. You will need to tighten it more before MOUNTING. 58

59 Smoothing Out the Wrinkles After saddling, you should pull the horse s forelegs forward from the knee to smooth out and bring forward the skin underneath the CINCH. This will help to prevent pinching and galling. Bend the leg forward at the knee by clasping your hands behind the knee and lifting the leg one at a time. You can also achieve the same result by leading your horse in a tight circle in both directions. Mounting Western 1. Lead your horse to a safe place for MOUNTING. Check your equipment to ensure that it is all adjusted correctly (CINCH, throatlatch and chin strap). 2. Stand on the left side of your horse and face either the same direction as the horse or face the horse and use peripheral vision to see the horse s head. By watching the eyes and ears of your horse, you can see if it s going to shy or bolt when you mount. 3. Take up the reins in your left hand, tight enough to keep your horse from stepping forward. If you ride with one hand, hold the reins appropriately, with the loose ends of your reins falling on the NEAR SIDE. If you will be riding with two hands, cross the reins over the horse s neck. 4. Place your left hand on the neck in front of the withers. 5. Grasp the saddle horn with your right hand. (You may use your right hand to steady the stirrup until your left foot is in it.) 6. Keep your knee close to the horse and do not allow the left toe to poke the horse. 7. Push off with your right leg so that you ve lifted yourself to a standing position with all your weight in the left stirrup. 8. Pass your right leg over the saddle without touching your horse. Now, sit down gently in the saddle. 9. Put your right foot in the stirrup without leaning over to guide it in with your hands. 10. Take up the reins and adjust them. 11. Do not let the horse move while you are MOUNTING. If the horse is allowed to walk off before you are properly settled in the saddle, it will develop a dangerous habit of doing so each time you mount. Equus says If your horse moves when you first mount up, go back to basics. It needs to understand the one-rein stop. Then, when it moves while you are MOUNTING, simply pull the one rein around and it will know to stop. Keep its head there for a few seconds, and then release. If it moves off again, repeat. Eventually your horse will stand still until you tell it to go. Another important thing is NOT to ask it to GO as soon as you get on. Always sit and relax for 60 seconds or more without asking it to move forward. Do some gentle flexing if you wish but don t let it move its feet. Soon the horse will stop anticipating a forward command as soon as you get on and will be more likely to stand still for you. 59

60 English 1. Before MOUNTING be sure to check that your GIRTH is snug. 2. Take up the reins in the left hand and place that hand on the withers. 3. Facing the rear of the horse, grasp the stirrup with the right hand and insert the left foot into the stirrup. Place your right hand either on the far side of the saddle or on the pommel and spring up lightly. 4. Swing the right leg over, making sure it does not touch the horse s body. 5. The rider should sit comfortably in the saddle. Drop the legs to their full extended length and adjust the irons so that when hanging loose they will strike just below the ankle bone for flat classes or just above the ankle for jumping classes. 6. Place the feet in the irons resting on the ball of the foot. 7. Place both hands on the reins. They should be slightly apart and are held above the horse s wither. 8. The BIGHT (or excess rein) may fall on either side of the horse s neck. Dismounting Western 1. Hold the reins with your left hand (as you did for MOUNTING). 2. Ensure your left foot is properly placed in the stirrup. When you DISMOUNT, you want the weight of your body to be on the ball of your foot. If your foot is pushed too far forward, there is a danger of not being able to quickly free your foot from the stirrup. 3. Put your right hand on the horn. 4. Remove your right foot from the stirrup and swing it over the saddle. Briefly bring both of your legs together. 5. Lightly step down from the horse, facing the same direction as the horse with the reins still in your left hand. (Remove your left foot from the stirrup as your right foot touches the ground). 6. Closed reins or a ROMAL should be brought forward over the horse s head after dismounting. 7. If you are using split reins, take them both down and hold them in a manner similar to a halter shank. 8. Slightly loosen the CINCH to let the horse relax, breath freely and to allow the heat from its body to dissipate. 60
61 English 1. Hold the reins with your left hand (as you did for MOUNTING) and place your hand on the horse s withers. 2. Grasp the pommel with your right hand. 3. Remove both feet from the stirrups. 4. Bend the upper body slightly forward. 5. Carefully swing your right leg back over the saddle without bumping the horse. 6. Bring your legs together. 7. Let your body slide to the ground, keeping the reins in your left hand. 8. Bring the reins over your horse s head. 9. Run your stirrups up and loosen the GIRTH to allow your horse to relax and breathe freely. Vaulting follows the same steps as sliding down from the horse, except the rider kicks both feet out from the stirrups and pushes from the horse. The rider lands on the ground with both feet, a short distance from the side of the horse. Unsaddling The steps for taking any saddle off a horse are the same as for saddling, only done in reverse order. Some important points to remember: Western 1. First undo any auxiliary equipment that attaches to the saddle (martingale, breast collar). 2. If you have a back CINCH, be sure to undo it first, before the front CINCH. 3. Once you have undone any cinches, tie them up on the far side so they will not drag in the dirt. 4. Do not pull the saddle over the wither without lifting the saddle as you remove it as this would cause discomfort for your horse. English 1. Push up both stirrup irons as high as possible on the stirrup leathers and pull the stirrup leathers through the stirrup irons. 2. Unbuckle the GIRTH on both sides, lay it over the saddle, dirty side up, and pass the ends through the irons on each side. For both Western and English saddles, remove the saddle and saddle blanket (or pad) together. Store your saddle in a natural position with the blanket (or pad) on top, lying with its dirty side up so that it has a chance to dry for its next use. Wash the pad often. 61


62 Bridling There are two accepted methods of bridling a horse. Some horses may respond better to one method than the other. Method One 1. Untie your horse. 2. Undo the halter buckle and slip the halter off your horse s nose and buckle it around your horse s neck. 3. Hold your bridle with your left hand, laying the reins over your left arm or shoulder so they won t get in the way or place the reins over the horse s head around the neck to keep them from falling on the ground. 4. Place your right hand over the poll of your horse between his ears, and grasp the crownpiece of the bridle. 5. With your left hand, spread the bit between your thumb and second finger. Push your thumb inside his mouth to encourage the horse to open it. While pulling the bridle up with your right hand, gently place the bit in the horse s mouth. Open the mouth by inserting your thumb in the interdental space (where the lips end). Pull up on the bridle until the bit rests on the bars of your horse s mouth. 6. Change hands and hold the crownpiece up and in front of your horse s ears with your left hand. Gently pull the headstall over the ears, one ear at a time, guiding the ears forward under the crownpiece with your right hand. Folding the ears forward, when placing equipment over them, is gentler on their ears. 7. Adjust the brow band so that it is straight and buckle up the throatlatch (if you have either of these). Between the throatlatch and your horse s throat, you should be able to fit three to four fingers (or a fist sideways). 8. Fasten the CAVESSON or noseband on an English bridle so that one or two fingers can be inserted between the CAVESSON and the nose, with CAVESSON inside the bridle cheek pieces. 9. If using a curb chain or strap, adjust it so that it is not twisted and so that two fingers can be inserted between the strap and the horse s jaw. 10. Undo the halter and place it in a safe place. Method Two This method is often used by shorter riders with tall horses OR for harder to bridle horses (to allow more head control) This is the same as Method One, except place your right arm under your horse s jaw, around its nose and grasp the cheek pieces of the bridle (Step 4). Remember to pull up with your right hand. Safety Tip: Improper bridling and unbridling can cause HEAD SHYness. When removed too quickly the bit can catch on the horse s teeth. Consequently, he throws his head up and pulls away, temporarily avoiding the unpleasantness. 62
. 4.")
63 Unbridling 1. Buckle a halter around your horse s neck, just behind its ears, so that you have control if it tries to move away. 2. Place the lead shank and reins over your left arm, being careful not to have them dragging on the ground. 3. Unbuckle the throatlatch and noseband (if you have one). 4. Hold the crownpiece of the bridle in your hand. Remove it, one ear at a time, by gently pulling the crownpiece; first over one ear, then over the other. 5. Once the ears are released from the crownpiece, continue holding tension on the bridle with your hand to hold the bit in your horse s mouth. 6. Slowly release the tension on the bridle and allow the bit to slip gently out of your horse s mouth. Be careful that the bit does not bang any teeth. 7. Once the bit is out of the mouth, hold the bridle in your left hand and continue to halter your horse. Western: Hang the bridle exactly as it would sit on your horse s head if the horse were facing you with the reins crossed over his neck. English: Hang the bridle as you would the western bridle, except the CAVESSON and throatlatch are done up and the reins go behind the bit, inside the CAVESSON and are buckled over the throatlatch. Caring for Your Tack Keep your leather dry and clean. Sponging it after use to remove dirt and sweat is very important. Use saddle soap to keep the leather clean and soft. Apply a light coating of neatsfoot oil on the underside of the leather to keep it soft. Taking good care of your equipment is only common sense. You have invested money in valuable equipment so it only makes sense to look after it. In return it will serve you for years to come. Storing Tack 1. Riding equipment should always be stored off the ground.,. 2. A saddle rack is very handy and is designed to the support a saddle, and to let the leathers hang straight. 3. Always make sure your saddle is protected from mice who are attracted to the taste of leather and salt. 4. Store your tack in a dry place and out of the sunlight. 5. Do not store your saddle in a barn because of the dampness and the ammonia from the manure. No matter how wet the leather gets do not place it near the heat. Allow it to dry naturally. 6. Check equipment regularly for deteriorating threads, weak glue and any screws or bolts that are coming out. 63

64 Cleaning Leather Equipment Saddles 1. Remove the cinch or girth. If it is cotton or mohair, soak it in a pail of warm soapy water. Rinse well and allow to dry at room temperature. Do not put it in a dryer. 2. Remove stirrups so the leathers can be cleaned. 3. Wipe the saddle with a dry cloth to take off the dirt Using a sponge rung out in warm water, apply glycerin saddle soap liberally. Don t get the leather too wet. Rinse and repeat. 5. Be sure to do under the fenders/saddle flaps. 6. Pay special attention to the stirrup leathers. 7. Let it dry thoroughly. Buff with a soft cloth. 8. From time to time it may be necessary to apply a thin coat of warm neatsfoot oil. (Never soak the leather with oil.) 9. Wait until the oil has dried and then wipe on a thin coat of saddle soap and rub in gently. 10. Let the saddle dry and buff with a soft cloth. 11. Replace cinch after it is dry. 12. Use silver polish for silver trim Bridles When cleaning your bridle, be sure to undo each buckle. Clean thoroughly with saddle soap. Let dry and polish with a soft cloth. Body Position No matter what your style of riding is, having a good balanced position is important. Sit tall in the saddle. Don t slump. There should be a straight line from your shoulder, through your hip (the seam on your jeans), to your heel. Your upper calf should have a light grip on the horse. Your foot should be turned out slightly in a natural position with the weight on the ball of your foot (without pushing). Your heel should be lower than your toe to allow more flexibility in your ankle. Your hand and arms should be relaxed and supple with your elbows in close to your body. You should hold your reins just above and in front of the saddle horn or pommel. Keep your head up and look where you are going. The weight of your head is noticeable to the horse and the horse will usually go in the direction you are looking. For example, you can ride in a circle with minimal leg or rein pressure, by just looking to the centre of the circle. Western English 64


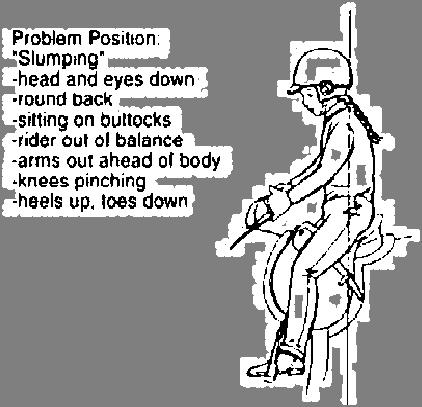

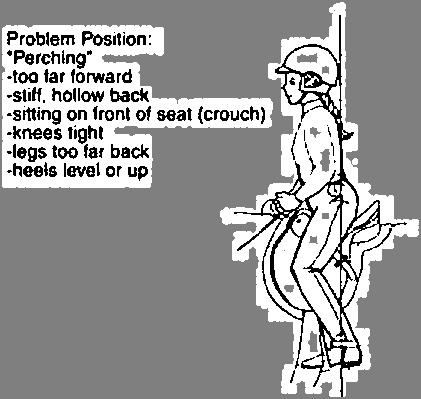

65 Safety for Hunt Seat Riders: 65
66 AIDS Horses are trained to respond to the basic AIDS that include: 1. Weight 2. Legs 3. Voice 4. Hands 1. Weight (Seat): Your horse will try to stay in balance under you. Leaning your body slightly forward encourages the horse to move faster while a slight shift back encourages it to slow down or stop. 2. Legs: Your legs are used to control your horse s movement forward and to control its hindquarters. They are also used to bend the horse s body for turning. The lower leg needs to be kept still when you ride so that the leg AIDS will be most effective when applied. As the horse learns more about leg pressure, it will require less cuing from the reins. 3. Voice: Your voice can be a very important aid since horses can easily learn words such as whoa, easy and back. Work calmly and quietly with your horse, being consistent in the tone of voice you use. 4. Hand(s): GOOD HANDS are described as steady, light, soft and firm in their ACTIONs, never hard or jerking. To develop GOOD HANDS you must learn to ride in balance with your horse. Whether you ride English or Western, it is important to learn to ride with two hands especially for schooling your horse. Two acceptable ways of holding the reins in western style with a shank bit: 66
67 Stopping Timing is very important when asking for a stop. It is a good idea to give your horse a voice CUE such as whoa first. Then squeeze with your legs and use a firm flexing (give and take) of the reins. Sit tall and deep in your saddle, gripping with your thighs. Push down on the heels. Do not throw your weight back and pull on the reins. Backing You should be sitting erect in the saddle with your weight just slightly forward. As you squeeze lightly with your legs, apply light rein pressure to prevent the horse from going forward. With the horse collected, use the voice CUE back and flex the reins gently and continue to squeeze with your legs. This is asking for forward motion but in reverse. Equus say... Backing is not natural to the horse so be very patient and ask for one step at a time, rewarding your horse as you progress. Remember to keep your hands low to encourage the horse to flex at the poll and tuck in its nose. If your horse does not want to back, you may try holding one rein steady while using a gentle give and take motion with the other. (Do not see-saw ). Applying the AIDS The Walk 1. The walk is a four beat gait where your horse should walk out freely. 2. To CUE for the walk, settle into your position in the saddle; take up the reins lightly and squeeze with your legs. This asks your horse to get prepared for some ACTION. 3. As you feel the horse become collected you release some pressure on the reins and squeeze just enough to ask the horse to move forward. The Jog (Western) 1. This is a two beat gait that should be ridden with your seat deep in the saddle and just enough weight on your ankles to absorb some of the motion. 2. To CUE for a slow JOG, apply more leg pressure and maintain just enough rein pressure to hold your horse at the speed you want. 3. You should shorten your reins somewhat because your horse s head rises when it jogs. 4. Your arms should remain close to your body with your hands relaxed, flexing lightly with your horse s mouth. 5. Keep your elbows close to your body. 6. Your feet and legs should remain steady with the heel down. 67
68 The Trot (English) 1. English riders use both a sitting trot and rising trot. 2. The trot is a two beat gait and may be performed slowly or quickly. 3. To CUE for the trot, apply leg pressure to urge the horse forward. At the same time, your hands should give with the movement allowing the horse to move forward. 4. At the sitting trot, sit quietly in a balanced position, not balancing on the reins. 5. In the rising trot, you will rise with the movement of the horse and return to the seat without a loss of balance. 6. Since the horse s legs move in alternate DIAGONAL pairs, the stride you post (rise) on is referred to as a DIAGONAL. The rule for a correct DIAGONAL is to post with the outside DIAGONAL pair. 7. For example, when you are riding to the right, rise when the horse lifts its left front leg and right hind leg. Sit when these legs touch the ground. 8. The reason for being on the correct DIAGONAL is that your horse s inside legs are in the best position to bear the full strain of your weight. When riding in a circle, the horse will find it easier to balance if the rider is out of the saddle when the inside front leg is on the ground. 9. If you are riding in a clockwise direction, you will post on the left DIAGONAL. When you travel counterclockwise, you will post on the right DIAGONAL. 10. When you feel your body being pushed up by the forward movement of the inside hind leg, let your pelvis come forward and up, as if you were being gently pulled by the belt buckle. 11. Keep your upper body slightly inclined forward from the hips. Remember, the stirrups are there to rest on, not push on. They are there to carry the weight of your legs, not the whole body. 12. To change diagonals is very simple. All you do is sit two beats of the trot or stay in the air for two beats. Try to feel the motion of your horse and not look down at his forelegs. You may find it helpful to count the strides 1, 2, 1, 2 as you ride. The Lope or CANTER 1. The lope is a three beat gait. 2. Your horse should be accepting the bit quietly and moving forward in an easy relaxed manner at the trot before you start asking for the lope. 3. Pick up slightly on the reins, then move your outside leg back behind the CINCH and apply pressure. At the same time, shift your weight to the outside hind leg. This will shift the horse s hindquarters to the inside, making it possible for it to lead with the inside leg. (From the trot, the leading hind leg will pick up the CANTER first. CUE the horse as the outside front leg moves forward.) 4. It is important that your horse is on the correct lead. If you are travelling to the left, your horse should be on the left lead. 5. Do not lean to the inside of the circle when asking your horse to lope. Your weight will cause it to pick up the wrong lead. 6. Do not allow your horse to lope disunited. This happens when a horse is on one lead in the front and the opposite lead behind. This is also known as cross-firing. Equus says... Relaxed, quiet hands are important to allow for rhythm with the movement of the horse s head. The legs are kept in close contact with the saddle and the horse. Your heels should be down. 68
69 Glossary -A- ACTION - How a horse moves its feet and legs at a walk, trot, etc. ABNORMAL - ABRASION - A scrape (type of wound). AIDS - Artificial: spurs, whips, martingales. AIDS - Natural: the legs, hands, weight, and voice, as used in controlling a horse. APPOINTMENTS - The tack and clothing a rider uses. AURICLE- The outer part of the ear. -B- BACK - To step a horse backwards. BALD-FACED - Face marked by wide white stripe from forehead to nose. BALANCE -The ability to change your center of gravity to suit the movement of the horse. BIGHT OF THE REINS - The part of the reins passing between thumb and fingers and out the top of the hand. BELL BOOTS - A circular boot made of rubber or other fabric that fits the horse from the pastern down over the hoof. BEET PULP - A dried by-product of processed sugar beets. BLACK POINTS - Mane, tail, and legs black or darker than rest of horse. pastern over the hoof. BRAN - The ground-up hulls (or the covering) of wheat. -C- CANNON - The lower leg bone below knee and below hock. CANTER - A three beat pace, slower than a GALLOP. CANTLE - The back of a saddle. CAVESSON - A noseband on a bridle. A stiff noseband on a halter used with long strap in training. CHESTNUTS - The horny growths on inside of a horse s leg, also called night eyes. CINCH - A wide cord GIRTH used on western saddles. COFFIN BONE - A little bone shaped like the hoof found at the front of the foot. COLD-BLOODED - A horse with ancestry from the draft breeds. COLD-HOSING - Running a cool stream of water over a wound or swelling. CONDITION - How healthy or unhealthy a horse looks. CONFORMATION - Refers to the structure and form of a horse. CONTRACTED HEELS - Close at the heels. CRACKED HEELS - a painful scabby skin condition found at the back of the pastern. CROP - A riding whip with a short straight stock and a loop. CROUP - Part of the back just in front of base of tail. CUE - A signal given by the rider to the horse. 69
70 -D- DAM - The female parent of a horse. DIAGONAL - The pair of legs that move forward at one time at a trot. Movement of a front leg and opposite hind leg. Important when POSTING at a trot. DISMOUNT - To move from a saddled horse to the ground, or from the horse s back to the ground. DORSAL STRIPE - A dark line along the spine. -E- ENCEPHALOMYELITIS - A serious disease, spread by mosquitoes, causing fever and death, also known as sleeping sickness. EQUINE - of or pertaining to the horse. EXHIBITOR Name for person showing a horse. -F- FARRIER - A person trained to shoes horses, and trim hooves. FAR-SIDE - The right side of a horse (also known as the off-side). FILLY - Female horse less than four years of age. FIRST AID - The first help given to an injured animal. FIVE-GAITED - A saddle horse trained to perform in five GAITS: the walk, trot, CANTER, slow gait and rack. FOAL - A young horse of either sex up to one year of age. FOREHAND - The front quarters of a horse: the head, forelegs, shoulder, and chest. -G- GAITS - The manner of going. The straight GAITS are walk, trot, CANTER and GALLOP. FIVE- GAITED horses walk, trot, CANTER, rack and do one of the slow GAITS, running walk, fox trot, or stepping pace. GALLOP - A three-beat gait resembling the CANTER but faster, 12 mi/hr (19 km/hr). The extended gallop may be a four-beat and is about 16 mi/hr (25 km/hr). GASKIN - The muscular part of the hind leg above the hock. GIRTH - The measure of the circumference of a horse s body back of the withers. A leather, canvas, or corded piece around body of horse to hold saddle on. GRAIN - Seeds from crops (such as oats, corn & barley) that are used as energy sources in concentrate feeds. GREGARIOUS - A word used to describe animals that like to be in a group, ie. horses. GREEN HORSE - One with little training. GELDING - A male horse of any age that has been castrated. GROOM - To remove dust and dirt from the horse using brushes and a cloth. Groom also refers to person who does this. GOOD HANDS - The rider s hands are in contact with the bit, but will still have some yield. 70
71 -H- HANDS - A measurement of the height of a horse. One hand equals 4 inches. For any measurements less than a hand use a decimal, then the number of inches (1 to 3) and any fraction of an inch written as a action HEAD SHY - Applied to a horse that is sensitive about the head, jerks away when touched. HEAD STALL - The leather bridle straps exclusive of bit and reins. HERD BOUND - A horse who refuses to leave the group of horses. HOOF - The foot as a whole in horses. The curved covering of horn over the foot. HORSE LENGTH - Eight feet, distance between horses in a column. HORSEMANSHIP - Art of riding the horse and understanding his needs. -I- INSTINCT - A natural reaction to any situation. INCISED WOUND - A clean cut wound caused by a sharp object. -J- JOCKEY - The leather flaps on the side of a saddle. JOG - Slow collected trot required for Western classes. -L- LAMENESS - A defect detected when the animal favors the affected foot when standing. The load on the ailing foot in ACTION is eased and a characteristic bobbing of the head occurs as the affected foot strikes the ground. LACERATION - A wound caused by tearing of the skin. LEGUMES - A type of forage in pasture or hay that has stems, oblong leaves and flowers, ie. alfalfa, clover. LOCKJAW - A common name for TETANUS. LOPE - A three-beat gait. -M- MARE - A mature female horse, over four years of age. MOUNTING - To get on the back of the horse with or without a saddle. -N- NAVICULAR BONE - A small bone inside the foot. NEAR SIDE - The left side of a horse. NUTRITION - Proper feeding program for a horse. Food, nourishment. 71
72 -O- OFF-SIDE - The right side of a horse. OUT OF - Means the same as the DAM of. Female parent of a FOAL. OVER-REACH - A painful wound on the heel or back of the fetlock on the front leg caused by the toe of the hind foot striking the front leg. -P- PARE - A two-beat gait in which the legs on the same side move at the same time, ie. left front and left hind; a natural gait of the Standardbred. PERIOPLE - The shiny outer covering of the hoof wall. PIGEON-TOED - Front toes are turned inwards while the heels are turned out. PLANTAR CUSHION - Fatty cushion at the back of the foot. PONY - Generally 14.2 hands or less in height. POSTING - At a trot the rider moves forward and up in time to the outside front leg of the horse. PUNCTURE - A deep narrow type of wound. PUREBRED - A horse with known ancestry from a definite breed and having no mixed heritage from other breeds. - Q - QUARTER CRACK - A vertical crack on the side of the hoof. QUILTS - Large quilted cotton sheets wrapped around the horses leg and held in place by leg wraps; used as protection when traveling or for injury. -R- RABIES - An infectious disease that destroys parts of the brain s nerve cells. ROMAL - A long flexible quirt or whip attached to closed reins. ROMAL REINS - A Y shaped set of reins with a single strap held by the rider. -S- SIRE - The male parent of a horse. SNAFFLE - A bit with a ring type of cheek piece and solid or jointed mouthpiece. SKID BOOTS - Boots worn to protect the fetlocks of the rear legs. SPLINT BOOTS - A flat boot worn on the front legs to protect the CANNON bone. SPLAY FOOT - Front toes turned out; heels turned in. SOLE -Hard protective covering on the bottom of the hoof. SNIP - A white streak on the nose between the nostrils. SOUND - The horse has no defects, illnesses or blemishes that will reduce their usefulness. STALLION - A male horse that has not been castrated (gelded). 72
73 -T- TACK - Riding equipment or gear for the horse, such as saddles, bridles, etc. TETANUS - A serious disease caused by toxin-producing bacteria that invade an open wound; also known as LOCKJAW. THREE-GAITED - A saddle horse trained to perform at the walk, trot and CANTER. THRUSH - A fungus infection in the frog of the foot. Causes a strong smelling discharge. TREE - The wooden or metal frame of a saddle TROT - A two-beat diagonal gait. -W- WALK - A slow, natural four-beat gait. WINDPUFF - A puffy enlargement in the fetlock. 73
74 74

75 4-H Achievement 4-H Achievement is a 4-H club celebration when members have completed their projects. Achievements are planned by the club to give recognition to members and leaders for their accomplishments in their 4-H projects and club activities. A 4-H Achievement can take many different formats: from choosing a theme, to member project displays, to members using their new skills for the event (entertainment, food, decorating, photographer, etc.), to members presenting their project to the whole group, the options are endless and open to the creativity of the members and leaders in each club! Clubs may also plan their Achievement to promote 4-H to the community or to recognize sponsors and others who have helped the club. Members and leaders - be sure to check your project books for the project completion If you have any questions, comments or suggestions for this or other 4-H projects contact: Manitoba 4-H Projects Manitoba Agriculture Food and Rural Development 1129 Queens Avenue Brandon, MB R7A 1L9 4h@gov.mb.ca Phone: Fax: This manual is for educational use only and is not intended as professional advice. For more information about 4-H and the many 4-H opportunities available please visit 75
Horse Handler Manual
 Horse Handler Manual Table of Contents I. The Role of a Horse Handler... 1 Promoting Independence... 1 II. Horse Handling... 2 Grooming... 2 Tacking up the Horse... 3 Leading in Class... 3 Arena Etiquette...
Approaching a Horse Safely
 Approaching a Horse Safely There are many things to notice about a horse before approaching them to make sure you are safe. This pamphlet provides tips on safely approaching a horse. Blind Zones Horses
2015 SENIOR GROOMING
 2015 SENIOR GROOMING 4586 (easy) DET34/HH38 Q: What is the name for the soft brush with fine bristles that's used to give a finishing touch? A: Body brush (soft brush) 4587 (easy) HH39 Q: How long an area
CANADIAN PONY CLUB WORKBOOK D LEVEL
 CANADIAN PONY CLUB WORKBOOK D LEVEL NAME BRANCH 2014 Canadian Pony Club 2014 All rights reserved. 1 CANADIAN PONY CLUB D WORKBOOK TABLE OF CONTENTS Contents LESSON 1 - PARTS OF THE PONY... 3 LESSON 2 -
Horse Vocabulary. By Debbie Miller, Trainer, Instructor
 Horse Vocabulary By Debbie Miller, Trainer, Instructor 1. Lunge Line Usually made of cotton, canvas or nylon about 25 feet long with a chain at one end to attach to the horse s halter or bridle. It is
SHOWMANSHIP WHAT IS SHOWMANSHIP?
 SHOWMANSHIP 2017 WHAT IS SHOWMANSHIP? The meaning of showmanship is to show how well you and your animal work together. It includes all the hard work that exhibitors put into their project from the first
LORAIN CO. 4-H SMALL EQUINE/SMALL PONY GROOM AND CLEAN CONTEST Monday, August 21, :00 Noon Lorain County Fairgrounds 4-H Ring A
 LORAIN CO. 4-H SMALL EQUINE/SMALL PONY GROOM AND CLEAN CONTEST Monday, August 21, 2017 12:00 Noon Lorain County Fairgrounds 4-H Ring A TEAMS Contest participants must be Lorain County 4-H members enrolled
In this module you will learn how to groom a horse and to employ some basic safety rules when working a horse from the ground.
 57 HORSE : HORSE Grooming WHAT WILL WE LEARN? In this module you will learn how to groom a horse and to employ some basic safety rules when working a horse from the ground. WHO CAN HELP? Horses are popular
SOUTH AFRICAN PONY CLUB
 SOUTH AFRICAN PONY CLUB Turnout of Pony & Rider Achievement Badge Workbook Objectives: To be able to turn out the rider and pony to The Pony Club standard. To understand why it is necessary to be clean
Saddles for Soldiers Orientation Packet (Phase 1)
") Saddles for Soldiers Orientation Packet (Phase 1) Shadow Hills Riding Club 10263 La Canada Way, Shadow Hills, CA 91040 Updated June 2015 Contents SHRC MISSION STATEMENT:... 2 The Saddles for Soldier s
Saddles for Soldiers Orientation Packet (Phase 1) Shadow Hills Riding Club 10263 La Canada Way, Shadow Hills, CA 91040 Updated June 2015 Contents SHRC MISSION STATEMENT:... 2 The Saddles for Soldier s
HORSE SENSE 101 A RIDER S GUIDE TO SAFETY
 HORSE SENSE 101 A RIDER S GUIDE TO SAFETY N.S.E.C. MISSION STATEMENT WE ARE DEDICATED TO EXCELLENCE IN SERVICE BY PROVIDING: A SAFE, FRIENDLY AND CARING ENVIRONMENT FOR ALL HORSE ENTHUSIASTS AND THEIR
Grooming Certification written portion
 Grooming Certification written portion Vocabulary: Fetlock Joint The lowest joint on a horse s leg, located directly above the pastern. Similar to an ankle. Pastern A short bone on a horses leg in between
WESTERN HORSEMANSHIP
 WESTERN HORSEMANSHIP True horsemanship is the art and science of riding. There are horsemen and there are riders. Every horseman is a rider but not every rider is a horseman. Horsemanship is the art of
RIDING FOR THE DISABLED ASSOCIATION THE BRAE CARRIAGE DRIVING VOLUNTEERS BASIC TRAINING NOTES
 RIDING FOR THE DISABLED ASSOCIATION THE BRAE CARRIAGE DRIVING VOLUNTEERS BASIC TRAINING NOTES Group Organiser: Alison Macintosh July 2011 RDA CARRIAGE DRIVING ROLE OF VOLUNTEERS Volunteers are required
GROOM & CLEAN RULES FOR CONTEST (1/1/18)
") GROOM & CLEAN RULES FOR CONTEST (1/1/18) GENERAL RULES Horses must be at least 13.2 hands or taller. Horses must meet a minimum Body Condition Score (BCS) of 4 in order to participate in the Groom and
GROOM & CLEAN RULES FOR CONTEST (1/1/18) GENERAL RULES Horses must be at least 13.2 hands or taller. Horses must meet a minimum Body Condition Score (BCS) of 4 in order to participate in the Groom and
Racine County Pony Club D2 Prep Guide
 Racine County Pony Club D2 Prep Guide 2014 Standard This rating preparation guide was produced by the Racine County Pony Club. It is not an OFFICIAL USPC PUBLICATION; no guarantee of accuracy is warranted;
Catch & Release Certification written portion
 Catch & Release Certification written portion Vocabulary to Know: Pasture A large fenced area with grass, used for horses to roam freely. Paddock A fenced area used for horses to roam freely. Also known
PASO FINO HORSE ASSOCIATION (PFHA) TRAIL HORSE TEST PROGRAM OVERVIEW
 TRAIL HORSE TEST PROGRAM OVERVIEW") PASO FINO HORSE ASSOCIATION (PFHA) TRAIL HORSE TEST PROGRAM OVERVIEW OBJECTIVES OF THE TRAIL HORSE TEST PROGRAM The Paso Fino Horse Association introduces the Trail Horse Test program (THT) to provide
PASO FINO HORSE ASSOCIATION (PFHA) TRAIL HORSE TEST PROGRAM OVERVIEW OBJECTIVES OF THE TRAIL HORSE TEST PROGRAM The Paso Fino Horse Association introduces the Trail Horse Test program (THT) to provide
Mile Hi Pony Club D-1 Rating Prep Guide (Revised for January 1, 2002 Standard)
") Mile Hi Pony Club D-1 Rating Prep Guide (Revised for January 1, 2002 Standard) How to Use This Guide There are two sections to the Guide to help you prepare for your rating. Riding Expectations. This section
Mile Hi Pony Club D-1 Rating Prep Guide (Revised for January 1, 2002 Standard) How to Use This Guide There are two sections to the Guide to help you prepare for your rating. Riding Expectations. This section
CAL POLY EQUINE SAFETY AWARENESS
 CAL POLY EQUINE SAFETY AWARENESS Protective Headgear Use approved headgear only Reasons: It can save your life No one is above the law Everyone is at risk regardless of age, experience, or riding style
MHCO Spring Clinic - Body Clipping and Show Grooming
 MHCO Spring Clinic - Body Clipping and Show Grooming The following tips are a guideline based on the experience and, in some cases, the opinions of the clinicians. There are as many different ways to prepare
Racine County Pony Club
 Racine County Pony Club D1 Prep Guide 2014 Standard The Racine County Pony Club produced this rating preparation guide. It is not an OFFICIAL USPC PUBLICATION; no guarantee of accuracy is warranted; USPC
Right from the Start Outline. Horses
 Right from the Start Outline Horses Characteristics Quick Agile Biters Attentive Expressive Very wide field of vision o 65 degrees of binocular vision- both eyes are used together o 285 degrees of monocular
Front View of the Animal
 BEEF CATTLE SHOWMANSHIP Celina R. Johnson and Brett Kaysen Colorado State University Showmanship is more than entering the show arena during the fair or livestock show! It includes all the hard work that
How To Ground Drive Your Horse
 How To Ground Drive Your Horse Like I have stated earlier, all the horses that come to me here at Triple R Horse Training are started in this very same way. Of course if they are already broke to the saddle
D-3 STUDY GUIDE HORSE MANAGEMENT EXPECTATIONS
 D-3 STUDY GUIDE HORSE MANAGEMENT EXPECTATIONS The candidate should be able to demonstrate simple skills without assistance, and to discuss care of the mount, using common horse terms. TURNOUT/TACK Rider
Est A TRADITION OF EXCELLENCE G U I D E
 Est. 1887 A TRADITION OF EXCELLENCE EQUINE CLIPPING G U I D E Est. 1887 A TRADITION OF EXCELLENCE Over 125 years of manufacturing quality Equine, Cattle and Sheep Clippers and Clipper Blades. INTRODUCTION
D-2 STUDY GUIDE HORSE MANAGEMENT EXPECTATIONS
 D-2 STUDY GUIDE HORSE MANAGEMENT EXPECTATIONS The candidate should be able to demonstrate simple skills, with assistance if necessary, and should understand the basic reasons for the everyday routines
Maryland 4-H Horsemanship Standards English Riding Level 1 (ER -1)
") Maryland 4-H Horsemanship Standards English Riding Level 1 (ER -1) 4-H Member: County: KEY: ES = Exceeds Standard MS = Meets Standard DNMS = Does not Meet Standard Approach a horse safely and put on a
Maryland 4-H Horsemanship Standards English Riding Level 1 (ER -1) 4-H Member: County: KEY: ES = Exceeds Standard MS = Meets Standard DNMS = Does not Meet Standard Approach a horse safely and put on a
Cloverbuds In the Saddle
 Cloverbuds In the Saddle Created by: Lauren Whitehurst Kalamazoo County Horse Project Educational Supervisor Updated 2013 Activities Below is a list of activities you may choose from to complete your horse
Western Halter Class Class Purpose: Animal judged on conformation,soundness, way of moving and general appearance. Exhibitor Tips: Can be up or down
 Western Halter Class Class Purpose: Animal judged on conformation,soundness, way of moving and general appearance. Hair: Exhibitor Tips: Can be up or down Clothing: You will see all kinds of clothing in
Horse Grooming and Tacking
 Horse Grooming and Tacking Consistency is a necessity for the emotional well-being of our horses. In an effort to create a consist environment for our horses, we need every volunteer preparing horses to
Swine Showmanship. By: Ryan Harrell
 Swine Showmanship By: Ryan Harrell 11-5-11 Practice Makes Perfect The key to successful showmanship is practice at home. Be Prepared! (Both you and the pig) Study the answers to the Questions Train Your
PCAWA THE HORSE or PONY - GENERAL
 PCAWA THE HORSE or PONY - GENERAL 33 THE COMFORT AND WELFARE OF THE HORSE/PONY MUST BE CONSIDERED PARAMOUNT AND SHALL BE ABOVE THE DEMANDS OF RIDERS, COACHES, OWNERS, OFFICIALS, ORGANISERS OR SPONSORS.
CANADIAN PONY CLUB WORKBOOK D1 LEVEL
 CANADIAN PONY CLUB WORKBOOK D1 LEVEL NAME BRANCH Canadian Pony Club 1997 All rights reserved. April 1997 CANADIAN PONY CLUB D1 WORKBOOK TABLE OF CONTENTS 1. Parts of the Horse MH p frontspiece US D p 231
HOW TO ACE YOUR TURNOUT INSPECTION
 HOW TO ACE YOUR TURNOUT INSPECTION AND WOW THE JUDGES Presented by Yvette Seger and Leanne Barnett, CHMJs Extraordinaire USPC Annual Meeting 2011 Powerpoint by Melissa Dabadie I shall endeavor to maintain
Training for Endurance Part 9
 Training for Endurance Part 9 Jim Holland Three Creeks Farm 175 Hells Hollow Drive Blue Ridge, GA 30513 (706) 258-2830 lanconn@tds.net www.threecreeksarabians.com Home of Sun of Dimanche+ and Mahada Magic
How to Go With the Flow at the Horse Show
 Photo by Alex Palmer How to Go With the Flow at the Horse Show The Maverick Farms Guide to Horse Show Etiquette What is a horse show? A horse show is a judged exhibition of horse and rider offering an
ABN: LUNGEING NOTES AND INFORMATION (updated August 2003)
") PONY CLUB ASSOCIATION OF SOUTH AUSTRALIA INC. 132 Rose Terrace WAYVILLE SA 5034 Phone: (08) 7225 1805 Fax: (08) 7225 1648 Email: ponyclubsa@gmail.com Web: www.ponyclub.asn.au ABN: 15 2888 078 234 LUNGEING
PONY CLUB ASSOCIATION OF SOUTH AUSTRALIA INC. 132 Rose Terrace WAYVILLE SA 5034 Phone: (08) 7225 1805 Fax: (08) 7225 1648 Email: ponyclubsa@gmail.com Web: www.ponyclub.asn.au ABN: 15 2888 078 234 LUNGEING
Preparing for 4-H Fitting & Showmanship
 Preparing for 4-H Fitting & Showmanship 4-H Fitting and Showmanship Fitting & Showmanship embodies the very heart of the 4-H program. The purpose of the 4-H Fitting & Showmanship program is to encourage
SOUTH AFRICAN PONY CLUB
 SOUTH AFRICAN PONY CLUB Loading Achievement Badge WORKBOOK Objectives: To know how to load/unload a pony, with assistance, safely into and out of a trailer or horsebox. Key points: Correct clothing for
EQUESTRIAN WITH SPECIAL NEEDS
 EQUESTRIAN WITH SPECIAL NEEDS Contents General Rules Equestrian with Special Needs Open Invitational Showmanship Class Equestrian with Special Needs Open Invitational Walk Equitation Class All 4-H ers
Florida 4-H Horse Horsemanship Level I
 Florida 4-H Horse Horsemanship Level I Name: Name of Club: Years in 4H Age: Equal Opportunity / Affirmative Action Institution In accordance with the Americans with Disabilities Act and Section 286.26,
D2 STUDY GUIDE. How to use the Study Guide: There are two sections to the Study Guide to help you prepare for your rating.
 D2 STUDY GUIDE The United States Pony Clubs, Inc., establishes Standards of Proficiency within the framework of the international Pony Club movement as the educational curriculum for a program of instruction
Beef Showmanship. Matthew C. Claeys Extension Livestock Specialist
 Beef Showmanship Matthew C. Claeys Extension Livestock Specialist A good showman is a person that has a sense or knack for an effective presentation of an animal. Showmanship is the one area of exhibiting
TAKING THE PLUNGE : INDEX Page 1. Aim of lungeing In order to teach/ you must become Page 2 proficient as coaches. Lungeing requirements.
 TAKING THE PLUNGE : LUNGEING INDEX Page 1 Aim of lungeing In order to teach/ you must become Page 2 proficient as coaches. Lungeing requirements. Page 3 What to look for when teaching lungeing. Page 4
Activities: Horse Handling STAFFING
 Activities: Horse Handling STAFFING These activities require one horse and handler team per student, plus an instructor, one safety person, and an example horse, ideally with a handler. All staff members
Course: Equine Science. Unit Title: Animal Handling TEKS: 130.5(C)(3)(B) Instructor: Ms. Hutchinson. Objectives:
(3)(B) Instructor: Ms. Hutchinson. Objectives:") Course: Equine Science Unit Title: Animal Handling TEKS: 130.5(C)(3)(B) Instructor: Ms. Hutchinson Objectives: After completing this unit of instruction, students will be able to: A. Locate the blind spot
Course: Equine Science Unit Title: Animal Handling TEKS: 130.5(C)(3)(B) Instructor: Ms. Hutchinson Objectives: After completing this unit of instruction, students will be able to: A. Locate the blind spot
Winnebago County 4-H Horse and Pony Manual (Revised March 2012)
") Winnebago County 4-H Horse and Pony Manual (Revised March 2012) SHOWMANSHIP (Manner in which animal is handled while being judged) Appearance of Animal 40 Appearance of Exhibitor 10 Showing Animal in Ring
Winnebago County 4-H Horse and Pony Manual (Revised March 2012) SHOWMANSHIP (Manner in which animal is handled while being judged) Appearance of Animal 40 Appearance of Exhibitor 10 Showing Animal in Ring
A 2. C 3. B 4. D 5. E Look 2. Head 3. Hand 4. Squeeze 5. Walking 6. Turn 7. Head
 Quiz answers 10. 11. 12. 13. 14. 15. 3. 1. Girth, Off foreleg, Sheath, Reins, Chin strap, Browband, Tail, Grass, Boot elastic, Jacket collar 2. 3. 4. True 4. See picture on page 9 for answers 5. See picture
BEEF. Bannock County 4-H. By Ashley Tolman
 BEEF Bannock County 4-H By Ashley Tolman Animal Selection What are the Priorities? Structure Muscle Condition (fat or lean) Balance (eye appeal) Volume Quality Travel The Ideal Steer Animal selection(cont.)
How to show Texas longhorns
 How to show Texas longhorns By: Brittney Frontera Table of Contents iii Table of Contents Table of Contents... iii Introduction... v Chapter 1: Preparing Your Animal for a Show...3 Training...3 Feeding...5
RANCH HORSE PLEASURE Purpose Conduct
 RANCH HORSE PLEASURE The purpose of Ranch Horse Pleasure should reflect the versatility, attitude, and movement of a working horse. The horse s performance should simulate a horse working outside the confines
Fitting & Showing Your Sheep
 Fitting & Showing Your Sheep Fitting & Showing Your Sheep Setting The Stage Training your lamb is an important part of the preparation for showing. Lambs are easily trained if they are treated properly
LEVEL FOUR: DISMOUNTED SKILLS
 LEVEL FOUR: DISMOUNTED SKILLS Explain why a horse would need shoes and how you would recognize that it is time for a reset. Explain three safety rules you will apply when bandaging your horses leg. Demonstrate
Oklahoma 4-H Horse Project Member Activity Manual One
 4-H Youth Development Oklahoma 4-H Horse Project Member Activity Manual One 4-H-ANSC-603 Member Activity manuals were prepared originally by Dr. David Freeman, Extension Equine Specialist, and Dr. Sheila
CERTIFICATE 2 ASSESSMENT REQUEST
 Tandivale Equestrian Centre Providing Comprehensive Equestrian Education since 1976 88 Johansons Road Warrandyte VIC 3113 9844 3882 www.tandivale.com Tandivale@hotmail.com CERTIFICATE 2 ASSESSMENT REQUEST
CANADIAN PONY CLUB C1 LEVEL WRITTEN/ORAL
 CANADIAN PONY CLUB C1 LEVEL WRITTEN/ORAL SPRING 2014 REFERENCES: MH US C US D US B US CMS HCH GTW AHSG Manual of Horsemanship 12th Edition USPC C Manual USPC D Manual USPC Bandaging Your Horse USPC Conformation
Knocking Off the Dirt!
 Proper grooming and keeping horses clean involves not only using the right tools but also behaving safely around the horse. Being clean can win awards! Introduction Horses, just like people, need to stay
COMPETITIVE TRAIL RIDE RULES (Effective 1/1/2018)
") REGISTRATION: 1. Upon arrival at the horse camp on Friday, stop at the registration table. You will receive a time card with the time you arrived on it. You have one hour to prepare your horse and to present
REGISTRATION: 1. Upon arrival at the horse camp on Friday, stop at the registration table. You will receive a time card with the time you arrived on it. You have one hour to prepare your horse and to present
PCAWA THE HORSE or PONY - GENERAL
 23 PCAWA THE HORSE or PONY - GENERAL THE COMFORT AND WELFARE OF THE HORSE/PONY MUST BE CONSIDERED PARAMOUNT AND SHALL BE ABOVE THE DEMANDS OF RIDERS, COACHES, OWNERS, OFFICIALS, ORGANISERS OR SPONSORS.
The Rein Board. A rein board is a useful tool for practice with the lines.
 The Rein Board A rein board is a useful tool for practice with the lines. Attach approximately a 1 lb weight to each line below the pulley and attach your lines to the top end. Now you can sit in a chair
C EFFICIENCY STANDARD MARKING SHEET
 C EFFICIENCY STANDARD MARKING SHEET RIDER DOB CLUB VENUE EXAMINER DATE WORKBOOK OVERALL RESULT COMMENT PRESENTATION RIDING JUMPING HORSE HANDLING HORSE CARE GENERAL KNOWLEDGE RESULT OVERALL WORKBOOK SECTION
PONY CLUB AUSTRALIA SYLLABUS OF INSTRUCTION FOR EFFICIENCY STANDARDS
 PONY CLUB AUSTRALIA SYLLABUS OF INSTRUCTION FOR EFFICIENCY STANDARDS INDEX Page General Conditions 2 Ages / Certificate colours 2 Pre-requisites 2 Examiners 2 Examination Credits 2 Written Papers 3 Pass
6 General Impression: Presentation of candidate, overall confidence and awareness of safety. No. Requirements Evidences 1 Mount and Dismount:
 v2016.01e 1 Approach and halter horse, lead horse out of stall, lead back to stall, remove halter and exit. If cross ties are used, safety an important factor. Applicant to be observed for safety leading
Kids n Horses News. February News chases away February Blues. February, 2017
 February, 2017 Kids n Horses News February News chases away February Blues Howdy to all the 4-H Horse Project members in Kansas! This is the February, 2017 edition of the Kids n Horses Newsletter to help
THE UNITED STATES PONY CLUBS, Inc.
 THE UNITED STATES PONY CLUBS, Inc. The Kentucky Horse Park 4041 Iron Works Parkway, Lexington, KY 40511 (859) 254-PONY (7669) D-3 TRADITIONAL (Eventing) COMBINED TEST SHEET 1 Candidate s Name Name of Pony
SADDLE/GAITED DIVISION (Classes18 27)
") SADDLE/GAITED DIVISION (Classes18 27) Gaited Performance classes (#23, 25, and 27) are intended for all gaited horse breeds. Generally this includes breeds that do not have a normal two-beat trot gait.
SADDLE/GAITED DIVISION (Classes18 27) Gaited Performance classes (#23, 25, and 27) are intended for all gaited horse breeds. Generally this includes breeds that do not have a normal two-beat trot gait.
Species Horse Module Safety
 Species Horse Module Safety Learning Objectives Beginner Recognize horse handling Safety Zones. Demonstrate how to tie a quick release and bowline knot. Demonstrate how to halter a horse safely. Demonstrate
Horses AGRICULTURAL PUBLISHED BY MU EXTENSION, UNIVERSITY OF MISSOURI-COLUMBIA. Safe Ground Handling of Horses
 Horses AGRICULTURAL MU Guide PUBLISHED BY MU EXTENSION, UNIVERSITY OF MISSOURI-COLUMBIA muextension.missouri.edu Safe Ground Handling of Horses Wayne Loch Department of Animal Sciences During the last
Rein Dancing.Learning to Long Line with Clay Maier
 Rein Dancing.Learning to Long Line with Clay Maier Warning: The following article contains information that may be habit forming and addictive. Read at your own risk. Long reining, long lining, and ground
Oceana County. 4-H Horse and Pony Project Notebook PICTURE OF HORSE AND RIDER
 Oceana County 4-H Horse and Pony Project Notebook CLOVERBUD (Ages 5-8) - 2018 PICTURE OF HORSE AND RIDER Name: Horses Name: 4-H Age: Years in Project: Name of Club: Years in Club: JUDGE S SCORE/COMMENT
Tips for Grooming your Pet Pomeranian
 Tips for Grooming your Pet Pomeranian by Vyctoria Brock www.pomkins.com Please note - This article is for education purpose only, it is not an illustration of grooming for the show ring. Choice of shampoo,
Roosevelt County Fair 2014 Horse Show Supplemental Information 1
 Roosevelt County Fair 2014 Horse Show Supplemental Information 1 This supplemental guide was created to provide additional information concerning the Youth Horse Show which may not be covered in the Fair
4-H Equine Series Where to Locate Information Required for the Dismounted Level Assessment Skills Levels 1-6
 4-H Equine Series Where to Locate Information Required for the Dismounted Level Assessment Skills Levels 1-6 Table of Contents Introduction 1 Level 1 3 Level 2 5 Level 3 7 Level 4 9 Level 5 12 Level 6
> Contents Foreword by Philippe Karl Introduction My Horses Recommended Reading The Basics
 contents v > Contents Foreword by Philippe Karl Introduction My Horses Recommended Reading The Basics What Is Trick Training? 1 What Kind of Horse Can Be Taught Tricks? 1 vii viii xi xiii xiv Hands-On
HORSEMEN WITHOUT A HORSE DIVISION II Grades 5 & 6 - Horses and Horsemanship
 HORSEMEN WITHOUT A HORSE DIVISION II Grades 5 & 6 - Horses and Horsemanship Name: Club: PURPOSE 1. Develop an appreciation of horseback riding as a healthy and wholesome form of recreation. 2. Learn horsemanship
Dear Parents, Johnson County 4-H Council - 1 -
 Dear Parents, We welcome you and your child to the Mini 4-H program. Mini 4-H is designed for boys and girls, who are in kindergarten, first, or second grade during this calendar year. Your job as a Mini
ROUND ROBIN SHOWMANSHIP The following divisions can participate in this contest: Beef Cattle, Goats, Sheep, Horses, and Swine.
 BEEF SHOWMANSHIP ROUND ROBIN SHOWMANSHIP The following divisions can participate in this contest: Beef Cattle, Goats, Sheep, Horses, and Swine. OBJECTIVES The goal of the Round Robin is for the top showmen
TABLE OF CONTENTS. Reference- Forms & Policies 22nd District Agriculture Indemnity Form CEC Indemnity Form CEC Policies
 1. Safety Rules 2. Questionaire 3. Tests 4. Achievement Skills 5. Appendix Reference- Horsemanship Parts of the horse Parts of the bridle Parts of the saddle Gaits Conformation TABLE OF CONTENTS Reference-
Equine Tack & Equipment Part I
 Equine Tack & Equipment Part I Halters and Bridles Types of Halters - Probably the safest type of halter for horses in pastures because they will break if caught on an. o Leather halters are and often
Learn to Hydrofoil. The. Easy steps for you to progress from your first ride on a hydrofoil to your first jumps off the water.
 The Learn to Hydrofoil Easy steps for you to progress from your first ride on a hydrofoil to your first jumps off the water. To find a nearby USA Water Ski GrassRoots event, go to: www. 1 Level 1 Hydrofoil
Grooming Tips. If your horse has white sock, try rubbing talcum powder onto it. That has always got my horses socks looking very white
 Grooming Tips Want to get that horse to really shine on show day? To lighten a white horse, apply either a whitening shampoo or a rubbing alcohol and allow it to dry. Then, apply a layer of baby powder
Trinity Equestrian Center
 Trinity Equestrian Center OUR MISSION Trinity Equestrian Center s (TEC) Healing With Horses mission is to connect people, horse and God by providing personal growth and development through equine assisted
FITTING A SNAFFLE BRIDLE. Club/Center Region Year
 FITTING A SNAFFLE BRIDLE Instructor Club/Center Region Year Topic: Fitting a Snaffle with a cavesson noseband Level/Certificate: D-3 Class Size: 2-6 Arena Size needed: none Time: 30 min Objective: D-3
January 31, H Horsemanship Skills Explanation Sheets Level 1 Handling and Riding
 4-H Horsemanship Skills Explanation Sheets Level 1 Handling and Riding History and Development of the Pennsylvania 4-H Horsemanship Skills Program The goal of the Pennsylvania 4-H Horsemanship Skills Program
Basic Skills Challenge Series
 The Learn to Slalom Basic Skills Challenge Series Fifteen easy steps for you to progress from your first attempt to slalom skiing on one ski. Level 1 On land, demonstrate: The seven skier hand signals
Knowledge Advancements
 Knowledge Advancements In the table below, list three different horse breeds and the following information about them. Breed: Origin: Characteristics: Primary uses: What are the five basic coat colors?
CIHF Youth Riding Program. Developed by the CIHF Education Committee
 CIHF Youth Riding Program Developed by the CIHF Education Committee CIHF Riding Program Ethics of a Horse Friend 1. Every person who deals with a horse is totally responsible for the living creature in
Horse Record Book 2017
 Horse Record Book 2017 January to Fair Record books are mandatory for all horse exhibitors except Cloverbuds Record books must be turned in during exhibitor check-in on Sun. 10 a.m. -2 p.m. Record books
Neal Smith Extension Area Specialist 4-H
 Neal Smith Extension Area Specialist 4-H Western Horsemanship Western Horsemanship Rider Will Be Judged On: Seat Hands Ability to Control and Show the Horse Performance of horse NOT more important than
No. Requirements Evidences
 v2016.01e 1 Demonstrate haltering a horse and explain the fit Maintain control of horse while confidently, efficiently haltering. Explain where noseband should lie on face, two (2) finger widths below
ARENA EXERCISES AND PATTERNS BEST
 50 ARENA EXERCISES AND PATTERNS BEST Essential Schooling for English and Western Riders Ann Katrin Querbach Contents DUPLICATION PROHIBITED Introduction 2 1. Finding Your Center The Correct Seat 4 1.1
This manual is intended for 4-H use and created for Maine 4-H members, leaders, extension agents and staff.
 This manual is intended for 4-H use and created for Maine 4-H members, leaders, extension agents and staff. Cover: Molly Sirois showing Gypsie 2007 show season Special thanks to: Valley Vet www.valleyvet.com
ELEMENTS WHICH MAY BE FOUND IN PATTERNS
 Back Back, In Hand Canter, Lope ELEMENTS WHICH MAY BE FOUND IN PATTERNS Equine moves backward a specified number of steps, in an even, steady and balanced manner. If asked to close the back, the equine
PEE WEE AND LIONS RULES AND SKILLS HANDOUT (April 2005) THE RULES
 THE RULES") PEE WEE AND LIONS RULES AND SKILLS HANDOUT (April 2005) THE RULES 1. When the whistle is blown by the coach, stand still, be quiet, and look at the coach; 2. If you want to speak raise your hand and wait
PEE WEE AND LIONS RULES AND SKILLS HANDOUT (April 2005) THE RULES 1. When the whistle is blown by the coach, stand still, be quiet, and look at the coach; 2. If you want to speak raise your hand and wait
Introduction to Evolutionary Hoof Care s New Hoof Care Work Stations TM and Evo Hoof Stands TM Also see Video Instructions at
 Introduction to Evolutionary Hoof Care s New Hoof Care Work Stations TM and Evo Hoof Stands TM Also see Video Instructions at www.evohoofcare.com This new generation of hoof support devices will significantly
The Handy Book of. Sigrid Schöpe HORSE TRICKS. Easy Training Methods for Great Results. Includes. of the World s Most Popular Tricks!
 Sigrid Schöpe The Handy Book of HORSE TRICKS Easy Training Methods for Great Results Includes 20 of the World s Most Popular Tricks! Contents DUPLICATION PROHIBITED by copyright holder 2 Playful, Fun,
PRE CUT CAR WINDOW TINTING INSTALLATION GUIDE
 PRE CUT CAR WINDOW TINTING INSTALLATION GUIDE EXPERT APPROVED! FOR PRE-CUT CAR WINDOW TINT KITS THOUROUGH STEP BY STEP GUIDE CO-CREATED WITH ONE OF OUR EXPERTS INSIDER TIPS DETAILED COLOUR PHOTO REFERENCES
SECTION E BREEDING CLASSES
 SECTION E BREEDING CLASSES 1. Breed Standard and Common Faults 2. Tack Requirements and Rules 3. Turn-Out of Horse, Including Shoes 4. Dress Requirements and Rules for Handlers 5. Classes, Age, and Gender