RJT. Pupil Task Cards: Throwing JUMP THROW RUN
|
|
|
- Roger Dorsey
- 6 years ago
- Views:
Transcription


1 RJT s: Throwing RUN JUMP THROW


2 s: Introduction Introduction to the s An important part of every child s cognitive development is to encourage them to explore new things and use self-guided learning to problem-solve and overcome challenges. The s provide teachers with a useful tool to encourage self-guided learning; peer observation; movement understanding; feedback and communication skills and is a creative way to expand the lesson. The s cover every athletics event and outline the key technical observation points for these events. This section also contains s for the key movement principles of running jumping and throwing (i.e. Agility, Jumping for height, Pull throw, etc.). Each card provides pupils with a series of challenges and/or questions designed to help them develop a greater understanding of each athletics events. These cards can be used to complement the Task section within each Activity Card. Getting the most from the s The s can be used with any age group, but teachers may wish to adapt how they use the cards based on the age and the ability of the group. Teacher Guided: For some pupils, teachers may wish to read out and explain each of the questions from the s and then allow the pupils to practice. Self-Guided: The teacher hands out a copy of the relevant s to pairs or small groups and asks them to go and explore the tasks before bringing the whole class back together to discuss what they observed. The s can either be used to complement a Technical Teaching Card, Activity Card or as a standalone activity. s can be downloaded or photocopied so as to provide sufficient copies for the whole class.


3 s: Stages of Progression Introduction The s provided in this resource have been spilt into four different formats (which are set out on the right). These task cards can be either used in a progressive order, which takes into consideration the pupil s increased understanding of movement and athletics skills or used to provide a variety of challenges to pupils. Each card aims to support pupils to develop a greater understanding of the athletics movements and how to improve these. It is hoped pupils will also develop their teamwork, communication and social skills through the role of both performer and coach. STAGE 1 STAGE 2 STAGE 3 STAGE 4 These pupil task cards replicate those used in primary schools and help reinforce the key learning principles for this age group. The cards focus on the foundation movement skills of running, jumping and throwing and encourage pupils to explore how they use their body to run, jump and throw effectively. These cards are ideal for those pupils new to athletics events and/or in the earlier stages of skill development. The stage 2 pupil task cards help pupils to develop their observation skills and a basic understanding of the technical points for each athletics event. Each pupil card provides 6 key technical points which pupils can use to observe each other s competence. The cards encourage pupils to observe their peers (either in pairs or small groups) and provide feedback on whether the pupil achieved the required technical points. The stage 3 pupil task cards build on the challenges set out in stage 2 by encouraging pupils to observe; analyse; consider potential interventions and provide feedback. Provided within each task card is a series of technical points, which if observed the pupil must tick. They will then record what strengths their partner demonstrated and any suggested areas of development, showing a clear level of understanding of the event. Stage 4 pupil task cards provide pupils with a group task which encourages them to look at a series of technical images and consider what technical points they would suggest for each image and share these with the rest of the group. Once the pupils have agreed on some key technical points, they practice the event using these points and then reflect on whether they need to be refined. This task activity promotes team work, creative thinking and a good understanding of the movement skills and the various athletics events.
4 Observation Model Feedback on specific observations and provide suggested changes. Discuss in groups / pairs what you need to do to improve. Use questions to check for partners understanding. 5 How will you your partner improve? Make the task Simpler or more Challenging. 5 Feedback on one or two observations you made and how these may be improved. Ask you partner what they think they did well and what they need to work on. This encourages them to self-reflect. What to look for/ what you need to know? The Key Technical Principles for the event: explained by teacher or outlined on the. What your partner(s) wants to work on. Previous experience of partner(s). Evaluation/Diagnosis Comparing with the Key Technical Principles (explained by the teacher or outlined in the s): What did your partner do well? What do they need to work on? Working with your partner(s): Provide instructions and an explanation on the task outlined by either your teacher or within the. If required ask teacher for clarification. 2 Observation (strategy) Initially focus on the technique and not the time they have run, height jumped or distance thrown. Consider where is the best place to observe, what you want to see. Consider how many times you should watch a skill. When observing start broad and then narrow down your focus ( whole body to body segments ).


.")
.")
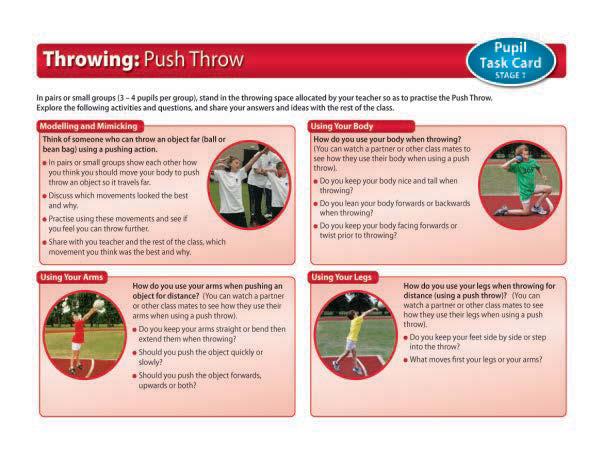
5 Throwing: Push Throw STAGE 1 In pairs or small groups (3 4 pupils per group), stand in the throwing space allocated by your teacher so as to practise the Push Throw. Explore the following activities and questions, and share your answers and ideas with the rest of the class. Modelling and Mimicking Think of someone who can throw an object far (ball or bean bag) using a pushing action. In pairs or small groups show each other how you think you should move your body to push throw an object so it travels far. Discuss which movements looked the best and why. Practise using these movements and see if you feel you can throw further. Share with you teacher and the rest of the class, which movement you think was the best and why. Using Your Body How do you use your body when throwing? (You can watch a partner or other class mates to see how they use their body when using a push throw). Do you keep your body nice and tall when throwing? Do you lean your body forwards or backwards when throwing? Do you keep your body facing forwards or twist prior to throwing? Using Your Arms How do you use your arms when pushing an object for distance? (You can watch a partner or other class mates to see how they use their arms when using a push throw). Do you keep your arms straight or bend then extend them when throwing? Should you push the object quickly or slowly? Should you push the object forwards, upwards or both? Using Your Legs How do you use your legs when throwing for distance (using a push throw)? (You can watch a partner or other class mates to see how they use their legs when using a push throw). Do you keep your feet side by side or step into the throw? What moves first your legs or your arms?


. Do you keep your body nice and tall when throwing?")

6 Throwing: Sling Throw STAGE 1 In pairs or small groups (3 4 pupils per group), stand in the throwing space allocated by your teacher so as to practise the Sling Throw. Explore the following activities and questions, and share your answers and ideas with the rest of the class. Modelling and Mimicking Think of someone who can throw an object far (hoop or rubber ring) using a Sling Throw action. In pairs or small groups show each other how you think you should move your body to Sling Throw an object so it travels far. Discuss which movements looked the best and why. Practise using these movements and see if you feel you can throw further. Share with your teacher and the rest of the class, which movement you think was the best and why. Using Your Body How do you use your body when throwing? (You can watch a partner or other class mates to see how they use their body when throwing). Do you keep your body nice and tall when throwing? Do you lean your body forwards or backwards when throwing? Do you keep your body facing forwards or twist prior to throwing? Using Your Arms How do you use your arms when throwing an object for distance using a Sling Throw? (You can watch a partner or other class mates to see how they use their arms when using a Sling Throw). Should your arm be long and relaxed or short and tense? Should your arm move quickly or slowly? Should you release the object high or low? Using Your Legs How do you use your legs when throwing for distance (using a Sling Throw)? Do you keep your feet side by side or twist the hips forwards prior to throwing? What moves first your legs or your arms?


7 Throwing: Pull Throw STAGE 1 In pairs or small groups (3 4 pupils per group), stand in the throwing space allocated by your teacher so as to practise the Pull Throw. Explore the following activities and questions, and share your answers and ideas with the rest of the class. Modelling and Mimicking Think of someone who can throw an object far (ball or bean bag) using a pulling (overarm throw) action. In pairs or small groups show each other how you think you should move your body to pull throw an object so it travels far. Discuss which movements looked the best and why. Practise using these movements and see if you feel you can throw further. Share with your teacher and the rest of the class, which movement you think was the best and why. Using Your Body How do you use your body when throwing? (You can watch a partner or other class mates to see how they use their body when throwing). Do you keep your body nice and tall when throwing? Do you lean your body forwards or backwards when throwing? Do you keep your body facing forwards or twist prior to throwing? Using Your Arms How do you use your arms when throwing an object for distance using a pull throw? (You can watch a partner or other class mates to see how they use their arms when using a pull throw). Should your arm be extended behind you or kept level with your body prior to throwing? Should you pull the object quickly or slowly? Should your hand be above or below shoulder height when throwing? Using Your Legs How do you use your legs when throwing for distance (using a pull throw)? Do you keep your feet side by side or step into the throw? What moves first your legs or your arms?


. Do you keep your body nice and tall when throwing?")

8 Throwing: Heave Throw STAGE 1 In pairs or small groups (3 4 pupils per group), stand in the throwing space allocated by your teacher so as to practise the Heave Throw. Explore the following activities and questions, and share your answers and ideas with the rest of the class. Modelling and Mimicking Think of someone who can throw an object far (ball) using a Heave Throwing action. In pairs or small groups show each other how you think you should move your body to Heave Throw an object so it travels far. Discuss which movements looked the best and why. Practise using these movements and see if you feel you can throw further. Share with your teacher and the rest of the class, which movement you think was the best and why. Using Your Body How do you use your body when throwing? (You can watch a partner or other class mates to see how they use their body when throwing). Do you keep your body nice and tall when throwing? Do you lean your body forwards or backwards when throwing? Do you keep your body facing backwards or twist prior to throwing? Using Your Arms How do you use your arms when throwing an object for distance using a Heave Throw? (You can watch a partner or other class mates to see how they use their arms when using a Heave Throw). Should your arms be long and relaxed or short and tense? Should your arms move quickly or slowly? Should you release the object high or low? Using Your Legs How do you use your legs when throwing for distance (using a Heave Throw)? Do you keep your legs straight or bend then extend prior to throwing? What moves first your legs or your arms?


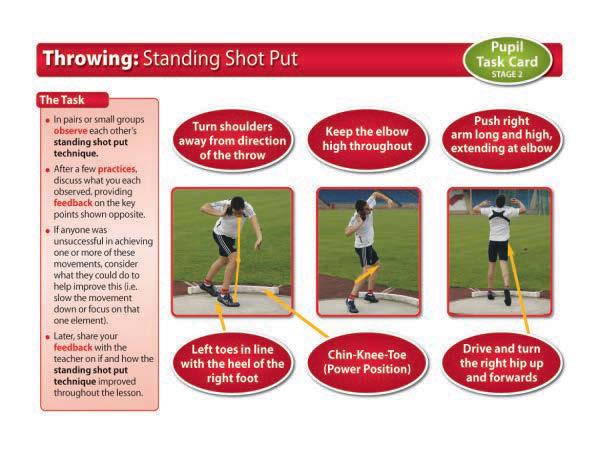
9 Throwing: Standing Shot Put STAGE 2 The Task In pairs or small groups observe each other s standing shot put technique. After a few practices, discuss what you each observed, providing feedback on the key points shown opposite. If anyone was unsuccessful in achieving one or more of these movements, consider what they could do to help improve this (i.e. slow the movement down or focus on that one element). Later, share your feedback with the teacher on if and how the standing shot put technique improved throughout the lesson. Turn shoulders away from direction of the throw Keep the elbow high throughout Push right arm long and high, extending at elbow Left toes in line with the heel of the right foot Chin-Knee-Toe (Power Position) Drive and turn the right hip up and forwards


10 Throwing: Glide Shot Put STAGE 2 The Task In pairs or small groups observe each other s glide shot put technique. After a few practices, discuss what you each observed, providing feedback on the key points shown opposite. If anyone was unsuccessful in achieving one or more of these movements, consider what they could do to help improve this (i.e. slow the movement down or focus on that one element). Later, share your feedback with the teacher on if and how the glide shot put technique improved throughout the lesson. Hold the shot under the chin and against the neck Keep the elbow high throughout Push right arm long and high, extending at elbow Back of circle Start at rear of circle keeping hips & shoulders square to the back Drive the hips towards the front of the circle before the shoulders After glide: land in power position with shoulders well back


11 Throwing: Rotational Shot Put STAGE 2 The Task In pairs or small groups observe each other s rotational shot put technique. After a few practices, discuss what you each observed, providing feedback on the key points shown opposite. If anyone was unsuccessful in achieving one or more of these movements, consider what they could do to help improve this (i.e. slow the movement down or focus on that one element). Later, share your feedback with the teacher on if and how the rotational shot put technique improved throughout the lesson. Start at rear of circle with hips & shoulders square to the back First step: drive and rotate right hip forward across the circle Land on the ball of the right foot and keep it rotating anticlockwise Back of circle Start throw by rotating left heel inwards and turning on ball of the foot Take a low running stride to the middle of the circle Land in the power position with shoulders back


 Releases off the index finger and not out the back of")
12 Throwing: Standing Discus Throw STAGE 2 The Task In pairs or small groups observe each other s standing discus throw technique. After a few practices, discuss what you each observed, providing feedback on the key points shown opposite. If anyone was unsuccessful in achieving one or more of these movements, consider what they could do to help improve this (i.e. slow the movement down or focus on that one element). Later, share your feedback with the teacher on if and how the standing discus throw technique improved throughout the lesson. Discus rests across finger pads (DO NOT GRIP) Turn right hip and leg to the front to start the throw Pull arm through long, fast and last Left toes in line with the heel of the right foot Chin-Knee-Toe (Power Position) Releases off the index finger and not out the back of the hand


13 Throwing: Rotational Discus Throw STAGE 2 The Task In pairs or small groups observe each other s rotational discus throw technique. After a few practices, discuss what you each observed, providing feedback on the key points shown opposite. If anyone was unsuccessful in achieving one or more of these movements, consider what they could do to help improve this (i.e. slow the movement down or focus on that one element). Later, share your feedback with the teacher on if and how the rotational discus throw technique improved throughout the lesson. Wind the upper body back, keeping the discus around shoulder height Take a running stride to the middle of the circle Keep the arm long and relaxed throughout the throw Back of circle Move body weight onto ball of left foot, which turns in direction of throw Keep the right foot turning as it lands in the centre of the circle Release off the index finger and not out the back of the hand


14 Throwing: Standing Javelin Throw STAGE 2 The Task In pairs or small groups observe each other s standing javelin throw technique. After a few practices, discuss what you each observed, providing feedback on the key points shown opposite. If anyone was unsuccessful in achieving one or more of these movements, consider what they could do to help improve this (i.e. slow the movement down or focus on that one element). Later, share your feedback with the teacher on if and how the standing javelin throw technique improved throughout the lesson. Javelin held back with extended arm and palm facing upwards Start movement by rocking back onto the back leg, then moving forwards The elbow remains above the shoulder when performing the throw Stand side on, feet shoulder width apart, left foot in front and pointing forwards Back foot is facing towards 1 o clock on a clock face The legs move before the arms


15 Throwing: 3-5 Stride Approach Javelin Throw STAGE 2 The Task In pairs or small groups observe each other s 3 5 stride approach javelin throw technique. After a few practices, discuss what you each observed, providing feedback on the key points shown opposite. If anyone was unsuccessful in achieving one or more of these movements, consider what they could do to help improve this (i.e. slow the movement down or focus on that one element). Later, share your feedback with the teacher on if and how the 3 5 stride approach javelin throw technique improved throughout the lesson. Legs should always cross in front of the body, NOT behind Rotate the right hip and knee forwards prior to left foot planting on final step Release javelin fast at roughly a 45 angle The three-stride approach pattern is: left foot, right foot, left foot, throw Drive the hip forward fast Keep shoulder and arm back until legs and hips have worked

.")
16 Throwing: Hammer Heave Throw STAGE 2 The Task In pairs or small groups observe each other s heave throw technique. After a few practices, discuss what you each observed, providing feedback on the key points shown opposite. Wind body up in opposite direction to the throw Move from low to high Release over left and right shoulders If anyone was unsuccessful in achieving one or more of these movements, consider what they could do to help improve this (i.e. slow the movement down or focus on that one element). Later, share your feedback with the teacher on if and how the heave throw technique improved throughout the lesson. Feet shoulder width apart Keep arms extended throughout Rotate through waist to increase force


17 Throwing: Standing Hammer Throw STAGE 2 The Task In pairs or small groups observe each other s standing hammer throw technique. After a few practices, discuss what you each observed, providing feedback on the key points shown opposite. If anyone was unsuccessful in achieving one or more of these movements, consider what they could do to help improve this (i.e. slow the movement down or focus on that one element). Later, share your feedback with the teacher on if and how the standing hammer throw technique improved throughout the lesson. Strong but relaxed grip, hands making a U shape Keep back straight, legs slightly bent Swing the hammer from low to a high point Stand with feet slightly wider than shoulder-width apart Keep the arms extended Release over left shoulder


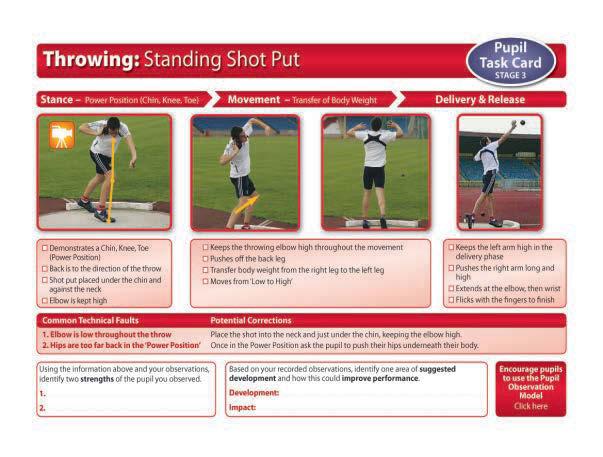
18 Throwing: Standing Shot Put STAGE 3 Stance Power Position (Chin, Knee, Toe) Movement Transfer of Body Weight Delivery & Release Demonstrates a Chin, Knee, Toe (Power Position) Back is to the direction of the throw Shot put placed under the chin and against the neck Elbow is kept high Keeps the throwing elbow high throughout the movement Pushes off the back leg Transfer body weight from the right leg to the left leg Moves from Low to High Keeps the left arm high in the delivery phase Pushes the right arm long and high Extends at the elbow, then wrist Flicks with the fingers to finish Common Technical Faults Potential Corrections 1. Elbow is low throughout the throw Place the shot into the neck and just under the chin, keeping the elbow high. 2. Hips are too far back in the Power Position Once in the Power Position ask the pupil to tuck their hips underneath their body. Using the information above and your observations, identify two strengths of the pupil you observed Based on your recorded observations, identify one area of suggested development and how this could improve performance. Development: Impact: Encourage pupils to use the Observation Model Click here
19 Throwing: Glide Shot Put STAGE 3 Preparation Glide Delivery & Release Back of circle Starts at the rear of the circle with back to direction of throw Keeps hips and shoulders square to the back of the circle Draws left leg into a crouch position Shifts body weight backwards over the right heel Drives the hips towards the front of the circle Push through the ball of the right foot Pull right foot quickly underneath the body Land in the Power Position Drives and turns the right hip up and forwards over the straightening left leg Right arm punches long and high, after a full extension of the legs and trunk Keeps the elbow high throughout the throw Pushes the right arm long and high in delivery Common Technical Faults Potential Corrections 1. Body weight is too far forward on landing Ensure the weight is on the back foot when landing and the hips are ahead of the shoulders. 2. Unable to drive right hip forwards on delivery Land in the Power Position (with correct feet spacing) after the glide to ensure good body positioning. Using the information above and your observations, identify two strengths of the pupil you observed Based on your recorded observations, identify one area of suggested development and how this could improve performance. Development: Impact: Encourage pupils to use the Observation Model Click here
20 Throwing: Rotational Shot Put STAGE 3 Preparation Rotation Delivery & Release Starts at the rear of the circle with back to direction of throw Starts by rotating the shoulder away from direction of rotation Turns on the ball of left foot, rotating the heel inwards to start the movement Keeps hips and legs rotating forwards, ahead of the shoulders Takes a low running stride to the middle of the circle Stays low during rotation Lands on the ball of the right foot and keep it rotating Lands in the Power Position Drives the hips forwards and upwards Keeps the elbow high throughout the throw Pushes the right arm long and high in delivery Common Technical Faults Potential Corrections 1. Body weight is too far forward on landing Ensure the weight is on the back foot when landing and the hips are ahead of the shoulders. 2. Unable to drive right hip forwards on delivery Land in the Power Position (with correct feet spacing) after the glide to ensure good body positioning. Using the information above and your observations, identify two strengths of the pupil you observed Based on your recorded observations, identify one area of suggested development and how this could improve performance. Development: Impact: Encourage pupils to use the Observation Model Click here
21 Throwing: Standing Discus STAGE 3 Grip and Hold Preparation Movement Transfer of Body Weight Delivery & Release Spreads the fingers comfortably across the discus Rests the discus across finger pads Does not grip the discus Stands side-on, with feet just over shoulder width apart Toes of left foot in line with heel of right foot Hips are tucked underneath the body and not push out behind Swings discus back in preparation for the throw Keeps the hand on top of the discus. Keeps the arm long and relaxed throughout the throw Pulls the arm through fast and last Leads with the thumb Releases off the index finger Common Technical Faults Potential Corrections 1. Brings the arm through too early and too low Leave the arm back and bring through fast and last, releasing at roughly shoulder height. 2. Hips are too far back in the Power Position Once in the Power Position ask the pupil to tuck their hips underneath their body. Using the information above and your observations, identify two strengths of the pupil you observed Based on your recorded observations, identify one area of suggested development and how this could improve performance. Development: Impact: Encourage pupils to use the Observation Model Click here
22 Throwing: Rotational Discus STAGE 3 Preparation Turn Delivery Release Stands at the rear of the circle, back to the direction of the throwing area Winds the upper body back, keeping the discus around shoulder height Keeps the body weight centred when winding up the body Uses an anticlockwise turn to rotate towards the middle of the circle Body weight is on the ball of left foot when rotating Take a running stride to the middle of the circle Keeps turning on the right foot when landing in the centre of the circle Lands in the Power Position prior to releasing the discus Pulls the arm through fast and last Leads with the thumb Releases off the index finger Common Technical Faults Potential Corrections 1. Brings arm through too early and too low Leave the arm back and bring through fast and last, releasing at roughly shoulder height. 2. Lands off balance after rotation Start off practicing a half turn and gradually build to a full turn. Focus on landing in the Power Position. Using the information above and your observations, identify two strengths of the pupil you observed Based on your recorded observations, identify one area of suggested development and how this could improve performance. Development: Impact: Encourage pupils to use the Observation Model Click here

23 Throwing: Standing Javelin STAGE 3 Grip & Hold Preparation Stance Movement & Delivery Transfer of Body Weight Grips the Javelin at the rim of the binding cord with thumb and either first or second finger Holds Javelin back with extended arm and palm facing upwards The Javelin is close to parallel with the elbow slightly flexed Stands side on with feet shoulder width apart, left foot in front and pointing in the direction of the throw The back foot is facing towards 1 o clock on a clock face Weight on the back leg (with knee slightly bent) when preparing to throw Rocks back onto the back leg and then moves forwards to start the throw Legs move before arms Extends the back leg at the knee and ankle to drive the right hip forwards Elbow remains above the shoulder when throwing Keeps shoulder and arm back until legs and hips have worked Keeps a tall body position Releases the javelin fast at roughly a 45 angle Common Technical Faults Potential Corrections 1. Weight is over the front leg when throwing Keep the weight on the back leg and then push off the back foot prior to the upper body working. 2. The arm comes through too early Keeping the arm and shoulder back as long as possible and until the legs have worked. Using the information above and your observations, identify two strengths of the pupil you observed Based on your recorded observations, identify one area of suggested development and how this could improve performance. Development: Impact: Encourage pupils to use the Observation Model Click here
24 Throwing: 3-5 Stride Approach Javelin STAGE 3 First Stride Second Stride Final Stride Delivery Grips the Javelin at the rim of the binding cord with thumb and either first or second finger Holds the Javelin back with extended arm and palm facing upwards Legs cross in front of the body and not behind Use a pattern of left foot, right foot, left foot, throw for the 3- stride approach Steps onto the whole of the left foot, push off onto the right foot, take quick stride onto the braced left leg Uses a daah, da, da rhythm. Drives the hip forward fast Keeps shoulder and arm back until legs and hips have worked Keeps a tall body position Releases the javelin fast at roughly a 45 angle Common Technical Faults Potential Corrections 1. Slows down prior to throwing Gradually build the run-up length and speed to ensure correct technique. 2. Pulls the javelin down when throwing Keep the shoulders and arm back until the legs and hips have worked. Using the information above and your observations, identify two strengths of the pupil you observed Based on your recorded observations, identify one area of suggested development and how this could improve performance. Development: Impact: Encourage pupils to use the Observation Model Click here

25 Throwing: Hammer Heave Throw STAGE 3 Grip & Preparation Movement Transfer of Body Weight Delivery Hands placed either side of the ball, with the grip towards the centre of the ball Places feet shoulder width apart Keeps the back straight with a good upright posture Winds the body up in the opposite direction to the throw Starts the rotation by turning the right foot out and right knee in Rotates through waist to increase force Keeps the arms extended (long) when in front of the body Keeps the body upright when rotating Pulls the arms up and over the left or right shoulder Releases the ball at the highest point Common Technical Faults Potential Corrections 1. Bends arms excessively when heaving the ball Keep the arms straight when in front of the body. 2. Bends the body sideways when rotating, losing torque Keep an upright posture as though the body is rotating around pole (from shoulders to hips). Using the information above and your observations, identify two strengths of the pupil you observed Based on your recorded observations, identify one area of suggested development and how this could improve performance. Development: Impact: Encourage pupils to use the Observation Model Click here

26 Throwing: Standing Hammer STAGE 3 Grip & Hold Preparation Movement Transfer of Body Weight Delivery & Release Holds the handle in the left hand (placed on the middle section of the fingers) Right hand then covers left hand Grip is strong but relaxed Hands make a U shape with the thumbs held crossed or parallel Stands with feet slightly wider than shoulder-width apart Back to the direction of the throw Keeps a straight back Bend legs slightly, weight evenly balanced on both feet Extend the arms and swing the hammer from low to a high Arms are extended when the hammer reaches the low point Drives hips upwards and forwards before release Releases the hammer over the left shoulder Extends the arms and watches the hammer s flight and landing Common Technical Faults Potential Corrections 1. Bends arms excessively when swinging the hammer Keep the arms long when the hammer is in front of the body. 2. Bends the body sideways when rotating, losing torque Keep an upright posture as though the body is rotating around pole (from shoulders to hips). Using the information above and your observations, identify two strengths of the pupil you observed Based on your recorded observations, identify one area of suggested development and how this could improve performance. Development: Impact: Encourage pupils to use the Observation Model Click here


27 Throwing: Standing Shot Put STAGE 4 Group Goal: To give and receive feedback between members of your group to help each of you in your ability to perform the standing shot put. a. Look at the pictures below as a group and think individually what the Technical Points in each phase would be for 1 minute (no talking at this stage). b. Next share your ideas as a group, taking it in turns to give and discuss ideas. Come to a common agreement and note the suggested Technical Points below. c. Now perform the standing shot put. d. After a few practices, reflect on whether your group needs to change the suggested Technical Points? Stance Power Position (Chin, Knee, Toe) Movement Transfer of Body Weight Delivery & Release Technical Point 1 Technical Point 2 Technical Point 3 Technical Point 4

28 Throwing: Glide Shot Put STAGE 4 Group Goal: To give and receive feedback between members of your group to help each of you in your ability to perform the glide shot put. a. Look at the pictures below as a group and think individually what the Technical Points in each phase would be for 1 minute (no talking at this stage). b. Next share your ideas as a group, taking it in turns to give and discuss ideas. Come to a common agreement and note the suggested Technical Points below. c. Now perform the glide shot put. d. After a few practices, reflect on whether your group needs to change the suggested Technical Points? Preparation Glide Delivery & Release Back of circle Technical Point 1 Technical Point 2 Technical Point 3 Technical Point 4
29 Throwing: Rotational Shot Put STAGE 4 Group Goal: To give and receive feedback between members of your group to help each of you in your ability to perform the rotational shot put. a. Look at the pictures below as a group and think individually what the Technical Points in each phase would be for 1 minute (no talking at this stage). b. Next share your ideas as a group, taking it in turns to give and discuss ideas. Come to a common agreement and note the suggested Technical Points below. c. Now perform the rotational shot put. d. After a few practices, reflect on whether your group needs to change the suggested Technical Points? Preparation Rotation Delivery & Release Technical Point 1 Technical Point 2 Technical Point 3 Technical Point 4


30 Throwing: Standing Discus STAGE 4 Group Goal: To give and receive feedback between members of your group to help each of you in your ability to perform the standing discus throw. a. Look at the pictures below as a group and think individually what the Technical Points in each phase would be for 1 minute (no talking at this stage). b. Next share your ideas as a group, taking it in turns to give and discuss ideas. Come to a common agreement and note the suggested Technical Points below. c. Now perform the standing discus throw. d. After a few practices, reflect on whether your group needs to change the suggested Technical Points? Grip and Hold Preparation Movement Transfer of Body Weight Delivery & Release Technical Point 1 Technical Point 2 Technical Point 3 Technical Point 4
31 Throwing: Rotational Discus STAGE 4 Group Goal: To give and receive feedback between members of your group to help each of you in your ability to perform the rotational discus throw. a. Look at the pictures below as a group and think individually what the Technical Points in each phase would be for 1 minute (no talking at this stage). b. Next share your ideas as a group, taking it in turns to give and discuss ideas. Come to a common agreement and note the suggested Technical Points below. c. Now perform the rotational discus throw (if safe to do so) from a throwing cage. d. After a few practices, reflect on whether your group needs to change the suggested Technical Points? Preparation Turn Delivery Release Technical Point 1 Technical Point 2 Technical Point 3 Technical Point 4
32 Throwing: Standing Javelin STAGE 4 Group Goal: To give and receive feedback between members of your group to help each of you in your ability to perform the standing javelin throw. a. Look at the pictures below as a group and think individually what the Technical Points in each phase would be for 1 minute (no talking at this stage). b. Next share your ideas as a group, taking it in turns to give and discuss ideas. Come to a common agreement and note the suggested Technical Points below. c. Now perform the standing javelin throw. d. After a few practices, reflect on whether your group needs to change the suggested Technical Points? Grip & Hold Preparation Stance Movement & Delivery Transfer of Body Weight Technical Point 1 Technical Point 2 Technical Point 3 Technical Point 4
. b. Next share your ideas as a group, taking it in turns to give and discuss ideas.")
33 Throwing: 3-5 Stride Approach Javelin STAGE 4 Group Goal: To give and receive feedback between members of your group to help each of you in your ability to perform a 3-5 stride approach javelin throw. a. Look at the pictures below as a group and think individually what the Technical Points in each phase would be for 1 minute (no talking at this stage). b. Next share your ideas as a group, taking it in turns to give and discuss ideas. Come to a common agreement and note the suggested Technical Points below. c. Now perform a 3-5 stride approach javelin throw. d. After a few practices, reflect on whether your group needs to change the suggested Technical Points? First Stride Second Stride Final Stride Delivery Technical Point 1 Technical Point 2 Technical Point 3 Technical Point 4

34 Throwing: Hammer Heave Throw STAGE 4 Group Goal: To give and receive feedback between members of your group to help each of you in your ability to perform the heave throw. a. Look at the pictures below as a group and think individually what the Technical Points in each phase would be for 1 minute (no talking at this stage). b. Next share your ideas as a group, taking it in turns to give and discuss ideas. Come to a common agreement and note the suggested Technical Points below. c. Now perform the heave throw. d. After a few practices, reflect on whether your group needs to change the suggested Technical Points? Grip & Preparation Movement Transfer of Body Weight Delivery Technical Point 1 Technical Point 2 Technical Point 3 Technical Point 4
35 Throwing: Standing Hammer STAGE 4 Group Goal: To give and receive feedback between members of your group to help each of you in your ability to perform the standing hammer throw. a. Look at the pictures below as a group and think individually what the Technical Points in each phase would be for 1 minute (no talking at this stage). b. Next share your ideas as a group, taking it in turns to give and discuss ideas. Come to a common agreement and note the suggested Technical Points below. c. Now perform the standing hammer throw (if safe to do so) from a hammer cage. d. After a few practices, reflect on whether your group needs to change the suggested Technical Points? Grip & Hold Preparation Movement Transfer of Body Weight Delivery & Release Technical Point 1 Technical Point 2 Technical Point 3 Technical Point 4
THROWING SKILLS RUN JUMP THROW
 RUN JUMP THROW CHAPTER 7: KEY IDEAS Throwing activities can be divided into the following sub-groups: pushing activities which lead to shot put pulling activities which lead to javelin throw slinging activities
SHOT PUT - GLIDE TECHNIQUE
 SHOT PUT - GLIDE TECHNIQUE The Shot Put can be broken down to four different phases. Preparation/Glide/Delivery & Recovery. Preparation - The thrower sets up correctly to commence the glide. Glide - The
Sprinting. Relevant Knowledge** Overall Level. Assessment Criteria. Learning Outcomes
 Sprinting 1. coordinate their limbs. 2. be familiar with the starter s order.. swing their arms in rhythm. 1. coordinate their limbs. 2. swing their arms in rhythm.. react accurately to signals.. master
Shot put learn by - doing Basic technique for the Shot Put By: Mark Harsha Portage High School Girls Head Coach
 Shot put learn by - doing Basic technique for the Shot Put By: Mark Harsha Portage High School Girls Head Coach Goal One: Shot grip and placement 1. Holding the shot The shot is held at the base of the
Shot Technical Model
 Shot Technical Model Progression related to Multi-Events Development (aged 8/9-12 years) can be referenced to Athletics 365. Further technical information can be found HERE Linear Shot - Whole Sequence
Page 1 Introduction. Fast and slow twitch muscle fibres are. Page 2 The Sprint Start. Page 4 - Sprints. Page 5 - Middle Distance
 Name: Below are some terms for you to research. Once you have found out what each term means write a short paragraph explaining why you perform better in some events than you do others. Page 1 Introduction
Discus Technical Model
 Discus Technical Model Progression related to Multi-Events Development (aged 8/9-12 years) can be referenced to Athletics 365 stages Red, Yellow & Green Whole Sequence Preparation Momentum Building Delivery
Shot Put - Glide Technique by Rob Lasorsa, M-F Athletic
 Shot Put - Glide Technique by Rob Lasorsa, M-F Athletic SHOT PUT GLIDE TECHNIQUE *ALL MOVEMENTS CONSIDER A RIGHT HANDED THROWER* GRIP, CARRY, RELEASE GRIP CARRY THROW INTO THE GROUND KNEELING THROW #1
THROW. Skill Progressions at a Glance. General Criteria (for right-handed throws) Safety for the Throws
 Safety for the Throws") THROW Skill Progressions at a Glance General Criteria (for right-handed throws) Movement sequence: a. preparation; b. momentum building; c. delivery; and d. recovery. During the delivery, right heel and
THROW Skill Progressions at a Glance General Criteria (for right-handed throws) Movement sequence: a. preparation; b. momentum building; c. delivery; and d. recovery. During the delivery, right heel and
Beginner Developing (RUN School Rabbits) Practising (RUN School Run) Emerging (Athletes) ATHLETE
 Practising (RUN School Run) Emerging (Athletes) ATHLETE") various s in response to instructions 2 Use backward to forward arm swing to increase ing distance 3 Identify preferred take off leg fast led approach with limited run up: 10-12 strides Achieve optimum
various s in response to instructions 2 Use backward to forward arm swing to increase ing distance 3 Identify preferred take off leg fast led approach with limited run up: 10-12 strides Achieve optimum
LEVEL 1 SKILL DEVELOPMENT MANUAL
 LEVEL 1 SKILL DEVELOPMENT MANUAL Lesson Manual C A Publication Of The USA Hockey Coaching Education Program The USA Hockey Coaching Education Program is Presented By LESSON C-1 SPECIFIC OBJECTIVES 1. Refine
Shot Put Glide Technique
 Shot Put Glide Technique By Rob Lasorsa * All movements are based on a right-handed thrower. Grip, Carry, Release Grip: Objective: Proper placement of shot in hand Description: The shot is placed on the
Coaching Points. SAFE LANDING When landing on one leg it is important to teach the players which foot they should be landing on.
 Footwork and Movement Skills Coaching Points INITIAL STANCE Forms the starting point for most attacking and defending skills. Feet shoulder-width apart Shoulders back and down Knees slightly flexed Knees
Basic Movement Patterns Locomotor Skills 1.3
 Basic Movement Patterns Locomotor Skills 1.3 Jumping Forward & Sideways & Landing Extending Arms upward upon takeoff Arms Reach Full Extension about head height at lift off Extending the Hips, Knees, and
Standing javelin. Development Stage: event group development. Outcome of Activity. What-2 Get the Athletes to Do. Equipment.
 24 Standing javelin 5m 30m 5m THROW FROM HERE IN DIRECTION OF THE ARROW SAFE WAITING AREA event group development Athletes will be able to perform an overhead pull throw from the Power Position with a
AMATEUR HOCKEY ASSOCIATION ILLINOIS, INC. MITE 8 & UNDER AMERICAN DEVELOPMENT MODEL
 Mite 8 & Under American Development Model Week 1 This coach s manual is intended to provide the instructions and tools to conduct the Mite and 8 & Under Illinois Hockey - Skills Challenge. Mite
Discus Technique: Basic Technique A Technical Analysis Grip Fork Gr Purpose: To provide control over Discus is held with Discus is held
 Discus Technique: A Technical Analysis Sandy Fowler University of Michigan Assistant Track & Field Coach Grip Purpose: To provide control over the implement throughout the spin. To provide for a proper
ACTIVITY TYPE. Coaching Points COACHING RESOURCE
 ACTIVITY TYPE Coaching Points COACHING RESOURCE 171 Footwork, Balance and Movement Skills Initial Stance Forms the starting point for most attacking and defending skills. Feet shoulder-width apart Shoulders
-$9(/,1²/(9(/ Learning Activities. 78/ THROW (Javelin Level 1) Run, Jump, Throw and away we go! (2001)
 Run, Jump, Throw and away we go! (2001)") -$9(/,1²/(9(/ Learning Activities OVERHEAD SOCCER THROWS (LARGE BALL) x Both hands are on the ball and it is thrown from overhead with both feet on the ground. Note the whipping action created. Limit to
-$9(/,1²/(9(/ Learning Activities OVERHEAD SOCCER THROWS (LARGE BALL) x Both hands are on the ball and it is thrown from overhead with both feet on the ground. Note the whipping action created. Limit to
The Grip: Place the shot comfortably on the base of the hand with the thumb down and the four fingers balancing the shot.
 The Javelin By Mark Mirabelli, Throwing Specialist - www.mmtrackandfield.com If I could use one word to express success in all three styles of throwing the shot put I would have to say the word drill.
Sprint run Card One. State of NSW, Department of Education and Communities, Skill components
 Sprint run Card One 1 2 3 4 5 6 Skill components 1. Lands on ball of the foot. 2. Non-support knee bends at least 90 degrees during recovery phase. 3. High knee lift (thigh almost parallel to the ground).
A Publication Of The USA Hockey Coaching Education Program The USA Hockey Coaching Education Program is Presented By
 LEVEL 1 SKILL DEVELOPMENT MANUAL Lesson Manual B A Publication Of The USA Hockey Coaching Education Program The USA Hockey Coaching Education Program is Presented By LESSON B-1 SPECIFIC OBJECTIVES 1.
LEVEL 1 SKILL DEVELOPMENT MANUAL
 LEVEL 1 SKILL DEVELOPMENT MANUAL Lesson Manual D A Publication Of The USA Hockey Coaching Education Program The USA Hockey Coaching Education Program is Presented By 1. Proper Stance: LESSON D-1 SPECIFIC
HOW TO HOLD THE SHOT
 HOW TO HOLD THE SHOT Balance the shot in his hand so it is resting at the point where the fingers are connected to the palm of the hand. Keep their fingers together and allow their thumb to gently rest
Javelin Technical Model
 Javelin Technical Model Progression related to Multi-Events Development (aged 8/9-12 years) can be referenced to Athletics 365. Further technical information can be found HERE Whole Sequence The javelin
ATHLETICS OMNIBUS - JAVELIN THROW From the Athletics Omnibus of Richard Stander, South Africa
 ATHLETICS OMNIBUS - JAVELIN THROW From the Athletics Omnibus of Richard Stander, South Africa JAVELIN THROW Javelin Throw is regarded as a strength event. The Javelin Thrower is required to throw a spear
Little League Pitching Mechanics - Simple Instructions For Little League
 Little League Pitching Mechanics - Simple Instructions For Little League Pitchers By Steven Ellis, former Chicago Cubs pitching pro The goal for any Little League coach or parent is to keep the game simple
to : entire team - warmup exercises (jumping jacks, leg stretches, arm circles, etc.) ( 10 minutes )
 ( 10 minutes )") Practice Plan - Minors: ( 2 hour practice) Practice #1 Date: Time: Team Roster: to : entire team - warmup exercises (jumping jacks, leg stretches, arm circles, etc.) ( 10 minutes ) to : entire team - throwing
Practice Plan - Minors: ( 2 hour practice) Practice #1 Date: Time: Team Roster: to : entire team - warmup exercises (jumping jacks, leg stretches, arm circles, etc.) ( 10 minutes ) to : entire team - throwing
PART 5: TEACHING SKIPPING SKILLS
 : TEACHING SKIPPING SKILLS This section includes: Learning skipping skills Skipping skills Individual Skipping skills Partner Skipping skills Long rope Skipping skills Double Dutch There are hundreds of
LEVEL 1 SKILL DEVELOPMENT MANUAL
 LEVEL 1 SKILL DEVELOPMENT MANUAL Lesson Manual A A Publication Of The USA Hockey Coaching Education Program The USA Hockey Coaching Education Program is Presented By LESSON A The Beginner Where to start?
Level 1 Stroke Performance Criteria
 STROKE PERFORMANCE CHART Level 1 Stroke Performance Criteria Component Swim on Front (Combined Stroke Using Any Type of Arm or Leg Action) Swim on Back (Combined Stroke Using Any Type of Arm or Leg Action)
OFFENSIVE SKILLS FOOTBALL SKILLS-SUCCESSFUL OFFENSE TAKING A SNAP GRIPPING THE BALL QUARTERBACKS STANCE
 OFFENSIVE SKILLS S E C T I O N I I I QUARTERBACKS STANCE Stand up straight with feet even, shoulder width. Have weight even on each foot, toes pointing straight ahead. Bend knees, keep back straight and
How to Make a Proper Fist
 How to Make a Proper Fist Bend your index finger so that the first knuckle touches the second knuckle of your thumb, tucking in the fold of skin that is between your thumb and index finger. Then fold your
ShuttlE. Schools Badminton LESSON PLANS 10 STARTER LESSONS
 Schools Badminton LESSON PLANS 10 STARTER LESSONS Schools Badminton LESSON PLANS 10 STARTER LESSONS Badminton World Federation 2011. First published November 2011. Overview 1. Introduction 10 Starter
Player Development. Pitching 1
 Pitching Player Development Pitching 1 Delivery Mechanics Checklist: 1. Feet slightly spread on throwing arm side of rubber 2. Body weight positioned over stride leg 3. Torso upright 4. Hips and shoulders
Teaching Progression and the Fine Points For Contact In The Underhand Pass (Service Reception and Defense) Step 1: Catch & Throw
 Step 1: Catch & Throw") Teaching Progression and the Fine Points For Contact In The Underhand Pass (Service Reception and Defense) Step 1: Catch & Throw - Players can be in pairs or if working individually then the coach can
Teaching Progression and the Fine Points For Contact In The Underhand Pass (Service Reception and Defense) Step 1: Catch & Throw - Players can be in pairs or if working individually then the coach can
Fielding Throwing and Catching Techniques, Practice and Drills
 Fielding Throwing and Catching Techniques, Practice and Drills Not to be reproduced without permission 1 1) Teach proper Fielding mechanics Ball grip Hand, glove and arm position Proper stance Throwing/Catching
LESSON PLAN. Unit: Ultimate Frisbee Date 4/29/13 Time: 7:25-8:48 Name: Preston Ingram Lesson: 8 1, 3 1, 3 1, 3
 LESSON PLAN Unit: Ultimate Frisbee Date 4/29/13 Time: 7:25-8:48 Name: Preston Ingram Lesson: 8 Block 1 No. Of students: 24 Lesson Game Play Objectives: (Expected Outcomes) The students will: 1) Be able
ABOUT THE TEACHING OF THROWING EVENTS
 ABOUT THE TEACHING OF THROWING EVENTS By Friedheld Endemann The following address provides a general outline of principles applied to learning practices in throwing events with recommended sequences for
Coaches Handbook. Coaches Handout Page 1
 Coaches Handout 2009 Page 1 General Session 1: How to Warm-up! Players are put through basic warm-ups and exercises that they should perform each week when they come to Tball. Stretching should be the
H.Dh. AEC PE Scheme Grade 3 Term1 2008
 1 We ek First Week Dat e 9 th January Topic Objectives Activities Assessment Material Needed Physical Fitness Activity Build up physical strength while doing fun activities Exercise whole body parts while
The Golf Swing. The Fundamentals
 The Golf Swing The Fundamentals Fundamental #1 Grip & Set-Up The grip and set-up should be viewed as putting parts of a machine together. The right parts connected in the right way will allow the machine
Basic Steps to Remember
 Lift those buns off the chairs. with these exercises. 1. Work your upper and lower body at the same time, beginning with legs, adding arms. 2. Alternate more vs. less strenuous movements. 3. If you get
ATHLETICS OMNIBUS - JAVELIN THROW From the Boland Athletics website:
 ATHLETICS OMNIBUS - JAVELIN THROW From the Boland Athletics website: www.bolandathletics.com 1. JAVELIN THROW Javelin Throw is regarded as a strength event. The Javelin Thrower is required to throw a spear
Beginning Softball Pitching Adapted from a guide created by Stan VanderSlik
 Beginning Softball Pitching Adapted from a guide created by Stan VanderSlik Pitching a softball is not like throwing a softball. Pitching is an underhand motion that, when done correctly, can result in
The Classical Circle Dance from Pa Kua Chang. Introduction and Transition 1 Single Palm Change
 1-1 The Classical Circle Dance from Pa Kua Chang The Circle Dance existed before Heaven and Earth. It is the Mother of Creation. And because it lies so close to Creation, how can it lead to destruction?
ShuttlE. Schools Badminton. Module 5: 10 starter lessons
 ShuttlE Time Schools Badminton Teachers MANUAL Module 5: 10 starter lessons ShuttlE Time Schools Badminton Teachers MANUAL 10 starter lessons Badminton World Federation 2011. First published November
Force Vectors SHOT PUT MECHANICS
 SHOT PUT MECHANICS The shot put is an individual event that is dominated by big, powerful male and female athletes. There are two techniques for throwing the shot put---the glide and rotation--. Neither
Thrower s Maintenance Program
 Thrower s Maintenance Program Elbow at 90 and fixed at side. Pull out with arm keeping elbow at side Elbow at 90 and fixed at side. Pull arm into body keeping elbow at side. Shoulder at 90 and elbow at
S t r e t c h i n g E x e r c i s e s
 Stretches for side of neck: 1. Sit or stand with arms hanging loosely at sides 2. Turn head to one side, then the other 3. Hold for 5 seconds, each side 4. Repeat 1 to 3 times Stretches For the side of
INTRODUCTION TO GOALKEEPING COACHING TECHNICAL INFORMATION
 INTRODUCTION TO GOALKEEPING COACHING TECHNICAL INFORMATION Welcome The Introduction to Goalkeeping Coaching Course (ITGKC) presents new or existing coaches with the opportunity to familiarise themselves
Sun Salutation Pose #1 Mountain Pose 1
 Sun Salutation Pose #1 Mountain Pose 1 Stand upright with feet together and look straight ahead, hands alongside body and palms forward. Lift abdomen inward and upward. Activate quadriceps and evenly distribute
26. FLUTTER KICKS 50 FITNESS ACTIVITIES HEART RAISERS ON THE SPOT MARCH MONTH
 MARCH 26. FLUTTER KICKS For small spaces, alternate left and right leg kicks in front of your body. Knees are slightly bent as you kick low and quick. Bend elbows at 90 degree angles and pump slightly
Hammer Technical Model
 Hammer Technical Model Progression related to Multi-Events Development (aged 8/9-12 years) can be referenced to Athletics 365 More technical information can be found HERE IAAF CECS Level II Event Specific
BURPEES BURPEES 10U/12U PHASE II - CORE & BACK 10U/12U PHASE II - CORE & BACK
 0U/U PHASE II - CORE & BACK BURPEES 0U/U PHASE II - CORE & BACK BURPEES Stand in athletic position: feet shoulder width apart and knees slightly bent. Squat down into a crouched position with hands on
PARTNER With all partner stretches: communicate with partner and use caution!!
 - warm up prior to stretching - isolate the muscle group to be stretched - move slowly and smoothly into stretch - use proper mechanics and correct alignment - breathe normal - slowly come out of stretch
11.1 Seating and the correct sitting position
 11. Sitting position 11.1 Seating and the correct sitting position The person who has had a stroke will spend much of their time sitting, especially in the early days after the stroke. A correct sitting
Dao Form from Lung Hu Shaun Master Weng 12 Moves
 Dao Form from Lung Hu Shaun Master Weng 12 Moves The Principles of Qigong 1) Adjust your psychology 2) Adjust your movements 3) Adjust your breath WARMUP 1. Opening and closing the chest arms out; Opening
Juniors BB Curriculum. Baserunning Curriculum (Juniors Level)
") Juniors BB Curriculum 1. Baserunning 2. Catcher 3. Batting 4. Infield 5. Outfield 6. Pitcher Objectives: Baserunning Curriculum (Juniors Level) Learn to take extra bases on a batted ball or an error Focus
Juniors BB Curriculum 1. Baserunning 2. Catcher 3. Batting 4. Infield 5. Outfield 6. Pitcher Objectives: Baserunning Curriculum (Juniors Level) Learn to take extra bases on a batted ball or an error Focus
Forearm Pass (Bump) with Partner Start with toss. Use the forearm pass to rally back and forth with your partner.
 with Partner Start with toss. Use the forearm pass to rally back and forth with your partner.") Forearm Pass (Bump) with Partner Start with toss. Use the forearm pass to rally back and forth with your partner. Ready Position Place feet shoulder width apart with toes pointed straight ahead. Place
Forearm Pass (Bump) with Partner Start with toss. Use the forearm pass to rally back and forth with your partner. Ready Position Place feet shoulder width apart with toes pointed straight ahead. Place
TRY IT! Athlete s name. Station #0 Warm up/balance. Station #6 Basketball Skills catch, dribble, pass, shoot and rebound
 TRY IT! Athlete s name Station #0 Warm up/balance Station #1 Running Tried it Did it Got it Station #2 Jumping Tried it Did it Got it Station #3 Ball Rolling Tried it Did it Got it Station #4 Throwing
U.S. Shooting Team Balance, Strength and Stability Workout. Training Work-Out
 U.S. Shooting Team Balance, Strength and Stability Workout Training Work-Out Modified by Dan Durben and Sommer Wood November 2006 from the program originally developed by Amber Darland for the USA Shooting
TECHNICAL MODELS & PROGRESSIONS FOR THE GLIDE SHOT PUT. Ben Bishop, Lake Park HS
 TECHNICAL MODELS & PROGRESSIONS FOR THE GLIDE SHOT PUT Ben Bishop, Lake Park HS 1 WHEN IS THE GLIDE A VIABLE OPTION? Athletes that rely heavily on strength levels as opposed to other athletic domains,
Netball practical examination support materials
 Netball Curriculum Council, 2009 This document apart from any third party copyright material contained in it may be freely copied, or communicated on an intranet, for non-commercial purposes by educational
Selecting Successful Vaulters. Teaching the Beginning Pole Vaulter 12/31/2010. Speed. Jumping Ability KCCTFCA Winter Coaches Clinic
 Teaching the Beginning Pole Vaulter 2011 KCCTFCA Winter Coaches Clinic Thane Nonamaker Gardner Edgerton High School Selecting Successful Vaulters Speed Jumping Ability Athletic Ability Attitude Speed The
TEACHING RACING STARTS SAFETY PROTOCOLS AND CHECKLIST
 TEACHING RACING STARTS SAFETY PROTOCOLS AND CHECKLIST Before You Teach, Be Sure: 1. Swimmers can jump feet first into deep water, surface, turn around, level off and swim 10 feet. 2. Swimmers can demonstrate
Activity Description/ Location Time Warm Up. 5 min. Balance
 Jackrabbit Level 4 Lesson#1 Classic Technique Activity Description/ Location Time Balance -Kick turn, -diagonal stride, -double poling, New Skill -one-step double poling. -one-step double poling (fluid
Oswaldtwistle Moor End Primary School
 Lancashire Year 2 Athletic Activities Core Task Key Stage 1 Colour Match Core Task The Colour match core task involves children throwing different pieces of equipment as accurately as possible in order
WGAAA Baseball Skill/Coaching Manual
 WGAAA Baseball Skill/Coaching Manual All baseball players regardless of age should have a base knowledge and capability of proper baseball mechanics. If a team is mechanically sound, more often than not,
Shoulder Exercises for Combined Labrum Repair Rehabilitation Protocol
 Shoulder Exercises for Combined Labrum Repair Rehabilitation Protocol The exercises illustrated and described in this document should be performed only after instruction by your physical therapist or Dr.
TAI CHI SHORT HAND FORM CLASSICAL YANG STYLE Updated 10/03/ updates available from
 TAI CHI SHORT HAND FORM CLASSICAL YANG STYLE Updated 10/03/2017 - updates available from www.taichichuan.org.uk During my 17 years learning of tai chi with Tony I have developed the following notes, both
SECTION 1 - TEACHING GUIDE
 TABLE OF CONTENTS PAGE OVERVIEW OF THE COMPLETE SCHEME OF WORK - 4-11 YEARS (RECEPTION AND KEY STAGES 1 & 2)...xix 4-7 YEARS (KEY STAGE 1) SCHEME OF WORK... xx 8-11 YEARS (KEY STAGE 2) SCHEME OF WORK...
DOYLE BASEBALL TERMINOLOGY
 www.doylebaseball.com/siebert DOYLE BASEBALL TERMINOLOGY THROWING (Part One/Upper Half) Stance spread and flex lower half Show throwing arm extended straight out to the side of the body then bend elbow
Training FUNdamentals skill checklist
 Training FUNdamentals skill checklist Key Points to Skills in Checklist This is a brief summary of some of the key points of the fundamental skills outlined in the FUNdamentals of Softball and Training
SKLLS TEACHING POINTS: HOLDING THE BALL
 SKLLS TEACHING POINTS: HOLDING THE BALL - Fingers spread around the ball - Thumbs on top - Fingers underneath - As a possible guide for beginners, putting the index finger on the seams helps put the hands
FUNDAMENTAL SOFTBALL SKILLS (DEVELOPING FUNDAMENTAL SKILLS)
") FUNDAMENTAL SOFTBALL SKILLS (DEVELOPING FUNDAMENTAL SKILLS) Learning outcomes: At the completion of this Module the candidate will be able to: Identify the fielding positions in softball and the responsibilities
FUNDAMENTAL SOFTBALL SKILLS (DEVELOPING FUNDAMENTAL SKILLS) Learning outcomes: At the completion of this Module the candidate will be able to: Identify the fielding positions in softball and the responsibilities
HOPPING Grade 1. Standard 1: The physically literate individual demonstrates competency in a variety of motor skills and movement patterns.
 HOPPING Grade 1 S1.E1.1: Hops, gallops, jogs and slides using a mature pattern. Hop in general space on preferred foot. 1. Students in scattered formation with personal space of at least 3-feet square
Belton High School Marching Fundamentals 2016
 Belton High School Marching Fundamentals 2016 Fundamentals of Teaching Fundamentals: 1. Say the name of the maneuver (INSTRUCT) 2. State its purpose (INSTRUCT) 3. Demonstrate it slowly, several times,
Instructional Manual
 Instructional Manual TABLE OF CONTENTS MEDICUS Dual 2000 Instructional Manual The Proper Grip 1 Posture, Stance & Alignment 2 Breakpoint 1: Takeaway 3 Breakpoint 2: Toe-up Position 4 Breakpoint 3: Setting
Chair exercises Sally Ann Belward, Falls Clinical Lead Physiotherapist
 Chair exercises Sally Ann Belward, Falls Clinical Lead Physiotherapist Exercise safety Exercise should be comfortable and fun Ensure participants are sat on a sturdy chair, have comfortable clothing and
Performing the Exercises. Crunches
 Crunches EQUIPMENT: Mats, such as those used for tumbling or wrestling. TIME LIMIT: Two Minutes IMPORTANT: Competitors may rest in either in the up or down position as long as they maintain the correct
Yoga Home Practice Guidebook. Boston Medical Center Veterans Back to Health Trial
 Yoga Home Practice Guidebook Table of Contents Welcome... 1 Study Contact Information... 2 Making the Most Out of Your Yoga Experience... 3 Setting up Your Home Practice... 4 Completing Your Home Practice
The Glide Shot Put Mitch Crouser Crouser s Elite Athlete
 1 The Glide Shot Put Mitch Crouser Crouser s Elite Athlete Glide v. Spin Top Americans spin Most Olympics/World Championships won by gliders Learn Power Position /Standing Throw first Learn Glide second
Floor Gymnastics:pair work correction
 Floor Gymnastics:pair work correction Example: Pupils must Stand straight on their good leg, arms out to the side, chin up, legs straight and tight, belly in. They then Lift the back leg up behind making
Coaching Principles. STEPS IN TEACHING A DRILL 1. Introduce 2. Demonstrate 3. Explain 4. Organize 5. Execute 6. Correct 7. Practice GENERAL PRINCIPLES
 Alpine Skiing Drill Book Updated August 2008 STEPS IN TEACHING A DRILL 1. Introduce 2. Demonstrate 3. Explain 4. Organize 5. Execute 6. Correct 7. Practice GENERAL PRINCIPLES Coaching Principles Drills
GLOSSARY OF TERMS 112 HOCKEY CANADA SKILLS DEVELOPMENT PROGRAM
 The following terms and definitions can be found in the Skills of Gold DVD set. Reference number indicates the skill presented in this DVD set. SKATING BALANCE AND AGILITY 1.01 Basic stance Balance starts
Warm Ups. Standing Stretches
 Warm Ups Mild warm-ups are a necessity for everyone. The need for warm-ups increases with age as the body becomes less elastic over time. It is recommended that you execute the warm-up routine in this
contents QuickStart Tennis Practice Sessions Introduction ages 5 6 practice sessions
 contents QuickStart Tennis Practice Sessions Introduction I II practice 1 Controlling the Racquet and the Ball 1 8 practice 2 Learning to Hit the Ball at the Side of the Body 9 16 practice 3 Receiving
Walking. Used in almost every aspect of daily living, walking gives your child the independence and freedom to move about and explore his environment.
 is your child s first upright movement on both feet. It requires the transfer of body weight from one foot to the other, with one foot always in contact with the ground. As this takes place, a corresponding
Lesson plan. Warm-up Learners perform drills that develop volleyball skills. They then try to maintain a rally using these skills Cool-down.
 Lesson 3 Lesson plan Lesson theme Practise basic volleyball skills Grade 10 Duration 50 minutes Date/week Context Recreation and physical wellbeing Movement focus: Sports and games. Linking with previous
OVERVIEW FOR STUNTS FLYER BODY POSITIONS
 TCI MODULE 6 Stunts Level 1 Page 1 of 11 OVERVIEW FOR STUNTS FLYER BODY POSITIONS *** NOTE *** For instruction purposes, we will assume regular flyer positions in this manual. That is, it is assumed that
Timing 1. The hips and shoulders rotate at the end of the catch to assist in the acceleration of the stroke.
 Freestyle Body Position 1. Head position should be comfortable at a 45º angle with the water line slightly above the goggles. 2. Hips and shoulders should remain high in the water with a straight line
40 Allied Drive Dedham, MA (office)
") Standing forward flexion Stand facing a mirror with the hands rotated so that the thumbs face forward. Raise the arm upward keeping the elbow straight. Try to raise the arm by hinging at the shoulder as
Standing forward flexion Stand facing a mirror with the hands rotated so that the thumbs face forward. Raise the arm upward keeping the elbow straight. Try to raise the arm by hinging at the shoulder as
RF-1. High Knee Marching, No Arms Run Form Drills. Improve running and movement technique
 High Knee Marching, No Arms Run Form Drills RF- Stand on the doubles sideline with the body relaxed and little or no weight on your heels. Relax the upper body and do not use the arms. Lift the left knee
Bordentown Regional High School Physical Education. Basketball Study Guide
 Bordentown Regional High School Physical Education Basketball Study Guide Basketball Study Guide History: The game of basketball was actually developed to help condition athletes during the winter months.
Jackrabbit Level 3 Lesson#1
 Jackrabbit Level 3 Lesson#1 Activity Description/ Location Time Warm Up Mirror the coach-skiers are spread out facing the coach they copy the coach as if they are looking in a mirror (coach steps right