Grandmaster Dr. Ted Gambordella
|
|
|
- Aileen Lewis
- 6 years ago
- Views:
Transcription


1 The Complete Book of Wrist Locks By Grandmaster Dr. Ted Gambordella Everything you need to know about Wrist Locks.
2 By Grandmaster Dr. Ted Gambordella 1
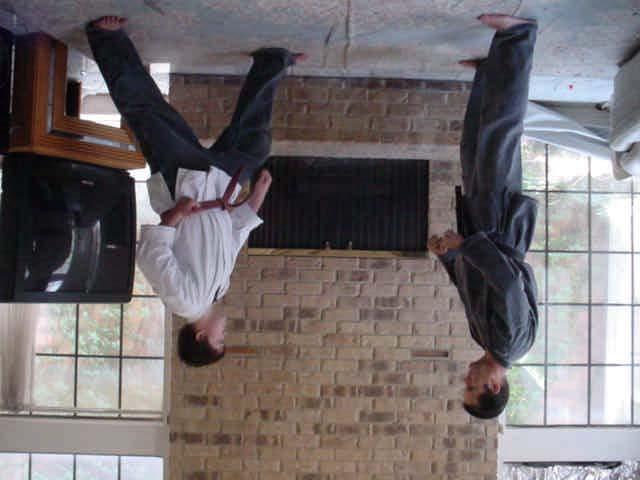
3 I have always loved to do wrist locks since I first began my martial arts training over 35 years ago. From the very beginning I knew that wrist locks were one of the most effective control techniques of the Martial Arts and one that didn t require a lot of strength, speed or stamina. But they did require a lot of practice. For even the simplest wristlock is very sophisticated and though they may look very simple to the average observer they are in fact very difficult to master. It is always very funny to watch a great aikido or jiu-jitsu master doing some marvelous wristlock, causing great pain and anguish to the student and to then have the other students try to do the same thing. They never get it right and never make it look so simple. That is the beauty of wrist locks, they look so easy, yet they require significant practice to master. I decided to write this book on wrist locks to teach the beginning student the correct ways to practice wrist locks and the correct applications of basic and advanced wrist locks. You will learn the Correct way to start and finish all wrist locks. You will also learn the correct way to practice the wrist locks. And you will learn to finish the wrist locks, standing up and from the ground. You will not learn to do unrealistic wrist locks that are too complex for the average person to do and would in fact require years of hard training. You will be able to do all the wrist locking techniques found in this book after only a few weeks of practice and they will all be effective control and self defense technique against even the largest of opponents. An important reminder to students while practicing their wrist locks. You must learn to do the wristlock correctly and this means you MUST CAUSE PAIN to the wrist when you are applying the wristlock. It does not do the student trying to learn any good at all to have his partner tap out when they start the wrist lock, at the first start of feeling any pain. They must feel the pain, and the student practicing must know what it feels like to cause the pain and how they started the technique and where and when the pain came in. You must not intentionally hurt your partner, but you must hurt them a little to learn to do the wrist locks correctly. This might sound contradictory, when I say you must hurt them but you must not hurt them intentionally. But you will understand after you begin your practice. You must learn where and 2


4 when the pain comes in and how start and stop the pain. You must learn control. And that takes practice and patience and a good partner. Basic Wrist locking Positions The human wrist is a marvelous thing. It can bend forward and backwards, and make circles right and left. It can bend up and down and a little sideways, but it definitely has it limitations on where and how far it can bend in any of these directions. And the entire art of wrist locking is in knowing how and where to over bend and over stretch the wrist to cause severe and immense pain and disable or control your attacker. Lets look at the ways to bend a wrist so that pain is caused and one can begin control techniques. The Wrist does not like to fen straight backwards. To do the backwards wrist lock. You hold the back of the hand directly facing you and push straight backwards. 3


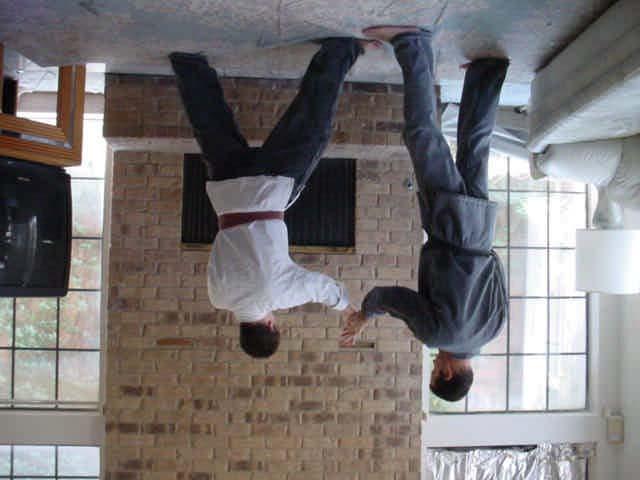
5 The wrist does not like to bend straight to the side. The wrist does not like to bend straight forward. The wrist does not like to bend straight backwards. The wrist hates to bend straight up and down. 4


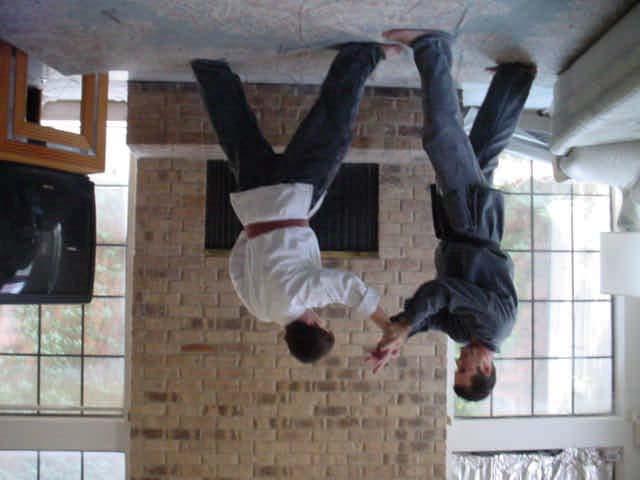
6 The wrist does not like to bend backwards and to the side. This is the first technique we will learn. \ Start by bending the wrist straight back with your left wrist. Keep the thumb on the back of the wrist, and bring your right hand up to the side and start pushing backwards and down to the right. Keep the pressure doing down and to the right, and point the fingers of the right hand towards the ground. 5


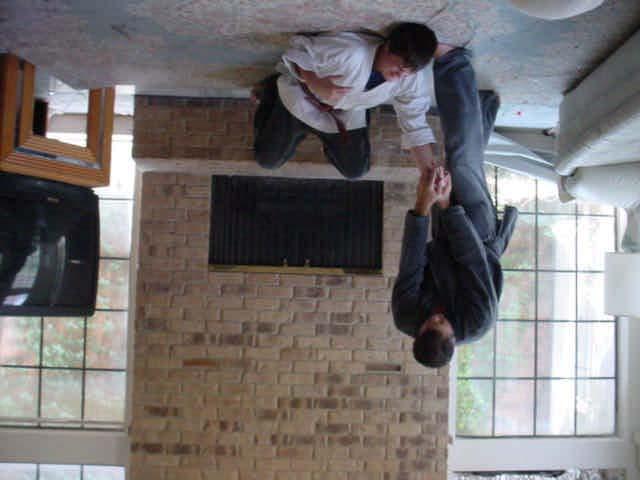
7 The continue down and outside pressure will throw him to the ground directly in front of you, You them hold the wrist and step around across and over his face. This will force him to roll over to his face and then you pull up on the wrist and lock it backwards as you apply pressure on the elbow and shoulder. 6


8 Continue to hold pressure on the elbow and shoulder and step over the arm to lock you leg around it. You may continue to bend the wrist with the left hand as you apply pressure on the elbow joint with your leg. You can finish the hold by locking the wrist severely over and bending the arm across your leg. Continual pressure will break the wrist, the elbow and the shoulder. 7


9 You start by holding the wrist with your thumb and fingers locking around the wrist bone and bringing your other hand up to start bending the wrist straight up directly in front of your body. By continuing the pressure up you will force the man to the ground and then you can step across and around to his back. Keeping the wrist locked and the elbow locked by applying pressure to the side. You can finish by locking the elbow and wrist and pushing forward to break them both. 8


10 A more painful variation of the side wristlock is done by applying more pressure to the wrist by bending the elbow towards the wrist. As you start to bend the wrist straight up, you grab the inside of the elbow and begin to pull the elbow towards your body and his wrist. As you continue your pressure he will drop to the ground in front of you where you can finish him by breaking the wrist. 9


11 The inner wrist lock is started by holding the wrist of the partner and then stepping under his arm while pulling up on the wrist and locking it to the side. Pressure is applied by turning the wrist in towards his body. Keeping the elbow very high. Finish the move by dropping to the knee and flipping him over to the ground. 10


12 The basic backwards wrist lock is done by holding the wrist with both hands and pushing straight back and down. This locks the wrist and the elbow. The basic upper wrist lock is done by holding the wrist with both hands, stepping in and lifting directly up while pushing back on the elbow to keep it flat and keep the wrist bent. PRACTICE FROM THE KNEES 11


13 It is very important when learning wrist locks to practice from the knees. This teaches one balance, power and control. Because you can not use your body weight or his lack of balance to effect the wrist lock. All the pressure must be applied by using correct techniques. Here are the basic wrist locks practiced from the knees. Your partner holds both your wrists with both his hands. You pull your hands apart, then quickly together as you reach under and grab his right wrist. Your hold under the wrist and turn into the wrist like you are turning a wheel on a car to the right. This will force him to the ground in front of you. 12


14 You are grabbed on the left wrist by his right hand. Turn the hand towards your body and away from the thumb. When you get your hand free reach up and grab the back of his wrist with your right hand. By applying pressure to the right and down you will throw him to the ground. 13


15 You are grabbed on the right wrist by his right wrist. You roll your wrist over and reach up with your fingers to grab his arm. At the same time you bring up your left hand to hold the arm. By applying pressure straight down and pushing towards his body with yours you will be able to drop him to the ground in front of you. 14


16 You are held by the right wrist with his right hand. Roll your wrist up and turn his wrist straight up and down. You now have him ready for a side wrist lock, which you do by pushing down with your entire body, not just the wrists towards the ground. You can finish him by curling his arm up with pressure on the elbow and continuing to lock the wrist. 15

17 You are held on the right wrist. Turn your wrist over until you have his wrist completely turned backwards. His palm should be facing you. Hold with both hands. Now press straight down towards the ground, this will force him down. You can continue the pressure by pushing straight up on the arm to lock it out. 16


18 You are held by the right wrist with his right hand. You pull him towards you and reach up and grab the back of his gi. Begin to pull down and forward to spin his body around in front of you. Continue to pull over his head until you make a complete circle, Then you may pull him to the ground and lock the wrist for control. 17


19 Here you are turning the wrist over and grabbing his thumb to start the wrist lock. Apply pressure to the thumb as you bend the wrist back and down You are bending the wrist back and down and also bending the thumb to really double the pain and control. 18


20 You are held by the right wrist, roll the wrist back and bring the other hand up for to grab his wrist. Bring your other hand up and lock the wrist and begin to push down and into his body for pressure. You finish the move by applying down ward pressure on this wrist with both hands. 19


21 ESCAPES You are held in a front choke. Immediately tighten your neck and reach up and slap his face very hard. Then continue to reach over to grab his right wrist with your right hand. Pull his wrist off your neck and continue to roll your arms over forcing him in a circle in front of you. Lock his wrist with a down ward wrist lock and then step in for the finish by breaking his arm. 20


22 You are grabbed in a front choke. Reach up and grab the index finger with your left hand on his left index finger. Close up of the finger bending Continue to bend the finger across his body and down as don t forget to smash his face with your elbow. 21


23 You are held on the shirt and punched at. Block the punch and reach around and take his arm off and begin to turn the wrist over to lock it. Hold the wrist straight up and begin to apply pressure to the back as you continue to turn the wrist towards his body. Keep the elbow up high. You can continue to lock the wrist and finish the hold by pulling up on his fingers as you break the wrist. 22


24 You are held from behind in a rear choke. Immediately reach back and hit his groin. Now reach up and lock both of his wrist and pull his body forward while turning his arms over to lock the elbows. You can continue to pull and finally flip him over your head to the ground. 23


25 You are held from behind in a choke. Reach up and smash his ribs and turn your body into him to excape. Continue to turn and lock his wrist. Keep his elbow up above his head. To assure your control. 24


26 Now lift up on the elbow and turn the wrist over. You can break his wrist and his elbow by continuing to apply pressure. Bend his wrist while chopping down on his elbow. Lock the wrist and drop him to the ground in front of you where you secure the wrist lock by locking your knees around his elbow. Continue your down ward pressure on his wrist and his elbow. 25


27 For more pain you can reach up and grab his elbow and push forward to dislocate his shoulder. You can also continue your pressure on his wrist and turn the elbow over to break it and the wrist. 26


28 You are held from behind in a bear hug. Reach up and smash the back of his hand with your knuckles. To loosen his grip. Pull his right wrist out in front of your body and lock it, and then take your right elbow and smash the side of his head while continuing the wrist pain. 27


29 You are held from behind in a bear hug. Reach behind and strike the groin to loosen the grip Now come up and grab his left wrist and turn it out. Continue to turn the wrist and step around and under. Lock the wrist up and keep the elbow high for control. 28


30 You are held by the hair. Reach up and grab his wrist to stop the pressure and turn his wrist straight over. The little finger should be pointing up. Now lock the wrist with a downward wrist lock and push your body weight into the lock for more pain. You can kick him in the chest of face to finish him. 29


31 You are held by the collar..reach up and grab the top of his wrist and the middle of the arm. Pull his hand off and turn the arm over using the elbow for leverage. Continue the pressure on the wrist and elbow joint for control. 30


32 GROUND TECHNIQUES You are in the mount position. Take both on your hands a press on his wrist and forearm to push his arm to the ground. Once the arm gets to the ground, lock the wrist and pull back towards your body and to the side You continue to apply wrist pressure and elbow joint pressure to secure the hold 31


33 You are on top. \Reach over and grab his right wrist and begin to bend it inward. Continue to turn the wrist inward until it locks for control 32


34 You are on top. Press his arms together and then hold the wrist of the right arm and pull the arm up straight. Sit on the shoulder to secure the hold. Lock the wrist and lock both legs around the arm. Pull both arms back and fall to the floor, locking the wrist and the elbow joint. 33


35 To add more pain I like to sit back up and twist the wrist over and down. Lock the wrist over and down and begin to push the wrist into the face area and down towards his body. Finish by twisting the wrist across your body and locking it. 34


36 A great wrist lock done from the back. The arm is bent and the wrist is also locked across the body. 35


37 From the back lift the arm and lock the wrist over Step over the arm with your right leg. Sit down to lock the arm and lock the wrist. This is very powerful; do not use too much force when trying it. 36


38 From the back, reach down and pull up the left arm, locking the wrist. You apply pressure by bending the wrist and leaning forward. To double the pain, reach over and grab the other arm and bring it up for a double painful hold down. 37


39 You are on the bottom in the guard, and he reaches down, and you grab his wrist and begin to lock it over and backwards. Wrap your leg over his head and continue to apply wrist pressure, you can also choke with the legs, and lock the elbow. 38
40 Combinations using many different wrist locks. Block the punch and grab the right wrist. 39


41 Roll the wrist over, lock it up, and point the fingers towards the ground to throw him to the ground under your legs. \ Hold up on the wrist and stomp him in the chest. Drop your knee in his chest and bend the wrist and elbow backwards over his head. 40

42 Come down to one knee and push the arm to the ground, keeping pressure on the wrist to effect the hold. Lift back up on the arm, and pull the elbow up. Bend over and grab the arm and lock the wrist and elbow to your side, while pulling up hard. 41


43 Continue to pull up and then lift the elbow up and place the arm on your leg, while locking the wrist across the leg. Put the leg under the arm and turn the elbow hard to lock it more. You can pull the leg back and put more pressure on the elbow. 42


44 Lock the legs around the head while continuing to bend the wrist. Then you can lift the arm up and begin a arm bar and wrist lock While keeping the legs wrapped around the head. Lock the wrist and break it You can let go of the head.. 43


45 Finish by locking the wrist over to break it and then back to break the elbow. Exercises to loosen and strengthen the wrists. It is important to keep the wrist loose and strong. The following exercises should be done each time you practice your wrist locks. Take each wrist and bend it backwards until you feel pressure. Do this at least 5 times each wrist. Put the backs of the wrists together and press very hard to loosen them. Hold the wrists out and shake them around in circles. 44


46 Take the wrists and put the palms together, press them straight down until they stretch, and then put them forwards and press them straight back. Lock the fingers together and then roll the wrists in a complete circle. This is very hard, but very Copyright good for stretching 2001 Dr. and Ted strengthening Gambordella the wrists. 45
How To Start And WIN Any Fight!
 by Grandmaster Dr. Ted Gambordella First Punches That Never Fail Everything You Need To Know To Win Every Fight...You Ever Start! Neck Breaking Kicks That End It Period! Chokes & Throws Ground Finishes
The Complete Book of One Steps
 By Grandmaster Dr. Ted Gambordella All the Basic One Steps You need from White to Green Belt. By Grandmaster Dr. Ted Gambordella 1 Since I began my martial arts training over 35 years ago. I have found
Yellow Belt Requirements
 Yellow Belt Requirements Techniques 1. Capturing Paws A 2. Sharpening the Blade A, B 3. Escape of the Lamb A 4. Chopping Bamboo A 5. Evading the Samurai A 6. Grasping Honor B 7. Entering the Shrine A 8.
1 & 3 Step Sparring Techniques
 1 & 3 Step Sparring Techniques These instructions are for reference only to help with your personal training outside of class. They are not a replacement for instruction or training received in class.
Troy s Dorsey Kickboxing Secrets World Champion Troy Dorsey Kick Boxing Secrets
 World Champion Troy Dorsey Kick Boxing Secrets Copyright 2003 Troy Dorsey 1 Copyright 2003 Troy Dorsey 2 Troy with George Forman at the 2000 World Boxing Hall of Fame Banquet Copyright 2003 Troy Dorsey
Stanford Kenpo Karate Association BLUE BELT. Version 10/2008 by T. Shem
 BLUE BELT Kenpo Blue Belt Requirements Techniques Supplemental Techniques 1. Thousand Mallets Crossing Swords A 2. Driving the Spike Chinese Eclipse 3. Siege of the Temple Ox Cart B 4. Tangled Wings --
6 th Kup - 5 th Kup (Green belt - blue tab)
") 6 th Kup - 5 th Kup (Green belt - blue tab) Long stance - Double knife-hand strike : Hammer-fist strike : Back-fist strike : Spear-Hand Punch : Back stance Single fist guarding block : Double fist guarding
6 th Kup - 5 th Kup (Green belt - blue tab) Long stance - Double knife-hand strike : Hammer-fist strike : Back-fist strike : Spear-Hand Punch : Back stance Single fist guarding block : Double fist guarding
Senior BLACK Belt Curriculum Your Senior BLACK curriculum will take approximately 18 months or 200 classes.
 A black belt is a white belt who never quit. Senior BLACK Belt Curriculum Your Senior BLACK curriculum will take approximately 18 months or 200 classes. Senior BLACK Belt Techniques 1) All WHITE Belt Techniques
Junior BLACK Belt Curriculum Your Junior BLACK curriculum will take approximately 18 months or 200 classes.
 A black belt is a white belt who never quit. Junior BLACK Belt Curriculum Your Junior BLACK curriculum will take approximately 18 months or 200 classes. Junior BLACK Belt Techniques 1) All WHITE Belt Techniques
CHAPTER 4 ADVANCED GROUND-FIGHTING TECHNIQUES
 (FM 21-150) CHAPTER 4 ADVANCED GROUND-FIGHTING TECHNIQUES After achieving an understanding of the basics of ground fighting, other elements of fighting on the ground are added. These techniques, however,
1 & 3 Step Sparring Techniques
 1 & 3 Step Sparring Techniques These instructions are for reference only to help with your personal training outside of class. They are not a replacement for instruction or training received in class.
Chung Yong Hapkido Kup Grade Syllabus
 2009 Chung Yong Hapkido Kup Grade Syllabus This document outlines the basic requirements for students to progress from white belt to red belt. An exam to prove a student s proficiency should be undertaken
Copyright 2001 Dr. Ted Gambordella
 1 INTRODUCTION CHOKES Chokes. If you are in a life or death fight situation and you absolutely want to make sure that the fight will NOT continue, and that you will be the Winner, Choke Them Out! Nothing
Copyright 2001 Dr. Ted Gambordella
 INTRODUCTION This book has been written as a training and information manual for people and students who may find that they have to defend themselves in the street from attack by those who may have such
Introduction. Mastering the Staff
 Introduction I began my training in the martial arts over fourteen years ago in the little town of Alexandria, Louisiana. From the first I was interested in weapons, but I had great difficulty in finding
BY Grandmaster Ted Gambordella
 Wrestling/Grappling Take Downs BY Grandmaster Ted Gambordella Coach David wright Wrestling and Grappling Takedowns By Grandmaster Dr. Ted Gambordella With Coach David Wright 1 About David Wright: 5 time
Self-defence. The vulnerable points of your attacker. The weapons to defend yourself. head eyes nose throat. your voice. teeth.
 Self-defence If it should become necessary for you to defend yourself, it is a good idea to be prepared. You can use the following techniques: Use your body language to radiate self-confidence! The weapons
YELLOW BELT CURRICULUM
 YELLOW BELT CURRICULUM 1. Stance a. Neutral stance b. Fighting Stance 2. Movement a. Forward, Back, Left, Right b. Shadow Boxing c. Movement while on the ground d. Basic Takedown Defense (sprawl) 3. Punches
FREE-STYLE KENPO KARATE AS TAUGHT BY
 LEE S KENPO KARATE Prancing Deer Curriculum Block #2 Belt Requirements AMERICAN FREE-STYLE KENPO KARATE AS TAUGHT BY Master LOGAN LEE Prancing Deer Techniques: Chinese Thumb Screw Hidden Fist Plucking
Hyung Standards: Sam-Il through Moon-Moo
 General Comments: Always pivot on the ball of the foot. When you pivot on your heel you immobilize your hip. Sam-Il Double middle block starts with both fists at shoulder level. High double forearm block
Krav Maga Yellow Belt Curriculum
 Krav Maga Yellow Belt Curriculum Prerequisites for advancement: 50 beginner-level class hours, Yellow Belt midterm, and instructor approval Target time: approximately 4-6 months Straight Punch Straight
Copyright Jim/Leann Rathbone DomoAji Publishing 2014 All Rights reserved Printed and Bound in USA
 Copyright 2014 by DomoAji Publishing All rights are reserved. Printed in the United States of America. No Part of this book may be used or reproduced in any form or by any means, or stored in a database
11 Kyu Preparatory Techniques prior to commencing study of the Fighting Techniques
 CADET 11 Kyu 11 th KYU Preparatory Techniques prior to commencing study of the Fighting Techniques STANCES: Attention Ready Left Lead Fighting Stance Right Lead Fighting Stance Straddle Stance (Horse Riding)
Shot put learn by - doing Basic technique for the Shot Put By: Mark Harsha Portage High School Girls Head Coach
 Shot put learn by - doing Basic technique for the Shot Put By: Mark Harsha Portage High School Girls Head Coach Goal One: Shot grip and placement 1. Holding the shot The shot is held at the base of the
Requirements for Rank
 American Chung Do Kwan Tae Kwon Do Association A.C.T.A. MN 702 Debbie Ln. Carver, MN 55315 www.tae-kwon-do.org Requirements for Rank 1R Gup Brown Belt to 1D Gup Brown/Black Belt Basic techniques: reverse
The Ancient Art of Chi Gong. for. Strength & Flexibility
 The Ancient Art of Chi Gong for Strength & Flexibility The Student/Athlete Educational Foundation, Inc. 12 Manison Street, Suite E Stoneham, MA 02180 781-850-4520 doc@chap.com Abdominal Butterfly (Stretches
Arm Range of Motion Exercises for
 Arm Range of Motion Exercises for People with Hemiplegia Hemiplegia is paralysis of muscles on one side of the body. Keeping your range of motion when you have hemiplegia is very important. It will help
WGAAA Baseball Skill/Coaching Manual
 WGAAA Baseball Skill/Coaching Manual All baseball players regardless of age should have a base knowledge and capability of proper baseball mechanics. If a team is mechanically sound, more often than not,
Black Belt KBK Kickboxing Syllabus. Line Work -Punches (Conducted With Bouncing Movement)
") Line Work -Punches (Conducted With Bouncing Movement) 1. Jab, Cross Punch 2. Backfist, Reverse Punch 3. Hook Punch (Lead Arm), Uppercut (Back Arm) 4. Step Through Jab, Cross Punch 5. Step Through Backfist,
Line Work -Punches (Conducted With Bouncing Movement) 1. Jab, Cross Punch 2. Backfist, Reverse Punch 3. Hook Punch (Lead Arm), Uppercut (Back Arm) 4. Step Through Jab, Cross Punch 5. Step Through Backfist,
Copyright 2001 Dr. Ted Gambordella
 INTRODUCTION Tonfa tactics Perhaps no other weapon in karate is as practical, powerful, and versatile as the tonfa, yet no other weapon is so little known and used. Why? I feel that the reasons are twofold.
How to Make a Proper Fist
 How to Make a Proper Fist Bend your index finger so that the first knuckle touches the second knuckle of your thumb, tucking in the fold of skin that is between your thumb and index finger. Then fold your
Krav Maga Class Plans CROSSROADS
 Krav Maga Class Plans CROSSROADS 10/2 Stance Movement Straight punches Straight low punches 10/3 Front kick to the groin Palm strikes Choke from the front- one handed & two handed 10/4 Ground position
S t r e t c h i n g E x e r c i s e s
 Stretches for side of neck: 1. Sit or stand with arms hanging loosely at sides 2. Turn head to one side, then the other 3. Hold for 5 seconds, each side 4. Repeat 1 to 3 times Stretches For the side of
Chair exercises Sally Ann Belward, Falls Clinical Lead Physiotherapist
 Chair exercises Sally Ann Belward, Falls Clinical Lead Physiotherapist Exercise safety Exercise should be comfortable and fun Ensure participants are sat on a sturdy chair, have comfortable clothing and
Introduction. Mastering the Knife
 Introduction I began my training in the martial arts over fourteen years ago in the little town of Alexandria, Louisiana. From the first I was interested in weapons, but I had great difficulty in finding
TACTICAL COMBATIVES COURSE STUDY GUIDE
 TACTICAL COMBATIVES COURSE STUDY GUIDE STANDING TECHNIQUES 1. ROUND KICK (All Minor Tasks) 1. Push off on the ball of your trail leg foot, and then step somewhat toward the target and laterally to the
Green Belt Requirements
 Green Belt Requirements Techniques 1. Dancing Cat 2. Gun Attack A, B 3. Slashing Claws 4. Snapping the Vines 5. Rickshaw 6. Fallen Warrior A 7. Striking the Gong 8. Wielding the Torch 9. Soaring Eagle
40 Allied Drive Dedham, MA (office)
") Standing forward flexion Stand facing a mirror with the hands rotated so that the thumbs face forward. Raise the arm upward keeping the elbow straight. Try to raise the arm by hinging at the shoulder as
Standing forward flexion Stand facing a mirror with the hands rotated so that the thumbs face forward. Raise the arm upward keeping the elbow straight. Try to raise the arm by hinging at the shoulder as
Mobilising. Mobilising
 Shoulder Rehabilitation Exercises (See attached information supplement) P1 of 7 1) Arms relaxed, circle your shoulders by shrugging the shoulders up, then drawing them back, down and forward. 2) You can
MSD RYU INTERNATIONAL CLOSE COMBAT KRAV MAGA CURRICULUM
 MSD RYU INTERNATIONAL CLOSE COMBAT KRAV MAGA CURRICULUM YELLOW BELT LEVEL 1 There are no prerequisites or fitness level requirements to start. I. Stance A. Neutral Stance B. Fighting Stance II. Movement
Junior White Belt Syllabus
 Junior White Belt Syllabus 1. Mat Etiquette 3. Blocking Kata 4. Side Breakfalls 5. Front Breakfall 6. Rolling Breakfall 7. Back Breakfall 8. Breaking a Front Strangle (2) 9. Breaking a Back Strange 10.
Warm Ups. Standing Stretches
 Warm Ups Mild warm-ups are a necessity for everyone. The need for warm-ups increases with age as the body becomes less elastic over time. It is recommended that you execute the warm-up routine in this
Master Club Curriculum - JL. Joint Locks. Building Martial Arts Knowledge Master Club Curriculum. Name: Graduation Date: / /
 Building Martial Arts Knowledge Master Club Curriculum Name: Graduation Date: / / Master Club Curriculum - JL Joint Locks 95 Joint Lock Basics (A) Circular Wrist Lock Circle hand around opponents wrist
GROUND COMBATIVES TRAINING STEP-BY-STEP INSTRUCTION MANUAL PICTORAL ANNEX FOR EXISTING TSP S
 GROUND COMBATIVES TRAINING STEP-BY-STEP INSTRUCTION MANUAL PICTORAL ANNEX FOR EXISTING TSP S Stand Up In Base - This is the most basic technique. It allows the Student to stand up in the presence of an
11/9 Headlock from the side, headlock from behind (bar arm, carotid) 11/11 Headlock from the side, headlock from behind (bar arm, carotid)
 11/11 Headlock from the side, headlock from behind (bar arm, carotid)") KM Class Techniques for November 2017 - BLANCO KM 1 Monday Thursday & Saturday 11/6 All focus mitt work & Thai pads Punching & kicking 11/7 Choke from the front with a push Choke from the front 11/8 Choke
KM Class Techniques for November 2017 - BLANCO KM 1 Monday Thursday & Saturday 11/6 All focus mitt work & Thai pads Punching & kicking 11/7 Choke from the front with a push Choke from the front 11/8 Choke
Krav Maga Techniques CROSSROADS November 2017 KM 1 Monday - Saturday
 Krav Maga Techniques CROSSROADS November 2017 KM 1 Monday - Saturday 11/1 Stance Movement Straight punches Straight low punches 11/2 Front kick to the groin Palm strikes Choke from the front- one handed
White to White/Stripe
 Adult Belt Curriculum at Mike Worobel Martial Arts White to White/Stripe 1. Basic Hand Strikes, 8 Point Blocking System, Front Ball Kicks, Front Instep Kicks, Side Blade Kicks, Crescent Kicks, Half Moon
Slezak s Karate School
 Slezak s Karate School Black Belt Testing Curriculum September 10, 2010 @ 10 A.M. Basic Technique Requirements: Low Block Center Punch High Punch High Block Outside/Inside Block Inside/Outside Block Front
Yellow Belt Grading Requirements - Details
 Yellow Belt Grading Requirements - Details Stance and movement: Horse Stance Looking for: Feet shoulder width apart or wider. Knees above feet. Feet face forwards. Thighs ideally parallel with ground.
BLUE BELT EXAMINATION
 BLUE BELT EXAMINATION for Brazilian Jiu Jitsu 1. History A. Helio Gracie - Who is he? What is his significance to Jiu Jitsu? - Name two (2) of his brothers. - Name five (5) of his sons. B. Jiu Jitsu -
Pulling and leading. From the first moment you got hold of the Spikey you must aim it at the attacker and stick it
 12 Pulling and leading As mentioned previously, even though this looks like a simple method of attack, it is still very effective and therefore presented to you. an attacker counts on the victim's feelings
Grappling Arts Publications
 Grappling Arts Publications 1 Grappling Arts Publications This is the third installment in our series of outtakes from Strategic Guard, the third book in the series Brazilian Jiu-Jitsu Details and Techniques.
Get Fit and Prevent a Fall!! Fun Exercises for Seniors!
 Get Fit and Prevent a Fall!! Fun Exercises for Seniors! The Idaho Department of Health and Welfare Injury Prevention Program, in conjunction with District Health Departments, offers you the Fit and Fall
Thrower s Maintenance Program
 Thrower s Maintenance Program Elbow at 90 and fixed at side. Pull out with arm keeping elbow at side Elbow at 90 and fixed at side. Pull arm into body keeping elbow at side. Shoulder at 90 and elbow at
BADMINTON TECHNIQUES
 Ana Moreno Cabrero Instructions for grip, body position and shots: BADMINTON TECHNIQUES A good player must choose the best shot depending on the situation at that time and the opponent's position on the
KM 1 Monday Thursday & Saturday 3/1 3/3 3/1 3/5. KM Class Techniques for March BLANCO. Elbows (all 7) Wrist releases (all) Movement
 Wrist releases (all) Movement") KM Class Techniques for March 2018 - BLANCO KM 1 Monday Thursday & Saturday 3/1 Elbows (all 7) Wrist releases (all) 3/3 Movement Advancing/Retreating Straight Punch Straight punches Straight low punches
KM Class Techniques for March 2018 - BLANCO KM 1 Monday Thursday & Saturday 3/1 Elbows (all 7) Wrist releases (all) 3/3 Movement Advancing/Retreating Straight Punch Straight punches Straight low punches
RANGER RUMBLE RULES 2019
 Ranger Rumble Rules 2019-1 RANGER RUMBLE RULES 2019 Tournament Type Mission Focus on: Safety and Health Introducing competition to students Teaching sportsmanship and Sport Jiu-Jitsu Creating a community
Shoulder Exercises for Combined Labrum Repair Rehabilitation Protocol
 Shoulder Exercises for Combined Labrum Repair Rehabilitation Protocol The exercises illustrated and described in this document should be performed only after instruction by your physical therapist or Dr.
Shot Technical Model
 Shot Technical Model Progression related to Multi-Events Development (aged 8/9-12 years) can be referenced to Athletics 365. Further technical information can be found HERE Linear Shot - Whole Sequence
Cervical and Shoulder Girdle Stretches
 Cervical and Shoulder Girdle Stretches Exercise 1: Scalene Stretch Sit straight up in a chair with your shoulders relaxed. Keep your gaze straight ahead at eye level and your chin pointed down slightly.
Introduction To Boxing! The Basics. Stretching Stance Footwork Power Punches Defense Hand wrapping
 Introduction To Boxing! The Basics Stretching Stance Footwork Power Punches Defense Hand wrapping Stretching (A Boxer should always stretch 5-10 mins. Before training..) 2 Arm & Chest Stretches Elbow Pull
Requirements for Red Belt
 Requirements for Red elt Part I: Kicking Techniques Front Kick Side Kick Impact target with the balls of the feet. Foot pivoted 15-35 degrees. Impact target with the blade of the foot. Toes slightly pointed
Shaolin Chuan Fa Requirements for Purple Belt
 Shaolin Chuan Fa Requirements for Purple Belt Stances The heart of any movement is the stance, because your position and balance dictates your ability to perform the desired strike or kick, or to evade
Defense Against Multiple Opponents (36)
") th Dan Requirements th Degree black Belt / General Requirements Successful completion of all requirements for th degree black-belt signifies master-level. All candidates for th degree black-belt must:
th Dan Requirements th Degree black Belt / General Requirements Successful completion of all requirements for th degree black-belt signifies master-level. All candidates for th degree black-belt must:
Self-Range of Motion Exercises for the Arm and Hand
 Self-Range of Motion Exercises for the Arm and Hand After a stroke, it is important to do the exercises in this handout for your affected arm and hand. You can do them on your own by using your unaffected
U.S. Shooting Team Balance, Strength and Stability Workout. Training Work-Out
 U.S. Shooting Team Balance, Strength and Stability Workout Training Work-Out Modified by Dan Durben and Sommer Wood November 2006 from the program originally developed by Amber Darland for the USA Shooting
Leading Edge Martial Arts Child White Belt Curriculum
 White Belt Curriculum Front Kick Side Kick Knee Strike #1 Front punch, back punch (also known as 1-2 punch) #2 Front kick, back punch #3 1-2 punch, back leg front kick #1 Single wrist grab (same side)
Tai Chi Combat Form. Two persons: A and B. hit tiger), Rt Punch to ribs.
, Rt Punch to ribs.") Page 1 of 22 T'ai Chi Chuan Combat Form Two persons: A and B A - advance and punch with right fist B - fall back, ward off with grasp bird's tail A - clean and punch again B - Step Rt., horizontal circle
Page 1 of 22 T'ai Chi Chuan Combat Form Two persons: A and B A - advance and punch with right fist B - fall back, ward off with grasp bird's tail A - clean and punch again B - Step Rt., horizontal circle
Basic Movement Patterns Locomotor Skills 1.3
 Basic Movement Patterns Locomotor Skills 1.3 Jumping Forward & Sideways & Landing Extending Arms upward upon takeoff Arms Reach Full Extension about head height at lift off Extending the Hips, Knees, and
Fusco Jiu-jitsu. Rank Requirements Updated
 Fusco Jiu-jitsu Rank Requirements Updated 8-2015 Philosophy Our testing approach is somewhat unique in the martial arts community. Our focus is on performance appropriate to each belt level. There is no
10 th Kup White Belt. The Basics
 10 th Kup White Belt Starting Tae Kwon Do as a white belt often feels rather daunting, especially when there are so many students around you that appear to make all the moves seem effortless. Just remember
MHBYW Dynasty Program
 MHBYW Dynasty Program Level 3: Red Skill Properly Executed? Comment Staggered/Square Stance Yes No Motion Yes No Starting Positions Neutral Yes No Top Yes No Bottom Yes No Four Defensive Stops Yes No Head,
Avoid injuring your opponent Avoid injuries to yourself. Basic Judo Training
 Avoid injuring your opponent Avoid injuries to yourself Basic Judo Training Level 1 Beginners Basics Level 2 Beginners Practical Level 3 Intermediate Basics Level 4 Intermediate Practical Level 5 Upper
TO BLUE CURRICULUM PROMOTION REQUIREMENTS
 PROMOTION REQUIREMENTS S1-BB TEST RANK* MIN. REQ. DEMO LIVE DEMO UKE FOCUS RE-TAKE SPECIFIC SPARRING** Stripe 1 (S1) 18 cl. & 3 mo. A1-A3, C1-2 A1-A3 S4 F1 N/A Top (Mount) Retention Stripe 2 (S2) 36 cl.
The Grip: Place the shot comfortably on the base of the hand with the thumb down and the four fingers balancing the shot.
 The Javelin By Mark Mirabelli, Throwing Specialist - www.mmtrackandfield.com If I could use one word to express success in all three styles of throwing the shot put I would have to say the word drill.
KRIYA LOWER BACK AND HIPS
 KRIYA LOWER BACK AND HIPS 1. Pelvic Grind Left. Place your hands on your knees and begin grinding yourself in a big, smooth circle going to the left. Lift the chest up high as you tilt the pelvis back,
Baseball Training Program
 Baseball Training Program Always consult your physician before beginning any exercise program. The information and advice published or made available through the Orthopaedic and Neurosurgery Specialists,
Performing the Exercises. Crunches
 Crunches EQUIPMENT: Mats, such as those used for tumbling or wrestling. TIME LIMIT: Two Minutes IMPORTANT: Competitors may rest in either in the up or down position as long as they maintain the correct
Good Morning Thumbs up for good. Hand then moves from left to right shoulder.
 Signing Book Introduc)on This book is designed to show a variety of signs that may be useful to know for daily life around the school, and can be used with all children to encourage communica)on. Signs
Upper Body: Range of Motion Exercises - Self-Directed for the Neck and Arms
 Upper Body: Range of Motion Exercises - Self-Directed for the Neck and Arms Author: Sarah Housman, MS, OTR/L; Mary Pearson OTR/L These exercises for joints of the arm and neck can help: maintain the range
UK Yoga Sports Federation
 UK Yoga Sports Federation STANDING HEAD TO KNEE POSE 4 parts 1. Stand with feet together, shift body weight to standing leg (leg closest to the judges) and lock the knee (leg straight and thigh muscle
11.1 Seating and the correct sitting position
 11. Sitting position 11.1 Seating and the correct sitting position The person who has had a stroke will spend much of their time sitting, especially in the early days after the stroke. A correct sitting
A Yoga Break at Work Routine created and published by Dr. Rick Morris (more information at:
 A Yoga Break at Work Routine created and published by Dr. Rick Morris (more information at: http://www.spinalstenosisanddisc.com/) This entire routine should take less than ten minutes. Repeat the stretch
( Reminder, movement and punches should be taught as well. Ex: Punching/movement warm up )
") KM Class Techniques for December 2018 - BLANCO KM 1 Monday Wednesday & Saturday 12/1 Hammerfist forward Hammerfist down Headlock from the side headlock from behind (bar arm, carotid) 12/3 Chops (inside
KM Class Techniques for December 2018 - BLANCO KM 1 Monday Wednesday & Saturday 12/1 Hammerfist forward Hammerfist down Headlock from the side headlock from behind (bar arm, carotid) 12/3 Chops (inside
Basic Steps to Remember
 Lift those buns off the chairs. with these exercises. 1. Work your upper and lower body at the same time, beginning with legs, adding arms. 2. Alternate more vs. less strenuous movements. 3. If you get
TAI CHI SHORT HAND FORM CLASSICAL YANG STYLE Updated 10/03/ updates available from
 TAI CHI SHORT HAND FORM CLASSICAL YANG STYLE Updated 10/03/2017 - updates available from www.taichichuan.org.uk During my 17 years learning of tai chi with Tony I have developed the following notes, both
Forearm Pass (Bump) with Partner Start with toss. Use the forearm pass to rally back and forth with your partner.
 with Partner Start with toss. Use the forearm pass to rally back and forth with your partner.") Forearm Pass (Bump) with Partner Start with toss. Use the forearm pass to rally back and forth with your partner. Ready Position Place feet shoulder width apart with toes pointed straight ahead. Place
Forearm Pass (Bump) with Partner Start with toss. Use the forearm pass to rally back and forth with your partner. Ready Position Place feet shoulder width apart with toes pointed straight ahead. Place
Flexibility Assessment
 Flexibility Assessment Name 1. For each area of flexibility record your score as either 1, 2 or 3, depending on which one of the criteria you were able to meet. (See flexibility lab sheets) Area of Flexibility
SHOT PUT - GLIDE TECHNIQUE
 SHOT PUT - GLIDE TECHNIQUE The Shot Put can be broken down to four different phases. Preparation/Glide/Delivery & Recovery. Preparation - The thrower sets up correctly to commence the glide. Glide - The
Position #1: Reception
 Ready Positions There are two ready positions commonly used in sitting volleyball depending on the situation presented. Reception ready position is used primarily for serve receive and it allows the athlete
Sprinting. Relevant Knowledge** Overall Level. Assessment Criteria. Learning Outcomes
 Sprinting 1. coordinate their limbs. 2. be familiar with the starter s order.. swing their arms in rhythm. 1. coordinate their limbs. 2. swing their arms in rhythm.. react accurately to signals.. master
U.S. Shooting Team Balance, Strength and Stability Workout. Shooting Warm-Up
 U.S. Shooting Team Balance, Strength and Stability Workout Shooting Warm-Up Modified by Dan Durben and Sommer Wood from the program originally developed by Amber Darland for the USA Shooting National Rifle
PEE WEE AND LIONS RULES AND SKILLS HANDOUT (April 2005) THE RULES
 THE RULES") PEE WEE AND LIONS RULES AND SKILLS HANDOUT (April 2005) THE RULES 1. When the whistle is blown by the coach, stand still, be quiet, and look at the coach; 2. If you want to speak raise your hand and wait
PEE WEE AND LIONS RULES AND SKILLS HANDOUT (April 2005) THE RULES 1. When the whistle is blown by the coach, stand still, be quiet, and look at the coach; 2. If you want to speak raise your hand and wait
EXERCISE GUIDE STRENGTHEN YOUR CORE
 EXERCISE GUIDE STRENGTHEN YOUR CORE BACK EXTENSION WITH BALL Rest your belly on the ball, feet planted wide apart on the floor behind you and hands resting on your lower back. Peel your chest away from
Movement Chart for Seiunchin Page 1 of 7
 Movement Chart for eiunchin Page 1 of 7 shoulder-width divisions Kata available on video and DVD from your sensei. tart 1 Ichi 2 i tart in parallel stance facing north. Bring your heels together. Bow.
AIKI COMBAT JUJITS CANE TECHNIQUES
 AIKI COMBAT JUJITS CANE TECHNIQUES White Tiger Productions 2012 Copyright 2013 by White Tiger Production All rights are reserved. Printed in the United States of America. No Part of this book may be used
Ab Plank with Straight Leg Raise
 Ab Plank with Straight Leg Raise Position yourself face up with your knees bent at 90 degrees, feet flat on the floor. Your hands should be directly under your shoulders facing forward. While in this position
Appendix 1. Strikes with the Stick and Cane
 Appendix 1. Strikes with the Stick and Cane I have always found jointlocks and takedowns with the stick and cane to be far more interesting than the strikes, most of which are obvious, even to beginners.
1/4 Elbows (all 7) Wrist releases (all) 1/5 Choke from the side Choke from behind Elbow #2 Horizontal side Elbow #5 Vertical back and up
 Wrist releases (all) 1/5 Choke from the side Choke from behind Elbow #2 Horizontal side Elbow #5 Vertical back and up") Krav Maga Techniques CROSSROADS January 2018 KM 1 Monday - Saturday 1/2 360 s (#5,#6,#7) Arm Pulls Choke from behind with a push 1/3 Offensive front kick inside defense ( High ) inside defense ( against
Krav Maga Techniques CROSSROADS January 2018 KM 1 Monday - Saturday 1/2 360 s (#5,#6,#7) Arm Pulls Choke from behind with a push 1/3 Offensive front kick inside defense ( High ) inside defense ( against
THERAPUTTY ACTIVITIES
 THERAPUTTY ACTIVITIES Theraputty activities will help to develop your hand strength and ability to control fine finger movements. Activities to be complete: (therapists to tick which activity you want