E-118 Assembly Guide
|
|
|
- Mervin Harrington
- 5 years ago
- Views:
Transcription
1 E-118 Assembly Guide
2 Table of Contents Overview of the assembly Fork installation Cable housing installation Handlebar installation Front brake installation Rear brake installation Handlebar assembly Seatpost installation Saddle adjustment For the warranty to be valid, the bicycle must be fully assembled by an authorized Argon 18 dealer. High end components, particularly carbon parts, need extra care when assembled. Those components must be installed using a torque wrench to make sure every bolts are at the right torque setting to prevent damage.
3 Overview of the assembly 1. Fork installation 2. Cable housing installation (IMPORTANT NOTICE: DON T INSTALL THE BB BEFORE THE CABLE HOUS- ING INSTALLATION) 3. Handlebar installation 4. Front brake installation 5. Rear brake installation 6. Handlebar assembly 7. Seatpost installation 8. Saddle adjustment
4 1. Fork installation 13a 13c 1. Screw the compressor 13a inside the stem until it disappears completely 2. Install the bearings 13c inside the frame by using grease 4a 13c
5 1. Fork installation 4e 13a 1. Install the fork on the frame 13b 13b 2. Place the dust cover on the upper bearing 13a 3. Screw the compressor with a 6mm hex key to adjust the pressure on the bearings 4. While maintaining the compressor with the hex key, apply some Loctite 242 (or equivalent) on the threads of the headset screw and assemble it to specified torque setting (8Nm) 4f Loctite 242 Tighten the headset screw lightly in order to avoid excessive compression of the headsets 5. Install the rubber cap 4e 8Nm 4f
6 2. Cable housing installation Install the rear derailleur cable housing starting at the drive side s drop-out 2. Install the front derailleur cable housing starting under the bottom bracket shell 3. Install the front brake cable housing starting at the center of the handlebar 4. Install the rear brake cable housing starting under the bottom bracket shell See the table below for the cable housing length suggested Suggested lengths of the cable housing housing/size XS S M L Front brake 58cm 60cm 62cm 64cm Rear brake 136cm 138cm 140cm 142cm 2 1 Front derailleur 140cm 142cm 144cm 146cm Rear derailleur 198cm 200cm 202cm 204cm
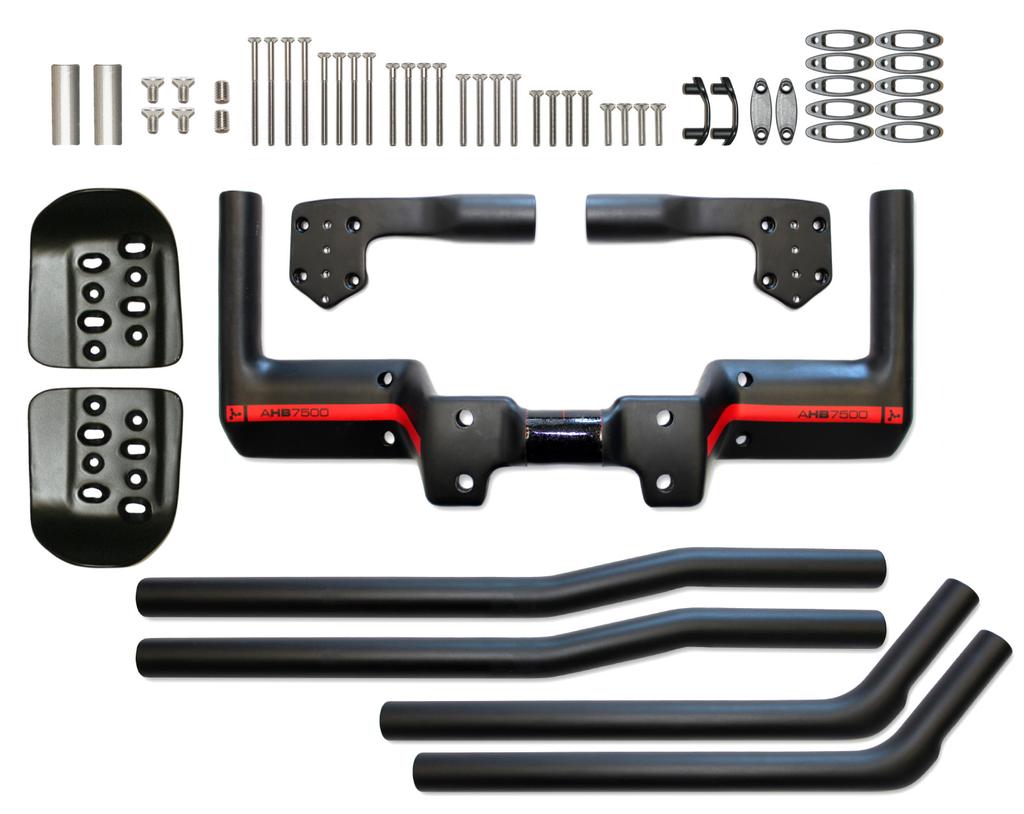
7 3. Handlebar installation configuration for a 65 mm stem configuration for a 95 mm stem CARBON FIBER ASSEMBLY GEL CARBON FIBER ASSEMBLY GEL 4d 6Nm 6Nm 4b 5a 4d 6Nm 6Nm 5a 8Nm 4c 8Nm 4c 4b Warning The AHB-7500 handlebar is designed specifically for the E-118. Do not use any other type of handlebar as safety or performance cannot be guaranteed with the use of incompatible equipment. Install the handlebar as shown in the diagram above, make sure to grease the screws and to apply some carbon fiber assembly gel in the clamping area.
8 4. Front brake installation 1. Install the brake as shown in the diagram - Install the spring 12c in the middle hole of the fork insert the short end of the spring should be positioned in the notch of the spring tensioner 12b - It is important not to mix the springs of the front and rear brakes - Respect the color code: the spring must be installed on the pivot of the same color 2h 12a 12e - You can configure the brake pads spacing with 1mm 12g, 2mm 12f or no spacers behind the brake pads depending of the rim width you are using 12c 12d 12i 12h 8Nm 8Nm
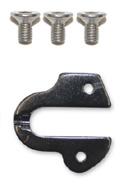
9 5. Rear brake installation 2 j 1. Remove the brake arm stopper 2. Install the brake as shown in the diagram 2 j 2 i 11c - Install the spring in the middle hole of the fork insert 11c 11h 11i 11a 11 j 3. Install the brake arm stopper and adjust the set screw 11i on the brake arm 11a to avoid any contact between brake components and chain ring. - It is important not to mix the springs of the front and rear brakes - Respect the color code: the spring must be installed on the pivot of the same color 2 j 11b 8Nm 11d 11g 8Nm - You can configure the brake pads spacing with 1mm 11 f, 2mm 11 e or no spacers behind the brake pads depending of the rim width you are using - A hex key supplied with the frame allows to adjust easily the brake when the crankset is in place hex key
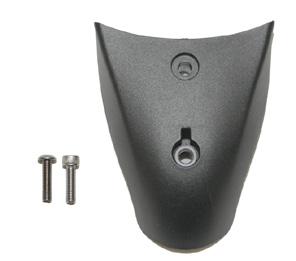
10 5. Rear brake installation 1. Finalize the installation of the brake by placing the cover of the bottom bracket 2f as shown in diagram 2f 2Nm 2Nm
11 6. Handlebar assembly 5Nm 5Nm 5Nm 5Nm 1. Install the extension connectors as shown in the diagram 5d 5d - Ensure that the lower bracket 5o is positioned correctly (see diagrams below) FIG 1 5q - Make sure you use the correct bolt length for the required number of spacers 5q 5p 5a 5o FIG 1 Correct installation of the lower bracket Incorrect installation of the lower bracket Lengths of extension holder screws No of spacers Length of the screws (mm) Part number 5n 5m 5l 5k 5j 5i
12 6. Handlebar assembly (configuration for the inversed handlebar: + 5cm) 5Nm 5Nm 5Nm 5Nm 1. Follow the directions of the regular configuration 5d 5p 5q 5a 5o
13 6. Handlebar assembly CARBON FIBER ASSEMBLY GEL 5d 5f 5b 5c 6Nm 5h 6Nm 1. Cut the extension bars 5b or 5c at the desired lengths and apply some carbon fiber assembly gel in the clamping area FIG 2 Depending on the cut, the extension bar gives you two options Straight extension bar Curved extension bar 2. Insert the extension bars into the connectors 5d and insert the shim under the extension bars. Make sure the shims are centered on the set screw 3. Tighten the extension bars using the set screw 5h Note: It is possible to obtain the straight extension bars by cutting the curved section of extensions FIG 2 5f
14 6. Handlebar assembly 1. Install the adhesive velcro on the carbon armrests 5e 9 4Nm 4Nm 4Nm 4Nm 5e 2. Screw the armrests 5e to the connectors 5d according to the desired position. Reverse the left and the right armrest 5e to obtain a more forward or backward setup. 3. Install the foam pads 5d
15 7. Seatpost installation CARBON FIBER ASSEMBLY GEL 7a 1. Peel off the plastic of the doublesided tape located at the back of the seat clamp thread 3b 2. Place the seat clamp thread inside the frame 3b 3a 3. Insert the seatpost 7a on which some carbon fiber assembly gel has been applied 3b 4. Position the seatpost at the desired height and insert the seat clamp wedge 3a 5. Tighten the set screw 3c 3c 8-10Nm
16 8. Saddle adjustment 1. Install the saddle on the rocker and lightly tighten the rail clamp using a ball end hex key 7g 7e 7b 8Nm 7e 2. Tighten the upper screw 7b of the rocker clamp 7f by keeping a space of 2 to 3 mm between the aluminum and carbon parts 2-3 mm gap 7f 5Nm 7g 8Nm 3. Adjust the angle of the saddle and tighten the lower screw of the rocker clamp 7c 7d 7c 4. Adjust the saddle offset and finalize the tightening of the rail clamp 7d 7a
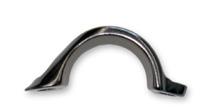
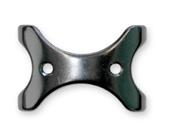
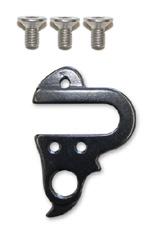
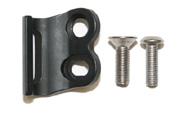
17 # Frameset parts Supplier Description 1 E-118 frame AR-TT03-UD # Parts installed on the frame Quantity 2a Rear Derailleur Hanger and screws 1 2b Front Derailleur Hanger and screws 1 2c Rear drop out insert and screws 1 2d Rear axle adjustment screws and spring 2 2e Screws for water bottle cage 4 2f BB plastic cap and screws 1 2g Di2 battery mount screws 2 2h Front brake pivot 1 black+ 1 silver 2i Rear brake pivot 1 black+ 1 silver 2j Brake arm stopper 1 # Seat clamp kit Quantity 3a Seat clamp wedge 1 3b Seat Clamp Thread 1 3c Set screw 1 # Fork kit Quantity 4a E118 Fork 1 4b Stem reversible spacer 1 4c Stem cap and screws (2xM5 + 1xM6) 1 4d Stem front rubber cap 1 4e Stem top rubber parts 1 4f Head set screw (long M5 screw) 1 # HB kit Quantity 5a E-118 Handle Bar 1 5b E-118 J bar 2 5c E-118 extension bar 25mm rise 2 5d E-118 extension holders 1 left + 1 right 5e E-118 armrest 2 5f Extension shim 2 5g Armrest screws M5x10mm 4 5h Extension Set Screws M6 2 5i Extension holders screws M5x75mm 4 5j Extension holders screws M5x65mm 4 5k Extension holders screws M5x55mm 4 5l Extension holders screws M5x45mm 4 5m Extension holders screws M5x35mm 4 5n Extension holders screws M5x25mm 4 5o Lower HB bracket 2 5p Upper HB bracket 2 5q Extension holders spacers 10 # Di2 configuration specific parts Quantity 6a Di2 plug 2 6b Di2 Hole Filler (no Di2) 2 6c Di2 Top tube grommet 1 6d Top tube grommet (no Di2) 1 # Seat post with the following parts assembled Quantity 7a ASP-7500 carbon seatpost 1 7b Upper rocker clamp M6 screw 1 7c Lower rocker clamp M6 screw 1 7d M5 screws 2 7e Rail top clamp 1 7f Rocker clamp 1 7g Rocker 1 # Additional tools Quantity 8 4mm allen key for brake adjustment 1 # Also included with the frameset shipped separately Quantity 9 Armrest foam pads 1 package 10 Brake levers 2 11 TKB-77 Rear brake including the following parts Quantity 11a Brake arms 1 left + 1 right 11b 125deg. cable pipe 1 11c Springs 1 black + 1 silver 11d Brake pad P for alloy rim 2 11e 2mm conical spacers 2 11f 1mm conical spacers 2 11g Pivots bolts 2 11h Spring tensioners 2 11i Set screw 1 11j Flat Washer 2 12 TKB-78* front brake including the following parts Quantity 12a Brake arms 1 left + 1 right 12b 110deg. Adjustable cable pipe 1 12c Springs 1 black + 1 silver 12d Spring tensioner 2 12e Brake pad P for alloy rim 2 12f 2mm conical spacers 2 12g 1mm conical spacers 2 12h Pivots bolts 2 12i Flat washer 2 13 EE079 Head Set including the following parts Quantity 13a SR102 compressor 1 13b Plastic Dust cover 1 13c 1 1/8 cartridge bearings 2 *TKB-95 (UK, Australia)


18 6c 6d 6b 6a 13c 13b 13a a 4f 4e 4d 4c 4b 3b 3a c 7a 7f 7e 7d 7c 7b 7g 2c 2b 2d 2a 2g 2f 2e 2j 2h 2i 5c 5a 5d 5e 5b 5p 5o 5m 5i 5h 5g 5f 5l 5k 5j 5n 5q
19
E-116 Assembly Guide
 E-116 Assembly Guide Table of Contents Overview of the assembly.... 2 1. Cable housing installation.... 3 2. Front brake installation.... 4 3. Rear brake installation... 5-6 4. Seatpost installation....
KRYPTON X ROAD : ASSEMBLY GUIDE
 KRYPTON X ROAD : ASSEMBLY GUIDE Revision 3.0-06-01-2016 KRYPTON X ROAD : Table of contents Assembly overview.........................2 1. Frame inspection........................3 2. Headset installation.......................4
E-80 : ASSEMBLY GUIDE
 E-80 : ASSEMBLY GUIDE E-80 : Table of contents Assembly overview..........................2 1. Frame inspection........................3 2. Cable housing installation.......................4-7 3. Brakes
GALLIUM: ASSEMBLY GUIDE
 GALLIUM: ASSEMBLY GUIDE Revision 2.0-04-08-206 GALLIUM: Table of contents Assembly overview..........................2. Frame inspection........................3 2. Headset installation.......................4
KRYPTON X ROAD : ASSEMBLY GUIDE
 KRYPTON X ROAD : ASSEMBLY GUIDE KRYPTON X ROAD : Table of contents Assembly overview.........................2 1. Frame inspection........................3 2. Headset installation.......................4
GALLIUM PRO: ASSEMBLY GUIDE
 GALLIUM PRO: ASSEMBLY GUIDE Revision 2.0-04-08-2016 GALLIUM PRO : Table of contents Assembly overview..........................2-3 1. Frame inspection........................4 2. Headset installation.......................5
NITROGEN: ASSEMBLY GUIDE
 NITROGEN: ASSEMBLY GUIDE Valid for MY2016 Nitrogen Revision 3.0-04-01-2016 NITROGEN: Table of contents Overview of the assembly..........................2-3 1. Frame inspection........................4
GALLIUM CS 281A: ASSEMBLY GUIDE. Revision Valid for MY2019 Gallium CS
 GALLIUM CS 281A: ASSEMBLY GUIDE Revision 0.0-2018-05-04 - Valid for MY2019 Gallium CS GALLIUM CS 281B: ASSEMBLY GUIDE Revision 0.0-2018-05-04 - Valid for MY2019 Gallium CS GALLIUM CS 281A / 281B: Table
NITROGEN DISC 286A: ASSEMBLY GUIDE
 NITROGEN DISC 286A: ASSEMBLY GUIDE Valid for MY2019 Nitrogen Disc 286A Revision 1.0-07-26-2018 NITROGEN DISC 286A: Table of Contents 1. Tools Needed and First Aid Kit...3 2. Frameset inspection...4 3.
GALLIUM PRO : ASSEMBLY GUIDE
 GALLIUM PRO : ASSEMBLY GUIDE GALLIUM PRO : Table of contents Assembly overview..........................2-3 1. Frame inspection........................4 2. Headset installation.......................5
GALLIUM PRO 210A: ASSEMBLY GUIDE
 GALLIUM PRO 210A: ASSEMBLY GUIDE Revision 5.0-05-23-2017 GALLIUM PRO 210A: Table of contents Assembly overview...2-3 1. Frame inspection...4 2. Headset installation...5 3. Cables & housing installation...6-9
E-117 TRI: ASSEMBLY GUIDE
 E-117 TRI: ASSEMBLY GUIDE Valid for MY2016 E-117 Tri Revision 8.0-07-08-2016 E-117 TRI: Table of Contents 1. Tools Needed & First Ait Kit..........................2 2. Fitting / Stack & Reach.....................3
GALLIUM PRO 259A & 259B: ASSEMBLY GUIDE
 GALLIUM PRO 259A & 259B: ASSEMBLY GUIDE GALLIUM PRO 259A & 259B: Table of Contents 1. Tools Needed and First Aid Kit... 3 2. Sizing Chart... 4 3. Trouble-shooting / Tips... 5 4. Seat Post Collar Assembly...
RADON 237A: ASSEMBLY GUIDE. Revision Valid for MY2017 Radon
 RADON 237A: ASSEMBLY GUIDE Revision 3.0-05-29-2017 - Valid for MY2017 Radon RADON 237A: Table of Contents 1. Tools Needed and First Aid Kit... 3 2. Sizing Chart... 4 3. Seat Post Collar Assembly... 5 4.
E-119 TRI: ASSEMBLY GUIDE
 E-119 TRI: ASSEMBLY GUIDE Valid for MY2016 E-119 Tri Revision 12.0-07-08-2016 E-119 TRI: Table of Contents 1. Tools Needed & First Ait Kit..........................2 2. Fitting / Stack & Reach.....................3
ELECTRON PRO 245A: ASSEMBLY GUIDE. Revision Valid for MY2017 Electron Pro
 ELECTRON PRO 245A: ASSEMBLY GUIDE Revision 2.0 04-19-2017 Valid for MY2017 Electron Pro ELECTRON PRO 245A: Table of Contents 1. Tools Needed and First Aid Kit...3 2. Specifications...4 3. Configurations...5
ELECTRON PRO: ASSEMBLY GUIDE. Revision Valid for MY2017 Electron Pro
 ELECTRON PRO: ASSEMBLY GUIDE Revision 1.0 10-20-2016 Valid for MY2017 Electron Pro ELECTRON PRO: Table of Contents 1. Tools Needed and First Aid Kit...3 2. Specifications...4 3. Configurations...5 4. Geometry...7
TABLE OF CONTENTS FRAME FEATURES INTRODUCTION
 S3 DISC MANUAL TABLE OF CONTENTS Introduction...1 Frame Features...2 Fork Preparation...3 Small Parts...5 Frame Preparation...6 Brake Housing Installation...7 Mechanical Cable Routing...9 Electric Cable
2019 MADONE ASSEMBLY MANUAL
 2019 MADONE ASSEMBLY MANUAL 2019 MADONE Rim brakes and Di2 drivetrain Rim brakes and mechanical drivetrain Disc brakes and Di2 drivetrain Disc brakes and mechanical drivetrain TABLE OF CONTENTS Common
E-119 TRI+ 284A: ASSEMBLY GUIDE
 E-119 TRI+ 284A: ASSEMBLY GUIDE Valid for MY2019 E-119 Tri+ Revision 1.0-07-18-2018 E-119 TRI+ 284A: Table of Contents 1. Tools Needed & First Ait Kit..........................2 2. Fitting / Stack & Reach.....................3
2019 MADONE ASSEMBLY MANUAL
 2019 MADONE ASSEMBLY MANUAL 2019 MADONE Rim brakes and Di2 drivetrain Disc brakes and Di2 drivetrain Rim brakes and mechanical drivetrain Disc brakes and mechanical drivetrain TABLE OF CONTENTS Common
FRAME FEATURES TABLE OF CONTENTS INTRODUCTION
 R3 MANUAL TABLE OF CONTENTS Introduction...1 Frame Features...2 Fork Preparation...3 Small Parts...5 Frame Preparation...6 Mechanical Cable Routing...7 Electric Cable Routing...9 Seatpost Assembly & Installation...11
SECTION 1 UNPACKING INSTRUCTIONS
 ANDEAN USER GUIDE SECTION 1 UNPACKING INSTRUCTIONS 2 REMOVE PART BOX, ACCESSORY BOX AND SADDLE AND SEATPOST. SET ACCESORIES AND SEAT ASIDE FOR FINAL. PARTS BOX ACCESORY BOX 3 UNSTRAP WHEEL BLOCKS AND HANDLEBAR
NOAH FAST. frame passport
 frame passport Type: 7DC last update: /08/05 INDEX 0. UPDATES... 3. GENERAL... 3.. Description... 3.. Part codes... 3. MATERIAL... 3 3. WEIGHT... 3 3.. Frame... 3 3.. Fork... 3 4. GEOMETRY... 4 5. CABLE
INSTRUCTION GUIDE TRANSITION CARBON (ALL MODELS)
") INSTRUCTION GUIDE TRANSITION CARBON (ALL MODELS) THIS INSTRUCTION GUIDE CONTAINS IMPORTANT INFORMATION. PLEASE READ CAREFULLY AND STORE IN A SAFE PLACE. Congratulations! The Specialized bicycle you have
INSTRUCTION GUIDE TRANSITION CARBON (ALL MODELS) THIS INSTRUCTION GUIDE CONTAINS IMPORTANT INFORMATION. PLEASE READ CAREFULLY AND STORE IN A SAFE PLACE. Congratulations! The Specialized bicycle you have
R5 RIM MANUAL EN. Version 1 I
 R5 RIM MANUAL EN Version 1 I 28.04.2017 TABLE OF CONTENTS Introduction...1 Frame Features...2 Fork Preparation...3 Small Parts...5 Frame Preparation...6 Mechanical Cable Routing...7 Electric Cable Routing...9
R3 RIM MANUAL EN. Version 1 I
 R3 RIM MANUAL EN Version 1 I 07.02.2017 TABLE OF CONTENTS Introduction...1 Frame Features...2 Fork Preparation...3 Small Parts...5 Frame Preparation...6 Mechanical Cable Routing...7 Electric Cable Routing...9
TABLE OF CONTENTS INTRODUCTION
 R3 DISC MANUAL TABLE OF CONTENTS Introduction... 1 Frame Features... 2 Fork Preparation... 3 Small Parts... 5 Frame Preparation... 6 Brake Housing Installation... 7 Mechanical Cable Routing... 9 Electric
FACTORBIKES.COM. Assembly Manual DISC V1.05
 FACTORBIKES.COM V1.05 Introduction I Limited Lifetime Warranty On Bicycles And Framesets I Necessary Tools 01 Instructions 01 1 Seatpost 01 2 Cut the cable housing to the correct length 03 3 Di2 Cable
PRECAUTION INTENDED USE OF THIS MANUAL INTRODUCTION AKING CARE OF
 Table of Contents 1 INTRODUCTION INTDED USE OF THIS MANUAL PRECAUTION TAKING CARE OF YOUR COMPOSITE BICYCLE 5 6 OVERDRIVE HEADSET INSTRUCTION COMPOSITE FRONT FORK 5 7 SPEEDCONTROL BRAKES 6 8 9 10 11 1
Frame passort Noah Fast Disc type 7E3 Englisch ~ Last update: 09/10/2018 ~
 Frame passort Noah Fast Disc type 7E3 Englisch ~ Last update: 09/10/2018 ~ INDEX 0. UPDATES... 3 1. GENERAL... 3 1.1. PART CODES... 3 2. MATERIAL... 3 3. WEIGHT... 3 3.1. FRAME... 3 3.2. FORK... 3 4. GEOMETRY...
R5 DISC MANUAL EN. Version 1 I
 R5 DISC MANUAL EN Version 1 I 30.04.2017 TABLE OF CONTENTS Introduction...1 Frame Features...2 Fork Preparation...3 Small Parts...5 Frame Preparation...6 Brake Housing Installation...7 Mechanical Cable
Electronic Drivetrain Cabling Guide R1.0
 Electronic Drivetrain Cabling Guide R1.0 Congratulations on the purchase of your new PARLEE Altum! The Altum is our most advanced model to date, delivering race ready performance with our signature PARLEE
FACTORBIKES.COM. Assembly Manual V2.20
 FACTORBIKES.COM V2.20 Introduction I Limited Lifetime Warranty On Bicycles And Framesets I Necessary Tools 01 Instructions 01 1 Seatpost 01 2 Di2 Cable Routing 03 3 Fork - Headset Barstem 05 4 Cutting
INTENDED USE OF THIS MANUAL
 Table of Contents 1 INTRODUCTION... 2 2 INTENDED USE OF THIS MANUAL... 2 3 PRECAUTION... 2 4 TAKING CARE OF YOUR COMPOSITE BICYCLE... 3 5 OVERDRIVE 2 HEADSET INSTRUCTION... 4 6 COMPOSITE FRONT FORK...
FRAME FEATURES TABLE OF CONTENTS INTRODUCTION. A guide to your Cervélo C Series frame.
 C SERIES MANUAL TABLE OF CONTENTS Introduction...1 Frame Features...2 Fork Preparation...3 Small Parts...5 Frame Preparation...6 Brake Housing Installation...7 Mechanical Cable Routing...9 Electric Cable
SANTANA STOWAWAY TANDEM WITH AIRLINER SAFECASE AND FTS FOAM TRAY SYSTEM ASSEMBLY AND DISASSEMBLY
 SANTANA STOWAWAY TANDEM WITH AIRLINER SAFECASE AND FTS FOAM TRAY SYSTEM ASSEMBLY AND DISASSEMBLY Congratulations! You are now the proud owner of the world s most travel-ready, performance tandem. The following
Final Assembly Instructions Bikes with Threaded Headsets
 Final Assembly Instructions Bikes with Threaded Headsets Thank you for buying your new bicycle from L.L.Bean. Read these instructions carefully before beginning the final assembly. Prior to shipping, our
MA NUAL 795 BLADE RS
 MA NUAL 79 BLADE RS CONGRATULATIONS! IMPORTANT INFORMATION INTRODUCTION TO THE PRODUCT PRE-ASSEMBLY CHECK FULL 79 BLADE RS ROUTING Rear derailleur hanger Mechanical/electronic routing configuration Routing
Have questions? Chat with us live at raleighusa.com or call us at , 8am 5pm PST
 1 2 Have questions? Chat with us live at raleighusa.com or call us at 1-800-251-8435, 8am 5pm PST The bicycle you have purchased is a complex piece of equipment that must be properly assembled and maintained
2019 S5 RETAILER ASSEMBLY MANUAL
 2019 S5 RETAILER ASSEMBLY MANUAL TABLE OF CONTENTS Important Information... 1 List of Tools & Supplies... 2 2019 S5 Parts List... 3 Frame Features... 4 Handlebar & Stem Components... 5 Handlebar Components
2019 S5 DISC RETAILER ASSEMBLY MANUAL
 2019 S5 DISC RETAILER ASSEMBLY MANUAL S5_Disc_manual_v5.5.indd 1 TABLE OF CONTENTS Important Information... 1 List of Tools & Supplies... 2 2019 S5 Disc Parts List... 3 Frame Features... 4 Handlebar &
Assembly Tools. Assembly will take 1-2 hours
 Assembly Tools Included in your parts box: Pedals Quick release skewer Reflectors (if not already installed) Toolkit (4+5mm combo Allen wrench, 13+15mm combo open-end wrench) Helpful Tools: Scissors (for
Rocky Mountain Element Technical Manual. Rev B
 Rocky Mountain Element Technical Manual Rev B 1 Table of Contents Materials Required... 3 Suspension Pivot Torque Guide... 4 Small Parts Torque Guide... 5 Assembly Instructions... 6 1) Bearing Installation...
Rock. ky Altit. ude. Rev B
 Rock ky Mountain Altit ude Technical Manual Date: August 17 th, 2016 Rev B 1 Table of Contents Materials Required... 3 Suspension Pivot Torque Guide... 4 Small Parts Torque Guide... 5 Assembly Instructions...
TECHNICAL SUPPORT DOCUMENT FULL SUSPENSION MODELS C7 C9 WARRANTY SMALL PARTS FRAME SPEC/SERVICING
 2016-2018 FULL SUSPENSION MODELS C7 C9 WARRANTY SMALL PARTS FRAME SPEC/SERVICING 2016-2018 FULL SUSPENSION MODELS C7 C9 PG.i WARRANTY INFORMATION COMPLETE BIKES ONE YEAR LIMITED WARRANTY NORCO Bicycles
EZ-3 USX HD Supplemental Owner s Manual
 EZ-3 USX HD Supplemental Owner s Manual Find us online at SunSeeker.Bike Revised 2/2016 CONGRATULATIONS! Congratulations and welcome to the Sun Seeker family! You have selected one of the most comfortable
Final Assembly Instructions Bikes with Threaded Headsets
 Final Assembly Instructions Bikes with Threaded Headsets Thank you for buying your new bicycle from L.L.Bean. Read these instructions carefully before beginning the final assembly. Prior to shipping, our
Shimano Di2 Installation on S5
 Installing Shimano Dura Ace Di2 Shifting Systems Note these instructions and pictures are for assembling the Shimano Dura Ace Di2 system (Internal Spec) on the Cervélo S5 frame. The Shimano Ultegra Di2
1 Electronic Wiring. Felt IA Owner s Manual. CalPac / AeroPac Installation... Pg Note:
 Felt IA Owner s Manual 1 2 3 4 5 6 7 8 Introduction................. Pg. 3 Fit Chart................... Pg. 4 Electronic Wiring.............. Pg. 5-15 Mechanical Cabling............. Pg. 16-24 Fork Installation...............
Have questions? Chat with us live at raleighusa.com or call us at , 8am 5pm PST
 1 2 Have questions? Chat with us live at raleighusa.com or call us at 1-800-251-8435, 8am 5pm PST The bicycle you have purchased is a complex piece of equipment that must be properly assembled and maintained
FRAMESET ASSEMBLY GUIDE TRUE GRIT. LaufCycling.com
 FRAMESET ASSEMBLY GUIDE TRUE GRIT LaufCycling.com Congratulations on your True Grit Frameset! We understand you are in a hurry to go riding a.s.a.p. - but please take a deep breath and read this installation
TECHNICAL SUPPORT DOCUMENT 2018 CARBON MODELS 650B / 29 WARRANTY SMALL PARTS FRAME SPEC/SERVICING
 2018 CARBON MODELS 650B / 29 WARRANTY SMALL PARTS FRAME SPEC/SERVICING 2018 CARBON MODELS 650B / 29 PG.i NORCO BICYCLES NEW PURCHASE CONSUMER WARRANTY PROGRAM - EFFECTIVE ON ALL 2017 MODEL YEAR BICYCLES
UNPACKING AND ASSEMBLING YOUR DIAMONDBACK ROAD BIKE
 EMAIL SIGNUP BIKE REG SEARCH BIKES THE RIDE HEALTH FITNESS SKILLS SHOP MAINTENANCE CYCLING 101 RIDERS LIKE YOU TEAMS SUPPORT UNPACKING AND ASSEMBLING YOUR DIAMONDBACK ROAD BIKE 1. Begin by carefully cutting
1. General Safety Information. Silvio V2.2 Assembly Instructions Assembly. Adjust to the rider.
 Silvio V. Assembly Instructions support@cruzbike.com. General Safety Information WARNING to avoid serious injuries:. If you are unsure about fitting, testing and adjusting brakes or gearing on a bicycle,
Rocky Mountain Instinct / Pipeline Alloy Frame Assembly Guide. Date: April 7, 2017
 Rocky Mountain Instinct / Pipeline Alloy Frame Assembly Guide Date: April 7, 2017 1 Table of Contents Front Triangle Preparation... 4 Parts Needed... 4 Instructions... 4 Chain Stay Preparation... 6 Parts
DISASSEMBLING & REASSEMBLING CARTRIDGE INSTALLING SEATPOST ON BIKE
 INTRODUCTION BILL OF MATERIALS SPECIFICATIONS & TOOLS PROCEDURES DISASSEMBLING & REASSEMBLING CARTRIDGE INSTALLING SEATPOST ON BIKE OPERATION OF SEATPOST GIANT LIMITED WARRANTY 1 INTRODUCTION Congratulations
SYNAPSE. OWNER S MANUAL SUPPLEMENT - (English)
") SYNAPSE OWNER S MANUAL SUPPLEMENT - (English) Read this supplement and your Cannondale Bicycle Owner s Manual. Both contain important safety information. Keep both for future reference. ENGLISH Cannondale
SYNAPSE OWNER S MANUAL SUPPLEMENT - (English) Read this supplement and your Cannondale Bicycle Owner s Manual. Both contain important safety information. Keep both for future reference. ENGLISH Cannondale
Ladies Shopper Bike Assembly Manual 28C03
 Ladies Shopper Bike Assembly Manual 28C03 Ecosmo Ltd 1 Know your bike 1. Wheel 2. Rear Derailleur 3. Chain 4. Crank Set 5. Pedal 6. Seat Quick Lock 7. Saddle and Post 8. Frame 9. Front Light 10. Front
MANTEL BIKE BOX: PACKING YOUR ROAD BIKE FOR TRANSPORT
 MANTEL BIKE BOX: PACKING YOUR ROAD BIKE FOR TRANSPORT ROAD BIKE COMPONENTS 1 Frame: a b c d e Top tube Down tube Seat tube Chain stay Seat stay 2 Saddle 3 Seat post 4 Seat post clamp 5 Rear brake 6 Front
a bike with a history like no other
 a bike with a history like no other First introduced in 201, the Nitrogen set itself apart from other Aero bikes by its versatility, its impeccable handling and stiffness. The Nirogen Pro followed in 2016
Final Assembly Instructions Bikes with Quill Stems
 Final Assembly Instructions Bikes with Quill Stems Thank you for buying your new bicycle from L.L.Bean. Read these instructions carefully before beginning the final assembly. Prior to shipping, our expert
OWNER'S MANUAL ENG. ran
 OWNER'S MANUAL ENG ran eng Thank you for choosing a DEDAcciai product. We in DEDAcciai develop, manufacture, and constantly test our products in order to maintain the highest standards of quality. We ask
TECHNICAL SUPPORT DOCUMENT 2018 CARBON MODELS 650B / 29 WARRANTY SMALL PARTS FRAME SPEC/SERVICING
 2018 CARBON MODELS 650B / 29 WARRANTY SMALL PARTS FRAME SPEC/SERVICING 2018 CARBON MODELS 650B / 29 PG.i WARRANTY INFORMATION OWNERSHIP REGISTER YOUR BIKE The original owner must register his / her new
Have questions? Chat with us live at raleighusa.com or call us at , 8am 5pm PST
 1 2 Have questions? Chat with us live at raleighusa.com or call us at 1-800-251-8435, 8am 5pm PST The bicycle you have purchased is a complex piece of equipment that must be properly assembled and maintained
comfort without compromising on performance and to fit your various needs on touring,
 Congratulations on your purchase of Goal-26X. Goal-26X is made to enhance comfort without compromising on performance and to fit your various needs on touring, shopping and communicating. Let s have fun
HOME ASSEMBLY INSTRUCTIONS
 HOME ASSEMBLY INSTRUCTIONS This Papillionaire Bicycle now belongs to you. It will take you to work, wait patiently outside your local cafe, and carry your groceries home. This is the start of your long-term
Bicycle Noise Diagnosis
 Bicycle Noise Diagnosis Bottom bracket noise is a common complaint but most times the noise could be coming from another area on the bicycle. Noises that are telegraphing through the frame often sound
Fenix SL. frame passport
 frame passport type: 7dF last update: 05/10/2017 INDEX 0. UPDATES... 3 1. GENERAL... 3 1.1. Description... 3 1.2. Part codes... 3 2. MATERIAL... 3 3. WEIGHT... 3 3.1. Frame... 3 3.2. Fork... 3 4. GEOMETRY...
CRUZBIKE Quest 2.0 Assembly
 CRUZBIKE Quest 2.0 Assembly CRUZBIKE Quest 2.0 Assembly... 1 General notes on assembly... 2 Un box and evaluate the frame and major parts... 2 Unfold the rear swing arm and arrange the frame... 3 Rear
INTRODUCTION BILL OF MATERIALS SPECIFICATIONS & TOOLS PROCEDURES OPERATION OF SEATPOST GIANT LIMITED WARRANTY
 INTRODUCTION BILL OF MATERIALS SPECIFICATIONS & TOOLS PROCEDURES OPERATION OF SEATPOST GIANT LIMITED WARRANTY 1 INTRODUCTION Congratulations on the purchase of your new GIANT CONTACT SWITCH seatpost. This
INSTRUCTION GUIDE S-WORKS ROAD CARBON CRANKSET (Carbon and Alloy OSBB cups)
") INSTRUCTION GUIDE S-WORKS ROAD CARBON CRANKSET (Carbon and Alloy OSBB cups) THIS BRIEF INSTRUCTION GUIDE CONTAINS IMPORTANT INFORMATION. PLEASE READ CAREFULLY AND STORE IN A SAFE PLACE. Congratulations!
INSTRUCTION GUIDE S-WORKS ROAD CARBON CRANKSET (Carbon and Alloy OSBB cups) THIS BRIEF INSTRUCTION GUIDE CONTAINS IMPORTANT INFORMATION. PLEASE READ CAREFULLY AND STORE IN A SAFE PLACE. Congratulations!
OWNER'S MANUAL ITA / ENG. atleta
 OWNER'S MANUAL ITA / ENG atleta eng Thank you for choosing a DEDAcciai product. We in DEDAcciai develop, manufacture, and constantly test our products in order to maintain the highest standards of quality.
E-trike Li Assembly Guide
 PREPARATION 1. Read this assembly manual BEFORE commencing assembly. 2. Carefully remove all the components and packaged hardware from the shipping boxes. 3. Unpack the contents of the large double box
TIMEMACHINE. Assembly Manual
 TIMEMACHINE Assembly Manual TIMEMACHINE Assembly Instruction Manual The new Timemachine 01 represents the pinnacle of functional integration, aerodynamic form and rider-focused fit. By patiently following
fenix carbon frame passport TYPE: 7DD LAST UPDATE: 31/10/2012
 fenix carbon frame passport TYPE: 7DD LAST UPDATE: 31/10/2012 www.ridley-bikes.com facebook.com/ridleybikes twitter.com/ridley_bikes INDEX 0. UPDATES... 3 1. GENERAL... 3 1.1. DESCRIPTION... 3 1.2. PART
Fenix Carbon. frame passport
 frame passport type: 7dD last update: 05/10/2017 INDEX 0. UPDATES... 3 1. GENERAL... 3 1.1. Description... 3 1.2. Part codes... 3 2. MATERIAL... 3 3. WEIGHT... 3 3.1. Frame... 3 3.2. Fork... 3 4. GEOMETRY...
MODEL: COMMUTER / ROAD BIKE
 STEP BY STEP BUILD GUIDE MODEL: COMMUTER / ROAD BIKE TABLE OF CONTENTS TOOLS 1 LET S GET STARTED 2 INSTALLING THE QUILL STEM 3 INSTALLING THE FRONT FENDER 4 INSTALLING THE QUICK RELEASE 5 INSTALLING THE
Assembly Tools. Assembly will take about an hour
 Assembly Guide Assembly Tools Included in your parts box: Pedals Toolkit (4+5mm combo Allen wrench, 13+15mm combo open-end wrench) Touch-up paint Spare fuses (for battery) Assembly will take about an hour
user manual hard eddie
 user manual hard eddie Welcome to the family AT INTENSE, WE HAVE ONE GOAL - TO PROVIDE THE RIDE OF YOUR LIFE. Our team of designers, engineers and product experts are focused on one thing every day: your
Fenix SL Disc. frame passport
 frame passport type: 7E1 last update: 05/10/2017 INDEX 0. UPDATES... 3 1. GENERAL... 3 1.1. Description... 3 1.2. Part codes... 3 2. MATERIAL... 3 3. WEIGHT... 3 3.1. Frame... 3 3.2. Fork... 3 4. GEOMETRY...
Fenix SLX disc. frame passport
 Fenix SLX disc frame passport type: 7E2 last update: 05/10/2017 INDEX 0. UPDATES... 3 1. GENERAL... 3 1.1. Description... 3 1.2. Part codes... 3 2. MATERIAL... 3 3. WEIGHT... 3 3.1. Frame... 3 3.2. Fork...
TECH SHEET ORANGE PIVOT TOOL INSTRUCTIONS
 page 1 ORANGE PIVOT TOOL INSTRUCTIONS This is a guide of how to change the pivot bearings on an Orange frame with a bore style pivot axle. 4 8 Bore Type Pivot Axle Horiz-Hold Type Pivot Axle Please read
Santa Fe Cycles Assembly Guide Introduction
 Santa Fe Cycles Assembly Guide Introduction Congratulations on your purchase of your new Santa Fe bicycle. You have purchased a bicycle that has many features and qualities. Please take a few minutes and
SUPERIOR TEAM/XP CRB BF-M03 SERVICE MANUAL
 SUPERIOR TEAM/XP CRB BF-M03 SERVICE MANUAL Superior would like to congratulate you on the purchase of your new bicycle. We place a great emphasis on the choice of materials and their processing so as to
Rear Drive System SERVICE INSTRUCTION. Specifications SI-R670B
 - SERVICE INSTRUCTION SI-R670B t Rear Drive System Before use, read these instructions carefully, and follow them for correct use. In order to realize the best performance, we recommend that the following
SCOTT PLASMA 4 BIKE OWNER S MANUAL
 www.scott-sports.com SCOTT PLASMA 4 All rights reserved 2014 SCOTT Sports SA SCOTT Sports SA 17 Route du Crochet 1762 Givisiez Switzerland BIKE OWNER S MANUAL 2015 Distribution: SSG (Europe) Distribution
Aura SLX. frame passport
 frame passport type: 7E1 last update: 05/10/2017 INDEX 0. UPDATES... 3 1. GENERAL... 3 1.1. Description... 3 1.2. Part codes... 3 2. MATERIAL... 3 3. WEIGHT... 3 3.1. Frame... 3 3.2. Fork... 3 4. GEOMETRY...
Service Information. Speed Concept Note about performing mechanical work on bicycles:
 Service Information Speed Concept 2011 The Trek Speed Concept bike is the fastest frameset we have ever made. To accomplish this, we have used shaped tubes, hidden front and rear brakes, and very thin-walled
NOAH RS. frame passport
 frame passport Type: 7DB last update: 21/08/2015 INDEX 0. UPDATES... 3 1. GENERAL... 3 1.1. Description... 3 1.2. Part codes... 3 2. MATERIAL... 3 3. WEIGHT... 3 3.1. Frame... 3 3.2. Fork... 3 4. GEOMETRY...
HELIUM SL. frame passport
 HELIUM SL frame passport type: 7dD last update: 27/06/2017 INDEX 0. UPDATES... 3 1. GENERAL... 3 1.1. Description... 3 1.2. Part codes... 3 2. MATERIAL... 3 3. WEIGHT... 3 3.1. Frame... 3 3.2. Fork...
MODEL: FIXIE / TRACK
 STEP BY STEP BUILD GUIDE MODEL: FIXIE / TRACK TABLE O F CON TENTS TOOLS 1 LET S GET STARTED 2 INSTALLING THE HANDLEBAR 3 INSTALLING THE FRONT WHEEL 4 ALIGNING THE STEM 5 INSTALLING THE SEATPOST 6 OPTIMIZING
ASSEMBLY GUIDE TRUE GRIT. LaufCycling.com
 ASSEMBLY GUIDE TRUE GRIT LaufCycling.com Congratulations on your True Grit! We understand you are in a hurry to go riding a.s.a.p. - but please take a deep breath and read this installation guide first.
Rocky Mountain Instinct / Pipeline Frame Assembly Guide. Date: March 31, 2017
 Rocky Mountain Instinct / Pipeline Frame Assembly Guide Date: March 31, 2017 1 Table of Contents Front Triangle Preparation... 4 Parts Needed... 4 Instructions... 4 Chain Stay Preparation... 6 Parts Needed...
Rev C Force 2 Parts Book Page 1 of 7 Top End
 1181378 Rev C.2016.03.14 Force 2 Parts Book Page 1 of 7 Force 2: Fork Assembly Date: Customer: Ship to: PER BIKE DESCRIPTION 1 1166391 1 Fork, Force 2 (incl: fork, 4 bolts) -Serial# Required- Red Blue
INSTRUCTION GUIDE S-WORKS ROAD CARBON CRANKSET (Carbon and Alloy OSBB cups)
") INSTRUCTION GUIDE S-WORKS ROAD CARBON CRANKSET (Carbon and Alloy OSBB cups) THIS BRIEF INSTRUCTION GUIDE CONTAINS IMPORTANT INFORMATION. PLEASE READ CAREFULLY AND STORE IN A SAFE PLACE. Congratulations!
INSTRUCTION GUIDE S-WORKS ROAD CARBON CRANKSET (Carbon and Alloy OSBB cups) THIS BRIEF INSTRUCTION GUIDE CONTAINS IMPORTANT INFORMATION. PLEASE READ CAREFULLY AND STORE IN A SAFE PLACE. Congratulations!
Lectric Cycles Mid-Drive Electric Motor Installation
 Lectric Cycles Mid-Drive Electric Motor Installation This write-up describes the installation of a Lectric Cycles electric motor. The model is the e-rad Mid-Drive 750 Watt conversion kit, installed on
BRAND OVERVIEW 06 FRAME FEATURES 08 GEOMETRY 10 MAINTENANCE SCHEDULE 12 SETUP OVERVIEW 12 DERAILLEUR HANGER INSTALL 16 CABLE/LINE SETUP 18 TECHNICAL
 BRAND OVERVIEW 06 FRAME FEATURES 08 GEOMETRY 10 MAINTENANCE SCHEDULE 12 SETUP OVERVIEW 12 DERAILLEUR HANGER INSTALL 16 CABLE/LINE SETUP 18 TECHNICAL ASSEMBLY OVERVIEW 22 EXPLODED VIEWS 30 REBUILD KITS
ASSEMBLY GUIDE: Izip & Ezip Electric Bicycles with Rack-Top Mounted Batteries ( RTMB Bicycles )
") ASSEMBLY GUIDE: Izip & Ezip Electric Bicycles with Rack-Top Mounted Batteries ( RTMB Bicycles ) Please Refer to your Owner s Manual for Detailed Setup Instructions Technical & Customer Service: 1-800-377-4532
ASSEMBLY GUIDE: Izip & Ezip Electric Bicycles with Rack-Top Mounted Batteries ( RTMB Bicycles ) Please Refer to your Owner s Manual for Detailed Setup Instructions Technical & Customer Service: 1-800-377-4532
BICYCLE ASSEMBLY INSTRUCTIONS. dutchcycles.com.au. Distribution Centre
 BICYCLE ASSEMBLY INSTRUCTIONS dutchcycles.com.au Distribution Centre Shed 68, 400-422 Somerville Road, Tottenham, VIC 3012 email: service@dutchcycles.com.au BICYCLE COMPONENTS KEY INTRODUCTION CONGRATULATIONS