SIGM400 OWNERS MANUAL: HANDLING & SAFETY INSTRUCTIONS
|
|
|
- Chester Lindsey
- 6 years ago
- Views:
Transcription


1 SIGM400 OWNERS MANUAL: HANDLING & SAFETY INSTRUCTIONS READ THE INSTRUCTIONS AND WARNINGS IN THIS MANUAL CAREFULLY BEFORE USING THIS FIREARM; DO NOT DISCARD THIS MANUAL. This instruction manual should always accompany this firearm and be transferred with it upon ownership, or when the firearm is loaned or presented to another person.
2 W WARNING LOCKING DEVICES This firearm was originally sold with a key- operated locking device. While it can help provide secure storage for your unloaded firearm, any locking device can fail. All firearms are designed to fire if they are loaded and the trigger is pulled. Therefore, never install the locking device inside the trigger guard or in any way that makes it possible to pull the trigger! Do not leave the keys in the lock. The ultimate responsibility for secure storage of any firearm must depend upon its owner and his or her individual circumstances. Firearms should be stored unloaded, in a secure location, separate from their ammunition. NEVER INSTALL THE LOCKING DEVICE INSIDE THE TRIGGER GUARD To maximize effectiveness and reduce the chances of malfunction or damage to a firearm, ALWAYS refer to the locking device s manufacturer directions for installation and removal of the device. 2

3 FIREARMS SAFETY IS YOUR RESPONSIBILITY This owner s manual is designed to assist you in learning how to use and care for your SIG SAUER pistol properly. Only when you are certain that you fully understand this manual and can properly carry out its instructions, should you practice loading and firing your firearm with live ammunition. Having a firearm in your possession is a full-time job; you cannot guess and you cannot forget. You must know how to use your firearm safely. If you have any doubts about your ability to handle or use this firearm safely, you should seek supervised instruction. The Sig Sauer Academy SM provides all levels of firearms safety and skill training, from beginner to expert. For more information contact: (603) Epping, New Hampshire SAFETY MUST BE THE FIRST AND CONSTANT CONSIDERATION OF EVERY PERSON WHO HANDLES FIREARMS AND AMMUNITION. For more information about safety, responsible firearms ownership, and shooting sports, contact: National Rifle Association (NRA) of America, Waples Mill Road, Fairfax, VA
4 Topic TABLE OF CONTENTS Page Locking Device...6 General Safety Information and Mechanical Characteristics...10 Basic Rules of Safe Firearms Handling Safety Information Protect your Eyes and Ears Ammunition Mechanical Characteristics and Rifle Theory Rifle Description General Barrel with Receiver and Gas System Bolt and Bolt Carrier Assembly Hand Guard Lower Receiver and Buttstock Assembly Buttstock Operation
5 Topic Page Trigger Guard Operation Sights Magazine Technical Specification Operation of Fire Control Selector /Safety Handling Important Instructions Loading the Magazine Loading the Rifle Reloading the Rifle (partially loaded magazine in rifle) Reloading the Rifle (empty magazine in rifle) Cycle of Operation Firing Unlocking of the Bolt, Extraction, and Ejection Cocking of the Hammer Chambering and Locking
6 Topic...Page 5.0 Unloading Procedures in case of a Stoppage Failure to Fire (Cold Rifle) Failure to Fire (Hot Rifle) Field Strip Disassembly Detailed Disassembly of the Bolt Carrier and Bolt Extractor Removal Hand Guard Removal Removal of Recoil Buffer and Action Spring Cleaning Bore Chamber Bolt Bolt Carrier Action Spring and Receiver Extension Magazine Reassembly Recoil Buffer and Action Spring
7 Topic...Page 9.2 Extractor Bolt to Bolt Carrier Bolt Carrier to Upper Receiver Rejoining Upper and lower Receivers Perform a Function Check Lubrication Transportation and Storage Service and Replacement Parts Policy Shipping Firearms for Repair Parts Diagram Parts List...77 SIG SAUER Limited Lifetime Firearms Warranty
8 WARNINGS OF GREAT IMPORTANCE ARE FOUND WITHIN THIS MANUAL Locking Devices 2 Alterations 9 Manual Safety 21 Ammunition 13, 16 Lead Exposure 16 Handling 39 Loading 41 Firing 44 Storage 71 Parts Purchasers 73 Shipping 75 OTHER CAUTIONS AND WARNINGS APPEAR THROUGHOUT THE MANUAL FIREARMS ARE DANGEROUS WEAPONS READ THE INSTRUCTIONS AND WARNINGS IN THIS MANUAL THOROUGHLY AND CAREFULLY BEFORE USING. 8
9 W WARNING ALTERATIONS This product was designed to function properly in its original condition. Alterations can make it unsafe. Do not alter any part or add or substitute any parts or accessories not manufactured by SIG SAUER Inc. DO NOT ALTER ANY FIREARM 9
10 GENERAL SAFETY INFORMATION AND MECHANICAL CHARACTERISTICS 1.0 Safety Information The safety warnings in this manual are important. By understanding the dangers inherent in the use of any firearm, and by taking the precautions described herein, you can enjoy complete safety in the use of your rifle. Failure to heed any of these warnings may result in serious injury to you or others, as well as severe damage to the firearm or other property. SIG SAUER Inc. shall not be responsible in any manner whatsoever for malfunctioning of the firearm, physical injury or property damage resulting in whole or in part from: 1) criminal or negligent discharge; 2) improper or careless handling; 3) unauthorized modifications; 4) defective, improper, hand-loaded, or reloaded ammunition; 5) corrosion; 6) neglect; or 7) other influences beyond our direct and immediate control. This limitation applies regardless of whether liability is asserted on the basis of contract, negligence, or strict liability (including any failure to warn). Under no circumstance shall SIG SAUER Inc. be liable for incidental or consequential damages, such as loss of use of property, commercial loss, and loss of earnings or profits. 10
11 THE BASIC RULES OF SAFE FIREARMS HANDLING 1. ALWAYS treat every firearm as if it were loaded. 2. ALWAYS be sure the barrel is clear of any obstruction. 3. ALWAYS be sure of your backstop, what lies beyond, and the safety of bystanders before you shoot. 4. ALWAYS use clean, dry, original factory-made ammunition of the proper type and caliber for your firearm. 5. ALWAYS wear ear protection and safety glasses when shooting. 6. ALWAYS carry your firearm so that you can control the direction of the muzzle if you fall or stumble. 7. NEVER shoot at a flat surface or water. 8. DO NOT leave an unattended firearm loaded. Firearms and ammunition should be stored separately, locked if possible, beyond the reach of children, careless adults, and unauthorized users. 9. NEVER allow your firearm to be used by anyone who has not read and understood this operator s manual. 10. DO NOT point any firearm, loaded or unloaded, at any undesired target. 11. NEVER fire your rifle near an animal unless it is trained to accept the noise: an animal s startled reaction could injure it or cause an accident. 12. NEVER drink alcoholic beverages or take drugs before or during shooting, as your vision and judgment could be seriously impaired, making your firearm handling unsafe. 11
12 1.1 Protect Your Eyes And Ears Always wear safety glasses and ear plugs or earmuff type protectors whenever you are shooting. Always make certain that persons close to you are similarly protected. Unprotected eyes may be injured by powder, gas, carbon residue, lubricant, metallic particles, or similar debris which may emanate occasionally from any firearm in normal use. Without ear protection, repeated exposure to shooting noise may lead to cumulative, permanent hearing loss Ammunition 1. Use only high quality, original, factory-manufactured ammunition. Do not use cartridges that are dirty, wet, corroded, bent, or damaged. Do not oil cartridges. Do not spray aerosol-type lubricants, preservative, or cleaners directly onto cartridges or where excess spray may flow into contact with cartridges. Lubricant or other foreign matter on cartridges can cause potentially dangerous ammunition malfunctions. Use only ammunition of the caliber for which your firearm is chambered. The proper caliber is permanently engraved on your firearm; never attempt to use ammunition of any other caliber. 2. The use of reloaded, remanufactured hand-loaded, or other non-standard ammunition voids all warranties. Reloading is a science and improperly loaded ammunition can be extremely dangerous. Severe damage to the firearm and serious injury to the shooter or to others may result. Always use ammunition that complies with the industry performance standards established by the Sporting Arms and Ammunition Manufacturers Institute, Inc. of the United States (SAAMI) or ammunition manufactured to military specifications. 12
13 W WARNING AMMUNITION (CARTRIDGE) NOTICE SIG SAUER Inc. SPECIFICALLY DISCLAIMS RESPONSIBILITY FOR ANY DAMAGE OR INJURY WHATSOEVER OCCURRING IN CONNECTION WITH, OR AS A RESULT OF, THE USE IN ANY SIG SAUER FIREARM OF FAULTY, NON-STANDARD, REMANUFACTURED HAND LOADED (RELOADED) AMMUNITION, OR CARTRIDGES OTHER THAN THOSE FOR WHICH THE FIREARM WAS ORIGINALLY CHAMBERED. 3. Firearms may be severely damaged and serious injury to the shooter or to others may result from any condition causing excessive pressure inside the chamber or barrel during firing. Excessive pressure can be caused by obstructions in the barrel, propellant powder overloads, the use of incorrect cartridges or defectively assembled cartridges. In addition, the use of a dirty, corroded, or damaged cartridge can lead to a burst cartridge case and consequent damage to the firearm and personal injury from the sudden escape of high-pressure propellant gas within the firearm s mechanism. 4. Immediately stop shooting and check the barrel for a possible obstruction whenever: You have difficulty in, or feel unusual resistance in, chambering a cartridge; A cartridge misfires (does not go off); The mechanism fails to extract a fired cartridge case; Unburned grains of propellant powder are discovered spilled in the mechanism; A shot sounds weak or abnormal. In such cases it is possible that a bullet is lodged part way down the barrel. Firing a subsequent bullet into the obstructed barrel can wreck the firearm and cause serious injury to the shooter or to bystanders. 5. Bullets can become lodged in the barrel: 13
14 If the cartridge has been improperly loaded without propellant powder, or if the powder fails to ignite (ignition of the cartridge primer alone will push the bullet out of the cartridge case, but usually does not generate sufficient energy to expel the bullet completely from the barrel); If the bullet is not properly seated in the cartridge case. When such a cartridge is extracted from the chamber without being fired, the bullet may be left behind in the bore at the point where the rifling begins. Subsequent chambering of another cartridge may push the first bullet further into the bore. 6. If there is any reason to suspect that a bullet is obstructing the barrel, immediately unload the firearm and look through the bore. It is not sufficient to merely look in the chamber. A bullet may be lodged some distance down the barrel where it cannot easily be seen. IF A BULLET IS IN THE BORE, DO NOT ATTEMPT TO SHOOT IT OUT BY USING ANOTHER CARTRIDGE OR BY BLOWING IT OUT WITH A BLANK OR ONE FROM WHICH THE BULLET HAS BEEN REMOVED. SUCH TECHNIQUES CAN GENERATE EXCESSIVE PRESSURE, WRECK THE FIREARM, AND CAUSE SERIOUS PERSONAL INJURY. If the bullet can be removed with a cleaning rod, clean any unburned powder grains from the bore, chamber, and mechanism before resuming shooting. If the bullet cannot be dislodged by tapping it with a cleaning rod, take the firearm to a gunsmith. 7. Dirt, corrosion, or other foreign matter on a cartridge can impede complete chambering and may cause the cartridge case to burst upon firing. The same is true of cartridges which are damaged or deformed. 8. Do not oil cartridges, and be sure to wipe the chamber clean of any oil or preservative before commencing to shoot. Oil 14
15 interferes with the friction between cartridge case and chamber wall that is necessary for safe functioning, and subjects the firearm to stress similar to that imposed by excessive pressure. 9. Use lubricants sparingly on the moving parts of your firearm. Avoid excessive spraying of any aerosol gun care product, especially where it may get on ammunition. All lubricants and aerosol spray lubricants in particular can penetrate cartridge primers and cause misfires. Some highly penetrative lubricants can also migrate inside cartridge cases and cause deterioration of the propellant powder; on firing, the powder may not ignite. If only the primer ignites, there is danger that the bullet may become lodged in the barrel. 15


16 W WARNING AMMUNITION Death, serious injury, and damage can result from the use of wrong ammunition, bore obstructions, powder overloads, or incorrect cartridge components. Always wear shooting glasses and hearing protectors. IMPROPER AMMUNITION DESTROYS FIREARMS W WARNING LEAD EXPOSURE Discharging firearms in poorly ventilated areas, cleaning firearms, or handling ammunition may result in exposure to lead and other substances known to the state of California to cause birth defects, reproductive harm, and other serious physical injury. Maintain adequate ventilation at all times. Wash hands thoroughly after exposure. SHOOTING OR CLEANING FIREARMS MAY EXPOSE YOU TO LEAD 16


17 2.0. Mechanical Characteristics and Rifle Theory 2.1 Rifle Description General The SIGM400 rifle is a direct impingment rifle with a rotary bolt mechanism capable of semi-automatic or full automatic fire operation. Semi-Automatic is defined as one round being fired each time the trigger is pressed to the rear until the magazine is depleted of ammunition. Full automatic or select fire is defined as a continuous rate of fire beginning with the initial press of the trigger and continuing until either the magazine is depleted of ammunition or the operator releases the trigger, at which time the trigger resets. The rifle is chambered in 5.56x45mm NATO and is compatible with.223 Remington ammunition Barrel, Receiver and Gas System The barrel is mechanically mated to the receiver by means of a barrel nut, and the barrel extension. The flash suppressor if applicable is screwed onto the muzzle end of the barrel via ½ x 28 TPI thread pattern. The front sight housing, which is fitted to the barrel, contains the gas port and the front sight. The upper receiver has an integral M1913 accessory rail for attachment of sights or optics. BARREL WITH RECEIVER AND GAS SYSTEM 17


18 2.1.3 Bolt/Bolt Carrier Assembly The bolt carrier guides the bolt and controls locking and unlocking by means of the cam pin. The bolt carrier incorporates a carrier key that transfers gas from the gas tube to the belt carrier assembly. The bolt carrier is responsible for cocking the hammer. mer. Cam Pin Bolt Carrier BOLT CARRIERRIER Bolt The bolt houses the firing pin, the extractor and the ejector. It incorporates locking lugs that lock the bolt into the barrel extension. The cam pin passes into the bolt which allows for locking and unlocking and is retained in the bolt by the firing pin. Bolt Rings Ejector BOLT ASSEMBLY Extractor 18


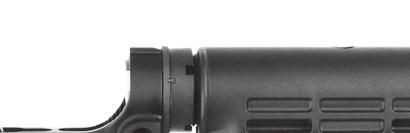
19 2.1.4 Hand Guard The hand guard protects the barrel and the gas system from damage and provides protection from barrel heat. HAND GUARD ASSEMBLY ON RIFLE 19


.")


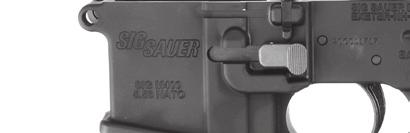
20 2.1.5 Lower Receiver Assembly and Buttstock The lower receiver assembly contains the fire control mechanism, bolt catch, magazine well, magazine release, pistol grip, sling attachment points, and buttstock assembly. The fire control selector is ambidextrous along with the magazine catch. The fire control selector has three positions, SAFE-SEMI-AUTO (depending on model). SAFE - Trigger is locked and rifle cannot be fired. SEMI - The rifle will fire one shot with each press of the trigger. AUTO - Continuous rate of fire beginning with the initial press of the trigger and continuing until either the magazine is depleted of ammunition or the operator releases the trigger, at which time the trigger resets. LOWER RECEIVER ASSEMBLY Bolt Catch Lever Sling attachment point Magazine release Fire control selector 20
21 W W MANUAL SAFETY ON MANUAL SAFETY OFF MANUAL SAFETY OFF FIRE CONTROL SELECTOR POSITION SAFE-SEMI W WARNING MANUAL SAFETY Keep the safety ON unless actually firing. Always move the safety to its intended position and check it. The safety is not ON unless it is completely ON. Never depend on a safety mechanism or any other mechanical device to justify careless handling or permitting the rifle to point in an unsafe direction. The only safe rifle is one in which the bolt is open, the chamber is empty, and there is no magazine in the firearm. KNOW HOW TO USE THE SAFETY 21


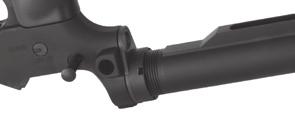
22 2.1.6 Buttstock Operation The SIGM400 is equipped with a telescoping buttstock. The buttstock may vary depending on the model. The buttstock on the SIGM400 may vary depending on the specific model you have. The buttstock provides for easy adjustment of the length to accommodate the individual shooter or for storage. To adjust the length of the buttstock, fully depress the release latch and pull the stock rearward to extend or push the stock forward to collapse. Intermediate positions may be selected by partially depressing the release latch and moving the stock to the desired position. Release Latch BUTTSTOCK 22


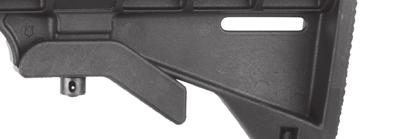


23 Release Latch BUTTSTOCK COLLAPSED AND FULLY EXTENDED 23


24 To remove the buttstock: Depress the adjustment lever to disengage the release latch and slide the stock to full extension. Grasp the release latch and pull down as you slide the stock from the receiver extension. BUTTSTOCK REMOVAL 24


25 To re-install the buttstock: DO NOT FORCE THE PARTS TOGETHER! Align the stock body with the receiver extension and Gently slide the buttstock onto the receiver extension until it stops (About 2 1/8 ) Grasp the release latch and pull down as you slide the stock the rest of the way on to the receiver extension. Check to see that the stock moves to all positions locks into place. INSERT VIEW OF BUTTSTOCK INSTALLATION 25


26 2.1.7 Trigger Guard Operation The trigger guard may be released from its normal position to make the trigger accessible for shooting with gloves. For safety reasons the trigger guard must not be released until just before firing the weapon. It should be returned to its normal position immediately. W CAUTION: BE CAREFUL WHEN INSERTING GLOVED FINGERS INTO THE TRIGGER GUARD AS ACCIDENTAL DISCHARGES MAY OCCUR! To release the trigger guard, depress the spring loaded detent on the front right side and rotate the guard downward. TRIGGER AND GUARD RELEASE To close the guard rotate the trigger guard back into place, depress the spring loaded detent and ensure the guard locks into place. 26
27 W WARNING DO NOT MANIPULATE THE TRIGGER GUARD UNLESS THE FIRE CONTROL SELECTOR IS ON SAFE AND THE RIFLE IS UNLOADED. 27


28 2.1.8 Sights The SIGM400 rifle features integrated MIL-STD 1913 rails on the upper receiver. These rails may be used for attaching a variety of sighting systems, both optical and fixed. These sights are designed to provide a simple, durable sighting solution should you decide not to use an optical device. SIGM400 SIGHT ASSEMBLY 28


29 Adjustable Rear Sight SHORT RANGE - This larger aperture is used for meters range. As shown, the sight is set for meters. This larger aperture is only used when the rear sights all the way down. In other words, the 300-meter mark is aligned with the mark on the left side of the receiver. SIGHT ADJUSTMENT FOR METERS NORMAL RANGE -The aperture is unmarked and used for most firing situations. It is used in conjunction with the elevation knob for 300, 400, 500, 600-meter targets. SIGHT ADJUSTMENT FOR METERS 29


30 Zeroing your SIGM400 a The front sight post and rear sight windage knob are adjusted so you can hit your point of aim at 300 meters. b The unmarked aperture must be in the up position. c. The 300-meter mark is aligned with the mark on the left side of the receiver. This will read 6/3 for the SIGM
31 Zeroing Adjustments 1. During zeroing procedures, only the front sight post and windage knob are adjusted to move the strike of the bullet on the target. 2. If you are zeroing on a 25-meter range, the rear sight elevation knob is adjusted in accordance to whichever weapon you are using. 3. Detailed zeroing procedures are on the target and the following pages. FRONT SIGHT - The front sight post is moved up or down when zeroing the weapon. Once the weapon is zeroed, the front sight post should not be moved. To adjust elevation, depress detent and rotate post. To raise strike of bullet, rotate post in the direction of arrow marked UP. Reverse the direction of rotation to lower strike of bullet. Each graduation (notch) moves the point of impact of bullet as indicated. 31
32 Changes in point of impact FOR ELEVATION (per click) M16A2 CLICKS IMPACT DISTANCE cm (3/8 in.) 25 meters cm (1 3/8 in.) 100 meters cm (2 ¾ in.) 200 meters FOR WlNDAGE KNOB (per click) CLICKS IMPACT DISTANCE cm (1/8 in.) 25 meters cm (1/2 in.) 100 meters cm (1 in.) 200 meters cm (1 ½ in.) 300 meters cm (2 in.) 400 meters cm (2 Min.) 500 meters cm (3 in.) 600 meters FOR ELEVATION (per click) M4/M4A1 CLICKS IMPACT DISTANCE cm (1/2 in.) 25 meters cm (1 7/8 in.) 100 meters cm (3 ¾ in.) 200 meters FOR WlNDAGE KNOB (per click) CLICKS IMPACT DISTANCE cm (3/16 in.) 25 meters cm (3/4 in.) 100 meters cm (1 ½ in.) 200 meters cm (2 1/4 in.) 300 meters cm (3 in.) 400 meters cm (3 3/4 in.) 500 meters cm (4 1/2 in.) 600 meters 32
33 Zeroing Adjustments (Cont) To remember your correct zero windage, note location of windage scale and windage knob pointer (heavy mark on outside of knob). Do not center rear sight aperture for inspections. Keep your correct battle sight zero windage on your weapon at all times. By following the steps below and establishing a zero at 25 meters, your sights will be set with a 300-meter battlesight. NOTE: Do not move front sight post at this time. lt was set at the factory or by a previous shooter and should be very close to your zero. Center the rear sight aperture by turning the windage knob left or right. (This is called mechanical zero windage.) 1. Position a 25 Meter Zero Target; 25 meters from the firing line. 2. The unmarked long range aperture should be up. 3. Rotate elevation knob in the down direction (counter-clockwise). The elevation knob should stop on the 300-meter mark (6/3). The rear sight should be all the way down on the last whole click before it bottoms out. This is called mechanical zero elevation for the rear sight If your range scale will not line up in the above manner, an armor will be required to adjust the range scale for you. 33
34 4. Now rotate the elevation knob clockwise (up) two clicks for the SIGM400 rifle. The elevation knob should remain aligned on the 300 meter setting for the SIGM400 carbine. Any further corrections required in elevation are made to the front sight post only. 5. Aim at target center. Adjust front sight and rear windage to move shot group center as close as possible to the white dot in the center of target. 6. If your shot group is not in the center of the bull s eye, use the squares on the target sheet to calculate the required clicks necessary to move your next shot group into the bull s-eye. (Remember that any changes in elevation are made by moving the front sight post.) The squares are numbered around the edges of the target to equal the number of clicks required to move the shot group to the bull s eye. 7. In order to raise your next shot group, rotate the front sight post clockwise. (One click will move the strike of the bullet one vertical square on the target sheet) In order to lower your next shot group, rotate the front sight post counterclockwise (one click, as above, equals one square). Changes in windage are made with the windage knob. (Three clicks will move the strike of the bullet one horizontal square on the target sheet). In order to move the shot group to the left, turn the windage knob counterclockwise. In order to move the shot group to the right, turn the windage knob clockwise. 8. Carefully aim and fire another group at the center of the target bull s eye. 9. Repeat Steps 6 through 8, if required. 10. If your group is centered, your weapon is now zeroed. 34

 round magazine.")


35 2.1.9 Magazine The SIGM400 rifle ships with (1) one thirty (30) round magazine. The SIGM400 is compatible with most M16/AR15 type magazines. Aftermarket magazines should always be checked for proper fit and function prior to using them with the SIGM400 rifle. 10, 20 AND 30 RD MAGAZINE 35
36 2.2 Technical Specifications Specifications are approximate and subject to change CALIBER 5.56 x 45mm NATO OVERALL LENGTH LENGTH WITH STOCK COLLAPSED N/A OVERALL HEIGHT 7.31 BARREL LENGTH W/FLASH SUPPRESSOR BARREL CONTOUR Heavy Mil-Spec M4 Profile Heavy RIFLING LEAD 1 in 8 1 in 7 NUMBER OF GROOVES 6 MUZZLE BRAKE N/A Mil-Spec SIGHT RADIUS 14.2 WEIGHT WITHOUT MAGAZINE 8.53 lbs 7.2 lbs 6.7 lbs 6.35 lbs MAGAZINE TYPE AR-15 Type Aluminum MAGAZINE CAPACITY TRIGGER Mil-STD TRIGGER PULL 7.6 lbs 36


37 2.2.1 Operation of Fire Control/Safety Four basic fundamentals of safe firearm handling should be applied during any and all activities described in this manual. Treat every firearm as if it were loaded. Always keep the muzzle pointed in a safe direction until ready to shoot. Keep your finger off of the trigger and out of the trigger guard until ready to fire. Be aware of your target and what is beyond it. The SIGM400 is equipped with an ambidextrous fire control selector lever commonly referred to as a safety lever which can be manipulated from either the left or right side of the lower receiver. The selector has three (3) positions, SAFE/SEMI/ AUTO (depending on model). SAFE - Trigger is locked and rifle CANNOT be fired with a normal press of the trigger. W FIRE CONTROL SELECTOR ON SAFE 37


38 AUTO The rifle will fire continuously at the cyclic rate until either the operator releases the trigger or the magazine is depleted of ammunition. SEMI The trigger is no longer locked and the rifle WILL FIRE one shot with each press of the trigger until either the operator stops firing or the ammunition is expended from the magazine. MANUAL SAFETY OFF MANUAL SAFETY OFF FIRE CONTROL SELECTOR ON SEMI-AUTO The fire control selector should always be in the SAFE position except when the operator is actually going to fire the rifle, and upon completion of firing. 38
39 3.0 Handling 3.1 Important Instructions Before manipulating the weapon, ensure the fire control lever is in the SAFE position and the trigger guard is in the closed position. Use only factory-new ammunition which corresponds to the caliber of the weapon. During all manipulations of the rifle, point the weapon in a safe direction. Do not place your finger on the trigger until the target has been verified and you intend to shoot. Do not load the weapon until immediately before use. Unload weapon immediately after shooting is finished. Remove the bolt carrier assembly and magazine from the weapon prior to transportation. W WARNING HANDLING Never carry the rifle loaded with the safety lever in the FIRE position. If dropped or struck with the safety off (FIRE), the rifle may fire. Such a discharge can occur with or without the trigger being directly struck or touched. Never rest a loaded rifle against any object (wall, tree, fence, vehicle, etc.) because there is always the possibility that the rifle will be jarred or slide from its position and fall with sufficient force to discharge. Keep the safety lever on SAFE unless actually firing. ANY FIREARM MAY FIRE IF DROPPED 39


40 3.2 Loading the Magazine SIGM400 MAGAZINE BEING LOADED 1. Ensure the magazine is the proper type and caliber for the rifle; 2. Place a round between the feed lips and press down- ensure the bullet is facing the front of the magazine; 3. Ensure the cartridges are fully seated to the rear of the magazine by tapping the back of the magazine in the palm of the hand. 40


41 3.3 Loading the Rifle 1. Ensure the safety lever is in the SAFE position; 2. Insert the magazine and check that it is properly seated; 3. Bolt forward: Pull the charging handle back fully and release; or 4. Bolt locked open: Depress bolt catch fully to release bolt. W WARNING DO NOT LOAD A RIFLE WITH A HOT CHAMBER BECAUSE A ROUND MAY COOK OFF (i.e., a round may detonate (fire) unexpectedly just because it is exposed to the heat of the rifle s chamber). MAGAZINE BEING INSERTED 41


42 3.4 Reloading the Rifle after firing has commenced (partially loaded magazine still in rifle). 1. Place fire control selector on SAFE. 2. Keep muzzle pointed in a safe direction and finger out of the trigger guard! 3. Depress magazine catch and remove magazine. MAG CATCH BEING DEPRESSED LEFT AND RIGHT SIDE 4. Insert loaded magazine and ensure it is seated properly. 42
. 1.")


43 3.5 Reloading the Rifle after firing has commenced (bolt locked open, empty magazine still in rifle). 1. Place fire control selector on SAFE. 2. Keep muzzle pointed in a safe direction and finger out of the trigger guard! 3. Depress magazine catch and remove magazine. 4. Insert loaded magazine and ensure it is seated properly. 5. Release the bolt by either: a. Depressing bolt catch fully releasing the bolt; b. Grasping the charging handle, retracting it slightly and releasing it. WHEN COMPLETING STEP 5.B ABOVE, RELEASE THE CHARGING HANDLE AND LET IT GO FORWARD UNDER FULL SPRING POWER. DO NOT RIDE THE CHARGING HANDLE FORWARD AS THIS MIGHT CAUSE A FAILURE OF THE CARTRIDGE TO FULLY SEAT INTO BATTERY. 43


44 4.0 Cycle of Operation Ready to Fire Condition The SIGM400 Ready to Fire condition is described as a loaded magazine properly seated into the magazine well, a live cartridge loaded into the chamber, the fire control selector place on SAFE. W WARNING FIRING The bolt automatically opens and shuts quickly while firing. Keep face and hands away from it. Hot brass and powder gas is ejected quickly and can burn you. The rifle should be fired from the right shoulder. Always wear shooting glasses and hearing protectors. BOLT OPENS FAST HOT BRASS EJECTED 4.1 Firing Semi-Auto Models (SAFE-SEMI) Rotate the fire control selector from the SAFE position to the SEMI position. Pressing the trigger rearward releases the hammer causing it to strike the firing pin, impacting the cartridge primer. 44
45 Select Fire Models (SAFE-SEMI-AUTO) Rotating the fire control selector from SAFE to AUTO or SEMI to AUTO will produce a continuous rate of fire beginning with the initial press of the trigger and continuing until either the magazine is depleted of ammunition or the operator releases the trigger, at which time the trigger resets. On AUTO releasing the trigger allows the hammer to be captured by the trigger sear and not the disconnect as it would be when in SEMI-AUTO mode. Pressing the trigger again will produce a continuous rate of fire until either the magazine is depleted of ammunition or the operator releases the trigger. W CAUTION: THE SIGM400 IS A SEMI-AUTOMATIC RIFLE AND WILL AUTOMATICALLY RELOAD THE NEXT CARTRIDGE IN THE MAGAZINE AFTER THE CHAMBERED CARTRIDGE IS FIRED FOLLOWING ONE PRESS OF THE TRIGGER. THE RIFLE WILL NOW BE READY TO FIRE AGAIN ONCE THE TRIGGER IS RELEASED Unlocking of Bolt; Extraction & Ejection 1. The gas pressure generated by the burning powder in the cartridge, propels the bullet through the bore of the tube. 2. When the bullet passes the gas port in the barrel a portion of the gas flows up into the gas block and into the gas valve. 3. The gasses then push the bolt carrier assembly to the rear. 4. As the bolt carrier moves rearward the cam pin allows the bolt to rotate to the right and unlock from the barrel extension. 5. As the bolt carrier continues rearward movement the extractor, gripping the right side of the expended cartridge case pulls the case from the chamber. 6. Once the expended case clears the chamber, the ejector located on the left side of the bolt face pushes the case out the ejection port located on the right side of the upper receiver. 45
46 4.1.2 Cocking of the Hammer 1. As the bolt carrier assembly continues rearward the bottom surface of the bolt carrier cocks the hammer rearward. 2. The hammer is then captured by the disconnect and held in place Chambering and Locking 1. Once the bolt carrier reaches its full rearward travel the buffer and recoil spring force the bolt carrier assembly forward. 2. As the bolt carrier assembly moves forward the next cartridge is stripped from the magazine and loaded into the chamber. 3. The bolt continues forward, rotates to the left, and locks into place. 4. The trigger is released and the hammer moves to its location of engagement with the trigger. 5. The rifle is now ready to be fired again. 46
47 5.0. Unloading ALWAYS MAKE SURE THE MUZZLE IS POINTED IN A SAFE DIRECTION! 1. Ensure the fire control selector is rotated to the SAFE position. 2. Remove the magazine by depressing the magazine catch; and 3. Retract the charging handle locking the bolt carrier assembly to the rear; and 4. Visually and physically inspect the chamber to verify it is empty. Remember to clear the chamber after the magazine is removed. Never assume that any firearm is unloaded until you have personally checked it, visually and physically. After every range session make sure the firearm is unloaded before you leave the range. W WARNING Removing cartridges from the magazine does not prevent the rifle from being fired! When there is a cartridge in the chamber and the safety lever is in the FIRE position, the cartridge will discharge if the trigger is pulled. It is absolutely essential for the user to know how to completely unload the rifle. Completely means emptying the magazine and removing a chambered cartridge. The safety lever should always be in the SAFE position when the rifle is being unloaded. THE RIFLE WILL FIRE EVEN IF THE MAGAZINE IS EMPTY OR REMOVED 47
48 TO CLEAR A STOPPAGE (JAM) 6.0. Procedures In Case of a Stoppage A Stoppage is an interruption in the cycle of operation as depicted in Section 4.0. A stoppage can normally be repaired by the operator by performing one of the following immediate actions described Failure to Fire (Cold Rifle) Trigger is pressed, hammer falls, rifle does not fire. 1. Ensure the magazine is properly seated in the magazine well by applying upward pressure and then pulling down on the magazine. 2. Retract the charging handle all the way back and observe the ejection of the expended case or a live cartridge; and 3. Visually inspect the chamber for any obstructions, if the chamber shows to be clear, release the charging handle to feed a new cartridge. Do NOT ride the charging handle forward. 4. Attempt to fire the rifle again. 48
49 6.2. Failure to Fire (Hot Rifle) Trigger is pressed, hammer falls, the rifle does not fire. 1. Keep the muzzle pointed down range, place the rifle on SAFE, remove the magazine, if you cannot extract the loaded cartridge within ten (10) seconds you must wait a minimum of 15 minutes before handling the rifle. 2. Upon completion of the 15 minutes, retract the charging handle all the way back and observe the ejection of the cartridge; and 3. Visually inspect the chamber for any obstructions, if the chamber shows to be clear, release the charging handle to feed a new cartridge. DO NOT ride the charging handle forward. 4. Attempt to fire the rifle again. If the rifle does not fire after completing 6.1 or 6.2: 1. Unload, and clear the rifle. 3. Cycle the bolt assembly chambering a round; and 2. Insert a fresh magazine; 4. Attempt to fire the rifle. If the rifle fails to fire after attempting all of the above, the rifle should be returned to SIG SAUER, Inc. for evaluation by a factory trained technician. W WARNING EXCESSIVE HEAT BUILD UP IN THE CHAMBER CAN CAUSE WHAT IS REFERRED TO AS A COOK OFF. THIS MEANS THE HEAT IN THE CHAMBER CAUSES THE POWDER TO IGNITE IN THE CHAMBERED CARTRIDGE. THE ROUND THEN DETONATES JUST AS IF IT WERE FIRED. IF THE RIFLE HAS BEEN FIRED FOR AN EXTENDED PERIOD OF TIME FOLLOW THE STEPS IN
50 6.4. Feedway Stoppage (Jam) A feedway stoppage occurs when one or more rounds are trapped in the upper receiver and stop the cycle of operation. To clear this problem: 1. Place the rifle on SAFE. 2. Remove the magazine (You might have to pull downward with some force to remove the magazine from the magazine well due to the jammed cartridges). 3. Cycle the bolt carrier assembly several times to clear any rounds from the receiver; and 4. Lock the bolt carrier to the rear, conduct a visual and physical inspection of the chamber to make sure the chamber has no obstructions; and 5. Insert a fresh magazine and continue to fire the rifle. W CAUTION: Always remove the source of ammunition (magazine) prior to attempting to clear a stoppage that requires retracting the charging handle/bolt carrier assembly as unintentional release of the spring loaded bolt carrier assembly could detonate live cartridges lodged in the upper receiver. 50

.")
 from left to right until it stops at the detent. 5.")

51 7.0. Field Strip Disassembly 1. Unload and clear the rifle per section Ensure the bolt carrier assembly is forward and the fire control selector is placed on SAFE. 3. Press the takedown pin from left to right until it stops (It is held into the lower receiver by a detent and will not pull free from the receiver). Takedown Pin THE TAKEDOWN PIN AND PIVOT PIN Pivot Pin 4. Press the Pivot Pin (front pin) from left to right until it stops at the detent. 5. Separate the upper receiver from the lower receiver. 6. Grasp the charging handle and pull it rearward until it stops. 7. Remove the bolt carrier assembly from the rear opening of the upper receiver. 8. Align the tabs of the charging handle and lift it from the receiver. 51


52 7.1. Detailed Disassembly of the Bolt Carrier and Bolt. 1. Remove the firing pin retaining pin from the left side of the bolt carrier. A small punch might be needed for this procedure. 2. Tilt the bolt carrier upward and catch the firing pin as it slides out of the rear of the bolt. 3. Rotate the bolt cam pin ¼ turn and lift it straight up out of the bolt carrier. 4. Pull the bolt out from the front of the bolt carrier. BOLT AND BOLT CARRIER 52


53 7.2. Extractor Removal 1. Apply slight pressure to the rear of the extractor with the thumb. 2. Using a punch, or the tip of the firing pin, push out the extractor pin. from either side. 3. Remove the extractor from the bolt. Extractor Retaining Pin Extractor BOLT WITH EXTRACTOR REMOVED NOTE: Only separate the extractor spring from the extractor when replacement is necessary 53


54 7.3. Hand Guard Removal W CAUTION: DO NOT REMOVE THE HAND GUARD ASSEMBLY UNLESS THE UPPER AND LOWER RECEIVERS ARE SEPARATED. REMOVAL OF THE HAND GUARD WILL EXPOSE THE GAS TUBE ASSEMBLY. SHOULD THE RIFLE FALL OR STRIKE A HARD SURFACE, THE GAS TUBE COULD BE DAMAGED EFFECTING OPERATION OF THE RIFLE. SEPARATING THE RECEIVERS REDUCES THE OVERALL WEIGHT OF THE RIFLE REDUCING THE RISK OF DAMAGE SHOULD THE RIFLE FALL OR STRIKE A HARD OBJECT OR SURFACE. EXPLODED VIEW OF HAND GUARD 54


55 7.4. Removal of Recoil Buffer and Action Spring REMOVAL OF THE RECOIL BUFFER AND SPRING IS EASIER IF THE HAMMER IS IN THE COCKED POSITION AND THE FIRE CONTROL SELECTOR IS ROTATED TO THE SAFE POSITION. ALWAYS WEAR SAFETY GLASSES WHEN HANDLING PARTS UNDER SPRING TENSION. 1. Depress buffer retaining plunger while maintaining control the buffer as you allow it to move forward from the receiver extension tube. THUMB OVER BUFFER ASSEMBLY 2. Guide the buffer and action spring from the receiver extension. 3. Use a clockwise twisting motion to separate the action spring from the recoil buffer. Do NOT pull straight back on the action spring as it can cause damage to the spring. BUFFER AND RECOIL SPRING REMOVAL 55
56 8.0. Cleaning 1. Your rifle is delivered factory packaged and preserved with a light coating of protective grease and oils. Before loading make certain that all packing grease and oil has been cleaned from the bore and exposed mechanism. 2. Before you begin to disassemble your firearm for cleaning, always double-check to make sure it is unloaded! 3. After cleaning always check to be sure that no cleaning patch or other obstruction remains in the bore or chamber! ONLY USE CLEANING AND LUBRICATION PRODUCTS THAT ARE SPECIFICALLY DESIGNED FOR USE ON FIREARMS. DO NOT USE WIRE BRUSHES ON ALUMINUM SURFACES SUCH AS THE RECEIVERS OR QUAD RAILS AS THIS MAY SCRATCH THE FINISH. READ ALL WARNING LABELS AND OBTAIN MSDS ON ANY CLEANING, LUBRICATION, AND PROTECTIVE CHEMICALS USED. CLEANER, LUBRICANT, PROTECTANT IS COMMONLY REFERRED TO AS CLP SOME BORE CLEANERS ARE NOT MEANT TO BE LEFT IN THE BORE FOR EXTENDED PERIOD OF TIME. FOLLOW ALL MANUFACTURER S INSTRUCTIONS AND CAUTIONS WHEN USING CLEANING OR LUBRICATION PRODUCTS ON FIREARMS. SOLVENT IS A GENERIC TERM AND WILL BE USED TO DESCRIBE A GENERAL BORE CLEANING SOLUTION. 56
57 8.1. Cleaning the Bore 1. Run a patch soaked in solvent through the bore. 2. Allow the solvent to soak in the barrel for at least 5 minutes. 3. Move on to section 8.3 and clean the bolt while the solvent works on loosening the residue in the bore of the barrel. 4. If the barrel is heavily fouled use a cleaning rod and a brass or nylon bore brush of the proper bore diameter and clean the bore from the chamber end to the muzzle end. Pass the brush completely out past the muzzle and do not change direction in the bore as the brush can become stuck in the bore. 5. Run cotton patches through the bore until the patches come out clean. The bore and chamber of the barrel may be lightly lubricated with an oily patch if the rifle is to be stored. Upon returning the rifle to service you must remove the oil by running a dry patch through the barrel Cleaning Chamber Keep muzzle pointed upward to keep chamber residue from running down into the cleaned bore. 1. Use a chamber brush coated in solvent to clean chamber. 2. Use a minimum of five (5) plunge strokes and three (3) 360 degree clockwise rotations. 3. Clean residue with cotton patches, swabs or a chamber mop. 57
58 8.3. Cleaning the Bolt A cotton patch or a soft toothbrush and solvent can be used to complete the following steps: 1. Clean all fouling from around the bolt locking lugs. 2. Clean all fouling from bolt body 3. Clean extractor and the extractor slot in the bolt. 4. Use pipe cleaner to clean firing pin channel Cleaning the Bolt Carrier 1. Clean all fouling from bolt carrier body. 2. Clean the bolt channel in the front of the carrier with a brush or cotton swabs Cleaning Action Spring and Receiver Extension 1. Clean with rag and solvent. 2. Wipe dry. 58


59 8.6. Cleaning the Magazine Magazines should be cleaned whenever the rifle is cleaned as preventive maintenance. MAGAZINE 1. Use a brush to clean inside the body. 2. Clean with a rag and CLP then wipe dry. 3. Clean follower and dry completely. The magazine body should be kept dry. Any oil or solvent left behind will attract dirt and debris causing undue wear and possibly feeding issues. 59


60 9.0 Reassembly 9.1. Recoil Buffer and Action Spring 1. Slide the action spring over the recoil buffer and snap it into place by using a clockwise twisting motion as you press it forward. SPRING TO BUFFER 60


61 2. Insert the action spring into the receiver extension tube. ACTION SPRING AND BUFFER STARTED INTO RECEIVER EXTENSION 3. Push the recoil buffer back into the receiver extension until the buffer retaining plunger engages the face of the buffer and holds it into the receiver extension. BUFFER HELD INTO RECEIVER EXTENSION 61


62 9.2. Extractor 1. Fit extractor to bolt body by holding bolt in one hand; and 2. While applying pressure with thumb over the spring end of the extractor, slide extractor pin into hole until ends are flush with bolt body. EXTRACTOR TO BOLT BODY 62
63 9.3. Bolt to Bolt Carrier W WARNING THE BOLT CAM PIN MUST BE INSTALLED OR THE RIFLE WILL SUFFER A CATASTROPHIC FAILURE WHICH COULD RESULT IN SERIOUS INJURY OR DEATH TO THE OPERATOR. DO NOT INTERCHANGE BOLT ASSEMBLIES FROM ONE RIFLE TO ANOTHER. DOING SO COULD RESULT IN SERIOUS INJURY OR DEATH TO THE OPERATOR. 63


64 1. Re-insert the bolt into the bolt carrier with the extractor oriented to the right side of the bolt carrier; and ALIGN BOLT INTO CARRIER BODY 2. Pull the bolt forward to the unlocked position; and align the cam pin hole inserting the cam pin into the bolt; and 3. Insert the firing pin into the tail shaft of the bolt. CAM PIN BACK INTO BOLT AND CARRIER 64


.")
65 W CAUTION: THE FIRING PIN MUST BE FULLY INSERTED INTO THE BOLT CARRIER PRIOR TO INSTALLATION OF THE FIRING PIN RETAINING PIN. THE RETAINING PIN MUST PASS BETWEEN THE LARGE SHOULDER OF THE FIRING PIN AND THE HEAD OF THE FIRING PIN. FIRING PIN INSERTED INTO BOLT/CARRIER 4. Re-install the firing pin retaining pin into the bolt carrier from left to right. 5. Point the bolt carrier assembly with the bolt face upward and ensure the firing pin is properly retained in the carrier by lightly slapping the bolt face back into the carrier (locked position). The firing pin should NOT fall out of the carrier. 65


")


66 9.4. Bolt Carrier Assembly to Upper Receiver 1. Position the upper receiver assembly with the open bottom facing upward; and 2. Insert the charging handle into the slotted key way of the receiver and push it forward slightly. 3. Take the bolt carrier assembly with the bolt pulled completely forward (unlocked position) and set it into the charging handle. 4. Simultaneously push the bolt carrier assembly and the charging handle forward until the bolt and the charging handle lock into place. REINSTALLATION OF THE BOLT CARRIER ASSEMBLY TO UPPER RECEIVER 66
67 9.5. Rejoining Upper and Lower Receivers To aid in steps 1-3, manually cock the hammer by pushing it down until it is held in place then rotate the fire control selector to SAFE. 1. Position the upper and lower receivers to align the pivot pin (front pin) holes. 2. Push the pivot pin from right to left until the head of the pivot pin is flush against the receiver. You will feel it captured by the detent pin. 3. Close the receivers together and push the takedown pin (rear pin) from right to left until the head of the takedown pin is flush against the receiver. You will feel it captured by the detent pin as you did the pivot pin. 67
68 10.0. Perform a Function Check of the SIGM400 Semi-Automatic Rifle With the SIGM400 rifle and one UNLOADED magazine perform a function check of the rifle as outlined below in steps THE FUNCTION CHECK SHOULD ALWAYS BE DONE AFTER CLEANING AND ASSEMBLING THE RIFLE. ALWAYS VISUALLY AND PHYSICALLY CLEAR THE FIREARM FIRST! SIGM400 (SAFE/SEMI ONLY) 1. Insert an empty magazine into the magazine well until it locks into place. 2. Pull down on the magazine to ensure it is locked in place by the magazine catch. 3. Pull charging handle fully back then push it forward into locked position. The bolt carrier should now be held to the rear by the bolt catch. 4. Depress the magazine catch. 5. The magazine should fall free of the rifle under its own weight (unloaded). 6. Push the top of bolt catch to release the bolt carrier. The bolt carrier will travel forward into the locked position. 7. Rotate the fire control selector to SAFE. 8. Press the trigger to the rear. The hammer should NOT fall. 9. Rotate the fire control selector to SEMI. 10. Press the trigger to the rear and DO NOT RELEASE IT. You should hear a loud click as the hammer falls. Keep the trigger pressed to the rear; and 11. Pull the charging handle to the rear and release it while keeping trigger pulled. Hammer should not fall but be held in the cocked position by the disconnect. 12. Release the trigger. A click should be heard as the hammer is caught by the trigger sear. 13. Press the trigger to the rear again and the hammer should fall. 68
69 11.0 Lubrication Using lubricant designed for use on firearms, lightly apply to the contact areas of the following components: Upper Receiver Assembly Forward assist. Ejection port cover spring and latch. Charging handle latch and spring. Front sight detent. Rear sight windage screw and detent. 69
STRIBOG GRAND POWER. The INSTRUCTIONS FOR USE, MAINTENANCE AND SAFETY. 1
 instructions The for use, maintenance STRIBOG and safety hestribog GRAND POWER INSTRUCTIONS FOR USE, MAINTENANCE AND SAFETY www.grandpower.eu 1 The STRIBOG Dear Customer, Thank you for purchasing a semi-automatic
AR STYLE FIREARMS OWNER'S MANUAL: OPERATION, HANDLING, DISASSEMBLY / REASSEMBLY & SAFETY INSTRUCTIONS
 AR STYLE FIREARMS OWNER'S MANUAL: OPERATION, HANDLING, DISASSEMBLY / REASSEMBLY & SAFETY INSTRUCTIONS - DO NOT DISCARD THIS MANUAL - READ THIS MANUAL CAREFULLY, PAYING CLOSE ATTENTION TO THE INSTRUCTIONS
ENR Enterprises, LLC. ENR 15 Manual
 ENR Enterprises, LLC ENR 15 Manual Table of Contents Disclaimer of Liability 2 Warnings: Dangerous Procedures 3 General Safety Warnings 4 Main Features and Overview 6 Rifle Clearing Before Use 7 Safety
REC7 DI OPERATOR S MANUAL
 EC7 D REC7 DI OPERATOR S MANUAL TABLE OF CONTENTS 2 2 4 5 6 6 6 8 8 10 11 12 12 13 13 15 18 20 22 USE OF THIS MANUAL SAFETY GUIDELINES WARRANTY AND SERVICE NOTES FUNCTIONS AND FEATURES BREAK IN PROCEDURE
PISTOL CALIBER AR STYLE FIREARMS
 PISTOL CALIBER AR STYLE FIREARMS OWNER'S MANUAL: OPERATION, HANDLING, DISASSEMBLY / REASSEMBLY & SAFETY INSTRUCTIONS - DO NOT DISCARD THIS MANUAL - READ THIS MANUAL CAREFULLY, PAYING CLOSE ATTENTION TO
AR /.223, 300 BLK, 22 Nosler,.224 Valkyrie. Covers. and. rifle models INSTRUCTION MANUAL
 AR-15 5.56/.223, 300 BLK, 22 Nosler,.224 Valkyrie Covers TM, TM and, TM rifle models INSTRUCTION MANUAL WARNING: BEFORE USING THIS FIREARM, READ AND FOLLOW THESE INSTRUCTIONS Safety First Thank you for
Be sure the cam pin is installed in the bolt group. If it isn t, your rifle can still fire and will explode causing injury.
 Responsibility This manual provides instructions on the operation and maintenance of the Barrett model M468 rifle. Read and understand it carefully before you try to use your rifle. Your safety, and that
INSTRUCTION MANUAL CZ 92
 INSTRUCTION MANUAL CZ 92 Before handling the pistol read this manual carefully and observe the following safety instructions. Improper and careless handling of the pistol could result in unintentional
SAR-15 RIFLE OWNERS MANUAL
 SAR-15 RIFLE OWNERS MANUAL SIONICS WEAPON SYSTEMS Our mission is to manufacture quality firearms made with pride in the USA. We are able to do accomplish this by using only the best American made parts.
INSTRUCTION MANUAL FOR. Models featured include: LF556, LF300, LF308, and LF6.5.
 INSTRUCTION MANUAL FOR Models featured include: LF556, LF300, LF308, and LF6.5. READ THIS MANUAL THOROUGHLY, PARTICULARLY THE WARNINGS, BEFORE USING THIS FIREARM Copyright 2016 Live Free Armory. All rights
ARAK-21 OPERATOR SAFETY AND INSTRUCTION MANUAL
 ARAK-21 OPERATOR SAFETY AND INSTRUCTION MANUAL NOTICE: The ARAK-21 Upper Assembly itself is not considered a Firearm under federal law or the National Firearms Act. The ARAK-21 Upper Assembly mounted on
SHF R50 SHF S50 Safety Harbor Firearms, Inc. PO Box 563 Safety Harbor, FL Ph: Fax:
 SHF R50 SHF S50 Safety Harbor Firearms, Inc. PO Box 563 Safety Harbor, FL 34695-0563 Ph: 727-726-2500 Fax: 727-797-6134 www.safetyharborfirearms.com 1 ^ WARNING Risk of serious injury or death. Failure
OWNER S MANUAL. Read the instructions and warnings in this manual carefully before using this firearm; do not discard this manual.
 OWNER S MANUAL SDP compact Read the instructions and warnings in this manual carefully before using this firearm; do not discard this manual. This instruction manual should always accompany this firearm
OPERATION AND FUNCTION
 CHAPTER 3 OPERATION AND FUNCTION This chapter discusses the operation of the M249 automatic rifle. This includes loading, unloading, cycle of functioning, adjusting the sight, and using the bipod. 3-1.
AR15/ BCA 10 RIFLE OWNER S MANUAL
 AR15/ BCA 10 RIFLE OWNER S MANUAL THIS IS NOT A SAFETY MANUAL. IF YOU NEED ASSISTANCE WITH THE SAFE HANDLING OF THIS, OR ANY FIREARM, PLEASE CONTACT A CERTIFIED FIREARMS INSTRUCTOR OR SCHOOL. Fundamental
INSTRUCTION MANUAL CZ 75 TS
 INSTRUCTION MANUAL CZ 75 TS CZ 75 TS - INSTRUCTION MANUAL Before handling the pistol read this manual carefully and observe the following safety instructions. Improper and careless handling of the pistol
ODEL 95 OPERATOR S MANUAL
 ODEL 95 MODEL 95 OPERATOR S MANUAL TABLE OF CONTENTS 2 2 3 5 6 6 6 7 7 8 8 11 11 12 12 19 20 22 24 26 MANUFACTURER S DISCLAIMER USE OF THE MANUAL SAFETY GUIDELINES WARRANTY AND SERVICE DESCRIPTION OF FIREARM
CZ 40 P - INSTRUCTION MANUAL
 Before handling the pistol read this manual carefully and observe the following safety instructions. Improper and careless handling of the pistol could result in unintentional discharge and could cause
TABLE OF CONTENTS READ FIRST
 TABLE OF CONTENTS READ FIRST PAGE INTRODUCTION............................. 1 NOTICES.................................. 1 WARNINGS................................ 2 PRECAUTIONS WHEN USING THIS FIREARM......
SIG SAUER ENHANCED AUTO MIL SPEC TRIGGER KIT INSTALLATION INSTRUCTIONS
 SIG SAUER ENHANCED AUTO MIL SPEC TRIGGER KIT INSTALLATION INSTRUCTIONS 1.0 Warnings 2 www.sigsauer.com This SIG SAUER Enhanced Mil-Spec Auto Trigger Kit comes complete with all parts and detailed installation
M16 R / M1600 R USER S MANUAL WARNING: READ THE INSTRUCTIONS AND SAFETY PRECAUTIONS IN THIS MANUAL CAREFULLY BEFORE USING THIS FIREARM.
 ARMSCOR M16 R / M1600 R USER S MANUAL WARNING: READ THE INSTRUCTIONS AND SAFETY PRECAUTIONS IN THIS MANUAL CAREFULLY BEFORE USING THIS FIREARM. DISCHARGING FIREARMS IN POOLY VENTILATED AREAS, CLEANING
Owner s Manual. for the Rossi Single Barrel Shotgun READ CAREFULLY BEFORE USING YOUR FIREARM
 Owner s Manual for the Rossi Single Barrel Shotgun READ CAREFULLY BEFORE USING YOUR FIREARM This Booklet The safety warnings in this booklet are important. By understanding the dangers inherent in the
Colt Advanced Law Enforcement Carbines
 OPERATOR S MANUAL FOR: Colt Advanced Law Enforcement Carbines LE6940 LE6944 LE6943 LE6945CQB & LE6946CQB COPYRIGHT 2010 COLT DEFENSE LLC ALL RIGHTS RESERVED Information contained in this publication is
Owner s Manual 1960 SEMI-AUTO RIFLE W/ WOOD STOCK & MILLED RECEIVER. Cal. 7.62x39MM
 Owner s Manual 1960 SEMI-AUTO RIFLE W/ WOOD STOCK & MILLED RECEIVER Cal. 7.62x39MM Congratulations on your purchase of a Polish 1960 Semi-Auto Rifle. With proper care, maintenance and handling, it will
NATIONAL ARMORY LLC Manufacturing Division 1315 SW 1 st Court Pompano Beach Florida NATIONAL ARMORY LLC.
 U NATIONAL ARMORY LLC Manufacturing Division NATIONAL ARMORY LLC. WARNING BEAR AR15 Read and understand this manual before using this firearm or any firearm as your life depends on it. Make sure to follow
INSTRUCTION MANUAL CZ 75 Champion
 INSTRUCTION MANUAL CZ 75 Champion CZ 75 CHAMPION - INSTRUCTION MANUAL Before handling the pistol read this manual carefully and observe the following safety instructions. Improper and careless handling
INSTRUCTION MANUAL CZ 630/631
 INSTRUCTION MANUAL CZ 630/631 Before handling the air rifle read this manual carefully and observe the following safety instructions. Improper and careless handling of the air rifle could result in unintentional
-
 Operator s manual SM-95202 Brügger & Thomet AG P.O. Box 42 3608 Thun Switzerland Fon +41 33 334 67 00 Fax +41 33 334 67 01 info@brugger-thomet.ch www.brugger-thomet.ch TABLE OF CONTENTS SAFETY instructions
Owner s Manual Golani Semi-Auto Sporter Rifle, Cal. 5.56mm
 Owner s Manual Golani Semi-Auto Sporter Rifle, Cal. 5.56mm Congratulations on your purchase of a Golani Semi-Auto Sporter Rifle. With proper care and handling it will give you long, reliable service. We
SEMI-AUTO RIFLE (AK STYLE)
") Owner s Manual SEMI-AUTO RIFLE (AK STYLE) Congratulations on your purchase of an AK-Style Semi-Automatic Rifle. With proper care and handling, it will give you many years of long, reliable service. Confirm
Owner s Manual SEMI-AUTO RIFLE (AK STYLE) Congratulations on your purchase of an AK-Style Semi-Automatic Rifle. With proper care and handling, it will give you many years of long, reliable service. Confirm
AKMS SEMI-AUTO RIFLE W/ FOLDING STOCK
 Owner s Manual AKMS SEMI-AUTO RIFLE W/ FOLDING STOCK Cal. 7.62x39MM Congratulations on your purchase of an AKMS rifle featuring an underfolding metal stock. With proper care, maintenance and handling,
trigger magazine release
 Made in Germany www.umarexusa.com slide gas vent hammer barrel bushing recoil spring plug slide stop trigger safety trigger guard magazine release grip Government 1911 A1 S Cal. 9 mm P.A.K. (Blank Firing)
slide takedown lever magazine release
 Made in Germany www.umarexusa.com manual safety extractor slide gas vent hammer trigger lock trigger P22 S guide rod takedown lever slide stop magazine release Cal. 9 mm P.A.K. (Blank Firing) OPERATING
Military Assault Rifle Operator Manual
 Military Assault Rifle Operator Manual 22 WARNINGS - Never Point any weapon, loaded or unloaded, at anything you do not intend to shoot. - Load and Unload with the muzzle pointed in a safe direction. -
OPERATOR S MANUAL FOR AR-24 SERIES PISTOLS
 OPERATOR S MANUAL FOR AR-24 SERIES PISTOLS ArmaLite Incorporated Box 299 Geneseo Illinois U.S.A. 61254 309-944-6939 ArmaLite.com 2006 ArmaLite Inc. This book provides instructions on the operation and
BFG-50A RIFLE OPERATOR S MANUAL WARNING! READ THIS MANUAL CAREFULLY BEFORE USING THIS FIREARM
 BFG-50A RIFLE OPERATOR S MANUAL WARNING! READ THIS MANUAL CAREFULLY BEFORE USING THIS FIREARM CONTENTS SAFETY...3 Safety Alert Symbol and Signal Words...3 TECHNICAL DATA...6 IDENTIFICATION...7 Model and
MECH-TECH SYSTEMS CCU MODEL FOR GLOCK PISTOLS
 MECH-TECH SYSTEMS CCU MODEL FOR GLOCK PISTOLS Operation & Maintenance Manual Read and understand this manual before attempting to use this product. If you have any questions call: 1-866-433-2122 www.mechtechsys.com
If you do not understand any of the material in this manual or have any questions, contact the Product Service Center or a qualified gunsmith.
 Bolt Action Rifle Patent No. 7823315 B2 and Patents Pending Note: This manual is only a supplement to your firearm s owner s manual. It only addresses the FLEX System and its accessories. IMPORTANT SAFETY
Kentucky Long Rifle.50 BMG Model: BA M-N-M Tactical. Users Guide
 Kentucky Long Rifle.50 BMG Model: BA M-N-M Tactical Users Guide Metals-N-More Bowling Green, KY 42101 Telephone 270-781-3642 Fax 270-781-3766 Email Info@Kentucky50.Com www.kentucky50.com INTRODUCTION Congratulations
Thank you for buying Bushmaster
 AZ 16010 Before disassembling, loading, or using this firearm, please Read, Understand, and Follow all the instructions in this manual, regarding proper handling and safe use!! Caution: If unfamiliar with
N-PAP & O-PAP M70 DF SEMI-AUTO RIFLES
 Owner s Manual N-PAP & O-PAP M70 DF SEMI-AUTO RIFLES Cal. 7.62X39MM Congratulations on your purchase of the PAP M70 DF Semi-Auto Rifle. With proper care and handling, it will give you long, reliable service.
AK63D SEMI-AUTO RIFLE
 Owner s Manual AK63D SEMI-AUTO RIFLE Cal. 7.62X39MM Congratulations on your purchase of the AK63D Semi-Auto Rifle. With proper care and handling, it will give you long, reliable service. The AK63D is a
TABLE of CONTENTS. Safety 4. Introduction 6. Description 6. Storage 6. Components 7. Unloading and Inspection 8. Disassembly 10. Care and Cleaning 12
 1911 Pistol Manual 2 TABLE of CONTENTS Safety 4 Introduction 6 Description 6 Storage 6 Components 7 Unloading and Inspection 8 Disassembly 10 Care and Cleaning 12 Loading and Firing 13 Troubleshooting
Defender Series Owner s Manual
 4904 Hwy 98/PO Box 67 Comer, GA 30629 (866) 803-0000 Fax (706-783-5800) Defender Series Owner s Manual MPA1SST & MPA20SST/DMG Carbines MPA10T & MPA10SST Pistols MPA30T & MPA30SST/DMG Pistols When you purchased
Owner s Manual WASR TYPE SPORTING RIFLES Cal. 7.62x39MM
 Owner s Manual WASR TYPE SPORTING RIFLES Cal. 7.62x39MM Congratulations on your purchase of the WASR Rifle. With proper care and handling, it will give you long, reliable service. The WASR is a semi-automatic
MODEL 1400 E USER S MANUAL WARNING: READ THE INSTRUCTIONS AND SAFETY PRECAUTIONS IN THIS MANUAL CAREFULLY BEFORE USING THIS FIREARM.
 ARMSCOR MODEL 1400 E USER S MANUAL WARNING: READ THE INSTRUCTIONS AND SAFETY PRECAUTIONS IN THIS MANUAL CAREFULLY BEFORE USING THIS FIREARM. DISCHARGING FIREARMS IN POORLY VENTILATED AREAS, CLEANING FIREARMS
GEN2 SIG516 OPERATOR MANUAL: HANDLING & SAFETY INSTRUCTIONS
 GEN2 SIG516 OPERATOR MANUAL: HANDLING & SAFETY INSTRUCTIONS READ THE INSTRUCTIONS AND WARNINGS IN THIS MANUAL CAREFULLY BEFORE USING THIS FIREARM; DO NOT DISCARD THIS MANUAL. This instruction manual should
Before handling the firearm read this manual carefully and observe the following safety instructions. CONTENTS
 Before handling the firearm read this manual carefully and observe the following safety instructions. Improper and careless handling of the firearm could result in accidental discharge and cause injury,
1. TABLE OF CONTENT. 9.4 Preserving Exploded drawing of K22 with components Component list of K22 model Warranty...
 1. TABLE OF CONTENT 1. Table of content...2 2. Records of firearm s owner...3 3. Basic description...5 4. Technical specifications...6 5. Serial number of pistol...7 6. Main parts of pistol...8 7. Basic
N-PAP & O-PAP M70 SEMI-AUTO RIFLES
 Owner s Manual N-PAP & O-PAP M70 SEMI-AUTO RIFLES Cal. 7.62X39MM Congratulations on your purchase of the PAP M70 Semi-Auto Rifle. With proper care and handling, it will give you long, reliable service.
NOTICE FEATURES BACKGROUND
 ,/ NOTICE Claims will not be honored for damage, injury or, death resulting from the intentional or accidental discharge of this firearm, or from it's function when used for purposes or subjected to treatment
SAAMI. Semi-Automatic Assault Shotgun Owner s Manual. Tel. : Fax
 Head Quarter Beyşehir Organize Sanayi Bölgesi Bayavşar Mah. 4959 Sk. No.24-42700 Beyşehir - Konya / TURKEY Tel. : +90 332 524 60 32-34 - Fax +90 332 524 62 4 - info@deryaarms.com SAAMI SPORTING ARMS AND
INSTRUCTION MANUAL CZ 750
 INSTRUCTION MANUAL CZ 750 Before handling the firearm read this manual carefully and observe the following safety instructions. Improper and careless handling of the firearm could result in unintentional
PAP M90 NP SEMI-AUTO RIFLE
 Owner s Manual PAP M90 NP SEMI-AUTO RIFLE Cal. 5.56X45MM (.223) Congratulations on your purchase of the PAP M90 NP Semi-Auto Rifle. With proper care and handling, it will give you long, reliable service.
INSTRUCTION MANUAL FOR
 PM333 INSTRUCTION MANUAL FOR SILENT-SR ISB FOR THE RUGER 10/22 TAKEDOWN and THE 22 CHARGER PISTOL TAKEDOWN MODEL READ THE INSTRUCTIONS AND WARNINGS IN THIS MANUAL CAREFULLY BEFORE USING THIS SUPPRESSOR
INSTRUCTION MANUAL. Slavia 630/631
 INSTRUCTION MANUAL Slavia 630/631 Before handling the air rifle read this manual carefully and observe the following safety instructions. Improper and careless handling of the air rifle could result in
Owner s Manual. STERLING TYPE I, TYPE II & TYPE III SEMI-AUTO RIFLES Cal. 9x19MM (TYPE I & TYPE II) Cal. 7.62x25MM (TYPE III)
 Cal. 7.62x25MM (TYPE III)") Owner s Manual STERLING TYPE I, TYPE II & TYPE III SEMI-AUTO RIFLES Cal. 9x19MM (TYPE I & TYPE II) Cal. 7.62x25MM (TYPE III) COLEFIRE MAGNUM SEMI-AUTO PISTOL Cal. 7.62x25MM Congratulations on your purchase
Owner s Manual STERLING TYPE I, TYPE II & TYPE III SEMI-AUTO RIFLES Cal. 9x19MM (TYPE I & TYPE II) Cal. 7.62x25MM (TYPE III) COLEFIRE MAGNUM SEMI-AUTO PISTOL Cal. 7.62x25MM Congratulations on your purchase
Owner s Manual FIREARMS SAFETY IS THE SOLE RESPONSIBILITY OF THE SHOOTER. ALWAYS TREAT ALL FIREARMS AS IF THEY WERE LOADED AT ALL TIMES!
 CENTURION 39 SPORTER RIFLE Owner s Manual Cal. 7.6x39MM 00% American Made! Congratulations on your purchase of the Centurion 39 Sporter Rifle. With proper care and handling, it will give you long, reliable
INSTRUCTION MANUAL FOR THE FREEDOM ARMS MODEL 2008 SINGLE SHOT HANDGUN
 INSTRUCTION MANUAL FOR THE FREEDOM ARMS MODEL 2008 SINGLE SHOT HANDGUN Manufacturing the World s Finest Handguns. Freedom Arms, Inc. 314 Hwy 239 Freedom, WY 83120 (307) 883-2468 web site: www.freedomarms.com
Instruction manual CZ 75
 Instruction manual CZ 75 Before handling the pistol read this manual carefully and observe the following safety instructions. Improper and careless handling of the pistol could result in unintentional
TM WARNING SUMMARY
 TM 9-005-239-0 WARNING SUMMARY Treat every firearm as if it were loaded. Never accept or take over a firearm from another until you have checked personally to see that it is unloaded or in a completely
Owner s Manual RAS47 SEMI-AUTO RIFLE. Cal. 7.62X39MM
 Owner s Manual RAS47 SEMI-AUTO RIFLE Cal. 7.62X39MM 100% AMERICAN MADE! Congratulations on your purchase of the 100% American Made RAS47 Semi-Automatic Rifle. With proper care and handling, it will give
OLYMPIC ARMS, INC. MPR SUPPLEMENTAL OWNER S MANUAL
 OLYMPIC ARMS, INC. MPR 308-15 SUPPLEMENTAL OWNER S MANUAL READ THIS MANUAL COMPLETELY BEFORE OPERATING YOUR RIFLE. FAILURE TO DO SO MAY RESULT IN DAMAGE TO YOUR RIFLE, INJURY OR DEATH TO THE SHOOTER OR
MINI DRACO SEMI-AUTO PISTOL
 Owner s Manual MINI DRACO SEMI-AUTO PISTOL Cal. 7.62X39MM Congratulations on your purchase of the Mini Draco Semi-Automatic Pistol. The Mini Draco is chambered for the 7.62x39mm cartridge. With proper
DRACO SEMI-AUTO PISTOL
 Owner s Manual DRACO SEMI-AUTO PISTOL Cal. 7.62X39MM Draco Mini Draco Micro Draco Congratulations on your purchase of the Draco Semi-Automatic Pistol. With proper care and handling, it will give you many
OWNER S MANUAL TO BE USED FOR AUTO-ORDNANCE M1 CARBINE
 OWNER S MANUAL TO BE USED FOR AUTO-ORDNANCE M CARBINE Maker of the world famous "TOMMY GUN" Manufactured by KAHR ARMS Worcester, MA As the owner of a firearm, you must undertake the full-time responsibility
KEL-TEC PLR-16 Pistol
 KEL-TEC PLR-16 Pistol SAFETY, INSTRUCTION & PARTS MANUAL STATEMENT OF LIABILITY This pistol may be classified as a dangerous weapon and is surrendered by KEL-TEC CNC INDUSTRIES INC. with the understanding
PAP M85 NP SEMI-AUTO PISTOL
 Owner s Manual PAP M85 NP SEMI-AUTO PISTOL Cal. 5.56X45MM (.223) Congratulations on your purchase of the PAP M85 NP Semi-Auto Pistol. With proper care and handling, it will give you long, reliable service.
Henry Mini Bolt.22. Instruction Manual For All H005 Series Rifles. Made in America
 Henry Mini Bolt.22 Instruction Manual For All H005 Series Rifles Important: Study this instruction manual carefully before you handle this firearm. Made in America IS A REGISTERED TRADEMARK OF THE HENRY
1911 Pistol. owner s Manual
 1911 Pistol owner s Manual IMPORTANT! This manual contains operating, care, and maintenance instructions. To assure safe operation, any user of this firearm must read and understand this manual before
Ultra 87 Pump Action Shotgun Instruction Manual
 Ultra 87 Pump Action Shotgun Instruction Manual Congratulations on your purchase of the Ultra 87 shotgun. With proper care and handling it will give you long, reliable service. It is important that you
USER MANUAL Tisas Pistols
 USER MANUAL Tisas Pistols ZiG M45 (.45 ACP Single Action) ZiG PC1911 (.45 ACP Single Action) ZiG PCS1911 (.45 ACP Single Action) ZiG PCS9 (9 x19 Single Action) Zenith Firearms Come Shoot the Quality WARNING
Before handling the pistol read this manual carefully and observe the following safety instructions. CONTENTS
 Before handling the pistol read this manual carefully and observe the following safety instructions. Improper and careless handling of the pistol could result in unintentional discharge and could cause
P9S Automatic Pistol Caliber.45 ACP
 P9S AUTOMATIC PISTOL Caliber.45 ACP P9S Automatic Pistol Caliber.45 ACP Instruction Manual HECKLER & KOCH, INC. 2148 Pacific Boulevard Sterling, Virginia 20166-8903 U.S.A. TEL. (703) 450-1900 TELEFAX (703)
RAD MRAD BREECH CONVERSION KIT INSTRUCTIONS
 RAD MRAD BREECH CONVERSION KIT INSTRUCTIONS TABLE OF CONTENTS 2 2 4 5 5 6 USE OF THIS MANUAL SAFETY GUIDELINES WARRANTY AND SERVICE CONTENTS PURPOSE OF BREECH CONVERSION KIT INSTRUCTIONS BREECH CONVERSION
Before handling the firearm read this manual carefully and observe the following safety instructions. CONTENTS
 Before handling the firearm read this manual carefully and observe the following safety instructions. Improper and careless handling of the firearm could result in accidental discharge and cause injury,
AES10B SEMI-AUTO RIFLE W/ CARRYING HANDLE & METAL FOLDING BUTTSTOCK & BIPOD
 Owner s Manual AES10B SEMI-AUTO RIFLE W/ CARRYING HANDLE & METAL FOLDING BUTTSTOCK & BIPOD Cal. 7.62x39MM Congratulations on your purchase of an AES10B Semi-Auto Rifle. With proper care, maintenance and
KEL-TEC PLR-22 Pistol and SU-22 Rifle
 KEL-TEC PLR-22 Pistol and SU-22 Rifle SAFETY, INSTRUCTION & PARTS MANUAL STATEMENT OF LIABILITY This firearm may be classified as a dangerous weapon and is surrendered by KEL-TEC CNC INDUSTRIES INC. with
 (Mechanical Malfunctions) STOP SHOOTING IMMEDIATELY AND UNLOAD YOUR FIREARM if your firearm develops: a mechanical malfunction; binding or stoppage; spitting powder/gas; a punctured cartridge primer; a
when it counts owners manual: Read the instructions and warnings in this manual carefully before using this firearm; do not discard this manual.
 OWNERS MANUAL: Handling & Safety Instructions Read the instructions and warnings in this manual carefully before using this firearm; do not discard this manual. This instruction manual should always accompany
A. Safety Information and Warnings... 2 B. Overview Description... 4 Nomenclature... 4 Specifications... 4 Ammunition... 5 Sling Mounting...
 TABLE OF CONTENTS A. Safety Information and Warnings... 2 B. Overview Description... 4 Nomenclature... 4 Specifications... 4 Ammunition... 5 Sling Mounting... 5 C. Operating Instructions Safety... 6 Loading
Ed Brown Products, Inc.
 Ed Brown Products, Inc. P.O. Box 492, Perry, MO 63462 - (573)-565-3261 - FAX (573)565-2791 Internet Address: www.edbrown.com email: edbrown@edbrown.com Ed Brown 1911 Owner s Manual WARNING: YOU MUST READ
VR1 Owner s Manual. Vigilance Rifles, Inc Plum Lane Redlands, CA P F
 VR1 Owner s Manual Vigilance Rifles, Inc. 1653 Plum Lane Redlands, CA 92374 P 909.307.8877 F 909.307.8866 www.vigilancerifles.com INTRODUCTION: Vigilance Rifles offers a new line of Semi-Automatic Rifles
SINGLE-ACTION BIG-BORE REVOLVER OWNER S INSTRUCTION MANUAL
 HERITAGE ROUGH RIDER SINGLE-ACTION BIG-BORE REVOLVER OWNER S INSTRUCTION MANUAL We recommend that you seek instruction in safe fi rearm handling by a competent fi rearms instructor. Remember there is no
Read the instructions and warnings in this manual carefully before using this firearm; do not discard this manual. This instruction manual should
 OWNERS MANUAL: Handling & Safety Instructions Read the instructions and warnings in this manual carefully before using this firearm; do not discard this manual. This instruction manual should always accompany
Model 82A1 OPERATOR S MANUAL
 82A1 Model 82A1 OPERATOR S MANUAL TABLE OF CONTENTS 2 2 3 3 5 6 7 7 7 8 8 10 14 17 18 19 20 21 23 24 28 32 MANUFACTURER S DISCLAIMER WARRANTY AND SERVICE USE OF THIS MANUAL SAFETY GUIDELINES DESCRIPTION
CARE AND MAINTENANCE OF YOUR FBS12 SHOTGUN 1) NEVER ALTER OR MODIFY YOUR SHOTGUN
 NEVER ALTER OR MODIFY YOUR SHOTGUN") CARE AND MAINTENANCE OF YOUR FBS12 SHOTGUN 1) ALTER OR MODIFY YOUR SHOTGUN This shotgun was produced under specific manufacturer guidelines and should not be changed under ANY circumstances. Altering the
CARE AND MAINTENANCE OF YOUR FBS12 SHOTGUN 1) ALTER OR MODIFY YOUR SHOTGUN This shotgun was produced under specific manufacturer guidelines and should not be changed under ANY circumstances. Altering the
2-1. CLEARING PROCEDURES
 CHAPTER 2 MAINTENANCE Proper maintenance contributes to weapon effectiveness as well as unit readiness. This chapter discusses the maintenance aspects of the M249 AR to include inspection; cleaning and
AR-15 Rifle Operator Maintenance
 AR-15 Rifle Operator Maintenance These procedures cover how to Clean, Inspect and Lubricate the AR15 Rifle NOTICE: This is not a replacement for the manufacturer s manual. If you do not have the owners
LEGENDARY ARMS WORKS MODEL 704 BOLT ACTION RIFLE OWNER S MANUAL
 LEGENDARY ARMS WORKS MODEL 704 BOLT ACTION RIFLE OWNER S MANUAL 76 W. Main Street Reinholds, PA 17569 PHONE: (717) 335-8555 FAX: (717) 335-8558 www.legendaryarmsworks.com email: info@law-arms.com WARNING:
OWNER S MANUAL FOR OA SERIES FIREARMS
 OWNER S MANUAL FOR OA SERIES FIREARMS 620-626 Old Pacific Hwy SE Olympia, WA 98513 (360) 459-7940 WARNING To avoid accidental firing, BE SURE WEAPON IS CLEAR. Failure to do so could result in serious injury
Model 1911 Series Pistols SAFETY & INSTRUCTION MANUAL
 REGENT Model 1911 Series Pistols 01 SAFETY & INSTRUCTION MANUAL READ AND UNDERSTAND THE INSTRUCTIONS AND WARNINGS IN THIS MANUAL CAREFULLY, BEFORE USING THIS FIREARM. FAILURE TO READ THESE INSTRUCTIONS
OWNER S MANUAL 464 LEVER ACTION CENTERFIRE LEVER ACTION RIFLE IMPORTANT SAFETY WARNINGS NOTE THE SYMBOL:
 OWNER S MANUAL 464 LEVER ACTION CENTERFIRE LEVER ACTION RIFLE IMPORTANT SAFETY WARNINGS NOTE THE SYMBOL: THESE SAFETY WARNINGS ARE FOR YOUR PROTECTION AS WELL AS THE SAFETY OF OTHERS. DISREGARDING INFORMATION
Owner s Manual CENTURY GP1975 RIFLE, Cal. 7.62x39mm
 Owner s Manual CENTURY GP1975 RIFLE, Cal. 7.62x39mm Congratulations on your purchase of a Century GP1975 Rifle. With proper care and handling it will give you long, reliable service. The Century GP1975
OPERATION AND SAFETY MANUAL
 OPERATION AND SAFETY MANUAL Anderson Manufacturing Models AM-10 and AM-15 Weapons All Available Calibers WARNING: BEFORE USING THIS FIREARM, READ AND FOLLOW THESE INSTRUCTIONS 1743 Anderson Blvd. Hebron,
Sterling Shotguns. Field and Target Models. Owner s Manual
 Sterling Shotguns Field and Target Models Owner s Manual If you have any questions about the safe use of a Big Horn Armory firearm, call us at 307-586-3700 or write us at P.O. Box 940, Cody Wyoming 82414.
Owner s Manual. Centurion 15 Sporter Rifle Cal..223
 Owner s Manual Centurion 15 Sporter Rifle Cal..223 Congratulations on your purchase of a Centurion 15 Sporter Rifle. With proper care and handling it will give you long, reliable service. The Centurion
HATFIELD. Continuing the Tradition SEMI-AUTOMATIC SHOTGUN INSTRUCTION MANUAL
 HATFIELD Continuing the Tradition SEMI-AUTOMATIC SHOTGUN INSTRUCTION MANUAL READ THE INSTRUCTIONS AND WARNINGS IN THIS MANUAL CAREFULLY BEFORE USING THIS FIREARM SAFETY HANDLING RULES 1.Always keep the
Figure 2-1. SAFE ( S ) position.
 position.") CHAPTER 2 OPERATION AND FUNCTION This chapter includes clearing, disassembly and assembly, loading, operating precautions, and cycle of operation. 2-1. CLEARING Clear the MK 19 differently in a firing
CHAPTER 2 OPERATION AND FUNCTION This chapter includes clearing, disassembly and assembly, loading, operating precautions, and cycle of operation. 2-1. CLEARING Clear the MK 19 differently in a firing
M14Y.22LR YOUTH BOLT ACTION USER S MANUAL WARNING: READ THE INSTRUCTIONS AND SAFETY PRECAUTIONS IN THIS MANUAL CAREFULLY BEFORE USING THE FIREARM.
 M14Y.22LR YOUTH BOLT ACTION USER S MANUAL WARNING: READ THE INSTRUCTIONS AND SAFETY PRECAUTIONS IN THIS MANUAL CAREFULLY BEFORE USING THE FIREARM. SEPTEMBER 2016 ROCK ISLAND ARMORY USER S MANUAL M14Y.22LR