Star 45 Short Kit Build by Bob Szczepanski
|
|
|
- Myles Hopkins
- 5 years ago
- Views:
Transcription
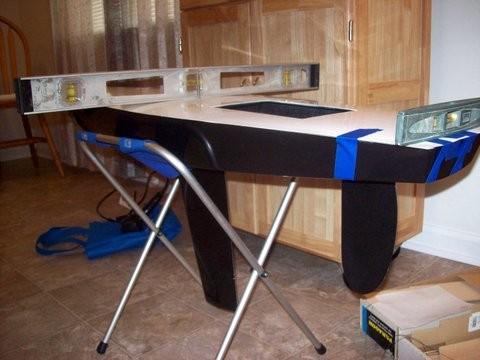
1 Star 45 Short Kit Build by Bob Szczepanski An old used Star 45 showed up at our pond one day last Fall. Nostalgia struck and I was hooked! A flood of memories sailing an International Star boat on Lake Ontario and the Finger Lakes, in upstate New York back in the mid to late '60's, came in a massive wave. Not being a prolific or avid boat builder (frames and fiber glassing are not an option), the excitement almost immediately vanished until I found out that a Star 45 short kit was available. I immediately ordered one. It arrived 7 weeks later. See Figure #1. The kit was just that, a bunch of parts, no instructions, photos or diagrams were included. The Star 45 is a builders boat. The short kit is too, but does provide a huge head start on the major assemblies. Upon conducting an extensive inspection of all the parts, it was clear that the quality was quite good. The hull measured in at the absolute minimum length: 44 ½ inches. Unfortunately, it also had a 5+ degree twist starting from the beam max point aft to the transom. I knew the length and certainly the twist would prove to be problematic. A number of small contaminant flaws were observed in the gel coat on the hull, rudder and keel fin. These were wet sanded off, then polished back to the original high gloss. The keel bulb was completely unfinished and clearly straight from the mold. The bottom of the hull also had a full width permanent slight oil can depression just aft of the molded in keel reinforcement hard point. Minor stuff, certainly better than I could likely to expect to achieve on my own. The deck, however, seemed flawless. In my haste to start work and get the feel of the kit parts, I cut out the molded-in deck hatch and installed a temporary balsa cross beam in the hull to establish the max. beam dimension (I chose 11 1/8 ), prior to taking the Figure #1 photo. I discovered that polyester resin, as opposed to epoxy, was used for all the lay ups and that the gel coat on all the molded parts was fairly soft and could be scratched very easily. I would need to be careful handling these parts. Everything in the kit was weighed prior to any construction and recorded as follows: Bare Hull 16.6 oz. (an impressive achievement!) Deck 9.7 oz. Keel Fin 9.0 oz Keel Bulb oz. Rudder 3.0 oz. Misc. Kit Hardware 1.7 oz. Total 177 oz. (11# 1 oz.) Clearly achieving the Class required minimum weight (12#) would not be a problem. In fact, I decided a strict weight management effort was in order. The start of the building process was to locate and draw center lines on both sides of the deck and hull. I discovered several things. First, the molded in scribe marks and three sets of dimples on the outside of the hull for the keel bolts were dead on center as was the scribe mark for the rudder post. Second, the molded in dimple for the rudder post was a bit off center and was not used to drill out the hole. I drilled out the aft most pair of keel bolt
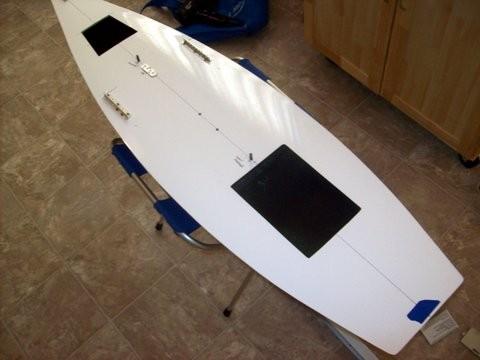
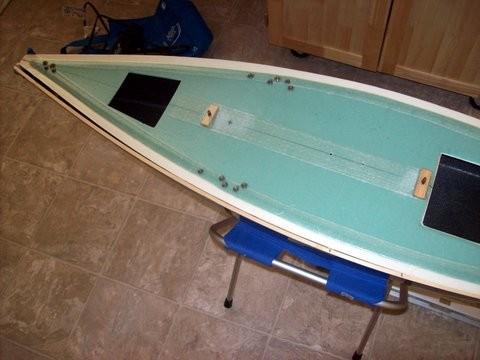
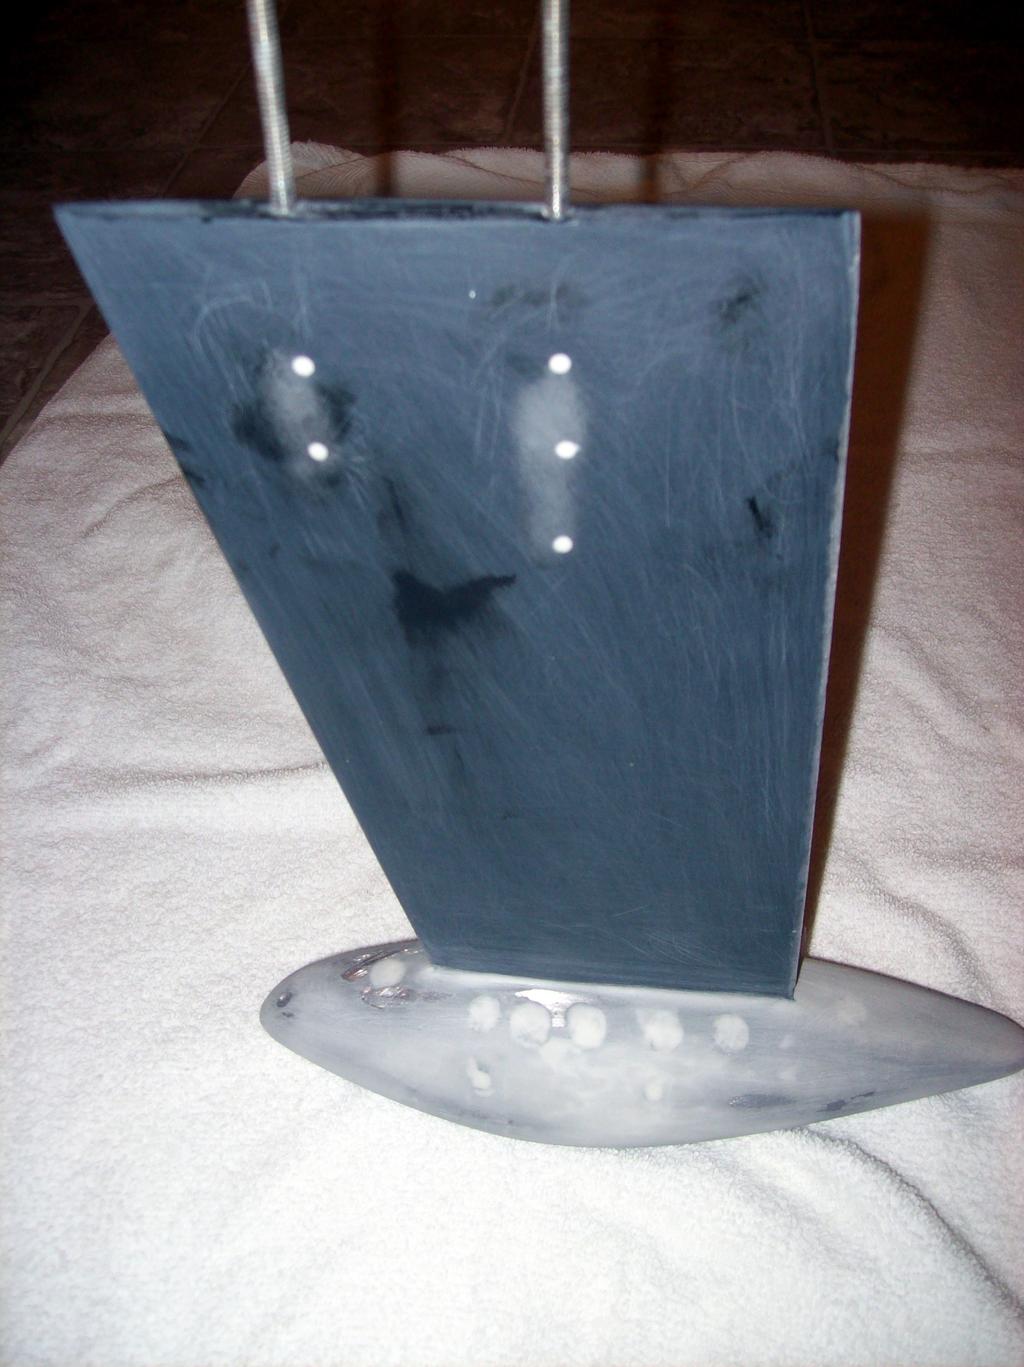
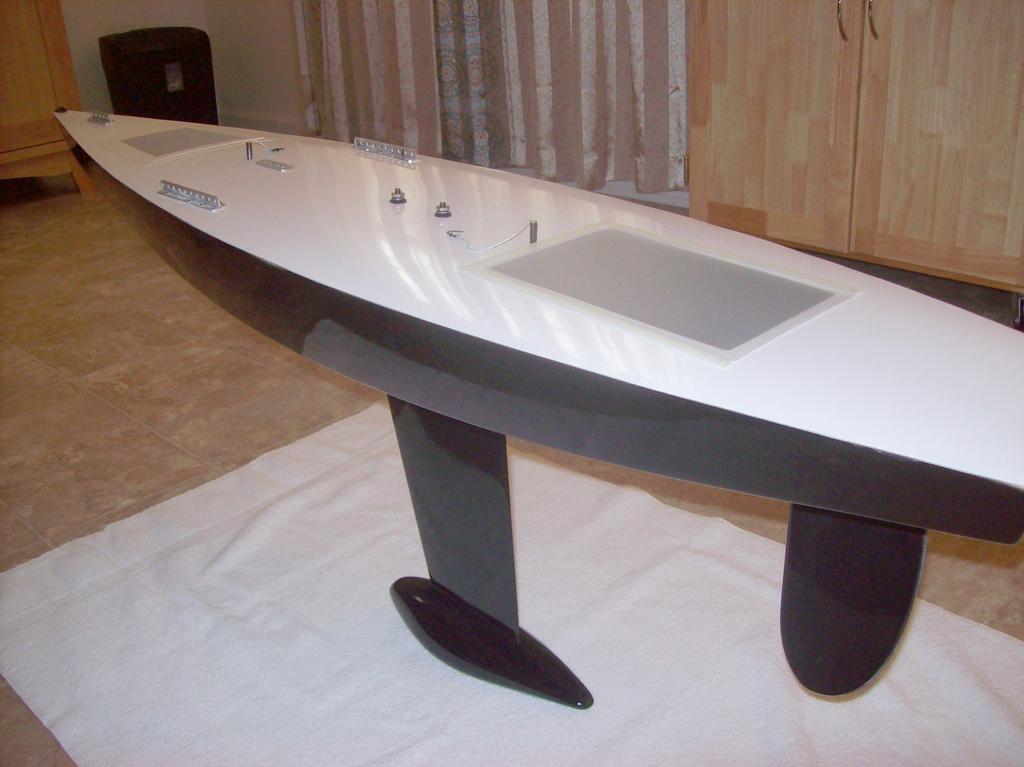
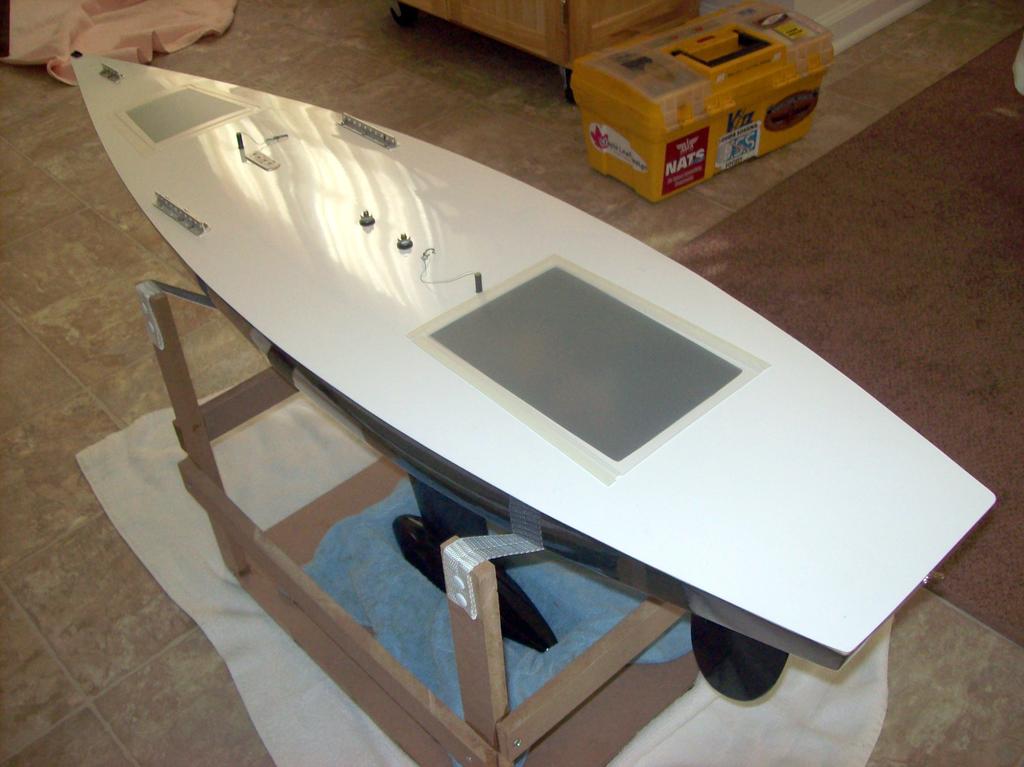
2 dimples. Third, the hard point in the hull for the compression post was about 1/2 off center, but was sized large enough not to be a problem. Finally, the underside of the deck was layed up with all reinforcements an 1/8 off center. Since the edge overhang of the deck was large enough to accommodate such a small offset, this only had to be noted. The lesson learned, however, even with a good quality kit, is to assume nothing, check and measure everything. The twist in the hull made installing the rudder a bit of a challenge. Also, the kit supplied rudder block angled sides didn't allow the post to be aligned to minimize the distance from the top of the rudder to the bottom of the hull. After re-cutting the block to correct the angle, the deck was taped on and used to eliminate the hull twist while gluing in the rudder block and aligning the rudder. Lots of blue tape, two levels and a plumb bob did the trick! See Figure #2. The same process was repeated to install the keel fin and keel bolt tubes, since I wanted a removable keel for ease of travel and storage. See Figure #3. Next, a small bulkhead was installed in the bow for the winch/sheet line turning block. Also, all deck hardware was installed and a forward hatch cutout made. It was sized to fit my hand and also saved a whopping.75 oz. That amount was just enough to offset the weight of the hatch covers. See Figures #4 & #5. Thinking ahead to mounting the electronics board, I fabricated two slotted support posts for the keel tubes. One of them had another slot cut in that would accept the electronics board and make it easily removable with one screw. See Figure #6. You can see the final electronics board installation in Figures #6A & #6B. Prior to gluing the deck on, I took a side trip. In Figure #6 you can see two HS-785 winch servos with custom made drums. Why do this? The the price of a HS-785 is quite inexpensive, but the down side of a single HS-785 sail winch is speed and limited torque. So, it was time to get creative. To solve the speed limit, I added an additional block which was located in the winch/sheet line. See Figure #7. This effectively doubles the speed of line movement at the expense of doubling the load on the winches. So, two winches are needed to double the total available torque and match the load. While the extra block doubles the speed of the line movement, the distance that the line must be moved by the winches is halved. This fortunate fact provides the opportunity to use custom drums to optimize the movement and increase the force. The standard HS-785 drum is 1 1/2 in diameter. After doing some geometry and simple math, I opted to make 3/4 diameter drums. The drum size reduction further doubles the available force from each winch, at the expense of some speed. To mitigate the loss of speed from the smaller drums, the size of each was designed to yield slightly less than 3 total turns on each winch. End result: about two seconds from full in to full out and more than double the force output of a standard HS-785. The penalty? - about 2 ounces of more weight than the single winch most would typically use. Hmm, at about $100 an ounce price differential on a 12 pound boat = good trade. Plus, it was kind of fun doing something different and saving a few dollars. Actually, to help rationalize the extra weight, I opted for a two cell 2300 MA Li Poly battery pack and a voltage regulator. This combination is about 3 ounces lighter than using a standard 5 cell AA pack. Ah, these days it is all about spin control, so as the government would say, I actually saved an ounce! To match the cool winch set up, programming the pair was the next step. The first winch was easy, just plug it into the throttle channel. The trick lies in the second winch. I plugged it into the elevator channel, then set up a programmable mix to slave it to the throttle. It quickly became evident that any inadvertent up or down movement of the rudder stick would move
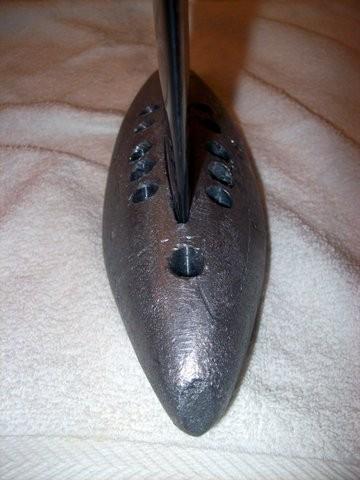
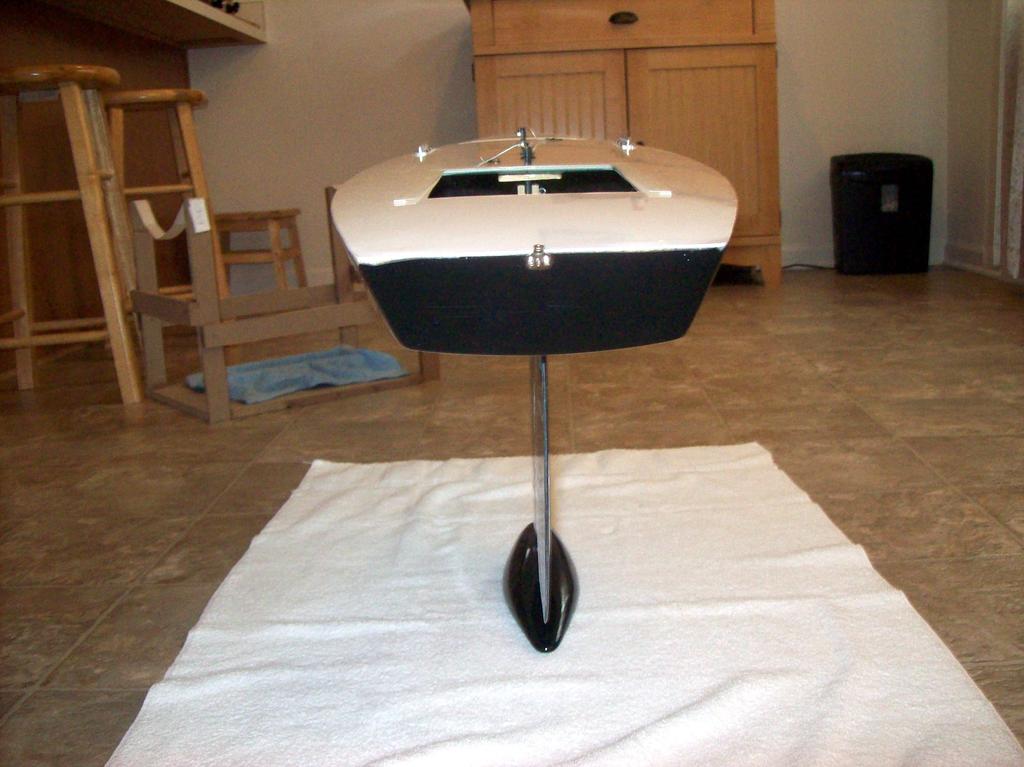
3 the second winch and would change sail trim. Not good! Then, a light bulb went on and I decided to change the elevator max. throws to 0%. Returning to the programmable mix, I programmed the throws to match the percentages on the throttle channel, but in the opposite direction. Now, you could move the right stick (rudder control) up and down and no winch movement would happen, yet both winches were perfectly in sync. when the sail control stick was moved. Yeehaw! Another major benefit to this was that one winch would rotate clockwise and the other in the opposite direction, so that the winch line would come off the top of one drum and the bottom of the other and provide some separation of the winch lines. Way Cool! Back to building. The deck was glued on by aligning all the center lines and correcting for the twist in the hull. Again, lots of blue tape, levels and plumb bobs. I used epoxy thickened with micro balloons to keep the glue from running. Once dry, the deck overhang was sanded off, then the assembled parts were declared a boat. Mounting the keel bulb on the fin was the next objective. Getting the fin to fit in the slot molded into the keel bulb was a project in itself. Removing lead from the inside of a slot requires determination and patience. I am good on determination, but sadly lacking in patience. I heavily rounded off the bottom leading and trailing edge of the fin and attacked the slot in the bulb with a rotary tool and a coarse file. Two hours and a bunch of cussing later it fit. OK, now what? Time to float the boat and determine the load waterline. First, of course, the total all up weight must be targeted. The completed boat less fin and keel bulb weighed in at 49.5 oz. The complete rig and sails weigh approximately 10 oz. The raw keel bulb and fin weighed in at oz. yielding a total all up projected weight of 206 oz. (12# 14 oz. - nearly 7% over minimum) I decided this was too much over the minimum and knew that drilling out the keel bulb was the only viable way to reduce weight. It sounded good to me, but doing a little math before the drilling built courage. The unmodified ballast to weight ratio of the existing assembly worked out to be just a bit over 66% while the intended weight reduction (about 5%) yielded a ballast to weight ratio of just under 65%. I put on my cowboy hat and fired up the drill. Being careful not to change the keel bulb's CG, equal amounts of lead were drilled out on either side. I removed 10+ oz. total to yield a keel fin/bulb weight of oz. (See Figure #8) This would yield a target sailing weight of 12# 4 oz. At this weight, the boat would be safely legal and barely 2% over minimum, while suffering only a very small reduction in the righting moment. After temporarily attaching the fin and now weight reduced keel bulb to the completed hull, along with a simulated rig weight located on the mast step, a trip to the pond was in order. People say whatever floats your boat, but the goal here was to determine the load waterline in order to align the keel bulb axis parallel to it. That done, it was time to check the rudder alignment. Interestingly and happily enough, the axis of the rudder shaft ended up perpendicular to the waterline. Life can be good! All my keel handling and bulb fitting apparently caused the keel bolts in the fin to become slightly loose. A clear wobble could be seen (and heard) in each rod. This was totally unacceptable and left unattended would cause hull flex and deterioration over time. The fix was to drill out the fin, align and then stabilize the rods with CA, then fill the holes and embed the fin top with epoxy. See Figure #9. The bulb itself was finished by plugging the drilled holes with cotton balls and coating the bare lead with a filler made of epoxy and micro balloons. Sanding, priming and painting the fin and bulb completed the assembly. See Figures #10 thru #13.

 could go from short kit to boat in 60 to 80 hours.")
4 In summary, the Star 45 short kit is not a project for the casual builder, but certainly is less demanding than a scratch build and I think a very reasonable value. The minimum length hull required some modification to the rig layout to get everything to fit on deck and not hang up on the backstay. The boat, ready to sail, ended up weighing 12# 3.5 oz.. I did spend well over 100 hours from start to finish, not counting building the rig and mounting sails. My guess is that a more prolific and avid builder (and now me) could go from short kit to boat in 60 to 80 hours. The problem for me is that I am only good for one boat build every two or three years, so I'll have to wait a bit for the next one. My thanks and appreciation go out to my new sailing friend, Phil Runquist, a very accomplished Star 45 builder, for his encouragement and guidance.
5

6
7
8
ODOM CLASS SPECIFICATIONS
 ODOM CLASS SPECIFICATIONS Effective March 1, 2004 1. GENERAL 1.1 Purpose of the Measurement Rules 1.1.1 The ODOM is a One-Design Class as defined by the American Model Yachting Association (AMYA). However,
Soling Building Tips II
 Soling Building Tips II Prepared: Arthur Deane Jan 20, 2002 adeane@ic.net Introduction The following are some lessons learned and experience gained in building a Soling kit. The plan developed is based
CR 914 Class Rules. Revised July 15, 2000 See also CR-914 Class Rule Interpretations
 CR 914 Class Rules Revised July 15, 2000 See also CR-914 Class Rule Interpretations 1 GENERAL - CLASS: The CR 914 is a One-Design class. The Class objective is that the sailing skills of the skipper shall
CONSTRUCTION OF A GUNBOAT A CLASS YACHT by Brian Dill
 CONSTRUCTION OF A GUNBOAT A CLASS YACHT by Brian Dill The Gunboat design is the latest Radio A class from Graham Bantock, optimised to provide the best boat speed below 4 knots and to be as good as possible
Tugster. Tug Boat. Competition or Sport Tug Kit. A Zippkits R/C Boat. Building Instructions
 Z I P P M A N U FA C T U R I N G Tugster Tug Boat Competition or Sport Tug Kit A Zippkits R/C Boat Building Instructions 2016 JMP Hobby Group St. Paul, Indiana 47272 www.zippkits.com Toll Free (866) 922-ZIPP
Constitution Instructions
 Constitution Instructions This kit will build a 1:48 scale hull for the USS Constitution frigate. The kit contains the following parts. 1/8 deck with laser etched deck lines 1/8 railing Ribs Center keel
Blazer Marine, Whiplash Sport 40
 Blazer Marine, Whiplash Sport 40 Thank you for choosing to build the Whiplash 40. We have spent over 12 years perfecting this design, and finally we are making it available to the world. We are excited
1982 Hydrostream Viking Restoration
 1982 Hydrostream Viking Restoration Part 2c: The Rebuild Daniel W. Rickey Winnipeg, Manitoba Canada daniel@cancercare.mb.ca 2000-09-22 Introduction Part one of this report showed how the shoddy manufacturing
Step 1: Block sand the transom to remove the seam joint. The end result should be a flat transom without a ledge where the seam joint is.
 WhiplashGV Instruction Manual Email: Brian@Blazermarine.com Phone: 513-598-1769 Step 1: Block sand the transom to remove the seam joint. The end result should be a flat transom without a ledge where the
PAY N PAK, 1/12 th Scale, Limited Sport Hydro P Sport Hydro
 1980 82 PAY N PAK, 1/12 th Scale, Limited Sport Hydro P Sport Hydro Introduction: The 1980 turbine Pay N Pak is a good subject for a model race boat. It has a low profile, mild pickle-fork setback, long
MiniOpti Optimist RC Dinghy CLASS RULES
 MiniOpti Optimist RC Dinghy CLASS RULES 1. GENERAL - CLASS The Mini-Optimist as in the full sized Optimist Dinghy class is a One-Design Class. The objective being that the sailing skills of the skipper
Trim Tab Wind Vane for boats with transom mounted rudders
 Trim Tab Wind Vane for boats with transom mounted rudders If your boat has a transom mounted rudder, you can build this self-steering windvane for around $150, using regular wood working tools and some
1/10 th Scale 1956 Ted Jones Classic Hydroplane
 1/10 th Scale 1956 Ted Jones Classic Hydroplane Preparation These plans show outside sheeting of 3/32 balsa laminated with 1/64 birch ply. This makes a light and strong skin for this boat. Optionally you
ANGEL INSTRUCTIONS ALMOST READY TO SAIL MODEL YACHT
 ANGEL INSTRUCTIONS ALMOST READY TO SAIL MODEL YACHT Long: 920mm High:1840mm Toatl sail area: 0.4 m2 1 MODEL YACHT ASSEMBLY INSTRUCTIONS & SAILING HINTS Thank you for purchasing one of our range of model
SEADUCER BOATS GAS SPORT HYDRO
 SEADUCER BOATS GAS SPORT HYDRO COME VISIT US ON THE WEB AT WWW.SEADUCERBOATS.COM 2 - Pkg. Of 440 push rod ends 2 - Pkg. of solder-on rod ends 2 -water outlet fitting 1-1/4" prop nut 1 -.250" x 30" flex
AMYA SeaWind Class Rules
 AMYA SeaWind Class Rules Revised 4/1/2011 1 GENERAL - CLASS: The SeaWind is a one design class. The class objective is competition where the skill of the skipper in sailing and adjusting his boat will
THUNDER INSTRUCTIONS A LMOST READY TO SAIL MODEL YACHT
 THUNDER INSTRUCTIONS A LMOST READY TO SAIL MODEL YACHT Long: 1000mm High:1890mm Toatl sail area: 0.4 m2 1 MODEL YACHT ASSEMBLY INSTRUCTIONS & SAILING HINTS Thank you for purchasing one of our range of
AMYA Soling 50 Class Rules
 AMYA Soling 50 Class Rules - 2009 Overall General Specifications Length = 50 Overall Beam = 12 1/8 Overall Draft = 11 Sail Area = 800 Square Inches Displacement = 17 lbs. Minimum Mast Height = 61-1/4 Maximum
AMYA SeaWind Class Rules
 AMYA SeaWind Class Rules Revised 4/1/2013 1 GENERAL - CLASS: The SeaWind is a one design class. The class objective is competition where the skill of the skipper in sailing and adjusting his boat will
DRAGONFLITE 95 RESTRICTED CLASS RULES 2016
 DragonFlite Force 95, Restricted Class Rules 2016 2013 Version 1.0 DRAGONFLITE 95 RESTRICTED CLASS RULES 2016 Version 1.0 DF Racing Rules Committee 2016 Introduction The DragonFlite 95 (DF95) project started
Stevenson Projects Building the Hull Top Deck and Bulkheads
 Stevenson Projects Building the Hull 1. Print out both piece sheets. 2. Cut out one keel piece and glue it to a piece of balsa wood or dense cardboard. Cut out the second keel piece and glue it to the
aero naut Electric Model Aeroplane Quido Order-No. 1303/00
 aero naut Electric Model Aeroplane Quido Order-No. 1303/00 Quido is a small model that accompanies you wherever you go. The prefabricated parts are mostly balsa and just need to be assembled according
Blazer Marine, Whiplash Sport Hydro
 Blazer Marine, Whiplash Sport Hydro Thank you for choosing to build the Whiplash Sport Hydro. We have spent over 12 years perfecting this design, and finally we are making it available to the world. We
Making Spars for the Schooner Jeanette
 Making Spars for the Schooner Jeanette..... by Byron Rosenbaum Figure 1. Byron Rosenbaum s 1:16-scale radio-controlled model of the schooner Jeanette. All photographs by the builder. The spars required
DRAGONFLITE 95 RESTRICTED CLASS RULES 2016
 DragonFlite Force 95, Restricted Class Rules 2016 2013 Version 1.2 1.0 DRAGONFLITE 95 RESTRICTED CLASS RULES 2016 Version 1.2 DF Racing Rules Committee 2016 Introduction The DragonFlite 95 (DF95) project
NEW YORK FIREBOAT - Three-Forty-Three
 NEW YORK FIREBOAT - Three-Forty-Three One of the newest fireboats is currently in use by the New York Fire Department. Two identical models were built by Eastern Shipbuilding in Panama, Florida and delivered
Apsara Hard chine version
 Apsara Hard chine version Update of the RG65WIKI page. Introduction One often encounter people on forums looking for simple to build hard chine hulls. The RG65 class is ideal for initiation to remote controlled
Dornier Do R 4 Super-Wal
 Dornier Do R 4 Super-Wal Model Aviation Laddie Mikulasko s Dornier Do R 4 Super-Wal Build the multiengine, record-setting seaplane. Article, plans, instructions, and photos by Laddie Mikulasko. Complete
Trogear Bowsprit Through Hull Installation Manual
 Trogear Marine Products, LLC www.trogear.com info@trogear.com 866-616-2978 Trogear Bowsprit Through Hull Installation Manual Congratulations on your purchase of the Trogear Bowsprit which can be installed
Aegea Assembly Notes:
 Aegea Assembly Notes: The Aegea model is a thermal Duration (TD) model made up of components from Phil Barnes 1 (bagged wing and tail group) and Terry Luckenback 2 (Pretty Mantis fuse). Due to its construction
AVA Building Instructions
 Suggested Assembly Sequence: AVA Building Instructions 1. Insert fittings in rudder and trial fit rudder on boom 2. Attach stab to v-mount and position ahead of rudder ¼, sanding the v-mount as needed.
Model Aero AT-6 Texan Introduction
 1 Model Aero AT-6 Texan Introduction We are excited to introduce the Model Aero AT-6 Texan! Originally used as an advanced trainer by the U.S. Armed Forces, the AT-6 is a relaxing slow flyer, equally at
LITTLE TRI construction
 LITTLE TRI construction I have built almost anything that can sail. At the age of 12 my first sail thing, an ice boat. I used skates which had to be mounted on shoes as runners. Big fun, very fast, only
Max Bee. Part II: Building Max Bee Stunt News 8. lighter: the building of Max. all published.
 Max Bee Can you say Exotic? Igor s World Championship winning design has lots of interesting aerodynamics as well as interesting aesthetic design cues. I know, I know, the designing article about Max Bee
SEADUCER BOATS GAS MONO COME VISIT US ON THE WEB AT
 SEADUCER BOATS GAS MONO COME VISIT US ON THE WEB AT WWW.SEADUCERBOATS.COM 1 - Pkg. Of 440 push rod ends 1 - Pkg. of solder-on rod ends 2 -water outlet fitting 1-1/4" prop nut 1 -.250" x 24" flex shaft
An Australian Classic by spectre.com
 An Australian Classic by www.go spectre.com Your Bug! Welcome to the Balain Bug experience!!!!!! The Bug kit has been designed so as to be a modern version of the Traditional Bug now you can sail like
Riviera Draft Shaft Hole Boring
 Riviera Draft Shaft Hole Boring a. Height from bottom of hull thru the hull to the center of the drive shaft. This will be calculated. b. Height of drop of strut. The strut for the Riviera is 7.5 c. Distance
Measurement Checklist for the Lido for the Championships
 This paper is intended to be a guide for rapid and easy measurement of the Lido 14 to assure painless application of the rules that, in general, govern one design performance and compliance. It is not
Building Instructions ME 163 B 1a M 1:5 Turbine
 Building Instructions ME 163 B 1a M 1:5 Turbine Thank you for choosing our kit of the Me-163B. We ask you to read the instruction once in advance before building this kit in order to avoid mistakes. Make
Robotic Yacht. The construction of Birdy II. Paul
 Robotic Yacht The construction of Birdy II Paul Table of Contents Introduction... 3 Construction... 4 Superstructure... 4 Birdy II... 5 Building Frame... 6 Bulkheads... 7 Drawing the Waterline... 7 Keel
Melges 24 Measurement Handbook. Provided by the United States Melges 24 Class Association
 Melges 24 Measurement Handbook Provided by the United States Melges 24 Class Association Table of Contents Page Introduction 3 Illustration 1 Deck Layout 4 Illustration 2 Measurement Data Points 5 Illustration
Akcent-2 - Building Instructions
 Akcent-2 Home Pictures Building Instructions Ordering Akcent-2 - Building Instructions Note! The pictures show older kits with "diser" wings. The new kits come with nicer D-box wings. Servo locations are
We hope you ll enjoy the Drifter as much as we have! Scott DeTray Model Aero Specifications:
 We are excited to bring you the Drifter RC airboat. You re probably thinking it doesn t fly so what is Model Aero thinking??? We have always liked RC vehicles of all types and have had a fondness for airboats
CATBOX. A Puddle Duck Racer. By Jim Michalak
 CATBOX A Puddle Duck Racer By Jim Michalak CAT BOX HULL SPECIFICATIONS 1. Bow transom from 1/4" plywood. Top and bottom edges framed with 3/4 x 1-1/2" lumber with bevels as shown. Mark centerlines boldly.
Chapter Twelve. Starting the rigging process
 Chapter Twelve Starting the rigging process Before I begin describing the rigging process, I must remind folks that it would be a great time to slip that traveler ring onto the bowsprit. I forgot to mention
Construction Chapters Index
 Construction Chapters Index 9 7 8 Chapters Index c. c. c. c. c. c. c7. c8. c9. c0. c. c. c. c. c. c. c7. Balsa Wood Skeleton Strip Planking Hull Fairing Keel Bulb Mould Lead Bulb Casting Keel Construction
Model Aero Sportster Indroduction
 1 Model Aero Sportster Indroduction We are excited to introduce the Model Aero Sportster! Inspired by classic designs of the past, the Sportster is a relaxing slow flyer, equally at home indoors or outside
INDEX CLASS RULES. ISSUED 3 - June 2007 ONE POINT FIVE CLASS RULES
 CLASS RULES INDEX 1. INTRODUCTION 2: 1.5 CLASS SPECIFICATIONS 3: CLASS PHILOSOPH 4: HULL AND DECK 5: KEEL / BULB AND RUDDE 6: DECK FITTINGS 7: SPARS AND RIGGING 8: SAILS ISSUED 3 - June 2007 ONE POINT
The USA Canterbury J. Class Rules
 Canterbury J Class Owners Association The USA Canterbury J Class Rules 2010 As Accepted 2008 and Revised February 2010 Published March 2010 The Canterbury J Class Rules ~ 2008 Page 1 of 10 THE CANTERBURY
Surfboard Repairs Chapter 7
 Surfboard Repairs Chapter 7 The Complete Surfing Guide for Coaches - Bruce "Snake" Gabrielson Repair Problems Boards continuously get bumped, hit rocks, break fins, get dropped, and many other things that
PACK 24 RAINGUTTER REGATTA November 19, 2010 (7pm at Hawthorne)
") PACK 24 RAINGUTTER REGATTA November 19, 2010 (7pm at Hawthorne) Welcome to the Pack 24 Raingutter Regatta! Get ready for a night of excitement, action and a lot of hot air. The premise of Raingutter Regatta
PACK 24 RAINGUTTER REGATTA November 19, 2010 (7pm at Hawthorne) Welcome to the Pack 24 Raingutter Regatta! Get ready for a night of excitement, action and a lot of hot air. The premise of Raingutter Regatta
WHITE WOLF. X-ray View MID POWER MODEL ROCKET KIT BUILDING INSTRUCTIONS KIT SPECIFICATIONS:
 WHITEWOLF-38 PARTS LIST 1 - Nose Cone 1-17" Airframe 1-6" Motor Tube 3 - Aft Fins 3 - Forward Fins 2 - Centering Rings 1-15" Parachute 2 - launch lugs 1-12 Kevlar Shock Cord 1 - Motor Retention >>(screw/washer)
INSTALLING YOUR CLC RUDDER
 INSTALLING YOUR CLC RUDDER These instructions are written to help you install the CLC rudder kit on your wooden kayak. The rudder can be fitted to your boat during construction or after completion. Please
Paper Tiger Catamaran International Association MEASUREMENT FORM
 Paper Tiger Catamaran International Association MEASUREMENT FORM Amended June 2000: July 2002: April 2012 Name of boat: Sail No: Owner s name: Owner s address: Postcode: Phone: (H) (B) (Mob.) Email: Owner
RC Nirvana Class One-Design Racing Rule 04/01/08
 RC Nirvana Class One-Design Racing Rule 04/01/08 This class one-design racing rule is designed to establish uniformity in the Nirvana class on all features that affect boat speed. Any modifications to
Hat s off to you for choosing a kit from Port Townsend Watercraft.
 Hat s off to you for choosing a kit from Port Townsend Watercraft. 1 A 30 year fascination with the challenges of nesting boat design, and many prototypes have led to the PT Eleven. Because you chose this
*HRUJH5LEHLUR3URGXFWV
 Página 1 de 6 *HRUJH5LEHLUR3URGXFWV 2'206$,/%2$7 E\720+28/( 0RGHO AMYA-sanctioned ODOM 7\SH sailboat 0DQXIDFWXUHU George Ribeiro Products /HQJWK 39 3/8 in. %HDP 8 1/2 in. :HLJKW 7 1/4 lb. +HLJKW bottom
CR-914 Kit Assembly Instructions Revised Oct 16, 2001
 Parts Inventory CR-914 Kit Assembly Instructions Revised Oct 16, 2001 Read these instructions before starting to build the boat. Parts list continued on the next page Parts list Continued - Upgrade Kit
Instructions for Fun Foam Critter 4/25/2007 BP Hobbies LLC 140 Ethel Road W Suite J Piscataway NJ,
 Instructions for Fun Foam Critter 4/25/2007 BP Hobbies LLC 140 Ethel Road W Suite J Piscataway NJ, 08854 http://www.bphobbies.com Specifications: Wing Span: 20" Length: 20" Flying Weight: 5.5-7.0 oz Controls:
AGM 33 PIKE ALL FIBERGLASS. Specifications Length: 92 Diameter 5.5 Weight: 24 lbs Motor Mount: 75mm Fins: 6-3/16 G10 CP: 68 from nose tip Parts List
 ALL FIBERGLASS AGM 33 PIKE Specifications Length: 92 Diameter 5.5 Weight: 24 lbs Motor Mount: 75mm Fins: 6-3/16 G10 CP: 68 from nose tip Parts List (1) Filament Wound Nose Cone w/ Metal Tip (1) Nose Cone
VALDIVIA BUILD LOG Dr Ron
 VALDIVIA BUILD LOG Dr Ron The Robbe kit of the two-masted schooner Valdivia was purchased in 2007, along with the fitting set and propulsion accessories, and has been staring me in the face since then
Building a model of a Thames Barge
 Building a model of a Thames Barge Stage 1 : Reading the instructions The model which I purchased is of the Will Everard, a steel-hulled barge built in the 1920's, one of a range of laser-cut kits from
Horizontal Fuselage. Top Vertical Fuselage 1. Lay out the Top Vertical Fuse Front(1), Top Vertical Fuse Back(2), and Vertical Stabilizer(3).
, Top Vertical Fuse Back(2), and Vertical Stabilizer(3).") Rumbuilder 71 B-17 Congrats on your Rumbuilder B-17! We re glad you chose to fly with us! If you have any problems, or missing/broken kit pieces, please contact us. We d be happy to replace any damaged
Rumbuilder 71 B-17 Congrats on your Rumbuilder B-17! We re glad you chose to fly with us! If you have any problems, or missing/broken kit pieces, please contact us. We d be happy to replace any damaged
Boat Boat Loader Fitting Instructions
 Aerodynamic & Heavy Duty Roof Rack Systems Australian Made - Australian Owned www.rhinorack.com Boat Boat Loader Fitting Instructions CONTROLLED Balance point 3 Front eye nuts position 3 Transom eye nut
RADIO CONTROL MODEL YACHT BUDGIE ONE DESIGN CLASS CLASS RULES
 1 RADIO CONTROL MODEL YACHT BUDGIE ONE DESIGN CLASS CLASS RULES 1. INTRODUCTION 2. BUDGIE CLASS SPECIFICATION 3. CLASS PHILOSOPHY 4. HULL AND DECK 5. KEEL / BULB AND RUDDER 6. DECK FITTINGS 7. SPARS AND
aero naut Order No. 3009/00
 aero naut Order No. 3009/00 Introduction: The model should be assembled following the sequence of the stages of construction described in these instructions. The laser-cut components are individually numbered.
1 Tuning Platform Reseating Beam Pads Rudder alignment Noisy Foils Rig Tension...
 Contents 1 Tuning... 2 1.1 Platform... 2 1.2 Reseating Beam Pads... 2 1.3 Rudder alignment... 3 1.4 Noisy Foils... 3 1.5 Rig Tension... 4 1.6 Mast rake... 4 1.7 Spreader rake... 5 1.8 Diamond tension...
Release :
 Release : 25.01.08 1 Technical datas : Wingspan : 936 mm Lenght : 444 mm Surface : 5.07 dm² Mass : 90g Wing loading : 17.8 g/dm² 2 A quick summary of the design The Nexus 900 is the result of a long research
Highlander Specifications
 Highlander Specifications July 22, 2012 Highlander Specifications The intent of this section is to clarify and add to what is shown in the official plans. In case of conflict between these specifications
F-1279-R UPPER RIGHT SKIN F-1280-R RIGHT SIDE SKIN F-1281-R LOWER RIGHT SKIN F-1208-R FUSELAGE FRAME
 F-1282-R BOTTOM RIGHT SKIN F-1283C J-STIFFENER F-1278 TOP SKIN F-00009-L ADAHRS BRACKET F-00009-R ADAHRS BRACKET F-1279-R UPPER RIGHT SKIN F-1280-R RIGHT SIDE SKIN SECTION 10: TAILCONE F-1279-L UPPER LEFT
In each step, the needed parts are shown the number right below. Locate all parts for the step.
 Tools Required for Assembly Phillips Screwdriver, Med Needle Nose Pliers Sandpaper (#400 grit) Hobby Knife Scissors CA Instant Glue Rubbing Alcohol Drill Bit 1/16", 1.6mm 5/64, 2mm 1/8, 3mm 5/32, 4mm Before
O K D I A MEASUREMENT FORM INTERNATIONAL OK DINGHY CLASS
 O K D I A 2010 MEASUREMENT FORM INTERNATIONAL OK DINGHY CLASS NOTES GENERAL 1. The builder shall pay the current building fee to the National OK Dinghy Association which shall issue a building fee receipt
Miss Mayflower. Build Manual
 Miss Mayflower Build Manual Thank you for the purchase of the Miss Mayflower, this new exciting craft will give you fun on many types of terrain including snow, gravel, pavement, grass, water, and when
NEW DESIGNS. Print in Landscape Mode with ¼ inch borders. Hinges (2) degrees. 1 Seating Type Optional
 degrees. 1 Seating Type Optional") 2017 IDEAS NEW DESIGNS Ken Simpson Designs Drawn 06-01-2017 Rev. 07-02-2017 The SPORTSMAN 10'L x 36 W x 15 H 475 pound Capacity Print in Landscape Mode with ¼ inch borders. Hinges (2) 36 30 8 degrees Click
2017 IDEAS NEW DESIGNS Ken Simpson Designs Drawn 06-01-2017 Rev. 07-02-2017 The SPORTSMAN 10'L x 36 W x 15 H 475 pound Capacity Print in Landscape Mode with ¼ inch borders. Hinges (2) 36 30 8 degrees Click
Building a Wind Tunnel
 Technical Report TR-5 Building a Wind Tunnel Estes Industries 1963 These reports are published as a service to its customers by Estes Industries, Inc., Box 227, Penrose, Colorado 81240 Building a Wind
Grain Surfboards Frequently Asked Questions
 Grain Surfboards Frequently Asked Questions Section 1: Grain Boards 1. How does building a Grain board differ from building a foam board? 2. They look more like furniture than surfboards. Are Grain boards
Essential Rig Tuning Guide The Ins and Outs of tuning your mast.
 Essential Rig Tuning Guide The Ins and Outs of tuning your mast. Tuning Your Rig The main goal in tuning your mast is to achieve a spar that s straight. By doing this it will help you gain control of sail
Website:
 Introduction The Javelin is a high performance, single trapeze, 14ft two-handed skiff raced competitively throughout New Zealand and Australia. Its lightweight 70kg hull, and powerful, efficient sail plan
8-GUN CORVETTE ASSEMBLY INSTRUCTIONS
 8-GUN CORVETTE ASSEMBLY INSTRUCTIONS THE HULL STEP 1 Fasten the Deck to the Hull. Find the hull. This is a large, pink, ship-shaped piece of insulating foam board. This will form the base of your model
What hull material types will the system work on? Do I still need an antifoul paint?
 1. The Hull What hull material types will the system work on? The system is effective on all GRP (Glass Reinforced Plastic), STEEL and ALUMINIUM hulls up to thickness of 70mm. Unfortunately the system
Bladerider X8 Assembly Help Notes
 2.1 Remove All Parts & Have Some Tools Handy Remove all items from the box and identify each part as per the packing sheet and check that nothing is missing. If there is something missing, please email
BUILDING INSTRUCTIONS
 Z I P P M A N U FA C T U R I N G A Zippkits R/C Boat BUILDING INSTRUCTIONS 2010 Zipp Manufacturing Frankfort, New York 13340 www.zippkits.com Table of Contents Introduction 1 Engine Mounting 30 S E C T
Introduction. low deck spinnaker launching and retrieval system for quick and easy sail handling to allow the real focus to be on sailing.
 Introduction The Farr 280 One Design is a new production racing sailboat by Farr Yacht Design that will deliver the excitement of grand prix racing to the under-30 one design arena. As a modern one design,
On the Wing... By Bill & Bunny Kuhlman,
 On the Wing... By Bill & Bunny Kuhlman, bsquared@themacisp.net Redwing XC, Part 4 August 2008 29 After nearly a year of work, our Redwing XC has finally taken wing. At the end of the last installment we
INTERNATIONAL SUNFISH CLASS ORGANIZATION CLASS RULES
 INTERNATIONAL SUNFISH CLASS ORGANIZATION November 2017 CLASS RULES 1. GENERAL The design and development of the Sunfish sailboat was directed to the creation of a one-design class where the true test is
How To Measure And Mark Basketball Lines Like The Pros
 Return To The Court Store 48 Cherokee 758 S. Broad Hills Street Drive Toccoa, GA 30577 Rydal, Phone: Georgia 404.915.8352 30171 Fax: 800.470.3537 Mark@thecourtstore.com Phone: 678.528.0354 02/15/2011 Author:
(PLEASE CONTACT YOUR LOCAL DEALER or CUSTOMER SERVICE FOR WARRANTY INFORMATION)
") RUDDER KIT SOLO KAYAKS IMPORTANT: Tandem models will require the Wildy Supplemental kit in addition to this kit. The Supplemental kit provides extension straps and extra footbraces that allow rudder positioning
RUDDER KIT SOLO KAYAKS IMPORTANT: Tandem models will require the Wildy Supplemental kit in addition to this kit. The Supplemental kit provides extension straps and extra footbraces that allow rudder positioning
Below are the instructions to build a roller-furling unit for under $10. Read the entire process before beginning the project.
 Greg Cowens' $10 PVC Roller Reefing for CP-16's by Greg Cowen Below are the instructions to build a roller-furling unit for under $10. Read the entire process before beginning the project. Materials: 2
J/70 Building Specification
 DECK, HARDWARE AND FITTINGS 1 FRP Composite deck 2 Indeck furler unit 3 Bow "U" bolt mooring eye (stainless) Option for one 6" (152mm) mooring cleat in lieu of eye. 4 Shroud chainplates (stainless) (BSI
Trixie 7. Study Plans. for a 7' 2" x 4' 6" Tender. Andrew Walters. For Rowing, Sail and Short Shaft Outboard Motors
 Trixie 7 Study Plans for a 7' 2" x 4' 6" Tender For Rowing, Sail and Short Shaft Outboard Motors Andrew Walters Trixie 7 Study Plans for a 7' 2" x 4' 6" Tender For Rowing, Sail and Short Shaft Outboard
SECTION 10iS: TAILCONE
 VAN'S AIRCRAFT, INC. F-1282-R BOTTOM RIGHT SKIN F-1283C J-STIFFENER F-1278 TOP SKIN F-00009-L ADAHRS BRACKET F-00009-R ADAHRS BRACKET F-1279-R UPPER RIGHT SKIN F-1280-R RIGHT SIDE SKIN SECTION 10iS: TAILCONE
Super Sport. Building Instructions Z I P P M A N U FA C T U R I N G. A Zippkits RC Boat. 46 inch Gas Mono Hull
 SS Z I P P M A N U FA C T U R I N G Super Sport 46 inch Gas Mono Hull A Zippkits RC Boat Building Instructions 2018 JMP Hobby Group LLC Indiana USA (866) 922-9477 www.zippkits.com 1 D E S I G N C U S T
photos by JURIJ KORENC production STUDIO 37
 photos by JURIJ KORENC production STUDIO 37 www.studio37.si Elan Marine d.o.o. Begunje 1, SI-4275, Begunje na Gorenjskem, Slovenia Phone: +386 4 535 13 70, Fax: +386 4 535 13 60 E-mail: elan.marine@elan.si
Cub Scout Pack Rain Gutter Regatta
 Cub Scout Pack 350 2014 Rain Gutter Regatta Event Location & Date: Advance Firehouse, Saturday November 22nd 11:00am-1:00pm (racing as soon as everyone registers) 106 E Wall Street Advance, IN 46102-9407
A Table Top Wind Tunnel You Can Build
 A Table Top Wind Tunnel You Can Build Basic principles of aerodynamics can be studied in the classroom with this simple, inexpensive wind tunnel. All you need to build it is some cardboard boxes, glue,
No.5550 INTRUCTION MANUAL WARRANTY WARNING. Notice This is not a toy. Assembly and operating of this boat requires adult supervision.
 INTRUCTION MANUAL WARRANTY Thunder Tiger guarantees this model kit to be free from defects in both material and workmanship. The total monetary value under warrant will in no case exceed the cost of the
CIRRUS AIRPLANE MAINTENANCE MANUAL
 RUDDER 1. GENERAL The rudder provides airplane directional (yaw) control and includes a rudder trim tab used for yaw trim adjustment. The rudder is of conventional design with skin, spar and ribs manufactured
 Photo Essay: How to Build a Nova Scotian Grand Banks Dory By Jeff Spira Plans available at: http://spirainternational.com/ How to Build a Nova Scotian Grand Banks Dory By Jeff Spira In Lunenburg, Nova
Highlander Specifications (DRAFT UNAPPROVED)
") Highlander Specifications March 26, 2014 Highlander Specifications (DRAFT UNAPPROVED) The intent of this section is to clarify and add to what is shown in the official plans. In case of conflict between
Highlander Specifications March 26, 2014 Highlander Specifications (DRAFT UNAPPROVED) The intent of this section is to clarify and add to what is shown in the official plans. In case of conflict between
BUIDLING INSTRUCTION GLIDER MINI-RACE. MINI-Race building instruction January
 Wingspan [mm]: 950 Aspect ratio: 7,7 Wing area [dm2]: 11,7 Wing loading [g/dm²] : 16 Takeoff weight [g]: 190 Airfoil: AG03 mod BUIDLING INSTRUCTION GLIDER MINI-RACE www.pcm.at 1 CONTENTS DATA 1. Kit contents