Important Information
|
|
|
- Verity Gardner
- 6 years ago
- Views:
Transcription
1 Owner s Manual

2 Important Information Congratulations to your new Blix bike! We re sure you will enjoy your cycling experience in a completely new way with the purchase of your new Blix bike. Before your first ride, read this manual thoroughly for operating guidelines, maintenance instructions, and other useful information to ensure that you get the most out of your Blix. About this manual This manual explains how to operate and ride your Blix bike. While we do not claim nor intend to include instructions and tips for every combination of rider and bike, rider and environment, and bike and environment, this manual is intended to explain how to operate a Blix bike. This manual includes instructions for performing basic maintenance tasks that will benefit the performance and lifespan of your bike. Some maintenance should only be performed by your dealer, and you can refer to this manual to check which maintenance needs to be performed by a Blix dealer. By following the instructions in this manual, you and your Blix bike should have many miles together. Activate your warranty To activate the limited warranty of your bike, register online at You will be asked to identify the frame number of your bike. It is important that you keep the frame number for your records as it is specific to only your bike. The frame number is located on the front of the frame head tube.we recommend that you write it down in the box below. My bicycle model: My dealer: Blix Owner s Manual, version 1.0 i
3 Assembly of your new bicycle The first adjustments and final assembly of your bicycle require special handling and skills, and this should only be done by a Blix authorized dealer. Your bike will be ready to ride upon assembly, but should you have any questions about the bike before operating it, please contact your authorized dealer. Blix models Each model s component setup is customized for different customer needs and tastes. However, all Blix bikes are equipped with: - Puncture resistant tires by Kenda - Schrader valves - Gear system by Shimano - Brake system by Tektro - Rust free screws and nuts - Portable battery - Foldable seats (for battery placement) - LED lights - Charger - ActiveDrive technology ii
4 If you have questions There are different models of Blix bicycles, and this manual may contain information and illustrations that don t apply to your bicycle. If you have any questions after reading this manual, we recommend to contact your dealer. If you still have any questions we encourage you to contact our customer service department: support@blixbike.com Blix Bicycle 877 Cedar st. #150 Santa Cruz, CA BLIX ( ) iii
5 Table of Content Guide to Safe Operations Before Riding Safety Regulations 1 Battery Safety... 1 Using a Blix bike... 2 Make sure the bike fits you... 2 Know how your Blix bike performs... 2 Unique Components... 3 Check Your Bike... 7 Safe Riding Lighting and reflectors... 8 Where a helmet... 8 How does it work? The Control Panel Auto function... 9 Mode function... 9 Throttle... 9 Lighting... 9 The Battery Overview Charging the Battery Storing the Battery Range and Influencing Factors Technical Description Let s Go - Quick Guide Maintenance General Maintenance Storing Adjustment Adjusting the Brakes Roller brake Hydraulic disc brake V-brake (rim brake) Quick adjustment of V-brake Adjusting V-brake Checking the brake pads Adjusting the Gears Adjusting Nexus Adjusting Acera / Deore The Wheels and Motor iv For more Information Limited Warranty Technical Specifications... 26
6 Before Riding Safety Regulations - Carefully read this manual before your first bike ride. Recommended total max weight is 220 lbs (rider and cargo) - Before each ride, check your bike to ensure that there are no visible damaged components. - Unfastened or damage parts should be secured appropriately or replaced. - Your Blix bike is intended for recreation and transportation. It is solely designed for cycling on paved roads and bike paths. - You should not make any alterations or changes to your Blix bike. This may affect the ride ability and safety of the bike. Battery Safety - For specified safety regulations for charging the battery, see section The Battery Charging the Battery. Keep the battery out of the reach of children. - Only use the charger provided with your Blix bike. - Use the charger only in a dry indoor environment. Do not connect the charger with wet hands. - Do not charge the battery under direct sunlight. - Do not charge the charger during lightning storms. - Charge the battery where there is plenty of ventilation. - Discontinue charging if you hear unusual noises or notice leakage from the battery. - Do not disassemble the battery - this will void your warranty. - Do not heat or hit the battery, this will damage your battery and possibly cause injury. - Do not immerse the battery in water or other liquid. - Disconnect the charger from the electrical outlet when not charging. 1
7 Using a Blix bike A Blix bike is a fast, smart and efficient solution for personal transportation. If you don t want to use the electrical assist system, your Blix bike will function as a normal traditional bicycle. The wheel hub-motor rotates without friction when you pedal. You re in control of the level of assistance you want during your ride. Make sure the bike fits you Your dealer should fit you with the proper size of bicycle. There should be at least 1 (25 mm) clearance between the top tube and the rider when standing over the bicycle. The seat may be adjusted to offer the best comfort and performance. Blix bikes are not intended for use by children under 16 years of age. Know how the bike performs A Blix bike is an electric bicycle and functions differently than a non-electric traditional bicycle. It has an electric engine integrated in the rear or, depending on the model, front wheelhub that can give you extra assistance and speed when riding the bike. It is important that you read this manual carefully and know how to operate the bicycle and its functions before you ride the bike for the first time. 2
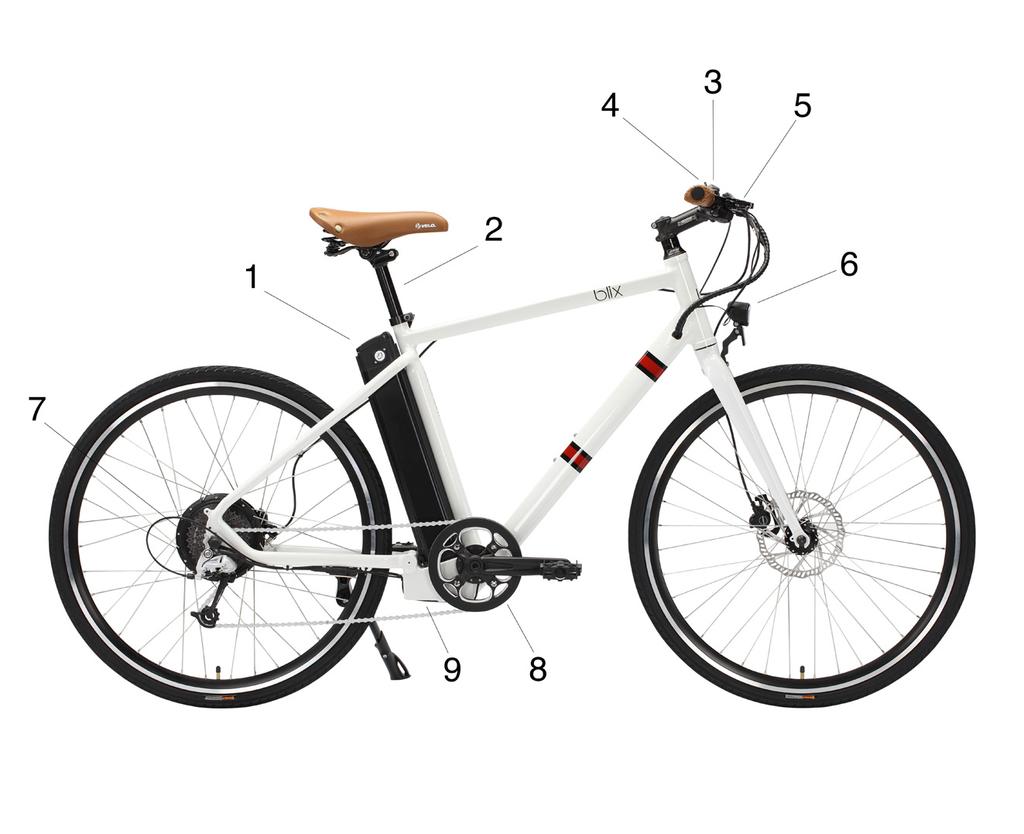
8 Unique Components 3


9 1 Battery with main switch 2 Seat post with tilting function 3 Control panel with ActiveDrive 4


10 4 Throttle 5 Brake levers with automatic power cut-off switch 6 LED-lighting 5


11 7 Hub-motor 8 Crankshaft with pedaling sensor 9 Control-box compartment under battery 6
12 Check Your Bike There are several simple guidelines that we recommend in order to keep your Blix bike in a good working condition. Here are a few steps for a long and trouble-free relationship with your new commuter friend. Keep it clean We encourage you to keep your Blix bike nice and clean. A clean bike lasts longer and is more enjoyable and safer to ride. Use a damp cloth to wipe off the bike. Do not use high-pressure water systems, this can damage parts of the bike. Tighten the screws Regularly check that screws and nuts are securely attached. Unfastened parts may cause the bike to not function properly and can cause accidents. Brake Make sure to maintain and service the brake system. Well functioning brakes are essential to operate the bike in a safe manner. Lubricate Keep the chain well lubricated with bicycle chain lube. Make sure to wipe off the chain with a cloth before and after lubrication in order to prevent accumulation of dirt and any excess oil. Charge Charge the battery regularly. Do not allow your battery to remain in a discharged state for a long period of time. Doing so will negatively affect the life of the battery. Pump Keep the bicycle tires sufficiently inflated. A properly inflated tire has lower rolling resistance and lasts longer. The recommended tire pressure is found on the side of the tire. Maintain the tires att this recommended pressure. 7


13 Safe Riding Lights and reflectors In order to improve the visibility of you and your bike, LED lights are powered by the battery and can be switched on and off from the control panel. Your Blix bike is also equipped with reflectors. Remember to keep the lights and reflectors clean for best visibility. Use your helmet Remember to use your helmet. Even if you feel confident on the road, you will share the road with others and accidents can happen. 8
14 The Control Panel ACTIVE DRIVE TM The control panel is where you control what level of assistance you want when riding your Blix bike. With ActiveDrive you can easily choose between different modes described below. AUTO-function Your control panel starts up in a smart AUTO-function mode. In this mode, the electric assistance provided by the system is based on the pedaling speed. You may adjust the assistance level by switching gears. A lower gear gives higher pedaling speed and more assistance. So when going uphill, switch to a lower gear and enjoy. MODE-function The control panel also has three fixed speed limit levels. Push the MODE-button and press it down for about two seconds, until the LOW light is illuminated. You may switch between LOW, MEDIUM and HIGH by quickly pressing the MODE-button. For switching back to AUTO-function: push in the MODE-button and keep it pressed for two seconds. Throttle If you don t want to pedal at all, you can use the throttle to receive electric assistance up to 16 mph. Using the throttle function will cause the battery to run out faster than when using the auto- or mode function. Lighting The LED lighting system of your Blix bike is controlled from the control panel by pressing the LIGHT-button. 9
15 The Battery - Overview Battery position The battery is located under the saddle of your Blix bike. This allows for a low center of gravity and better stability when cycling. Battery type The battery is a lithium-ion battery and suitable for regular use and recharge. The main switch and battery lock The battery is provided with a main switch (ON/OFF) for activating the battery, and a battery lock for securing the battery to the bicycle. The same key is used for securing your battery and activating your bike. Charging You may charge the battery when it is mounted in its position under the saddle of the bike. You may also remove the battery and charge it from a regular wall outlet. Complete charging time of a fully discharged battery is about 3 hours. You may also charge the battery even if it is not fully discharged, it will not damage the battery. Fuses The battery is equipped with a fuse. If the main fuse blows, the battery will not provide power to the motor. Contact a professional to replace the fuse. Your Blix bike is delivered with two additional spare main fuses (30A). 10


16 Charging the Battery Removing the battery The battery can be charged in its fixed position under the saddle or removed and charged elsewhere. Remove the battery by tilting the seat post, unlock the battery-lock, remove the key, and pull the battery upward. Make sure to take out the keys before pulling the battery up. Charge the battery Only charge the battery with the charger provided with your Blix bike. For charging, connect the charger to a wall outlet and to the battery. When charging is completed, disconnect the charger. Charger The charger has two LED lights: POWER and CHARGE. The POWER light turns red when the charger is plugged into an outlet. The CHARGE light turns red while battery is charging. When the charger is not connected to battery or when the battery is fully charged, the CHARGE light turns green. 11

17 Reattaching battery Turn the battery so that the key lock is facing the left hand side when looking towards the front of the bike. Slide the battery down through the fixed tracks on the bike. Lock the battery to prevent from theft. Check battery status Make sure the battery is turned on. Current battery status may be displayed in two different indicators. Indicator 1 - Control panel Press the ON-button. The top red lights indicate battery status. Indicator 2 - Battery Press and hold the white button on top of the battery. The red lights indicate battery status. During operation, the displayed battery status is based on the current biking condition. A lower battery status will be displayed when biking uphill, during acceleration and when switching to a higher level of electric assistance. 12
18 Storing the Battery The battery status and durability is maintained by regularly using and charging the battery. When storing the battery, make sure to perform regular maintenance by charging the battery according to the specifications found in this manual and on the battery. Store the battery indoors and in normal roomtemperature. When storing the battery it is recommended that you charge the battery for two hours each month.! - Do not leave the battery uncharged for longer time periods. It will alter the battery life.!! - The battery charger is exclusively designed for use in a dry indoor environment with good ventilation.!!! - When charging, only use the charger provided with your Blix bike. 13
19 Range and Influencing Factors Battery Range There are many factors that affect the range of the battery. In the list below you will find some examples of factors and conditions that have negative impact on the range. Factors having negative influence on range: - Headwind - Hilly terrain - Soft ground - Low tire pressure - High assistance level - High speed - No or poor maintenance - Low gear - Low manual pedaling force - High weight, the bike is heavily loaded. 14
20 Technical Description The battery consists of a series of interconnected lithiumion cells. The battery also contains a control unit (BMS) that monitors the cells during use and during charging of the battery. The control unit (BMS) turns off the battery at a given voltage level to prevent damage to the battery cells. This means the battery is empty and needs recharging. The control unit also contains a balancing circuit that controls charging so that the individual cells are charged evenly. This improves the performance of battery. Should there arise an unbalance between the cells, the battery range may be affected. In order to improve the balance between the cells, it is recommended to fully discharge and charge the battery 2-3 times monthly (complete discharge and charge cycles). 15

21 Let s Go! Quick Guide Step 1 Insert the key into the main switch in the battery and turn to ON. Step 2 Push the ON/OFF-button on the control panel on the handlebar. This will activate the electric assistance system. Ready! - Ride your Blix bike in a similar manner as on a traditional non-electric bicycle. The electric assistance system will automatically provide assistance based on your pedaling speed. Don t forget your helmet! 16
22 Maintenance General Maintenance It is not just nice to have a clean bike, it s smart too. A clean bike lasts longer and performs better than a dirty bike. Wash your bike gently with a damp cloth. Do not use pressure washer systems! Periodically check through the nuts and bolts on the bike to make sure they are tightened and secure. It is also recommended to do periodic servicing of your bike by a professional. Storing Your Blix bike is best stored indoors when not in use to protect from wearing from weather conditions. Take proper care of your battery and do not expose it to extreme temperatures. Preferably, store the battery inside when not in use. Do not forget to recharge the battery during periods between use. Refer to the Storing the battery section of this manual. 17
23 Adjusting the Brakes Different models have different types of brake systems, these are explained below. Ask your dealer if you are not sure which brake system your model has. For safety reasons, the brake lever on the handlebar is equipped with a cut-off sensor that automatically turns off the power assistance when braking. Coaster brake Blix bikes with hub gears are equipped with coaster brakes. This type of brake requires minimum servicing. If you need to service the brakes, it is recommended to contact a professional. Hydraulic disc brake Hydraulic disc brakes provide great braking performance, and requires little servicing. Adjustments and service of this brake should be made by a professional. An additional manual for the hydraulic brake system is available at V-brake (rim brake) Some Blix bike models are also equipped with V-brakes, or rimbrakes, having brake pads gripping the front wheel rim during braking. These brakes provide good and effective braking, but wear out over time. You need to regularly check the brake pads, tighten the braking wire and/or replace the pads when worn out.! - If you hear a scraping metallic sound when you brake with the rim brake, the brake pads may be completely worn out and need to be replaced immediately. Worn out brake pads cause unnecessary wear on the bicycle rim and will lead to reduced braking performance and accidents. 18


24 Quick adjustment of V-brake Adjustment screw (j) is located at the brake lever. To tighten the braking wire, screw the adjustment screw outwards. Secure its position with the locking-nut. Adjusting the V-brakes If the brake pads are worn, you may need to tighten the braking wire. 1. Loosen the bolt on the brake arm using a hex key. 2. Tighten the wire 1-3 mm and lock the position by tightening the screw. Check the brake pads Adjust the brake arm with adjustment screw (J). Tightening the adjustment screw increases the spring tension and turns the brake arm away from the rim. The brake pads should not be in contact with the rim when not braking. Adjusting the tension for one brake arm will influence the other arm. Adjust the tension for each arm until they move symmetrically. 19


25 Adjusting the Gears Different models have different types of gear systems, these are explained below. Ask your dealer if you re not sure which gear system your model has. The gears are pre-adjusted before purchase, but after some time of use the gears may need some adjustments. Instructions for how to adjust each gear system are described on the following pages. Internal-gear hub, Nexus For Blix bike models equipped with an internal Nexus hubgear, the gear mechanism is located inside the back wheel hub. Internal-gear hubs are more reliable and require less maintenance than derailleur systems. You can shift gear at a stop. You shift gear by turning the gear-shifter on the handlebar. External gears (derailleur) Acera/Deore External gears provides efficient operation and drivetrain of your Blix bike. The derailleur arranged below the cassette guides the chain to correct rear sprockets during shifting. You shift gear by pressing the respective gear-shift buttons (+ or -) Shimano Acera Shimano Deore Adjusting the gears You may adjust the gears yourself. To fine tune the gears is easy and may be done as soon as you experience any trouble. Gears that are not adjusted correctly may cause unnecessary wearing of the gear system. 20


26 Adjusting Nexus 8 On the right side of the rear wheel hub, there are two yellow lines to be used as guidnance for correct gear adjustment. Adjusting the gears Arrange the shifter on the handlebar into the 4th gear. Shifter on handlebar Fine tune the gear by screwing on the adjustment screw (j) found on the shifter on the handlebar. The yellow lines on the hub move towards each other when you are screwing clockwise. Continue until the yellow lines are aligned. Check that the adjustment is correct by shifting to other gears and back to the 4th gear. The yellow lines should align again. Rear wheel hub 21


27 Adjustment - Acera / Deore Adjusting the gears For adjusting the gear, turn the adjustment screw (J). The gear wire runs through this bolt. By tightening the wire, the derailleur will change to a lower gear more easily. Tighten the wire by turning the adjustment screw (J) one step at a time in a counter-clockwise direction. One step makes a big difference check after each step. In order to loosen the wire, turn the adjustment screw in a clockwise direction, one step at a time. 22


28 The Wheels and Motor Un-mount the wheel The power cable to the hub-motor is provided with a connector and can be unplugged by pulling it apart. When the connector is unplugged, the wheel can be un-mounted in a similar manner as a traditional bike wheel. The connector plug is provided with two arrows which align to indicate the correct position. 23
29 For more Information If you would like additional information about your new Blix bike, contact your local dealer or Blix bicycle directly. If you want additional information about electric bicycles or cycling in general, there are also a lot of available information to be found in your public library or online. If you have any questions or if there is something you think we should know - tell us about it! We continually strive to improve our products and services and we love to hear your opinion! Thank you for choosing Blix! -The Blix Team Blix Bicycle LLC 877 Cedar street, suite 150 Santa Cruz, CA
30 Limited Warranty Go to to activate this warranty. 3 years Frame and rigid front forks, excluding suspension forks. 1 year Paint finish and decals. Motor, battery, electrical components and all other parts. Suspension forks. (a) Remedies: The sole remedy is limited to repair or replacement of defective parts and components of those with equal or greater value at the sole discretion of Blix. Seller s liability under any limited warranty is discharged, in Seller s sole discretion and at its expense, by: repairing or replacing the affected goods; or crediting or refunding the end user s purchase price of the affected goods, less any applicable discounts, rebates or credits. Seller s limited warranty is extended to the first end user purchaser only and such end user must register their product at to claim warranty coverage. Affected products may not be submitted to Seller for warranty repair or replacement except with written authorization from Seller after confirmation of coverage. Notice for replacement must be given within 60 days of the discovery of the defect. (b) Exclusions: The above warranty or any implied warranty does not cover normal wear and tear, improper assembly, damage or failure due to accident, misuse, abuse, or neglect, improper follow-up maintenance, installation of third party components, parts, or accessories, or any products that have been modified from manufacturer s specifications. (c) Delivery Costs: The end user is responsible for all costs and risk of loss associated with the delivery of warranted goods to Seller or its agent for warranty repair or replacement, and Seller is responsible for all costs and risk of loss associated with the return delivery of repaired or replaced products to the end user. (d) Warranty claims: Warranty claims must be made through the dealer/store that the bicycle was purchased from. If you purchased your bike online from we will be your dealer. All Warranty decisions will be made by Blix Bicycle LLC. (e) THIS SECTION SETS FORTH PURCHASER AND END USER S SOLE REMEDY AND SELLER S ENTIRE LIABILITY FOR ANY WARRANTY RELATING TO THE PRODUCTS. EXCEPT FOR THE LIMITED EXPRESS WARRANTIES DESCRIBED IN THIS SECTION (A) NEITHER SELLER NOR MANUFACTURER HAS MADE OR MAKES ANY EXPRESS OR IMPLIED REPRESENTATION OR WARRANTY WHATSOEVER, INCLUDING ANY WARRANTIES OF: (i) MERCHANTABILITY; (ii) FITNESS FOR A PARTICULAR PUR- POSE; (iii) TITLE; (iv) NON-INFRINGEMENT; OR (v) PERFORMANCE OF PRODUCTS TO STANDARDS SPECIFIC TO THE COUNTRY OF IMPORT, WHETHER ARISING BY LAW, COURSE OF DEALING, COURSE OF PERFORMANCE, USAGE OF TRADE OR OTHERWISE, ALL OF WHICH ARE EXPRESSLY DISCLAIMED AND (B) PURCHASER ACKNOWLEDGES THAT IT HAS NOT RELIED ON ANY REPRESENTATION OR WAR- RANTY MADE BY SELLER, EXCEPT AS SPECIFICALLY DESCRIBED IN THIS SECTION. 25
31 Technical Specification Battery: 36 Volt 10 Ah / 13,5Ah 360 Wh / 486 Ah Charing time: 3 hours Weight 7 lbs Main fuse: 30A Lithium-ion Charger: Input: 110V Output: 42V (for 36V-battery) Motor: Brushless hub motor 36V 250 Watt / 350 Watt Max speed:16 mph Bicycle: Frame: Aluminum Recommended maximum weight: 220 lbs (rider and cargo) 26
32 Life is Beautiful. Ride.
Congratulations on your purchase of a JC Series Performer trike! The Performer JC Series is designed for everything from touring to commuting and
 Congratulations on your purchase of a JC Series Performer trike! The Performer JC Series is designed for everything from touring to commuting and shopping in the city. The JC Series frames are made of
Instruction Manual: VelectriX Foldaway
 Instruction Manual: VelectriX Foldaway CONTENTS Safe Riding Recommendations Page 2 Pre-Ride Checklist Page 3 Display and Controls Page 4 Quick Guide to Folding Page 6 Battery Instructions Page 7 Maintenance
Instruction Manual: VelectriX Urban 2.0+
 Instruction Manual: VelectriX Urban 2.0+ CONTENTS Safe Riding Recommendations Page 2 Pre-Ride Checklist Page 3 Display and Controls Page 4 Maintenance Page 8 Warranty Page 9 Contact Details Page 10 Service
Instruction Manual: VelectriX Urban 2.0
 Instruction Manual: VelectriX Urban 2.0 CONTENTS Safe Riding Recommendations Page 2 Pre-Ride Checklist Page 3 Display and Controls Page 4 Maintenance Page 8 Warranty Page 9 Contact Details Page 10 Service
Instruction Manual: VelectriX Ascent 29 MTB
 Instruction Manual: VelectriX Ascent 29 MTB CONTENTS Safe Riding Recommendations Page 2 Pre-Ride Checklist Page 3 Display and Controls Page 4 Maintenance Page 8 Warranty Page 9 Contact Details Page 10
This is the Quick Start Guide for the Optibike Pioneer Allroad electric bicycle. The Guide provides for basic information required to ride the
 This is the Quick Start Guide for the Optibike Pioneer Allroad electric bicycle. The Guide provides for basic information required to ride the Allroad. It is not intended to be an extensive manual. It
Instruction Manual: VelectriX Ascent+ 29 MTB
 Instruction Manual: VelectriX Ascent+ 29 MTB CONTENTS Safe Riding Recommendations Page 2 Pre-Ride Checklist Page 3 Display and Controls Page 4 Maintenance Page 8 Warranty Page 9 Contact Details Page 10
USER GUIDE TO POWER ASSISTED BIKES
 USER GUIDE TO POWER ASSISTED BIKES 1 PAGE CONTENTS Page. 3 Unpacking Page. 3-4 Easy steps to get started Page. 5 General Assembly Instructions Page. 6 Aligning H/Bars, Page. 7 Tightening pedals onto Crank
SANTA CRUZ BICYCLES Cable Routing Procedure MY17
 SANTA CRUZ BICYCLES Cable Routing Procedure MY17 Copyright Santa Cruz Bicycles 2017 TABLE OF CONTENTS SAFETY INSTRUCTIONS... 3 CABLE ROUTING... 3 INTRODUCTION...3 TOOLS AND SUPPLIES...3 REAR DERAILLEUR
POWER ASSISTED BICYCLES OWNERS MANUAL
 POWER ASSISTED BICYCLES OWNERS MANUAL WE HAVE INCLUDED A BICYCLE OWNER S MANUAL WHICH YOU SHOULD REFER TO FOR ALL GENERAL CYCLE MAINTENANCE. CONTENTS Page. 3 Unpacking. Page. 3-4 Easy steps to get started.
HELMETS SAVE LIVES!!! ALWAYS WEAR A PROPERLY FITTED HELMET WHEN YOU RIDE YOUR SCOOTER. DO NOT RIDE AT NIGHT. AVOID RIDING IN WET CONDITIONS.
 HELMETS SAVE CORRECT FITTING - MAKE SURE YOUR HELMET COVERS YOUR FOREHEAD. LIVES!!! ALWAYS WEAR A PROPERLY FITTED HELMET WHEN YOU RIDE YOUR SCOOTER. DO NOT RIDE AT NIGHT. AVOID RIDING IN WET CONDITIONS.
comfort without compromising on performance and to fit your various needs on touring,
 Congratulations on your purchase of Goal-26X. Goal-26X is made to enhance comfort without compromising on performance and to fit your various needs on touring, shopping and communicating. Let s have fun
Santa Fe Cycles Assembly Guide Introduction
 Santa Fe Cycles Assembly Guide Introduction Congratulations on your purchase of your new Santa Fe bicycle. You have purchased a bicycle that has many features and qualities. Please take a few minutes and
BIKE TO GO - USER MANUAL - MODEL#: JBTG24
 BIKE TO GO 24 - USER MANUAL - MODEL#: JBTG24 GET ACQUAINTED WITH YOUR 24 BIKE TO GO Congratulations on your new Jetson 24 folding bicycle! The Jetson 24 Bike to Go is an innovative and fun personal transportation
Ladies Shopper Bike Assembly Manual 28C03
 Ladies Shopper Bike Assembly Manual 28C03 Ecosmo Ltd 1 Know your bike 1. Wheel 2. Rear Derailleur 3. Chain 4. Crank Set 5. Pedal 6. Seat Quick Lock 7. Saddle and Post 8. Frame 9. Front Light 10. Front
ASSEMBLY GUIDE: Izip & Ezip Electric Bicycles with Rack-Top Mounted Batteries ( RTMB Bicycles )
") ASSEMBLY GUIDE: Izip & Ezip Electric Bicycles with Rack-Top Mounted Batteries ( RTMB Bicycles ) Please Refer to your Owner s Manual for Detailed Setup Instructions Technical & Customer Service: 1-800-377-4532
ASSEMBLY GUIDE: Izip & Ezip Electric Bicycles with Rack-Top Mounted Batteries ( RTMB Bicycles ) Please Refer to your Owner s Manual for Detailed Setup Instructions Technical & Customer Service: 1-800-377-4532
Parts List. 7. Handlebars 8. Grips 9. Handlebar Stem 10. Front Brake 11. Front Wheel 12. Crank 13. Chain
 Woodworm Cruise Parts List 1. Free Wheel with Rear Hub 2. Fenders 3. Fender Stay 4. Quick Release 5. Saddle 6. Seat Post 7. Handlebars 8. Grips 9. Handlebar Stem 10. Front Brake 11. Front Wheel 12. Crank
SANTA CRUZ BICYCLES Geometry Adjust Flip Chip
 SANTA CRUZ BICYCLES Geometry Adjust Flip Chip Copyright Santa Cruz Bicycles 2017 TABLE OF CONTENTS SAFETY INSTRUCTIONS... 3 GEOMETRY ADJUST FLIP CHIP... 3 INTRODUCTION...3 TOOLS AND SUPPLIES...3 MY18 NOMAD
Owner's Manual Product Line
 Owner's Manual 2017 Product Line Table of contents 1. Safety Information 2. Quick release procedure I. Installation II. Adjustment and operation III. Inspection of proper installation 3. Registering your
DISASSEMBLING & REASSEMBLING CARTRIDGE INSTALLING SEATPOST ON BIKE
 INTRODUCTION BILL OF MATERIALS SPECIFICATIONS & TOOLS PROCEDURES DISASSEMBLING & REASSEMBLING CARTRIDGE INSTALLING SEATPOST ON BIKE OPERATION OF SEATPOST GIANT LIMITED WARRANTY 1 INTRODUCTION Congratulations
WELCOME! Thank you for choosing our electric bike!
 WELCOME! Thank you for choosing our electric bike! This manual shows how to use the bicycle when you get it. new electric bicycle and gives good advice and instructions. Your electric bicycle shall be
model - CYPRESS DX W
 Contents model - CYPRESS DX W Maintenenace manual Read and Save these instructions Welcome Contents 1 Preparing Nothing makes us happier than seeing people out riding bikes. For over thirty years Giant
Assembly Tools. Assembly will take about an hour
 Assembly Guide Assembly Tools Included in your parts box: Pedals Toolkit (4+5mm combo Allen wrench, 13+15mm combo open-end wrench) Touch-up paint Spare fuses (for battery) Assembly will take about an hour
SG-7R46 SG-7R45 BR-IM41-R CJ-7S40 WARNING CAUTION SERVICE INSTRUCTIONS. Inter-7 Hub. Inter-M Brake Cassette joint NOTE:
 t WARNING It is important to completely understand the operation of your bicycle's brake system. Improper use of your bicycle's brake system may result in a loss of control or an accident, which could
Item N o.: Item N am e:40cm Boys Rival Bike
 Item N o.:42272892 Item N am e:40cm Boys Rival Bike 9 bell 8 grip 30 crash pad 10 brake lever 26 wheel reflector 22 saddle 23 seat post 25 rear reflector 24 quick release 6 handle bar 7 stem 2 top tube
Owner s Manual. The most comfortable upright bicycles ever made.
 Owner s Manual The most comfortable upright bicycles ever made. At Day 6, we hope you will enjoy riding our bicycles as much as we enjoy designing them. We have truly combined the best features of a recumbent
E-trike Li Assembly Guide
 PREPARATION 1. Read this assembly manual BEFORE commencing assembly. 2. Carefully remove all the components and packaged hardware from the shipping boxes. 3. Unpack the contents of the large double box
Folding Dual Suspension MTB. Instruction Manual
 Folding Dual Suspension MTB Instruction Manual Introduction The Stowabike Folding MTB has been made to last and with proper maintenance, it will give you years of enjoyable rides and journeys. The following
BICYCLE ASSEMBLY INSTRUCTIONS. dutchcycles.com.au. Distribution Centre
 BICYCLE ASSEMBLY INSTRUCTIONS dutchcycles.com.au Distribution Centre Shed 68, 400-422 Somerville Road, Tottenham, VIC 3012 email: service@dutchcycles.com.au BICYCLE COMPONENTS KEY INTRODUCTION CONGRATULATIONS
Cantilever Brake. Dealer's Manual. ROAD MTB Trekking. City Touring/ Comfort Bike
 (English) DM-RCBR001-00 Dealer's Manual ROAD MTB Trekking City Touring/ Comfort Bike URBAN SPORT E-BIKE Cantilever Brake BR-CX70 BR-CX50 BL-4700 BL-4600 BL-R780 BL-R3000 ST-7900 ST-6700 ST-5700 ST-4600
owner s manual 2012 yeti arc
 owner s manual 2012 yeti arc YETI CYCLES 600 Corporate Circle, Unit D Golden, CO 80401 888.576.9384 www.yeticycles.com Table of Contents Brand Overview 06 Frame Features 08 Geometery 10 Maintenance Schedule
DM-MBST (English) Dealer's Manual. ROAD MTB Trekking. City Touring/ Comfort Bike. Shifting lever. EZ-FIRE Plus ST-EF500 ST-EF510
 Dealer's Manual. ROAD MTB Trekking. City Touring/ Comfort Bike. Shifting lever. EZ-FIRE Plus ST-EF500 ST-EF510") (English) DM-MBST001-00 Dealer's Manual ROAD MTB Trekking City Touring/ Comfort Bike URBAN SPORT E-BIKE Shifting lever EZ-FIRE Plus ST-EF500 ST-EF510 CONTENTS IMPORTANT NOTICE... 3 TO ENSURE SAFETY...
(English) DM-MBST001-00 Dealer's Manual ROAD MTB Trekking City Touring/ Comfort Bike URBAN SPORT E-BIKE Shifting lever EZ-FIRE Plus ST-EF500 ST-EF510 CONTENTS IMPORTANT NOTICE... 3 TO ENSURE SAFETY...
Parts and Owners Manual
 Parts and Owners Manual MOWER MODEL: SERIAL: ENGINE MODEL & HP: DATE PURCHASED: PURCHASED FROM: You must receive special training from the dealer before operating this mower. 9/30/2005 Commercial Mower
DM-MBRD (English) Dealer's Manual. ROAD MTB Trekking. City Touring/ Comfort Bike. Rear Derailleur SLX RD-M7000 DEORE RD-M6000
 Dealer's Manual. ROAD MTB Trekking. City Touring/ Comfort Bike. Rear Derailleur SLX RD-M7000 DEORE RD-M6000") (English) DM-MBRD001-04 Dealer's Manual ROAD MTB Trekking City Touring/ Comfort Bike URBAN SPORT E-BIKE Rear Derailleur SLX RD-M7000 DEORE RD-M6000 CONTENTS IMPORTANT NOTICE... 3 TO ENSURE SAFETY... 4
(English) DM-MBRD001-04 Dealer's Manual ROAD MTB Trekking City Touring/ Comfort Bike URBAN SPORT E-BIKE Rear Derailleur SLX RD-M7000 DEORE RD-M6000 CONTENTS IMPORTANT NOTICE... 3 TO ENSURE SAFETY... 4
Congratulations, once again, on buying an E RIDER Model 18!!!!
 Congratulations, once again, on buying an E RIDER Model 18!!!! USER MANUAL We are sure you will be excited by the delivery of your brand new bike and you will be eager to start using your E RIDER as soon
TANDEM. When you buy a Pedego, you re investing in: ($3, to $3, ) Notes
 Notes") TANDEM ($3,295. 00 to $3,795. 00 ) The Pedego Tandem is the world s only electric bicycle built for two. Riding is twice as fun with someone you love. FRAME OPTIONS AND COLORS ONE SIZE Black Red TIRE /
TANDEM ($3,295. 00 to $3,795. 00 ) The Pedego Tandem is the world s only electric bicycle built for two. Riding is twice as fun with someone you love. FRAME OPTIONS AND COLORS ONE SIZE Black Red TIRE /
RADROVER REAR RACK INSTALLATION MANUAL
 RADROVER REAR RACK INSTALLATION MANUAL WWW.RADPOWERBIKES.COM We are here to help! Please contact us at SUPPORT@RADPOWERBIKES.COM or 1-800-939-0310 if you have questions. REV022216 Welcome Thanks you for
KIDS SCOTT 2011 BIKE OWNERS MANUAL
 SCOTT 2011 BIKE OWNERS MANUAL B SCOTT SPORTS SA 17 RTE DU CROCHET 1762 GIVISIEZ SWITZERLAND 2009 SCOTT SPORTS SA, ALL RIGHTS RESERVED SCOTT-SPORTS.COM CONTENT Congratulations P. 004 General introduction
KIDS SCOTT 2013 BIKE OWNERS MANUAL
 SCOTT 2013 BIKE OWNERS MANUAL SCOTT SPORTS SA 17 RTE DU CROCHET 1762 GIVISIEZ SWITZERLAND 2011 SCOTT SPORTS SA, ALL RIGHTS RESERVED SCOTT-SPORTS.COM B content Congratulations... P. 004 General introduction...
MAGNETIC CYCLING TRAINER SF-B0419 USER MANUAL
 MAGNETIC CYCLING TRAINER SF-B049 USER MANUAL IMPORTANT: Read all instructions carefully before using this product. Retain owner s manual for future reference. For customer service, please contact: support@sunnyhealthfitness.com
7130 Lancer Rear Drive Magnetic Commercial Indoor Cycling Bike
 7130 Lancer Rear Drive Magnetic Commercial Indoor Cycling Bike Owner s Manual Made in Taiwan INDEX IMPORTANT SAFETY INFORMATION... 1 EXPLODED DRAWING... 2 PARTS LIST... 3 ASSEMBLY INSTRUCTION... 4-9 USER
INTRODUCTION BILL OF MATERIALS SPECIFICATIONS & TOOLS PROCEDURES OPERATION OF SEATPOST GIANT LIMITED WARRANTY
 INTRODUCTION BILL OF MATERIALS SPECIFICATIONS & TOOLS PROCEDURES OPERATION OF SEATPOST GIANT LIMITED WARRANTY 1 INTRODUCTION Congratulations on the purchase of your new GIANT CONTACT SWITCH seatpost. This
DM-RCWH (English) Dealer's Manual. ROAD MTB Trekking. City Touring/ Comfort Bike. Wheel Set. WH-RX31 SM-AX x12 SM-AX x12
 Dealer's Manual. ROAD MTB Trekking. City Touring/ Comfort Bike. Wheel Set. WH-RX31 SM-AX x12 SM-AX x12") (English) DM-RCWH001-00 Dealer's Manual ROAD MTB Trekking City Touring/ Comfort Bike URBAN SPORT E-BIKE Wheel Set WH-RX31 SM-AX720-100x12 SM-AX720-142x12 CONTENTS IMPORTANT NOTICE... 3 TO ENSURE SAFETY...
(English) DM-RCWH001-00 Dealer's Manual ROAD MTB Trekking City Touring/ Comfort Bike URBAN SPORT E-BIKE Wheel Set WH-RX31 SM-AX720-100x12 SM-AX720-142x12 CONTENTS IMPORTANT NOTICE... 3 TO ENSURE SAFETY...
TRAILMATE METEOR ASSEMBLY MANUAL
 TRAILMATE METEOR ASSEMBLY MANUAL (DISC BRAKE VERSION) The Trailmate Meteor recumbent has been designed for easy assembly. This means more time to enjoy the smooth ride with single speed, 3 speed coaster
Assembly Tools. Assembly will take 1-2 hours
 Assembly Tools Included in your parts box: Pedals Quick release skewer Reflectors (if not already installed) Toolkit (4+5mm combo Allen wrench, 13+15mm combo open-end wrench) Helpful Tools: Scissors (for
It's Not Rocket Science, It's Bicycle Maintenance
 TECM 2700.011 It's Not Rocket Science, It's Bicycle Maintenance A Comprehensive Bicycle Maintenance Manual for All Riders Patrick Doran, Bryan Hayes, Ashley Huffman, Corbin Sheridan 4/18/2012 It's Not
Bicycle Owner's Manual Easy Access Bike
 Bicycle Owner's Manual Easy Access Bike AGE: FROM 9 YEARS OLD AND UP IMPORTANT Check bike after assembly or any adjustments. Consult bicycle retailer with questions. Always wear a helmet. Children should
User manual. Velo-Plus². Van Raam BV Aaltenseweg CM Varsseveld The Netherlands 06.13
 Velo-Plus² Van Raam BV Aaltenseweg 56 7051 CM Varsseveld The Netherlands 06.13 Contents Contents... Contact details manufacturer... Conformity... Introduction... Delivery... Intended usage... Safety measures...
Owners Manual Courtesy of ElectricScooterParts.com
 Owners Manual Courtesy of ElectricScooterParts.com Contents MINIMOTO SPORT RACER Owner s manual and safety information Page 2 Warnings 3-5 Electrical hazard 6 Vehicle assembly and set up 7-8 Brake adjustment
600 Corporate Circle, Unit D Golden, CO USA P// //
 Yeti Cycles 600 Corporate Circle, Unit D Golden, CO USA P//303.278.6909 // 888.576.9384 www.yeticycles.com A R C - X O W N E R S M A N U A L 0 8-1 0 Table of Contents Brand Overview 6 Frame Features 8
Dual Pivot Caliper Brake
 (English) DM-RBBR001-01 Dealer's Manual ROAD MTB Trekking City Touring/ Comfort Bike URBAN SPORT E-BIKE Dual Pivot Caliper Brake SORA BL-R3000 BR-R3000 CLARIS BL-R2000 BR-R2000 Brake cable BC-1051 CONTENTS
TECHNICAL SUPPORT DOCUMENT FULL SUSPENSION MODELS C7 C9 WARRANTY SMALL PARTS FRAME SPEC/SERVICING
 2016-2018 FULL SUSPENSION MODELS C7 C9 WARRANTY SMALL PARTS FRAME SPEC/SERVICING 2016-2018 FULL SUSPENSION MODELS C7 C9 PG.i WARRANTY INFORMATION COMPLETE BIKES ONE YEAR LIMITED WARRANTY NORCO Bicycles
Owner s Manual. Operation and Maintenance Instructions. Wisper 705Se. January st edition
 Owner s Manual Operation and Maintenance Instructions Wisper 705Se January 2009 1 st edition We strongly recommend that you read this entire manual before using your Wisper bike Wisper Limited - 1 - User
Have questions? Chat with us live at raleighusa.com or call us at , 8am 5pm PST
 1 2 Have questions? Chat with us live at raleighusa.com or call us at 1-800-251-8435, 8am 5pm PST The bicycle you have purchased is a complex piece of equipment that must be properly assembled and maintained
ION STEP THRU. SCOOTERETTI T/ Dalhousie St. Ottawa, Ontario, K1N 7E4
 ION STEP THRU The ION Step Thru is the ultimate leisure electric bicycle. With its upright riding design, the ION Step Thru is built for truly enjoying the cycling experience. Use it in traditional mode
SERVICE INSTRUCTIONS SI-7B40B C810
 t SERVICE INSTRUCTIONS SI-7B40B C810 For safety, be sure to read these instructions, and follow them for correct use. General Safety Information WARNING Do not press the FLIGHT DECK (cycle computer) switch
ASSEMBLY GUIDE TRUE GRIT. LaufCycling.com
 ASSEMBLY GUIDE TRUE GRIT LaufCycling.com Congratulations on your True Grit! We understand you are in a hurry to go riding a.s.a.p. - but please take a deep breath and read this installation guide first.
User manual. Velo Plus². Van Raam BV Aaltenseweg CM Varsseveld The Netherlands. Version 14.10
 Velo Plus² Van Raam BV Aaltenseweg 56 7051 CM Varsseveld The Netherlands Version 14.10 Table of contents Table of contents... 2 Contact details manufacturer... 2 Conformity... 2 Introduction... 3 Delivery...
Have questions? Chat with us live at raleighusa.com or call us at , 8am 5pm PST
 1 2 Have questions? Chat with us live at raleighusa.com or call us at 1-800-251-8435, 8am 5pm PST The bicycle you have purchased is a complex piece of equipment that must be properly assembled and maintained
DM-TRRD (English) Dealer's Manual. ROAD MTB Trekking. City Touring/ Comfort Bike. Rear Derailleur DEORE XT RD-T8000 DEORE RD-T6000
 Dealer's Manual. ROAD MTB Trekking. City Touring/ Comfort Bike. Rear Derailleur DEORE XT RD-T8000 DEORE RD-T6000") (English) DM-TRRD001-01 Dealer's Manual ROAD MTB Trekking City Touring/ Comfort Bike URBAN SPORT E-BIKE Rear Derailleur DEORE XT RD-T8000 DEORE RD-T6000 CONTENTS IMPORTANT NOTICE... 3 TO ENSURE SAFETY...
(English) DM-TRRD001-01 Dealer's Manual ROAD MTB Trekking City Touring/ Comfort Bike URBAN SPORT E-BIKE Rear Derailleur DEORE XT RD-T8000 DEORE RD-T6000 CONTENTS IMPORTANT NOTICE... 3 TO ENSURE SAFETY...
User manual. Fun-2-Go. Van Raam BV Aaltenseweg CM Varsseveld Netherlands 06.13
 Fun-2-Go Van Raam BV Aaltenseweg 56 7051 CM Varsseveld Netherlands 06.13 Contents Contents... Contact details manufacturer... Conformity... Introduction... Delivery... Intended usage... Safety measures...
Final Assembly Instructions Bikes with Threaded Headsets
 Final Assembly Instructions Bikes with Threaded Headsets Thank you for buying your new bicycle from L.L.Bean. Read these instructions carefully before beginning the final assembly. Prior to shipping, our
DeskCycle USER S MANUAL. Ellipse QUESTIONS / PROBLEMS. Order# Support and Contact: See the support link at DeskCycle.com
 DeskCycle Ellipse USER S MANUAL Visit us at www.deskcycle.com for: Usage Tips Calorie Calculator Accessories And More QUESTIONS / PROBLEMS Order# Support and Contact: See the support link at DeskCycle.com
Troubleshooting Guide
 Troubleshooting Guide This troubleshooting guide outlines quick fixes to the most common technical questions about the ElliptiGO. If the problem persists or you feel uncomfortable performing these actions,
LITERIDER 2&3 IMPORTANT WARNING. 2Bike (1x) Bolt (1x) Nut (1x) Small Hex Wrench (1x)
 Bolt (1x) Nut (1x) Small Hex Wrench (1x)") LITERIDER 2&3 3 Bike (1x) Bolt (1x) Flat Washer (2x) Nut (1x) Large Hex Wrench (1x) 2Bike (1x) wrench (1x) Small Hex Wrench (1x) keys (2x) Long Strap (1x) 2-Zip Strips (6x) 3-Zip Strips (9x) Wheel strap
LITERIDER 2&3 3 Bike (1x) Bolt (1x) Flat Washer (2x) Nut (1x) Large Hex Wrench (1x) 2Bike (1x) wrench (1x) Small Hex Wrench (1x) keys (2x) Long Strap (1x) 2-Zip Strips (6x) 3-Zip Strips (9x) Wheel strap
Have questions? Chat with us live at raleighusa.com or call us at , 8am 5pm PST
 1 2 Have questions? Chat with us live at raleighusa.com or call us at 1-800-251-8435, 8am 5pm PST The bicycle you have purchased is a complex piece of equipment that must be properly assembled and maintained
SCOTT KIDS BIKE OWNER S MANUAL
 www.scott-sports.com SCOTT KIDS All rights reserved 2014 SCOTT Sports SA SCOTT Sports SA 17 Route du Crochet 1762 Givisiez Switzerland BIKE OWNER S MANUAL 2015 Distribution: SSG (Europe) Distribution Center
Item N o.: Item N am e:50cm GIRLS BELLA CRUISER BIKE
 Item N o.:42272847 Item N am e:50cm GIRLS BELLA CRUISER BIKE grip brake lever mudguard mudguard braket free wheel rear hub saddle seat post rear reflector seat clamp chain guard chain wheel crank stem
Copyright Trek Bicycle Corporation 2005 All rights reserved
 i ii iii Aero Brake Levers Owner s Manual Table of contents Read this manual before you ride... 1 Introduction... 2 Inspect your brake levers regularly... 2 Adjusting aero brake levers... 2 Lubricating
TECHNICAL SPECIFICATIONS 1 BLUE PAPERS ORDU OME TECHNICAL MANUAL
 TECHNICAL SPECIFICATIONS 1 BLUE PAPERS ORDU OME TECHNICAL MANUAL TECHNICAL SPECIFICATIONS 2 CONTENT GEOMETRY AND SPECIFICATIONS 3 FRAME MATERIAL AND CARE 4 ORDU OME CAPS -PARTS 5 CABLE ROUTING 8 ORBEA
Final Assembly Instructions Bikes with Quill Stems
 Final Assembly Instructions Bikes with Quill Stems Thank you for buying your new bicycle from L.L.Bean. Read these instructions carefully before beginning the final assembly. Prior to shipping, our expert
Thank you for purchasing a WIKE BOX BIKE!
 Thank you for purchasing a WIKE BOX BIKE! Contents Safety.....3 Front wheel.4 Kickstand..5 Handle Bar & Box 6 Seat post and Saddle 7 Final pre-ride check 8 Tools needed to assemble Bike: -High table or
DM-MARD (English) Dealer's Manual. ROAD MTB Trekking. City Touring/ Comfort Bike REAR DERAILLEUR XTR RD-M9100 RD-M9120
 Dealer's Manual. ROAD MTB Trekking. City Touring/ Comfort Bike REAR DERAILLEUR XTR RD-M9100 RD-M9120") (English) DM-MARD001-00 Dealer's Manual ROAD MTB Trekking City Touring/ Comfort Bike URBAN SPORT E-BIKE REAR DERAILLEUR XTR RD-M9100 RD-M9120 CONTENTS CONTENTS...2 IMPORTANT NOTICE...3 TO ENSURE SAFETY...4
(English) DM-MARD001-00 Dealer's Manual ROAD MTB Trekking City Touring/ Comfort Bike URBAN SPORT E-BIKE REAR DERAILLEUR XTR RD-M9100 RD-M9120 CONTENTS CONTENTS...2 IMPORTANT NOTICE...3 TO ENSURE SAFETY...4
SCOTT BMX USER MANUAL
 SCOTT BMX USER MANUAL All rights reserved 2017 SCOTT Sports SA Distribution: SSG (Europe) Distribution Center SA, P.E.D. Zone C1, Rue du Kiell 60, 6790 Aubange, Belgium v6.3/040717 WWW.SCOTT-SPORTS.COM
Lectric Cycles Mid-Drive Electric Motor Installation
 Lectric Cycles Mid-Drive Electric Motor Installation This write-up describes the installation of a Lectric Cycles electric motor. The model is the e-rad Mid-Drive 750 Watt conversion kit, installed on
EZee Glider Manual. Tools needed for Assembly: Wrench (included) Philips Screwdriver (not included) Assembly Instructions
 Philips Screwdriver (not included) Assembly Instructions") EZee Glider Manual Congratulations on your purchase of the EZee Glider! Your glider is designed for years of nearly carefree use by your child. These instructions include how to set up your glider and
EZee Glider Manual Congratulations on your purchase of the EZee Glider! Your glider is designed for years of nearly carefree use by your child. These instructions include how to set up your glider and
BackCountry ebikes 2019 MULE Assembly
 BackCountry ebikes 2019 MULE Assembly Required Tools: Cutting Pliers (to cut box poly strapping and heavy bike banding) Scissors (to remove bubble wrap) Allen wrenches (3mm, 4mm, 5mm, 6mm) Wrenches (10mm,
Warning: Please read this entire manual before riding your Simbi. Failure to do so could result in serious injury or even death.
 Warning: Please read this entire manual before riding your Simbi. Failure to do so could result in serious injury or even death. Contents 1. OVERVIEW... 3 A. Thank You... 3 B. General Warning... 3 C. Important
Foldable Magne c Exercise Bike
 ASSEMBLY INSTRUCTIONS Foldable Magne c Exercise Bike CAUTION! Please make sure the pedals are attached to the correct sides, L to left and R to right. Screw in the right pedal clockwise and the left counter-clockwise.
O W N E R S M A N U A L
 OWNER S MANUAL TABLE OF CONTENTS WELCOME TO THE YOLO TRIBE 3 WHAT S INCLUDED AND TOOLS NEEDED 4 ASSEMBLY INSTRUCTIONS YOLO BOLT 5 SAFETY AND PRODUCT WARNING 9 OPERATING YOUR NEW YOLO ELECTRIC BIKE: BATTERY
Rothan Owner s manual
 Rothan Owner s manual www.islabikes.co.uk 1. Brake levers 2. Brake pads 3. Saddle 4. Seatpost 5. Seatpost clamp 6. Stem 7. Stem bolts 8. Headset 9. Headset spacers 10. Headset adjuster bolt 11. Handlebars
SCOTT SCOTT-SPORTS.COM BIKE OWNERS MANUAL OWNERS MANUAL / BEDIENUNGSANLEITUNG / MANUEL D UTILISATION
 SCOTT-SPORTS.COM SCOTT SPORTS SA / 17 RTE DU CROCHET / 1762 GIVISIEZ / SWITZERLAND 2008 SCOTT SPORTS SA, ALL RIGHTS RESERVED B CONFORME AUX EXIGENCES DE SECURITE SCOTT 2008 NF R30-020 BIKE OWNERS MANUAL
Final Assembly Instructions Bikes with Threaded Headsets
 Final Assembly Instructions Bikes with Threaded Headsets Thank you for buying your new bicycle from L.L.Bean. Read these instructions carefully before beginning the final assembly. Prior to shipping, our
2018 ACCESSORY ATTACHMENTS OWNER S MANUAL
 2018 ACCESSORY ATTACHMENTS OWNER S MANUAL WWW.RADPOWERBIKES.COM We are here to help! Please contact us at SUPPORT@RADPOWERBIKES.COM or 1-800-939-0310 if you have questions. REV031418 Welcome Thanks you
DELTA DELTA X OWNER S MANUAL EVELO.COM. Important Safety and Product Information. delta_manual_final_single.indd 1 12/06/ :11
 DELTA DELTA X OWNER S MANUAL Important Safety and Product Information delta_manual_final_single.indd 1 12/06/2017 14:11 TABLE OF CONTENTS Welcome!... 3 Contact Information... 3 Unboxing... 4 Registration...
Shifting Lever. RAPIDFIRE Plus 11-speed
 (English) DM-SL0005-04 Shifting Lever Dealer's Manual RAPIDFIRE Plus 11-speed MTB XTR SL-M9000 DEORE XT SL-M8000 CONTENTS IMPORTANT NOTICE... 3 TO ENSURE SAFETY... 4 LIST OF TOOLS TO BE USED... 7 INSTALLATION...
ROAD Wheel Set. Dealer's Manual WH-9000-C24-CL WH-9000-C24-TL WH-9000-C35-CL WH-9000-C35-TU WH-9000-C50-CL WH-9000-C50-TU WH-9000-C75-TU
 (English) DM-WH0002-00 Dealer's Manual ROAD Wheel Set WH-9000-C24-CL WH-9000-C24-TL WH-9000-C35-CL WH-9000-C35-TU WH-9000-C50-CL WH-9000-C50-TU WH-9000-C75-TU WH-RS21 WH-RS61 CONTENTS IMPORTANT NOTICE...
Quattrocycle BV. Quattrocycle. User Manual. Last update February Quattrocycle BV Bremkant EJ Middelbeers. User Manual Quattrocycle 1
 Quattrocycle User Manual Last update February 2010 Quattrocycle BV Bremkant 6 5091 EJ Middelbeers User Manual Quattrocycle 1 Table of Contents Page Chapter 1: Introduction 3 Chapter 2: Instructions for
ROAD DISC TECHNICAL MANUAL
 ROAD DISC TECHNICAL MANUAL INTRODUCTION Congratulations on purchasing a Felt disc brake equipped road bike. As with all of our bikes and components, our aim is to provide the rider with the best product
Special instruction of installation for SAINT FH-M800/RD-M800 and FH-M805/RD-M805
 Technical Service Instructions SI-5VB0E t RD-M805 / RD-M800 Rear derailleur Special instruction of installation for SAINT FH-M800/RD-M800 and FH-M805/RD-M805 A hub axle is an essential component for the
User Manual. 2. Assembly Instructions
 3,532 User Manual User Manual 2. Assembly Instructions Congratulations for purchasing a Smartmotion ebike! Please read this guide fully BEFORE using your electric bike. 1. Smartmotion electric bicycle
T-016 ASSEMBLY MANUAL MODEL ROCK AND ROLL Main Street NE Minneapolis, MN
 MODEL T-016 ASSEMBLY MANUAL ROCK AND ROLL 5280 Main Street NE Minneapolis, MN 55421 1.877.226.7824 www.kurtkinetic.com COMPONENTS Tools Required for Assembly: 17mm Wrench or Adjustable Wrench When unpacking,
KMX Kompact Sports Trike
 KMX Kompact Sports Trike Assembly Instructions 1.0 Introduction Thank you for choosing KMX! When properly assembled and set up your KMX will provide many years of enjoyment. KMX Karts Ltd does its utmost
Installation Instructions Air Compressor Part # 2780, 2781
 Note: It is essential that the operator of this product read and understand the contents of this manual before installing and using this product. Parts Included Qty Parts Included Qty Compressor 1 Coil
Thumb Shifter Plus Thumb Shifter
 (English) DM-SL0004-01 Dealer's Manual Thumb Shifter Plus Thumb Shifter Thumb Shifter Plus SL-FT55 SL-TX50 SL-TX30 Thumb Shifter SL-TZ20 IMPORTANT NOTICE This dealer's manual is intended primarily for
Carried Standard: GB Owner s Manual. (Battery Type: Lithium Battery) Shanghai Leisheng Dynamics Technology Co.,Ltd.
 Shanghai Leisheng Dynamics Technology Co.,Ltd.") Carried Standard: GB17761-1999 Owner s Manual (Battery Type: Lithium Battery) Shanghai Leisheng Dynamics Technology Co.,Ltd. Address: No.5788, Huyi Road Jiading District Shanghai Phone:021-59583532 Website:
Carried Standard: GB17761-1999 Owner s Manual (Battery Type: Lithium Battery) Shanghai Leisheng Dynamics Technology Co.,Ltd. Address: No.5788, Huyi Road Jiading District Shanghai Phone:021-59583532 Website:
Rugged Powered Bin Lifter. Operating Manual
 Rugged Powered Bin Lifter Operating Manual Rugged Powered Bin Lifter Operating Manual OM0016E/2 This manual contains important safety, installation and operating instructions for this unit. Read this manual
Final Assembly Instructions Bikes with 16 Wheel Size
 Final Assembly Instructions Bikes with 16 Wheel Size Thank you for buying your new bicycle from L.L.Bean. Read these instructions carefully before beginning the final assembly. Prior to shipping, our expert
BICYCLE TO MOTORCYCLE BICYCLE RACK
 BICYCLE TO MOTORCYCLE BICYCLE RACK Install Manual Warning: You are responsible for securing the rack to your motorcycle., checking the attachments prior to use and periodically inspecting the products
FACTORBIKES.COM. Assembly Manual DISC V1.05
 FACTORBIKES.COM V1.05 Introduction I Limited Lifetime Warranty On Bicycles And Framesets I Necessary Tools 01 Instructions 01 1 Seatpost 01 2 Cut the cable housing to the correct length 03 3 Di2 Cable