Beginner s Course. Instruction Booklet. Version 1.1
|
|
|
- Adela Gilbert
- 6 years ago
- Views:
Transcription


1 Beginner s Course Instruction Booklet Version 1.1 1
2 Contents The journey begins 3 Archery safety 4 Course overview 7 The 10 steps of Archery 9 Stance 10 Nocking the arrow 12 Setting the string hand 13 Setting the bow hand/arm 14 Pre-draw 16 Drawing the bow 17 Anchor 19 Aiming 21 Release 22 Follow through 23 Relax 24 What to expect 25 Frequently asked questions 26 Elbow rotation exercises 30 Building strength 31 Homework tasks 34 2

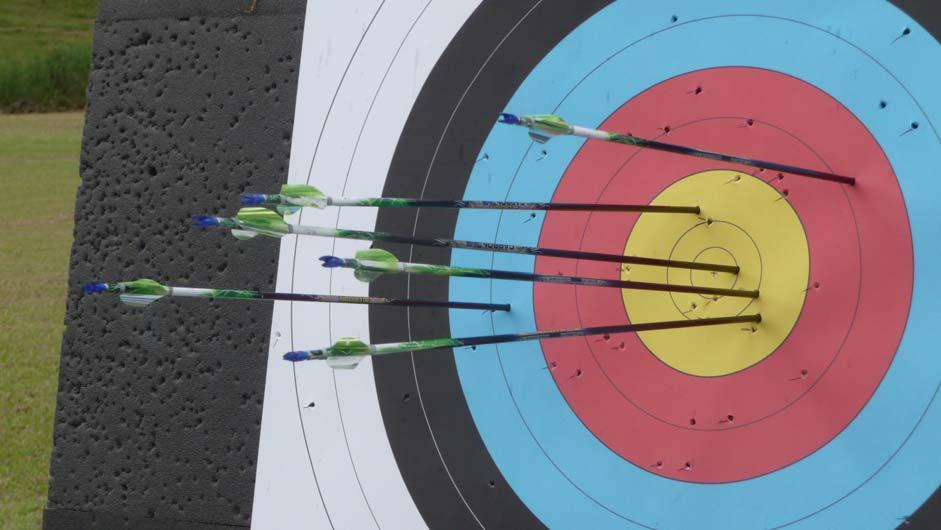
 is 1387 out of a possible 1440 points.")
3 The journey begins Congratulations on taking an important step towards improving your archery skills and hopefully developing a lifelong passion for the sport. Archery is a great sport as it teaches you to take control of your mind and body and focusing everything onto a single task. Archery is all about challenging yourself to do just that little bit better. We can all do a little bit better, even the best archers in the world could do a little better. For example, the world record for men s recurve on the commonly shot FITA90 round (36 arrows each at 90m, 70m, 50m and 30m) is 1387 out of a possible 1440 points. Some participants of the Beginner s courses become disappointed because they set themselves unrealistically high expectations. They expect perfection because the sight was in the centre of the target when they released the arrow and when it doesn t go where they think it should they get frustrated. As a beginner you should expect to miss the target occasionally. Expect that the arrows will only occasionally land in the centre of the target. Once you accept this, you will become more aware of your improvement. First, you will notice that you continually get all the arrows on the target, then, as you continue to improve, all your arrows start land within the black ring, then the blue ring and so on. Remember, the point of archery is not to be perfect; it is about just trying to be that little bit better. Do I need to study this booklet? Won t I be taught all this stuff in the course? The instructors at the Beginner s course will demonstrate and teach all the archery techniques you need to be able to start shooting with greater accuracy and consistency. However, there is a lot of information that you need to know for you to understand the difference between good and bad technique. By learning this information prior to the class you will be able to better visualise what we are teaching and will be able to progress much faster. 3
4 Archery safety The safety of everyone at Centenary Archers Club, whether they are shooting or just watching, is of paramount importance. Archery safety is a matter of exercising common sense, good judgement and courtesy 1. All members are responsible for their own safety and the safety of others 1. To make sure that everyone stays safe on and off the field we follow a few simple rules, some of which are outlined below. Our club s Safety Policy follows that of archery s national governing body in Australia (Archery Australia). Everyone who shoots at Centenary Archers is a member of Archery Australia, and so should read, understand, and abide by the full Safety Policy 1. Safety before you start shooting Alcohol or drugs must never be consumed before or during shooting. Recurve bows should only ever be strung using a recommended method. Always wear the appropriate protective equipment such as armguard, finger tab and if required, a chest guard. It is advisable to wear tight fitting clothes that will not get caught up in the bow string. Covered footwear (not sandals or thongs) is essential. Long hair should be tied back, dangling earrings removed and items should be removed from chest pockets. A bow must never be drawn and released without an arrow on the string (Dry Fire). To do so could result in damage to the bow limbs, a broken string and/or injury to the archer. There is not smoking allowed on the field As a courtesy to others, mobile phones should be switched to silent ring mode Safety while shooting The Director of Shooting (D.O.S.) has absolute control of the field. You must follow his/her instructions and obey the whistle system (described on page 6). Everyone must be behind the waiting line before the signal to approach the shooting line is given. Under no circumstance is shooting permitted if there is someone in front of the shooting line. There is no place, on or off the shooting line, for any form of horseplay. Never touch or strike other people, throw objects or distract other people while they are shooting. 4
5 Archery safety continued Any bow which is drawn (even without an arrow) must be pointed towards the target Never shoot an arrow high into the air or attempt to shoot an arrow over a long distance without a target. Always take care to avoid making physical contact with other archers when handling a bow and arrow. It is easy to touch a person with the bow tips or an arrow which can cause distraction to another person. If a bow or an arrow falls in front of the shooting line, never go forward to retrieve the arrow. Wait until all shooting has stopped and the signal to go forward has been given. Always step back behind the waiting line when finished shooting. Safety while collecting arrows Never run on an archery field, with or without arrows in hand Always carry arrows in a quiver or by holding the arrows close to points with the fletch end placed under the arm. When approaching targets look for arrows lodged in the ground short of the target as nocks are very sharp and can injure legs. Always approach targets from the side so as not to walk into arrows in the target or lodged in the ground. Care must be exercised when drawing arrows out of the target to ensure there is no one standing behind the arrows. Arrows that strike the target frame need to be checked by the coach or instructors before using again to ensure that they are safe to use Exposed carbon fibre strands from broken carbon fibre arrows or limbs can penetrate the skin and cause health problems and therefore care must be taken to avoid touching the exposed fibres. Seek advice from coach/instructors. 1: Archery Australia Safety Guidelines, 6th Edition, Archery Australia Inc Board, 2011, Policy #1018 For all Archery Australia official documents please visit their Policies and Procedures page on the Archery Australia website. 5
6 Archery safety continued The safety whistle system The Director of Shooting (D.O.S.) has control of the field and is responsible for everyone s safety. The D.OS. coordinates the shooting on the field with a series of whistles so that all archers know when it is safe to shoot and when they can collect their arrows. The whistles are: Two whistles: Move from the waiting line to the shooting line. You can pick up your bow and load and arrow. Do not raise the bow at the target or attempt to draw the bow. One whistle: The D.O.S. has determined that it is safe to shoot. You may now fire your arrows at the target when you are ready. You will have 4 minutes to shoot all your arrows. If archers are still shooting after 3.5 minutes, the D.O.S. will yell out 30 seconds. You must finish shooting in this time. After you have finished shooting, return to behind the waiting line so that the D.O.S. knows when everyone has stopped shooting. Three whistles: No more shooting allowed on the filed. It is now safe for archers to collect their arrows from the target. After you have collected your arrows return to behind the waiting line. Five or more whistles: Emergency. There is some danger on the field that needs to be addressed and it is no longer safe to shoot. Immediately stop shooting and do not release an arrow. If you are at full draw, point the bow down at the ground and slowly bring the string back to its resting position. Return to the waiting line and wait until the D.O.S. determines that it is safe to shoot again. 6
7 Course overview The Beginner s course is designed in stages. First, the core skills are taught to give the participants a solid grounding in archery technique. Secondly, participants are introduced to the concept of listening to the body and being aware of your body position and its effect on the arrow. Lastly, we focus on some of the finer techniques of archery that are essential to maintain consistency between shots. Along the way, other skills are also taught so that by the end of the course you should have the confidence and knowledge to be able to setup a bow and practice archery without requiring any assistance. However, help at the club is always available whenever you need it; you just have to ask. Day 1: Core Archery Technique How to string and set up a recurve bow Archery warm-up exercises and muscle toning exercises Archery technique using Archery Australia s ten steps of Archery Stance Nocking the arrow Setting the string hand Setting the bow hand and the bow arm Pre-draw and drawing the bow Anchor Aiming Release Follow through Relaxing between shots Day 2: Zen and the Art of Archery Focus on the feel of the correct archery form. Using the right muscles for good consistency and to prevent injury: back tension, shoulder muscles and bow arm rotation. How to score arrows Day 3: Individual Refinement How to get that perfect release Shooting at longer distances. How to select the right bow and arrows for you. 7
8 Warm up exercises Archery places a large strain on your body and damage to muscles or tendons can occur if you do not do any warm up and stretching exercises. Therefore, we recommend that before you start to shoot that you do at least the following stretching exercises. To loosen upper arm and chest muscles: Interlock the fingers with palms out; extend arms above head, keeping fingers locked; stretch upwards and hold for 10 seconds. To loosen back muscles: Cross arms in front of chest and place hands around shoulders. Slowly stretch hands towards middle of back as far as possible. Hold for 10 seconds To loosen chest, top of shoulder and lower arm muscles: Bend one arm over head and down back, bend other arm around and up back. Grasp finger tips and hold for 10 seconds, then reverse arm positions and hold for 10 seconds. Keep backbone vertical during this exercise. To loosen shoulders and back muscles: Lock fingers together, extend arms and twist slowly as far as possible to the right and hold for 10 seconds. Then twist slowly to the left and hold for 10 seconds. CAUTION: Do not twist suddenly as this could strain the muscles surrounding the spine. 8
9 The 10 steps of Archery Archery Australia have broken down the archery technique into 10 key steps. Some of these steps will feel awkward at first however, these steps will allow you to develop a consistent shooting form which is essential for developing accuracy and precision. Biomechanics A key goal of these steps is to develop a shooting style that uses the body s skeleton as the foundation with minimum use of muscles. By aligning your body such that the forces are as much as possible directed along the bones, the muscles are mostly used to stabilize the body. This reduces muscle fatigue, gives greater control and enhances consistency. However, it is important to note that not everyone can achieve perfect body alignment due to the relative dimensions or their skeletal structure or their body shape. It is very common for archers to make a compromise between the ideal alignment and one that is more reproducible given their body shape. But there are archery programs that differ from these 10 steps. Which is the correct program? There are many coaches who have developed their own archery program. The one you are most likely to hear about on the archery field is the Kisik Lee method ( Mr Lee was Australia s archery coach that saw Simon Fairweather obtain gold for Australia in the Sydney Olympics. Not long after this, Mr Lee became head coach for the USA archery team and has made the USA a dominant force in archery today. Each archery program has its merits and reasons for doing things differently. However, the core skills of all these programs are the same. Essentially, you need to be able to get your body into a stable position which is reproducible and minimises muscle fatigue. The 10 steps, as it is taught here, is a relatively uncomplicated method which heavily focuses on these common core skills. Once you have mastered these core skills, you will be well positioned to be able to assess the merits of other archery programs 9
 the archer must straddle the shooting line with one foot either side of the line. The leg and knee muscles relaxed, but not locked.")

, so that you are looking directly at the target, the archer should be standing upright and not be leaning backwards.")
10 Stance Body Alignment The standing position on the shooting line (the stance) is the foundation of the shot and each archer will need to develop a comfortable and repeatable position. From a front view (see image on the right) the archer must straddle the shooting line with one foot either side of the line. The leg and knee muscles relaxed, but not locked. The spine should be straight and the archer s head directly over their spine. A straight line should be able to be drawn through the archer s shoulders, hips and feet. It is common for beginners to lean back, taking the majority of their body weight on their back foot, this should be avoided. The archer s body weight should be evenly distributed on both feet with 60%-70% of body weight taken on the balls of the feet and 30%-40% on the heels. Looking from behind the archer (see image to the left), so that you are looking directly at the target, the archer should be standing upright and not be leaning backwards. Additionally, the lower spine should be straight. The spine has a natural curve as it comes from the upper body into the waist and then joins the hip. This natural curve needs to be straightened by clenching the pelvic floor muscles (that is clenching your buttocks). The straightened lower spine as well as upright posture must be maintained throughout all stages of shooting as this is what is creating a solid and stable shooting platform. 10


11 More about stance Chest down technique Typically, beginner archers allow both their chest and shoulders to rise up when drawing the bow. This can lead to string clearance issues in which the string will either push into the archer s chest at full draw or slap the bow arm upon release. To correct this, the archer needs to consciously pull the shoulders down as he/she is drawing the bow. Ideally, archers should also engage their abdominal muscles to pull the chest down towards their hips. Not to be confused with sucking the stomach in, but rather, extending the stomach slightly, Achieving this will help straighten the lower spine as well as creating greater string clearance. Note: it is recommended to get comfortable with shooting a bow before concerning yourself with this technique Open or Square stance? A square stance is recommended to start with as it is Images above show the square stance of an archer shoo ng le handed (le image) and right handed (right image) with the target to the le easy to reproduce and gives excellent body alignment in relation to the target. In a square stance, the archers feet are parallel to the shooting line and therefore perpendicular (i.e. square) to the target. Some archers will later adopt an open stance where the feet are still parallel but have been rotated up to 35 degrees from square (see image on the left). Each type of stance has its own advantages and disadvantages and the choice of stance depends largely on the archer s body shape and string clearance. Images above show the open stance of an archer shoo ng le handed (le image) and right handed (right image) with the target to the le 11
 is placed so that it is pointing away from the bow.")
 is pointing away from the bow and is square to the bow string.")

12 Nocking the arrow The arrow is placed on the string just under the metal string nock. This position is called the nocking point and is positioned slightly above the centre of the string. For recurve bows the index vane (which is typically a different colour to the other two vanes) is placed so that it is pointing away from the bow. To nock an arrow, hold bow so that it is vertical or slightly canted. The bow should not be horizontal where it could interfere with the archers standing beside you on the shooting line. Holding the arrow by your thumb and index finger, rotate the arrow until the index vane (the arrow s white vane in the image) is pointing away from the bow and is square to the bow string. Carefully draw the arrow back against the string until the nock engages the bow string under the string nock. Make sure you hear the arrow make a click noise as the nock engages with the string. If you do not hear this noise, pull the arrow off the string and start again. Finally, once the arrow has been correctly nocked, ensure the arrow is on the arrow rest. Check again to ensure that the index vane (the odd coloured vane) is pointing away from the bow and the arrow in nocked onto the string below the metal string nock. If the arrow will not click onto the bow string have it checked for damage. 12

. As the relative lengths of everyone s fingers is slightly different the exact positioning of the string on the third finger will vary.")

13 Setting the string hand The first three fingers of the drawing hand are placed on the string, the index finger above the arrow, and the second and third fingers below the arrow. Start with a finger width gap between the index and middle fingers. These fingers should not be touching the arrow nock. Initially the string should be positioned just in front of the first joint of index and third finger and behind the first joint of the middle finger as this position will prevent soreness and calluses in the fingers (refer to the image on the right). As the relative lengths of everyone s fingers is slightly different the exact positioning of the string on the third finger will vary. As the bow is drawn the string will roll forward slightly in your fingers. The middle finger takes about 50% of the overall pressure of the string, the top or index finger takes 40% with the third or lower finger taking about 10%. It is important to create a deep hook with your fingers as this ensures the hand is as relaxed as it is possible (see image on the right). Some archers incorrectly assume that placing the string along the finger tips is better than placing the string in a deep hook. Their reasoning is that there is less finger to get in the way of the string and therefore creating a cleaner release. However, placing the string on the finger tips creates a large amount of tension in the hand which will likely introduce more variation into the release. To achieve a good, clean release, it is important that the hand is relaxed with the back of the hand flat and the knuckles not poking out. The wrist is also flat and stretched straight along the arm; there should be a straight line from the elbow to the fingers. Why does the arrow keep falling off the rest? As the string is drawn back, the string can push your fingers together which can cause you to pinch the arrow nock between the index and middle fingers. This may cause the arrow to rotate and lift off the rest during drawing. To prevent this, keep the string hand and forearm as relaxed as possible using only the few muscles needed to keep your fingers in the hook position. The back of the hand should not be cupped but rather stretched out by the force of the string pulling on your hand. Additionally, using a tab with a larger finger spacer will also help to avoid pinching the arrow nock with your fingers. 13


.")
14 Setting the bow hand/arm The bow hand should be positioned directly behind the centreline of the bow. Place hand on the bow grip so the pressure point is as high as possible into the pivot point of the bow. By pulling back slightly on the string you should feel the bow put pressure along the upper part (finger-side) of the thumb muscle (the Thenar Eminence, if you want to get technical). The pressure of the bow should not be on the thumb joint, nor on the webbing of your hand between your thumb and index finger. Nor should there be any pressure on the finger-side of your hand s life line. In the picture to the right, the blue dot indicates the point on the hand where most of the pressure from the bow should be felt. The pressure point on the hand should also be aligned with the centre of the bow handle to avoid bow torque (twisting) upon release. Ideally, all fingers should be relaxed and slightly curled over in a natural position (refer to the image on the left). The knuckles of the bow hand should be angled at 45 o, which will assists in orientating the bow arm and shoulder which will provide better string clearance. However, many find it difficult to maintain the ideal bow hand orientation by the method described above. An easy method to get your bow hand in the correct position is by making a gun shape using your bow hand, that is the thumb and index finger extended and all other fingers curled up. The index finger and thumb are then placed around the bow s throat whereas the curled fingers are tucked up beside the bow handle (refer to the image to the right). This will help raise the knuckles to the ideal 45 o angle and provide a pocket in your palm for the bow handle to sit. The upside of this technique is that you don t have to think too much about your hand position. The downside of this technique is that it adds some tension into your bow hand, which will need to be replicated on every shot to maintain consistency. 14


15 More on bow hand/arm When viewed from the side, the finger knuckles should not be protruding as the fingers should be relaxed. The knuckles will slope downwards at 45 degrees or less, and will also slope backwards towards the archer. That is, the pinkie knuckle is closer to the archer than the index finger knuckle. When viewed from the other side of the bow, the thumb should be relaxed and pointed towards the target. The thumb should also be a little lower than the index finger which will help to ensure that the bones in the forearm are in the correct alignment and your elbow joint is almost vertical. Everyone s hand shape is a little different and many archers will modify their bow grip to best suit their hand shape and preferred bow grip position. Whatever method is used, it is important to keep your bow hand relaxed with no muscle tension to avoid gripping the bow. Any muscle tension or gripping of the bow can introducing side pressures (torque) on the bow which adversely affect the flight of the arrow. As the bow hand must remain relaxed, it is essential to use a finger sling (or equivalent wrist or bow sling) to prevent the bow from falling to the ground after the shot. The choice of sling type depends largely on the archer s preference and on that allows the archer to achieve a consistent relaxed bow hand prior to, and after, the release. 15

16 Pre-draw Focus and Concentration Once the fingers have been positioned on the bow string and the bow hand positioned on the bow, a slight tension is taken up on the string. At this point you need to focus on the target while remaining in a relaxed state. This is known as the preparation position where you ready yourself for the shot that is about to be taken. Stand with your head held upright directly over spine. The head is turned to look directly at the target. Ideally, from this point on, the focus remains on the centre of the target until the arrow hits the target. At the preparation stage the you should develop a system that allows you to Switch On and focus. Being able to switch on and focus is important as it narrows the archer s concentration, removes external distractions and allows them to only think of the task at hand. Bow Arm and Pre-draw The bow arm and drawing arm are raised together leaving the bow arm shoulder sitting down in its natural position. It is critical that the archer s upper bow arm is set into the bow shoulder pocket. This is achieved by squeezing the bow-side shoulder blade which will pull the bow arm down and backwards. The string arm s elbow should be kept above the line of the arrow and as near as possible behind the bow and the string hand. The string hand should be relaxed with the back of hand flat and in behind the string. The bow arm s elbow is kept firm and turned down and out to give good string clearance. In other words, the fold in the bow arm s elbow is close to vertical such that if the archer were to bend their arm the hand would come towards the archer s chest. 16


17 Drawing the bow Commence the draw with the bow aimed at the top of the target. The archer s upper bow arm is set into the bow shoulder pocket by squeezing the bow-side shoulder blade which will pull the bow arm down and backwards. At the same time, the archer will also be squeezing the drawing arm shoulder blade as the string is drawn back. While the drawing arm is moving back, the bow arm is held firmly extended with the shoulder down. During the draw, keep the drawing arm elbow either level with, or slightly higher than the arrow to ensure that the correct muscles are engaged. Having a low drawing arm elbow can lead to rotator cuff injuries and therefore should be avoided. The head should be held as still as possible, allowing the string to be drawn firmly to the head. Many archers make the mistake of moving the head toward the string, which decreases the archers draw-length and negatively affects the archers performance. At full draw, the elbow of the drawing arm should be in line with the shaft of the arrow, the back of the drawing hand should be flat and the bow arm straight with the elbow rotated away from the bowstring. 17

18 More on drawing the bow The diagrams below show the relative positions of the arms and joints throughout the draw. The green line runs through the centre of the archer s torso. Note that the archer s head is centrally aligned on his body and that the head does not move during the draw. The red line is the line of force exerted between the string and the bow handle. Note that at full draw, the archers bow hand, the arrow s nock and string arm s elbow are all in direct alignment with the line of force. This can be observed when viewing the archer from above as well as from the front (bottom two images). In this position, the archer is using the minimum amount of muscle tension to hold the string as a large proportion of the force is being supported by the archer s bone structure. This is the ideal body position for shooting. Although this is the most biomechanically efficient position, some archers can not achieve this ideal position due to their body structure or relative bone lengths. In these cases the archer must make a compromise between the ideal position and one that is comfortable, and most importantly, reproducible. For example, people with steeply sloped jawlines may find it is possible to achieve the ideal shooting position but will not be able to make a solid anchor as they will have very little contact between their string hand and jaw. These archers will likely perform better by slightly repositioning their string arm to achieve a more solid and reproducible anchor. 18


19 Anchor The anchor is the term used to describe the position where the drawing hand makes contact with the face. Developing a consistent and solid anchor-point is vital for archery precision. The difficulty of getting a good anchor Most people find anchoring is very difficult at first. Everyone s face and hand geometry is different and therefore, it is not possible to describe exactly where your hand and face make contact at anchor. The archer will have to determined this by trial and error. Everyone must find a position on their jawline for their string hand where it feels comfortable and is easily repeatable so that the same spot can be found every time. It is also essential that the anchor is as solid as possible in that it does not allow much movement of the string hand. The more hand movement that is possible at anchor, the larger the archers arrow groupings will be. Another consideration is that the jaw position has to be kept constant. This is achieved keeping the jaw closed so that the upper and lower teeth are touching but not clenched. The 3 point contact anchor The ideal anchor for a sighted recurve bow is where the index finger of the drawing hand makes solid and full contact under the jaw from the second joint onwards to the palm area of the hand. The string then makes solid contact with the side of the chin and then lightly touches the tip of nose. This gives you three contact points to help you to keep a consistent anchor from shot to shot. Adding a shelf on the finger tab can help create a larger contact area between the hand and the jaw and therefore create a better anchor. The use of a shelf is not essential and is dependent on the archer s preference. It is important that the string remains close to the front of the chin and not drawn back further along the jaw line. Anchoring further back on the jawline will likely result in the string or the arrow touching the face as it is released causing a disturbance in the arrows flight. As the disturbance will be slightly different every time, the archer would experience poor arrow groupings, especial on targets at longer distances. 19

20 More on anchor The string hand The back of the hand should be flat so that the knuckles are not protruding outwards. The wrist and forearm should be straight and relaxed. The hand itself will be slightly angled outwards away from the neck and not held totally vertically. If the archer holds the hand totally vertically this will immediately cause tension in the hand, wrist and forearm. Archers should avoid excessively twisting or rolling the drawing handed. This will create inconsistent pressures on the fingers, increase tension in the forearm and wrist and cause string torque and ultimately a bad arrow release. Body Alignment If the body alignment is correctly established during the draw nothing more needs to be done at anchor. The diagram below shows the ideal relative position of the shoulder joints, the string arm elbow and the bow hand at anchor. Note that the shoulders are in alignment with the bow arm and the elbow of the string arm is in alignment with both hands (and the arrow). This is the most stable shooting form as most of the force of the bow is directed along the bone structure, which minimises the amount strain placed on the muscles to hold the bow at anchor. Achieving a stable body alignment will allow the archer to direct all of his/her attention to aiming and executing the perfect release. Holding Holding is the short time frame between the anchor and the start of the expansion step, which will ultimately result in the release of the arrow. If holding is done correctly, the archer s body is maintaining resistance against the natural forces that would cause the form to collapse. Collapse occurs when either the drawing arm is allowed to be pulled forward or the bow arm pulled back toward the archer s body. It is best to think of the holding step as the brief amount of time in which no additional increase in back tension is used to allow the archer to stabilise the anchor position. There should never be a loss of back muscle tension or an engagement of other muscle groups to help hold the weight of the bow. 20


21 Aiming String alignment A consistent string alignment must be maintained between shots. String alignment is the relationship between the blurred image of the bowstring and the sight pin. Align the string to the right of the sight pin. This acts as a rear sight and ensures that back of the arrow is aligned with the front of the arrow. Failure to take the sight picture into account will cause large left/right variations in the positions of the arrow on the target. The picture above shows the sight picture that the archer should see. In this case it is a blurry image of the white string to the right of the green sight pin. The only thing that is in focus is the target as that is what the archer is focussing on. Aiming and Expansion Aiming should only commence once the draw, anchor and holding steps have been completed. If aiming is started too early, then the archer becomes more focused on the outcome rather than keeping the focus on maintaining a consistent technique that must always feel the same. During the aiming process, the principle focus must remain on the centre of the target with the sight pin and string only a secondary (and blurry) image in their vision. It is important that the tension in the muscles of the back must be slowly but continuously be increased while aiming. Losing back muscle tension at this stage or engaging other muscle groups will adversely affect the arrow release. During aiming, the archer must hold their breath to minimise bow arm movement. However, it is important to understand that it is impossible for an archer to hold the sight pin still on the target; there will always be movement usually caused by the heart beat. The archer must remain relaxed and allow the sight pin to float on the target. The subconscious mind will take care of the aiming process. With practice and confidence the movement of the pin is reduced to the point where it is minimal. 21

22 Release The release, also called the loose, is one of the most critical steps in achieving good arrow flight. A poor release will cause inconsistent variations to the movement of the arrow and will result in poor arrow groupings. The release is achieved by relaxing the muscles in the drawing forearm, allowing the weight of the bow to pull the string from the fingers. In reaction to the loss of pressure from the string the drawing hand moves slightly backwards. When releasing the arrow, it is important that back tension be maintained to ensure the release hand stays close to the face. Notice in the image below, taken a few milliseconds after release, that the hand is relaxed and the skin on the face is slightly puckered by the hand as it slides backwards across the face. The release should not be forced but should be a natural reaction to the weight coming off the fingers. Being able to relax your fingers while under pressure as opposed to opening your fingers is difficult for many people. It may help to think of the release as simply trying to let go of just a few pounds of pressure from the string rather than the entire force. This will be sufficient to allow the string to slip from the fingers without making a large movement in your hand. Typically, when archers do try to open their fingers to release the arrow, their hands end up away from their face with fingers stretched out almost as if they are waving goodbye to the arrow. Practicing string release It may also help to practice relaxing your fingers while under pressure. You can do this by curling your fingers of both hands and then gripping them together while trying to pull your arms apart. If you relax your fingers correctly, the fingers will still be slightly curled after release. If they are straight or tensed, you are using muscles to open up your fingers. These muscle movements will cause inconsistent arrow flights and should be avoided. 22


23 Follow through The follow through is the body movement that occurs after the arrow has left the bow and is travelling toward the target. During this time, focus must remain on the centre of the target until the arrow hits the target. Trying to watch the arrow fly in the air can result in inconsistencies between shots as the archer moves his body before the arrow has a chance to leave the bow. The follow through consists of two main movements: the bow will lunge forward and the string hand will propel backwards. Neither of these movements need to be guided by the archer as they are simply the reaction to the sudden release in force as the string is released. However, as these movements are reactions to the release of force, they reveal important information about what forces the archer was applying to the bow prior to release. The string hand If you are rotating your drawing arm around so that the forearm is directly inline with the force exerted by the bow, the string hand should, upon release, move backwards, remaining close to the face and end up with the finger tips at the back of your neck or just behind your ears (see image to the right). If the string hand does not move, this indicates that you have engaged muscles to hold your string arm in position. This is not desirable. If your string hand travels away from your face after release, this indicates that you might not be holding the bow weight using the correct muscles and/or you are not rotating your string arm around far enough to bring it in alignment with the force of the bow. Neither is desirable. The bow arm Ideally, during release the bow should move forward without any interference or side to side pressure on the grip. The bow hand should be relaxed during release so it is advisable to use a bow or finger sling to prevent the bow s falling out of your hand. If it twists to either side or rotates immediately following release it is likely that the pressure applied to the bow by your hand is not perfectly aligned with the target. Adjustments may need to be made to your bow arm position/rotation or how the bow hand is positioned on the bow handle. 23


24 Relax Archery is not a race. There are no prizes given for the person who shoots all of his/her arrows the quickest. Remember, archery is about controlling your mind and body. Therefore, after every shot, take the time to relax your muscles and recover from the shot. This is also the time to analyse the shot. You need to ask yourself a number of questions including: Did the arrow go where I think it would? Do I need to change anything before my next shot? Where did I feel the stresses on my body during the shot? How do these compare to shots that landed in the middle of the target? How did the bow react after the shot, e.g. did it twist in my hand? What might I be doing to cause this? What aspect of my archery technique should I concentrate on during my next shot? Am I completely lost and need someone to tell me what I am doing wrong? The time taken to relax between shots should take longer than the act of shooting the arrow. Before taking your next shot, ask yourself: Am I ready to shoot? Prior to every shot you need to be mentally focused on what you want to achieve and your body needs to be rested sufficiently to allow you to achieve your goal. 24

25 What to expect The bumpy ride that is Archery Everyone s archery journey is unique as you are, but one thing that is common is that it is impossible to continuously improve day after day, year after year. While beginner archers often go through a rapid improvement process, everyone eventually experiences periods of poor performance, even the elite archers. This arises due to any number of factors but commonly it is because the archer has made a deliberate or unintentional change to their archery form. This is a very critical time for an archer as it is easy to tell yourself that I am no good at archery, I should just quit. The much harder path to take is to tell yourself I am not doing as well as I could be but this is an opportunity for me to become a better and stronger archer. I know this sounds a little corny but this really is the beauty of archery, it will continuously throw obstacles in your way but by seeing these obstacles as opportunities to improve you will build up your selfesteem as well as your archery performance. So, how do I figure out what I am doing wrong and improve? If you are going through a poor performance period or just want to improve, the best advice I can give is to go back through the 10 steps of archery. I guarantee that if you are performing sub-optimally it is due to an issue with at least one of the 10 steps. Always check them in order as the initial steps will affect the later steps. It can be very informative to examine your form by drawing the bow in front of a mirror. This is particularly useful for adjusting your body into alignment so that you can feel what the perfect alignment should feel like. Another useful tool is to film yourself from a number of different angles while you shoot and then study the video to see if you can identify any issues. If you can not figure out what you are doing wrong have someone, preferably an instructor or the club coach watch you shoot. They can often spot subtle problems that can have a big effect on performance. 25
26 Frequently asked Questions Everyone else is shooting better than me. What am I doing wrong? Firstly, everyone is not shooting better than you. It is common for people to focus on their bad shots and forget about their good shots. What you want to be able to do is shot more of your good shots. This means that you need to be more consistent in your shooting form. A combination of practice and the information in this booklet will help you to achieve this consistency. However, if you are really lost, ask for help. Why bother with the 10 steps when I shoot better instinctively? Instinctive shooters do not use a sight or other archery aids and purely shoot based on feeling. However, all talented instinctive shooters use the same techniques as described in the 10 steps with the only exception of not using a sight and, in some cases, using a different anchor position and string grip. The ultimate goal of learning archery technique is to become so familiar with your technique that it becomes an instinctual set of movements where you highly sensitive to any deviation to your normal form. The 10 steps will feel awkward at first but, their benefits will quickly become apparent. When will I be ready to shoot at the Olympics? This isn t as silly as it sounds. Six years after Australia s Tim Cuddihy attended a Come n try archery session he won a Bronze Medal at the Olympics in Athens The secret to archery is to have good form and to be able to replicate this form arrow after arrow. If you are dedicated and work hard to improve your archery skills, it is possible that you may get the chance to represent Australia in Archery. What bow should I buy? This is impossible to answer. The choice of bow is determined by a number of factors including your budget, age, strength, size and personal preference. Bows range from around $150 to over $2000. Please seek advice from the club coach or instructors before making a bow purchase to ensure that you purchase a bow that is suited to you. However, that being said, the correct size bow is roughly determined by the archers draw-length (distance of arrow nock to the plunger button position at full draw). See table below. The longer the bow the smoother the draw, but the arrow speed will be slower. This guide will help the archer get the best compromise between Draw-length ( inches) Bow length (inches) smoothness of draw and arrow speed. < or smaller It is not wise to spend a lot of money buying really good quality limbs initially as you will likely want to get higher poundage limbs after you have built > or 72 up your strength. The first set of limbs 26
27 More FAQs you buy should be light enough that you can obtain good archery form without struggling. Typically, most people buy limbs which are too strong and the archer can not get good archery alignment. Once you have developed your form and you have built up muscle strength, you will likely want stronger limbs so that you can shoot longer distances (like 70m) without resorting to angling your bow way up in the air. As a reference only, most elite archers use bow weights (the force of the bow at full draw) of approximately 38-40lb for women and 42-50lb for men. Note: it is not advised to start at such high draw-weights. You will need to ask an instructor (or coach) what draw-weight is best for you to start with. Do I need an expensive bow to shoot well? No, definitely not. Never fall into the trap of thinking that you can only shoot accurately with really expensive equipment. This is not true. At least 95% of the accuracy is due to the archers form, not the equipment. The more expensive bows and equipment will feel a little nicer and more efficiently transfer their energy Into the arrow. These really expensive bow setups will only perform fractionally better than a standard mid-range bow (approximately $500). However, it is also important to realise that the really cheap bows are usually only good to get the feel of archery and typically not designed for the level of accuracy required in competition shooting. When I join the club can I just pay for club membership and not the SQAS and Archery Australia fees? Unfortunately no. The fees paid to SQAS (South Queensland Archery Society) and Archery Australia pay for a number of things including competitions, insurance, record keeping, administration, training programs etc.. When you become a member of SQAS and AA you will then be able to shoot at different archery clubs around Australia. Am I good enough to compete in archery competitions? Archery competitions do not have to be about competing against others. In fact, most archers who participate in competitions are not competing for first place, and many archery events do not even have a prize for first place. Most people participate in competitions to make them better archers as it forces them to focus and to rapidly adapt to any issue (eg. wind, rain, equipment problem, background distractions etc.). As there is usually no, or very little competition between archers, archery competitions tend to attract people who want to improve their archery while having a good time and socialising. 27
28 Even more FAQs What is the best competition to start with? Definitely in-club competitions. At Centenary Archer s Club (CAC) we have two regular competitions: The End of Month Shoot (EOMS) and the Centenary Archer s cup. The EOMS is held on the last Saturday of every month and there are a number of different competition rounds that you can shoot. Information on these can be found on the CAC website as well as on the day. Entry is free although you still need to pay grounds fees for the day ($5 for adults, $2 for juniors). The Centenary cup is a new event which is designed to encourage archers to improve. The competition is held every second Saturday of the month and like the EOMS, entry is free. Everyone shoots 30 arrows at targets set at 40m,30m and 20m. Your scores are collected and a prize is given to the archer who has improved the most over previous scores. This event is biased towards the beginner archers who often show dramatic improvements in the scores. Do not tell yourself that you will enter into this competition when you start shooting better. This competition is best entered when you are just starting to learn so that you have lots of room for improvement. Who knows, maybe you will win it the competition ever month as you continue to improve. Scores from both the EOMS and the Centenary Archers cup will go towards your classification ranking which will be awarded at the end of the year. You can also win Allgold and Perfect medals as well as club records. See the CAC website for more details on classifications, medals and other awards. How do I know how well I am doing or if I am improving? The only way to know this is to start scoring your arrows. You can do this in competitions like the End of Month Shoot or the Centenary Archer s cup but also recording your scores every Saturday and comparing them to your previous scores. If you want to get a little nerdy about it (like me) you can record your scores in an Excel spreadsheet so that you can graph them overtime. It is great to know what your average score per arrow is at each distance so that you can have an idea of whether you are performing at, or hopefully, above your level. Just doing archery one day a week is not enough for me, I need more time to practice. We know how you feel. Typically, some of the members will also shoot at the club on Sunday afternoons if it is not too hot or wet. We are organising to have an indoor shooting range installed at our club so that we can shoot at night and in complete shade in summer. Until then, a number of members will drive to Samford valley archery club to shoot at their indoor range on Wednesday nights. It costs $7 for Archery Australia members. 28
29 Even more FAQs Can I practice archery at home? Yes, but. It is the authors understanding that, at the time of writing this booklet, the laws in Queensland allow people to practice archery at home. However, as laws change all the time, you will need to confirm that this interpretation of the law is still accurate. Before you start firing off arrows, there are a number of very important issues that need to be considered. Firstly, a bow with an arrow nocked is legally considered to be a loaded weapon in Queensland and as such precautions need to be made to ensure its safe use. If anyone considers themselves in any danger from your use of the bow at home, they have the right to call the police and, if these claims are found to be valid concerns, the police will likely confiscate your bow. Therefore, never shoot towards your neighbours property regardless of what type of fence you have installed between your properties. The only way you can ensure the safety of your neighbours is to shoot towards your own house. If you are going to shoot towards your house you must ensure that no one (including pets) in your own home are in danger of being injured by an arrow. The target butt should be set up against a wide, solid wall of your house, ideally brick, that will not allow misfired arrows to penetrate the wall. There should be no windows or doors nearby your target butt through which people in your house may be standing behind or walk though and thereby placing them in danger. One possibility might be to shoot at a target placed inside your garage. Important: You are fully responsible for any damages to property, or worse, injuries to people or animals as a result of your actions. It was an accident will not convince the police that you should not be charged. Take no chances with safety! Can I practice archery at my local park? No, absolutely not. By doing so, you will be violating peoples rights to live in safe environment, which will almost certainly get you a ride in the back of a police car. You cannot ensure the safety of the public if you are shooting in a public space. Similarly, you are not permitted to use the grounds of Centenary Archer s Club outside of our regular operating times and without the presence of a trained D.O.S. The land is used by the public when not in use by our club and therefore should be considered to be a public park outside of our operating hours. 29


30 Elbow rotation exercise A problem that is common to many archers is that when they draw the bow, their elbow of their bow arm rotates anticlockwise (for a right handed archer) so that the elbow joint is facing upwards. In this position, the widest part of the elbow is typically in the path of the string. Without an arm guard for protection, this would cause a painful bruise as the string hits the arm. However, even with an arm guard on, the string hitting the elbow will cause variations in the arrow flight and considerably reduce accuracy. To prevent the string from hitting the elbow, it must be rotated out of the way of the string such that the widest part of your elbow is point downwards. However, this is an unusual movement and you will need to do some exercises to allow you to be able to do this under the strain of the bow. At first this may feel uncomfortable but with practice the you will learn to rotate the elbow during the drawing process. The exercise As indicated in the images below, place the palm of your bow arm on a wall with your fingers pointing up While exerting pressure on the wall with your bow arm, rotate your elbow in a clockwise direction (right hand archers, anticlockwise for left hand archer). Repeat this exercise for a couple of minutes each day. Note: Ensure that you are only rotating the elbow and not rolling the shoulder upwards 30
31 Building strength Strength in archery is not only the muscle power required to draw a bow, but also to maintain balance and stay steady as you aim. How strong you currently are dictates what poundage of bow you can use. A bow that is too strong for you will only do possible damage to your muscles and joints. A light draw weight bow will generally be used for beginners to learn basic skills without the need for strength. As skills are developed, then a stronger draw weight bow may be used and so strengthening of muscles will be required. Some of the above stretching exercises can also be used to strengthen muscles. The best results for strength training can be achieved by the following principles: Specific Movement Progressive Loading Specific Movement To strengthen the strength and endurance of your archery muscles, the exercise used should closely imitate the movement of shooting a bow. Remember, when strengthening specific muscles, include both right and left hand sides to maintain a balance of muscle strength. The muscle groups used in archery where strength is required are: the upper back and shoulder muscles to draw the bow, the upper and lower shoulder muscles to control the draw arm, the arm muscles to extend the bow arm, the finger muscles to hold the bowstring. A loop of rubber tubing is an excellent training aid to increase the strength and endurance of your archery muscles. Use the rubber tube to imitate drawing a bow. Pull it back and hold for 10 seconds. Repeat about 6-10 times. Repeat exercise with opposite hands to balance muscle development. If you have your own bow, you can use it to help build strength by repeatedly drawing, holding and letting down the bow in a similar exercise to that described for the rubber tubing above. These exercises will give you much greater bow control and allow you to progress to using bows with higher bow poundages much quicker. 31
32 More on building strength Using a chest expander or a piece of rubber tubing, grasp each end, raise arms to shoulder height and extend arms forward in front of your. Then, keeping your elbows straight, move your arms outwards and backwards by squeezing shoulder blades together. Hold for 10 seconds and repeat about 6-10 times. The chest expander or rubber tubing can also be used to tone other muscles around the shoulder. Grasp each end, raise one arm above head and the other arm level with shoulder. Pull down with arm and hold for 10 seconds. Repeat about 6-10 times. Swap arm positions and repeat exercise. Progressive Loading The training weight for a person to start with is usually established by finding the maximum load that can be lifted 10 times in repetition. (Usually about 75% of maximum strength). With all exercises, it is best to start with only a few repetitions of each exercise for the first two weeks, then progressively increase the number of repetitions over a period of about 4 weeks, until 8 to 10 repetitions can be achieved. Allow a recovery period between each exercise to avoid fatigue. Most importantly, if a particular exercise is causing pain in the muscles or joints, then reduce the weight and/or the number of repetitions. No Pain, No Gain is wrong. When the body feels pain, it is a message to ease off and slow down before you do damage to muscle fibres and tendons. These progressive exercises can be achieved via a number of means including using gym equipment, home exercises such as push ups or using a weight set. However, it is important to note that you can injure yourself with these exercises if you over exert yourself so it is best to consult either the club coach or other professionals prior to doing these exercises to get the right advise for you. Other muscle groups often over-looked in archery are: the upper and lower leg muscles to control balance, the lower back and waist muscles to stabilise the stance. 32


33 More on building strength The rotator cuff muscles The rotator cuff is a group of muscles and tendons that stabilize the shoulder joints. By strengthening these muscles you will not only minimize the chance of causing a muscle injury but also increase your ability to hold the bow steady. Additionally, strengthening the rotator cuff muscles will prevent the arm rotating into the path of the string. Image source: docid=000438&doctype=1 Rotator cuff injuries can occur during archery due to the strain of drawing the bow. The low poundage bows and protective equipment used In the beginner s course minimize the chance of these injuries occurring however, we recommended that you tone the rotator cuff muscles. An excellent guide to toning the rotator cuff muscles can be found on Youtube entitled: Rotator Cuff Workout - Rotator Cuff Exercises for Injury Prevention and can be found at: Important: Do not over extend yourself or use heavy weights while doing these exercises. 33


34 Homework tasks Prior to, and during the beginner s course, there are a few homework tasks for you to complete. These tasks are designed so that you will gain maximum benefit from the Beginner s course. As you can see from the detail in this instruction booklet, there is a lot of information that you need to take on-board in order to develop a good shooting form. By reading through this information prior to the classes you will have a greater understanding of what you need to do and therefore spend more time perfecting your technique. Do I have to do the homework tasks? Archery is like many other things in life; the more you put into it, the more you get from it. We have designed the course and the homework tasks so that those who really want to succeed in archery can do so. A number of past participants from this course have been able to shoot successfully with the target placed at 70m (the distance used in the Olympics) within a month or so of graduating from the course. The course is challenging; there is a lot to learn in a relatively short space of time. But for those archers who are willing to take on these challenges and take on board the advice that is given to them, the rewards will be quickly realised. 34
STEP 1. STANCE. The stance must be a consistent, repeatable and comfortable.
 STEP 1. STANCE The body can be divided into 2 parts the upper body from the hips up and the lower body from the hips down. The upper part of the body must maintain consistent position from shot to shot
*The steps described are for the right-handed person; adjustments will need to be made for a lefthander.
 archery study guide history The origin of archery is unknown; however, archery has been an activity with varied objectives for human beings since the beginning of recorded history. The successful use of
St George s Archery Club BEGINNERS COURSE SESSION RUNNING ORDER PLANNER
 St George s Archery Club BEGINNERS COURSE SESSION RUNNING ORDER PLANNER SESSION ONE Lead SESSION THREE Lead Bow Selection Freestyle Shot Refresher Arrow Selection Warm-up Bracers & safety check Adjusting
OzBow Archery Instruction Program (the pathway to Olympic participation)
") OzBow Archery Instruction Program (the pathway to Olympic participation) The OzBow Archery Instruction Program is the second step in the Archery Australia Pathway Program. This program provides the participants
OzBow Archery Instruction Program (the pathway to Olympic participation) The OzBow Archery Instruction Program is the second step in the Archery Australia Pathway Program. This program provides the participants
ARCHERY & SCOUTING. PRESENTATION POINTS: Equipment & Safety Personal Safety Facility Safety 10 steps to good shooting
 ARCHERY & SCOUTING PRESENTATION POINTS: Equipment & Safety Personal Safety Facility Safety 10 steps to good shooting Kathleen Millar, CAE, OCT NCCP Level 4 Coach EQUIPMENT SAFETY Stringing & Unstringing
Woodruff Archery Merit Badge Requirements Packet
 Scout Name: Troop #: MB Period: Requirement 1: Woodruff Archery Merit Badge Requirements Packet a. State and explain the Range Safety Rules: (1). Three safety rules when on the shooting line. (2). Three
Archery Fundamentals
 Archery Fundamentals Objectives Common bow types and their basic parts Basic parts of an arrow and its usage Safe practices for archers Responsible shooter Good shooting form Know Your Bow and Arrows Modern
GETTING STARTED with AAAR
 GETTING STARTED with AAAR Instinctive shooting employs the use of your anchor (rear sight), your dominant eye, and the point of the arrow (front sight) to develop a point-of-aim view. Without bow and arrow,
THE FOUNDATION OF THE SHOT
 CHAPTER_2 THE FOUNDATION OF THE SHOT Success in archery depends on consistency and consistency starts with a solid foundation. Fully understanding and being able to apply the fundamentals is the key to
Woodruff Archery Merit Badge Requirements Packet
 Scout Name: Troop #: MB Period: Requirement 1: Woodruff Archery Merit Badge Requirements Packet a. State and explain the Range Safety Rules: (1). Three safety rules when on the shooting line. (2). Three
Beginners Course. This is just a quick document that gives you a bit of information prior to starting the beginners course.
 Welcome to our Beginners Course This is just a quick document that gives you a bit of information prior to starting the beginners course. If you could please read through this prior to the first lesson.
FITA Coach s Manual. RECURVE BOW SHOOTING FORM Module. Intermediate Level
 FITA Coach s Manual RECURVE BOW SHOOTING FORM Module Intermediate Level FITA Coaching Manual Intermediate Level Module RECURVE BOW SHOOTING FORM The centre line of the body when assuming the stance The
Introduction to Basic Archery
 Introduction to Basic Archery Archery includes a complex set of activities, from backyard target shooting to formal or field competitions, from family fun to bow hunting and bow fishing, or even the Olympic
Ab Plank with Straight Leg Raise
 Ab Plank with Straight Leg Raise Position yourself face up with your knees bent at 90 degrees, feet flat on the floor. Your hands should be directly under your shoulders facing forward. While in this position
The selection, set-up and tuning of a Recurve bow
 The selection, set-up and tuning of a Recurve bow Malcolm Grant January 2005 Firstly: there are several cost and design differences to be considered when deciding on an individual archer s equipment. Budget:
Belton High School Marching Fundamentals 2016
 Belton High School Marching Fundamentals 2016 Fundamentals of Teaching Fundamentals: 1. Say the name of the maneuver (INSTRUCT) 2. State its purpose (INSTRUCT) 3. Demonstrate it slowly, several times,
Beginner shooting tips
 Beginner shooting tips The new shooter is in a great position to learn the fundamentals of shooting. Being new you are a clean slate where as a person who has been shooting for some time may bring some
Be g i n n i n g s. Ar c h e r y B E S T. A Step-by-Step Instructional Guide for Teaching Olympic Style Archery to New Archers
 B E S T (Biomechanically Efficient Shooting Technique) Be g i n n i n g s in Ar c h e r y A Step-by-Step Instructional Guide for Teaching Olympic Style Archery to New Archers B E S T (Biomechanically
SUN GOD ARCHERY at UCSD: NTS Shot Cycle
 3 PILLARS OF THE SHOT CYCLE SUN GOD ARCHERY at UCSD: NTS Shot Cycle 1) Barrel of the gun Bow hand pressure point, front shoulder, and back shoulder alignment 2) Holding Being braced "inside the bow" Analogy:
Basic Shooting Skills Positions. By: Shannon Carlton
 Basic Shooting Skills Positions By: Shannon Carlton Agenda Introduction Dominant Eye Rifle Fitting Prone Position Rifle Fitting Tips Standing Position Sequences Checklists Positions Stable Comfortable
KOSCIELISKO POL. Biathlon Shooting Lesson :00 16:30
 KOSCIELISKO POL Biathlon Shooting Lesson 29.09.2011 15:00 16:30 Basic Shooting Skills Positions Basic Shooting Skills Positions Basic Shooting Skills Positions Introduction Dominant Eye Rifle Fitting Prone
FITA Coach s Manual. CLOUT ARCHERY Module. Intermediate Level
 FITA Coach s Manual CLOUT ARCHERY Module Intermediate Level FITA Coaching Manual Intermediate Level Module Contents CLOUT ARCHERY The Clout Round Description 2 Some Rules 3 Aiming 3 Shooting Form 4 Shooting
CHAPTER 4 ADVANCED GROUND-FIGHTING TECHNIQUES
 (FM 21-150) CHAPTER 4 ADVANCED GROUND-FIGHTING TECHNIQUES After achieving an understanding of the basics of ground fighting, other elements of fighting on the ground are added. These techniques, however,
The Secrets Of The Swing
 The Secrets Of The Swing brought to you by www.golfclubdistance.org and Amazing Golf Mind Table of Contents 1. The Address 2. The Take Away 3. The Top Of The Backswing 4. The First Move 5. The Downswing
Structure (Down plane)
") By Lauren Russell Structure (Down plane) The body (toes, knees, hips, wrists and shoulders) is aligned parallel to the intended target line. The torso is tilted over the ball from the hips whilst maintaining
By Lauren Russell Structure (Down plane) The body (toes, knees, hips, wrists and shoulders) is aligned parallel to the intended target line. The torso is tilted over the ball from the hips whilst maintaining
Coaching Principles. 1. Introduce 2. Demonstrate 3. Explain 4. Organize 5. Execute 6. Correct 7. Practice
 5 Pin Bowling Drill Book Updated August 2008 Coaching Principles STEPS IN TEACHING A DRILL 1. Introduce 2. Demonstrate 3. Explain 4. Organize 5. Execute 6. Correct 7. Practice GENERAL PRINCIPLES Drills
Shooting Clinic, Alaska Biathlon Anchorage 4 April 2009 Instructor: Richard Barlow Session 3: Fundamentals, Position Details A.
 Shooting Clinic, Alaska Biathlon Anchorage 4 April 2009 Instructor: Richard Barlow Session 3: Fundamentals, Position Details A. Fundamental Steps 1. The sequence of six steps for a well-aimed shot needs
Chair exercises Sally Ann Belward, Falls Clinical Lead Physiotherapist
 Chair exercises Sally Ann Belward, Falls Clinical Lead Physiotherapist Exercise safety Exercise should be comfortable and fun Ensure participants are sat on a sturdy chair, have comfortable clothing and
Techniques To Treat Your Pain At Home (512)
") Techniques To Treat Your Pain At Home (512) 288-5322 7010 W. TX-71 Suite 360 Austin TX, 78735 Arm Only Bird Dog Start in the quadruped position (all fours) with arms and thighs perpendicular to the floor.
Techniques To Treat Your Pain At Home (512) 288-5322 7010 W. TX-71 Suite 360 Austin TX, 78735 Arm Only Bird Dog Start in the quadruped position (all fours) with arms and thighs perpendicular to the floor.
Try on this 10 minute yoga sequence for size to balance your body and focus your mind.
 Need a little more energy to start your workday right? From: https://www.workandmoney.com/s/10-minute-yoga-routine Try on this 10 minute yoga sequence for size to balance your body and focus your mind.
Page 1 of 6. Important Safety Rules for Parents Supervising Family Archery
 WARNING DANGEROUS PROJECTILE: A mishandled arrow or bowstring may result in serious injury or even death. Parental Supervision Required. Bows and arrows are not toys. Page 1 of 6 Failure to follow Instructions
Chapter 8 - POSTURE. The following guidelines can be used to develop good postural habits. ! 2010 High Performance Golf
 Chapter 8 - POSTURE Posture is the habitual position that people hold themselves in, whether they are sitting, standing, active or sedentary. The aim of good posture is to maintain the natural curves of
OVERVIEW FOR STUNTS FLYER BODY POSITIONS
 TCI MODULE 6 Stunts Level 1 Page 1 of 11 OVERVIEW FOR STUNTS FLYER BODY POSITIONS *** NOTE *** For instruction purposes, we will assume regular flyer positions in this manual. That is, it is assumed that
Instructional Manual
 Instructional Manual TABLE OF CONTENTS MEDICUS Dual 2000 Instructional Manual The Proper Grip 1 Posture, Stance & Alignment 2 Breakpoint 1: Takeaway 3 Breakpoint 2: Toe-up Position 4 Breakpoint 3: Setting
2990 Lorne Scots Royal Canadian Army Cadet Corps Rifle Drill
 2990 Lorne Scots Royal Canadian Army Cadet Corps Rifle Drill Page 1 of 27 TABLE OF CONTENTS PARA ITEM PAGE Section 1 BASIC RIFLE DRILL 1.1 INTRODUCTION 3 1.2 ATTENTION 5 1.3 STAND AT EASE FROM ATTENTION
GROUND COMBATIVES TRAINING STEP-BY-STEP INSTRUCTION MANUAL PICTORAL ANNEX FOR EXISTING TSP S
 GROUND COMBATIVES TRAINING STEP-BY-STEP INSTRUCTION MANUAL PICTORAL ANNEX FOR EXISTING TSP S Stand Up In Base - This is the most basic technique. It allows the Student to stand up in the presence of an
THERAPUTTY ACTIVITIES
 THERAPUTTY ACTIVITIES Theraputty activities will help to develop your hand strength and ability to control fine finger movements. Activities to be complete: (therapists to tick which activity you want
AUSTRALIAN BASEBALL UMPIRE S MANUAL
 AUSTRALIAN BASEBALL UMPIRE S MANUAL UMPIRE POSITIONS AND SIGNALS 2009 by Australian Baseball All rights reserved. No part of this publication may be reproduced or distributed in any form without prior
defenders get specific coaching for their respective positions, goalies require the same attention and guided skill development.
 POWER POINT SLIDES ACTIVITIES NOTES Mini-lecture: Over view- 10 RM- p. 1 1. Provide the following overview of the clinic: Rationale: Goaltending is a critical aspect of team play and requires direct &
Basic Shooting Skills Principles of Marksmanship. By: Shannon Carlton
 Basic Shooting Skills Principles of Marksmanship By: Shannon Carlton Agenda Introduction Principles of Coaching 5 Principles of Marksmanship Developing a Routine Making Sight Adjustments Sequences Principles
EXERCISE GUIDE STRENGTHEN YOUR CORE
 EXERCISE GUIDE STRENGTHEN YOUR CORE BACK EXTENSION WITH BALL Rest your belly on the ball, feet planted wide apart on the floor behind you and hands resting on your lower back. Peel your chest away from
FITA BEGINNERS MANUAL. Black. Arrow
 Black Arrow 35 CURRICULUM FOR THE FITA BLACK ARROW AWARD. PERFORMANCE: Shooting distance: 14 meters Minimum required score: 115 points SKILLS Your shooting sequence should include the following: Draw process:
The Golf Swing. The Fundamentals
 The Golf Swing The Fundamentals Fundamental #1 Grip & Set-Up The grip and set-up should be viewed as putting parts of a machine together. The right parts connected in the right way will allow the machine
RIFLE DRILL. 1. General. Before commencing instruction in rifle drill, it is important that the cadets receive instruction in the parts of the rifle.
 RIFLE DRILL 1. General. Before commencing instruction in rifle drill, it is important that the cadets receive instruction in the parts of the rifle. 2. Rifle Movements. Unless stated otherwise, cadets
Mindfulness Lesson Plan
 Mindfulness Lesson Plan What is Mindfulness? MEDICAL DISCLAIMER Not all exercises are suitable for everyone and it is recommended that you consult your doctor before beginning this or any exercise program.
Warm Ups. Standing Stretches
 Warm Ups Mild warm-ups are a necessity for everyone. The need for warm-ups increases with age as the body becomes less elastic over time. It is recommended that you execute the warm-up routine in this
U.S. Shooting Team Balance, Strength and Stability Workout. Training Work-Out
 U.S. Shooting Team Balance, Strength and Stability Workout Training Work-Out Modified by Dan Durben and Sommer Wood November 2006 from the program originally developed by Amber Darland for the USA Shooting
Made in the USA OWNER S MANUAL
 Made in the USA OWNER S MANUAL Service and Repair Information Your local archery retailer should be your first resource for service and repair. The retail establishment where you purchased your bow has
TACTICAL COMBATIVES COURSE STUDY GUIDE
 TACTICAL COMBATIVES COURSE STUDY GUIDE STANDING TECHNIQUES 1. ROUND KICK (All Minor Tasks) 1. Push off on the ball of your trail leg foot, and then step somewhat toward the target and laterally to the
Shoulder Exercises for Combined Labrum Repair Rehabilitation Protocol
 Shoulder Exercises for Combined Labrum Repair Rehabilitation Protocol The exercises illustrated and described in this document should be performed only after instruction by your physical therapist or Dr.
THROWING SKILLS RUN JUMP THROW
 RUN JUMP THROW CHAPTER 7: KEY IDEAS Throwing activities can be divided into the following sub-groups: pushing activities which lead to shot put pulling activities which lead to javelin throw slinging activities
CHAPTER 3 - FOOT DRILL. 1. During the initial stages of training in foot drill, instruction is to be given in open order.
 CHAPTER 3 - FOOT DRILL BASIC FOOT DRILL 1. During the initial stages of training in foot drill, instruction is to be given in open order. 2. Exercises are to be taught first by numbers and when proficient,
PARTNER With all partner stretches: communicate with partner and use caution!!
 - warm up prior to stretching - isolate the muscle group to be stretched - move slowly and smoothly into stretch - use proper mechanics and correct alignment - breathe normal - slowly come out of stretch
RJT. Pupil Task Cards: Throwing JUMP THROW RUN
 RJT s: Throwing RUN JUMP THROW s: Introduction Introduction to the s An important part of every child s cognitive development is to encourage them to explore new things and use self-guided learning to
UNITED STATES MARINE CORPS WEAPONS TRAINING BATTALION MARINE CORPS COMBAT DEVELOPMENT COMMAND QUANTICO, VIRGINIA
 UNITED STATES MARINE CORPS WEAPONS TRAINING BATTALION MARINE CORPS COMBAT DEVELOPMENT COMMAND QUANTICO, VIRGINIA 22134-5040 DETAILED INSTRUCTOR GUIDE LESSON TITLE RIFLE SITTING POSITION COURSE TITLE ANNUAL
RULES POSTURE GUIDELINES: ADULT DIVISION COMPULSORY POSTURES
 RULES 2018-2019 POSTURE GUIDELINES: ADULT DIVISION COMPULSORY POSTURES Copyright 2014 International Yoga Sports Federation (IYSF) Second Edition, 2016. All rights reserved. Except for brief quotations
U.S. Shooting Team Balance, Strength and Stability Workout. Shooting Warm-Up
 U.S. Shooting Team Balance, Strength and Stability Workout Shooting Warm-Up Modified by Dan Durben and Sommer Wood from the program originally developed by Amber Darland for the USA Shooting National Rifle
T H E M O S T I M P O R T A N T L E S S O N O F A L L
 T H E M O S T I M P O R T A N T L E S S O N O F A L L #2 The Grip CHEAT SHEET 1. Minimal compensation for consistency 2. Grip rotation influences club face angle 3. Turn hand right for more hook, Turn
York County Bowmen. Archery School. This manual belongs to:
 York County Bowmen Archery School This manual belongs to: Safety First! Safety rules are NOT foolproof. Apply common sense at all times. If in doubt, DON T SHOOT! Personal Safety Range Safety Before shooting,
LESSON 4: THE FIRST TARGET POSITION - STANDING
 LESSON 4: THE FIRST TARGET POSITION - STANDING PURPOSE This lesson introduces you to the first target position, which is the standing position. the type of clothes that are used in school-age sporter class
Other options if your program is large and you can afford various sizes: 54" for 8-12yr; 62" for 11-15yr; 66" for intermediates, 68" young adult/adult
 Bow Most beginner programs use a 62" 15-18 lb draw recurve bow, which is suitable for youth (or beginner adults, if the program is mixed). A recurve, 3-part take down bow, makes transportation easier,
COACHING WINDMILL PITCHERS GETTING STARTED
 COACHING WINDMILL PITCHERS GETTING STARTED INTRODUCTION Coaching pitchers in NOT difficult. All you need is some interest and a little information to understand what you're doing. The interest has to come
SWIMFIT 1KM. Your 12 week guide to swim 1km Freestyle
 FIT 1KM Your 12 week guide to swim 1km Freestyle 200 1KM TAKE THE PLUNGE If you re a competent swimmer and want to get back in the water, or are wanting to push yourself in the pool, this is the programme
Sprinting. Relevant Knowledge** Overall Level. Assessment Criteria. Learning Outcomes
 Sprinting 1. coordinate their limbs. 2. be familiar with the starter s order.. swing their arms in rhythm. 1. coordinate their limbs. 2. swing their arms in rhythm.. react accurately to signals.. master
Page 1 Introduction. Fast and slow twitch muscle fibres are. Page 2 The Sprint Start. Page 4 - Sprints. Page 5 - Middle Distance
 Name: Below are some terms for you to research. Once you have found out what each term means write a short paragraph explaining why you perform better in some events than you do others. Page 1 Introduction
LEVEL 1 SKILL DEVELOPMENT MANUAL
 LEVEL 1 SKILL DEVELOPMENT MANUAL Lesson Manual C A Publication Of The USA Hockey Coaching Education Program The USA Hockey Coaching Education Program is Presented By LESSON C-1 SPECIFIC OBJECTIVES 1. Refine
SUNDAY MONDAY TUESDAY WEDNESDAY THURSDAY FRIDAY SATURDAY **REST**
 At minimum, walk 30 minutes, 5 days a week. Not sure if an exercise is right for you? Test your blood sugar before and after you work out. If your blood sugar is higher afterwards, the exercise is too
10 th Kup White Belt. The Basics
 10 th Kup White Belt Starting Tae Kwon Do as a white belt often feels rather daunting, especially when there are so many students around you that appear to make all the moves seem effortless. Just remember
GOALKEEPER DEVELOPMENT CURRICULUM
 GOALKEEPER DEVELOPMENT CURRICULUM U6 and U8 *Using goalkeepers is not recommended for these two age groups. *In today s game, goalkeepers must be able to control the ball with their feet and pass as well
8 Pieces of Brocade. 1. Two hands lifting the sky with finger interlocked to harmonize the triple warmers.
 8 Pieces of Brocade Preparing/standing form: Move left feet one step to the left side, feet with shoulder width, relax and bend knee slightly, stand strict, tongue touch the upper jaw, close lower jaw,
o Lead o Twinkle o Dance Positions: Closed, Promenade, Fallaway, Counter Promenade, Counter Fallaway, and Facing Position
 Class 3 Overview Waltz Goals Move Like a Champion: Just Say No (#31) New Figures: Box with Underarm Turn (Figure 1B); Simple Twinkle (Figure 5) Key Concepts and Terms o Sway o Rise and fall o Lead o Twinkle
Full swing technique is a pillar of a solid overall game. The following 4 core competencies are strong predictors of success in ball striking.
 Full Swing Analysis What are we trying to accomplish? Core Competencies in the Full Swing Full swing technique is a pillar of a solid overall game. The following 4 core competencies are strong predictors
Building an Effective Scrum
 ARU LEVEL III Task 12 2010 Building an Effective Scrum ON OWN FEED. By Dean Carlisle INTRODUCTION Law 20: The purpose of the scrum is to restart play quickly, safely and fairly, after a minor infringement
Instructor Administration Sheets
 Instructor Administration Sheets STAGE 1 (BEGINNER) TO STAGE 15 (BRONZE STAR) THE ROYAL LIFE SAVING SOCIETY - WESTERN AUSTRALIA INC. INSTRUCTOR ADMINISTRATION SHEETS The Assessment Guide has been designed
6 th Kup - 5 th Kup (Green belt - blue tab)
") 6 th Kup - 5 th Kup (Green belt - blue tab) Long stance - Double knife-hand strike : Hammer-fist strike : Back-fist strike : Spear-Hand Punch : Back stance Single fist guarding block : Double fist guarding
6 th Kup - 5 th Kup (Green belt - blue tab) Long stance - Double knife-hand strike : Hammer-fist strike : Back-fist strike : Spear-Hand Punch : Back stance Single fist guarding block : Double fist guarding
PEE WEE AND LIONS RULES AND SKILLS HANDOUT (April 2005) THE RULES
 THE RULES") PEE WEE AND LIONS RULES AND SKILLS HANDOUT (April 2005) THE RULES 1. When the whistle is blown by the coach, stand still, be quiet, and look at the coach; 2. If you want to speak raise your hand and wait
PEE WEE AND LIONS RULES AND SKILLS HANDOUT (April 2005) THE RULES 1. When the whistle is blown by the coach, stand still, be quiet, and look at the coach; 2. If you want to speak raise your hand and wait
Shot put learn by - doing Basic technique for the Shot Put By: Mark Harsha Portage High School Girls Head Coach
 Shot put learn by - doing Basic technique for the Shot Put By: Mark Harsha Portage High School Girls Head Coach Goal One: Shot grip and placement 1. Holding the shot The shot is held at the base of the
40 Allied Drive Dedham, MA (office)
") Standing forward flexion Stand facing a mirror with the hands rotated so that the thumbs face forward. Raise the arm upward keeping the elbow straight. Try to raise the arm by hinging at the shoulder as
Standing forward flexion Stand facing a mirror with the hands rotated so that the thumbs face forward. Raise the arm upward keeping the elbow straight. Try to raise the arm by hinging at the shoulder as
EFFORTLESS SWIMMING. Mastering Freestyle Technique: How to swim faster, longer and easier (and look good doing it)
") Mastering Freestyle Technique: How to swim faster, longer and easier (and look good doing it) Dear Fellow Swimmer, Thank you very much for investing your money, confidence and time into this course. We've
Mastering Freestyle Technique: How to swim faster, longer and easier (and look good doing it) Dear Fellow Swimmer, Thank you very much for investing your money, confidence and time into this course. We've
Yellow Belt Grading Requirements - Details
 Yellow Belt Grading Requirements - Details Stance and movement: Horse Stance Looking for: Feet shoulder width apart or wider. Knees above feet. Feet face forwards. Thighs ideally parallel with ground.
MENTAL PREPARATION FOR HOCKEY. Created By: Trevor Morgan
 MENTAL PREPARATION FOR HOCKEY Created By: Trevor Morgan Table of Contents Background Information 2 The Mind 2 Mental Preparation. 2 Words of Inspiration 3 Focus Areas for Players. 4 Setting Goals.. 4 Controlling
Top 10 Yoga Exercises to relieve Sciatica
 Top 10 Yoga Exercises to relieve Sciatica This is due to compression and inflammation of the spinal nerves. A sharp pain radiates from the lower back to to the leg and foot in a pattern determined by the
Timing 1. The hips and shoulders rotate at the end of the catch to assist in the acceleration of the stroke.
 Freestyle Body Position 1. Head position should be comfortable at a 45º angle with the water line slightly above the goggles. 2. Hips and shoulders should remain high in the water with a straight line
UK Yoga Sports Federation
 UK Yoga Sports Federation STANDING HEAD TO KNEE POSE 4 parts 1. Stand with feet together, shift body weight to standing leg (leg closest to the judges) and lock the knee (leg straight and thigh muscle
The BIG BOOK of Golf Drills
 The BIG BOOK of Golf Drills 1 How to Use This Guide Congratulations on purchasing the Big Book of Golf Drills! This book is designed to use as a reference guide. We do not recommend printing this out as
Copyright All Rights Reserved. By Rick Stonebraker.
 Page 1 of 17 Copyright 2000 All Rights Reserved By Rick Stonebraker http://www.texasarchery.org FOREWORD Page 2 of 17 An important part of archery is the equipment. The skill of the archer is also important
Instructions for How to Teach the Level 2 Course - Day 2
 Instructions for How to Teach the Level 2 Course - Day 2 WWW.USARCHERY.ORG a program of in partnership with F O U N D A T I O N S Instructions for How to Teach the Level 2 Course - Day 2 INTRODUCTION
ORIENTATION SEQUENCE
 ORIENTATION SEQUENCE In-Trinity builds strength, deepens flexibility and improves balance, coordination and agility. For the first time, you will access movements never possible before, taking your training
AYRA International League Minimum Skills
 AYRA International League Minimum Skills The International League should continue to work on all previous teachings and build upon these skills. This is a good age to start introducing more advanced skills,
Teaching Progression and the Fine Points For Contact In The Underhand Pass (Service Reception and Defense) Step 1: Catch & Throw
 Step 1: Catch & Throw") Teaching Progression and the Fine Points For Contact In The Underhand Pass (Service Reception and Defense) Step 1: Catch & Throw - Players can be in pairs or if working individually then the coach can
Teaching Progression and the Fine Points For Contact In The Underhand Pass (Service Reception and Defense) Step 1: Catch & Throw - Players can be in pairs or if working individually then the coach can
BEGINNING PITCHING TIPS BRYC Softball Updated February 4, 2008
 BEGINNING PITCHING TIPS BRYC Softball Updated February 4, 2008 General 1. Work on sound mechanics before anything else. The earlier a player learns the mechanics, the quicker she will progress in learning
11.1 Seating and the correct sitting position
 11. Sitting position 11.1 Seating and the correct sitting position The person who has had a stroke will spend much of their time sitting, especially in the early days after the stroke. A correct sitting
A Publication Of The USA Hockey Coaching Education Program The USA Hockey Coaching Education Program is Presented By
 LEVEL 1 SKILL DEVELOPMENT MANUAL Lesson Manual B A Publication Of The USA Hockey Coaching Education Program The USA Hockey Coaching Education Program is Presented By LESSON B-1 SPECIFIC OBJECTIVES 1.
The Grip: Place the shot comfortably on the base of the hand with the thumb down and the four fingers balancing the shot.
 The Javelin By Mark Mirabelli, Throwing Specialist - www.mmtrackandfield.com If I could use one word to express success in all three styles of throwing the shot put I would have to say the word drill.
Sun Salutation Pose #1 Mountain Pose 1
 Sun Salutation Pose #1 Mountain Pose 1 Stand upright with feet together and look straight ahead, hands alongside body and palms forward. Lift abdomen inward and upward. Activate quadriceps and evenly distribute
PRO BANDS TRAINING GUIDE
 PRO BANDS TRAINING GUIDE Thank you for choosing SKLZ Pro Bands. We are dedicated to providing you with the best tools and instruction possible to help you unleash your athletic potential. If there is anything
How to Make a Proper Fist
 How to Make a Proper Fist Bend your index finger so that the first knuckle touches the second knuckle of your thumb, tucking in the fold of skin that is between your thumb and index finger. Then fold your
LESSON 9 THE SWING PLANE AND THE BODY (Part 1)
") LESSON 9 THE SWING PLANE AND THE BODY (Part 1) A BLOW IN PLANE FACE ON. In our very first lesson we understood the principle of striking a fence post with a hammer; we could make a glancing blow, but the
LESSON 9 THE SWING PLANE AND THE BODY (Part 1) A BLOW IN PLANE FACE ON. In our very first lesson we understood the principle of striking a fence post with a hammer; we could make a glancing blow, but the
KLiC Activity Scenario Template Informal Setting
 KLiC Activity Scenario Template Informal Setting Activity title: Fencing for beginners Subject: Informal Sports Activity Student (Athlete) age: All Ages Estimated duration: 75 minutes (excluding setup
Dr. D. Ryan York, PT, DPT, CGS Doctorate in Physical Therapy Certified Golf Performance Specialist, GOLO Golf University
 Dr. D. Ryan York, PT, DPT, CGS Doctorate in Physical Therapy Certified Golf Performance Specialist, GOLO Golf University Dr. Chad Edwards, PT, DPT, CGFI Doctorate in Physical Therapy Certified Golf Fitness