Kentucky Long Rifle.50 BMG Model: BA M-N-M Tactical. Users Guide
|
|
|
- Albert Phelps
- 5 years ago
- Views:
Transcription

1 Kentucky Long Rifle.50 BMG Model: BA M-N-M Tactical Users Guide Metals-N-More Bowling Green, KY Telephone Fax
2 INTRODUCTION Congratulations on your purchase of the Kentucky Long Rifle Model BA.50 BMG, it has been test fired and ready for your enjoyment. Before unpacking and using this rifle please read this user s guide. It will familiarize you with the rifles functioning and safe handling. Please note also included warnings of possible dangers from misuse that could lead to serious accidents. Warning This rifle is for use with high quality, original factory manufactured cartridges. Use of hand loaded, remanufactured, or other non-standard ammunition may cause serious malfunctions which could pose safety hazards to the shooter or others. Warning If the firearm is carelessly or improperly handled unintentional discharge could result and could cause injury, death or damage to property. Caution Carefully read this instruction manual prior to loading and firing your firearm. Follow all instructions on the proper handling and safe use of your firearm. IF UNFAMILIAR WITH FIREARMS, SEEK FURTHER ASSISTANCE THRU SAFE HANDLING COURSES, NRA APPROVED INSTRUCTOR, LAW ENFORCEMENT AGENCY, LOCAL GUN CLUB, STATE WILDLIFE AGENCY OR OTHER SIMILAR QUALIFIED PROGRAMS WITHIN YOUR AREA. Caution Any round in the camber will be discharged when trigger is pulled. The user should never leave the KLR.50 BMG loaded or unattended. Always verify the rifle is unloaded and the chamber is empty before attempting to clean or field strip your KLR.50 BMG. Warning Hearing loss is permanent. Always wear ear plugs or ear muffs, - using both is advised. It is also your responsibility to protect the hearing of others around you. The muzzle brake is an integral part of the rifle s design and diverts a large portion of the shot blast to the side and rearward of the muzzle. NEVER FIRE YOUR RIFLE WITHOUT THE MUZZLE BRAKE. People and objects should not be in the vicinity of the muzzle. The safest place for anyone is behind the shooter. 1
3 General Safety Precautions 1. Always handle your KLR.50 BMG as if it were loaded in order to prevent accidental discharge. 2. When handling your KLR.50 BMG always personally check and verify you rifle is unloaded. 3. Never point your.50 BMG at anything you do not intend to shoot. Always point your rifle in a safe direction. 4. Check your barrel and trigger mechanism for obstructions, and clear any obstructions before firing your rifle. 5. Never store your KLR.50 BMG loaded. Always unload and check to make sure the chamber is empty. Store the rifle in a safe place out of reach of anyone not capable of handling the rifle safely. 6. Always make sure that when firing your KLR.50 BMG that the backstop is capable of stopping the round without ricochet or thru penetration. 7. Always be sure of your target and beyond. The KLR.50 BMG projectile can travel more than 5 miles. 8. Never leave your KLR.50 BMG unattended. Children or persons not familiar with basic firearm safety rules could accidently fire the rifle. 9. Never handle a firearm while using alcohol, drugs, or any substance that could impair your judgment or vision. 10. Always use eye and ear protection when firing your KLR.50 BMG. Failure to do so may result in loss of eyesight and hearing. 11. If you re taking prescription medication always check with your doctor to make sure it is safe to handle a firearm. 12. Always make sure your KLR.50 BMG is unloaded prior to cleaning, storing, or transporting your rifle. 13. Never pull the trigger on your KLR.50 BMG until the bolt is fully forward and in its locked down position. 14. Only use high quality commercially manufactured ammunition in excellent condition and of the correct caliber of the rifle you are firing. Use of reloaded ammunition will void warranty. Reloads could exceed the loading limits set by the industry and could be unsafe to use. 15. Failure to Fire: Always hold the rifle firmly, keeping it pointed in a safe direction for a period of no less than 1 minute. If a hang fire (slow ignition) has occurred the round will fire within 1 minute. If the round has not fired eject the round and check the primer for firing pin indent. If the primer strike is light, off centered, or nonexistent have a qualified gunsmith thoroughly check the rifle. If the firing pin indent appears normal compared to other rounds shot from the same rifle, faulty ammunition is likely. Keep the round separate from others and discard according to manufactures specifications. 2
4 Specifications and Capabilities Specifications Caliber:.50 BMG Weight: 30 lbs. unloaded Overall Length: 58 ½ Barrel Length: 29 (standard) # of Grooves 8 Twist 1 in 15 Magazine Capacity: 5 rounds Stock: Tactical machined 6061-T6 Safety: Manual thumb-lever Trigger Pull: 4.5 lbs. Finish Cerakote Capabilities Muzzle Velocity: Approximately 2797 f/s with standard 660 grain projectile Range 5+ miles 3
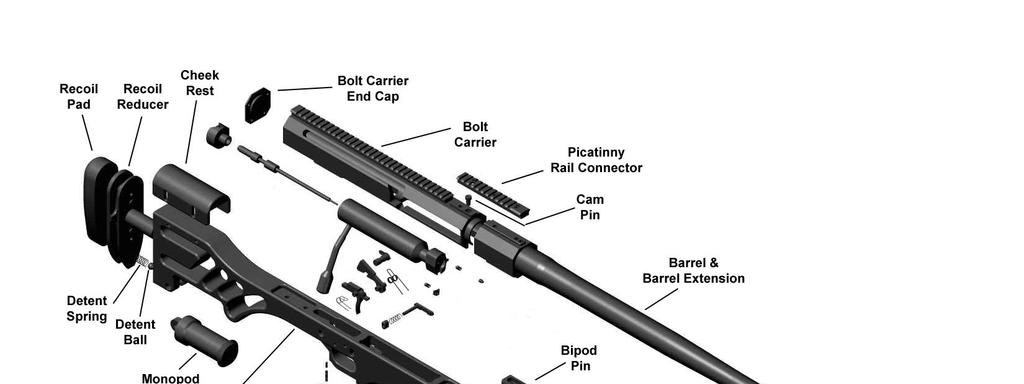
5 Component Identification 4
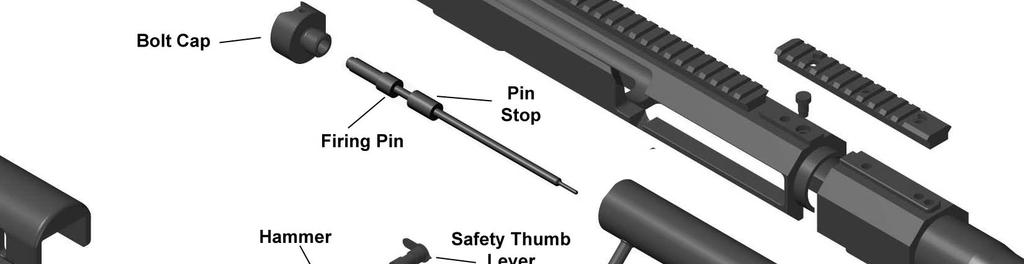
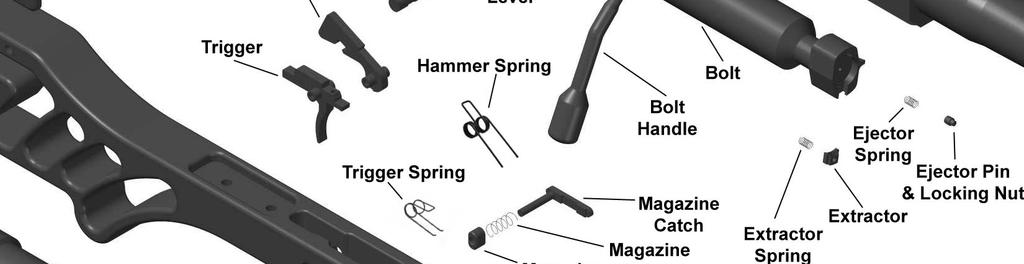
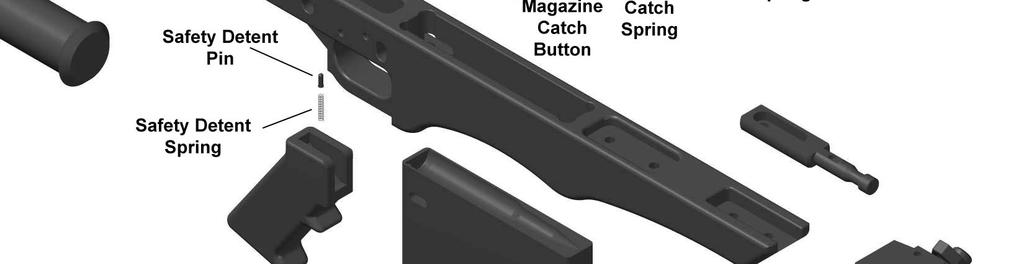
6 Component Identification (continued) 5


7 Firing your rifle Fig 1 Fig 2 1. Open the bolt and move to the rear as pictured in Fig 1. Make sure that the barrel and chamber are free from obstructions. 2. Using appropriate ammunition, load the magazine and insert into the magazine port of your rifle as shown in Fig 2. Make sure that the magazine catch locks securely into the magazine catch slot. (If you can remove the magazine without having to push the magazine catch button then the magazine is not fully locked into position). Fig 3 Fig 4 Fig 5 3. Push the bolt handle forward and down to lock into firing position as shown in Fig 3. The bolt will pick up a cartridge on its way forward and force it into the chamber. (Make sure bolt is fully forward and in the down position Fig 3). 4. Make sure the safety lever is in the safe position as shown in Fig Aim at your intended target, making sure to use enough scope eye relief to avoid impact, and release the safety with your thumb as shown in Fig 5. Pull the trigger. 6


8 Unloading your rifle Fig 6 Fig 7 1. Rotate bolt up with the palm of your hand into position as shown in Fig 6. Significant force may be required with a sticking cartridge. Pull the bolt back to its most rearward position as shown in Fig 7. The spent cartridge will eject through the extractor port. Fig 8 Fig 9 2. Once you have emptied your magazine, grip the magazine with your left hand and press the magazine release button shown in Fig 8. The magazine should then easily detach as shown in Fig 9. 7
 picatinny rail bolts (item 1) shown in Fig 11.")
 bolt carrier mounting bolts (item 3) shown in Fig 12. Grip the bolt carrier at the rear and lift up and pull back. Fig 13 Fig 14 3. Remove the (qty.")


9 Dissembling your rifle Fig 10 Fig 11 Fig Move bolt to reward most rearward position as shown in Fig 10, and remove magazine. Using a 1/8 allen wrench remove the (qty. 3) picatinny rail bolts (item 1) shown in Fig 11. It may be necessary to free the connector by tapping it at position (2) with a soft non-marring hammer. 2. Remove the (qty. 2) bolt carrier mounting bolts (item 3) shown in Fig 12. Grip the bolt carrier at the rear and lift up and pull back. Fig 13 Fig Remove the (qty. 2) barrel extension bolts (item 4) shown in Fig 13. The barrel and barrel extension are heavy, so use caution when you remove the final bolt as it is possible the barrel could fall forward. 4. Remove the magazine catch by pressing the magazine button (item 6) completely in, (this can be accomplished by using a 3/16 or smaller punch). Rotate the magazine catch counter-clockwise, keeping pressure applied with the punch. Release pressure on the button gently as it is under spring pressure. Remove magazine catch, button and spring. 5. Relieve the hammer spring pressure by making sure the hammer is not in its firing (cocked) position. Using your palm, apply pressure against the hammer and pull trigger. This will allow you to gently relieve most of the hammer spring pressure by allowing the hammer to come forward. 8

10 6. Remove the (qty. 4) trigger group pin retaining set screws (item 7) shown in Fig 14. From both sides of the rifle using a 5/64 allen wrench, push pins completely out either side using a 1/16 straight punch and remove the hammer and trigger. 7. Remove the pistol grip (item 5) shown in Fig 14. Insert a 3/16 Allen wrench through the bottom of grip and remove the bolt holding the grip to the lower receiver. Carefully pull the grip away from receiver as the safety detent and detent spring can fall out. You can now remove the safety thumb lever by pushing it through with a 3/16 diameter or smaller punch. Fig Remove the butt pad and plate. Using a 3/32 Allen wrench, remove screw (item 8) shown in Fig 15. Pull butt pad and plate off pin. 9. Using a 5/32 Allen wrench, remove the cheek rest by unscrewing the (qty. 4) button head cap screws, and pulling upwards (item 9) shown in Fig 15. 9


 as shown in Fig 18.")
11 Fig Mounting plate has (qty. 2) button-head cap screws (item 11) shown in Fig 16. Behind the plate in area labeled (A) there is a spring and detent ball. Be careful removing this plate as it is under pressure. 11. Remove the mounting plate using a 1/8 Allen wrench, remove the (qty. 2) button-head cap screws (item 11) shown in Fig Remove the monopod using a 5/32 allen wrench by unscrewing shoulder bolt (item 12) shown in Fig 16. Monopod may be tight in groove; rotating it back-and-forth with a pull will free it. Fig 17 Fig Remove the bipod mounting pin using a 1/8 Allen wrench, remove (qty. 2) bolts (item 13) shown in Fig 17. Lift bipod mounting pin out of its pocket. 14. Remove the muzzle brake with a spanner wrench on the locking nut (item 14) as shown in Fig 18. Insert 1/8 spanner pin into hole (16) and rotate clockwise until the seal between locking nut and muzzle brake (item 15) loosens. Turn the muzzle brake counter-clockwise until it separates from barrel. Remove the locking nut in the same manner. 10
 by pushing it out the top of bolt carrier (item 18). It may be necessary to gently tap the pin to free it.")
 by turning it counter-clockwise. Now the bolt (item 21) can be removed from the bolt carrier.")
.")
. Turn counterclockwise and unthread it from the bolt.")
12 Fig 19 Fig Move the bolt to its rearward-most position as shown in Fig 19. Remove the cam pin (item 19) by pushing it out the top of bolt carrier (item 18). It may be necessary to gently tap the pin to free it. Use a brass punch, not steel, as the cam pin may be damaged. 16. Move bolt back forward as shown in Fig 20. Using a 5/16 wrench, remove bolt handle (item 22) by turning it counter-clockwise. Now the bolt (item 21) can be removed from the bolt carrier. Fig 21 Fig Remove the extractor (item 24) shown in Fig 21, by inserting dental pick into hole (25) and pushing the extractor spring down. While holding the spring down carefully slide extractor out the side of the bolt (item 23). Spring will be under pressure so take precautions that it doesn t fly out and across the room. 18. Remove the ejector pin using a 1/8 socket over the hex shaped ejector pin (item 26). Turn counterclockwise and unthread it from the bolt. There is an ejector spring under the pin so it can also fly out. 19. Hold the bolt (item 28) shown in Fig 22 securely and turn the bolt cap (item 27) counter-clockwise and remove from bolt. Pull the firing pin and firing pin stop out of bolt. 11
 shown in Fig 23 into the lower receiver (item 3) slot with the holes")
, tighten securely. 2.")
, tighten securely.")
 into lower receiver.")
13 Assembling your rifle Fig 23 Fig Insert the bipod pin (item 2) shown in Fig 23 into the lower receiver (item 3) slot with the holes aligned. Insert the (qty. 2) 1/4-20 low head socket cap screws (item 1), tighten securely. 2. Insert the monopod (item 5) shown in Fig 24, into the lower receiver (item 6) slot. Align holes in receiver and monopod. Insert the ¼-20 shoulder bolt (item 4), tighten securely. Fig 25 Fig Insert ball detent (item 7) shown in Fig. 25, into lower receiver (item 8). Next, insert ball detent spring (item 9) into lower receiver. Spring will protrude from lower receiver as shown in Fig Insert recoil reducer mounting plate (item 12) shown in Fig 25, with pressure to compress the spring. 5. Insert the (qty. 2) flat head socket cap screws (item 13) into the lower receiver. Tighten securely. 12

 shown in Fig 28, over lower receiver (19). Align slots of cheek rest with mounting holes in receiver. Insert the (qty. 4) ½-20 button head cap screws (item 20) and (qty.")
 shown in Fig 29, to the lower receiver (item 22).")
14 Fig 27 Fig Before installing the recoil pad (item 14) shown in Fig 27, the pin (item 17) is adjustable for a softer or firmer feel. Insert a 3/32 Allen wrench into end of pin (item 17). For a softer recoil turn the pin clock wise, for a firmer recoil turn the pin counter-clockwise. After adjustments, slide recoil pad into recoil reducer mounting plate. Align the screw hole with pin (item 16), and with the slot in the recoil pin (item 17). Insert set screw (item 16) until it s snug against recoil pin (item 17). 6. Slide cheek rest (18) shown in Fig 28, over lower receiver (19). Align slots of cheek rest with mounting holes in receiver. Insert the (qty. 4) ½-20 button head cap screws (item 20) and (qty. 4) nylon washers (item 21) into the mounting holes. Set cheek rest to desired position and lock into place. Fig Attach the barrel and barrel extension (item 23) shown in Fig 29, to the lower receiver (item 22). The barrel extension has a rectangular key which fits inside the key pocket of the lower receiver. Make sure it is seated fully into pocket and securely tighten the (qty. 2) ¼-20 bolts. Chamber and bore should be cleaned regularly. 13
 over hammer (item 28) as shown in Fig 31. Fig 32 9.")
 into lower receiver and trigger.")
 and tighten until precisely flush with outside of receiver. This procedure will center pin correctly.")
15 Fig 30 Fig Install trigger spring (item 25) over trigger (item 26) as shown in Fig 30. Install hammer spring (item 27) over hammer (item 28) as shown in Fig 31. Fig Install the trigger and trigger spring (item 29) into the lower receiver (item 30) as shown in Fig 32. Make sure the spring legs face muzzle end. Align the hole in the lower receiver with the hole in trigger. 10. Insert trigger pin (item 31) into lower receiver and trigger. Use a 9/64 or smaller punch to press pin (item 31) into receiver just enough to allow retaining setscrew to engage threads. Insert retaining setscrew (item 32) and tighten until precisely flush with outside of receiver. This procedure will center pin correctly. Insert retaining setscrew (item 33) in opposite side, and tighten. Check trigger for free movement. Lubricant should be used on trigger group parts. 14
 into lower receiver (item 39) as shown in Fig 34.")
 with detent pin and hole in pistol grip (item 38).")


16 Fig 33 Fig Insert safety thumb lever (item 34) into lower receiver (item 35) as shown in Fig With safety thumb lever installed, attach the pistol grip. Insert safety lever detent pin (item 36) into lower receiver (item 39) as shown in Fig 34. Verify that the safety lever and detent are correctly positioned by using a small punch to apply pressure on top of detent pin, and work the thumb lever from safe to fire position. You should feel the detent at each position. 13. Align safety detent spring (item 37) with detent pin and hole in pistol grip (item 38). Push pistol grip onto lower receiver, making sure that detent spring stays in position. Attach pistol grip with ¼-20 socket head cap screw and locking washer to lower receiver, tighten securely. Fig 35 Fig Install hammer and hammer spring (item 40) into lower receiver (item 41) as shown in Fig 35. Hammer spring needs to be folded so legs face rearward as shown in Fig 36. A correctly installed hammer is shown in Fig 36 with the spring legs resting on top of trigger pin. 15. Align hole in lower receiver with hole in hammer. Insert hammer pin (item 42) into lower receiver and hammer. Using a 9/64 or smaller punch to press pin (item 42) into receiver at least 1/8 inch. Insert pin retaining setscrew (item 43) and tighten until flush with outside of receiver. Repeat for opposite pin retaining setscrew (item 44). 15

 into slot. Once in place the spring will hold extractor in position. 18.")
17 Fig 37 Fig Insert ejector spring (item 46) into bolt (item 48) shown in Fig 37. Apply a small drop of Locktite (high strength) on ejector pin locking nut (item 47). Insert into bolt and tighten until nut is below bolt face surface. It is extremely important to have locking nut below bolt face surface. FAILURE TO HAVE LOCKING NUT BELOW BOLT FACE CAN CAUSE INJURY, DEATH, OR DAMAGE TO PROPERTY! 17. Insert extractor spring (item 49) into bolt (item 48) as shown in Fig 37. Using a small dental pick, push extractor spring down while sliding extractor (item 50) into slot. Once in place the spring will hold extractor in position. 18. Slide pin stop (item 51) over firing pin (item 52) as shown in Fig 38. Insert firing pin (item 52) into bolt (item 53). With firing pin pushed completely into bolt, pin should protrude from bolt face by 1/16 to 3/ Apply Locktite to bolt cap (item 54) threads. Tighten bolt cap against bolt keeping flats on both bolt and bolt cap aligned. Fig Slide bolt (item 56) into carrier (item 57) as shown in Fig 39. Apply Locktite to bolt handle (item 58) and insert into bolt. Using a 5/16 wrench on flats (item 59) and tighten bolt handle. 16
 into lower receiver (item 66).")
18 Fig Insert magazine catch spring (item 63) into lower receiver (item 66) as shown in Fig Insert magazine button (item 64) into lower receiver. 23. Using a 3/16 diameter punch, push and hold the magazine button completely into receiver. 24. Insert magazine catch (item 65) into lower receiver (item 66). Rotate catch until threads start into button. Once threads engage, turn magazine catch a full 3 to 4 turns. 25. Align magazine catch with slot inside receiver. Gently release magazine catch button. The amount of magazine catch button protrusion can be adjusted by adding another turn or, if in too far, removing a turn. 17
 of bolt carrier (item 67) will insert into barrel extension (item 68). Push completely in. 28.")
 ¼-20 socket head cap screws and tighten securely Fig 43 30.")
19 Fig Install bolt carrier (item 67) into barrel extension (item 68) and lower receiver (item 71) as shown in Fig Slightly tilt bolt carrier so the boss (item 69) of bolt carrier (item 67) will insert into barrel extension (item 68). Push completely in. 28. Tilt bolt carrier back to a horizontal position and insert carrier key (item 70) into lower receiver. It may be necessary to gently tap carrier with a non-marring hammer to seat key fully. 29. Make sure carrier is seated fully and completely against barrel extension. Insert the (qty. 2) ¼-20 socket head cap screws and tighten securely Fig Slide bolt to its rearward-most position shown in Fig 43. Insert cam pin (item 73) into bolt carrier (item 74). It may be necessary to tap in with a non-marring hammer. Head of pin will seat flush with top of bolt carrier. 31. Position picatinny rail (item 75) over keys of bolt carrier and barrel extension. It may be necessary to gently tap into place with a soft non-marring hammer. 32. Insert the (qty. 3) ¼-20 low head cap screws (item 77) and tighten securely. 18
20 Fig Apply a small amount of Loctite to muzzle threads. Screw muzzle brake locking nut (item 79) fully onto barrel (item 80) as shown in Fig Screw muzzle brake (item 78) fully onto barrel (item 80) until it seats against locking nut. If flats of muzzle brake are not parallel with picatinny rail, loosen muzzle brake to desired position. 35. Once muzzle brake is in desired position tighten locking nut against muzzle brake using spanner wrench. 19
21 Troubleshooting Malfunction Cause Corrective Action A. Failure to 1. Damaged cartridge Chamber and Lock 2. Dirty or obstructed chamber B. Failure to Fire 1. Safety is on 2. Faulty ammunition 3. Bolt handle not fully in locked position 4. Firing pin broken or damaged C. Failure to Extract 1. Broken or worn extractor 2. Broken or worn extractor spring 3. Extractor not moving freely 4. Dirty ammunition or chamber 5. Broken case rim D. Failure to Eject 1. Broken or worn ejector 2. Broken or worn ejector spring 3. Ejector not moving freely E. Very Hard Recoil 1. Missing muzzle brake 2. Recoil reducer is out of adjustment or broken 3. Improper shooting position 1. Remove and Replace Cartridge 2. Clean Chamber 1. Ensure safety in in firing position 2. Replace Ammunition 3. Ensure bolt handle is down fully. 4. Return complete bolt assembly for repair. 1. Replace extractor 2. Replace extractor spring 3. Clean extractor, extractor spring and pocket 4. Clean ammunition and chamber 5. Clear with cleaning rod 4. Replace ejector 5. Replace ejector spring 6. Remove and clean ejector, ejector spring and pocket 1. Attach muzzle brake 2. Adjust or replace damaged unit 3. Properly hold butt pad against shoulder firmly 20
22 LIMITED WARRANTY The BA KLR.50 BMG is warranted by Metals-N-More Inc. to be free from defects in material and workmanship for a period of twelve (12) months from the date of purchase by the original purchaser. Under this warranty, the obligation of Metals-N- More Inc. is limited to the free replacement (to the original purchaser) of any part which, under normal conditions of use, proves to be faulty because of defect in material or workmanship. Metals-N-More Inc. will not be responsible for the results of misuse, neglect, corrosion, unreasonable use, improper or defective ammunition, unauthorized alterations, or normal wear and tear. The use of nonstandard, old, damaged, corroded, or remanufactured hand-loaded ammunition will void all warranties, expressed or implied. In order to receive warranty service, the entire firearm and damaged parts must be returned to the factory. Warranty claim must be in writing, and include serial number and the nature of the problem. Shipping charges to the manufacturer must be paid by the purchaser. If claim is accepted for warranty work, return shipping and insurance charges will be paid by Metals-N-More Inc. LIMITATION OF LIABILITY The liability of Metals-N-More Inc. for any and all losses and damages to the purchase shall in no event exceed the purchase price of the firearm, and then only if the firearm is proven to be defective in material and workmanship. Metals-N-More Inc. shall under no circumstances be liable for incidental or consequential damages resulting from negligence of Metals-N-More Inc. or from negligence or misuse of the purchaser. Metals-N-More Inc. makes no other warranties of any kind, expressed or implied with respect to the Model BA KLR.50 BMG. YOUR RESPONSIBILITY Your KLR.50 BMG rifle is a precision engineered and manufactured rifle. It has been test fired and inspected before packing and shipping from our factory. Its safe use depends on you alone. You are the best safety device for your weapon. 21
REC7 DI OPERATOR S MANUAL
 EC7 D REC7 DI OPERATOR S MANUAL TABLE OF CONTENTS 2 2 4 5 6 6 6 8 8 10 11 12 12 13 13 15 18 20 22 USE OF THIS MANUAL SAFETY GUIDELINES WARRANTY AND SERVICE NOTES FUNCTIONS AND FEATURES BREAK IN PROCEDURE
STRIBOG GRAND POWER. The INSTRUCTIONS FOR USE, MAINTENANCE AND SAFETY. 1
 instructions The for use, maintenance STRIBOG and safety hestribog GRAND POWER INSTRUCTIONS FOR USE, MAINTENANCE AND SAFETY www.grandpower.eu 1 The STRIBOG Dear Customer, Thank you for purchasing a semi-automatic
ODEL 95 OPERATOR S MANUAL
 ODEL 95 MODEL 95 OPERATOR S MANUAL TABLE OF CONTENTS 2 2 3 5 6 6 6 7 7 8 8 11 11 12 12 19 20 22 24 26 MANUFACTURER S DISCLAIMER USE OF THE MANUAL SAFETY GUIDELINES WARRANTY AND SERVICE DESCRIPTION OF FIREARM
AR STYLE FIREARMS OWNER'S MANUAL: OPERATION, HANDLING, DISASSEMBLY / REASSEMBLY & SAFETY INSTRUCTIONS
 AR STYLE FIREARMS OWNER'S MANUAL: OPERATION, HANDLING, DISASSEMBLY / REASSEMBLY & SAFETY INSTRUCTIONS - DO NOT DISCARD THIS MANUAL - READ THIS MANUAL CAREFULLY, PAYING CLOSE ATTENTION TO THE INSTRUCTIONS
ARAK-21 OPERATOR SAFETY AND INSTRUCTION MANUAL
 ARAK-21 OPERATOR SAFETY AND INSTRUCTION MANUAL NOTICE: The ARAK-21 Upper Assembly itself is not considered a Firearm under federal law or the National Firearms Act. The ARAK-21 Upper Assembly mounted on
PISTOL CALIBER AR STYLE FIREARMS
 PISTOL CALIBER AR STYLE FIREARMS OWNER'S MANUAL: OPERATION, HANDLING, DISASSEMBLY / REASSEMBLY & SAFETY INSTRUCTIONS - DO NOT DISCARD THIS MANUAL - READ THIS MANUAL CAREFULLY, PAYING CLOSE ATTENTION TO
VR1 Owner s Manual. Vigilance Rifles, Inc Plum Lane Redlands, CA P F
 VR1 Owner s Manual Vigilance Rifles, Inc. 1653 Plum Lane Redlands, CA 92374 P 909.307.8877 F 909.307.8866 www.vigilancerifles.com INTRODUCTION: Vigilance Rifles offers a new line of Semi-Automatic Rifles
M16 R / M1600 R USER S MANUAL WARNING: READ THE INSTRUCTIONS AND SAFETY PRECAUTIONS IN THIS MANUAL CAREFULLY BEFORE USING THIS FIREARM.
 ARMSCOR M16 R / M1600 R USER S MANUAL WARNING: READ THE INSTRUCTIONS AND SAFETY PRECAUTIONS IN THIS MANUAL CAREFULLY BEFORE USING THIS FIREARM. DISCHARGING FIREARMS IN POOLY VENTILATED AREAS, CLEANING
SAR-15 RIFLE OWNERS MANUAL
 SAR-15 RIFLE OWNERS MANUAL SIONICS WEAPON SYSTEMS Our mission is to manufacture quality firearms made with pride in the USA. We are able to do accomplish this by using only the best American made parts.
HATFIELD. Continuing the Tradition SEMI-AUTOMATIC SHOTGUN INSTRUCTION MANUAL
 HATFIELD Continuing the Tradition SEMI-AUTOMATIC SHOTGUN INSTRUCTION MANUAL READ THE INSTRUCTIONS AND WARNINGS IN THIS MANUAL CAREFULLY BEFORE USING THIS FIREARM SAFETY HANDLING RULES 1.Always keep the
Defender Series Owner s Manual
 4904 Hwy 98/PO Box 67 Comer, GA 30629 (866) 803-0000 Fax (706-783-5800) Defender Series Owner s Manual MPA1SST & MPA20SST/DMG Carbines MPA10T & MPA10SST Pistols MPA30T & MPA30SST/DMG Pistols When you purchased
Ed Brown Products, Inc.
 Ed Brown Products, Inc. P.O. Box 492, Perry, MO 63462 - (573)-565-3261 - FAX (573)565-2791 Internet Address: www.edbrown.com email: edbrown@edbrown.com Ed Brown 1911 Owner s Manual WARNING: YOU MUST READ
SAFETY RULES WARNING: READ THESE SAFETY RULES & OPERATORS MANUAL BEFORE HANDLING YOUR FIREARM
 SAFETY RULES WARNING: READ THESE SAFETY RULES & OPERATORS MANUAL BEFORE HANDLING YOUR FIREARM Never point a firearm at anyone and always keep the muzzle pointed in a safe direction. Always treat all firearms
RAD MRAD BREECH CONVERSION KIT INSTRUCTIONS
 RAD MRAD BREECH CONVERSION KIT INSTRUCTIONS TABLE OF CONTENTS 2 2 4 5 5 6 USE OF THIS MANUAL SAFETY GUIDELINES WARRANTY AND SERVICE CONTENTS PURPOSE OF BREECH CONVERSION KIT INSTRUCTIONS BREECH CONVERSION
ENR Enterprises, LLC. ENR 15 Manual
 ENR Enterprises, LLC ENR 15 Manual Table of Contents Disclaimer of Liability 2 Warnings: Dangerous Procedures 3 General Safety Warnings 4 Main Features and Overview 6 Rifle Clearing Before Use 7 Safety
trigger magazine release
 Made in Germany www.umarexusa.com slide gas vent hammer barrel bushing recoil spring plug slide stop trigger safety trigger guard magazine release grip Government 1911 A1 S Cal. 9 mm P.A.K. (Blank Firing)
TABLE of CONTENTS. Safety 4. Introduction 6. Description 6. Storage 6. Components 7. Unloading and Inspection 8. Disassembly 10. Care and Cleaning 12
 1911 Pistol Manual 2 TABLE of CONTENTS Safety 4 Introduction 6 Description 6 Storage 6 Components 7 Unloading and Inspection 8 Disassembly 10 Care and Cleaning 12 Loading and Firing 13 Troubleshooting
FX IMPACT OWNER S MANUAL
 made in sweden FX IMPACT OWNER S MANUAL Warranty Information All FX Airguns carry a One Year Warranty against faulty workmanship and defective materials. If it becomes necessary, first contact the dealer
SHF R50 SHF S50 Safety Harbor Firearms, Inc. PO Box 563 Safety Harbor, FL Ph: Fax:
 SHF R50 SHF S50 Safety Harbor Firearms, Inc. PO Box 563 Safety Harbor, FL 34695-0563 Ph: 727-726-2500 Fax: 727-797-6134 www.safetyharborfirearms.com 1 ^ WARNING Risk of serious injury or death. Failure
MECH-TECH SYSTEMS CCU MODEL FOR GLOCK PISTOLS
 MECH-TECH SYSTEMS CCU MODEL FOR GLOCK PISTOLS Operation & Maintenance Manual Read and understand this manual before attempting to use this product. If you have any questions call: 1-866-433-2122 www.mechtechsys.com
MRAD. Operator s Manual. (Multi-Role Adaptive Design) PO Box 1077 Murfreesboro, TN USA / / FAX /
 PO Box 1077 Murfreesboro, TN USA / / FAX /") MRAD (Multi-Role Adaptive Design) Operator s Manual PO Box 1077 Murfreesboro, TN 37133 USA / 615.8962938 / 615.896.7313 FAX / mail@barrett.net 03-23-11 P# 12925 Use of this manual Before you handle the
MRAD (Multi-Role Adaptive Design) Operator s Manual PO Box 1077 Murfreesboro, TN 37133 USA / 615.8962938 / 615.896.7313 FAX / mail@barrett.net 03-23-11 P# 12925 Use of this manual Before you handle the
Owners Manual MAX-10/45 Upper Receiver. Rev. A. NFA Warning. LAGE Manufacturing, L.L.C. 916 E. Baseline Rd. STE #113 Mesa, AZ 85204
 Owners Manual MAX-10/45 Upper Receiver NFA Warning LAGE Manufacturing, L.L.C. 916 E. Baseline Rd. STE #113 Mesa, AZ 85204 CM109mk2-300 Rev. A This upper receiver is designed to be used with the M-10/45
LEGENDARY ARMS WORKS MODEL 704 BOLT ACTION RIFLE OWNER S MANUAL
 LEGENDARY ARMS WORKS MODEL 704 BOLT ACTION RIFLE OWNER S MANUAL 76 W. Main Street Reinholds, PA 17569 PHONE: (717) 335-8555 FAX: (717) 335-8558 www.legendaryarmsworks.com email: info@law-arms.com WARNING:
O.F. MOSSBERG & SONS, INC.
 100848 Flex 2/15/18 11:57 AM Page 1 Patent No. 7823315 B2 B2 and and Patents Pending Note: This manual is only a supplement to your firearm s owner s manual. It only addresses the FLEX System and its accessories.
Beeman Precision Airguns Spring-Piston Air Rifles P1, P3, P11
 Beeman Precision Airguns Spring-Piston Air Rifles P1, P3, P11 User Instruction Manual V1 10/17 CONTENTS Rules of safe shooting...3 Cocking & Loading... 4 Safety... 4 Sight Adjustment...5 Trigger Adjustment...5
slide takedown lever magazine release
 Made in Germany www.umarexusa.com manual safety extractor slide gas vent hammer trigger lock trigger P22 S guide rod takedown lever slide stop magazine release Cal. 9 mm P.A.K. (Blank Firing) OPERATING
If you do not understand any of the material in this manual or have any questions, contact the Product Service Center or a qualified gunsmith.
 Bolt Action Rifle Patent No. 7823315 B2 and Patents Pending Note: This manual is only a supplement to your firearm s owner s manual. It only addresses the FLEX System and its accessories. IMPORTANT SAFETY
KEL-TEC PLR-16 Pistol
 KEL-TEC PLR-16 Pistol SAFETY, INSTRUCTION & PARTS MANUAL STATEMENT OF LIABILITY This pistol may be classified as a dangerous weapon and is surrendered by KEL-TEC CNC INDUSTRIES INC. with the understanding
INSTRUCTION MANUAL CZ 92
 INSTRUCTION MANUAL CZ 92 Before handling the pistol read this manual carefully and observe the following safety instructions. Improper and careless handling of the pistol could result in unintentional
KEL-TEC PLR-22 Pistol and SU-22 Rifle
 KEL-TEC PLR-22 Pistol and SU-22 Rifle SAFETY, INSTRUCTION & PARTS MANUAL STATEMENT OF LIABILITY This firearm may be classified as a dangerous weapon and is surrendered by KEL-TEC CNC INDUSTRIES INC. with
BFG-50A RIFLE OPERATOR S MANUAL WARNING! READ THIS MANUAL CAREFULLY BEFORE USING THIS FIREARM
 BFG-50A RIFLE OPERATOR S MANUAL WARNING! READ THIS MANUAL CAREFULLY BEFORE USING THIS FIREARM CONTENTS SAFETY...3 Safety Alert Symbol and Signal Words...3 TECHNICAL DATA...6 IDENTIFICATION...7 Model and
Please read warranty and refund policy before starting. Also please watch our instruction video at
 Please read warranty and refund policy before starting. Also please watch our instruction video at www.bullpupunlimited.com/video-instructions Also remember to start all screws by hand so they do not cross
TM WARNING SUMMARY
 TM 9-005-239-0 WARNING SUMMARY Treat every firearm as if it were loaded. Never accept or take over a firearm from another until you have checked personally to see that it is unloaded or in a completely
OWNER S MANUAL TO BE USED FOR AUTO-ORDNANCE M1 CARBINE
 OWNER S MANUAL TO BE USED FOR AUTO-ORDNANCE M CARBINE Maker of the world famous "TOMMY GUN" Manufactured by KAHR ARMS Worcester, MA As the owner of a firearm, you must undertake the full-time responsibility
MODEL 1400 E USER S MANUAL WARNING: READ THE INSTRUCTIONS AND SAFETY PRECAUTIONS IN THIS MANUAL CAREFULLY BEFORE USING THIS FIREARM.
 ARMSCOR MODEL 1400 E USER S MANUAL WARNING: READ THE INSTRUCTIONS AND SAFETY PRECAUTIONS IN THIS MANUAL CAREFULLY BEFORE USING THIS FIREARM. DISCHARGING FIREARMS IN POORLY VENTILATED AREAS, CLEANING FIREARMS
INSTRUCTION MANUAL CZ 75 TS
 INSTRUCTION MANUAL CZ 75 TS CZ 75 TS - INSTRUCTION MANUAL Before handling the pistol read this manual carefully and observe the following safety instructions. Improper and careless handling of the pistol
Model 82A1 OPERATOR S MANUAL
 82A1 Model 82A1 OPERATOR S MANUAL TABLE OF CONTENTS 2 2 3 3 5 6 7 7 7 8 8 10 14 17 18 19 20 21 23 24 28 32 MANUFACTURER S DISCLAIMER WARRANTY AND SERVICE USE OF THIS MANUAL SAFETY GUIDELINES DESCRIPTION
1911 Pistol. owner s Manual
 1911 Pistol owner s Manual IMPORTANT! This manual contains operating, care, and maintenance instructions. To assure safe operation, any user of this firearm must read and understand this manual before
CONTENTS INTRODUCTION. WARNING: This manual contains important warnings that must be understood before using this firearm.
 CONTENTS Safety Rules...............................Page 2 Operation................................Page 5 Major Components.........................Page 6 Assembly.................................Page
MP651K AIR PISTOL/ RIFLE INSTRUCTION MANUAL
 MP651K AIR PISTOL/ RIFLE INSTRUCTION MANUAL European American Armory Corp. 3855 North U.S. Highway One Cocoa, Florida 32927 (407) 639-4842 www.eaacorp.com E-mail: eaacorp@bv.net Copyright EAA Corp. 11/98
INSTRUCTION MANUAL CZ 75 Champion
 INSTRUCTION MANUAL CZ 75 Champion CZ 75 CHAMPION - INSTRUCTION MANUAL Before handling the pistol read this manual carefully and observe the following safety instructions. Improper and careless handling
MP654K AIR PISTOL INSTRUCTION MANUAL
 MP654K AIR PISTOL INSTRUCTION MANUAL European American Armory Corp. 3855 North U.S. Highway One Cocoa, Florida 32926 (321) 639-4842 This manual was downloaded from www.eaacorp.com E-mail: eaacorp@eaacorp.com
USER MANUAL Tisas Pistols
 USER MANUAL Tisas Pistols ZiG M45 (.45 ACP Single Action) ZiG PC1911 (.45 ACP Single Action) ZiG PCS1911 (.45 ACP Single Action) ZiG PCS9 (9 x19 Single Action) Zenith Firearms Come Shoot the Quality WARNING
Thank you for buying Bushmaster
 AZ 16010 Before disassembling, loading, or using this firearm, please Read, Understand, and Follow all the instructions in this manual, regarding proper handling and safe use!! Caution: If unfamiliar with
RULES FOR SAFE FIRING:
 EN THIS AIRGUN IS INTENDED FOR USE BY THOSE YEARS OF AGE OR OLDER. ADULT SUPERVISION REQUIRED. SOFT-AIR-PISTOL PPK/S BLOW BACK RULES FOR SAFE FIRING:. Get to know the single parts of your new soft-air
SAFETY & INSTRUCTION USER MANUAL CARACAL F CARACAL C
 READ THE INSTRUCTIONS AND WARNINGS READ THE INSTRUCTIONS AND WARNINGS IN IN THIS MANUAL CAREFULLY BEFORE USING THIS MANUAL CAREFULLY BEFORE USING THETHE FIREARM. FIREARM. SAFETY & INSTRUCTION USER MANUAL
CARE AND MAINTENANCE OF YOUR FBS12 SHOTGUN 1) NEVER ALTER OR MODIFY YOUR SHOTGUN
 NEVER ALTER OR MODIFY YOUR SHOTGUN") CARE AND MAINTENANCE OF YOUR FBS12 SHOTGUN 1) ALTER OR MODIFY YOUR SHOTGUN This shotgun was produced under specific manufacturer guidelines and should not be changed under ANY circumstances. Altering the
CARE AND MAINTENANCE OF YOUR FBS12 SHOTGUN 1) ALTER OR MODIFY YOUR SHOTGUN This shotgun was produced under specific manufacturer guidelines and should not be changed under ANY circumstances. Altering the
Paintball Marker. User s Manual. 530 South Springbrook Road Newberg, OR 97132
 Paintball Marker User s Manual 530 South Springbrook Road Newberg, OR 97132 Component Concepts, Inc., 530 South Springbrook Road, Newberg, OR 97132 Phone: (503) 554-8095 Fax: (503) 554-9370 www.phantomonline.com
INSTRUCTION MANUAL FOR. Models featured include: LF556, LF300, LF308, and LF6.5.
 INSTRUCTION MANUAL FOR Models featured include: LF556, LF300, LF308, and LF6.5. READ THIS MANUAL THOROUGHLY, PARTICULARLY THE WARNINGS, BEFORE USING THIS FIREARM Copyright 2016 Live Free Armory. All rights
A. Safety Information and Warnings... 2 B. Overview Description... 4 Nomenclature... 4 Specifications... 4 Ammunition... 5 Sling Mounting...
 TABLE OF CONTENTS A. Safety Information and Warnings... 2 B. Overview Description... 4 Nomenclature... 4 Specifications... 4 Ammunition... 5 Sling Mounting... 5 C. Operating Instructions Safety... 6 Loading
INSTRUCTION MANUAL FOR
 PM333 INSTRUCTION MANUAL FOR SILENT-SR ISB FOR THE RUGER 10/22 TAKEDOWN and THE 22 CHARGER PISTOL TAKEDOWN MODEL READ THE INSTRUCTIONS AND WARNINGS IN THIS MANUAL CAREFULLY BEFORE USING THIS SUPPRESSOR
P9S Automatic Pistol Caliber.45 ACP
 P9S AUTOMATIC PISTOL Caliber.45 ACP P9S Automatic Pistol Caliber.45 ACP Instruction Manual HECKLER & KOCH, INC. 2148 Pacific Boulevard Sterling, Virginia 20166-8903 U.S.A. TEL. (703) 450-1900 TELEFAX (703)
OPERATION AND FUNCTION
 CHAPTER 3 OPERATION AND FUNCTION This chapter discusses the operation of the M249 automatic rifle. This includes loading, unloading, cycle of functioning, adjusting the sight, and using the bipod. 3-1.
3. Keep your finger off the trigger while operating the action and at all other times until you are ready to shoot.
 1 GUN SAFETY RULES Observe these rules of safe gun handling. 1. Always keep the muzzle pointed in a safe direction. Watch the muzzle at all time: never point a gun, accidentally or intentionally, at any
IMPORTANT SAFETY WARNINGS NOTE THE SYMBOL:
 18092 464 Lever Action 2/15/18 11:59 AM Page 1 OWNER S MANUAL 464 LEVER ACTION CENTERFIRE LEVER ACTION RIFLE IMPORTANT SAFETY WARNINGS NOTE THE SYMBOL: THESE SAFETY WARNINGS ARE FOR YOUR PROTECTION AS
Not a toy. Adult supervision required. Misuse or careless use may cause serious injury or death. May be dangerous up to 350 yards (320 meters).
.") Owner's Manual www.umarex-usa.com CP99 CO2 Air Pistol.177 cal. (4.5 mm) Pellet patented Not a toy. Adult supervision required. Misuse or careless use may cause serious injury or death. May be dangerous
Owner's Manual www.umarex-usa.com CP99 CO2 Air Pistol.177 cal. (4.5 mm) Pellet patented Not a toy. Adult supervision required. Misuse or careless use may cause serious injury or death. May be dangerous
If you do not understand any of the material in this manual or have any questions, contact the Product Service Center or a qualified gunsmith.
 OWNER S MANUAL 464 LEVER ACTION CENTERFIRE LEVER ACTION RIFLE IMPORTANT SAFETY WARNINGS NOTE THE SYMBOL: THESE SAFETY WARNINGS ARE FOR YOUR PROTECTION AS WELL AS THE SAFETY OF OTHERS. DISREGARDING INFORMATION
Colt Advanced Law Enforcement Carbines
 OPERATOR S MANUAL FOR: Colt Advanced Law Enforcement Carbines LE6940 LE6944 LE6943 LE6945CQB & LE6946CQB COPYRIGHT 2010 COLT DEFENSE LLC ALL RIGHTS RESERVED Information contained in this publication is
Henry Mini Bolt.22. Instruction Manual For All H005 Series Rifles. Made in America
 Henry Mini Bolt.22 Instruction Manual For All H005 Series Rifles Important: Study this instruction manual carefully before you handle this firearm. Made in America IS A REGISTERED TRADEMARK OF THE HENRY
INSTRUCTION MANUAL FOR THE FREEDOM ARMS MODEL 2008 SINGLE SHOT HANDGUN
 INSTRUCTION MANUAL FOR THE FREEDOM ARMS MODEL 2008 SINGLE SHOT HANDGUN Manufacturing the World s Finest Handguns. Freedom Arms, Inc. 314 Hwy 239 Freedom, WY 83120 (307) 883-2468 web site: www.freedomarms.com
Owners Manual MAX-10/9 mk2 Upper Receiver. LAGE Manufacturing, L.L.C. 916 E. Baseline Rd. STE #113 Mesa, AZ Rev. A
 Owners Manual MAX-10/9 mk2 Upper Receiver LAGE Manufacturing, L.L.C. 916 E. Baseline Rd. STE #113 Mesa, AZ 85204 CM109mk2-300 Rev. A NFA Warning This upper receiver is designed to be used with the M-10/9
MP532 AIR RIFLE INSTRUCTION MANUAL
 MP532 AIR RIFLE INSTRUCTION MANUAL European American Armory Corp. 3855 North U.S. Highway One Cocoa, Florida 32927 (407) 639-4842 This manual was downloaded from www.eaacorp.com E-mail: eaacorp@bv.net
OWNER'S MANUAL
 OWNER'S MANUAL www.umarex-usa.com MODELS Beretta 92FS and 92FS Match Caliber.177 (4.5 mm) Pellet CO2 Air Pistol patented Not a toy. Adult supervision required. Misuse or careless use may cause serious
CZ 40 P - INSTRUCTION MANUAL
 Before handling the pistol read this manual carefully and observe the following safety instructions. Improper and careless handling of the pistol could result in unintentional discharge and could cause
HUBEN K1 Pre-charged Pneumatic Air Rifle Owner s Manual
 HUBEN K1 Pre-charged Pneumatic Air Rifle Owner s Manual 5135 Naiman Parkway, Cleveland, OH 44139 l 216-220-1180 Record the serial number of your airgun... READ THIS MANUAL AND THE WARNINGS AND SAFETY PROCEDURES
Owner s Manual 1960 SEMI-AUTO RIFLE W/ WOOD STOCK & MILLED RECEIVER. Cal. 7.62x39MM
 Owner s Manual 1960 SEMI-AUTO RIFLE W/ WOOD STOCK & MILLED RECEIVER Cal. 7.62x39MM Congratulations on your purchase of a Polish 1960 Semi-Auto Rifle. With proper care, maintenance and handling, it will
M1600 SEMI-AUTOMATIC RIFLE USER S MANUAL WARNING: READ THE INSTRUCTIONS AND SAFETY PRECAUTIONS IN THIS MANUAL CAREFULLY BEFORE USING THE FIREARM.
 M1600 SEMI-AUTOMATIC RIFLE USER S MANUAL WARNING: READ THE INSTRUCTIONS AND SAFETY PRECAUTIONS IN THIS MANUAL CAREFULLY BEFORE USING THE FIREARM. SEPTEMBER 2016 ROCK ISLAND ARMORY USER S MANUAL M1600 SEMI-AUTOMATIC
Not a toy. Adult supervision required. Misuse or careless use may cause serious injury or death. May be dangerous up to 500 yards (457 meters).
.") Owner s manual www.umarex-usa.com CO2 repeater rifle cal..177 (4.5mm) pellet cal..22 (5.5mm) pellet Not a toy. Adult supervision required. Misuse or careless use may cause serious injury or death. May
Owner s manual www.umarex-usa.com CO2 repeater rifle cal..177 (4.5mm) pellet cal..22 (5.5mm) pellet Not a toy. Adult supervision required. Misuse or careless use may cause serious injury or death. May
M14Y.22LR YOUTH BOLT ACTION USER S MANUAL WARNING: READ THE INSTRUCTIONS AND SAFETY PRECAUTIONS IN THIS MANUAL CAREFULLY BEFORE USING THE FIREARM.
 M14Y.22LR YOUTH BOLT ACTION USER S MANUAL WARNING: READ THE INSTRUCTIONS AND SAFETY PRECAUTIONS IN THIS MANUAL CAREFULLY BEFORE USING THE FIREARM. SEPTEMBER 2016 ROCK ISLAND ARMORY USER S MANUAL M14Y.22LR
Remington 700. Disclaimer Limited Warranty Satisfaction Guarantee Installation Instructions
 Remington 700 Disclaimer Limited Warranty Satisfaction Guarantee Installation Instructions WARNING: Failure to properly install your trigger and ensure proper safety functionality could result in an unsafe
A A A
 Winchester SXP Talon T Rear Pistol Grip with Scorpion Recoil Grip A.5.0.65 A.5.0.65 A.5.0.65 Extended Scorpion Material to Reduce and Discomfort to the Shooter's Hand and Thumb Sure-Grip Texture Triton
Sterling Shotguns. Field and Target Models. Owner s Manual
 Sterling Shotguns Field and Target Models Owner s Manual If you have any questions about the safe use of a Big Horn Armory firearm, call us at 307-586-3700 or write us at P.O. Box 940, Cody Wyoming 82414.
22-17 Partner. Owner s Manual. 624 Old Pacific Hwy SE Olympia, WA Tel (800) Fax (360) Available Rifle Kit
 Fax (360) Available Rifle Kit") Available Rifle Kit Complete Upper Receiver Kit 624 Old Pacific Hwy SE Olympia, WA 98513 Tel (800) 228-3471 Fax (360) 491-3447 Owner s Manual 22-17 Partner Warnings & Operation Do not attempt to fire the
Available Rifle Kit Complete Upper Receiver Kit 624 Old Pacific Hwy SE Olympia, WA 98513 Tel (800) 228-3471 Fax (360) 491-3447 Owner s Manual 22-17 Partner Warnings & Operation Do not attempt to fire the
Owner s Manual Golani Semi-Auto Sporter Rifle, Cal. 5.56mm
 Owner s Manual Golani Semi-Auto Sporter Rifle, Cal. 5.56mm Congratulations on your purchase of a Golani Semi-Auto Sporter Rifle. With proper care and handling it will give you long, reliable service. We
SEMIAUTOMATIC SHOTGUN OWNER'S MANUAL
 SEMIAUTOMATIC SHOTGUN OWNER'S MANUAL ARMSAN@ARMSAN.COM TECHNICAL DATA Caliber :12 gauge / 20 gauge / 28 gauge Operation: Semi-Automatic, Gas Operated System Barrel Length: 20 (51cm), 24 (61cm), 26 (66cm),
-
 Operator s manual SM-95202 Brügger & Thomet AG P.O. Box 42 3608 Thun Switzerland Fon +41 33 334 67 00 Fax +41 33 334 67 01 info@brugger-thomet.ch www.brugger-thomet.ch TABLE OF CONTENTS SAFETY instructions
YES CORRECT WRONG. KSG-TACTICAL Specifications Operating System Pump Action Capacity (Dual Magazines)
") YES CORRECT NO WRONG KSG-TACTICAL Specifications Operating System Pump Action Capacity (Dual Magazines) 4+4+1, 3 shells 5+5+1, 2.75 shells Chamber 12-gauge 3.00 (76 mm) Barrel Length 13.7 (410 mm) Length
YES CORRECT NO WRONG KSG-TACTICAL Specifications Operating System Pump Action Capacity (Dual Magazines) 4+4+1, 3 shells 5+5+1, 2.75 shells Chamber 12-gauge 3.00 (76 mm) Barrel Length 13.7 (410 mm) Length
OWNER S MANUAL. Read the instructions and warnings in this manual carefully before using this firearm; do not discard this manual.
 OWNER S MANUAL SDP compact Read the instructions and warnings in this manual carefully before using this firearm; do not discard this manual. This instruction manual should always accompany this firearm
OWNER S MANUAL 464 LEVER ACTION CENTERFIRE LEVER ACTION RIFLE IMPORTANT SAFETY WARNINGS NOTE THE SYMBOL:
 OWNER S MANUAL 464 LEVER ACTION CENTERFIRE LEVER ACTION RIFLE IMPORTANT SAFETY WARNINGS NOTE THE SYMBOL: THESE SAFETY WARNINGS ARE FOR YOUR PROTECTION AS WELL AS THE SAFETY OF OTHERS. DISREGARDING INFORMATION
User Instruction Manual
 User Instruction Manual PRE-CHARGED PNEUMATIC PCP Air Rifle With Built-In Pump Ver 1, 9/18 CONTENTS Rules of safe shooting...3 Warnings...4 Parts of your Aspen air rifle...5 Operating the safety...6 Trigger...6
KHANSHOTGUNS. Thank you for choosing KHANSHOTGUNS 12 Gauge pump-action shotgun
 KHANSHOTGUNS Thank you for choosing KHANSHOTGUNS 12 Gauge pump-action shotgun Your pump-action shotgun represents a piece of rich history of quality firearms design and manufacture. During the manufacturing
CROSSBOWS XR175. Recurve Crossbow OWNER S MANUAL
 CROSSBOWS XR175 Recurve Crossbow OWNER S MANUAL READ ALL INSTRUCTIONS AND WARNINGS BEFORE USING If you have any questions about this product or need some help, do not return the product to the store before
IZH 60/61 air rifle owner s manual
 IZH 60/61 air rifle owner s manual IZH 61 IZH 60 5135 Naiman Parkway Solon, OH 44139 216-220-1180 Record your gun s serial number:... Follow the warnings and safety procedures shown here and throughout
OPERATION AND FUNCTIONING
 C1, FM 23-65 * CHAPTER 3 OPERATION AND FUNCTIONING This chapter explains the operation of the MG. It discusses the loading, unloading, and clearing procedures, and the cycle of functioning of the weapon.
INSTRUCTION MANUAL CZ 750
 INSTRUCTION MANUAL CZ 750 Before handling the firearm read this manual carefully and observe the following safety instructions. Improper and careless handling of the firearm could result in unintentional
SAAMI. Semi-Automatic Assault Shotgun Owner s Manual. Tel. : Fax
 Head Quarter Beyşehir Organize Sanayi Bölgesi Bayavşar Mah. 4959 Sk. No.24-42700 Beyşehir - Konya / TURKEY Tel. : +90 332 524 60 32-34 - Fax +90 332 524 62 4 - info@deryaarms.com SAAMI SPORTING ARMS AND
Paintball Marker. User s Manual. Direct Feed. SC: Stock Class. VSC: Vertical Air Stock Class. 530 South Springbrook Road Newberg, OR 97132
 Paintball Marker User s Manual Direct Feed SC: Stock Class 530 South Springbrook Road Newberg, OR 97132 VSC: Vertical Air Stock Class www.phantomonline.com Component Concepts, Inc., 530 South Springbrook
USER S MANUAL WARNING: READ THE INSTRUCTIONS AND SAFETY PRECAUTIONS IN THIS MANUAL CAREFULLY BEFORE USING THE FIREARM.
 M20P SA RIFLE USER S MANUAL WARNING: READ THE INSTRUCTIONS AND SAFETY PRECAUTIONS IN THIS MANUAL CAREFULLY BEFORE USING THE FIREARM. SEPTEMBER 2016 ROCK ISLAND ARMORY USER S MANUAL M20P SA RIFLE SAFETY,
Please read warranty and refund policy before starting.
 Please read warranty and refund policy before starting. This conversion kit only fits 2 ¾ and 3 inch 12 gauge Remington 870/ Mossberg 500 shotgun with plain barrel with bead sight. It will not work with
IMPORTANT SAFETY WARNINGS NOTE THE SYMBOL:
 18313 Mossberg_464_57629R 7/6/18 10:07 AM Page 1 OWNERS MANUAL 464 LEVER ACTION RIMFIRE LEVER ACTION RIFLE IMPORTANT SAFETY WARNINGS NOTE THE SYMBOL: THESE SAFETY WARNINGS ARE FOR YOUR PROTECTION AS WELL
MODEL Government 1911 and 1911 Compensator
 Owner's Manual www.umarex-usa.com MODEL Government 1911 and 1911 Compensator Caliber.177 (4.5 mm) Pellet CO 2 Air Pistol patented WARNING: Not a toy. Adult supervision required. Misuse or careless use
PA 3-1 CHROME SHOTGUN USER S MANUAL WARNING: READ THE INSTRUCTIONS AND SAFETY PRECAUTIONS IN THIS MANUAL CAREFULLY BEFORE USING THE FIREARM.
 PA 3-1 CHROME SHOTGUN USER S MANUAL WARNING: READ THE INSTRUCTIONS AND SAFETY PRECAUTIONS IN THIS MANUAL CAREFULLY BEFORE USING THE FIREARM. SEPTEMBER 2016 ROCK ISLAND ARMORY USER S MANUAL PA 3-1 CHROME
IZH61 AIR RIFLE INSTRUCTION MANUAL
 IZH61 AIR RIFLE INSTRUCTION MANUAL European American Armory Corp. 1426 West King Street Cocoa, FL 32922 (321) 639-4842 www.eaacorp.com E-mail: eaacorp@eaacorp.com Copyright EAA Corp. 9/98 EAA MODEL: IZH61
trigger trigger guard
 Made in Germany www.umarexusa.com gas vent hammer cylinder ejector rod cylinder release grip Smith & Wesson Chiefs Special S Cal. 9 mm R.K. (Blank Firing) OPERATING INSTRUCTIONS trigger trigger guard USA
ALL LOCAL LAWS ABOUT THE OWNERSHIP AND THE USE OF THIS AIRGUN. USA
 OWNER S MANUAL READ ALL INSTRUCTIONS AND WARNINGS IN THIS MANUAL BEFORE USING THIS AIRGUN. Congratulations and thank you for purchasing your new STOEGER pellet airgun. WARNING This airgun is not a toy.
.177 Cal. CO2 BB Tactical Rifle
 HELLRAISER.177 Cal. CO2 BB Tactical Rifle User Instruction Manual For ages 16 and older with adult supervision V1 10/17 CONTENTS Rules of safe shooting...3 Specifications... 4 Learning parts of your airgun...
NOTICE FEATURES BACKGROUND
 ,/ NOTICE Claims will not be honored for damage, injury or, death resulting from the intentional or accidental discharge of this firearm, or from it's function when used for purposes or subjected to treatment
KHANSHOTGUNS. Thank you for choosing KHANSHOTGUNS coachgun
 Thank you for choosing KHANSHOTGUNS coachgun Your coachgun represents a piece of rich history of quality firearms design and manufacture. During the manufacturing process, we have endeavored to incorporate
 (Mechanical Malfunctions) STOP SHOOTING IMMEDIATELY AND UNLOAD YOUR FIREARM if your firearm develops: a mechanical malfunction; binding or stoppage; spitting powder/gas; a punctured cartridge primer; a
OLYMPIC ARMS, INC. MPR SUPPLEMENTAL OWNER S MANUAL
 OLYMPIC ARMS, INC. MPR 308-15 SUPPLEMENTAL OWNER S MANUAL READ THIS MANUAL COMPLETELY BEFORE OPERATING YOUR RIFLE. FAILURE TO DO SO MAY RESULT IN DAMAGE TO YOUR RIFLE, INJURY OR DEATH TO THE SHOOTER OR