Operations Manual for The
|
|
|
- Shannon Hill
- 6 years ago
- Views:
Transcription

1 Operations Manual for The


2 WARNING: The paintball marker, which you have purchased, is not a toy. Misuse or carelessness may cause serious injury or death. Eye and ear protection designed specifically for paintball use must be worn to prevent injury. Read the Owners Manual before using. Misuse of this paintball marker, including but not limited to vandalism, may result in criminal penalties. Use only goggle systems that are designed for paintball use. Goggles that are not specifically designed for paintball use will not withstand the multiple impacts of paintballs fired from a semi-automatic paintball marker. Never work on your marker without disconnecting the air supply. Do not carry a paintball marker in public unless it is properly stored. Please check your local laws. 2
3 Warranty Policy 4 Safety 5 Features of the Diadem 6 Quick Start 8 Marker Operation and Menu 11 Programming 11 Tournament Lock 18 Trigger Adjustments 20 Battery Replacement 21 Hints and Tips 22 Performance 23 Maintenance 24 Support 28 New Products and Warranty Card SEE WARNING ON OPPOSITE PAGE 3
4 What It Covers We take pride in making quality parts for all of our products. We have put a great emphasis on ensuring that the marker, which you have purchased, is made to high standards of quality. In some very rare cases, something may have gone wrong in the process of making and delivering your marker. We offer this warranty to you in order to ensure that you get what you paid for a high quality, high performance paintball marker. Action Markers warranties all mechanical components, excluding the electronic assembly, air valve, and any 3 rd party components that may have been installed onto the marker to be free from defects for 90 days from the original retail purchase. Action Markers warranties all electronic components to be free from defects for 30 days. All 3 rd party components are warranted per the original manufacturer s warranty. Action Markers does not give any warranty either express or implied on any parts or components made by 3 rd parties, except where required by law. The purpose of this warranty is to ensure that you get the high quality product that you paid for. The warranty covers parts, labor, manufacturing defects or malfunctions. We will also cover any aftermarket accessories that are manufactured by Action Markers and are designed for use on the Diadem. In other words, if there is something wrong with the marker, which was in any way our fault, we will fix the problem at our cost. What It Does Not Cover We at Action Markers are fans of paintball and play the sport as often as possible. We also know the frustration that sometimes accompanies the sport. We cannot afford to warranty any of the actions that may accompany this frustration. If you feel the absolute need to throw your paintball marker at the tree that didn t offer enough cover, you do so at your own expense. We also do not offer any warranty for accidents such as automobile accidents or a house fire. Any use of the marker other than that which it was intended, such as playing baseball with it, will also not be covered by the warranty. Any 3 rd party modification or aftermarket accessory that causes a problem will not be covered. The presence of a 3 rd party accessory does not void the warranty if the accessory was not the cause of the problem. Finally, we do not cover any cosmetic scratches, normal wear and tear, or any damages caused by attempted modification of the marker. Why? In deciding the policies for this warranty we were faced with two somewhat conflicting desires. We want to be able to sell our marker for as low of a price as possible. We also want to be able to give the best service to our customers. We feel that the warranty policies that we have made give the best value to the most people Return Authorization In order to process your repair work as fast as possible we require you to call us and get a return authorization (RA) number before you send your marker in. This number allows us to begin processing the order even before we receive your marker so 4
5 that we can fix it and return it to you quickly. We will not accept any packages that come in without an RA number on them. Any package without an RA number written clearly on the outside of the package will be returned to the sender at his or her expense. Technical Support We recommend that you look on our website for technical support. It is available twenty-four hours a day, seven days a week, and doesn t take off holidays. We will regularly post new information on the website and your question may already be answered there. If you are unable to find what you need at our website, Technical Support is available from 9:00 a.m. until 3:00 p.m. Eastern Time on Monday through Friday. If you need to call us have your serial number ready so that we can find your information on our computers quickly. It will also help if you have sent in your warranty card. Technical support is almost always faster through or through the website than it is through calling. To avoid long periods of being put on hold, please try the website and first. THIS PAINTBALL MARKER IS NOT A TOY!! This paintball marker should be treated with respect. Never point the marker at a person who is not properly attired with a complete face mask. While paintball as a sport has a very low injury rate, if the marker is misused or not properly maintained, it can cause serious injury, including blindness, or even death. Please read and understand all safety instructions and directions contained in this manual before using this paintball marker. Adult supervision is recommended at all times whenever a minor is handling this paintball marker. Never point at or shoot any animal with this paintball marker. Never point at or shoot this paintball marker at any person, unless both you and your target are participating in paintball activities and are both wearing proper safety attire. Proper safety attire includes approved paintball goggles, mask, gloves, and pads. Follow all maintenance instructions carefully. If you have any questions regarding maintenance procedures, contact your local dealer or if your dealer is unable to answer your question, call Action Markers directly. Any time you have an air supply connected to your marker, it is assumed to be armed. NEVER RELY ON SAFE-MODE ALONE AS A FAIL-SAFE DEVICE. Before connecting your air supply, make sure your marker is turned off (you will not see a light through the clear panel). In addition to the safety on the marker, a barrel bag should be used any time you are not actively playing. Turn on your marker and remove the barrel bag only when you are on a playing field and the game has started. The marker is ready to fire when you can see a green light (like the traffic signal) through the clear plastic panel on your grip-frame. 5
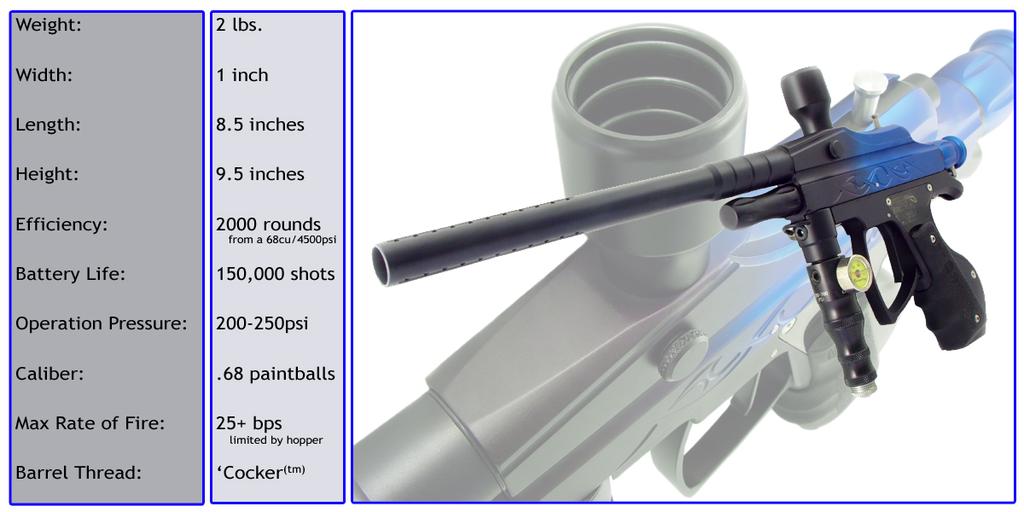
6 A chronograph should be used to check your paintball s velocity before using your marker. Ensure that your marker is firing at velocities lower than 300 feet per second before playing. Never shoot this paintball marker if the chronograph reading is higher than 300 feet per second. Velocity adjustments should never be done on the playing field. All changes in velocity should take place between games and be checked with a chronograph. Remove the air supply from the paintball marker and dry fire in a safe direction before disassembling the marker. Do not put your fingers in the breech area or down the ball feed tube while firing the paintball marker. Never shoot at any target closer than ten feet. Only fire this marker where it is safe and legal to do so. Do not fire at any place of residence or at any building not specifically designated as part of a paintball field. Never look down the barrel when it is connected to the marker. If you need to clean the barrel disconnect the air supply and field strip the marker before cleaning. Never use a damaged marker. If your marker is damaged, take your marker into your nearest dealer or service center to be repaired. At Action Markers, we all play paintball on a regular basis. We are paintballers. Combining our personal experiences with those of high-level paintball players, we were able to assemble a complete wish list of performance that we feel comfortable every player will agree with. Our engineers hated us, but the players are the bosses here, so after the screaming and crying died down, they got to work. Using a design team comprising of engineers, designers, machinists, and above all paintball players Action Markers was able to create the revolution that has come to be known as the Diadem. With a features list a mile and a half long, the Diadem has been designed from the ground up to be the player s marker. We have milled both the upper and lower receiver out of solid aluminum to gain the strength to keep the marker in top shape. We use only state-of-the-art machines to make the Diadem. The ram is designed with particular attention to wear reducing details, like a polished stainless steel hammer. The Diadem is a high quality, precision marker that will easily withstand the high level of abuse that is standard to a paintball marker. Of course the marker is only good while you can still shoot it. Using a uniquely designed valve chamber, a near magically created Ram system, adding on a Quick Evacuation Valve (QEV), and a light upper bolt, we have made the Diadem use a minimal amount of air to reach the desired velocity. The end result is amazingly high air 6
7 efficiency Under field conditions we have been able to get over 2000 rounds from a full 68/4500 Nitro Tank. Under testing conditions we can get even more. To complement the air efficiency, we have made the trigger pull as short as possible. Using special micro-switch and trigger hinge match, we are able to get a short, even trigger pull that is fully adjustable to less than ½ mm of travel. We have also made our trigger pads wider than most to be more comfortable on your fingers. A wider trigger pad means that the force of pulling the trigger back is spread across your entire finger, so walking the trigger is easier than ever before. The trigger frame was designed to actually improve the performance of the player by allowing a more comfortable and ergonomically natural hand position. The result is less stress on your wrist and hand enabling you to move your fingers even fast. The average paintball player gets 2-3 balls per second faster shooting simply by using the Bubble Grip on the Diadem. The extra speed of shooting is facilitated by the design of the pneumatic Ram, which is the center of the Diadems operations. Using a fully pneumatic system to power the ball and upper bolt movement we were able to get amazing reliability and speed out of the Diadem. By adding in a spring assist to the Ram we were able to transcend amazing and get right down to revolutionary. The Diadem is capable of running off of a single regulator powering both the Ram and the ball at the same pressure. It does this by using the slight tension of the spring to offset some of the pressure coming in from the regulator and the using the spring to assist the pneumatics of the Ram in its return to open. The result: A much lower force hitting the ball when firing which lowers the chances of the ball being broken and a much higher return speed allowing the next ball to feed into the breach faster. In summary, faster firing and less ball breaks. The feed tube on the Diadem is our trademark Vari-Grip feed system. The Vari- Grip system allows the use of a large variety of hoppers without any adjustments (like a tightening screw or sanding the hopper s neck down to fit). The Vari-Grip system also holds onto your hopper so tightly, you could carry your marker by it! (Carrying your marker by the hopper is, of course, not recommended, but you could if you were inclined to.) The Vari-Grip feed tube has 3 internal o-rings that the hopper will compress to give a snug fit, ensuring that the hopper cannot come off during play. If the hopper seems to be too snug, add a drop or two of lubricant to each o-ring. If it is still too snug then remove one or two of the o-rings. When attaching your hopper to the marker always turn the hopper in a clockwise motion, the same way that you turn the feed tube when putting it on. This will lock the Feed Tube in place. With the feed tube locked this way it will not be able to come loose easily. This is a good thing. The side effect of the locking is that you will most likely not be able to loosen the Feed Tube by Hand. If you do want to ever change your feed tube, you will need to use a non-abrasive tool to turn the feed tube loose. We recommend a 7
8 rubber strap wrench. Some players find they can also use their hopper to loosen the feed neck, but care must be taken to remove the feed neck from the hopper. Paintball can be a messy sport. From paintballs exploding on the bunker next to you, to an emergency dive behind a tree that lands you in a mud-puddle, there are many ways for your marker to get dirty. Any sort of foreign object inside of your marker can damage it very quickly. A small amount of dirt inside the upper bolt can shred the O- rings. We have tried to eliminate the possibility of anything that doesn t belong in the marker, getting into the marker. Our first step to fight the dirt is to limit the amount that gets inside the marker. We have found that when landing on the ground or rolling away from an opponent, dirt can get into the marker through any openings on the side of the marker. We then took this knowledge, designed the upper bolt to cock from the rear, and used a connecting pin on the top of the marker to connect the upper and hammers. This design lowers the chance of a players contact with the ground allowing any foreign substances to get inside the marker. Eventually, no matter what the design of the marker is, something will get inside the marker and you will be forced to clean it. The cleaning of a marker has been among the top of our personal frustrations with many markers. We have designed the Diadem to be able to be field stripped in a matter of seconds. It is a process of pulling the connecting pin out and the pulling the upper bolt out. Cleaning the lower chamber is only a slightly longer of a process, involving removing of the Ram Cap and airline then unscrewing the ram. Most cleaning and maintenance can be accomplished without the use of tools. This section is a quick overview of how to use the Diadem. When you are ready to play, first attach the barrel to the body of the marker. Connect an air supply to the marker. The Diadem will perform well with Nitrogen or Compressed Air, but CO 2 is not recommended. After the barrel and air supply are attached, and a barrel bag has been placed over the barrel, turn the marker on by pressing the second button on the grip-frame. You will also need to get a loader, also known as a hopper, to carry your supply of paintballs. Because most people will want a better loader, we have chosen to not include a cheap loader with the Diadem, as it will very easily out-shoot them. Attach the loader to the feed tube on the top of the marker and fill the loader with paintballs. Keep the marker turned off until ready to fire. When ready, press the button that is closest to the rear of the marker and hold it down until the LED turns green. You are now ready to fire. 8


9 To field strip the Diadem first remove any air supply from the marker and pull the trigger once or twice to remove any air which may still be in the marker. Pull up the connecting pin at the top of your marker and slide the upper bolt out of the marker. You now have access to the upper chamber and upper bolt for cleaning. If you need to clean the ram for any reason, turn your marker off, pull off the Ram Cover, remove the airline, and unscrew the ram and carefully slide the ram out. Take care to prevent scratching any of the parts. Even though the ram casing is treated to increase hardness, scratches can sometimes occur and affect performance. To reassemble, place the ram into the lower chamber (again with care) and turn until completely inserted. The airline attachment should be pointing straight down. You may now reattach the airline and Ram Cap. 9


10 (Note: Failure to tighten the ram completely into the marker may result in permanent damage to your marker as well as injury or even death.) Now replace the upper bolt into the upper chamber. Push the upper bolt forward until lined up with the grove in the hammer. Push the connecting pin back down until it stops and is engaged with the hammer. (As opposed to being engaged to the hammer.) (note if you have changed the regulator on the Diadem from the Standard Centerflag Regulator, these instructions may be different for you.)velocity adjustment is done through the primary regulator. See the diagram in the back of this manual for reference. To increase the velocity turn the screw counter-clockwise (increasing the output pressure of the regulator) and to decrease the velocity, turn the screw clockwise (decreasing the output pressure of the regulator). One full revolution of the screw will change the velocity significantly so be sure to re-check the velocity after any adjustments. Fire several shots before re-checking your velocity, as the pressure may not stabilize immediately. You will want to be sure that your paintball velocity is less than 300 feet per second. Most fields are strict with this rule and you may not be allowed to play if you are shooting too fast. As a quick tip many people have found it easiest to adjust the velocity by fully turning the velocity screw out of the regulator (this will cut off all airflow) and then adjusting it in until the velocity is up to speed. Always use high quality paintballs. Lower quality paintballs will break more easily and will not fly as accurately as high quality paintballs. 10
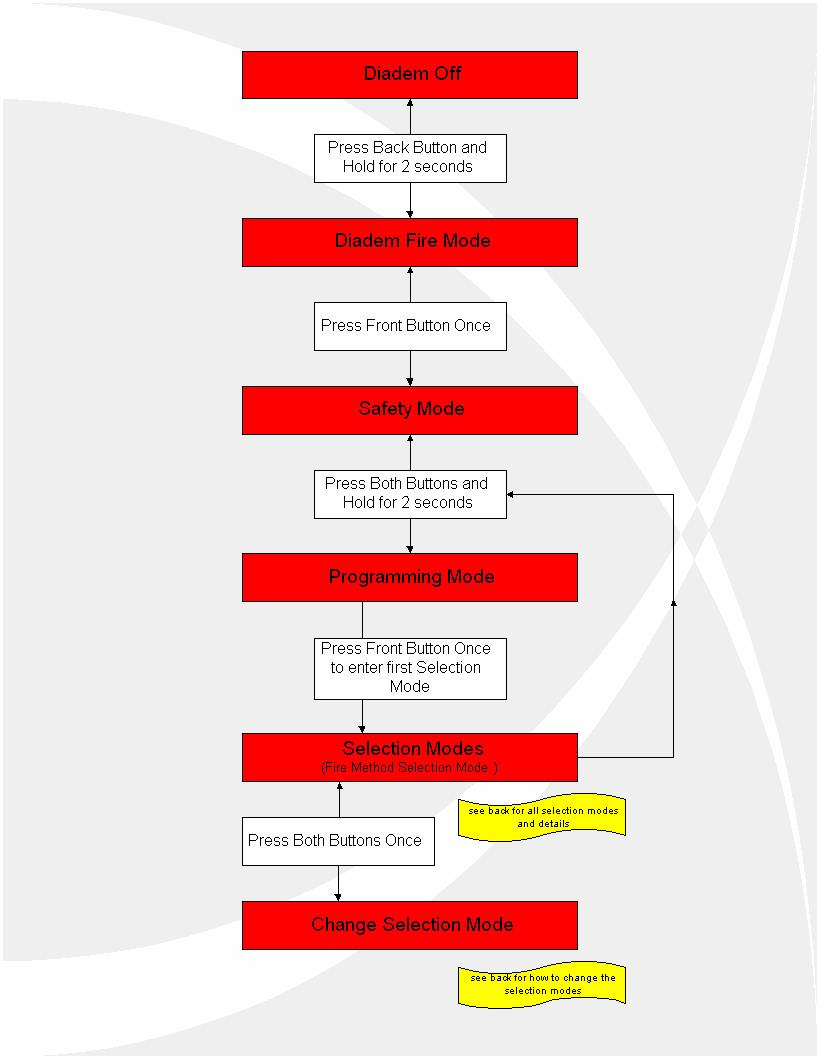
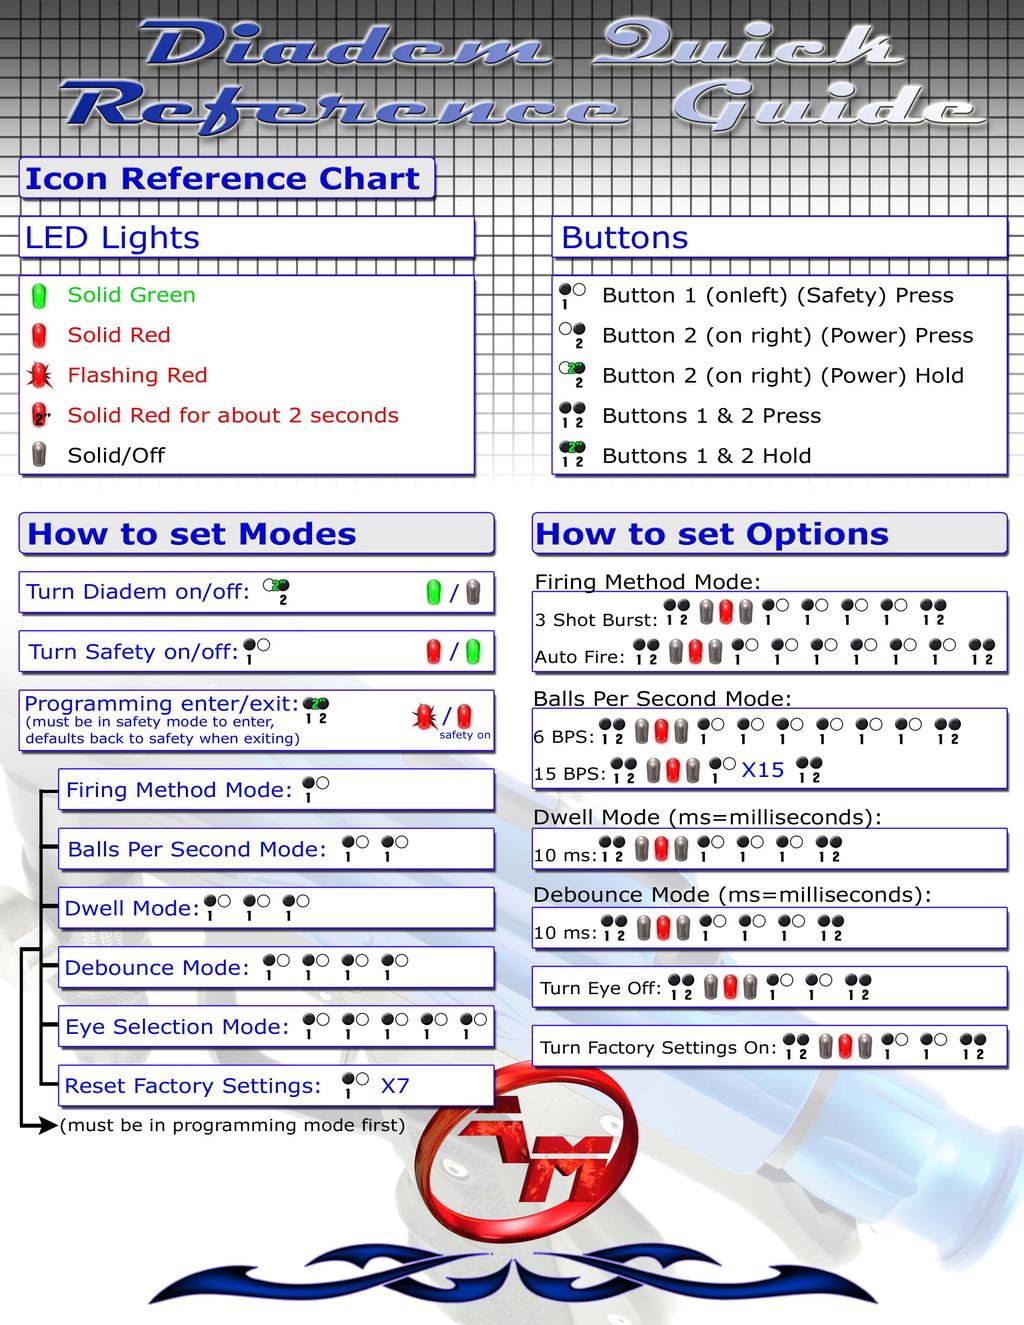
11 The Default Electronic settings for the Diadem are as follows: Fire Mode = Single Shot BPS = 12 BPS Dwell = 14 ms Debounce = 5 ms Eye = On To change the electronic settings of the Diadem see the following information: How it all Works: The trigger pushes the micro switch (I bet you already knew that part), which sends a signal to the electronics and tells them to fire a number of times depending on the mode of fire. On each fire the board sends a signal to a Custom designed electronic air valve that is in the grip handle. The air valve opens its output valve and pushes air (at about 200 psi) through a hose to a pneumatic ram that is in the lower chamber of the upper receiver. The ram flies forward (at near warp speeds) and opens the valve in the front of the marker. The open valve allows air (at the same pressure) to travel through the marker. The seals on the ram and the upper bolt direct the flow at the ball, which goes out the end of the barrel (I really hope that you knew that part already). Additional air is used to return the ram to its resting state, aided by the spring inside the Ram. Repeat up to 25 times a second. (However the top rate of fire is programmable as well, so you might tell it to top out at 4 times a second. Can t imagine why you d want to do that, though.) Programming: All programming is done through the two buttons on the side of the marker with the circuit board showing through.. (It is best and safest to remove your air supply while programming your Diadem ITS) The Following Chart on the next page shows the sequence of programming your Diadem. We will go over this in more detail. 11
12 12

13 13
14 To program the mode of fire: 1. Turn Your Diadem on. 2. Enter Safety Mode by holding the front (+) button for 2 seconds. The LED will turn a solid Red. 3. Enter Programming Mode by pressing both buttons and holding them for 2 seconds, until the LED starts flashing Red. 4. Select Method 1 (Firing Method Selection) by pressing the forward (+) button once. The LED will now flash Red-Green-Red-Off and repeat that sequence. 5. Enter into Change Option Mode by pressing both buttons at the same time once and quickly releasing them. The LED will flash red one time and then turn off. 6. Select your fire mode by pressing the front (+) button one of the following numbers of times: 1 = Single Shot (Tournament Lock uses this mode) 2 = Reactive Trigger (One shot on trigger pull, one shot on trigger release) 3 = Turbo (Begins adding shots in between trigger pulls after 3 pulls per second) 4 =3 shot Burst 6= 6 Shot Burst 6 = Full Auto Mode 7. Exit Change Selection Mode by pressing both buttons and releasing them quickly. The LED will start flashing in the following sequence: a. Red-Green-Red----Green-Off (if Single Shot option has been selected) b. The Green-Off sequence will flash a number of times representing which option you picked, for example: If you had set the Diadem to fire in Turbo Fire Mode then the Green-Off Sequence would flash 3 times as follows: Green-Off- Green-Off- Green-Off The entire sequence would be: Red-Green-Red---- Green-Off- Green-Off- Green-Off- REPEAT 8. Exit Method Selection Mode by pressing and holding both buttons for 2 seconds until the LED turns red. You are now back in Safety Mode. 9. Exit Safety Mode by pressing the front (+) button once. 10. The Diadem is now ready to fire in your selected Firing Mode: (**Note: If you have the tournament lock on, the Diadem will always shoot in Single Fire Mode regardless of which mode you selected) To program the balls per second: 1. Turn Your Diadem on. 2. Enter Safety Mode by pressing the forward (+) button once. The LED will turn a solid Red. 3. Enter Programming Mode by pressing both buttons and holding them for 2 seconds, until the LED starts flashing Red. 4. Select Method 2 (BPS Selection) by pressing the forward (+) button twice. The LED will now flash Red-Green-Red-Green-Red-Off and repeat that sequence. 5. Enter into Change Option Mode by pressing both buttons once and quickly releasing them. The LED will flash red one time and then turn off. 14
15 6. Select your BPS setting by pressing the forward (+) button the number of times representing how many BPS you want to shoot (1-25): 7. Exit Change Selection Mode by pressing both buttons and releasing them quickly. The LED will start flashing in the following sequence: a. Red-Green-Red-Green-Red----Green-Off b. The Green-Off sequence will flash a number of times representing which option you picked, for example: If you had set the Diadem to fire 3 times per second then the Green-Off Sequence would flash 3 times as follows: Green-Off- Green-Off- Green-Off The entire sequence would be: Red- Green-Red-Green-Red---- Green-Off- Green-Off- Green-Off- REPEAT 8. Exit Option Selection Mode by pressing and holding both buttons for 2 seconds until the LED turns red. 9. Exit Safety Mode by pressing the forward (+) button once. 10. The Diadem is now ready to fire in your selected Firing Mode: Dwell Setting: Note: only adjust the dwell setting on your Diadem ITS if you are an advanced user. You can experiment with different settings using these directions if you really want to, but it is highly recommended that you do so when you are not about to go into a game. Note: The Dwell setting can only be set between 8 and 25 ms (milliseconds) 1. Turn Your Diadem on. 2. Enter Safety Mode by pressing the forward (+) button once. The LED will turn a solid Red. 3. Enter Programming Mode by pressing both buttons and holding them for 2 seconds, until the LED starts flashing Red. 4. Select Option 3 (Dwell Selection) by pressing the forward (+) button 3 times. The LED will now flash Red-Green-Red-Green-Red-Green-Red-Off and repeat that sequence. 5. Enter into Change Selection Mode by pressing both buttons once and quickly releasing them. The LED will flash red one time and then turn off. 6. Select your dwell setting by pressing the forward (+) button the number of times representing the dwell that you would like to set your Diadem with (NOTE: pressing the button once will set it to 8 ms) 7. Exit Change Selection Mode by pressing both buttons and releasing them quickly. The LED will start flashing in the following sequence: c. Red-Green-Red-Green-Red-Green-Red ----Green-Off d. The Green-Off sequence will flash a number of times representing which option you picked, for example: If you had set the Diadem to fire with a dwell of 11 ms then the Green-Off Sequence would flash 11 times as follows: Green-Off- Green-Off- Green-Off- Green-Off- Green-Off- Green-Off- Green-Off- Green-Off- Green-Off- Green-Off- Green-Off The entire sequence would be: Red-Green-Red-Green-Red-green-red---- Green-Off- Green-Off- Green-Off- Green-Off- Green-Off- Green-Off- Green-Off- Green-Off- Green-Off- Green-Off- Green-Off - REPEAT 15
16 8. Exit Option Selection Mode by pressing and holding both buttons for 2 seconds until the LED turns red. 9. Exit Safety Mode by pressing the forward (+) button once. 10. The Diadem is now ready to fire in your selected Firing Mode: SETTING THE DEBOUNCE: Note: only adjust the debounce setting on your Diadem ITS if you are an advanced user. You can experiment with different settings using these directions if you really want to, but it is highly recommended that you do so when you are not about to go into a game. Note: The Debounce setting can only be set between 0 and 50 ms (milliseconds) 1. Turn Your Diadem on. 2. Enter Safety Mode by pressing the forward (+) button once. The LED will turn a solid Red. 3. Enter Programming Mode by pressing both buttons and holding them for 2 seconds, until the LED starts flashing Red. 4. Select Option 4 (Debounce Selection) by pressing the forward (+) button 4 times. The LED will now flash Red-Green-Red-Green-Red-Green-Red-Green-Red-Off and repeat that sequence. 5. Enter into Change Selection Mode by pressing both buttons once and quickly releasing them. The LED will flash red one time and then turn off. 6. Select your debounce setting by pressing the forward (+) button the number of times representing the debounce that you would like to set your Diadem with (NOTE: debounce is set in 5 ms increments 0, 5, 10, etc) 7. Exit Change Selection Mode by pressing both buttons and releasing them quickly. The LED will start flashing in the following sequence: e. Red-Green-Red-Green-Red-Green-Red-green-Red ----Green-Off f. The Green-Off sequence will flash a number of times representing which option you picked, for example: If you had set the Diadem to fire with a debounce of 15 ms then the Green-Off Sequence would flash 3 times as follows: Green-Off- Green-Off- Green-Off. The entire sequence would be: Red-Green-Red-Green-Red-green-red-green-red---- Green-Off- Green- Off- Green-Off- - REPEAT 8. Exit Option Selection Mode by pressing and holding both buttons for 2 seconds until the LED turns red. 9. Exit Safety Mode by pressing the forward (+) button once. 10. The Diadem is now ready to fire in your selected Firing Mode: SETTING THE EYE: Note: only adjust the eye setting on your Diadem ITS if you are an advanced user. You can experiment with different settings using these directions if you really want to, but it is highly recommended that you do so when you are not about to go into a game. 16
17 Note: The Eye setting can only be set to on or off. 1. Turn Your Diadem on. 2. Enter Safety Mode by pressing the forward (+) button once. The LED will turn a solid Red. 3. Enter Programming Mode by pressing both buttons and holding them for 2 seconds, until the LED starts flashing Red. 4. Select Option 5 (Eye Selection) by pressing the forward (+) button 5 times. The LED will now flash Red-Green-Red-Green-Red-Green-Red-Green-Red-greenred-Off and repeat that sequence. 5. Enter into Change Selection Mode by pressing both buttons once and quickly releasing them. The LED will flash red one time and then turn off. 6. Select your eye setting by pressing the forward (+) button once to turn the eye on or twice to turn it off. 7. Exit Change Selection Mode by pressing both buttons and releasing them quickly. The LED will start flashing in the following sequence: g. Red-Green-Red-Green-Red-Green-Red-green-Red-green-red ----Green- Off h. The Green-Off sequence will flash a number of times representing which option you picked, for example: If you had set the Diadem to fire with eye on then the Green-Off Sequence would flash 1 time as follows: Green-Off. The entire sequence would be: Red-Green-Red-Green-Red-green-redgreen-red-green-red---- Green-Off- REPEAT 8. Exit Option Selection Mode by pressing and holding both buttons for 2 seconds until the LED turns red. 9. Exit Safety Mode by pressing the forward (+) button once. 10. The Diadem is now ready to fire in your selected Firing Mode: RESET TO DEFAULT: Note: RESETTING YOUR DIADEM TO ITS DEFAULTS WILL ERASE ANY SETTING CHANGES THAT YOU HAVE MADE!!! MAKE SURE THAT THIS IS WHAT YOU WANT TO DO, BECAUSE THERE IS NO WAY TO REVERSE A RESET! 1. Turn Your Diadem on. 2. Enter Safety Mode by pressing the forward (+) button once. The LED will turn a solid Red. 3. Enter Programming Mode by pressing both buttons and holding them for 2 seconds, until the LED starts flashing Red. 4. Select Option 7 (Reset to Default Selection) by pressing the forward (+) button 7 times. The LED will now flash Red-Green-Red-Green-Red-Green-Red-Green- Red-Green-Red-Green-Red-Green-Red-Off and repeat that sequence. 5. Enter into Change Selection Mode by pressing both buttons once and quickly releasing them. The LED will flash red one time and then turn off. 6. Select your RESET TO DEAFAULT setting by pressing the forward (+) button once to keep your current settings on or twice to reset the Diadem to factory defaults. 17

18 7. Exit Change Selection Mode by pressing both buttons and releasing them quickly. The LED will start flashing in the following sequence: i. Red-Green-Red-Green-Red-Green-Red-Green-Red-Green-Red-Green- Red-Green-Red- ----Green-Off j. The Green-Off sequence will flash a number of times representing which option you picked, for example: If you had set the Diadem to keep your current settings then the Green-Off Sequence would flash 1 time as follows: Green-Off. The entire sequence would be: Red-Green-Red- Green-Red-Green-Red-Green-Red-Green-Red-Green-Red-Green-Red Green-Off- REPEAT 8. Exit Programming Mode by pressing and holding both buttons for 2 seconds until the LED turns red. 9. Exit Safety Mode by pressing the forward (+) button once. 10. Turn your Diadem off by pressing the back button and holding it until the LED turns off (about 2 seconds) 11. Turn your Diadem on by pressing the back button and holding it until the LED turns Green. (about 2 seconds) 12. The Diadem is now ready to fire in your selected Firing Mode: Tournament Lock: You will want to use the Tournament Lock Mode while playing in tournaments or league games. Note: You cannot change any of the programmable settings when you are in tournament lock. Ensure that all the settings of the marker are how you want them to be before turning the tournament lock on 1. Turn your marker off and disconnect the air supply. 2. Remove the rubber grips 18
 position 6.")

19 3. Remove the clear plastic cover-plate 4. Locate the Tournament Lock Switch 5. Push the Tournament Lock Switch into the Forward (to the left) position 6. Replace the plastic cover and rubber grip. Do not over tighten the screws. 7. When you turn your marker back on, it will be in Semi-Auto mode, and you will be unable to reprogram your marker while set in the Tournament Lock Mode. 19
20 Adjusting the trigger is done through 2 set screws inside of the trigger housing. One of them is in the body of the marker, and the other is in the trigger itself. Both are accessible without taking the Diadem apart. The front screw, in the body of the marker, is used to adjust the over-travel, the amount distance that the trigger moves after the Diadem fires. The rear screw, in the trigger itself, is used to adjust the under-travel, or the distance that the trigger moves before the Diadem fires. The minimum amount of trigger movement required for the Diadem to fire is.5 mm. NOTE:It is possible to render your Diadem unusable with improperly adjusted triggers. Be sure that you understand the concepts presented here before adjusting your marker. If your trigger won t move, or moves but never fires, you probably have made a mistake in the trigger adjustment. Loosen both set screws and try again! To adjust the Over-Travel of the trigger (to its minimum distance): 1. Remove all air and paint from the Diadem. 2. Make sure that the eye is turned on, and the Diadem is in single fire mode. see the programming guide (above) for instructions on how to do this. 3. Press and hold the trigger. The LED should turn and stay red 4. Turn the Over Travel set screw clockwise until the LED turns green. 5. Turn the Over Travel Set screw counter-clockwise until the LED turns Red. 6. This is the minimum over-travel the Diadem can have and still operate. 7. If this setting is not to your liking adjust the over-travel to your desired placement, making sure that the LED turns red when the trigger is pushed. To adjust the Under-Travel of the trigger (to its minimum distance): 1. Remove all air and paint from the Diadem. 2. Make sure that the eye is turned on, and the Diadem is in single fire mode. See the programming guide (above) for instructions on how to do this. 3. With the trigger loose, turn the under-travel screw clockwise, until the LED turns Red. (NOTE: if you have already adjusted the over-travel, you may pinch the trigger between the two set screws and render it unable to move. If this happens you will need to loosen either the under travel or the over travel.) 4. Turn the under-travel screw counter-clockwise, until the LED turns green 5. This is the minimum setting for the under travel 6. If this setting is not to your liking, loosen the under-travel to your desired setting. Making sure that the LED is green whenever it is not being pressed. 20


 The Diadem LED will flash Red anytime the battery is within 5 % of going dead. This is to allow you ample time to change the battery before it completely stops.")
21 Through adjusting the under-travel and over-travel of the Diadem ITS, you are able to customize the trigger feel to your exact specifications. Not everyone likes the trigger in the exact same place, and you should not necessarily just set the trigger to the minimum pull possible. For instance, I have found that I shoot 1-2 BPS faster with a mm trigger pull than I do with the minimum pull. Each person is different in their playing and shooting styles and should make sure that the trigger setting on the Diadem ITS suits them personally. Although the Diadem ITS has low drain circuitry, and you can leave your marker turned on for weeks at a time before the battery finally wears out, eventually you will have to replace it. (The battery, not the marker.) The Diadem LED will flash Red anytime the battery is within 5 % of going dead. This is to allow you ample time to change the battery before it completely stops. However, some functions on the Diadem may not operate properly while the battery is low. (Note: Due to testing the Diadems prior to shipping, we can not guarantee that the battery that comes installed in your Diadem is fully charged. If you have any problems with your Diadem, one of the first things to check is the battery. And always carry a spare battery with you to important games ) To replace the battery 1. Remove the two screws on the front side of the rubber grip to reveal the battery. 2. While holding the battery harness, remove the old battery from the diadem. Do not hold the battery harness by the wires, doing so can cause the wires to pull out of the harness and is not covered by warranty. 3. Place the new batter in the battery harness NOTE: Do not connect the battery backwards, doing so may cause irreparable damage to your Diadem s circuit board, and is not covered by warranty 4. Replace the grip screws. 21


22 Paintballs are inherently inaccurate. A paintball is moving relatively slow, less than 300 feet per second, and has a relatively high surface area that wind can hit. The paintballs themselves, with a solid exterior and a liquid filled interior, are likely to develop a curve in the air. Learn to adjust to the playing conditions of the day. A good idea is to fire multiple shots and aim from where the first one hits. Three round burst fire, firing three paintballs quickly and then pausing, is a good balance in conserving paintballs and air, and ensuring a hit. Though you might want to vary how many shots you fire when you lean out of you bunker, as your opponent will learn your rhythm and shoot you out as you begin to lean out. Play Hard. Put everything you have into the game. Don t be afraid to get hit, even the best players will get shot on occasion. Warning: Playing hard may cause you to become irresistible to members of the opposite gender. This condition may be aggravated when using the Diadem ITS. USE CAUTION. Teamwork is the key to most victories. Rambo won t win a lot of paintball games. Learn to work with your selected team of friends. When you have a good system down with your friends and you can communicate your intentions nearly telepathically, learn to play with a group of people that you have never met before. Accept different roles and don t expect to always be the team captain. Tell all of your friends and co-workers about the sport of paintball. It is generally more fun to play with people that you know, and it s a good stress reliever to be able to shoot your co-workers too. Try Walking the Trigger! All your friends are doing it! Walking the trigger is a technique where you use two fingers to pull the trigger, but you alternate between them. Imagine shooting 10 balls a second with your trigger finger. Now add another shot in between each shot with your second finger. You have just DOUBLED your firepower! Of course it takes a lot of practice to get this technique down, but it is well worth it to reach those high rates of fire! 22
23 A technique called snap shooting will improve your chances to eliminate the other team while keeping you in the game. Learn to shoot AS SOON as you lean out of your bunker and lean back behind it AS SOON as you are done firing. Always vary how many shots you fire, what side you lean out from, how high you are from the ground, and how often you lean out. Practice this technique, and you will see more eliminations per game. Do not blind fire. Blind firing is when you shoot around your bunker without leaning out. In tournament play, you can be ejected from a game, and in the woods, you just can t see your opposition coming at you. It s always good to practice looking where you re shooting while presenting as small a target as possible. Above all else, play fair. Don t try to wipe the paintball off of your shirt before the ref sees you. Don t adjust your velocity mid-game. Paintball has received some negative publicity because the markers look so much like real weapons. We need to work together to keep paintball a clean, safe, and fun sport. Please don t ruin the experience for the other players. The Diadem should get over 900 shots from a full 45ci/3000psi Nitro tank out of the box, from a 68 ci. / 4500 psi you should achieve up to 2000 rounds from a single full fill. Any modifications, such as changing the barrel, will change this number. Weather conditions may also affect the air usage. The paint itself plays a large factor in air efficiency the better the paint matches the internal diameter of the barrel the better your air efficiency will be. For extended life of your Diadem, please always use Nitrogen or Compressed Air as your air supply. Although the Diadem ITS will operate on CO 2, the nature of that gas may interfere with the electronics, and can cause your Diadem ITS to cease functioning. Damage to the electronics or the air valve by CO2 is not warranted. The barrel, which is included with the Diadem, is designed to accommodate most of the standard sizes of paintballs and should work fine with any of the major paintballs on the market. We recommend that you use higher quality paintballs to get the best performance. The Rx Barrel System features removable sleeves that re-size the bore of your barrel to more closely match the paint you are using, increasing your accuracy and air efficiency. The trigger pull can also be adjusted. By removing the Under-travel and Over- Take on your trigger, you can increase the speed at which you can fire. This is desirable when using a feed system that will force paintballs into the breach faster than they can fall. The trigger is adjustable down to ½ mm total travel. 23


24 Many of the concepts listed here are talked about in other parts of the manual. Use this as a concise way of finding reference information. Lubrication Lubrication is a key element to proper maintenance. When you fire the Diadem the moving parts are slowly being worn down. Lubrication slows this process. To lubricate your Diadem properly first remove any air source from the marker. Remove the upper bolt and the hammer as outlined above. Now drop a couple of drops of oil onto the hammer o-ring. With the upper bolt out of the marker put a few drops onto each o-ring on the upper bolt. Always do visual inspections of each o-ring as you oil it. A damaged or missing o-ring may cause the Diadem to misfire. You should lubricate your Diadem before each day of playing. Oil all O-rings by placing one drop of oil on and spreading it around with your finger. 24


25 Check all your O-rings Velocity Adjustment To adjust the velocity of your Diadem you must raise or lower the pressure of air released. This is done by turning the pressure adjustment screw located on the bottom of the regulator. Turning the screw clockwise increases the velocity. A turn counterclockwise decreases the velocity. If you using a regulator that did not come from Action Markers on the marker, check the regulator s directions to make sure of your adjustments. When changing the velocity of your Diadem ITS, be sure to fire several shots to make sure that the setting is locked in. We have found the best performance of the Diadem is reached when the marker is firing at around 295 feet per second. Air Tanks The Diadem is designed to work great with all air tanks made for paintball use. We recommend using compressed air or Nitrogen for the most consistent velocity. CO2 has the possibility of damaging some of the internals of the Diadem. Damage caused by CO2 is not warranted. 25
, pulling up the locking pin on the top of your marker, and then sliding the upper")
26 Field Stripping Field Stripping your Diadem is extremely easy. It is done by removing the air supply (or using the on/off valve on your Advanced Drop to shut off the air supply), pulling up the locking pin on the top of your marker, and then sliding the upper bolt out the rear of the marker. This allows you to clean the upper bolt and chamber Cleaning To keep your marker in top condition it should be cleaned anytime you have used it. To clean it properly, remove any air supply from the marker and pull the trigger once or twice to let any remaining air escape. Remove the barrel from the front of the marker and clean separately. Pull the connecting pin up. Slide the upper bolt out of the rear of the marker. Then run a squeegee through the top chamber (from back to front) to ensure that there is no paint in the chamber. Examine the upper bolt and remove any traces of paint there as well. Next remove the ram. To remove the ram assembly, simply remove the Ram Cap (Note the orientation of the Ram as it is in the marker, you will need to replace the ram in this position when re-assembling the marker), remove the airline, and turn the Ram Assembly counter-clockwise. Use care when pulling the Ram Assembly out so you do not scratch the Ram Housing. Look for any paint which may have leaked to the bottom and gotten on the hammer or in the lower chamber. Clean your marker with any standard paintball cleaning equipment. Re-assembling First replace the Ram Assembly, carefully sliding it in up to the threads and then turning it clockwise. Now replace the upper bolt into the upper chamber. The easiest way we have found to line up the connecting pin with the hammer is to apply some pressure to the top of the pin as it enters the upper chamber and slide the bolt forward until it drops down. 26


27 Transportation Whenever transporting your marker, be sure to use a carrying case to prevent any wear and tear. We feel that all wear and tear should happen in the course of an actual paintball game. Dropping your paintball marker on the sidewalk shouldn t be a concern that you worry about. The box that your marker came in also doubles as a nice case already. As a reminder, never transport your marker in the open in public. Not everybody can recognize it as a paintball marker. 27
28 The following is a list of the most common problems you may have with paintball markers, along with their most common solutions. The list is not intended to be comprehensive. If you are having a problem that is not listed, please refer to We will be posting new and updated Support issues through our website. If your concern is not resolved through the website then call your dealer or call our technical support number listed under contact information. Firing in unexpected mode: Last programmed firing mode is still in memory - Reprogram the firing mode to your preference Leaks at tank connection: Bad tank o ring Replace the O-Ring on the tank Damaged tank adapter Replace the Tank adapter Poor accuracy: Wet or oily barrel Clean the barrel out with a dry squeegee. Ensure that the barrel is completely dry. Field strip your marker and ensure that the upper chamber is dry as well. Bad or poor quality paintballs This is the biggest cause of inaccuracy. Ensure that the Paintballs are not uneven or dimpled. Use a higher quality of paintball. Velocity too high Re-check your velocity at a chronograph and change as needed to get your velocity down under 300 feet per second. Velocity too low Re-check velocity using a chronograph and change as needed. Keep your velocity under 300 feet per second. Ensure that you are not running out of air in your air supply. Bad or damaged barrel Inspect your barrel for nicks or scratches on the inside of the barrel. If it is damaged in any way you may need to replace your barrel. Check with your local dealer or look at our website, to order a new barrel. Breaks paintballs: Bad or poor quality paintballs Use higher quality paintballs. Ensure that your paintballs are not overly fragile. Bad or dirty barrel Make sure that your barrel is clean and free from all debris. If there is any damage to your barrel you may need to get a new barrel. Slow Feed Rate One of the most common causes of ball breakage on the Diadem is out shooting your hopper. If you are consistently getting chopped paint you should consider getting a motorized ball hopper that would better keep up with the Diadem s Rate of Fire. Rate of Fire set too high Reprogram your maximum rate of fire to match your hopper 28
29 Inconsistent velocity: Bad or oval shaped paintballs Use higher quality paintballs. Ensure that your paintballs are completely spherical without becoming oblong. Bad upper bolt O-ring Replace worn out O-rings. Regulator Problems There are a number of possible problems with the regulator. Check with your regulator manufacturer to see if there are any problems with your regulator. Extremely Low velocity: Low Tank Recharge or change your air supply Will not fire/ Light will not turn on: Battery is too low or dead Replace the battery with a new one. Trigger adjustment is set wrong Refer to the Trigger adjustment section and check your trigger to make sure it is set right. New Products and Updates We are continually in the process of designing new products. A full line of accessories and upgrades to the Diadem is available. For information regarding new Products call your local dealer or Action Markers, Inc or visit us online at 29
30 Contact Information If you need to contact us for any reason check out our website at Action Markers, Inc Fourier Dr. Fort Wayne, Indiana Tel: (260) Fax: (260) Website: (cut out and return Warranty cards to the above address with your receipt.) Check out to see our new referral program let your friends know how much you love the Diadem and we will pay for you to play paintball! WARRANTY REGISTRATION CARD Purchased From Serial # Date City State Zip Your Name (Please Print) Street Address City State Zip Phone # Address Why did you choose the Sentinel? What other markers do you own? Who referred you to Action Markers? Visit us at 30
31

32
Synergy Owners Manual
 Synergy Owners Manual Table of Contents Safety Guidelines...2 Quickstart Guide...3 Owners Manual...7 Field Strip Guide...11 Do s & Don ts...12 Diagrams...13 Troubleshooting Guide...15 Warranty Info...16
MAYHEM MAYHEM OWNERS MANUAL. Paintball Guns International. Manufactured by
 MAYHEM MAYHEM OWNERS MANUAL Manufactured by Paintball Guns International Table of Contents Specifications...................... 2 Parts diagram and Listing............. 3 Description of Marker Operation.......
IMPORTANT CO2/ HPA AIR TANK SAFETY INSTRUCTION AND GUIDELINES. Tank valves must be installed or removed by qualified personnel.
 !WARNING! IMPORTANT SAFETY INSTRUCTION AND GUIDELINS!WARNING! IMPORTANT CO2/ HPA AIR TANK SAFETY INSTRUCTION AND GUIDELINES GETTING STARTED This Paintball Marker is NOT A TOY. Misuse can cause serious
Play Safe. Safety. Instruction Manual. Warning. Rebel Specifications
 Operation Guide Instruction Manual Congratulations on your purchase of the 32 Degrees Rebel Xtreme semi-auto. Before you use this marker, please read this manual in its entirety. Please follow all safety
IMPORTANT CO2/ HPA AIR TANK SAFETY INSTRUCTION AND GUIDELINES. Tank valves must be installed or removed by qualified personnel.
 !WARNING! IMPORTANT SAFETY INSTRUCTION AND GUIDELINS!WARNING! IMPORTANT CO2/ HPA AIR TANK SAFETY INSTRUCTION AND GUIDELINES GETTING STARTED This Paintball Marker is NOT A TOY. Misuse can cause serious
TABLE OF CONTENTS SAFETY FIRST!...3 BASIC OPERATION...4 ADJUSTMENTS...5. Cocking Pressure...5. Three-Way Valve Adjustment...6
 TABLE OF CONTENTS SAFETY FIRST!...3 BASIC OPERATION...4 ADJUSTMENTS...5 Cocking Pressure...5 Three-Way Valve Adjustment...6 External Three-Way adjustment...6 In-Line Regulator...6 Ram to Cocking Block
IMPORTANT CO2/ HPA AIR TANK SAFETY INSTRUCTION AND GUIDELINES. Tank valves must be installed or removed by qualified personnel.
 !WARNING! IMPORTANT SAFETY INSTRUCTION AND GUIDELINS!WARNING! IMPORTANT CO2/ HPA AIR TANK SAFETY INSTRUCTION AND GUIDELINES GETTING STARTED This Paintball Marker is NOT A TOY. Misuse can cause serious
WARNING TABLE OF CONTENTS:
 WARNING WARNING: This is not a toy. Misuse may cause serious injury or death. Eye protection designed specifically for paintball must be worn by the user and persons within range. Recommend 18 years of
Cover.qxd 1/10/05 10:30 AM Page 2. user manual. diablopaintball.com
 Cover.qxd 1/10/05 10:30 AM Page 2 user manual Cover.qxd 1/10/05 10:30 AM Page 3 Table Of Contents: Page Topic(s) 1 Warning and Rules Safe Marker Handling 2 Warranty Information 3 Welcome 4 Battery Installation
SAFETY Always wear approved safety goggles or an approved mask whenever you handle this paintball marker!
 Instruction Manual Table of Contents SAFETY... 1 COMPRESSED AIR ONLY... 2 FAST START... 3 FIRST TIME PROBLEMS... 4 PERFORMANCE... 4 LUBRICATION... 5 VELOCITY ADJUSTMENT... 5 CLEANING... 5 PAINTBALLS...
TABLE OF CONTENT IMPORTANT HPA AIR TANK SAFETY INSTRUCTIONS AND GUIDELINES RYSE ON/OFF ASA GETTING STARTED O-RING LIST SCREW LIST MICRO SQ BOARD
 TABLE OF CONTENT 4 IMPORTANT HPA AIR TANK SAFETY INSTRUCTIONS AND GUIDELINES 22 RYSE ON/OFF ASA 6 GETTING STARTED 23 O-RING LIST 8 MICRO SQ BOARD 25 SCREW LIST 6 TRIGGER ADJUSTMENT 28 INTERNAL PARTS 7
! WARNING! IMPORTANT HPA AIR TANK SAFETY INSTRUCTION AND GUIDELINES ! WARNING! IMPORTANT SAFETY INSTRUCTION AND GUIDELINES
 ! WARNING! IMPORTANT SAFETY INSTRUCTION AND GUIDELINES! WARNING! IMPORTANT HPA AIR TANK SAFETY INSTRUCTION AND GUIDELINES This Paintball Marker is NOT A TOY. Misuse can cause serious injury or death. It
TIPPMANN 98 CUSTOM. Owner s Manual CO2 POWERED PAINTBALL GUN
 TIPPMANN PNEUMATICS, INC. Get Your ur Heart t Pound unding With h A Tippmann! WARNING: This paintball marker/gun is not a toy nor is it intended for unsupervised use by persons under the age of 18 years.
E-MAG TM Instruction Manual
 E-MAG TM Instruction Manual SAFETY THIS PAINTBALL MARKER IS NOT A TOY! This paintball marker should be treated as a dangerous instrument and should always be treated with respect. Never point a paintball
WARNING. Paintball Pistol. Paintball Pistol
 This lightweight assault paintball pistol is custom milled from high grade aluminum for superb balance and precision. The compact construction of this competition paintball pistol will give you a mobile
FIRESTORM. Assembly Instructions. Electric Upgrade Kit for the Autococker. Designed & Manufactured by PGI
 FIRESTORM Electric Upgrade Kit for the Autococker Assembly Instructions Designed & Manufactured by PGI Table of Contents Introduction 1 Safety 1 Parts Diagram 2 Parts Diagram Listing 2 Getting Started
Thank you for purchasing your new Empire Reloader B Sound-Activated 3-Speed Paintball Hopper!
 Thank you for purchasing your new Empire Reloader B Sound-Activated 3-Speed Paintball Hopper! Should you require any technical assistance on the use of this product, or if your product needs servicing,
ProMaster Troubleshooting Guide
 ProMaster Troubleshooting Guide Always read your owner's manual before operating or doing maintenance on your ProMaster marker. The manual contains in-depth maintenance and setup information. Always remove
MODEL 1410 OWNER S MANUAL
 2111 S. 8th, Rogers, Ar 72758 U.S.A. (501) 636-1200 Fax (501)636-0573 http://www.brasseagle.com THIS BOOKLET CONTAINS: Safety Information Warranty Registration Annotated Diagram Operating Instructions
user manual .68 CALIBER ELECTRONIC PAINTBALL MARKER Meets or exceeds ASTM standards.
 user manual TM TM TABLE OF CONTENTS: Page Topic(s) 1 Warning and Rules Safe Marker Handling 2 Warranty Information 3 Welcome 4 Initial Assembly 6 Parts Key 7 Exploded Diagram 8 Battery Installation 9 Attaching
user manual .68 CALIBER ELECTRONIC PAINTBALL MARKER Meets or exceeds ASTM standards.
 user manual TM TM TABLE OF CONTENTS: Page Topic(s) 1 Warning and Rules Safe Marker Handling 2 Warranty Information 3 Welcome 4 Initial Assembly Battery Installation 9 Attaching Propellant Source Attaching
Paintball Marker. User s Manual. Direct Feed. SC: Stock Class. VSC: Vertical Air Stock Class. 530 South Springbrook Road Newberg, OR 97132
 Paintball Marker User s Manual Direct Feed SC: Stock Class 530 South Springbrook Road Newberg, OR 97132 VSC: Vertical Air Stock Class www.phantomonline.com Component Concepts, Inc., 530 South Springbrook
VIBE. Quick Start Manual
 VIBE Quick Start Manual STATISTICS PLEASE READ CAREFULLY VITAL STATISTICS LENGTH/HEIGHT/WEIGHT: OPERATING PRESSURE: PAINTBALLS: POWER SOURCE: PROPELLANT: RATE OF FIRE: OPERATION: MODES OF FIRE: ANTI CHOP
Paintball Marker. User s Manual. 530 South Springbrook Road Newberg, OR 97132
 Paintball Marker User s Manual 530 South Springbrook Road Newberg, OR 97132 Component Concepts, Inc., 530 South Springbrook Road, Newberg, OR 97132 Phone: (503) 554-8095 Fax: (503) 554-9370 www.phantomonline.com
BT PAINTBALL DESIGNS, INC. 570 MANTUA BLVD., SEWELL, NJ
 Rip Clip Manual_2.qxp 4/15/08 11:00 AM Page a BT PAINTBALL DESIGNS, INC. 570 MANTUA BLVD., SEWELL, NJ 08080 WWW.BTPAINTBALL.COM Rip Clip Manual_2.qxp 4/15/08 11:00 AM Page b BT Paintball would like to
Rip Clip Manual_2.qxp 4/15/08 11:00 AM Page c
 Rip Clip Manual_2.qxp 4/15/08 11:00 AM Page b Rip Clip Manual_2.qxp 4/15/08 11:00 AM Page c Rip Clip Manual_2.qxp 4/15/08 11:00 AM Page 1 BT Paintball would like to thank you for your purchase of the BT
SAFETY WARNING MUST READ
 Airgun Designs Inc. Table of Contents SAFETY...1-2 COMPRESSED AIR ONLY... 2 FAST START... 3 LvL 10 ANTI-CHOP SYSTEM... 4 LOADER...4 PERFORMANCE... 4 LUBRICATION... 4 VELOCITY ADJUSTMENT... 5 BLOW-OFF VALVE...
WARNING OWNER S MANUAL WARSENSOR WSP PAINTBALL PISTOL
 WARSENSOR WSP PAINTBALL PISTOL OWNER S MANUAL WARNING WARSENSOR PAINTBALL MARKERS ARE NOT A TOY. ANY MISUSE MAY CAUSE SERIOUS INJURY OR DEATH. THE USER AND ANY PERSON WITHIN RANGE MUST WEAR EYE PROTECTION
WARNING OLED & BASIC MENU QUICK START
 Getting Started QUICK START WARNING The VANGUARD MARKER is not a toy. Careless or improper use, including failure to follow instructions and warnings within this Operator Manual and attached to the VANGUARD
Pilot JAVA 9.6V RECHARGEABLE BATTERY & CHARGER INCLUDED. Kingman Group Live Oak Avenue, Baldwin Park, CA 91706, U.S.A. Toll-free 888.
 Pilot Kingman Group 14010 Live Oak Avenue, Baldwin Park, CA 91706, U.S.A. Toll-free 888.KINGMAN www.kingman.com JAVA 9.6V RECHARGEABLE BATTERY & CHARGER INCLUDED 14010 Live Oak Avenue, Baldwin Park, CA
Users Manual STANDARD, SELECT, AND LCD MODELS
 Users Manual Generation E Sports STANDARD, SELECT, AND LCD MODELS Generation E Sports 956 South Second Street Ronkonkoma, NY 11779 USA (631) 580-4377 www.matrixmarker.com GENERATION E SPORTS MATRIX OPERATORS
Please visit our website at and leave your comments.
 We promise our customers the best services and premium quality products with value. MODIFY and its logo are registered trademarks. Please visit our website at www.modify.com.tw and leave your comments.
Shocker Sport TM Manual. Includes: Shocker Sport 4X4 TM and Shocker Sport Turbo TM
 Shocker Sport TM Manual Includes: Shocker Sport 4X4 TM and Shocker Sport Turbo TM WARNING! The Shocker Sport TM Paintball Marker is not a toy. Misuse or careless use may cause serious injury or death.
Proto Matrix Musashi 3 Upgrade Manual
 Proto Matrix Musashi 3 Upgrade Manual Musashi 3 Upgrade Instructions for Proto Matrix FEATURES...3 LED INDICATOR...3 SOLID GREEN...3 SOLID RED...3 SLOW BLINKING GREEN...3 SLOW BLINKING RED...3 POWER OPERATION...3
Autococker Marker Manual
 Autococker Marker Manual Autococker Trilogy Select-Fire Manual WORR GAME PRODUCTS, LLC. TRILOGY AUTOCOCKER OWNERS MANUAL WARNING: This Always is not wear a toy. paintball Misuse approved may cause eye
TABLE OF CONTENTS. AIR SOURCE : CO2/HPA ONLY (not included)
") Owner s Manual INCLUDES -.68 CALIBER CONQU3ST PAINTBALL MARKER - 10.5 ONE PIECE BARREL (AUTOCOCKER THREAD) - SPARE PARTS KIT - TOOL KIT - BARREL BLOCKING DEVICE AIR SOURCE : CO2/HPA ONLY (not included)
Owner s Manual INCLUDES -.68 CALIBER CONQU3ST PAINTBALL MARKER - 10.5 ONE PIECE BARREL (AUTOCOCKER THREAD) - SPARE PARTS KIT - TOOL KIT - BARREL BLOCKING DEVICE AIR SOURCE : CO2/HPA ONLY (not included)
BT_SA-17_Manual.qxp 3/11/10 9:54 AM Page C
 BT_SA-17_Manual.qxp 3/11/10 9:54 AM Page C OWNER S MANUAL BT_SA-17_Manual.qxp 3/11/10 9:54 AM Page D CONTENTS 1. Rules for Safe Marker Handling..............................1 2. Introduction and Specifications..............................1
MILSIG HEAT CORE MAINTENANCE GUIDE
 MILSIG HEAT CORE MAINTENANCE GUIDE Maintenance guide for the HEAT Core System in the Paradigm PRO and MK3 marker By Jasper Tam - MILSIG Certified Tech Last Updated: Oct 3 rd 2012 MILSIG Paintball Canada
User Instruction Manual
 User Instruction Manual 4500 psi Air Compressor Ver 2, 1.18 Contents Parts Included...3 Assembly Instructions...3-5 Operation Instructions...6-7 Oil Change Intervals...8 Air Filter Replacement...9 Setting
IMPORTANT SAFETY GUIDELINES !CAUTION!
 USERS MANUAL TABLE OF CONTENTS IMPORTANT SAFETY GUIDELINES 1 OPERATION GUIDE / START UP 2 CO2 / COMPRESSED AIR TANK 3-4 ELECTRONICS & SETTINGS 5-6 BATTERY CHARGING 7-8 VELOCITY ADJUSTMENT 9 SHOULDER STOCK
Proto Paintball USA EUROPE ASIA
 Proto Paintball USA 10637 Scripps Summit Ct. San Diego, CA 92131 P 858-536-5183 F 858-536-5191 EUROPE Dye House, 7-8 Commerce Way Croydon, Surrey, CR0 4XA, United Kingdom P +44 (0) 20-8649-6330 F +44 (0)
PLEASE READ ALL OPERATING INSTRUCTIONS BEFORE USING THE LEGEND PAINTBALL MARKER
 PLEASE READ ALL OPERATING INSTRUCTIONS BEFORE USING THE LEGEND PAINTBALL MARKER TABLE OF CONTENTS WARNINGS Important Safety Instructions and Guidelines...page 1 OPERATING INSTRUCTIONS Turning your LEGEND
IMPORTANT CO2/ HPA AIR TANK SAFETY INSTRUCTION AND GUIDELINES. Tank valves must be installed or removed by qualified personnel.
 !WARNING! IMPORTANT SAFETY INSTRUCTION AND GUIDELINS!WARNING! IMPORTANT CO2/ HPA AIR TANK SAFETY INSTRUCTION AND GUIDELINES GETTING STARTED This Paintball Marker is NOT A TOY. Misuse can cause serious
ELECTRONIC PAINTBALL MARKER
 ELECTRONIC PAINTBALL MARKER Welcome to ZXS Powered by Zap On behalf of everyone at our company, thank you for your purchase of an ZXS Electronic Marker. This Owner s Manual is designed to help you enjoy
Not a toy. Adult supervision required. Misuse or careless use may cause serious injury or death. May be dangerous up to 500 yards (457 meters).
.") Owner s manual www.umarex-usa.com CO2 repeater rifle cal..177 (4.5mm) pellet cal..22 (5.5mm) pellet Not a toy. Adult supervision required. Misuse or careless use may cause serious injury or death. May
Owner s manual www.umarex-usa.com CO2 repeater rifle cal..177 (4.5mm) pellet cal..22 (5.5mm) pellet Not a toy. Adult supervision required. Misuse or careless use may cause serious injury or death. May
Inflatable Stand Up Paddle Board Manual
 Inflatable Stand Up Paddle Board Manual V-Max AIR 12 6 Voyager AIR 11 6 Koa AIR 10 2 and 10 8 Heavy duty built in carrying handles Steel D Ring Built in Cargo Straps EVA Deck Pad High Pressure Air Valve
TABLE OF CONTENTS Section Page Safety Warranty
 GEN4 I N T I M I D A T O R A L E G E N D R E B O R N TABLE OF CONTENTS Section Page Safety..............................................................................2 Warranty............................................................................3
VR1 Owner s Manual. Vigilance Rifles, Inc Plum Lane Redlands, CA P F
 VR1 Owner s Manual Vigilance Rifles, Inc. 1653 Plum Lane Redlands, CA 92374 P 909.307.8877 F 909.307.8866 www.vigilancerifles.com INTRODUCTION: Vigilance Rifles offers a new line of Semi-Automatic Rifles
stormrider Instructions for Use Version 08/2017
 stormrider EN Instructions for Use Version 08/2017 INTRODUCTION DESCRIPTION SAFETY INSTRUCTIONS TECHNICAL DATA HANDLING & OPERATION CARE & MAINTENANCE TROUBLESHOOTING DESCRIPTION Front Sight Barrel Rear
Cleaning rod: spring steel, stainless steel or carbon fibre cleaning rod - only use a one-piece rod. Avoid using snakes.
 Telemark Biathlon Where performance and precision come together http://telemarkbiathlon.com Rifle Cleaning Date : July 19, 2013 Anschutz Rifle Manual - Click Here Izhmash 7-3 Rifle Manual - still looking
HUBEN K1 Pre-charged Pneumatic Air Rifle Owner s Manual
 HUBEN K1 Pre-charged Pneumatic Air Rifle Owner s Manual 5135 Naiman Parkway, Cleveland, OH 44139 l 216-220-1180 Record the serial number of your airgun... READ THIS MANUAL AND THE WARNINGS AND SAFETY PROCEDURES
USER MANUAL ELECTRIC BLOWBACK SYSTEM. Rev LIMITED WARRANTY
 LIMITED WARRANTY Spartan Imports warrants this airsoft rifle purchased through Spartan Imports Authorized Dealers to be free from manufacturer defects in materials and workmanship under normal consumer
Windy City II. User instruction manual WARNING: Fill pressure: 200 bar (approximately 2,900 psi)
") Windy City II User instruction manual Rules of safe shooting... 2 Filling the rifle... 3-4 Loading the magazine... 5-6 Inserting the magazine... 7 Adjusting the trigger... 7-8 Safety... 9 Warranty... 10
Windy City II User instruction manual Rules of safe shooting... 2 Filling the rifle... 3-4 Loading the magazine... 5-6 Inserting the magazine... 7 Adjusting the trigger... 7-8 Safety... 9 Warranty... 10
1799 Carpenter Road Oakley, California Operator s M a n u a l
 1799 Carpenter Road Oakley, California 94561 2 0 0 5 Operator s M a n u a l Table of Contents Section Page Safety.....................................................2 Warranty...................................................3
G7S Hand Pump Owner s Manual
 G7S Hand Pump Owner s Manual Copyright Air Venturi 2018 Version 4-18 Specifications 24.80 inches long closed 43.31 inches long extended 4500 psi/310 bar max pressure Features Integral manometer (pressure
IZH 53M air pistol owner s manual
 IZH 53M air pistol owner s manual 18370 S. Miles Rd Warrensville Heights, OH 44128 216-220-1180 Record the serial number of your airgun... BASIC SAFETY RULES 1. Never point your airgun at anyone or allow
Modular training weapon Owners manual
 Modular training weapon Owners manual MTW Basic Features Thank you for joining the Wolverine family! We hope you will enjoy your new Modular Training Weapon. Please read the Owners Manual carefully before
TABLE OF CONTENTS DM4 OWNER S MANUAL QUICK REFERENCE...PAGE 02 IMPORTANT SAFETY INSTRUCTIONS AND GUIDELINES...PAGE 03
 < < S P E C S > > WEIGHT [.3 LBS] WIDTH [.37 ] LENGTH [9.7 ] HEIGHT [8. ] EFFICIENCY [,00 SHOTS OFF 68CU 400PSI] BATTERY LIFE [40,000 SHOTS] OPERATING PRESSURE [7PSI] CYCLE PRESSURE [7PSI] MAX RATE OF
Tactical Sniper air rifle & carbine
 Tactical Sniper air rifle & carbine User instruction manual Fill pressure: 200 bar (approximately 2,900 psi) Rev 4/17 Contents Rules of safe shooting... 3 Filling your rifle... 4-5 Loading the magazine...
User Instruction Manual
 User Instruction Manual PRE-CHARGED PNEUMATIC PCP Air Rifle With Built-In Pump Ver 1, 9/18 CONTENTS Rules of safe shooting...3 Warnings...4 Parts of your Aspen air rifle...5 Operating the safety...6 Trigger...6
 www.empirepaintball.com 1. SAFE MARKER HANDLING IMPORTANT: Never carry your marker uncased when not on a playing field. The non-playing public and law enforcement personnel may not be able to distinguish
STATEMENT OF LIABILITY
 STATEMENT OF LIABILITY LASERLINE IS MANUFACTURED BY WEST INDUSTRIES INC. LASERLINE IS PATENTED AND TRADEMARKED. This device is not a toy. Misuse may cause serious injury. The user and any person within
CONTENTS. Read this entire manual before loading, or installing an air cylinder, or in any way attempting to operate the marker
 OWNER S MANUAL CONTENTS 1. Rules for Safe Marker Handling 2. Introduction and Specifications 3. Battery Replacement and Life Indicator 4. Basic Operation 5. Compressed Air/Nitrogen Supply 6. Installing
Beeman Precision Airguns Spring-Piston Air Rifles P1, P3, P11
 Beeman Precision Airguns Spring-Piston Air Rifles P1, P3, P11 User Instruction Manual V1 10/17 CONTENTS Rules of safe shooting...3 Cocking & Loading... 4 Safety... 4 Sight Adjustment...5 Trigger Adjustment...5
AR STYLE FIREARMS OWNER'S MANUAL: OPERATION, HANDLING, DISASSEMBLY / REASSEMBLY & SAFETY INSTRUCTIONS
 AR STYLE FIREARMS OWNER'S MANUAL: OPERATION, HANDLING, DISASSEMBLY / REASSEMBLY & SAFETY INSTRUCTIONS - DO NOT DISCARD THIS MANUAL - READ THIS MANUAL CAREFULLY, PAYING CLOSE ATTENTION TO THE INSTRUCTIONS
O p e r a t o r s M a n u a l A - B o m b D a r k R i p p e r 2 R i p p e r ivera R obert R by esign D & Photography
 O p e r a t o r s M a n u a l A-Bomb Dark Ripper 2 Ripper 2.5 Photography & Design by Robert Rivera - 305.819.1009 Table of Contents Section Page Safety.....................................................2
RULES FOR SAFE FIRING:
 EN THIS AIRGUN IS INTENDED FOR USE BY THOSE YEARS OF AGE OR OLDER. ADULT SUPERVISION REQUIRED. SOFT-AIR-PISTOL PPK/S BLOW BACK RULES FOR SAFE FIRING:. Get to know the single parts of your new soft-air
BUSHMASTER 2000 / 2K2 (LCD) MANUAL. BushMaster 2000 Overview
 MANUAL. BushMaster 2000 Overview") BUSHMASTER 2000 / 2K2 (LCD) MANUAL BushMaster 2000 Overview The BushMaster 2000 is a quality marking instrument specially designed to meet the needs of the professional style tournament player. The BushMaster
BUSHMASTER 2000 / 2K2 (LCD) MANUAL BushMaster 2000 Overview The BushMaster 2000 is a quality marking instrument specially designed to meet the needs of the professional style tournament player. The BushMaster
WARNING: PCP PELLET RIFLE Cal. 4,5 mm (.177) Cal. 5,5 mm (.22) Operating instructions 2-9
 Cal. 5,5 mm (.22) Operating instructions 2-9") PCP PELLET RIFLE Cal. 4,5 mm (.177) Cal. 5,5 mm (.22) Operating instructions 2-9 WARNING: NOT A TOY. THIS AIRGUN IS DESIGNED FOR USE BY EXPERIENCED SHOOTERS 18 YEARS OF AGE OR OLDER AND IS INTENDED FOR
PCP PELLET RIFLE Cal. 4,5 mm (.177) Cal. 5,5 mm (.22) Operating instructions 2-9 WARNING: NOT A TOY. THIS AIRGUN IS DESIGNED FOR USE BY EXPERIENCED SHOOTERS 18 YEARS OF AGE OR OLDER AND IS INTENDED FOR
Beeman Precision Airguns R-Series Air Rifle Owner s Manual
 Beeman Precision Airguns R-Series Air Rifle Owner s Manual WARNING Not a toy. Adult supervision required. Misuse or careless use may cause serious injury or death. Contents Rules of safe shooting... 3
USERS MANUAL. Manufactured by MacDev Paintball - Australia macdev.net
 USERS MANUAL Manufactured by MacDev Paintball - Australia macdev.net Tactical Drone Users Manual Copyright Mac Developments Pty. Ltd. 2009 All rights reserved No part of this document may be copied or
NOT A TOY. ADULT SUPERVISION REQUIRED. MISUSE OR CARELESS USE MAY CAUSE SERIOUS INJURY OR DEATH.DANGEROUS UP TO 350 YARDS (320 METER).
.") Caution: NOT A TOY. ADULT SUPERVISION REQUIRED. MISUSE OR CARELESS USE MAY CAUSE SERIOUS INJURY OR DEATH.DANGEROUS UP TO 350 YARDS (320 METER). This air rifle is primarily intended for adult use. However,
Caution: NOT A TOY. ADULT SUPERVISION REQUIRED. MISUSE OR CARELESS USE MAY CAUSE SERIOUS INJURY OR DEATH.DANGEROUS UP TO 350 YARDS (320 METER). This air rifle is primarily intended for adult use. However,
dye Precision, Inc. USA Scripps Summit Ct. San Diego, CA P f
 O W N E R S M A N U A L dye Precision, Inc. USA 10637 Scripps Summit Ct. San Diego, CA 92131 P 858-536-5183 f 858-536-5191 GERMANY Albert Einstein Str. 2 B 77656 Offenburg, Germany P +49 (0)781 639 349
Proto Paintball USA EUROPE ASIA
 Proto Paintball USA 10637 Scripps Summit Ct. San Diego, CA 92131 P 858-536-5183 F 858-536-5191 EUROPE Unit 1, ZK Park, 23 Commerce Way Croydon, Surrey CRO 4ZS United Kingdom P +44 (0) 20-8649-6330 F +44
OWNER'S MANUAL
 OWNER'S MANUAL www.umarex-usa.com MODELS Beretta 92FS and 92FS Match Caliber.177 (4.5 mm) Pellet CO2 Air Pistol patented Not a toy. Adult supervision required. Misuse or careless use may cause serious
User Instruction Manual
 User Instruction Manual 320 fps 18rounds 12gram VELOCITY BBs CO2 CARTRIDGE GRIP SAFETY BLOWBACK John Wayne 1911 CO2,.177 Cal. (4.5mm) Air Pistol Contents Safety Instructions...3 Learning the Parts of Your
HELMETS SAVE LIVES!!! ALWAYS WEAR A PROPERLY FITTED HELMET WHEN YOU RIDE YOUR SCOOTER. DO NOT RIDE AT NIGHT. AVOID RIDING IN WET CONDITIONS.
 HELMETS SAVE CORRECT FITTING - MAKE SURE YOUR HELMET COVERS YOUR FOREHEAD. LIVES!!! ALWAYS WEAR A PROPERLY FITTED HELMET WHEN YOU RIDE YOUR SCOOTER. DO NOT RIDE AT NIGHT. AVOID RIDING IN WET CONDITIONS.
Pneumatic Wet Sander. (4,500 rpm) Operation Instruction
 Operation Instruction") Pneumatic Wet Sander (4,500 rpm) Operation Instruction ON / OFF Safety Lever Features ON / OFF 4 6 3 5 2 5 3 6 7 4 Safety Lever 2 8 Rubber Sleeve Ergonomic handle comforts the users hand, its excellent
Pneumatic Wet Sander (4,500 rpm) Operation Instruction ON / OFF Safety Lever Features ON / OFF 4 6 3 5 2 5 3 6 7 4 Safety Lever 2 8 Rubber Sleeve Ergonomic handle comforts the users hand, its excellent
Freedom8 ShoeBox Compressor Manual
 Freedom8 ShoeBox Compressor Manual Warning!! This product is not a toy! Use or misuse can cause severe injury or death! Use only with adult supervision. This unit is only to be used with tanks, hoses and
MECH-TECH SYSTEMS CCU MODEL FOR GLOCK PISTOLS
 MECH-TECH SYSTEMS CCU MODEL FOR GLOCK PISTOLS Operation & Maintenance Manual Read and understand this manual before attempting to use this product. If you have any questions call: 1-866-433-2122 www.mechtechsys.com
HYDRAULIC PUNCH DRIVER 38456, 38520, 7306 / 7306SB, 7310 / 7310SB, 7506, 7606SB, 7610SB, 7625 / 7625Pg / 7625PgSB, 7646 / 7646Pg / 7646PgSB
 INSTRUCTION MANUAL HYDRAULIC PUNCH DRIVER 38456, 38520, 7306 / 7306SB, 7310 / 7310SB, 7506, 7606SB, 7610SB, 7625 / 7625Pg / 7625PgSB, 7646 / 7646Pg / 7646PgSB Read and understand all of the instructions
ARIAKON. Thank you for choosing ARIAKON. ARE YOU A PLAYER?
 Page 20 Page 1 Thank you for choosing ARIAKON. ARIAKON www.ariakon.com 2794 LOKER AVE WEST SUITE 107 CARLSBAD CA 92008 Phone: 1-877-4-ARIAKON 760-268-0735 FAX: 760-268-0736 Email: sales@ariakon.com ARE
SAFETY RULES WARNING: READ THESE SAFETY RULES & OPERATORS MANUAL BEFORE HANDLING YOUR FIREARM
 SAFETY RULES WARNING: READ THESE SAFETY RULES & OPERATORS MANUAL BEFORE HANDLING YOUR FIREARM Never point a firearm at anyone and always keep the muzzle pointed in a safe direction. Always treat all firearms
MANUAL SEALLESS STEEL STRAPPING TOOL MODEL A
 OPERATION MANUAL / SPARE PARTS LIST MANUAL SEALLESS STEEL STRAPPING TOOL MODEL A337.0001 13.1912.01 13191201.en/MAS/ 10.02 INDEX PAGE 1 SAFETY INSTRUCTIONS 2 2 WARRANTY CONDITIONS AND LIABILITY 4 3 APPROPRIATE
WARNING continued: 14. Never put any body parts or foreign objects into the breech or feed tube. 15. Always use the supplied barrel cover when your
 owner s manual 1 Owner s Manual 2 WARNING: 1. The DP G5 SPEC-R is NOT A TOY. Treat it with the same respect and care you would a firearm. 2. Carelessness, Misuse, and failure to adhere to the warning and
FX IMPACT OWNER S MANUAL
 made in sweden FX IMPACT OWNER S MANUAL Warranty Information All FX Airguns carry a One Year Warranty against faulty workmanship and defective materials. If it becomes necessary, first contact the dealer
O P E R A T O R S M A N U A L
 OPERATOR S MANUAL WARNING! This is not a toy. Misuse may cause serious injury or death. Eye protection designed specifically for paintball must be worn by the user and persons within range. Must be 18
PISTOL CALIBER AR STYLE FIREARMS
 PISTOL CALIBER AR STYLE FIREARMS OWNER'S MANUAL: OPERATION, HANDLING, DISASSEMBLY / REASSEMBLY & SAFETY INSTRUCTIONS - DO NOT DISCARD THIS MANUAL - READ THIS MANUAL CAREFULLY, PAYING CLOSE ATTENTION TO
INTRODUCING THE G.I. SPORTZ VICTUS WARRANTY
 INTRODUCING THE G.I. SPORTZ VICTUS The G.I. Victus was created in collaboration with Bob Long Domestic Gun Developer for the last 20 years. The Marker was designed to give its user the fastest rate of
MP651K AIR PISTOL/ RIFLE INSTRUCTION MANUAL
 MP651K AIR PISTOL/ RIFLE INSTRUCTION MANUAL European American Armory Corp. 3855 North U.S. Highway One Cocoa, Florida 32927 (407) 639-4842 www.eaacorp.com E-mail: eaacorp@bv.net Copyright EAA Corp. 11/98
SAAMI. Semi-Automatic Assault Shotgun Owner s Manual. Tel. : Fax
 Head Quarter Beyşehir Organize Sanayi Bölgesi Bayavşar Mah. 4959 Sk. No.24-42700 Beyşehir - Konya / TURKEY Tel. : +90 332 524 60 32-34 - Fax +90 332 524 62 4 - info@deryaarms.com SAAMI SPORTING ARMS AND
T4.1 MAGAZINE & HOPPER-FED PAINTBALL RIFLE TIBERIUS ARMS TECHNICAL MANUAL
 T4.1 MAGAZINE & HOPPER-FED PAINTBALL RIFLE TIBERIUS ARMS TECHNICAL MANUAL TECHNICAL MANUAL T4.1 MAGAZINE & HOPPER-FED PAINTBALL RIFLE TABLE OF CONTENTS Warnings...Page 1 T4.1 Rifle Diagram...Page 2 Universal
BB AIR EXTERMINATOR REVOLVER
 ITEM NO. B1419 air gun BB AIR EXTERMINATOR REVOLVER HANDLING & INSTRUCTIONS MANUAL ignite-blackops.com Manufactured & Distributed by 2013 Bear River International, LLC Frisco, TX 75034 All Rights Reserved
AIR HAMMERS MODEL NO: CAT138/CAT139 OPERATING & MAINTENANCE INSTRUCTIONS PART NO: / GC064
 AIR HAMMERS MODEL NO: CAT138/CAT139 PART NO: 3120152 /3120153 OPERATING & MAINTENANCE INSTRUCTIONS GC064 INTRODUCTION Thank you for purchasing this CLARKE Air Hammer. Before attempting to use this product,
USERS HANDBOOK. THIS HANDBOOK REFERS TO TX200 Mk3 & TX200HC MODELS
 TX200 Mk3 TX200HC USERS HANDBOOK THIS HANDBOOK REFERS TO TX200 Mk3 & TX200HC MODELS PLEASE READ THIS MANUAL BEFORE USING YOUR NEW RIFLE, IT CONTAINS IMPORTANT SAFETY INFORMATION AND INSTRUCTION ON ADJUSTMENT
OWNER S MANUAL. Read the instructions and warnings in this manual carefully before using this firearm; do not discard this manual.
 OWNER S MANUAL SDP compact Read the instructions and warnings in this manual carefully before using this firearm; do not discard this manual. This instruction manual should always accompany this firearm
MODEL Government 1911 and 1911 Compensator
 Owner's Manual www.umarex-usa.com MODEL Government 1911 and 1911 Compensator Caliber.177 (4.5 mm) Pellet CO 2 Air Pistol patented WARNING: Not a toy. Adult supervision required. Misuse or careless use
S4W PRO ROBOT. User Manual. paddlepalace.com
 S4W PRO ROBOT paddlepalace.com 800-547-5891 503-777-2266 S4W Pro Taking Robot Technology to the Next Level The Paddle Palace S4W Pro takes robot technology to the next level. This innovative robot has
FULL METAL M4 COBRA ASSAULT RIFLE HANDLING & INSTRUCTIONS MANUAL
 ITEM NO. 3500 FULL METAL M4 COBRA ASSAULT RIFLE HANDLING & INSTRUCTIONS MANUAL ignite-blackops.com Manufactured & Distributed by 2012 Bear River International, LLC Logan, UT 84321 All Rights Reserved MADE
User Manual GRI- 1500Li
 User Manual GRI- 1500Li Your Cart Tek caddy cart was thoroughly quality control checked and road tested before being shipped to your address. We do everything possible to assure that your caddy is in perfect