RELOADED Board -firmware 2.00 for Shocker and Nerve
|
|
|
- MargaretMargaret Christal Fox
- 6 years ago
- Views:
Transcription
1
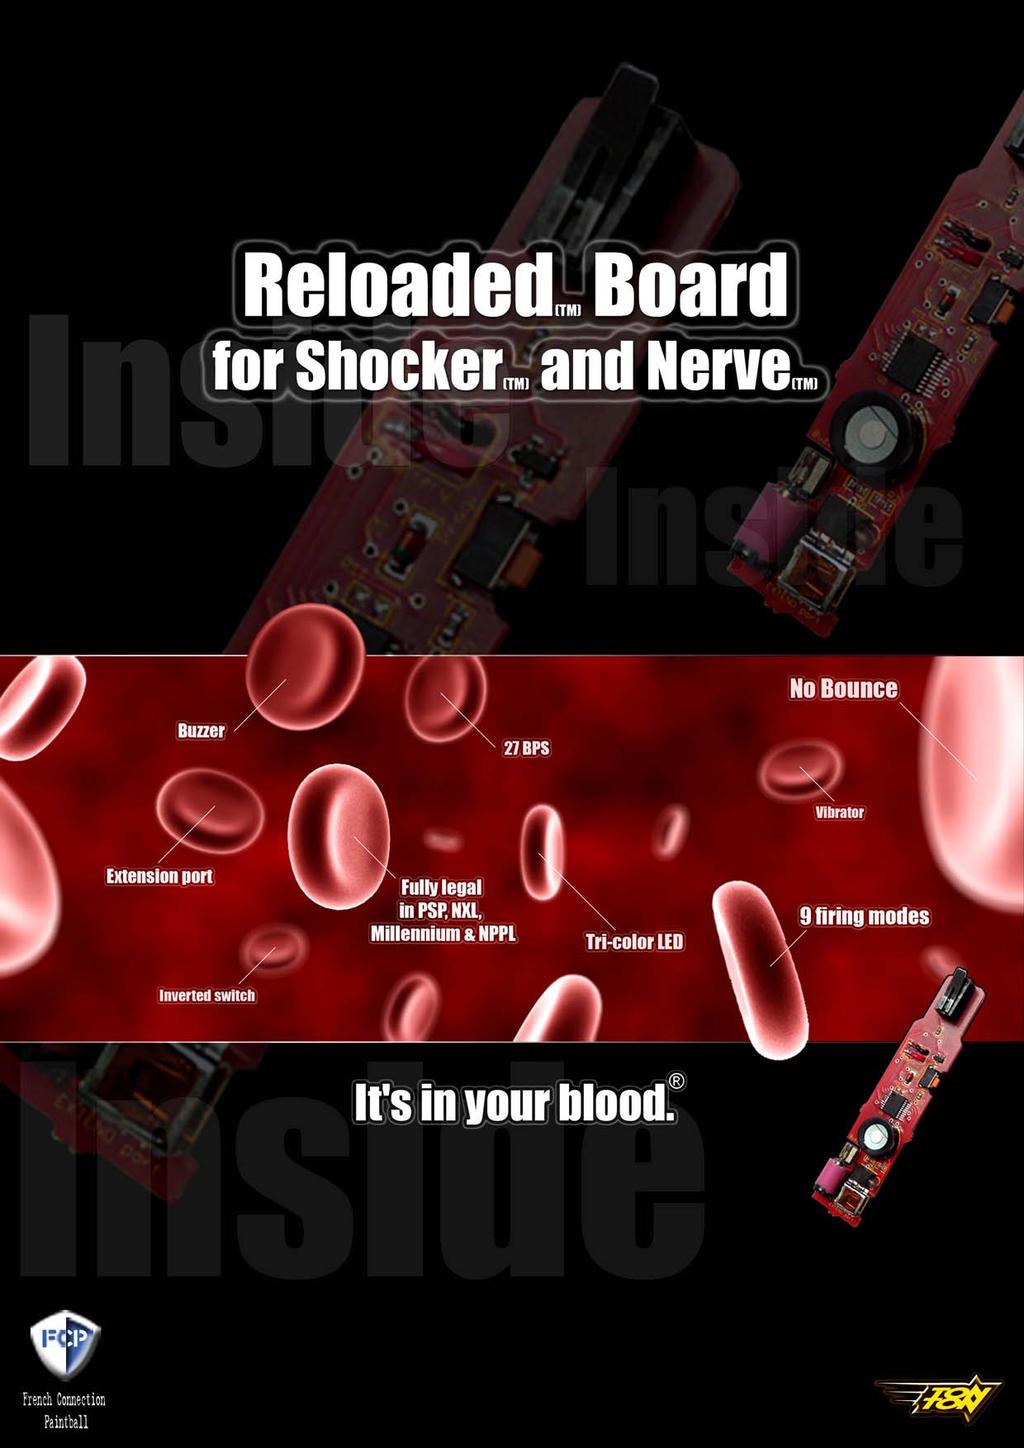
2 PERFORMANCE HIGHLIGHTS RELOADED Board -firmware 2.00 for Shocker and Nerve Developed for hard gamers. Sustained rate of fire in all situations! High Trigger scan priority for maximum sensitivity. Automatic filtering of trigger bounces. No need to consider it! Just drop in and PLAY! No need for mechanical mods of the Shocker. Seamless setup through the XTEND board FEATURES High Trigger poling rate Up to 24 bps while the eyes are enabled Automatic Drop Off Control (ADOC). Automatic Trigger Debounce (ATD). Power Aware Design (PAD) for maximum battery life. Exclusive Auto-Adaptive Loader Delay (A 2 LD) Automatic Force Fire (AF 2 ) in case of obstructed barrel and empty breech while eyes are on. First shot boost (ADOC) after inactivity in FCP mode Automatic eyes de-activation in case of loader problem New ROF Concept All Adjustment parameters stored in non volatile memory. On board buzzer, vibrator and Tricolor led. Reloaded Xtend TM LCD extension port 9 Fire Modes available This board is a French Connection Paintball product. FCP has developed a new board for the popular Smart Part SHOCKER and NERVE. The RELOADED board process data from the trigger and the eyes using a unique combination of hardware and software improvements. Its objective is to provide a repeatable and accurate rate of fire, whatever the situation in the field. The RELOADED is a flexible and state of the art electronic board that will ensure a sustained rate of fire while the player is under pressure, therefore allowing him to concentrate on the action instead of on his finger. The RELOADED allows for fast programming through its unique GAME TYPE parameter. Nine GAME TYPES are available: NPPL, SEMI AJUSTABLE, MILLENNIUM, PSP & PSP Burst, FCP Ramp Mode, NXL mode, Breakout mode & Laser Beam Mode. We added a ROF concept, that automatically compensates for DWELL adjustement to guaranty an accurate "ball per second" adjustement. The RELOADED board can be extended through its on board RELOADED XTEND port. The RELOADED XTEND board is a remote control with an embedded LCD matrix. The RELOADED XTEND remote control offers a valuable advantage over other SHOCKER boards. It allows you to seamlessly program your favorite modes with crystal clear messages displayed on the LCD matrix. 2
3 Table of contend 1 Overview of the Board 4 2 How to install your board? 5 3 Starting instructions 6 4 Turning the RELOADED ON 6 5 Going to GAME mode EYES OPERATION 7 6 Going to PROGRAMMING Mode PARAMETERS DESCRIPTION GAME TYPE ROF SENSITIVITY DWELL TIMERS ALARMS DROP OFF CONTROL 13 7 Switching the GUN OFF 14 8 Auto-OFF Switching of the GUN 14 9 How to program the board? IN PROGRAMMING MODE SAFETY MEMORY CORRUPTION PROGRAMMING VISUAL HELP POWERING THE GUN TURNING THE GUN ON SELECTING GAME MODE TURNING THE GUN OFF GOING TO PROGRAMMING MODE Game Types at a glance Troubleshooting SHOCKER IS DIFFICULT TO SWITCH ON/OFF BREACKING PAINT VELOCITY IS INCONSISTENT THE SHOCKER EXHIBIT LOW VELOCITY THE SHOCKER IS DROPPING OFF THE SHOCKER IS GASSED UP, BUT DOES NOT SHOOT THE GUN FIRES AT A VERY LOW ROF WHATEVER THE RATE OF MY FINGERS Funny acronyms glossary 25 3
 is located on this second board.")
4 1 Overview of the Board The drawing below shows the different buttons and peripheral of the RELOADED. In the future we will refer to the buttons using the capital letters given within brackets. This drawing does not represent the upper stock board of the SHOCKER TM. The On/Off button referred as (O) is located on this second board. It lights in blue and can be found at the back of the grip frame when the stock board is in place. 4
5 2 How to install your board? 1. Unscrew the grips and lift up the left part. 2. Unplug the 10 wire connector from the back of the stock board. Unplug the 9v battery from the stock board, if any. 3. Remove the two metal pins that retain the trigger switch and board in the frame. 4. Pull back on the top half of the stock board so the trigger switch can clear the frame then extract the stock board out of the frame, finishing with the bottom half. 5. Do the exact same step in reverse order with the RELOADED. Starting with the bottom half and trigger switch facing the trigger, gently insert the board in the retaining slot at the bottom of the grip frame. 6. Line up the trigger switch with the two pin holes then insert the two retaining pins back into the frame and through the trigger switch mounting holes. 7. Plug the 10 wire connector into the RELOADED board. Plug the 9V battery in the power socket beginning with the negative pole. Then gently insert in the remaining space of the grip frame. 8. Put the grips back in place or proceed to programming steps... 5
6 3 Starting instructions First install the reloaded in the frame grip of the gun and plug the ribbon cable in the Reloaded to connect the Dwell board to the Reloaded. Only, connect a good 9v battery (PP3 type) to the battery socket of the RELOADED. The reloaded board tolerates down to 5.6v. To prevent bad battery, you must connect your battery beginning with the negative pole or the positive pole, not both at the same time. Not respecting that will lock the board in an alarm cycle. The board flashes its LED until you properly insert the battery. Right after you correctly plugged the battery, the board will perform a complete peripheral check. The Tricolor LED will flash green, then red. The blue LED will flash and the buzzer emit a three tone beep. Finally the board vibrates once to complete the boot sequence. This means the battery is correctly connected and has enough power. From this point, the RELOADED is asleep and ready to serve (Sleep mode). The Power Aware Design (PAD) of the RELOADED ensures more than 2 months in this mode. 4 Turning the RELOADED ON To turn the RELOADED board ON, just press and hold the power button (O) located on the back of the Frame Grip for more than two seconds. The Blue LED on the back of the frame will flash rapidly and stop on solid. The board will vibrate once and play the welcome music. You are now in ON-STATE. From this point you have three possibilities. 1. Quickly Press and Release the trigger (T) once to go to GAME mode. 2. Quickly Press and Release the orange button (P) once to go to PROGRAMMING mode. 3. Press and hold the ON/OFF button (O) for more than two seconds to switch the gun back off (Sleep mode) 6
7 5 Going to GAME mode Entering GAME mode is signaled by a three tone beep. In this mode, your gun is ready to fire. Just pull the trigger! The RELOADED will automatically take care of the recharge time, debounce, eyes activation and deactivation. This ensures no drop off during sustained sequences of fire. No need for you to manually handle the eyes. No need for fuzzy debounce considerations. Just play, shoot and enjoy! While in GAME mode, you can turn the gun OFF at any time by pressing and holding the power button (O) for more than two seconds. At this point, the Gun will vibrate twice, the Good bye music will sound and all LEDs will turn off. In GAME mode the blue led located on the back of the grip frame, is blinking. How fast it blinks depends on Eyes options. See below for more in depth explanations. 5.1 EYES OPERATION By default, the Eyes are systematically enabled when the marker is first turned on. Due to its unique Auto Adaptive Loader Delay (AALD) feature the RELOADED board will adjust its Eyes setting to the loader delivery rate. If no ball is presented to the eyes after a short delay, the board will automatically deactivate the Eyes feature for a very short period of time. This is the Automatic Forced Fire (AF 2 ) feature. 7
8 This allows an incredible flexibility when in the middle of a strategic move. If a ball is blocked at the entrance of the barrel and the breech is empty while Eyes are on, the RELOADED will automatically disconnected the eyes, for this single shot. You won t even notice it! Just concentrate on the action! The RELOADED is in charge! Note: In order to be able to dry fire, the eyes system does not need to be turned off. Simply remove the loader, and the RELOADED will adapt to the new situation. If for some reason (you fool!), you want to turn the Eyes, and all associated actions, off or back on, just push and release the power button quickly. This will toggle the Eyes on or off. When the Eyes system is active, the blue led at the back of the frame grip blinks rapidly. When it is disabled the blue led will change to a slow blinking sequence. 6 Going to PROGRAMMING Mode Entering the PROGRAMMING mode is signaled by a welcome music. In this mode, you can adjust the parameters for your particular gun and game style. The Programming Button is the only button on the RELOADED board. To access it, open the left side of the grip, and look at the edge of the board. The button is right there, orange. You can t miss it! Once, in this mode the board LED will light up GREEN. This means first parameter is selected. Because the RELOADED exhibits an incredible level of sophisticated auto adaptive functions, there are very few parameters to set It s a crystal clear 1, 2, 3 philosophy. 8
9 There are actually six different parameters that can be adjusted. Game Type, Rate of Fire, Sensitivity, DWELL, Timers Alarm and ADOC are set once for all. The RELOADED will automatically modulate those settings to ensure an appropriate service of the gun. In the same time, you just have to set the GAME type parameter to drastically change the behavior of the gun. Possible parameters are shown below and explained in the following sections: 1. Game type. 2. ROF. 3. Sensitivity. 4. Dwell. 5. Timers Alarm. 6. Automatic Drop-Off Control. 6.1 PARAMETERS DESCRIPTION GAME TYPE GAME TYPE is used to rapidly set the game style. Depending on the Game type selected, it will automatically adjust all inside parameters of the RELOADED board so you have nothing else to do! GAME type parameter has 9 states: 1. NPPL Semi 2. SEMI Ajustable 3. MILLENNIUM Mode 4. PSP Mode 5. PSP Burst 6. FCP Enhanced 7. NXL mode 8. BREAKOUT 9. Laser Beam 9
10 NPPL semi Tournament type is the default setting. This mode is used for NPPL game type. In this mode, one trigger action will end up with one shoot. The rate of fire is the exact same rate as the player s finger. Even debounce timings are automatically adjust by the board to get a fully legal shoot behavior. In this mode, the ROF & sensitivity parameters are ignored, but all other advanced features hereafter are available: Automatic Trigger Debounce (ATD) Auto-Adaptive Loader Delay (A 2 LD) Automatic Force Fire (AF 2 ) Automatic Eyes De-activation (AEDA) in case of loader problem Please see glossary for further explanation of funny acronyms! AJUSTABLE semi mode : In this mode, one trigger action will end up with one shoot but the rate of fire will be capped by the ROF value set in the ROF parameter. In this mode, the sensitivity parameter is ignored, but all other advanced features hereafter are available. Millennium Mode : Semi-auto with caped ROF of 15 bps, defined as no consecutive shots maybe timed shorter than 65 ms apart, ramping starting over 7.5 bps and is maintained while 7.5 bps is achieved. Once the trigger is released, only a single shot is discharged thereafter. Of course, Sensitivity and ROF parameters are ignored in this mode. PSP Mode : Semi-auto with caped ROF of 15 bps, ramping allowed after 3 shots, ramping starting over adjustable SENSITIVITY. ROF parameter is ignored. 10
11 PSP Burst : Semi-auto with caped ROF of 15, EXTRA ramping allowed after 3 shots, EXTRA ramping is a modified ramping that fires 3 shots after each real trigger action. Sensitivity and ROF parameters are ignored. FCP Enhanced : Semi-auto with adjustable ROF, ramping allowed right after the first ball, ramping starting over adjustable SENSITIVITY and stopping with adjustable sensivity. NXL mode is LEGAL in NXL league. It will allow a full mode after 3 balls in tournament mode (for safety reasons). Once those balls have been fired, the gun is set to full, with a legal limitation of 15 bps. This mode is maintained for 1 second after the last shoot. Pressing the trigger within this second will continue to fire in full. If one second elapses without any shoot, the full mode is lost and a 3 balls sequence must be fired again. The Sensitivity & ROF parameters are ignored in this mode. WARNING: FCP MODE, BREAKOUT MODE AND FULL MODE ARE NOT ALLOWED IN NPPL, NXL, MILLENNIUM AND PSP TOURNAMENTS. THOSE MODES ARE HERE FOR FUN AND EXTREME SENSATIONS! IT IS THE PLAYER S RESPONSIBILITY TO SET THE APPROPRIATE MODE COMPLYING WITH THE KIND OF TOURNAMENT HE PARTICIPATS. THE RELOADED CAN NOT DO THIS FOR YOU! BreakOut Mode : after 3 shots of semi-auto you get the F/A with adjustable ROF for one trigger action. As soon as you release the trigger you jump to FCP ENHANCED mode (this can be setup differently on request, but FCP ENHANCED is so flexible that it can be setup to mimics any other gametypes!!). Laser Beam mode is dedicated to those sci-fi fans who ever wanted to posses a laser beam! In this mode, pulling and holding the trigger will fire the gun at the rate of fire set in the ROF param. The SENSITIVITY parameter is ignored in this mode. 11
12 6.1.2 ROF ROF, or Rate Of Fire, can be set between 4 and 23. It is a Ball Per Second value. 4 meaning 4 bps, and 23 meaning 23bps. It is automatically compensate for DWELL adjustement to guaranty an accurate "ball per second" adjustement. This has nothing to do with velocity ramping. The RELOADED does not allow such thing SENSITIVITY SENSITIVITY can be adjusted between 1 to 4. 1 being the most sensitive mode and 4 being the less. 1 sets the threshold to 2.5 Trigger Actions Per Seconds (Taps), 2 sets the sensitivity to 5 taps, 3 sets to 7.5 taps and 4 sets to 10 taps. We used the taps terminology to clearly differenciate a Trigger action (when you push on the trigger and release it) and the result, which is how many balls are fired in 1 second (the Bps). This because when ramping is activated, you have less taps than bps. The Threshold AND the rules of the tournaments define there threshold referring to the taps. Therfore only the actual trigger action are taken into account when ramping DWELL DWELL is used to set the opening time of the solenoid of the gun. You must set this parameter accordingly with your gun technology. We have noticed that many things can influence this setting. First be sure that your Regulator is sufficiently and correctly greased. Second, depending on your Bolt weight, you will have to tune this value. The RELOADED board handles automatically all associated recharge time to properly service the gun. The range of settings is limited to truly usable and stable values. No fooling around with fuzzy option tuning! Explanation: Experiencing drop off or bolt not completely cycling are symptoms of poor adjustments. In this case you should turn the opening time up (the DWELL parameter). DWELL can be set between 6 and 30, and is expressed in steps of 0.5ms for fine tuning the balls velocity. 12
13 6.1.5 TIMERS ALARMS Timers alarm has a range of 0 to 20. It express the time that elapses between two Vibrator alarms, by steps of 30 seconds. 0 meaning OFF and 20 meaning 10 minutes (30x20 = 600 sec = 10 min). The Alarm counter starts immediately when you enter the GAME mode. If you want, you can wait for the beginning of the game in ON-STATE mode and press the trigger (T) to enter the GAME mode in the very last seconds of the OFFICIAL count down. When the Alarm timer duration has elapsed the gun vibrates three times and automatically restarts its count down DROP OFF CONTROL AUTOMATIC DROP-OFF CONTROL (ADOC) is provided for fine tuning the gun. Depending on Bold characteristics, dwell mechanics and whether your regulator in greased or not, the gun can experience some drop-off, especially on the first shot and after a period of inactivity. So, you can therefore indicate the gun what bonus dwell should be added to this particular ball. Automatic Drop Off Control can be set between 0 and 20 in steps of 0.5ms. This parameter gives a bonus to the DWELL after 20 seconds of inactivity to ensure that the first ball will get out of the barrel. Beware of too much ADOC. Since the more you open the DWELL the riskier you break a ball! 13
14 7 Switching the GUN OFF Switching the gun off can be done while in ON-STATE or in GAME mode. Turning it off from PROG. mode is not possible since you first must save your parameters. If you want to do so while in PROG. mode, first exit the PROG mode (see PROG mode section to learn more on how to do that) then switch off from the GAME mode. To switch the gun off, just press and hold the ON/OFF button (O) for more than two seconds. The gun will vibrates twice and the goodbye music will sound. All LED are now off and the board is asleep. 8 Auto-OFF Switching of the GUN The 2.00 software has an automatic long inactivity detection that will automatically switch the gun off after 20 minutes in iddle state. 14
15 9 How to program the board? The RELOADED board sets a new standard in Gun programming behavior. Forget what you have been doing for years with other boards. You ve entered the RELOADED world. Three things to know: EXAMPLES Each action in acknowledged by a beep. Setting the Game type to Millennium Mode if the former game type was NPPL mode : 1. Open the left side of the grip 2. Turn on the marker. 3. Push the Prog. Button once to enter Programming mode. 4. Push the prog button twice to set value of game type to Millennium Mode. 5. Press and hold the on/off button for 2 seconds to save and exit AND enter the GAME mode Your Game type is programmed and ready to be tested The programming mode acts in a cycle manner. Pushing buttons will jump to next value. Each time you reach the maximum value; the RELOADED adds one different beep and brings you back to the minimum value. 9.1 IN PROGRAMMING MODE In PROGRAMMING mode you have four possible actions: The programming button is used to increment the value of parameters. The on/off button is used to change the active parameter if you quickly press and release it. The on/off button is ALSO used to Save & Exit the PROGRAMMING mode. If you press and hold it for more than 2 seconds. The trigger is used to read the current value, if you quickly press and release it. The board LED color will help you to figure out which parameter is selected. Solid Green Game type Solid Orange ROF Solid Red Sensitivity Blinking Green DWELL Blinking Orange Timers Alarm Blinking Red ADOC NOTE: FOR SAFETY REASONS, PROGRAMMING THE GUN SHOULD BE DONE WITHOUT ANY BALL IN THE FEEDER SINCE YOUR GOING DIRECTLY TO GAME MODE AFTER PROGRAMMING. 15
16 First you need to select the parameter you want to set. Push and release the on/off button to cycle through parameters. Push and hold the on/off button to cycle faster and automatically through the parameters. Programming Example 2: Setting the Sensitivity to 1: 1. Open the left side of the grip 2. Turn on the marker. 3. Push the Prog. Button once to enter Programming mode. 4. Push the On/Off button twice to select the SENSITIVITY parameter. 5. Starting from a sensitivity of 2,for example, push the programming button 3 times to set value of SENSITIVITY to 1. You have cycled trough the whole range and jumped back to the min value. 6. Press and hold the trigger for 2 seconds to save and exit AND enter the GAME mode. Your Sensitivity is programmed. You now need to change the value of the parameter. Push and release the Programming button to cycle through values. Push and hold the Programming button to cycle faster and automatically through the values. Remember: Each time you reach the maximum value, you jump to the minimum value. This situation will be indicated by a second and different beep. Each time the value is incremented, a beep is emitted making the tuning very easy. If you don t remember the value of a parameter, just quickly press & release de Trigger (T). The board will play one beep per increment of the parameter (10 beeps for a value of 10) AND the Blue LED will light once per increment of the parameter (this is a new feature). You see and hear the value. Once you are all set and satisfied with your tunings, just press and hold the on/off button (O) for more than 2 seconds. Your parameters are saved in the non volatile memory of the board so that you don t need to reprogram everything, next time you turn your gun on. You are now ready to test the new settings... Enjoy! Note : Pressing the on/off for more than 2 seconds saves and exits AND gets you to the GAME mode with the parameters you just set. No need to turn the gun OFF and ON. 16
17 9.2 SAFETY The Saving of your parameters in the memory is acknowledged by the Blue LED blinking and a GAME mode welcome music. For safety reason there is also a one second latency when you jump from PROG mode to GAME mode added to blue led blinking and music. 9.3 MEMORY CORRUPTION WARNING : Unpowering the board during save sequence will corrupt your parameters. If this happens, just go back to prog mode, and press and hold the prog button UNTILL you hear the two tone beep (it can be long, but no more than 255 beeps, so be patient!) of the board indicating that you have cycled to a correct value. Repeat this for each parameter. Once you are done, save all your parameters by pressing and holding the trigger for more than 2 seconds. During PROGRAMMING mode, powering the gun off is not allowed (nor advised) because of memory access. To turn your gun off, simply press and hold the on/off button to Save & Exit, then press and hold the on/off button as usual, to switch off. 17
18 9.4 PROGRAMMING VISUAL HELP Here are some visual helps for better comprehension POWERING THE GUN EXAMPLES Action What happens? Typical sequence example: Power the gun Turn the gun ON Select GAME mode by pushing the trigger PLAY! Turn the gun OFF Plug the battery into the socket TURNING THE GUN ON First, power the gun. Then Action Press & hold on/off for 2 sec. The board vibrates once and emits a two tone beep. The gun is ON but asleep! What happens? The Green, Blue and Red LED flash once. The gun vibrates once and plays the welcome music SELECTING GAME MODE First, power the gun and turn it ON. Then Examples of possible sequences in GAME mode: Examples of possible sequences in GAME mode: You can do this: or this Action What happens? Press and release the trigger. The gun plays a three tone beep The gun is in GAME mode. The BLUE LED blinks rapidly. Pull the trigger to The gun fires. fire as many Rate of fire depends on times as you programmed parameters. want! Each time you fire the BLUE LED flashes. Press & release the On/Off button Press & release the On/Off button The EYES are OFF. The BLUE LED blinks slowly. The EYES are ON. The BLUE LED blinks rapidly. 18
19 9.4.4 TURNING THE GUN OFF This is not possible while in Prog. mode. Action Press & hold the On/Off button for more than 2 seconds What happens? The gun vibrates twice and plays the Goodbye music. The gun is asleep and can remain so for months. 19
20 9.4.5 GOING TO PROGRAMMING MODE EXAMPLES Typical sequence example: Power the gun Turn the gun ON Select PROG. mode by pushing the Programming button Save & Exit to GAME mode Test settings. Close the grip and/or Turn the gun OFF Examples of possible sequences in PROG mode: You can do this to set you gun to Full auto: You can do this to change Dwell from 8ms to 9ms (by steps of 0.5ms) and Sensitivity from 1 to 4: Action Press and release the Programming button. Press and release the On/Off button or press & hold the On/Off button to cycle trough parameters. Press and release the Programming button or press & hold the programming button. Press & hold the on/off button for 2 seconds bis Press & release the trigger What happens? The gun plays a Welcome Prog. music. The gun is in PROGRAMMING mode. The GREEN LED is ON, meaning Game type parameter is selected. The gun beeps once for each action or beeps rapidly if you hold the button. The LED will cycle accordingly. SOLID GREENSOLID ORANGESOLID RED BLINKING GREEN BLINKING ORANGE BLINKING RED for each action. When you reach the parameter you want to set, stop your action. Press and release (T) to hear one beep per unity (see 4bis). If you reach the last parameter the gun plays a different beep once and jumps to the first parameter. The gun beeps once for each action or beeps rapidly if you hold the button. The LED is ON and its color indicates the active parameter you are setting. If you reach the last value the gun vibrates once and jumps to the first value. The gun Saves & Exits the programming mode and Jumps to GAME mode where you can instantly test the new setup. The gun will read the current value of the parameter. It sounds once for each increment of the value. 1 beep for NPPL Mode 2 beeps for Ajustable semi 3 beeps for Millennium etc... 20
21 10 Game Types at a glance Below you can find a matrix that quickly explaines how the game types use the parameters you set and how the board will react GAMETYPE ROF SENS start SENS stop Full Header Comment NPPL No limit! Ignored Ignored No No No limit = Max of 23 bps Semi Adjustable Ignored Ignored No No - MILLENNIUM 15 Capped 7.5 Same as start No Yes(1) 15 beeing defined as 65ms max between balls PSP 15 Capped Adjustable Same as start No Yes(1) PSP Burst 15 Capped Adjustable EXTRA balls mode: Same as w hen Ramping, each No Yes(1) start trigger action fires 3 balls instead of 2. FCP Adjustable Adjustable Same as start -1 No No NXL 15 Capped Ignored Ignored Yes Yes(1) Breackout Adjustable Ignored Ignored Yes Yes(1) Full is granted for one single trigger push, then you jump to FCP mode. (2) Full Adjustable Ignored Ignored Yes No Notes: (1) A header is a semi-auto sequence that you have to perform prior to anything. This header is reactivated each time you don t fire for more than 1 second. (2) Full is obtain only once in the game. Once you have performed the security header, and pushed the trigger within the next 1 second, you get the Full. As soon as you release the trigger, you jump to FCP mode. Remember that FCP, Breackout and full are not legal in tournaments So reprogrammed your board before entering the fields Or you will be outlaw! 21
22 11 Troubleshooting Below text in italic is extracted from the SHOCKER user manual SHOCKER IS DIFFICULT TO SWITCH ON/OFF Check the solenoid wiring harness. It is maybe in the way of the on/off button. To do so, remove the grip frame. Relocate wires away from switch and check for damage. Check if battery is not low (V < 5.5V) or dead. We have noticed that the switch on the solenoid board is sometime soldered to far from the frame. In this case contatc your Smart part dealer for adjustement 11.2 BREACKING PAINT Most of the time Breaking paint is due to mechanical problems. The Shocker Users manual says: Paint to barrel match is wrong. The paint you are using is too large for the barrel you are shooting it through. Ball Detents are damaged or missing. Check to make sure white delrin ball is intact and reactive on both sides. Replace if damaged or missing. Paint is too low quality or too brittle. Switch to a name brand, high quality manufacturer. Loader may not be keeping up if you deactivate the eye system in this case, check loader batteries or use a faster loader. Check Reloaded battery. It may be low, causing incomplete cycling VELOCITY IS INCONSISTENT Warning: Velocity is very related with weather conditions. Outside temperature and humidity can drasticaly modify pressure regulation and paints diameter. 22
23 Most of the time inconsistent velocity is due to mechanical problems. The Shocker Users manual says: Clean regulator and inspect seat assembly. (See separate Max-Flo manual) Check paint to barrel match. Paint may be too large or too small for the barrel you are shooting it through. Find a paintball that fits your barrel properly. Check the Shocker and Max-Flo regulator for leaks THE SHOCKER EXHIBIT LOW VELOCITY Your Reloaded battery is low. Replace with fresh name brand battery. Turn the on/off valve on all the way. Check your operating pressure so that it is Increase to 190psi if lower. If pressure is slowly increase dwell setting THE SHOCKER IS DROPPING OFF FIRST OF ALL, clean and grease the Shocker and the regulator and ckeck again. Increase the dwell slightly THE SHOCKER IS GASSED UP, BUT DOES NOT SHOOT Turn the Reloaded board on. Battery may be dead. Replace with fresh name brand battery. Check to see if solenoid wiring harness has come free from either end of the circuit board. If yes then reconnect THE GUN FIRES AT A VERY LOW ROF WHATEVER THE RATE OF MY FINGERS Due to its AFF feature, while in Vision mode, the gun will fire wheter there are balls present or not. 23
24 But if balls have odd shapes or are badly discolored. Each ball detecttion will have a penalty causing the gun to lower its ROF to 9 bps. You can remove the Vision eye or choose a different type of ball or check to see if you have previously broken a ball. Broken paint may cover the actual Vision eye and cause it to misread. Clean it with a paper towel and a small amount of alcohol. If this does not work, the eye may be damaged and will need to be replaced. Call Smart Parts or your local Smart Parts dealer for parts. The Vision may not read certain dark shell paints, such as black. While it is not a given that the Vision does not see black shell paint, continued failure of the Vision system with black shell paints should indicate for you to try a bit of a brighter shell paintball. 24
25 12 Funny acronyms glossary Automatic Intelligent Trigger Debounce (AITD) Each time you press the trigger, the switch is activated. The switch is made of metal plates that will bounce for a short period of time. At the Board level those bounces are considered as independent trigger actions. Therfore the board must be abble to filter those false events. In the case of the RELOADED board, the player has NOTHING to set up to handle this inherent property of a switch. The RELOADED board knows exactly what to do with this intrinsec characteritic of the switch. Auto Adaptive Loader Delay (A 2 LD) After each shot, the gun must make sure a slight delay is added to the cycle to ensure you won t chop the next ball. Thanks to its unique A 2 LD technology, the RELOADED sets the appropriate delay for each ball, without any user action! Automatic Drop Off Control (ADOC) Due to electrical and pneumatic leakages of the solenoid, when the marker has been left sitting for a long period (approx. more than 30 seconds), the first shot suffers of drop off. To avoid this, The ADOC feature will add an additional dwell boost to the first shot after such a long inactivity. WARNING: After 20 seconds of inactivity, the first ball velocity will be slightly higher. Don t forget to fire at least once before a chrony check if you want to setup your gun! ADOC is not available in tournament modes. Recharge time This is the amount of time needed to recharge the gun after a shoot. This includes: waiting for a ball to be present, let the air flow to the regulator, debounce the trigger, wait for the bolt to be pulled backward, etc Some of those delays take place at the same time, some are unavoidable. The RELOADED board automatically adjusts the different delays to service the gun at his optimum performance, what ever the circumstances. 25
26 Auto Force Fire (AF 2 ) This feature will force the fire in the event a ball has been pushed slightly into the detents where the Eyes are unable to detect it. In this situation the RELOADED will automatically handles the situation and corrects the problem so you can continue firing normally. You won t even notice the problem as occurred. Automatic Eyes De-activation (AEDA) In case of repetitive loading problem the RELOADED will instantly activate its AEDA feature. This allows jumping from an HALO feeding rate to a dry shoot mode, in a snap, without any user action. 26
27 It is very important that you read the next two pages carefully. LIMITATION OF LIABILITY FRENCH CONNECTION PAINTBALL WILL NOT BE RESPONSIBLE FOR ANY DAMAGES OR INJURIES THAT ACCOMPANY OR RESULT FROM YOUR USE OF ITS PRODUCTS. THESE INCLUDE (BUT ARE NOT LIMITED TO) DAMAGES OR INJURY CAUSED BY ANY: (1) USE OF (OR INABILITY TO USE) THE RELOADED BOARD; (2) USE OF (OR INABILITY TO USE) ANY PRODUCT TO WHICH YOU INTERFACE FROM OUR RELOADED BOARD; (3) FAILURE OF PERFORMANCE; (4) ERROR; (5) OMISSION; (6) INTERRUPTION; (7) DEFECT; OR (8) DELAY IN OPERATION; WE ARE NOT LIABLE FOR ANY CONSEQUENTIAL OR INCIDENTAL DAMAGES, WHICH ARE DAMAGES INTENDED TO COMPENSATE SOMEONE DIRECTLY FOR A LOSS OR INJURY, DAMAGES REASONABLY EXPECTED TO RESULT FROM A LOSS OR INJURY, OR OTHER MISCELLANEOUS DAMAGES AND EXPENSES RESULTING DIRECTLY FROM A LOSS OR INJURY. FURTHERMORE, WE ARE NOT LIABLE EVEN IF WE HAVE BEEN NEGLIGENT OR IF OUR AUTHORIZED REPRESENTATIVE HAS BEEN ADVISED OF THE POSSIBILITY OF SUCH DAMAGES OR BOTH. HOWEVER, IN CERTAIN STATES WHERE THE LAW MAY NOT ALLOW US TO LIMIT OR EXCLUDE LIABILITY FOR THESE INCIDENTAL OR CONSEQUENTIAL DAMAGES, THE ABOVE LIMITATION MAY NOT APPLY AND YOU MAY HAVE THE RIGHT TO RECOVER THESE TYPES OF DAMAGES. IN ANY EVENT, OUR LIABILITY TO YOU FOR ALL LOSSES, DAMAGES, INJURIES AND CLAIMS OF ANY KIND, WHETHER THE DAMAGES ARE CLAIMED UNDER THE TERMS OF A CONTRACT, OR THEY ARE CLAIMED TO BE CAUSED BY NEGLIGENCE OR OTHER WRONGFUL CONDUCT OR ANY OTHER LEGAL THEORY, WILL NOT BE GREATER THAN THE AMOUNT YOU HAVE PAID TO GET THE RELOADED BOARD. DISCLAIMER THE MATERIAL IN THIS DOCUMENT IS PROVIDED AS IS. THIS MEANS THAT FRENCH CONNECTION PAINBALL DISCLAIMS ALL EXPRESS AND IMPLIED WARRANTIES ABOUT THE RELOADED BOARD DESCRIBED IN THE DOCUMENT. THIS INCLUDES, BUT ITS NOT LIMITED TO, WARRANTIES THAT: (1) THE RELOADED BOARD IS OF ANY PARTICULAR LEVEL OF QUALITY OR IS FIT FOR A PARTICULAR PURPOSE; (2) THAT THE FUNCTIONAL ELEMENTS CONTAINED IN THE RELOADED BOARDS WILL BE UNINTERRUPTED OR ERROR-FREE; (3) THAT DEFECTS WILL BE CORRECTED; OR (4) THAT INFORMATION CONTAINED IN THE DOCUMENT IS ACCURATE AS OF ANY PARTICULAR DATE. 27
28 Trade and other Marks All products and company names mentioned in this document may be trade, service or registered marks of their respective owners. Use of any RELOADED Logo or acronyms for commercial or non-commercial purposes without prior written consent of French Connection Paintball may constitute infringement of a registered mark. Ownership of Materials The information and images contained in this document is copyrighted and may not be distributed, modified, reproduced in whole or in part without the prior written permission of French Connection Paintball. Third Companies and Products Mention of third party products, companies and web sites in this document is for informational purposes only. French Connection Paintball assumes no responsibility with regard to the selection, performance or use of these products or vendors. Enforcement of Intellectual property rights French Connection Paintball actively and aggressively enforces its intellectual property rights. Piracy In many countries copyright law provides for severe civil and criminal penalties for the unauthorized reproduction or distribution of copyrighted material. Feedback and Information Any feedback you provide French Connection Paintball with shall be deemed non confidential and French Connection Paintball shall be free to use such information on an unrestricted basis. Official Language French is the Official Language of the French Connection Paintball and will prevail in all questions of interpretation. Legal Contacts If you have questions concerning the licensing or usage of French Connection Paintball marks or copyrighted materials contact French Connection Paintball by at: reloaded@fcp.com 28
29 Personal notes: 29
Proto Matrix Musashi 3 Upgrade Manual
 Proto Matrix Musashi 3 Upgrade Manual Musashi 3 Upgrade Instructions for Proto Matrix FEATURES...3 LED INDICATOR...3 SOLID GREEN...3 SOLID RED...3 SLOW BLINKING GREEN...3 SLOW BLINKING RED...3 POWER OPERATION...3
LED CONVERSION BOARD - YAKUZA SERIES EGO/GEO
 LED CONVERSION BOARD - YAKUZA SERIES EGO/GEO The LED conversion board replaces the OLED screen mini-board on your Yakuza Series board. Combined with new firmware, your board will function similarly to
Yakuza OLED Series Droid & Cyborg 07 Board
 Yakuza OLED Series Droid & Cyborg 07 Board 1. Features 2. Installation 3. Board Operation 4. OLED Diagrams 5. Menu System 6. Settings 7. Recommendations FEATURES Fully functional in the MacDev Droid and
YAKUZA SERIES OLED. For the Bob Long Closer, Marq, Vice, and Protege 4C Technology by Extreme Paintball Design LLC, pat pend FEATURES
 1. Features 2. Installation 3. Board Operation 4. OLED Diagrams 5. Menu System 6. Settings 7. Recommendations YAKUZA SERIES OLED For the Bob Long Closer, Marq, Vice, and Protege 4C Technology by Extreme
OPERATING INSTRUCTIONS V 5.3
 1 OPERATING INSTRUCTIONS V 5.3 DM 06/ 07 EGO 06/ 07 ION /SP8 MINI Proto Matrix 07 Proto Rail Shocker Seventh Element, Inc WARNING Failure to follow directions may result in damage to board. Do not pull
Lasoya ProMaster Board Settings
 Default Settings Lasoya ProMaster Board Settings DIP 1 DIP 2 DIP 3 DIP 4 MODE Description Off Off Off Off Semi Auto Uncapped Semi-Auto, PDS On On On On On PSP Mode PSP Ramp, 15 BPS, PDS On Default settings
NoX 06 Cyborg Board Instructions
 Installation: First insure that the air is off, and then refer to your markers instruction manual to put the marker in a safe, non firing condition. When removing or installing the board, user must be
USERS MANUAL. Manufactured by MacDev Paintball - Australia macdev.net
 USERS MANUAL Manufactured by MacDev Paintball - Australia macdev.net Tactical Drone Users Manual Copyright Mac Developments Pty. Ltd. 2009 All rights reserved No part of this document may be copied or
IMPORTANT CO2/ HPA AIR TANK SAFETY INSTRUCTION AND GUIDELINES. Tank valves must be installed or removed by qualified personnel.
 !WARNING! IMPORTANT SAFETY INSTRUCTION AND GUIDELINS!WARNING! IMPORTANT CO2/ HPA AIR TANK SAFETY INSTRUCTION AND GUIDELINES GETTING STARTED This Paintball Marker is NOT A TOY. Misuse can cause serious
PLEASE READ ALL OPERATING INSTRUCTIONS BEFORE USING THE LEGEND PAINTBALL MARKER
 PLEASE READ ALL OPERATING INSTRUCTIONS BEFORE USING THE LEGEND PAINTBALL MARKER TABLE OF CONTENTS WARNINGS Important Safety Instructions and Guidelines...page 1 OPERATING INSTRUCTIONS Turning your LEGEND
IMPORTANT CO2/ HPA AIR TANK SAFETY INSTRUCTION AND GUIDELINES. Tank valves must be installed or removed by qualified personnel.
 !WARNING! IMPORTANT SAFETY INSTRUCTION AND GUIDELINS!WARNING! IMPORTANT CO2/ HPA AIR TANK SAFETY INSTRUCTION AND GUIDELINES GETTING STARTED This Paintball Marker is NOT A TOY. Misuse can cause serious
Synergy Owners Manual
 Synergy Owners Manual Table of Contents Safety Guidelines...2 Quickstart Guide...3 Owners Manual...7 Field Strip Guide...11 Do s & Don ts...12 Diagrams...13 Troubleshooting Guide...15 Warranty Info...16
O W N E R S M A N U A L E M P I R E P A I N T B A L L. C O M
 OWNER S MANUAL CONTENTS 1. Rules for Safe Marker Handling...1 2. Introduction and Specifications...1 3. Battery Replacement and Life Indicator...2 4. Compressed Air/Nitrogen Supply...2 5. Basic Operation...3
WARNING OLED & BASIC MENU QUICK START
 Getting Started QUICK START WARNING The VANGUARD MARKER is not a toy. Careless or improper use, including failure to follow instructions and warnings within this Operator Manual and attached to the VANGUARD
BT PAINTBALL DESIGNS, INC. 570 MANTUA BLVD., SEWELL, NJ
 Rip Clip Manual_2.qxp 4/15/08 11:00 AM Page a BT PAINTBALL DESIGNS, INC. 570 MANTUA BLVD., SEWELL, NJ 08080 WWW.BTPAINTBALL.COM Rip Clip Manual_2.qxp 4/15/08 11:00 AM Page b BT Paintball would like to
Rip Clip Manual_2.qxp 4/15/08 11:00 AM Page c
 Rip Clip Manual_2.qxp 4/15/08 11:00 AM Page b Rip Clip Manual_2.qxp 4/15/08 11:00 AM Page c Rip Clip Manual_2.qxp 4/15/08 11:00 AM Page 1 BT Paintball would like to thank you for your purchase of the BT
CONTENTS. Read this entire manual before loading, or installing an air cylinder, or in any way attempting to operate the marker
 OWNER S MANUAL CONTENTS 1. Rules for Safe Marker Handling 2. Introduction and Specifications 3. Battery Replacement and Life Indicator 4. Basic Operation 5. Compressed Air/Nitrogen Supply 6. Installing
Modular training weapon Owners manual
 Modular training weapon Owners manual MTW Basic Features Thank you for joining the Wolverine family! We hope you will enjoy your new Modular Training Weapon. Please read the Owners Manual carefully before
OPERATING INSTRUCTIONS V 7.3
 1 OPEATING INSTUCTIONS V 7.3 DM 06/ 07/ 08 EGO 06/ 07/ 08 Fusion 7/ 8 Intimidator 2k4/ 05/ 06 ION /SP8/ MINI Proto Matrix 07/ 08 Proto ail Proto SLG Shocker SFT/NXT G3/IQ Seventh Element, Inc WANING Failure
BUILT TO WIN PAINTBALL LOADER SPIRE III MANUAL
 BUILT TO WIN PAINTBALL LOADER SPIRE III MANUAL SPIRE III SETUP Thank you for purchasing the Virtue Spire III paintball loader. This manual covers all aspects of your Spire III loader. It is recommended
Thank you for purchasing your new Empire Reloader B Sound-Activated 3-Speed Paintball Hopper!
 Thank you for purchasing your new Empire Reloader B Sound-Activated 3-Speed Paintball Hopper! Should you require any technical assistance on the use of this product, or if your product needs servicing,
PROCESSOR UNIT - V3 WITH WIRING. Spring limit M180 and ROF 25bb/s
 21 st century electronics for AEG weapons PROCESSOR UNIT - V3 WITH WIRING Spring limit M180 and ROF 25bb/s Installation of this device leave to expert He must know how to solder and disassemble airsoft
PROCESSOR UNIT - V2. Spring limit M180 and ROF 25bb/s
 21 st century electronics for AEG weapons PROCESSOR UNIT - V2 Spring limit M180 and ROF 25bb/s Installation of this device leave to expert He must know how to solder and disassemble airsoft gun Never use
O P E R A T O R S M A N U A L
 OPERATOR S MANUAL WARNING! This is not a toy. Misuse may cause serious injury or death. Eye protection designed specifically for paintball must be worn by the user and persons within range. Must be 18
Sweeper Dual Control. Automatic Sweeper Switching System SW SERIES SWEEPERS SW-4815 SW-4820 SW-4825 MAGUIRE PRODUCTS INC.
 MAGUIRE PRODUCTS INC. SW SERIES SWEEPERS For SW Series Sweeper Models: SW-4815 SW-4820 SW-4825 Sweeper Dual Control Automatic Sweeper Switching System INSTRUCTION AND OPERATION MANUAL Copyright Maguire
ProMaster Troubleshooting Guide
 ProMaster Troubleshooting Guide Always read your owner's manual before operating or doing maintenance on your ProMaster marker. The manual contains in-depth maintenance and setup information. Always remove
MAYHEM MAYHEM OWNERS MANUAL. Paintball Guns International. Manufactured by
 MAYHEM MAYHEM OWNERS MANUAL Manufactured by Paintball Guns International Table of Contents Specifications...................... 2 Parts diagram and Listing............. 3 Description of Marker Operation.......
unconventional-airsoft.com
 unconventional-airsoft.com Congratulations on your new digital fire control computer! This unit will change the way you use and look at your electric gun. With this short document, you will know all you
E-MAG TM Instruction Manual
 E-MAG TM Instruction Manual SAFETY THIS PAINTBALL MARKER IS NOT A TOY! This paintball marker should be treated as a dangerous instrument and should always be treated with respect. Never point a paintball
Users Manual STANDARD, SELECT, AND LCD MODELS
 Users Manual Generation E Sports STANDARD, SELECT, AND LCD MODELS Generation E Sports 956 South Second Street Ronkonkoma, NY 11779 USA (631) 580-4377 www.matrixmarker.com GENERATION E SPORTS MATRIX OPERATORS
EXTREME PROCESSOR UNIT
 21 st century electronics for AEG weapons EXTREME PROCESSOR UNIT Spring limit M190 Installation of this device leave to expert He must know how to solder and disassemble airsoft gun Never use soldering
INDEX. About this Manual. Section 1 - Orientation. Section 2 - Installation. Section 3 - Quick Set-up.
 OPERATING MANUAL About this Manual This manual contains the installation and operating instructions for the Eclipseblade E2 Electronic grip frame. IMPORTANT: If you are installing the Eclipseblade E2 electronic
Cover.qxd 1/10/05 10:30 AM Page 2. user manual. diablopaintball.com
 Cover.qxd 1/10/05 10:30 AM Page 2 user manual Cover.qxd 1/10/05 10:30 AM Page 3 Table Of Contents: Page Topic(s) 1 Warning and Rules Safe Marker Handling 2 Warranty Information 3 Welcome 4 Battery Installation
ELECTRONICS 10.0 CODE. Instruction Manual Troubleshooting Guide Warranty Information. Manual date: 02/27/07 Code version: 10.2
 page 10.0 CODE ELECTRONICS Manual date: 02/27/07 Code version: 10.2 Instruction Manual Troubleshooting Guide Warranty Information Predator Electronics 100 West Walnut Ave. suite 48 Dalton, Georgia 30720
tel: UK +44 (0) tel: USA web:
 tel: USA web:") > MANUFACTURED IN ENGLAND BY PLANET ECLIPSE < tel: UK +44 (0)161 872 5572 tel: USA 401 247 9061 e-mail: info@planeteclipse.com web: www.planeteclipse.com Operating Manual Introduction About this Manual
> MANUFACTURED IN ENGLAND BY PLANET ECLIPSE < tel: UK +44 (0)161 872 5572 tel: USA 401 247 9061 e-mail: info@planeteclipse.com web: www.planeteclipse.com Operating Manual Introduction About this Manual
Operating instructions Electrical switching facility pco
 Operating instructions Electrical switching facility pco from software version V1.33 on TABLE OF CONTENTS 1. Before you start... 4 1.1 Brief description... 4 1.2 Using this manual... 4 2. pco integrated
SHOCKER RSX OWNER S MANUAL PLEASE READ CAREFULLY 1
 SHOCKER RSX OWNER S MANUAL WWW.SHOCKERPAINTBALL.COM 1 QUICK START Velocity must be measured and adjusted to below 300 feet per second (91.4 PLEASE meters per READ second) CAREFULLY before each session
A4s Operation Manual
 A4s Operation Manual Safety Instruction Please read this manual carefully, also with related manual for the machinery before use the controller. For installing and operating the controller properly and
A4 Operation Manual. Fig.1-1 Controller Socket Diagram
 A4 Operation Manual Safety Instruction Please read this manual carefully, also with related manual for the machinery before use the controller. For installing and operating the controller properly and
USER MANUAL ELECTRIC BLOWBACK SYSTEM. Rev LIMITED WARRANTY
 LIMITED WARRANTY Spartan Imports warrants this airsoft rifle purchased through Spartan Imports Authorized Dealers to be free from manufacturer defects in materials and workmanship under normal consumer
Shocker Sport TM Manual. Includes: Shocker Sport 4X4 TM and Shocker Sport Turbo TM
 Shocker Sport TM Manual Includes: Shocker Sport 4X4 TM and Shocker Sport Turbo TM WARNING! The Shocker Sport TM Paintball Marker is not a toy. Misuse or careless use may cause serious injury or death.
SAFETY Always wear approved safety goggles or an approved mask whenever you handle this paintball marker!
 Instruction Manual Table of Contents SAFETY... 1 COMPRESSED AIR ONLY... 2 FAST START... 3 FIRST TIME PROBLEMS... 4 PERFORMANCE... 4 LUBRICATION... 5 VELOCITY ADJUSTMENT... 5 CLEANING... 5 PAINTBALLS...
User Guide. Introduction. Manufacturer Information. v6 Firmware - updated for all units sold in 2013
 User Guide v6 Firmware - updated for all units sold in 2013 Introduction Poacher Catcher Intruder Alert devices use a miniature Passive Infra-Red Receiver (PIR) to detect the presence of a warm body moving
TorMinal. Operating instructions V OCE-Rev.L_EN
 TorMinal Operating instructions 1-138 3800-20310V001-112016-0-OCE-Rev.L_EN Table of contents General Information... 4 Symbols... 4 General safety instructions... 4 Safety information for batteries... 4
Accu-Tab Systems 1000 Series by Axiall Corporation
 Accu-Tab Systems 1000 Series by Axiall Corporation Installation and Operating Instructions Model 1050 DANGER: DO NOT MIX CHEMICALS! The Accu-Tab chlorinator is designed for use with Axiall approved tablets
PROPORTIONING VALVE. Model 150 INSTRUCTION MANUAL. March 2017 IMS Company Stafford Road
 PROPORTIONING VALVE Model 150 INSTRUCTION MANUAL March 2017 IMS Company 10373 Stafford Road Telephone: (440) 543-1615 Fax: (440) 543-1069 Email: sales@imscompany.com 1 Introduction IMS Company reserves
Proto Paintball USA EUROPE ASIA
 Proto Paintball USA 10637 Scripps Summit Ct. San Diego, CA 92131 P 858-536-5183 F 858-536-5191 EUROPE Unit 1, ZK Park, 23 Commerce Way Croydon, Surrey CRO 4ZS United Kingdom P +44 (0) 20-8649-6330 F +44
RAM 4021 Operation Manual
 RAM 4021 Operation Manual Worldwide Manufacturer of Gas Detection Solutions TABLE OF CONTENTS RAM 4021 For your safety...3 Description...3 Set-up mode...4 Annunciator lights/alarms...4 Operation...5 Calibration...6
VIBE. Quick Start Manual
 VIBE Quick Start Manual STATISTICS PLEASE READ CAREFULLY VITAL STATISTICS LENGTH/HEIGHT/WEIGHT: OPERATING PRESSURE: PAINTBALLS: POWER SOURCE: PROPELLANT: RATE OF FIRE: OPERATION: MODES OF FIRE: ANTI CHOP
USER MANUAL ELECTRIC BLOWBACK SYSTEM
 LIMITED WARRANTY Spartan Imports warrants this airsoft rifle purchased through Spartan Imports Authorized Dealers to be free from manufacturer defects in materials and workmanship under normal consumer
WELCOME TO THE REVOLUTION
 USER GUIDE WELCOME TO THE REVOLUTION THANK YOU FOR CHOOSING THE GCQUAD We listened to what you wanted - and created the most accurate, versatile and game-enhancing ball and club analysis solution available
TABLE OF CONTENTS DM4 OWNER S MANUAL QUICK REFERENCE...PAGE 02 IMPORTANT SAFETY INSTRUCTIONS AND GUIDELINES...PAGE 03
 < < S P E C S > > WEIGHT [.3 LBS] WIDTH [.37 ] LENGTH [9.7 ] HEIGHT [8. ] EFFICIENCY [,00 SHOTS OFF 68CU 400PSI] BATTERY LIFE [40,000 SHOTS] OPERATING PRESSURE [7PSI] CYCLE PRESSURE [7PSI] MAX RATE OF
user manual .68 CALIBER ELECTRONIC PAINTBALL MARKER Meets or exceeds ASTM standards.
 user manual TM TM TABLE OF CONTENTS: Page Topic(s) 1 Warning and Rules Safe Marker Handling 2 Warranty Information 3 Welcome 4 Initial Assembly 6 Parts Key 7 Exploded Diagram 8 Battery Installation 9 Attaching
INTRODUCING THE G.I. SPORTZ VICTUS WARRANTY
 INTRODUCING THE G.I. SPORTZ VICTUS The G.I. Victus was created in collaboration with Bob Long Domestic Gun Developer for the last 20 years. The Marker was designed to give its user the fastest rate of
T i m i n g S y s t e m s. RACEAMERICA, Inc. P.O. Box 3469 Santa Clara, CA (408)
") RACEAMERICA T i m i n g S y s t e m s Demo Tree Controller Owner s Manual Models 3204D, 3204DW & 3204DX Rev D RACEAMERICA, Inc. P.O. Box 3469 Santa Clara, CA 95055-3469 (408) 988-6188 http://www.raceamerica.com
RACEAMERICA T i m i n g S y s t e m s Demo Tree Controller Owner s Manual Models 3204D, 3204DW & 3204DX Rev D RACEAMERICA, Inc. P.O. Box 3469 Santa Clara, CA 95055-3469 (408) 988-6188 http://www.raceamerica.com
user manual .68 CALIBER ELECTRONIC PAINTBALL MARKER Meets or exceeds ASTM standards.
 user manual TM TM TABLE OF CONTENTS: Page Topic(s) 1 Warning and Rules Safe Marker Handling 2 Warranty Information 3 Welcome 4 Initial Assembly Battery Installation 9 Attaching Propellant Source Attaching
For Models: 55A00-2 (HAI UPB 1500W Wall Switch Dimmer) 55A00-3 (HAI UPB 2400W Wall Switch Dimmer) 37A00-1 (HAI Auxiliary Switch)
 55A00-3 (HAI UPB 2400W Wall Switch Dimmer) 37A00-1 (HAI Auxiliary Switch)") HAI UPB High Power Wall Switch Dimmer and HAI Auxiliary Switch Installation and Operating Instructions For Models: 55A00-2 (HAI UPB 1500W Wall Switch Dimmer) 55A00-3 (HAI UPB 2400W Wall Switch Dimmer)
HAI UPB High Power Wall Switch Dimmer and HAI Auxiliary Switch Installation and Operating Instructions For Models: 55A00-2 (HAI UPB 1500W Wall Switch Dimmer) 55A00-3 (HAI UPB 2400W Wall Switch Dimmer)
Play Safe. Safety. Instruction Manual. Warning. Rebel Specifications
 Operation Guide Instruction Manual Congratulations on your purchase of the 32 Degrees Rebel Xtreme semi-auto. Before you use this marker, please read this manual in its entirety. Please follow all safety
Accu-Tab Systems 2000 P Series by Axiall Corporation
 Accu-Tab Systems 2000 P Series by Axiall Corporation Installation and Operating Instructions Models 2075 P 2150 P For NSF/ANSI-Standard 61 NSF STANDARD 61 applications use NSF/ANSI Standard 60 listed Axiall
O W N E R S M A N U A L
 2017 OWNER S MANUAL THE CHOICE OF CHAMPIONS = HYPERLINK TO MORE INFORMATION INCLUDED WITH YOUR M-2 MARKER 3 Piece barrel kit (1) 14 UL Barrel tip (1).684 UL Barrel back (1).688 UL Barrel back Dye multi
Proto Paintball USA EUROPE ASIA
 Proto Paintball USA 10637 Scripps Summit Ct. San Diego, CA 92131 P 858-536-5183 F 858-536-5191 EUROPE Dye House, 7-8 Commerce Way Croydon, Surrey, CR0 4XA, United Kingdom P +44 (0) 20-8649-6330 F +44 (0)
AA100 Acoustic Actuator
 AA100 Acoustic Actuator Operating Manual REV. A, September 2001 COPYRIGHT 2001. ALL RIGHTS RESERVED Return Procedure It is necessary to obtain from ORE Offshore a Returned Material Evaluation (RMA) number
FIRESTORM. Assembly Instructions. Electric Upgrade Kit for the Autococker. Designed & Manufactured by PGI
 FIRESTORM Electric Upgrade Kit for the Autococker Assembly Instructions Designed & Manufactured by PGI Table of Contents Introduction 1 Safety 1 Parts Diagram 2 Parts Diagram Listing 2 Getting Started
1799 Carpenter Road Oakley, California Operator s M a n u a l
 1799 Carpenter Road Oakley, California 94561 2 0 0 5 Operator s M a n u a l Table of Contents Section Page Safety.....................................................2 Warranty...................................................3
dye Precision, Inc. USA Scripps Summit Ct. San Diego, CA P f
 O W N E R S M A N U A L dye Precision, Inc. USA 10637 Scripps Summit Ct. San Diego, CA 92131 P 858-536-5183 f 858-536-5191 GERMANY Albert Einstein Str. 2 B 77656 Offenburg, Germany P +49 (0)781 639 349
NB/NBR NITROGEN BOOSTER FOR AVIATION SERVICE
 NB/NBR NITROGEN BOOSTER FOR AVIATION SERVICE INSTALLATION, OPERATION & MAINTENANCE MANUAL INTERFACE DEVICES, INC. 230 Depot Road, Milford, CT 06460 Ph: (203) 878-4648, Fx: (203) 882-0885, E-mail: info@interfacedevices.com
TABLE OF CONTENTS IMPORTANT SAFETY INSTRUCTIONS AND GUIDELINES... PAGE 02 QUICK REFERENCE... PAGE 04 BOARD SETTINGS AND FUNCTIONS...
 D M 9 O W N E R S M A N U A L TABLE OF CONTENTS IMPORTANT SAFETY INSTRUCTIONS AND GUIDELINES......................... PAGE 02 QUICK REFERENCE........................................................ PAGE
O W N E R S M A N U A L
 OWNER S MANUAL THE CHOICE OF CHAMPIONS = HYPERLINK TO MORE INFORMATION INCLUDED WITH YOUR M-2 MARKER 3 Piece barrel kit (1) 14 UL Barrel tip (1).684 UL Barrel back (1).688 UL Barrel back Dye multi tool
testo Leakage detector for refrigerants Instruction manual
 testo 316-3 Leakage detector for refrigerants Instruction manual 2 1 Contents 1 Contents 1 Contents... 3 2 Safety and the environment... 4 2.1. About this document... 4 2.2. Ensure safety... 4 2.3. Protecting
User Manual GRI- 1500Li
 User Manual GRI- 1500Li Your Cart Tek caddy cart was thoroughly quality control checked and road tested before being shipped to your address. We do everything possible to assure that your caddy is in perfect
HATFIELD. Continuing the Tradition SEMI-AUTOMATIC SHOTGUN INSTRUCTION MANUAL
 HATFIELD Continuing the Tradition SEMI-AUTOMATIC SHOTGUN INSTRUCTION MANUAL READ THE INSTRUCTIONS AND WARNINGS IN THIS MANUAL CAREFULLY BEFORE USING THIS FIREARM SAFETY HANDLING RULES 1.Always keep the
PM8 manual-final.qx6 10/4/07 1:06 PM Page 1
 PM8 manual-final.qx6 10/4/07 1:06 PM Page 1 Proto Paintball USA 10637 Scripps Summit Ct. San Diego, CA 92131 P 858-536-5183 F 858-536-5191 EUROPE Unit 1, ZK Park, 23 Commerce Way Croydon, Surrey CRO 4ZS
RULES FOR SAFE FIRING:
 EN THIS AIRGUN IS INTENDED FOR USE BY THOSE YEARS OF AGE OR OLDER. ADULT SUPERVISION REQUIRED. SOFT-AIR-PISTOL PPK/S BLOW BACK RULES FOR SAFE FIRING:. Get to know the single parts of your new soft-air
WARNING TABLE OF CONTENTS:
 WARNING WARNING: This is not a toy. Misuse may cause serious injury or death. Eye protection designed specifically for paintball must be worn by the user and persons within range. Recommend 18 years of
Roller AC Servo System
 Safely Instruction Roller AC Servo System HMI-15 User Manual Please read this manual carefully, also with related manual for the machinery before use the controller. For installing and operating the controller
ELECTRONIC PAINTBALL MARKER
 ELECTRONIC PAINTBALL MARKER Welcome to ZXS Powered by Zap On behalf of everyone at our company, thank you for your purchase of an ZXS Electronic Marker. This Owner s Manual is designed to help you enjoy
DM8 manual.qx6 10/8/07 5:14 PM Page 1
 DM8 manual.qx6 10/8/07 5:14 PM Page 1 DYE Precision, Inc. USA 10637 Scripps Summit Ct. San Diego, CA 92131 P 858-536-5183 F 858-536-5191 EUROPE Unit 1, ZK Park, 23 Commerce Way Croydon, Surrey CRO 4ZS
Not a toy. Adult supervision required. Misuse or careless use may cause serious injury or death. May be dangerous up to 500 yards (457 meters).
.") Owner s manual www.umarex-usa.com CO2 repeater rifle cal..177 (4.5mm) pellet cal..22 (5.5mm) pellet Not a toy. Adult supervision required. Misuse or careless use may cause serious injury or death. May
Owner s manual www.umarex-usa.com CO2 repeater rifle cal..177 (4.5mm) pellet cal..22 (5.5mm) pellet Not a toy. Adult supervision required. Misuse or careless use may cause serious injury or death. May
RAM 4021-DPX Operation Manual
 RAM 4021-DPX Operation Manual Worldwide Manufacturer of Gas Detection Solutions TABLE OF CONTENTS ABL 4021-DPX / RAM 4021-DPX For Your Safety... 3 Description... 3 Setup Mode... 4 Lights/Alarms... 4 Operation...
S4W PRO ROBOT. User Manual. paddlepalace.com
 S4W PRO ROBOT paddlepalace.com 800-547-5891 503-777-2266 S4W Pro Taking Robot Technology to the Next Level The Paddle Palace S4W Pro takes robot technology to the next level. This innovative robot has
RAM Operation Manual. Worldwide Manufacturer of Gas Detection Solutions
 RAM 4021 Operation Manual Worldwide Manufacturer of Gas Detection Solutions TABLE OF CONTENTS RAM 4021 For Your Safety... 2 Description.... 2 Setup Mode.... 2 Lights/Alarms.... 3 Operation.... 4 Calibration....
GV Standard X-Vent. Setup, Commissioning & Installation Guide
 GV Standard X-Vent Setup, Commissioning & Installation Guide Technical experts in the design, manufacture and supply of precision engineered, architectural rooflights for residential and commercial buildings.
User Manual 1 P a g e Rev. V1.6-EN 11/08/2014
 User Manual 1 P a g e Rev. V1.6-EN 11/08/2014 Copyright Disclaimer Trademarks and patents Intended use Contact info 2011 Inflotrolix, Inc. This document may not be copied in whole or in part or otherwise
IMPULSE. Operation and adjustment instructions IPS136 - SOLENOID CLAMP PIN IPS105P - IMPULSE SOLENOID CLAMP SOL4SHKNRV - SOLENOID VALVE
 IMPULSE Operation and adjustment instructions CKET CUPPED SCREW IPS136 - SOLENOID CLAMP PIN S S IPS105P - IMPULSE SOLENOID CLAMP SOL4SHKNRV - SOLENOID VALVE PS153 - HEAT SHRINK TUBE ORN0201070B ORN0401070BU
ROPV R40 E Series User Manual
 HARBIN ROPV INDUSTRY DEVELOPMENT CENTER ROPV R40 E Series User Manual For Use with the Following ROPV Pressure Vessel Models: R40 300E R40 450E Headquarters Tel:(+86)451-82267301 Fax:(+86)451-82267303
This Manual was downloaded from the Paintball Gun Service Manuals list.
 This Manual was downloaded from the Paintball Gun Service Manuals list. Proto Paintball USA 10637 Scripps Summit Ct. San Diego, CA 92131 P 858-536-5183 F 858-536-5191 EUROPE UNITED KINGDOM Dye House, 7-8
HUNTER Beeper Collar Manual
 HUNTER 2000- Beeper Collar Manual For a better performance: Use only Duracell batteries Each adjustment affects the duration of the batteries The battery contacts must be kept clean The thread of the Beeper
accidents which arise due to non-observance of these instructions and the safety information herein. SPECIFICATIONS
 18 GAUGE 1-1/4 INCH BRAD NAILER Model: 7611 CALIFORNIA PROPOSITION 65 WARNING: You can create dust when you cut, sand, drill or grind materials such as wood, paint, metal, concrete, cement, or other masonry.
RAM Operation Manual. Worldwide Manufacturer of Gas Detection Solutions
 RAM 4021 Operation Manual Worldwide Manufacturer of Gas Detection Solutions TABLE OF CONTENTS RAM 4021 For Your Safety... 2 Description.... 2 Setup Mode.... 2 Lights/Alarms.... 3 Operation.... 4 Calibration....
trigger magazine release
 Made in Germany www.umarexusa.com slide gas vent hammer barrel bushing recoil spring plug slide stop trigger safety trigger guard magazine release grip Government 1911 A1 S Cal. 9 mm P.A.K. (Blank Firing)
RAM Operation Manual
 RAM 4021-1 Operation Manual Worldwide Manufacturer of Gas Detection Solutions TABLE OF CONTENTS RAM 4021-1 For Your Safety... 2 Description... 2 Setup Mode... 3 Lights/Alarms... 3 Operation... 4 Calibration...
PRODUCT MANUAL Glass Touch RGB Controller 12V-24V
 Product Description Solid Apollo s Glass Touch In-Wall RGB controllers are an easy and sophisticated way to control lights in one room or space. The Glass Touch In-Wall RGB controllers run on 12-24V power
EXTREME PROCESSOR UNIT
 21 st century electronics for AEG weapons EXTREME PROCESSOR UNIT WITH WIRING GERMANY VERSION (no burst, no fullauto) Spring limit M190 Installation of this device leave to expert He must know how to solder
Remains 2006 By. Alien Warning:
 Remains 2006 By Alien Warning: This is a dangerous piece of sporting equipment. Like any air rifle or air pistol, it can cause injury or death. By purchasing this paintball marker you assume all liability.
STEYR evo 10 E STEYR evo 10 E Compact
 TM STEYR evo 10 E STEYR evo 10 E Compact MATCH Bedienungsanleitung Operator's manual Mode d'emploi Instrucciones de funcionamiento STEYR evo 10 E STANDARD STEYR evo 10 E COMPACT ATTENTION This operator
UBEC 1AT. AUTO TANK Fill System Installation, Operation, & Setup Instructions
 Document Number: XE-ATA5PM-R1A UBEC 1AT AUTO TANK Fill System 08899155 Installation, Operation, & Setup Instructions Rev170906-EB-FRC PHYSICAL: 1302 WEST BEARDSLEY AVE ELKHART, IN 46514 WWW.ELKHARTBRASS.COM
Paintball Marker. User s Manual. Direct Feed. SC: Stock Class. VSC: Vertical Air Stock Class. 530 South Springbrook Road Newberg, OR 97132
 Paintball Marker User s Manual Direct Feed SC: Stock Class 530 South Springbrook Road Newberg, OR 97132 VSC: Vertical Air Stock Class www.phantomonline.com Component Concepts, Inc., 530 South Springbrook
! WARNING! IMPORTANT HPA AIR TANK SAFETY INSTRUCTION AND GUIDELINES ! WARNING! IMPORTANT SAFETY INSTRUCTION AND GUIDELINES
 ! WARNING! IMPORTANT SAFETY INSTRUCTION AND GUIDELINES! WARNING! IMPORTANT HPA AIR TANK SAFETY INSTRUCTION AND GUIDELINES This Paintball Marker is NOT A TOY. Misuse can cause serious injury or death. It
AK / Instruction Manual
 AK / Instruction Manual BEFORE USING THIS PRODUCT, CAREFULLY READ THOUGH MANUAL AND RETAIN IT FOR FUTURE REFERENCE. ECHO1USA AUTOMATIC ELECTRIC GUNS ARE INTENDED FOR AGES 18 AND ABOVE. THIS PRODUCT MAY