Rigging Guide. August, 2016
|
|
|
- Coleen Lambert
- 5 years ago
- Views:
Transcription


1 Rigging Guide August, 2016 Photo by Martina Orsini Revision: 2.0
2 INDEX 1 Unpacking Before starting Removing contents Tools Required Trolley Assembly Hull & Wings Hull Wing Frame Assembly & Control Lines Control Systems Ride Height Adjuster Gearing Foils Foil Assembly Rig Boom Lashing Bridle Initial Sail Set-up Boom Rigging Safety and Maintenance Boat maintenance Drain your hull Check your gantry Check your foil bolts Wash your boat General safety for sailors Sailing Tips Launching Take off Upwind sailing Tacking Downwind sailing Gybing Back at shore


3 1 UNPACKING 1.1 BEFORE STARTING Your new boat will be delivered to you in a wooden or fibreglass crate. This crate is sturdy enough to protect your new boat under normal shipping conditions. It can also be reused for re shipping, if for example you are attending an international event. Note: It is important to visually inspect the crate upon delivery and before taking receipt of your new boat from the shipping company. 1.2 REMOVING CONTENTS Remove the contents carefully. Try not to put them on the ground where they may be damaged. Some of the components are delicate and need to be treated with respect. Before you remove all the contents of the crate give some thought to where you will store them in order to keep them from harm's way. 3
 - Allen key set (5mm,2mm,6mm) - Rubber mallet - Knife - Super glue - Thin splicing wire 1.")
4 1.3 TOOLS REQUIRED A basic tool kit is required to put this boat together. Care must be taken when assembling components to ensure to damage to bolt heads or threads. Tools: - Philips head screwdrivers (Number 2, Number 1) - Allen key set (5mm,2mm,6mm) - Rubber mallet - Knife - Super glue - Thin splicing wire 1.4 TROLLEY ASSEMBLY Remove the boat and trolley from the box and insert the axle through the holes in the trolley just forward of the main cradle. Push the axle spacers over the protruding steel axle on each side of the trolley Put the trolley wheels on. Insert axle washer and wheel clip retainer pins. 4
 onto the hull using")


5 2 HULL & WINGS 2.1 HULL Assemble the wing blocks (raised or lowered) onto the hull using the supplied pins. Ensure that the trolley loops are in place around the rear wing blocks and that the trolley straps are tight to secure the boat to the trolley. Screw both bungs into the hull, one in the transom and one near the bulkhead on the starboard side. Bolt the gantry onto the hull by unscrewing all the screws and fitting the side screws first. A good starting setting for the gantry angle screw is 23mm measured from the tube to the steel bracket along the centreline. See photo below. 5


6 2.2 WING FRAME ASSEMBLY & CONTROL LINES Slide the wing covers onto the boltrope track from the rear. Take the outhaul rope kit (Kit 11) and follow these instructions: Step 1: Tie a loop in the centre of the red and white control line Step 2: Thread the control line through the outer, rear eyelet in the wing cover 6


7 Step 3: Take the supplied kite blocks and tie one end of the supplied bungee to them. (ie. One bungee and one kite block tied together per side of boat) Step 4: Thread the control line through the kiteblock Step 5: Tie the end of the control line onto the small loop on the wing corner block 7

.")


8 Step 6: Using one of the wing cover battens or similar, thread the bungee through the outer wing cover sleeve to the back of the boat (ie from bow to stern). Step 7: At the back of the boat, thread the bungee through the kite block that comes assembled to the rear wing corner block. Step 8: Using the same method as before, thread the bungee back through the outer wing cover sleeve to the front corner block and terminate the bungee at the block (stern to bow). Step 9: Repeat to other side 8


9 Take the downhaul rope kit, which is kit no. 10, and assemble the downhaul control line and retrieval line as per the images shown in both the rope kit and below. Step 1: Take the double block, triple block and control line Step 2: Thread the control line through the bulkhead cleats, bulkhead single blocks and double and triple blocks to create a purchase system. At this point the double and triple blocks will not be shackled onto anything. 9


10 Step 3: Thread the control line through the forward, inner eyelet in the wing cover. Step 4: Take the supplied kite blocks and tie one end of the supplied bungee to them. (ie. One bungee and one kite block tied together per side of boat) Step 5: Thread the control line through the kiteblock 10


11 Step 6: Tie the end of the control line to the loop on the front wing corner block Step 7: Thread the bungee down through the inside of the front wing cover sleeve all the way to the centre of the boat. At the centre, go through the Ronstan shock mounted underneath the pushrod and up the opposite wing cover sleeve all the way until the opposite wing corner block. Terminate the bungee at the wing corner. The bungee should now run internally from one side of the boat to the other. 11
 onto the wing tubes.")

.")
12 Step 8: Repeat to other side. As a check, each front wing corner should now have two control lines and two pieces of bungee terminating on its small loop. If you can see these, proceed to wing assembly. Wing assembly Slide the wing tube sleeves (black aluminium) onto the wing tubes. Aligning the holes; place the bottom pin (this comes supplied fixed to your hull) into both the tube and sleeve to keep the sleeve in place. Slide the front wing tube into place through the front wing cover sleeve making sure that none of the control lines are tangled around the wing bar. Fix with the front wing bar hinge pin and front wing corner block but do not put the wing block pins in at this stage. While the wing covers are nice and loose, it is a good time to set the hiking strap restrictor. Inside the front wing cover sleeve, you will find a piece of webbing (hiking strap restrictor). This webbing needs to be threaded through the plastic cleat (fixed to the webbing already) to create a small loop. The length of this loop should be to roughly the middle of the hole in the tramp when the tramp has some tension on it. See pictures below. 12


13 Fix the rear wing bar and wing sleeve to the hull via the rear wing hinge pin, slide the foot straps down the rear wing bars, and place the rear corner block onto the end of the bar. Slide the outer wing bar through the wing cover sleeve, and assemble with the front wing corner. The wing corner slides inside the outer wing tube. Pull back on the rear wing bar and insert the rear wing corner block into the outer wing bar, it may need a tap with a soft rubber mallet to get this part all the way in. See pictures below. 13


14 Thread the hiking strap lashing which is kit no. 5 as per the rope kit images. Remember to go through the hole in the wing cover. The inner hole (standard) is for longer legs, the outer hole for shorter legs. Remember at this point to go through the hiking strap restrictor loop. This stops the hiking strap slipping up the wing bar. 14


15 Thread the lashing for the wing covers using Rope Kit 4. It is best at this stage to keep the tension in the lashings as low as possible. Start at the inner forward lashing point, and work your way outwards. You should start with a clove hitch at the first knot you tie, as it will stop the batten from slipping inwards or outwards along the tramp. You can leave the lashing untied at the end for the moment. Lower the wings now until they sit comfortably in the wing blocks and insert the wing block pins. If the pins are very difficult to insert, try loosening the wing cover lashings a small amount. If you are still having trouble, do not hesitate to use a rubber mallet (within reason) to convince the pins that they fit. 15


16 Tighten and tie off the hiking strap. Tighten and tie off the wing covers carefully not to rip the tramps by pulling too hard. Tighten the wing lashings gradually. Over tightening the lashings in one position can damage the wing covers. 16


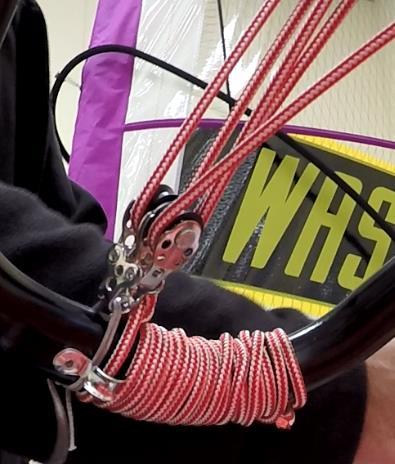
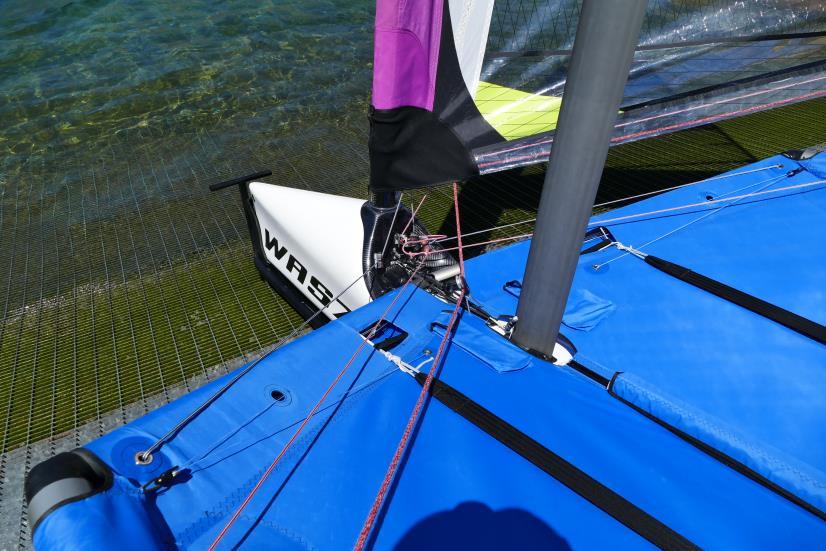
17 The noodle should now be placed above the boltrope track in the center of the wings and locked in place with the wing cover flaps and Velcro. 3 CONTROL SYSTEMS 3.1 RIDE HEIGHT ADJUSTER The ride height adjuster kit no. 9 controls the length of the push rod running from the reversing lever to the bell-crank. This push-rod length will be your way of controlling how high you fly above the water. The following steps outline the suggested rigging method for the ride height adjuster; Dip the end of the control rope in super glue, and once it has gone hard trim the end with a sharp knife to create a pointed end. Thread the control rope end through the hole into the top end of the ride height adjuster barrel. Tie a small thumb knot in the end of the rope you just pulled through. 17


18 Thread the control line through the wing cover, as shown in the rope kit images. From RHA barrel, underneath wing tramps until eyelet, through eyelet, ontop of wing tramps (under hiking strap) until kiteblock on tramps, through kiteblock, into hole in front wing cover sleeve, down inside sleeve until centre of boat, through ronstan shock. Repeat in reverse to mirror control line. See pictures below. 18


19 Wind the control line around the barrel until it is as tight as possible. Finally put the free end through the remaining hole in the barrel and tie thumb knot and superglue to make sure the knot will never slip. The trick here is to tie the knot so that the adjuster control line is as tight as possible. Cut off the stiffened ends. 19


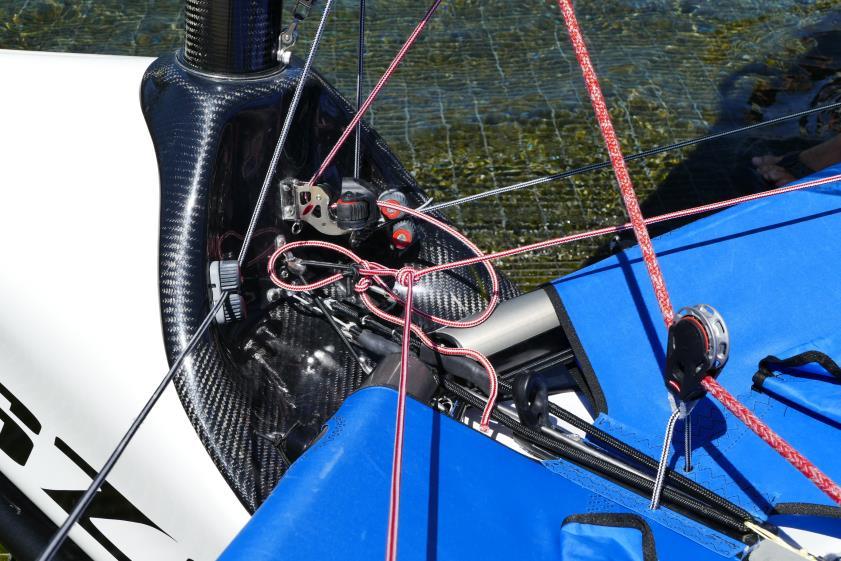
20 3.2 GEARING The gearing system on the WASZP is located inside the small bonnet at the bow of the boat. Although this system has been assembled for you, the length of the gearing screw shown is very important for controlling the ride attitude of your WASZP. The longer the screw, the more responsive the boat will be to wave height, and vice versa with a shorter screw. We suggest that if you are sailing your WASZP at a venue with either large waves or high wind, to wind the screw out to the position shown in image which is where the back of the screw is near to flush with the back of the fitting. If sailing in flat water or light winds the screw can be wound in until half the thread shown in the image is showing. To change the gearing, first remove the screw at the end of the gearing pin with an Allen key. Next, wind the gearing pin until you reach your desired position. Finally replace the grub screw with Loctite to ensure it doesn t come loose whilst sailing. 4 FOILS 4.1 FOIL ASSEMBLY Firstly, check that your vertical and horizontal foils come together completely. There should be no gap between the bottom of the vertical and the horizontal surface. If they do not come together the whole way, there may be some residual mixture left over from sealing the foils that needs to be cleaned out of the horizontal female plug. The best way is with some sort of scraping device (knife, screwdriver, chisel). 20
 showing in the top of the rudder box with the top bushing")


21 Before going ahead and assembling the foils, the rudder box should be assembled onto the gantry. To do this, align the hole in the plastic part (light brown) showing in the top of the rudder box with the top bushing in the gantry. If there is no hole showing in the plastic part, as shown in the image below, use a sharp object to rotate the plastic part until the hole is showing. Insert the rudder pin now, with the plastic washer at the top. And align the bottom holes to allow the rudder pin to be fully inserted. Replace the ring at the bottom of the rudder pin to fasten it in place. The plastic bushings that hold the rudder pin are deliberately very tight, a rubber mallet may be needed to insert the pin fully. 21

.")


22 Now insert the rudder vertical into the top of the rudder box. Take one of the pieces of bungee from rope kit 6, and wrap it twice around the rudder vertical and rudder box, passing between the rudder box and the gantry (See below pictures). Tie the bungee tight, as this will stop your rudder from falling down. The other piece of bungee from rope kit 6, can be tied in a loop around the tiller and bottom gantry strut (See pictures below). The foil bolt can now be removed and the horizontal slid into place on the bottom of the vertical. Carefully replace the foil bolt and do it up tight. 22


23 The rudder pull down system can now be installed by tying one end of the control line onto the ring on the top of the rudder vertical. Pass the line through the single block and cleat on the rudder box and then tie a knot. Now take the bungee and fix that to the knot on the end of the control line. Thread the bungee through the fitting on the end of the tiller. Finally fix the free end of the bungee back to the single block that is mounted on the rudder box. The rudder assembly is now complete. Take the front vertical foil, and remove the small grub screw that connects the pushrod terminal to the bellcrank. Insert the vertical plug into the horizontal foil socket but do not push it on all the way. 23


24 Line up the threaded push rod and the hole in the horizontal and slowly wind the pushrod into the barrel bolt that lives inside the foil. Be careful not to apply too much force to get the rod to rotate. Correct alignment should allow the rod to spin with the force your fingers can apply. Any more force may result in damage to the foil. Spin the rod until there is no thread showing above the foil surface. The vertical and horizontal may now be married together fully, and the foil bolt replaced in the same manner as the rudder. Finally, replace the small grub screw at the top of the vertical. Make sure this screw is replaced with Loctite, otherwise it can easily become unfastened whilst sailing. The boat must be rolled onto its side and the trolley removed in order to insert the centreboard into the centre case. With the mast stepped (no sail), the boat will be much easier and safer to roll onto its side. Once the mast has been assembled and stepped into the boat, tie the mast into the hull to stop it from falling out. The boat can now be rolled onto its side. As this point it is advisable to place something heavy on the mast to hold the boat in a capsized position. **Please note, the trolley straps need to be done up as tight as possible whenever the boat is rolled on its side to ensure no damage is done to either the boat or the trolley. During this step, it will also be helpful to tie a small weight to the gantry. This will keep the boat sitting on the wing only, instead of resting the bow on the ground. Once on its side, the trolley can be carefully removed from the hull and placed on the ground. Remove the foil stopper pin from the centreboard vertical, and insert the foil into the centre case. Once in place, replace the foil stopper pin back into the foil. Without this, the foil is able to fall out of the boat, resulting in a lost centreboard! 24


25 Whilst the boat is on its side, it is a good opportunity to insert the foil pin, clip the ride height adjuster to the foil bell crank and familiarise yourself with the dynamics of the WASZP control system. You should check that moving the wand tip corresponds to the foil flap moving. You should also now check that your ride height adjuster is working properly by using the full range of adjustment on the adjuster barrel. Once you are satisfied with how the mechanics of the boat work. We will go through a basic control system setup guide to get you foiling as soon as possible. Follow the following steps whilst your boat is in the capsized position with the mainfoil inserted and foil stopper pin in place. Set the foil stopper pin in the middle slot in the centre case insert. This corresponds to a middle pin hole for the centreboard pin. Slide your centreboard pin into the middle hole. Take the wand out of the wand holder, and (using tape or a friend) hold the tip of the wand even with the surface of the water if the boat was low-riding (sailing with the hull in the water ). See picture below. 25
 towards the rear of the boat until it can t go any more.")
 position.")
26 At this point, when the hull is in the water, we are looking for maximum lift from the foil. This means we want the flap on the mainfoil to be all the way down. To do this, push the ball joint, (located at the top of the mainfoil vertical) towards the rear of the boat until it can t go any more. You can check that this is maximum flap down by looking at the gap showing between the horizontal and verticals. Holding the ride height adjuster still, spin the tail end until it lines up with the ball joint in the maximum lift (flap down) position. Clip the ride height adjuster tail onto the ball joint, connecting the wand to the main foil flap. You should now check that when the wand is on the water in low riding mode, that the foil is responding with maximum lift. When your wand flicks forwards, check that the flap responds by rising upwards, reducing the gap between the flap and the vertical. This is your base setting to go sailing with, and may require some adjustment from your ride height adjuster whilst foiling. Unclip the ride height adjuster, raise the foil and right the boat. But do not forget to replace the wand in the wand holder, as righting the boat with it in the down position can lead to breakages. The next time you put your main foil down and in the middle pin hole, all that is needed to do is clip the ride height adjuster onto the ball joint and you are ready to foil. 26


27 5 RIG 5.1 BOOM LASHING To fix the boom to the mast, the boom lashing must first be tied and taped. Although the position of this lashing is an important tuning parameter, a good starting point is 2400mm from the mast base. 1. To begin, take the boom lashing rope supplied in the rope kit and tie a clove hitch around the mast, leaving one of the tails twice as long as the other tail. 2. From here, take the long tail and tie a single half hitch around the mast. 3. Tie simple overhand knot to create a reef knot. If tight enough, the lashing shouldn t slide up or down the mast. To be safe, electrical tape can be wrapped immediately above and below the lashing. 27


28 4. Finally, tie a loop with the remaining tail lengths, finishing with a reef knot. - 28

 onto wing covers as shown below.")

29 5.2 BRIDLE Bridle position is an important tuning parameter on your WASZP. Follow these steps for initial setup; Tie mainsheet bridle (port/starboard) onto wing covers as shown below. Tie bridle restrictor onto the ring on the top of the rudder pin. Shackle all three lines onto the supplied mainsheet block A good starting point for the length of the bridles is 470mm (Port/Starboard) and 730mm for the bridle restrictor. 29


30 5.3 INITIAL SAIL SET-UP Your WASZP sail can be scratched and damaged if dragged over concrete surfaces. It is best to find a softer surface to unroll the sail. Usually, the hull and wing covers are adequate. Using the rope supplied in rope kit 16, lash the two mainsheet blocks to the webbing blocks found at the base of the luff and the clew. Remove the double block with a long d-shackle attached, and secure it to the eyelet in the clew of the sail. Take the control line from rope kit 13, thread it through the webbing block at the clew, all the way down the pocket along the foot of the sail and through the webbing block at the bottom of the luff. A broomstick or something similar is very useful for feeding the line down the pocket. Put a stopper knot in either end of the control line. The same can be done with the mainsheet, which is found in rope kit 14. This time, thread the mainsheet through the mainsheet blocks. Be sure not to tangle the mainsheet around the outhaul rope. 30


31 Your WASZP sail is supplied ready to go sailing, with the camber inducers and camber spacers set in place in the factory. Simply slide the mast up the luff pocket, leaving all the cams to one side of the mast except the top cam, which should be assembled onto the mast. The remaining cams can now be put onto the mast and the mast stepped into the boat. To pop the cams onto the mast; Have the mast in the luff pocket with the cams on the bottom side of the mast. Apply downwards pressure to the intersection of the luff pocket and batten pockets (just behind the cam) 31


.")
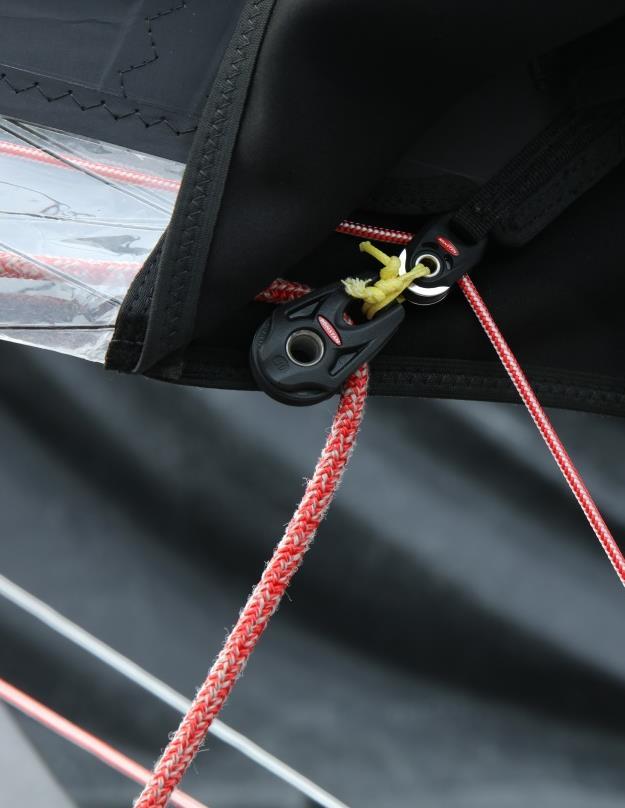
32 With your other hand, push the cam upwards from the bottom so that it pops onto the mast Close the zip Repeat, working your way from the top of the sail to the bottom. Once stepped, shackle the downhaul triple block onto the eyelet on the sail, and the double block onto the mast (See picture below). Pull firm tension on the downhaul to set the sail. 32


33 In the sail bag pocket you will find several plastic shims. These are called cam spacers and are used to shim the cams forward to increase the tension in the sail luff-pocket. These are used to fine tune the sail once the sail has been stretched in. For now, the factory setting is acceptable. 5.4 BOOM RIGGING Once some downhaul tension is applied, the boom lashing should be visible in the sail cut-out. The fitting on the front end of the boom can now be used to hook your boom lashing loop and the boom can safely hung from the mast. The boom tail end can now be put in place, with an initial length setting of 30 (8.2m 2 sail). The next step is to thread the outhaul. Beginning clew, take the control line through the bottom sheave of the double block from port to starboard. 33


34 Thread the rope upwards through the starboard sheave of the double block on the clew of the sail. Thread the rope through the remaining sheave on the boom end from starboard to port. Thread the rope upwards through the final sheave, before tying the end of the control around the boom, making sure to go through the saddle. Do not tie the control line straight onto the saddle. At the base of the luff, take the control line and insert it through the swivel cleat at the centre of the bulkhead. 34


35 Finally, tie the end of the control line off to the loop at the centre of the outhaul line that runs through the wing covers. We will now thread the mainsheet from the clew running forwards through the mainsheet block on the bridle and back up to the mainsheet block, terminating with a bowline. Please note that the outhaul line that runs through the sail is deliberately too long. This is to ensure that when the foil is in the raised position, the outhaul can be eased enough to allow the sail to flop over the foil. If you find you are rarely using this feature, trim around 1.6m off the tail of the outhaul control line. Alternatively, the excess control line can be wrapped and tied to the end of the boom, as shown below. 35
36 36
37 6 SAFETY AND MAINTENANCE 6.1 BOAT MAINTENANCE Drain your hull The hull has two drain holes, one on the starboard side of the transom and the other on the starboard side near the bulkhead. If you have any water in the hull undo the screws in the drain holes and with the rig/mast up and the boat capsized on shore with the starboard wing down, lift the bow until the boat sits on the starboard wing back corner, with the gantry and mast tip touching the ground. Any water trapped in the hull will flow out. Your Waszp has a small breather hole located above the starboard downhaul cleat on the bulkhead; this is sufficient in any weather to allow the hull to breathe Check your gantry Make sure the bolts are tightened securely and re-check after a few sails Check your foil bolts Make sure the bolts at the base of the foils are always done up tight, this should be checked every few sails Wash your boat After every sail your boat must be washed thoroughly with clean fresh water. 6.2 GENERAL SAFETY FOR SAILORS We want you to understand safety as it applies to our product and to equip yourself in order to minimise any risk. Please read on.. Take care to always to wear a buoyancy aid, it is mandatory when racing but in some parts of the world it is not a legal requirement when cruising. However it is sensible to get into the habit of wearing one at all times. Not only will it keep you afloat if things go wrong, but most buoyancy aids also provide valuable impact protection. Wear a good wetsuit. Modern full-length long arm wetsuits are very good at keeping you warm and also absorbing minor impacts that a sailor can be exposed to. Remember it is one thing to be warm as you work the boat hard, but another to be warm for extended periods of time in the water. Be aware of your surroundings, and invest in the correct kit to keep you warm in all conditions. Try to always sail with a training partner, or failing that make sure someone at your club is aware that you are going sailing. It is also a good idea to take a mobile phone or a VHF radio in an Aquapac type waterproof case out with you so you can call for help if you need it. When you are working hard, dehydration can occur quickly. Always make sure you take enough liquid out on the water with you. Most drink bottle sizes will fit in the pocket in your wing covers. Get in the habit of checking your boat over before you go sailing, replace worn parts and ropes as necessary. It s easier on the land than on the water but if a rope does breaks, make sure you have some handy lengths of spare rope and a few shackles in the pocket of your life jacket. Sail within your ability. Do not take risks, and if it s too windy or too rough for you, be sensible and go and do something else. There will always be another day. Make sure you know the forecast; many a sailor has been caught out by not understanding the true wind speed and/or sea state. Offshore winds for example can look quite benign from the land, but in fact be very strong at the sailing area, and of course with an offshore wind if things go wrong you won t be blown back to the shore either We suggest wearing some form of head protection. The WASZP can get up to much higher speeds than conventional dinghies, which always increases the risk of injury. Finally remember your safety is the responsibility of the skipper. In a WASZP, that is you. As if you didn t have enough things to think about! 37
38 7 SAILING TIPS 7.1 LAUNCHING Launching the WASZP is a skill that should not be taken lightly! It is advisable that the first few times you launch a second person to help is on hand just in case. The WASZP trolley has been designed to allow for two different launching techniques. The first technique is explained below; At the edge of the water, with your WASZP pointing into the wind, remove the trolley straps. Be sure at this point to not let the WASZP roll on its side, at the foil tip may touch the ground. Wheel the boat into the water, stopping when the boat begins to float off the trolley. This should be between knee to waist deep water. Sink the trolley down (using your foot) to enable the centreboard horizontal to clear the trolley. Leave your trolley to a friend to return it to the beach. Walk your WASZP into deeper water (waist deep is enough) and lower the foils to around half down. Ensure when hopping into the boat to have the mainsheet in hand first, as the WASZP hull is less stable than a conventional dinghy, and the sail is need to keep the boat from capsizing. When sailing with the foils in a raised position, it is advisable to skim a wing along the surface of the water. This will add stability and stop the boat from going too fast. When appropriate, slow the boat down to a stop, remove the wand holder and lower the centreboard, lining up the stopper pin with its corresponding groove in the centre case. Insert the foil pin and foil pin retainer. Clip the ride height adjuster ball joint onto the top of the bell crank. Lower the rudder using the rudder pull down system Insert the rudder foil pin and foil pin retainer The second technique is slightly easier if you are alone; however it requires the boat to be rolled onto its side once in the water. With your WASZP pointing into the wind, wheel the boat into the water, stopping at around knee depth. Roll the boat onto its side, with the rig on the leeward side of the hull. Remove the trolley from the hull. Return your trolley to the beach. At this point you can either right the boat and continue in the same fashion as explained above, or; Push the foils down into the lowered position Remove the wand holder, letting the wand swing forward Insert the foils pins and retaining clips Attach the ride height adjuster Holding the mast, walk the boat out until the water is around chest deep before righting the boat and hopping in. 7.2 TAKE OFF Start trying to foil when the boat hits 7 knots. Get as much lift on the rudder as possible by winding the tiller mechanism until the rudder pin is all the way forward. The outhaul should be loose enough pre-foiling to get some twist and shape in the sail. The downhaul should be loose enough to allow mast to straighten but not allow wrinkles in the sail. 38
39 Crack sheet to gain speed. Induce a minimal amount of leeward heel so that you can bring it upright as the boat starts to foil and you pump twice. Remember, no bouncing on the wing. Once foiling head back up to the breeze and bring on the outhaul. 7.3 UPWIND SAILING Sailing the WASZP upwind is similar to many other dinghies, except faster! Ride height and rudder angle adjustment are important when learning to foil. Your rudder pin should be towards the front of the rudder box slot to maintain a good pitch angle. The aim is to have the boat flat or slightly bow down whilst sailing upwind. While you are sailing, always remember to check where the rudder pin is sitting, as sometimes it can unwind itself in tacks or in capsizes. The boat will also be easier and more efficient to sail when it is higher on the foils. Use your ride height adjuster to allow yourself to find a comfortable foiling position. The standard sail shape of the WASZP sail is very full to create plenty of power while in low riding mode. Once foiling, your sail shape will need to change quickly to keep up with your apparent wind. Usually this involves trimming the outhaul on hard and sheeting the mainsheet in. Do not be afraid to pull the outhaul and downhaul on hard when you are overpowered. From a technique perspective, your WASZP will respond better to smaller mainsheet movements, and larger steering movements. 7.4 TACKING Keep the boat dead flat or with slight windward heel pre-tack. Move faster and earlier than you want to (or even can imagine) and steer right through to a beam reach to keep the speed up. It helps to get the tiller extension through very early, and allow your body to follow your tiller hand through the boat. Mainsheet tension is one of the most important aspects of tacking. Generally, until you are on the new wing with the battens popped, keep the mainsheet as tight as possible. However, once on the new tack you will need to ease the mainsheet quickly to allow the boat to accelerate. There doesn t seem to be an accepted technique for where to place the feet through a tack. This being said, the noodle in the centre of the WASZP wings is a very useful platform for your feet to propel you through a tack. Hands should be swapped after the boat has tacked and is in control, not in a hurry post tack whilst still building speed. 39

40 7.5 DOWNWIND SAILING To go downwind, the ride height may need to be lowered slightly using the ride height adjuster. The bow of the boat will also need to be trimmed upwards by moving the rudder pin rearwards in the rudder box slot. Usually this will be around two turns on the tiller mechanism. Downwind rig setting is best with twist but not a knuckle (not too much draft forwards) at the front of the sail which will cause you to sail low and slow rather than true VMG by building apparent. Avoid the knuckle by keeping on enough downhaul. When sailing downwind, your body weight should be towards the back of the wing. 7.6 GYBING Speed, Stability and steady steering make the gybe happen. Faster is faster! It s a good simple rule to aim to reduce speed loss to a minimum. Always look forwards and move earlier than you think you need to. It s seen as faster to gybe the boat faster and get as far out on the new wing bar as possible, steering the boat up to the breeze to keep you there will keep the power on and get you back to max speed quicker. You don't want to hear this, but it needs to be said: practice, practice, practice. Some pointers for easy gybing (not necessarily to get around fast, but to get around easily): Ease the sheet and point down so you can get to a comfortable stable position on the wing. Get the tiller extension through to the new windward side. Steer the boat around to the new jibe direction keeping it flat by a combination of moving your body and steering under the rig. The noodle in the centre of the boat is your best friend! Pop the cams by a jerk on the mainsheet if not already done by wind pressure. Swap hands on tiller and mainsheet. As the boat has slowed down by this point you will have to point up from the normal jibe angle to get flow back over the sail. 40

41 7.7 BACK AT SHORE When coming in to the shore always do this at slow speed, if you hit the bottom you can damage the foils so it is better to come in slowly and judge how deep it is! As you come in to the shore remove the ride height adjustor and foil pins. This will allow the foils to be half raised. The rudder should come up on its own as you sail along, so no need to strain yourself. Fix the wand holder to the wand. Sail until it is around knee deep and then replace the boat back onto the trolley, remembering to do the trolley straps up tight. You can also sail in until waist deep and capsize the boat to raise the foils. We have found this is a matter of personal preference. The key things to remember when launching and retrieving are the following; 1. Always have the trolley strap on tight when rolling the boat on its side 2. The wand can hit the ground in shallow water. When in less than waist deep water keep the wand in the wand holder. 3. The foil tips can be damaged by hitting the ground in shallow water, be careful when in less than knee deep water. 41
Rigging Guide. July, Revision: 1.6
 Rigging Guide July, 2016 Revision: 1.6 INDEX 1 Unpacking... 3 1.1 Before starting... 3 1.2 Removing contents... 3 1.3 Trolley Assembly... 3 2 Hull & Wings... 4 2.1 Hull... 4 2.2 Wing Frame Assembly & Control
Rigging Guide. June, 2017
 Rigging Guide June, 2017 Photo by Martina Orsini Revision: 2.3 INDEX 1 Unpacking... 3 1.1 Before starting... 3 1.2 Removing contents... 3 1.3 Tools Required... 4 1.4 Trolley Assembly... 4 2 Hull & Wings...
Bladerider X8 Assembly Help Notes
 2.1 Remove All Parts & Have Some Tools Handy Remove all items from the box and identify each part as per the packing sheet and check that nothing is missing. If there is something missing, please email
CONTROL SETUP WASZP Team 11/29/2016
 CONTROL SETUP WASZP Team 11/29/2016 INTRO This guide will help you tune your WASZP for optimised stability and performance. It will run through a good base setting for the systems that control your flight,
Index 1. Trampoline 2. Main Foils 3. Spinnaker Pole 4. Mast Setup 5. Mast Rigging 6. Rig Tension 7. Trapeze Lines 8. Rudders 9. Boom 10. Main Sheet an
 By User Manual Index 1. Trampoline 2. Main Foils 3. Spinnaker Pole 4. Mast Setup 5. Mast Rigging 6. Rig Tension 7. Trapeze Lines 8. Rudders 9. Boom 10. Main Sheet and Traveler 11. Main Sail 12. Downhaul
TUNE YOUR SAILS SPEED. Optimist Tuning Guide. Photo Wavelength
 TUNE YOUR SAILS FOR OUTRIGHT SPEED Photo Wavelength PEAK / HEAD THROAT TACK CLEW THANK YOU for choosing North Sails for your Optimist. Whether you are just starting out in an Optimist you are an experienced
ASSEMBLY MANUAL HOBIE CATSY
 ASSEMBLY MANUAL HOBIE CATSY HOBIE CAT EUROPE ZI Toulon Est, BP 50 8078 Toulon cedex 9, France Tel : + (0)9 08 78 78 - Fax : + (0)9 08 99 Email : hobiecat@hobie-cat.net - http://www.hobie-cat.net ASSEMBLY
The Definite Guide to Optimist Trim
 The Definite Guide to Optimist Trim by Martin Gahmberg & the WB-Sails team The purpose of this tuning guide is to help you trim your WB sail optimally by learning the effects of the controls: How to change
Topaz OMEGA Rigging Instructions
 Topaz OMEGA Rigging Instructions www.toppersailboats.com TOPAZ OMEGA RIGGING INSTRUCTIONS CONTENTS 02. Introduction 02. Manufacturers Details 03. Maintenance 04. Raising the Mast 05. Attaching the Boom
Wysiwig - Wayfarer Rigging Guide
 Wysiwig - Wayfarer 8767 - Rigging Guide GENERAL NOTES Before you go afloat, make sure that the self-bailer is closed. It is operated through the cut-out in the starboard floorboard. If you do not close
Weta Basic Rigging Guide
 Weta Basic Rigging Guide A quick reference guide of how to rig your Weta, with some tips to make rigging quick and easy! For a more indepth guide see our Weta Manual under Weta Owners on the website. 1.
Pico rigging manual 2007.doc Page 1 of 28
 Pico rigging manual 2007.doc Page 1 of 28 Pico Rigging Instructions The Pico rigging instructions are a guide to rigging your boat. Due to production supplies certain parts may be slightly modified from
CII Rigging suggestions
 CII Rigging suggestions This mini-manual uses photographs of the final prototype sail and the final pre-production mast. Where changes occurred between these and the production units, they are described
TUNE YOUR SAILS FOR OUTRIGHT SPEED. Starling Tuning Guide Solutions for today s sailors
 1 TUNE YOUR SAILS FOR OUTRIGHT SPEED 1 The object of the Starling class is for all sails and masts to be identical. We pride ourselves on our ability to reproduce sails identically, so please feel free
1 Tuning Platform Reseating Beam Pads Rudder alignment Noisy Foils Rig Tension...
 Contents 1 Tuning... 2 1.1 Platform... 2 1.2 Reseating Beam Pads... 2 1.3 Rudder alignment... 3 1.4 Noisy Foils... 3 1.5 Rig Tension... 4 1.6 Mast rake... 4 1.7 Spreader rake... 5 1.8 Diamond tension...
Dolly wheels in slot #8 for Boat #10.
 Rigging: Laser SAIL SELECTION: The International Laser Class has three different official rigs. Each sail is designed for sailors of different weights. The Standard Rig was designed for sailors weighing
Optimist Tuning Guide
 Optimist Tuning Guide Sail Care: To help you re new racing sail stay in top condition as long as possible here is some tips - Try not to crease your sail, some creases can cause MIT tears in your sail
Taming the Kite! Wineglasses. Wineglasses occur when the top half of the kite fills before the bottom with a twist in the middle.
 Taming the Kite! What goes wrong? Wineglass when launching can happen in light or heavy weather Broaching on a reach usually in heavy weather Death rolls usually in heavy weather Gybing disasters worse
Vanguard Sailboats 300 Highpoint Avenue Portsmouth, RI For the dealer nearest you call SAIL
 Vanguard Sailboats 300 Highpoint Avenue Portsmouth, RI 02871 For the dealer nearest you call 800. 966.SAIL Unpack the major parts listed below and lay them out on a soft piece of ground free of sharp objects.
Agenda. How a sailboat works What are you looking at? Modes of sailing A few boat handling tips Some resources
 Agenda How a sailboat works What are you looking at? Modes of sailing A few boat handling tips Some resources The Sail is a Wing Like a wing in principle, lift is generated by both the shape (camber) of
Follow these easy steps to properly assemble your new Zim 420
 Thank you for buying a Zim 420 and welcome to the Zim Sailing family. We are extremely proud of the quality of our boats and the race results are proven. Many of the top sailors are choosing Zim over other
The Challenger Tuning Guide
 The Challenger Tuning Guide Challenger Safety Checks Before Going Sailing Crossbeam bolts should be finger tight plus ¾ to 1 turn with a spanner. Always use a washer. Make sure the mast deck straps are
Assembly Instructions Star Kayak Sails kit to a Hobie Mirage drive kayak.
 Assembly Instructions Star Kayak Sails kit to a Hobie Mirage drive kayak. 1. Remove packaging lay out contents. Separate the plastic tubes from the aluminium tubes. 3 plastic and 4 aluminium. ( Giant Star
Hansa 2.3 Rigging Guide
 Hansa 2.3 Rigging Guide Manufactured by Hansa Sailing Systems Pty Ltd ABN 56 079 318 031 4/4 Cumberland Avenue SOUTH NOWRA NSW 2541 AUSTRALIA Postal: PO Box 5048 NOWRA DC NSW 2541 Telephone: +61 2 4403
FDR CHRYSLER 16' CATAMARAN (MUSKETEER) The initial rigging of a sailboat is not difficult, but if the boat is strange
 The initial rigging of a sailboat is not difficult, but if the boat is strange") Page of 6 Revised 2/0/76 RIGGING INSTRUCTIONS FDR CHRYSLER 6' CATAMARAN (MUSKETEER) The initial rigging of a sailboat is not difficult, but if the boat is strange to the new owner, or the new owner is
Page of 6 Revised 2/0/76 RIGGING INSTRUCTIONS FDR CHRYSLER 6' CATAMARAN (MUSKETEER) The initial rigging of a sailboat is not difficult, but if the boat is strange to the new owner, or the new owner is
Table of content Introduction 5 1. Part 1. Assembly Tools needed for Assembly Glossary Hulls Mounting the beams 7
 Table of content Introduction 5 1. Part 1. Assembly 6 1.1. Tools needed for Assembly 6 1.2. Glossary 6 1.3. Hulls 7 1.3.1. Mounting the beams 7 1.3.2. Fixing the mast rotation cleats 8 1.3.3. Placing the
OPPI Rigging Guide 3/2008
 OPPI Rigging Guide 3/2008 McLaughlin Boat Works optistuff.com Thanks for purchasing OPPI, the most durable and F-U-N sailboat available. Rigging your OPPI is easy and the following pictures make it a breeze
Melges 24 Sailing Guide
 RACING GUIDES www.ullmansails.com Upwind Sailing Melges 24 Sailing Guide The Melges is most efficient when sailed as flat as possible. Excessive heel causes leeway which is slow. The skipper must work
Tuning Guide January 2012
 Tuning Guide January 2012 www.skud.org This tuning guide has been prepared by the IACA SKUD 18 Committee to assist new sailors in the SKUD 18 class to prepare their MkI or MkII boat to a competitive level
Instruction Manual. Features. Specification: Length: 730mm Width: 500mm Height: 1000mm Sail Area: 0.15m 2. Weight: 692g (w/o battery & receiver)
") AN UNBELIEVABLE SPEED MACHINE Instruction Manual Features Specification: Length: 730mm Width: 500mm Height: 1000mm Sail Area: 0.15m 2 Weight: 692g (w/o battery & receiver) Thank you for purchasing your
AN UNBELIEVABLE SPEED MACHINE Instruction Manual Features Specification: Length: 730mm Width: 500mm Height: 1000mm Sail Area: 0.15m 2 Weight: 692g (w/o battery & receiver) Thank you for purchasing your
3. Sail Kit. Table of Contents: Portland Pudgy Safety Dinghy: 3. Sail Kit
 Table of Contents: 3. Sail Kit Sailing the Portland Pudgy... 1 Sailing Tips... 1 Reducing the Sail Area (Reefing the Sail)... 2 Method 1. Reducing Sail without the Exposure Canopy... 2 Method 2. Reducing
Tuning C420 Sails By Brian Doyle and Dave Kirkpatrick
 Tuning C420 Sails By Brian Doyle and Dave Kirkpatrick In the spring of 2003, the Club 420 Class sails were redesigned to provide a better competitive and useful lifespan. Now that several events have been
Rudder Kit Assembly Instructions for Quest 13
 Rudder Kit Assembly Instructions for Quest 13 Revised 4/2/2015 78501 Rudder System The Hobie Quest is designed for the addition of an optional rudder system. Rudder systems in boats like this allow you
Far East Boat Optimist Rigging Instructions
 Far East Boat Optimist Rigging Instructions These instructions are written specifically for Far East Boats Championship and Racing Optimist. Parts of the Optimist PAGE 1 Sprit Wind Indicator Sail Mast
ABN Unit 11, Tulip Street Cheltenham 3192 Victoria, Australia phone:
 KA Sail Australia a division of Kingston Range Pty Ltd ABN 39053749116 Unit 11, 91-95 Tulip Street Cheltenham 3192 Victoria, Australia phone: +61 3 9585 3585 email: office@kasail.com WASZP upgrades In
Ref :MMHC14SR_GB Emetteur :MF Date :Dec 2014 Revision : 1 Page 1/18. ASSEMBLY MANUAL : HOBIE CAT 14 Std & Race HOBIE CAT 14 STD & RACE
 Ref :MMHC14SR_GB Emetteur :MF Date :Dec 2014 Revision : 1 Page 1/18 HOBIE CAT 14 STD & RACE Ref :MMHC14SR_GB Emetteur :MF Date :Dec 2014 Revision : 1 Page 2/18 TABLE OF CONTENT Part list... 3 Ropes and
M32 CATAMARAN ASSEMBLY MANUAL
 M32 CATAMARAN ASSEMBLY MANUAL 1 M32 CATAMARAN ASSEMBLY MANUAL MANUAL SUMMARY M32 ASSEMBLY Parts and tools Instructions MAST PLATFORM Parts and tools Instructions MAST STEPPING Instructions MAIN HALYARD
2. Note that the ropes from the rigging board are secured in the cam cleats of the jib fairleads.
 VII 1. Place the hull, bow into wind, on its trailer, a soft surface, or a rigging board. We strongly recommend making a rigging board; it is simple and inexpensive and greatly simplifies rigging and working
ASSEMBLY MANUAL. Last up-date : January 2005 HOBIE MAX RACE
 ASSEMBLY MANUAL Last up-date : January 005 HOBIE MAX RACE List of the parts Necessary tools spanners nr 7 It is advisable to be at least two people to assemble the Hobie Max pair of niversal pliers TABLE
Club 420 Class Rigging Manual
 Club 420 Class Rigging Manual Performance sailcraft 2000 Inc 2555 Dollard Lasalle, Quebec, H8N 3A9 Tel: 514 363 5050 email: info @ps2000.ca Website: www.ps2000.ca Mast set up Remove the pole and unwrap
2012-June-12 SECOND DRAFT Hobie Getaway Spinnaker Installation Instructions
 SECTION A: INTRODUCTION This unofficial set of installation instructions was written for a 2009 Hobie Getaway, using a 2012 Hobie Spinnaker Kit 20999020. Note from the Author: I had never seen this kit
INSTRUCTION NO
 INSTRUCTION NO. 14138 Dagger Rigging Instr. P~e 2.of 6 MODEL 244 CHRYSLER "DAGGER" SAILBOAT RIGGING INSTRUCTIONS We, at Chrysler Boat Corporation, congratulate you on your selection of our Model 244 "Dagger"
PT 11 trouble-shooting and maintenance.
 PT 11 trouble-shooting and maintenance. Does your rudder not stay down?...your back seat slip off?...your knobs tight and your leather pads loose? Maybe we can help. We have used our PT 11 s hard enough
North Sails Seattle Thunderbird Tuning Guide
 Page 1 of 6 North Sails Seattle Thunderbird Tuning Guide Introduction The following tuning guide is meant as a good starting point in setting up your boat. Since not all Thunderbirds are exactly alike
12.9 Gennaker. February Setting up and sailing with the 12.9 Gennaker
 12.9 Gennaker Setting up and sailing with the 12.9 Gennaker February 2013 The 12.9 Gennaker is a new bigger gennaker for the Weta. The standard gennaker is 8 sqm and the 12.9 gennaker is 12.9 sqm. The
RIGGING INSTRUCTIONS Let's assume that you have your boat on a trailer when you take delivery from your dealer.
 This is the original owner's manual, written about 1972, and applicable for boats manufactured through 1978. Starting in 1979 a few changes were made in the roller furling jib and forestay arrangement.
Wind Light Moderate Heavy Speed 0-8 mph 9-17 mph 18 + mph
 Hobie 20 Racing Setting - Compiled by Bob Mimlitch, Fleet 23, Dallas, TX Most of the information is from Bob Curry's articles in Catamaran Sailor published by Mary Wells. Wind Light Moderate Heavy Speed
J/22 Dave Perry. Based on sailing the POW in the Ft Worth Boat Club (TX) boats in 2006 We sailed with three in the boat
 boats in 2006 We sailed with three in the boat") J/22 Dave Perry Based on sailing the POW in the Ft Worth Boat Club (TX) boats in 2006 We sailed with three in the boat GENERAL Boats spin fast! Boats go fast sideways when downspeed Use weight to help
J/22 Dave Perry Based on sailing the POW in the Ft Worth Boat Club (TX) boats in 2006 We sailed with three in the boat GENERAL Boats spin fast! Boats go fast sideways when downspeed Use weight to help
E Scow Racing and Rigging Manual
 E Scow Racing and Rigging Manual Written by Mark Ehlers Editing and content revisions by Andrew Bartling Aspects of Sailing E Scows Crew weight should never exceed 675lbs. The target weight for 4 people
Safety Afloat. Before you go sailing:
 RIGGING MANUAL Safety Afloat This instruction manual is not a guide to sailing your craft and it should not be considered suitable for the task of learning to sail a boat. Please read the manual before
Trampoline Installation Instructions
 Congratulations on purchasing an Oz Trampolines Product. Following are detailed setup instructions for your trampoline. Please ensure all boxes and parts are present before continuing. Setting Up Your
UPWIND Light wind: <8 knots Sail Setting
 UPWIND Since the Laser is a strictly one designed class with very few controls, upwind sailing becomes very physical and technical. Big efforts will only result in little gains in your upwind speed. However,
WELCOME TO THE HOBIE FAMILY
 ASSEMBLY MANUAL WELCOME TO THE HOBIE FAMILY Congratulations on the purchase of your new TriFoiler and welcome to the HOBIE sailing family. We offer this manual as a guide to increased safety and enjoyment
420 Rigging Guide.
 A smaller version of the olympic 470 class, the 420 was formerly a youth development class. It has a good class following, and is a good introduction to performance boats. With a PY number of 1087 it s
TUNE YOUR SAILS SPEED
 TUNE YOUR SAILS FOR OUTRIGHT SPEED Rev R05 Important Notes l We recommend not exceeding 350lbs total crew weight as this puts excess stress on the mast and the boat. l When sailing, the boat performs best
T 10 Tacking Ver
 T 10 Tacking Assume sailing upwind in moderate conditions Ensure Jib sheets are clear both in the cockpit and forward. Ensure new course is clear of other boats, shipping, and navigation hazards. Ensure
Rhodes 19 Tuning Guide
 Rhodes 19 Tuning Guide Jud Smith jsmith@doylesails Tomas Hornos tomas@doylesails.com Send order forms to: onedesign@doylesails..com SETTING UP YOUR RHODES 19 FOR DOYLE SAILS BEFORE STEPPING THE MAST 1.
Most sail with 5 or 6 in the boat. Here are the names I will use for the various positons (from the back forward):
:") Racing the Oakcliff Sailing Match 40 s Dave Perry notes May 17, 2016 There are many ways to do things. Here are some notes on how we do things on the Match 40 s at Oakcliff. Most sail with 5 or 6 in the
Racing the Oakcliff Sailing Match 40 s Dave Perry notes May 17, 2016 There are many ways to do things. Here are some notes on how we do things on the Match 40 s at Oakcliff. Most sail with 5 or 6 in the
Stand-N-Fish FULL DETAIL INSTALLATION INSTRUCTIONS
 1 Stand-N-Fish FULL DETAIL INSTALLATION INSTRUCTIONS Thank you for purchasing the incredible new Stand-N-Fish Kayak Fishing System. Once installed on your kayak the Stand-N-Fish will take your kayak fishing
F-27 RIGGING GUIDE EXTRACTED FROM ORIGINAL F-27 SAILING MANUAL
 F-27 RIGGING GUIDE EXTRACTED FROM ORIGINAL F-27 SAILING MANUAL By Ian Farrier not be possible if the towing vehicle is a van. When trailering, allow extra distance for stopping. Watch also for low bridges,
J/70 Tuning Guide. For any question you may have on tuning your J/70 for speed, contact our experts:
 Photo Paul Todd/OUTSIDE IMAGES For any question you may have on tuning your J/70 for speed, contact our experts: Tim Healy 401-683-7997 tim.healy@northsails.com Will Welles 401-683-7997 will.welles@northsails.com
Falcon 3 145, 170, 195 and Tandem Owner / Service Manual
 Falcon 3 145, 170, 195 and Tandem Owner / Service Manual January 2007 - Second Edition Removing The Sail From The Airframe And Short Packing The Glider Many maintenance and repair procedures will require
SAIL WELL, STAY WELL. Sydney Flying Squadron ACN Sydney Flying Squadron. SAILING A SKIFF a guide
 Historic 18 foot Myra Too Sydney Flying Squadron ACN 000 487 230 76 McDougall Street Milsons Point. 2061 SAIL WELL, STAY WELL SAILING A SKIFF a guide PO Box 577 Milsons Point 2061 T: 9955 8350 Web: sydneyflyingsquadron.com.au
OWNER S MANUAL OWNER'S MANUAL TABLE OF CONTENT. 1. Introduction. 2. EC Documentation a) Certificate of homologation b) Declaration of conformity
 Certificate of homologation b) Declaration of conformity") OWNER'S MANUAL TABLE OF CONTENT 1. Introduction 2. EC Documentation a) Certificate of homologation b) Declaration of conformity 3. Description a) Hull identification b) Design category c) Technical data
OWNER'S MANUAL TABLE OF CONTENT 1. Introduction 2. EC Documentation a) Certificate of homologation b) Declaration of conformity 3. Description a) Hull identification b) Design category c) Technical data
Rigging Manual. 1 Parts of the Hull. 2 Parts of the Sail. 3 Sunfish Mast Kit. 4 Bailer Installation. 5 Ratchet Block Installation
 SUNFISH SUNFISH RACE SUNFISH Rigging Manual 1 Parts of the Hull Go-fast tip number one: Read this rigging guide first. 2 Parts of the Sail 3 Sunfish Mast Kit 4 Bailer Installation 5 Ratchet Block Installation
Sailboat Rigging and Tuning
 Sailboat Rigging and Tuning February 13, 2006 The following texts are compiled from three main sources, Bob Sterne (www.crya.ca), Greg Fisher (www.modelyacht.org), and the Soling 1M website (www.solingonemeter.org).
COASTAL IN-BOOM FURLING SYSTEM. Installation Manual
 COASTAL IN-BOOM FURLING SYSTEM Installation Manual 1 TABLE OF CONTENTS Page Number 3. Disclaimer 4. Components packing list & required tools 5. Gooseneck bracket location 6. Installation sail track 7.
Assembly, Fitting, Care & Maintenance
 Assembly, Fitting, Care & Maintenance Assembly 1.1 Remove All Parts and Tools from Packaging 1.2 Part and Tools required for assembly 1.3 Check Foot & Leg Assembly 1.4 Adjust Upper-Leg-Support (ULS) Height
HOME ASSEMBLY INSTRUCTIONS
 HOME ASSEMBLY INSTRUCTIONS This Papillionaire Bicycle now belongs to you. It will take you to work, wait patiently outside your local cafe, and carry your groceries home. This is the start of your long-term
Sonar Tuning Guide. Jud Smith Tomas Hornos Send order forms to:
 Sonar Tuning Guide Jud Smith jsmith@doylesails Tomas Hornos tomas@doylesails.com Send order forms to: onedesign@doylesails..com Rig Tune We recommend checking your shroud tuning before going sailing. Start
2018 Osprey Yacht Club
 Page 1 2018 Osprey Yacht Club Optimist Sailboat Youth Training Manual Or How to have a lot of fun on a small sailboat! Revision Date: August 19, 2017 Page 2 Table of Contents Table of Contents... 2 What
A Basic Guide to Europe Dinghy Rigging
 The Basics: A Basic Guide to Europe Dinghy Rigging Use the smallest blocks available for the line size. Most of the blocks on your boat will be micro blocks. Examine all of your rigging and ensure that
Sailing Upwind. Section 14. Close-hauled. Starboard Tack. Port Tack Figure 14 1 Port Versus Starboard Tack. 14 Sailing Upwind 111
 14 ing Upwind 111 Section 14 ing Upwind Close-hauled. ing as close to the wind, or as directly into the wind, as possible. Also, on-the-wind or by-the-wind, beating. Cunningham (Rig). An arrangement of
Set-up and Tuning Notes: 17 September 2012
 Set-up and Tuning Notes: 17 September 2012 This document is being continually updated. Please check the release date above regularly to ensure you have the most recent edition. We appreciate any feedback
1997 Transformer Bump & Jump
 1997 Transformer Bump & Jump Rigging & Fine Tuning Guide 1) Roll out the sail, insert the foot batten and tension it. 2) Slide the mast through the luff sleeve (see diagram 1). Note: When rigging with
HOBIE TEDDY ASSEMBLY MANUAL
 ASSEMBLY MANUAL HOBIE TEDDY HOBIE CAT EUROPE ZI Toulon Est, BP 50 83078 Toulon cedex 9, France Tel : +33 (0)494 08 78 78 - Fax : +33 (0)494 08 3 99 Email : info@hobie-cat.net - http://www.hobie-cat.net
Sail Trimming Guide for the Beneteau 40
 INTERNATIONAL DESIGN AND TECHNICAL OFFICE Sail Trimming Guide for the Beneteau 40 October 2007 Neil Pryde Sails International 1681 Barnum Avenue Stratford, CONN 06614 Phone: 203-375-2626 Fax: 203-375-2627
Welcome to the. National Twelve Owners Association. Dear National 12 sailor
 Welcome to the National Twelve Owners Association Dear National 12 sailor Welcome to the National 12 Owners Association. The Association organises many events and activities during the year and I would
Section V Sailing off the wind
 Section V Sailing off the wind 1 Sail shapes and flow patterns - off the wind a) Principles When reaching, it is maximum thrust which is important, and here the leech ribbons come into their own. Fig.43a
Now we get to the really fun part of cat sailing, but first you need to know about apparent wind.
 Shelley Sailing Club Inc. Notes for informal catamaran training course, Alec Duncan, 14/3/2015 Part 4: Reaching and running Now we get to the really fun part of cat sailing, but first you need to know
Raider 16/Sport - Spinnaker Rigging. Rigging Spinnaker
 Rigging Spinnaker Step 1: Run the spinnaker halyard (minimum 52' in length) through the block then back down the mast. Step the mast as you normally would. Step 2: Temporally tie one end of the spinnaker
The Mirror, Rigging and Improving Performance. Series One, Basic Improvements
 The Mirror, Rigging and Improving Performance Short notes to help you towards that elusive goal of perfect performance. Series One, Basic Improvements Angus Carlisle Mirror Fleet Captain, 2005 Ripon Sailing
TUNE YOUR SAILS SPEED. Viper 640 Tuning Guide. Rev. R03b
 TUNE YOUR SAILS FOR OUTRIGHT SPEED Mast Tuning Tuning Guide for the Carbon Mast SET SPREADER ANGLE Check spreader angle by placing a straightedge or string from shroud to shroud at the spreaders. Measure
 Table of content Introduction 5 1. Part 1. Assembly 6 1.1. Tools needed for Assembly 6 1.2. Glossary 6 1.3. Hulls 7 1.3.1. Mounting the beams 7 1.3.2. Fixing the mast rotation cleats 8 1.3.3. Mounting
OWNER S MANUAL. for Inters and Nacra F-18
 OWNER S MANUAL for Inters and Nacra F-18 Tools you ll need: 9/16 socket Wrench Phillips Screwdriver Allen Wrench (included) HULL ASSEMBLY Place hulls boxes approx. 8 feet apart. Make sure both hulls are
TUNE YOUR SAILS FOR OUTRIGHT SPEED. MC Scow Tuning Guide. Rev Q10
 TUNE YOUR SAILS FOR OUTRIGHT SPEED Rev Q10 Sail Designs Z-MAX MAINSAIL The Z-MAX has proven to be a fantastic all around sail for all sailors. Simple to set up, easy to use and trim. This new sail has
Paper Tiger Catamaran International Association MEASUREMENT FORM
 Paper Tiger Catamaran International Association MEASUREMENT FORM Amended June 2000: July 2002: April 2012 Name of boat: Sail No: Owner s name: Owner s address: Postcode: Phone: (H) (B) (Mob.) Email: Owner
ESOCCI RIGGING MANUAL
 ESOCCI RIGGING MANUAL 1 Spray Covers Hull Rear Iako Forward Iako Ama ESOCCI RIGGING MANUAL 2 When training & racing in outrigger canoes, the canoe is your protector on the water and therefore it is imperative
Over Deck Control Lines V1
 Over Deck Control Lines V1 1 - Pack Contents Downhaul control line Outhaul control line Downhaul takeup elastic 3 x 30mm block Traveller line (with pre-spliced loop) 2 x Side deck strops 2 x Ronstan Shocks
Peinert ZEPHYR. Assembly. The Zephyr is easily rigged; there are only three removable parts - the seat, the foot stretcher, and the rigger arm.
 Peinert ZEPHYR Assembly The Zephyr is easily rigged; there are only three removable parts - the seat, the foot stretcher, and the rigger arm. Removal and installation of the seat. If the seat is in the
CRUZBIKE Quest 2.0 Assembly
 CRUZBIKE Quest 2.0 Assembly CRUZBIKE Quest 2.0 Assembly... 1 General notes on assembly... 2 Un box and evaluate the frame and major parts... 2 Unfold the rear swing arm and arrange the frame... 3 Rear
CSC Learn to Sail Class
 CSC Learn to Sail Class JUNE 2014 Pedram Leilabady LNYC Nomenclature Sailors Lingo! Direc@ons Ahead Astern 1 6/3/14 Main Parts Mainsail Jib Sails / Spars Head Mast Head Leech Luff Leech Luff Mainsail Clew
Setup &Tuning guide. Updated 1st February 07
 Setup &Tuning guide Updated 1st February 07 Boat preparation Tape a piece of batten to the backstay ram with a calibrated scale drawn on it. This will allow you to reproduce the same backstay settings
Sail Trimming Guide for the Beneteau 373
 INTERNATIONAL DESIGN AND TECHNICAL OFFICE Sail Trimming Guide for the Beneteau 373 March 2004 Neil Pryde Sails International 354 Woodmont Road #18 Milford, CT 06460 Phone: 203-874-6984 Fax: 203-877-7014
CLASS RULES Closed Class Rules for a Manufacturer Controlled Class
 CLASS RULES 2016 Closed Class Rules for a Manufacturer Controlled Class DRAFT ONLY Revision 6: July 2016 INDEX PART I ADMINISTRATION Section A General A.1 Language... 4 A.2 Abbreviations... 4 A.3 Authorities...
Navaro Buggy Instruction Manual INSTRUCTION BOOKLET
 INSTRUCTION BOOKLET Safety Thank you for purchasing your new Flexifoil buggy. If operated and looked after properly, your new buggy will serve you well. Before assembling and using this buggy, you must
DO NOT use any Alien Flier Zip Line Products or Accessories until you read and understand these SAFETY WARNINGS!
 ! WARNING DO NOT use any Alien Flier Zip Line Products or Accessories until you read and understand these SAFETY WARNINGS! A zip line can be very dangerous. Do not use this kit if you do not understand
Sail Trimming Guide for the Beneteau 343
 INTERNATIONAL DESIGN AND TECHNICAL OFFICE Sail Trimming Guide for the Beneteau 343 June 2006 Neil Pryde Sails International 1681 Barnum Avenue Stratford, CONN 06614 Phone: 203-375-2626 Fax: 203-375-2627
INSTRUCTION MANUAL. January 23, 2003, Revision 0
 INSTRUCTION MANUAL Model 810A In-Vitro Test Apparatus for 310B Muscle Lever January 23, 2003, Revision 0 Copyright 2003 Aurora Scientific Inc. Aurora Scientific Inc. 360 Industrial Parkway S., Unit 4 Aurora,
WIND CLIPPER KTS ILLUM SCALE INC DEC CLIPPER WIND SYSTEM
 CLIPPER WIND KTS ILLUM SCALE DEC INC CLIPPER WIND SYSTEM TABLE OF CONTENTS INTRODUCTION PRE-TEST OF INSTRUMENT INSTALLING THE MASTHEAD SENSOR UNIT INSTALLING THE DISPLAY NORMAL OPERATION CHANGING THE