Instructions for Birth Pool in a Box
|
|
|
- Trevor Lee
- 5 years ago
- Views:
Transcription


1 Instructions for Birth Pool in a Box
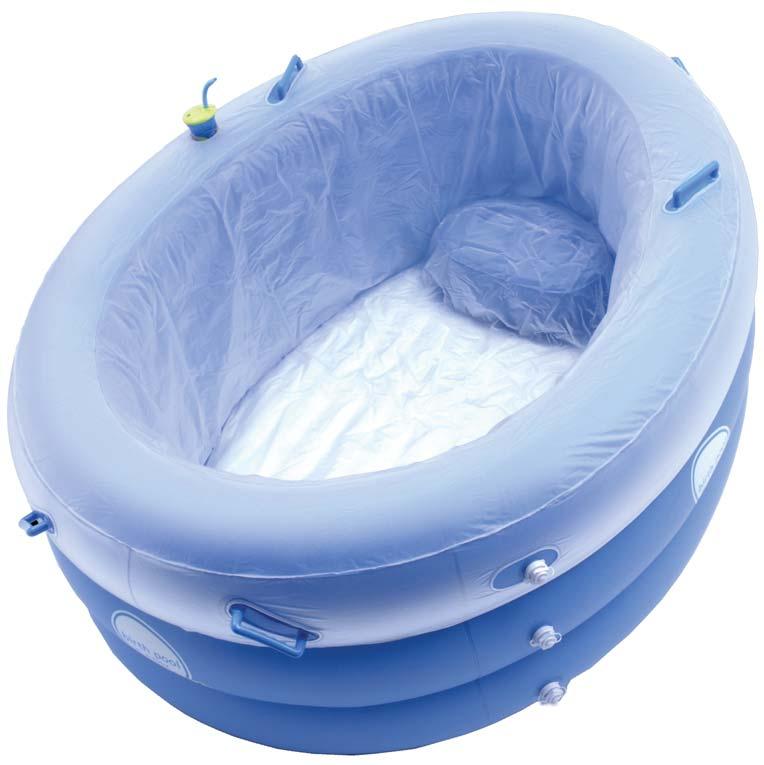
2 Thank you for purchasing Birth Pool in a Box! We aim to make the use of water for labour and birth accessible for all women. We hope you are able to enjoy the benefits as many women have done with Birth Pool in a Box. Preparation is a key success factor - take time to read these and avoid disappointment. To help us improve our products or service, please send us feedback through the internet at Best wishes for your birth! The Good Birth Company Table of Contents Warnings & Important Information 3 12 Steps to Success with your Birth Pool in a Box 4-5 Things to Do Before Labour Begins 6 Setting up your Birth Pool in a Box 6-7 Filling Pool 8-9 Emptying the Pool 9-10 Cleaning and Packing Away 11 Troubleshooting 11 Warranty Returns Information back cover back cover! WARNINGS & IMPORTANT INFORMATION - READ THESE NOW Our birth pools are personal products - for use by one woman only - unless they are marked as a Professional or Hospital Grade model. Do not accept a Personal pool as a loan or hire pool, This is marked on the pool labels on the bag and next to the top large white valve on the pool. Store at above 5 C (41F) indoors Read and follow all instructions before opening the pool and setting up Remove pool from all packaging and warm up to room temperature for 72 hours before unfolding and handling Do a practice set-up of the pool at weeks to familiarise yourself with it and check it Do not use the pool outdoors before using it for birth Do not inflate the pool to a height of more than 28.5 (72cm) for all pools except 09-R Regular with cupholder (09-R) not more than 30.5 (77cm) Always ensure the pool and liner are at room temperature before unfolding, inflating or folding. This takes 72 hours - see page 6 for details. Do not use an industrial compressor to inflate the pool Ensure all plugged-in portable mains electrical devices are not able to reach the pool with water in it to avoid risk of accidental electric shock Ensure this pool is placed on a surface strong enough to support its filled weight including occupants and supporters (see page 8 for details) Ensure the pool is placed on a flat surface free of sharp objects and prepare the surface thoroughly before setting up and filling the pool Do not fill the pool with water above 45 C Inflatable products naturally lose a small amount of pressure over time - top up before use and secure valves tightly Inflatable products are affected by changes in temperature - if the pool appears to have lost pressure overnight, top up with air, check all valves are securely closed and check after 4 hours at constant temperature Check any applicable local laws regarding child safety fencing if using pool outside as a leisure pool Do not allow children to handle or use the tap connectors or hosepipe. Always consult a qualified midwife or doctor before using this pool for birth Always supervise children playing in or near the pool 2 3
3 12 Steps to Success with your Birth Pool in a Box These are distilled from our experience supporting thousands of home water births. Get most or all of these sorted and you've given yourself the best chance possible. Note: these assume that you have discussed using water for labour or birth with your midwife and have decided to go ahead. 1 Plan for Success Assume that you will have your home water birth and plan accordingly. To do otherwise undermines your chances of success. Labour is often unpredictable but if events take a different course you can know that you did everything you could to achieve the birth you wanted. 2 Involve your partner Get your partner involved! Have him review the instructions and technical specification and take ownership of the set up, filling, temperature management and emptying. 3 Check the floor strength - your pool filled with water will weigh up to 650kg If not using pool on ground floor, ask a wood preservation company to check the integrity of your home's floor boards and joists. They will usually do a free quote for any work required. In the UK, they can be found in the classification Woodworm & Dry Rot Control in Yellow Pages or on Yell.com. 4 Review instructions Takes 10 minutes. Do it at weeks, then follow them! 5 Check tap connectors and hose Check that you have a tap connector that fits a suitable tap in your home. If not, either buy an alternative (eg. at B&Q) or try a different tap. Then check that your hose will reach from tap to pool. 6 Check hot water capacity If you don't have an on-demand boiler, test how long it takes to fill the bath 4 times (for Regular pool, 2.5 times for Mini). If it take more than 1.5 hours, consider how to create hot water in other ways, eg kettle, urn, large pans on stove. Be careful where you pour hot water! 12 Steps to Success with your Birth Pool in a Box continued 7 Prepare the floor Sweep or vacuum the floor before putting the pool down. If your floor is stone or ceramic, cover it with a blanket first to reduce heat loss through floor. 8 Warm up the pool Make sure the pool and accessories are at room temperature before unfolding and handling. PVC is brittle below 10C (52F) and it takes 72 hours for the innermost material to warm up when the pool is folded and out of its packaging. 9 Practice set up Practice setting up the pool between 36 and 38 weeks. You can always sell the pool on Ebay later if you don't use it. A full practice including filling with water is even better and soaking in a pool can help with late pregnancy back pains and SPD. Remember to use a new liner for birth. 10 Reduce ventilation When you start to fill the pool with water, close the windows and doors to reduce ventilation. Once the room reaches equilibrium humidity, the rate of heat loss will fall by half. Covering the pool before getting in also helps. 11 Start filling the pool early If your labour is progressing fast, fill the pool at 37ºC. If it is early days but you want to get started, fill half full at 40ºC and take stock before continuing. Do not get into a pool with water above 37ºC - you will be hot in labour and overheating can be dangerous for your baby. 12 Mix the water Mix up water before taking a temperature reading. This is especially true if you are adding hot water at the bottom of the pool. 4 5


. Inflate 3 side chambers, lowest first.")


 to retain stability. Over-inflation is a cause of Fitted Heat Cover failure. Some heat covers do not have an inflatable centre.")
4 Things to do before labour begins Setting up your Birth Pool in a Box - 15 to 45 minutes continued Check that the Tap Connectors you have will fit a set of taps in your home. While we have provided options that will work with most taps in the Basic and Standard Kits, we cannot guarantee that any supplied by us will fit your taps. You can get alternatives at good hardware stores eg. B&Q. Read the instructions - they have been created from many experiences with the pool! Estimate how long it will take to fill the pool with your hot water system: the Regular Pool is approx 4 bathtubs full of water and Mini Pool bathtubs. Practice setting up the pool to familiarise yourself with it before labour begins. Warm pool up to room temperature before unfolding. Remove jewellery or other sharp items from your body and clothing. Setting up your Birth Pool in a Box - 15 to 45 minutes IF THEY ARE COLD TO THE TOUCH, DO NOT UNFOLD OR INFLATE Actions Ensure Pool and Disposable Liner are both at room temperature before unfolding and inflating. Remove from all packaging and leave to stand for 72 hours if they have been exposed to temperature below 10 C (50 F). - the material becomes brittle at low temperatures. Prepare floor area: remove sharp objects sweep/vacuum place Floor Cover on floor If your floor is concrete, stone or tile, place a rug or blanket flat underneath to reduce heat loss into floor. The pool width increases when filled with water - leave 4 (10cm) space to the nearest wall. Tips The midwife will want room to assist from at least 3 sides of the pool. A floor covering is recommended. Actions Screw round flange tightly into three large white valves and ensure cap is removed (see picture). Inflate 3 side chambers, lowest first. Leave top chamber less than fully inflated - sagging - to enable Disposable Liner to be fitted. Place Disposable Liner on pool with holes fitting over handles and valve to secure liner. Complete inflation of top chamber. Discuss with your midwife whether the pool height is appropriate. To reduce total height, open valve on middle chamber for a few seconds. Then add air to the top and bottom chambers to increase firmness. Inflate centre of Fitted Heat Cover (if applicable) until most of creases just disappear and set aside. Top up the wall chambers and put away Electric Inflate - Deflate Pump and any other portable mains electrical devices before filling pool with water. Tips Twist nozzle as you insert. Over-inflation is a cause of failure. Do not exceed 28.5 (72cm) total height or 30.5 (77cm) if 09-R Regular pool with cupholder. Liner can stretch. Always use a new Disposable Liner for birth. Middle chamber must be at least 8 (20cm) to retain stability. Over-inflation is a cause of Fitted Heat Cover failure. Some heat covers do not have an inflatable centre. 6 Lift floor valve 5cm above floor, place nozzle in valve and Inflate floor until creases have largely disappeared and you cannot feel the floor when standing on it. Repeat with seat (not on all models) - inflate and close valve firmly. Twist nozzle in valve if pumping is difficult - outlet may be blocked by material. One side of base of the valve can be pushed open by the nozzle. Try different angles! Insert until you get a soft click. Over-inflation is a cause of floor seam failure. Fit Cover over top chamber of pool, with holes placed over handles and large white air valve. This is a snug fit. Prepare other items you need., e.g. a clean bowl/bucket to remove water if required when topping up. 7
5 8 Filling Pool - 30 minutes to 2.5 hours ALWAYS USE A DISPOSABLE LINER EVEN FOR PRACTICE RUNS Filling time depends on your hot water system. A powerful on-demand combi boiler will fill the pool in about 40 minutes. Always use a Disposable Liner even for practice runs - it is a back-up container for the water in case of an accident or problem. The warranty is voided if you do not use a Disposable Liner each time and a new Disposable Liner for the birth. 1 Attach tap-hose connector to tap and secure hose onto connector. 2 Run warm water through hose into a sink or drain for 2 minutes. Then turn taps off. 3 Push the open end of hose through a top handle and lay on floor of pool. If your liner has a Hose slot, then slide the hose into this to secure it while filling. 4 Begin filling pool with water at approx 37 C. The water temperature will fall approx 2 C while filling without a Cover and less than 1 C with one. DO NOT BEGIN FILLING WITH ONLY HOT WATER - this may damage the Filling Hose, Disposable Liner and Pool. 5 Once the water covers the floor of the pool, flatten and smooth out folds and kinks in the Disposable Liner around the floor and seat (if applicable), removing any air pockets. Place Cover over pool, with holes fitting over handles. Turn off the taps and remove the hose to do this, and then push the hose through a top handle and through the hole in the Cover until the end of the hose rests on floor of pool. 6 Mix up water and monitor water temperature every 15 minutes and adjust as required. 7 Fill with water to top of middle chamber - the level of the MINIMUM water mark on the liner. 8 Remove any Heat Cover, Thermometers and Filling Hose from pool before entering. 9 Secure MyAnchor (black strap - if applicable) to the outer handles of the pool away from the top handles and adjust strap length as required. An additional turn back through the buckle prevents slipping. Never re-use a hose that has been used to empty a pool after birth. Too little hose inside pool may result in water spraying! Go 1-2 C higher if you plan to enter the pool a few hours later, or more if you do not have a Cover. Do not use water above 45 C. Do this before the water is 2 inches deep or the liner will be hard to move. Air is expelled through holes around top handles, or grommets. Read thermometer instructions! You can add more water later if needed. Filling Pool continued Filling Time Filling time depends on your water supply and can range from 30 minutes to 2.5 hours. Should you need to speed up filling and are short of hot water, heat water on stove and add this water to the pool, taking care that the woman is out of the pool and POUR THE HOT WATER AWAY FROM THE SIDES OF THE POOL. Then agitate the water to diffuse the hot water around the whole pool. The time to start filling the pool is in early labour. It's better to be a little early than too late! Maintaining the Temperature This can be the responsibility of the woman's partner. With the Fitted Heat Cover or ClearFit Cover on, the water will only lose approximately 0.5 C per hour, depending on the temperature, humidity and air flow where the pool is located. To adjust the temperature to body temperature, simply remove some water with a clean bucket and add hot water either through the hose or from a pan/kettle as required - WOMAN MUST GET OUT FIRST. POUR HOT WATER AWAY FROM SIDES OF POOL. Water Freshness The water remains fresh for approximately 24 hours. After that, we advise that you empty the water and refill the pool. If your Submersible Water Pump has been used before, remove the Disposable Liner and put a new one in place before re-filling the pool - trapped water in the pump may have harmful bacteria inside. Practice runs You may wish to have a practice run, setting up and filling the pool. To do this, we strongly recommend you to buy an extra Disposable Liner to ensure that the liner you use for the birth is clean. Never fill the pool with water without a Disposable Liner. Emptying the Pool Method A - Using Electric Submersible Water Pump with the filling hose minutes 1 Remove any debris from the water with a strainer and discard. 2 Attach the smallest adapter from box onto top of Submersible Water Pump. Push one end of Filling Hose onto adaptor nozzle. 3 Lower pump to bottom of pool at one end of the pool, with any suction cups facing down to the floor.. 4 Place other end of hose in a toilet or outside drain. Plug in and switch on pump at socket. Debris may block the Submersible Water Pump. It may be necessary to soften the hose end with warm water and/or use a blunt knife to expand the hose. The suction cups will not work on the liner. Check Submersible Water Pump instructions for troubleshooting. 9
6 10 Emptying the Pool continued Method A - Using Electric Submersible Water Pump with the filling hose minutes 5 When pump starts to suck air, remove liner from one end and pull towards pump to increase water depth. Unplug pump once water stops flowing. 6 If you plan to use pump again do the following: Empty a bucket of fresh water using pump and hose. Refill bucket and add Milton sterilising fluid or tablets. Place open end of hose in bucket and plug pump in to cycle fluid around. Leave to stand for 30 minutes. Drain pump and hose and stand/hang to dry. 7 Dispose of items disposable and not required again: e.g Disposable Liner, Cover (if colourless), MyAnchor, Strainer, Thermometer, Filling Hose, Submersible Water Pump, Tap Connector. Method B - Siphon using Filling Hose 1 Remove any debris from the water with a strainer and discard. 2 Start a siphon: Place entire Filling Hose in water and ensure it is filled with water. Leave one end under the water, place thumb over other end and take to a drain lower than pool floor. Release thumb. 3 Remove Disposable Liner from one end and pull towards hose end to make water deeper. 4 Dispose of all items disposable and not required again: Disposable Liner, Strainer, MyAnchor, Thermometer, Filling Hose, Tap Connector, Cover (if colourless). Do not leave pump unattended. Re-using the pump & hose after a practice run or relaxation soak is not a problem if you follow these instructions. Re-using them after birth is not recommended and voids the warranty. The Disposable Liner can be used as a bag for all these items. Emptying time depends on length of hose, hose end's vertical height below pool and number of siphons: you can cut hose and set up second siphon. Water will stop flowing once hose end comes out of water. The liner can be used as a bag for all these items. The colourless Fitted Heat Cover is disposable. Cleaning and Packing Away 1 Wipe pool and Fitted Heat Cover (if blue) with a cloth soaked in detergent. Soak a cloth in Milton sterilising solution and wipe again. Stand to dry. 2 Deflate pool by opening all valves to deflate position. Floor and seat will need to be actively deflated using a pump. 3 Fold pool to fit into nylon bag. Air will be expelled through large valves as you fold. Troubleshooting Birth Pool in a Box For a complete FAQ on Birth Pool in a Box, please visit and look under the menu item CUSTOMER SUPPORT Problem Pool sides not firm enough Pool appears to deflate rapidly Side walls too high to get out safely Pool loses heat faster than expected Temperature measurements differ with different thermometers Submersible Water Pump not working Actions Move pipe or nozzle on pump to the deflate position marked on pump. The bag is generouslysized. Add air to pool with pump. Do not use Electric Inflate-Deflate Pump if pool has water in it. Stop when total height is (71-72cm) - pool should then be firm enough to sit on side walls for women less than 15 stone (95kg). For a Regular pool with cupholder (09-R) stop at (76-77cm) Re-inflate and check all valves are secured. If re-occurs, re-inflate and listen for any air leak and patch over leak with repair kit, or use Duck/Gaffer tape. If this doesn't solve problem, contact The Good Birth Company. Sit on sides and swing legs over. Alternatively, open top or middle chamber valves to release air, reducing height. Opening the top valve also reduces width as woman exits. Close windows and doors. Turn on heating in room. Place Fitted Heat Cover on when woman is not in pool. Close forced-air vents in the room if applicable. If floor is stone or tile, empty pool and place blankets under pool. Check that pool water is mixed, reading is taken from same place and thermometer instructions are followed. Check electricity supply. Then check manufacturer's instructions - pump may be blocked by debris. Strain water and unblock pump then try again. 11

7 Warranty This warranty applies only to the original purchaser. We will replace any Personal or disposable product with a manufacturing defect reported and returned within 60 days of shipment. You must do a practice set-up of the pool in time to return the item for inspection and receive the replacement before your birth. We inspect the returned items and contact you to arrange either a replacement or to refund you within 5 working days of receipt. You must contact us before sending any products using the form at The warranty period for Professional or Hospital Grade products is one year or 20 uses, whichever is earlier. This warranty does not cover punctures, cuts or abrasions caused by careless handling or improper storage in contravention of the instructions. Returns Information See separate documentation provided by the retailer you purchased from. If you purchased directly from The Good Birth Company, please visit and contact us before returning. Check that your name and order reference are on the pool box and inside before returning.
WATER SLIDE. Limbo Beach
 84694 Limbo Beach WATER SLIDE IMPORTANT SAFETY INSTRUCTIONS. PLEASE READ AND SAVE THESE INSTRUCTIONS BEFORE SETUP AND USE. KEEP THESE INSTRUCTIONS IN A SAFE PLACE FOR FUTURE REFERENCE. FOR AGES 5-12 ADULT
OWNER S MANUAL AirTop Large and AirTop Small
 It is the owner s responsibility to read and understand the material presented in this manual and to instruct all users or operators on how to use product safely. By inflating the product, you hereby agree
INFLATION STATION. Cordless OWNER S MANUAL MODEL NO: RCP-C65B
 [ACT 050] Manual E 4/4/06 4:34 PM Page 1 Cordless INFLATION STATION OWNER S MANUAL MODEL NO: RCP-C65B KEEP THE ORIGINAL BOX, PACKAGING AND RECEIPT. BEFORE OPERATING THIS UNIT, READ THE MANUAL THOROUGHLY
ROUND ASSEMBLY. Positioning
 ROUND ASSEMBLY Positioning To ensure maximum enjoyment and efficiency, consider the following steps when selecting the desired location of you pool. Select a location that receives maximum sunlight for
TABLE OF CONTENTS. Hello! Happy Paddling, SAFETY WARNING WHAT S INCLUDED IN YOUR BOX GENERAL USE INFORMATION INFLATION INSTRUCTIONS FIN INSTALLATION
 Hello! Thank you for purchasing an inflatable stand up paddle board and WELCOME TO THE TEN TOES FAMILY! We are a small team of outdoor adventurers who strive to make paddle boarding as enjoyable and fulfilling
Instruction Manual for Configura Cushionair Portable Pump
 Instruction Manual for Configura Cushionair Portable Pump Fitted with battery powered pump, suitable for Configura Portable chairs V E R S I O N O N E M A Y 2 0 1 6 Contents Introduction 3 Set up of Cushionair
IMPORTANT SAFETY INSTRUCTIONS. PLEASE READ AND SAVE THESE INSTRUCTIONS BEFORE SETUP AND USE. KEEP THESE INSTRUCTIONS IN A SAFE PLACE FOR FUTURE
 31562 Spray N Splash ELEPHANT POOL IMPORTANT SAFETY INSTRUCTIONS. PLEASE READ AND SAVE THESE INSTRUCTIONS BEFORE SETUP AND USE. KEEP THESE INSTRUCTIONS IN A SAFE PLACE FOR FUTURE REFERENCE. FOR AGES 3+
12V AIR STATION ALL-IN-ONE
 [ACT 027] Manual E 6/9/05 10:18 PM Page 3 Multi use 12V AIR STATION ALL-IN-ONE OWNER S MANUAL MODEL NO: C71A-54 KEEP THE ORIGINAL BOX, PACKAGING AND RECEIPT. BEFORE OPERATING THIS UNIT, READ THE MANUAL
Spray N Splash JUNGLE FUN POOL
 23188 Spray N Splash JUNGLE FUN POOL IMPORTANT SAFETY INSTRUCTIONS. PLEASE READ AND SAVE THESE INSTRUCTIONS BEFORE SETUP AND USE. KEEP THESE INSTRUCTIONS IN A SAFE PLACE FOR FUTURE REFERENCE. FOR AGES
PIRATE SHIP. Ahoy Matey
 59073 Ahoy Matey PIRATE SHIP IMPORTANT SAFETY INSTRUCTIONS. PLEASE READ AND SAVE THESE INSTRUCTIONS BEFORE SETUP AND USE. KEEP THESE INSTRUCTIONS IN A SAFE PLACE FOR FUTURE REFERENCE. FOR AGES 5+ ADULT
VAC-U DRIVE Swinging float arm for Acrobat like agility 36 Fin disk with DEEP VEE Scoop
 ACROBAT Vac-U-Drive Automatic Pool Cleaner VAC-U DRIVE Swinging float arm for Acrobat like agility 36 Fin disk with DEEP VEE Scoop Proven technology:diaphragm driven strength & quietness Unique hose design
Everyday INFLATION STATION CORDLESS
 [ACT 050] Manual E 3/30/06 9:43 AM Page 3 Everyday INFLATION STATION CORDLESS OWNER S MANUAL MODEL NO: W03A-54 KEEP THE ORIGINAL BOX, PACKAGING AND RECEIPT. BEFORE OPERATING THIS UNIT, READ THE MANUAL
Inflatable Dock Slide Owner s Manual
 Inflatable Dock Slide Owner s Manual Introduction Water sports can be safe and fun for all levels of enthusiasts. The Owner s Manual is presented to enhance your enjoyment of the sport. It is intended
Sea Rebel Kayak Owner s Manual
 Sea Rebel Kayak Owner s Manual www.ravesports.com Table of Contents Product instructions and warnings...2 Inflating instructions...3 Proper use.. 4 Deflating and storage.........6 Cleaning and troubleshooting...8
SPUD OWNER S MANUAL ALWAYS WEAR A COAST GUARD APPROVED FLOTATION DEVICE WHEN OPERATING THE SPUD KAYAK.
 SPUD OWNER S MANUAL ALWAYS WEAR A COAST GUARD APPROVED FLOTATION DEVICE WHEN OPERATING THE SPUD KAYAK. Know the limits of your abilities and the limits of your equipment. Changes in air temperature and
Pontoon Slide Owner s Manual
 Pontoon Slide Owner s Manual Introduction Water sports can be safe and fun for all levels of enthusiasts. The Owner s Manual is presented to enhance your enjoyment of the sport. It is intended to alert
To purchase replacement parts and accessories, or to obtain technical assistance, visit:
 IMPORTANT Read this guide and follow all instructions carefully before assembling or using this product. To purchase replacement parts and accessories, or to obtain technical assistance, visit: www.splasharoundpools.com
Med Aire Alternating Pressure Pump and Pad System
 User Manual Med Aire Alternating Pressure Pump and Pad System 14002E 14001E Symbols & Statements NOTE Indicates some tips or some information users should be aware of. CAUTION Indicates correct operating
SLIDE. Super Sweet. instruction manual SLIP SLIDE SPLASH INFLATE THE FUN WITH THINGS YOU NEED TO KNOW ABOUT THE SUPER SWEET SLIDE.
 Super Sweet instruction manual INFLATE THE FUN WITH THINGS YOU NEED TO KNOW ABOUT THE SUPER SWEET. SLIP ALWAYS read, understand and follow all warnings and instructions before use. Keep for future reference.
Island Hopper Gator Monster Head & Tail Water Trampoline Attachments
 Island Hopper Gator Monster Head & Tail Water Trampoline Attachments Aqua Sports Technology 11859 Lakeshore North, Auburn, CA 95602 530 268-7310 www.watertrampolines.com Table of Contents Introduction.....2
VANDAL SUP OWNER S MANUAL
 IQ SURF IQ FREE IQ TOURING IQ RACE VANDAL SUP OWNER S MANUAL 1 Dear customer, Congratulations on your purchase of the board. We are proud to bring you a quality product at an affordable price with excellent
Pontoon Slide Owner s Manual
 Pontoon Slide Owner s Manual WWW.RAVESPORTS.COM Copyright 2018 All rights reserved. No part of this publication may be reproduced or transmitted in any form or by any means, electronic or mechanical, including
[ACT 005] Manual E 5/25/05 9:24 PM Page 3 MULTI-FUNCTION
![[ACT 005] Manual E 5/25/05 9:24 PM Page 3 MULTI-FUNCTION](/thumbs/83/88603772.jpg "[ACT 005] Manual E 5/25/05 9:24 PM Page 3 MULTI-FUNCTION") [ACT 005] Manual E 5/25/05 9:24 PM Page 3 MULTI-FUNCTION Air Compressor OWNER S MANUAL MODEL NO: RCP-C62A KEEP THE ORIGINAL BOX, PACKAGING AND RECEIPT. BEFORE OPERATING THIS UNIT, READ THE MANUAL THOROUGHLY
[ACT 005] Manual E 5/25/05 9:24 PM Page 3 MULTI-FUNCTION Air Compressor OWNER S MANUAL MODEL NO: RCP-C62A KEEP THE ORIGINAL BOX, PACKAGING AND RECEIPT. BEFORE OPERATING THIS UNIT, READ THE MANUAL THOROUGHLY
PETERSEN 161-SERIES HIGH PRESSURE LIFTING AIR BAGS OPERATING INSTRUCTIONS WARNING!
 PETERSEN 161-SERIES HIGH PRESSURE LIFTING AIR BAGS OPERATING INSTRUCTIONS WARNING! Read and understand instructions before using Petersen Plugs. Failure to comply may result in property damage, serious
12V Mini Air Compressor
 INSTRUCTIONS FOR 12V Mini Air Compressor Stock No.80999 Part No.DA12/250B IMPORTANT: PLEASE READ THESE INSTRUCTIONS CAREFULLY TO ENSURE THE SAFE AND EFFECTIVE USE OF THIS PRODUCT. GENERAL INFORMATION This
Operation Manual Guillotine Cutter RC-5
 Operation Manual Guillotine Cutter RC-5 Technical Specifications General Safety/Operating Instructions Using the Guillotine Cutter/Crimper Blade Change Instructions Maintenance Instructions This is a detailed
Lil Fun Walker ASSEMBLY INSTRUCTIONS ADULT ASSEMBLY REQUIRED Styles and colors may vary
 Lil Fun Walker ASSEMBLY INSTRUCTIONS ADULT ASSEMBLY REQUIRED Styles and colors may vary Required: Phillips Screwdriver IMPORTANT: Read all instructions before assembly and use of the Walker Keep the instructions
Palau and Hibiscus Inflatable SUP Board Owner s Manual
 Palau and Hibiscus Inflatable SUP Board Owner s Manual www.ravesports.com Table of Contents Warnings...3 Safety.. 4 Equipment. 5 Set up.. 6 How to use SUP Board. 8 Deflation.. 9 Cleaning, storage and repair....10
Pontoon Slide Owner s Manual
 Pontoon Slide Owner s Manual www.ravesports.com Table of Contents Introduction... 2 Safety rules and information... 3 Boat compatibility guide.5 Assembling and using your Pontoon Slide... 6 Cleaning and
Installation of Your SprayMaster System
 Installation of Your SprayMaster System 1. At the installation site, remove all equipment from the corrugated box and the polyethylene drum and replace the drum lid. Check the picture to identify each
OWNER S MANUAL ALWAYS WEAR A GOVERNMENT APPROVED FLOATATION DEVICE WHEN FISHING. Know the limits of your ability and the limits of your equipment.
 OWNER S MANUAL ALWAYS WEAR A GOVERNMENT APPROVED FLOATATION DEVICE WHEN FISHING. Know the limits of your ability and the limits of your equipment. Changes in air temperature and elevation could cause the
12 Volt Inflator. Operator s Manual. Model: ICC12F, ICC12FC, ICC12FCN, ICC12FCM, ICC12N
 Operator s Manual 12 Volt Inflator Model: ICC12F, ICC12FC, ICC12FCN, ICC12FCM, ICC12N 873 E. Citation Court Boise, Idaho 83716 USA 800-874-5771 www.bon-aireindustries.com Safety Guidelines Assembly Operation
12V MINI AIR COMPRESSOR
 12V MINI AIR COMPRESSOR STOCK No.65958 PART No.DA12/250A INSTRUCTIONS IMPORTANT: PLEASE READ THESE INSTRUCTIONS CAREFULLY TO ENSURE THE SAFE AND EFFECTIVE USE OF THIS TOOL. 08/2001 GENERAL INFORMATION
12 Saturn Owner s Manual
 12 Saturn Owner s Manual Water Sports Equipment Inflation, set up and supervision must be done by a mature and knowledgeable adult! Inspect product for any unsafe conditions before use! Do not use if repair
DURAS INFLATABLE BOAT OWNER'S MANUAL
 DURAS INFLATABLE BOAT OWNER'S MANUAL Table of Contents About your new Duras Inflatable Boat Page 1 Assembly Instruction Page 3 Motor Installation Page 5 Capacities Page 5 Troubleshooting Page 6 Using
SILENTAIRE TECHNOLOGY
 SILENTAIRE TECHNOLOGY General User and Maintenance Instructions Thank you and congratulations on the purchase of your PANTHER, the leader in the industry of portable air compressors. The PANTHER is built
Outback Inflatable SUP Board Owner s Manual
 Outback Inflatable SUP Board Owner s Manual www.ravesports.com Table of Contents Warnings....3 Safety...4 Equipment..5 Set up...5 How to use SUP Board.6 Deflation...6 Cleaning, storage and repair...7 Limited
VERTICAL AIR COMPRESSORS
 VERTICAL AIR COMPRESSORS MODEL NO: VE11C150, VE15C150, VE18C150 PART NO: 2226005, 2226000, 2226015 OPERATION & MAINTENANCE INSTRUCTIONS LS0615 INTRODUCTION Thank you for purchasing this CLARKE Vertical
Owner s Guide. ElevateSUP.com
 Owner s Guide ElevateSUP.com IMPORTANT READ THIS IMPORTANT INFORMATION BEFORE USING YOUR STAND UP PAD- DLEBOARD Disregarding any of the safety precautions and instructions contained in the owner s manual
airo-double-naut inflatable kayak made by
 airo-double-naut inflatable kayak made by airo-double-naut by Feathercraft A. B. A. Pivot Foot Pedals for Stern Paddler B. Pump - can be used to inflate and deflate C. C. Rudder and Skeg D. Coaming Rim
Inflatable Ice Rink Owner s Manual
 Inflatable Ice Rink Owner s Manual 10ft x 13ft model shown www.ravesports.com Copyright 2016 All rights reserved. No part of this publication may be reproduced or transmitted in any form or by any means,
aironaut inflatable kayak made by
 aironaut inflatable kayak made by aironaut by Feathercraft The pump can both inflate and deflate. Green tape indicates inflation connection. Made in Canada. Paddled World Wide. 1. Unfold the kayak and
Eaton Filtration, LLC
 Eaton Filtration, LLC 900 Fairmount Avenue, Elizabeth, NJ 07207 Phone: 908-787-1000 Fax: 908-351-7893 E-Mail: filtration@eaton.com Web: www.filtration.eaton.com Installation, Operation & Service Manual
Inflatable Stand Up Paddle Board Manual
 Inflatable Stand Up Paddle Board Manual V-Max AIR 12 6 Voyager AIR 11 6 Koa AIR 10 2 and 10 8 Heavy duty built in carrying handles Steel D Ring Built in Cargo Straps EVA Deck Pad High Pressure Air Valve
Aqua Buddy Owner s Manual
 Aqua Buddy Owner s Manual www.ravesports.com Table of Contents Product instructions and warnings... 2 Instructions on how to use product...3 Water sports safety code... 5 Inflating instructions... 8 Troubleshooting...
80 Litre Suction Oil Drainer
 80 Litre Suction Oil Drainer Please dispose of packaging for the product in a responsible manner. It is suitable for recycling. Help to protect the environment, take the packaging to the local amenity
RAVE Inflatable Pool/Social Floats
 RAVE Inflatable Pool/Social Floats www.ravesports.com Thank you for purchasing this RAVE product. It has been designed and constructed to provide you and your family lasting memories of hours of exciting
MODEL 840 AIR HYDRAULIC PUMP INSTRUCTION
 MODEL 840 AIR HYDRAULIC PUMP INSTRUCTION Jackco Transnational Inc. 202 South El Monte, CA 888-452-2526 www.jackco.com FOR YOUR SAFETY Read all instructions, warnings and cautions carefully. Follow all
Inflatable Stand-Up Paddle Boards SUPS OWNER S MANUAL
 Inflatable Stand-Up Paddle Boards SUPS OWNER S MANUAL WARNING: Read carefully and understand all ASSEMBLY AND OPERATION INSTRUCTIONS before operating. Failure to follow the safety rules and other basic
3 GALLON, OILLESS PANCAKE COMPRESSOR INSTRUCTIONS. Item #31289
 3 GALLON, OILLESS PANCAKE COMPRESSOR INSTRUCTIONS Item #31289 The EASTWOOD 3 GALLON, OILLESS PANCAKE COMPRESSOR, with an Integral Air Regulator, efficiently supplies all compressed air requirements for
SASK-A-POLE OWNERS AND USERS MANUAL
 SASK-A-POLE OWNERS AND USERS MANUAL GENERAL INFORMATION The Saskatchewan Abilities Council s Sask-a-Pole accessibility and transfer aid is designed to help provide safe and easy access to chairs, beds,
Bath Buddy / Bathmate Instruction Book
 Bath Buddy / Bathmate Instruction Book Thank you for purchasing the Bath Buddy / Bathmate portable bath lift. This simple bathing aid is designed The Bath Buddy/Bathmate is all that s needed to gently
Alternating Pressure / Low Air Loss Mattress System
 750000 Alternating Pressure / Low Air Loss Mattress System User Manual Important: Do not operate the Mattress System without first reading and understanding this manual! Save this manual for future use.
Flat Fold Highchair INSTRUCTION MANUAL. Designed and manufactured to BS EN 14988: 2012 IMPORTANT:
 Flat Fold Highchair INSTRUCTION MANUAL Designed and manufactured to BS EN 14988: 2012 IMPORTANT: Thank you for choosing our product. Please read and understand these instructions before using this flat
SSFU SUPER SPRAYFAST UNIVERSAL ADHESIVE APPLICATOR
 S S F U SSFU SUPER SPRAYFAST UNIVERSAL ADHESIVE APPLICATOR MACHINERY DIVISION OWNER S MANUAL UNIT INSTRUCTIONS Please follow all SSFU Safety Instructions. Contact your Duro Dyne Tech Service if you have
Instructions for use Compressed air injector with water trap
 Instructions for use Compressed air injector with water trap Table of Contents Introduction 1. Description of Functions 2. Putting into Operation 3. Instructions for Cleaning and Care 3.1 Disassembling
User Instructions K-Bot RX2/RX3 Pool Cleaner
 Klever Kleena User Instructions K-Bot RX2/RX3 Pool Cleaner K-Bot RX2 K-Bot RX3 8151289 8151289 K-Bot_RX2-RX3_2012.indd 1 15/2/2012 9:59 AM 8151289 K-Bot_RX2-RX3_2012.indd 2 15/2/2012 9:59 AM K-Bot RX2/RX3
Flexi-pro Aerosol Delivery System (FADS) Manual
 Manual") 603-000-010 Flexi-pro Aerosol Delivery System (FADS) Manual Troubleshooting Troubleshooting Problem Solution Problem Solution About Flexi-pro Aerosol Delivery System is able to adapt to a variety of traditional
603-000-010 Flexi-pro Aerosol Delivery System (FADS) Manual Troubleshooting Troubleshooting Problem Solution Problem Solution About Flexi-pro Aerosol Delivery System is able to adapt to a variety of traditional
SILENTAIRE TECHNOLOGY
 SILENTAIRE TECHNOLOGY 8614 Veterans Memorial. Houston, Texas 77088 832/327-7452 800/972-7668 Fax: 832/327-0668 E-mail: silentaire@silentaire.com Thank you and congratulations on the purchase of your OILLESS
VECTA DELUXE SENSORY DISTRACTION STATION INSTRUCTION MANUAL
 VECTA DELUXE SENSORY DISTRACTION STATION INSTRUCTION MANUAL SET UP INSTRUCTIONS Read Instructions First The Vecta is a mobile cart that allows you to take the Multi-Sensory experience from room to room.
AC1810 / AC1810-A TECHNICAL SPECIFICATIONS. Operating Pressure psi ( kgs/cm²) [AC1810] Displacement. Net Weight
![AC1810 / AC1810-A TECHNICAL SPECIFICATIONS. Operating Pressure psi ( kgs/cm²) [AC1810] Displacement. Net Weight](/thumbs/83/88369739.jpg "AC1810 / AC1810-A TECHNICAL SPECIFICATIONS. Operating Pressure psi ( kgs/cm²) [AC1810] Displacement. Net Weight") Technical Specifications Operating Instructions Maintenance Information Troubleshooting Guide Parts Diagrams AC1810 / AC1810-A THE EVOLUTION OF PERFECTION CAUTION: Before attempting to use or service this
Technical Specifications Operating Instructions Maintenance Information Troubleshooting Guide Parts Diagrams AC1810 / AC1810-A THE EVOLUTION OF PERFECTION CAUTION: Before attempting to use or service this
Storm Owner s Manual
 Storm Owner s Manual www.ravesports.com Table of Contents Product instructions and warnings... 3 Water sports safety code... 8 Inflating instructions... 11 Troubleshooting... 12 Cleaning and storage...
User manual STARLOCK. Careways International - Innovation Quality Performance
 EN User manual LOCK Careways International - Innovation Quality Performance Content About this manual... 3 The Starlock cushion... 4 1 Warnings... 5 2 Important parts... 6 3 Use... 8 3.1 The right amount
To purchase replacement parts and accessories, or to obtain technical assistance, visit: or call (909)
") IMPORTANT Read this guide and follow all instructions carefully before assembling or using this product. To purchase replacement parts and accessories, or to obtain technical assistance, visit: www.splasharoundpools.com
IMPORTANT Read this guide and follow all instructions carefully before assembling or using this product. To purchase replacement parts and accessories, or to obtain technical assistance, visit: www.splasharoundpools.com
INFLATABLE STAND UP PADDLEBOARD 10 DRIFTER 10 8 ATR
 INFLATABLE STAND UP PADDLEBOARD 10 DRIFTER 10 8 ATR Thank you for choosing a Hobie Stand Up Paddleboard Start with an unmatched 60 years of revolutionary board building experience, Add the racing and surfing
Booster Pump PB4-60 Replacement Kits
 Booster Pump PB4-60 Replacement Kits FOR YOUR SAFETY - This product must be installed and serviced by a contractor who is licensed and qualified in pool equipment by the jurisdiction in which the product
Eaton Filtration, LLC
 Eaton Filtration, LLC 900 Fairmount Avenue, Elizabeth, NJ 07207 Phone: 908-787-1000 Fax: 908-351-7893 E-Mail: filtration@eaton.com Web: www.filtration.eaton.com Installation, Operation & Service Manual
UK RBF Bath buddy instruction 16pp 21/9/07 09:07 Page 1. Bath-Buddy / Bathmate Instruction Book
 UK RBF Bath buddy instruction 16pp 21/9/07 09:07 Page 1 Bath-Buddy / Bathmate Instruction Book UK RBF Bath buddy instruction 16pp 21/9/07 09:07 Page 2 Thank you for purchasing a Bath-Buddy/Bathmate portable
Valve Cap. Button. Valve Base
 - Riber Inflatable Stand Up Paddle Board Users Guide Thank you for choosing a Riber Product Ltd. Stand Up Paddle board. This guide is to help you get the most out of your board and ensure you enjoy long
Paradise Pump Series Operator s Manual
 Paradise Pump Series Operator s Manual P/N 12421-000 9/05 Paradise Pump Operator s Manual Important Before using the Paradise Pump Alternating Pressure Relief Systems, please read and understand this
(145) GENERIC TYPE-A INFLATABLE MANUAL ENGLISH X /09/2015
 GENERIC TYPE-A INFLATABLE MANUAL ENGLISH X /09/2015") IMPORTANT SAFETY RULES Read and follow all safety information and instructions. Keep for 145 future reference. Failure to follow these warnings and instructions can result in serious injury or death to
IMPORTANT SAFETY RULES Read and follow all safety information and instructions. Keep for 145 future reference. Failure to follow these warnings and instructions can result in serious injury or death to
ASSEMBLY INSTRUCTIONS
 XR 9-2009:new odc 1018 revised 2/17/10 9:11 AM Page 1 ODC XR 9 OUTDOOR DISCOVERY CRAFT ASSEMBLY INSTRUCTIONS Your ODC XR 9 Pontoon Boat comes in two separate cartons consisting of the following parts:
Owner s Instruction Manual
 Owner s Instruction Manual IMPORTANT! PLEASE READ THIS MANUAL CAREFULLY BEFORE PROCEEDING. AFTER READING THIS MANUAL, SAVE THESE INSTRUCTIONS FOR FUTURE REFERENCE. Congratulations on your purchase of the
Rapid Response Shelters. Rubber Product Manual
 Rapid Response Shelters Rubber Product Manual 1 Index Technical Data Parts List Materials List Operational Instructions Packing Maintenance & Procedures Repairs & Storage 3 4 5 6 8 10 11 WARNING: Carefully
Inflatable Stretcher. Product Manual
 Inflatable Stretcher Product Manual MFC International 2017 1 Index Technical Data / Capacity Parts Parts List Materials List Operational Instructions Packing Storage Maintenance & Test Procedures Repairs
Owner s Instruction Manual
 Owner s Instruction Manual IMPORTANT! PLEASE READ THIS MANUAL CAREFULLY BEFORE PROCEEDING. AFTER READING THIS MANUAL, SAVE THESE INSTRUCTIONS FOR FUTURE REFERENCE. Congratulations on your purchase of the
MODEL #7100X A-FRAME LADDER
 SAVE THESE INSTRUCTIONS DEALER/INSTALLER: GIVE TO HOMEOWNER MODEL #7100X A-FRAME LADDER LADDER MUST BE ATTACHED TO POOL FRAME... DO NOT USE WITH INFLATABLE POOLS ASSEMBLY AND INSTALLATION MANUAL The Anti-Entrapment
Standard. Abdominal Aortic Aneurysm (AAA) Repair Trainer. Part No: 60610
 Repair Trainer. Part No: 60610") User Guide Abdominal Aortic Aneurysm (AAA) Repair Trainer Part No: 6060 Standard Part No: 065-088 Issue, June 005 04 Limbs & Things For more Vascular training products visit limbsandthings.com Limbs &
User Guide Abdominal Aortic Aneurysm (AAA) Repair Trainer Part No: 6060 Standard Part No: 065-088 Issue, June 005 04 Limbs & Things For more Vascular training products visit limbsandthings.com Limbs &
BEAM CLAY Soft Touch Bases A Series Premium Bases
 Page 1 Soft Touch Bases A Series Premium Bases Page 2 Soft Touch Bases A Series Premium Bases Page 3 Soft Touch Bases C Series Convertible Bases Page 4 Soft Touch Bases C Series Convertible Bases Page
user instructions and warranty ELK freedom through lightweight solutions
 user instructions and warranty freedom through lightweight solutions The by Mangar International, is a four compartment emergency lifting cushion, which, when operated by a person experienced in its use,
Owner s Instruction Manual
 Owner s Instruction Manual IMPORTANT! PLEASE READ THIS MANUAL CAREFULLY BEFORE PROCEEDING. AFTER READING THIS MANUAL, SAVE THESE INSTRUCTIONS FOR FUTURE REFERENCE. Congratulations on your purchase of the
AQUARIUS. Operating Instructions for the. Type 70 Electrolytic Gas Soldering / Welding Unit. Table of Contents
 AQUARIUS Operating Instructions for the Type 70 Electrolytic Gas Soldering / Welding Unit Table of Contents 1. Important General Remarks 2 2. Safety Instructions 2 3. Description of the Soldering Unit
Spas that free your mind.
 Spas that free your mind. 110-120V 60Hz 1200W Read this manual before operating 1 IMPORTANT SAFETY INSTRUCTIONS When using this electrical equipment, basic safety precautions should always be followed,
DO NOT REMOVE PRIOR TO SALE MD1250
 DO NOT REMOVE PRIOR TO SALE For 40 years Mustang Survival has been committed to providing life support solutions. Through constant innovation and the application of new technologies, Mustang is the leading
Please Do Not Return This Product To The Store!
 MODEL NUMBER: GM000W - GAMEMAKER TORCH O W N E R ' S M A N U A L PLEASE READ AND FOLLOW THIS MANUAL IN ITS ENTIRETY BEFORE USE. DOING SO WILL PROVIDE HELPFUL HINTS THAT WILL AID IN GETTING MAXIMUM USE
Abdominal Aortic Aneurysm (AAA) Repair Trainer User Guide
 Repair Trainer User Guide") Abdominal Aortic Aneurysm (AAA) Repair Trainer User Guide Designed and manufactured by Limbs & Things Limited, Sussex Street, St. Philips, Bristol, BS 0RA, UK. Telephone: +44 (0)7 3 0500 Fax: +44 (0)7
Abdominal Aortic Aneurysm (AAA) Repair Trainer User Guide Designed and manufactured by Limbs & Things Limited, Sussex Street, St. Philips, Bristol, BS 0RA, UK. Telephone: +44 (0)7 3 0500 Fax: +44 (0)7
Aqua Pilot Suction Pool Cleaner
 Aqua Pilot Suction Pool Cleaner PL1810 Installation and User Guide Welcome Congratulations on purchasing the PureLine Aqua Pilot Suction Cleaner. Your new Aqua Pilot is guaranteed to provide you with years
Products For The. Fire & Emergency Services. Cintec International Limited
 Products For The Fire & Emergency Services Cintec International Limited Waterwall Isolation Units Acetylene Isolator Specifications: External Height External Width External Depth Internal Height Internal
Installing ASI Umbilical Delivery Systems
 Rev A 05 Nov 2015 Page 1 of 10 PURPOSE This guide provides an overview of tubing connections into an ASI wall-mounted Junction Box that has already been plumbed with a compressed air connection including
Round pool 52 (1,32m)
") Round pool 52 (1,32m) www.aquabois.com above ground or semi-inground Instructions for the assembly and installation of a wood pool Dear client, Congratulations, you have purchased a pool of superior quality
Round pool 52 (1,32m) www.aquabois.com above ground or semi-inground Instructions for the assembly and installation of a wood pool Dear client, Congratulations, you have purchased a pool of superior quality
TITAN FLOW CONTROL, INC.
 PREFACE: This manual contains information concerning the installation, operation, and maintenance of Titan Flow Control (Titan FCI) Simplex Basket Strainers. To ensure efficient and safe operation of Titan
USER GUIDE ROLLING WALKERS INSTRUCTIONS FOR USE JANUARY, Maximum User Weight: 170kg (Do not exceed this weight)
") USER GUIDE ROLLING WALKERS INSTRUCTIONS FOR USE JANUARY, 2013 Model Nos: BE07889T Maximum User Weight: 170kg (Do not exceed this weight) Model Nos: BE07890TB Maximum User Weight: 227kg (Do not exceed this
USER GUIDE ROLLING WALKERS INSTRUCTIONS FOR USE JANUARY, 2013 Model Nos: BE07889T Maximum User Weight: 170kg (Do not exceed this weight) Model Nos: BE07890TB Maximum User Weight: 227kg (Do not exceed this
VERTICAL AIR COMPRESSORS
 VERTICAL AIR COMPRESSORS MODEL NO: VE15C150, VE18C150, VE25C150 PART NO: 2226010, 2226020, 2226025 OPERATION & MAINTENANCE INSTRUCTIONS LS0715 INTRODUCTION Thank you for purchasing this CLARKE Vertical
ChargAIRE ALWAYS WEAR A GOVERNMENT APPROVED FLOATATION DEVICE WHEN PADDLE BOARDING. Know the limits of your ability and the limits of your Equipment.
 ChargAIRE ALWAYS WEAR A GOVERNMENT APPROVED FLOATATION DEVICE WHEN PADDLE BOARDING. Know the limits of your ability and the limits of your Equipment. Changes in air temperature and elevation could cause
Chapter 2 Rigging. Cutting Wire Rope. Anchoring Wire Rope to Drum. Winding Wire Rope Onto Drum
 Chapter 2 Rigging Cutting Wire Rope The wire rope must be tightly seized on both sides of the point where the wire rope will be cut, as shown in Figure 2-1. Seize the wire rope with either seizing wire
For use with select HPC Fire Pits ONLY- refer to product catalog or website. 100K BTU Maximum WARNING: FOR OUTDOOR USE ONLY
 For use with select HPC Fire Pits ONLY- refer to product catalog or website. 100K BTU Maximum : FOR OUTDOOR USE ONLY Small Tank LP Kit (STLPK) Installation & Operation Instructions Installation We suggest
Paintball Marker. User s Manual. 530 South Springbrook Road Newberg, OR 97132
 Paintball Marker User s Manual 530 South Springbrook Road Newberg, OR 97132 Component Concepts, Inc., 530 South Springbrook Road, Newberg, OR 97132 Phone: (503) 554-8095 Fax: (503) 554-9370 www.phantomonline.com
THE OWNER'S MANUAL IS IN TWO VOLUMES: VOLUME 2 TECHNICAL SPECIFICATIONS - ASSEMBLY PROCEDURE ZODIAC
 CAUTION NOTICE: CAREFULLY READ THIS MANUAL BEFORE OPERATING YOUR BOAT. THIS OWNER S MANUAL IS IN TWO VOLUMES THAT MUST BE KEPT TOGETHER. THE OWNER'S MANUAL IS IN TWO VOLUMES: - VOLUME 1 DEALS WITH OPERATING
Welcome to your new Firepod It will only work properly on Propane Gas (Also known as LPG and Patio Gas) with the special regulator supplied
 with the special regulator supplied") Welcome to your new Firepod It will only work properly on Propane Gas (Also known as LPG and Patio Gas) with the special regulator supplied To enjoy your Firepod safely please read the instructions and
Welcome to your new Firepod It will only work properly on Propane Gas (Also known as LPG and Patio Gas) with the special regulator supplied To enjoy your Firepod safely please read the instructions and
(122PO) DELUXE WALL MOUNT SURFACE SKIMMER ENGLISH SIZE: X 7.25 PANTONE 295U 05/16/2014
 DELUXE WALL MOUNT SURFACE SKIMMER ENGLISH SIZE: X 7.25 PANTONE 295U 05/16/2014") () DELUXE WALL MOUNT SURFACE SKIMMER ENGLISH SIZE: 4.875 X 7.25 PANTONE 295U 05/16/2014 OWNER S MANUAL IMRTANT SAFETY RULES Read, understand, and follow all instructions carefully before installing and
() DELUXE WALL MOUNT SURFACE SKIMMER ENGLISH SIZE: 4.875 X 7.25 PANTONE 295U 05/16/2014 OWNER S MANUAL IMRTANT SAFETY RULES Read, understand, and follow all instructions carefully before installing and