BUOYANCY COMPENSATORS OWNER S MANUAL
|
|
|
- Dominic Mosley
- 5 years ago
- Views:
Transcription


1 BUOYANCY COMPENSATORS OWNER S MANUAL DUI/OMS 11/2017

2 INTRODUCTION OMS BUOYANCY COMPENSATORS OWNER S MANUAL Thank you for choosing OMS. OMS Buoyancy Compensators have been constructed from rugged materials with unique features adaptable to advanced underwater environments. The general design philosophy allows for complete system integration of a number of components achieving high lift capacities, low drag, and increased safety through redundancy. With a selection of different harnesses, different air cells and accessories, a diver can configure his or her system for the specific environment for which they are operating. OMS equipment is intended for use by Certified SCUBA divers and individuals with the training and experience to dive these environments safely. Loss of buoyancy control can result in an uncontrolled descent or an uncontrolled rapid ascent resulting in drowning, decompression sickness, or lung overpressure injuries. Do not use this product until you have read, understood, and followed all instructions and safety precautions in this owner s manual and practiced emergency drills. If the owner s manual is unavailable or lost, another copy may be downloaded at If any portion of this manual is unclear, or if you are unable to obtain satisfactory answers from your dive store or instructor, contact OCEAN MANAGEMENT SYSTEMS GMBH Klosterhofweg 96 Moenchengladbach Germany Support@OMSDIVE.com OMS Equipment is distributed by: North America, South America, Australia, Korea, New Zealand and Japan: DIVING UNLIMITED INTERNATIONAL, INC Delevan Drive San Diego, CA USA +1 (619) (800) Support@DUI-Online.com Europe, Russia, Africa and Southeast Asia: BTS EUROPA AG Klosterhofweg 96 Moenchengladbach Germany Info@BtS-eu.com 2
3 TABLE OF CONTENTS Contents INTRODUCTION... 2 TABLE OF CONTENTS... 3 DEFINITION OF IMPORTANT SIGNAL WORDS USED IN THIS MANUAL... 3 TECHNICAL SUPPORT... 4 SAFETY... 5 INTENDED USE AND APPLICATIONS FOR OMS BUOYANCY COMPENSATORS... 7 LOW PRESSURE HOSE INSTALLATION... 8 INTRODUCTION TO OMS BUOYANCY COMPENSATORS... 8 COMFORT HARNESS II SMARTSTREAM HARNESS SIDESTREAM OMS AIR CELL OPTIONS INFLATORS AND DUMP VALVES ASSEMBLY OF THE MOST POPULAR OMS BUOYANCY COMPENSATORS Weight Pocket Accessories PRE-DIVE CHECKS OPERATING THE BUOYANCY COMPENSATOR POST DIVE AND MAINTENANCE OMS WINGS WITH RETRACTION BANDS WARRANTY SERVICE DEFINITION OF IMPORTANT SIGNAL WORDS USED IN THIS MANUAL Throughout this manual we will use certain words to call your attention to conditions, practices, or techniques that may directly affect your safety. Pay particular attention to information introduced by the following signal words.!!! DANGER!!! Indicates an imminently hazardous situation which, if not avoided, will result in death or serious injury.!! WARNING!! Indicates a potentially hazardous situation which, if not avoided, can result in death or serious injury. 3
4 TECHNICAL SUPPORT! CAUTION! Indicates a potentially hazardous situation which, if not avoided, may result in minor or moderate injury. It may also be used to alert against unsafe practices. If any portion of this manual is unclear, or if you are unable to obtain satisfactory answers from your dive store or instructor, contact OCEAN MANAGEMENT SYSTEMS GMBH Klosterhofweg 96 Moenchengladbach Germany Support@OMSDIVE.com If you lose this manual, please contact your dealer or OMS for another copy. A copy may be downloaded at 4
5 SAFETY IMPORTANT SAFETY INFORMATION OMS Buoyancy Compensators are intended for use by certified SCUBA divers who have successfully completed training under the supervision of a qualified instructor.!! WARNING! Follow all instructions and heed these safety precautions. Improper use or misuse of the buoyancy compensator could result in serious injury or death.!! WARNING!! This owner s manual is NOT a substitute for instruction by a qualified instructor and training agency. DO NOT USE this equipment until you have practiced and mastered practical diving skills, including emergency skills, in a controlled environment under the supervision of a dive instructor, certified by a nationally recognized instructional organization and knowledgeable in the use of this type of equipment.!! WARNING!! Improper use or misuse of this buoyancy compensator could result in loss of buoyancy control, including uncontrolled descents and uncontrolled rapid ascents, resulting in drowning, decompression sickness, or air embolism. This OMS Buoyancy Compensator does not qualify as a U.S. Coast Guard approved life jacket or life preserver. Do not depend upon this system to save your life under any circumstances. It is not designed to float you face up in the water if you are unconscious.!!! DANGER!!! This buoyancy compensator will not float you face up if you are unconscious in the water. If you become unconscious on the surface while wearing this system you will drown if you are face down.! CAUTION! Operating temperature range of the OMS BC system is -20 C (-4 F) to 70 C (158 F). All prudent/known safeguards and procedures should be observed when diving in near or sub-freezing temperatures on the surface and below CAUTION The BCD is only designed to be used as buoyancy compensation system for use in diving. Please don t use for anything else. CAUTION The normal service life of of a BC under normal use is 10 years from the date of manufacturing, At which time please contact your waste disposal provider regarding proper disposal. CAUTION Factory prescribed service of this BC should be performed at least once annually by a authorized OMS Dealer. Annual service consist of the a complete overhaul of the power inflator, and general leak inspection of the bladder(s) and valve 5
6 connections. CAUTION The buoyancy compensator is not a breathing system and the gas should not be inhaled from the buoyancy compensator bladder You should be weighted to allow yourself to remain neutrally buoyancy throughout all depths of your dive. Do not depend solely upon this buoyancy compensator to lift you to the surface. If it is damaged it may not hold air. In certain situations, dropping your weight belt or dropping a portion or all of the integrated weights may be the best method of establishing positive buoyancy to remain on the surface. Before every dive, inspect and test this buoyancy compensator for leakage. Leaks may not be apparent just by visually inspecting the buoyancy compensator. If the buoyancy compensator is damaged in any way, it must not be used until it is repaired. You should have the ability to use the oral inflation function of the power inflator to add air to the buoyancy compensator in the event the power inflator mechanism fails. This is a critical skill Never over inflate the buoyancy compensator. Over inflation of the buoyancy compensator while you are underwater can cause you to experience a rapid ascent.!! WARNING!! Rapid ascents are dangerous and can lead to lung overpressure injuries and/or decompression sickness. Either of these conditions can cause serious injury or death. You must control your ascents and descents by adjusting your buoyancy. Be sure to follow the recommended ascent rate specified by the dive tables or dive computer you are using. If you are using a weight belt, it must have a clear drop path. If your buoyancy compensator is equipped with a crotch strap, the weight belt must be put on last. If you are using the integrated weight system, the weight pockets must be properly attached to the harness. Never use your buoyancy compensator to lift heavy objects underwater. The buoyancy compensator is not designed to be used for this purpose, whether or not you are wearing it. The buoyancy compensator is not a lift bag. If you are wearing the buoyancy compensator and have inflated it to lift a heavy object, if you drop the object the excess buoyancy may cause you to suffer a rapid ascent.!! WARNING!! Rapid ascents are dangerous and can lead to lung overpressure injuries and/or decompression sickness. Either of these conditions can cause serious injury or death. Do not attempt to breathe the air in the buoyancy compensator. The air in the wing may be contaminated with high levels of bacteria. 6
7 The buoyancy compensator must be properly assembled and adjusted for you. If you disassemble the system to change components, and are unsure if you have properly reassembled it, see your OMS dealer to ensure that the buoyancy compensator is functioning correctly. You should never be weighted so heavily with your diving system that you cannot establish immediate positive buoyancy at the surface by ditching your weights. If your buoyancy compensator fails and you cannot establish positive buoyancy at the surface by ditching your weights alone, you may drown. Before each use, be sure to soak the tank bands in water before attaching the buoyancy compensator to the cylinder. After you have attached the tank bands to the cylinder, check the tension to ensure that the cylinder will not fall out of the bands. Tighten the bands as needed. Failure to follow this procedure can cause the cylinder to fall out of the bands, either underwater or on the surface. This can result in injury to you or to other divers close by. INTENDED USE AND APPLICATIONS FOR OMS BUOYANCY COMPENSATORS OMS Buoyancy Compensators are intended for use by Certified SCUBA divers or individuals in training that are under the direct supervision of a certified instructor. It is designed to perform the following functions: Surface Flotation: By adding air to the buoyancy compensator, you can establish positive buoyancy at the surface. This makes surface swimming much easier. Assistance in Controlling Descents: By dumping or adding air to the buoyancy compensator you can help control your descent. You should never start a dive either excessively negatively buoyant or positively buoyant. Keep one hand on your power inflator mechanism continuously during the descent to help control your movement through the water column. Be prepared to add air to stop your descent.!! WARNING!! Rapid descents are dangerous and can lead to pressure injuries and/or drowning. Either of these conditions can result in serious injury or death. Assistance in Establishing Neutral Buoyancy at Depth: You can establish neutral buoyancy at depth by adding just enough air to the buoyancy control system to allow you to hover. However, if you ascend or descend even a few feet, you may need to readjust the amount of air in the BCS. Assistance in Controlling Ascents: Keep one hand on your power inflator/deflator mechanism continuously during the ascent to help control your movement through the water column. As the air expands inside the buoyancy compensator during the ascent you must be prepared to vent air in order to avoid a rapid ascent.!! WARNING!! The deflator must be the highest point in order to dump air properly. Not properly positioning the deflator can cause a rapid ascent which is dangerous and can lead to lung overpressure injuries and/or decompression sickness. Either of these conditions can cause serious injury or death. 7
8 LOW PRESSURE HOSE INSTALLATION Your OMS wing comes with an accessory low-pressure (LP) hose to provide LP air to the BCS s power inflator. The hose needs to be installed by a qualified individual in one of your regulator s LP 3/8 (9.5mm) ports. Care should be taken in selecting an LP port that will allow the hose to be routed to the power inflator with the best/shortest route to the inflator assembly. Notes to Installer:!! WARNING!! Never connect the low-pressure inflator hose to a high-pressure port on your regulator. If the hose is connected to a high-pressure port, it may fail without warning causing severe personal injury. Regulator first stages have LP ports which are 3/8 (9.5mm) and are smaller than the high-pressure (HP) port(s) which are 7/16 (11 mm). However, care must be taken with older regulators where the HP and LP ports are all 3/8 (9.5mm). In most cases, HP ports are marked HP. However, if the output pressure of the port is in question it should be checked. The maximum output pressure of a LP port should be 200psi (13.8 bar). Once an LP port has been located and the plug removed, check that the O-ring is present and in good condition on the hose. The O-ring should be lubricated with the appropriate lubricant (silicone for air use or an oxygen compatible lubricant for Nitrox use). Also check hose fitting to ensure the threads and O-ring are free from dirt or debris. Install the threaded end of the hose into the port using a 9/16 (14 mm) wrench. Do not over tighten. The fitting should be tightened to approximately 3.3 ft-lb (14.7 N! CAUTION! Recommended working pressure of the OMS BC inflator is 120 psi (8.3 bar) to 160 psi (11 bar) INTRODUCTION TO OMS BUOYANCY COMPENSATORS OMS Buoyancy Control Systems are built around a modular design that allows a diver to customize their system. Typically, a complete system consists of a harness, an air cell (wing), and a system to attach cylinders. Accessory pockets can also be added. It is important for a diver to configure a system that fits properly and has enough lift to comfortably support the diver and cylinders at the surface. Tools and emergency items (marker buoys, signal devices, etc.) should be secured such that they are easily available yet do not pose an entanglement hazard to guidelines and mooring ropes. All this is possible with OMS products. HARNESSES OMS have 5 different harness styles available. IQ Lite Pack 8


9 The IQ Pack is a soft pack harness system that can be used as part of a light weight travel rig or can be fitted with a metal back plate for use with high capacity dual cylinders. It has padded shoulder straps with a side release buckle on both sides, sternum strap and an aluminum steel waist buckle. The following sizing information is provided as guidelines. The IQ Lite Pack is extremely adjustable and many people can fit into more than one size. IQ Lite Pack Chest Height Weight Part # Size in cm in cm lbs. kg A S A S A M / L A L IQ Lite Pack Cumber bun The IQ Pack is a soft pack harness system that can be used as part of a light weight travel rig or can be fitted with a metal back plate for use with high capacity dual cylinders. It has padded shoulder straps with a side release buckle on both sides, sternum strap and an aluminum steel waist buckle. The Cumberbun is waist strap that is 3 (7.62 cm) with a velcro attachment. The following sizing information is provided as guidelines. The IQ Lite Pack Cumber bund is available in these sizes: IQ Lite Pack CB Chest Height Weight Part # Size in cm in cm lbs. Kg A S A S A M / L A L


10 COMFORT HARNESS II The Comfort Harness II is a full featured harness with padded shoulder straps with a side release buckle on both sides, sternum strap and an aluminum waist buckle. It also includes adjustable D- ring attachment points. The Comfort Harness II can be assembled with OMS stainless steel or aluminum backplate. Comfort Harness II Aluminum Back Plate Chest Height Weight Part # Size in cm in cm lbs. kg A S - M A L A L The following sizing information is provided as guidelines. The Comfort Harness II is extremely adjustable and many people can fit into more than one Available with Stainless Steel or Aluminum back plate Comfort Harness II also available without the back plate Aluminum Backplate Continuous weave (DIR) A The Continuous Weave Harness is a simple harness that uses one piece of webbing that weaves through the backplate. It has no sternum strap or shoulder release buckles. It is a minimal harness for maximum reliability. Sizing: One size fits all Also Available: Stainless Steel Backplate # A Stainless Steel with Chemical Resistant Webbing (CR) A


 crotch strap with DPV D-ring Sizing: One size fits")
11 SMARTSTREAM HARNESS SmartStream was developed to alleviate configuration challenges which may arise while donning a heavy rig. By pulling the waist stapes forward the shoulder straps secure to the diver s shoulders and back proper adjustment is instantly achieved. This uniquely adjustable OMS system allows the use of OMS weight pockets or place to hold a canister light. The harness use 11.5 ft. (3.5 m) of 2 (50 mm) webbing and 316 Stainless Steel D-rings with stops to prevent slippage. OMS Stainless Steel waist belt buckle, 2 (50 mm) crotch strap with DPV D-ring Sizing: One size fits all Available Styles: Smart Stream Harness, Stainless Steel Backplate A Smart Stream Harness, Aluminum Backplate A Smart Stream Harness, Stainless Steel Backplate and Chemical Resistant webbing (CR) A


12 Adjusting the Smartstream Harness A-BACK PLATE SS OR AL B-SHOULDER WAIST STRAP C-SS SLIP RING D-SS TRI GLIDE E-WAIST STRAP RETAINER F-1 WAIST STRAP LIMITER RIGHT F-2 WAIST STRAP LIMITER LEFT G-W/S LIMITER D-RING H-W/S LIMITER SS BUCKLE I-WAIST STRAP TRI GLIDE J-D-RING & TRI GLIDE k-limiter DISTANCE L-SHOULDER The Smartstream adjustable shoulder/waist strap alleviates the fixed shoulder/waist strap lengths typically found on most DIR harness. 1. Adjustment starts the the shoulder/waist strap travel limiter assembly consisting of, limiters F-1 or F2, webbing E and Tri Glide D. Ideally starting point is placing the limiters F-1 and F2 sit on the outboard side of the diver s waist. Adjustments to length K is made by taking up or letting out webbing E though the Tri Glide D. 2. Once F-1 and F-2 are in position put the harness assembly on adjust the shoulder waist strap B by pulling the waist strap ends and buckling it. 3. Look at the positions of Tri Glide I and D-Ring & Tri Glide J. Distance K the distance between J and F-1 and I and F-2 determines the amount of slack that can be pulled into the shoulder straps B when the waist belt buckle is un done. Example a distance K of 3 in (7.6 cm) will low the shoulder straps to loosen up that much. 4. Each diver needs to work out the distance of L and K to best meet there needs. On the divers right side of the harness F-2 is equipped with a buckle H. Buckle H can be used to secure the end of webbing E. This provides a mounting point for a canister light or accessory pocket to 12


13 Installation of Weight Pocket Smartstream Harness This illustration show the right side installation however the process outlines below applies to both sides 1. If the harness has been adjusted to proper fit, it is helpfully to mark positing of D, I & J on the Shoulder Waist Strap B. A wax marker or bar of soap can be used to mark critical placements points. 2. Remove the waist belt buckle from the left end of Shoulder Waist Strap B 3. Remove I and J from the Shoulder Waist Strap B 4. Pull the Shoulder Waist Strap B back through (F-1 & F-2) and loop C 5. Remove the Waist Strap Retainer assembly E by unthreading it from D, A and C 6. Remove Buckle H from F-2 by unthreading it from E 7. Position (F-1 & F-2) of the Waist Strap Retainer E between the loops located on the back of the pocket and then thread E though the center of the pocket loop checking that the pocket is oriented correctly. On the Vertical Weight Pocket the weight release pulls down while on the Horizontal Weight Pocket the weight release pulls forward. A simple final check can be done by hold the pocket and webbing assembly up to the hip it is to mounted on. Then checking that webbing of E raps around to the back of the body and the weight pocket release handles pulls are properly aligned to the direction of pull. 8. Retread E though D, A, C and back though D and tucking the loss end of E through the loops on the back of the pocket 9. Rethread B passing it through C the pocket loops and (F-1, F-2) and (J, I). Then attach the waist belt buckle on the left end of B PUBLIC SAFETY (PS) HARNESS The PUBLIC SAFETY (PS) HARNESS built around a proprietary Stainless Steel backplate. The backplate allows the adjustment of the harness to the torso length of the diver. Stainless Steel waist and shoulder strap adjustable buckles. Compatible with the full range of OMS Air Cells and when using optional rail system, the Interspiro Drivatar System and the Deviator DP! Surface Supply System Public Safety (PS) Harness A Sizing: One size fits all Shown with optional Public Safety Weight Pockets (20 lbs. (9.1 kg) per pocket A


14 IQ Chemically Resistant Backpack This is the same design as the IQ backpack but manufactured with chemically resistant materials and designed for the Public Safety Diver (PSD) for use in HAZMAT environments. The IQ Pack will distribute weight across the hips and back to evenly disperse the weight of single or double tanks. The comfortable adjustable ergonomic padded shoulder straps help the diver attain the ideal snug fit in and out of the water. The OMS soft pack design adds substantial comfort over the traditionally more stable design of a hard backplate but the IQ pack offers BOTH features in one system. It offers a truly unique rear pocket located behind the lumbar pad to accommodate an optional hard backplate to increase harness stability if desired offering multiple cylinder mounting options. The CRIQ backpack also uses flaps with fasteners in lieu of Velcro to hold the backplate in place to minimize contaminant adherence. Epaulets on each shoulder pad assist with hose routing of both the corrugated hose (left side) and your regulator hoses (right side) to keep a streamlined profile in the water and eliminate "entanglement hazards". The Epaulets utilizes snaps for closure, this eliminates areas for contaminants. The waist strap is equipped with a latch-style stamped stainless steel buckle and the adjustable torso chest (sternum) and crotch straps are equipped with squeeze-style slide-release plastic buckles for easy donning and doffing. Harness system includes (2) chest mounted D-rings, (2) waist strap D-rings, a crotch strap O-ring, and multiple statically placed small D-rings, all made from corrosion resistant stainless steel. Used with OMS 45 lbs. (20 N) Deep Ocean Wing IQ Lite Pack Chest Height Weight Part # Size in cm in cm lbs. kg A M - L A L - L
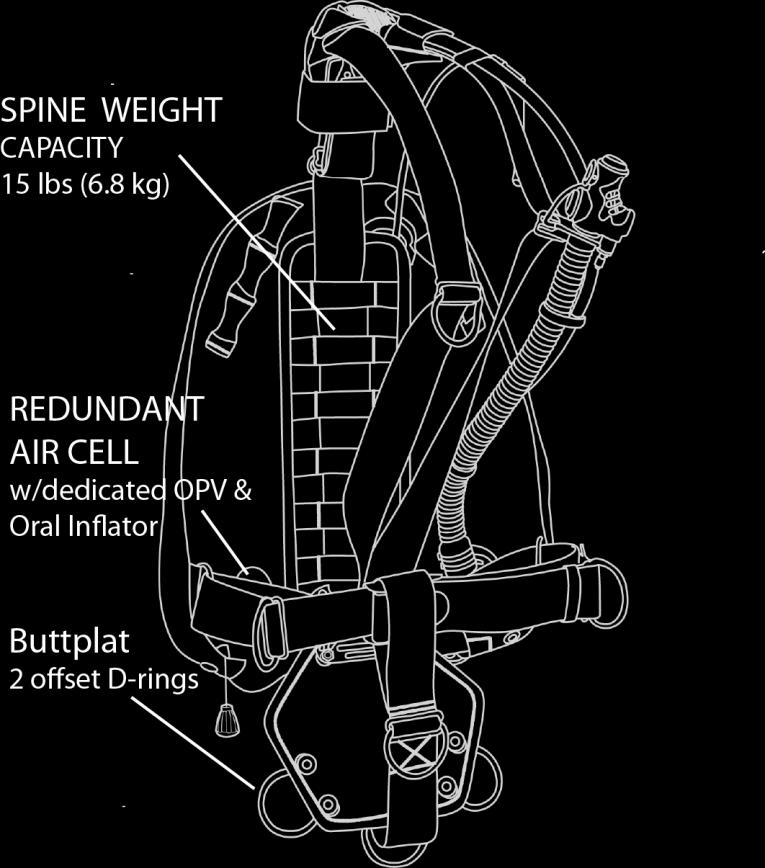
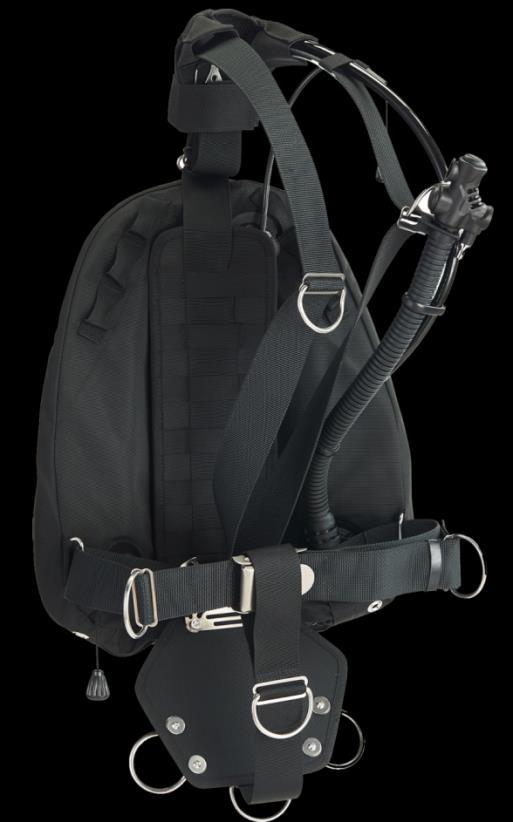
15 SIDESTREAM27 The SIDESTREAM27 side mount harness with 27 lbs. (120 N) air cell utilizes a split-pack pack design and is a minimalist side mount style the harness will fit anyone simply by adjusting the 2 (50 mm) webbing to match the dives torso length. The SIDESTREAM27 incorporates a spine weight pocket system which can hold up to 15 lbs. (17 kg). A Buttplate consisting of 2 offset D-rings for cylinder clips and 2 waste D-rings. Includes a redundant air-cell with an oral inflator and dedicated OPV. Sizing: One size fits all 15


16 16


 shape to move")


17 OMS AIR CELL OPTIONS OMS air cells, often referred to as wings, are available in different configurations and lift capacities. It is extremely important that the air cell you select has enough buoyancy to support the diver and cylinders at the surface. Some of the features of the different OMS air cells include redundant internal bladders, elastomeric retraction bands to help minimize the volume of the uninflated BC, or a Donut (circular) shape to move air more efficiently. OMS air cells are constructed from 1000 denier Cordura backed with 5-ounce urethane. The inner bladder is made of virgin urethane for superior durability. OMS air cells are available in several different lift capacities with single and double internal bladders. Inflator mechanisms and dump valves are standardized making them interchangeable and completely serviceable. OMS air cells can be attached to any OMS backplate system using the bolts from a set of steel bands for doubles or the bolts from a single tank adapter. Nylon tank bands can be used to attach it to the IQ Pack. 17
18 Air Cell Descriptions and lifts OMS Wing Description Name Part# EAN# Lift PM (Performance Mono) Wing RED PM (Performance Mono) Wing BLACK PM (Performance Mono) Wing GREY / BLACK PM (Performance Mono) Wing PINK / BLACK PM (Performance Mono) Wing RED / BLACK PM (Performance Mono) Wing RED PM (Performance Mono) Wing BLACK PM (Performance Mono) Wing GREY / BLACK PM (Performance Mono) Wing PINK / BLACK PM (Performance Mono) Wing RED / BLACK Deep Ocean Wing Black Deep Ocean Wing Black Deep Ocean Wing Red Deep Ocean Wing Black Vintage Deep Ocean Wing Red Vintage Deep Ocean Wing Chemically Resistant Tesseract Wing Vintage Trieste Wing Black Vintage Trieste Wing Red Vintage Trieste Wing Black Vintage Trieste Wing Red Vintage Ocean Wing Black Vintage Ocean Wing Red Vintage A lbs (~12. kg) 118N A lbs (~12. kg) 118N A lbs (~12. kg) 118N A lbs (~12. kg) 118N A lbs (~12. kg) 118N A lbs (~14.7 kg) 144N A lbs (~14.7 kg) 144N A lbs (~14.7 kg) 144N A lbs (~14.7 kg) 144N A lbs (~14.7 kg) 144N A lbs (~21.8 kg) 214N A lbs (~23.8 kg) 233N A lbs (~38.8 kg) 381N A lbs (~38.8 kg) 381N A lbs (~38.8 kg) 381N A lbs (~23.8 kg) 233N A lbs (~23.8 kg) 233N A lbs (~23.8 kg) 233N A lbs (~23.8 kg) 233N A lbs (~38.8 kg) 381N A lbs (~38.8 kg) 381N A lbs (~27.4kg) 269N A lbs (~27.4kg) 269N Single Tank Double Tank Features Retraction Bands Redundant Air Cell 18
 269N A11518017 4251088250177 45 lbs (~25.4 kg) 249N A11518018 4251088250184 45 lbs (~25.")
 268N A11518058 4251088251938 45 lbs (~27.3 kg) 268N SideStream 27 A11518087 4251088259439 27 lbs (~12.")
19 Ocean Wing Chemically Resistant Vintage Performance Double Wing Black Performance Double Wing Red Performance Double Wing BLACK Performance Double Wing PINK / Black Performance Double Wing GREY / Black Performance Double Wing Black Performance Double Wing Red A lbs (~27.4kg) 269N A lbs (~25.4 kg) 249N A lbs (~25.4 kg) 249N A lbs (~25.4 kg) 249N A lbs (~25.4 kg) 249N A lbs (~25.4 kg) 249N A lbs (~27.3 kg) 268N A lbs (~27.3 kg) 268N SideStream 27 A lbs (~12. kg) 118N INFLATORS AND DUMP VALVES OMS INFLATORS The threaded end of the Quick Disconnect hose attaches to a low-pressure port of the diver's first stage. The Quick Disconnect end is attached to the inflator mechanism by pulling back on the collar and pressing it onto the Quick Disconnect nipple. Inflate the BC by pressing the power inflation button. Use short bursts to control the amount of air entering the BC. The oral inflation mouthpiece allows for oral inflation by exhaling into the mouth piece while completely depressing the deflate button. Air can be vented by depressing the deflate button or by using the pull dump. OMS DUMP VALVES Air can also be vented from the BC by gently pulling on the pull dump cord. OMS BCDs are available with a lower dump valve located at the bottom of the BC or upper dump valves on the diver's shoulder. Some models are equipped with both. 19
20 !! WARNING!! The deflator must be the highest point in order to dump air properly. Not properly positioning the deflator can cause a rapid ascent which is dangerous and can lead to lung overpressure injuries and/or decompression sickness. Either of these conditions can cause serious injury or death. Pull dumps should be inspected regularly by fully inflating the BC to insure they vent properly. Also, be sure to thoroughly rinse them after each dive to prevent debris from becoming trapped in the seal causing air to leak from the BC.!!WARNING!! Repeated improper use of the oral inflation/deflation mechanism or dump valves assemblies may allow water to enter the BC with a subsequent reduction in buoyancy. Reduced buoyancy can cause a loss of buoyancy control resulting in personal injury or death. ASSEMBLY OF THE MOST POPULAR OMS BUOYANCY COMPENSATORS OMS have multiple harness and wing options available. The following are the most popular combinations: THE IQ HARNESS SYSTEM Attaching the Wing and Single Tank A wing can be attached to the IQ Lite Pack or IQ Pack with two nylon tank bands. Locate the sewn webbing slots sewn onto the back of the IQ Lite or IQ Pack. Thread a nylon tank band through the top slot and another through the bottom slot. Next, thread the free ends of the tank bands through the corresponding slots in the wing. As the tank bands are tightened onto the tank the bladder and harness will be securely sandwiched together against the tank. ATTACHING THE STAINLESS STEEL SINGLE TANK ADAPTOR (PART# A ) The OMS single tank adaptor may be used to secure a single tank to an IQ Lite Pack that has a backplate installed. To install a backplate, grasp the top of the IQ Lite s Pack's back pad and open the bottom of the pad where the Velcro encloses the inner pocket. Slide a backplate up into the slot aligning the grommet holes with the bolt holes in the backplate. Insert the bolt studs of the Single Tank Adaptor through the grommet holes in the back of the wing through the bolt holes of the backplate and through the corresponding holes in the harness. Hold the adaptor, wing and harness together and place the large washer over the bolt stud then the split lock washer followed by the wing nut. Tighten the wing nut securely then press close the bottom of the pad with the attached Velcro flap. 20

 then the split lock washer.")

21 ATTACHING THE CYLINDERS TO THE SINGLE TANK ADAPTOR The OMS single tank adaptor may be used to allow a single tank to be attached to an OMS harness equipped with a metal back plate. This makes switching back and forth between double and single tanks easier and faster. It also provides a more stable mount for larger, heavier high capacity tanks. The Single Tank Adaptor is installed by passing the bolts of the adaptor through the grommet holes of the BC then through the matching holes on the back plate. Be sure that the BC is oriented with the warning label against the diver's back. Install the flat washer first (against the backplate or harness) then the split lock washer. Thread the wing nuts onto the bolts and tighten securely by hand. Next install two nylon cam bands through the slots on the Single Tank Adaptor. Weave the webbing of the tank band through the cam buckle, Utilizing the weave outlined on page 16. Remember, all nylon webbing stretches when wet so be sure to soak the nylon tank bands in water before tightening. 21


 or 32lb (142 N) The Performance Mono Wing is a donut-style wing allowing quick and easy movement")
22 INSTALLING THE SOFT SINGLE TANK ADAPTER (PART# A ) The Soft Single Tank Adapter is ideal for the traveling diver. Lightweight and easy to manage, this adapter will work on the IQ Pack when use of a hard plate is not required. Additionally, it can be used on a Stainless Steel or Aluminum Backplate if the traveling diver needs to reduce luggage weight. The tank bands are routed through either the slots of the IQ Lite Pack or the slots in the Stainless Steel or Aluminum backplate. Book screws keep the air cell and tank adapter in place allowing it to be handled as one unit. The soft single tank adapter and stainless steel single tank adapter will work with all of the OMS Wings except for the Performance Mono and Performance Double Wing to achieve the best possible performance. Single Tank Adapter Uninstalled Single Tank Adapter Installed OMS PERFORMANCE MONO WING 27lb (120 N) or 32lb (142 N) The Performance Mono Wing is a donut-style wing allowing quick and easy movement of air from one side of the air cell to the other. This is the ideal wing for the traveling diver as it is small, lightweight and easy to pack. The air cell has stabilizing bars built into the wing to reduce tank shifting during the dive. The stabilizing bars eliminate the need for an additional single tank adapter. Threading the cylinder strap (Tank Band) Single tanks are usually attached using nylon cam buckles. The nylon strap weaves through a buckle that secures the strap against the tank. It is important that the strap is correctly woven through the buckle otherwise there will be insufficient tension securely hold the tank. Also, to 22


23 remember that the nylon stretches when wet so it is important to soak the nylon strap in water before tightening the cam band. The slots on the cam buckle are numbered to aid in threading the strap. Threading the Cylinder Strap 1. Lay the buckle on the cylinder so the numbers are facing up. 2. Thread the strap up from the bottom through hole 3. Thread the strap through hole 2. Pull to tighten around the cylinder. 23
: Each of the Weight Pockets have a webbing")

 valve starts to relieve pressure by venting air.")
24 Pull the strap back over the buckle to tighten. NOTE: This procedure to thread the strap through the buckle is the same for a plastic buckle. Weight Pocket Accessories The Weight Pocket Install on each of the Harnesses in the same manner (Smartstream, IQ Lite, Public Safety, and Sidemount Adapter): Each of the Weight Pockets have a webbing strap on the back side that the waist strap of each harness will slip through allowing the Weight Pocket to slid back and forth to get the best placement for the weight. This applying to the left and right side waist strap of each harness unit PRE-DIVE CHECKS Connect the power inflator to an air source. Depress and release the inflation button intermittently to ensure that the airflow is unobstructed, and that airflow stops completely when the button is released. Fully inflate the buoyancy compensator until the overpressure relief function of the Overpressure- Relief / Pull-to-Dump (OPR/PD) valve starts to relieve pressure by venting air. Stop inflating the buoyancy compensator and the OPR/PD valve should stop venting air and reseal. The buoyancy compensator air cell should be rigid and fully inflated. Manually operate the OPR/PD valve by pulling on the pull cord assembly. Pull for a second then let go ensuring that valve reseals after each pull. Fully Inflate the BCS and let it sit for 5-10 minutes. If the bladder shows any signs of deflation within 24
25 the 5-10 minute period, DO NOT USE THE BUOYANCY COMPENSATOR. Check the two-cylinder bands to ensure they are properly tensioned and the cylinder is held firmly. If your system includes weight pockets, check that the weight pockets are secure and that the weight pockets are not overloaded. If you are using a weight belt, it must have a clear drop path. If your buoyancy compensator is equipped with a crotch strap, the weight belt must be put on last. If you are using the integrated weight system, the weight pockets must be properly attached to the harness.!!warning!! Donning the crotch strap over the weight belt will prevent the weight from being pulled free in an emergency which can result in serious injury or death. Check the operation of all buckles. Check all fittings and connections for damaged components (cracks, tears, etc.) On dual bladder models test each bladder separately (Do not inflate both bladders at the same time) On wings with elastomeric retraction bands, with the BC fully inflated check that pull dump cord or folds in the BC are not trapped by the retraction bands. After entry, inspect units for bubbles indicating leaks. Test pull dumps for smooth operation and positive seal. OPERATING THE BUOYANCY COMPENSATOR!! WARNING!! Before using this buoyancy compensator (BC), you must receive instruction and certification in SCUBA diving and buoyancy control from a recognized training agency. Use of SCUBA equipment by uncertified or untrained persons is dangerous and can result in injury or death. On dual bladder models, the bladder against the diver's back is the primary bladder. Do not inflate both bladders at the same time. This could decrease the overall lift provided by the jacket.!!warning!! Repeated improper use of the Oral Inflation/ Deflation mechanism or dump valves assemblies may allow water to enter the BC with a subsequent reduction in buoyancy. Reduced buoyancy can cause a loss of buoyancy control resulting in personal injury or death. POST DIVE AND MAINTENANCE 25
26 With proper care, your OMS Buoyancy Compensator will provide years of service. The following care and maintenance must be performed after each diving outing. Thoroughly rinse the BCS with fresh water to remove salt, sand, etc. Once the outside has been completely rinsed, rinse out the inside of the bladder. Connect an air source to inflator. To thoroughly rinse the interior of the air cell, using a hose, direct water into the bladder via the oral inflator. Completely drain the bladder via the oral inflator or OPR valve. Inflate the BCS and allow it to dry inside and out. Avoid prolonged exposure to direct sunlight or temperature extremes. Ultraviolet rays will not only fade the materials, but will reduce the strength of the materials. Use in heavily chlorinated water will cause the buoyancy compensator fabric to discolor and deteriorate. Store in a cool dry place. OMS WINGS WITH RETRACTION BANDS OMS Deep Ocean, Tesseract and Trieste wings include elastomeric retraction bands that keep the BC compact when not fully inflated. They also aid in deflation by preventing localized air trapping.!!warning!! Failure to follow these assembly instructions can cause BCD failure resulting in personal injury or death! REPLACEMENT OF ELASTOMERIC BANDED WINGS Replacement sets of Elastomeric Retraction Bands include 12 bands. Prestretch the bands to their limit before installation (repeat this 2-3 times for each band). This process makes the stringing and tying the elastomeric bands easier. Lay the wing flat with the OMS logo upward. Thread each band individually through the grommet tabs around the outer edge of the BC. 26


. Deflate the wing and check that it deflates evenly around the entire circumference.")
27 Once all the bands have been threaded, fully inflate the wing until the dump valve vents. It is extremely important that the wing is fully inflated while the bands are tied into place! Installing the bands on an uninflated BC can compromise the BCD's lift capacity! Thread the top of each band through the inner rows of grommet holes and stretch them around to tie the ends together in a SQUARE KNOT on the tank side of the wing (opposite the side with a warning label). Make sure the bands are tied snugly against the BC. You should be able to easily slide your finger between the wing and the band. Once all the knots are tied, pull each of them around so that it is safely tucked near the backside of each inner grommet (tank side/no-label side). Deflate the wing and check that it deflates evenly around the entire circumference. Orally inflate the wing to be sure the bands are not too snug. You should be able to orally inflate the BC with little effort. If there is excessive resistance to oral inflation loosen the bands. Deflated OMS Wing with Retraction Bands Inflated OMS Wing with Retraction Bands 27
28 WARRANTY OMS LIMITED WARRANTY OMS warrants that your OMS Buoyancy Compensator will be free from defects in materials and workmanship for a period of two (2) years from the date of the original retail purchase. Any product determined by OMS to be defective in materials or workmanship in accordance with the above warranties will be repaired or replaced at the option of OMS, free of charge, when received at the factory freight prepaid, together with proof of purchase. The original warranty date applies regardless of whether the item is repaired or replaced. This warranty is expressly in lieu of all other warranties. Any implied warranties of merchantability or fitness for a particular purpose are limited to the same duration as this express warranty. This warranty does not cover, and OMS shall not be liable for incidental or consequential damages. Some states do not allow the exclusion or limitation of implied warranties, incidental or consequential damages, so the above limitations and exclusions may not apply to you. This warranty does not cover fading or any damage resulting from misuse, abuse, neglect, alteration, failure to perform maintenance as instructed, damage caused by contaminants, or unauthorized repair or service. This warranty does not cover any representation or warranty made by dealers beyond the provisions of this warranty. This warranty does not cover costs incurred for normal repair, inspection and preventative maintenance. This warranty is a consumer warranty extended only to the original retail purchaser, and does not apply to equipment used for commercial purposes. You must establish proof of purchase to obtain warranty service or replacement. This warranty gives you specific legal rights, and you may also have other rights which vary from state to state, country to country. OCEAN MANAGEMENT SYSTEMS GMBH Klosterhofweg 96 Moenchengladbach Germany Support@OMSDIVE.com 28


29 SERVICE OMS have extensive service facilities in Europe and the USA offering the highest quality repair services for your equipment: Europe, Russia, Africa and Southeast Asia: BTS EUROPA AG Klosterhofweg 96 Moenchengladbach Germany North America, South America, Australia, Korea, New Zealand and Japan: DIVING UNLIMITED INTERNATIONAL, INC Delevan Drive San Diego, CA USA Tel: or Fax: EN 1809:2014+A1:2016 Testhouse: TÜV Rheinland LGA Products GmbH Tillystrasse 2 D Nürnberg NB
30 NOTES: Date Annual Inspection Maintenance and Annual Inspection Record Maintenance Notes 30
Ocean Management Systems, Inc. P.O. Box 146, Montgomery, NY 12549
 Buoyancy Compensator User s Guide Ocean Management Systems, Inc. P.O. Box 146, Montgomery, NY 12549 Phone: 845.692.3600 fax: 845.692.3623 www.omsdive.com E-mail: mailto:info@omsdive.com Buoyancy Compensator
T3200 TransPlate Harness
 T3200 TransPlate Harness www.diverite.com Product Description The TransPlate Harness is designed specifically for use with hard back-plates, such as stainless steel or aluminum. The TransPlate Harness
LTS BCD USER GUIDE. Hollis (2014) Doc r01 (8/29/14)
 Doc r01 (8/29/14)") LTS BCD USER GUIDE Contents NOTICES...3 DANGERS, WARNINGS, CAUTIONS, & NOTES...3 WARNINGS...4 INTRODUCTION...5 CARE AND MAINTENANCE...5 INFLATOR AND DUMP VALVE USE...6 ATTACHING A TANK...7 INTEGRATED WEIGHT
LTS BCD USER GUIDE Contents NOTICES...3 DANGERS, WARNINGS, CAUTIONS, & NOTES...3 WARNINGS...4 INTRODUCTION...5 CARE AND MAINTENANCE...5 INFLATOR AND DUMP VALVE USE...6 ATTACHING A TANK...7 INTEGRATED WEIGHT
BUOYANCY COMPENSATOR DEVICE MANUAL
 INTRIGUE WS SPORTPAK H2Odysey USER / OWNER BUOYANCY COMPENSATOR DEVICE MANUAL DESCRIPTION INDEX PAGE INTRODUCTION #1 CAUTION #1 / #2 / #15 BCD USE and FUNCTION #3 FEATURES #4 CONSTRUCTION and MATERIALS
SIDE 16 Sidemount System User Manual
 SIDE 16 Sidemount System User Manual Version 1.1, April 15, 2014 Disclaimer This document is proprietary to Scubatech Sp. z o. o. ("Scubatech") and no ownership rights are hereby transferred. No part of
J800 HOPE BUOYANCY COMPENSATOR OWNER S MANUAL
 J800 HOPE BUOYANCY COMPENSATOR OWNER S MANUAL EN1809 0 www.istsports.com 1 0120 I. INTRODUCTION I. INTRODUCTION CONTENTS II. GENERAL WARNING AND CAUTION Definition of WARNING, CAUTION and ATTENTION III.
WSX Sidemount Owner s Manual
 WSX Sidemount Owner s Manual P/N 18418 Rev 05/15 2 WSX Sidemount Owner's Manual INTRODUCTION Congratulations and thank you for choosing Apeks. Your buoyancy compensator meets all existing standards for
SMS75 HARNESS USER GUIDE
 SMS75 HARNESS USER GUIDE Contents NOTICES......3 DANGERS, WARNINGS, CAUTIONS, & NOTES...3 WARNINGS...4 INTRODUCTION......5 UNDERSTANDING THE SMS75 HARNESS...6 HOW TO "RIG" YOUR CYLINDERS...7 ATTACHING
Katana Sidemount Harness USER GUIDE
 Katana Sidemount Harness USER GUIDE Contents NOTICES...3 DANGERS, WARNINGS, CAUTIONS, & NOTES...3 WARNINGS...4 INTRODUCTION......5 UNDERSTANDING THE KATANA SIDEMOUNT HARNESS...6 HOW TO "RIG" YOUR CYLINDERS...7
RG2200 BC Integrated Octopus
 175 NW Washington Street Lake City, Florida 32055, USA Web: www.diverite.com Phone: 386.752.1087 Fax: 386.755.0613 RG2200 BC Integrated Octopus Product description The Rite Source is both a BC inflation/deflation
WTX-D Buoyancy System
 TABLE OF CONTENTS Copyright Notice Warnings, Cautions and Notes Safety Information Apeks WTX Harness Apeks WTX-D Buoyancy Cells Attaching the MP Hose to the First Stage Mounting a WTX-D Buoyancy Cell Using
ZEOS 28 ZEOS 38 HYDROS 40 HYDROS 50 READ CAREFULLY. YOUR COMFORT AND SAFETY IS WORTH MORE THAN 15 MINUTES.
 ZEOS 28 ZEOS 38 HYDROS 40 HYDROS 50 USER MANUAL ENGLISH READ CAREFULLY. YOUR COMFORT AND SAFETY IS WORTH MORE THAN 15 MINUTES. CONGRATULATIONS! YOU HAVE PURCHASED A PERFECT PRODUCT IN WHICH, WITHOUT ANY
Congratulations on the purchase of your new EDGE Buoyancy Compensator (BC).
.") Congratulations on the purchase of your new EDGE Buoyancy Compensator (BC). EDGE has designed, engineered and tested your new BC with extreme care in order to provide you with a product that has exceptional
Congratulations on the purchase of your new EDGE Buoyancy Compensator (BC). EDGE has designed, engineered and tested your new BC with extreme care in order to provide you with a product that has exceptional
ZEOS 28 ZEOS 38 HYDROS 40 HYDROS 50. User manual English
 ZEOS 28 ZEOS 38 HYDROS 40 HYDROS 50 User manual English 1 Introduction Congratulations! You have purchased a perfect product in which, without any compromise, we have connected the best existing materials
fenzy x4 technical manual PN (orange) PN (black)
 PN (black)") fenzy x4 technical manual PN 854710 (orange) PN 854420 (black) Copyright Notice This owner s manual is copyrighted, all rights reserved. It may not, in whole or in part, be copied, photocopied, reproduced,
fenzy x4 technical manual PN 854710 (orange) PN 854420 (black) Copyright Notice This owner s manual is copyrighted, all rights reserved. It may not, in whole or in part, be copied, photocopied, reproduced,
RG3100 and RG3100Ice Regulator System
 RG3100 and RG3100Ice Regulator System User Guide www.diverite.com Date of purchase: www.diverite.com RG1208-5 & RG1208-5Ice www.diverite.com First Stage Regulator Product Description The RG1208-5 and RG1208-5Ice
QUICK REFERENCE. Right Shoulder dump valve. Pull knob for right shoulder dump valve. Hide-away pocket flap. Rear dump valve (1 of 2)
") OWNER S MANUAL R 2 Fusion Owner s Manual QUICK REFERENCE Right Shoulder dump valve Pull knob for right shoulder dump valve Hide-away pocket flap Rear dump valve (1 of 2) SureLock weight release mechanism
OWNER S MANUAL R 2 Fusion Owner s Manual QUICK REFERENCE Right Shoulder dump valve Pull knob for right shoulder dump valve Hide-away pocket flap Rear dump valve (1 of 2) SureLock weight release mechanism
COPYRIGHT NOTICE WARNINGS, CAUTIONS AND NOTES
 TABLE OF CONTENTS Copyright Notice Warnings, Cautions and Notes Safety Information Dealer Inspection and Service Warranty Information Basic Setup Weight Integration Features Inflation Methods Deflation
with SureLock OWNER'S MANUAL
 0 with SureLock OWNER'S MANUAL 2 Pro QD+ with SureLock Owner's Manual CONTENTS Safety Information............................... 3 General Precautions & Warnings...3 Basic Setup....................................
Women's Buoyancy Compensator. Owner's Manual
 Women's Buoyancy Compensator Owner's Manual Copyright Notice This owner s manual is copyrighted, all rights reserved. It may not, in whole or in part, be copied, photocopied, reproduced, translated, or
Travel Wing. Buoyancy Compensator User Instruction Manual
 Travel Wing Buoyancy Compensator User Instruction Manual 2 P a g e T r a v e l Contents Important Information... 4 Intended Use... 5 Introduction... 5 Integrated Weights or Equipment Stowage... 7 Stowage
Pearl TABLE OF CONTENTS. English. Copyright Notice
 TABLE OF CONTENTS Copyright Notice Warnings, Cautions and Notes Safety Information Dealer Inspection and Service Annual Service and Inspection Record Warranty Information Limited Lifetime Warranty Product
Halcyon. Contour BC OWNER S MANUAL
 Halcyon Contour BC OWNER S MANUAL 1 TABLE OF CONTENTS WARNINGS, CAUTIONS, AND NOTES 3 CONTACTING HALCYON 3 GENERAL PRECAUTIONS AND WARNINGS 4 HALCYON CONTOUR COMPONENTS 6 PRE-DIVE BC SYSTEM INSPECTION
BC4300, BC4400 Buoyancy Compensator Wings. Product Description and Specifications REC EXP BC4300
 Product Description and Specifications Providing superior performance, reliability, and durability, the Rec EXP and Classic EXP wings are well-suited for use with anything from single tank open water diving
SURFACE SUPPLIED HARNESS
 SURFACE SUPPLIED HARNESS USER S MANUAL REV 4/10 2 Surface Supplied Harness User s Manual Copyright Notice This owner s manual is copyrighted, all rights reserved. It may not, in whole or in part, be copied,
BD Buoyancy Compensator
 BD Buoyancy Compensator User's Manual 2 BD BUOYANCY COMPENSATOR USER'S MANUAL Copyright Notice This owner s manual is copyrighted, all rights reserved. It may not, in whole or in part, be copied, photocopied,
OMS Comfort Harness II
 Assembly of the Shoulder Pads OMS Comfort Harness II Take the larger of the two pieces of webbing (with grommet) and start at the top of the Back Plate: A) Thread the webbing thru the back slanted slots
READ CAREFULLY. YOUR COMFORT AND SAFETY IS WORTH MORE THAN 15 MINUTES.
 ZEN USER MANUAL ENGLISH READ CAREFULLY. YOUR COMFORT AND SAFETY IS WORTH MORE THAN 15 MINUTES. INDEX CONGRATULATIONS! YOU HAVE PURCHASED A PERFECT PRODUCT IN WHICH, WITHOUT ANY COMPROMISE, WE HAVE CONNECTED
Wave TABLE OF CONTENTS. Copyright Notice. Weight Integration Features. Warnings, Cautions and Notes. Inflation Methods. Safety Information
 TABLE OF CONTENTS Copyright Notice Warnings, Cautions and Notes Safety Information Dealer Inspection and Service Warranty Information Basic Setup Donning and Adjustment Procedures Weight Integration Features
B.C.D. Buoyancy Compensator Device User Manual
 B.C.D. Buoyancy Compensator Device User Manual English ver 2.2 CONTENTS Important Warnings Preparation before diving - How to assemble the retaining rubber bungees - How to assemble the tank straps - How
NATIONAL (NATO) STOCK NUMBER: NSN
 STOCK NUMBER: NSN") THE SKED RESCUE SYSTEM NATIONAL (NATO) STOCK NUMBER: NSN 6530-01-260-1227 FLOTATION INSTRUCTIONS Please Post In Your Training Area SKED RAPID DEPLOYMENT FLOATATION SYSTEM Thank you for your purchase of
THE SKED RESCUE SYSTEM NATIONAL (NATO) STOCK NUMBER: NSN 6530-01-260-1227 FLOTATION INSTRUCTIONS Please Post In Your Training Area SKED RAPID DEPLOYMENT FLOATATION SYSTEM Thank you for your purchase of
Note: For CE certification, this wing was tested with the T3000 TransPac Harness System.
 Product Description and Specifications The Rec Wing (Buoyancy Compensator Wing) provides superior performance, reliability and durability in a versatile single or redundant bag design that can be used
Rapid Diver System User's Manual
 Rapid Diver System User's Manual Rev 7/17 2 Rapid Diver User's Manual INTRODUCTION Congratulations and thank you for choosing Aqua Lung. Your Rapid Diver System meets all existing standards for quality
Axiom TABLE OF CONTENTS. English. Copyright Notice
 TABLE OF CONTENTS Copyright Notice Warnings, Cautions and Notes Safety Information Dealer Inspection and Service Annual Service and Inspection Record Warranty Information Limited Lifetime Warranty Product
STEALTH 2.0 Side Mount System
 STEALTH 2.0 Side Mount System User manual English 1 Introduction Congratulations! You have purchased a perfect product in which, without any compromise, we have connected the best existing materials made
STEALTH 2.0 TEC Side Mount System
 STEALTH 2.0 TEC Side Mount System User manual English Rev.2 1 Introduction Congratulations! You have purchased a perfect product in which, without any compromise, we have connected the best existing materials
WTX Buoyancy System TABLE OF CONTENTS. Mounting a Single or Twin Cylinder(s) Using Nuts and Bolts. Copyright Notice. Warnings, Cautions and Notes
 Using Nuts and Bolts. Copyright Notice. Warnings, Cautions and Notes") TABLE OF CONTENTS Copyright Notice Warnings, Cautions and Notes Safety Information Apeks WTX Harness Apeks WTX Buoyancy Cells Attaching the MP Hose to the First Stage Mounting a WTX Buoyancy Cell Using
TABLE OF CONTENTS Copyright Notice Warnings, Cautions and Notes Safety Information Apeks WTX Harness Apeks WTX Buoyancy Cells Attaching the MP Hose to the First Stage Mounting a WTX Buoyancy Cell Using
READ CAREFULLY. YOUR COMFORT AND SAFETY IS WORTH MORE THAN 15 MINUTES.
 PROJECT USER MANUAL ENGLISH READ CAREFULLY. YOUR COMFORT AND SAFETY IS WORTH MORE THAN 15 MINUTES. INDEX CONGRATULATIONS! YOU HAVE PURCHASED A PERFECT PRODUCT IN WHICH, WITHOUT ANY COMPROMISE, WE HAVE
Buoyancy Control Device
 Owner s manual for FLY 13, FLY 13 RESCUE, FLY 16H, FLY 17D, FLY 20D, FLY 21H, FLY 25D Buoyancy Control Device Distribution and service FINN SUB s.r.o. Rakovecka 35 63500 Brno Czech Republic www.finnsub.com
Gemini Owner s Manual
 Gemini Owner s Manual WARNING - Improper use of the Gemini Breathable Inflator may result in serious injury or death. Do not attempt to use this product unless you have received certified scuba instruction
Table of Contents 2 ATOMIC AQUATICS BC1 OWNERS MANUAL
 OWNERS MANUAL Table of Contents BC1 Key Design Features... 3 BC1 Features... 4 Warranty Registration... 6 Precautions and Safety Information... 7 Adding ballast... 8 High Performance Inflator Options...
600 / 600FC OWNER'S MANUAL
 PROGRESSION 600 / 600FC OWNER'S MANUAL Issue 2 / Version E - Dec. 10, 1997 Copyright 1997 GAMMA Sports - All Rights Reserved PROGRESSION 600 / 600FC OWNER'S MANUAL TABLE OF CONTENTS PAGE 1... WARRANTY
AIR SOURCE. Owner's Manual
 AIR SOURCE Owner's Manual CONTENTS INTRODUCTION... 5 WHAT IS THE AIR SOURCE?...5 GUIDELINES & LIMITATIONS... 6 DAMAGE...6 LUBRICATION...6 SAFETY PRECAUTIONS... 7 INSTALLATION... 8 INFLATION... 10 OPERATION
MANUAL SIDE MOUNT SYSTEM
 MANUAL Razor Harness 2 SIDE MOUNT SYSTEM ontent Table of contents 1 The Razor Harness 2 3 1.1 Package content 3 1.2 Hardware Layout: 4 2 Rigging the Razor Harness 2 7 2.1 Tools 7 2.2 Overview 8 Step 1:
602 STRINGING MACHINE OWNER'S MANUAL
 PROGRESSION 602 STRINGING MACHINE OWNER'S MANUAL AL Issue 1- April 2000 Copyright 2000 GAMMA Sports - All Rights Reserved PROGRESSION 602 STRINGING MACHINE TABLE OF CONTENTS PAGE 1... WARRANTY PAGE 2...
RG1200 Regulator System
 RG1200 Regulator System UserGuide Date of purchase: www.diverite.com DEVELOPED BY COPYRIGHT NOTICE WARRANTY INFORMATION Dive Rite 175 NW Washington Street Lake City, FL 32055 Phone: 386.752.1087 Fax:
ExtendAire TM II. Intermediate Pressure Accessory Kit USER INSTRUCTIONS
 ExtendAire TM II Intermediate Pressure Accessory Kit USER INSTRUCTIONS THIS MANUAL MUST BE CAREFULLY READ AND FOLLOWED BY ALL PERSONS WHO HAVE OR WILL HAVE THE RESPONSIBILITY FOR USING OR SERVICING THIS
NORTHERN DIVER PFD MANUAL
 PFD MANUAL NORTHERN DIVER PFD MANUAL Thank you for purchasing this Northern Diver PFD. To help ensure your future safety, do not use this product before reading this manual. It is important to fully understand
MANUAL SIDE MOUNT SYSTEM
 MANUAL Razor T Weight System SIDE MOUNT SYSTEM Content Table of contents 1 The Razor T Weight System 3 1.1 Package Content 3 1.2 Overview 4 2 Rigging the TWS Lumbar Strap 7 3 Rigging the TWS Waist Strap
Axiom i3 TABLE OF CONTENTS. English. Copyright Notice
 TABLE OF CONTENTS Copyright Notice Warnings, Cautions and Notes Safety Information Dealer Inspection and Service Annual Service and Inspection Record Warranty Information Limited Lifetime Warranty Product
DIVATOR RS4 USER MANUAL
 DIVATOR RS4 USER MANUAL USER MANUAL HAZARD INDICATORS... 3 SAFETY NOTICE... 4 TECHNICAL DESCRIPTION... 5 PREPARING FOR USE... 9 PRE-DIVE PROCEDURES... 11 CHECKS DURING DIVING... 12 DIVING IN COLD WATER...
SCUBATECH. User Instruction Manual. Buoyancy compensators. Range of models
 SCUBATECH User Instruction Manual Buoyancy compensators Range of models Tecline Donut 15, 17, 22 Tecline Donut (17, 22, 30) Special Edition Tecline Donut 22 Special Edition Rebreather Tecline Peanut 21
SAFETY INFORMATION... 3 BASIC SETUP... 5 WEIGHT INTEGRATION FEATURES... 9 DONNING AND ADJUSTMENT PROCEDURES INFLATION METHODS...
 OWNER S MANUAL R 2 Latitude Owner s Manual SAFETY INFORMATION... 3 General Precautions & Warnings...3 BASIC SETUP... 5 Attaching the LP Hose to the First Stage... 5 Securing the BC to the Cylinder... 6
X-6 STRINGING MACHINE OWNER'S MANUAL. Issue 1 - May Copyright 2004 GAMMA Sports - All Rights Reserved
 X-6 STRINGING MACHINE OWNER'S MANUAL Issue 1 - May 2004 Copyright 2004 GAMMA Sports - All Rights Reserved OWNER'S MANUAL GAMMA X-6 TABLE OF CONTENTS PAGE 1... WARRANTY PAGE 2... FEATURES PAGE 3...ASSEMBLY
LINE ID - divespacegear
 076-530-134 www.divespacegear.com info@divesapcegear.com LINE ID - divespacegear www.facebook.com/divespacegearcom HALCYON BCD *Halcyon infinity Cinch System 30IB OR 40IB OPTION-AL OR SS https://www.youtube.com/watch?v=p-ft5z9vtsu
Freedom8 ShoeBox Compressor Manual
 Freedom8 ShoeBox Compressor Manual Warning!! This product is not a toy! Use or misuse can cause severe injury or death! Use only with adult supervision. This unit is only to be used with tanks, hoses and
isup MANUAL THANK YOU FOR PURCHASING A KAHUNA isup, WE HOPE YOU HAVE MANY YEARS OF PADDLING ENJOYMENT.
 i isup MANUAL THANK YOU FOR PURCHASING A KAHUNA isup, WE HOPE YOU HAVE MANY YEARS OF PADDLING ENJOYMENT. THIS MANUAL IS A GENERAL GUIDELINE FOR SET-UP, CARE AND PROPER USE. PLEASE REFER TO OUR WEBSITE
- Manufactured and tested in accordance with ADCI. - Each of the 9 D-rings has been tested to a breaking strength of 1000kg
 The R-Vest has been developed to assist divers, it is a one-piece jacket that incorporates a recovery harness, cylinder attachment, tool attachment points and weight belt. The diver s weight and the weight
Rapid Survival System
 Rapid Survival System Model W User Manual Emergency Floatation for Moving Water Self Rescue Version 10.02 Contents User Manual... 1 Part 1: Description and Function... 3 Part 2: Package Contents... 3 Part
OWNERS MANUAL. Model Shown with optional Primary Mooring Cleats. Portable Mooring System SAFETY OPERATION MAINTENANCE PARTS
 OWNERS MANUAL Model 2400 Shown with optional Primary Mooring Cleats. Portable Mooring System SAFETY OPERATION MAINTENANCE PARTS CAUTION: Before using your new Pier Tender, read rules for Safety, Operation,
RECOVERY VEST MANUAL
 RECOVERY VEST MANUAL EN 15333-1:2008 WLL (working load limit) 1000kg NORTHERN DIVER 1000KG R-VEST MANUAL Thank you for purchasing Northern Diver R-Vest. To help ensure your future diving safety, do not
Introduction. 2. Limited Lifetime Warranty. 3. Drysuit Guidelines.. 4. Responsible Drysuit Diving... 5
 Drysuit Manual CONTENTS Introduction. 2 Limited Lifetime Warranty. 3 Drysuit Guidelines.. 4 Responsible Drysuit Diving... 5 Personalizing your Drysuit for Initial Use... 7 Neck & Wrist Seals... 7 Trimming
MMR Air Mask With. with Quick-Connect Hose
 MMR Air Mask With with Quick-Connect Hose Upgrade Kits P/N 10025120 Slide to Connect P/N 10050038 Slide to Connect w/ Solid Cover P/N 10038666 Push To Connect P/N 10050037 Push To Connect w/ Solid Cover
SHERWOOD OWNER S MANUAL
 SHERWOOD OWNER S MANUAL Thank you for choosing Sherwood Regulators. To get the most satisfying use of this product, please take time to read this entire manual to understand the use and limitations of
TABLE OF CONTENTS. English
 X-Tek TABLE OF CONTENTS IMPORTANT WARNINGS... 2 CE CERTIFICATION... 2 EN 250: 2000 norm regulations and what they mean...3 Definition of SCUBA according to EN 250: 2000...3 Limitations provided by EN 250:
BUOYANCY COMPENSATOR DEVICE OWNER S MANUAL
 BUOYANCY COMPENSATOR DEVICE OWNER S MANUAL For models: Alpha (J-1000) Hydro D (J-1200) Artemis (J-1300) Female exclusive BCD Sojourn (J-1500) EN 250 EN 1809 0426 www.istsports.com Ver. E991007-1 - CONTENTS
WATER HEATER THERMAL EXPANSION TANKS Owner s Manual. Safety Instructions Installation Maintenance Warranty. Models: 2-5 Gallon Capacity
 WATER HEATER THERMAL EXPANSION TANKS Owner s Manual Safety Instructions Installation Maintenance Warranty Models: 2-5 Gallon Capacity Thank You for purchasing this Thermal Expansion Tank. Properly installed
solo harness USER GUIDE
 solo harness USER GUIDE Notices LIMITED WARRANTY For details, refer to the Product Warranty section on the Hollis web site: www.hollisgear.com COPYRIGHT NOTICE This operating manual is copyrighted, all
This document to be used with Hurley traditional Davits
 ~ InstructIon Manual ~ This document to be used with Hurley traditional Davits WarnIngs WarnIng - Failure to install, maintain, protect, and operate the system properly can cause malfunction resulting
8MAY15 US RACK, Inc Falcon Drive, Madera, CA
 8MAY15 US RACK, Inc. - 2850 Falcon Drive, Madera, CA 93637-559-661-3050 INSTRUCTIONS for Bedrail-mounted MOTORCYCLE RACK, Model 2001-4TRA WARNING: Do NOT attempt to install or use this rack without following
ROPV R40 E Series User Manual
 HARBIN ROPV INDUSTRY DEVELOPMENT CENTER ROPV R40 E Series User Manual For Use with the Following ROPV Pressure Vessel Models: R40 300E R40 450E Headquarters Tel:(+86)451-82267301 Fax:(+86)451-82267303
Underwater Housing for Canon EOS M
 Underwater Housing for Canon EOS M User Manual 1 Table of Contents 1. Introduction 2. Specifications 3. Function Controls 4. Set up Instructions 5. Use & Care of Housing 6. Service 7. Warranty 1. Introduction
In this manual; Warnings, Cautions and Notes calls your attention to information provided to help ensure your safety. Always dive safely.
 In this manual; Warnings, Cautions and Notes calls your attention to information provided to help ensure your safety. Always dive safely. A WARNING indicates a procedure or situation that, if not avoided,
ALPS Flotation Collar. User s Manual
 ALPS Flotation Collar User s Manual Capewell Aerial Systems LLC 4298 JEB Stuart Hwy Meadows of Dan, VA 24120 www.aerialmachineandtool.com Phone: 276-952-2006 FAX: 276-952-2231 Table of Contents Section
MANUAL SIDE MOUNT SYSTEM
 MANUAL SIDE MOUNT SYSTEM Content Table of contents 1 The Razor Side Mount System 4 1.1 Overview 4 1.2 Complete Razor Side Mount System 6 1.3 Razor Harness 2 7 1.4 The Razor T Weight System 11 1.5 The Razor
INSTRUCTION MANUAL FOR EBA MINUTE SELF-CONTAINED SELF RESCUER (SCSR) Manual Number: NH13747 Revision: A, ECN 2384 September 7, 2001
 Manual Number: NH13747 Revision: A, ECN 2384 September 7, 2001") INSTRUCTION MANUAL FOR EBA 6.5 60 MINUTE SELF-CONTAINED SELF RESCUER (SCSR) Manual Number: NH13747 Revision: A, ECN 2384 September 7, 2001 Page 1 of 20 CONTENTS PAGE INTRODUCTION 3 GENERAL INFORMATION..3
INSTRUCTION MANUAL FOR EBA 6.5 60 MINUTE SELF-CONTAINED SELF RESCUER (SCSR) Manual Number: NH13747 Revision: A, ECN 2384 September 7, 2001 Page 1 of 20 CONTENTS PAGE INTRODUCTION 3 GENERAL INFORMATION..3
Reliance Industries, LLC Operating instructions for the / Bolt-on D-Ring Anchorage. Model # 3071
 Reliance Industries, LLC Operating instructions for the 3071-1 / 3071-2 Bolt-on D-Ring Anchorage Model # 3071 Reliance Industries, LLC PO Box 140008 Denver, CO 80214 Ph. (800) 488-5751 Ph. (303) 424-8650
INSTRUCTION MANUAL EBA-75 CLOSED-CIRCUIT ESCAPE RESPIRATOR (CCER) CAPACITY 3
 CAPACITY 3") INSTRUCTION MANUAL FOR THE EBA-75 CLOSED-CIRCUIT ESCAPE RESPIRATOR (CCER) CAPACITY 3 Manual Number: NH24053 Revision: A, ECN 3590 December 14, 2015 Page 1 of 13 CONTENTS PAGE INTRODUCTION... 3 GENERAL
INSTRUCTION MANUAL FOR THE EBA-75 CLOSED-CIRCUIT ESCAPE RESPIRATOR (CCER) CAPACITY 3 Manual Number: NH24053 Revision: A, ECN 3590 December 14, 2015 Page 1 of 13 CONTENTS PAGE INTRODUCTION... 3 GENERAL
X-6FC STRINGING MACHINE OWNER'S MANUAL. Issue 1 - May Copyright 2004 GAMMA Sports - All Rights Reserved
 X-6FC STRINGING MACHINE OWNER'S MANUAL Issue 1 - May 2004 Copyright 2004 GAMMA Sports - All Rights Reserved OWNER'S MANUAL GAMMA X-6FC TABLE OF CONTENTS PAGE 1... WARRANTY PAGE 2... FEATURES PAGE 3...
OWNER S MANUAL. A Diver s Reserve Parachute
 OWNER S MANUAL A Diver s Reserve Parachute Congratulations on purchasing your new SPARE AIR system This product is a sophisticated, high-quality alternate air source designed for recreational divers. It
Instruction Manual LIMITED 1 YEAR WARRANTY. Hydraulic Punch Driver Read this material before using this product.
 Instruction Manual Hydraulic Punch Driver 902-483 LIMITED 1 YEAR WARRANTY We make every effort to assure that its products meet high quality and durability standards, and warrant to the original purchaser
Pay special attention to information provided in warnings, cautions and notes that are accompanied by one of these symbols:
 TABLE OF CONTENTS General Information Outlaw / Rogue Components ModLock Connectors Waistband / Shoulder Strap Assembly Aircell Assembly ModLock Connector Disassembly Waistband Extender Double Cylinder
SUP Owner s Manual.
 SUP Owner s Manual www.futurebeach.com Introduction Congratulations! You have just purchased a Future Beach SUP. The SUP business is growing and Future Beach is at the leading edge of this change. Our
Inflatable Dock Slide Owner s Manual
 Inflatable Dock Slide Owner s Manual Introduction Water sports can be safe and fun for all levels of enthusiasts. The Owner s Manual is presented to enhance your enjoyment of the sport. It is intended
Sea Rebel Kayak Owner s Manual
 Sea Rebel Kayak Owner s Manual www.ravesports.com Table of Contents Product instructions and warnings...2 Inflating instructions...3 Proper use.. 4 Deflating and storage.........6 Cleaning and troubleshooting...8
SHERWOOD PRO OWNER S MANUAL
 SHERWOOD PRO OWNER S MANUAL Blizzard Pro Regulator SRB9950 PRE-DIVE DIVE Side View Thank you for choosing Sherwood Regulators. To get the most satisfying use of this product, please take time to read this
Compact Triple Cabinet Outlet Station Model B Installation and Operating Instructions
 PORTER Parker Hannifin Corporation Porter Instrument Division 245 Township Line Rd. P.O. Box 907 Hatfield, PA 19440-0907 USA (215) 723-4000 / fax (215) 723-5106 Compact Triple Cabinet Outlet Station Model
Miller Revolution Key Features
 Thank you for purchasing the Miller Revolution Harness. The Revolution is an all new and totally innovative harness engineered with seven (7) unique components and more than eleven (11) key product features.
H-160 & H-320 Vehicle User s Guide
 H-160 & H-320 Vehicle User s Guide 1 COPYRIGHT NOTICE This user s guide is copyrighted, all rights are reserved. It may not, in whole or in part, be copied, photocopied, reproduced, translated, or reduced
CBP LPU- 40 Flotation Collar User s Manual
 CBP LPU- 40 Flotation Collar User s Manual January 2015 Capewell Aerial Systems LLC 4298 JEB Stuart Hwy Meadows of Dan, VA 24120 www.aerialmachineandtool.com Phone: 276-952-2006 FAX: 276-952-2231 Table
INDUSTRIAL VALVES MODELS: C62-A; C62-D. INSTRUCTION MANUAL Installation Operation Parts Service DIAPHRAGM BYPASS PRESSURE REGULATING VALVES
 INSTRUCTION MANUAL Installation Operation Parts Service IMPORTANT Record your Regulator model number and serial number here for easy reference: Model No. Serial No. Date of Purchase When ordering parts
STYRIGGER PRODUCT MANUAL
 STYRIGGER PRODUCT MANUAL Thank you for choosing the Styrigger kayak and canoe stabilizer. A kayak or canoe equipped with a Styrigger (safety outrigger) is an excellent choice for a beginner or someone
Chapter 9 Accessories
 SuperLite 17B Chapter 9 Accessories 9.1 Introduction This section provides the manufacturer s advice on how to install KMDSI accessories including the Hot Water Shroud, Low Pressure Inflator Hoses, and
OWNER'S MANUAL. Copyright 1999 ATS - All Rights Reserved
 OWNER'S MANUAL AL Issue 2 - August 19, 1999 Copyright 1999 ATS - All Rights Reserved OWNER'S MANUAL TABLE OF CONTENTS PAGE 1... WARRANTY PAGE 2... ASSEMBLY INSTRUCTIONS PAGE 4... MOUNTING THE RACQUET PAGE
LPU- 40 Flotation Collar
 105 Nutmeg Road South South Windsor, CT 06074 sales@capewell.com P: 860.610.0700 www.capewell.com LPU- 40 Flotation Collar User s Manual List of Revisions or Amendments Date Revision or Amendment 12 January
117 West Washington Street Lake City, FL USA Phone (386) Fax (386)
 Fax (386)") 117 West Washington Street Lake City, FL 32055 USA Phone (386) 752-1087 Fax (386) 755-0613 www.diverite.com Transpac II Owner s Manual Page 2 Dive Rite Transpac II Limited Warranty Dive Rite will at its
117 West Washington Street Lake City, FL 32055 USA Phone (386) 752-1087 Fax (386) 755-0613 www.diverite.com Transpac II Owner s Manual Page 2 Dive Rite Transpac II Limited Warranty Dive Rite will at its
SOTR Special Operations Tactical Respirator
 SOTR Special Operations Tactical Respirator OPERATOR S MANUAL FOR INDIVIDUAL RESPIRATORY PROTECTION OPS-CORE 2018 OMM G055-1000 REV. B INTRODUCTION ABOUT YOUR SOTR The Ops-Core Special Operations Tactical
Pressure Relief Valve Instruction Manual
 CVR3-M0_062017 Pressure Relief Valve Instruction Manual MODEL: CVR3 SFA Companies 10939 N. Pomona Ave. Kansas City, MO 64153 Tel: 888-332-6419 * Fax: 816-448-2142 E-mail: sales@bvahydraulics.com Website:
Paintball Marker. User s Manual. Direct Feed. SC: Stock Class. VSC: Vertical Air Stock Class. 530 South Springbrook Road Newberg, OR 97132
 Paintball Marker User s Manual Direct Feed SC: Stock Class 530 South Springbrook Road Newberg, OR 97132 VSC: Vertical Air Stock Class www.phantomonline.com Component Concepts, Inc., 530 South Springbrook
User Instruction Manual
 User Instruction Manual 4500 psi Air Compressor Ver 2, 1.18 Contents Parts Included...3 Assembly Instructions...3-5 Operation Instructions...6-7 Oil Change Intervals...8 Air Filter Replacement...9 Setting