WHEELS AND TRANSMISSIONS IONS
|
|
|
- Silvia Kennedy
- 5 years ago
- Views:
Transcription


1 WHEELS AND TRANSMISSIONS IONS MOUNTING TIRES ON WHEELS Install a rim strip or rim tape; this protects the tube from punctures caused by the tips of the spokes and the spoke nipples. Align the hole in the rim strip for the valve stem with the hole in the wheel rim. Some tires have a certain rotating direction marked on their sidewall. Generally, any V in the tread pattern should open toward the rear of the direction of tire travel. On our trikes, we often mount the right rear wheel with the cassette mount on the inside, but it doesn t really matter. Mount one side of the tire on the rim, and then push the inner tube into the partially mounted tire. Make sure the tube is not folded or twisted. After the valve stem is situated, use the tire levers to force the second side of the tire onto the wheel rim. Take care not to pinch the inner tube as you go. Some tires may prove to be very tight and difficult to lever onto the rim; warming and thus softening the tires--as well as lubricating with soapy water--may help get them on. Before inflating, rotate the tire and tube around the rim as needed until the valve stem sticks straight out of its hole. Inflate slightly and, before inflating further, check to make sure that the tire is seated evenly on the rim. Finally, inflate the tire to its highest recommended pressure. Figure 3-1. Rim Strip Some of our vehicles utilize high pressure (80 to 110 psi) tires for lower rolling resistance on pavement. Many tire models on the market are rated for a maximum of 45 to 60 psi. Sometimes people choose to inflate these medium-pressure tires over the rated pressure so that they roll more easily. Be aware that over-inflation is not recommended by the tire manufacturer. If the tire still does not want to seat correctly, then deflate to 15 or 20 PSI. Squirt some Windex or dish soap on the trouble spot making sure to work it in below the bead. Then re-inflate the tire to desired PSI. The lubrication should help the tire to seat itself. Figure 3-2. Tire Assembly For safety reasons, insert the quick release axle into the wheel so that the quick release handle is on the side opposite the disc brake if at all possible. Technical Manual 3-1
2 TRANSMISSIONS Our standard transmission for a single-seat three- or four-wheeler is illustrated below. The pedals are attached to a triple-sprocket crankset, which creates rotation (by means of a chain) of an 8-speed gear cluster on a jackshaft (thus turning the jackshaft). A single sprocket on the outer end of the jackshaft then creates rotation (by chain) of the 8-speed gear on the left rear wheel--the drive wheel. Two-wheel drive is a custom option, wherein the jackshaft is extended to the right to drive the right rear wheel as well. Trike Compound Gears When all three gear clusters are in low, the resulting gearing is very "low", "slow" or "powerful". This means that one revolution of the pedals will produce only a small forward motion of the vehicle. The force required to turn the pedals in low gear is very little; thus pedaling is easy. When all three gear clusters are in high, the resulting gearing is very "fast" or "high". One revolution of the pedals will produce a lot of forward motion. Unless the vehicle is already moving fast, the effort required to turn the cranks will be very great. The very highest gears are used only at high speeds on downhills, with the help of gravity. The term "Gear Inches" is shorthand for describing the "size" of gear you are in. Being in a "90 gear-inch" gear is like pedaling an 1890's high-wheeler with a 90" diameter wheel and fixed pedals; a single turn of the cranks and you go a long way forward. This is called a "tall" or "high" gear. Being in a "10-inch gear" is like pedaling a little kid's trike with 10" diameter wheel (a "low" gear); Figure 3-3 Top view of gears on a trike. you don't make much forward progress for each turn of the cranks, though pedaling is relatively easy. Being in a 26 gear-inch gear on a mountain bike with 26" diameter wheels means that for each turn of the pedals, the drive wheel goes around exactly once. In a 52" gear, the drive wheel goes around exactly twice for each revolution of the cranks. As normally set up; the left hand shifts the front triple sprocket by means of a twist-grip shifter. The right hand shifts the middle 8-speed cluster, also using a twist-grip shifter. A third shifter (a thumb lever) is used to shift the rear 8-speed cluster. The rear cluster is shifted only occasionally, and is normally left in a position to give an appropriately low gear for the conditions in which you are riding. Contrary to some assumptions; single-wheel-drive on a trike (as Lightfoot Cycles uses it) with appropriate tires almost always provides plenty of traction, even in snowy or gravelly conditions. Single-wheel-drive also does not create any difficulties with tracking (traveling straight ahead) on a properly laid-out long-wheelbase design, despite the fact that only one side of the vehicle has power. Electric assist and two-wheel-drive options create two different forms of very positive dual-wheel traction. Technical Manual 3-2

3
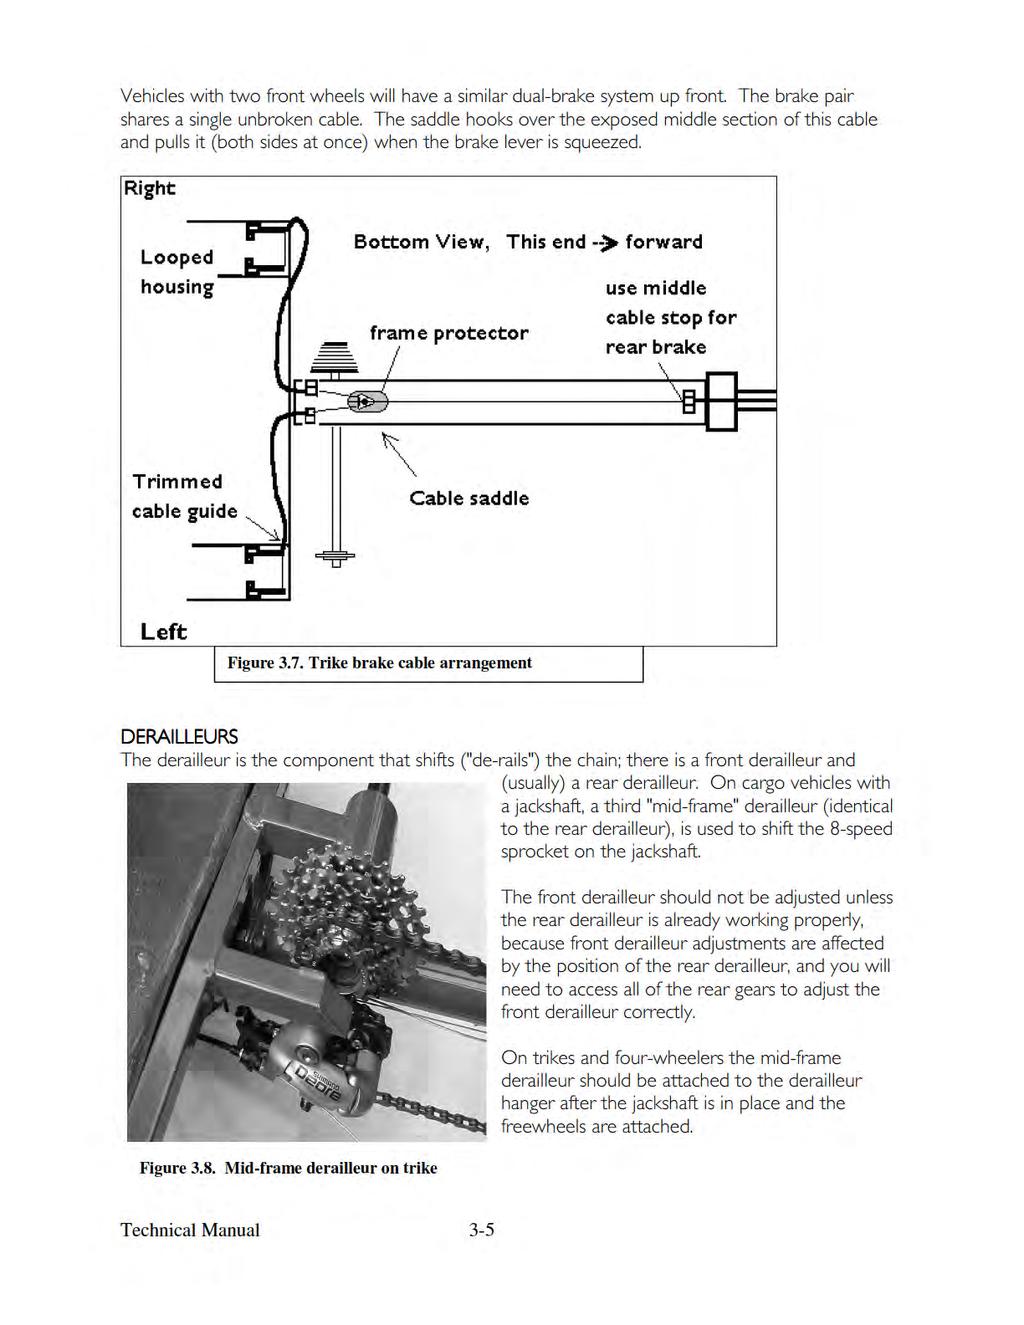
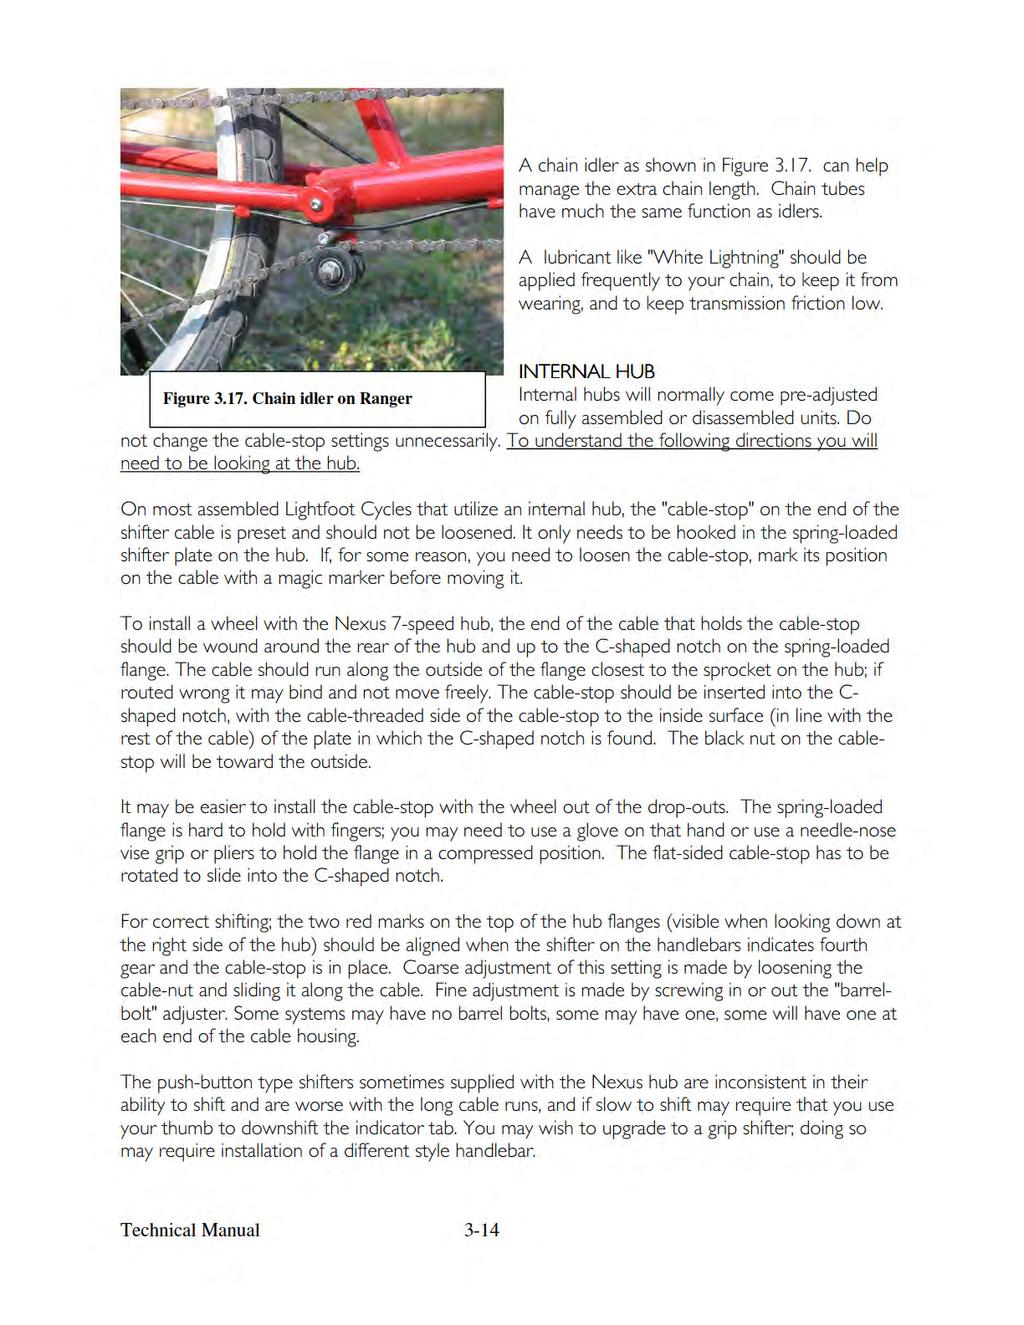
4 recommend hairspray or any solvents that might damage the gel grip. You may have to trim the grips; they may be a bit too long to fit on some handlebars with certain components. Standard placement of the shifters connects the left grip shifter to the front triple chainring. The right grip shift controls the rear derailleur on bikes, or the mid-frame derailleur on trikes and quadracycles. On trikes and quadracycles, the thumb shifter controls the rear derailleur. If an internal hub gearing system is used, then the right grip shift will control the internal hub in the rear drive wheel, and the thumb shifter will control the mid-frame derailleur. This allows the most commonly shifted gears (the internal gear hub) to be those most easily shifted, and leaves the rarely-shifted ranges to be controlled by the more awkward thumb shifter. The derailleur shifted by the thumb shifter is generally shifted only infrequently and is used to set a "range" of operation such as low range, medium or high range. ROUTING THE CABLES Try to keep the length of the cable housing as short as possible, however; do not make tight bends in the housing. Zip ties can be used to tie loose sections of cable to the frame. The cable "saddle" is used to activate both rear brakes as shown in Figure 3.5. Place it about 3 inches in front of the mid-frame cable saddles. Before installing it, place a patch of frame protector in the spot it will sit. This will protect the frame from scratching and noise. Figure 3.6. Trike shift cable arrangement Technical Manual 3-4
5
6
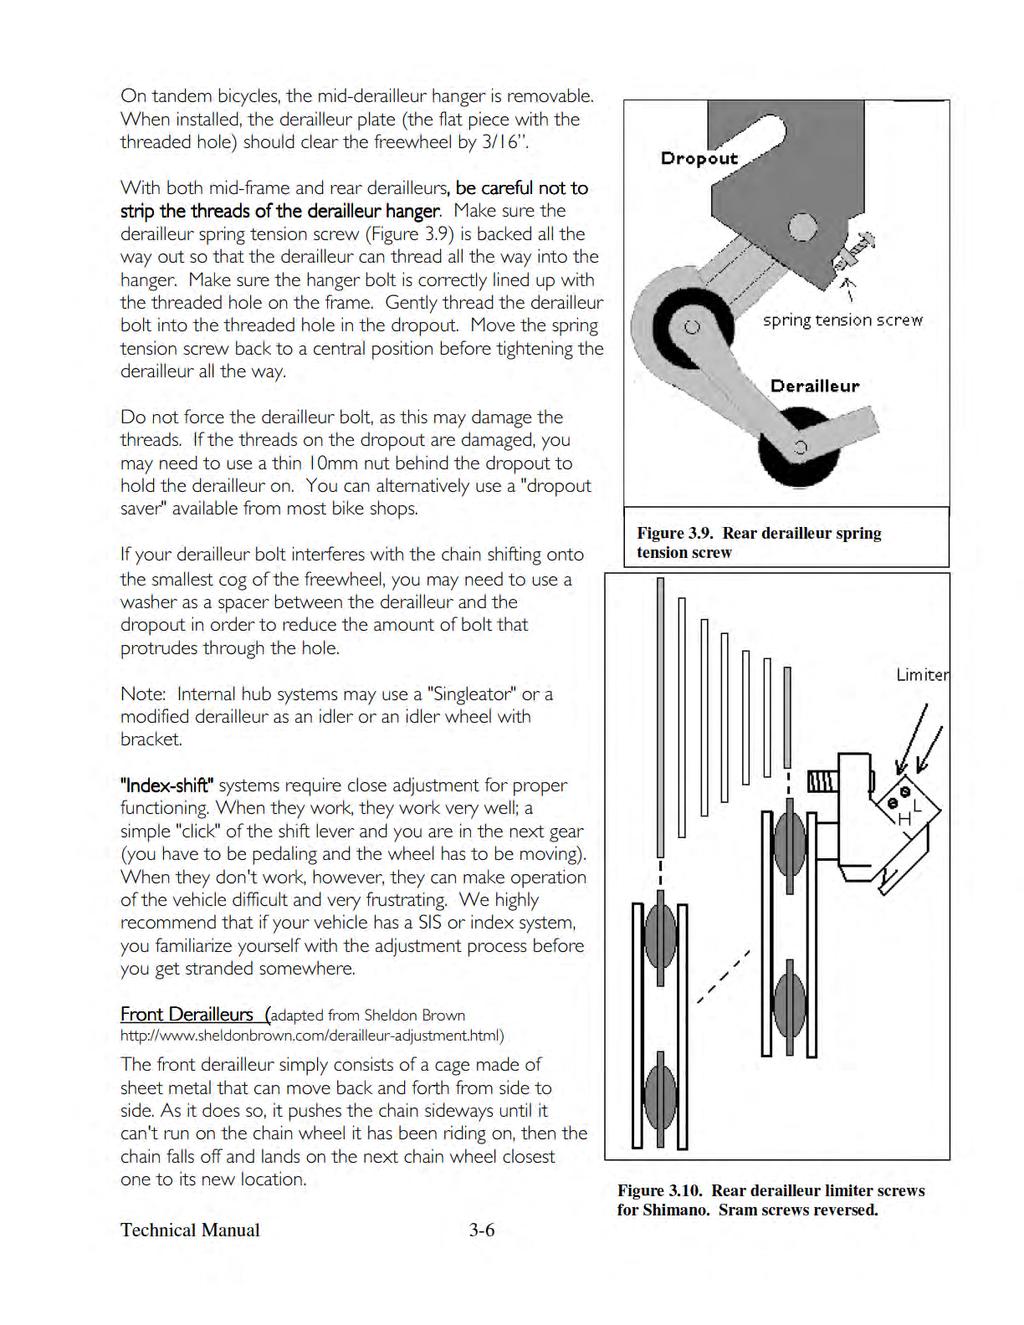
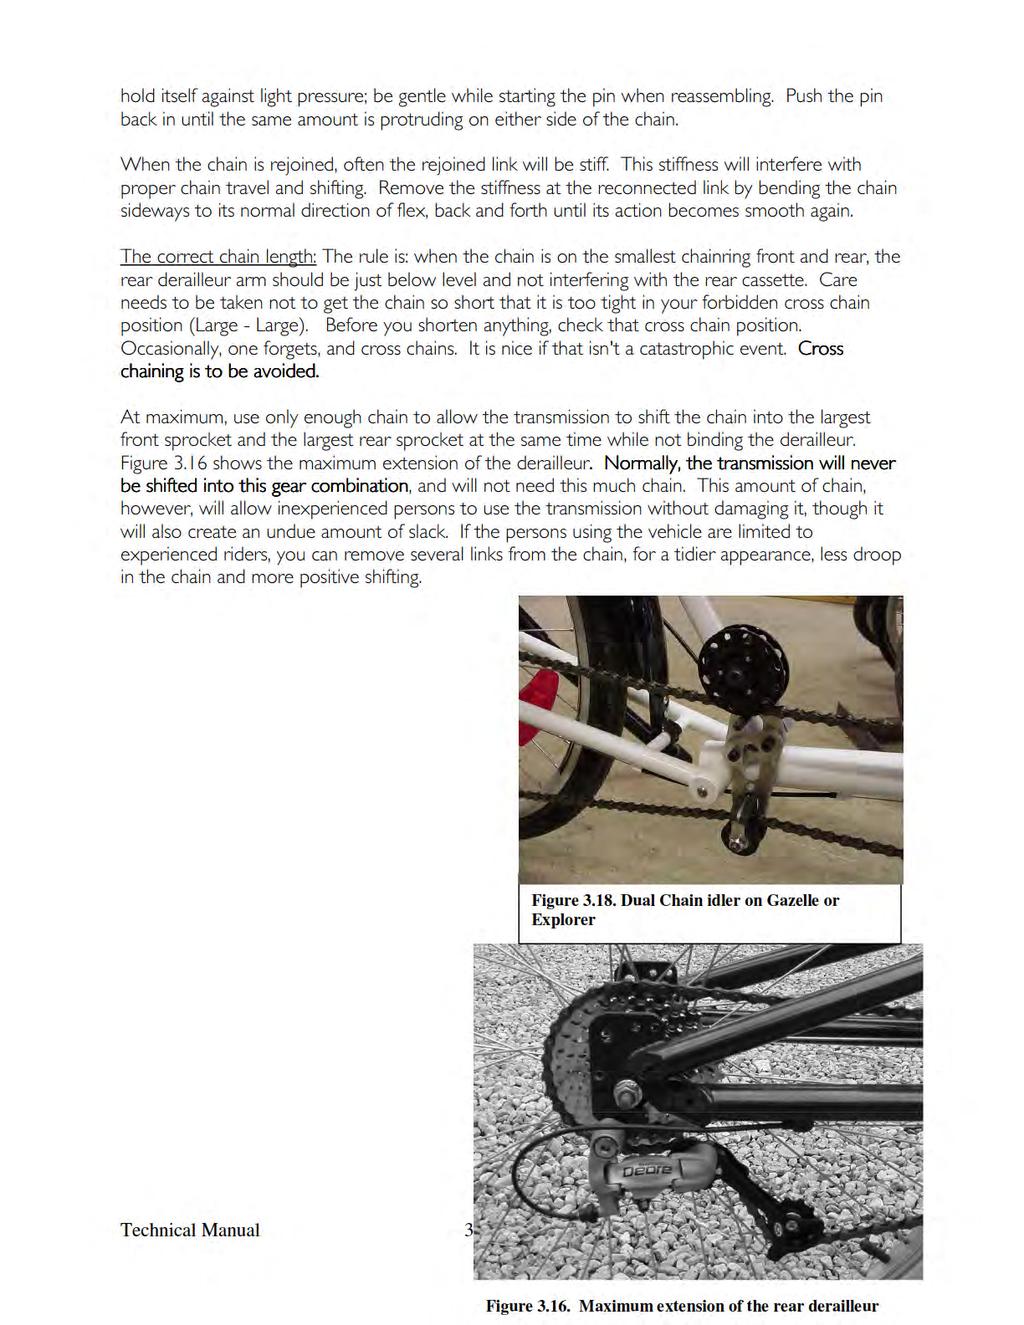
7 Front derailleur adjustment is not an exact science. It requires a good eye and a bit of patience to get it right. When you apply power to the pedals, the power is transmitted to the rear sprockets by the upper run of the chain. The lower run of the chain is just the return path, and the only tension on the lower run is that applied by the spring in the rear derailleur. Since the front derailleur does its shifting with the upper, power-transmitting, section of chain, it has a harder task to perform. In general, you should not expect a front derailleur to shift well while you are pedaling hard, even if the rear derailleur does so. The Three Front Derailleur Adjustments Clamp Position The most critical adjustment of a front derailleur is its attachment to the bicycle frame. This must be set correctly before you attempt to adjust the limit stops. There are two variables, angle and height. The front derailleur comes with a small piece of plastic holding it into the extended (highgear) position. A small piece of clear plastic stuck to the side shows where the teeth of the sprockets should meet the shifter when in high gear; this tells how high to mount the derailleur. As you tighten the clamp, watch to make sure the derailleur cage remains parallel with the sprockets. Remove the plastic spacer after the derailleur is firmly clamped to the frame. Angle of the front derailleur is judged by looking down on the cage from above. Modern front derailleurs have very subtly shaped cages, so it is not always easy to tell when the ideal adjustment has been made. In general, the centerline of the cage should be parallel to the centerline of the frame. Rotating the derailleur so that the back of the cage is farther out will sometimes improve shifting to the small ring of a triple by preventing overshifting, but may cause increased need for trimming on the larger rings. It may also cause the crank to strike the cage. Rotating the derailleur so that the front of the cage is farther out will help reduce the need for trimming on the large chainwheel, and will provide crisper downshifting, but with a greater tendency to overshift on the inside. This may be appropriate on bicycles equipped with an antiderailment device. Height of the front derailleur is a principal factor in how well it will shift. Manufacturers commonly recommend 2mm clearance between the bottom of the outer cage plate and the teeth of the large chainwheel. This is a bit of an oversimplification. Best performance will result from the very lowest position that still just barely keeps the cage from hitting the chainwheel teeth. The lower you can get it, the better it will shift, and the less you will need to trim the front derailleur. Derailleur Chain wheel Mismatch To get the front derailleur as low as possible, the curvature of the outer cage plate has to match the curvature of the largest chainwheel. If you use a larger chainring than the derailleur was designed for, the rear of the cage will hit the teeth of the big chainring before the front of the cage gets low enough to provide crisp shifting without the need for trimming. If you use a smaller chainring than the derailleur was designed for, it will shift OK, but you'll have to do a fair amount of trimming, due to the rear of the cage being higher than it should be, so that the chain crosses through it farther back. Lately I've started modifying front derailleurs for improved shifting with larger rings. I have an RSX on a bike with 50/38/28 Biopace (the sweep of a 50 Biopace is comparable to that of a 52 round.) The RSX front derailleur works great on its intended 46/36/26 setup, but the cage doesn't match the curve of the larger chainring. In a couple of minutes with a grinding wheel, I removed a good bit of metal from the bottom rear of the outer cage plate, and a bit from the bridge section where Technical Manual 3-7
8 the inner and outer cage plates connect at the back. This made the derailleur match the curvature of the larger chainwheel, and allowed me to set it low enough to provide good chain control. This setup now works fine with an STI rig that doesn't permit "trimming" the front derailleur. Low-gear limit stop. The low-gear limit stop stops the derailleur from shifting past the smallest chainwheel and throwing the chain onto the bottom bracket shell. If it is too loose, the chain will fall off when you try to downshift to the small chainwheel. If it is too tight, you it will be difficult or impossible to shift down to the low chainweel. On older front derailleurs, the low-gear stop is the one closer to the frame. Many newer designs reverse this position for reasons relating to the mechanism used. The basic adjustment for the low-gear stop is to set it so that the chain just barely clears the inner plate of the cage when the lowest gear (small front, large rear) is selected. This will usually be the best position for double-chainwheel setups, and will permit the use of most or all of the rear sprockets with a minimum of trimming. For triple chainweels, it will sometimes be necessary to adjust the low-gear stop a bit looser, so that the outer plate of the derailleur can travel far enough to knock the chain off of the middle ring. Anti-derailment devices In some instances, you may find that one adjustment of the low-gear stop causes the chain to derail past the small chainring, but a tighter setting results in slow downshifting to the small ring. In such cases, a good, if inelegant, solution is sometimes to install an anti-derailment device that clamps to the seat tube. These products, such as the 3rd Eye Chain Watcher and the N-Gear Jump Stop set up a barrier preventing the chain from overshooting the small ring, no matter how loose the low-gear stop is set. This allows the low-gear stop to be set to allow the derailleur to move farther inboard for faster, more precise shifting, even under some load. These devices can often save the day when extra-wide range gearing is used on a mountain bike or tandem. High-gear limit stop The high-gear limit stop is pretty straightforward. It should be set so that the chain almost rubs on the outside plate of the front derailer cage when the bicycle is in its highest gear (large front/small rear). This will reduce the need for trimming as you shift the rear derailer. If the shift to the large chainwheel is slow, make sure that you aren't pedaling too hard, front upshifting requires being ready to have the cranks slow down when the shift takes place. If the shift is unreliable even when you are pedaling lightly, you may be able to improve it by loosening the high-gear stop a bit. If you do so, check to make sure that the derailer cage is not moving so far out that it can be struck by the crank as it goes by. Sometimes front upshifting may be improved by rebending the front edge of the inner cage plate outward a bit. This may be done with an adjustable wrench. This is rarely necessary on modern front derailers, but used to be a very common trick on older, cruder designs. Front Derailleur Trimming As you shift the rear derailleur one way or another, the direction from which the chain runs from back to front changes a bit. As a result, sometimes it is necessary to "trim" the adjustment of the front shifter after changing gears with the rear, even if you are staying on the same front chainring. Technical Manual 3-8
9 Trimming means using the shifter to move the front derailleur cage sideways just a little bit, enough to stop the chain from rubbing, but not enough to make it shift to a different chainring. Older front derailleurs designed for friction shifters used to require trimming as a matter of course, but newer indexed systems can often be set up so that no trimming is necessary. For a "trimless" front indexing, you will usually need to be using the particular chainwheel sizes for which the front derailleur was designed, and the chainwheels must not be bent even a little bit. The lower down the cage is mounted, the less trimming will be needed. If your system requires trimming, it is essential that you do it. If you ride with the chain rubbing against the front derailleur cage, you will wear a groove in the side of the cage and it will never shift properly. Adjusting derailleur systems is most easily done with the drive wheel elevated into the air so it can turn freely. Make the initial "rough" adjustment without the chain installed. Fine-tune and test with the chain in place. Rough Adjustment: Start by letting the spring-loaded derailleur relax to its highest position (lowest position if it is the front derailleur). The shifter cable should be either disconnected or the shift lever at the handlebars should be in the position in which it is taking up the least amount of cable. (Note: the shift lever should be complementary to the derailleur in model or type.) Then screw in or out the little "high/low limiting screw" that restricts the movement of the derailleur in and out; this establishes how far the derailleur can move, so that it does not shift the chain entirely off the sprocket cluster. There are two of these, usually marked with an H for high (small sprocket) and an L for low (large sprocket). Move the screw until the derailleur jockey wheels line up with the outermost cassette sprocket. Manually, push the derailleur to its other extreme and adjust the other limiting screw until the derailleur lines up with that sprocket or chain ring (front). The instructions that come with your front derailleur give metric settings for making this adjustment. Return the derailleurs to their relaxed position. Above smallest chainring and sprocket. Now, Install the chain and connect the cables. Make sure that the housing (the tube in which the cable is housed) is socketed into the mechanism or cable stops at each end by stretching the cable under the midframe after everything is connected. Disconnect, take up the slack and reconnect. When the shift lever is now rotated (while pedaling), the derailleur should shift the chain from one sprocket to the next. When the derailleur reaches the farthest sprocket, re-adjust the low limiter screw to permit the chain enough movement to shift onto the sprocket, but not so much that it goes off the far side. If the system is an index system (as most LFC vehicles are), fine-adjustment to exactly position the rear derailleur for accurate shifts is generally made with a "barrel-adjuster" bolt, either where the cable enters the derailleur or where the cable exits the shift lever. If your chain hesitates to shift up (to the smaller sprocket), twist the barrel adjuster inward, thus taking some of the tension off of the cable. If the chain does not shift down (to the larger sprocket), twist the barrel adjuster outward, adding tension to the cable so that it pulls the derailleur further over toward the larger sprocket. Technical Manual 3-9
10 Indicator marks for the front derailleur (even on index systems) do not accurately indicate what gear the front triple sprocket is in. This is not a problem, but you can take the time to adjust it as close as you wish. The shifter for the rear-most derailleur on a trike or Tandem is a "friction shifter". The limits to derailleur movement are adjusted in the same way as for the index shifter, but there is no need to fine tune the operation of the shifter lever. Shifting is done by sound, sight, and feel. After a learning period, this can be done fairly accurately without looking. The screw or "D-ring" on top of the shifter can be tightened to adjust the tension of the thumb lever; it should not be so tight that it is difficult to shift, but not so loose that the derailleur spring pulls the cable back out of gear. You will be able to shift those "range" gears if you are climbing steep hills, starting heavy loads or flying down a hill and need more gears. Generally, leave it in a center gear unless you are experiencing one of those conditions. It's a tight squeeze on that shifter to get all 8 gears. Most of the time it can be set up to get all 8, but occasionally only 7 are available. Don't get too excited if only 7 are available, You will still have 168 gear combinations. If it ever needs to be adjusted, you can have it set up for whichever end you need the gears most, High or low. JACK-SHAFT The Jack-Shaft transfers power from the centerline to the outside drive wheel on trikes and some quads. PROPER CARE AND MAINTENANCE IS CRITICAL FOR GOOD FUNCTION AND REPLACEMENT EASE. Remove, clean and grease the parts every 1000 miles or each year. Remove any burrs that develop around bolt holes with a round file or sandpaper. Check the bolts holding the freewheel and cassette mounts frequently to make sure they are tight. Sloppy bolts create burrs which will make removal of the jackshaft almost impossible. Technical Manual 3-10
11
12
13
14
BICYCLE ASSEMBLY INSTRUCTIONS. dutchcycles.com.au. Distribution Centre
 BICYCLE ASSEMBLY INSTRUCTIONS dutchcycles.com.au Distribution Centre Shed 68, 400-422 Somerville Road, Tottenham, VIC 3012 email: service@dutchcycles.com.au BICYCLE COMPONENTS KEY INTRODUCTION CONGRATULATIONS
Shifting Lever. Dealer's Manual. RAPIDFIRE Plus SL-M2000 SL-M3010 SL-M4010. Thumb Shifter SL-TZ500. ROAD MTB Trekking. City Touring/ Comfort Bike
 (English) DM-MDSL001-01 Dealer's Manual ROAD MTB Trekking City Touring/ Comfort Bike URBAN SPORT E-BIKE Shifting Lever RAPIDFIRE Plus SL-M2000 SL-M3010 SL-M4010 Thumb Shifter SL-TZ500 CONTENTS IMPORTANT
Have questions? Chat with us live at raleighusa.com or call us at , 8am 5pm PST
 1 2 Have questions? Chat with us live at raleighusa.com or call us at 1-800-251-8435, 8am 5pm PST The bicycle you have purchased is a complex piece of equipment that must be properly assembled and maintained
Thumb Shifter Plus Thumb Shifter
 (English) DM-SL0004-01 Dealer's Manual Thumb Shifter Plus Thumb Shifter Thumb Shifter Plus SL-FT55 SL-TX50 SL-TX30 Thumb Shifter SL-TZ20 IMPORTANT NOTICE This dealer's manual is intended primarily for
Front Derailleur. Shifters and derailleurs work together!
 The drivetrain consists of the cranks, chainring(s), chain, and cog(s). On multispeed bikes, derailleurs, which move the chain to change gears, are also considered part of the drivetrain. ANATOMY of the
Final Assembly Instructions Bikes with Quill Stems
 Final Assembly Instructions Bikes with Quill Stems Thank you for buying your new bicycle from L.L.Bean. Read these instructions carefully before beginning the final assembly. Prior to shipping, our expert
Folding Dual Suspension MTB. Instruction Manual
 Folding Dual Suspension MTB Instruction Manual Introduction The Stowabike Folding MTB has been made to last and with proper maintenance, it will give you years of enjoyable rides and journeys. The following
CRUZBIKE Quest 2.0 Assembly
 CRUZBIKE Quest 2.0 Assembly CRUZBIKE Quest 2.0 Assembly... 1 General notes on assembly... 2 Un box and evaluate the frame and major parts... 2 Unfold the rear swing arm and arrange the frame... 3 Rear
ASSEMBLY GUIDE AROUND THE BLOCK - 1, 3, 7, & 21 SPEED SIXTHREEZERO
 ASSEMBLY GUIDE AROUND THE BLOCK - 1, 3, 7, & 21 SPEED SIXTHREEZERO OUR COMMITMENT We want you to love your bike as much as we do. If you run into any issues, no matter how small, let us know and we ll
comfort without compromising on performance and to fit your various needs on touring,
 Congratulations on your purchase of Goal-26X. Goal-26X is made to enhance comfort without compromising on performance and to fit your various needs on touring, shopping and communicating. Let s have fun
Good tread, no splits, cracks or holes, properly inflated. True, no missing or broken spokes, good rim. Secure, facing in right direction
 APPENDIX 1 Bike Check This is an M check. Start at the front of the bike and systematically work towards the back. Put a cross beside anything that is faulty. Note any faults you find. X FAULT Front tyre
Have questions? Chat with us live at raleighusa.com or call us at , 8am 5pm PST
 1 2 Have questions? Chat with us live at raleighusa.com or call us at 1-800-251-8435, 8am 5pm PST The bicycle you have purchased is a complex piece of equipment that must be properly assembled and maintained
Parts List. 7. Handlebars 8. Grips 9. Handlebar Stem 10. Front Brake 11. Front Wheel 12. Crank 13. Chain
 Woodworm Cruise Parts List 1. Free Wheel with Rear Hub 2. Fenders 3. Fender Stay 4. Quick Release 5. Saddle 6. Seat Post 7. Handlebars 8. Grips 9. Handlebar Stem 10. Front Brake 11. Front Wheel 12. Crank
Front derailleur. Dealer's Manual SORA FD-R3000 FD-R3030 CLARIS FD-R2000 FD-R2030. ROAD MTB Trekking. City Touring/ Comfort Bike DM-RBFD001-01
 (English) DM-RBFD001-01 Dealer's Manual ROAD MTB Trekking City Touring/ Comfort Bike URBAN SPORT E-BIKE Front derailleur SORA FD-R3000 FD-R3030 CLARIS FD-R2000 FD-R2030 CONTENTS IMPORTANT NOTICE... 3 TO
DM-RBRD (English) Dealer's Manual. ROAD MTB Trekking. City Touring/ Comfort Bike. Rear Derailleur
 Dealer's Manual. ROAD MTB Trekking. City Touring/ Comfort Bike. Rear Derailleur") (English) DM-RBRD001-00 Dealer's Manual ROAD MTB Trekking City Touring/ Comfort Bike URBAN SPORT E-BIKE Rear Derailleur CLARIS RD-R2000 CONTENTS IMPORTANT NOTICE... 3 TO ENSURE SAFETY... 4 LIST OF TOOLS
(English) DM-RBRD001-00 Dealer's Manual ROAD MTB Trekking City Touring/ Comfort Bike URBAN SPORT E-BIKE Rear Derailleur CLARIS RD-R2000 CONTENTS IMPORTANT NOTICE... 3 TO ENSURE SAFETY... 4 LIST OF TOOLS
Have questions? Chat with us live at raleighusa.com or call us at , 8am 5pm PST
 1 2 Have questions? Chat with us live at raleighusa.com or call us at 1-800-251-8435, 8am 5pm PST The bicycle you have purchased is a complex piece of equipment that must be properly assembled and maintained
Lectric Cycles Mid-Drive Electric Motor Installation
 Lectric Cycles Mid-Drive Electric Motor Installation This write-up describes the installation of a Lectric Cycles electric motor. The model is the e-rad Mid-Drive 750 Watt conversion kit, installed on
MANTEL BIKE BOX: PACKING YOUR ROAD BIKE FOR TRANSPORT
 MANTEL BIKE BOX: PACKING YOUR ROAD BIKE FOR TRANSPORT ROAD BIKE COMPONENTS 1 Frame: a b c d e Top tube Down tube Seat tube Chain stay Seat stay 2 Saddle 3 Seat post 4 Seat post clamp 5 Rear brake 6 Front
Santa Fe Cycles Assembly Guide Introduction
 Santa Fe Cycles Assembly Guide Introduction Congratulations on your purchase of your new Santa Fe bicycle. You have purchased a bicycle that has many features and qualities. Please take a few minutes and
DM-SL (English) Dealer's Manual. REVOSHIFT Shifter SL-RS47 SL-RS45 SL-RS36 SL-RS35 SL-RS34 SL-RS25
 Dealer's Manual. REVOSHIFT Shifter SL-RS47 SL-RS45 SL-RS36 SL-RS35 SL-RS34 SL-RS25") (English) DM-SL0002-03 Dealer's Manual REVOSHIFT Shifter SL-RS47 SL-RS45 SL-RS36 SL-RS35 SL-RS34 SL-RS25 IMPORTNT NOTICE This dealer's manual is intended primarily for use by professional bicycle mechanics.
(English) DM-SL0002-03 Dealer's Manual REVOSHIFT Shifter SL-RS47 SL-RS45 SL-RS36 SL-RS35 SL-RS34 SL-RS25 IMPORTNT NOTICE This dealer's manual is intended primarily for use by professional bicycle mechanics.
model - CYPRESS DX W
 Contents model - CYPRESS DX W Maintenenace manual Read and Save these instructions Welcome Contents 1 Preparing Nothing makes us happier than seeing people out riding bikes. For over thirty years Giant
Special instruction of installation for SAINT FH-M800/RD-M800 and FH-M805/RD-M805
 Technical Service Instructions SI-5VB0E t RD-M805 / RD-M800 Rear derailleur Special instruction of installation for SAINT FH-M800/RD-M800 and FH-M805/RD-M805 A hub axle is an essential component for the
Final Assembly Instructions Bikes with Threaded Headsets
 Final Assembly Instructions Bikes with Threaded Headsets Thank you for buying your new bicycle from L.L.Bean. Read these instructions carefully before beginning the final assembly. Prior to shipping, our
How to ensure optimal functionality of Campagnolo drivetrains
 How to ensure optimal functionality of ampagnolo drivetrains A.1 - POWER-TORQUE SYSTEM The bearing seat must be fit without interference on the RIGHT side, and the bolt should be inserted in the LEFT cup
Rear Drive System SERVICE INSTRUCTION. Specifications SI-R670B
 - SERVICE INSTRUCTION SI-R670B t Rear Drive System Before use, read these instructions carefully, and follow them for correct use. In order to realize the best performance, we recommend that the following
DM-MARD (English) Dealer's Manual. ROAD MTB Trekking. City Touring/ Comfort Bike REAR DERAILLEUR XTR RD-M9100 RD-M9120
 Dealer's Manual. ROAD MTB Trekking. City Touring/ Comfort Bike REAR DERAILLEUR XTR RD-M9100 RD-M9120") (English) DM-MARD001-00 Dealer's Manual ROAD MTB Trekking City Touring/ Comfort Bike URBAN SPORT E-BIKE REAR DERAILLEUR XTR RD-M9100 RD-M9120 CONTENTS CONTENTS...2 IMPORTANT NOTICE...3 TO ENSURE SAFETY...4
(English) DM-MARD001-00 Dealer's Manual ROAD MTB Trekking City Touring/ Comfort Bike URBAN SPORT E-BIKE REAR DERAILLEUR XTR RD-M9100 RD-M9120 CONTENTS CONTENTS...2 IMPORTANT NOTICE...3 TO ENSURE SAFETY...4
DM-MBRD (English) Dealer's Manual. ROAD MTB Trekking. City Touring/ Comfort Bike. Rear Derailleur SLX RD-M7000 DEORE RD-M6000
 Dealer's Manual. ROAD MTB Trekking. City Touring/ Comfort Bike. Rear Derailleur SLX RD-M7000 DEORE RD-M6000") (English) DM-MBRD001-04 Dealer's Manual ROAD MTB Trekking City Touring/ Comfort Bike URBAN SPORT E-BIKE Rear Derailleur SLX RD-M7000 DEORE RD-M6000 CONTENTS IMPORTANT NOTICE... 3 TO ENSURE SAFETY... 4
(English) DM-MBRD001-04 Dealer's Manual ROAD MTB Trekking City Touring/ Comfort Bike URBAN SPORT E-BIKE Rear Derailleur SLX RD-M7000 DEORE RD-M6000 CONTENTS IMPORTANT NOTICE... 3 TO ENSURE SAFETY... 4
Final Assembly Instructions Bikes with Threaded Headsets
 Final Assembly Instructions Bikes with Threaded Headsets Thank you for buying your new bicycle from L.L.Bean. Read these instructions carefully before beginning the final assembly. Prior to shipping, our
Front derailleur. Dealer's Manual DURA-ACE FD-R9100 ULTEGRA FD-R FD ROAD MTB Trekking. City Touring/ Comfort Bike DM-RAFD001-03
 (English) DM-RAFD001-03 Dealer's Manual ROAD MTB Trekking City Touring/ Comfort Bike URBAN SPORT E-BIKE Front derailleur DURA-ACE FD-R9100 ULTEGRA FD-R8000 105 FD-5801 Procedures for cable tension adjustment
DM-RD (English) Dealer s Manual. ROAD Rear Derailleur RD-9000 RD-6800 RD-5800 RD-4700
 Dealer s Manual. ROAD Rear Derailleur RD-9000 RD-6800 RD-5800 RD-4700") (English) DM-RD0003-09 ROAD Rear Derailleur Dealer s Manual RD-9000 RD-6800 RD-5800 RD-4700 CONTENTS IMPORTANT NOTICE...3 TO ENSURE SAFETY...4 LIST OF TOOLS TO BE USED...6 INSTALLATION...8 Chain length...
(English) DM-RD0003-09 ROAD Rear Derailleur Dealer s Manual RD-9000 RD-6800 RD-5800 RD-4700 CONTENTS IMPORTANT NOTICE...3 TO ENSURE SAFETY...4 LIST OF TOOLS TO BE USED...6 INSTALLATION...8 Chain length...
SANTANA STOWAWAY TANDEM WITH AIRLINER SAFECASE AND FTS FOAM TRAY SYSTEM ASSEMBLY AND DISASSEMBLY
 SANTANA STOWAWAY TANDEM WITH AIRLINER SAFECASE AND FTS FOAM TRAY SYSTEM ASSEMBLY AND DISASSEMBLY Congratulations! You are now the proud owner of the world s most travel-ready, performance tandem. The following
Congratulations on your purchase of a JC Series Performer trike! The Performer JC Series is designed for everything from touring to commuting and
 Congratulations on your purchase of a JC Series Performer trike! The Performer JC Series is designed for everything from touring to commuting and shopping in the city. The JC Series frames are made of
Troubleshooting Guide
 Troubleshooting Guide This troubleshooting guide outlines quick fixes to the most common technical questions about the ElliptiGO. If the problem persists or you feel uncomfortable performing these actions,
Front derailleur. Dealer's Manual FD-M9000 FD-M9020 FD-M9025 FD-M8000 FD-M8020 FD-M8025 FD-M612 FD-M617 FD-M618 FD-M672 FD-M677
 (English) DM-FD0003-05 Front derailleur Dealer's Manual FD-M9000 FD-M9020 FD-M9025 FD-M8000 FD-M8020 FD-M8025 FD-M612 FD-M617 FD-M618 FD-M672 FD-M677 CONTENTS IMPORTANT NOTICE... 4 TO ENSURE SAFETY...
9-speed super narrow. chain such as. CN-7701 / CN-HG93 8- / 7- / 6-speed narrow. chain such as CN-HG50 / CN-IG51
 - Technical Service Instructions SI-5VH0B t RD-M600 Rear derailleur General Safety Information WARNING The ST-M600 DUAL CONTROL lever is used for both gear shifting and braking operations. Make sure that
UNPACKING AND ASSEMBLING YOUR DIAMONDBACK ROAD BIKE
 EMAIL SIGNUP BIKE REG SEARCH BIKES THE RIDE HEALTH FITNESS SKILLS SHOP MAINTENANCE CYCLING 101 RIDERS LIKE YOU TEAMS SUPPORT UNPACKING AND ASSEMBLING YOUR DIAMONDBACK ROAD BIKE 1. Begin by carefully cutting
DM-RCWH (English) Dealer's Manual. ROAD MTB Trekking. City Touring/ Comfort Bike. Wheel Set. WH-RX31 SM-AX x12 SM-AX x12
 Dealer's Manual. ROAD MTB Trekking. City Touring/ Comfort Bike. Wheel Set. WH-RX31 SM-AX x12 SM-AX x12") (English) DM-RCWH001-00 Dealer's Manual ROAD MTB Trekking City Touring/ Comfort Bike URBAN SPORT E-BIKE Wheel Set WH-RX31 SM-AX720-100x12 SM-AX720-142x12 CONTENTS IMPORTANT NOTICE... 3 TO ENSURE SAFETY...
(English) DM-RCWH001-00 Dealer's Manual ROAD MTB Trekking City Touring/ Comfort Bike URBAN SPORT E-BIKE Wheel Set WH-RX31 SM-AX720-100x12 SM-AX720-142x12 CONTENTS IMPORTANT NOTICE... 3 TO ENSURE SAFETY...
DM-RARD (English) Dealer's Manual. ROAD MTB Trekking. City Touring/ Comfort Bike. Rear Derailleur DURA-ACE RD-R9100 ULTEGRA RD-R8000
 Dealer's Manual. ROAD MTB Trekking. City Touring/ Comfort Bike. Rear Derailleur DURA-ACE RD-R9100 ULTEGRA RD-R8000") (English) DM-RARD001-03 Dealer's Manual ROAD MTB Trekking City Touring/ Comfort Bike URBAN SPORT E-BIKE Rear Derailleur DURA-ACE RD-R9100 ULTEGRA RD-R8000 CONTENTS IMPORTANT NOTICE... 3 TO ENSURE SAFETY...
(English) DM-RARD001-03 Dealer's Manual ROAD MTB Trekking City Touring/ Comfort Bike URBAN SPORT E-BIKE Rear Derailleur DURA-ACE RD-R9100 ULTEGRA RD-R8000 CONTENTS IMPORTANT NOTICE... 3 TO ENSURE SAFETY...
FREQUENTLY ASKED QUESTIONS ANSWERED! MOUNTING TO MY BIKE
 FREQUENTLY ASKED QUESTIONS ANSWERED! MOUNTING TO MY BIKE Will a Rohloff hub work on my bike? It is likely that the Rohloff hub will work on your bike as there are number of different hub configurations,
ST Shimano Total Integration. Technical Service Instructions. General Safety Information SI-6CT0B
 Technical Service Instructions SI-6CT0B t ST-4400 Shimano Total Integration Shimano Total Integration Features The Shimano Total Integration TIAGRA series features a dual action control lever which actuates
Front derailleur. Dealer's Manual XTR FD-M9000 FD-M9020 FD-M9025 DEORE XT FD-M8000 FD-M8020 FD-M8025 DEORE FD-M612 FD-M617 FD-M618 SLX FD-M672 FD-M677
 (English) DM-FD0003-06 Dealer's Manual ROAD MTB Trekking City Touring/ Comfort Bike URBAN SPORT E-BIKE Front derailleur XTR FD-M9000 FD-M9020 FD-M9025 DEORE XT FD-M8000 FD-M8020 FD-M8025 DEORE FD-M612
Bicycle Owner's Manual Easy Access Bike
 Bicycle Owner's Manual Easy Access Bike AGE: FROM 9 YEARS OLD AND UP IMPORTANT Check bike after assembly or any adjustments. Consult bicycle retailer with questions. Always wear a helmet. Children should
Owner s Manual for Multi Speed & Freewheel Bicycles This Owner's Manual contains assembly, operation, and maintenance instructions.
 Your Model Number is: (write your model number here) Owner s Manual for Multi Speed & Freewheel Bicycles This Owner's Manual contains assembly, operation, and maintenance instructions. WARNING: - Check
DM-GN (English) Dealer's Manual. General Operations
 Dealer's Manual. General Operations") (English) DM-GN0001-20 Dealer's Manual General Operations CONTENTS IMPORTANT NOTICE... 7 TO ENSURE SAFETY... 8 REAR DERAILLEUR 9 TO ENSURE SAFETY... 10 REAR DERAILLEUR FOR MTB/TREKKING... 12 Installation
(English) DM-GN0001-20 Dealer's Manual General Operations CONTENTS IMPORTANT NOTICE... 7 TO ENSURE SAFETY... 8 REAR DERAILLEUR 9 TO ENSURE SAFETY... 10 REAR DERAILLEUR FOR MTB/TREKKING... 12 Installation
Dealer's Manual ROAD MTB Trekking City Touring/ URBAN SPORT E-BIKE Comfort Bike Front derailleur ALIVIO Non-Series
 (English) DM-MDFD001-02 Dealer's Manual ROAD MTB Trekking City Touring/ Comfort Bike URBAN SPORT E-BIKE Front derailleur ALIVIO FD-M4000 FD-M4020 Non-Series FD-MT400 CONTENTS IMPORTANT NOTICE... 3 TO ENSURE
DM-FD (English) Dealer's Manual. Front derailleur FD-M9000 FD-M9020 FD-M9025 FD-M8000 FD-M8020 FD-M8025 FD-M612 FD-M617 FD-M618 FD-M672
 Dealer's Manual. Front derailleur FD-M9000 FD-M9020 FD-M9025 FD-M8000 FD-M8020 FD-M8025 FD-M612 FD-M617 FD-M618 FD-M672") (English) DM-FD0003-04 Front derailleur Dealer's Manual FD-M9000 FD-M9020 FD-M9025 FD-M8000 FD-M8020 FD-M8025 FD-M612 FD-M617 FD-M618 FD-M672 FD-M677 CONTENTS IMPORTANT NOTICE... 3 TO ENSURE SAFETY...
(English) DM-FD0003-04 Front derailleur Dealer's Manual FD-M9000 FD-M9020 FD-M9025 FD-M8000 FD-M8020 FD-M8025 FD-M612 FD-M617 FD-M618 FD-M672 FD-M677 CONTENTS IMPORTANT NOTICE... 3 TO ENSURE SAFETY...
MODEL: COMMUTER / ROAD BIKE
 STEP BY STEP BUILD GUIDE MODEL: COMMUTER / ROAD BIKE TABLE OF CONTENTS TOOLS 1 LET S GET STARTED 2 INSTALLING THE QUILL STEM 3 INSTALLING THE FRONT FENDER 4 INSTALLING THE QUICK RELEASE 5 INSTALLING THE
Ladies Shopper Bike Assembly Manual 28C03
 Ladies Shopper Bike Assembly Manual 28C03 Ecosmo Ltd 1 Know your bike 1. Wheel 2. Rear Derailleur 3. Chain 4. Crank Set 5. Pedal 6. Seat Quick Lock 7. Saddle and Post 8. Frame 9. Front Light 10. Front
MODEL: FIXIE / TRACK
 STEP BY STEP BUILD GUIDE MODEL: FIXIE / TRACK TABLE O F CON TENTS TOOLS 1 LET S GET STARTED 2 INSTALLING THE HANDLEBAR 3 INSTALLING THE FRONT WHEEL 4 ALIGNING THE STEM 5 INSTALLING THE SEATPOST 6 OPTIMIZING
Thank you for purchasing a WIKE BOX BIKE!
 Thank you for purchasing a WIKE BOX BIKE! Contents Safety.....3 Front wheel.4 Kickstand..5 Handle Bar & Box 6 Seat post and Saddle 7 Final pre-ride check 8 Tools needed to assemble Bike: -High table or
E-trike Li Assembly Guide
 PREPARATION 1. Read this assembly manual BEFORE commencing assembly. 2. Carefully remove all the components and packaged hardware from the shipping boxes. 3. Unpack the contents of the large double box
Drive Belt Instructions
 Drive Belt Safety Do not roll, pry, twist, invert or bend the belt back on itself. Do not zip tie the belt. The acceptable temperature range for your belt drive is -53 C to 85 C. Do not lubricate the belt
Assembly, Fitting, Care & Maintenance
 Assembly, Fitting, Care & Maintenance Assembly 1.1 Remove All Parts and Tools from Packaging 1.2 Part and Tools required for assembly 1.3 Check Foot & Leg Assembly 1.4 Adjust Upper-Leg-Support (ULS) Height
We strongly recommend watching our video tutorial for the easiest installation process.
 Introduction We strongly recommend watching our video tutorial for the easiest installation process. GTRO is dedicated for all non-sports bicycles. Please, remember it has not been tested for heavy-duty
EZ-3 USX HD Supplemental Owner s Manual
 EZ-3 USX HD Supplemental Owner s Manual Find us online at SunSeeker.Bike Revised 2/2016 CONGRATULATIONS! Congratulations and welcome to the Sun Seeker family! You have selected one of the most comfortable
EZee Glider Manual. Tools needed for Assembly: Wrench (included) Philips Screwdriver (not included) Assembly Instructions
 Philips Screwdriver (not included) Assembly Instructions") EZee Glider Manual Congratulations on your purchase of the EZee Glider! Your glider is designed for years of nearly carefree use by your child. These instructions include how to set up your glider and
EZee Glider Manual Congratulations on your purchase of the EZee Glider! Your glider is designed for years of nearly carefree use by your child. These instructions include how to set up your glider and
Trike-Bike Assembly Manual
 Be sure to check our website for more instruction details, videos and photographs as well as a complete listing of each Nut and Bolt for the Trike Bike. www.trike-bike.com.au Go to the page marked ASSEMBLY
Co-Motion Co-Pilot Bicycles for travel
 Revised October 2014 Co-Motion Co-Pilot Bicycles for travel Packing and travel instructions Eugene Oregon USA Toll free 1-866-282-6336 www.co-motion.com Congratulations! A Co-Motion Co-Pilot is a great
Bicycle Owner s Manual
 Bicycle Owner s Manual The following manual provides assembly and maintenance instructions, as well as a guide to safe usage of your new bicycle. WARNING Read the complete Owner s Manual before starting
2019 MADONE ASSEMBLY MANUAL
 2019 MADONE ASSEMBLY MANUAL 2019 MADONE Rim brakes and Di2 drivetrain Rim brakes and mechanical drivetrain Disc brakes and Di2 drivetrain Disc brakes and mechanical drivetrain TABLE OF CONTENTS Common
Rear Drive System SERVICE INSTRUCTIONS SI-R920A WARNING. Note Always be sure to use the sprocket set bearing the same group
 - SERVICE INSTRUCTIONS SI-R90A t Rear Drive System Before use, read these instructions carefully, and follow them for correct use. WARNING Use neutral detergent to clean the chain. Do not use alkali-based
Item N o.: Item N am e:southern Star 40cm Girls Cherry Bike
 Item N o.:42174868 Item N am e:southern Star 40cm Girls Cherry Bike Tighten them so they do not move and are horizontal. Check the handlebar is in good condition and the ends of the handlebar are
Assembly Tools. Assembly will take 1-2 hours
 Assembly Tools Included in your parts box: Pedals Quick release skewer Reflectors (if not already installed) Toolkit (4+5mm combo Allen wrench, 13+15mm combo open-end wrench) Helpful Tools: Scissors (for
Assembly Tools. Assembly will take about an hour
 Assembly Guide Assembly Tools Included in your parts box: Pedals Toolkit (4+5mm combo Allen wrench, 13+15mm combo open-end wrench) Touch-up paint Spare fuses (for battery) Assembly will take about an hour
How to adjust your derailleur
 How to adjust your derailleur Limit screws, indexing and B-limit Written By: The Hive 2017 service.bythehive.com Page 1 of 8 Step 1 How to adjust your derailleur There are three adjustments that need to
Mini Glider Manual. Your Glider comes partially assembled. The front wheel and the handlebars require assembly.
 Mini Glider Manual Congratulations on your purchase of the Mini Glider! Your glider is designed for years of nearly carefree use by your child. These instructions include how to set up your glider and
Reinforced connecting pin. Silver. 6.5mm. Black. 7.1mm
 - SERVICE INSTRUCTIONS SI-R70C t Rear Drive System Before use, read these instructions carefully, and follow them for correct use. WARNING Use neutral detergent to clean the chain. Do not use alkali-based
HOME ASSEMBLY INSTRUCTIONS
 HOME ASSEMBLY INSTRUCTIONS This Papillionaire Bicycle now belongs to you. It will take you to work, wait patiently outside your local cafe, and carry your groceries home. This is the start of your long-term
Item N o.: Item N am e:40cm Boys Rival Bike
 Item N o.:42272892 Item N am e:40cm Boys Rival Bike 9 bell 8 grip 30 crash pad 10 brake lever 26 wheel reflector 22 saddle 23 seat post 25 rear reflector 24 quick release 6 handle bar 7 stem 2 top tube
ROAD Wheel Set. Dealer's Manual WH-9000-C24-CL WH-9000-C24-TL WH-9000-C35-CL WH-9000-C35-TU WH-9000-C50-CL WH-9000-C50-TU WH-9000-C75-TU
 (English) DM-WH0002-00 Dealer's Manual ROAD Wheel Set WH-9000-C24-CL WH-9000-C24-TL WH-9000-C35-CL WH-9000-C35-TU WH-9000-C50-CL WH-9000-C50-TU WH-9000-C75-TU WH-RS21 WH-RS61 CONTENTS IMPORTANT NOTICE...
Quattrocycle BV. Quattrocycle. User Manual. Last update February Quattrocycle BV Bremkant EJ Middelbeers. User Manual Quattrocycle 1
 Quattrocycle User Manual Last update February 2010 Quattrocycle BV Bremkant 6 5091 EJ Middelbeers User Manual Quattrocycle 1 Table of Contents Page Chapter 1: Introduction 3 Chapter 2: Instructions for
SI-F971A. 9-speed super narrow chain such as CN-7700 / CN-HG92 8- / 7- / 6-speed narrow chain such as CN-HG50 / CN-IG51
 SERVICE INSTRUCTIONS SI-F971A Front Drive System Before use, read these instructions carefully, and follow them for correct use. WARNING Use neutral detergent to clean the chain. Do not use alkali-based
CANYON WORKSHOP: CORRECT PACKAGING FOR TRANSPORT
 Whether you're travelling or sending your bike in for a service, the Canyon BikeGuard is sturdy and can be used several times. It is of course necessary that you retain all the packaging material delivered
DM-TRRD (English) Dealer's Manual. ROAD MTB Trekking. City Touring/ Comfort Bike. Rear Derailleur DEORE XT RD-T8000 DEORE RD-T6000
 Dealer's Manual. ROAD MTB Trekking. City Touring/ Comfort Bike. Rear Derailleur DEORE XT RD-T8000 DEORE RD-T6000") (English) DM-TRRD001-01 Dealer's Manual ROAD MTB Trekking City Touring/ Comfort Bike URBAN SPORT E-BIKE Rear Derailleur DEORE XT RD-T8000 DEORE RD-T6000 CONTENTS IMPORTANT NOTICE... 3 TO ENSURE SAFETY...
(English) DM-TRRD001-01 Dealer's Manual ROAD MTB Trekking City Touring/ Comfort Bike URBAN SPORT E-BIKE Rear Derailleur DEORE XT RD-T8000 DEORE RD-T6000 CONTENTS IMPORTANT NOTICE... 3 TO ENSURE SAFETY...
SG-7R46 SG-7R45 BR-IM41-R CJ-7S40 WARNING CAUTION SERVICE INSTRUCTIONS. Inter-7 Hub. Inter-M Brake Cassette joint NOTE:
 t WARNING It is important to completely understand the operation of your bicycle's brake system. Improper use of your bicycle's brake system may result in a loss of control or an accident, which could
MANUAL LEKKER BIKES 2016
 MANUAL LEKKER BIKES 2016 CONTACT For your own safety, never do work on your bicycle unless you feel absolutely sure about it. If you are in doubt or if you have any questions please contact our helpdesk:
Bicycle Owner s Manual Children s Bicycles
 Bicycle Owner s Manual Children s Bicycles The following manual provides assembly and maintenance instructions, as well as a guide to safe usage of your new bicycle. WARNING - Read the complete Owner s
DM-MBST (English) Dealer's Manual. ROAD MTB Trekking. City Touring/ Comfort Bike. Shifting lever. EZ-FIRE Plus ST-EF500 ST-EF510
 Dealer's Manual. ROAD MTB Trekking. City Touring/ Comfort Bike. Shifting lever. EZ-FIRE Plus ST-EF500 ST-EF510") (English) DM-MBST001-00 Dealer's Manual ROAD MTB Trekking City Touring/ Comfort Bike URBAN SPORT E-BIKE Shifting lever EZ-FIRE Plus ST-EF500 ST-EF510 CONTENTS IMPORTANT NOTICE... 3 TO ENSURE SAFETY...
(English) DM-MBST001-00 Dealer's Manual ROAD MTB Trekking City Touring/ Comfort Bike URBAN SPORT E-BIKE Shifting lever EZ-FIRE Plus ST-EF500 ST-EF510 CONTENTS IMPORTANT NOTICE... 3 TO ENSURE SAFETY...
Road Chain Catcher Installation Instructions (K13-001, K13-006, K SL1, K SL2)
") Road Chain Catcher Installation Instructions (K13-001, K13-006, K13-001-SL1, K13-001-SL2) Description: The K-Edge Road Chain Catcher series is designed to eliminate chain drop on the lowest chainring due
Road Chain Catcher Installation Instructions (K13-001, K13-006, K13-001-SL1, K13-001-SL2) Description: The K-Edge Road Chain Catcher series is designed to eliminate chain drop on the lowest chainring due
It's Not Rocket Science, It's Bicycle Maintenance
 TECM 2700.011 It's Not Rocket Science, It's Bicycle Maintenance A Comprehensive Bicycle Maintenance Manual for All Riders Patrick Doran, Bryan Hayes, Ashley Huffman, Corbin Sheridan 4/18/2012 It's Not
Preparation/Maintenance Manual
 Preparation/Maintenance Manual It is essential that you read this manual in its entirety before riding your bike for the first time to ensure that your bike is properly assembled and safe to ride. It is
FRONT DERAILLEUR 10/11x3
 FRONT DERAILLEUR 10/11x3 1 - TECHNICAL SPECIFICATIONS 52 52 2 - COMPATIBILITY WARNING! Different combinations from those included in the table could cause the malfunction of the drivetrain and result in
welcome to the family contents
 manual 2 trike anatomy welcome to the family Congratulations on your purchase of a Greenspeed Anura trike. We believe that you have purchased the finest recumbent tricycle available in the world today.
Shifting Lever. RAPIDFIRE Plus 11-speed
 (English) DM-SL0005-04 Shifting Lever Dealer's Manual RAPIDFIRE Plus 11-speed MTB XTR SL-M9000 DEORE XT SL-M8000 CONTENTS IMPORTANT NOTICE... 3 TO ENSURE SAFETY... 4 LIST OF TOOLS TO BE USED... 7 INSTALLATION...
2019 MADONE ASSEMBLY MANUAL
 2019 MADONE ASSEMBLY MANUAL 2019 MADONE Rim brakes and Di2 drivetrain Disc brakes and Di2 drivetrain Rim brakes and mechanical drivetrain Disc brakes and mechanical drivetrain TABLE OF CONTENTS Common
BackCountry ebikes 2019 MULE Assembly
 BackCountry ebikes 2019 MULE Assembly Required Tools: Cutting Pliers (to cut box poly strapping and heavy bike banding) Scissors (to remove bubble wrap) Allen wrenches (3mm, 4mm, 5mm, 6mm) Wrenches (10mm,
Warning: Please read this entire manual before riding your Simbi. Failure to do so could result in serious injury or even death.
 Warning: Please read this entire manual before riding your Simbi. Failure to do so could result in serious injury or even death. Contents 1. OVERVIEW... 3 A. Thank You... 3 B. General Warning... 3 C. Important
THIS INSTRUCTION BOOKLET CONTAINS IMPORTANT SAFETY INFORMATION. PLEASE READ AND KEEP FOR FUTURE REFERENCE.
 THIS INSTRUCTION BOOKLET CONTAINS IMPORTANT SAFETY INFORMATION. PLEASE READ AND KEEP FOR FUTURE REFERENCE. FOR SERVICE ASSISTANCE CALL KENT TOLL FREE 1.800.451.5368 Monday - Friday 9:00 a.m. to 4:00 p.m.
Final Assembly Instructions Bikes with 16 Wheel Size
 Final Assembly Instructions Bikes with 16 Wheel Size Thank you for buying your new bicycle from L.L.Bean. Read these instructions carefully before beginning the final assembly. Prior to shipping, our expert
TRAILMATE METEOR ASSEMBLY MANUAL
 TRAILMATE METEOR ASSEMBLY MANUAL (DISC BRAKE VERSION) The Trailmate Meteor recumbent has been designed for easy assembly. This means more time to enjoy the smooth ride with single speed, 3 speed coaster
Using Your Bike Friday : Folding Rear Rack
 Using Your Bike Friday : Folding Rear Rack Green Gear Cycling, Inc. 3364 W. 11th Ave. Eugene, OR 97402 800-777-0258 USA & Canada +1-541-687-0487 Int l +1-541-687-0403 Fax www.bikefriday.com info@bikefriday.com
Front Chainwheel. Dealer's Manual MTB. Bottom bracket. ROAD MTB Trekking. City Touring/ Comfort Bike XTR FC-M9000 FC-M9020 SM-BB93 SM-BB94-41A
 (English) DM-MAFC001-01 Dealer's Manual ROAD MTB Trekking City Touring/ Comfort Bike URBAN SPORT E-BIKE Front Chainwheel MTB XTR FC-M9000 FC-M9020 Bottom bracket SM-BB93 SM-BB94-41A CONTENTS IMPORTANT
NO LATHE TRIKE HUBS. All content copyright AtomicZombie Extreme Machines. All rights reserved. 1
 NO LATHE TRIKE HUBS First of all, thanks all of those who visit the Atomic Zombie forum and help others with advice and offer their great tips and tricks. There have been two alternative ideas posted in
3. Fit. 1 Owner s manual
 3. Fit NOTE: Correct fit is an essential element of bicycling safety, performance and comfort. Making the adjustments to your bicycle which result in correct fit for your body and riding conditions requires
Item Name: 30CM GIRLS STAR THE UNICORN BIKE
 Item No.: 42333753 Item Name: 30CM GIRLS STAR THE UNICORN BIKE Contents 1. Parts identification 1 2. Safety precautions 2 3. Check list 6 4. Assembly 7 5. Adjustment 14 6. Repair and Service 15 7. Warranty
ASSEMBLY GUIDE: Izip & Ezip Electric Bicycles with Rack-Top Mounted Batteries ( RTMB Bicycles )
") ASSEMBLY GUIDE: Izip & Ezip Electric Bicycles with Rack-Top Mounted Batteries ( RTMB Bicycles ) Please Refer to your Owner s Manual for Detailed Setup Instructions Technical & Customer Service: 1-800-377-4532
ASSEMBLY GUIDE: Izip & Ezip Electric Bicycles with Rack-Top Mounted Batteries ( RTMB Bicycles ) Please Refer to your Owner s Manual for Detailed Setup Instructions Technical & Customer Service: 1-800-377-4532
BIKE CHAIN BASICS. Figure 1 - Two different sizes of bicycle chain
 BIKE CHAIN BASICS Figure 1 - Two different sizes of bicycle chain When creating your own human powered vehicles, a chain drive will likely be your chosen power transfer system, as it is an inexpensive,
THIS INSTRUCTION BOOKLET CONTAINS IMPORTANT SAFETY INFORMATION. PLEASE READ AND KEEP FOR FUTURE REFERENCE.
 THIS INSTRUCTION BOOKLET CONTAINS IMPORTANT SAFETY INFORMATION. PLEASE READ AND KEEP FOR FUTURE REFERENCE. FOR SERVICE ASSISTANCE CALL TOLL FREE 1.800.451.5368 Monday - Friday 8:00 a.m. to 4:00 p.m. Eastern
ASSEMBLY GUIDE TRUE GRIT. LaufCycling.com
 ASSEMBLY GUIDE TRUE GRIT LaufCycling.com Congratulations on your True Grit! We understand you are in a hurry to go riding a.s.a.p. - but please take a deep breath and read this installation guide first.
DM-CD (English) Dealer's Manual. Chain Device SM-CD50
 Dealer's Manual. Chain Device SM-CD50") (English) DM-CD0001-00 Chain Device Dealer's Manual SM-CD50 IMPORTANT NOTICE This dealer's manual is intended primarily for use by professional bicycle mechanics. Users who are not professionally trained
(English) DM-CD0001-00 Chain Device Dealer's Manual SM-CD50 IMPORTANT NOTICE This dealer's manual is intended primarily for use by professional bicycle mechanics. Users who are not professionally trained