Item Name: 30CM GIRLS STAR THE UNICORN BIKE
|
|
|
- Martha Carter
- 6 years ago
- Views:
Transcription

1 Item No.: Item Name: 30CM GIRLS STAR THE UNICORN BIKE
2
3 Contents 1. Parts identification 1 2. Safety precautions 2 3. Check list 6 4. Assembly 7 5. Adjustment Repair and Service Warranty 22


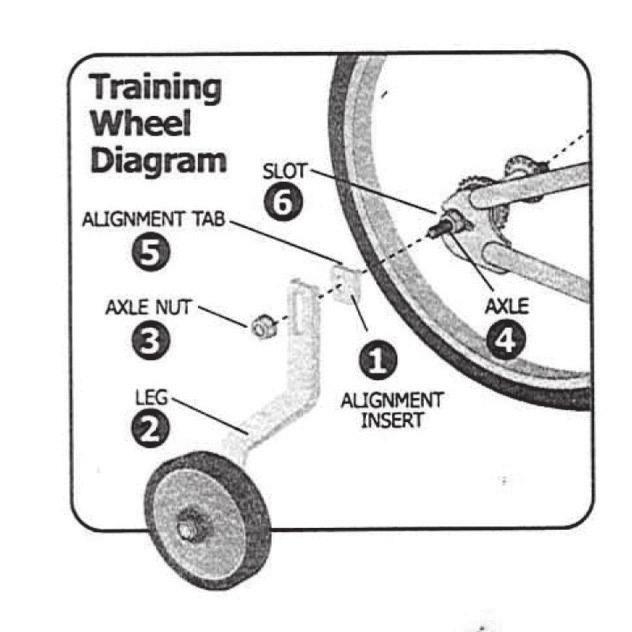
4 28 push bar 24 crash pad 9 bell 8 grip 26 basket 25 streamer 19 saddle 6 handle bar 7 stem 1 head tube 20 seat post 21 qucik release 2 top tube 5 head set 14 tyre 27 wheel cover 4 fork 3 down tube 18 spoke 12 chain guard 10 crank 17 rear hub 1 chainwheel 23 training wheel leg 13 pedals 15rim 16 front hub 22 training wheel
5
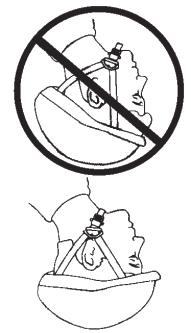
6 SAFETY PRECAUTIONS worn whilst riding this bike. Always ensure that appropriate footwear is If there is front brake,apply the rear brake first, and then apply the front brake. The front brake is strong and if not used correctly you may lose control and fall.
7

8
9 Tighten them so they do not move and are horizontal. Check the handlebar is in good condition and the ends of the handlebar are plugged. Check the bell is fitted and working well. Warning: Handlebar grips and tube end plugs should be replaced if damaged, as bare ends have been know to cause injury. Please check the condition of grips and bar ends before rdie.

10
11
12 9

13 Stem Diagram MINIMUM INSERTION MARK WARNING: do not over tighten the stem bolt. Over tightening the stem bolt can damage the steering and cause loss of control. Make sure the stem is aligned with the front wheel and tighten stem bolt. 10


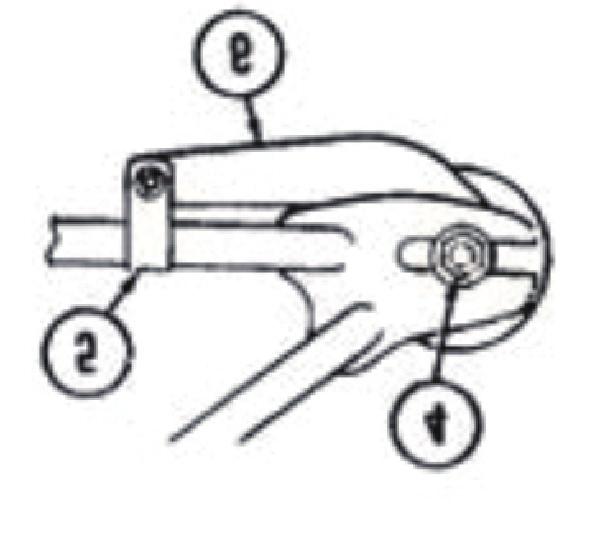
14 Stem and headset Diagram Handlebar and Stem (continued) Put the handlebar in a comfortable position for the rider WARNING: If the handlebar clamp is mot tight enough, the handlebar can ship in the stem. This can cause loss of the control. 7. locknut 4.stem bolt 1.stem 3.minimum insertion mark 2.wedge nut Tighten the bolts of the handlebar clamp. If the handlebar clamp has more than one bolt, then tighten the bolts equally. 2. Test the tightness of the stem: straddle the front wheel and hold it between your legs. Try to turn the front wheel by turning the handlebar. If the handlebar and the stem turn without turning the front wheel, realign the stem with the front wheel. Tighten the bolt tighter than you did before (about half a revolution only at a time). Do this test again, until the handlebar and the stem do not turn without turning the wheel. 3. Test the tightness of the handlebar: Hold the bicycle stationary and try to move the ends of the handlebar forward or backward. If the handlebar moves, loosen bolts of handlebar clamps. Put the handlebar in the correct position. Tighten the bolts of the handlebar clamp tighter than before. If the handlebar clamp has more than one bolt, tighten the bolts equally. Do this test again, until the handlebar does not move in the handlebar clamp. 11

15 2. Streamers Assemble a streamer to each grip. Push the arrowhead or the plug of a streamer fully into the end of each grip. 3. Bell The bell is attach to the handlebar. Adjust the bell ring into a comfortable place that is easy to use when riding. 12


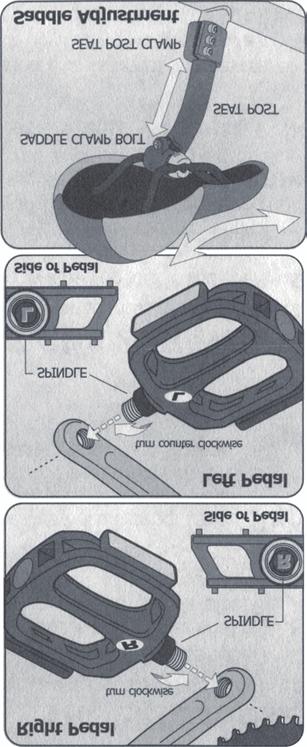
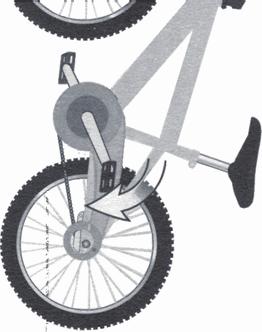
16 4. Basket Insert the plastic clips onto the basket, then wrap the clips around the front pad and secure as shown. 5. Push bar Slide the end of the push bar onto the seat post, tighten securely with the collar and nut provided. 6. Quick release adjustment Loosen the quick release handle and insert the seat post into the seat tube. Tighten the quick release with suitable strength.make the handle of the quick release vertical with the seat post. Pull the handle of the quick release to the front of the seat post. 13


17 by your dealer before you ride it. 14

18 15 of 25-28N.M.

19 TYRE REMOVAL 1. Let the air out of the tyre by depressing the valve core (the little pin in the centre of the valve stem opening). 2. Separate the tyre bead from the sides of the rim by pressing with your thumbs. Work your way around the tyre on both sides to be sure that the beads of the tyre are not sticking to the rim. (Figure A) 3. Stand he wheel up on the firm surface with the valve stem on the bottom and grasp the upper part of the tyre with both hands. Try to roll the tyre off the far side of the rim. 4. With the wheel standing as in Figure B, use bicycle tyre tools for spoon handles with rounded ends (at least two-preferably three) to lift the bead on one side of the tyre off the rim. Be careful not to pinch the inner tube between the tyre tools and the tyre bead or rim. Once you have got the bead off for about one fourth of the circumference of the tyre using the tools, the rest can usually be pulled off by hand. 5. With the bead on one side of the tyre completely off the rim, you can now pull the inner tube out from between the tyre and rim everywhere except in they are of the valve stem. FIGURE A Press wih thumbs to separete tyre bead. Continue around entire rim until the bead is completely separated. FIGURE B Lift bead with spoons or tyre tools. FIGURE C replace tyre onto rim. FIGURE D Rims strip protects inner tube from spoke ends. 6. It should now be easy to pull the tyre the rest of the way off the rim. Start at the side of the wheel opposite the valve stem and simply lift the bead of the tyre up over the side of the rim and pull it off. FIGURE F Use thumb to press valve stem through hole in rim.make certain valve stem is straight. 16
20 Frequently check the tyre inflation pressure because all tyres lose air slowly over time. For extended storage,keep the weigh of the biycle off the tyres. WARNING: Do not ride or sit on the bicycle if either inner tube is under inflated. This can damage the tyre and inner tube. Do not use unregulated air hoses to inflate the inner tubes. An unregulated hose can suddenly over inflate bicycletyres and cause them to burst. Use a hand or a foot pump to inflate the inner tubes. Service station meter-regulated air hoses are also acceptable. The correct inflation pressure is shown on the tyre sidewall. Before adding air to any tyre, make sure the edges of the tyre (the bead) is the same distance from the rim, all around the rim, on both sides of the tyre. If the tyre does not appear to be seated correctly, release air from the inner tube until you can push the bead of the tyre into the rim where necessary, add air slowly and stop frequently to check the tyre sealing and the pressure, until you reach the correct inflation pressure as indicated on the tyre sidewall.replace worn or defective tyres and inner tubes. 17
21 Inspection of Bearings Maintenance: Frequently check the bearings of the bicycle. Have a bicycle service shop lubricate the bearings once a year or any time they do not pass the following tests. Head Tube Bearings: The fork should turn freely and smoothly at all times. With the front wheel off the ground, you should not be able to move the fork up, down, or side-to-side in the head tube. Crank bearings: The crank should turn freely and smoothly at all times and the front sprockets should not be loose on the crank. You should not be able to move the pedal end of the crank from side-to-side. Wheel bearing: Lift each end of the bicycle off the ground and slowly spin the raised wheel by hand. The bearings are correctly adjusted if: The wheel spins freely and easily. The weight of the spoke reflector when you put it toward the front or rear of the bicycle causes the wheel to spin back and forth several times. There is no side-to-side movement at the wheel rim then you push it to the side with light force. Lubrication/Maintenance WARNING: Do not over lubricate. If oil gets on the wheel rims or the brake shoes, it will to reduce brake performance and a longer distance to stop the bicycle will be necessary. Injury to the rider or to others can occur. The chain can throw excess oil onto the wheel rim. Wipe excess oil off the chain. Keep all oil off the surfaces of the pedals where your feet rest. Using soap and hot water wash all oil off the wheel rims, the brake shoes, the pedals, and the tyres. Rinse with clean water and dry completely before you ride the bicycle. 18

22 19 excess Normal Repair Kits Some parts of the bicycle will be easily worn down, Below is the normal repair kits for future use. 1.Spare inner tube ; 2.Patch kits 3.Pump 4.Tire levers It is recommended that significant mechanical repairs should be carried out by a skilled bicycle mechanic.
23 WHEELS Wheel inspec on It is most important that wheels are kept in top condi on. Properly maintaining your bicycle s wheels will help braking performance and stability when riding. Beware of the following poten al problems: Dirty or greasy rims: Cau on: these can render your brakes ine ec ve. Do not clean them with oily or greasy material. When cleaning, use a clean rage or wash with soapy water, rinse and air dry, don t ride while they re wet. When lubrica ng your bicycle, don t get oil on the rim braking surfaces. Wheels not straight: Li each wheel o the ground and spin them to see if they are crooked or out of round. If wheels are straight, they will need to be adjusted. This is quite di cult and is best le to a bicycle specialist. Broken or loose spokes: Check that all spokes are ght and that none are missing or damaged. Cau on: such damage can result in severe instability and possibly an accident if not corrected. Again, bicycle specialist beat handle spoke repairs. Loose hub bearings: Li each wheel o the ground and try to move the wheel from side to side. Cau on: if there is movement between the axle and the hub, do not ride the bicycle. Adjustment is required. Axle nut Check that these are ght before each ride. Fork replacement: If you choose to replace the front fork, please ensure that the fork is the same size and inner tube diameter as the original fork that was sold with the bicycle. 20
24 21
25 Thank you for your purchase from Kmart. 12 Month Warranty Kmart Australia Ltd warrants your new product to be free from defects in materials and workmanship for the period stated above, from the date of purchase, provided that the product is used in accordance with accompanying recommendations or instructions where provided. This warranty is in addition to your rights under the Australian Consumer Law. Kmart will provide you with your choice of a refund, repair or exchange (where possible) for this product if it becomes defective within the warranty period. Kmart will bear the reasonable expense of claiming the warranty. This warranty will no longer apply where the defect is a result of alteration, accident, misuse, abuse or neglect. Please retain your receipt as proof of purchase and contact our Customer Service Centre on (Australia) or (New Zealand) or alternatively, via Customer Help at Kmart.com.au for any difficulties with your product. Warranty claims and claims for expense incurred in returning this product can be addressed to our Customer Service Centre at 690 Springvale Rd, Mulgrave Vic Our goods come with guarantees that cannot be excluded under the Australian Consumer Law. You are entitled to a replacement or refund for a major failure and compensation for any other reasonably foreseeable loss or damage. You are also entitled to have the goods repaired or replaced if the goods fail to be of acceptable quality and the failure does not amount to a major failure. For New Zealand customers, this warranty is in addition to statutory rights observed under New Zealand legislation. 22
26
27
28
Item N o.: Item N am e:40cm GIRLS VIOLET BIKE
 Item N o.:42547242 Item N am e:40cm GIRLS VIOLET BIKE 1 2 SAFETY PRECAUTIONS If there is front brake,apply the rear brake first, and then apply the front brake. The front brake is strong and if not used
Item N o.: Item N am e:40cm Boys Rival Bike
 Item N o.:42272892 Item N am e:40cm Boys Rival Bike 9 bell 8 grip 30 crash pad 10 brake lever 26 wheel reflector 22 saddle 23 seat post 25 rear reflector 24 quick release 6 handle bar 7 stem 2 top tube
Item N o.: Item N am e:southern Star 40cm Girls Cherry Bike
 Item N o.:42174868 Item N am e:southern Star 40cm Girls Cherry Bike Tighten them so they do not move and are horizontal. Check the handlebar is in good condition and the ends of the handlebar are
Item N o.: Item N am e:50cm GIRLS BELLA CRUISER BIKE
 Item N o.:42272847 Item N am e:50cm GIRLS BELLA CRUISER BIKE grip brake lever mudguard mudguard braket free wheel rear hub saddle seat post rear reflector seat clamp chain guard chain wheel crank stem
Parts List. 7. Handlebars 8. Grips 9. Handlebar Stem 10. Front Brake 11. Front Wheel 12. Crank 13. Chain
 Woodworm Cruise Parts List 1. Free Wheel with Rear Hub 2. Fenders 3. Fender Stay 4. Quick Release 5. Saddle 6. Seat Post 7. Handlebars 8. Grips 9. Handlebar Stem 10. Front Brake 11. Front Wheel 12. Crank
Owner s Manual. The most comfortable upright bicycles ever made.
 Owner s Manual The most comfortable upright bicycles ever made. At Day 6, we hope you will enjoy riding our bicycles as much as we enjoy designing them. We have truly combined the best features of a recumbent
Folding Dual Suspension MTB. Instruction Manual
 Folding Dual Suspension MTB Instruction Manual Introduction The Stowabike Folding MTB has been made to last and with proper maintenance, it will give you years of enjoyable rides and journeys. The following
Bicycle Owner s Manual Children s Bicycles
 Bicycle Owner s Manual Children s Bicycles The following manual provides assembly and maintenance instructions, as well as a guide to safe usage of your new bicycle. WARNING - Read the complete Owner s
Rothan Owner s manual
 Rothan Owner s manual www.islabikes.co.uk 1. Brake levers 2. Brake pads 3. Saddle 4. Seatpost 5. Seatpost clamp 6. Stem 7. Stem bolts 8. Headset 9. Headset spacers 10. Headset adjuster bolt 11. Handlebars
comfort without compromising on performance and to fit your various needs on touring,
 Congratulations on your purchase of Goal-26X. Goal-26X is made to enhance comfort without compromising on performance and to fit your various needs on touring, shopping and communicating. Let s have fun
Owner s Manual for Coaster Brake Bicycles This Owner's Manual contains assembly, operation, and maintenance instructions.
 Your Model Number is: (write your model number here) Owner s Manual for Coaster Brake Bicycles This Owner's Manual contains assembly, operation, and maintenance instructions. WARNING: - Check operation
Santa Fe Cycles Assembly Guide Introduction
 Santa Fe Cycles Assembly Guide Introduction Congratulations on your purchase of your new Santa Fe bicycle. You have purchased a bicycle that has many features and qualities. Please take a few minutes and
Rothan Owner s manual.
 Owner s manual www.islabikes.com www.islabikes.com 1. Brake levers 2. Brake pads 3. Saddle 4. Seatpost 5. Seatpost clamp 6. Stem 7. Stem bolts 8. Headset 9. Headset spacers 10. Headset adjuster bolt 11.
Owner s Manual 700c Fixed Gear Bicycles
 Owner s Manual 700c Fixed Gear Bicycles This manual contains important safety, assembly, operation and maintenance information. Please read and fully understand this manual before operation. Save this
Have questions? Chat with us live at raleighusa.com or call us at , 8am 5pm PST
 1 2 Have questions? Chat with us live at raleighusa.com or call us at 1-800-251-8435, 8am 5pm PST The bicycle you have purchased is a complex piece of equipment that must be properly assembled and maintained
Beinn Owner s manual
 Beinn Owner s manual www.islabikes.co.uk Setting up your Islabike You can view our how to set up your Beinn video guides on our website: http://www.islabikes.co.uk/info-hub/islabike-setup-video-guides
Bicycle Owner's Manual Easy Access Bike
 Bicycle Owner's Manual Easy Access Bike AGE: FROM 9 YEARS OLD AND UP IMPORTANT Check bike after assembly or any adjustments. Consult bicycle retailer with questions. Always wear a helmet. Children should
Congratulations on your purchase of a JC Series Performer trike! The Performer JC Series is designed for everything from touring to commuting and
 Congratulations on your purchase of a JC Series Performer trike! The Performer JC Series is designed for everything from touring to commuting and shopping in the city. The JC Series frames are made of
Luath Owner s manual.
 Luath Owner s manual www.islabikes.com www.islabikes.com Setting up your Luath 3 11 7 12 1 16 14 6 4 5 8 9 10 13 15 2 21 19 20 22 23 17 18 Serial number Please make a record of your serial number. This
Serial number. Cnoc Owner s manual.
 Serial number Please make a record of your serial number. This is a combination of letters and numbers unique to your bike stamped to the underside of the frame. This is required by police and insurance
Bicycle Owner s Manual
 Bicycle Owner s Manual The following manual provides assembly and maintenance instructions, as well as a guide to safe usage of your new bicycle. WARNING Read the complete Owner s Manual before starting
Distributed in Australia and New Zealand by Bike Solutions Pty Ltd
 GOMIER MANUAL 2500 SERIES This manual is for the following 2500 series models 20 (50cm) 6 speed external gears 20 (50cm) 3 speed internal gears (pictured and detailed in this manual) 20 (50cm) footbrake
Have questions? Chat with us live at raleighusa.com or call us at , 8am 5pm PST
 1 2 Have questions? Chat with us live at raleighusa.com or call us at 1-800-251-8435, 8am 5pm PST The bicycle you have purchased is a complex piece of equipment that must be properly assembled and maintained
Owner s Manual for Multi Speed & Freewheel Bicycles This Owner's Manual contains assembly, operation, and maintenance instructions.
 Your Model Number is: (write your model number here) Owner s Manual for Multi Speed & Freewheel Bicycles This Owner's Manual contains assembly, operation, and maintenance instructions. WARNING: - Check
USER GUIDE TO POWER ASSISTED BIKES
 USER GUIDE TO POWER ASSISTED BIKES 1 PAGE CONTENTS Page. 3 Unpacking Page. 3-4 Easy steps to get started Page. 5 General Assembly Instructions Page. 6 Aligning H/Bars, Page. 7 Tightening pedals onto Crank
Have questions? Chat with us live at raleighusa.com or call us at , 8am 5pm PST
 1 2 Have questions? Chat with us live at raleighusa.com or call us at 1-800-251-8435, 8am 5pm PST The bicycle you have purchased is a complex piece of equipment that must be properly assembled and maintained
Beinn Owner s manual.
 Beinn Owner s manual www.islabikes.com www.islabikes.com Setting up your Islabike You can view our how to set up your Beinn video guides on the Islabikes YouTube channel. Or follow the steps in this booklet...
model - CYPRESS DX W
 Contents model - CYPRESS DX W Maintenenace manual Read and Save these instructions Welcome Contents 1 Preparing Nothing makes us happier than seeing people out riding bikes. For over thirty years Giant
HELMETS SAVE LIVES!!! ALWAYS WEAR A PROPERLY FITTED HELMET WHEN YOU RIDE YOUR SCOOTER. DO NOT RIDE AT NIGHT. AVOID RIDING IN WET CONDITIONS.
 HELMETS SAVE CORRECT FITTING - MAKE SURE YOUR HELMET COVERS YOUR FOREHEAD. LIVES!!! ALWAYS WEAR A PROPERLY FITTED HELMET WHEN YOU RIDE YOUR SCOOTER. DO NOT RIDE AT NIGHT. AVOID RIDING IN WET CONDITIONS.
TRAILMATE METEOR ASSEMBLY MANUAL
 TRAILMATE METEOR ASSEMBLY MANUAL (DISC BRAKE VERSION) The Trailmate Meteor recumbent has been designed for easy assembly. This means more time to enjoy the smooth ride with single speed, 3 speed coaster
BICYCLE ASSEMBLY INSTRUCTIONS. dutchcycles.com.au. Distribution Centre
 BICYCLE ASSEMBLY INSTRUCTIONS dutchcycles.com.au Distribution Centre Shed 68, 400-422 Somerville Road, Tottenham, VIC 3012 email: service@dutchcycles.com.au BICYCLE COMPONENTS KEY INTRODUCTION CONGRATULATIONS
E-trike Li Assembly Guide
 PREPARATION 1. Read this assembly manual BEFORE commencing assembly. 2. Carefully remove all the components and packaged hardware from the shipping boxes. 3. Unpack the contents of the large double box
Beinn 29 Owner s manual
 Owner s manual Setting up your 4 13 8 12 1 14 15 19 16 7 5 6 5 22 20 9 10 11 21 2 3 1. Brake levers 2. Brake calipers 3. Rotors 4. Saddle 5. Seatpost 6. Seatpost clamp 7. Saddle clamp 8. Stem 9. Stem bolts
Helios Separable Tandem Manual
 Helios Separable Tandem Manual This manual accompanies the Helios owners manual Introduction The separable kit fitted to your Helios tandem allows for even greater flexibility in the way you can enjoy
Instruction Manual: VelectriX Urban 2.0
 Instruction Manual: VelectriX Urban 2.0 CONTENTS Safe Riding Recommendations Page 2 Pre-Ride Checklist Page 3 Display and Controls Page 4 Maintenance Page 8 Warranty Page 9 Contact Details Page 10 Service
Thank you for purchasing a WIKE BOX BIKE!
 Thank you for purchasing a WIKE BOX BIKE! Contents Safety.....3 Front wheel.4 Kickstand..5 Handle Bar & Box 6 Seat post and Saddle 7 Final pre-ride check 8 Tools needed to assemble Bike: -High table or
TRICYCLE ADU LT. To register your bike visit
 ADU LT TRICYCLE THIS MANUAL CONTAINS IMPORTANT SAFETY, PERFORMANCE AND MAINTENANCE INFORMATION. READ THE MANUAL BEFORE TAKING YOUR FIRST RIDE ON YOUR NEW TRICYCLE, AND KEEP THE MANUAL HANDY FOR FUTURE
Instruction Manual: VelectriX Foldaway
 Instruction Manual: VelectriX Foldaway CONTENTS Safe Riding Recommendations Page 2 Pre-Ride Checklist Page 3 Display and Controls Page 4 Quick Guide to Folding Page 6 Battery Instructions Page 7 Maintenance
UNPACKING AND ASSEMBLING YOUR DIAMONDBACK ROAD BIKE
 EMAIL SIGNUP BIKE REG SEARCH BIKES THE RIDE HEALTH FITNESS SKILLS SHOP MAINTENANCE CYCLING 101 RIDERS LIKE YOU TEAMS SUPPORT UNPACKING AND ASSEMBLING YOUR DIAMONDBACK ROAD BIKE 1. Begin by carefully cutting
Ladies Shopper Bike Assembly Manual 28C03
 Ladies Shopper Bike Assembly Manual 28C03 Ecosmo Ltd 1 Know your bike 1. Wheel 2. Rear Derailleur 3. Chain 4. Crank Set 5. Pedal 6. Seat Quick Lock 7. Saddle and Post 8. Frame 9. Front Light 10. Front
7130 Lancer Rear Drive Magnetic Commercial Indoor Cycling Bike
 7130 Lancer Rear Drive Magnetic Commercial Indoor Cycling Bike Owner s Manual Made in Taiwan INDEX IMPORTANT SAFETY INFORMATION... 1 EXPLODED DRAWING... 2 PARTS LIST... 3 ASSEMBLY INSTRUCTION... 4-9 USER
HOME ASSEMBLY INSTRUCTIONS
 HOME ASSEMBLY INSTRUCTIONS This Papillionaire Bicycle now belongs to you. It will take you to work, wait patiently outside your local cafe, and carry your groceries home. This is the start of your long-term
Assembly Tools. Assembly will take about an hour
 Assembly Guide Assembly Tools Included in your parts box: Pedals Toolkit (4+5mm combo Allen wrench, 13+15mm combo open-end wrench) Touch-up paint Spare fuses (for battery) Assembly will take about an hour
Instruction Manual: VelectriX Urban 2.0+
 Instruction Manual: VelectriX Urban 2.0+ CONTENTS Safe Riding Recommendations Page 2 Pre-Ride Checklist Page 3 Display and Controls Page 4 Maintenance Page 8 Warranty Page 9 Contact Details Page 10 Service
DM-RCWH (English) Dealer's Manual. ROAD MTB Trekking. City Touring/ Comfort Bike. Wheel Set. WH-RX31 SM-AX x12 SM-AX x12
 Dealer's Manual. ROAD MTB Trekking. City Touring/ Comfort Bike. Wheel Set. WH-RX31 SM-AX x12 SM-AX x12") (English) DM-RCWH001-00 Dealer's Manual ROAD MTB Trekking City Touring/ Comfort Bike URBAN SPORT E-BIKE Wheel Set WH-RX31 SM-AX720-100x12 SM-AX720-142x12 CONTENTS IMPORTANT NOTICE... 3 TO ENSURE SAFETY...
(English) DM-RCWH001-00 Dealer's Manual ROAD MTB Trekking City Touring/ Comfort Bike URBAN SPORT E-BIKE Wheel Set WH-RX31 SM-AX720-100x12 SM-AX720-142x12 CONTENTS IMPORTANT NOTICE... 3 TO ENSURE SAFETY...
Instruction Manual: VelectriX Ascent 29 MTB
 Instruction Manual: VelectriX Ascent 29 MTB CONTENTS Safe Riding Recommendations Page 2 Pre-Ride Checklist Page 3 Display and Controls Page 4 Maintenance Page 8 Warranty Page 9 Contact Details Page 10
RADROVER REAR RACK INSTALLATION MANUAL
 RADROVER REAR RACK INSTALLATION MANUAL WWW.RADPOWERBIKES.COM We are here to help! Please contact us at SUPPORT@RADPOWERBIKES.COM or 1-800-939-0310 if you have questions. REV022216 Welcome Thanks you for
KMX Kompact Sports Trike
 KMX Kompact Sports Trike Assembly Instructions 1.0 Introduction Thank you for choosing KMX! When properly assembled and set up your KMX will provide many years of enjoyment. KMX Karts Ltd does its utmost
POWER ASSISTED BICYCLES OWNERS MANUAL
 POWER ASSISTED BICYCLES OWNERS MANUAL WE HAVE INCLUDED A BICYCLE OWNER S MANUAL WHICH YOU SHOULD REFER TO FOR ALL GENERAL CYCLE MAINTENANCE. CONTENTS Page. 3 Unpacking. Page. 3-4 Easy steps to get started.
Safety manual Beinn 20/24/26
 Safety manual Beinn 20/24/26 Thank you for buying an Islabike! Your bike has been thoroughly checked and adjusted prior to delivery but there are a few tasks to perform before the bike is ready to ride:
Assembly, Fitting, Care & Maintenance
 Assembly, Fitting, Care & Maintenance Assembly 1.1 Remove All Parts and Tools from Packaging 1.2 Part and Tools required for assembly 1.3 Check Foot & Leg Assembly 1.4 Adjust Upper-Leg-Support (ULS) Height
Good tread, no splits, cracks or holes, properly inflated. True, no missing or broken spokes, good rim. Secure, facing in right direction
 APPENDIX 1 Bike Check This is an M check. Start at the front of the bike and systematically work towards the back. Put a cross beside anything that is faulty. Note any faults you find. X FAULT Front tyre
Final Assembly Instructions Bikes with Threaded Headsets
 Final Assembly Instructions Bikes with Threaded Headsets Thank you for buying your new bicycle from L.L.Bean. Read these instructions carefully before beginning the final assembly. Prior to shipping, our
THIS INSTRUCTION BOOKLET CONTAINS IMPORTANT SAFETY INFORMATION. PLEASE READ AND KEEP FOR FUTURE REFERENCE.
 THIS INSTRUCTION BOOKLET CONTAINS IMPORTANT SAFETY INFORMATION. PLEASE READ AND KEEP FOR FUTURE REFERENCE. FOR SERVICE ASSISTANCE CALL TOLL FREE 1.800.451.5368 Monday - Friday 8:00 a.m. to 4:00 p.m. Eastern
Copyright Trek Bicycle Corporation 2005 All rights reserved
 i ii iii Aero Brake Levers Owner s Manual Table of contents Read this manual before you ride... 1 Introduction... 2 Inspect your brake levers regularly... 2 Adjusting aero brake levers... 2 Lubricating
CLASS CYCLE P8000 OWNER'S MANUAL JOHNSON HEALTH TECH. CO., LTD.
 CLASS CYCLE P8000 JOHNSON HEALTH TECH. CO., LTD. No.26, Ching Chuan Rd., Taya Hsiang, Taichung Hsien 428, Taiwan, R.O.C. TEL: +886-4-2566700 FAX: +886-4-2560087 E-mail: sales@johnsonfitness.com http://www.johnsonfitness.com
Mini Glider Manual. Your Glider comes partially assembled. The front wheel and the handlebars require assembly.
 Mini Glider Manual Congratulations on your purchase of the Mini Glider! Your glider is designed for years of nearly carefree use by your child. These instructions include how to set up your glider and
Final Assembly Instructions Bikes with Threaded Headsets
 Final Assembly Instructions Bikes with Threaded Headsets Thank you for buying your new bicycle from L.L.Bean. Read these instructions carefully before beginning the final assembly. Prior to shipping, our
Assembly Tools. Assembly will take 1-2 hours
 Assembly Tools Included in your parts box: Pedals Quick release skewer Reflectors (if not already installed) Toolkit (4+5mm combo Allen wrench, 13+15mm combo open-end wrench) Helpful Tools: Scissors (for
JUNIOR LOW RIDER OWNER'S MANUAL
 JUNIOR LOW RIDER OWNER'S MANUAL ITEM No. P/N DESCRIPTION QTY ITEM No. P/N DESCRIPTION QTY 1 11643 BEARING AXLE 99502HNR 4 42 11684 CHAIN/CL DES/REG 37P CB/3SP 1 2 20184 FRAME JR LR MAIN ST COLOR 1 43
TECHNICAL SUPPORT DOCUMENT FULL SUSPENSION MODELS C7 C9 WARRANTY SMALL PARTS FRAME SPEC/SERVICING
 2016-2018 FULL SUSPENSION MODELS C7 C9 WARRANTY SMALL PARTS FRAME SPEC/SERVICING 2016-2018 FULL SUSPENSION MODELS C7 C9 PG.i WARRANTY INFORMATION COMPLETE BIKES ONE YEAR LIMITED WARRANTY NORCO Bicycles
TECHNICAL SPECIFICATIONS 1 BLUE PAPERS ORDU OME TECHNICAL MANUAL
 TECHNICAL SPECIFICATIONS 1 BLUE PAPERS ORDU OME TECHNICAL MANUAL TECHNICAL SPECIFICATIONS 2 CONTENT GEOMETRY AND SPECIFICATIONS 3 FRAME MATERIAL AND CARE 4 ORDU OME CAPS -PARTS 5 CABLE ROUTING 8 ORBEA
TRICYCLES IMP - TERRIER - TMX - TRACKER
 Owner s Manual TRICYCLES IMP - TERRIER - TMX - TRACKER Congratulations! You have made an excellent investment in your child's health and happiness.our tricycles offer valuable exercise and therapy by providing
FACTORBIKES.COM. Assembly Manual V2.20
 FACTORBIKES.COM V2.20 Introduction I Limited Lifetime Warranty On Bicycles And Framesets I Necessary Tools 01 Instructions 01 1 Seatpost 01 2 Di2 Cable Routing 03 3 Fork - Headset Barstem 05 4 Cutting
ROAD Wheel Set. Dealer's Manual WH-9000-C24-CL WH-9000-C24-TL WH-9000-C35-CL WH-9000-C35-TU WH-9000-C50-CL WH-9000-C50-TU WH-9000-C75-TU
 (English) DM-WH0002-00 Dealer's Manual ROAD Wheel Set WH-9000-C24-CL WH-9000-C24-TL WH-9000-C35-CL WH-9000-C35-TU WH-9000-C50-CL WH-9000-C50-TU WH-9000-C75-TU WH-RS21 WH-RS61 CONTENTS IMPORTANT NOTICE...
MANUAL LEKKER BIKES 2016
 MANUAL LEKKER BIKES 2016 CONTACT For your own safety, never do work on your bicycle unless you feel absolutely sure about it. If you are in doubt or if you have any questions please contact our helpdesk:
3. Fit. 1 Owner s manual
 3. Fit NOTE: Correct fit is an essential element of bicycling safety, performance and comfort. Making the adjustments to your bicycle which result in correct fit for your body and riding conditions requires
TECHNICAL SUPPORT DOCUMENT 2018 CARBON MODELS 650B / 29 WARRANTY SMALL PARTS FRAME SPEC/SERVICING
 2018 CARBON MODELS 650B / 29 WARRANTY SMALL PARTS FRAME SPEC/SERVICING 2018 CARBON MODELS 650B / 29 PG.i NORCO BICYCLES NEW PURCHASE CONSUMER WARRANTY PROGRAM - EFFECTIVE ON ALL 2017 MODEL YEAR BICYCLES
USER GUIDE ROLLING WALKERS INSTRUCTIONS FOR USE JANUARY, Maximum User Weight: 170kg (Do not exceed this weight)
") USER GUIDE ROLLING WALKERS INSTRUCTIONS FOR USE JANUARY, 2013 Model Nos: BE07889T Maximum User Weight: 170kg (Do not exceed this weight) Model Nos: BE07890TB Maximum User Weight: 227kg (Do not exceed this
USER GUIDE ROLLING WALKERS INSTRUCTIONS FOR USE JANUARY, 2013 Model Nos: BE07889T Maximum User Weight: 170kg (Do not exceed this weight) Model Nos: BE07890TB Maximum User Weight: 227kg (Do not exceed this
Owner's Manual Product Line
 Owner's Manual 2017 Product Line Table of contents 1. Safety Information 2. Quick release procedure I. Installation II. Adjustment and operation III. Inspection of proper installation 3. Registering your
Instruction Manual: VelectriX Ascent+ 29 MTB
 Instruction Manual: VelectriX Ascent+ 29 MTB CONTENTS Safe Riding Recommendations Page 2 Pre-Ride Checklist Page 3 Display and Controls Page 4 Maintenance Page 8 Warranty Page 9 Contact Details Page 10
SCOTT BMX USER MANUAL
 SCOTT BMX USER MANUAL All rights reserved 2017 SCOTT Sports SA Distribution: SSG (Europe) Distribution Center SA, P.E.D. Zone C1, Rue du Kiell 60, 6790 Aubange, Belgium v6.3/040717 WWW.SCOTT-SPORTS.COM
EZee Glider Manual. Tools needed for Assembly: Wrench (included) Philips Screwdriver (not included) Assembly Instructions
 Philips Screwdriver (not included) Assembly Instructions") EZee Glider Manual Congratulations on your purchase of the EZee Glider! Your glider is designed for years of nearly carefree use by your child. These instructions include how to set up your glider and
EZee Glider Manual Congratulations on your purchase of the EZee Glider! Your glider is designed for years of nearly carefree use by your child. These instructions include how to set up your glider and
Cycling Instructor Ltd.
 Information for Parents & Guardians Holiday Cycling Courses The Council provides free cycle training courses for children in the holidays. There is no cost to you. To join in pupils must be able to cycle
MANTEL BIKE BOX: PACKING YOUR ROAD BIKE FOR TRANSPORT
 MANTEL BIKE BOX: PACKING YOUR ROAD BIKE FOR TRANSPORT ROAD BIKE COMPONENTS 1 Frame: a b c d e Top tube Down tube Seat tube Chain stay Seat stay 2 Saddle 3 Seat post 4 Seat post clamp 5 Rear brake 6 Front
Instructions for Assembly and Operation
 Instructions for Assembly and Operation Congratulations on the purchase of your new bike! With proper assembly and maintenance it will offer you years of enjoyable riding! IMPORTANT: Carefully read and
Creig Owner s manual.
 Creig Owner s manual www.islabikes.com www.islabikes.com 1. Brake levers 2. Brake calipers 3. Saddle 4. Seatpost 5. Seatpost clamp 6. Saddle clamp 7. Stem 8. Stem bolts 9. Headset 10. Headset spacers 11.
KIDS SCOTT 2011 BIKE OWNERS MANUAL
 SCOTT 2011 BIKE OWNERS MANUAL B SCOTT SPORTS SA 17 RTE DU CROCHET 1762 GIVISIEZ SWITZERLAND 2009 SCOTT SPORTS SA, ALL RIGHTS RESERVED SCOTT-SPORTS.COM CONTENT Congratulations P. 004 General introduction
2018 ACCESSORY ATTACHMENTS OWNER S MANUAL
 2018 ACCESSORY ATTACHMENTS OWNER S MANUAL WWW.RADPOWERBIKES.COM We are here to help! Please contact us at SUPPORT@RADPOWERBIKES.COM or 1-800-939-0310 if you have questions. REV031418 Welcome Thanks you
KIDS SCOTT 2013 BIKE OWNERS MANUAL
 SCOTT 2013 BIKE OWNERS MANUAL SCOTT SPORTS SA 17 RTE DU CROCHET 1762 GIVISIEZ SWITZERLAND 2011 SCOTT SPORTS SA, ALL RIGHTS RESERVED SCOTT-SPORTS.COM B content Congratulations... P. 004 General introduction...
Frame number. Beinn 20 Pro Series Owner s manual.
 Frame number Please make a record of your frame number. This is a combination of letters and numbers unique to your bike stamped to the underside of the frame. This is required by police and insurance
BLUE PAPERS AVANT OMP TECHNICAL MANUAL
 BLUE PAPERS AVANT OMP TECHNICAL MANUAL AVANT OMP TECHNICAL SPECIFICATIONS 1 CONTENT GEOMETRY 3 ERGONOMY 4 SPECIFICATIONS 5 FRAME AND MATERIAL 6 PARTS & HARDWARE 7 CABLE ROUTING 11 TORQUE SPECIFICATIONS
Final Assembly Instructions Bikes with Quill Stems
 Final Assembly Instructions Bikes with Quill Stems Thank you for buying your new bicycle from L.L.Bean. Read these instructions carefully before beginning the final assembly. Prior to shipping, our expert
DM-WH (English) Dealer's Manual. MTB Wheel Set. Non-Series WH-MT68 WH-MT66 WH-MT35 WH-MT15
 Dealer's Manual. MTB Wheel Set. Non-Series WH-MT68 WH-MT66 WH-MT35 WH-MT15") (English) DM-WH0005-02 Dealer's Manual MTB Wheel Set Non-Series WH-MT68 WH-MT66 WH-MT35 WH-MT15 CONTENTS IMPORTANT NOTICE... 3 TO ENSURE SAFETY... 4 INSTALLATION... 6 Tire size...6 List of tools to be
(English) DM-WH0005-02 Dealer's Manual MTB Wheel Set Non-Series WH-MT68 WH-MT66 WH-MT35 WH-MT15 CONTENTS IMPORTANT NOTICE... 3 TO ENSURE SAFETY... 4 INSTALLATION... 6 Tire size...6 List of tools to be
TECHNICAL SUPPORT DOCUMENT 2018 CARBON MODELS 650B / 29 WARRANTY SMALL PARTS FRAME SPEC/SERVICING
 2018 CARBON MODELS 650B / 29 WARRANTY SMALL PARTS FRAME SPEC/SERVICING 2018 CARBON MODELS 650B / 29 PG.i WARRANTY INFORMATION OWNERSHIP REGISTER YOUR BIKE The original owner must register his / her new
The type of terrain: flat and rough-terrain
 1 2 The type of terrain: flat and rough-terrain ASSEMBLING YOUR BICYCLE 1. Gears 2. Rear Brake 3. Rear Reflector 4. Seat Post 5. Saddle 6. Front Brake Lever 7. Gear Selector 8. Handle Bars 9. Bell 10.
FAILURE TO COMPLY WITH THE MANUFACTURER S INSTRUCTIONS CAN LEAD TO SERIOUS INJURY OR DEATH OF THE PASSENGER/RIDER!
 FAILURE TO COMPLY WITH THE MANUFACTURER S INSTRUCTIONS CAN LEAD TO SERIOUS INJURY OR DEATH OF THE PASSGER/RIDER! Installation instructions for the Yepp Mini The Yepp Mini is suitable for carrying children
Thank you for purchasing the Hollander II Bike from Made.com
 Thank you for purchasing the Hollander II Bike from Made.com Please take time to identify the hardware as well as the individual components of this product. As you unpack and prepare for assembly, place
FACTORBIKES.COM. Assembly Manual DISC V1.05
 FACTORBIKES.COM V1.05 Introduction I Limited Lifetime Warranty On Bicycles And Framesets I Necessary Tools 01 Instructions 01 1 Seatpost 01 2 Cut the cable housing to the correct length 03 3 Di2 Cable
ebike: EB01 and EB02 OPERATING MANUAL
 ebike: EB01 and EB02 OPERATING MANUAL IMPORTANT SAFEGUARDS: IMPORTANT: READ ALL INSTRUCTIONS BEFORE USE. RETAIN INSTRUCTIONS FOR FUTURE REFERENCE. WARNING: Basic safety precautions should always be observed
T-016 ASSEMBLY MANUAL MODEL ROCK AND ROLL Main Street NE Minneapolis, MN
 MODEL T-016 ASSEMBLY MANUAL ROCK AND ROLL 5280 Main Street NE Minneapolis, MN 55421 1.877.226.7824 www.kurtkinetic.com COMPONENTS Tools Required for Assembly: 17mm Wrench or Adjustable Wrench When unpacking,
Halfords. activity pack. Leader's notes. Leaders notes The Scout Association Registered Charity number /SC038437
 Halfords activity pack Leader's notes 2013 The Scout Association Registered Charity number 306101/SC038437 Welcome to the Halfords Cub Scout Cyclist Badge activity pack. Halfords is delighted to be working
TECHNICAL SPECIFICATIONS 1 BLUE PAPERS OIZ TECHNICAL MANUAL
 TECHNICAL SPECIFICATIONS BLUE PAPERS OIZ TECHNICAL MANUAL TECHNICAL SPECIFICATIONS CONTENT GEOMETRY AND SPECIFICATIONS 3 FRAME MATERIAL AND CARE 5 OIZ FRAME PARTS 6 CABLE ROUTING 3 TORQUE 0 SHOCK PREASSURE
2012 K9100 COMPACT Worldwide Cycling Solutions Through Creative Innovations.
 Home Instruction Sheet Step-1Please check for any missing parts. Model K9100 COMPACT (Basic AirCaddy) aircaddy web page 20 04/03/12 98% (1) T3230-00 METAL WHEEL TRUCK Model K8350 (Aircraft Kit) (Optional)
THIS INSTRUCTION BOOKLET CONTAINS IMPORTANT SAFETY INFORMATION. PLEASE READ AND KEEP FOR FUTURE REFERENCE.
 THIS INSTRUCTION BOOKLET CONTAINS IMPORTANT SAFETY INFORMATION. PLEASE READ AND KEEP FOR FUTURE REFERENCE. FOR SERVICE ASSISTANCE CALL KENT TOLL FREE 1.800.451.5368 Monday - Friday 9:00 a.m. to 4:00 p.m.
Performance & Sports Trike
 Performance & Sports Trike THE KMX KOLT THE KMX KOBRA THE KMX KOYOTE Assembly Instructions 1.0 Introduction Thank you for choosing KMX! When properly assembled and set up your KMX will provide many years
Preparation/Maintenance Manual
 Preparation/Maintenance Manual It is essential that you read this manual in its entirety before riding your bike for the first time to ensure that your bike is properly assembled and safe to ride. It is
Bicycle Owner s Manual for Montague, SwissBike, and Paratrooper Bicycles
 Table of Contents 1. Introduction 1 2. Owner s Responsibility 2 3. Parts of Your Bicycle & Location of Quick Releases 3 4. Assembly and Adjustment 4-11 Packing List 4 Operation of Quick Release Levers
Cycling. Scout s Name: Unit: Counselor s Name: Counselor s Ph. hypothermia, heat reactions, frostbite, dehydration, insect stings, tick.
 Cycling Merit Badge Workbookk This workbook can help you but you still need to read the merit badge pamphlet (book). No one can add or subtract from the Boy Scout Requirements #33216. Each Scout must do
EZ-3 USX HD Supplemental Owner s Manual
 EZ-3 USX HD Supplemental Owner s Manual Find us online at SunSeeker.Bike Revised 2/2016 CONGRATULATIONS! Congratulations and welcome to the Sun Seeker family! You have selected one of the most comfortable