FAILURE TO COMPLY WITH THE MANUFACTURER S INSTRUCTIONS CAN LEAD TO SERIOUS INJURY OR DEATH OF THE PASSENGER/RIDER!
|
|
|
- Joleen Paul
- 5 years ago
- Views:
Transcription
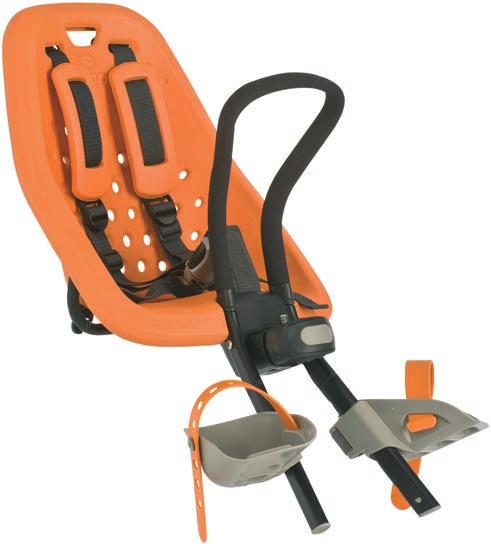
1 FAILURE TO COMPLY WITH THE MANUFACTURER S INSTRUCTIONS CAN LEAD TO SERIOUS INJURY OR DEATH OF THE PASSGER/RIDER! Installation instructions for the Yepp Mini The Yepp Mini is suitable for carrying children up to a maximum weight of 33 lbs / 15 kg including child, pack and contents (about 3 years old). The Yepp Mini can be attached to steel handlebar stems from inches / 20-28mm / in diameter using the fittings supplied. Installation The Yepp mini must always be installed on the bicycle facing forward. Assemble the seat as shown in (pic.1). Tighten both hexagon screws firmly tight (torque 4Nm) Attach the handlebar stem fitting to the handlebar as shown in (pic.3). Tighten both Hexagon screws firmly tight ( tightening torque 8 Nm). If you have a Ahead type handlebar system, you can use our special Ahead adapter (art ). The Yepp Mini is attached in two stages. Press the red button on the bottom and pull simultaneously the grey handle to the rear (pic.4a). Position the seat over the lip on the clamp. Release the slide and push the seat straight down until it clicks into place (pic.4b). This means that the seat is secured automatically. Check this by pulling the seat upwards. If it s secured properly, you will not be able to pull it out. For additional security, always lock the seat (pic.4a). Make a note of the key number so you can get a replacement if the original key is lost. To release the seat, perform the above actions in reverse order (pic.8a+b). Place your child in the seat and position the footrests to the correct height (pic.6). Connect the straps once the footrests are in the correct position. Close the 5-point harness and adjust it to the correct length (pic.7). To open the harness: press both halves of the clip in and push both sides at the same time. Additional stem adapters are available for attaching the seat on a second bicycle. Warnings and Safety advices Always ensure that the harness is fastened snugly around the child. Never modify the child seat in any way. Check after assembling if all fasteners are tightened properly and everything functions correct. Use the Yepp Mini only on a bicycle that is in good working order, which is suitable for carrying the additional load and of a proper size/ adjustment for the rider. Check the original owner s manual you received with bicycle or contact the bicycle manufacturer / distributor to obtain this information. Caution: The Yepp Mini can only be attached to steel handlebar stems from inches / 20-28mm in diameter using the fitting clamp supplied. For special Ahead handlebar systems a special adapter is available. (art ) GMGINT007 version
2 Always remove the child seat from the bicycle when the bicycle is being transported on a motor vehicle. Air turbulence on the child seat can damage the child seat, which could cause a dangerous situation. Do not use the seat if any part of it appears damaged. Have any damaged parts replaced by your dealer. Never leave your child in the child seat unattended or with the bicycle supported only by the kickstand. Caution: Note that cycling with a child in a child seat will lessen the stability and alter the way the bicycle handles move. Particularly regarding steering / braking and how the rider mounts/dismounts the bicycle. Take a test ride without a child in the child seat (put some weight in the seat to simulate the child s weight) to ensure that everything is installed properly and that the seat does not hinder your ability to operate the bicycle safely. Make sure that the Yepp Mini is always firmly secured by turning the integrated lock to the locked position (pic.8). It is both a safety precaution and prevents possible theft of the Yepp Mini. Make a note of the key number so you can get a replacement if the original key is lost. Before each ride, ensure that the child seat does not interfere with braking, pedaling, or steering of the bicycle. Never ride at the bicycle at night without adequate lighting. Caution: Steering movement may be restricted with a child seat attached to the handlebars. You will need to install different handlebars if the steering movement is less than 45 degrees to each side. Always fasten the harness, even if you are not carrying a child in the seat, so that it does not hang loose. Always use the foot support straps. Caution: Ensure that both the rider and the child are wearing approved and properly-fitting helmets. Caution: Do not ride in inclement or hazardous conditions, including temperatures below freezing that could cause the child to suffer frostbite. Never carry bags or other luggage in the child seat. Additionally, additional luggage and accessories should not be attached to the child seat, as they may exceed the 33 lbs / 15 kg load limit and may lessen stability. Use a sturdy (two-legged) kickstand on your bicycle. Caution: Only children who are able to hold their head upright while wearing a bicycle helmet (approximately one year old) should be passengers in a child seat. Additionally, do not carry a child who is too young to sit comfortably and independently in the child seat. Never carry two children in one seat. The Yepp Mini should not be used on a moped or a scooter. The use on E-bikes is allowed. The Yepp Mini is not suitable for use on lightweight (e.g. carbon) frames, always consult your dealer or the manufacturer. The Yepp Mini is designed for average daily use. It is not meant to be used on extreme circumstances such as off-road or ATB-courses. Check that the child seat has not become too hot in the sun before putting a child in it. Never lift the Yepp Mini with a child in it. Check initially, and then regularly thereafter, that your child s weight does not exceed 33 lbs / 15 kg. For bigger children, GMG offers the Yepp Maxi and the Yepp Junior. Caution: Check frequently that all fittings are sufficiently tight. Any damaged or broken parts must be replaced immediately. Consult your dealer. Check that using the Yepp Mini is permitted by law in the state in which you intend to use it. If allowed, the minimum age for a rider to carry a child in a Yepp Mini child seat may vary from state to state. Installation instructions for the Yepp Mini
3 Do not allow any of the child s body, clothing, shoe laces, or toys to come in contact with moving parts of the bicycle. The rear reflectors in the seat must be visible whether the child is in the seat on the bicycle or not. Always replace the child seat after an accident, even if there is no visible damage. Cleaning Cleaning the Yepp Maxi is simple: clean with lukewarm soapy water. Never use aggressive cleaning agents. Guarantee GMG guarantees that this product has been manufactured according to the latest European safety standards and quality requirements for this product and that this product at the time of purchasing has no defect in workmanship and material. During production various quality checks have been performed. In case, despite all our efforts, during our guarantee period of 24 months, this product shows a material and/or manufacturing fault (with normal use as described in this manual), than GMG is required to respect this guarantee. In that case please contact your dealer. For detailed information on the application of the guarantee you can contact your dealer. The guarantee is excluded in the following cases : In case of use different than described in the manual. The product is brought for repair through a not authorized dealer. The product is not presented with the original proof of purchase to the manufacturer. Repairs were performed by third party or not authorized retailer. The defect was caused by misuse, careless use or maintenance, by neglect or impact damage to the seat and/or frame. In case of normal wear to parts, which you may expect during daily use of a product. Since when? The guarantee term starts at the date of purchasing of the product. For what period? The guarantee is for a period of 24 consecutive months. The guarantee is only for the first owner and cannot be transferred. This warrantee is according to the European Standard 99/44/EG dated May 25th GMGINT007 version
4 Guarantee specifications: < 6 months > 6 months after purchase after purchase Fading? Corrosion? Harness wear? Feet rests? = Guarantee? = Guarantee possible after inspection Rights of modifications reserved Installation instructions for the Yepp Mini


5 User instructions 33 lbs 15 kg
6 14344 childseat C15 - Class C 33 lbs 15 kg Discover other bikes & accessories on our website.
Installation instructions for the Yepp Maxi Easyfit
 Installation instructions for the Yepp Maxi Easyfit The Yepp Maxi Easyfit is suitable for: - fitting to an Easyfit luggage carrier* (fig 1A) or - fitting in combination with the Yepp Maxi Easyfit carrier
The Yepp Rack 35 kg has an Easyfit window so that the Yepp Maxi Easyfit and the Yepp Junior Easyfit can be installed immediately.
 GMG013 version 04-2016 90 EN YEPP Rack 35 kg 28 with Easyfit window User manual The Yepp Rack 35 kg is a solid luggage carrier which can be fitted on most city- and hybrid bicycles. The carrier is not
Thule RideAlong Mini Front Child Bike Seat
 Congratulations on your purchase of the Thule RideAlong Mini front child bike seat. This is a premium product with every detail carefully designed for high safety and easy use. We wish you and your child
The Yepp Rack 35 kg has an Easyfit window so that the Yepp Maxi Easyfit and the Yepp Junior Easyfit can be installed immediately.
 GMG012 version 03-2015 90 EN YEPP Rack 35 kg 28 with Easyfit window User manual The Yepp Rack 35 kg is a solid luggage carrier which can be fitted on most city- and hybrid bicycles. The carrier is not
BABYSEAT II. Suspension Child Carrier
 BABYSAT II Suspension Child Carrier User's Guide D FR S IT JP KR CHS User needs check whether there are any laws specific to the carrying of children in seats attached to cycles that apply in the country
2018 ACCESSORY ATTACHMENTS OWNER S MANUAL
 2018 ACCESSORY ATTACHMENTS OWNER S MANUAL WWW.RADPOWERBIKES.COM We are here to help! Please contact us at SUPPORT@RADPOWERBIKES.COM or 1-800-939-0310 if you have questions. REV031418 Welcome Thanks you
Thule Chariot Cross 1 & 2 Instructions
 Thule Chariot Cross 1 & 2 Instructions C.20170201 51100481 - B IMPORTANT - KEEP THESE INTRUCTIONS FOR FUTURE REFERENCE. Your child s safety may be affected if you do not follow these instructions. Conversion
Quattrocycle BV. Quattrocycle. User Manual. Last update February Quattrocycle BV Bremkant EJ Middelbeers. User Manual Quattrocycle 1
 Quattrocycle User Manual Last update February 2010 Quattrocycle BV Bremkant 6 5091 EJ Middelbeers User Manual Quattrocycle 1 Table of Contents Page Chapter 1: Introduction 3 Chapter 2: Instructions for
HELMETS SAVE LIVES!!! ALWAYS WEAR A PROPERLY FITTED HELMET WHEN YOU RIDE YOUR SCOOTER. DO NOT RIDE AT NIGHT. AVOID RIDING IN WET CONDITIONS.
 HELMETS SAVE CORRECT FITTING - MAKE SURE YOUR HELMET COVERS YOUR FOREHEAD. LIVES!!! ALWAYS WEAR A PROPERLY FITTED HELMET WHEN YOU RIDE YOUR SCOOTER. DO NOT RIDE AT NIGHT. AVOID RIDING IN WET CONDITIONS.
BABYSEAT II. Suspension Child Carrier
 BABYSAT II Suspension Child Carrier User's Guide D FR S IT JP KR CHS User needs check whether there are any laws specific to the carrying of children in seats attached to cycles that apply in the country
Thank you for purchasing a WIKE BOX BIKE!
 Thank you for purchasing a WIKE BOX BIKE! Contents Safety.....3 Front wheel.4 Kickstand..5 Handle Bar & Box 6 Seat post and Saddle 7 Final pre-ride check 8 Tools needed to assemble Bike: -High table or
ALTERNATOR RACKS 135, 170 & 190 INSTRUCTIONS
 Figure A Item # Description Quantity 1 Alternator Rack 1 1 3 4 11 5 10 8 2 Lower Mount Kit (see detail) 2 3 16mm M5 Swivel-Mount Bolt 2 4 M7 Washer 2 5 M6 Lock Nut 2 6 Lock Washer 2 7 Swivel Mount 2 8
Copyright Trek Bicycle Corporation 2005 All rights reserved
 i ii iii Aero Brake Levers Owner s Manual Table of contents Read this manual before you ride... 1 Introduction... 2 Inspect your brake levers regularly... 2 Adjusting aero brake levers... 2 Lubricating
LIGHTWEIGHT TRIWALKER OWNER S HANDBOOK
 LIGHTWEIGHT TRIWALKER OWNER S HANDBOOK Triwalker Owner s Handbook (Z25987 Rev A) Page 1 of 12 CONTENTS 1. Contents 2. Introduction 3. Parts Description 4. Personal Safety 5. Adjustments for Comfort 6.
Mini Glider Manual. Your Glider comes partially assembled. The front wheel and the handlebars require assembly.
 Mini Glider Manual Congratulations on your purchase of the Mini Glider! Your glider is designed for years of nearly carefree use by your child. These instructions include how to set up your glider and
BICYCLE TO MOTORCYCLE BICYCLE RACK
 BICYCLE TO MOTORCYCLE BICYCLE RACK Install Manual Warning: You are responsible for securing the rack to your motorcycle., checking the attachments prior to use and periodically inspecting the products
contents introduction
 contents 1. Contents 2. Introduction 3. Parts Description 4. Personal Safety 5. Transportation & Assembly 6. Adjustments for Comfort 7. Brake Operation 8. Care and Maintenance 9. Specification 10. Warranty
Congratulations on your purchase of a JC Series Performer trike! The Performer JC Series is designed for everything from touring to commuting and
 Congratulations on your purchase of a JC Series Performer trike! The Performer JC Series is designed for everything from touring to commuting and shopping in the city. The JC Series frames are made of
Ladies Shopper Bike Assembly Manual 28C03
 Ladies Shopper Bike Assembly Manual 28C03 Ecosmo Ltd 1 Know your bike 1. Wheel 2. Rear Derailleur 3. Chain 4. Crank Set 5. Pedal 6. Seat Quick Lock 7. Saddle and Post 8. Frame 9. Front Light 10. Front
EZee Glider Manual. Tools needed for Assembly: Wrench (included) Philips Screwdriver (not included) Assembly Instructions
 Philips Screwdriver (not included) Assembly Instructions") EZee Glider Manual Congratulations on your purchase of the EZee Glider! Your glider is designed for years of nearly carefree use by your child. These instructions include how to set up your glider and
EZee Glider Manual Congratulations on your purchase of the EZee Glider! Your glider is designed for years of nearly carefree use by your child. These instructions include how to set up your glider and
Instructions for Assembly and Operation
 Instructions for Assembly and Operation Congratulations on the purchase of your new bike! With proper assembly and maintenance it will offer you years of enjoyable riding! IMPORTANT: Carefully read and
INTRODUCTION BILL OF MATERIALS SPECIFICATIONS & TOOLS PROCEDURES OPERATION OF SEATPOST GIANT LIMITED WARRANTY
 INTRODUCTION BILL OF MATERIALS SPECIFICATIONS & TOOLS PROCEDURES OPERATION OF SEATPOST GIANT LIMITED WARRANTY 1 INTRODUCTION Congratulations on the purchase of your new GIANT CONTACT SWITCH seatpost. This
Item N o.: Item N am e:40cm Boys Rival Bike
 Item N o.:42272892 Item N am e:40cm Boys Rival Bike 9 bell 8 grip 30 crash pad 10 brake lever 26 wheel reflector 22 saddle 23 seat post 25 rear reflector 24 quick release 6 handle bar 7 stem 2 top tube
Instruction Manual: VelectriX Urban 2.0
 Instruction Manual: VelectriX Urban 2.0 CONTENTS Safe Riding Recommendations Page 2 Pre-Ride Checklist Page 3 Display and Controls Page 4 Maintenance Page 8 Warranty Page 9 Contact Details Page 10 Service
INSTALLATION INSTRUCTIONS
 KIT CONTENTS: INSTALLATION INSTRUCTIONS PART NUMBER: DESCRIPTION: E361SXA302 roof MOUNT BICycle CARRIER SINGLE Short Carriage Bolt 1x Long Carriage Bolt 3x Over-Molded Wrench 1x Button Head Screw 2x Washer
RADROVER REAR RACK INSTALLATION MANUAL
 RADROVER REAR RACK INSTALLATION MANUAL WWW.RADPOWERBIKES.COM We are here to help! Please contact us at SUPPORT@RADPOWERBIKES.COM or 1-800-939-0310 if you have questions. REV022216 Welcome Thanks you for
IMPORTANT SAFETY NOTICE
 OWNER S MANUAL NOTE: Any photos of the YBIKE or decals in the owner s manual are intended to be used as a reference only, and there may be some differences to the unit you purchased. IMPORTANT SAFETY NOTICE
Instruction Manual: VelectriX Ascent 29 MTB
 Instruction Manual: VelectriX Ascent 29 MTB CONTENTS Safe Riding Recommendations Page 2 Pre-Ride Checklist Page 3 Display and Controls Page 4 Maintenance Page 8 Warranty Page 9 Contact Details Page 10
BIKE TO GO - USER MANUAL - MODEL#: JBTG24
 BIKE TO GO 24 - USER MANUAL - MODEL#: JBTG24 GET ACQUAINTED WITH YOUR 24 BIKE TO GO Congratulations on your new Jetson 24 folding bicycle! The Jetson 24 Bike to Go is an innovative and fun personal transportation
Read Instructions carefully before use. Rollator is designed for indoor & outdoor use. Do NOT use as a wheelchair or as a transport chair.
 Charcoal Red Seat Height 500-10191 500-10195 19 500-10211 500-10215 21 500-10241 500-10245 24 User Manual Read Instructions carefully before use. Rollator is designed for indoor & outdoor use. Do NOT use
ROLLATOR (R6 and R8) OWNER S HANDBOOK
 OWNER S HANDBOOK") C O N T E N T S The Drive Medical lightweight 4- wheeled rollator is designed to aid the user to walk and, as an option, carry items such as shopping. The R6 is ideal for indoor use, whilst the R8 is suitable
C O N T E N T S The Drive Medical lightweight 4- wheeled rollator is designed to aid the user to walk and, as an option, carry items such as shopping. The R6 is ideal for indoor use, whilst the R8 is suitable
Instruction Manual: VelectriX Ascent+ 29 MTB
 Instruction Manual: VelectriX Ascent+ 29 MTB CONTENTS Safe Riding Recommendations Page 2 Pre-Ride Checklist Page 3 Display and Controls Page 4 Maintenance Page 8 Warranty Page 9 Contact Details Page 10
Nanofold Highchair Instruction Manual
 Nanofold Highchair Instruction Manual IMPORTANT KEEP FOR FUTURE REFERENCE PLEASE READ THESE INSTRUCTIONS CAREFULLY BEFORE USING THIS PRODUCT 2 Safety Warnings Getting to know your Highchair 3 Thank you
IMPORTANT:KEEP THESE INSTRUCTIONS FOR FUTURE REFERENCE. ROCK A BABY BABY ROCKER WITH TOY BAR INSTRUCTION BOOK Series LX9068
 IMPORTANT:KEEP THESE INSTRUCTIONS FOR FUTURE REFERENCE ROCK A BABY BABY ROCKER WITH TOY BAR INSTRUCTION BOOK Series LX9068 WARNINGS ALWAYS FOLLOW THE MANUFACTURERS INSTRUCTIONS. READ ALL INSTRUCTIONS CAREFULLY
RO LLATO R (R6 and R8) O W NER S HANDBO O K
 O W NER S HANDBO O K") RO LLATO R (R6 and R8) O W NER S HANDBO O K R6/R8 Owner s Handbook (Z25988 Rev B) Page 1 of 12 C O N T E N T S 1. Contents 2. Introduction 3. Parts Description 4. Personal Safety 5. Adjustments for Comfort
RO LLATO R (R6 and R8) O W NER S HANDBO O K R6/R8 Owner s Handbook (Z25988 Rev B) Page 1 of 12 C O N T E N T S 1. Contents 2. Introduction 3. Parts Description 4. Personal Safety 5. Adjustments for Comfort
USER GUIDE ROLLING WALKERS INSTRUCTIONS FOR USE JANUARY, Maximum User Weight: 170kg (Do not exceed this weight)
") USER GUIDE ROLLING WALKERS INSTRUCTIONS FOR USE JANUARY, 2013 Model Nos: BE07889T Maximum User Weight: 170kg (Do not exceed this weight) Model Nos: BE07890TB Maximum User Weight: 227kg (Do not exceed this
USER GUIDE ROLLING WALKERS INSTRUCTIONS FOR USE JANUARY, 2013 Model Nos: BE07889T Maximum User Weight: 170kg (Do not exceed this weight) Model Nos: BE07890TB Maximum User Weight: 227kg (Do not exceed this
Instruction Manual: VelectriX Foldaway
 Instruction Manual: VelectriX Foldaway CONTENTS Safe Riding Recommendations Page 2 Pre-Ride Checklist Page 3 Display and Controls Page 4 Quick Guide to Folding Page 6 Battery Instructions Page 7 Maintenance
Inspecting before riding
 Inspecting before riding ) Squeeze both brake levers firmly. Do they move smoothly, yet their movement stops before they touch the handlebar grip? Do both wheels spin without wobbling or binding? Gently
Instruction Manual: VelectriX Urban 2.0+
 Instruction Manual: VelectriX Urban 2.0+ CONTENTS Safe Riding Recommendations Page 2 Pre-Ride Checklist Page 3 Display and Controls Page 4 Maintenance Page 8 Warranty Page 9 Contact Details Page 10 Service
POWER ASSISTED BICYCLES OWNERS MANUAL
 POWER ASSISTED BICYCLES OWNERS MANUAL WE HAVE INCLUDED A BICYCLE OWNER S MANUAL WHICH YOU SHOULD REFER TO FOR ALL GENERAL CYCLE MAINTENANCE. CONTENTS Page. 3 Unpacking. Page. 3-4 Easy steps to get started.
Operator s Manual. All-Terrain Wheelchair
 Operator s Manual All-Terrain Wheelchair By Brandon Calavan Ana Groff Steve Benn Dylan Rinker Sebastian Pineo Team 1 Faculty Advisor: John Enderle Teaching Assistant: Sarah Brittain Client: Melody Kettle
Item N o.: Item N am e:40cm GIRLS VIOLET BIKE
 Item N o.:42547242 Item N am e:40cm GIRLS VIOLET BIKE 1 2 SAFETY PRECAUTIONS If there is front brake,apply the rear brake first, and then apply the front brake. The front brake is strong and if not used
Item Name: 30CM GIRLS STAR THE UNICORN BIKE
 Item No.: 42333753 Item Name: 30CM GIRLS STAR THE UNICORN BIKE Contents 1. Parts identification 1 2. Safety precautions 2 3. Check list 6 4. Assembly 7 5. Adjustment 14 6. Repair and Service 15 7. Warranty
Flat Fold Highchair INSTRUCTION MANUAL. Designed and manufactured to BS EN 14988: 2012 IMPORTANT:
 Flat Fold Highchair INSTRUCTION MANUAL Designed and manufactured to BS EN 14988: 2012 IMPORTANT: Thank you for choosing our product. Please read and understand these instructions before using this flat
DISASSEMBLING & REASSEMBLING CARTRIDGE INSTALLING SEATPOST ON BIKE
 INTRODUCTION BILL OF MATERIALS SPECIFICATIONS & TOOLS PROCEDURES DISASSEMBLING & REASSEMBLING CARTRIDGE INSTALLING SEATPOST ON BIKE OPERATION OF SEATPOST GIANT LIMITED WARRANTY 1 INTRODUCTION Congratulations
Owner's Manual Product Line
 Owner's Manual 2017 Product Line Table of contents 1. Safety Information 2. Quick release procedure I. Installation II. Adjustment and operation III. Inspection of proper installation 3. Registering your
Buying. c l e A Guide For Parents
 Buying your Bi c y child a c l e A Guide For Parents Types Of Bicycles When selecting a bike for your child, keep in mind these characteristics about the several basic types of bikes that are manufactured.
TECHNICAL SUPPORT DOCUMENT FULL SUSPENSION MODELS C7 C9 WARRANTY SMALL PARTS FRAME SPEC/SERVICING
 2016-2018 FULL SUSPENSION MODELS C7 C9 WARRANTY SMALL PARTS FRAME SPEC/SERVICING 2016-2018 FULL SUSPENSION MODELS C7 C9 PG.i WARRANTY INFORMATION COMPLETE BIKES ONE YEAR LIMITED WARRANTY NORCO Bicycles
Thule Coaster XT. Instructions. IMPORTANT - Keep these instructions for future reference. B
 Thule Coaster XT Instructions IMPORTANT - Keep these instructions for future reference. B 51100985 CONTENTS 1 Introduction 1.1 Manual Intended Use 04 1.2 Carrier Intended Use 04 1.3 Specifications 04 2
13062/11 LL/tl 1 DG I
 COUNCIL OF THE EUROPEAN UNION Brussels, 20 July 2011 13062/11 CONSOM 129 COVER NOTE from: European Commission, date of receipt: 13 July 2011 to: General Secretariat of the Council No Cion doc.: D14548/02
OPERATOR S MANUAL SPREADER. CSS, VNQ [For Combine Harvester AW82V] Original instructions
![OPERATOR S MANUAL SPREADER. CSS, VNQ [For Combine Harvester AW82V] Original instructions](/thumbs/90/102423265.jpg "OPERATOR S MANUAL SPREADER. CSS, VNQ [For Combine Harvester AW82V] Original instructions") OPERATOR S MANUAL SPREADER CSS, VNQ [For Combine Harvester AW82V] en Original instructions Introduction Introduction Please read this operator s manual before using your spreader. We would first like to
OPERATOR S MANUAL SPREADER CSS, VNQ [For Combine Harvester AW82V] en Original instructions Introduction Introduction Please read this operator s manual before using your spreader. We would first like to
KMX Kompact Sports Trike
 KMX Kompact Sports Trike Assembly Instructions 1.0 Introduction Thank you for choosing KMX! When properly assembled and set up your KMX will provide many years of enjoyment. KMX Karts Ltd does its utmost
page 2 Attachment of the upper straps to the vehicle. With the boot still open, wrap the strap around the boot lid.
 Open the boot of the vehicle From inside, thread the straps over the top edge, between the boot and roof, leaving the dumbbells hanging free inside the vehicle (ensuring they will not be crushed when shut.)
BABY ROCKER WITH TOY BAR
 BABY ROCKER WITH TOY BAR IMPORTANT: KEEP THIS BOOKLET IN A SAFE PLACE FOR FUTURE REFERENCE. www.britax.com.au Series AX910 WARNINGS ALWAYS FOLLOW THE MANUFACTURERS INSTRUCTIONS. READ ALL INSTRUCTIONS CAREFULLY
Carve Owner s Manual
 Carve Owner s Manual 2 Ski Bike Owner s Manual 1st Edition, 2016 IMPORTANT: This manual contains important safety, performance and service information. Read it before you take the first ride on your new
Performance & Sports Trike
 Performance & Sports Trike THE KMX KOLT THE KMX KOBRA THE KMX KOYOTE Assembly Instructions 1.0 Introduction Thank you for choosing KMX! When properly assembled and set up your KMX will provide many years
Item N o.: Item N am e:southern Star 40cm Girls Cherry Bike
 Item N o.:42174868 Item N am e:southern Star 40cm Girls Cherry Bike Tighten them so they do not move and are horizontal. Check the handlebar is in good condition and the ends of the handlebar are
INSTALLATION INSTRUCTIONS
 INSTALLATION INSTRUCTIONS KIT CONTENTS: PART NUMBER: DESCRIPTION: E361SXA300 ROOF MOUNT BICYCLE CARRIER B9 TRIBECA Short Carriage Bolt Long Carriage Bolt 3x Over-Molded Wrench Button Head Screw 2x Washer
Owner s Manual. The most comfortable upright bicycles ever made.
 Owner s Manual The most comfortable upright bicycles ever made. At Day 6, we hope you will enjoy riding our bicycles as much as we enjoy designing them. We have truly combined the best features of a recumbent
310 SERIES TILT-TO-LOAD ROTATOR. The Specialist In Drum Handling Equipment
 OPERATOR S MANUAL FOR MORSE TILT-TO-LOAD DRUM ROTATOR SAFETY INFORMATION: While Morse Manufacturing Co. drum handling equipment is engineered for safety and efficiency, a high degree of responsibility
LITERIDER 2&3 IMPORTANT WARNING. 2Bike (1x) Bolt (1x) Nut (1x) Small Hex Wrench (1x)
 Bolt (1x) Nut (1x) Small Hex Wrench (1x)") LITERIDER 2&3 3 Bike (1x) Bolt (1x) Flat Washer (2x) Nut (1x) Large Hex Wrench (1x) 2Bike (1x) wrench (1x) Small Hex Wrench (1x) keys (2x) Long Strap (1x) 2-Zip Strips (6x) 3-Zip Strips (9x) Wheel strap
LITERIDER 2&3 3 Bike (1x) Bolt (1x) Flat Washer (2x) Nut (1x) Large Hex Wrench (1x) 2Bike (1x) wrench (1x) Small Hex Wrench (1x) keys (2x) Long Strap (1x) 2-Zip Strips (6x) 3-Zip Strips (9x) Wheel strap
comfort without compromising on performance and to fit your various needs on touring,
 Congratulations on your purchase of Goal-26X. Goal-26X is made to enhance comfort without compromising on performance and to fit your various needs on touring, shopping and communicating. Let s have fun
USER GUIDE TO POWER ASSISTED BIKES
 USER GUIDE TO POWER ASSISTED BIKES 1 PAGE CONTENTS Page. 3 Unpacking Page. 3-4 Easy steps to get started Page. 5 General Assembly Instructions Page. 6 Aligning H/Bars, Page. 7 Tightening pedals onto Crank
walk with independence
 walk with independence Lightweight www.novamedicalproducts.com WARNING Failure to follow any or all safety instructions may result in serious injury or death. adjustment and usage yourself or ambulate
User manual. Fun-2-Go. Van Raam BV Aaltenseweg CM Varsseveld Netherlands 06.13
 Fun-2-Go Van Raam BV Aaltenseweg 56 7051 CM Varsseveld Netherlands 06.13 Contents Contents... Contact details manufacturer... Conformity... Introduction... Delivery... Intended usage... Safety measures...
Item N o.: Item N am e:50cm GIRLS BELLA CRUISER BIKE
 Item N o.:42272847 Item N am e:50cm GIRLS BELLA CRUISER BIKE grip brake lever mudguard mudguard braket free wheel rear hub saddle seat post rear reflector seat clamp chain guard chain wheel crank stem
All rights reserved 2010 Les Fabrications TJD inc.
 Les Fabrications TJD inc. All rights reserved Les Fabrications TJD inc., Rivière-du-Loup, G5R 5X9. No copy or reproduction of this manual shall be made, in whole or in part, without the prior wrote permission
Owners Manual Courtesy of ElectricScooterParts.com
 Owners Manual Courtesy of ElectricScooterParts.com Contents MINIMOTO SPORT RACER Owner s manual and safety information Page 2 Warnings 3-5 Electrical hazard 6 Vehicle assembly and set up 7-8 Brake adjustment
SR8 STEEL RO LLATO R O WNER S HANDBO O K
 SR8 STEEL RO LLATO R O WNER S HANDBO O K WA006SIL Owner s Handbook Page 1 of 12 P A R T S D E S C R I P T I O N WA006SIL Owner s Handbook Page 2 of 12 P E R S O N A L S A F E T Y For your health and comfort,
SLADDA bicycle frame and belt drive. 25 Year Limited Warranty INCLUDED
 SLADDA bicycle frame and belt drive 25 Year Limited Warranty INCLUDED Everyday life at home puts high demands on bicycles. SLADDA bicycle is tested to comply with our strict standards for strength and
CLASS CYCLE P8000 OWNER'S MANUAL JOHNSON HEALTH TECH. CO., LTD.
 CLASS CYCLE P8000 JOHNSON HEALTH TECH. CO., LTD. No.26, Ching Chuan Rd., Taya Hsiang, Taichung Hsien 428, Taiwan, R.O.C. TEL: +886-4-2566700 FAX: +886-4-2560087 E-mail: sales@johnsonfitness.com http://www.johnsonfitness.com
Parts List. 7. Handlebars 8. Grips 9. Handlebar Stem 10. Front Brake 11. Front Wheel 12. Crank 13. Chain
 Woodworm Cruise Parts List 1. Free Wheel with Rear Hub 2. Fenders 3. Fender Stay 4. Quick Release 5. Saddle 6. Seat Post 7. Handlebars 8. Grips 9. Handlebar Stem 10. Front Brake 11. Front Wheel 12. Crank
User manual. Velo-Plus². Van Raam BV Aaltenseweg CM Varsseveld The Netherlands 06.13
 Velo-Plus² Van Raam BV Aaltenseweg 56 7051 CM Varsseveld The Netherlands 06.13 Contents Contents... Contact details manufacturer... Conformity... Introduction... Delivery... Intended usage... Safety measures...
Bicycle Owner's Manual Easy Access Bike
 Bicycle Owner's Manual Easy Access Bike AGE: FROM 9 YEARS OLD AND UP IMPORTANT Check bike after assembly or any adjustments. Consult bicycle retailer with questions. Always wear a helmet. Children should
Cantilever Brake. Dealer's Manual. ROAD MTB Trekking. City Touring/ Comfort Bike
 (English) DM-RCBR001-00 Dealer's Manual ROAD MTB Trekking City Touring/ Comfort Bike URBAN SPORT E-BIKE Cantilever Brake BR-CX70 BR-CX50 BL-4700 BL-4600 BL-R780 BL-R3000 ST-7900 ST-6700 ST-5700 ST-4600
User manual. Velo Plus². Van Raam BV Aaltenseweg CM Varsseveld The Netherlands. Version 14.10
 Velo Plus² Van Raam BV Aaltenseweg 56 7051 CM Varsseveld The Netherlands Version 14.10 Table of contents Table of contents... 2 Contact details manufacturer... 2 Conformity... 2 Introduction... 3 Delivery...
Rothan Owner s manual
 Rothan Owner s manual www.islabikes.co.uk 1. Brake levers 2. Brake pads 3. Saddle 4. Seatpost 5. Seatpost clamp 6. Stem 7. Stem bolts 8. Headset 9. Headset spacers 10. Headset adjuster bolt 11. Handlebars
222 Schwinn Recumbent Exercise Bike Parts List Full Size Hardware Chart Product Illustration Assembly Instructions
 222 Schwinn Recumbent Exercise Bike Parts List Full Size Hardware Chart Product Illustration Assembly Instructions FITNESS SAFEGUARDS AND WARNINGS Before starting any exercise program, consult with your
TRAILMATE METEOR ASSEMBLY MANUAL
 TRAILMATE METEOR ASSEMBLY MANUAL (DISC BRAKE VERSION) The Trailmate Meteor recumbent has been designed for easy assembly. This means more time to enjoy the smooth ride with single speed, 3 speed coaster
CIVIA PARKWAY EBIKE OWNER S MANUAL SUPPLEMENT
 CIVIA PARKWAY EBIKE OWNER S MANUAL SUPPLEMENT RETAILER: This framesheet MUST BE provided to the end user. Civia offers stylish, comfortable, affordable bikes that allow people to discover the joy just
600 Corporate Circle, Unit D Golden, CO USA P// //
 Yeti Cycles 600 Corporate Circle, Unit D Golden, CO USA P//303.278.6909 // 888.576.9384 www.yeticycles.com A R C - X O W N E R S M A N U A L 0 8-1 0 Table of Contents Brand Overview 6 Frame Features 8
owner s manual 2012 yeti arc
 owner s manual 2012 yeti arc YETI CYCLES 600 Corporate Circle, Unit D Golden, CO 80401 888.576.9384 www.yeticycles.com Table of Contents Brand Overview 06 Frame Features 08 Geometery 10 Maintenance Schedule
Owner s Manual 700c Fixed Gear Bicycles
 Owner s Manual 700c Fixed Gear Bicycles This manual contains important safety, assembly, operation and maintenance information. Please read and fully understand this manual before operation. Save this
DM-RAPD (English) Dealer's Manual. ROAD MTB Trekking. City Touring/ Comfort Bike. SPD-SL Pedal DURA-ACE PD-R9100 ULTEGRA PD-R8000 SM-PD63
 Dealer's Manual. ROAD MTB Trekking. City Touring/ Comfort Bike. SPD-SL Pedal DURA-ACE PD-R9100 ULTEGRA PD-R8000 SM-PD63") (English) DM-RAPD001-01 Dealer's Manual ROAD MTB Trekking City Touring/ Comfort Bike URBAN SPORT E-BIKE SPD-SL Pedal DURA-ACE PD-R9100 ULTEGRA PD-R8000 SM-PD63 CONTENTS IMPORTANT NOTICE... 3 TO ENSURE
(English) DM-RAPD001-01 Dealer's Manual ROAD MTB Trekking City Touring/ Comfort Bike URBAN SPORT E-BIKE SPD-SL Pedal DURA-ACE PD-R9100 ULTEGRA PD-R8000 SM-PD63 CONTENTS IMPORTANT NOTICE... 3 TO ENSURE
SG-7R46 SG-7R45 BR-IM41-R CJ-7S40 WARNING CAUTION SERVICE INSTRUCTIONS. Inter-7 Hub. Inter-M Brake Cassette joint NOTE:
 t WARNING It is important to completely understand the operation of your bicycle's brake system. Improper use of your bicycle's brake system may result in a loss of control or an accident, which could
VERSA BIKE RACK INSTRUCTIONS
 VERSA BIKE RACK INSTRUCTIONS Models #8, 8 Important This rack is designed for use with a or. receiver hitch. The rack is designed to hold a maximum of two bicycles. Do not use it for anything other than
Co-Motion Co-Pilot Bicycles for travel
 Revised October 2014 Co-Motion Co-Pilot Bicycles for travel Packing and travel instructions Eugene Oregon USA Toll free 1-866-282-6336 www.co-motion.com Congratulations! A Co-Motion Co-Pilot is a great
SETTING THE HANDLE HEIGHT ON THE ROLLATOR
 Model No: Maximum User Weight: 10910C (Lightweight) 10928C (Heavy duty) 125kg (20st) (Lightweight) 170kg (27st) (Heavy duty) Height of handles: 780-915mm (30.5-36 ) (Lightweight) 790-930mm (31-36.5 ) (Heavy
Magnetic Bike. Model No: AENERGISER BODY WORX. Retain this owner s manual for future reference Read and follow all instructions in this owner s manual
 BODY WORX Magnetic Bike Model No: AENERGISER Retain this owner s manual for future reference Read and follow all instructions in this owner s manual Version A 1 EXPLODE DRAWING -02- PARTS LIST AND TOOLS
Foldable Magne c Exercise Bike
 ASSEMBLY INSTRUCTIONS Foldable Magne c Exercise Bike CAUTION! Please make sure the pedals are attached to the correct sides, L to left and R to right. Screw in the right pedal clockwise and the left counter-clockwise.
Usage and Care Instructions
 SUPERSTAR Student Transportation Add-On Restraint Usage and Care Instructions SUPERSTAR 25-90 lbs. (11.3-40.8 kg) 52 in. (132 cm) tall or less at least 2 years of age *927360* Table Of Contents Store this
Shoreline Cantilever Lift 2500lb Capacity Models: (108" inside width) - Part # (120" inside width) - Part #
 - Part # (120 inside width) - Part #") Shoreline Cantilever Lift 2500lb Capacity Models: 25108 (108" inside width) - Part # 1017402 25120 (120" inside width) - Part # 1017403 1. 2. 3. 4. 5. CAUTION - PUT SAFETY FIRST Before attempting to install
Shoreline Cantilever Lift 2500lb Capacity Models: 25108 (108" inside width) - Part # 1017402 25120 (120" inside width) - Part # 1017403 1. 2. 3. 4. 5. CAUTION - PUT SAFETY FIRST Before attempting to install
Bike holder with three-point-support for mounting stand
 Bike holder with three-point-support for mounting stand Ref.no. 589 4726 Translation of the original manual Issued: 07 / 2010 Keep this manual for future reference! Manufacturer: Weilnhammer Maschinenbau
3. Fit. 1 Owner s manual
 3. Fit NOTE: Correct fit is an essential element of bicycling safety, performance and comfort. Making the adjustments to your bicycle which result in correct fit for your body and riding conditions requires
Cycling Instructor Ltd.
 Information for Parents & Guardians Holiday Cycling Courses The Council provides free cycle training courses for children in the holidays. There is no cost to you. To join in pupils must be able to cycle
On foot. Remember. Respect. Think ahead. and by bicycle
 On foot Remember. Respect. Think ahead. and by bicycle Contents: On foot and by bicycle... 3 On their own paths... 4 Bicycle path and pavement side by side... 4 Shared-use path... 5 Using bicycle lanes...
BELT DRIVE INDOOR CYCLING BIKE SF-B1712
 BELT DRIVE INDOOR CYCLING BIKE SF-B1712 USER MANUAL IMPORTANT! Read all instructions carefully before using this product. Retain owner s manual for future reference. For customer service, please contact:
SS650 HELMET USER MANUAL
 SS650 HELMET USER MANUAL READ BEFORE USING YOUR SPEED AND STRENGTH HELMET Congratulations on the purchase of your new Speed and Strength motorcycle helmet. At Speed and Strength, we take great pride in
Dual Release Walkers 6291 Series. 1 General. 1 Dual Release Walkers. 1.1 Symbols WARNING
 User Manual DEALER: This manual MUST be given to the user of the product. USER: BEFORE using this product, read this manual and save for future reference. Dual Release Walkers 6291 Series EN User Manual...page
ASSEMBLY GUIDE TRUE GRIT. LaufCycling.com
 ASSEMBLY GUIDE TRUE GRIT LaufCycling.com Congratulations on your True Grit! We understand you are in a hurry to go riding a.s.a.p. - but please take a deep breath and read this installation guide first.