How to fix your bike when you're miles from home
|
|
|
- Cameron Daniels
- 6 years ago
- Views:
Transcription


1 How to fix your bike when you're miles from home
2
3

4


5

6
7
8

9

10

11

12 1. Small and medium zip-ties 2. A small piece of cut-down Biro casing wrapped with a length of duct tape 3. One or two SRAM Power Links, 9 and/or 10- speed, depending on your bike and those of people you ride with if you want to be Bicycle Repair Man. These links will work with most chains 4. A small length of malleable wire (copper wire that can be twisted by hand is best) 5. Some 20p or 50p coins 6. A piece of tyre casing or other suitable material cut down to about 5cm square 7. Optionally, a spare 5mm Allen bolt or two, about 2.5cm in length, and 4mm and 6mm Allen bolts if you have enough space to fit them in your container 8. A St Christopher medallion or lucky charm!

13

14
15


16
,")
. Have one pair set up for mud.")
 4 tubes or more (I keep mine in a zip lock bag with baby powder)")
17 2 large plastic tote boxes ( clear see through labeled with contents) Tool box which must contain at least allen keys 2-10mm, cable cutter, cone wrenches 12-19mm, hammer, spoke wrenches, phillips and slotted screw driver, chain whip, chain pin tool, bottom bracket tool (for your bike), pedal wrench, torque wrench and sockets, and shock pump Floor pump Repair stand 2 spare wheel sets (inflated and complete with tires, tube, and rear cassette). Have one pair set up for mud. 1 complete cable set (pre-cut and ready to install) Front and rear derailleur (cable stops already set) 2 rear derailleur hangers 2 or 3 sets of brake pads (use sintered pads, organics tend to wear out too quickly when wet) 4 tubes or more (I keep mine in a zip lock bag with baby powder) Lubricants and cleaners (chain lube, grease, WD-40, bike wash), brushes and picks (for getting the crud out)
18 Replace a couple of your shorter 5mm bottle-cage bolts with longer ones that are 3-4cm; these can be used on many modern twin bolt seatposts or clamps. Fill your tubes with tyre sealant such as Slime, Tubless with a top up of stan s This can be extremely effective at warding off the debris from recently trimmed hedgerow. You can buy pre-filled tubes or inject sealant into Schrader or two-piece Presta valves. To treat tubes with one-piece Presta valves, you can cut a hole in them (as small a possible!), inject the sealant and fix it afterwards. Buy a couple of spare normal spokes of the right length, with nipples, and tape them or zip tie them tightly under the left chainstay to keep them out of sight they are handy to have in reserve. Now you're all set, here's how to use your emergency kit to deal with common problems

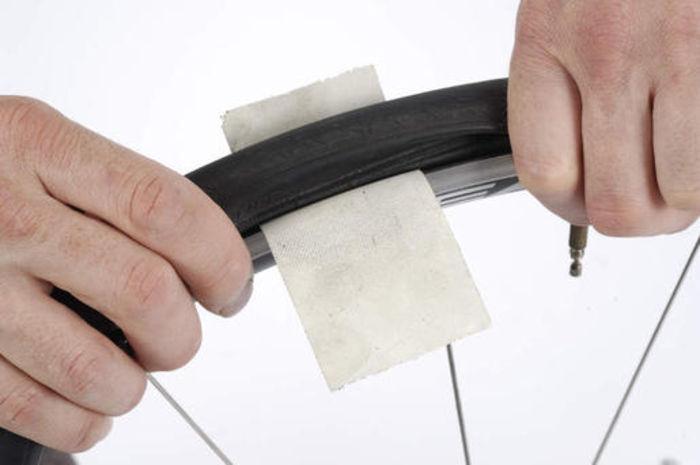
19 Jockey wheels have an annoying habit of coming loose, usually because they weren't tightened correctly after cleaning. That piece of copper wire or the 5mm bolt you've got can now do its thing. Just loop the cable through the centre of the jockey wheel to keep it in place. Use your handy survival kit duct tape and install a slightly larger piece overlapping the bead of the tyre, thus anchoring it securely when inflated. You might want to put a second layer, or even use the piece of cloth or tyre casing, which you also happen to have in your box of tricks.
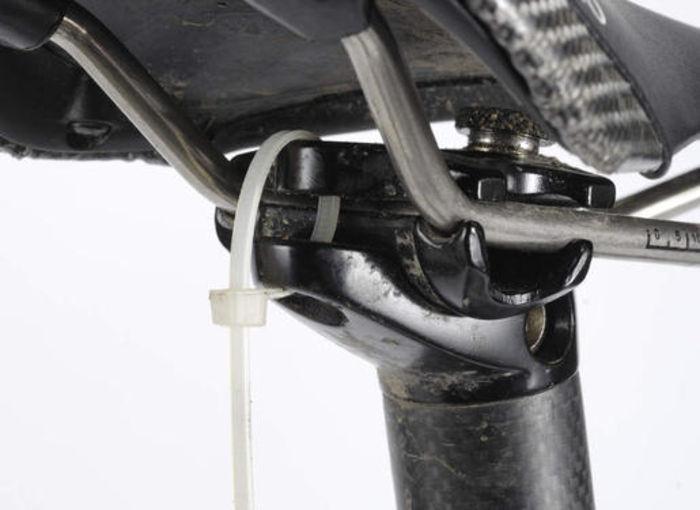
20 Re-attach a saddle to a seatpost when the clamp bolt has broken using zip-ties, but sit on it gingerly for the ride home. It's not perfect but better than sitting on a seatpost. Carefully tear the tube apart at the puncture, then tightly knot both ends; or do the same with your handy zip-ties. The tube will expand back into the tyre upon infl ation, but go easy on the pressure.
21 Place the bent rear mech into the smallest cog and big ring, then carefully and slowly pull the derailleur back into position. The cage of the rear mech should be in line with the smallest sprocket and check that it's pointing in a perpendicular direction to the ground. Be careful when selecting the lowest gear while riding afterwards though, as the derailleur might no longer be as well adjusted and could get caught in the spokes. If your derailleur or hanger is broken beyond repair, you can remove it entirely and then shorten your chain using the SRAM Power Links in your survival kit. This repair depends on a bit of luck and preparation having a multi-tool that includes a chain breaker will make life a lot easier, though you might not be able to get ideal chain tension if you have vertical dropouts. Try to get the chain line as straight as possible.
22 You can pinch a bolt from a place on the bike where it can be spared, and use it where it's more critical in an emergency. If you lose a stem bolt, for example, you can borrow one from a rack strut or from a water bottle cage bolt. But be careful and go easy until a permanent replacement can be found, especially if you think carbon parts might be damaged. Run a cloth lightly over suspect areas to check for a cracked surface any small cracks will pull the cloth's threads. If replacing a spoke won't do or isn't an option, a pretzeled wheel can be straightened sufficiently to get you home with a bit of technique and brute force. Place the wheel with the axle and high point of the buckle against the ground, then firmly push with substantial weight while gripping the rim on either side of the bent zone. You can focus and increase your leverage by using your feet in place of hands and body weight, along with a stone or raised surface feature such as a kerb. Exceptions might be if you have a delicate carbon frame with tight clearances, where a few miles of tyre rub could not only result in a blowout, but put a hole in your chainstays, seatstays, or fork blades. Those spare coins might come in handy now if you forgot your phone or ran out of battery charge.

23 A useful trick is knowing how to remove a tyre without the aid of tyre levers. First, make sure all the air is removed, then lean over the wheel, holding it vertically against the ground. Starting with both hands at the top, pinch and manipulate the tyre beads into the centre of the rim channel simultaneously, with both hands working downwards. As your hands meet towards the bottom you'll find that you've gained a substantial amount of slack, which should be enough to just pull the bead over the rim flange. If it's still a little tight, remove your quick-release skewer and use the lever it works! Check the tyre for any debris before fitting the new inner tube. Run your hands all the way round the inside of the wheel rim to feel for anything that may have pierced the casing such as a thorn or piece of glass, taking care not to cut your fingers. If you break a gear cable, it's most likely to be the rear one, in the lever itself or near the head-tube where most friction occurs. Remove your front derailleur cable and carefully thread it through the right lever (you'll probably have to twist it in the direction of the winding to stop the strands from fraying). Tie it using a square knot onto the cable attached to the rear mech, about halfway along the downtube. Before tying the knot, push the mech up onto the big cog. This will take up any slack when it's released though with a multi-tool you can take up the slack in the usual way. You can also immobilise the derailleur in a specific gear if all cable options are gone jam a twig or piece of debris in the parallelogram, after placing it into the desired gear.


24 If your front mech s inner cable breaks, find some wood to wedge between the bottom of the seat tube and inside edge of the front mech cage. Make it wide enough to hold the front mech open to the point where you run the middle ring, then simply zip-tie together. Brake lever pivots If one of these takes a suicide leap from your bike, find the lever in the bushes. Use a zip tie or a short piece of wire and thread one end through the hole. With the lever attached via the tie or wire, you can twist the two ends together and snip them off.


25 First, take the wheel and tire off to find the hole or rip. Depending on the size of the damage, you may be able to cover the hole to get you home. WHO NEEDS BIKE PATCHES! Step 1: Find an alternative patch Peal a sticker off your bike, water bottle or helmet. Step 2: Use this as your patch. Sand the hole, glue it and stick the patch on, apply pressure until dry and get yourself home


26 Step 1: Cut the tube at each end of the hole/slice. You can do this either with a blade or using a sharp chain ring on the bike. Step 2: Tie a knot at both ends making sure it s as tight as possible. Make sure you don t leave too much slack that you can t get the tube back on the wheel. Step 3: Pump some air before you put the wheel back on to test for leakage. Be patient as this may take a few goes. You could use zip ties to help make the seal more secure. Step 4: Stretch it over the wheel and pump to a low pressure, just enough to get you home and to not damage your wheel.


27 TUBELESS TIRE OR JUST TUBELESS! This is your last resort! Proven to work by my friends and I in Ireland while it was pouring with freezing rain. This is not pretty, but it will work, given a little time and patience. Make a tube Step 1: Grab piles of grass, leaves or anything soft around you. Step 2: Evenly pack the tire with as much as possible. Step 3: Once you can t pack any more, compress the tire with a short ride and continue the packing process. You will have to do this many times before the bike can be ridden and you may need to repeat the process on the way home. Be careful not to damage your wheel by cycling on the rim. My friends and I made it home after riding 10 miles. Not comfortable, but it works.
28 A broken derailleur is normally caused by a bent hanger forcing the derailleur into the spokes. If you are unable to bend it into place, then you have no option but to take it off and continue with single speed. Most likely your chain is bent and will need shortened. Step 1: Use your chain breaker to push the chain link at the start of the bent chain. DO NOT take the pin completely out. Only push the pin far enough so you can clip the chain apart, keeping the pin attached to one side of the link. Step 2: Take the chain off. Step 3: If the derailleur is damaged unscrew the gear cable and take the derailleur off. Secure the gear cable to the frame with a zip tie or duck tape. Step 4: Chose a light, comfortable gear that is easy to ride (e.g.- middle chain ring to middle cassette ring). Step 5: Measure the chain length by wrapping the chain around the chosen gear, using the pushed pin as the starting pin. Step 6: Shorten the chain to the correct length. Step 7: Hang the chain on the bottom bracket so it s loose. Connect the chain. If the link is stiff, bend it back and forth until it is loose.

29 Step 8: Reattach the chain to the chain-rings and adjust to give it tension. Remember: DON T USE YOUR GEARS.

30 Normally caused by a sharp rock, resulting in your tube popping out. It s unlikely you will be carrying a tire boot, so you will have to be creative. If you have dental floss you could stitch the gap. If not, you will have to patch it. A friend of mine once used an energy bar wrapper and some duck tape to hold it in place. I have also heard of money notes and race number plates being used. Remember it s just to get you home. Step 1: Find a patch strong enough to hold in the tube. Step 2: Use duck tape, glue etc to hold the patch in place. Step 3: Refit the tube and pump it slowly to a low pressure. Ride slowly and keep checking the repair.
31 Fix torn sidewalls, large punctures and little nagging leaks that can ruin your day - and your walletfix torn sidewalls, large punctures and little nagging leaks that can ruin your day - and your wallet Tubeless tires users who run liquid sealant can often run a tire until the tread is nearly burned off the carcass without suffering a flat. When something large enough to defeat the sealant slashes into the tire, however, the usual option is inserting a tube for the remainder of the crippled tire's life. The thought of slugging around with a tube in my tubeless is almost worse than throwing away a nearly new, 60-dollar tire just because it has a sidewall rip. Luckily, there are ways to successfully repair fairly large holes and tears in tubeless tires. Armed with this week's Tech Tuesday and a little sleuthing at an auto parts store, you should be able to repair substantial damage to your tires and return them to service.

32


33


34


35


36


37 Should You Accidentally Poke Your Tire With a Knife...


38


39 Sidewall Slashes, They're the Worst


40

41 Before you start this job it is important to figure out what make of chain you have on your bike. If you have a Shimano chain on your bike you'll either have to reconnect it by using another company's reusable link, or by inserting one of Shimano's new pins. If you do not have either of those items you can still follow the steps below in order to get your bike back on the trail and yourself out of the bush, but be sure to be careful as the new connection will not be as strong as if you had used the new pin and could fail. I would recommend taking it to your local shop to have them fix it before you hit the trails again. There are a number of reasons why your chain could have broken and there are many riders out there who swear by one brand over another. The truth is that any and all chains can break, but there is always a good reason for it. The causes could range from a bad shift under load that caused an outer plate to separate from the pin, large amounts of wear, or even incorrect installation in the first place. Despite a lot of riders insistence that it must be down to their leg strength, this is never the case as there is always an underlying cause. The chain may have broken while you were practicing your gate starts, but your meager amount of ponies wasn't the root cause of the problem! 1. The first thing to do is to remove the broken chain from your bike. This will make it much easier to remove the damaged links and check for any others that may be twisted and cause your bike to skip under load. When you look at the breaking point on the chain you may see a number of different things. Depending on how the chain snapped, you may be left with any number of combinations of male (inner links) and female (outer plates), but to put it back together without using a replaceable link you'll need to use your chain tool and make one end a male end and the other a female end.

42 2. Now lets start by removing the damaged pieces. Some chain tools feature two different slots to put the chain in. The inner most position is strictly for fixing stiff links that may arise after you fix the chain, but you'll only ever use the outermost position to install or remove links. If your chain tool only has one position then you don't have to worry about this. One more thing to note is that some chain tools use a threaded dial to fit different width chains. If this is the case with your tool, simply turn the dial in after you've placed your chain in the slot. This will hold it in place as you work on it. As you are doing this, you'll only want to remove the damaged pieces in order to keep the chain as close to its proper length as possible. In order to produce a male end (inner link) simply push the chain pin completely through and out the opposite side. The outer plates will fall away and you'll be left with only the inner link. Take care not to let the roller (round piece that can be found between the two inner plates) fall out as they sometimes are prone to doing so.


43 3. The next step is to make a female (two outer plates) end on the opposite end of the chain. This is the tricky part. Once again, put the chain in your tool's outermost position and make sure that the tool's pin is perfectly lined up with the chain pin. Begin to push the pin, but the key is to stop before it is completely through. The goal is to push it out far enough to allow you to remove the damaged bits, and if done right you'll have to flex the two pieces to snap them apart. Once apart, you should have close to a millimeter of the pin protruding towards the inside of the female outer plates. If you happen to accidentally push the pin all the way out, you'll have to restart on a new section of chain as it's not recommended to try and reinstall the wayward pin. Leaving the chain pin protruding slightly to the inside will also make it much easier to join the chain once it's on your bike, as it will snap together and you won't have to hold it.
 to the smallest")
44 4. Now you're ready to reinstall the chain onto your bike. In order to have the least amount of chain tension to make it easier on yourself, shift your rear derailleur to the smallest cog position and your front derailleur (if you have one) to the smallest ring position. Feed the chain through on the route that it would normally take, but be sure to have the pin that you just pushed mostly out facing to the outside of the bike so it is easier to work with. 5. Join the two ends of the chain together. If you've pushed the pin on the female end just the right amount, you should be able to snap it together and not have to hold it from coming apart. If not, you'll struggle to keep it from springing apart as you use the chain tool to push the pin through. One trick is to take a 4" section of old spoke and bend it into a "C" shape, using each end to hold the chain together. Before you begin to push the pin back into the chain, take a few seconds to make sure that everything is lined up. If the chain pin is not lined up perfectly with the holes in the outer plates, it will damage them as it passes through and the chain will not be safe to ride. When you're happy that everything is lined up, begin pushing the chain pin through until there is an equal amount protruding on either side of the outer plates. Depending on your chain, the ends of the pin may be very close to flush with the outer plates. The important part is that both sides are equal. Inspect the new joint carefully for any damage to the chain such as plates that were bent out during installation.

45 6. There is a good chance that the chain does not rotate freely at the new joint. This is because the outer plates have been squeezed together in the chain tool as you pushed the pin through. You can easily spot a stiff link when pedaling backwards and watching it go through the rear derailleur's pulley wheels. There are two ways to deal with this, you can use your hands or use your chain tool to fix it. I prefer to simply use my hands. Place one hand on each side of the chain with your thumbs close to the stiff link. Using some effort, flex the chain side to side directly at the offending link. It should only take one or two tries until the new joint turns freely. The alternative method is to use the innermost position on your chain tool to give the pin at the stiff link only the slightest nudge. This is also an effective method of freeing up the stiff link.

46 7. Before you jump on your machine and start sprinting away, always check to make sure that you've done the job correctly. There should be no bowing or cracking of the outer plates at the new joint. Run through your gears and take a few cautious pedals before going out and wheelie dropping off your balcony! Keep in mind that you've removed chain links and the chain is now shorter than it was before you broke it. If the chain was already at just the right length, it may be too short now when in the bigger cogs. Be very careful otherwise you'll end up installing a new rear derailleur and hanger!

47 Before you begin adjusting things it is important to be sure that all of your shifting components are in good working order. You could spend the next hour following these instructions, but it will be of no use if you're using bent, damaged, or worn out parts. Take a few minutes to be sure that both your derailleur and derailleur hanger are straight. Do this by standing directly behind your bike and sighting up through your derailleur, everything should be straight and in line. Also, your chain should not be completely worn out and dry, as this will have a detrimental effect on your shifting as well. Likewise, if your cable is rusty and not moving free, all your efforts will be wasted. Once you're happy that everything is in good condition move on to the steps below. You'll be adjusting three settings during this process: cable tension, limit screws, and B-tension. Cable Tension It is exactly as it sounds. The amount of tension on the shift cable controls how much the derailleur moves with each click of the shifter. Too much tension and it will shift past the correct cog as you shift to an easier gear, as well as shift slow in the opposite direction. Too little tension and it will shift slow, or not at all, to a bigger cog, and move too far as you come down to a harder gear. The correct amount of cable tension is a balance that moves the chain up and down over your cassette at just the right amount. Limit Screws Think of your limit screws as your derailleur's adjustable stops. They only effect the amount that the derailleur is allowed to move at each extreme of its travel. There are two limit screws, one for the low range (easiest gearing) and one for the high range (hardest gearing), and are labeled accordingly with "H" being for High and "L" for low. The further you dial in the "high" limit screw, the less range your derailleur will have at the high range. If you find that your derailleur is shifting over the top of the largest cog, you'll need to apply more "low" limit until it no longer over shifts. If your shifting is good throughout the middle of your cassette, but is not able to shift to the largest cog, you may have dialed in too much limit. The same applies to the high limit adjustment. If you manage to bend your derailleur or derailleur hanger after you make these adjustments, they will no longer be effective.

48 B Tension Screw This lesser known screw adjusts how close the derailleur's upper pulley wheel follows the cassette. If it is too close, the upper pulley and chain will come in contact with the cassette, especially when back pedaling. Too far away and your shifting will be slower than you may like. Certain derailleurs will need more B Tension screw applied to keep them from bumping on large 32 or 34 tooth cogs found on some mountain bike cassettes. 1. For this process we are going to start from scratch. If your shifting is only slightly out of adjustment you may not need to start from the very beginning. Begin by shifting your SRAM rear derailleur to the smallest cog (least amount of cable tension) and then undo the derailleur's cable anchor bolt in order to release all cable tension. The cable should now be free and have no effect on the shifting. Take note of where the shift cable is clamped in relation to the bolt before you loosen it. Is there a channel or groove where the cable is intended to be clamped? You'll need to know this when the time comes to re clamp the cable.

49 2. We are going to start by setting the high limit screw to the correct position. This is an important step as some of your other adjustments will be affected by this as well. If your high limit is off, there is a good chance the rest of your adjustments will be as well. To do this, manually move the derailleur with your hand by pushing on the knuckle (not the cage!) and moving the chain up the cassette just as you would if you were shifting to an easier gear. Next, slowly release it and let it come down under it's own spring tension. It should move the chain onto the smallest cog with no hesitation, but at the same time it should not let it go past the cog and and make contact with the frame. Sight from directly behind the smallest cog, the upper pulley wheel and chain should be directly in line with the teeth for the cog. 3. If it is shifting too far and the chain and upper pulley wheel are not lined up with the small cog, or the chain is coming right off and making contact with the frame, you'll need to add more high limit. Turn the high limit screw clockwise half a turn or less and then recheck. Likewise, if the chain is not coming down onto the smallest cog, or hesitating slightly before it does, you'll need to dial out the high limit screw a small amount to let the derailleur have more range. 4. The next step is to correctly adjust your derailleur's low limit screw. This adjustment keeps your rear derailleur from shifting the chain up and over the largest cog and into the spokes. With the shift cable still loose and not clamped down, push gently on the derailleur body (not the cage!) in order to move the chain up to the largest cog just as it would if you were shifting to an easier gear. Do this slowly as if your low limit is not adjusted correctly it will over shift and possibly damage your drive side spokes. You should be able to push the the derailleur body until the chain is on the largest cog. If it doesn't have enough free movement to reach the largest cog, or is doing it slowly, you'll need to dial out the low limit screw by turning it counter clockwise a small amount. If it moves the chain up and over the cog and into the spokes, you'll need to add more low limit by turning the screw clockwise. You should be able to move the derailleur and chain up to the largest cog and feel a firm stop. Again, when sighting from behind, the upper pulley wheel and chain should be directly lined up with the teeth on the largest cog.


50 5. Now it is time to re clamp your shift cable, but first you should make sure that it is moving free through your shift housing. To do this shift as if you were shifting to the largest cog/easiest gear. Now hold onto the cable end with your hand and shift back down one click at a time. The cable should move freely and not bind at any point. If it does you'll need to replace your cable before continuing. If you are happy with it then move on to the next step. 6. It is very important to make sure that the derailleur and chain are in the smallest cog/hardest gear position before you re clamp your shift cable. Also, be sure to take note of where exactly the cable is supposed to be clamped. Certain models of derailleurs may need to have the cable clamped in different positions. Have a close look and you should be able to see a channel or knurled surface that defines the clamping area. If you position the cable in the wrong spot it will not shift correctly as the cable pull ratio will be off. Before clamping the cable, have the barrel adjuster at the shifter dialed two turns out from full in. With the derailleur in this position, pull the shift cable snug with your hand and clamp it in the correct position under the cable anchor bolt. When doing this be sure to pull all of the slack out of the cable. With practice you'll be able to know just how hard to tug on the cable so that you won't have to make drastic, if any, tension adjustments after it's clamped.

51

52 7. Now you're ready to check your shifting and see if any adjustments are needed. While pedaling shift the rear derailleur up one gear at a time towards the largest cog/easiest gear. If it's adjusted correctly, one click of the shifter will move the chain up to the next cog without hesitation and without it over shifting to the next cog. When checking your shifting be sure to shift one gear at a time as it can become confusing if it's out of adjustment and you're doing multiple jumps. The first couple of tries may result in not enough tension, with the symptom being that the derailleur is not able to move enough to bring the chain up to the next largest cog. If this is the case, you'll need to add more tension by dialing the barrel adjuster at the shifter out/counter clockwise. Only turn this adjuster 1/8 to 1/4 turn at each go and then recheck. If you find that it is over shifting and moving the chain too far, you'll need to remove some tension. Do this by dialing the barrel adjuster in/clockwise 1/8 to 1/4 turn and then recheck. Another technique to fine tune your shifting is simply to listen to it. A rear derailleur that is out of adjustment will "tick tick tick" as you pedal, while a properly adjusted one should be nearly silent.

53 8. Before taking your bike off the stand the last thing to check is the B-Tension screw adjustment. To check this, shift your bike to the largest cog/easiest gear, and pedal forwards and in reverse. The derailleur's upper pulley and chain should not come in contact with the large cog, but be roughly within 5-6 mm of it. If you find that it is rubbing you'll need to add more B-Tension, do this by dialing the screw in/clockwise three to four turns. If it is too far away, your shifting may be slower than it needs to be. If it is too close you could damage the upper pulley wheel as well as not be able to pedal backwards or freewheel correctly. 9. Once you are happy with how your bike is shifting while on the rack be sure to take it for a spin outside before heading up to the mountain. The drive train may react differently during riding because it is under far more load when pedaling with your legs than it was in the rack. You may need to make further adjustments to have it perform optimally, but by using the steps above you should be able to dial it in to perfection.


54 When freehub bodies fail, the cassette will have no ability to drive you forward. You can fix the cassette to the drive side spokes in the rear wheel by attaching a zip tie to the spokes and holes in the cassette sprockets. Pedal carefully to avoid breaking your fix, though. Headset Stacked Spacer You can add to the total stack height of your headset spacers by wrapping a single zip tie around the steerer tube

55 You can store a few useful odds and ends inside your seat post tube. Popular stash items are a few zip ties, your address, a plaster, a split magic chain link, a cleat bolt and a glueless puncture patch. You can pick and choose what you think you ll need, although all of this is so light that you won t notice it, and it shouldn t rattle around. Use a whittled-down cork as a bung to keep the items secure.

56 Back in 1958, engineers Robert Thomas and Hobart Betts invented the Ty-Rap for securing aircraft cabling, and the zip tie (or cable tie or whatever you want to call it) has gone on to dominate everything from bodging to kidnapping. But did you know you don t have to cut them off? Pull the loose end right over and slide a thumbnail in to push the ratchet away and it ll slide apart. Lamp posts, telephone poles and so on are a great free source!

57 At some point in my formative years, I heard someone say, "If you have duct tape, it ain't broke." THE END!
Parts List. 7. Handlebars 8. Grips 9. Handlebar Stem 10. Front Brake 11. Front Wheel 12. Crank 13. Chain
 Woodworm Cruise Parts List 1. Free Wheel with Rear Hub 2. Fenders 3. Fender Stay 4. Quick Release 5. Saddle 6. Seat Post 7. Handlebars 8. Grips 9. Handlebar Stem 10. Front Brake 11. Front Wheel 12. Crank
Folding Dual Suspension MTB. Instruction Manual
 Folding Dual Suspension MTB Instruction Manual Introduction The Stowabike Folding MTB has been made to last and with proper maintenance, it will give you years of enjoyable rides and journeys. The following
Final Assembly Instructions Bikes with Threaded Headsets
 Final Assembly Instructions Bikes with Threaded Headsets Thank you for buying your new bicycle from L.L.Bean. Read these instructions carefully before beginning the final assembly. Prior to shipping, our
Good tread, no splits, cracks or holes, properly inflated. True, no missing or broken spokes, good rim. Secure, facing in right direction
 APPENDIX 1 Bike Check This is an M check. Start at the front of the bike and systematically work towards the back. Put a cross beside anything that is faulty. Note any faults you find. X FAULT Front tyre
Final Assembly Instructions Bikes with Quill Stems
 Final Assembly Instructions Bikes with Quill Stems Thank you for buying your new bicycle from L.L.Bean. Read these instructions carefully before beginning the final assembly. Prior to shipping, our expert
Have questions? Chat with us live at raleighusa.com or call us at , 8am 5pm PST
 1 2 Have questions? Chat with us live at raleighusa.com or call us at 1-800-251-8435, 8am 5pm PST The bicycle you have purchased is a complex piece of equipment that must be properly assembled and maintained
Have questions? Chat with us live at raleighusa.com or call us at , 8am 5pm PST
 1 2 Have questions? Chat with us live at raleighusa.com or call us at 1-800-251-8435, 8am 5pm PST The bicycle you have purchased is a complex piece of equipment that must be properly assembled and maintained
Have questions? Chat with us live at raleighusa.com or call us at , 8am 5pm PST
 1 2 Have questions? Chat with us live at raleighusa.com or call us at 1-800-251-8435, 8am 5pm PST The bicycle you have purchased is a complex piece of equipment that must be properly assembled and maintained
Final Assembly Instructions Bikes with Threaded Headsets
 Final Assembly Instructions Bikes with Threaded Headsets Thank you for buying your new bicycle from L.L.Bean. Read these instructions carefully before beginning the final assembly. Prior to shipping, our
BICYCLE ASSEMBLY INSTRUCTIONS. dutchcycles.com.au. Distribution Centre
 BICYCLE ASSEMBLY INSTRUCTIONS dutchcycles.com.au Distribution Centre Shed 68, 400-422 Somerville Road, Tottenham, VIC 3012 email: service@dutchcycles.com.au BICYCLE COMPONENTS KEY INTRODUCTION CONGRATULATIONS
Santa Fe Cycles Assembly Guide Introduction
 Santa Fe Cycles Assembly Guide Introduction Congratulations on your purchase of your new Santa Fe bicycle. You have purchased a bicycle that has many features and qualities. Please take a few minutes and
ASSEMBLY GUIDE AROUND THE BLOCK - 1, 3, 7, & 21 SPEED SIXTHREEZERO
 ASSEMBLY GUIDE AROUND THE BLOCK - 1, 3, 7, & 21 SPEED SIXTHREEZERO OUR COMMITMENT We want you to love your bike as much as we do. If you run into any issues, no matter how small, let us know and we ll
comfort without compromising on performance and to fit your various needs on touring,
 Congratulations on your purchase of Goal-26X. Goal-26X is made to enhance comfort without compromising on performance and to fit your various needs on touring, shopping and communicating. Let s have fun
CRUZBIKE Quest 2.0 Assembly
 CRUZBIKE Quest 2.0 Assembly CRUZBIKE Quest 2.0 Assembly... 1 General notes on assembly... 2 Un box and evaluate the frame and major parts... 2 Unfold the rear swing arm and arrange the frame... 3 Rear
SANTANA STOWAWAY TANDEM WITH AIRLINER SAFECASE AND FTS FOAM TRAY SYSTEM ASSEMBLY AND DISASSEMBLY
 SANTANA STOWAWAY TANDEM WITH AIRLINER SAFECASE AND FTS FOAM TRAY SYSTEM ASSEMBLY AND DISASSEMBLY Congratulations! You are now the proud owner of the world s most travel-ready, performance tandem. The following
2019 MADONE ASSEMBLY MANUAL
 2019 MADONE ASSEMBLY MANUAL 2019 MADONE Rim brakes and Di2 drivetrain Rim brakes and mechanical drivetrain Disc brakes and Di2 drivetrain Disc brakes and mechanical drivetrain TABLE OF CONTENTS Common
2019 MADONE ASSEMBLY MANUAL
 2019 MADONE ASSEMBLY MANUAL 2019 MADONE Rim brakes and Di2 drivetrain Disc brakes and Di2 drivetrain Rim brakes and mechanical drivetrain Disc brakes and mechanical drivetrain TABLE OF CONTENTS Common
model - CYPRESS DX W
 Contents model - CYPRESS DX W Maintenenace manual Read and Save these instructions Welcome Contents 1 Preparing Nothing makes us happier than seeing people out riding bikes. For over thirty years Giant
Lectric Cycles Mid-Drive Electric Motor Installation
 Lectric Cycles Mid-Drive Electric Motor Installation This write-up describes the installation of a Lectric Cycles electric motor. The model is the e-rad Mid-Drive 750 Watt conversion kit, installed on
Just as you d bring along a map if you were heading off for a trip on
 In This Chapter Chapter 1 Channeling Your Inner Grease Monkey Entering the world of bike repair and maintenance Caring for your bike before, during, and after you ride Making emergency, basic, and advanced
Special instruction of installation for SAINT FH-M800/RD-M800 and FH-M805/RD-M805
 Technical Service Instructions SI-5VB0E t RD-M805 / RD-M800 Rear derailleur Special instruction of installation for SAINT FH-M800/RD-M800 and FH-M805/RD-M805 A hub axle is an essential component for the
Troubleshooting Guide
 Troubleshooting Guide This troubleshooting guide outlines quick fixes to the most common technical questions about the ElliptiGO. If the problem persists or you feel uncomfortable performing these actions,
Bicycle maintenance made ridiculously easy From zero to hero all the things an absolute beginner needs to know to look after their own bike
 Bicycle maintenance made ridiculously easy From zero to hero all the things an absolute beginner needs to know to look after their own bike Checklists Every ride Monthly Repairs Clean Lubricate Fix a flat
TABLE OF CONTENTS FRAME FEATURES INTRODUCTION
 S3 DISC MANUAL TABLE OF CONTENTS Introduction...1 Frame Features...2 Fork Preparation...3 Small Parts...5 Frame Preparation...6 Brake Housing Installation...7 Mechanical Cable Routing...9 Electric Cable
TABLE OF CONTENTS INTRODUCTION
 R3 DISC MANUAL TABLE OF CONTENTS Introduction... 1 Frame Features... 2 Fork Preparation... 3 Small Parts... 5 Frame Preparation... 6 Brake Housing Installation... 7 Mechanical Cable Routing... 9 Electric
Front Derailleur. Shifters and derailleurs work together!
 The drivetrain consists of the cranks, chainring(s), chain, and cog(s). On multispeed bikes, derailleurs, which move the chain to change gears, are also considered part of the drivetrain. ANATOMY of the
Drive Belt Instructions
 Drive Belt Safety Do not roll, pry, twist, invert or bend the belt back on itself. Do not zip tie the belt. The acceptable temperature range for your belt drive is -53 C to 85 C. Do not lubricate the belt
E-trike Li Assembly Guide
 PREPARATION 1. Read this assembly manual BEFORE commencing assembly. 2. Carefully remove all the components and packaged hardware from the shipping boxes. 3. Unpack the contents of the large double box
MANTEL BIKE BOX: PACKING YOUR ROAD BIKE FOR TRANSPORT
 MANTEL BIKE BOX: PACKING YOUR ROAD BIKE FOR TRANSPORT ROAD BIKE COMPONENTS 1 Frame: a b c d e Top tube Down tube Seat tube Chain stay Seat stay 2 Saddle 3 Seat post 4 Seat post clamp 5 Rear brake 6 Front
HOME ASSEMBLY INSTRUCTIONS
 HOME ASSEMBLY INSTRUCTIONS This Papillionaire Bicycle now belongs to you. It will take you to work, wait patiently outside your local cafe, and carry your groceries home. This is the start of your long-term
Preparation/Maintenance Manual
 Preparation/Maintenance Manual It is essential that you read this manual in its entirety before riding your bike for the first time to ensure that your bike is properly assembled and safe to ride. It is
Assembly, Fitting, Care & Maintenance
 Assembly, Fitting, Care & Maintenance Assembly 1.1 Remove All Parts and Tools from Packaging 1.2 Part and Tools required for assembly 1.3 Check Foot & Leg Assembly 1.4 Adjust Upper-Leg-Support (ULS) Height
How to Pack Your Bike in a SHERPR Box
 How to Pack Your Bike in a SHERPR Box SHERPR is a no hassle door to door service for shipping your sports equipment, allowing you to enjoy the break you deserve without the added stress of worrying about
9-speed super narrow. chain such as. CN-7701 / CN-HG93 8- / 7- / 6-speed narrow. chain such as CN-HG50 / CN-IG51
 - Technical Service Instructions SI-5VH0B t RD-M600 Rear derailleur General Safety Information WARNING The ST-M600 DUAL CONTROL lever is used for both gear shifting and braking operations. Make sure that
The type of terrain: flat and rough-terrain
 1 2 The type of terrain: flat and rough-terrain ASSEMBLING YOUR BICYCLE 1. Gears 2. Rear Brake 3. Rear Reflector 4. Seat Post 5. Saddle 6. Front Brake Lever 7. Gear Selector 8. Handle Bars 9. Bell 10.
TRAILMATE METEOR ASSEMBLY MANUAL
 TRAILMATE METEOR ASSEMBLY MANUAL (DISC BRAKE VERSION) The Trailmate Meteor recumbent has been designed for easy assembly. This means more time to enjoy the smooth ride with single speed, 3 speed coaster
FRAME FEATURES TABLE OF CONTENTS INTRODUCTION
 R3 MANUAL TABLE OF CONTENTS Introduction...1 Frame Features...2 Fork Preparation...3 Small Parts...5 Frame Preparation...6 Mechanical Cable Routing...7 Electric Cable Routing...9 Seatpost Assembly & Installation...11
Congratulations on your purchase of a JC Series Performer trike! The Performer JC Series is designed for everything from touring to commuting and
 Congratulations on your purchase of a JC Series Performer trike! The Performer JC Series is designed for everything from touring to commuting and shopping in the city. The JC Series frames are made of
MODEL: FIXIE / TRACK
 STEP BY STEP BUILD GUIDE MODEL: FIXIE / TRACK TABLE O F CON TENTS TOOLS 1 LET S GET STARTED 2 INSTALLING THE HANDLEBAR 3 INSTALLING THE FRONT WHEEL 4 ALIGNING THE STEM 5 INSTALLING THE SEATPOST 6 OPTIMIZING
ASSEMBLY GUIDE: Izip & Ezip Electric Bicycles with Rack-Top Mounted Batteries ( RTMB Bicycles )
") ASSEMBLY GUIDE: Izip & Ezip Electric Bicycles with Rack-Top Mounted Batteries ( RTMB Bicycles ) Please Refer to your Owner s Manual for Detailed Setup Instructions Technical & Customer Service: 1-800-377-4532
ASSEMBLY GUIDE: Izip & Ezip Electric Bicycles with Rack-Top Mounted Batteries ( RTMB Bicycles ) Please Refer to your Owner s Manual for Detailed Setup Instructions Technical & Customer Service: 1-800-377-4532
Final Assembly Instructions Bikes with 16 Wheel Size
 Final Assembly Instructions Bikes with 16 Wheel Size Thank you for buying your new bicycle from L.L.Bean. Read these instructions carefully before beginning the final assembly. Prior to shipping, our expert
EZ-3 USX HD Supplemental Owner s Manual
 EZ-3 USX HD Supplemental Owner s Manual Find us online at SunSeeker.Bike Revised 2/2016 CONGRATULATIONS! Congratulations and welcome to the Sun Seeker family! You have selected one of the most comfortable
How to adjust your derailleur
 How to adjust your derailleur Limit screws, indexing and B-limit Written By: The Hive 2017 service.bythehive.com Page 1 of 8 Step 1 How to adjust your derailleur There are three adjustments that need to
EZee Glider Manual. Tools needed for Assembly: Wrench (included) Philips Screwdriver (not included) Assembly Instructions
 Philips Screwdriver (not included) Assembly Instructions") EZee Glider Manual Congratulations on your purchase of the EZee Glider! Your glider is designed for years of nearly carefree use by your child. These instructions include how to set up your glider and
EZee Glider Manual Congratulations on your purchase of the EZee Glider! Your glider is designed for years of nearly carefree use by your child. These instructions include how to set up your glider and
R3 RIM MANUAL EN. Version 1 I
 R3 RIM MANUAL EN Version 1 I 07.02.2017 TABLE OF CONTENTS Introduction...1 Frame Features...2 Fork Preparation...3 Small Parts...5 Frame Preparation...6 Mechanical Cable Routing...7 Electric Cable Routing...9
MODEL: COMMUTER / ROAD BIKE
 STEP BY STEP BUILD GUIDE MODEL: COMMUTER / ROAD BIKE TABLE OF CONTENTS TOOLS 1 LET S GET STARTED 2 INSTALLING THE QUILL STEM 3 INSTALLING THE FRONT FENDER 4 INSTALLING THE QUICK RELEASE 5 INSTALLING THE
UNPACKING AND ASSEMBLING YOUR DIAMONDBACK ROAD BIKE
 EMAIL SIGNUP BIKE REG SEARCH BIKES THE RIDE HEALTH FITNESS SKILLS SHOP MAINTENANCE CYCLING 101 RIDERS LIKE YOU TEAMS SUPPORT UNPACKING AND ASSEMBLING YOUR DIAMONDBACK ROAD BIKE 1. Begin by carefully cutting
ROAD Wheel Set. Dealer's Manual WH-9000-C24-CL WH-9000-C24-TL WH-9000-C35-CL WH-9000-C35-TU WH-9000-C50-CL WH-9000-C50-TU WH-9000-C75-TU
 (English) DM-WH0002-00 Dealer's Manual ROAD Wheel Set WH-9000-C24-CL WH-9000-C24-TL WH-9000-C35-CL WH-9000-C35-TU WH-9000-C50-CL WH-9000-C50-TU WH-9000-C75-TU WH-RS21 WH-RS61 CONTENTS IMPORTANT NOTICE...
DM-MARD (English) Dealer's Manual. ROAD MTB Trekking. City Touring/ Comfort Bike REAR DERAILLEUR XTR RD-M9100 RD-M9120
 Dealer's Manual. ROAD MTB Trekking. City Touring/ Comfort Bike REAR DERAILLEUR XTR RD-M9100 RD-M9120") (English) DM-MARD001-00 Dealer's Manual ROAD MTB Trekking City Touring/ Comfort Bike URBAN SPORT E-BIKE REAR DERAILLEUR XTR RD-M9100 RD-M9120 CONTENTS CONTENTS...2 IMPORTANT NOTICE...3 TO ENSURE SAFETY...4
(English) DM-MARD001-00 Dealer's Manual ROAD MTB Trekking City Touring/ Comfort Bike URBAN SPORT E-BIKE REAR DERAILLEUR XTR RD-M9100 RD-M9120 CONTENTS CONTENTS...2 IMPORTANT NOTICE...3 TO ENSURE SAFETY...4
WHEELS AND TRANSMISSIONS IONS
 WHEELS AND TRANSMISSIONS IONS MOUNTING TIRES ON WHEELS Install a rim strip or rim tape; this protects the tube from punctures caused by the tips of the spokes and the spoke nipples. Align the hole in the
1. General Safety Information. Silvio V2.2 Assembly Instructions Assembly. Adjust to the rider.
 Silvio V. Assembly Instructions support@cruzbike.com. General Safety Information WARNING to avoid serious injuries:. If you are unsure about fitting, testing and adjusting brakes or gearing on a bicycle,
Bicycle Owner's Manual Easy Access Bike
 Bicycle Owner's Manual Easy Access Bike AGE: FROM 9 YEARS OLD AND UP IMPORTANT Check bike after assembly or any adjustments. Consult bicycle retailer with questions. Always wear a helmet. Children should
Item N o.: Item N am e:40cm Boys Rival Bike
 Item N o.:42272892 Item N am e:40cm Boys Rival Bike 9 bell 8 grip 30 crash pad 10 brake lever 26 wheel reflector 22 saddle 23 seat post 25 rear reflector 24 quick release 6 handle bar 7 stem 2 top tube
SG-7R46 SG-7R45 BR-IM41-R CJ-7S40 WARNING CAUTION SERVICE INSTRUCTIONS. Inter-7 Hub. Inter-M Brake Cassette joint NOTE:
 t WARNING It is important to completely understand the operation of your bicycle's brake system. Improper use of your bicycle's brake system may result in a loss of control or an accident, which could
Assembly Tools. Assembly will take about an hour
 Assembly Guide Assembly Tools Included in your parts box: Pedals Toolkit (4+5mm combo Allen wrench, 13+15mm combo open-end wrench) Touch-up paint Spare fuses (for battery) Assembly will take about an hour
MY BIKE WHAT TYPE OF BIKE SHOULD I RIDE?
 MY BIKE WHAT TYPE OF BIKE SHOULD I RIDE? The is a ride for everyone with kilometres of roads perfect for uninterrupted touring. The route will follow roads that are all sealed tarmac - the bitumen is good
Assembly Tools. Assembly will take 1-2 hours
 Assembly Tools Included in your parts box: Pedals Quick release skewer Reflectors (if not already installed) Toolkit (4+5mm combo Allen wrench, 13+15mm combo open-end wrench) Helpful Tools: Scissors (for
Rothan Owner s manual
 Rothan Owner s manual www.islabikes.co.uk 1. Brake levers 2. Brake pads 3. Saddle 4. Seatpost 5. Seatpost clamp 6. Stem 7. Stem bolts 8. Headset 9. Headset spacers 10. Headset adjuster bolt 11. Handlebars
TB Title: Mountain Bike Maintenance Part 1 of 2
 Technical Brief No.: TB-09-0528 Title: Mountain Bike Maintenance Part 1 of 2 For many New England mountain bikers and other cyclist, spring is that time of the year to make sure your bike is safe and ready
Bicycle Noise Diagnosis
 Bicycle Noise Diagnosis Bottom bracket noise is a common complaint but most times the noise could be coming from another area on the bicycle. Noises that are telegraphing through the frame often sound
Trike-Bike Assembly Manual
 Be sure to check our website for more instruction details, videos and photographs as well as a complete listing of each Nut and Bolt for the Trike Bike. www.trike-bike.com.au Go to the page marked ASSEMBLY
Oversized Pulley Wheel System for SRAM etap Mounting & Maintenance
 Oversized Pulley Wheel System for SRAM etap Mounting & Maintenance Congratulations with your new CeramicSpeed Oversized Pulley Wheel System for SRAM etap Personally, I want to thank you for joining the
SANTA CRUZ BICYCLES Cable Routing Procedure MY17
 SANTA CRUZ BICYCLES Cable Routing Procedure MY17 Copyright Santa Cruz Bicycles 2017 TABLE OF CONTENTS SAFETY INSTRUCTIONS... 3 CABLE ROUTING... 3 INTRODUCTION...3 TOOLS AND SUPPLIES...3 REAR DERAILLEUR
DM-RCWH (English) Dealer's Manual. ROAD MTB Trekking. City Touring/ Comfort Bike. Wheel Set. WH-RX31 SM-AX x12 SM-AX x12
 Dealer's Manual. ROAD MTB Trekking. City Touring/ Comfort Bike. Wheel Set. WH-RX31 SM-AX x12 SM-AX x12") (English) DM-RCWH001-00 Dealer's Manual ROAD MTB Trekking City Touring/ Comfort Bike URBAN SPORT E-BIKE Wheel Set WH-RX31 SM-AX720-100x12 SM-AX720-142x12 CONTENTS IMPORTANT NOTICE... 3 TO ENSURE SAFETY...
(English) DM-RCWH001-00 Dealer's Manual ROAD MTB Trekking City Touring/ Comfort Bike URBAN SPORT E-BIKE Wheel Set WH-RX31 SM-AX720-100x12 SM-AX720-142x12 CONTENTS IMPORTANT NOTICE... 3 TO ENSURE SAFETY...
Shimano Di2 Installation on S5
 Installing Shimano Dura Ace Di2 Shifting Systems Note these instructions and pictures are for assembling the Shimano Dura Ace Di2 system (Internal Spec) on the Cervélo S5 frame. The Shimano Ultegra Di2
ASSEMBLY GUIDE TRUE GRIT. LaufCycling.com
 ASSEMBLY GUIDE TRUE GRIT LaufCycling.com Congratulations on your True Grit! We understand you are in a hurry to go riding a.s.a.p. - but please take a deep breath and read this installation guide first.
Safety manual Beinn 20/24/26
 Safety manual Beinn 20/24/26 Thank you for buying an Islabike! Your bike has been thoroughly checked and adjusted prior to delivery but there are a few tasks to perform before the bike is ready to ride:
Item N o.: Item N am e:southern Star 40cm Girls Cherry Bike
 Item N o.:42174868 Item N am e:southern Star 40cm Girls Cherry Bike Tighten them so they do not move and are horizontal. Check the handlebar is in good condition and the ends of the handlebar are
R5 RIM MANUAL EN. Version 1 I
 R5 RIM MANUAL EN Version 1 I 28.04.2017 TABLE OF CONTENTS Introduction...1 Frame Features...2 Fork Preparation...3 Small Parts...5 Frame Preparation...6 Mechanical Cable Routing...7 Electric Cable Routing...9
DM-MBRD (English) Dealer's Manual. ROAD MTB Trekking. City Touring/ Comfort Bike. Rear Derailleur SLX RD-M7000 DEORE RD-M6000
 Dealer's Manual. ROAD MTB Trekking. City Touring/ Comfort Bike. Rear Derailleur SLX RD-M7000 DEORE RD-M6000") (English) DM-MBRD001-04 Dealer's Manual ROAD MTB Trekking City Touring/ Comfort Bike URBAN SPORT E-BIKE Rear Derailleur SLX RD-M7000 DEORE RD-M6000 CONTENTS IMPORTANT NOTICE... 3 TO ENSURE SAFETY... 4
(English) DM-MBRD001-04 Dealer's Manual ROAD MTB Trekking City Touring/ Comfort Bike URBAN SPORT E-BIKE Rear Derailleur SLX RD-M7000 DEORE RD-M6000 CONTENTS IMPORTANT NOTICE... 3 TO ENSURE SAFETY... 4
Serial number. Cnoc Owner s manual.
 Serial number Please make a record of your serial number. This is a combination of letters and numbers unique to your bike stamped to the underside of the frame. This is required by police and insurance
Luath Owner s manual.
 Luath Owner s manual www.islabikes.com www.islabikes.com Setting up your Luath 3 11 7 12 1 16 14 6 4 5 8 9 10 13 15 2 21 19 20 22 23 17 18 Serial number Please make a record of your serial number. This
Front derailleur. Dealer's Manual SORA FD-R3000 FD-R3030 CLARIS FD-R2000 FD-R2030. ROAD MTB Trekking. City Touring/ Comfort Bike DM-RBFD001-01
 (English) DM-RBFD001-01 Dealer's Manual ROAD MTB Trekking City Touring/ Comfort Bike URBAN SPORT E-BIKE Front derailleur SORA FD-R3000 FD-R3030 CLARIS FD-R2000 FD-R2030 CONTENTS IMPORTANT NOTICE... 3 TO
ebike: EB01 and EB02 OPERATING MANUAL
 ebike: EB01 and EB02 OPERATING MANUAL IMPORTANT SAFEGUARDS: IMPORTANT: READ ALL INSTRUCTIONS BEFORE USE. RETAIN INSTRUCTIONS FOR FUTURE REFERENCE. WARNING: Basic safety precautions should always be observed
DM-RD (English) Dealer s Manual. ROAD Rear Derailleur RD-9000 RD-6800 RD-5800 RD-4700
 Dealer s Manual. ROAD Rear Derailleur RD-9000 RD-6800 RD-5800 RD-4700") (English) DM-RD0003-09 ROAD Rear Derailleur Dealer s Manual RD-9000 RD-6800 RD-5800 RD-4700 CONTENTS IMPORTANT NOTICE...3 TO ENSURE SAFETY...4 LIST OF TOOLS TO BE USED...6 INSTALLATION...8 Chain length...
(English) DM-RD0003-09 ROAD Rear Derailleur Dealer s Manual RD-9000 RD-6800 RD-5800 RD-4700 CONTENTS IMPORTANT NOTICE...3 TO ENSURE SAFETY...4 LIST OF TOOLS TO BE USED...6 INSTALLATION...8 Chain length...
Rear Drive System SERVICE INSTRUCTION. Specifications SI-R670B
 - SERVICE INSTRUCTION SI-R670B t Rear Drive System Before use, read these instructions carefully, and follow them for correct use. In order to realize the best performance, we recommend that the following
INSTRUCTION GUIDE TRANSITION CARBON (ALL MODELS)
") INSTRUCTION GUIDE TRANSITION CARBON (ALL MODELS) THIS INSTRUCTION GUIDE CONTAINS IMPORTANT INFORMATION. PLEASE READ CAREFULLY AND STORE IN A SAFE PLACE. Congratulations! The Specialized bicycle you have
INSTRUCTION GUIDE TRANSITION CARBON (ALL MODELS) THIS INSTRUCTION GUIDE CONTAINS IMPORTANT INFORMATION. PLEASE READ CAREFULLY AND STORE IN A SAFE PLACE. Congratulations! The Specialized bicycle you have
MANUAL LEKKER BIKES 2016
 MANUAL LEKKER BIKES 2016 CONTACT For your own safety, never do work on your bicycle unless you feel absolutely sure about it. If you are in doubt or if you have any questions please contact our helpdesk:
SERVICE CALL TOLL FREE Monday - Friday 8:00 a.m. to 5:00 p.m. Pacific Standard Time
 SERVICE CALL TOLL FREE 800-222-5527 Monday - Friday 8:00 a.m. to 5:00 p.m. Pacific Standard Time 2 Congratulations on the purchase of your new Raleigh bicycle! With proper assembly and maintenance it will
Mini Glider Manual. Your Glider comes partially assembled. The front wheel and the handlebars require assembly.
 Mini Glider Manual Congratulations on your purchase of the Mini Glider! Your glider is designed for years of nearly carefree use by your child. These instructions include how to set up your glider and
Owner s Manual for Multi Speed & Freewheel Bicycles This Owner's Manual contains assembly, operation, and maintenance instructions.
 Your Model Number is: (write your model number here) Owner s Manual for Multi Speed & Freewheel Bicycles This Owner's Manual contains assembly, operation, and maintenance instructions. WARNING: - Check
Changing Out the Rear Hub and Sprocket on a 2012 Morgan Three Wheeler Calum Fraser 17/07/2015
 Intro The early Three Wheelers had the rear sprocket in a stepped arrangement relative to the front sprocket with the belt overhanging the sprocket on the outside face. While this is probably less of a
R5 DISC MANUAL EN. Version 1 I
 R5 DISC MANUAL EN Version 1 I 30.04.2017 TABLE OF CONTENTS Introduction...1 Frame Features...2 Fork Preparation...3 Small Parts...5 Frame Preparation...6 Brake Housing Installation...7 Mechanical Cable
Thumb Shifter Plus Thumb Shifter
 (English) DM-SL0004-01 Dealer's Manual Thumb Shifter Plus Thumb Shifter Thumb Shifter Plus SL-FT55 SL-TX50 SL-TX30 Thumb Shifter SL-TZ20 IMPORTANT NOTICE This dealer's manual is intended primarily for
FRAME FEATURES TABLE OF CONTENTS INTRODUCTION. A guide to your Cervélo C Series frame.
 C SERIES MANUAL TABLE OF CONTENTS Introduction...1 Frame Features...2 Fork Preparation...3 Small Parts...5 Frame Preparation...6 Brake Housing Installation...7 Mechanical Cable Routing...9 Electric Cable
Ladies Shopper Bike Assembly Manual 28C03
 Ladies Shopper Bike Assembly Manual 28C03 Ecosmo Ltd 1 Know your bike 1. Wheel 2. Rear Derailleur 3. Chain 4. Crank Set 5. Pedal 6. Seat Quick Lock 7. Saddle and Post 8. Frame 9. Front Light 10. Front
DM-RARD (English) Dealer's Manual. ROAD MTB Trekking. City Touring/ Comfort Bike. Rear Derailleur DURA-ACE RD-R9100 ULTEGRA RD-R8000
 Dealer's Manual. ROAD MTB Trekking. City Touring/ Comfort Bike. Rear Derailleur DURA-ACE RD-R9100 ULTEGRA RD-R8000") (English) DM-RARD001-03 Dealer's Manual ROAD MTB Trekking City Touring/ Comfort Bike URBAN SPORT E-BIKE Rear Derailleur DURA-ACE RD-R9100 ULTEGRA RD-R8000 CONTENTS IMPORTANT NOTICE... 3 TO ENSURE SAFETY...
(English) DM-RARD001-03 Dealer's Manual ROAD MTB Trekking City Touring/ Comfort Bike URBAN SPORT E-BIKE Rear Derailleur DURA-ACE RD-R9100 ULTEGRA RD-R8000 CONTENTS IMPORTANT NOTICE... 3 TO ENSURE SAFETY...
Warning: Please read this entire manual before riding your Simbi. Failure to do so could result in serious injury or even death.
 Warning: Please read this entire manual before riding your Simbi. Failure to do so could result in serious injury or even death. Contents 1. OVERVIEW... 3 A. Thank You... 3 B. General Warning... 3 C. Important
2,500/4,000 LB Easy Riser Vertical Cable Feighner Lift
 2,500/4,000 LB Easy Riser Vertical Cable Feighner Lift CAUTION - PUT SAFETY FIRST 1. Before attempting to install or operate this lift, study and fully understand the proper operating procedures and safety
REPLACING THE AFT RUDDER CABLES
 REPLACING THE AFT RUDDER CABLES Note: You must have the assistance of a qualified Aircraft Mechanic to perform this procedure. A logbook entry with the mechanics signature is required. Please read these
Chain Installation Guide
 Chain Installation Guide How to Install Chain Reasons for installing a new chain: 1 Extend the life of your gears and overall drivetrain 2 Better Performance 3 Safety Installation You will need: Chain
Beinn 29 Owner s manual
 Owner s manual Setting up your 4 13 8 12 1 14 15 19 16 7 5 6 5 22 20 9 10 11 21 2 3 1. Brake levers 2. Brake calipers 3. Rotors 4. Saddle 5. Seatpost 6. Seatpost clamp 7. Saddle clamp 8. Stem 9. Stem bolts
FREQUENTLY ASKED QUESTIONS ANSWERED! MOUNTING TO MY BIKE
 FREQUENTLY ASKED QUESTIONS ANSWERED! MOUNTING TO MY BIKE Will a Rohloff hub work on my bike? It is likely that the Rohloff hub will work on your bike as there are number of different hub configurations,
Nexus. Dealer's Manual. ROAD MTB Trekking. City Touring/ Comfort Bike SG-3R40 SG-3R45 SG-3R75 SG-3R75-A SG-3R75-B SG-3D55 SG-3C41
 (English) DM-SG0005-01 Dealer's Manual ROAD MTB Trekking City Touring/ Comfort Bike URBAN SPORT E-BIKE Nexus SG-3R40 SG-3R45 SG-3R75 SG-3R75-A SG-3R75-B SG-3D55 SG-3C41 SL-3S35-E SL-3S41-E SL-3S42-E SM-BC03
Shifting Lever. Dealer's Manual. RAPIDFIRE Plus SL-M2000 SL-M3010 SL-M4010. Thumb Shifter SL-TZ500. ROAD MTB Trekking. City Touring/ Comfort Bike
 (English) DM-MDSL001-01 Dealer's Manual ROAD MTB Trekking City Touring/ Comfort Bike URBAN SPORT E-BIKE Shifting Lever RAPIDFIRE Plus SL-M2000 SL-M3010 SL-M4010 Thumb Shifter SL-TZ500 CONTENTS IMPORTANT
BIKE CHAIN BASICS. Figure 1 - Two different sizes of bicycle chain
 BIKE CHAIN BASICS Figure 1 - Two different sizes of bicycle chain When creating your own human powered vehicles, a chain drive will likely be your chosen power transfer system, as it is an inexpensive,
It's Not Rocket Science, It's Bicycle Maintenance
 TECM 2700.011 It's Not Rocket Science, It's Bicycle Maintenance A Comprehensive Bicycle Maintenance Manual for All Riders Patrick Doran, Bryan Hayes, Ashley Huffman, Corbin Sheridan 4/18/2012 It's Not
ROAD wheel set. Dealer's Manual DURA-ACE WH-R9100-C24-CL WH-9000 ULTEGRA WH-6800
 (English) DM-WH0002-11 Dealer's Manual ROAD MTB Trekking City Touring/ Comfort Bike URBAN SPORT E-BIKE ROAD wheel set DURA-ACE WH-R9100-C24-CL WH-9000 ULTEGRA WH-6800 Non-Series WH-RS81 WH-RS61 WH-RS31
Bicycle Owner s Manual
 Bicycle Owner s Manual The following manual provides assembly and maintenance instructions, as well as a guide to safe usage of your new bicycle. WARNING Read the complete Owner s Manual before starting
Beinn Owner s manual.
 Beinn Owner s manual www.islabikes.com www.islabikes.com Setting up your Islabike You can view our how to set up your Beinn video guides on the Islabikes YouTube channel. Or follow the steps in this booklet...