F O R YO U R F R EE GIFT!*
|
|
|
- Logan Sutton
- 5 years ago
- Views:
Transcription


1


2 REGISTER ONLINE F O R YO U R F R EE GIFT!* Scan the code to go the website and register in no time or checkout... *For full terms and conditions see website. IMPORTANT INFORMATION BYK Model: Serial Number: Purchase Date: Dealer: Keep this information in a safe place as a reference for service, warranty or insurance.
3 INTRODUCTION Congratulations on the purchase of your new Byk bicycle. To help you get the most enjoyment and performance out of your Byk, we have prepared this manual as your guide to its proper use and maintenance. We encourage you to read it carefully and completely before riding your bicycle for the first time, paying special attention to the cautions for your own personal safety. While you will find this manual full of helpful and informative advice, it is not meant to be a comprehensive instruction on the workings and assembly of a bicycle. If you are interested in learning more about your bicycle, then you should read one of the many excellent books available on bicycle repair and maintenance. Your local bicycle shop is also a good source of information. Some bicycle adjustments and maintenance procedures, especially those involving brakes, chain tension and all bearings, do require knowledge, experience and mechanical ability. For your own protection, we continually warn you throughout this manual against making any adjustments to your bicycle that are beyond your ability. If your bicycle develops a problem, or if you are unsure of how to properly maintain it, take it to your Byk bicycle dealer. Your dealer is a professional bicycle mechanic and has the correct tools for making adjustments. Assembly instructions are no included in this owners manual as your Byk bicycle should come to you completely assembled and properly adjusted. It is your right to receive it in this condition. It is not possible to illustrate and describe in this manual all the different component brands that come with your Byk bicycle. However, we have carefully selected those component models that best represent that type of component. If you should have any questions concerning the particular components on your bicycle, your Byk dealer will be happy to answer them for you. Enjoy your B y k and if you should have nay problems, comments or questions, do not hesitate to contact your friendly Byk dealer.
4 WARNINGS Before you ride, be sure you familiarise yourself with all of the following safeguards. Failure to follow these warnings could result in serious injury to yourself or others and damage to your bicycle. Read this manual carefully and completely, paying particular attention to the cautions. Be sure the bicycle fits the intended user. Check that your bicycle is in proper operating condition. Special attention should be paid to brakes, chain tension, wheels and tyres and all nuts and bolts. Be sure you understand how to operate your bicycle and its controls. Always wear a helmet while riding Wear bright or light coloured clothing or a vest with reflectors so that you can easily be seen. Know and obey traffic laws. Your bicycle is a vehicle and subject to the same rules as motor vehicles. Always ride single file and with the traffic, never against it. Maintain a steady course. Do not weave in and out of the traffic or make a sudden swerve. Exercise caution when making tight turns. You could fall if your foot catches in the front wheel. Use proper hand signals to warn others road users, other cyclists and pedestrians of your intention to stop or turn. Never carry riders or packages which may inhibit your control of the bicycle or obstruct your view. Do not stunt ride or hitch a free ride on a truck or car. Remember braking distances increase in wet conditions. Ride more slowly, be alert, and apply your brakes sooner than you would under dry conditions. Always ride defensively. Watch for car entering traffic or doors of parked cars opening. Beware of common road hazards such as broken glass, storm drains, pot holes, pedestrians, dogs and cats, and railroad crossings. Never ride at night without reflectors and a proper lighting system. Do not tamper with or physically alter your bicycle frame in any way. If you fail to observe this warning you ay seriously harm the structural integrity and/or longevity of your frame which could lead to a serious accident. The guarantee on your frame will also be voided if the frames has been tampered with or altered.
5 TABLE OF CONTENTS You should read this manual Owner s information and responsibility What kind of bicycle is it? What is it called? Section 1: Safety Precautions 1.1 Fitting your bicycle for a safe ride Safety check before riding your bicycle Safety equipment and sensible riding Section 2: How things work Section 3: Service and Basic Maintenance 3.1 Maintaining your bicycle Monthly service chart Additional Information: Helpful hints, Special Instructions and Warranty 4.1 About your bicycle retailer Special instructions for care of carbon fibre bicycles Tools and bicycle assembly Lock your bicycle Keep a record of your bicycle Troubleshooting chart Bicycle record chart Acknowledgments This manual has been developed by BIA Ltd. Illustrations reproduced courtesy of BIA member Companies. The information contained in this Manual complies with relevant Australian Standards at the time of printing. This Manual may not be reproduced without the express and written permission of BIA Ltd. Bicycle Industries Australia Ltd. ABN Bicycle Industry of Australia on the Web: BICYCLE INDUSTRIES AUSTRALIA LTD PAGE 1
6 YOU SHOULD READ THIS MANUAL Your bicycle is legally a vehicle. It can be ridden on roads mixing with other traffic. You need to know about certain legal and common sense requirements for the enjoyable, safe and trouble free use of your bicycle. OWNER S INFORMATION AND RESPONSIBILITY To reduce the risk of serious personal injury, you should read the instructions in this manual carefully. There are warnings throughout this manual. Follow all warning instructions. Don t risk injury, mechanical failure or damage. Your bicycle has been supplied fully assembled and adjusted ready for use. Return your bicycle for an initial service by your bicycle retailer to ensure correct functions of components. The owner or main rider is then responsible for normal maintenance of the bicycle to keep it in good operating condition. Know how to operate all standard and accessory equipment on the bicycle. Ensure that anyone who uses the bicycle has been fully instructed in the operation of bicycle functions. Your bicycle conforms to relevant Australian & New Zealand Standards. Other local regulations may apply. Check with your bicycle retailer. Many bicycle product manufacturers and suppliers provide additional information on Web sites. The Bicycle Industry in Australia Web site includes many useful links and other information at: The Cycling Promotion Fund offers hints and links at: BICYCLE INDUSTRIES AUSTRALIA LTD PAGE
7 WHAT KIND OF BICYCLE IS IT? Bicycles can be broadly categorised into five types: Road or Touring Mountain or Off Road Cross, Hybrid, City or Comfort BMX Freestyle Bicycles for younger riders use are generally scaled down versions of adult bicycles including the step through design. Other bicycles include tandems, recumbents and folding bicycles. Which type is your new bicycle? ROAD OR TOURING Typically has narrow tyres and drop handlebar. Variations include bicycles suited for touring, commuting, sports, and recreational riding. MOUNTAIN OR OFF ROAD The Mountain Bicycle is designed to give the rider maximum control and durability on a wide variety of harsh terrain. Everything about the Mountain Bicycle is more rugged. Its frame geometry provides maximum ground clearance and allows you to quickly and easily shift your weight to change the balance of the bicycle as terrain conditions demand. WARNING: Not all Mountain type bicycles are intended for off road or competition use. Check specifications and technical advice from your bicycle retailer before use. CROSS, HYBRID, CITY OR COMFORT Usually something of a mixture of characteristics of the Road and Mountain types but may include evolving frame shapes and components. Suited for general purpose riding BICYCLE INDUSTRIES AUSTRALIA LTD PAGE 3
8 BMX BMX, are general purpose bicycles for younger riders. The BMX type Bicycle is a versatile machine usually of 20 (510mm) or less sized wheels with wide section tyres, ideal for general purpose use by younger riders. WARNING: General purpose Freestyle and BMX bicycles are not designed for stunting, racing or competition use. FREESTYLE Modelled on a trick riding style machine, featuring 360 degree revolving handlebar/fork assembly, axle pegs and wide profile tyres. Using a freestyle type bicycle for trick or competition riding may void warranty. POWER ASSISTED BICYCLES Have characteristics and equipment which may require special instruction, adjustment, care and maintenance. Read carefully all instruction manuals. Ask your bicycle retailer for advice on maintenance, adjustments and repair. Unauthorised work may limit or void the warranty. FOLDING BICYCLES Designed for easy storage. May require special instruction before use. Ensure that all locking devices are correctly secured before riding a Folding bicycle. BICYCLE INDUSTRIES AUSTRALIA LTD PAGE
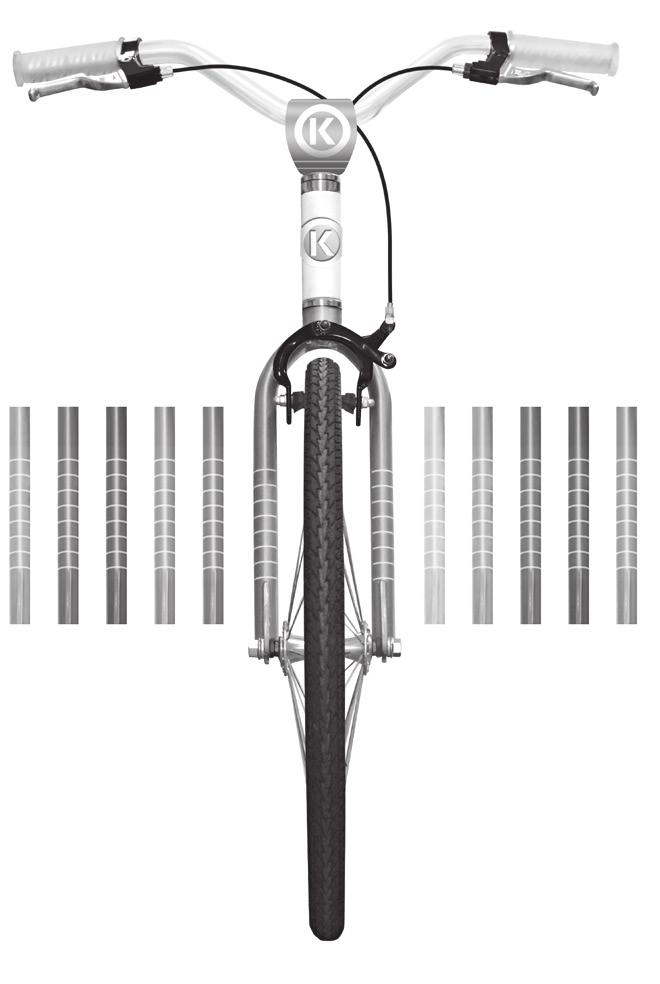
9 WHAT IS IT CALLED? Although bicycle components vary in design, weight and method of use, basically all bicycles are the same. A bicycle is made up of a frame, wheels, drive train, brakes, stem, handle bars and saddle. Frames must show a makers ID label. Familiarise yourself with the bicycle s terminology; it will make basic maintenance instructions much easier to follow. TYPICAL PARTS OF A BICYCLE NOTE: not all components nor all bicycle types are shown. WARNING: Handlebar handgrips or tube-end plugs should be replaced if damaged. Unprotected tube-ends can cause injury. Bicycles used by children should especially be checked to ensure bar end handgrips are in good condition BICYCLE INDUSTRIES AUSTRALIA LTD PAGE 5
10 FOR ALL TYPES Where a suspension unit, disk and / or hydraulic brake units, multi-gear hub, electric gear changing system, etc, are fitted, consult manufacturers specification and warranty documents. For correct selection and repair advice, ask your bicycle retailer. Unauthorised work may limit or void a product warranty. 1. SAFETY PRECAUTIONS 1.1 FITTING YOUR BICYCLE FOR A SAFE RIDE To ride safely and comfortably a bicycle and its equipment must be matched properly to the size and skills of the rider. FITTING FOR LEG LENGTH FRAME SIZE RIDER LEG LENGTH MAKE SURE THE BICYCLE FITS A bicycle that is too big or too small for the rider is hard to control and can be uncomfortable. If your bicycle does not fit properly, you may lose control and fall. BICYCLE INDUSTRIES AUSTRALIA LTD PAGE
11 SADDLE HEIGHT To ride comfortably and pedal efficiently, it s very important to have the saddle at the correct height. Your leg length determines the correct saddle height. The saddle is at the correct height for you when, while seated on the saddle, your knee is slightly bent when the crank is at the maximum down stroke (pedal is closest to the ground). To adjust the saddle height, loosen the seat binder bolt (A) or the quick release (B) and move the seat post up or down as required. Make sure that the saddle is parallel to the top tube of the bicycle. Retighten the seat post tight enough so that you cannot twist the saddle out of alignment. A loose seat post will allow the saddle to turn or slip and may cause you to lose control and fall. Therefore: 1. Ask your bicycle retailer to help you make sure you know how to correctly clamp your seat post. 2. Before you ride the bicycle, first check that the seat post is securely clamped. Under no circumstances should the seat post project from the frame beyond its Minimum Insertion or Maximum Extension mark. WARNING: do not replace the seat post with a post which is: A) not of the same diameter or B) longer than the original. Either will void the warranty and could lead to seat post failure, loss of rider control and injury. HANDLEBAR HEIGHT AND ANGLE After you have set the saddle height and tilt, adjust the handlebar for a safe and comfortable ride. Ask your bicycle retailer for advice BICYCLE INDUSTRIES AUSTRALIA LTD PAGE 7
12 WARNING: Under no circumstances should the head stem be retightened with its Minimum Insertion or Maximum Extension mark visible. Threadless headset. DO NOT over tighten the two securing bolts. If unsure, consult your bicycle retailers. If the front brake cable is attached to the handlebar stem moving the stem up or down will require a readjustment of the brake. If in doubt, ask your bicycle retailer to make the adjustment. CONTROLS POSITION ADJUSTMENT The brake and shifting controls on your bicycle are positioned where they work best for most riders. The angle of the controls and the position on the handlebars can be changed. Ask your bicycle retailer to make the adjustments for you. WARNING: Front wheel brake lever must be mounted on the right hand side; rear brake lever on the left hand side. HAND BRAKE LEVER REACH Many bicycles have brake levers which can be adjusted for reach. If you have small hands and find it difficult to squeeze the brake levers, your bicycle retailer can either adjust the reach or fit shorter reach brake levers. BICYCLE INDUSTRIES AUSTRALIA LTD PAGE
13 1.2 SAFETY CHECK BEFORE RIDING YOUR BICYCLE Check and tighten any loose nuts, bolts and straps. If you re not sure, ask your bicycle retailer to check. Tyres correctly inflated? Check by pushing down with your thumb on the top of the tyre. The tyre should depress slightly. Compare to how it feels when you know the tyres are correctly inflated. Replace damaged tyres before they puncture. Wheels true? Spin each wheel and check for brake clearance and side-to-side wobble. If a wheel wobbles or hits the brake pads, take the bicycle to your bicycle retailer. Brakes: Check that the brakes operate effectively. QUICK RELEASES Are the front wheel, rear wheel and seat post quick releases properly adjusted and in the locked position? Check all quick release mechanisms are correctly and securely closed. CHECK LIGHTS AND REFLECTORS Working Correctly aligned HANDLEBAR AND SADDLE Are the handlebar and saddle system: horizontal? tight enough so they won t twist? handlebars secure, good condition? handle bar ends plugged? Is a bell fitted and working? Any broken or worn parts should be replaced before the bicycle is used BICYCLE INDUSTRIES AUSTRALIA LTD PAGE 9
14 Certain activities may damage your bicycle and result in serious personal injury. Take these precautions: avoid jumping kerbs avoid potholes and gratings avoid stunt riding and jumping WARNING: Do not remove protective safety equipment fitted to your bicycle, including handlebar end covers or plugs; reflectors fitted to frame, wheels and pedals; reflector mount brackets (where cantilever brakes are fitted); front chain ring guard; rear wheel spoke protector (right hand side); chain guard where fitted; warning stickers affixed to frame. NOTE: A replacement fork must be the same length and maintain the same rake and trail characteristics as the original. Ask your bicycle retailer for advice. 1.3 SAFETY EQUIPMENT AND SENSIBLE RIDING As a road user you have responsibility for your own safety and the safety of others. You need to know: the road rules how to ride safely YOUR BICYCLE Check your bicycle before you use it. (Use the safety check 1.2 including the adjustments). BICYCLE INDUSTRIES AUSTRALIA LTD PAGE
15 YOUR BICYCLE (CONT) Know how to work all bicycle controls. For riding in low light and night conditions, fit your bicycle with appropriate front and rear lamps. WARNING: Check reflectors and mounting brackets regularly to make sure that they are clean, straight, unbroken and securely mounted. Equip your bicycle with lights: white front and red rear. Riding in low light or at night time without reflectors and lights is extremely dangerous. YOUR CLOTHING Wear a correctly fitted and fastened Approved helmet. Be seen: wear brightly coloured clothes - yellow, green and orange are best for day, reflective tape improves the conspicuity of riders at night. Wear shoes. Do not wear thongs or ride with bare feet BICYCLE INDUSTRIES AUSTRALIA LTD PAGE 11
16 WARNING: Always wear a correctly fitted and fastened helmet when riding your bicycle. BE ALERT Obey all road rules Watch out for other road and pathway users. Adapt your riding to suit the conditions. HOOK TURN This manoeuvre can assist in safer right hand turns at intersections. There are three steps to the hook turn: 1. Stay on the left, go straight ahead and cross the intersection. Stop on the other side of the intersection. 2. Swing your bike around to face the new direction. 3. Obey any traffic lights and complete your turn when it is safe. CARRYING LOADS Use correctly fitted carriers, racks, panniers or a back pack for parcels. RIDING IN THE WET Wet weather affects visibility for all road users. It is harder for you, and other vehicles, to stop in the wet. Allow more distance to brake. BICYCLE INDUSTRIES AUSTRALIA LTD PAGE
17 RIDING IN LOW LIGHT Riding when light levels are low: - use lamps and reflectors, - wear bright reflective clothing. BE RESPONSIBLE Follow the road rules. Use common sense. If riding in remote areas: go with a friend leave details of route and return time with a responsible person tell them when you get back! PARENTS Most cycling incidents involve small children and teenagers. Make sure: The bicycle is in good working order The rider knows: How to use the controls The road rules Clothing, helmet, lighting are appropriate for the bicycle trips undertaken. QUICK SAFETY SUMMARY obey all traffic laws be predictable be alert use reliable safety equipment use the bicycle for the manufacturer s recommended purpose adjust riding to traffic and weather conditions wear appropriate clothing Follow manufacturer s instructions for any adjustments BICYCLE INDUSTRIES AUSTRALIA LTD PAGE 13
18 2. HOW THINGS WORK It s important for your enjoyment and safety to know how things work on your bicycle. QUICK RELEASE (QR) MECHANISM The bicycle quick release allows wheel removal without the need for tools. WARNING: Riding with an improperly adjusted wheel quick release can allow the wheel to wobble or disengage from the bicycle, causing damage to the bicycle and risk of a crash. It is essential that you: Ask your bicycle retailer to show you how to install and remove your wheels safely. Use the correct technique for clamping your wheel in place with a quick release. Before you ride the bicycle, check that each wheel is securely clamped. The Wheel Quick Release is a long bolt called a skewer, with a lever on one end and a nut on the other, the wheel quick release uses a cam action to clamp a bicycle wheel in place. BICYCLE INDUSTRIES AUSTRALIA LTD PAGE
19 ADJUSTING THE QUICK RELEASE MECHANISM The wheel hub is clamped in place by the force of the Quick Release lever cam pushing against one dropout and pulling the adjusting nut using the skewer against the other dropout. Turning the adjusting nut CLOCKWISE will INCREASE the clamping strength of the lever. Turning the adjusting nut ANTI-CLOCKWISE will DECREASE the clamping strength of the lever. The full force of the cam action is needed to clamp the wheel securely. You cannot secure the quick release mechanism by twisting the adjusting nut. Never use the QR lever to wind up the mechanism. Tighten or loosen using the adjusting nut with the QR lever in the open position. FRONT WHEEL SECONDARY RETENTION DEVICES. Some bicycles have front forks which use a secondary wheel retention device to keep the wheel from disengaging if the axle nuts loosen. Some bicycle front forks have a shaped lug which acts to keep the wheel from disengaging if the axle nuts are loosened. To remove the wheel the axles nuts (or quick release mechanism) must be backed off far enough for the wheel to be removed. WARNING: Removing or disabling the secondary retention device is extremely dangerous, may void the warranty, and can lead to serious injury BICYCLE INDUSTRIES AUSTRALIA LTD PAGE 15
20 REMOVING THE FRONT WHEEL Cantilever and Linear brakes Release the Brake Quick Release. (This will allow the brakes to be opened to let the tyre pass between the brake blocks). Side pull brakes Release the Brake Quick Release. (This will allow the brakes to be opened to let the tyre pass between the brake blocks). Move the Wheel Quick Release Lever to the open position. If your bicycle is fitted with secondary retention devices unwind the Quick Release Lever enough to allow the wheel to be removed. If your front wheel is fitted with axle nuts instead of a Quick Release mechanism, use a spanner of the correct size to fit the axle nuts. Unwind the axle nut sufficiently to allow the secondary retention devices to release. Hold the front of the bicycle 30mm to 50mm off the ground to allow the wheel to be removed. INSTALLATION OF THE FRONT WHEEL The installation is the reverse procedure to Removing the Front Wheel, except: Make sure the wheel axle is correctly positioned in the fork (see diagram). Position the Quick Release parallel to the front fork when it is in the CLOSE position. This will prevent the lever being knocked open whilst riding. The Quick Release Lever is positioned on the left hand side. BICYCLE INDUSTRIES AUSTRALIA LTD PAGE
21 ADJUSTMENT NOTES If the Quick Release Lever can be easily pushed to the CLOSE position, the clamping strength is insufficient. Return the lever to a position at right angles to the fork. Turn the Adjusting Nut clockwise to increase the clamping strength. Push the lever back to the CLOSE position to check the clamping strength. You will need a reasonable amount of force to CLOSE the lever to ensure the adjustment is correct. NOTE: If you are not sure of any of these steps or how the quick release mechanism operates ask your bicycle retailer. REMOVING THE REAR WHEEL Set the rear gear lever so that the chain can be moved to the smallest cog. Release the Brake Quick Release (see Removing the Front Wheel) If fitted with axle nuts, use the correct spanner to loosen the axle nuts enough to allow the wheel to be removed. If fitted with a Quick Release Lever, move the lever into the OPEN position. This allows the wheel to be removed. Lift the bike off the ground 30-50mm, push the wheel forward and down until it comes out of the dropouts BICYCLE INDUSTRIES AUSTRALIA LTD PAGE 17
22 INSTALLING THE REAR WHEEL Installation is the reverse procedure of removing the rear wheel. NOTE: Make sure that the chain is on the small cog as you position the rear wheel in the dropouts. Check that you have the correct clamping pressure (Quick Release Lever). If you have axle nuts make sure they are tightened correctly. Ensure that the Quick Release Lever is positioned as shown to prevent the lever from releasing whilst riding. When repositioning the wheel in the frame make sure that it is centrally located to prevent rubbing of the wheel on the frame. WARNING: Failure to properly reinstall a wheel may result in a crash. SEAT POST QUICK RELEASE Many bicycles are equipped with quick release seat post clamps. The seat post quick release clamps work exactly like the Wheel Quick Release. See Adjusting the Quick Release Mechanism. Follow the steps described to adjust the height of your seat post. WARNING: The full force of the cam action is needed to clamp the seat post securely. BICYCLE INDUSTRIES AUSTRALIA LTD PAGE
23 OTHER SEAT POST FIXINGS An Allen Key Bolt or a nut is used. You must use the correct type of tool to make adjustments. The Seat Post must be inserted in the seat tube to at least the minimum insertion point. Ensure indexing lug on the seat post clamp bolt is correctly engaged in the seat tube clamp. BRAKES The braking action of a bicycle is a function of friction between brake surfaces, usually the brake blocks and the wheel rims. Keep your wheel rims and brake blocks clean and free of lubricants, waxes or polishes. Make sure that your hands can reach and squeeze the brake levers comfortably. Most bicycles are fitted with front and rear hand brake levers and these are attached to either CANTILEVER CALIPERS, SIDE PULL CALIPERS, DISK or LINEAR BRAKES. When replacing both brake cables check that the left hand cable is fitted to the rear brake when looking from the riding position. To adjust chain tension on a bicycle fitted with a back pedal brake or internally geared hub with a single freewheel cog, the back wheel must be moved forward or backward in the dropouts. Loosen the axle nuts and brake arm clip. Allow 10-12mm of up/ down chain movement halfway between chainring (front) and cog (rear). Re-tighten nuts and brake arm clip. For back pedal brakes: check that the brake arm clip is securely attached to the chain stay BICYCLE INDUSTRIES AUSTRALIA LTD PAGE 19
24 WARNING: Careless use of the front brake first can cause a crash. Note: Most brakes have some form of quick release mechanism to allow the brake shoes to clear the tyre when a wheel is removed or reinstalled. When the brake quick release is in the open position, the brake will not operate. Ask your bicycle retailer for help. Make sure you understand the way the brake quick release works on your bicycle. BRAKE ADJUSTMENT CANTILEVER TYPE BRAKES You should have approximately 2mm clearance between the brake blocks and the wheel rim. To adjust the brakes, on the brake lever turn the barrel adjuster CLOCKWISE to loosen the brake. Move the adjuster ANTI-CLOCKWISE to tighten the brake. Turn the lock ring located below the barrel until it stops to set your adjustments. If your brakes shudder/squeal you need to check the toe in/out alignment of the brake blocks. The leading edge of the block should be 0.5-1mm, closer to the wheel rim than the trailing edge. To centre the brake arms, loosen the cable carrier nut, slide the cable carrier up or down until it centres the brake blocks (so there is an even gap on either side of the rim). Retighten the cable carrier nut. Spin the wheel to ensure the brake blocks, do not rub on the wheel rim. BICYCLE INDUSTRIES AUSTRALIA LTD PAGE
25 Use the springforce adjustment screw to change toe in/out position. Using an Allen key turn CLOCKWISE to move the brake pad trailing edge out. Turn the Allen key ANTI-CLOCKWISE to move the brake pad trailing edge in. LINEAR TYPE BRAKES A Linear brake arm might have a post type brake block (as for a Cantilever brake) or a block which can only be adjusted for toe-in and block-to-rim alignment, in which case brake block-to-rim clearance is adjusted by changing the brake cable length at the brake arm or at the brake lever cable adjuster. Ask your bicycle retailer how to make the correct adjustment. To release a Linear brake press the brake arms together and unclip the cable lead unit (curved metal tube) from the pivotted metal stirrup. The brake cable remains attached to the opposite brake arm. If the cable lead unit and cone shaped ferrule cannot be unclipped either slacken the cable at the brake lever (using the cable adjuster) or release the cable end which is attached to the brake arm. NOTE: Allow sufficient travel in the brake lever and cable to enable the curved cable lead tube to be unclipped from the stirrup. To reset the cable lead tube press the brake arms together and re-clip into the pivotted metal stirrup. IMPORTANT: Ensure the cone shaped ferrule is fully seated in the stirrup. Ensure the protective flexible bellows or accordion-like cable protector between the brake arm and the stirrup is correctly located BICYCLE INDUSTRIES AUSTRALIA LTD PAGE 21
26 LINEAR BRAKE (CONT) Brake lever travel can be adjusted for ease of use by a child or anyone with small hands by means of the adjuster screw usually located on the body of the brake lever. NOTE: a brake lever with too little travel before hitting the handlebar may cause a linear brake to lock up if the lever is pulled on hard. Longer lever travel allows more progressive and better controlled braking. Adjust to suit your riding style, or ask your bicycle retailer to assist you make the correct adjustment. NOTE: all components of a linear brake must be compatible. Do not mix brake types. The brake lever for a linear brake is not designed to work with other types. SIDE PULL TYPE BRAKES (ROAD BICYCLES) When your side pull brake caliper is properly adjusted, you should have between 1-2mm gap between the brake block and the wheel rim. To centre the brake caliper use the centering adjustment screw to centre the brakes. Turn the screw CLOCKWISE to move the caliper to the right. Turn the screw ANTI-CLOCKWISE to move the caliper to the left. To set the gap between the blocks and the wheel rim use the Cable Adjustment Bolt. Turn the Adjustment Bolt CLOCKWISE to move the brake block away from the rim. Turn the Adjustment Bolt ANTI-CLOCKWISE to move the brake block towards the rim. Tighten the Cable Adjustment Bolt Lock Nut in a CLOCKWISE direction to set your adjustment. BICYCLE INDUSTRIES AUSTRALIA LTD PAGE
27 If your brakes shudder/squeal you need to adjust the toe in/out. As you need to realign the caliper arms to overcome this problem, your dealer should make this adjustment to your bike. DISK STYLE BRAKES The distinctive feature of disk brakes is the actual braking disk that is fixed to the wheel and the caliper unit attached to the front fork or rear wheel frame. The brake is activated either by a cable or hydraulic system. Disk brake systems require special care of the disk itself, which can even be damaged by some bicycle parking racks. Hydraulic systems may require special tools and adjustments. If in doubt about any adjustments or maintainance consult your bicycle retailer or the manufacturer s manual or specifications data. Some brands provide technical data on their websites. WARNING: Failure to properly maintain your brake system may result in a crash. The brake Quick Release mechanisms are used to open the brake arm to assist in the removal / installation of wheels. The brakes will not function if the Quick Release is left open. WARNING: Failure to firmly secure the Brake Quick Release Mechanism may cause a crash BICYCLE INDUSTRIES AUSTRALIA LTD PAGE 23
28 THE DERAILLEUR GEAR SYSTEM The gear system on your bicycle consists of: A rear cluster (freewheel) which is attached to the rear wheel. A rear derailleur which moves the chain across the cluster to change the gear ratio. A front derailleur which moves the chain between the front chain rings to change the gear ratio. Gear levers which, when moved, change the gears. Control cables which attach the gear levers to both the front and rear derailleurs. A chain. INTERNAL GEARED HUB If your bicycle is fitted with a multi speed internal geared rear hub it may require special instruction for correct use, adjustment, care and maintenance. Read carefully the instruction manual supplied with your bicycle. Ask your bicycle retailer for advice on use and maintenance of an internal geared hub. NOTE: Unauthorised work may limit or void the warranty. The purpose of derailleurs is to move from one sprocket to another to allow for a variety of gear ratios. These ratios allow the rider to maintain a constant pedal revolution in a variety of road and speed conditions. Ask your bicycle retailer for advice. BICYCLE INDUSTRIES AUSTRALIA LTD PAGE
29 SHIFTING GEARS Identify your gear levers from the diagrams. Mountain / Cross bicycles have handlebar mounted shifters. Road bikes use various types of shifters, these can include Integrated Brake and Gear Levers, rotating handlebar grip shift systems or other variants. Ask your bicycle retailer to explain the gear changing procedure. Practice changing gears to gain confidence. For smooth operation of all types of levers you must be pedalling forwards when changing gears. NOTE: Some bicycles have gear levers mounted on the down tube (see diagram) of the frame. Using this type of mounting requires practice. WARNING: Pedalling backwards whilst changing gears can jam the chain causing damage to your bicycle and/or a crash. FRICTION GEAR SHIFT LEVERS Friction levers are stopless and hold the derailleur in place with simple force (tension). The amount of friction can be adjusted by means of the screw on top of the lever assembly. If derailleur gears on your bicycle are indexed, each time you move the gear lever one click the derailleur travels a set distance to engage the next gear. This enables you easier and more accurate gear changing BICYCLE INDUSTRIES AUSTRALIA LTD PAGE 25
30 The gear shift principle: The right hand lever operates the rear gears. The left hand lever operates the front chain ring shifter. When shifting through a wide range of gears, you may notice a noise as a result of the chain rubbing on the inside of the front derailleur cage. This noise can be eliminated by moving the gear lever (friction systems) or adjusting the gear cable (indexing systems.) WARNING: Avoid riding with the chain on both the largest front chain ring and the largest rear cog, smallest rear cog and small chain ring. This puts excessive strain on the chain and can damage derailleur parts. Practice changing to a lower gear before stopping. This will assist easier starting at take-off. As you gain more experience with your gear ratios you will be able to select the most suitable gear for the terrain and weather conditions. NOTE: Your bicycle retailer will be able to assist you if you are uncertain about the steps in shifting gears. DERAILLEUR ADJUSTMENT From time to time your rear derailleur needs adjustment. You may need to tighten the derailleur cable to remove excessive cable slack. Excessive slack in the cable will cause the derailleur to miss shift. BICYCLE INDUSTRIES AUSTRALIA LTD PAGE
31 Locate the Adjusting Barrel on the back of the derailleur. Turn the barrel ANTI-CLOCKWISE half a turn and test the derailleur by changing gear. Continue to turn the barrel until the chain is pitching correctly onto each gear. NOTE: If you are not sure of these steps consult your bicycle retailer. After the initial settling in period, if you have any adjustments that need attention, return to your bicycle retailer for advice. TOE CLIPS AND TOE STRAPS Toe clips and straps are used to assist with the correct positioning of your feet on the pedals and to help your riding technique. The toe clip positions the ball of the foot over the pedal spindle, which gives maximum pedalling power. The toe strap, when tightened, keeps the foot engaged throughout the rotation cycle of the pedal. Getting into and out of pedals with toe clips and straps requires skill which can only be acquired with practice. Do not ride in traffic or around other hazards until you can use toe clips and straps as a reflex action. Never ride in traffic with your toe straps tight. CLIPLESS PEDALS Clipless pedals are usually adjustable. Your bicycle retailer can show you how to make this adjustment. WARNING: Clipless pedals are intended for use with shoes specifically made to fit them and are designed to firmly keep the foot engaged with the pedal. Practice is required to learn to engage and disengage the foot safely BICYCLE INDUSTRIES AUSTRALIA LTD PAGE 27
32 TYRES AND TUBES Bicycle tyres are available in many designs and specifications, ranging from general purpose designs to tyres designed to perform best under very specific weather or terrain conditions. Your bicycle retailer can help you select the most appropriate tyre and tube. The size and pressure rating of a tyre is marked on the sidewall of the tyre. The part of this information which is most important to you is Tyre Pressure. The best way to inflate a bicycle tyre to the correct pressure is with a bicycle pump. Your bicycle retailer can help you select an appropriate pump. TAKE CARE: When using compressed air, over inflation can burst the tube and tyre. Never inflate a tyre beyond the maximum pressure marked on the sidewall of the tyre. Tyre pressure is given either as maximum pressure or as a pressure range. How a tyre performs under different terrain or weather conditions depends largely on tyre pressure. Inflating the tyre to near its maximum recommended pressure gives the lowest rolling resistance; but also produces the harshest ride. High pressures work best on smooth, dry pavement. Very low pressures, at the bottom of the recommended pressure range, give the best performance on loose or muddy surfaces. Riding with your tyres underinflated can cause a puncture, the tyre deforms and pinches the inner tube between the rim and the riding surface. Cornering with underinflated tyres can cause the tyre to roll off the rim resulting in a fall. Ask your bicycle retailer to recommend the best tyre pressure for your kind of riding. BICYCLE INDUSTRIES AUSTRALIA LTD PAGE
33 TYRE VALVES There are two kinds of bicycle tube valves in common use - the Schraeder Valve and the Presta Valve. The bicycle pump you use must have the fitting appropriate to the valve stems on your bicycle. The Schraeder is like the valve on a car tyre. To inflate a Schraeder valve tube with compressed air or with a bicycle pump, remove the valve cap and push the air hose or pump fitting on to the end of the valve stem. To let air out of a Schraeder valve, depress the pin in the end of the valve stem with the end of a key or other appropriate object. The Presta valve has a narrower diameter and is only found on bicycle tyres. To inflate a Presta valve tube using a Presta headed bicycle pump: remove the valve cap unscrew (anti-clockwise) the valve stem lock nut push down on the valve stem to free it up push the pump head on to the valve head, and inflate. BICYCLE SUSPENSIONS Some bicycles come equipped with suspension systems. There are many different types of suspension systems. If your bicycle has a suspension system ask your bicycle retailer to explain care and use. Return your bicycle for regular maintenance and adjustment of the suspension system BICYCLE INDUSTRIES AUSTRALIA LTD PAGE 29
34 NOTE: Changing suspension adjustment can change the handling and braking characteristics of your bicycle. Read and follow manufacturer s instructions Not all bicycles can be safely retrofitted with suspension systems. Check with your bicycle retailer. 3.1 MAINTAINING YOUR BICYCLE SERVICE AND BASIC MAINTENANCE Bicycles perform best when they are kept clean, lubricated and serviced regularly. How much of your bicycle s service and maintenance you can do yourself depends on your level of skill and experience, and whether or not you have the special tools required. WARNING: Some bicycle service and repair tasks require special knowledge and tools. Do not begin any adjustments or service on your bicycle if you have doubt about your ability. Unauthorised or incorrect service and repairs may void product warranty. CLEANING Mud and dust can be highly abrasive. Regular cleaning will help maintain your bicycle in good condition. Always dry and lubricate your bicycle after washing to prevent rust. BICYCLE INDUSTRIES AUSTRALIA LTD PAGE
35 LUBRICATION Keep your bicycle regularly lubricated for good performance and durability. Lubrication reduces friction and helps protect against rust. All bearings and other moving parts require regular appropriate lubrication: Grease type lubrication:- bearings in head stem, wheels, bottom bracket and pedals (requires disassembly refer to your bicycle retailer). Oil type lubrication:- Brake and derailleur pivot points and jockey wheels, chain, free wheel. For advice on appropriate special lubricants, ask your bicycle retailer. 3.2 MONTHLY SERVICE CHART Monthly servicing of your bicycle is recommended. This consists of lubrication and adjustment of components. Use the correct type of lubricants and tools, service the bicycle s components in logical groups and clean before you start. TYRES AND TUBES Clean the tyres and inspect treads for wear. Remove any debris from tread or walls. Check tyre pressure is correct. Replace faulty tubes. WHEELS Clean rims and check they are not dented or dimpled. Check rims for trueness and spokes for evenness of tension. Replace any bent or broken spokes BICYCLE INDUSTRIES AUSTRALIA LTD PAGE 31
36 CHAIN Check chain for excessive wear or stretching. Check for any stiff links. Use recommended lubricant. BRAKES Check brake block and brake lever mounting bolts. Check brake blocks for wear. Replace if necessary. Check block toe-in is correct. Lubricate brake pivot bolts and adjust where necessary. GEAR AND BRAKE CABLES Inspect all cable housing for damage. Replace if necessary. Clean and examine all cable wires for kinks and frayed ends. Replace if necessary. Adjust barrel adjusters and/or cable anchor bolts to compensate for cable stretch. HUBS Check front and rear hub bearings for excess play or binding. Have adjustable cup-and-cone bearings, tightened or loosened if necessary. Check hubs are correctly lubricated. Tighten hub axle nuts and check quick release levers. FRONT AND REAR DERAILLEURS Clean derailleur cages bushings. Check the accuracy of the indexing and adjust cable tension at barrel adjusters and/or cable anchor bolts as required. BICYCLE INDUSTRIES AUSTRALIA LTD PAGE
37 CRANK/CHAINRINGS AND FREEWHEELS Clean chainrings; check they are true and have no excessively worn, or broken teeth. Check crank arms are tight on bottom bracket spindle. Clean and lubricate freewheel and check for wear. Check freewheel sprockets for worn or broken teeth. BOTTOM BRACKET/AXLE Test bottom bracket bearings for excess play or binding. Check that the locknut is tight. Check bottom bracket is correctly lubricated. HEADSET Check headset for excess play or binding. Check the locknut is tight. PEDALS Check pedal bodies are not cracked. If pedals are loose, tighten the mounting bolts firmly. Inspect toe clips/toe straps for damage. GENERAL Check frame alignment and all the tubes for dents or damage. Check all bolts and nuts are secure. Tighten bolts with the correct tools. CAUTION: Alloy bicycle parts can be damaged by overtightening BICYCLE INDUSTRIES AUSTRALIA LTD PAGE 33
38 STORAGE The best protection for your bicycle is to store it under cover in a dry environment and away from corrosive materials such as battery acid and swimming pool chemicals. Thoroughly dry off your bicycle after use in wet conditions. Wax or lubricate as required. Failure to follow this procedure may lead to rust and corrosion of metal work. 4. ADDITIONAL INFORMATION HELPFUL HINTS, SPECIAL INSTRUCTIONS AND WARRANTY 4.1 ABOUT YOUR BICYCLE RETAILER Your bicycle retailer will help you to select bicycle accessories for the kind of riding you wish to do. Bicycle shop staff have the knowledge, tools and experience to give you reliable advice and provide maintenance services. If you have a problem with your bicycle or your riding, talk to your bicycle retailer. 4.2 SPECIAL INSTRUCTIONS FOR CARE OF CARBON FIBRE BICYCLES A carbon fibre frame requires special care due to the nature of its construction. Never clamp the bicycle using any of the carbon fibre frame tubes. Use the seat post to hold the frame during assembly. Do not use any solvents on the frame. Clean only with a mild detergent and water. Do not paint the frame. BICYCLE INDUSTRIES AUSTRALIA LTD PAGE
39 Avoid scratches and direct impacts to the frame. If you are involved in a mishap, or your bicycle is scratched during use, immediately see your bicycle retailer for inspection of the damage. Use a chain protector to lessen the chance of chipping the carbon fibre tubing. Use the manufacturer s recommended size seatpost and headset. Do not attempt to alter the original sizes of these parts. Avoid overtightening of the seatpost. Any other questions? Please contact your bicycle retailer. 4.3 TOOLS AND BICYCLE ASSEMBLY Should you intend to undertake maintenance the following tools are considered to be the basic requirement: Adjustable wrench 5-10cm Adjustable wrench 32cm Flat screw driver 15mm Phillips head screw driver 15mm Allen Key set 2mm-8mm Set of open end spanners 7-17mm Set of tyre levers Chain link remover Wire cutters Torque wrench BICYCLE INDUSTRIES AUSTRALIA LTD PAGE 35
40 All nuts and bolts should be checked on a regular basis for tightness. To assist in achieving the correct tension when tightening nuts and bolts the use of a torque wrench is recommended. Apply the following torque for the nominated parts of your bicycle: Front Wheel Nuts Rear Wheel Nuts Seat Binder Nut Seat Pillar Clamp Nut Brake Anchor Nut Handle Bar Clamp Nut Head Stem Expander Bolt Crank Cotter Pin Nuts Brake Centre Bolt Newton Metres Newton Metres Newton Metres Newton Metres 7-11 Newton Metres Newton Metres Newton Metres 9-14 Newton Metres 2-17 Newton Metres The following checklist presumes a bicycle which is assembled except for the handlebar & stem, brake and gear levers, saddle and seat stem, pedals, frame reflectors and wheels. Fit wheels to frame and align. Secure axle nuts or Quick Release (QR) mechanism. Lubricate handlebar stem, slacken wedge bolt and wedge, slide into head set to below minimum insert mark, align square to front wheel, tighten wedge bolt. Tighten wedge bolt. Check head stem lock nut is tight and that the handlebar will not rotate. If your bicycle is equipped with a threadless headset, check fitting adjustments with your bicycle retailer. DO NOT OVER TIGHTEN the two securing bolts. Slide brake and gear lever assemblies onto handlebar in correct configuration. Tighten locking bolts. Adjust brake assembly cables and align brake blocks for prescribed clearance. BICYCLE INDUSTRIES AUSTRALIA LTD PAGE
41 Fit handlebar tape or handgrips, stop ends to bar if bar is taped, and bell. Assemble saddle onto seat stem. Tighten fixing nuts. Lubricate seat stem and insert in seat tube to below minimum insert mark. Tighten seat binder bolt or Quick Release mechanism. Fit pedals to crank in correct order; pedal marked R on the right hand side; L on the left. Fit frame mounted reflector brackets and reflectors. Align reflectors to vertical. Tighten all bolts. Confirm that wheel reflectors are fitted. Recheck that all components are correctly assembled, all bolts, nuts and QR correctly secure. Check that handlebar and saddle cannot be swivelled sideways. Check derailleur gears/hub gears for correct operation; adjust to manufacturer s specification. Check both brakes for correct operation. WARNING: If you are unsure about correct assembly and/or adjustment, seek advice from a qualified bicycle mechanic. Threadless head sets: some bicycles, especially those equipped with a front fork suspension system, are fitted with a threadless head set. Special tools and/or procedures may be required to correctly secure such devices. 4.4 LOCK YOUR BICYCLE If you lock up your bicycle, it is much less likely to be stolen. Nearly all bicycles stolen were not locked at the time. Lock your bicycle to something solid e.g. a tree, a parking meter or a post. Make sure the bicycle cannot be lifted from the post or the post lifted out of the ground or pavement. Use a good quality U-Lock BICYCLE INDUSTRIES AUSTRALIA LTD PAGE 37
42 A good quality, hardened steel U-lock is your bicycle s best protection from theft. U-locks are more secure than cables or chains with padlocks. Combination locks provide least security. Make sure the lock or cable is not in a position which makes it easy to be removed or cut. A front wheel with Quick Release can be removed and locked to the frame. A good quality U-Lock may be the most secure device for locking your bicycle. Bicycle parking rails should comply with Australian Standard AS (1993). Refer to Guide to Traffic Engineering Practice Part 14 - Bicycles (AUSTROADS 1999). - provides additional information. - helping you get more out of your riding. - getting more and better facilities for cycling. 4.5 KEEP A RECORD OF YOUR BICYCLE Take a colour photograph of your bicycle, write the frame number on the back of the photograph and keep it in a safe place. Less than one in ten stolen bicycles is returned, partly because the owner cannot describe the bicycle. Engraving a registration number on the bicycle will also help. The police, Neighbourhood Watch and service clubs run bicycle registration programs. If you keep a record of the details of your bicycle it will greatly increase the possibility of getting it back should it be lost or stolen. Remember the advice about LOCKING YOUR BICYCLE. A good quality lock is cheap insurance. See the record chart at end of this manual. BICYCLE INDUSTRIES AUSTRALIA LTD PAGE
Parts List. 7. Handlebars 8. Grips 9. Handlebar Stem 10. Front Brake 11. Front Wheel 12. Crank 13. Chain
 Woodworm Cruise Parts List 1. Free Wheel with Rear Hub 2. Fenders 3. Fender Stay 4. Quick Release 5. Saddle 6. Seat Post 7. Handlebars 8. Grips 9. Handlebar Stem 10. Front Brake 11. Front Wheel 12. Crank
BICYCLE ASSEMBLY INSTRUCTIONS. dutchcycles.com.au. Distribution Centre
 BICYCLE ASSEMBLY INSTRUCTIONS dutchcycles.com.au Distribution Centre Shed 68, 400-422 Somerville Road, Tottenham, VIC 3012 email: service@dutchcycles.com.au BICYCLE COMPONENTS KEY INTRODUCTION CONGRATULATIONS
Folding Dual Suspension MTB. Instruction Manual
 Folding Dual Suspension MTB Instruction Manual Introduction The Stowabike Folding MTB has been made to last and with proper maintenance, it will give you years of enjoyable rides and journeys. The following
Bicycle Owner's Manual Easy Access Bike
 Bicycle Owner's Manual Easy Access Bike AGE: FROM 9 YEARS OLD AND UP IMPORTANT Check bike after assembly or any adjustments. Consult bicycle retailer with questions. Always wear a helmet. Children should
Have questions? Chat with us live at raleighusa.com or call us at , 8am 5pm PST
 1 2 Have questions? Chat with us live at raleighusa.com or call us at 1-800-251-8435, 8am 5pm PST The bicycle you have purchased is a complex piece of equipment that must be properly assembled and maintained
Have questions? Chat with us live at raleighusa.com or call us at , 8am 5pm PST
 1 2 Have questions? Chat with us live at raleighusa.com or call us at 1-800-251-8435, 8am 5pm PST The bicycle you have purchased is a complex piece of equipment that must be properly assembled and maintained
Santa Fe Cycles Assembly Guide Introduction
 Santa Fe Cycles Assembly Guide Introduction Congratulations on your purchase of your new Santa Fe bicycle. You have purchased a bicycle that has many features and qualities. Please take a few minutes and
Item N o.: Item N am e:40cm Boys Rival Bike
 Item N o.:42272892 Item N am e:40cm Boys Rival Bike 9 bell 8 grip 30 crash pad 10 brake lever 26 wheel reflector 22 saddle 23 seat post 25 rear reflector 24 quick release 6 handle bar 7 stem 2 top tube
Final Assembly Instructions Bikes with Threaded Headsets
 Final Assembly Instructions Bikes with Threaded Headsets Thank you for buying your new bicycle from L.L.Bean. Read these instructions carefully before beginning the final assembly. Prior to shipping, our
Good tread, no splits, cracks or holes, properly inflated. True, no missing or broken spokes, good rim. Secure, facing in right direction
 APPENDIX 1 Bike Check This is an M check. Start at the front of the bike and systematically work towards the back. Put a cross beside anything that is faulty. Note any faults you find. X FAULT Front tyre
Have questions? Chat with us live at raleighusa.com or call us at , 8am 5pm PST
 1 2 Have questions? Chat with us live at raleighusa.com or call us at 1-800-251-8435, 8am 5pm PST The bicycle you have purchased is a complex piece of equipment that must be properly assembled and maintained
Final Assembly Instructions Bikes with Quill Stems
 Final Assembly Instructions Bikes with Quill Stems Thank you for buying your new bicycle from L.L.Bean. Read these instructions carefully before beginning the final assembly. Prior to shipping, our expert
model - CYPRESS DX W
 Contents model - CYPRESS DX W Maintenenace manual Read and Save these instructions Welcome Contents 1 Preparing Nothing makes us happier than seeing people out riding bikes. For over thirty years Giant
Final Assembly Instructions Bikes with Threaded Headsets
 Final Assembly Instructions Bikes with Threaded Headsets Thank you for buying your new bicycle from L.L.Bean. Read these instructions carefully before beginning the final assembly. Prior to shipping, our
Ladies Shopper Bike Assembly Manual 28C03
 Ladies Shopper Bike Assembly Manual 28C03 Ecosmo Ltd 1 Know your bike 1. Wheel 2. Rear Derailleur 3. Chain 4. Crank Set 5. Pedal 6. Seat Quick Lock 7. Saddle and Post 8. Frame 9. Front Light 10. Front
Congratulations on your purchase of a JC Series Performer trike! The Performer JC Series is designed for everything from touring to commuting and
 Congratulations on your purchase of a JC Series Performer trike! The Performer JC Series is designed for everything from touring to commuting and shopping in the city. The JC Series frames are made of
SANTANA STOWAWAY TANDEM WITH AIRLINER SAFECASE AND FTS FOAM TRAY SYSTEM ASSEMBLY AND DISASSEMBLY
 SANTANA STOWAWAY TANDEM WITH AIRLINER SAFECASE AND FTS FOAM TRAY SYSTEM ASSEMBLY AND DISASSEMBLY Congratulations! You are now the proud owner of the world s most travel-ready, performance tandem. The following
The type of terrain: flat and rough-terrain
 1 2 The type of terrain: flat and rough-terrain ASSEMBLING YOUR BICYCLE 1. Gears 2. Rear Brake 3. Rear Reflector 4. Seat Post 5. Saddle 6. Front Brake Lever 7. Gear Selector 8. Handle Bars 9. Bell 10.
Item N o.: Item N am e:50cm GIRLS BELLA CRUISER BIKE
 Item N o.:42272847 Item N am e:50cm GIRLS BELLA CRUISER BIKE grip brake lever mudguard mudguard braket free wheel rear hub saddle seat post rear reflector seat clamp chain guard chain wheel crank stem
comfort without compromising on performance and to fit your various needs on touring,
 Congratulations on your purchase of Goal-26X. Goal-26X is made to enhance comfort without compromising on performance and to fit your various needs on touring, shopping and communicating. Let s have fun
UNPACKING AND ASSEMBLING YOUR DIAMONDBACK ROAD BIKE
 EMAIL SIGNUP BIKE REG SEARCH BIKES THE RIDE HEALTH FITNESS SKILLS SHOP MAINTENANCE CYCLING 101 RIDERS LIKE YOU TEAMS SUPPORT UNPACKING AND ASSEMBLING YOUR DIAMONDBACK ROAD BIKE 1. Begin by carefully cutting
Rothan Owner s manual
 Rothan Owner s manual www.islabikes.co.uk 1. Brake levers 2. Brake pads 3. Saddle 4. Seatpost 5. Seatpost clamp 6. Stem 7. Stem bolts 8. Headset 9. Headset spacers 10. Headset adjuster bolt 11. Handlebars
E-trike Li Assembly Guide
 PREPARATION 1. Read this assembly manual BEFORE commencing assembly. 2. Carefully remove all the components and packaged hardware from the shipping boxes. 3. Unpack the contents of the large double box
MANUAL LEKKER BIKES 2016
 MANUAL LEKKER BIKES 2016 CONTACT For your own safety, never do work on your bicycle unless you feel absolutely sure about it. If you are in doubt or if you have any questions please contact our helpdesk:
Item Name: 30CM GIRLS STAR THE UNICORN BIKE
 Item No.: 42333753 Item Name: 30CM GIRLS STAR THE UNICORN BIKE Contents 1. Parts identification 1 2. Safety precautions 2 3. Check list 6 4. Assembly 7 5. Adjustment 14 6. Repair and Service 15 7. Warranty
Special instruction of installation for SAINT FH-M800/RD-M800 and FH-M805/RD-M805
 Technical Service Instructions SI-5VB0E t RD-M805 / RD-M800 Rear derailleur Special instruction of installation for SAINT FH-M800/RD-M800 and FH-M805/RD-M805 A hub axle is an essential component for the
Owner s Manual. The most comfortable upright bicycles ever made.
 Owner s Manual The most comfortable upright bicycles ever made. At Day 6, we hope you will enjoy riding our bicycles as much as we enjoy designing them. We have truly combined the best features of a recumbent
Shifting Lever. Dealer's Manual. RAPIDFIRE Plus SL-M2000 SL-M3010 SL-M4010. Thumb Shifter SL-TZ500. ROAD MTB Trekking. City Touring/ Comfort Bike
 (English) DM-MDSL001-01 Dealer's Manual ROAD MTB Trekking City Touring/ Comfort Bike URBAN SPORT E-BIKE Shifting Lever RAPIDFIRE Plus SL-M2000 SL-M3010 SL-M4010 Thumb Shifter SL-TZ500 CONTENTS IMPORTANT
TRAILMATE METEOR ASSEMBLY MANUAL
 TRAILMATE METEOR ASSEMBLY MANUAL (DISC BRAKE VERSION) The Trailmate Meteor recumbent has been designed for easy assembly. This means more time to enjoy the smooth ride with single speed, 3 speed coaster
Assembly Tools. Assembly will take 1-2 hours
 Assembly Tools Included in your parts box: Pedals Quick release skewer Reflectors (if not already installed) Toolkit (4+5mm combo Allen wrench, 13+15mm combo open-end wrench) Helpful Tools: Scissors (for
Troubleshooting Guide
 Troubleshooting Guide This troubleshooting guide outlines quick fixes to the most common technical questions about the ElliptiGO. If the problem persists or you feel uncomfortable performing these actions,
EZee Glider Manual. Tools needed for Assembly: Wrench (included) Philips Screwdriver (not included) Assembly Instructions
 Philips Screwdriver (not included) Assembly Instructions") EZee Glider Manual Congratulations on your purchase of the EZee Glider! Your glider is designed for years of nearly carefree use by your child. These instructions include how to set up your glider and
EZee Glider Manual Congratulations on your purchase of the EZee Glider! Your glider is designed for years of nearly carefree use by your child. These instructions include how to set up your glider and
space, turn up your party playlist and get to know your new travel companion!
 HOME ASSEMBLY INSTRUCTIONS This Papillionaire Bicycle now belongs to you. It will take you to work, wait patiently outside your local cafe, and carry your groceries home. This is the start of your longterm
Thumb Shifter Plus Thumb Shifter
 (English) DM-SL0004-01 Dealer's Manual Thumb Shifter Plus Thumb Shifter Thumb Shifter Plus SL-FT55 SL-TX50 SL-TX30 Thumb Shifter SL-TZ20 IMPORTANT NOTICE This dealer's manual is intended primarily for
Bicycle Owner s Manual Children s Bicycles
 Bicycle Owner s Manual Children s Bicycles The following manual provides assembly and maintenance instructions, as well as a guide to safe usage of your new bicycle. WARNING - Read the complete Owner s
Mini Glider Manual. Your Glider comes partially assembled. The front wheel and the handlebars require assembly.
 Mini Glider Manual Congratulations on your purchase of the Mini Glider! Your glider is designed for years of nearly carefree use by your child. These instructions include how to set up your glider and
THIS INSTRUCTION BOOKLET CONTAINS IMPORTANT SAFETY INFORMATION. PLEASE READ AND KEEP FOR FUTURE REFERENCE.
 THIS INSTRUCTION BOOKLET CONTAINS IMPORTANT SAFETY INFORMATION. PLEASE READ AND KEEP FOR FUTURE REFERENCE. FOR SERVICE ASSISTANCE CALL KENT TOLL FREE 1.800.451.5368 Monday - Friday 9:00 a.m. to 4:00 p.m.
Bicycle Owner s Manual
 Bicycle Owner s Manual The following manual provides assembly and maintenance instructions, as well as a guide to safe usage of your new bicycle. WARNING Read the complete Owner s Manual before starting
Distributed in Australia and New Zealand by Bike Solutions Pty Ltd
 GOMIER MANUAL 2500 SERIES This manual is for the following 2500 series models 20 (50cm) 6 speed external gears 20 (50cm) 3 speed internal gears (pictured and detailed in this manual) 20 (50cm) footbrake
THIS INSTRUCTION BOOKLET CONTAINS IMPORTANT SAFETY INFORMATION. PLEASE READ AND KEEP FOR FUTURE REFERENCE.
 THIS INSTRUCTION BOOKLET CONTAINS IMPORTANT SAFETY INFORMATION. PLEASE READ AND KEEP FOR FUTURE REFERENCE. FOR SERVICE ASSISTANCE CALL TOLL FREE 1.800.451.5368 Monday - Friday 8:00 a.m. to 4:00 p.m. Eastern
HOME ASSEMBLY INSTRUCTIONS
 HOME ASSEMBLY INSTRUCTIONS This Papillionaire Bicycle now belongs to you. It will take you to work, wait patiently outside your local cafe, and carry your groceries home. This is the start of your long-term
Instructions for Assembly and Operation
 Instructions for Assembly and Operation Congratulations on the purchase of your new bike! With proper assembly and maintenance it will offer you years of enjoyable riding! IMPORTANT: Carefully read and
THIS INSTRUCTION BOOKLET CONTAINS IMPORTANT SAFETY INFORMATION. PLEASE READ AND KEEP FOR FUTURE REFERENCE.
 THIS INSTRUCTION BOOKLET CONTAINS IMPORTANT SAFETY INFORMATION. PLEASE READ AND KEEP FOR FUTURE REFERENCE. FOR SERVICE ASSISTANCE CALL TOLL FREE 1.800.451.5368 Monday - Friday 8:00 a.m. to 4:00 p.m. Eastern
ASSEMBLY GUIDE AROUND THE BLOCK - 1, 3, 7, & 21 SPEED SIXTHREEZERO
 ASSEMBLY GUIDE AROUND THE BLOCK - 1, 3, 7, & 21 SPEED SIXTHREEZERO OUR COMMITMENT We want you to love your bike as much as we do. If you run into any issues, no matter how small, let us know and we ll
Warning: Please read this entire manual before riding your Simbi. Failure to do so could result in serious injury or even death.
 Warning: Please read this entire manual before riding your Simbi. Failure to do so could result in serious injury or even death. Contents 1. OVERVIEW... 3 A. Thank You... 3 B. General Warning... 3 C. Important
Item N o.: Item N am e:southern Star 40cm Girls Cherry Bike
 Item N o.:42174868 Item N am e:southern Star 40cm Girls Cherry Bike Tighten them so they do not move and are horizontal. Check the handlebar is in good condition and the ends of the handlebar are
THIS INSTRUCTION BOOKLET CONTAINS IMPORTANT SAFETY INFORMATION. PLEASE READ AND KEEP FOR FUTURE REFERENCE.
 THIS INSTRUCTION BOOKLET CONTAINS IMPORTANT SAFETY INFORMATION. PLEASE READ AND KEEP FOR FUTURE REFERENCE. FOR SERVICE ASSISTANCE CALL KENT TOLL FREE 1.800.451.5368 Monday - Friday 9:00 a.m. to 4:00 p.m.
Thank you for purchasing a WIKE BOX BIKE!
 Thank you for purchasing a WIKE BOX BIKE! Contents Safety.....3 Front wheel.4 Kickstand..5 Handle Bar & Box 6 Seat post and Saddle 7 Final pre-ride check 8 Tools needed to assemble Bike: -High table or
Assembly Tools. Assembly will take about an hour
 Assembly Guide Assembly Tools Included in your parts box: Pedals Toolkit (4+5mm combo Allen wrench, 13+15mm combo open-end wrench) Touch-up paint Spare fuses (for battery) Assembly will take about an hour
CLASS CYCLE P8000 OWNER'S MANUAL JOHNSON HEALTH TECH. CO., LTD.
 CLASS CYCLE P8000 JOHNSON HEALTH TECH. CO., LTD. No.26, Ching Chuan Rd., Taya Hsiang, Taichung Hsien 428, Taiwan, R.O.C. TEL: +886-4-2566700 FAX: +886-4-2560087 E-mail: sales@johnsonfitness.com http://www.johnsonfitness.com
DM-RARD (English) Dealer's Manual. ROAD MTB Trekking. City Touring/ Comfort Bike. Rear Derailleur DURA-ACE RD-R9100 ULTEGRA RD-R8000
 Dealer's Manual. ROAD MTB Trekking. City Touring/ Comfort Bike. Rear Derailleur DURA-ACE RD-R9100 ULTEGRA RD-R8000") (English) DM-RARD001-03 Dealer's Manual ROAD MTB Trekking City Touring/ Comfort Bike URBAN SPORT E-BIKE Rear Derailleur DURA-ACE RD-R9100 ULTEGRA RD-R8000 CONTENTS IMPORTANT NOTICE... 3 TO ENSURE SAFETY...
(English) DM-RARD001-03 Dealer's Manual ROAD MTB Trekking City Touring/ Comfort Bike URBAN SPORT E-BIKE Rear Derailleur DURA-ACE RD-R9100 ULTEGRA RD-R8000 CONTENTS IMPORTANT NOTICE... 3 TO ENSURE SAFETY...
ASSEMBLY GUIDE: Izip & Ezip Electric Bicycles with Rack-Top Mounted Batteries ( RTMB Bicycles )
") ASSEMBLY GUIDE: Izip & Ezip Electric Bicycles with Rack-Top Mounted Batteries ( RTMB Bicycles ) Please Refer to your Owner s Manual for Detailed Setup Instructions Technical & Customer Service: 1-800-377-4532
ASSEMBLY GUIDE: Izip & Ezip Electric Bicycles with Rack-Top Mounted Batteries ( RTMB Bicycles ) Please Refer to your Owner s Manual for Detailed Setup Instructions Technical & Customer Service: 1-800-377-4532
CRUZBIKE Quest 2.0 Assembly
 CRUZBIKE Quest 2.0 Assembly CRUZBIKE Quest 2.0 Assembly... 1 General notes on assembly... 2 Un box and evaluate the frame and major parts... 2 Unfold the rear swing arm and arrange the frame... 3 Rear
DM-RCWH (English) Dealer's Manual. ROAD MTB Trekking. City Touring/ Comfort Bike. Wheel Set. WH-RX31 SM-AX x12 SM-AX x12
 Dealer's Manual. ROAD MTB Trekking. City Touring/ Comfort Bike. Wheel Set. WH-RX31 SM-AX x12 SM-AX x12") (English) DM-RCWH001-00 Dealer's Manual ROAD MTB Trekking City Touring/ Comfort Bike URBAN SPORT E-BIKE Wheel Set WH-RX31 SM-AX720-100x12 SM-AX720-142x12 CONTENTS IMPORTANT NOTICE... 3 TO ENSURE SAFETY...
(English) DM-RCWH001-00 Dealer's Manual ROAD MTB Trekking City Touring/ Comfort Bike URBAN SPORT E-BIKE Wheel Set WH-RX31 SM-AX720-100x12 SM-AX720-142x12 CONTENTS IMPORTANT NOTICE... 3 TO ENSURE SAFETY...
Owner s Manual for Multi Speed & Freewheel Bicycles This Owner's Manual contains assembly, operation, and maintenance instructions.
 Your Model Number is: (write your model number here) Owner s Manual for Multi Speed & Freewheel Bicycles This Owner's Manual contains assembly, operation, and maintenance instructions. WARNING: - Check
Cantilever Brake. Dealer's Manual. ROAD MTB Trekking. City Touring/ Comfort Bike
 (English) DM-RCBR001-00 Dealer's Manual ROAD MTB Trekking City Touring/ Comfort Bike URBAN SPORT E-BIKE Cantilever Brake BR-CX70 BR-CX50 BL-4700 BL-4600 BL-R780 BL-R3000 ST-7900 ST-6700 ST-5700 ST-4600
THIS INSTRUCTION BOOKLET CONTAINS IMPORTANT SAFETY INFORMATION. PLEASE READ AND KEEP FOR FUTURE REFERENCE.
 THIS INSTRUCTION BOOKLET CONTAINS IMPORTANT SAFETY INFORMATION. PLEASE READ AND KEEP FOR FUTURE REFERENCE. FOR SERVICE ASSISTANCE CALL KENT TOLL FREE 1.800.451.5368 Monday - Friday 9:00 a.m. to 4:00 p.m.
THIS INSTRUCTION BOOKLET CONTAINS IMPORTANT SAFETY INFORMATION. PLEASE READ AND KEEP FOR FUTURE REFERENCE.
 THIS INSTRUCTION BOOKLET CONTAINS IMPORTANT SAFETY INFORMATION. PLEASE READ AND KEEP FOR FUTURE REFERENCE. FOR SERVICE ASSISTANCE CALL TOLL FREE 1.800.451.5368 Monday - Friday 8:00 a.m. to 4:00 p.m. Eastern
Welcome, and congratulations on the purchase of your new Northrock Bicycle. Before you take your bicycle for a ride we encourage you to complete the
 Welcome, and congratulations on the purchase of your new Northrock Bicycle. Before you take your bicycle for a ride we encourage you to complete the following information for future reference, and we suggest
Lectric Cycles Mid-Drive Electric Motor Installation
 Lectric Cycles Mid-Drive Electric Motor Installation This write-up describes the installation of a Lectric Cycles electric motor. The model is the e-rad Mid-Drive 750 Watt conversion kit, installed on
DM-MARD (English) Dealer's Manual. ROAD MTB Trekking. City Touring/ Comfort Bike REAR DERAILLEUR XTR RD-M9100 RD-M9120
 Dealer's Manual. ROAD MTB Trekking. City Touring/ Comfort Bike REAR DERAILLEUR XTR RD-M9100 RD-M9120") (English) DM-MARD001-00 Dealer's Manual ROAD MTB Trekking City Touring/ Comfort Bike URBAN SPORT E-BIKE REAR DERAILLEUR XTR RD-M9100 RD-M9120 CONTENTS CONTENTS...2 IMPORTANT NOTICE...3 TO ENSURE SAFETY...4
(English) DM-MARD001-00 Dealer's Manual ROAD MTB Trekking City Touring/ Comfort Bike URBAN SPORT E-BIKE REAR DERAILLEUR XTR RD-M9100 RD-M9120 CONTENTS CONTENTS...2 IMPORTANT NOTICE...3 TO ENSURE SAFETY...4
Bicycle Noise Diagnosis
 Bicycle Noise Diagnosis Bottom bracket noise is a common complaint but most times the noise could be coming from another area on the bicycle. Noises that are telegraphing through the frame often sound
Quattrocycle BV. Quattrocycle. User Manual. Last update February Quattrocycle BV Bremkant EJ Middelbeers. User Manual Quattrocycle 1
 Quattrocycle User Manual Last update February 2010 Quattrocycle BV Bremkant 6 5091 EJ Middelbeers User Manual Quattrocycle 1 Table of Contents Page Chapter 1: Introduction 3 Chapter 2: Instructions for
3. Fit. 1 Owner s manual
 3. Fit NOTE: Correct fit is an essential element of bicycling safety, performance and comfort. Making the adjustments to your bicycle which result in correct fit for your body and riding conditions requires
Final Assembly Instructions Bikes with 16 Wheel Size
 Final Assembly Instructions Bikes with 16 Wheel Size Thank you for buying your new bicycle from L.L.Bean. Read these instructions carefully before beginning the final assembly. Prior to shipping, our expert
BikeEd Need to Know: Teenager / Adult
 BikeEd Need to Know: Teenager / Adult Always Practice bike handling skills to better control your bike Wear a helmet, fitted correctly Perform ABC Quick Check on your bike before each ride Ride on the
Inspecting before riding
 Inspecting before riding ) Squeeze both brake levers firmly. Do they move smoothly, yet their movement stops before they touch the handlebar grip? Do both wheels spin without wobbling or binding? Gently
T R A F F I C S K IL L S 101
 page 1/5 GENERAL INSTRUCTIONS Mark your answers on the answer sheet provided. DO NOT make any marks on the test. Please read the following definitions and assumptions carefully before answering the test
HELMETS SAVE LIVES!!! ALWAYS WEAR A PROPERLY FITTED HELMET WHEN YOU RIDE YOUR BICYCLE. DO NOT RIDE AT NIGHT. AVOID RIDING IN WET CONDITIONS.
 HELMETS SAVE CORRECT FITTING - MAKE SURE YOUR HELMET COVERS YOUR FOREHEAD. LIVES!!! ALWAYS WEAR A PROPERLY FITTED HELMET WHEN YOU RIDE YOUR BICYCLE. DO NOT RIDE AT NIGHT. AVOID RIDING IN WET CONDITIONS.
Owner s Manual. for multi-speed bicycles. 7th Edition, 2004
 Owner s Manual for multi-speed bicycles 7th Edition, 2004 IMPORTANT: This manual contains important safety, performance, and service information. Read it before you take the first ride on your new bicycle,
USER MANUAL INDEX PART 1. PARTS IDENTIFICATION 4 PART 2. ASSEMBLY 6 PART 3. BEFORE YOU RIDE 10
 USER MANUAL You have chosen one of the finest bicycles available. Your bicycle has been carefully manufactured with the benefit of years of experience and fully tested to ensure the highest standards
Item N o.: Item N am e:40cm GIRLS VIOLET BIKE
 Item N o.:42547242 Item N am e:40cm GIRLS VIOLET BIKE 1 2 SAFETY PRECAUTIONS If there is front brake,apply the rear brake first, and then apply the front brake. The front brake is strong and if not used
Recumbent Bicycle/Tricycle Owner s Manual
 Recumbent Bicycle/Tricycle Owner s Manual 9th Edition, 2007 This manual meets EN Standards 14764, 14766 and 14781. IMPORTANT: This manual contains important safety, performance and service information.
Bicycle Owner s Manual
 Bicycle Owner s Manual simcoebicycles.com 10th Edition, 2014 This manual meets 16 CFR 1512 and EN 14764, 14766 and 14781 Standards IMPORTANT: This manual contains important safety, performance and service
USER GUIDE TO POWER ASSISTED BIKES
 USER GUIDE TO POWER ASSISTED BIKES 1 PAGE CONTENTS Page. 3 Unpacking Page. 3-4 Easy steps to get started Page. 5 General Assembly Instructions Page. 6 Aligning H/Bars, Page. 7 Tightening pedals onto Crank
Rothan Owner s manual.
 Owner s manual www.islabikes.com www.islabikes.com 1. Brake levers 2. Brake pads 3. Saddle 4. Seatpost 5. Seatpost clamp 6. Stem 7. Stem bolts 8. Headset 9. Headset spacers 10. Headset adjuster bolt 11.
7130 Lancer Rear Drive Magnetic Commercial Indoor Cycling Bike
 7130 Lancer Rear Drive Magnetic Commercial Indoor Cycling Bike Owner s Manual Made in Taiwan INDEX IMPORTANT SAFETY INFORMATION... 1 EXPLODED DRAWING... 2 PARTS LIST... 3 ASSEMBLY INSTRUCTION... 4-9 USER
Owner s Manual Revision
 Owner s Manual Revision 5-25-2016 Owner s Manual Alter Cycles Bicycle Owner s Manual Congratulations on the purchase of your new Alter Cycles bicycle. You have chosen one of the smoothest riding bikes
MODEL: COMMUTER / ROAD BIKE
 STEP BY STEP BUILD GUIDE MODEL: COMMUTER / ROAD BIKE TABLE OF CONTENTS TOOLS 1 LET S GET STARTED 2 INSTALLING THE QUILL STEM 3 INSTALLING THE FRONT FENDER 4 INSTALLING THE QUICK RELEASE 5 INSTALLING THE
DM-RD (English) Dealer s Manual. ROAD Rear Derailleur RD-9000 RD-6800 RD-5800 RD-4700
 Dealer s Manual. ROAD Rear Derailleur RD-9000 RD-6800 RD-5800 RD-4700") (English) DM-RD0003-09 ROAD Rear Derailleur Dealer s Manual RD-9000 RD-6800 RD-5800 RD-4700 CONTENTS IMPORTANT NOTICE...3 TO ENSURE SAFETY...4 LIST OF TOOLS TO BE USED...6 INSTALLATION...8 Chain length...
(English) DM-RD0003-09 ROAD Rear Derailleur Dealer s Manual RD-9000 RD-6800 RD-5800 RD-4700 CONTENTS IMPORTANT NOTICE...3 TO ENSURE SAFETY...4 LIST OF TOOLS TO BE USED...6 INSTALLATION...8 Chain length...
DM-MBRD (English) Dealer's Manual. ROAD MTB Trekking. City Touring/ Comfort Bike. Rear Derailleur SLX RD-M7000 DEORE RD-M6000
 Dealer's Manual. ROAD MTB Trekking. City Touring/ Comfort Bike. Rear Derailleur SLX RD-M7000 DEORE RD-M6000") (English) DM-MBRD001-04 Dealer's Manual ROAD MTB Trekking City Touring/ Comfort Bike URBAN SPORT E-BIKE Rear Derailleur SLX RD-M7000 DEORE RD-M6000 CONTENTS IMPORTANT NOTICE... 3 TO ENSURE SAFETY... 4
(English) DM-MBRD001-04 Dealer's Manual ROAD MTB Trekking City Touring/ Comfort Bike URBAN SPORT E-BIKE Rear Derailleur SLX RD-M7000 DEORE RD-M6000 CONTENTS IMPORTANT NOTICE... 3 TO ENSURE SAFETY... 4
Front derailleur. Dealer's Manual DURA-ACE FD-R9100 ULTEGRA FD-R FD ROAD MTB Trekking. City Touring/ Comfort Bike DM-RAFD001-03
 (English) DM-RAFD001-03 Dealer's Manual ROAD MTB Trekking City Touring/ Comfort Bike URBAN SPORT E-BIKE Front derailleur DURA-ACE FD-R9100 ULTEGRA FD-R8000 105 FD-5801 Procedures for cable tension adjustment
SERVICE CALL TOLL FREE Monday - Friday 8:00 a.m. to 5:00 p.m. Pacific Standard Time
 SERVICE CALL TOLL FREE 800-222-5527 Monday - Friday 8:00 a.m. to 5:00 p.m. Pacific Standard Time 2 Congratulations on the purchase of your new Raleigh bicycle! With proper assembly and maintenance it will
Front derailleur. Dealer's Manual SORA FD-R3000 FD-R3030 CLARIS FD-R2000 FD-R2030. ROAD MTB Trekking. City Touring/ Comfort Bike DM-RBFD001-01
 (English) DM-RBFD001-01 Dealer's Manual ROAD MTB Trekking City Touring/ Comfort Bike URBAN SPORT E-BIKE Front derailleur SORA FD-R3000 FD-R3030 CLARIS FD-R2000 FD-R2030 CONTENTS IMPORTANT NOTICE... 3 TO
Beinn 29 Owner s manual
 Owner s manual Setting up your 4 13 8 12 1 14 15 19 16 7 5 6 5 22 20 9 10 11 21 2 3 1. Brake levers 2. Brake calipers 3. Rotors 4. Saddle 5. Seatpost 6. Seatpost clamp 7. Saddle clamp 8. Stem 9. Stem bolts
9-speed super narrow. chain such as. CN-7701 / CN-HG93 8- / 7- / 6-speed narrow. chain such as CN-HG50 / CN-IG51
 - Technical Service Instructions SI-5VH0B t RD-M600 Rear derailleur General Safety Information WARNING The ST-M600 DUAL CONTROL lever is used for both gear shifting and braking operations. Make sure that
DM-MBST (English) Dealer's Manual. ROAD MTB Trekking. City Touring/ Comfort Bike. Shifting lever. EZ-FIRE Plus ST-EF500 ST-EF510
 Dealer's Manual. ROAD MTB Trekking. City Touring/ Comfort Bike. Shifting lever. EZ-FIRE Plus ST-EF500 ST-EF510") (English) DM-MBST001-00 Dealer's Manual ROAD MTB Trekking City Touring/ Comfort Bike URBAN SPORT E-BIKE Shifting lever EZ-FIRE Plus ST-EF500 ST-EF510 CONTENTS IMPORTANT NOTICE... 3 TO ENSURE SAFETY...
(English) DM-MBST001-00 Dealer's Manual ROAD MTB Trekking City Touring/ Comfort Bike URBAN SPORT E-BIKE Shifting lever EZ-FIRE Plus ST-EF500 ST-EF510 CONTENTS IMPORTANT NOTICE... 3 TO ENSURE SAFETY...
THIS MANUAL CONTAINS IMPORTANT SAFETY, PERFORMANCE AND MAINTENANCE INFORMATION. READ THE MANUAL BEFORE TAKING YOUR FIRST RIDE ON YOUR NEW BICYCLE,
 THIS MANUAL CONTAINS IMPORTANT SAFETY, PERFORMANCE AND MAINTENANCE INFORMATION. READ THE MANUAL BEFORE TAKING YOUR FIRST RIDE ON YOUR NEW BICYCLE, AND KEEP THE MANUAL HANDY FOR FUTURE REFERENCE. CORRECT
DM-FD (English) Dealer's Manual. Front derailleur FD-M9000 FD-M9020 FD-M9025 FD-M8000 FD-M8020 FD-M8025 FD-M612 FD-M617 FD-M618 FD-M672
 Dealer's Manual. Front derailleur FD-M9000 FD-M9020 FD-M9025 FD-M8000 FD-M8020 FD-M8025 FD-M612 FD-M617 FD-M618 FD-M672") (English) DM-FD0003-04 Front derailleur Dealer's Manual FD-M9000 FD-M9020 FD-M9025 FD-M8000 FD-M8020 FD-M8025 FD-M612 FD-M617 FD-M618 FD-M672 FD-M677 CONTENTS IMPORTANT NOTICE... 3 TO ENSURE SAFETY...
(English) DM-FD0003-04 Front derailleur Dealer's Manual FD-M9000 FD-M9020 FD-M9025 FD-M8000 FD-M8020 FD-M8025 FD-M612 FD-M617 FD-M618 FD-M672 FD-M677 CONTENTS IMPORTANT NOTICE... 3 TO ENSURE SAFETY...
Preparation/Maintenance Manual
 Preparation/Maintenance Manual It is essential that you read this manual in its entirety before riding your bike for the first time to ensure that your bike is properly assembled and safe to ride. It is
Cycling. Scout s Name: Unit: Counselor s Name: Counselor s Ph. hypothermia, heat reactions, frostbite, dehydration, insect stings, tick.
 Cycling Merit Badge Workbookk This workbook can help you but you still need to read the merit badge pamphlet (book). No one can add or subtract from the Boy Scout Requirements #33216. Each Scout must do
Owner s Manual for Coaster Brake Bicycles This Owner's Manual contains assembly, operation, and maintenance instructions.
 Your Model Number is: (write your model number here) Owner s Manual for Coaster Brake Bicycles This Owner's Manual contains assembly, operation, and maintenance instructions. WARNING: - Check operation
TRICYCLE ADU LT. To register your bike visit
 ADU LT TRICYCLE THIS MANUAL CONTAINS IMPORTANT SAFETY, PERFORMANCE AND MAINTENANCE INFORMATION. READ THE MANUAL BEFORE TAKING YOUR FIRST RIDE ON YOUR NEW TRICYCLE, AND KEEP THE MANUAL HANDY FOR FUTURE
Contents. 5 Use Brake Operation Security... 34
 Contents 1 Safety...4 Safety Signal Words...4 User Responsibility............................... 4 Personal Safety.................................. 6 Riding Safety...7 Before You Ride Safety Checklist...9
Dealer's Manual ROAD MTB Trekking City Touring/ URBAN SPORT E-BIKE Comfort Bike Front derailleur ALIVIO Non-Series
 (English) DM-MDFD001-02 Dealer's Manual ROAD MTB Trekking City Touring/ Comfort Bike URBAN SPORT E-BIKE Front derailleur ALIVIO FD-M4000 FD-M4020 Non-Series FD-MT400 CONTENTS IMPORTANT NOTICE... 3 TO ENSURE
Front derailleur. Dealer's Manual FD-M9000 FD-M9020 FD-M9025 FD-M8000 FD-M8020 FD-M8025 FD-M612 FD-M617 FD-M618 FD-M672 FD-M677
 (English) DM-FD0003-05 Front derailleur Dealer's Manual FD-M9000 FD-M9020 FD-M9025 FD-M8000 FD-M8020 FD-M8025 FD-M612 FD-M617 FD-M618 FD-M672 FD-M677 CONTENTS IMPORTANT NOTICE... 4 TO ENSURE SAFETY...
DM-SL (English) Dealer's Manual. REVOSHIFT Shifter SL-RS47 SL-RS45 SL-RS36 SL-RS35 SL-RS34 SL-RS25
 Dealer's Manual. REVOSHIFT Shifter SL-RS47 SL-RS45 SL-RS36 SL-RS35 SL-RS34 SL-RS25") (English) DM-SL0002-03 Dealer's Manual REVOSHIFT Shifter SL-RS47 SL-RS45 SL-RS36 SL-RS35 SL-RS34 SL-RS25 IMPORTNT NOTICE This dealer's manual is intended primarily for use by professional bicycle mechanics.
(English) DM-SL0002-03 Dealer's Manual REVOSHIFT Shifter SL-RS47 SL-RS45 SL-RS36 SL-RS35 SL-RS34 SL-RS25 IMPORTNT NOTICE This dealer's manual is intended primarily for use by professional bicycle mechanics.
Helios Separable Tandem Manual
 Helios Separable Tandem Manual This manual accompanies the Helios owners manual Introduction The separable kit fitted to your Helios tandem allows for even greater flexibility in the way you can enjoy
POWER ASSISTED BICYCLES OWNERS MANUAL
 POWER ASSISTED BICYCLES OWNERS MANUAL WE HAVE INCLUDED A BICYCLE OWNER S MANUAL WHICH YOU SHOULD REFER TO FOR ALL GENERAL CYCLE MAINTENANCE. CONTENTS Page. 3 Unpacking. Page. 3-4 Easy steps to get started.