Sea Eagle FoldCat. 375FC Instruction & Owner s Manual. For video instructions visit SeaEagle.com/Instructions
|
|
|
- Amelia Douglas
- 5 years ago
- Views:
Transcription


1 Sea Eagle FoldCat 375FC Instruction & Owner s Manual For video instructions visit SeaEagle.com/Instructions Sea Eagle Boats Inc. 19 N. Columbia Street, Suite 1 Port Jefferson, NY November 2018 VIDEO INSTRUCTIONS scan this code or visit
2 Congratulations on purchasing a Sea Eagle! With over 45 years of experience in designing, selling and using these quality inflatables, we re confident that you are going to love your Sea Eagle and we re ready to proudly stand behind them. Sea Eagle Warranty All Sea Eagle products come standard with a 3 year warranty against manufacturing defects The warranty begins the date that your product is delivered. Sea Eagle must inspect equipment in order to determine if there is a defect. In the event that an item must be shipped back to us, Sea Eagle will only reimburse the standard return shipping charge through FedEx, UPS, or U.S.P.S. at published shipping rates. Fees charged by retail shipping outlets, like The UPS Store, will not be reimbursed and you are responsible for handling and packing charges. Sea Eagle will refuse delivery on packages without a valid return authorization number and will not be responsible for shipping or handling charges. To obtain a return authorization number, please contact Sea Eagle directly, unless you purchased from an authorized dealer/reseller in which case contact them for more information. If you receive a damaged item, please call the shipping carrier to report the issue. Do not return damaged merchandise until it has been inspected by the carrier. Sea Eagle will be notified by the carrier when they have completed their inspection and if necessary, Sea Eagle will arrange for the repair or replacement of damaged merchandise. See complete warranty details at SeaEagle.com/Warranty. Decals, Stickers & Registration Always contact your state boating authorities for information on boating registration and regulations. Most states require you to register your boat if you are using a motor. Upon registration it may be required to provide the Manufacturer s Statement of Origin. Purchases made through an authorized dealer or reseller may require for you to contact them directly in order to obtain this. You may be charged your own state sales tax if you were not charged sales tax at the time of purchase. Registered boats generally require for the registration number to be applied to the boat. We do not recommend the use of decals or stickers as they tend to crack and peel over time with the repeated inflation and deflation of your Sea Eagle. Instead we suggest applying these numbers to a small piece of hard plastic or marine plywood and hanging it from your boat like a license plate if permitted by your state. Another method is to apply the numbers to the hull using either PVC based paint or permanent marker. Contact Us Unlike many other companies today we pride ourselves on answering the phone and helping you with any concerns, questions or special ordering needs that you may have! Feel free to give us a call at and we will be happy to talk with you! Our business hours are Monday to Friday from 9-5 (EST). Sea Eagle Boats Inc. 19 N. Columbia Street, Suite 1 Port Jefferson NY Staff@SeaEagle.com 1
3 OPERATING YOUR SEA EAGLE MOTORING The Fold Cat pontoons are large diameter which gives the boat plenty of flotation. Large pontoons raise the height of the motor mount, we therefore recommend a using a 20 long shaft gas motor with the boat for maximum performance. The motor mount should be installed in the lowest position. Any power rating under 3 hp is recommended. Adding more power will not increase speed, in fact the motor can only be used up to approximately one-third throttle. More throttle will cause the motor to sound like it is straining and cause it to shake. Overpowering will also waste fuel. Gas motors typically have a much greater range than electric motors. Trolling motor power is measured in pounds of thrust and battery draw. A motor rated at 30 lbs thrust consumes approximately 30 amps at full throttle. They typically are far less powerful than a gas motor but provide adequate power for a light weight inflatable boat such as the FoldCat. Most trolling motors have a maximum speed of about 4 mph. The propeller is pitched to maintain this speed and not faster. A larger trolling motor, a 55 lb thrust motor for example, will push a boat faster in a headwind, but not faster in calm water or against a current. Most trolling motors consume much less than 30 amps at lower throttle settings. We measured the Watersnake Venom at 12.4 amps at the number 3 setting for example. To calculate the range that can be expected from a battery, divide the amp hour rating of the battery by the amperage rating of the motor. For example a Group 24, 77Ah battery paired with a Minn Kota 30: 77 Ah divided by 30 amps yields 2.5 hours at full throttle. A 12v deep cycle marine battery, lithium ion battery, personal watercraft battery or electric vehicle battery is acceptable. The important parameter is the battery s ampere hour (Ah) rating. A Group 27 battery or smaller is recommended. Charge battery after each use. Lead acid batteries like to be kept charged. Running the battery all the way down will shorten its life. Exposure to excessive heat will shorten battery life. Cranking amps (CCA) are not a consideration. 12v automobile, lawn tractor and motorcycle batteries can be used but are not designed for deep discharge so will wear out more quickly. A battery box is recommended especially around aluminum crossbenches or oar shafts which could cause an electrical short. A circuit breaker or fuse is recommended (required in some areas) to prevent damage in the event the motor wires are placed on the wrong terminals. Reversing the polarity can cause the wires to heat up, melt the insulation, and cut through the boat. A 12v battery charger will be needed. Chargers are widely available. If available, choose gel cell over wet cell. Wet cell batteries have liquid acid inside them. Marine batteries are heavy, choose one you can carry without injury. Expensive batteries can weigh less and last longer because of their superior internal architecture. Battery can be secured to the aluminum crossbenchs or placed on the black PVC floor. Follow manufacturer's safety procedures. DISPLACEMENT HULL In addition to motor type, there are factors that regulate how fast a boat can go. Two important factors are boat length at the waterline and planing. Under most conditions the FoldCat cannot plane, it is considered a displacement hull. The FoldCat s length limits the hull speed to below 8 mph. For further information, search the internet for displacement hull speed. On a river or in a tidal inlet, if the current exceeds approximately 8 mph, you will not be able to make progress relative to land and in fact will be swept backwards. Adding a larger motor will not make a displacement hull exceed its hull speed, steer to calmer water, portage, or await a tide change. 2
4 OPERATING YOUR SEA EAGLE WEIGHT BALANCE Distribute the weight of passengers and gear evenly in the boat. The boat should not be leaning side to side nor fore and aft (front to back). This may require moving some items, like a trolling motor battery forward as much as possible. Note: the floor can easily support the weight of passengers or a battery. The No Standing label is to prevent tripping on the crossbenches. DANGER To avoid injury if you or a passenger falls overboard, approach the boat on the side opposite the motor. See re-entering instructions on page 15. Do not smoke around open gasoline containers. Avoid spilling gas. Gas powered motors produce carbon monoxide which can cause asphyxiation. Avoid breathing exhaust. ROWING Due to it s light weight, the FoldCat is surprisingly easy to row. Clearance is limited so you must have your legs straight or the oars will hit your legs. If you are new to rowing it may seem easy enough, but it will take some practice to coordinate the strokes. There are many online articles and videos to aid in learning. The boat can be rowed in either direction, but rowing is most efficient when pulling on the power stroke which propels the rower backwards. Make it a habit to look behind you frequently to check for hazards and to make course corrections. The FoldCat is not intended for rowing in flat water such as lakes and bays. Always bring the oars even if you have a motor. (????) DAMAGE The FoldCat is tough and durable but it can be damaged. Sticks and rocks typically don t puncture the FoldCat, but discarded metal, nails in floating docks and oyster beds can puncture. A lot of damage can be done dragging the boat. This is true while it is in the bag too. It is better to carry than to drag a Fold Cat, but especially avoid dragging the FoldCat on concrete or asphalt. The boat can be pushed off the shore and return to shore and pulled aground. This should not damage the FoldCat, but care should be taken to avoid hazards that could cut or puncture. Fish hooks rarely puncture a boat because they are recurved, but fish spines can make small punctures. Hold fish off the pontoons and land fish on the black floor. 3
5 Safety In a manual of this type it is impossible to give adequate space to the topic of water safety. For further information on boating safety, visit USCGBoating.org or enroll in a water safety course given by a local provider. It is your responsibility to be aware of and comply with all relevant safety regulations. For all water recreation or sport you should have a reasonable swimming ability. Just as swimmers have a cardinal rule about not swimming alone, it is strongly advised that you should never go boating alone. Boating Safety Tips Always wear a USCG approved PFD (life vest) at all times while on the water. Be aware of your local boating rules and regulations and abide by them accordingly. Check inflation levels each time before you go out and inflate your boat for a full 24 hours before undertaking long trips. DO NOT allow children to use Sea Eagle unsupervised. DO NOT consume alcohol while boating or operating a boat while under the influence of alcohol or drugs. DO NOT drag your Sea Eagle over rocks or gravel if it can be avoided. DO NOT exceed the certified maximum capacities of this boat under any circumstance. DO NOT go boating alone. DO NOT use compressors, CO2 or compressed air for inflation, only use Sea Eagle recommended pumps. DO NOT use your Sea Eagle Boat as a personal flotation device as they are designed for leisure/recreation in mind. DO NOT sleep inside of your Sea Eagle while on the water. Safety Equipment The type of water conditions you are on should determine the type of safety equipment that you should have on board. For all types of boating we strongly recommend that every passenger wear a USCG approved PFD (personal flotation device) like a life vest. In most places this is a requirement by law, but from our point of view it is also an exercise of good judgment to have a PFD for all passengers. Other important items to consider for all types of boating SAFETY Drinking Water & Snacks: Kayaking is a physical activity that can work up both a thirst and a sweat and especially on a hot or warm day it is a good idea to have drinking water readily available to you to prevent dehydration. Bring a good amount of water for all passengers as you want to avoid drinking the water you re kayaking in which may be full of contaminants. Extra Clothes/Layers: You never know when the weather can change and it s a good idea to come prepared with extra clothing. If you have a dry (waterproof) bag than we recommend storing them inside so they re not damp in case of emergency. First Aid-Kit: The contents of the kit may vary depending upon your preferences, but make sure to carry a kit that reflects the possible dangers for the conditions you are in. Foot Pump/Repair Kit: Although our boats are both durable and rugged, it may be possible that you need to make a repair while on the water in which case you ll need the repair kit and the foot pump to re-inflate the boat. If this is your first repair, you may also want to bring this instruction manual with you. Sun/Rain Protection: A hat can protect both your face and head from the rain or sun. You may also want to carry sunscreen with you as both the sun and the sun s reflection from the water can do serious damage to your skin. If you are out for prolonged periods of time you may need to reapply sunscreen as needed. Whistle: Having a whistle readily available to you in case of emergency is a great way to attract the attention of others if assistance is needed. Float Plan: Similar to a pilot s Flight Plan, consider having a Float Plan ( Always tell someone where you are going to be boating and what time you plan to return. Keep a cell phone in a waterproof container that will float if it falls in the water. 4


6 INFLATION, VALVES & PUMPS Recessed Air Valves Remove the cap and press and turn the valve stem counterclockwise so that the stem is in the UP position. When the stem is in the up position the valve will retain air. Turn the stem clockwise and down to valve for deflation. BTP Turbo & BP12 Electric Pumps (OPTIONAL) These electric pumps come with a nylon shoulder carry bag, 12V DC power cord, hose and adapters. A-41 Foot Pump Unwrap the hose and press the two halves to release the clip. Screw the hose into the OUT port. Foot pump rapidly inflates boat. Cannot not over inflate boat with foot pump. WARNINGS: Keep out of the reach of children. Don t leave running unattended. Do not use inflator for more than 20 minutes continuously as this can cause overheating and damage. Recessed Adapter The recessed valve adapter is located inside of the orange repair kit canister. Insert the ribbed end of the valve adapter into the hose on the foot pump. Locate the gray adapter with red gasket. Press and twist this adapter firmly onto the gray tube at the end of the black hose. The tube is glued in, do not try to remove it. When ready to inflate, insert valve adapter and twist clockwise to lock in. The adapter has a bar that will hold the valve open for easy pumping. Do not inflate until underbars are installed. Also included are a cluster of seven valve adapters, with raised numbers on each arm of the cluster. The adapter marked number 1 is the only adapter needed for your Sea Eagle. 5


7 INFLATION, VALVES & PUMPS Take adapter number 1 from the cluster and firmly push it into the grey tube that is already connected to the end of the hose. To ensure that the adapter is on as tight as possible, push it past the raised ring that is inside of the adapter. Connect the cord at the end of the power supply into the end of the cord attached to the pump. BTP Turbo Pump Connect the other end of the hose to the red inflation port at the top of the pump, located near the ON and OFF buttons. PSI numbers are red. Connect the Turbo Pump to a 12V battery (car or marine) using the alligator clips at the end of the extension cord. Connect the red clip to the positive pole and the black clip to the negative pole. BP12 Electric Pump Connect the hose to the red inflation port in the end of the pump. PSI numbers are yellow. Press the ON button to begin inflation. The pump operates in two stages which can be identified by the noise of the turbine at the start, followed by the piston. The pump automatically stops once the pressure is reached. Adjust the pressure dial to read 3.2 PSI which is the operating pressure of your Sea Eagle. PSI is marked in red on the dial. Never turn the dial when the device is under pressure as this will immediately cause the instrument to break. Warning: Air compressors that are designed for other uses like tire inflation (usually around 50 PSI) can easily harm your Sea Eagle which works at a much lower pressure of 3.2 PSI. For this reason we recommend only using Sea Eagle pumps. 6


8 ASSEMBLY & INFLATION Locate an area large enough to unfold the boat. Avoid hazards that could damage the boat or injure you. If out of alignment, slide crossbenches so they are centered on the hold-downs. Insert the adapter into the valve, turn it to the right until it locks in the opening. Valve stem must be in the UP position. Note: if adapter it too tight to turn, stretch rubber gasket until pliable and retry. Stabilizer Underbars Insert underbars under the crossbenches, two in the front, two in the rear. Pump until very firm. Pontoon should be very tight with almost no wrinkles. Floor will be stretched tight between pontoons. Use firm even strokes, do not stomp on pump. Finished when very firm resistance from foot pump is felt. Align the ends of the underbars in line with the triangular markings on each pontoon. Note: Bars might not touch markings. Swivel Seat The 375FC has two basic seating positions with one at the rear and the other at the front. When properly aligned, the underbars should line up underneath the center crossboard. Bars may not touch under crossboards. Once they are in place, finish inflating the boat to full capacity. Quick Release Seat Mount comes with four 2 bolts and four wing nuts. A Phillips head screwdriver (not included) is needed to complete installation. The mount can remain attached when being folded for storage and is a one-time assembly. 7

 The pedestal is included in several FoldCat boat packages and")


.")

 into the mounts.")
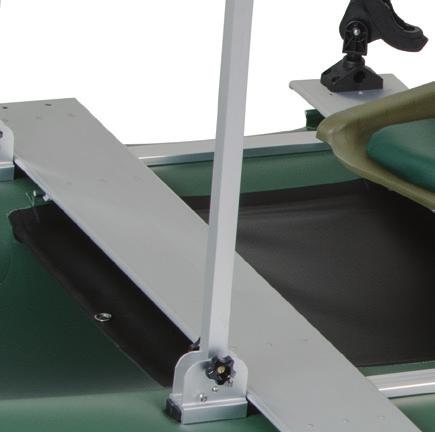
9 ASSEMBLY & INFLATION Position the mount over the pre-drilled holes designated for it and bolt the mount to the floorboard using the bolts and wing nuts. Locking tongue should point to side of boat. Pedestal (OPTIONAL) The pedestal is included in several FoldCat boat packages and includes four 1/2 bolts and four wingnuts. The 375FC can be fitted with up to two pedestals. Scotty Rod Holder Holds a bait caster reel in a cushioned cradle. Slot in the front allows for a spinning reel to be securely held in place. Includes side/deck mount. A Phillips Head screwdriver (not included) is needed. Scotty Rod Holder consists of a surface mount base, adjustable rod holder and four #6 x 1 phil truss stainless steel screws. A #2 phillips head screwdriver is needed (not included). Note: Make sure that all hardware is secured tightly before every use. Bolt the pedestal directly to the bottom of the swivel seat. Four 1/2 screws and wingnuts are provided. Now slide base of the swivel seat (or base of the pedestal) into the mounts. Make sure that the spring loaded lever mechanism locks into place (up position). Orient the base so the Inboard arrow is pointing toward the center of the boat. Secure base to the crossboard with the screws. This is a one-time installation. Oars & Oarlocks Each oarlock includes one oarlock pin, two bolts, two knurled knobs and two washers. First, attach the oarlock to the middle floorboard. 8
 using knurled nuts Secure the brackets to the motor mount block using")


10 ASSEMBLY & INFLATION Bolt the raised oarlock bases at both ends of the aluminum bench through the pre-drilled 3/8 holes (2 at each end) using knurled nuts Secure the brackets to the motor mount block using one set of bolts. Orient the block so it hangs about 1/2 below the floorboard. Then use the remaining bolts to secure the mount to the floorboard. Slide the oarlock pin over the shaft of the oars, snap the oars shafts together and then insert the oarlock pin into the top of the oarlock. Tighten the clamp with the wingnut. To prevent cavitation when using a short shaft gas motor. The completed setup should hang slightly below the floorboard, as shown. Tighten the knurled nuts and bolts before securing a motor. Once the oar pins are inserted place, lock them in place using the slide rings as shown. Casting Bar ( OPTIONAL) Adds safe and secure support for stand-up casting and doubles as a convenient hand-hold while stepping aboard. Includes crossbar with padded cover, two upright leg bases, and two 4mm hex keys (one spare). 375FC Motormount Includes a motor mount block, two brackets, four bolts, knurled knobs and washers. Insert the uprights into the crossbar. The height of the casting bar can be adjusted to one of three positions using the pre-drilled holes on the uprights. 9


11 Before attaching the casting bar to your boat, make sure that the FoldCat s pontoons are partially deflated. Insert the upright bases over the underbars in the bow and tighten the set screws at the base using the hex key. DEFLATION & STORAGE As you deflate, it can be helpful to push the pontoons under the floorboards. DEFLATION & STORAGE Although PVC material can become brittle in extremely cold temperatures, you can still safely store your Sea Eagle in them so long as you avoid dropping it and do not subject it to any sudden impacts. If you re planning to leave your Sea Eagle outside, be sure to keep it raised up off of the ground. Its also a good idea to keep it covered so that it is not directly exposed to berries, leaves, rain, sunlight and other elements. Sea Eagles that are left in water will most likely have to be emptied from time to time. Make sure that your boat is dry before storing your FoldCat for more than a few days, to remove any excess moisture that could cause unsightly mildew. Choose a cool, dry spot when storing in an enclosed area like basement, closet or garage. Before you begin the deflation process, remove the seats, rod holders, casting bar and motor mount. To deflate, remove the cap and press the valve stem down and clockwise into the open position. Release around 50-75% of the air from each chamber before fully deflating. Leave the valve open so excess air can be pushed out as you rollup the boat. Start by folding the pontoon ends toward the middle. Roll the boat forward pushing any excess air out of the boat as you go along. When you re finished, tuck the bow ends neatly underneath. Place the hull at the center of the opened boat bag and wrap the boat with the narrow flaps first. Lash down with the nylon straps to secure and repeat this process with the wide flaps and nylon straps. 10


12 TROUBLESHOOTING & REPAIRS If your boat is losing air it doesn t necessarily mean that its leaking. For instance a boat that is inflated late in the day with 90 air may cool 20 overnight. The cooler air will exert less pressure on the hull and the boat will appear softer the next morning. When there has been no variation in temperature and your boat is losing air then it is time to start looking for the leak. PVC Based Glue For repairs on our boats you will need to use a PVC based glue. The first thing you should do when looking for a leak is to actually look at the boat. Visually inspect the boat from a few feet away and if necessary, flip it over and closely check the outside. Any large leaks when your boat looses a considerable amount of air should be clearly visible. Be sure to check the tightness of the one-way recessed valves as well and if necessary, tighten them with the valve wrench included in the orange repair kit canister. If you have a rough idea of where your leak is but can t see it, you may want to try listening for it as you may be able to hear the air escaping and pinpoint the leak. Other troubleshooting techniques you can try to locate the leak is to dowse/spray a mix of dishwashing liquid over suspicious areas. The leak may produce bubbles that will pinpoint the location of the leak. Although our Sea Eagles are very rugged and tough, you may still experience the occasional puncture through use of your boat. Fortunately most repairs are fairly easy and only take a few minutes. For an extensive repair please contact us directly for assistance or a quote to have it sent back and repaired at our facility. Repair fees start at $75.00 and do not include return shipping charges. Repair Kit All Sea Eagles come standard with this repair kit which includes both PVC patches and PVC glue. Repair kits that are included in boat package purchases also include the recessed valve adapter and valve wrench. Repair: Pinholes Deflate your boat and thoroughly clean and dry the area that is to be repaired. For small punctures less than 1/8 apply a small drop of glue and allow 12 hours to dry. For immediate use allow 30 minutes to dry and then inflate the compartment with the repair only 3/4 full and be sure to make a more permanent repair later. Repair: Patching Leaks larger than a pinhole can be patched. Most patches can be done in a few minutes, but we do offer a repair service for more complex jobs out of warranty. 11


")

13 TROUBLESHOOTING & REPAIRS Using a pen, trace the outline of your patch which should be large enough to overlap the damaged area by approximately 1/2. Angle the pencil inward a bit so that the ink will be covered by the patch later. 2-Part Adhesive The adhesive that comes standard in your repair kit works for most repairs and installations, but for more detailed and extensive repair we recommend a 2-part PVC adhesive. Apply adhesive to the dull side of the patch and around the area to be repaired. Coat the affected area lightly but completely with glue. If available, heat the glued surfaces with a hair dryer. Valve Replacement DO NOT change out the valve unless you are sure it is broken. In most cases the valve will not leak. Because the base of the valve is built into the boat it cannot be replaced without cutting the chamber open. Place the patch on the damaged area and then press down firmly. Allow to cure for at least 24 hours. Suggested tools include channel lock pliers, valve wrench (included with your repair kit) and piece of repair material (also found in the repair kit). A temperature of 160 degrees will activate the adhesive. NEVER use a heat gun on your boat. Inflate the chamber to full pressure if possible and loosen with the valve wrench by turning it counterclockwise. Deflate the chamber and unscrew the valve body from the base. TIP: Check our website at SeaEagle.com/Instructions for a demonstrational video on this process. 12

 One of the world s lightest four-stroke outboards. The Honda BF2.")

 Delivering the power and performance of a 3HP gas motor, the Torqeedo Travel weighs")
 We all try to keep our boats clean, but their are some stains you just can t avoid.")
 Minn Kota Motors are the most reliable electric trolling motors on the market.")
 U.S.C.G. approved. Life jackets, paddling vest, PFD Belts available in various sizes.")
14 TROUBLESHOOTING & REPAIRS Place the material in the jaws of the channel lock pliers to protect the hull material. Once the body of is unscrewed from the base, pull the body from the opening and insert the replacement base. The opening is very tight, so you may have to pull on it hard. OPTIONAL ACCESSORIES Honda BF2.3 Long Shaft Gas Motor (OPTIONAL) One of the world s lightest four-stroke outboards. The Honda BF2.3 is so light, it rivals many two-stroke 2HP engines and electric motors, without the battery. While still maintaining Honda s reliable, efficient 4-stroke design! OPTIONAL ACCESSORIES Sea Eagle offers a large array of accessories for your FoldCat. Torqeedo Travel 1003s (OPTIONAL) Delivering the power and performance of a 3HP gas motor, the Torqeedo Travel weighs just 29.5 lbs. Please specify motor before ordering as the 375FC takes the 1003s (short shaft) model. 3M Marine Cleaner (OPTIONAL) We all try to keep our boats clean, but their are some stains you just can t avoid. 3M Marine Cleaner & Restorer can remove the toughest stains from mud, bird droppings, oil, and many others. Minn Kota Motors (OPTIONAL) Minn Kota Motors are the most reliable electric trolling motors on the market. These motors run off a 12v deep cycle marine battery (which is not included or sold by Sea Eagle) Personal Flotation Devices (OPTIONAL) U.S.C.G. approved. Life jackets, paddling vest, PFD Belts available in various sizes. Battery Power Center (OPTIONAL) Allows trolling motor leads and charger leads to be connected without opening the box. Built-in battery meter includes two 12-volt accessory plugs and three manual reset circuit breakers. Fits group 24 and 27 size batteries. 13


15 BOARDING THE FOLDCAT FROM THE WATER If you go for a swim, go diving or fall off of the FoldCat, the easiest way to reenter is on the opposite side of the motor. Never try to climb back onto the boat where the motor is attached. Follow these steps to get back onto the boat safely and easily. Swim to the bow and grab the carry handles. Swing one leg over. Grab the 1st slat. Hoist yourself up. Begin to pull yourself up. You re ready to go! Take hold of the 2nd slat. Continue pulling yourself on board. Sea Eagle Boats Inc. 19 N. Columbia Street, Suite 1 Port Jefferson NY staff@seaeagle.com 14
Sea Eagle EZ Cart. Instruction & Owner s Manual. Sea Eagle Boats Inc. 19 N. Columbia Street, Suite 1 Port Jefferson, NY
 Sea Eagle EZ Cart Instruction & Owner s Manual Sea Eagle Boats Inc. 19 N. Columbia Street, Suite 1 Port Jefferson, NY 11777 1-800-748-8066 April 2017 Congratulations on purchasing a Sea Eagle! With over
FishSkiff FSK16 Instruction & Owner s Manual
 FishSkiff FSK16 Instruction & Owner s Manual Sea Eagle Boats Inc. 19 N. Columbia Street, Suite 1 Port Jefferson, NY 11777 1-800-748-8066 January 2019 Congratulations on purchasing a Sea Eagle! With 50
DURAS INFLATABLE BOAT OWNER'S MANUAL
 DURAS INFLATABLE BOAT OWNER'S MANUAL Table of Contents About your new Duras Inflatable Boat Page 1 Assembly Instruction Page 3 Motor Installation Page 5 Capacities Page 5 Troubleshooting Page 6 Using
FishSkiff FSK16 Instruction & Owner s Manual
 FishSkiff FSK16 Instruction & Owner s Manual Sea Eagle Boats Inc. 19 N. Columbia Street, Suite 1 Port Jefferson, NY 11777 1-800-748-8066 August 2018 Congratulations on purchasing a Sea Eagle! With 50 years
Instruction & Owner s Manual For video instructions visit SeaEagle.com/Instructions
 FastTrack Angler 385fta Instruction & Owner s Manual For video instructions visit SeaEagle.com/Instructions Sea Eagle Boats Inc. 19 N. Columbia Street, Suite 1 Port Jefferson, NY 11777 1-800-748-8066 April
FastTrack Kayaks. 385FTG, 385FT & 465FT Instruction & Owner s Manual. For video instructions visit SeaEagle.com/Instructions
 FastTrack Kayaks 385FTG, 385FT & 465FT Instruction & Owner s Manual For video instructions visit SeaEagle.com/Instructions VIDEO INSTRUCTIONS Sea Eagle Boats Inc. 19 N. Columbia Street, Suite 1 Port Jefferson,
RIB11. Instruction & Owner s Manual. Sea Eagle Boats Inc. 19 N. Columbia Street, Suite 1 Port Jefferson, NY
 RIB11 Instruction & Owner s Manual Sea Eagle Boats Inc. 19 N. Columbia Street, Suite 1 Port Jefferson, NY 11777 1-800-748-8066 September 2018 Congratulations on purchasing a Sea Eagle! With 50 years of
Instruction & Owner s Manual For video instructions visit SeaEagle.com/Instructions
 FastTrack Angler 385fta Instruction & Owner s Manual For video instructions visit SeaEagle.com/Instructions Sea Eagle Boats Inc. 19 N. Columbia Street, Suite 1 Port Jefferson, NY 11777 1-800-748-8066 February
TABLE OF CONTENTS. Hello! Happy Paddling, SAFETY WARNING WHAT S INCLUDED IN YOUR BOX GENERAL USE INFORMATION INFLATION INSTRUCTIONS FIN INSTALLATION
 Hello! Thank you for purchasing an inflatable stand up paddle board and WELCOME TO THE TEN TOES FAMILY! We are a small team of outdoor adventurers who strive to make paddle boarding as enjoyable and fulfilling
Inflatable Stand-Up Paddle Boards SUPS OWNER S MANUAL
 Inflatable Stand-Up Paddle Boards SUPS OWNER S MANUAL WARNING: Read carefully and understand all ASSEMBLY AND OPERATION INSTRUCTIONS before operating. Failure to follow the safety rules and other basic
Sea Rebel Kayak Owner s Manual
 Sea Rebel Kayak Owner s Manual www.ravesports.com Table of Contents Product instructions and warnings...2 Inflating instructions...3 Proper use.. 4 Deflating and storage.........6 Cleaning and troubleshooting...8
Model PSI Compressor with 3-Gallon Air Tank 12VDC
 Model 6350 150 PSI Compressor with 3-Gallon Air Tank 12VDC IMPORTANT: It is essential that you and any other operator of this product read and understandd the contents of this manual before installing
SPUD OWNER S MANUAL ALWAYS WEAR A COAST GUARD APPROVED FLOTATION DEVICE WHEN OPERATING THE SPUD KAYAK.
 SPUD OWNER S MANUAL ALWAYS WEAR A COAST GUARD APPROVED FLOTATION DEVICE WHEN OPERATING THE SPUD KAYAK. Know the limits of your abilities and the limits of your equipment. Changes in air temperature and
Hybrid SUP HB96. Instruction & Owner s Manual
 Hybrid SUP HB96 Instruction & Owner s Manual Congratulations on purchasing a Sea Eagle! With over 45 years of experience in designing, selling and using these quality inflatables, we re confident that
isup MANUAL THANK YOU FOR PURCHASING A KAHUNA isup, WE HOPE YOU HAVE MANY YEARS OF PADDLING ENJOYMENT.
 i isup MANUAL THANK YOU FOR PURCHASING A KAHUNA isup, WE HOPE YOU HAVE MANY YEARS OF PADDLING ENJOYMENT. THIS MANUAL IS A GENERAL GUIDELINE FOR SET-UP, CARE AND PROPER USE. PLEASE REFER TO OUR WEBSITE
ASSEMBLY INSTRUCTIONS
 XR 9-2009:new odc 1018 revised 2/17/10 9:11 AM Page 1 ODC XR 9 OUTDOOR DISCOVERY CRAFT ASSEMBLY INSTRUCTIONS Your ODC XR 9 Pontoon Boat comes in two separate cartons consisting of the following parts:
FishSUP FS126 Instruction & Owner s Manual For video instructions visit SeaEagle.com/Instructions
 FishSUP FS126 Instruction & Owner s Manual For video instructions visit SeaEagle.com/Instructions Sea Eagle Boats Inc. 19 N. Columbia Street, Suite 1 Port Jefferson, NY 11777 1-800-748-8066 January 2018
VANDAL SUP OWNER S MANUAL
 IQ SURF IQ FREE IQ TOURING IQ RACE VANDAL SUP OWNER S MANUAL 1 Dear customer, Congratulations on your purchase of the board. We are proud to bring you a quality product at an affordable price with excellent
INSTALLATION INSTRUCTIONS
 KIT CONTENTS: INSTALLATION INSTRUCTIONS PART NUMBER: DESCRIPTION: E361SXA302 roof MOUNT BICycle CARRIER SINGLE Short Carriage Bolt 1x Long Carriage Bolt 3x Over-Molded Wrench 1x Button Head Screw 2x Washer
Pontoon Slide Owner s Manual
 Pontoon Slide Owner s Manual Introduction Water sports can be safe and fun for all levels of enthusiasts. The Owner s Manual is presented to enhance your enjoyment of the sport. It is intended to alert
2,500/4,000 LB Easy Riser Vertical Cable Feighner Lift
 2,500/4,000 LB Easy Riser Vertical Cable Feighner Lift CAUTION - PUT SAFETY FIRST 1. Before attempting to install or operate this lift, study and fully understand the proper operating procedures and safety
OWNER S MANUAL AirTop Large and AirTop Small
 It is the owner s responsibility to read and understand the material presented in this manual and to instruct all users or operators on how to use product safely. By inflating the product, you hereby agree
INSTALLATION INSTRUCTIONS
 INSTALLATION INSTRUCTIONS KIT CONTENTS: PART NUMBER: DESCRIPTION: E361SXA300 ROOF MOUNT BICYCLE CARRIER B9 TRIBECA Short Carriage Bolt Long Carriage Bolt 3x Over-Molded Wrench Button Head Screw 2x Washer
RG1200 Service and Repair Manual
 Dive Rite RG 1200 Regulator Service and Repair Manual Page 1 Text and Photography by Pete Nawrocky Copyright ( ) 1999-2000, Lamartek, Inc., dba Dive Rite RG1200 Service and Repair Manual First Stage.........................................
RAVE SUP STAND UP PADDLE BOARD User Guide/Owner s Manual
 RAVE SUP STAND UP PADDLE BOARD User Guide/Owner s Manual ! W A R N I N G This product is not a lifesaving device. Always wear a nationally approved personal floatation device when using this product. Not
Inflatable Dock Slide Owner s Manual
 Inflatable Dock Slide Owner s Manual Introduction Water sports can be safe and fun for all levels of enthusiasts. The Owner s Manual is presented to enhance your enjoyment of the sport. It is intended
275 RID Assembly Instructions
 75 RID Assembly Instructions Part No. 0003003 v. Lscsep0 PARTS LIST (Specifications and contents subject to change without notice) Description Part # A. RID Track...0000050 B. Capacity Plate...0053 C.
Inflatable Stand Up Paddle Board Manual
 Inflatable Stand Up Paddle Board Manual V-Max AIR 12 6 Voyager AIR 11 6 Koa AIR 10 2 and 10 8 Heavy duty built in carrying handles Steel D Ring Built in Cargo Straps EVA Deck Pad High Pressure Air Valve
DEAR CUSTOMER. Water Fun 275 & 300
 Water Fun 275 & 300 DEAR CUSTOMER Thank you for choosing a boat from Water Fun. We are confident that the boat will give you many fine moments at sea. It is recommended that you read the entire manual
OWNER S MANUAL ALWAYS WEAR A GOVERNMENT APPROVED FLOATATION DEVICE WHEN FISHING. Know the limits of your ability and the limits of your equipment.
 OWNER S MANUAL ALWAYS WEAR A GOVERNMENT APPROVED FLOATATION DEVICE WHEN FISHING. Know the limits of your ability and the limits of your equipment. Changes in air temperature and elevation could cause the
Stand-N-Fish FULL DETAIL INSTALLATION INSTRUCTIONS
 1 Stand-N-Fish FULL DETAIL INSTALLATION INSTRUCTIONS Thank you for purchasing the incredible new Stand-N-Fish Kayak Fishing System. Once installed on your kayak the Stand-N-Fish will take your kayak fishing
Pontoon Slide Owner s Manual
 Pontoon Slide Owner s Manual WWW.RAVESPORTS.COM Copyright 2018 All rights reserved. No part of this publication may be reproduced or transmitted in any form or by any means, electronic or mechanical, including
Cimarron Pontoon Boat
 The Cimarron Pontoon Boat O W N E R ' S M A N U A L C I M A R R O N P O N T O O N B O A T O W N E R S M A N U A L T A B L E O F C O N T E N T S INTRODUCTION 4 SAFETY INFORMATION AND SYMBOLS 5 RESPONSIBILITIES
SATURN INFLATABLE BOATS USER MANUAL
 SATURN INFLATABLE BOATS USER MANUAL 1 Content 1. General 1.1 Introduction 1.2 Manufacturer 1.3 Type 2. General 2.1 Standard accessories and option 3. Warning 4. Assembly 4.1 Air floor boat 4.2 Wood floor
3/8" Dr. Air Butterfly Impact Wrench
 8192106 3/8" Dr. Air Butterfly Impact Wrench Owner s Manual Read and understand all instructions before use. Retain this manual for future reference. Specifications Construction: Polished aluminum and
Santa Fe Cycles Assembly Guide Introduction
 Santa Fe Cycles Assembly Guide Introduction Congratulations on your purchase of your new Santa Fe bicycle. You have purchased a bicycle that has many features and qualities. Please take a few minutes and
Pontoon Slide Owner s Manual
 Pontoon Slide Owner s Manual www.ravesports.com Table of Contents Introduction... 2 Safety rules and information... 3 Boat compatibility guide.5 Assembling and using your Pontoon Slide... 6 Cleaning and
Storm Owner s Manual
 Storm Owner s Manual www.ravesports.com Table of Contents Product instructions and warnings... 3 Water sports safety code... 8 Inflating instructions... 11 Troubleshooting... 12 Cleaning and storage...
MAINTENANCE PROCEDURE FOR X 650
 MAINTENANCE PROCEDURE FOR X 650 X 650 25. juli 2005-1/6 MAINTENANCE PROCEDURE FOR X 650 2 ND STAGE WARNING: This maintenance procedure is only for appointed Scubapro technicians that completed a course
Pakboats PakCanoe Assembly Instructions
 Pakboats PakCanoe Assembly Instructions Note: Please read these assembly instructions carefully before assembling the canoe. a A. Assembling the canoe Note: Don't be afraid to get into the canoe while
Read Before Operating!
 Read Before Operating! IMPORTANT OPERATING INSTRUCTIONS THE DEUCE PITCHING MACHINE THROWS REAL REGULATION BALLS; HOWEVER, THE ACCURACY OF THE DEUCE DEPENDS ON THE QUALITY, HARDNESS AND TYPE OF BALLS YOU
8MAY15 US RACK, Inc Falcon Drive, Madera, CA
 8MAY15 US RACK, Inc. - 2850 Falcon Drive, Madera, CA 93637-559-661-3050 INSTRUCTIONS for Bedrail-mounted MOTORCYCLE RACK, Model 2001-4TRA WARNING: Do NOT attempt to install or use this rack without following
12 Saturn Owner s Manual
 12 Saturn Owner s Manual Water Sports Equipment Inflation, set up and supervision must be done by a mature and knowledgeable adult! Inspect product for any unsafe conditions before use! Do not use if repair
Shoreline Cantilever Lift 2500lb Capacity Models: (108" inside width) - Part # (120" inside width) - Part #
 - Part # (120 inside width) - Part #") Shoreline Cantilever Lift 2500lb Capacity Models: 25108 (108" inside width) - Part # 1017402 25120 (120" inside width) - Part # 1017403 1. 2. 3. 4. 5. CAUTION - PUT SAFETY FIRST Before attempting to install
Shoreline Cantilever Lift 2500lb Capacity Models: 25108 (108" inside width) - Part # 1017402 25120 (120" inside width) - Part # 1017403 1. 2. 3. 4. 5. CAUTION - PUT SAFETY FIRST Before attempting to install
POWER ASSISTED BICYCLES OWNERS MANUAL
 POWER ASSISTED BICYCLES OWNERS MANUAL WE HAVE INCLUDED A BICYCLE OWNER S MANUAL WHICH YOU SHOULD REFER TO FOR ALL GENERAL CYCLE MAINTENANCE. CONTENTS Page. 3 Unpacking. Page. 3-4 Easy steps to get started.
ASSEMBLY MANUAL HOBIE CATSY
 ASSEMBLY MANUAL HOBIE CATSY HOBIE CAT EUROPE ZI Toulon Est, BP 50 8078 Toulon cedex 9, France Tel : + (0)9 08 78 78 - Fax : + (0)9 08 99 Email : hobiecat@hobie-cat.net - http://www.hobie-cat.net ASSEMBLY
Valve Cap. Button. Valve Base
 - Riber Inflatable Stand Up Paddle Board Users Guide Thank you for choosing a Riber Product Ltd. Stand Up Paddle board. This guide is to help you get the most out of your board and ensure you enjoy long
LITERIDER 2&3 IMPORTANT WARNING. 2Bike (1x) Bolt (1x) Nut (1x) Small Hex Wrench (1x)
 Bolt (1x) Nut (1x) Small Hex Wrench (1x)") LITERIDER 2&3 3 Bike (1x) Bolt (1x) Flat Washer (2x) Nut (1x) Large Hex Wrench (1x) 2Bike (1x) wrench (1x) Small Hex Wrench (1x) keys (2x) Long Strap (1x) 2-Zip Strips (6x) 3-Zip Strips (9x) Wheel strap
LITERIDER 2&3 3 Bike (1x) Bolt (1x) Flat Washer (2x) Nut (1x) Large Hex Wrench (1x) 2Bike (1x) wrench (1x) Small Hex Wrench (1x) keys (2x) Long Strap (1x) 2-Zip Strips (6x) 3-Zip Strips (9x) Wheel strap
STEALTH 1200 OWNER'S MANUAL
 STEALTH 1200 OWNER'S MANUAL Decoy Slots Gun Rack With Shell Holder Tie-Down Slots Side Storage Compartments Watertight storage compartment front and back Molded-In Handle Drain Plug Oar Lock Space Cup
Angel 250 Angel 250 (H) Angel 300 Angel 300 (H) Angel 330 Angel 330 (H)
 Angel 300 Angel 300 (H) Angel 330 Angel 330 (H)") Angel 250 Angel 250 (H) Angel 300 Angel 300 (H) Angel 330 Angel 330 (H) Owner s manual www.silvermarine.com CONTENTS GENERAL INTRODUCTION...2 STRUCTURE TERMINOLOGY...3 TECHNICAL SPECIFICATIONS...3 PARTS
Angel 250 Angel 250 (H) Angel 300 Angel 300 (H) Angel 330 Angel 330 (H) Owner s manual www.silvermarine.com CONTENTS GENERAL INTRODUCTION...2 STRUCTURE TERMINOLOGY...3 TECHNICAL SPECIFICATIONS...3 PARTS
400H HARDMOUNT AIR COMPRESSOR KIT PART NO H HARDMOUNT AIR COMPRESSOR KIT PART NO
 400H HARDMOUNT AIR COMPRESSOR KIT PART NO. 40042 450H HARDMOUNT AIR COMPRESSOR KIT PART NO. 45042 400H 450H IMPORTANT: It is essential that you and any other operator of this product read and understand
QUALITY ALUMINUM BOAT LIFTS, INC. INSTRUCTIONS. Dominator Lake Lift
 INSTRUCTIONS Dominator Lake Lift PHONE:251-986-3882 * FAX:251-986-3136 QABLDOMINATORINST.2014 P a g e 1 Quality Aluminum Boat Lifts, INC. Installation Instructions: Dominator Lake Lift Thank you for your
aironaut inflatable kayak made by
 aironaut inflatable kayak made by aironaut by Feathercraft The pump can both inflate and deflate. Green tape indicates inflation connection. Made in Canada. Paddled World Wide. 1. Unfold the kayak and
Misaligned Folds Paper Feed Problems Double Feeds Won t Feed FLYER Won t Run iii
 Operator s Manual Table of Contents Operator Safety... 1 Introduction... 2 Unpacking and Setup... 3 Unpacking... 3 Setup... 4 FLYER Overview... 5 FLYER Diagram... 5 Capabilities... 5 Control Panel... 6
Assembly Instructions. -Cantilever Boat Lifts
 Assembly Instructions -Cantilever Boat Lifts Winch Instruction Page Safety Information 1. The winch is built for the multipurpose of hauling and lifting operations. It is not to be used as a hoist for
SIGNATURE DEF REELS Models: Bare Reel Reel Reel Reel
 SERVICE BULLETIN SB2023 Rev C 7/11 SIGNATURE DEF REELS Models: 2400-006 Bare Reel 2400-007 16 Reel 2400-008 20 Reel 2400-009 30 Reel Thoroughly read and understand this manual before installing, operating
AC1810 / AC1810-A TECHNICAL SPECIFICATIONS. Operating Pressure psi ( kgs/cm²) [AC1810] Displacement. Net Weight
![AC1810 / AC1810-A TECHNICAL SPECIFICATIONS. Operating Pressure psi ( kgs/cm²) [AC1810] Displacement. Net Weight](/thumbs/83/88369739.jpg "AC1810 / AC1810-A TECHNICAL SPECIFICATIONS. Operating Pressure psi ( kgs/cm²) [AC1810] Displacement. Net Weight") Technical Specifications Operating Instructions Maintenance Information Troubleshooting Guide Parts Diagrams AC1810 / AC1810-A THE EVOLUTION OF PERFECTION CAUTION: Before attempting to use or service this
Technical Specifications Operating Instructions Maintenance Information Troubleshooting Guide Parts Diagrams AC1810 / AC1810-A THE EVOLUTION OF PERFECTION CAUTION: Before attempting to use or service this
SLIDE. Super Sweet. instruction manual SLIP SLIDE SPLASH INFLATE THE FUN WITH THINGS YOU NEED TO KNOW ABOUT THE SUPER SWEET SLIDE.
 Super Sweet instruction manual INFLATE THE FUN WITH THINGS YOU NEED TO KNOW ABOUT THE SUPER SWEET. SLIP ALWAYS read, understand and follow all warnings and instructions before use. Keep for future reference.
accidents which arise due to non-observance of these instructions and the safety information herein. SPECIFICATIONS
 18 GAUGE 1-1/4 INCH BRAD NAILER Model: 7611 CALIFORNIA PROPOSITION 65 WARNING: You can create dust when you cut, sand, drill or grind materials such as wood, paint, metal, concrete, cement, or other masonry.
Read Before Operating!
 Read Before Operating! IMPORTANT OPERATING INSTRUCTIONS THE DEUCE PITCHING MACHINE THROWS REAL REGULATION BALLS; HOWEVER, THE ACCURACY OF THE DEUCE DEPENDS ON THE QUALITY, HARDNESS AND TYPE OF BALLS YOU
Puffin Sport Assembly and User Information
 Puffin Sport Assembly and User Information ScanSport, Inc. / Pakboats Post Office Box 700 May Street Enfield, New Hampshire 03748 USA Phone: (888) 863-9500 (toll free) From outside the US: +1 (603) 632-9500
INSTALLATION INSTRUCTIONS
 INSTALLATION INSTRUCTIONS Accessory (ROOF) P/N 08L07-E09-100 Application 6 PILOT Publications No. Issue Date JUN 5 PARTS LIST 6 Washers Bicycle attachment 2 Brackets Hex wrench 4 Knobs 2 Keys 1 Rear Bracket
AIR COMPRESSOR. Failure to follow all instructions as listed below may result in electrical shock, fire, and/or serious personal injury.
 2 GALLON AIR COMPRESSOR Model: 7517 DO NOT RETURN TO STORE. Please CALL 800-348-5004 for parts and service. CALIFORNIA PROPOSITION 65 WARNING: You can create dust when you cut, sand, drill or grind materials
Owners Manual Courtesy of ElectricScooterParts.com
 Owners Manual Courtesy of ElectricScooterParts.com Contents MINIMOTO SPORT RACER Owner s manual and safety information Page 2 Warnings 3-5 Electrical hazard 6 Vehicle assembly and set up 7-8 Brake adjustment
12 Volt Inflator. Operator s Manual. Model: ICC12F, ICC12FC, ICC12FCN, ICC12FCM, ICC12N
 Operator s Manual 12 Volt Inflator Model: ICC12F, ICC12FC, ICC12FCN, ICC12FCM, ICC12N 873 E. Citation Court Boise, Idaho 83716 USA 800-874-5771 www.bon-aireindustries.com Safety Guidelines Assembly Operation
Assembly instructions nortik scubi 2 Recreational kayak
 Assembly instructions nortik scubi 2 Recreational kayak QR-Code assembly video: Assembly instructions nortik scubi 2 Dear Customer, You have purchased a nortik scubi 2, an innovative hybrid kayak for recreational
5 Gallon Pressure Pot with HVLP Spray Gun and Hose
 California Air Tools 5 Gallon Pressure Pot with HVLP Spray Gun and Hose Model No. 365 Technical Data Type of feed.pressure Maximum pressure in the tank... 0,413Mpa (60PSI) Working pressure in the tank.0,
ANNUAL SELF INSPECTION / SERVICING INSTRUCTION SHEET
 ANNUAL SELF INSPECTION / SERVICING INSTRUCTION SHEET These instructions relate ONLY to the following models of inflatable PFD s: Watersnake Inflatable PFD & Watersnake Deluxe PFD (ADULT AND CHILDRENS SIZES)
Freedom8 ShoeBox Compressor Manual
 Freedom8 ShoeBox Compressor Manual Warning!! This product is not a toy! Use or misuse can cause severe injury or death! Use only with adult supervision. This unit is only to be used with tanks, hoses and
Ladies Shopper Bike Assembly Manual 28C03
 Ladies Shopper Bike Assembly Manual 28C03 Ecosmo Ltd 1 Know your bike 1. Wheel 2. Rear Derailleur 3. Chain 4. Crank Set 5. Pedal 6. Seat Quick Lock 7. Saddle and Post 8. Frame 9. Front Light 10. Front
INSTRUCTION MANUAL. January 23, 2003, Revision 0
 INSTRUCTION MANUAL Model 810A In-Vitro Test Apparatus for 310B Muscle Lever January 23, 2003, Revision 0 Copyright 2003 Aurora Scientific Inc. Aurora Scientific Inc. 360 Industrial Parkway S., Unit 4 Aurora,
Assembly Instructions. for. Puffin Saranac. ScanSport, Inc. P.O. Box 700 (234 May Street) Enfield, New Hampshire Phone: (603)
 Enfield, New Hampshire Phone: (603)") Assembly Instructions for Puffin Saranac ScanSport, Inc. P.O. Box 700 (234 May Street) Enfield, New Hampshire 03748 Phone: (603) 632 9500 Fax: (603) 632 5611 info@pakboats.com www.pakboats.com Assembling
Assembly Instructions for Puffin Saranac ScanSport, Inc. P.O. Box 700 (234 May Street) Enfield, New Hampshire 03748 Phone: (603) 632 9500 Fax: (603) 632 5611 info@pakboats.com www.pakboats.com Assembling
420C AIR COMPRESSOR KIT PART NO C AIR COMPRESSOR KIT PART NO
 420C AIR COMPRESSOR KIT PART NO. 42042 460C AIR COMPRESSOR KIT PART NO. 46043 420C 460C IMPORTANT: It is essential that you and any other operator of this product read and understand the contents of this
Please Do Not Return This Product To The Store!
 MODEL NUMBER: GM000W - GAMEMAKER TORCH O W N E R ' S M A N U A L PLEASE READ AND FOLLOW THIS MANUAL IN ITS ENTIRETY BEFORE USE. DOING SO WILL PROVIDE HELPFUL HINTS THAT WILL AID IN GETTING MAXIMUM USE
IMPORTANT SAFETY INSTRUCTIONS
 IMPORTANT SAFETY INSTRUCTIONS CAUTION - To reduce risk of electrical shock: - Do not disassemble. Do not attempt repairs or modifications. Refer to qualified service agencies for all service and repairs.
Seamax Boat Bimini Top User Manual
 Seamax Boat Bimini Top User Manual Size A / B / C 3 BOW Size D / E / F 4 BOW Thanks for your purchase. Seamax Bimini Top has built-in the aluminum eye-end fitting to install on standard oar lock pin (diameter
Rapid Survival System
 Rapid Survival System Model W User Manual Emergency Floatation for Moving Water Self Rescue Version 10.02 Contents User Manual... 1 Part 1: Description and Function... 3 Part 2: Package Contents... 3 Part
444C DUAL PERFORMANCE VALUE PACK
 (Chrome) PART NO. 44432 IMPORTANT: It is essential that you and any other operator of this product read and understand the contents of this manual before installing and using this product. SAVE THIS MANUAL
USER GUIDE TO POWER ASSISTED BIKES
 USER GUIDE TO POWER ASSISTED BIKES 1 PAGE CONTENTS Page. 3 Unpacking Page. 3-4 Easy steps to get started Page. 5 General Assembly Instructions Page. 6 Aligning H/Bars, Page. 7 Tightening pedals onto Crank
SPECIFICATIONS Type: Twin stack, single phase Tank: 4 gallon Air Output: PSI; PSI Max PSI: 125 PSI HP: 1.
 2 GALLON TWIN STACK AIR COMPRESSOR Model: 9526 DO NOT RETURN TO STORE. Please CALL 800-348-5004 for parts and service. CALIFORNIA PROPOSITION 65 WARNING: You can create dust when you cut, sand, drill or
!!!! SERVICE MANUAL PRESSURE POT 2 GALLON. Service Manual: LT Washington St 931 Progress Ave., #7
 EXEL North America, Inc. EXEL Industrial Canada, Inc. 1310 Washington St 931 Progress Ave., #7 West Chicago, IL 60185 Scarborough ONT, M1G 3V5 Ph : (800) 573 5554 Ph : (800) 450 0655 Fx : (800) 664 1511
MODEL NUMBER: PSI AIR SOURCE KIT 200 PSI Compressor on 2.0 Gallon 200 PSI Air Tank
 IMPORTANT SAFETY INSTRUCTIONS CAUTION - To reduce risk of electrical shock or Electrocution: MODEL NUMBER: 20008 200 PSI AIR SOURCE KIT 200 PSI Compressor on 2.0 Gallon 200 PSI Air Tank IMPORTANT: It is
Booster Pump PB4-60 Replacement Kits
 Booster Pump PB4-60 Replacement Kits FOR YOUR SAFETY - This product must be installed and serviced by a contractor who is licensed and qualified in pool equipment by the jurisdiction in which the product
airo-double-naut inflatable kayak made by
 airo-double-naut inflatable kayak made by airo-double-naut by Feathercraft A. B. A. Pivot Foot Pedals for Stern Paddler B. Pump - can be used to inflate and deflate C. C. Rudder and Skeg D. Coaming Rim
Lectric Cycles Mid-Drive Electric Motor Installation
 Lectric Cycles Mid-Drive Electric Motor Installation This write-up describes the installation of a Lectric Cycles electric motor. The model is the e-rad Mid-Drive 750 Watt conversion kit, installed on
USER S MANUAL QUESTIONS? CAUTION. Model No. FMEX Serial No. Write the serial number in the space above for reference. Serial Number Decal
 Model No. FMEX81110.0 Serial No. Write the serial number in the space above for reference. USER S MANUAL Serial Number Decal QUESTIONS? If you have questions, or if parts are damaged or missing, please
200 PSI COMPRESSORS - MODEL NUMBERS
 200 PSI COMPRESSORS - MODEL NUMBERS 380C AIR COMPRESSOR KIT PART NO. 38033 480C AIR COMPRESSOR KIT PART NO. 48043 380C 480C IMPORTANT: It is essential that you and any other operator of this product read
250C-IG COMPRESSOR KIT 12V PART NO C-IG COMPRESSOR KIT 24V PART NO
 250C-IG COMPRESSOR KIT 12V PART NO. 25050 250C-IG COMPRESSOR KIT 24V PART NO. 25058 IMPORTANT: It is essential that you and any other operator of this product read and understand the contents of this manual
100C Air Compressor Kit
 10010 100C Air Compressor (standard mounting bracket, CE Spec) 10014 100C Air Compressor (no leader hose or check valve, CE Spec) 10016 100C Air Compressor (with Omega Bracket, CE Spec) IMPORTANT: It is
EZee Glider Manual. Tools needed for Assembly: Wrench (included) Philips Screwdriver (not included) Assembly Instructions
 Philips Screwdriver (not included) Assembly Instructions") EZee Glider Manual Congratulations on your purchase of the EZee Glider! Your glider is designed for years of nearly carefree use by your child. These instructions include how to set up your glider and
EZee Glider Manual Congratulations on your purchase of the EZee Glider! Your glider is designed for years of nearly carefree use by your child. These instructions include how to set up your glider and
MODEL NUMBER: M20005 AIR SOURCE KIT. 30% Duty Compressor on. 2.0 Gallon Air Tank SAVE THIS MANUAL FOR FUTURE REFERENCE
 MODEL NUMBER: M20005 AIR SOURCE KIT 30% Duty Compressor on 2.0 Gallon Air Tank SAVE THIS MANUAL FOR FUTURE REFERENCE USER MANUAL IMPORTANT SAFETY INSTRUCTIONS CAUTION - To reduce risk of electrical shock
7130 Lancer Rear Drive Magnetic Commercial Indoor Cycling Bike
 7130 Lancer Rear Drive Magnetic Commercial Indoor Cycling Bike Owner s Manual Made in Taiwan INDEX IMPORTANT SAFETY INFORMATION... 1 EXPLODED DRAWING... 2 PARTS LIST... 3 ASSEMBLY INSTRUCTION... 4-9 USER
Palau and Hibiscus Inflatable SUP Board Owner s Manual
 Palau and Hibiscus Inflatable SUP Board Owner s Manual www.ravesports.com Table of Contents Warnings...3 Safety.. 4 Equipment. 5 Set up.. 6 How to use SUP Board. 8 Deflation.. 9 Cleaning, storage and repair....10
ODC XR 12 OUTDOOR DISCOVERY CRAFT TWO MAN PONTOON BOAT ASSEMBLY INSTRUCTIONS
 ODC XR 12 OUTDOOR DISCOVERY CRFT TWO MN PONTOON BOT SSEMBLY INSTRUCTIONS Your ODC XR 12 Two Man Pontoon Boat comes in two separate cartons consisting of the following parts: FRONT FISHING FRME (1) Left
THE OWNER'S MANUAL IS IN TWO VOLUMES: VOLUME 2 TECHNICAL SPECIFICATIONS - ASSEMBLY PROCEDURE ZODIAC
 CAUTION NOTICE: CAREFULLY READ THIS MANUAL BEFORE OPERATING YOUR BOAT. THIS OWNER S MANUAL IS IN TWO VOLUMES THAT MUST BE KEPT TOGETHER. THE OWNER'S MANUAL IS IN TWO VOLUMES: - VOLUME 1 DEALS WITH OPERATING
TABLE OF CONTENTS nrs.com
 OWNER S MANUAL TABLE OF CONTENTS Assembly...3 Valves...4 Maintenance and Cleaning...4 Boat Repair...5 Transport...5 Storage...6 Limited Warranty...6 Congratulations! Your NRS GigBob is ready to carry you
j i m m y s t y k s. c o m
 OWNERS GUIDE READ THIS INFORMATION BEFORE USING YOUR PUFFER INFLATABLE PADDLE BOARD TABLE OF CONTENTS DISREGARDING ANY OF THE SAFETY PRECAUTIONS AND INSTRUCTIONS CONTAINED IN THE OWNER S MANUAL AND/OR
accidents which arise due to non-observance of these instructions and the safety information herein. SPECIFICATIONS
 18 GAUGE 2 INCH BRAD NAILER Model: 7555 CALIFORNIA PROPOSITION 65 WARNING: You can create dust when you cut, sand, drill or grind materials such as wood, paint, metal, concrete, cement, or other masonry.
450P- RV AUTOMATIC PORTABLE COMPRESSOR EXTREME SERIES
 450P- RV AUTOMATIC PORTABLE COMPRESSOR EXTREME SERIES PART NO. 45053 IMPORTANT: It is essential that you and any other operator of this product read and understand the contents of this manual before installing
VERTICAL SURFBOARD CARRIER READ ME! IMPORTANT WARNING!
 VERTICAL SURFBOARD CARRIER ENG RRAC09 30 min READ ME! Thank you for purchasing a Front Runner Vertical Surfboard Carrier. Before you start, take a moment to familiarize yourself with this Fitting Instruction