Assembly instructions nortik scubi 2 Recreational kayak
|
|
|
- Frederick Burke
- 5 years ago
- Views:
Transcription


1 Assembly instructions nortik scubi 2 Recreational kayak QR-Code assembly video:
2 Assembly instructions nortik scubi 2 Dear Customer, You have purchased a nortik scubi 2, an innovative hybrid kayak for recreational use. With great performance, little packing size and weight for a boat of this size, it is extremely versatile in use. The assembling instructions are very detailed and almost every step is illustrated. You will notice that it will help you at one point or another. After a few times and with a little practice you won t need the manual anymore. The experience shows that the first assembly needs more time than you will need later and we ask you to assemble the boat step by step according to this instruction. After some practice, you will assemble the nortik scubi 2 easily within 10 minutes! Please note that there is an assembly video on youtube: For further information please contact your dealer. Otherwise, you may also like to contact us - as the manufacturer: +49 (0) kontakt@nortik.com 2


 #8 Double action pump (no")


3 1) Parts overview #1 1x Hull #2 #2 2x Stem element (bow and stern = identical) #1 #3 4x Keel rod #3 #4 #5 #4 2x Cross ribs for front seat 1x open (lower than for rear seat) 1 x closed (wider than for rear seat) #5 2x Cross ribs for back seat 1x open, 1 x closed #6 Packing bag (no pic) #7 Repair kit (no pic) #8 Double action pump (no pic) 2) Marking All keel rods have little marks with arrows. Sort the rods in a way that all arrows point in the same direction. The arrow always points in direction of the bow. The two keel rods in the middle positions have installed counter clips for the installation of the cross ribs 3

.")

4 3) Assembly General proceeding: First you assemble the keel rods and the stem and insert them into the hull. Then mount the cross ribs and at last inflate the sponsons. First unfold the hull and take one of the stem elements (they are identical). Take the keel rod shown on the picture (with the arrow marking positioned in the front). Make sure the arrow points towards the bow. sleeve Slide the keel rod under the front seat and push it through the sleeve on the hull before clipping it to the stem element. Bow-Section keel rod Push both as far as possible into the stern. 4

.")
5 Make sure everything sits centrally. Fold the support rod upwards and clip it into the cross tube. support rod cross tube Then take the stern element and the keel rod shown on the picture (with the arrow marking positioned in the rear). Make sure the arrow points towards the bow. 5


6 Stern-Section Proceed in the same way as with the bow. keel rod sleeve Slide the keel rod under the back seat and push it through the sleeve on the hull before clipping it to the stem element. Push the stem element as far as possible into the stern Then fold the flexible rod upwards and clip it from below into the cross-tube installed in the hull again Take the last two keel rods. Make sure that the arrows on the rods point towards the bow. 6


7 Place the keel rods under the seats and slide them through the sleeves on the hull before clipping them to the rods you have already installed to the bow-/ stern-section. sleeve sleeve 7

 Pull them both up, until you can fit the lower (with hemispherical end) in the upper (with the riveted")

8 First make sure, that bow- and stern element still are in a central position. Then take out the split pin. Pull up the two middle keel rods. IMPORTANT: Do not grab the rods too close to the ends, but at least a length of the riveted half-tube away from it! (see picture on the left) Pull them both up, until you can fit the lower (with hemispherical end) in the upper (with the riveted half-tube) rod. Make sure that bow and stern do not twist sidewise, but stand as much as possible upright. Slowly push both rods downwards into the hull. This is how the longitudinal tension is provided by pressing the frame into the hull. Make also sure not to twist the rods while pushing them down. If the rods are twisted, it can be difficult to re-enter the split pin in the next step. 8


9 Push the split pin through the two rods and put the rubber band around to secure it. Now install the cross ribs. First take the closed cross rib for the front seat (#4 in the part overview). Push the boat skin a bit aside and place the cross rib behind the front seat diagonally onto the clip on the keel rod. (see picture on the left) 9


.")
10 Then right it slowly up, while the clips interlock. When the cross rib sits upright, clip in the seat bars on the back side of it. (see picture below) Note: If this is hard to do, slide the seat cloth as far as possible towards the bow Then take the open cross rib for the front seat (#4 in the part overview). Clip it on both sides to the seat bars. 10


11 Then press the C-Clip onto the keel rod Follow the same procedure with the remaining cross ribs (#5 in the part overview) for the back seat. 11


12 Now inflate the high pressure sponsons. IMPORTANT: There is an adapter for the filling valves in the repair kit. Put it onto the double action pump. Then insert the adapter into the valve and with a half turn screw it to it. The inflating valves have to positions that you can adjust by pushing and turning the white pin in the middle. In one position you can inflate and disconnect the pump without letting the air out again. If you want to deflate, push in the pin and do a half turn. The valve stays open. Best is first to inflate the lower sponson on one side to around 50%, then on the other side equally. Then change again and fully inflate them in turns. Proceed likewise with the upper sponsons. The ideal pressure is bar ( psi) Do not exceed it! Your boat is now fully assembled and ready for use. 12


 For that you just have to")

13 4) Solo use If you want to paddle your nortik scubi 2 alone, you can do that from the front seat. You will have to use the stern as bow (the front seat is around 35 cm more in the middle of the boat.) For that you just have to change the backrest of the front seat to the other direction. A solo deck is also available. 13

 Then mount it completely and make")


14 5) Installation of the Deck Mount the deck from the stern. Place it in such wise, the deck just covers the Velcro on the boat. It will overlap a little in the back. (see picture on the left) Then mount it completely and make sure to tauten it. Then shove the overlap underneath the black cover at the stern. The two little tubes are the openings for the tripping lines of the rudder system, in case you want to use it. The deck is fully installed. Now you can attach the sprayskirts. 14


, put the distance piece through the hole (3) and reclose the wing nut.")
15 5) Installation of the rudder system The rudder system can be used on both sides of your nortik scubi 2. Both, bow and stern have a pickup for the rudder blade. This allows you to use the rudder system either in solo use, or when paddling in pairs. Steering rope extension 2x Steering rope Pull-up rope Steering bar Carabiner for pull-up rope 2x Shackle for steering bar Rudder blade At the first assembling take the small security ring (1.) off the rudder blade. Then open the wing nut (2), put the distance piece through the hole (3) and reclose the wing nut. Now place the rudder onto the cavity at the stern and secure it with pin, by pushing it through from above. Secure the pin at the bottom again with the little ring. 15
")


16 Take the pull-up clip (with Velcro underneath) and lead the pull-up line through it. Then lead the two steering ropes through the holes of the cross beam...and turn them around. They will lock themselves by being tensioned. Now lead the extensions of the steering lines (with chains) from behind under the cross rib of the middle seat. 16


17 Then lead the whole extension through the loop. Now you have attached the extension to the cross rib. Lead the two steering lines from behind through the two D-rings, on which the back rest is attached. Now knot the steering line to the last chain link of the extension. You can adjust the length of the line to your requirements. Then position the steering bar as you favour and secure it with the shackles. 17


18 By pushing the bar with your feet you can now change the direction of the rudder blade. Lead the end of the pull-up rope back through pin and attach it to the rudder with the carabiner. 8) Instructions for disassembling The disassembling corresponds the assembling in reverse order. Before folding the hull, lay it out flatly. Fully drain the air from the sponsons. You can also do this with the supplied pump, since it has a suction function. Then fold the sides in the middle (lengthwise) as shown. Bow-section Fold it like shown on the next pictures 18
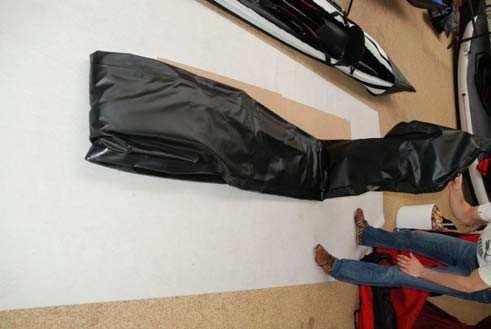
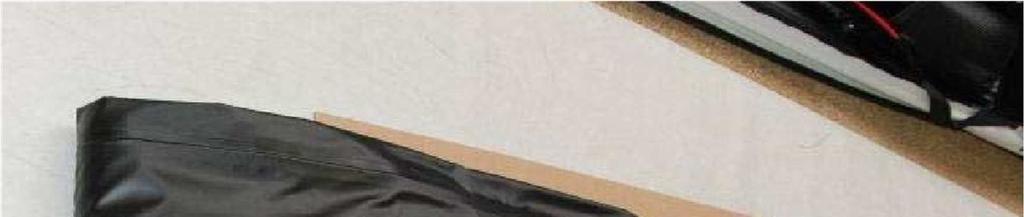


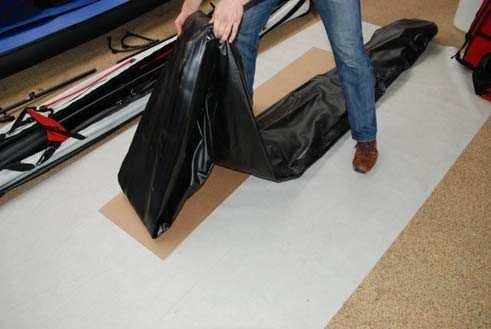

19 Bow-section So you can get the hull back into the bag easily. 19
20 9) Care, Safety, Storage and further Information: Salt water: If you want to use your boat in the brackish water / salt water, the treatment of the rod with "CorroFilm" is absolutely recommended. Ask your local Dealer for it! CorroFilm can be sprayed onto (and if necessary also in) the rods and generates a transparent, dry protective film which protects the aluminum perfectly against the "attack" of salt water. Ask your dealer about CorroFilm. Clean the rods and boat skin after exposing it to salt water (e.g. after the tour) with sufficient fresh water. IMPORTANT: If the boat is to be stored for a longer time, take the air out of the sponsons! A folding boat should be built up and removed several times a year. Ensure that the boat skin and rods are dry when packed and stored. The boat skin is resistant to salt water. Nevertheless, it should also be cleaned with fresh water after the return from a tour in brackish or salt water. Especially when sand or small stones can cause high abrasion. Please make sure to carry the boat not only by the handles, but also support it from the bottom, in order to relieve the handles from tension. Always wear a life jacket when you are using your boat on the Waters! Beware of rapid weather changes! IMPORTANT: If you are on tour for longer, be sure to check the air pressure in the sponsons. Air expands when heated. The operating pressure must not be exceeded. In the case of doubt, be careful to carefully let out some air. Your boat is equipped with overpressure valves (the two red valves in the stern). These will let out air in case the pressure exceeds too much. It is a security mechanism for the extreme case. Do not test it willingly, but follow the guidelines. You can store your nortik scubi 2 built up or disassembled in the bag. Please make sure that your boat is not exposed to unnecessarily long heat. If it is built up, take the pressure from the sponsons by deflating them a bit. Repairing and reinforcements: The PVC / PU skin can easily be repaired in case of abrasion, a small crack or hole with the included repair kit. - Cut a strip of PVC / PU material from the supplied repair kit. Make sure that it extends generously over the damaged area. - Round the corners of the strip with scissors or similar. - Clean the strip and the area to be patched. Both must be free of grease. - It is best to roughen the spot with a fine sandpaper,(but in a pinch it will also work without it) - Apply a thin layer of glue on both surfaces - Wait for the glue to dry slightly, then press the patch firmly onto the area to be repaired. If you can make the repairing at home: Let the glue dry for an hour, place the patch on the spot, and gently warm both with a hot air dryer. Then push the patch firmly onto the hull. On tour: The nortik scubi 2 can be reused shortly after repair. However, the adhesive and protective effect still improves within 12 hours when the adhesive is completely dried. The sponson can be repaired in the same procedure as described above. Please pay attention to a clean, grease-free surface. Your nortik scubi 2 is equipped with a keel strip. However, you can apply additional reinforcements at much stressed points. Depending on the type of use, other keel strips or partial reinforcements of the skin are recommended. If necessary, ask for it in specialized dealers. 20

21 For more information about your and other products, sources of supply and downloads at any time: 21
Assembly Instruction - Triton Vuoksa 2 advanced Touring kayak
 Assembly Instruction - Triton Vuoksa 2 advanced Touring kayak QR-Code assembly video: You can find many assembling videos to our boats on our YouTube channel: https://www.youtube.com/c/faltbootde Assembly
ASSEMBLING INSTRUCTION - TRITON LADOGA 2 ADVANCED
 ASSEMBLING INSTRUCTION - TRITON LADOGA 2 ADVANCED Touring and sea kayak Assembly video: Assembling Instruction - Triton Ladoga 2 advanced Dear Customer, At first: please do not be alarmed by the extent
Assembling Instruction - Triton Ladoga 1 advanced Allround touring and sea kayak
 Assembling Instruction - Triton Ladoga 1 advanced Allround touring and sea kayak 1 Assembling Instruction - Triton Ladoga 1 advanced Dear Customer, At first: please do not be alarmed by the extent of these
Assembly Instructions. for. Puffin Saranac. ScanSport, Inc. P.O. Box 700 (234 May Street) Enfield, New Hampshire Phone: (603)
 Enfield, New Hampshire Phone: (603)") Assembly Instructions for Puffin Saranac ScanSport, Inc. P.O. Box 700 (234 May Street) Enfield, New Hampshire 03748 Phone: (603) 632 9500 Fax: (603) 632 5611 info@pakboats.com www.pakboats.com Assembling
Assembly Instructions for Puffin Saranac ScanSport, Inc. P.O. Box 700 (234 May Street) Enfield, New Hampshire 03748 Phone: (603) 632 9500 Fax: (603) 632 5611 info@pakboats.com www.pakboats.com Assembling
Puffin Sport Assembly and User Information
 Puffin Sport Assembly and User Information ScanSport, Inc. / Pakboats Post Office Box 700 May Street Enfield, New Hampshire 03748 USA Phone: (888) 863-9500 (toll free) From outside the US: +1 (603) 632-9500
Puffin Sport and Saco
 Puffin Sport and Saco Assembly and User Information Pakboats/ScanSport, Inc. Post Office Box 700 May Street Enfield, New Hampshire 03748 USA Phone: (888) 863-9500 (toll free) From outside the US: +1 (603)
Pakboats PakCanoe Assembly Instructions
 Pakboats PakCanoe Assembly Instructions Note: Please read these assembly instructions carefully before assembling the canoe. a A. Assembling the canoe Note: Don't be afraid to get into the canoe while
The Legendary Performance Kurrent
 The Your Legendary Adventure Performance Unfolds Kurrent Folding kayaks TM Feathercraft Products Ltd. 4-1244 Cartwright Street on Granville Island, Vancouver, British Columbia, Canada V6H 3R8 Toll Free:
DURAS INFLATABLE BOAT OWNER'S MANUAL
 DURAS INFLATABLE BOAT OWNER'S MANUAL Table of Contents About your new Duras Inflatable Boat Page 1 Assembly Instruction Page 3 Motor Installation Page 5 Capacities Page 5 Troubleshooting Page 6 Using
The Legendary Performance of Heron
 The Your Legendary Adventure Performance Unfolds of Heron Folding kayaks TM Feathercraft Products Ltd. 4-1244 Cartwright Street on Granville Island, Vancouver, British Columbia, Canada V6H 3R8 Toll Free:
RUDDER KIT INSTRUCTIONS
 C I N S T R U C T I O N S RUDDER KIT INSTRUCTIONS PAMLICOS-0,0,T, T, 60T, Excel Rotomolded Pamlico 0, 0, T, T, 60T, Excel The addition of a rudder to a kayak results in additional control and efficiency,
Instructions MANUAL. Folding kayak NERIS-3
 Instructions MANUAL Folding kayak NERIS-3 1. General description NERIS-3 is a touring folding kayak ideal for flat Technical features: water trips on rivers, lakes and water Loading capacity 375 kg reservoirs.
THE OWNER'S MANUAL IS IN TWO VOLUMES: VOLUME 2 TECHNICAL SPECIFICATIONS - ASSEMBLY PROCEDURE ZODIAC
 CAUTION NOTICE: CAREFULLY READ THIS MANUAL BEFORE OPERATING YOUR BOAT. THIS OWNER S MANUAL IS IN TWO VOLUMES THAT MUST BE KEPT TOGETHER. THE OWNER'S MANUAL IS IN TWO VOLUMES: - VOLUME 1 DEALS WITH OPERATING
Wisper FOLDING KAYAKS
 YOUR THE LEGENDARY ADVENTURE PERFORMANCE UNFOLDS OF Wisper FOLDING KAYAKS TM Feathercraft Products Ltd. 4-1244 Cartwright Street on Granville Island, Vancouver, British Columbia, Canada V6H 3R8 Toll Free:
THE LEGENDARY PERFORMANCE OF YOUR ADVENTURE UNFOLDS
 YOUR THE LEGENDARY ADVENTURE PERFORMANCE UNFOLDS OF K-Light Classic 2008 Feathercraft Products Ltd. 4-1244 Cartwright Street on Granville Island, Vancouver, British Columbia, Canada V6H 3R8 Telephone:
ASSEMBLY INSTRUCTIONS
 XR 9-2009:new odc 1018 revised 2/17/10 9:11 AM Page 1 ODC XR 9 OUTDOOR DISCOVERY CRAFT ASSEMBLY INSTRUCTIONS Your ODC XR 9 Pontoon Boat comes in two separate cartons consisting of the following parts:
Kahuna FOLDING KAYAKS
 THE YOUR LEGENDARY ADVENTURE PERFORMANCE UNFOLDS OF Kahuna FOLDING KAYAKS TM Feathercraft Products Ltd. 4-1244 Cartwright Street on Granville Island, Vancouver, British Columbia, Canada V6H 3R8 Telephone:
YOUR ADVENTURE UNFOLDS
 THE YOUR LEGENDARY ADVENTURE PERFORMANCE UNFOLDS OF Khatsalano Feathercraft Products Ltd. 4-1244 Cartwright Street on Granville Island, Vancouver, British Columbia, Canada V6H 3R8 Telephone: (604) 681-8437
GREENLAND II OWNER S GUIDE.
 GREENLAND II OWNER S GUIDE www.folbot.com Page 2 of 12 FOLBOT OWNER S TIPS ADDING YEARS TO YOUR FOLBOT S LIFE 1. As you become familiar with the assembly of the boat, pieces will fall into place naturally.
Khatsalano. with built-in coaming
 YOUR THE LEGENDARY ADVENTURE PERFORMANCE UNFOLDS OF Khatsalano with built-in coaming Feathercraft Products Ltd. 4-1244 Cartwright Street on Granville Island, Vancouver, British Columbia, Canada V6H 3R8
Kurrent 2.0 FOLDING KAYAKS
 The YOUR Legendary ADVENTURE Performance UNFOLDS Kurrent 2.0 FOLDING KAYAKS TM Feathercraft Products Ltd. 4-1244 Cartwright Street on Granville Island, Vancouver, British Columbia, Canada V6H 3R8 Toll
PARTS - FORWARD. Kayaking + Fishing Parts & Accessories Hook HATCH SEAL "TRIM-LOC" (TOP MOLDED) 5 REQ
 5 REQ") PARTS - FORWARD 72104001 Hook 71301001 HATCH SEAL "TRIM-LOC" (TOP MOLDED) 5 REQ 71302001 HULL FLANGE SEAL (pre 2012 ADV) "TRIM-LOC" (SIDE GLUED) 5 REQ 80012001 Pedal Retainer Bungee w/ Hook 84560001 Mast
PARTS - FORWARD 72104001 Hook 71301001 HATCH SEAL "TRIM-LOC" (TOP MOLDED) 5 REQ 71302001 HULL FLANGE SEAL (pre 2012 ADV) "TRIM-LOC" (SIDE GLUED) 5 REQ 80012001 Pedal Retainer Bungee w/ Hook 84560001 Mast
Instructions MANUAL. Folding kayak NERIS-2 (tandem)
") Instructions MANUAL Folding kayak NERIS-2 (tandem) 1. General descrition NERIS-2 is a touring folding kayak ideal for flat water trips on rivers, lakes and water reservoirs. It is also suitable for sea
Instructions MANUAL Folding kayak NERIS-2 (tandem) 1. General descrition NERIS-2 is a touring folding kayak ideal for flat water trips on rivers, lakes and water reservoirs. It is also suitable for sea
RUDDER KIT INSTRUCTIONS
 A I N S T R U C T I O N S RUDDER KIT INSTRUCTIONS TARPON 0/40/60/60i The Tarpon series is designed as a high performance sit-on-top kayak tailored for the sport paddler. Our rudder system is designed to
K2 Expedition Double
 YOUR THE LEGENDARY ADVENTURE PERFORMANCE UNFOLDS OF K2 Expedition Double Feathercraft Products Ltd. 4-1244 Cartwright Street on Granville Island, Vancouver, British Columbia, Canada V6H 3R8 Telephone:
(PLEASE CONTACT YOUR LOCAL DEALER or CUSTOMER SERVICE FOR WARRANTY INFORMATION)
") RUDDER KIT SOLO KAYAKS IMPORTANT: Tandem models will require the Wildy Supplemental kit in addition to this kit. The Supplemental kit provides extension straps and extra footbraces that allow rudder positioning
RUDDER KIT SOLO KAYAKS IMPORTANT: Tandem models will require the Wildy Supplemental kit in addition to this kit. The Supplemental kit provides extension straps and extra footbraces that allow rudder positioning
K2 Expedition Double
 Your The Legendary Adventure Performance Unfolds of K2 Expedition Double with built-in coamings and pivot pedals Feathercraft Products Ltd. 4-1244 Cartwright Street on Granville Island, Vancouver, British
DEAR CUSTOMER. Water Fun 275 & 300
 Water Fun 275 & 300 DEAR CUSTOMER Thank you for choosing a boat from Water Fun. We are confident that the boat will give you many fine moments at sea. It is recommended that you read the entire manual
K1 Expedition FOLDING KAYAKS
 THE YOUR LEGENDARY ADVENTURE PERFORMANCE UNFOLDS OF K1 Expedition FOLDING KAYAKS TM Feathercraft Products Ltd. 4-1244 Cartwright Street on Granville Island, Vancouver, British Columbia, Canada V6H 3R8
AdvancedTrak Rudder Kit AE4005. Assembly and Installation Instructions
 AdvancedTrak Rudder Kit AE4005 Assembly and Installation Instructions Thank you for your purchase of the Advanced Elements AdvancedTrak Rudder Kit! A Kayak Rudder is a great way to enhance the tracking
Inflatable Stand-Up Paddle Boards SUPS OWNER S MANUAL
 Inflatable Stand-Up Paddle Boards SUPS OWNER S MANUAL WARNING: Read carefully and understand all ASSEMBLY AND OPERATION INSTRUCTIONS before operating. Failure to follow the safety rules and other basic
(PLEASE CONTACT YOUR LOCAL DEALER or CUSTOMER SERVICE FOR WARRANTY INFORMATION)
") RUDDER KIT SOLO AND TANDEM KAYAKS IMPORTANT: For Tandem kayaks, the Supplemental Kit will be needed in addition to this kit and can be purchased through a registered dealer. The addition of a rudder to
RUDDER KIT SOLO AND TANDEM KAYAKS IMPORTANT: For Tandem kayaks, the Supplemental Kit will be needed in addition to this kit and can be purchased through a registered dealer. The addition of a rudder to
aironaut inflatable kayak made by
 aironaut inflatable kayak made by aironaut by Feathercraft The pump can both inflate and deflate. Green tape indicates inflation connection. Made in Canada. Paddled World Wide. 1. Unfold the kayak and
Bladerider X8 Assembly Help Notes
 2.1 Remove All Parts & Have Some Tools Handy Remove all items from the box and identify each part as per the packing sheet and check that nothing is missing. If there is something missing, please email
Constitution Instructions
 Constitution Instructions This kit will build a 1:48 scale hull for the USS Constitution frigate. The kit contains the following parts. 1/8 deck with laser etched deck lines 1/8 railing Ribs Center keel
ASSEMBLY MANUAL HOBIE CATSY
 ASSEMBLY MANUAL HOBIE CATSY HOBIE CAT EUROPE ZI Toulon Est, BP 50 8078 Toulon cedex 9, France Tel : + (0)9 08 78 78 - Fax : + (0)9 08 99 Email : hobiecat@hobie-cat.net - http://www.hobie-cat.net ASSEMBLY
isup MANUAL THANK YOU FOR PURCHASING A KAHUNA isup, WE HOPE YOU HAVE MANY YEARS OF PADDLING ENJOYMENT.
 i isup MANUAL THANK YOU FOR PURCHASING A KAHUNA isup, WE HOPE YOU HAVE MANY YEARS OF PADDLING ENJOYMENT. THIS MANUAL IS A GENERAL GUIDELINE FOR SET-UP, CARE AND PROPER USE. PLEASE REFER TO OUR WEBSITE
INSTALLING THE TRIDENT 11, 13 OR 15 RUDDER
 INSTALLING THE TRIDENT 11, 13 OR 15 RUDDER Parts Included: Steering Parts: Foot Rail Parts: Rudder Parts: Retraction Parts: 4 - Rubber 2 - Rail Assemblies 1 - Rudder Body 1 - Rudder Retraction Grommets
OWNER S MANUAL ALWAYS WEAR A GOVERNMENT APPROVED FLOATATION DEVICE WHEN FISHING. Know the limits of your ability and the limits of your equipment.
 OWNER S MANUAL ALWAYS WEAR A GOVERNMENT APPROVED FLOATATION DEVICE WHEN FISHING. Know the limits of your ability and the limits of your equipment. Changes in air temperature and elevation could cause the
STERN MOTOR FOOT CONTROL KIT For use with the Torqeedo 403 Ultralight
 STERN MOTOR FOOT CONTROL KIT For use with the Torqeedo 403 Ultralight The Wilderness Systems Foot Control Kit is designed to connect directly to a Torqeedo 403 Ultralight motor mounted on the stern of
VANDAL SUP OWNER S MANUAL
 IQ SURF IQ FREE IQ TOURING IQ RACE VANDAL SUP OWNER S MANUAL 1 Dear customer, Congratulations on your purchase of the board. We are proud to bring you a quality product at an affordable price with excellent
Parts List. 7. Handlebars 8. Grips 9. Handlebar Stem 10. Front Brake 11. Front Wheel 12. Crank 13. Chain
 Woodworm Cruise Parts List 1. Free Wheel with Rear Hub 2. Fenders 3. Fender Stay 4. Quick Release 5. Saddle 6. Seat Post 7. Handlebars 8. Grips 9. Handlebar Stem 10. Front Brake 11. Front Wheel 12. Crank
ULTIMATE 12 RUDDER INSTALLATION INSTRUCTIONS
 ULTIMATE 12 RUDDER INSTALLATION INSTRUCTIONS TOOLS NEEDED: DRILL ¼ DRILL BIT ¾ HOLE SAW 3/16 DRILL BIT PHILLIPS HEAD SCREWDRIVER 7/16 WRENCH HEAT SOURCE: PROPANE TORCH, LIGHTER OR HOT AIR GUN WIRE CUTTER
airo-double-naut inflatable kayak made by
 airo-double-naut inflatable kayak made by airo-double-naut by Feathercraft A. B. A. Pivot Foot Pedals for Stern Paddler B. Pump - can be used to inflate and deflate C. C. Rudder and Skeg D. Coaming Rim
 www.aquaglidekayak.com WORK SPACE AND TOOLS 1. Take care to position yourself in a clean, dry area with good ventilation. For proper curing of adhesives, temperature should remain above 10 C (50 F).
Owner s Instruction Manual
 Owner s Instruction Manual IMPORTANT! PLEASE READ THIS MANUAL CAREFULLY BEFORE PROCEEDING. AFTER READING THIS MANUAL, SAVE THESE INSTRUCTIONS FOR FUTURE REFERENCE. Congratulations on your purchase of the
SPUD OWNER S MANUAL ALWAYS WEAR A COAST GUARD APPROVED FLOTATION DEVICE WHEN OPERATING THE SPUD KAYAK.
 SPUD OWNER S MANUAL ALWAYS WEAR A COAST GUARD APPROVED FLOTATION DEVICE WHEN OPERATING THE SPUD KAYAK. Know the limits of your abilities and the limits of your equipment. Changes in air temperature and
Your kit contains the following items. Additional Items You May Need. Pre- cut parts Propeller rigging and rubber Sandpaper Covering sheet
 Your kit contains the following items Pre- cut parts Propeller rigging and rubber Sandpaper Covering sheet The SkyFox offers great glide performance in a rubber powered plane due to its built up wing.
Ref Part Part # Qty Letter A Rudder Catcher B X 1/2 PH Bolts C Rudder Bracket
 Ref Part Part # Qty A Rudder Catcher 07.2694.0000 1 J B Q A B 10-32 X 1/2 PH Bolts 07.2136.0000 10 C Rudder Bracket 07.2689.0000 1 D Kayak Pad Eye 01.1315.0430 2 E Cherry Rivets 01.1315.0459 4 H T N P
ESOCCI RIGGING MANUAL
 ESOCCI RIGGING MANUAL 1 Spray Covers Hull Rear Iako Forward Iako Ama ESOCCI RIGGING MANUAL 2 When training & racing in outrigger canoes, the canoe is your protector on the water and therefore it is imperative
Hansa COG 14 th century SCALE: 1/72 Length: 430mm Width: 210mm Height: 330mm
 Hansa COG 14 th century SCALE: 1/72 Length: 430mm Width: 210mm Height: 330mm HISTORY: The Hansa was a medieval association of German cities which engaged by in long distance business mainly in area of
B.C.D. Buoyancy Compensator Device User Manual
 B.C.D. Buoyancy Compensator Device User Manual English ver 2.2 CONTENTS Important Warnings Preparation before diving - How to assemble the retaining rubber bungees - How to assemble the tank straps - How
K1 Expedition. with built-in coaming FOLDING KAYAKS
 YOUR THE LEGENDARY ADVENTURE PERFORMANCE UNFOLDS OF K1 Expedition with built-in coaming FOLDING KAYAKS Feathercraft Products Ltd. 4-1244 Cartwright Street on Granville Island, Vancouver, British Columbia,
SCUBAPRO. Balanced Power Inflator
 SCUBAPRO Balanced Power Inflator USE THIS GUIDE AS A REFERENCE WHEN SERVICING THE BALANCED POWER INFLATOR Important note: The following information is not designed to be a complete training guide for servicing
SERIES 2 RAMP OWNER S MANUAL TOOLS REQUIRED: BEFORE YOU BEGIN... Read and understand these instructions before beginning a ramp setup.
 SERIES 2 RAMP OWNER S MANUAL BEFORE YOU BEGIN... Read and understand these instructions before beginning a ramp setup. Use caution and care for your back when lifting, pushing, pulling, folding or unfolding
Assembly Instructions Star Kayak Sails kit to a Hobie Mirage drive kayak.
 Assembly Instructions Star Kayak Sails kit to a Hobie Mirage drive kayak. 1. Remove packaging lay out contents. Separate the plastic tubes from the aluminium tubes. 3 plastic and 4 aluminium. ( Giant Star
Kayak Trailer Project.doc
 Kayak Trailer Project.doc Note: the red trailer shown in some of the illustrations is no longer available from Northern Tools. However, may be able to adapt similar trailer, but measurements may not be
GEAR BOAT. playseries sportseries proseries BOAT GEAR 122
 BOAT GEAR 122 BOAT GEAR playseries sportseries proseries Bright colors and graphics, perfect for leisurely cruising and relaxing around the pool on lazy summer days. A broad range of recreation boats and
INTRODUCTION Thank you for purchasing the SLSUPB10 - SLSUPB20. Please read this manual carefully before using this product.
 by INTRODUCTION Thank you for purchasing the SLSUPB10 - SLSUPB20. Please read this manual carefully before using this product 2 WHAT S WHAT? Air Valve Carrying Handle Tie down Bungee Cords Leash Plug SLSUPST15
ALLY. Folding Canoes & Kayak. ALLY an innovative canoe and worldwide success. Made in Norway. Foto: Tommy Simonsen
 ALLY Folding Canoes & Kayak Made in Norway Foto: Tommy Simonsen ALLY an innovative canoe and worldwide success An ALLY folding canoe has many advantages compared with "ordinary" canoes: You can store it
java Assembly Instructions SIT-ON-TOP KAYAKS
 TM java FOLDING Assembly Instructions airline SIT-ON-TOP KAYAKS by Contents 1 Kayaking Safety 3 Care and Maintenance Repairing or Replacing Air Tubes 4 Java Assembly Instructions 10 Java in Double Configuration
Rudder Kit Assembly Instructions for Quest 13
 Rudder Kit Assembly Instructions for Quest 13 Revised 4/2/2015 78501 Rudder System The Hobie Quest is designed for the addition of an optional rudder system. Rudder systems in boats like this allow you
GREEK TRIREME, 480 B.C. Scale: 1/72 Length: 515mm Width: 180mm Height: 220mm
 GREEK TRIREME, 480 B.C. Scale: 1/72 Length: 515mm Width: 180mm Height: 220mm HISTORY: The model represents a Greek Trireme from the age of battle of Salamis (480 B.C.). The crew were 170 oarsmen and about
Inflatable Stand Up Paddle Board Manual
 Inflatable Stand Up Paddle Board Manual V-Max AIR 12 6 Voyager AIR 11 6 Koa AIR 10 2 and 10 8 Heavy duty built in carrying handles Steel D Ring Built in Cargo Straps EVA Deck Pad High Pressure Air Valve
Owner s Guide. ElevateSUP.com
 Owner s Guide ElevateSUP.com IMPORTANT READ THIS IMPORTANT INFORMATION BEFORE USING YOUR STAND UP PAD- DLEBOARD Disregarding any of the safety precautions and instructions contained in the owner s manual
SATURN INFLATABLE BOATS USER MANUAL
 SATURN INFLATABLE BOATS USER MANUAL 1 Content 1. General 1.1 Introduction 1.2 Manufacturer 1.3 Type 2. General 2.1 Standard accessories and option 3. Warning 4. Assembly 4.1 Air floor boat 4.2 Wood floor
X-PRESS STAGE SYSTEM OWNER S MANUAL. TOOLS REQUIRED Allen Wrench (provided)
") X-PRESS STAGE SYSTEM BEFORE YOU BEGIN... Read and understand these instructions before operating. Use caution and care for your back when lifting, pushing, pulling, or folding and unfolding these units.
X-PRESS STAGE SYSTEM BEFORE YOU BEGIN... Read and understand these instructions before operating. Use caution and care for your back when lifting, pushing, pulling, or folding and unfolding these units.
Falcon 3 145, 170, 195 and Tandem Owner / Service Manual
 Falcon 3 145, 170, 195 and Tandem Owner / Service Manual January 2007 - Second Edition Removing The Sail From The Airframe And Short Packing The Glider Many maintenance and repair procedures will require
Pressure Dump Valve Service Kit for Series 3000 Units
 Instruction Sheet Pressure Dump Valve Service Kit for Series 000 Units. Overview The Nordson pressure dump valve is used to relieve hydraulic pressure instantly in Series 00, 400, 500, and 700 applicator
YOUR ADVENTURE UNFOLDS
 YOUR The Legendary ADVENTURE Performance UNFOLDS of Klondike Feathercraft Products Ltd. 4-1244 Cartwright Street on Granville Island, Vancouver, British Columbia, Canada V6H 3R8 Telephone: (604) 681-8437
TABLE OF CONTENTS. Hello! Happy Paddling, SAFETY WARNING WHAT S INCLUDED IN YOUR BOX GENERAL USE INFORMATION INFLATION INSTRUCTIONS FIN INSTALLATION
 Hello! Thank you for purchasing an inflatable stand up paddle board and WELCOME TO THE TEN TOES FAMILY! We are a small team of outdoor adventurers who strive to make paddle boarding as enjoyable and fulfilling
275 RID Assembly Instructions
 75 RID Assembly Instructions Part No. 0003003 v. Lscsep0 PARTS LIST (Specifications and contents subject to change without notice) Description Part # A. RID Track...0000050 B. Capacity Plate...0053 C.
THE AMERICAN BARN DOOR KITE
 THE AMERICAN BARN DOOR KITE Oregon Kitemaker s Retreat January 2007 Rod Beamguard 4104 NW 112 th Way Vancouver, WA 98685-3578 (360) 574-8050 home (360) 750-9833 office kytfevr@wa-net.com PLANFORM BARN
HOME ASSEMBLY INSTRUCTIONS
 HOME ASSEMBLY INSTRUCTIONS This Papillionaire Bicycle now belongs to you. It will take you to work, wait patiently outside your local cafe, and carry your groceries home. This is the start of your long-term
MAINTENANCE PROCEDURE FOR X 650
 MAINTENANCE PROCEDURE FOR X 650 X 650 25. juli 2005-1/6 MAINTENANCE PROCEDURE FOR X 650 2 ND STAGE WARNING: This maintenance procedure is only for appointed Scubapro technicians that completed a course
Final Assembly Instructions Bikes with Threaded Headsets
 Final Assembly Instructions Bikes with Threaded Headsets Thank you for buying your new bicycle from L.L.Bean. Read these instructions carefully before beginning the final assembly. Prior to shipping, our
Drawn up by: / RK Revision: 01 Reviewed: Page: 1 of 23 HI-SR 540 USA. Operating instruction SR 540 Face Shield
 Page: 1 of 23 Operating instruction SR 540 Face Shield Page: 2 of 23 General information The SR 540 Face Shield can be used together with the SR 500 Powered Air-Purifying Respirator system of components
Angel 250 Angel 250 (H) Angel 300 Angel 300 (H) Angel 330 Angel 330 (H)
 Angel 300 Angel 300 (H) Angel 330 Angel 330 (H)") Angel 250 Angel 250 (H) Angel 300 Angel 300 (H) Angel 330 Angel 330 (H) Owner s manual www.silvermarine.com CONTENTS GENERAL INTRODUCTION...2 STRUCTURE TERMINOLOGY...3 TECHNICAL SPECIFICATIONS...3 PARTS
Angel 250 Angel 250 (H) Angel 300 Angel 300 (H) Angel 330 Angel 330 (H) Owner s manual www.silvermarine.com CONTENTS GENERAL INTRODUCTION...2 STRUCTURE TERMINOLOGY...3 TECHNICAL SPECIFICATIONS...3 PARTS
Topaz OMEGA Rigging Instructions
 Topaz OMEGA Rigging Instructions www.toppersailboats.com TOPAZ OMEGA RIGGING INSTRUCTIONS CONTENTS 02. Introduction 02. Manufacturers Details 03. Maintenance 04. Raising the Mast 05. Attaching the Boom
Mount the actuator in the bracket provided and install a 24-foot EFTC cable to the actuator.
 . Mount the actuator in the bracket provided and install a 4-foot EFTC cable to the actuator. Route the cable through left stanchions,, and 4. Be sure that the cable does not contact any spring or push
On the Go Swing System Instruction Manual
 On the Go Swing System Instruction Manual WARNING READ ENTIRE MANUAL BEFORE USE. THIS SWING IS NOT A TOY. THIS SWING IS ONLY TO BE USED BY TRAINED PERSONNEL, SUCH AS AN OCCUPATIONAL THERAPIST, PHYSICAL
Sea Rebel Kayak Owner s Manual
 Sea Rebel Kayak Owner s Manual www.ravesports.com Table of Contents Product instructions and warnings...2 Inflating instructions...3 Proper use.. 4 Deflating and storage.........6 Cleaning and troubleshooting...8
KAYAK ERGOMETER. Operating Instructions (Rev 3.0)
") KAYAK ERGOMETER Operating Instructions (Rev 3.0) Weba Sport und Med.- Artikel GmbH Liesneckgasse 6/1 1210 Vienna Austria Tel.: ++43 1 2723550 Fax: ++43 1 27235504 office@webasport.at www.weba-sport.com
KAYAK ERGOMETER Operating Instructions (Rev 3.0) Weba Sport und Med.- Artikel GmbH Liesneckgasse 6/1 1210 Vienna Austria Tel.: ++43 1 2723550 Fax: ++43 1 27235504 office@webasport.at www.weba-sport.com
3. Sail Kit. Table of Contents: Portland Pudgy Safety Dinghy: 3. Sail Kit
 Table of Contents: 3. Sail Kit Sailing the Portland Pudgy... 1 Sailing Tips... 1 Reducing the Sail Area (Reefing the Sail)... 2 Method 1. Reducing Sail without the Exposure Canopy... 2 Method 2. Reducing
Read Instructions carefully before use. Rollator is designed for indoor & outdoor use. Do NOT use as a wheelchair or as a transport chair.
 Charcoal Red Seat Height 500-10191 500-10195 19 500-10211 500-10215 21 500-10241 500-10245 24 User Manual Read Instructions carefully before use. Rollator is designed for indoor & outdoor use. Do NOT use
Kari-Tek. Kari-Tek. Hydro Skeg Retro-Fitting Instructions. Instructions for retro-fitting of Hydro Skeg
 Kari-Tek Instructions for retro-fitting of Hydro Skeg A good knowledge of fibreglassing will be required to fit the Hydro Skeg successfully. When working with fibreglass and cutting the holes, safety glasses,
Assembly, Fitting, Care & Maintenance
 Assembly, Fitting, Care & Maintenance Assembly 1.1 Remove All Parts and Tools from Packaging 1.2 Part and Tools required for assembly 1.3 Check Foot & Leg Assembly 1.4 Adjust Upper-Leg-Support (ULS) Height
8. Carefully layout all the parts of the reservoir setup and clean any dirt, grime or dust from the parts. ( image 8 ) 8
 8") INSTRUCTIONS TO SERVICE AMADAXTREME SHOCKS 2.0 REMOTE RES AUSTRALIAN VERSION PART 1 - SERVICE THE RESERVOIR 1.Prior to cleaning the shock check for any leaks or signs of damage to the res, lines, bushes
INSTRUCTIONS TO SERVICE AMADAXTREME SHOCKS 2.0 REMOTE RES AUSTRALIAN VERSION PART 1 - SERVICE THE RESERVOIR 1.Prior to cleaning the shock check for any leaks or signs of damage to the res, lines, bushes
On the Go Swing System Instruction Manual
 On the Go Swing System Instruction Manual WARNING READ ENTIRE MANUAL BEFORE USE. THIS SWING IS NOT A TOY. THIS SWING IS ONLY TO BE USED UNDER ADULT SUPERVISION. CONSULT WITH A CHILD S THERAPIST ON HOW
K1 Expedition with built-in coaming
 YOUR THE LEGENDARY ADVENTURE PERFORMANCE UNFOLDS OF K1 Expedition with built-in coaming FOLDING KAYAKS TM Feathercraft Products Ltd. 4-1244 Cartwright Street on Granville Island, Vancouver, British Columbia,
Lectric Cycles Mid-Drive Electric Motor Installation
 Lectric Cycles Mid-Drive Electric Motor Installation This write-up describes the installation of a Lectric Cycles electric motor. The model is the e-rad Mid-Drive 750 Watt conversion kit, installed on
INSTALLING THE PROWLER 13 RUDDER
 INSTALLING THE PROWLER 13 RUDDER Parts Included: Steering Parts: Foot Rail Parts: Rudder Parts: Retraction Parts: 4 Rubber 2 Rail Assemblies Rudder Body 1 Rudder Retraction Grommets (includes steering
Final Assembly Instructions Bikes with Threaded Headsets
 Final Assembly Instructions Bikes with Threaded Headsets Thank you for buying your new bicycle from L.L.Bean. Read these instructions carefully before beginning the final assembly. Prior to shipping, our
Stand-N-Fish FULL DETAIL INSTALLATION INSTRUCTIONS
 1 Stand-N-Fish FULL DETAIL INSTALLATION INSTRUCTIONS Thank you for purchasing the incredible new Stand-N-Fish Kayak Fishing System. Once installed on your kayak the Stand-N-Fish will take your kayak fishing
MOOWII MANUAL. Using a kite is dangerous and can cause severe injuries. Before use, carefully read this manual.
 MOOWII MANUAL Using a kite is dangerous and can cause severe injuries. Before use, carefully read this manual. Release of liability By assembling or using this CrazyFly kiteboarding product (further named
Seamax Boat Bimini Top User Manual
 Seamax Boat Bimini Top User Manual Size A / B / C 3 BOW Size D / E / F 4 BOW Thanks for your purchase. Seamax Bimini Top has built-in the aluminum eye-end fitting to install on standard oar lock pin (diameter
INFLATABLE TENDER OWNER S MANUAL
 INFLATABLE TENDER OWNER S MANUAL INFLATABLE TENDER OWNER S MANUAL Please read this instruction carefully before assembling your tender 1 General 1.1 Introduction 1.2 Type of inflatable tender 2 Parts identification
aero naut Order No. 3009/00
 aero naut Order No. 3009/00 Introduction: The model should be assembled following the sequence of the stages of construction described in these instructions. The laser-cut components are individually numbered.
ODC XR 12 OUTDOOR DISCOVERY CRAFT TWO MAN PONTOON BOAT ASSEMBLY INSTRUCTIONS
 ODC XR 12 OUTDOOR DISCOVERY CRFT TWO MN PONTOON BOT SSEMBLY INSTRUCTIONS Your ODC XR 12 Two Man Pontoon Boat comes in two separate cartons consisting of the following parts: FRONT FISHING FRME (1) Left
PT 11 trouble-shooting and maintenance.
 PT 11 trouble-shooting and maintenance. Does your rudder not stay down?...your back seat slip off?...your knobs tight and your leather pads loose? Maybe we can help. We have used our PT 11 s hard enough