Manual - Transport & Special bikes
|
|
|
- Lynne Hutchinson
- 5 years ago
- Views:
Transcription


1 SE Manual - Transport & Special bikes
2
3 Congratulation to your new bike! Modern technology and thoroughly tested components guarantee you a great bike. Like other technical devices your bike also needs maintenance and service. This manual is not a service manual but describes only simple maintenance. More advanced repairs we ask that you submit to a professional. Before using your bike, please read this instruction manual. This manual is not model bound, so we ask you to read the section that applies to your bike.

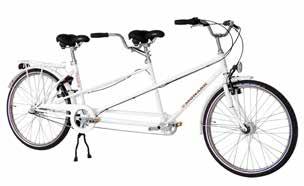
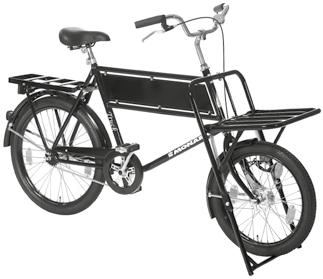
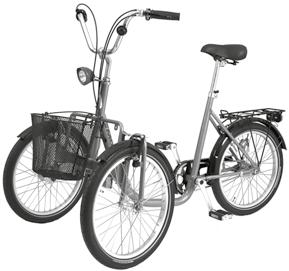
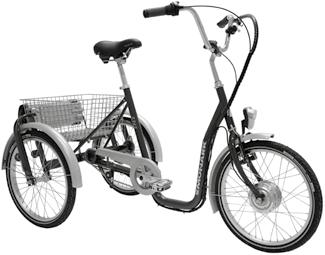
4 The year was The first Kroon bike was produced and the location was Vansbro in Dalarna. Today, Monark has taken over production of Kroon transport bikes and specialized bikes. Design, development and manufacturing are still in Vansbro in an ultra-modern factory, in which, the Monark world leader ergometer bikes also are produced. It is a genuine craftmanship, quality thinking and proud traditions that characterize the classical cycle Monark bike is a good hard worker, a workhorse that can withstand hard and tough and ensures long life. Monark's bike is a unique product that is available in a variety of designs. Everything from the good old errand-boy's model, scooters, flatbed bikes, handicap bikes, tandem bikes to the famous postman's bike. The Monark bike is an affordable, reliable and smart transportation for those who are in need of simple, fast and efficient deliveries.
5 Contents Description...6 Assembly/Adjustment...7 Safety precautions User instructions Maintenance Specifications MONARK EXERCISE AB, Vansbro, Sweden
6 Description 6 Monark Transport & Special bikes
7 Assembly/Adjustment Components: 1. Chain guard 2. Crank bearing 3. Crank 4. Pedal 5. Frame 6. Front fork 7. Spoke reflector 8. Rim 9. Tyres 10. Spoke 11. Front hub 12. Reflector 13. Carrier 14. Steering-head bearing 15. Stem 16. Handlebar 17. Bell 18. Brake lever 19. Handles 20. Gear lever 21. Seat post bracket 22. Saddle post 23. Saddle 24. Carrier 25. Rear lamp 26. Rear mudguard 27. Lock 28. Chain 29. Rear hub 30. Basket 31. Battery lighting Mounting the pedals Remember that one pedal is right-hand threaded, marked "R" (right), and the other one is left-hand threaded, marked "L" (left). See Fig: Assembling pedals. The pedals must be securely bolted to the crank, if not the threads in the crank can be destroyed. In that kind of case, there is a risk that the pedal come loose and cause an accident. NOTE! When the bike is new the pedals must be retightened after five hours of cycling. The pedals must be securely attached in the cranks. Fig: Assembling pedals 1) Right-hand threaded pedal marked R (right) 2) Left-hand threaded pedal marked L (left) Monark Transport & Special bikes 7


8 Assembly / Adjustment Handlebar adjustment If you must change the handlebar position, unscrew the expander bolt about 5 mm, see Fig: Handlebar adjustment. Tap the bolt using a wooden or plastic mallet to loosen the expander cone. Raise or lower the handlebars to the desired position. Then retighten the expander bolt. The expander bolt s head has either an external or internal hexagonal grip. Ensure that the handlebar stem are inserted so that the height position mark is not visible (at least 6.5 cm). If the handlebar stem is positioned too high the fork tube, as well as the stem itself, may become damaged. From a safety point of view, it is therefore important to follow the mounting instructions. Seat height and angle adjustment Unscrew the screwed joint to raise or lower the seat. Adjust the height and tighten properly. The mark on the seat post must not be visible after adjustment, see Fig: Saddle adjustment. If you want to change the seat angle loosen the saddle clamp nut. Some bike models have a different seat post design than shown in Fig: Saddle adjustment. The method for adjusting the seat height and angle is, however, largely the same. Tighten the saddle bracket resp. bolted connections properly after adjustment. The handlebar stem and seat post must be recessed so that the height position mark is not visible. Fig: Saddle adjustment 1) Nut 2) Seat clamp 3) Seat post 4) Max. heigh position 5) Locking Fig: Handlebar adjustment 1) Expander bolt 2) Max. heigh position mark 8 Monark Transport & Special bikes
9 Assembly / Adjustment Headlamp assembly There are a few different variations of the headlamps but they assembled and works in a similar way. The headlamp is assembled onto a bracket, which is first screwed onto the handle, see Fig: Mounting the bracket. Install the headlamp in the slots, you hear a click when it is in the right place, see Fig: Assembly of headlamp. The headlamp lights with a button on the top, see Fig: Turn on the headlamp. Fig: Mounting the bracket When replacing the batteries, loosen the screw on the underside and the remove the cap. Remove the battery holder and replace the batteries. Remember that polarity switch them right, see Fig: Battery replacement. Fig: Turn on the headlamp Fig: Assembly of headlamp Fig: Reassembly of headlamp Fig: Battery replacement Monark Transport & Special bikes 9
10 Safety precautions Check your bike regularly, partly to make any necessary adjustments, and partly to familiarize yourself with the bike. Screws and nuts All screws and nuts must be re-tightened at regular intervals. Pay particular attention to wheel nuts. Lighting and reflectors Make sure the lights and reflectors are clean and working. Brakes Check the brakes before every use. Tyre and tube Check the air pressure. It is much easier and smoother to cycle with correctly inflated tyres and also helps prevent wheel and tyre damage. Also check that the tyre is properly fitted on the rim and that no sharp objects are stuck in the tyre. If you have a flat tire, replace or repair the tube. Do not forget to check the inside of the tyre (no sharp objects, nails, etc.). Remember that most tyre damage is caused by insufficiently inflated tyres. Front fork and Frame Check that the front fork and frame is not deformed. Contact immediately a professional for inspection at the slightest sign of damage. Wheels Ensure that the wheels are correctly aligned with the frame. Spin the wheels and check that they are not warped and that there are no loose spokes. Check that the brake arm is securely attached. Lift up the front of the bike and hit the top of the tyre with your hand. If there is any movement, check attachment. Feel for play in the bearings by rocking the wheels back and forth. Chain Regularly check the chain for damage or cracks under load due to wear. Ensure that the chain is always well lubricated and is not slack! Saddle It is important that the seat and seat post are securely tightened. Check before each use, and post-tighten if necessary. The seat post must not be positioned so that the MAX mark is visible! Handlebar Ensure that the handlebars and handlebar stem are securely tightened. Replace worn grips and make sure that they are securely attached to the handlebars and cannot be rotated. The handlebar stem must not be positioned so that the "MAX" mark is visible! Steering-head bearing The lock nut must be tightened and the steering-head bearing must not have any play. The handlebars must move freely. Crank section The crank bearing is most easily checked by lifting off the front of the chain. The crank bearing should now rotate easily, without any resistance or play. Make sure the locking ring on the left side is tight. Check the chain wheel and crank arm so that they are not damaged. Tighten crank arm bolts and pedals regularly. Gears and gear hub with foot brake Keep them clean and well-adjusted. Keep control cables and wires well lubricated. Changing gears on bikes with a gear hub Always change gear in good time before a slope Always pedal forwards without any load when changing gear, you can even make a very slight movement backwards. So that the gears are set properly before the hub again becomes hard loaded. Otherwise the gear mechanism may become damaged. A 3-, 4-, 5-, 7- or 8-gear hub can be damaged if it is not set correctly. Therefore, check the gear set-up before using the bike. Any questions? Contact a professional if you have any questions about the above points or if in doubt about the function of any of the parts. 10 Monark Transport & Special bikes
11 User instructions Braking technique 1. Adapt your speed and distance in relation to other vehicles, so that you are able to brake to a standstill safely, even in variable weather conditions. Take extra care in icy conditions. 2. If the bike has two hand brakes, apply both brakes at the same time. Never use just one brake to stop. Remember that the largest proportion of the braking effect comes from the front brake. Emergency braking using only the front brake can result in the rear wheel lifting, risking losing control of the bike and ending up in the road. Use the front brake with caution when cycling on icy roadways. 3. When cycling down steep slopes, try to shift the balance slightly back, especially if the roadway is icy. 4. Start braking earlier when cycling on wet surfaces! The braking distance can double on wet surfaces compared with dry surfaces. 5. A loaded bike takes longer to brake! If a child is travelling in a child seat on the carrier, or a full bag is being transported, remember to start braking earlier than normal and to apply the brakes gradually, so that you always have control over the bike and load. Also remember that the steering response and balance are affected with loads on the bike. Never overload your bike! 6. If any of the following occur during the course of a journey, stop immediately and consult a professional for inspection and repair. If any unusual noises are heard when the brakes are in use. If the braking effect is unusually strong. If the braking effect is unusually weak. Disc brake Disc brakes have a burn-in period, and the braking force will gradually increase during this period. Make sure that you are aware of any of such increases in braking force before using the brakes during the burn-in period. Disc brake parts will become hot during use. Do not touch them while riding or immediately after you have dismounting from the bicycle. When it is raining the braking distance becomes longer. Reduce your speed and brake early and gently. If noise occurs when you brake, it could mean that the brake pads are worn down. Check pad thickness, they should be 0.5 mm or thicker. If they are thinner, they must be replaced. If oil or grease gets on the pads, you should replace them. If you turned the bike upside down or on its side, be sure to press the brake lever a few times to check that the brakes are working properly before riding. Any questions? Contact a professional if you have any questions about the above points or if in doubt about the function of any of the parts. This may be due to insufficient amounts of brake grease. Ask the professional to lubricate the mechanism with suitable roll brake grease. Monark Transport & Special bikes 11


12 User instructions Cycling with loads on the carrier Load the bike with care for optimum safety. Find out the maximum load of the bike, avoid high loads. Remember that force becomes greater with a load on the bike, which means that a longer braking distance is required. Observe caution when cycling down hills and around bends. Cycling with bicycle trailer Before you start, check tyre pressure, wheel nut and the link between trailer and bike. Do not load the trailer over the allowed weight. Remember that force becomes greater with a load in the trailer, which means that a longer braking distance is required. Observe caution when cycling down hills and around bends. If the child is transported in the trailer, put your child strapped in a fitted child seat. The child should also wear a helmet! The bike should be equipped with dual brakes, independent of each other. Fig: Generator lighting 1) Grounding screw Fig: The contact surface of the generator Lighting When cycling in the dark, the bike must be equipped with front and rear lighting by law. The bike must also be equipped with white reflectors at the front, red ones to the rear and orange or white reflectors on the sides. All reflectors must be type approved according to the applicable law. Regularly check that the front- and rear lights are working satisfactorily and that wheels reflector is clean and is firmly attached. Generator lighting Verify that the generator has the right support bracket against the tyre. Otherwise the bike rolls heavily and can tear the tyre abnormal. See Fig: Generator lighting and Fig: The contact surface of the generator. Lubricate the closing mechanism now and then. Also check that the generator bracket's grounding screw is firmly secured. if the light do not work, it could depend on that the bulb is broken or wrong grounding. Also, check that the cables are intact. Bulb: 6 V, 3 W (0.5 A). Also check that the generator bracket is tightly secured on the fork blade. If it is loose, the risk is that the bracket and the generator can slide down the fork blade and tip into the wheel. It is important to occasionally check that the spoke reflector properly fasten. If it is not the case, it must be fixed or replaced, otherwise it can, while driving, risk it cross-sets itself and can then lock the wheel and serious accidents can occur. 12 Monark Transport & Special bikes
13 User instructions Battery lighting Some bike models are equipped with a battery headlamp with integrated reflectors. The headlamp is assembled on the handlebar using a quick release bracket and can be removed. If the lights does not work, check that the batteries are working. Please be aware that severe cold reduces the effect of the batteries. Batteries: Head lamp Rear lamp Reflector Any questions? 4 pcs. 1.5 V AA 2 pcs. 1.5 V R6 Front- resp. rear wheel is equipped with reflectors. Front- resp. rear lamp is equipped with approved reflectors. Contact a professional if you have any questions about the above points or if in doubt about the function of any of the parts. General care advice Always keep your bike clean. Use eco-marked degreasers to remove oil-mixed dirt. Avoid hosing the bike down with water as this can penetrate the hub and other bearings. Do not use a high-pressure washer on the bike! Use a cloth and a rust inhibitor, e.g. 5:56. This breaks down the dirt and protects from rust. It is important to use a rust inhibitor to protect chrome and zinc coated parts, the paint will also benefit from the same protection. It also makes the next clean easier. It is also important that the chain, freewheel sprocket, gears, control cables and other moving parts are always well lubricated. Check all screws and nuts are properly tightened. It is recommended to clean, surface-treat and lubricate the bike in preparation for winter. Do I need any extra insurance? As a private person, you are offered an insurance when you buy your bike, please see the attached information. Monark Transport & Special bikes 13
14 Maintenance Steering-head bearing and crank bearing Any play in the steering-head bearing or crank bearing must be remedied immediately. If adjustments are not made immediately, abnormal wear to the component parts can occur. There are many reasons for play in the bearings but it is usually due to wear or because something has broken. These bearings should be repaired and adjusted by a professional. Ask the professional to check and lubricate these when leaving your bike for a service. Pedals The pedal bearings should be oiled regularly, preferably using a thin oil. When applying oil, lean the bike slightly so that the oil reaches the outer bearing. If you assemble the pedals yourself, remember that one is right threaded (marked R) and that one is left threaded (marked L), see Fig: Pedal assembly. The right threaded pedal must be assembled on the right side of the bike. The pedals must be securely attached in the crank and must be tightened with a special tool. This is especially important on a bike with an aluminium crank. If the pedals are not securely attached, the thread in the crank can become damaged and this can cause an accident. If the bike is equipped with an aluminium crank, you should NEVER use any grease at the mounting. Wheel alignment If you remove the wheels, it is very important that these are in line with each other when they are re-mounted again, see Fig: Wheel alignment. If the wheels are not in line the bike will drag in any direction. Check that the wheels are not missing any spokes and that the spokes are tightened. A wheel with missing or poorly tightened spokes will quickly become damaged, which will result in expensive repairs. If you find something wrong with the wheel, it is best to let a professional repair it. Fig: Wheel alignment Fig: Pedal assembly 1) Right threaded pedal marked R (right) 2) Left threaded pedal marked L (left) 14 Monark Transport & Special bikes

15 Maintenance Chain The most common chain dimension on bikes without a chain gear is 1/2 x 1/8. The chain is assembled on all models. Ensure that the chain is always well lubricated and is not slack! In the middle of its free length the chain should have a play of about 10 mm, see Fig: Chain max. play. To adjust the chain loosen the hub nuts and the screw holding the rear hubs brake arm. Then move the wheel forward or back until the chain has the right play. If the chain is too tight it can cause damage to the rear hubs. If the chain is slightly soiled, apply a small amount of thin oil using a brush. Wipe off any excess oil. The chain should mainly be dry as the oil should lubricate the chain links and nothing else. If the chain is heavily soiled and caked in old oil and dirt, use a steel brush to clean the chain before lubricating it. If the chain has rusted, replace it immediately. Generally speaking, the chain should be replaced every three years or after approx km. Fig: Chain max. play 1) Max. 10 mm If you have to remove the chain, note the following when reinstalling it. The chain lock spring must be on the side that is turned inwards and the spring must be mounted with the closed end in the chain s direction of movement, see Fig: Chain lock. Any questions? Contact a professional if you have any questions about the above points or if in doubt about the function of any of the parts. Fig: Chain lock A) Chain's movement direction 1) Locking spring Monark Transport & Special bikes 15

16 Maintenance Tyre and tube Tyre sizes Different countries have used use different systems for designating tyre. Monark Exercise uses a system, expressed in millimetres, based on ETRTO norms, which replaces all older designations. This is how some of the new designations look compared with the previous ones for the same tyre. ETRTO Older x x x x x 1.75 In the ETRTO designation, the first group of digits indicates the tyre s height and profile width in mm and the other the wheel's diameter in mm. Tyre replacement Removal: Replace tyres using three standard tyre levers. Release the air, remove and press in the valve slightly. Squeeze the tyre together, so that it releases fully from the sides of the rim, all the way around. Insert one of the tyre levers under one side of the tyre. Avoid positioning any of the tyre levers next to the valve. Pry the tyre over the edge of the wheel and hook the tyre lever onto a spoke. Repeat this with the second and third tyre lever leaving a gap of 8-10 cms in-between. You can then remove the middle tyre lever and use it to pry the tyre over a fourth time. The entire side of the tyre can now be pried over the wheel edge by hand. Pull the tube from the tyre. Now use the applicable number of tyre pullers needed to detach the tyre from the other side. Mounting: Mount one side of the tyre on the rim. Make sure that the rim tape is in place. Press in the valve through the hole in the rim, fill the tube with a small amount of air. Insert the tube into the tyre, straighten any creases. Press the valve so that it partly goes into the tyre and start to application here. Hook the tyre on by hand, one section at a time. If you encounter difficulties, squeeze the tyre together and press in towards the rim on the already installed section. Assembling should be possible without the need of tools. If installation by hand is not possible, use tyre levers as an aid, but take care to prevent damaging the tube. When the tyre is on, ensure that it has not caught on the valve and that it is correctly aligned. Check this by rotating the wheel and looking at the line of sight on the tyre. This line of sight must run evenly on the side of the wheel, all the way around. See Fig: Line of sight 1 and Fig: Line of sight 2. Check that the valve is straight. Add a little more air and check that the tyre is correctly positioned on the rim again. Tighten any lock nuts and top up with air. 1 Fig: Line of sight 1 (correct) 2 Fig: Line of sight 2 (incorrect) Incorrectly positioned tyre on rim pose a great risk that the bike start to "wobble" and the tyre can loosen from the rim which can result in an accident. 16 Monark Transport & Special bikes
17 Maintenance Repairing tubes: First, make sure the valve is not leaking. Apply a small amount of saliva over the top of the valve; if it bubbles then there is a leak. When a standard valve is leaking the valve rubber or the insert have to be replaced. If air is escaping from the tube from somewhere other than valve, there is a hole in the tube. Remove the tyre and tube according to the Tyre replacement section. Inflate the tube and dip it in water. You can then see where bubbles are escaping. Mark the puncture using a pen or chalk and let all the air out. Wipe the tube dry and roughen the surface around the puncture using sandpaper. Apply solution around the puncture to an area slightly larger than the repair patch and allow the solution to become tacky (the drying time is usually stated on the tube). Remove the protective film from the side of the repair patch, which must be turned towards the hole, and then attach the patch to the tube. Wait a few minutes so that it adheres sufficiently before filling with air. NOTE! If a sharp object has caused a flat tyre and has gone through the tyre and is still in place, remove it before inserting the tube. The solution contains solvent and is flammable. Ensure that there is good ventilation. Store out of the reach of children. Monark Transport & Special bikes 17
18 Specifications Workbike Truck Model designation Frame Unisex Unisex Special Special Rim (mm): Front/Rear Tyre size: Front/Rear Stainless 559 Stainless 559 Steel Steel x2/23x2 20x2/23x2 Spoke Stainless 2.36 mm Stainless 2.36 mm Stainless 2.36 mm Stainless 2.36 mm Front hub Shimano Nexus Shimano Nexus Shimano Nexus Shimano Nexus Rear hub Shimano 0-speed Shimano Nexus 3 Shimano 0-speed Shimano Nexus 3 Sprocket rear Steel 21 T Steel 21 T Steel 20 T Steel 20 T Brakes: Front/Rear Saddle/Seat post Roller brake/ Hub brake Emotion EVL/ 27,2x300 Alu Roller brake/ Hub brake Emotion EVL/ 27,2x300 Alu Roller brake/ Hub brake Emotion RVL/ 25.8x300 Roller brake/ Hub brake Handlebar Classic Classic Classic Classic Emotion RVL/ 25.8x300 Steering-head 22.2 TH 1150-W 22.2 TH 1150-W 22.2 TH 1150-W 22.2 TH 1150-W bearing Stem 220x22.2 Alu 220x22.2 Alu 220x22.2 Alu 220x22.2 Alu Crank sprocket Sugino 170 mm 38 T Pedals 9/16 threads Sugino 170 mm 38 T 9/16 threads Sugino Alu 170 mm 44 T Sugino Alu 170 mm 44 T Mudguards Steel, Steel, Steel, Steel, Carrier Wire rack rear Wire rack rear Speciality front and rear Speciality front and Tubes rack rear Tubes rack rear rear Lighting Front/Rear LED rear lamp LED rear lamp Trioblock halogen 10 L/ Toplight Other Approved Ring lock AXA Solid Approved Ring lock AXA Solid Trioblock halogen 10 L/ Toplight Max user weight 120 kg 120 kg 120 kg 120 kg Weight 21 kg 21 kg 27 kg 28 kg 18 Monark Transport & Special bikes
19 Specifications Tandem Model designation Frame Special tandem 28 Rim (mm): Front/Rear Tyre size Puncture protected Spoke Stainless 2.36 mm Front hub Deore for disc brake Rear hub Shimano Nexus 3 Sprocket rear Steel 20 T 30 mm thickness Brakes: Front/Rear Special tandem 28 Special tandem 28 Special tandem 28 Special tandem 28 RF RF RF RF RF Disc brake/ V brake + hub brake Saddle/Seat post Emotion RVL / 25.4x Puncture protected Stainless 2.36 mm Deore for disc brake Shimano Nexus 3 Steel 20 T 30 mm thickness Disc brake/ V brake + hub brake Emotion RVL / 25.4x Puncture protected Stainless 2.36 mm Deore for disc brake Shimano Nexus 7 Steel 20 T 30 mm thickness Disc brake/ V brake + hub brake Emotion RVL / 25.4x Puncture protected Stainless 2.36 mm Deore for disc brake Shimano Nexus 7 Steel 20 T 30 mm thickness Disc brake/ V brake + hub brake Emotion RVL / 25.4x315 Handlebar Classic Classic Classic Classic Classic Steering-head bearing Stem Crank sprocket Pedals Puncture protected Stainless 2.36 mm Deore for disc brake Shimano Nexus 8 Steel 20 T 30 mm thickness Disc brake/ V brake + hub brake Emotion RVL / 25.4x TH 1150-W 22.2 TH 1150-W 22.2 TH 1150-W 22.2 TH 1150-W 22.2 TH 1150-W 220x22.2 Alu angled Sugino 170 mm 44/33 T Mudguards Steel 28" Carrier Wire rack rear 28" 220x22.2 Alu angled Sugino 170 mm 44/33 T Steel 28" Wire rack rear 28" 220x22.2 Alu angled Sugino 170 mm 44/33 T Steel 28" Wire rack rear 28" 220x22.2 Alu angled Sugino 170 mm 44/33 T Steel 28" Wire rack rear 28" 220x22.2 Alu angled Sugino 170 mm 44/33 T Steel 28" Wire rack rear 28" Lighting Front/Rear LED/LED LED/LED LED/LED LED/LED LED/LED Other Approved Ring lock AXA Solid, Central stand Approved Ring lock AXA Solid, Central stand Approved Ring lock AXA Solid, Central stand Approved Ring lock AXA Solid, Central stand Approved Ring lock AXA Solid, Central stand Max user weight 190 kg 190 kg 190 kg 190 kg 190 kg Weight 29 kg 29 kg 29 kg 29 kg 29 kg Monark Transport & Special bikes 19
20 Specifications Tricycle bikes Model designation EL Frame Special tricycle Special tricycle Special tricycle Special tricycle Rim (mm): Alu 406 Alu 406 Alu 406 Alu 507 Front/Rear Tyre size: Front/Rear Spoke Stainless 2.36 mm Stainless 2.36 mm Stainless 2.36 mm Stainless 2.36 mm Front hub Shimano generator hub Shimano generator hub Shimano generator hub/sram generator hub Shimano Nexus generator hub Rear hub Shimano Nexus 3 Shimano Nexus 3 Shimano Nexus 3 Shimano Nexus 3 Sprocket rear Steel 19 T Steel 19 T Steel 19 T Steel 20/22 T Brakes: Front/Rear Saddle/Seat post Roller brake/ Hub brake Emotion RVL/ 27.2x300 V brake/ Hub brake Emotion RVL/ 27.2x300 V brake/ Hub brake Emotion RVL/ 27.2x300 Roller brake/ Foot brake Emotion RVL/ 27.2x300 Handlebar High model High model Classic City Alu Steering-head 22.2 TH 1150-W 22.2 TH 1150-W 22.2 TH 1150-W 22.2 TH 1150-W bearing Stem 220x22.2 Alu 220x22.2 Alu 220x22.2 Alu 300/110x22.2 Adjustable Alu Crank sprocket Pedals Mudguards Sugino 170 mm 38 T Steel Sugino 170 mm 38 T Steel Sugino 170 mm 38 T Steel Carrier Luggage carrier rear Luggage carrier rear Basket front Wire rack rear Lighting Front/Rear Other Generator lighting/ LED Approved Basta Click lock Generator lighting/ LED Approved Basta Click lock Generator lighting/ LED Approved Ring lock AXA Solid Sugino 170 mm 38 T Steel Luggage carrier rear Generator lighting/ LED Differential operation Approved Basta lock front Max user weight 140 kg 140 kg 140 kg 140 kg Weight 28 kg 36 kg 25 kg 29 kg 20 Monark Transport & Special bikes
21 Specifications Balloon Model designation Frame Men's bike 56 cm Men's bike 56 cm Lady's bike 56 cm Lady's bike 56 cm Rim (mm): Front/Rear RF RF RF RF Tyre size Spoke Stainless 2.36 mm Stainless 2.36 mm Stainless 2.36 mm Stainless 2.36 mm Front hub Shimano Nexus Shimano Nexus Shimano Nexus Shimano Nexus Rear hub Shimano 0-speed Shimano Nexus 3 Shimano 0-speed Shimano Nexus 3 Sprocket rear Steel 21 T Steel 21 T Steel 21 T Steel 21 T Brakes: Front/Rear Hub brake/ Roller brake Hub brake/ Roller brake Hub brake/ Roller brake Hub brake/ Roller brake Saddle/Seat post Emotion EVL / 27.2x300 Emotion EVL / 27.2x300 Emotion EVL / 27.2x300 Emotion EVL / 27.2x300 Handlebar Classic Classic Classic Classic Steering-head 22.2 TH 1150-W 22.2 TH 1150-W 22.2 TH 1150-W 22.2 TH 1150-W bearing Stem 220x22.2 Alu 220x22.2 Alu 220x22.2 Alu 220x22.2 Alu Crank sprocket Sugino Alu 170 mm 44 T Sugino Alu 170 mm 44 T Sugino Alu 170 mm 44 T Sugino Alu 170 mm 44 T Pedals Mudguards Steel Steel Steel Steel Carrier Wire rack rear Wire rack rear Wire rack rear Wire rack rear Lighting Front/Rear Other LED/LED LED/LED LED/LED LED/LED Approved Ring lock AXA Solid Approved Ring lock AXA Solid Approved Ring lock AXA Solid Approved Ring lock AXA Solid Max user weight 120 kg 120 kg 120 kg 120 kg Weight 19 kg 19 kg 19 kg 19 kg At Monark we work continuously with developing our products and our range. For the latest information, such as specifications, accessories and news, please visit our website or contact us. Technical support & warranty Phone: +46(0) E mail: service@monarkexercise.se Monark Transport & Special bikes 21
22 Notes 22 Monark Transport & Special bikes
23 Notes Monark Transport & Special bikes 23

281 59 49 40 FAX:")
24 Version 1605 Art. No KROONS VÄG 1, SE VANSBRO, SWEDEN TEL: +46(0) FAX: +46(0)
Santa Fe Cycles Assembly Guide Introduction
 Santa Fe Cycles Assembly Guide Introduction Congratulations on your purchase of your new Santa Fe bicycle. You have purchased a bicycle that has many features and qualities. Please take a few minutes and
Parts List. 7. Handlebars 8. Grips 9. Handlebar Stem 10. Front Brake 11. Front Wheel 12. Crank 13. Chain
 Woodworm Cruise Parts List 1. Free Wheel with Rear Hub 2. Fenders 3. Fender Stay 4. Quick Release 5. Saddle 6. Seat Post 7. Handlebars 8. Grips 9. Handlebar Stem 10. Front Brake 11. Front Wheel 12. Crank
Folding Dual Suspension MTB. Instruction Manual
 Folding Dual Suspension MTB Instruction Manual Introduction The Stowabike Folding MTB has been made to last and with proper maintenance, it will give you years of enjoyable rides and journeys. The following
Ladies Shopper Bike Assembly Manual 28C03
 Ladies Shopper Bike Assembly Manual 28C03 Ecosmo Ltd 1 Know your bike 1. Wheel 2. Rear Derailleur 3. Chain 4. Crank Set 5. Pedal 6. Seat Quick Lock 7. Saddle and Post 8. Frame 9. Front Light 10. Front
HOME ASSEMBLY INSTRUCTIONS
 HOME ASSEMBLY INSTRUCTIONS This Papillionaire Bicycle now belongs to you. It will take you to work, wait patiently outside your local cafe, and carry your groceries home. This is the start of your long-term
comfort without compromising on performance and to fit your various needs on touring,
 Congratulations on your purchase of Goal-26X. Goal-26X is made to enhance comfort without compromising on performance and to fit your various needs on touring, shopping and communicating. Let s have fun
BICYCLE ASSEMBLY INSTRUCTIONS. dutchcycles.com.au. Distribution Centre
 BICYCLE ASSEMBLY INSTRUCTIONS dutchcycles.com.au Distribution Centre Shed 68, 400-422 Somerville Road, Tottenham, VIC 3012 email: service@dutchcycles.com.au BICYCLE COMPONENTS KEY INTRODUCTION CONGRATULATIONS
KMX Kompact Sports Trike
 KMX Kompact Sports Trike Assembly Instructions 1.0 Introduction Thank you for choosing KMX! When properly assembled and set up your KMX will provide many years of enjoyment. KMX Karts Ltd does its utmost
Thank you for purchasing a WIKE BOX BIKE!
 Thank you for purchasing a WIKE BOX BIKE! Contents Safety.....3 Front wheel.4 Kickstand..5 Handle Bar & Box 6 Seat post and Saddle 7 Final pre-ride check 8 Tools needed to assemble Bike: -High table or
model - CYPRESS DX W
 Contents model - CYPRESS DX W Maintenenace manual Read and Save these instructions Welcome Contents 1 Preparing Nothing makes us happier than seeing people out riding bikes. For over thirty years Giant
Cantilever Brake. Dealer's Manual. ROAD MTB Trekking. City Touring/ Comfort Bike
 (English) DM-RCBR001-00 Dealer's Manual ROAD MTB Trekking City Touring/ Comfort Bike URBAN SPORT E-BIKE Cantilever Brake BR-CX70 BR-CX50 BL-4700 BL-4600 BL-R780 BL-R3000 ST-7900 ST-6700 ST-5700 ST-4600
Quattrocycle BV. Quattrocycle. User Manual. Last update February Quattrocycle BV Bremkant EJ Middelbeers. User Manual Quattrocycle 1
 Quattrocycle User Manual Last update February 2010 Quattrocycle BV Bremkant 6 5091 EJ Middelbeers User Manual Quattrocycle 1 Table of Contents Page Chapter 1: Introduction 3 Chapter 2: Instructions for
SG-7R46 SG-7R45 BR-IM41-R CJ-7S40 WARNING CAUTION SERVICE INSTRUCTIONS. Inter-7 Hub. Inter-M Brake Cassette joint NOTE:
 t WARNING It is important to completely understand the operation of your bicycle's brake system. Improper use of your bicycle's brake system may result in a loss of control or an accident, which could
TRAILMATE METEOR ASSEMBLY MANUAL
 TRAILMATE METEOR ASSEMBLY MANUAL (DISC BRAKE VERSION) The Trailmate Meteor recumbent has been designed for easy assembly. This means more time to enjoy the smooth ride with single speed, 3 speed coaster
Nexus. Dealer's Manual. ROAD MTB Trekking. City Touring/ Comfort Bike SG-3R40 SG-3R45 SG-3R75 SG-3R75-A SG-3R75-B SG-3D55 SG-3C41
 (English) DM-SG0005-01 Dealer's Manual ROAD MTB Trekking City Touring/ Comfort Bike URBAN SPORT E-BIKE Nexus SG-3R40 SG-3R45 SG-3R75 SG-3R75-A SG-3R75-B SG-3D55 SG-3C41 SL-3S35-E SL-3S41-E SL-3S42-E SM-BC03
EZee Glider Manual. Tools needed for Assembly: Wrench (included) Philips Screwdriver (not included) Assembly Instructions
 Philips Screwdriver (not included) Assembly Instructions") EZee Glider Manual Congratulations on your purchase of the EZee Glider! Your glider is designed for years of nearly carefree use by your child. These instructions include how to set up your glider and
EZee Glider Manual Congratulations on your purchase of the EZee Glider! Your glider is designed for years of nearly carefree use by your child. These instructions include how to set up your glider and
7130 Lancer Rear Drive Magnetic Commercial Indoor Cycling Bike
 7130 Lancer Rear Drive Magnetic Commercial Indoor Cycling Bike Owner s Manual Made in Taiwan INDEX IMPORTANT SAFETY INFORMATION... 1 EXPLODED DRAWING... 2 PARTS LIST... 3 ASSEMBLY INSTRUCTION... 4-9 USER
DM-RD (English) Dealer s Manual. ROAD Rear Derailleur RD-9000 RD-6800 RD-5800 RD-4700
 Dealer s Manual. ROAD Rear Derailleur RD-9000 RD-6800 RD-5800 RD-4700") (English) DM-RD0003-09 ROAD Rear Derailleur Dealer s Manual RD-9000 RD-6800 RD-5800 RD-4700 CONTENTS IMPORTANT NOTICE...3 TO ENSURE SAFETY...4 LIST OF TOOLS TO BE USED...6 INSTALLATION...8 Chain length...
(English) DM-RD0003-09 ROAD Rear Derailleur Dealer s Manual RD-9000 RD-6800 RD-5800 RD-4700 CONTENTS IMPORTANT NOTICE...3 TO ENSURE SAFETY...4 LIST OF TOOLS TO BE USED...6 INSTALLATION...8 Chain length...
Rothan Owner s manual
 Rothan Owner s manual www.islabikes.co.uk 1. Brake levers 2. Brake pads 3. Saddle 4. Seatpost 5. Seatpost clamp 6. Stem 7. Stem bolts 8. Headset 9. Headset spacers 10. Headset adjuster bolt 11. Handlebars
E-trike Li Assembly Guide
 PREPARATION 1. Read this assembly manual BEFORE commencing assembly. 2. Carefully remove all the components and packaged hardware from the shipping boxes. 3. Unpack the contents of the large double box
Have questions? Chat with us live at raleighusa.com or call us at , 8am 5pm PST
 1 2 Have questions? Chat with us live at raleighusa.com or call us at 1-800-251-8435, 8am 5pm PST The bicycle you have purchased is a complex piece of equipment that must be properly assembled and maintained
DM-MARD (English) Dealer's Manual. ROAD MTB Trekking. City Touring/ Comfort Bike REAR DERAILLEUR XTR RD-M9100 RD-M9120
 Dealer's Manual. ROAD MTB Trekking. City Touring/ Comfort Bike REAR DERAILLEUR XTR RD-M9100 RD-M9120") (English) DM-MARD001-00 Dealer's Manual ROAD MTB Trekking City Touring/ Comfort Bike URBAN SPORT E-BIKE REAR DERAILLEUR XTR RD-M9100 RD-M9120 CONTENTS CONTENTS...2 IMPORTANT NOTICE...3 TO ENSURE SAFETY...4
(English) DM-MARD001-00 Dealer's Manual ROAD MTB Trekking City Touring/ Comfort Bike URBAN SPORT E-BIKE REAR DERAILLEUR XTR RD-M9100 RD-M9120 CONTENTS CONTENTS...2 IMPORTANT NOTICE...3 TO ENSURE SAFETY...4
Have questions? Chat with us live at raleighusa.com or call us at , 8am 5pm PST
 1 2 Have questions? Chat with us live at raleighusa.com or call us at 1-800-251-8435, 8am 5pm PST The bicycle you have purchased is a complex piece of equipment that must be properly assembled and maintained
Congratulations on your purchase of a JC Series Performer trike! The Performer JC Series is designed for everything from touring to commuting and
 Congratulations on your purchase of a JC Series Performer trike! The Performer JC Series is designed for everything from touring to commuting and shopping in the city. The JC Series frames are made of
DM-MBST (English) Dealer's Manual. ROAD MTB Trekking. City Touring/ Comfort Bike. Shifting lever. EZ-FIRE Plus ST-EF500 ST-EF510
 Dealer's Manual. ROAD MTB Trekking. City Touring/ Comfort Bike. Shifting lever. EZ-FIRE Plus ST-EF500 ST-EF510") (English) DM-MBST001-00 Dealer's Manual ROAD MTB Trekking City Touring/ Comfort Bike URBAN SPORT E-BIKE Shifting lever EZ-FIRE Plus ST-EF500 ST-EF510 CONTENTS IMPORTANT NOTICE... 3 TO ENSURE SAFETY...
(English) DM-MBST001-00 Dealer's Manual ROAD MTB Trekking City Touring/ Comfort Bike URBAN SPORT E-BIKE Shifting lever EZ-FIRE Plus ST-EF500 ST-EF510 CONTENTS IMPORTANT NOTICE... 3 TO ENSURE SAFETY...
User manual. Velo-Plus². Van Raam BV Aaltenseweg CM Varsseveld The Netherlands 06.13
 Velo-Plus² Van Raam BV Aaltenseweg 56 7051 CM Varsseveld The Netherlands 06.13 Contents Contents... Contact details manufacturer... Conformity... Introduction... Delivery... Intended usage... Safety measures...
DM-RARD (English) Dealer's Manual. ROAD MTB Trekking. City Touring/ Comfort Bike. Rear Derailleur DURA-ACE RD-R9100 ULTEGRA RD-R8000
 Dealer's Manual. ROAD MTB Trekking. City Touring/ Comfort Bike. Rear Derailleur DURA-ACE RD-R9100 ULTEGRA RD-R8000") (English) DM-RARD001-03 Dealer's Manual ROAD MTB Trekking City Touring/ Comfort Bike URBAN SPORT E-BIKE Rear Derailleur DURA-ACE RD-R9100 ULTEGRA RD-R8000 CONTENTS IMPORTANT NOTICE... 3 TO ENSURE SAFETY...
(English) DM-RARD001-03 Dealer's Manual ROAD MTB Trekking City Touring/ Comfort Bike URBAN SPORT E-BIKE Rear Derailleur DURA-ACE RD-R9100 ULTEGRA RD-R8000 CONTENTS IMPORTANT NOTICE... 3 TO ENSURE SAFETY...
Mini Glider Manual. Your Glider comes partially assembled. The front wheel and the handlebars require assembly.
 Mini Glider Manual Congratulations on your purchase of the Mini Glider! Your glider is designed for years of nearly carefree use by your child. These instructions include how to set up your glider and
DM-MBRD (English) Dealer's Manual. ROAD MTB Trekking. City Touring/ Comfort Bike. Rear Derailleur SLX RD-M7000 DEORE RD-M6000
 Dealer's Manual. ROAD MTB Trekking. City Touring/ Comfort Bike. Rear Derailleur SLX RD-M7000 DEORE RD-M6000") (English) DM-MBRD001-04 Dealer's Manual ROAD MTB Trekking City Touring/ Comfort Bike URBAN SPORT E-BIKE Rear Derailleur SLX RD-M7000 DEORE RD-M6000 CONTENTS IMPORTANT NOTICE... 3 TO ENSURE SAFETY... 4
(English) DM-MBRD001-04 Dealer's Manual ROAD MTB Trekking City Touring/ Comfort Bike URBAN SPORT E-BIKE Rear Derailleur SLX RD-M7000 DEORE RD-M6000 CONTENTS IMPORTANT NOTICE... 3 TO ENSURE SAFETY... 4
DM-TRRD (English) Dealer's Manual. ROAD MTB Trekking. City Touring/ Comfort Bike. Rear Derailleur DEORE XT RD-T8000 DEORE RD-T6000
 Dealer's Manual. ROAD MTB Trekking. City Touring/ Comfort Bike. Rear Derailleur DEORE XT RD-T8000 DEORE RD-T6000") (English) DM-TRRD001-01 Dealer's Manual ROAD MTB Trekking City Touring/ Comfort Bike URBAN SPORT E-BIKE Rear Derailleur DEORE XT RD-T8000 DEORE RD-T6000 CONTENTS IMPORTANT NOTICE... 3 TO ENSURE SAFETY...
(English) DM-TRRD001-01 Dealer's Manual ROAD MTB Trekking City Touring/ Comfort Bike URBAN SPORT E-BIKE Rear Derailleur DEORE XT RD-T8000 DEORE RD-T6000 CONTENTS IMPORTANT NOTICE... 3 TO ENSURE SAFETY...
Have questions? Chat with us live at raleighusa.com or call us at , 8am 5pm PST
 1 2 Have questions? Chat with us live at raleighusa.com or call us at 1-800-251-8435, 8am 5pm PST The bicycle you have purchased is a complex piece of equipment that must be properly assembled and maintained
Bicycle Owner's Manual Easy Access Bike
 Bicycle Owner's Manual Easy Access Bike AGE: FROM 9 YEARS OLD AND UP IMPORTANT Check bike after assembly or any adjustments. Consult bicycle retailer with questions. Always wear a helmet. Children should
DM-RCWH (English) Dealer's Manual. ROAD MTB Trekking. City Touring/ Comfort Bike. Wheel Set. WH-RX31 SM-AX x12 SM-AX x12
 Dealer's Manual. ROAD MTB Trekking. City Touring/ Comfort Bike. Wheel Set. WH-RX31 SM-AX x12 SM-AX x12") (English) DM-RCWH001-00 Dealer's Manual ROAD MTB Trekking City Touring/ Comfort Bike URBAN SPORT E-BIKE Wheel Set WH-RX31 SM-AX720-100x12 SM-AX720-142x12 CONTENTS IMPORTANT NOTICE... 3 TO ENSURE SAFETY...
(English) DM-RCWH001-00 Dealer's Manual ROAD MTB Trekking City Touring/ Comfort Bike URBAN SPORT E-BIKE Wheel Set WH-RX31 SM-AX720-100x12 SM-AX720-142x12 CONTENTS IMPORTANT NOTICE... 3 TO ENSURE SAFETY...
IMPORTANT SAFETY NOTICE
 OWNER S MANUAL NOTE: Any photos of the YBIKE or decals in the owner s manual are intended to be used as a reference only, and there may be some differences to the unit you purchased. IMPORTANT SAFETY NOTICE
Performance & Sports Trike
 Performance & Sports Trike THE KMX KOLT THE KMX KOBRA THE KMX KOYOTE Assembly Instructions 1.0 Introduction Thank you for choosing KMX! When properly assembled and set up your KMX will provide many years
Rothan Owner s manual.
 Owner s manual www.islabikes.com www.islabikes.com 1. Brake levers 2. Brake pads 3. Saddle 4. Seatpost 5. Seatpost clamp 6. Stem 7. Stem bolts 8. Headset 9. Headset spacers 10. Headset adjuster bolt 11.
Beinn Owner s manual
 Beinn Owner s manual www.islabikes.co.uk Setting up your Islabike You can view our how to set up your Beinn video guides on our website: http://www.islabikes.co.uk/info-hub/islabike-setup-video-guides
Final Assembly Instructions Bikes with Quill Stems
 Final Assembly Instructions Bikes with Quill Stems Thank you for buying your new bicycle from L.L.Bean. Read these instructions carefully before beginning the final assembly. Prior to shipping, our expert
Trike-Bike Assembly Manual
 Be sure to check our website for more instruction details, videos and photographs as well as a complete listing of each Nut and Bolt for the Trike Bike. www.trike-bike.com.au Go to the page marked ASSEMBLY
USER GUIDE TO POWER ASSISTED BIKES
 USER GUIDE TO POWER ASSISTED BIKES 1 PAGE CONTENTS Page. 3 Unpacking Page. 3-4 Easy steps to get started Page. 5 General Assembly Instructions Page. 6 Aligning H/Bars, Page. 7 Tightening pedals onto Crank
Thank you for purchasing the Hollander II Bike from Made.com
 Thank you for purchasing the Hollander II Bike from Made.com Please take time to identify the hardware as well as the individual components of this product. As you unpack and prepare for assembly, place
POWER ASSISTED BICYCLES OWNERS MANUAL
 POWER ASSISTED BICYCLES OWNERS MANUAL WE HAVE INCLUDED A BICYCLE OWNER S MANUAL WHICH YOU SHOULD REFER TO FOR ALL GENERAL CYCLE MAINTENANCE. CONTENTS Page. 3 Unpacking. Page. 3-4 Easy steps to get started.
Final Assembly Instructions Bikes with Threaded Headsets
 Final Assembly Instructions Bikes with Threaded Headsets Thank you for buying your new bicycle from L.L.Bean. Read these instructions carefully before beginning the final assembly. Prior to shipping, our
ASSEMBLY GUIDE AROUND THE BLOCK - 1, 3, 7, & 21 SPEED SIXTHREEZERO
 ASSEMBLY GUIDE AROUND THE BLOCK - 1, 3, 7, & 21 SPEED SIXTHREEZERO OUR COMMITMENT We want you to love your bike as much as we do. If you run into any issues, no matter how small, let us know and we ll
Item N o.: Item N am e:40cm Boys Rival Bike
 Item N o.:42272892 Item N am e:40cm Boys Rival Bike 9 bell 8 grip 30 crash pad 10 brake lever 26 wheel reflector 22 saddle 23 seat post 25 rear reflector 24 quick release 6 handle bar 7 stem 2 top tube
Final Assembly Instructions Bikes with Threaded Headsets
 Final Assembly Instructions Bikes with Threaded Headsets Thank you for buying your new bicycle from L.L.Bean. Read these instructions carefully before beginning the final assembly. Prior to shipping, our
Beinn 29 Owner s manual
 Owner s manual Setting up your 4 13 8 12 1 14 15 19 16 7 5 6 5 22 20 9 10 11 21 2 3 1. Brake levers 2. Brake calipers 3. Rotors 4. Saddle 5. Seatpost 6. Seatpost clamp 7. Saddle clamp 8. Stem 9. Stem bolts
Bicycle Owner s Manual Children s Bicycles
 Bicycle Owner s Manual Children s Bicycles The following manual provides assembly and maintenance instructions, as well as a guide to safe usage of your new bicycle. WARNING - Read the complete Owner s
ebike: EB01 and EB02 OPERATING MANUAL
 ebike: EB01 and EB02 OPERATING MANUAL IMPORTANT SAFEGUARDS: IMPORTANT: READ ALL INSTRUCTIONS BEFORE USE. RETAIN INSTRUCTIONS FOR FUTURE REFERENCE. WARNING: Basic safety precautions should always be observed
Instruction Manual: VelectriX Urban 2.0
 Instruction Manual: VelectriX Urban 2.0 CONTENTS Safe Riding Recommendations Page 2 Pre-Ride Checklist Page 3 Display and Controls Page 4 Maintenance Page 8 Warranty Page 9 Contact Details Page 10 Service
Good tread, no splits, cracks or holes, properly inflated. True, no missing or broken spokes, good rim. Secure, facing in right direction
 APPENDIX 1 Bike Check This is an M check. Start at the front of the bike and systematically work towards the back. Put a cross beside anything that is faulty. Note any faults you find. X FAULT Front tyre
Instruction Manual: VelectriX Foldaway
 Instruction Manual: VelectriX Foldaway CONTENTS Safe Riding Recommendations Page 2 Pre-Ride Checklist Page 3 Display and Controls Page 4 Quick Guide to Folding Page 6 Battery Instructions Page 7 Maintenance
MANUAL LEKKER BIKES 2016
 MANUAL LEKKER BIKES 2016 CONTACT For your own safety, never do work on your bicycle unless you feel absolutely sure about it. If you are in doubt or if you have any questions please contact our helpdesk:
Final Assembly Instructions Bikes with 16 Wheel Size
 Final Assembly Instructions Bikes with 16 Wheel Size Thank you for buying your new bicycle from L.L.Bean. Read these instructions carefully before beginning the final assembly. Prior to shipping, our expert
Item N o.: Item N am e:southern Star 40cm Girls Cherry Bike
 Item N o.:42174868 Item N am e:southern Star 40cm Girls Cherry Bike Tighten them so they do not move and are horizontal. Check the handlebar is in good condition and the ends of the handlebar are
Assembly, Fitting, Care & Maintenance
 Assembly, Fitting, Care & Maintenance Assembly 1.1 Remove All Parts and Tools from Packaging 1.2 Part and Tools required for assembly 1.3 Check Foot & Leg Assembly 1.4 Adjust Upper-Leg-Support (ULS) Height
Drive Belt Instructions
 Drive Belt Safety Do not roll, pry, twist, invert or bend the belt back on itself. Do not zip tie the belt. The acceptable temperature range for your belt drive is -53 C to 85 C. Do not lubricate the belt
ASSEMBLY GUIDE: Izip & Ezip Electric Bicycles with Rack-Top Mounted Batteries ( RTMB Bicycles )
") ASSEMBLY GUIDE: Izip & Ezip Electric Bicycles with Rack-Top Mounted Batteries ( RTMB Bicycles ) Please Refer to your Owner s Manual for Detailed Setup Instructions Technical & Customer Service: 1-800-377-4532
ASSEMBLY GUIDE: Izip & Ezip Electric Bicycles with Rack-Top Mounted Batteries ( RTMB Bicycles ) Please Refer to your Owner s Manual for Detailed Setup Instructions Technical & Customer Service: 1-800-377-4532
Front derailleur. Dealer's Manual DURA-ACE FD-R9100 ULTEGRA FD-R FD ROAD MTB Trekking. City Touring/ Comfort Bike DM-RAFD001-03
 (English) DM-RAFD001-03 Dealer's Manual ROAD MTB Trekking City Touring/ Comfort Bike URBAN SPORT E-BIKE Front derailleur DURA-ACE FD-R9100 ULTEGRA FD-R8000 105 FD-5801 Procedures for cable tension adjustment
User manual. Velo Plus². Van Raam BV Aaltenseweg CM Varsseveld The Netherlands. Version 14.10
 Velo Plus² Van Raam BV Aaltenseweg 56 7051 CM Varsseveld The Netherlands Version 14.10 Table of contents Table of contents... 2 Contact details manufacturer... 2 Conformity... 2 Introduction... 3 Delivery...
Item N o.: Item N am e:50cm GIRLS BELLA CRUISER BIKE
 Item N o.:42272847 Item N am e:50cm GIRLS BELLA CRUISER BIKE grip brake lever mudguard mudguard braket free wheel rear hub saddle seat post rear reflector seat clamp chain guard chain wheel crank stem
Shifting Lever. RAPIDFIRE Plus 11-speed
 (English) DM-SL0005-04 Shifting Lever Dealer's Manual RAPIDFIRE Plus 11-speed MTB XTR SL-M9000 DEORE XT SL-M8000 CONTENTS IMPORTANT NOTICE... 3 TO ENSURE SAFETY... 4 LIST OF TOOLS TO BE USED... 7 INSTALLATION...
Owner s Manual. The most comfortable upright bicycles ever made.
 Owner s Manual The most comfortable upright bicycles ever made. At Day 6, we hope you will enjoy riding our bicycles as much as we enjoy designing them. We have truly combined the best features of a recumbent
Item Name: 30CM GIRLS STAR THE UNICORN BIKE
 Item No.: 42333753 Item Name: 30CM GIRLS STAR THE UNICORN BIKE Contents 1. Parts identification 1 2. Safety precautions 2 3. Check list 6 4. Assembly 7 5. Adjustment 14 6. Repair and Service 15 7. Warranty
DM-WH (English) Dealer's Manual. MTB Wheel Set. Non-Series WH-MT68 WH-MT66 WH-MT35 WH-MT15
 Dealer's Manual. MTB Wheel Set. Non-Series WH-MT68 WH-MT66 WH-MT35 WH-MT15") (English) DM-WH0005-02 Dealer's Manual MTB Wheel Set Non-Series WH-MT68 WH-MT66 WH-MT35 WH-MT15 CONTENTS IMPORTANT NOTICE... 3 TO ENSURE SAFETY... 4 INSTALLATION... 6 Tire size...6 List of tools to be
(English) DM-WH0005-02 Dealer's Manual MTB Wheel Set Non-Series WH-MT68 WH-MT66 WH-MT35 WH-MT15 CONTENTS IMPORTANT NOTICE... 3 TO ENSURE SAFETY... 4 INSTALLATION... 6 Tire size...6 List of tools to be
Safety manual Beinn 20/24/26
 Safety manual Beinn 20/24/26 Thank you for buying an Islabike! Your bike has been thoroughly checked and adjusted prior to delivery but there are a few tasks to perform before the bike is ready to ride:
Special instruction of installation for SAINT FH-M800/RD-M800 and FH-M805/RD-M805
 Technical Service Instructions SI-5VB0E t RD-M805 / RD-M800 Rear derailleur Special instruction of installation for SAINT FH-M800/RD-M800 and FH-M805/RD-M805 A hub axle is an essential component for the
Luath Owner s manual.
 Luath Owner s manual www.islabikes.com www.islabikes.com Setting up your Luath 3 11 7 12 1 16 14 6 4 5 8 9 10 13 15 2 21 19 20 22 23 17 18 Serial number Please make a record of your serial number. This
ST Shimano Total Integration. Technical Service Instructions. General Safety Information SI-6CT0B
 Technical Service Instructions SI-6CT0B t ST-4400 Shimano Total Integration Shimano Total Integration Features The Shimano Total Integration TIAGRA series features a dual action control lever which actuates
Dual Pivot Caliper Brake
 (English) DM-RBBR001-01 Dealer's Manual ROAD MTB Trekking City Touring/ Comfort Bike URBAN SPORT E-BIKE Dual Pivot Caliper Brake SORA BL-R3000 BR-R3000 CLARIS BL-R2000 BR-R2000 Brake cable BC-1051 CONTENTS
Preparation/Maintenance Manual
 Preparation/Maintenance Manual It is essential that you read this manual in its entirety before riding your bike for the first time to ensure that your bike is properly assembled and safe to ride. It is
Troubleshooting Guide
 Troubleshooting Guide This troubleshooting guide outlines quick fixes to the most common technical questions about the ElliptiGO. If the problem persists or you feel uncomfortable performing these actions,
User manual. Fun-2-Go. Van Raam BV Aaltenseweg CM Varsseveld Netherlands 06.13
 Fun-2-Go Van Raam BV Aaltenseweg 56 7051 CM Varsseveld Netherlands 06.13 Contents Contents... Contact details manufacturer... Conformity... Introduction... Delivery... Intended usage... Safety measures...
Front chainwheel. Dealer's Manual. ROAD MTB Trekking. City Touring/ Comfort Bike ACERA FC-M3000 FC-M3000-B2 FC-M ALTUS FC-M2000
 (English) DM-MDFC001-01 Dealer's Manual ROAD MTB Trekking City Touring/ Comfort Bike URBAN SPORT E-BIKE Front chainwheel ALIVIO FC-M4000 FC-M4050 FC-M4050-B2 FC-M4060 ACERA FC-M3000 FC-M3000-B2 FC-M3000-8
CLASS CYCLE P8000 OWNER'S MANUAL JOHNSON HEALTH TECH. CO., LTD.
 CLASS CYCLE P8000 JOHNSON HEALTH TECH. CO., LTD. No.26, Ching Chuan Rd., Taya Hsiang, Taichung Hsien 428, Taiwan, R.O.C. TEL: +886-4-2566700 FAX: +886-4-2560087 E-mail: sales@johnsonfitness.com http://www.johnsonfitness.com
ROAD Wheel Set. Dealer's Manual WH-9000-C24-CL WH-9000-C24-TL WH-9000-C35-CL WH-9000-C35-TU WH-9000-C50-CL WH-9000-C50-TU WH-9000-C75-TU
 (English) DM-WH0002-00 Dealer's Manual ROAD Wheel Set WH-9000-C24-CL WH-9000-C24-TL WH-9000-C35-CL WH-9000-C35-TU WH-9000-C50-CL WH-9000-C50-TU WH-9000-C75-TU WH-RS21 WH-RS61 CONTENTS IMPORTANT NOTICE...
Instruction Manual: VelectriX Ascent 29 MTB
 Instruction Manual: VelectriX Ascent 29 MTB CONTENTS Safe Riding Recommendations Page 2 Pre-Ride Checklist Page 3 Display and Controls Page 4 Maintenance Page 8 Warranty Page 9 Contact Details Page 10
Warning: Please read this entire manual before riding your Simbi. Failure to do so could result in serious injury or even death.
 Warning: Please read this entire manual before riding your Simbi. Failure to do so could result in serious injury or even death. Contents 1. OVERVIEW... 3 A. Thank You... 3 B. General Warning... 3 C. Important
Shifting Lever. Dealer's Manual. RAPIDFIRE Plus SL-M2000 SL-M3010 SL-M4010. Thumb Shifter SL-TZ500. ROAD MTB Trekking. City Touring/ Comfort Bike
 (English) DM-MDSL001-01 Dealer's Manual ROAD MTB Trekking City Touring/ Comfort Bike URBAN SPORT E-BIKE Shifting Lever RAPIDFIRE Plus SL-M2000 SL-M3010 SL-M4010 Thumb Shifter SL-TZ500 CONTENTS IMPORTANT
SANTANA STOWAWAY TANDEM WITH AIRLINER SAFECASE AND FTS FOAM TRAY SYSTEM ASSEMBLY AND DISASSEMBLY
 SANTANA STOWAWAY TANDEM WITH AIRLINER SAFECASE AND FTS FOAM TRAY SYSTEM ASSEMBLY AND DISASSEMBLY Congratulations! You are now the proud owner of the world s most travel-ready, performance tandem. The following
TRICYCLE ADU LT. To register your bike visit
 ADU LT TRICYCLE THIS MANUAL CONTAINS IMPORTANT SAFETY, PERFORMANCE AND MAINTENANCE INFORMATION. READ THE MANUAL BEFORE TAKING YOUR FIRST RIDE ON YOUR NEW TRICYCLE, AND KEEP THE MANUAL HANDY FOR FUTURE
Wheel Set. Dealer's Manual DURA-ACE WH-R9100-C40-CL WH-R9100-C40-TU WH-R9100-C60-CL WH-R9100-C60-TU. ROAD MTB Trekking. City Touring/ Comfort Bike
 (English) DM-RAWH001-01 Dealer's Manual ROAD MTB Trekking City Touring/ Comfort Bike URBAN SPORT E-BIKE Wheel Set DURA-ACE WH-R9100-C40-CL WH-R9100-C40-TU WH-R9100-C60-CL WH-R9100-C60-TU CONTENTS IMPORTANT
Front Chainwheel. Dealer's Manual MTB. Bottom bracket. ROAD MTB Trekking. City Touring/ Comfort Bike XTR FC-M9000 FC-M9020 SM-BB93 SM-BB94-41A
 (English) DM-MAFC001-01 Dealer's Manual ROAD MTB Trekking City Touring/ Comfort Bike URBAN SPORT E-BIKE Front Chainwheel MTB XTR FC-M9000 FC-M9020 Bottom bracket SM-BB93 SM-BB94-41A CONTENTS IMPORTANT
MODEL: FIXIE / TRACK
 STEP BY STEP BUILD GUIDE MODEL: FIXIE / TRACK TABLE O F CON TENTS TOOLS 1 LET S GET STARTED 2 INSTALLING THE HANDLEBAR 3 INSTALLING THE FRONT WHEEL 4 ALIGNING THE STEM 5 INSTALLING THE SEATPOST 6 OPTIMIZING
MODEL: COMMUTER / ROAD BIKE
 STEP BY STEP BUILD GUIDE MODEL: COMMUTER / ROAD BIKE TABLE OF CONTENTS TOOLS 1 LET S GET STARTED 2 INSTALLING THE QUILL STEM 3 INSTALLING THE FRONT FENDER 4 INSTALLING THE QUICK RELEASE 5 INSTALLING THE
User Manual Important, read before use!
 EN User Manual Important, read before use! SMART Congratulations on your new rollator! Volaris Smart The Volaris Smart will make your life easier in many ways. We ask you to read carefully through this
BICYCLE TO MOTORCYCLE BICYCLE RACK
 BICYCLE TO MOTORCYCLE BICYCLE RACK Install Manual Warning: You are responsible for securing the rack to your motorcycle., checking the attachments prior to use and periodically inspecting the products
ROAD MTB Trekking. MTB Wheel Set
 (English) DM-WH0007-04 Dealer's Manual ROAD MTB Trekking City Touring/ Comfort Bike URBAN SPORT E-BIKE MTB Wheel Set MTB XTR WH-M9000-TU-R-29 WH-M9000-TU-F15-29 WH-M9000-TU-R12-29 WH-M9000-TL-R-29 WH-M9000-TL-F15-29
Beinn Owner s manual.
 Beinn Owner s manual www.islabikes.com www.islabikes.com Setting up your Islabike You can view our how to set up your Beinn video guides on the Islabikes YouTube channel. Or follow the steps in this booklet...
BELT DRIVE PREMIUM INDOOR CYCLING BIKE SF-B1509 USER MANUAL
 BELT DRIVE PREMIUM INDOOR CYCLING BIKE SF-B1509 USER MANUAL IMPORTANT! Read all instructions carefully before using this product. Retain owner s manual for future reference. For customer service, please
Cycling Instructor Ltd.
 Information for Parents & Guardians Holiday Cycling Courses The Council provides free cycle training courses for children in the holidays. There is no cost to you. To join in pupils must be able to cycle
Using Your Bike Friday : Folding Rear Rack
 Using Your Bike Friday : Folding Rear Rack Green Gear Cycling, Inc. 3364 W. 11th Ave. Eugene, OR 97402 800-777-0258 USA & Canada +1-541-687-0487 Int l +1-541-687-0403 Fax www.bikefriday.com info@bikefriday.com
WELCOME! Thank you for choosing our electric bike!
 WELCOME! Thank you for choosing our electric bike! This manual shows how to use the bicycle when you get it. new electric bicycle and gives good advice and instructions. Your electric bicycle shall be
UNPACKING AND ASSEMBLING YOUR DIAMONDBACK ROAD BIKE
 EMAIL SIGNUP BIKE REG SEARCH BIKES THE RIDE HEALTH FITNESS SKILLS SHOP MAINTENANCE CYCLING 101 RIDERS LIKE YOU TEAMS SUPPORT UNPACKING AND ASSEMBLING YOUR DIAMONDBACK ROAD BIKE 1. Begin by carefully cutting
9-speed super narrow. chain such as. CN-7701 / CN-HG93 8- / 7- / 6-speed narrow. chain such as CN-HG50 / CN-IG51
 - Technical Service Instructions SI-5VH0B t RD-M600 Rear derailleur General Safety Information WARNING The ST-M600 DUAL CONTROL lever is used for both gear shifting and braking operations. Make sure that
CRUZBIKE Quest 2.0 Assembly
 CRUZBIKE Quest 2.0 Assembly CRUZBIKE Quest 2.0 Assembly... 1 General notes on assembly... 2 Un box and evaluate the frame and major parts... 2 Unfold the rear swing arm and arrange the frame... 3 Rear
EZ-3 USX HD Supplemental Owner s Manual
 EZ-3 USX HD Supplemental Owner s Manual Find us online at SunSeeker.Bike Revised 2/2016 CONGRATULATIONS! Congratulations and welcome to the Sun Seeker family! You have selected one of the most comfortable
LITERIDER 2&3 IMPORTANT WARNING. 2Bike (1x) Bolt (1x) Nut (1x) Small Hex Wrench (1x)
 Bolt (1x) Nut (1x) Small Hex Wrench (1x)") LITERIDER 2&3 3 Bike (1x) Bolt (1x) Flat Washer (2x) Nut (1x) Large Hex Wrench (1x) 2Bike (1x) wrench (1x) Small Hex Wrench (1x) keys (2x) Long Strap (1x) 2-Zip Strips (6x) 3-Zip Strips (9x) Wheel strap
LITERIDER 2&3 3 Bike (1x) Bolt (1x) Flat Washer (2x) Nut (1x) Large Hex Wrench (1x) 2Bike (1x) wrench (1x) Small Hex Wrench (1x) keys (2x) Long Strap (1x) 2-Zip Strips (6x) 3-Zip Strips (9x) Wheel strap
Front Chainwheel. Dealer's Manual. Non-Series FC-MT500-2 FC-MT500-B2 FC-MT500-3 FC-MT600-2 FC-MT600-B2 FC-MT700-2 FC-MT700-B2
 (English) DM-MBFC001-01 Dealer's Manual ROAD MTB Trekking City Touring/ Comfort Bike URBAN SPORT E-BIKE Front Chainwheel DEORE XT FC-M8000-1 FC-M8000-B1 FC-M8000-2 FC-M8000-B2 FC-M8000-3 SLX FC-M7000-11-1
Assembly Tools. Assembly will take 1-2 hours
 Assembly Tools Included in your parts box: Pedals Quick release skewer Reflectors (if not already installed) Toolkit (4+5mm combo Allen wrench, 13+15mm combo open-end wrench) Helpful Tools: Scissors (for