NSBIKES 2012 SODA & SODA SLOPE TECH MANUAL
|
|
|
- Britney Wilkerson
- 5 years ago
- Views:
Transcription


1 NSBIKES 2012 SODA & SODA SLOPE TECH MANUAL

2 Warnings and important information General riding information Introduction Overview of product line Frame concept & information: SODA Frame concept & information: SODA SLOPE Technical sheet: SODA Technical sheet: SODA SLOPE Exploded view: SODA Exploded view: SODA SLOPE Replacement parts Instructions: general info Instructions: suspension settings Instructions: SODA rear wheel mounting Instructions: SODA cs lenght adjust Instructions: SODA SLOPE rear wheel mounting Instructions: SODA travel adjust Instructions: SODA SLOPE BB assembly Instructions: SODA / SODA SLOPE external cable routing Instructions: SODA internal cable routing Tightening torque Maintenance: pre-ride & periodical checks Box contains: SODA Box contains: SODA SLOPE NS BIKES waranty Proof of purchase waranty card
3

4 WARNINGS AND IMPORTANT INFORMATION ATTENTION: Please read this manual carefully. It contains important safety information! WARNING: Extreme riding, often shown on TV or in bike magazines is a very dangerous sport, and requires an amazing amount of skill. By engaging in this type of activity, you are accepting the risk of possible injury or even death. Even the best bike will not help you can land a clean trick. Even the best protective gear will not guarantee complete safety. Remember that in this kind of riding, you can only trust your own abilities and you must accept the inherent risk. If you want to avoid significant risk then do not ride this way. The manufacturer of NS Bikes assumes no responsibility for any injury that may arise from using this product. WARNING: Some of the service procedures require specialist tools and good mechanical skills. Therefore, to minimize the risk of serious or even fatal accidents, maintenance and assembly work on your bike should be carried out by an authorized bicycle workshop. IMPORTANT NOTICE: This manual is not intended as a comprehensive use, service, repair or maintenance manual. Please consult your dealer for advice and your dealer may also be able to refer you to classes, clinics or books on bicycle use, service, repair or maintenance. WARNING: The frame box contains instructions for components made by third parties. You must study these carefully and follow the directions before riding your bike. ATTENTION: When using the Soda frame in the long travel setting (that is when shock bolts inside rocker arm are in the upper hole) the adapter in the droput must be set to long chain stay position! The frame will not work with long travel and short chainstay setup. Trying to use the frame anyway with this incorrect setting can damage the frame or result in serious accidents!!! 3
.")
5 GENERAL RIDING INFORMATION Riding a bicycle can be dangerous. You must keep this in mind and be cautions at all times. See and be seen. Use lights and reflective clothing in low light conditions. Always wear a helmet when riding. It can save your life. Always conduct a pre-ride check (detailed information can be found further in this manual). Never ride the bicycle if you observe any technical problems or have any doubts about the proper functioning of any elements in the bicycle. Keep the bike clean and well maintained. Carry a pump, spare inner tube, patch kit, and a basic tool kit - you may need this in the case of a flat tire of other common mechanical problem that is usually easy to fix if you have the right tools. Ask your dealer for advice on this issue. If your bicycle is equipped with gears, you can choose a gear combination that is most comfortable for the riding conditions. Gears will allows you to maintain a constant rate of pedaling. Use lower gears for going up hill and higher gears for going downhill. You should stop pedaling for a moment when you make each gear change. Ask your dealer to give you more advice on this issue. Be careful with the brakes - they can be powerful and if activated too aggressively, can cause you to crash. You should spend some time to get a feel of the brakes on a side road or empty parking lot before first ride. Avoid riding too fast, especially down hill. It is easy to loose control of the bicycle and crash at high speeds, and also you will find it very difficult to slow down especially if the hill is steep. Protect your bike from theft. Purchase a lock and never leave your bike unlocked while unattended, even if you are planning to be away from it for just a few minutes. 4

6 INTRODUCTION Welcome and thanks for choosing the NS Soda! Although NS is mainly know for it s hardtails, we actually have a lot of background in the field of full suspension. Szymon, the founder of NS raced downhill in the late 90 s and early 2000 with pretty good results and as an engineer he was always really into the mechanics of frame design. All the guys in our company have full suspension freeride or enduro bikes on which we ride the local trails every day. Since day one at NS we always had some full suspension project running and prototypes being made in the background. It was a pretty natural path for us, it just took a long time to finalise. We went through a large number of designs that in each case were prototyped, tested and almost ready to lanuch. But each time we knew that something was missing. Finally we setlled on a form that we liked and got to working out the details. Since then it s been over 3 years of really hard work to put make this project a reality. We set out to reach a number of goals: 1. Simplicity and reliability. 2. No gimmicks, no bogus acronyms, XPS-CTG systems that do not offer any advantages for the rider, instead just make the frame more complex. 3. A wide range of applications for each product, the ability to transform the bikes from big-city fun bikes to weekend downhill bombers. 4. Supreme torsional stiffness to handle new-school tricks (180 s, 360 s etc). 5. Compact geometry that will stimulate users to fly rather than plough along. 6. Attractive aesthetics in line with our other products and with the whole NS Bikes style. 7. Good price, opening doors for younger riders. Today we can proudly claim that all 7 target points have been achieved! We hope that you will be just as happy with your Soda as we are! Have fun! 5


7 OVERVIEW OF PRODUCT LINE frameset, available with coil or air shock category: compact freeride / enduro / bike park hype: the do-it-all frameset that can be built into anything from a short travel jump bike to a mini dh machine SLOPE frameset, available with air shock category: slopestyle / dirt jumping / bike park hype: radical bike for big moves, takes over where dirt jumping hardtails are not enough 6

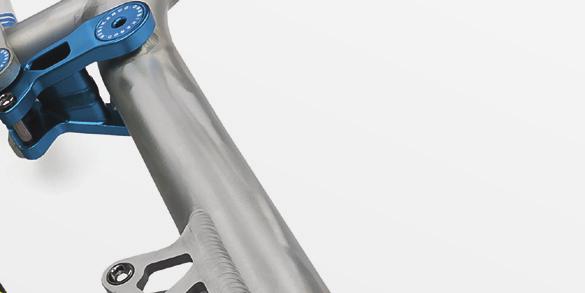
8 FRAME CONCEPT & INFORMATION: SODA This is the one-bike solution for gravity orientated riders. The Soda is a compact freeride / bike park frame, and depending on build and setup, it will be at home on dirt jumps, bike parks, DH runs and still it can be pedaled quite efficiently uphill. Adjustable chainstays (417mm - 432mm) in conjunction with adjustable travel (152mm - 177mm) allows for dramatic changes of the bike s character. This bike is exceptionally nimble and manoeuvrable in short travel and short chainstay mode (note: chainstays are VERY short in this position, much shorter than most bikes on the market), and still stable at high speeds in long travel with long chainstays. The frame is also very torsionally stiff - not only can it handle all rotational tricks but it also feels great in fast corners where you can often feel other frames flexing. We are used to seeing smiles on faces of our dirt jumpers who love the maneuverability of the Soda, but what really means a lot to us is that more traditional big mountain freeriders and downhillers were amazed by what this frame can do. We uses a custom tubeset developed specially for this frame, to achieve the best perforate, durability and aesthetics. You won t find any ugly external gussets on the Soda. We blended in an array of beautifully cnc d parts, each one optimized for weight and strength. You will find an internal headset and tapered headtube for low stack height and stiffness. The frame has an option of external or internal cable routing, depending on your preferences. In the rear end you will find a 4-bar linkage that gives several advantages: - lateral stiffness of the rear end of the bike - minimized side loads on the shock, eliminating excessive shock wear and friction - an optimized shock rate curve. For a DH / Big Mountain setup we suggest the following settings: 180mm single crown or 200mm double crown fork, coil shock, long travel and long chainstay settings in the back. For tricks and smooth jump trails we suggest the following setup: mm fork, air shock, short chainstay and short travel setting. For most pedaling efficiency we suggest the following setup: mm fork, air shock, long chainstay and short travel setting. 7

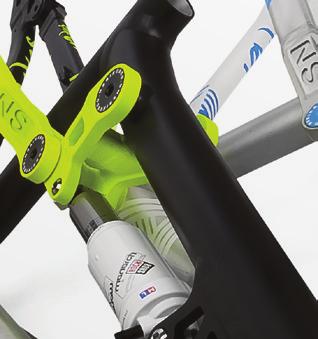
9 FRAME CONCEPT & INFORMATION: SODA SLOPE The Soda Slope is a radical bike for big moves that takes over where dirt jumping hardtails are not enough. It s most important feature is that it enables true singlespeed setups with no chain tensioners or standard derailleur / single front ring setups. It is exceptionally nimble and maneuverable with one of the shortest chainstays we have ever seen on production full suspension bikes. The Soda Slope was designed to feel just like a Majesty dirt-jump frame but with a safety valve in the rear end for big hits and high speed runs. We also tested the Slope in a more traditional DH environment, and found that with a longer fork (around 160mm) it can actually ride surprisingly well. Even thought he travel is short, the quality of the ride was great. The frame is really very stiff torsionally - we have been throwing 180 s and 360 s for days on end and experienced absolutely no problems. The suspension didn t hamper our test riders who could pull off just about every street trick that they could do on their hardtails. We uses a custom tubeset developed specially for this frame, to achieve the best performance, durability and aesthetics. You won t find any ugly external gussets on the Soda Slope. We blended in an array of beautifully cnc d parts, each one optimized for weight and strength. You will find an internal headset and tapered headtube for low stack height and stiffness. In the rear end you will find a 4-bar linkage that gives several advantages: - lateral stiffness of the rear end of the bike - minimised side loads on the shock, eliminating excessive shock wear and friction - an optimised shock rate curve. Designed to run with air shocks and very little or even no sag for slope / dirt / street, or with standard sag settings (around 25-30%) for a more conventional feel. 8
 length x stroke shock eyelet spacers width: front: 22,2mm x rear: 32.0mm internal or external cable guide option head tube: tapered 1.")
10 TECHNICAL SHEET: SODA A6061-T6 custom formed and butted tubes / smooth double pass welding mm (6-7 ) adjustable rear wheel travel (via adjustable shock mount) rear shock: 216x63mm (8.5x2.5 ) length x stroke shock eyelet spacers width: front: 22,2mm x rear: 32.0mm internal or external cable guide option head tube: tapered 1.5 ZS (56mm ID/44mm ID), 115mm stack height fits forks with standard 1-1/8 or tapered /8 steer tubes headset included with frame for both 1 1/8 and 1.5 steerers rear hub 135x10mm bolt type or 135x12mm Maxle, ]Rock Shock Maxle axle included with frame IS-2000 disk brake mount BB: standard mtb english 1.37x24tpi, 73mm wide, ISCG-05 mounts rear derailleur: removable hanger included front derailleur: not compatible seat post/clamp: 30.9mm / 34.9mm max tire: 26 x 2.5 weight (w/o shock): ~3.35kg / 7.25 lbs Geometry with 160mm / 180mm travel forks (~545mm / ~565mm axle to crown) top tube actual: M:548mm (21.6 ) L: 564mm (22.2 ), top tube effective with 160mm travel / 545mm fork M: 573mm (22.5 ) L: 593mm (23.3 ) top tube effective with 180mm travel / 565mm fork M: 576mm (22.7 ) L: 596mm (23.5 ) reach: M: 403mm / L: 424mm CS with 6 short travel: short CS / long CS adjustable mm ( ) (via flip-flop dropouts) CS with 7 long travel: long CS only 433mm (17 ) seat tube: M: 393mm (15.5 ), L: 417mm (16.5 ) head tube angle: 66.5 (160mm travel / 545mm fork), 65.5 (180mm travel / 565mm fork) seat tube angle: 71 (160mm travel / 545mm fork), 70 (180mm travel / 565mm fork) bottom bracket height: +6mm / 346mm (160mm travel), +13mm / 353mm (180mm travel) wheelbase with 160mm travel / 545mm fork: M: 1122mm (short CS) 1137mm (long CS), wheelbase with 160mm travel / 545mm fork: L: 1144mm (short CS) 1160mm (long CS) wheelbase with 180mm travel / 565mm fork: M: 1131mm (short CS) 1146mm (long CS), wheelbase with 180mm travel / 565mm fork: L: 1150mm (short CS) 1166mm (long CS) * the actual seat tube angle is around 1.5 slacker than quoted due to specific seat tube shape and it s offset position; the numbers quoted show the equivalent for a traditional frame Sizing information: The Soda does not have traditional mountain bike geometry. For example our 15.5 medium frame is much longer than a normal 15.5 mountain bike frame. In other words the frame size is not an indication of the fit of the frame. Here are some basic guidelines for choosing frame size: For enduro and all mountain: choose the M size if you are between 165cm - 178cm () choose the L size if you are between 175cm - 188cm. This sizing will allow you to set the seat at the perfect height for pedalling. For freeride and jumping: choose the M size if you are between 168cm - 181cm choose the L size if you are between 178cm - 192cm. This sizing will let you enjoy the best manouverability of the bike. 9
 rear wheel travel rear shock: 190x50mm (7.5 x 2.0 ) length x stroke shock eyelet spacers width: 22,2mm (front&rear) head tube: tapered 1.")
11 TECHNICAL SHEET: SODA SLOPE A6061-T6 custom formed and butted tubes / smooth double pass welding pivot around BB allowing true singlespeed setups 107mm (4.2 ) rear wheel travel rear shock: 190x50mm (7.5 x 2.0 ) length x stroke shock eyelet spacers width: 22,2mm (front&rear) head tube: tapered 1.5 ZS (56mm ID/44mm ID), 115mm stack height fits forks with standard 1-1/8 or tapered /8 steertubes headset included with frame for both 1 1/8 and 1.5 steerers rear hub: 135x10mm, suggested bolt-on hubs, IS-2000 disk brake mount BB: standard mtb english 1.37x24tpi, 73mm wide, ISCG-05 mounts rear derailleur: optional hanger included front derailleur: not compatible seat post/clamp: 30.9mm / 34.9mm max tire: 26 x 2.4 weight (w/o shock): ~3.2kg / 7 lbs Geometry with 525mm axle to crown forks (~140mm travel): top tube actual: 540mm (21.25 ), effective: 553mm (21.8 ) reach: chainstay min 390mm (15.3 ) - 407mm (16 ) via horizontal dropouts seat tube: 348mm (13.7 ) head tube angle: 68 seat tube angle: 73 * bottom bracket height: +11mm (+0.4 ) / ~351mm (~13.8 ) wheelbase (slammed): 1070mm (42.1 ) * the actual seat tube angle is around 1.0 slacker than quoted due to specific seat tube shape and it s offset position; the numbers quoted show the equivalent for a traditional frame Sizing information: Like our hardtails, the Soda Slope comes in one size. This size fits most riders from around 168cm to 188cm. 10


12 EXPLODED VIEW: SODA Make yourself familiar with the names of all the main parts of the frame by studying the diagrams below: Fig. 1 Soda frame main parts Fig. 2 Soda frame rocker arm links details 11


13 Fig. 3 Soda frame dropouts / dropout link details Fig. 4 Soda frame main pivot link details 12
14 EXPLODED VIEW: SODA SLOPE Make yourself familiar with the names of all the main parts of the frame by studying the diagram below: Fig. 5 Soda Slope frame main parts Fig. 6 Soda Slope frame rocker arm links details 13


15 Fig. 7 Soda Slope frame dropout link details Fig. 8 Soda Slope frame BB / main pivot link details 14
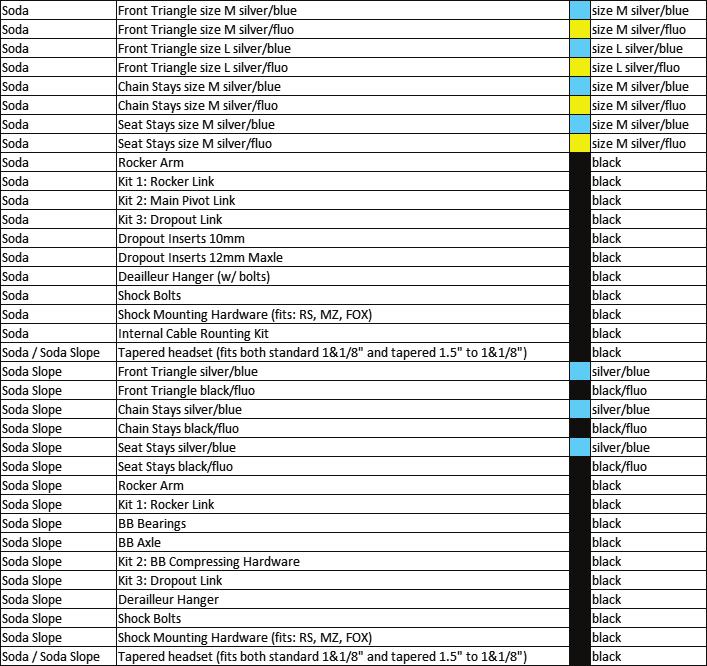
16 REPLACEMENT PARTS 15
 and 115mm stack height. It fits forks with standard 1-1/8 steer tubes or tapered 1.")
17 INSTRUCTIONS: GENERAL INFO Fork: The frames are designed to work with the following forks: Soda: suspension forks mm travel, Soda Slope: suspension forks with mm travel. Headset: Soda & Soda Slope frames come with a tapered head tube with 1.5 ZS (bottom: 56mm ID* / top: 44mm ID) and 115mm stack height. It fits forks with standard 1-1/8 steer tubes or tapered /8 steer tubes. Headset added to the frame works with both 1 1/8 and 1.5 steers as there are two crown races included. The headset comes with two top-cap -: 8mm and 15mm, tu suit riders personal preferences. Additional headset spacers can be added between the headset and the stem. Don t cut your steertube too low! The process of mounting headsets in the frame should be done by a qualified mechanic.. Please note that headsets with OD55 mm bottom cups or other internal headsets won t fit. Only headsets with a bottom cup with 56m OD will work with Soda / Soda Slope frames. Any use of wrong type of headset can be dangerous & can damage the frame. BB: The frames are designed to work with the following bottom bracket sizes: 73mm/113mm, or other 73mm wide BB with a chainline of approximately 51mm. The Soda Slope will accept bmx cranks with Euro BB. Most Euro BB s are designed with 68mm wide BB However they can be used but a 5mm spacer must be added to the central spacer between the BB bearings (same diameters as original central spacer). Before installation make sure that the BB is clean, lightly greased, free of dirt and paint. The installation process should be carried out according to the BB manufacturers instructions. Chainring sizes: The frames are designed to work with the following chainrings: Soda: up to 38t, Soda Slope: up to 36t. Max chainring size is only an approx reference. It can vary depending on the manufacturer, model, cranks & BB used. Biggest tire: The frames will fit the following tires: Soda: 26 x 2.5, Soda Slope: 26 x 2.3. Note that these numbers are for reference only as the size and shape of the tire can vary depending on the manufacturer and rim width. Brake compatibility: Soda / Soda Slope frames are disk brake compatible. Both frames come with International Standard IS-2000 disc brake mount. Both frames will fit discs up to 200mm. Seatpost & seatclamp: All Soda frames work with 30.9mm seatposts and 34.9mm seatclamp (not included with the frame) Do not extend the seat post above the minimum insertion mark. Maximum seat insertion is about 280mm for Soda and 230mm for Soda Slope. 16

18
19

20 SUSPENSION SETTINGS Suspension settings are a matter of personal preference. Some riders like it plush, some like it firm. However here are some suggestions of shock settings that you can use as basic guidelines. Coil shocks: For rider weight of 70kg a 450 lbs spring will give a medium-soft ride in the long travel position (approximate sag35%), and a firm setting in the short travel position (approximate sag: 28%). For rider weight of 80kg a 450 lbs spring will give a very soft ride in the long travel position (approximately 38% sag) and a medium soft ride in the short travel position (aprox. 30% sag) Air shocks: For rider weight of 80kg you will get a sag of 33% (medium-soft) at 160psi in short travel mode a sag of 28% (medium-firm) at 170psi in short travel mode a sag of 33% (medium-soft) at 190psi in long travel mode a sag of 28% (medium-firm) at 200psi in long travel mode Play around with the air pressure and spring weights until you find a setting that suits you best. Remember that the shock in the long travel setting will always require a firmer spring (or more air pressure) to achieve the same percentage of sag as the shock had in the short travel setting. 19

21 INSTRUCTIONS: SODA REAR WHEEL MOUNTING Soda frame are compatible with both 135x10 bolt on hubs with female oversized axle + side bolts or 135x12 Maxle hubs. Two sets of dropouts inserts are included with the frame: 135x10, 135x12 Maxle. Rock Shock Maxle 135x12 axle is also included with the frame. ATTENTION: 135x10 or 135x12 hubs with longer thru axle + side nuts and hubs with 135x10 standard Q-R wont fit!! For proper dropout inserts installation and chainstay length adjustment please refer first to: # INSTRUCTIONS: SODA CS LENGTH ADJUST Mounting the rear wheel: - Loosen the bolts on the disc brake calliper and slide the rear wheel into the dropouts (hub side bolts / Maxle axle should be removed from the hub), then mount the chain on the chainrings. - Align the wheel. - Mount the 135x10 bolts or 135x12 Maxle axle and tighten according to hub manufacturers instructions (just before this, make sure the wheel is positioned symmetrically in the stays). - Adjust the position of the disc brake caliper so that it does not interfere with the disc but at the same time make sure that it will use the maximum area of the brake pads when the brake is applied. Wheel removal: To remove the wheel just loosen the hub bolts or Maxle axle and the wheel will come out of the frame. 20
 side dropout. (see Fig.")

22 INSTRUCTIONS: SODA CS LENGTH ADJUST Choosing correct dropout inserts set: - For 135x10 bolt-on hubs use dropout inserts with 10mm holes there are no difference between left and right inserts. - For 135x12 hubs use dropouts inserts with 12mm holes: the smaller insert with tread inside is for the drive (right) side dropout. (see Fig.9) The bigger insert w/o thread inside is for the non-drive (left) side. Fig x12 Maxle dropout inserts right side with thread inside Adjusting CS length: - Make sure to start by this procedure by un-tightening the insert securing set screws (in the back part of the dropouts). Do not remove them completely to avoid loosing them! (Fig. 10) - Put the correct dropout inserts into the frame 135x10 or 135x12 Maxle. They should be pushed into the frame untill they are flush with the surface of the drotpous. - Tighten the securing screws (in the back part of the dropouts) immobilizing the dropouts inserts. Do not over tighten! Fig. 10 Insert securing set screws Insert securing set screws 21
 Fig.")

23 Adjusting derailleur hanger and disk brakes: Note that short and long chainstay positions have coresponding positions for derailleur hanger and disc brake. The drawings below explain how they should be mounted. Fig. 11 Shows dropouts inserts in the long CS setting (please notice correct derailleur hanger setup and brake setup) Fig. 12 Shows dropouts inserts in the short CS setting (please notice correct derailleur hanger setup and brake setup) Fig. 11 Long CS setting Fig. 12 Short CS setting * always set the same CS length for both sides! * always set derailleur hanger in proper position referring to CS length! * always set brake in proper position referring to CS length! * always use threaded 135x12 Maxle dropout insert in the drive side (right) dropout! * always set long CS for long travel setup. frame will not work with long travel and short CS setup. Trying to use the frame anyway with this incorrect setting can damage the frame or result in fatal accidents!!! 22

24 INSTRUCTIONS: SODA SLOPE REAR WHEEL MOUNTING TIP: for frames with horizontal dropouts & single speed we always suggest bolt on hubs or hubs with thru axles and track nuts. This way you can get much more clamping force than with any QR hub. Most riders don t even use the axle positioners / chain tensioners when running bolt on hubs. Mounting the rear wheel: - Loosen the bolts on the disc brake caliper and slide the rear wheel into the dropouts (track nuts / bolts should be removed from the axle), then mount the chain on the chainrings. - Align the wheel so that the chain becomes tight. - Mount the bolts and tighten according to hub manufacturers instructions (just before this, make sure the wheel is positioned symmetrically in the stays). - Adjust the position of the disc brake caliper so that it does not interfere with the disc but at the same time make sure that it will use the maximum area of the brake pads when the brake is applied 23

. In this setup you can use the long or short chainstay position in the dropouts. Fig 14.")
25 INSTRUCTIONS: SODA TRAVEL ADJUST Fig 13 shows the long travel position (shock bolts inside rocker arm in upper hole) Note that in this setup the dropout inserts must be set to the long chainstay position! The frame will not work with long travel and short chainstay setup. Trying to use the frame anyway with this incorrect setting can damage the frame or result in fatal accidents!!! Fig 13. Long travel position Fig 14 shows the short travel position (shock bolts inside rocker arm in lower hole). In this setup you can use the long or short chainstay position in the dropouts. Fig 14. Short travel position Changing the travel: -unscrew the shock mounting bolt in the rocker (use a 2 x 5mm allen key), -remove bolt -rotate rocker inserts / washers, -move shock to another hole in the rocker arm, -install bolt again, -tighten to proper force. 24
 or check if bearings are pressed and sit well inside the frame -slide CS yoke into place")
26 INSTRUCTIONS: SODA SLOPE BB ASSEMBLY The Soda Slope frame comes with the main pivot around the BB to allow real singlespeed setups. In order to assemble the swingarm and cancel play in the assembly: -insert bearings into frame (if removed) or check if bearings are pressed and sit well inside the frame -slide CS yoke into place -install BB shell paying attention to the position of the blocking tooth (fig. 15) -tighten non-drive side BB cup to specific torque -tighten drive side BB cup till play /slack on CS disappear -tighten compressing bolts slightly (to 4 NM) -un-tighten drive side bb cup again - install 2.5mm bb spacer (or bb mounted chain tensioner) under the drive side bb cup -tighten bb cups to specific torque -tighten compressing bolts to specific torque (to 6-8NM) blocking tooth / cut Fig 15. BB shell with cut and chainstay yoke with blocking tooth 25


.")


.")


27 INSTRUCTIONS: SODA / SODA SLOPE EXTERNAL CABLE ROUTING Cables should be attached under the top tube, between the shock mounts, over the shock, over the rocker arm then on the inside part of the chainstays (as on Fig. 16). In case of hydraulic brakes the rocker arm needs to be disassembled from top tube and cable put over rocker arm and under top tube (see Fig. 17). In case of mechanical brake there is no need to disassemble rocker arm. Disassemble rocker arm using using a 2x5mm allen key. Make sure you don t loose washers that are mounted between toptube and rocker. Fig 16. Soda / Soda Slope external cable routing Fig 17. Rocker arm disassembled from top tube (hydraulic brakes) Please use small zip-ties to attach brake cable to the cableguides (we do not suggest click-on clips) 26

28 INSTRUCTIONS: SODA INTERNAL CABLE ROUTING The Soda frame has an option of running the cables inside the frame. In order to avoid damage of the cables and the steertube we added a kit of protectors for internal routing (see Fig. 18): -Headtube groomets (2pcs) -Steertube protectors (2pcs: each one working with specific standard:: 1& 1/8 or tapered 1.5 to 1 & 1/8 steertubes) -Cable housing (2pcs) to protect the area between DT/BB/CS. Fig 18. Soda frame: internal cable rounting kit 27
. They will protect the cable being kinked on the head tube entrance - Insert the cable and / or hose into the head tube.")

29 Cable installations procedure: For this process you will need to disassemble the brake hose and / or derailleur cable and remove the fork from the from the head tube. -Mount the rubber grommets in the head tube (see Fig. 19). They will protect the cable being kinked on the head tube entrance - Insert the cable and / or hose into the head tube. The cables coming from the left side of the handlebar should enter the right hole, and the cables coming from the right side should enter the left hole. Fig 19 Headtube rubber grommet protector -As on Fig. 20 Lead cables on each side of the steertube to the downtube. Use the correct steertube protector for your steertube (we include protectors for standard and taperted steertubes). Fig 20. Internal cable rounting inside headtube. Steertube protector 28


30 - Lead cables through the down tube and exit through the holes near the BB, as in photo. Make sure derailleur cable exits the downtube on the drive-side, and the brake cable exits from the downtube on the non-drive side. Use included cable housing to protect this area on both sides (Fig. 21). Insert the cables into the chainstays yoke. Adjust the position of the cable housing protector so both it s ends enter the DT & CS yoke evenly. Use a zip-tie on the drive side to make sure the derailleur cable doesn t get caught on the chainrings. Fig. 21. Internal cable routing in DT/ BB / CS yoke area. Cable housing protector. -derailleur cable exits on the end of chainstays near right dropout and goes to the derailleur (Fig. 22) Fig. 22 Internal cable routing for rear derailleur 29

31 - brake cable exits on the inside surface of the CS and goes to the brake caliper (Fig. 23) Fig. 23 Internal cable routing for rear disk brake TIGHTENING TORQUE Correct tightening force on fasteners, nuts, bolts, screws on your bicycle is crucial. Too little force, and the fastener may not hold securely. Too much force, and the fastener can strip threads, stretch, deform or break. Either way, incorrect tightening force can result in component failure, which can cause you to loose control and fall. If any problems are found during the preride check you should immediately seek professional advice from a bicycle mechanic. See also the manuals of the suppliers of the suspension fork, rear shock, and other parts that come with this frame Do not ride the bicycle until all problems have been resolved. Riding a bicycle with any defects can be a hazard to your health and life! Unless you are every competent cyclist and mechanic, do not attempt to execute any of these adjustments yourself. Seek advice at your local bicycle shop. The rear suspension bolts (rear shock and pivots) have been tightened in the factory with specific torque. In case of re-adjustment extreme care should be taken when re-tightening them. Tightening torque for various bolts on the frame: Soda / Soda Slope Shock bolts: Soda / Soda Slope Suspension Pivots: Soda derailleur hanger Soda dropout blocking screws: Soda Slope BB tightening bolts: 10 NM (2x 5mm allen key) NM (2x 6mm allen key) 3-4 NM (do not overtighten!) (2.5mm allen key) 2-3 NM (do not overtighten!) (2.5mm allen key) 6-8 NM (4mm allen key) DO NOT lubricate any of the pivot points. High quality self lubricating Teflon has been applied in the factory. For the following parts please first refer to manufacturer instructions. The following values are given for reference only: Soda 135x10 rear hub bolt 20-25Nm (6mm / 8mm allen key) Soda 135x12 Maxle rear hub quick-release axle: follow Rock Shox instructions Soda Slope 135x10mm bolt-on hubs: 29-35Nm Soda / Soda Slope rear derailleur bolt 9 Nm MTB crank to bottom bracket bolts 40 Nm (or according to manufacturer instructions) 3pcs cranks to bottom bracket bolts 12Nm, then pinch bolts (if used) 12Nm Bolts in seat post clamp: M5: 10Nm, M6: 12Nm 30
 and examine it CAREFULLY for any")
32 MAINTENANCE: PRE-RIDE & PERIODICAL CHECKS Take care of your frame and you will enjoy it for a longer time. Before every ride you should always make a pre-ride check. It should include the following points: clean the frame (note that high-pressure washing may cause damage to some components on the bicycle so it should be avoided) and examine it CAREFULLY for any indications of potential failures including cracks, corrosion, dents, paint peeling and any other indications of potential problems, inappropriate use or abuse. If anything suspicious is found, contact your local bike dealer for a proper inspection. These are important safety checks and very important to help prevent accidents, injury and shortened product lifespan. DO NOT RIDE THE BICYCLE IF IT YOU SEE ANY DEFECTS. Things to check before each ride: Check all frame bolts are correctly tightened refer to # TIGHTENING TORQUE Check wheel axle to frame & fork connection - this is critical for your safety. If you have axle bolts they should be tightened according to the manufacturer s specification. If you have a quick release make sure that it is set to the CLOSED position, and that there is a reasonable amount of resistance applied. Check headset looseness, check stem to handlebar connection and stem to steertube connection. Steering system: The steering system includes: handle bar, stem, headset and fork. All elements should be connected firmly for riding safety. If you wish to make any adjustments yourself, be warned that incorrect setup can be very dangerous and we always advise you to seek professional advice for this! Check the connection between the handlebars and stem. Try pushing the handlebars up and down - there should be no movement between these two elements. Check the headset for play (stand next to the bicycle, apply the front brake and push forwards and backwards. There should be no play between the frame and fork). If any play is found contact your local bike shop. Do not attempt to make any adjustments yourself. If you are confident that you can do this yourself then adjust the steering system according to the headset/stem manufacturer instructions. All parts of the stem should be regularly checked for damage or cracks. If you find anything suspicious, contact an experienced bike mechanic immediately. A defective steering system can cause serious injury or death. Check BB connection to the frame. There should be no play between the frame and bb. Inspect closely bb cups / bearings. For Soda Slope please also try to re-adjust bb following # INSTRUCTIONS: SODA SLOPE BB ASSEMBLY Check cranks connection to bb and pedals connection to cranks. Check chain line and chain tension. Check derailleur connection with the frame and make sure the function is proper before every ride. Check brake clamp to frame & fork connection Clean rear shock & forks stanchion tubes 31

33 Check general condition of rear shock and front fork(take special note of any cracks or deformations). Check shock / fork preassure (for air shoks). Refer to the # SUSPENSION SETTINGS and manufacturers instruction. Make sure SAG don t exceed the reasonable limit. Make sure the air pressure do not exceed limits provided by sock / fork manufacturer Before every ride check the brake cables and their housing for kinks, rust, broken strands, or frayed ends. If you notice any damage, you should ask a bicycle shop to replace the cables immediately. Damaged cables can seriously impede braking efficiency. For information about servicing suspension shock and other parts (135x12 Maxle axle, headset etc) mounted on the bike it is necessary to follow manufacturers instructions closely. The user manual for the additional parts are supplied in the frame box. BOX CONTAINS: SODA -Soda frame -Headset (2 crown races, 2 topcaps)* -Shock mount bolts (2pcs) -Dropout inserts 10mm (L+R) -Dropout inserts 12mm Maxle (L+R)* -Rock Shox Maxle axle* -Derailleur hanger (with 2 bolts) -Internal cableguide kit -Zipties for cable routing -Instruction BOX CONTAINS: SODA SLOPE -Soda Slope frame -Headset (2 crown races, 2 topcaps)* -Shock mount bolts (2pcs) -Derailleur hanger* -Zipties for cable routing -Instruction *Only for aftermarket frame 32
34 NS BIKES WARANTY 1. 7ANNA, manufacturer of NS Bikes, warrants all it s products against defects in materials and workmanship for a period of 1 year, and also offers an additional 1 year crash replacement warranty. 2. If any defects are noticed in the product, the Customer must stop using it immediately and should report this to the dealer that sold it within 14 days. Using a damaged product will void the warranty, lead to more extensive damage and may pose a serious hazard to the rider s health and life. 3. The warranty period starts from the day when the product is purchased. This purchase must be documented with the cash receipt for all products plus a filled in warranty card for frames (which includes the following information: date of purchase, serial number of frame, customers name and name of dealer). 4. The warranty applies only to the original owner and is not transferable. 5. Claims under this warranty should be made through the dealer where the product was purchased. 6. The warranty is valid only if the component is sold by an authorized dealer and assembled by a qualified bicycle mechanic. 7. The warranty does not cover: - normal wear and tear - labour charges for replacing parts, - paint and decals, - problems that result from excessive loads occurring during extreme riding or from bad riding technique. - problems that result from incorrect assembly or installation. 8. This warranty is void if: - the warranty card is filled in incorrectly or incompletely, - any modifications have been made to the product by the customer, - the product had not been used, maintained or repaired according the the manufacturers instructions, - the product was transferred to any third party. 9. Directions on how to deal with warranty cases shall be provided by the distributor of the product in the region where it was purchased. 10. The crash replacement warranty covers damage resulting from crashing, or excessive loads generated by things like casing jumps or throwing the bike. Such damage won t be covered by the normal warranty, however NS Bikes offers the possibility to replace the product for 50% of the original suggested retail price under the Crash Replacement policy. The conditions for this are: - Crash Replacement is valid for 1 year from the purchase date, - NS Bikes reserves the right to deny Crash Replacement without further explanations, - Crash Replacement does not apply to parts damaged in other situations than in riding (for example Crash Replacement will not cover a part that has been damaged during shipping), - Crash Replacement does not apply to complete bikes. It only applies to components made by NS that are mounted in the bikes. 33
35 Frame model Frame serial number :... :... PROOF OF PURCHASE - WARRANTY CARD Shock serial number (if any) :... Price :... Date of purchase :... I certify that I am acquainted with the actual specification of the Dealer s stamp bicycle (this can be slightly different than that published by the distributor). Buyer s signature Dealer s signature :... :...
. A broken leg can be fixed. A broken brain cannot!")
36 manufactured by: 7anna sp. z o.o. sp. k., Raciborskiego 123, Gdansk, POLAND tel / mobile / info@nsbikes.com / Always wear a helmet when riding. It will not make you deathproof, but will increase your chances to avoid serious injury if you crash (and you WILL crash). A broken leg can be fixed. A broken brain cannot! Even if you see some of our riders without a helmet, it s only because they are complete idiots! NSBIKES 2012 SODA & SODA SLOPE TECH MANUAL
SODA EVO & SODA SLOPE TECH MANUAL
 SODA EVO & SODA SLOPE TECH MANUAL 3 4 5 6 7 8 9 10 11 13 18 19 20 21 23 24 25 26 29 30 31 32 32 33 34 Warnings and important information General riding information Introduction Overview of product line
Snabb SNABB TECH MANUAL
 SNABB TECH MANUAL SŁAWEK ŁUKASIK NS TEAM RIDER / GARDA ITALY 4 5 6 6 6 8 10 12 12 12 12 13 13 14 14 16 17 18 19 Warnings and important information General riding information Frame information Technical
FUZZ FUZZ TECH MANUAL
 TECH MANUAL SAM PILGRIM 2013 FMB TOUR WINNER 4 5 6 6 6 6 7 8 10 10 10 11 11 12 12 14 15 16 17 18 19 Warnings and important information General riding information Introduction Frame concept & information
SCOTT VOLTAGE FR USER MANUAL
 SCOTT VOLTAGE FR USER MANUAL All rights reserved 2017 SCOTT Sports SA Distribution: SSG (Europe) Distribution Center SA, P.E.D. Zone C1, Rue du Kiell 60, 6790 Aubange, Belgium v6.3/040717 WWW.SCOTT-SPORTS.COM
SCOTT SPORTS SA _17 RTE DU CROCHET_1762 GIVISIEZ_SWITZERLAND _ 2009 SCOTT SPORTS SA, ALL RIGHTS RESERVED_SCOTT-SPORTS.
 SCOTT SPORTS SA _17 RTE DU CROCHET_1762 GIVISIEZ_SWITZERLAND _ 2009 SCOTT SPORTS SA, ALL RIGHTS RESERVED_SCOTT-SPORTS.COM V GAMBLER CONTENT The Gambler should be adjusted exactly to the current rider for
GAMBLER SCOTT 2011 BIKE OWNERS MANUAL
 SCOTT 2011 BIKE OWNERS MANUAL D SCOTT SPORTS SA 17 RTE DU CROCHET 1762 GIVISIEZ SWITZERLAND 2009 SCOTT SPORTS SA, ALL RIGHTS RESERVED SCOTT-SPORTS.COM CONTENT Gambler Concept P. 004 Geometry/Technical
SCOTT GAMBLER BIKE OWNER S MANUAL
 www.scott-sports.com SCOTT GAMBLER All rights reserved 2014 SCOTT Sports SA SCOTT Sports SA 17 Route du Crochet 1762 Givisiez Switzerland BIKE OWNER S MANUAL 2015 Distribution: SSG (Europe) Distribution
INTRODUCTION TABLE OF CONTENTS 1. ENGLISH INTRODUCTION...PAGE 1 GEOMETRY / FRAME SPECIFICATIONS...PAGE 2-3 FRAME FEATURES...
 TABLE OF CONTENTS INTRODUCTION...PAGE GEOMETRY / FRAME SPECIFICATIONS...PAGE - FRAME FEATURES...PAGE -5 SEAT POST SET-UP...PAGE -5 FRAME HARDWARE KITS...PAGE 6-9 REPLACEABLE DERAILLEUR HANGER...PAGE 0-
GAMBLER SCOTT 2013 BIKE OWNERS MANUAL
 SCOTT 2013 BIKE OWNERS MANUAL SCOTT SPORTS SA 17 RTE DU CROCHET 1762 GIVISIEZ SWITZERLAND 2011 SCOTT SPORTS SA, ALL RIGHTS RESERVED SCOTT-SPORTS.COM D CONTENT Gambler Concept...P. 004 Geometry/Technical
TECHNICAL SUPPORT DOCUMENT 2018 CARBON MODELS 650B / 29 WARRANTY SMALL PARTS FRAME SPEC/SERVICING
 2018 CARBON MODELS 650B / 29 WARRANTY SMALL PARTS FRAME SPEC/SERVICING 2018 CARBON MODELS 650B / 29 PG.i WARRANTY INFORMATION OWNERSHIP REGISTER YOUR BIKE The original owner must register his / her new
SCALE CARBON SCOTT 2011 BIKE OWNERS MANUAL
 SCOTT 2011 BIKE OWNERS MANUAL H SCOTT SPORTS SA 17 RTE DU CROCHET 1762 GIVISIEZ SWITZERLAND 2009 SCOTT SPORTS SA, ALL RIGHTS RESERVED SCOTT-SPORTS.COM CONTENT Scale Carbon Concept P. 004 Geometry Scale
SCALE CARBON SCOTT 2013 BIKE OWNERS MANUAL
 SCALE CARBON SCOTT 2013 BIKE OWNERS MANUAL SCOTT SPORTS SA 17 RTE DU CROCHET 1762 GIVISIEZ SWITZERLAND 2011 SCOTT SPORTS SA, ALL RIGHTS RESERVED SCOTT-SPORTS.COM H content Scale Carbon Concept... P. 004
TECHNICAL SUPPORT DOCUMENT 2018 CARBON MODELS 650B / 29 WARRANTY SMALL PARTS FRAME SPEC/SERVICING
 2018 CARBON MODELS 650B / 29 WARRANTY SMALL PARTS FRAME SPEC/SERVICING 2018 CARBON MODELS 650B / 29 PG.i NORCO BICYCLES NEW PURCHASE CONSUMER WARRANTY PROGRAM - EFFECTIVE ON ALL 2017 MODEL YEAR BICYCLES
scott 2012 bike owners manual SCOTT SPORTS SA 17 RTE DU CROCHET 1762 GIVISIEZ SWITZERLAND 2011 SCOTT SPORTS SA, ALL RIGHTS RESERVED SCOTT-SPORTS.
 scott 2012 bike owners manual VoltaGE FR F SCOTT SPORTS SA 17 RTE DU CROCHET 1762 GIVISIEZ SWITZERLAND 2011 SCOTT SPORTS SA, ALL RIGHTS RESERVED SCOTT-SPORTS.COM content Voltage FR Concept...P. 004 Geometry
NITROGEN DISC 286A: ASSEMBLY GUIDE
 NITROGEN DISC 286A: ASSEMBLY GUIDE Valid for MY2019 Nitrogen Disc 286A Revision 1.0-07-26-2018 NITROGEN DISC 286A: Table of Contents 1. Tools Needed and First Aid Kit...3 2. Frameset inspection...4 3.
TABLE OF CONTENTS FRAME FEATURES INTRODUCTION
 S3 DISC MANUAL TABLE OF CONTENTS Introduction...1 Frame Features...2 Fork Preparation...3 Small Parts...5 Frame Preparation...6 Brake Housing Installation...7 Mechanical Cable Routing...9 Electric Cable
scott 2012 bike owners manual SCOTT SPORTS SA 17 RTE DU CROCHET 1762 GIVISIEZ SWITZERLAND 2011 SCOTT SPORTS SA, ALL RIGHTS RESERVED SCOTT-SPORTS.
 scott 2012 bike owners manual D SCOTT SPORTS SA 17 RTE DU CROCHET 1762 GIVISIEZ SWITZERLAND 2011 SCOTT SPORTS SA, ALL RIGHTS RESERVED SCOTT-SPORTS.COM content Gambler Concept...P. 004 Geometry/Technical
ELECTRON PRO 245A: ASSEMBLY GUIDE. Revision Valid for MY2017 Electron Pro
 ELECTRON PRO 245A: ASSEMBLY GUIDE Revision 2.0 04-19-2017 Valid for MY2017 Electron Pro ELECTRON PRO 245A: Table of Contents 1. Tools Needed and First Aid Kit...3 2. Specifications...4 3. Configurations...5
IGNITE ALLOY 29. frame passport
 IGNITE ALLOY 29 frame passport last update: 18/01/2016 INDEX 0. UPDATES... 3 1. GENERAL... 3 1.1. Description... 3 1.2. Part codes... 3 2. MATERIAL... 3 3. WEIGHT... 3 3.1. Frame... 3 4. GEOMETRY... 3
SCOTT BIG ED / BIG JON USER MANUAL 2016
 SCOTT BIG ED / BIG JON USER MANUAL 2016 All rights reserved 2016 SCOTT Sports SA Distribution: SSG (Europe) Distribution Center SA, P.E.D. Zone C1, Rue du Kiell 60, 6790 Aubange, Belgium v6.1/30082016
Have questions? Chat with us live at raleighusa.com or call us at , 8am 5pm PST
 1 2 Have questions? Chat with us live at raleighusa.com or call us at 1-800-251-8435, 8am 5pm PST The bicycle you have purchased is a complex piece of equipment that must be properly assembled and maintained
E-118 Assembly Guide
 E-118 Assembly Guide Table of Contents Overview of the assembly.... 2 1. Fork installation.... 3-4 2. Cable housing installation.... 5 3. Handlebar installation... 6 4. Front brake installation.... 7-8
SCOTT BIG ED BIKE OWNER S MANUAL
 www.scott-sports.com SCOTT BIG ED All rights reserved 2014 SCOTT Sports SA SCOTT Sports SA 17 Route du Crochet 1762 Givisiez Switzerland BIKE OWNER S MANUAL 2015 Distribution: SSG (Europe) Distribution
SCOTT PLASMA 4 BIKE OWNER S MANUAL
 www.scott-sports.com SCOTT PLASMA 4 All rights reserved 2014 SCOTT Sports SA SCOTT Sports SA 17 Route du Crochet 1762 Givisiez Switzerland BIKE OWNER S MANUAL 2015 Distribution: SSG (Europe) Distribution
SANTA CRUZ BICYCLES Cable Routing Procedure MY17
 SANTA CRUZ BICYCLES Cable Routing Procedure MY17 Copyright Santa Cruz Bicycles 2017 TABLE OF CONTENTS SAFETY INSTRUCTIONS... 3 CABLE ROUTING... 3 INTRODUCTION...3 TOOLS AND SUPPLIES...3 REAR DERAILLEUR
SCOTT BIG ED / BIG JON USER MANUAL
 SCOTT BIG ED / BIG JON USER MANUAL All rights reserved 2017 SCOTT Sports SA Distribution: SSG (Europe) Distribution Center SA, P.E.D. Zone C1, Rue du Kiell 60, 6790 Aubange, Belgium v6.3/040717 SCOTT Sports
2019 MADONE ASSEMBLY MANUAL
 2019 MADONE ASSEMBLY MANUAL 2019 MADONE Rim brakes and Di2 drivetrain Rim brakes and mechanical drivetrain Disc brakes and Di2 drivetrain Disc brakes and mechanical drivetrain TABLE OF CONTENTS Common
OWNER S MANUAL 2013 ARC CARBON
 OWNER S MANUAL 2013 ARC CARBON YETI CYCLES 621 Corporate Circle, Unit B Golden, CO 80401 888.576.9384 www.yeticycles.com TABLE OF CONTENTS BRAND OVERVIEW 01 FRAME FEATURES 04 GEOMETERY 08 MAINTENANCE SCHEDULE
SCOTT GAMBLER USER MANUAL
 SCOTT GAMBLER USER MANUAL All rights reserved 2017 SCOTT Sports SA Distribution: SSG (Europe) Distribution Center SA, P.E.D. Zone C1, Rue du Kiell 60, 6790 Aubange, Belgium v6.3/040717 WWW.SCOTT-SPORTS.COM
SCALP - MEGA - SNAP - FRAME MANUAL
 SCALP - MEGA - SNAP - FRAME MANUAL WARRANTY Nukeproof warrants each new Nukeproof bicycle frame against defects in workmanship and materials for 2 years from the purchase date of the original owner. THIS
HELMETS SAVE LIVES!!! ALWAYS WEAR A PROPERLY FITTED HELMET WHEN YOU RIDE YOUR SCOOTER. DO NOT RIDE AT NIGHT. AVOID RIDING IN WET CONDITIONS.
 HELMETS SAVE CORRECT FITTING - MAKE SURE YOUR HELMET COVERS YOUR FOREHEAD. LIVES!!! ALWAYS WEAR A PROPERLY FITTED HELMET WHEN YOU RIDE YOUR SCOOTER. DO NOT RIDE AT NIGHT. AVOID RIDING IN WET CONDITIONS.
ELECTRON PRO: ASSEMBLY GUIDE. Revision Valid for MY2017 Electron Pro
 ELECTRON PRO: ASSEMBLY GUIDE Revision 1.0 10-20-2016 Valid for MY2017 Electron Pro ELECTRON PRO: Table of Contents 1. Tools Needed and First Aid Kit...3 2. Specifications...4 3. Configurations...5 4. Geometry...7
FRAMESET ASSEMBLY GUIDE TRUE GRIT. LaufCycling.com
 FRAMESET ASSEMBLY GUIDE TRUE GRIT LaufCycling.com Congratulations on your True Grit Frameset! We understand you are in a hurry to go riding a.s.a.p. - but please take a deep breath and read this installation
owner s manual 2012 yeti arc
 owner s manual 2012 yeti arc YETI CYCLES 600 Corporate Circle, Unit D Golden, CO 80401 888.576.9384 www.yeticycles.com Table of Contents Brand Overview 06 Frame Features 08 Geometery 10 Maintenance Schedule
moto Owner s Manual Supplement PDF CONTENTS
 READ THIS SUPPLEMENT AND YOUR CANNONDALE BICYCLE OWNER S MANUAL CAREFULLY! Both contain important safety information. Keep both for future reference. moto Owner s Manual Supplement 122172.PDF CONTENTS
comfort without compromising on performance and to fit your various needs on touring,
 Congratulations on your purchase of Goal-26X. Goal-26X is made to enhance comfort without compromising on performance and to fit your various needs on touring, shopping and communicating. Let s have fun
CRUZBIKE Quest 2.0 Assembly
 CRUZBIKE Quest 2.0 Assembly CRUZBIKE Quest 2.0 Assembly... 1 General notes on assembly... 2 Un box and evaluate the frame and major parts... 2 Unfold the rear swing arm and arrange the frame... 3 Rear
Rocky Mountain Instinct / Pipeline Frame Assembly Guide. Date: March 31, 2017
 Rocky Mountain Instinct / Pipeline Frame Assembly Guide Date: March 31, 2017 1 Table of Contents Front Triangle Preparation... 4 Parts Needed... 4 Instructions... 4 Chain Stay Preparation... 6 Parts Needed...
SCOTT SCOTT-SPORTS.COM SAG-BOY BIKE OWNERS MANUAL GAMBLER OWNERS MANUAL / BEDIENUNGSANLEITUNG / MANUEL D UTILISATION
 SCOTT-SPORTS.COM GAMBLER SAG-BOY The lengths of the grey beam shows the optimum eye-to-eye distance of the rear shock. Der graue Balken zeigt den optimalen Bolzenabstand des Dämpfers. La longueur de la
Have questions? Chat with us live at raleighusa.com or call us at , 8am 5pm PST
 1 2 Have questions? Chat with us live at raleighusa.com or call us at 1-800-251-8435, 8am 5pm PST The bicycle you have purchased is a complex piece of equipment that must be properly assembled and maintained
DISASSEMBLING & REASSEMBLING CARTRIDGE INSTALLING SEATPOST ON BIKE
 INTRODUCTION BILL OF MATERIALS SPECIFICATIONS & TOOLS PROCEDURES DISASSEMBLING & REASSEMBLING CARTRIDGE INSTALLING SEATPOST ON BIKE OPERATION OF SEATPOST GIANT LIMITED WARRANTY 1 INTRODUCTION Congratulations
Mayhem and Living Link Frames Assembly Instructions and Suspension Setup Manual
 Mayhem and Living Link Frames Assembly Instructions and Suspension Setup Manual Table of Contents Warning Intended Use Frame Geometry Component Compatibility Frame Assembly Section Tools Required A. Internally
INSTRUCTION GUIDE TRANSITION CARBON (ALL MODELS)
") INSTRUCTION GUIDE TRANSITION CARBON (ALL MODELS) THIS INSTRUCTION GUIDE CONTAINS IMPORTANT INFORMATION. PLEASE READ CAREFULLY AND STORE IN A SAFE PLACE. Congratulations! The Specialized bicycle you have
INSTRUCTION GUIDE TRANSITION CARBON (ALL MODELS) THIS INSTRUCTION GUIDE CONTAINS IMPORTANT INFORMATION. PLEASE READ CAREFULLY AND STORE IN A SAFE PLACE. Congratulations! The Specialized bicycle you have
Special instruction of installation for SAINT FH-M800/RD-M800 and FH-M805/RD-M805
 Technical Service Instructions SI-5VB0E t RD-M805 / RD-M800 Rear derailleur Special instruction of installation for SAINT FH-M800/RD-M800 and FH-M805/RD-M805 A hub axle is an essential component for the
SUPERIOR TEAM/XP CRB BF-M03 SERVICE MANUAL
 SUPERIOR TEAM/XP CRB BF-M03 SERVICE MANUAL Superior would like to congratulate you on the purchase of your new bicycle. We place a great emphasis on the choice of materials and their processing so as to
2019 MADONE ASSEMBLY MANUAL
 2019 MADONE ASSEMBLY MANUAL 2019 MADONE Rim brakes and Di2 drivetrain Disc brakes and Di2 drivetrain Rim brakes and mechanical drivetrain Disc brakes and mechanical drivetrain TABLE OF CONTENTS Common
user manual hard eddie
 user manual hard eddie Welcome to the family AT INTENSE, WE HAVE ONE GOAL - TO PROVIDE THE RIDE OF YOUR LIFE. Our team of designers, engineers and product experts are focused on one thing every day: your
TABLE OF CONTENTS INTRODUCTION
 R3 DISC MANUAL TABLE OF CONTENTS Introduction... 1 Frame Features... 2 Fork Preparation... 3 Small Parts... 5 Frame Preparation... 6 Brake Housing Installation... 7 Mechanical Cable Routing... 9 Electric
PRECAUTION INTENDED USE OF THIS MANUAL INTRODUCTION AKING CARE OF
 Table of Contents 1 INTRODUCTION INTDED USE OF THIS MANUAL PRECAUTION TAKING CARE OF YOUR COMPOSITE BICYCLE 5 6 OVERDRIVE HEADSET INSTRUCTION COMPOSITE FRONT FORK 5 7 SPEEDCONTROL BRAKES 6 8 9 10 11 1
600 Corporate Circle, Unit D Golden, CO USA P// //
 Yeti Cycles 600 Corporate Circle, Unit D Golden, CO USA P//303.278.6909 // 888.576.9384 www.yeticycles.com A R C - X O W N E R S M A N U A L 0 8-1 0 Table of Contents Brand Overview 6 Frame Features 8
EZ-3 USX HD Supplemental Owner s Manual
 EZ-3 USX HD Supplemental Owner s Manual Find us online at SunSeeker.Bike Revised 2/2016 CONGRATULATIONS! Congratulations and welcome to the Sun Seeker family! You have selected one of the most comfortable
RADON 237A: ASSEMBLY GUIDE. Revision Valid for MY2017 Radon
 RADON 237A: ASSEMBLY GUIDE Revision 3.0-05-29-2017 - Valid for MY2017 Radon RADON 237A: Table of Contents 1. Tools Needed and First Aid Kit... 3 2. Sizing Chart... 4 3. Seat Post Collar Assembly... 5 4.
Parts List. 7. Handlebars 8. Grips 9. Handlebar Stem 10. Front Brake 11. Front Wheel 12. Crank 13. Chain
 Woodworm Cruise Parts List 1. Free Wheel with Rear Hub 2. Fenders 3. Fender Stay 4. Quick Release 5. Saddle 6. Seat Post 7. Handlebars 8. Grips 9. Handlebar Stem 10. Front Brake 11. Front Wheel 12. Crank
Helios Separable Tandem Manual
 Helios Separable Tandem Manual This manual accompanies the Helios owners manual Introduction The separable kit fitted to your Helios tandem allows for even greater flexibility in the way you can enjoy
Rocky Mountain Instinct / Pipeline Alloy Frame Assembly Guide. Date: April 7, 2017
 Rocky Mountain Instinct / Pipeline Alloy Frame Assembly Guide Date: April 7, 2017 1 Table of Contents Front Triangle Preparation... 4 Parts Needed... 4 Instructions... 4 Chain Stay Preparation... 6 Parts
INTRODUCTION BILL OF MATERIALS SPECIFICATIONS & TOOLS PROCEDURES OPERATION OF SEATPOST GIANT LIMITED WARRANTY
 INTRODUCTION BILL OF MATERIALS SPECIFICATIONS & TOOLS PROCEDURES OPERATION OF SEATPOST GIANT LIMITED WARRANTY 1 INTRODUCTION Congratulations on the purchase of your new GIANT CONTACT SWITCH seatpost. This
UNPACKING AND ASSEMBLING YOUR DIAMONDBACK ROAD BIKE
 EMAIL SIGNUP BIKE REG SEARCH BIKES THE RIDE HEALTH FITNESS SKILLS SHOP MAINTENANCE CYCLING 101 RIDERS LIKE YOU TEAMS SUPPORT UNPACKING AND ASSEMBLING YOUR DIAMONDBACK ROAD BIKE 1. Begin by carefully cutting
INTENDED USE OF THIS MANUAL
 Table of Contents 1 INTRODUCTION... 2 2 INTENDED USE OF THIS MANUAL... 2 3 PRECAUTION... 2 4 TAKING CARE OF YOUR COMPOSITE BICYCLE... 3 5 OVERDRIVE 2 HEADSET INSTRUCTION... 4 6 COMPOSITE FRONT FORK...
E-116 Assembly Guide
 E-116 Assembly Guide Table of Contents Overview of the assembly.... 2 1. Cable housing installation.... 3 2. Front brake installation.... 4 3. Rear brake installation... 5-6 4. Seatpost installation....
Have questions? Chat with us live at raleighusa.com or call us at , 8am 5pm PST
 1 2 Have questions? Chat with us live at raleighusa.com or call us at 1-800-251-8435, 8am 5pm PST The bicycle you have purchased is a complex piece of equipment that must be properly assembled and maintained
TECHNICAL SUPPORT DOCUMENT FULL SUSPENSION MODELS C7 C9 WARRANTY SMALL PARTS FRAME SPEC/SERVICING
 2016-2018 FULL SUSPENSION MODELS C7 C9 WARRANTY SMALL PARTS FRAME SPEC/SERVICING 2016-2018 FULL SUSPENSION MODELS C7 C9 PG.i WARRANTY INFORMATION COMPLETE BIKES ONE YEAR LIMITED WARRANTY NORCO Bicycles
FRAME FEATURES TABLE OF CONTENTS INTRODUCTION. A guide to your Cervélo C Series frame.
 C SERIES MANUAL TABLE OF CONTENTS Introduction...1 Frame Features...2 Fork Preparation...3 Small Parts...5 Frame Preparation...6 Brake Housing Installation...7 Mechanical Cable Routing...9 Electric Cable
«SAG-BOY» BIKE OWNERS MANUAL OWNERS MANUAL BEDIENUNGSANLEITUNG MANUEL D UTILISATION
 «SAG-BOY» OWNERS MANUAL BEDIENUNGSANLEITUNG MANUEL D UTILISATION The length of the grey beam shows the optimum eye-to-eye distance of the rear shocks. Der graue Balken zeigt den optimalen Bolzenabstand
GALLIUM CS 281A: ASSEMBLY GUIDE. Revision Valid for MY2019 Gallium CS
 GALLIUM CS 281A: ASSEMBLY GUIDE Revision 0.0-2018-05-04 - Valid for MY2019 Gallium CS GALLIUM CS 281B: ASSEMBLY GUIDE Revision 0.0-2018-05-04 - Valid for MY2019 Gallium CS GALLIUM CS 281A / 281B: Table
SANTA CRUZ BICYCLES Geometry Adjust Flip Chip
 SANTA CRUZ BICYCLES Geometry Adjust Flip Chip Copyright Santa Cruz Bicycles 2017 TABLE OF CONTENTS SAFETY INSTRUCTIONS... 3 GEOMETRY ADJUST FLIP CHIP... 3 INTRODUCTION...3 TOOLS AND SUPPLIES...3 MY18 NOMAD
1. General Safety Information. Silvio V2.2 Assembly Instructions Assembly. Adjust to the rider.
 Silvio V. Assembly Instructions support@cruzbike.com. General Safety Information WARNING to avoid serious injuries:. If you are unsure about fitting, testing and adjusting brakes or gearing on a bicycle,
BICYCLE ASSEMBLY INSTRUCTIONS. dutchcycles.com.au. Distribution Centre
 BICYCLE ASSEMBLY INSTRUCTIONS dutchcycles.com.au Distribution Centre Shed 68, 400-422 Somerville Road, Tottenham, VIC 3012 email: service@dutchcycles.com.au BICYCLE COMPONENTS KEY INTRODUCTION CONGRATULATIONS
DM-MARD (English) Dealer's Manual. ROAD MTB Trekking. City Touring/ Comfort Bike REAR DERAILLEUR XTR RD-M9100 RD-M9120
 Dealer's Manual. ROAD MTB Trekking. City Touring/ Comfort Bike REAR DERAILLEUR XTR RD-M9100 RD-M9120") (English) DM-MARD001-00 Dealer's Manual ROAD MTB Trekking City Touring/ Comfort Bike URBAN SPORT E-BIKE REAR DERAILLEUR XTR RD-M9100 RD-M9120 CONTENTS CONTENTS...2 IMPORTANT NOTICE...3 TO ENSURE SAFETY...4
(English) DM-MARD001-00 Dealer's Manual ROAD MTB Trekking City Touring/ Comfort Bike URBAN SPORT E-BIKE REAR DERAILLEUR XTR RD-M9100 RD-M9120 CONTENTS CONTENTS...2 IMPORTANT NOTICE...3 TO ENSURE SAFETY...4
We strongly recommend watching our video tutorial for the easiest installation process.
 Introduction We strongly recommend watching our video tutorial for the easiest installation process. GTRO is dedicated for all non-sports bicycles. Please, remember it has not been tested for heavy-duty
Folding Dual Suspension MTB. Instruction Manual
 Folding Dual Suspension MTB Instruction Manual Introduction The Stowabike Folding MTB has been made to last and with proper maintenance, it will give you years of enjoyable rides and journeys. The following
owner s manual 2012 yeti sb95
 owner s manual 2012 yeti sb95 YETI CYCLES 600 Corporate Circle, Unit D Golden, CO 80401 888.576.9384 www.yeticycles.com Table of Contents Brand Overview 06 Frame Features 08 Geometery 10 Maintenance Schedule
Item N o.: Item N am e:40cm Boys Rival Bike
 Item N o.:42272892 Item N am e:40cm Boys Rival Bike 9 bell 8 grip 30 crash pad 10 brake lever 26 wheel reflector 22 saddle 23 seat post 25 rear reflector 24 quick release 6 handle bar 7 stem 2 top tube
IGNITE CARBON 29. frame passport
 IGNITE CARBON 29 frame passport last update: 11/10/2017 INDEX 0. UPDATES... 3 1. GENERAL... 3 1.1. Description... 3 1.2. Part codes... 3 2. MATERIAL... 3 3. WEIGHT... 3 3.1. Frame... 3 4. GEOMETRY... 4
Final Assembly Instructions Bikes with Threaded Headsets
 Final Assembly Instructions Bikes with Threaded Headsets Thank you for buying your new bicycle from L.L.Bean. Read these instructions carefully before beginning the final assembly. Prior to shipping, our
Mini Glider Manual. Your Glider comes partially assembled. The front wheel and the handlebars require assembly.
 Mini Glider Manual Congratulations on your purchase of the Mini Glider! Your glider is designed for years of nearly carefree use by your child. These instructions include how to set up your glider and
SUPERIOR TEAM XF CRB BF-1601 SERVICE MANUAL
 SUPERIOR TEAM XF CRB BF-1601 SERVICE MANUAL Superior would like to congratulate you on the purchase of your new bicycle. We place a great emphasis on the choice of materials and their processing so as
Santa Fe Cycles Assembly Guide Introduction
 Santa Fe Cycles Assembly Guide Introduction Congratulations on your purchase of your new Santa Fe bicycle. You have purchased a bicycle that has many features and qualities. Please take a few minutes and
SCOTT ADDICT DISC/GRAVEL/CX USER MANUAL
 SCOTT ADDICT DISC/GRAVEL/CX USER MANUAL All rights reserved 2017 SCOTT Sports SA Distribution: SSG (Europe) Distribution Center SA, P.E.D. Zone C1, Rue du Kiell 60, 6790 Aubange, Belgium v6.3/040717 WWW.SCOTT-SPORTS.COM
E-117 TRI: ASSEMBLY GUIDE
 E-117 TRI: ASSEMBLY GUIDE Valid for MY2016 E-117 Tri Revision 8.0-07-08-2016 E-117 TRI: Table of Contents 1. Tools Needed & First Ait Kit..........................2 2. Fitting / Stack & Reach.....................3
FRAME FEATURES TABLE OF CONTENTS INTRODUCTION
 R3 MANUAL TABLE OF CONTENTS Introduction...1 Frame Features...2 Fork Preparation...3 Small Parts...5 Frame Preparation...6 Mechanical Cable Routing...7 Electric Cable Routing...9 Seatpost Assembly & Installation...11
GALLIUM PRO: ASSEMBLY GUIDE
 GALLIUM PRO: ASSEMBLY GUIDE Revision 2.0-04-08-2016 GALLIUM PRO : Table of contents Assembly overview..........................2-3 1. Frame inspection........................4 2. Headset installation.......................5
Final Assembly Instructions Bikes with Quill Stems
 Final Assembly Instructions Bikes with Quill Stems Thank you for buying your new bicycle from L.L.Bean. Read these instructions carefully before beginning the final assembly. Prior to shipping, our expert
owner s manual 2012 yeti sb66
 owner s manual 2012 yeti sb66 YETI CYCLES 600 Corporate Circle, Unit D Golden, CO 80401 888.576.9384 www.yeticycles.com Table of Contents Brand Overview 06 Frame Features 08 Geometery 10 Maintenance Schedule
Carve Owner s Manual
 Carve Owner s Manual 2 Ski Bike Owner s Manual 1st Edition, 2016 IMPORTANT: This manual contains important safety, performance and service information. Read it before you take the first ride on your new
SANTANA STOWAWAY TANDEM WITH AIRLINER SAFECASE AND FTS FOAM TRAY SYSTEM ASSEMBLY AND DISASSEMBLY
 SANTANA STOWAWAY TANDEM WITH AIRLINER SAFECASE AND FTS FOAM TRAY SYSTEM ASSEMBLY AND DISASSEMBLY Congratulations! You are now the proud owner of the world s most travel-ready, performance tandem. The following
GALLIUM: ASSEMBLY GUIDE
 GALLIUM: ASSEMBLY GUIDE Revision 2.0-04-08-206 GALLIUM: Table of contents Assembly overview..........................2. Frame inspection........................3 2. Headset installation.......................4
Ladies Shopper Bike Assembly Manual 28C03
 Ladies Shopper Bike Assembly Manual 28C03 Ecosmo Ltd 1 Know your bike 1. Wheel 2. Rear Derailleur 3. Chain 4. Crank Set 5. Pedal 6. Seat Quick Lock 7. Saddle and Post 8. Frame 9. Front Light 10. Front
2015 MUKLUK FRAMESHEET
 RETAILER: This framesheet MUST BE provided to the end user. At Salsa, we believe that a sense of adventure makes life better. The bicycle can be so much more than just a bike; it s a path to new places,
BLUE PAPERS AVANT OMP TECHNICAL MANUAL
 BLUE PAPERS AVANT OMP TECHNICAL MANUAL AVANT OMP TECHNICAL SPECIFICATIONS 1 CONTENT GEOMETRY 3 ERGONOMY 4 SPECIFICATIONS 5 FRAME AND MATERIAL 6 PARTS & HARDWARE 7 CABLE ROUTING 11 TORQUE SPECIFICATIONS
FACTORBIKES.COM. Assembly Manual DISC V1.05
 FACTORBIKES.COM V1.05 Introduction I Limited Lifetime Warranty On Bicycles And Framesets I Necessary Tools 01 Instructions 01 1 Seatpost 01 2 Cut the cable housing to the correct length 03 3 Di2 Cable
Build Specs: Shock Specs: eye-to-eye x 2.25" stroke, Upper Pin 46mm x 8mm, Lower Pin 22.2mm x 8mm Website 2006 Bikes
 2007 Website 2006 Bikes Overview Pricing/Components Sizing/Geometry Larger View As the evolution of freeriding continues to get crazier, the DirtBag was designed to meet rider's needs taking it to the
TECHNICAL SPECIFICATIONS 1 BLUE PAPERS OIZ TECHNICAL MANUAL
 TECHNICAL SPECIFICATIONS BLUE PAPERS OIZ TECHNICAL MANUAL TECHNICAL SPECIFICATIONS CONTENT GEOMETRY AND SPECIFICATIONS 3 FRAME MATERIAL AND CARE 5 OIZ FRAME PARTS 6 CABLE ROUTING 3 TORQUE 0 SHOCK PREASSURE
Rocky Mountain Element Technical Manual. Rev B
 Rocky Mountain Element Technical Manual Rev B 1 Table of Contents Materials Required... 3 Suspension Pivot Torque Guide... 4 Small Parts Torque Guide... 5 Assembly Instructions... 6 1) Bearing Installation...
Contents. Assembly. Setup. Crush Mode/ Plush Mode Onboard Frame Storage Maintenance and Small Parts Safety
 Owner s Manual Contents Assembly Frame fittings Fastener torque Fork compatibility Drivetrain compatibility ISCG Mount Setup Fork Shock install & orientation, air springs vs coil springs Suspension sag,
2015 FARGO FRAMESHEET
 2015 FARGO FRAMESHEET RETAILER: This framesheet MUST BE provided to the end user. At Salsa, we believe that a sense of adventure makes life better. The bicycle can be so much more than just a bike; it
Final Assembly Instructions Bikes with Threaded Headsets
 Final Assembly Instructions Bikes with Threaded Headsets Thank you for buying your new bicycle from L.L.Bean. Read these instructions carefully before beginning the final assembly. Prior to shipping, our
R3 RIM MANUAL EN. Version 1 I
 R3 RIM MANUAL EN Version 1 I 07.02.2017 TABLE OF CONTENTS Introduction...1 Frame Features...2 Fork Preparation...3 Small Parts...5 Frame Preparation...6 Mechanical Cable Routing...7 Electric Cable Routing...9
owner s manual 2012 yeti sb66 c
 owner s manual 2012 yeti sb66 c YETI CYCLES 600 Corporate Circle, Unit D Golden, CO 80401 888.576.9384 www.yeticycles.com Table of Contents Brand Overview 06 Frame Features 08 Geometery 10 Maintenance
Model year 2014 USER MANUAL
 Model year 2014 USER MANUAL WARRANTY Terms and conditions BOS MTB offers warranty on its products on the following terms : BOS MTB guarantees to the original purchaser that the BOS product for which they
DM-MBRD (English) Dealer's Manual. ROAD MTB Trekking. City Touring/ Comfort Bike. Rear Derailleur SLX RD-M7000 DEORE RD-M6000
 Dealer's Manual. ROAD MTB Trekking. City Touring/ Comfort Bike. Rear Derailleur SLX RD-M7000 DEORE RD-M6000") (English) DM-MBRD001-04 Dealer's Manual ROAD MTB Trekking City Touring/ Comfort Bike URBAN SPORT E-BIKE Rear Derailleur SLX RD-M7000 DEORE RD-M6000 CONTENTS IMPORTANT NOTICE... 3 TO ENSURE SAFETY... 4
(English) DM-MBRD001-04 Dealer's Manual ROAD MTB Trekking City Touring/ Comfort Bike URBAN SPORT E-BIKE Rear Derailleur SLX RD-M7000 DEORE RD-M6000 CONTENTS IMPORTANT NOTICE... 3 TO ENSURE SAFETY... 4