w w w. B o b L o n g D i r e c t. c o m w w w. B o b L o n g D i r e c t. c o m
|
|
|
- Lorraine Hill
- 6 years ago
- Views:
Transcription

1 w w w. B o b L o n g D i r e c t. c o m
2 Table of Contents Safety / Caution...3 Warranty...4 Introduction...5 4C Enhancing Eye System...6 Quick Reference...8 Marker Electronics...9 Onboard LED Indicator...9 Dipswitch Cheatsheet...10 Dipswitch Indicators...11 Rate of Fire Adjustment...12 Dwell and Firing Mode Set Up...13 International Firing Modes...14 Maintenance...15 Rammer Maintenance...15 High Pressure Regulator Maintenance...16 Low Pressure Regulator Maintenance...17 Poppet Maintenance...18 Eye Maintenance...19 Consumables List...20 O-Ring List...21 Troubleshooting...22 Troubleshooting...23
3 This paintball marker is not a toy. Misuse or mishandling can result in serious injury or death. Every person within range of a loaded paintball gun must wear eye protection specifically designed for paintball. Recommended at least 18 years of age to purchase, 14 years old to use with adult supervision or 10 years old to use on paintball fields meeting ASTM standards F Ensure you read entire instruction manual before operating your Protege. Please follow all local, state, and federal laws concerning the operation and use of paintball markers. By purchasing this paintball marker you assume all liability. B.L.A.S.T. assumes no liability for injury or death due to misuse or mishandling of this marker. Never point a paintball marker at anyone not wearing paintball approved goggles. Even at the lowest possible operating velocity, a paint ball will cause serious injury should it hit someone in the eye area. Never look down the barrel of your marker with or without wearing paintball approved goggles. Before performing any maintenance on the marker, ensure air source is disconnected and marker has been dry fired. Leave the ON/OFF switch in the OFF position whenever marker is not operational. Always insert barrel plug in barrel when marker is not operational. Re move only in designated operational areas. Only play at commercial playing fields that have a chronograph, ref erees, and clearly marked safe areas. Chronograph your marker before each game to ensure marker is operating at a safe velocity. Safe veloc ity is considered to be 280 feet per second (fps).
4 Marker Warranty WARRANTY Bob Long Technologies warrantees our markers against manufacturing defects. Electrical components are warranted for a period of 90 days. All solenoids and wire harnesses are tested for function prior to leaving our factory. Solenoids and wire harnesses will only be warranted at the discretion of Bob Long Technologies. Only use factory authorized lubricants when maintaining your marker. The use of non-authorized lubricants or maintenance solutions will void your warranty. The use of Teflon tape as a sealant for any marker component may internally damage electro-pneumatics. The use of Teflon tape will void your warranty. When installing aftermarket Drop-Forwards, ensure attachment fasteners DO NOT protrude into internal grip assembly. When installing aftermarket grips, ensure attachment fasteners DO NOT protrude into internal grip assembly. Any attachment fasteners protruding into the grip assembly will void your warranty. For questions concerning your Protege or this manual please call (925)
5 The time-tested Intimidator platform has a new brother the Protege. Beginning in 2000 with the release of the Classic Intimidator, Bob Long set the bar high with the first marker to feature breakbeam anti-chop eyes, dual regulation, an integrated drop forward, two piece barrel, and gradient anodizing in several patterns in one marker in one affordable package. Although this marker was relatively under the radar of the paintball community, Bob Long Technologies set the paintball world on fire in 2001 with the release of the Ground Zero Intimidator the smallest, fastest, and most consistent marker to hit the scene. Featuring a 45 frame, the new Torpedo regulator, and faster electronics and a smaller, sportier feel. In 2002, Bob Long expanded upon the Intimidator line with the release of more models, extensive milling and upgraded electronics; featuring the world s most aggressive marker programming at the time. Three years later, Bob Long rocked the tournament on its heels again with the Alias Intimidator bringing Intimidator speed and reliability to a smaller scale. Finally, in the Intimdator s last stand before the release of the Protege, the Generation Five brought efficiency and speed to a whole new level. And new for 2008, the Protege aims to surpass all expectations, and set the bar notches higher in a true Bob Long fashion. The Protege marker represents the newest addition to the stable of cutting edge Bob Long products. Featuring the absolute newest and greatest features a marker can offer, the Protege serves as the latest issue of the acclaimed Intimidator series. The Protege incorporates the winning features of the timeless Intimidator with the demands of the modern player. The Protege is smaller, faster, stronger and lighter than any of its predecessors and more affordable. Utilizing the patented 4C Quad optoelectronic system, the Protege combines the blazing electronic speed of the Marq series with the utterly efficient stacked-tube poppet design of the Intimidator.
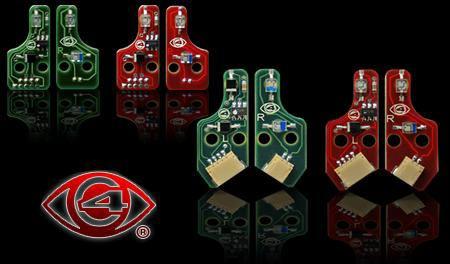
6 4C ENHANCING EYE SYSTEM 4C System Enhancing Eyes Theory and Functionality For years, high performance paintball markers have minimized paintball breakage by using a break-beam infrared sensor system commonly known as eyes. These eye systems are traditionally positioned at the bottom of a markers breech. Single sensor eye systems will only allow a marker to fire when a paintball has finally rested on the bottom of the breech, therefore breaking the infrared beam and communicating fire to the markers micro-controller. A broad spectrum of controlled testing has proven this current eye system to be the predominant limiting factor when seeking out maximum rate of fire potential. Our engineering staff at Bob Long Technologies has successfully implemented an advanced system of optoelectronics which can increase a markers cycle rate almost 40%. The multi-sensor 4C System Enhancing Eyes define the absolute cutting edge in electronic marker technology. There are two instances of wasted time in a markers firing sequence (cycle time). One instance occurs during the time taken for a micro-controller to energize the coil of a solenoid. The second instance occurs during the time taken for a markers bolt to respond to the recently transferred air pressure. This combined time can be 20mS or greater. A marker cycling at 20 balls per second has a cycle time of 50mS, so 20mS would account for 40% of the total cycle time. Using multiple sensors around the breech provides the information needed to accelerate the cycle time. A sensor near the top of the breech indicates whether or not another paintball is ready to be loaded. A sensor near the bottom of the breech indicates whether or not a paintball is properly staged and ready to be propelled. These sensors working in tandem provide us with valuable time measurements and other consistency data. Because we now know how long it takes paintballs to move down through the breech into the final staged position, we energize the solenoid coil early so when a paintball reaches the final staged position the bolt has begun its forward movement. This timing adjustment, made possible by 4C System Enhancing Eyes, eliminates all wasted time in a markers firing sequence.
7 4C Play by Play Here is a more detailed description of how the 4C System Enhancing Eyes work. The time it takes for a markers bolt to move back past sensors toward final open position, allowing a paintball to fall, will be recorded. The time it takes for the next paintball to pass by the top sensor while falling will be recorded. The time difference between these measurements will be calculated by the markers micro-controller and a paintballs falling velocity will be obtained. This falling velocity will indicate if the hopper being used is force-fed or gravity-fed. Use of a force-fed hopper will result in the much higher falling velocity of paintballs. Force-feeding also provides the best estimates of time required for a paintball to fall into its final staged position. Because vital measurements have been obtained by the 4C System Enhancing Eyes a solenoids coil can now be pre-energized, factoring for mechanical delay. Use of a gravity-fed hopper will result in a slow inconsistent falling velocity. If a gravity-fed hopper is detected the pre-energizing sequence is ruled out by the micro-controller and only the bottom sensor will be used in processing when the firing sequence should begin. Assume it takes 15mS to get a markers bolt moving forward (calculating 20mS for a ball to fall past upper sensor into final staged position at lower sensor). In this instance the solenoid can be activated 5mS after the upper sensor is triggered. 15mS later the paintball will reach its final staged position at the same time the bolt has begun its forward movement. This cycle timing adjustment, made possible by 4C System Enhancing Eyes, eliminates all wasted time in a markers firing sequence. 4C is a registered trademark of Extreme Paintball Design, LLC patent pending

 should light up and indicate the status of that marker.")
8 Air Supply: Much like any other tournament marker, the Protege requires the use of compressed air or nitrogen only. The Protege is compatible with both high-pressure and low-pressure compressed air systems. If using an adjustable-output air system, set the system s output between 400 and 500 psi. Screwing your preset air system into the ASA at the bottom of the grip will pressurize the marker, preparing it for use. Turning on your Protege: To power up your Protege, press the On\Off button on the rear of the marker. The LED (light-emitting diode) should light up and indicate the status of that marker. By default, the marker is ready to fire when loaded with paint and air when powered on. To turn the Protege off, press and hold the button until the LED lights orange, then red. Release the button and the marker will be powered off. Hopper and Paint: The Protege utilizes the absolute cutting edge in both electronic and pneumatic technology; to utilize the Protege in its full capacity, the use of a forcefeed motorized loader is recommended. To ensure little or no breakage of paint in both the loader and marker, only use top-grade paintballs in your new Protege. Adjusting Velocity: Although both of the regulators on the Protege come preset from the factory, always adjust the regulators to account for paint to bore match, atmospheric differences, and your field s maximum chronograph limit. The velocity of your marker is controlled through the vertical regulator, which is adjusted with a 1\8 Allen wrench. Turning the screw clockwise (or inward) will increase your velocity; turning the screw counterclockwise will decrease your velocity.
9 To power on marker: Press power button once and release. To turn eyes off: w w w. B o b L o n g D i r e c t. c o m MARKER ELECTRONICS Congratulations! Your marker comes with one of the most technologically advanced circuit boards ever made for any paintball marker. The following instructions and diagrams will teach you how to unleash the potential of the Frenzy 3.0 to let you squeeze every drop of performance out of your Protege. Pull and hold trigger while powering on marker. LED will flash white then release. To power off marker: Basic 0perations Press power button and hold. LED will flash orange then red and board will power itself off. 0nboard LED Indicator NOTE: THE FOLLOWING LEDs ARE FLASHING DURING NORMAL OPERATION! Eyes on. No paintball staged in Chamber. Eyes off / Simulate Low Battery. Change battery immediately to avoid failure. Eye Malfunction. Clean eyes to resume normal operation. 2C Eye ONLY - Bottom eye tripped. Paintball properly staged in chamber. 4C Eye ONLY - Top eye tripped. Also use this to test top eye. 4C Eye ONLY - Bottom eye tripped. Paintball properly staged in chamber.
10 Dipswitch Cheatsheet w w w. B o b L o n g D i r e c t. c o m We understand that sometimes the dipswitch settings on your board might get a bit confusing. Have no fear! Below are some dipswitch diagrams showing you the most common settings so that you can get back on the field as soon as possible. NPPL-SEMI (UNCAPPED) PSP - 3 SH0T PSP -RAMPING
11 Dipswitch Indicators ON Dipswitches control the specific electronic settings of the marker. In the illustraton to the left, Dipswitch 1 would be ON, and dipswitches 2-6 would be OFF. Setting ON OFF Final Tune Cycle Delay ON Fine Tune Cycle Delay OFF Debounce Setup Mode: Debounce Setup Mode ON Debounce Setup Mode OFF ROF Cap ON (15 BPS) ROF Cap OFF (Uncapped) Firing Mode (See Below) Firing Mode (See Below) Firing Mode (See Below) Firing Mode (See Below) Dipswitch 0peration Dwell Setup Mode ON Dwell Setup Mode OFF To check your Debounce setting: Flip dipswitch #2 to ON Power up the marker The LED will flash the current Debounce setting, and the marker will power itself off. (IE: 1 flash = 1ms of Debounce) To change your Debounce setting: Flip dipswitch #2 to ON Power up the marker. Pull, and hold down the trigger while powering the marker on. The LED will now become white; release the trigger. After releasing the trigger, the LED will turn off, and flash the current Debounce setting, and then turn green indicating that it is ready for your response. Pull the trigger the number of times you wish to set the Debounce to (IE: 6 pulls = 6 ms of Debounce), and wait. The board will respond by flashing the setting you just entered, confirming your set ting. Return dipswitch #2 back to the OFF position, and reboot your marker. 11
12 ROF Cap The ROF (Rate of Fire) cap on the Frenzy 3.0 is simple and intuitive. Controlled through dipswitch 3, follow the instructions below to program your BPS (Balls Per Second) Cap Setting: ROF Programming Mode ON ROF Programming Mode OFF Flip dipswitch #3 to ON Power up the marker. Pull, and hold down the trigger while powering the marker on. The LED will now become white; release the trigger. After releasing the trigger, the LED will turn off, and flash the current BPS Cap setting, and then turn green indi cating that it is ready for input. Pull the trigger the number of times you wish to set the BPS Cap to (IE: 13 pulls =13 BPS Cap), and wait. The board will respond by flashing the setting you just entered, confirming your set ting. Return dipswitch #3 back to the OFF position, and reboot your marker. 12
13 Firing Mode Setup: w w w. B o b L o n g D i r e c t. c o m Firing Modes are controlled through dipswitches 4 and 5. To configure them,simply manipulate the switches to the setting you desire Semi- Auto 3 Shot Burst Ramping Dwell Setup Mode: To check your Dwell setting: Flip dipswitch #6 to ON Power up the marker The LED will flash the current Dwell setting, and the marker will power itself off. (IE: 1 flash = 1ms of Dwell) Full Auto All assisted firing modes (Full Auto, Ramping, 3 Shot) activate after the 3rd trigger pull To change your Dwell setting: Flip dipswitch #6 to ON Power up the marker. Pull, and hold down the trigger while powering the marker on. The LED will now become white; release the trigger. After releasing the trigger, the LED will turn off, and flash the current Debounce setting, and then turn green indi cating that it is ready for input. Pull the trigger the number of times you wish to set the Debounce to (IE: 6 pulls = 6 ms of dwell), and wait. The board will respond by flashing the setting you just entered, confirming your set ting. Return dipswitch #2 back to the OFF position, and reboot your marker. NOTE: DO NOT ARBITRARILY CHANGE THE DWELL SETTING OF YOUR MARKER! DOING SO CAN CAUSE ERRATIC VELOCITY READINGS AND MARKER MALFUNCTION! 13
14 European Mode To comply with European firearm regulations, the Frenzy 3.0 board can be configured to remove the Full Auto and 3-Shot modes. To enable the European Mode: Turn off the marker Turn dipswitches 4 and 5 ON (turning the marker to full auto) Hold down the trigger and power on the marker (continue to hold down the trigger even after the marker has booted); the LED will flash white once After the LED has flashed white, press the power button again and it will change color Release the trigger, and the LED will change color again Pull the trigger 10 times; the marker will now power down after 3 seconds Turn dipswitch 3 to the ON position The board is now capped at 15 balls per second, and locked with European set tings Australian Mode (Semi-Automatic Mode Only) Power off board. Set dip switches 4 and 5 to the (On) position. Pull and hold trigger while powering on board. When LED flashes white press power button once, then LED will turn aqua. Release trigger and LED will turn green awaiting your response. Pull trigger 13 times then wait until board powers itself off. Set dip switches 4 and 5 back to the (Off ) position. When you power on your board it will be locked in Australian Mode. Use dip switch 3 to cap your BPS output in compliance with tournament regula tions. 14
 10,000 Shots (5 Cases) 20,000 Shots (10 Cases) Recommended Upkeep Clean and regrease rammer Inspect o-rings for damage Clean debris and old grease")


15 MAINTENANCE w w w. B o b L o n g D i r e c t. c o m Mileage 5,000 Shots (2.5 Cases) 10,000 Shots (5 Cases) 20,000 Shots (10 Cases) Recommended Upkeep Clean and regrease rammer Inspect o-rings for damage Clean debris and old grease from ram interior Repeat above steps Clean, inspect, and regrease HPR Piston and o-rings Clean, inspect, and regrease LPR Piston and o-rings Repeat above steps Clean, inspect, and regrease poppet shaft o-ring Rammer Maintenance De-gas the marker and insure that there are no paintballs in the breech or barrel of the marker. Remove the ram cap from the rear of the marker. Remove the bolt from the marker by pulling upward on the bolt pin. Remove the ram by tilting the marker up ward, allowing the ram to gently slide out of the ram sleeve. Remove the ram from the Protege, and clean any excess grease and debris from the ram with a clean cloth. Inspect the surface of the ram and orings for excessive wear or nicks, and replace as necessary. Inspect the interior of the ram sleeve if necessary, use a swab on the interior of the ram sleeve to clean debris and old grease. Regrease the ram with Dow 55, and gently replace the ram back into the sleeve. Reinstall your Protege ram cap, and check the marker for leaks by airing it up. 15


16 360 Inline Regulator: Your Protege comes equipped with one of the best high pressure regulators on the market. To ensure the best consistency and the highest flow possible, it is recommended that you clean and relubricate the HPR according to the maintenance schedule. HPR Maintenance: Degas the marker and ensure that there are no paintballs in the breech or barrel of the marker. Remove your macroline hose from the 90 fitting on your regulator Unscrew your regulator from the Protege vertical adaptor, and set your marker down. Grasp the two halves of the regulator, and unscrew the regulator base in a counter clockwise fashion. Tap the regulator base on a hard, flat surface to allow the regulator piston, spring stack, spring follower to slide out of the regulator base. Inspect the surface of the piston and oring for excessive wear or nicks, and replace as necessary. Inspect the interior walls of the regula tor base if necessary, use a swab on the interior of the regulator base to clean de bris and old grease. Regrease the piston with Dow 55, and gently replace the piston, spring stack, and spring follower back into the regulator base. Proper Washer Stack Layout: )()()()( 16


17 Protege Low Pressure w Regulator: w w. B o b L o n g D i r e c t. c o m Your Protege comes equipped with one of the best low pressure regulators on the market. To ensure the best consistency and the highest flow possible, it is recommended that you clean and relubricate the low according to the maintenance schedule. LPR Maintenance: Degas your marker and ensure that there are no paintballs in the breech or barrel of the marker. Remove your macroline hose from the 90 fitting on your regulator Unscrew your regulator from the Protege vertical adaptor, and set the vertical regulator down. Grasp the low pressure regulator to ensure that it does not eject from the marker upon removal of its retaining screw. Remove the LPR retaining screw from in side the Protege vertical adaptor, and allow the LPR assembly to slide out of the mark er. Remove the brass LPR adjustment screw from the LPR assembly by unscrewing it in the counterclockwise direction. Remove the LPR cap from the LPR body by unscrewing it in the counterclockwise direc tion. Tap the LPR body on a hard, flat surface to allow the LPR piston, spring, and washer to slide out of the regulator base. Inspect the surface of the piston and oring for excessive wear or nicks, and replace as necessary. Inspect the interior walls of the LPR body if necessary, use a swab on the interior of the LPR body to clean debris and old grease. Regrease the piston with Dow 55, and gently replace the piston, spring stack, and spring follower back into the LPR body. Replace and tighten the LPR cap, and rein sert the brass LPR adjuster screw. 17


18 Poppet Maintenance: w w w. B o b L o n g D i r e c t. c o m Degas the marker and ensure that there are no paintballs in the breech or barrel of the marker. Remove your macroline hose from the 90 fitting on your regulator Unscrew your regulator from the Protege vertical adaptor, and set the vertical regula tor down. Grasp the low pressure regulator to ensure that it does not eject from the marker upon removal of its retaining screw. Remove the LPR retaining screw from in side the Protege vertical adaptor, and allow the LPR assembly to slide out of the mark er. Using a pair of needle nose pliers, remove the poppet return spring and poppet valve from the front of the ram sleeve. Inspect the surface of the poppet and oring for excessive wear or nicks, and replace as necessary. Clean debris and excess grease from the poppet surface, and regrease the poppet or ing with Dow55. Replace the poppet and poppet return spring into the ram sleeve, and attach the LPR with the LPR retaining screw. 18


19 Anti Chop Eye Maintenace: w w w. B o b L o n g D i r e c t. c o m 1 In the event of a chopped ball or debris in the breech, your Protege eyes may need cleaning. Remove the eye cover screw, and remove the eye cover. Carefully unscrew the PCB retaining screw Gently lift the eye PCB away from the body of the marker. Unplug the main harness from the eye PCB (be careful to not pull on the wires this could potentially damage your harness and\ or eye PCB) Remove the eye PCB for cleaning. Use a clean cotton swab to clean the sur face of the eye, dampen the swab with alco hol if necessary. You can safely clean the electronic compo nents on eye PCB with canned air as well however, be careful to not invert the can or apply direct downward pressure on any com ponent. After the eye has been sufficiently cleaned, reinstall the PCB and reinstall the PCB re taining screw and eye cover
20 CONSUMABLES LIST Part Name Specifications Quantity Xpress Mount ASA Set 8-32x3\16 Cup Point Socket Set Screw 4 Screws Grip Panel Screws 6-32 x 3\16 Button Head Socket Cap 6 Screw Bottom PCB Retaining Screw M2x4mm Pan Head Machine Screw 1 Trigger Spring Stop Screws M2x12mm Pan Head Machine Screw 2 Trigger Pre-Travel Set Screw 6-32x3\8 Cup-Point Socket Set Screw 1 Trigger Post-Travel Set Screw 6-32x1\4 Cup-Point Socket Set Screw 1 Rear Grip Frame Screw 10-32x5\16 Button Head Socket Cap 1 Screw Drive Manifold Screw 2-56x1\4 Socket Head Cap Screw 1 Rear Bolt Spring Retainer 1\4-28x3\8 Cup-Point Socket Set Screw 1 Screw Bolt Pin Detent Ball 3\16" Ball Bearing 1 Eye Cover Screw 2-56x1\4 Socket Head Cap Screw 2 Eye Board PCB Retaining 2-56x1\4 Flat Head Machine Screw 2 Screw Bottom Air Passage Plug M3x3mm Cup-Point Socket Set Screw 1 LPR Retaining Screw 10\32 x 1\2 Socket Head Cap Screw Inline Regulator Swivel 10\32x1\4 Cup-Point Socket Set Screw 2 Lock Screws 360 Inline Regulator Adjustment 1\4-28x3\8 Cup-Point Socket Set Screw 1 Screw Rear Air Passage Plug M3x8mm Cup-Point Socket Set Screw 1 Front Air Passage Plug M3x8mm Cup-Point Socket Set Screw 1 20
21 O-RING LIST Part Name Specifications Quantity 360 Inline Regulator Piston Oring 016 Buna (Durameter 70) Regulator ASA Internal Stem 014 Buna (Durameter 70) 2 Orings 360 Regulator ASA Oring 015 Buna (Durameter 70) 1 Primary Air Chamber Gasket 028 Buna (Durameter 70) 1 LPR Housing Orings 015 Buna (Durameter 70) 3 LPR Piston Oring 012 Buna (Durameter 70) 1 Bolt Orings 014 Buna (Durameter 70) 3 Poppet Shaft Oring 006 Buna (Durameter 70) 1 Rear Ram Oring 011 Buna (Durameter 70) 1 Front Ram Oring 006 Buna (Durameter 70) 1 Drive Manifold Orings 1mm X 3mm Buna (Durameter 70) 2 Hose Barb Fitting Seal 1mm X 3mm Buna (Durameter 70) 3 Solenoid Manifold Oring 1mm X 4.5 mm Buna (Durameter 70) 1 Ram Sleeve Orings 015 Buna (Durameter 70) 5 Ram Sleeve Internal Cap Seal 1mm x 14mm Buna (Durameter 70) 1 21
22 Marker will not turn on out of the box Ensure that the battery that you re using in your new marker is a high quality alkaline 9 volt. Verify that your battery is correctly oriented (matching with the correct terminals), and that it is making firm contact with the prongs on the circuit board. Make sure that the wiring harness is correctly inserted into the receptacle, and that the on\off pad is making contact with the switch on the circuit board. Velocity is inconsistent over the chronograph Always check that your paintballs are of high quality, and consistent in size, as well as using a correctly sized barrel. If this does not correct your issue, verify that your vertical regulator and low pressure regulator are lubricated and that their seals are in good condition. Replace your battery. Also, inspect the rammer orings for nicks and that it is properly lubricated. Marker chops paint Always check that your paintballs are of high quality, and consistent in size, as well as using a correctly sized barrel. If this does not correct your issue, verify that your vertical regulator and low pressure regulator are lubricated and that their seals are in good condition drop off and regulator inconsistency are almost always the culprit in paint breakage. Ensure that your detents and bolt face are in good condition, and there is nothing in the breech of the marker. Reset your board settings to factory, and use a force-fed loader. Marker does not air up after tank is connected Verify that the pin valve on your tank is outputting pressure to the regulator some tanks will not work properly with certain ASAs. Attempt airing up the marker with another tank to see if this remedies the issue. Marker does not display correct LED indicator color when turned on Ensure that the battery that you re using in your new marker is a high quality alkaline 9 volt. Verify that your battery is correctly oriented (matching with the correct terminals), and that it is making firm contact with the prongs on the circuit board. If that does not correct the problem, verify that the breech of the maker is clear of obstructions, the bolt is in the back position, and that the eyes are plugged into the harness. Marker is leaking from the ASA Check the tank oring (015 Urethane) for nicks or tears. If this does not correct the leak, check that the macroline hose is in good condition, and not cut unevenly. 22
23 Marker is leaking from the vertical regulator\hpr If the leak is coming from the macroline elbow, make sure that the macroline fitting has been secured to the regulator with factory approved thread-sealant (NOT TEFLON TAPE) and that the macroline hose has not been cut unevenly. Also, ensure that you re using a low-pressure HPA system, and that your regulator is outputting the correct amount. If your regulator continues to leak after these remedies, replace the piston oring and Schrader valve inside the regulator. Air is leaking from the front of the marker frame Verify that the racetrack oring in the front of the frame is free of nicks, and has a light coat of lubrication to induce swelling. Verify that the screw in the center of the vertical ASA is snug, and that there is nothing obstructing your frame from making a tight seal with the bottom of the body. Air is leaking from the rear of the marker frame Remove the trigger frame from the marker, and inspect the hose to the solenoid. If it appears worn or pinched, consider replacing the hose. Additionally, on the first generation of Protégé and Vice markers, some frames had insufficient clearance and would contort the hose in such a manner that would cause some markers to develop a frame leak. If your marker has this issue, replace the hose and apply a small amount of grease to the hose to allow it to compress in the frame without being deformed. If this does not fix your issue, consult expert advice or consider returning the marker to BLAST for service. Marker leaks down the barrel Ensure that your ram orings are free of nicks, and properly lubricated. Verify that your poppet base is in good condition, with its stem oring being free of lacerations and properly lubricated. If this does not correct your issue, consult expert advice or consider returning the marker to BLAST for service. Marker fires more than one shot per pull, or has trigger bounce Raise your marker s debouce level, and make sure that your trigger activation level is not too short. Also, verify that your trigger has the spring installed and that it is properly functioning. Verify that your marker is in semi-automatic mode. Marker double feeds Replace the marker s ball detents. 23


24 BOB LONG TECHNOLOGIES 1799 CARPENTER RD OAKLEY, CA
INTRODUCING THE G.I. SPORTZ VICTUS WARRANTY
 INTRODUCING THE G.I. SPORTZ VICTUS The G.I. Victus was created in collaboration with Bob Long Domestic Gun Developer for the last 20 years. The Marker was designed to give its user the fastest rate of
IMPORTANT CO2/ HPA AIR TANK SAFETY INSTRUCTION AND GUIDELINES. Tank valves must be installed or removed by qualified personnel.
 !WARNING! IMPORTANT SAFETY INSTRUCTION AND GUIDELINS!WARNING! IMPORTANT CO2/ HPA AIR TANK SAFETY INSTRUCTION AND GUIDELINES GETTING STARTED This Paintball Marker is NOT A TOY. Misuse can cause serious
VICE & PROTÉGÉ MANUAL VERSION 2.0
 GEN 5 INTIMIDATOR VICE & PROTÉGÉ MANUAL VERSION 2.0 BOB LONG TECHNOLOGIES 209-293-4440 www.boblongdirect.com CONTENTS Contents... 2 Warning... 3 Warranty... 3 Quick Start... 4 Installing Air Tank... 4
! WARNING! IMPORTANT HPA AIR TANK SAFETY INSTRUCTION AND GUIDELINES ! WARNING! IMPORTANT SAFETY INSTRUCTION AND GUIDELINES
 ! WARNING! IMPORTANT SAFETY INSTRUCTION AND GUIDELINES! WARNING! IMPORTANT HPA AIR TANK SAFETY INSTRUCTION AND GUIDELINES This Paintball Marker is NOT A TOY. Misuse can cause serious injury or death. It
IMPORTANT CO2/ HPA AIR TANK SAFETY INSTRUCTION AND GUIDELINES. Tank valves must be installed or removed by qualified personnel.
 !WARNING! IMPORTANT SAFETY INSTRUCTION AND GUIDELINS!WARNING! IMPORTANT CO2/ HPA AIR TANK SAFETY INSTRUCTION AND GUIDELINES GETTING STARTED This Paintball Marker is NOT A TOY. Misuse can cause serious
1799 Carpenter Road Oakley, California Operator s M a n u a l
 1799 Carpenter Road Oakley, California 94561 2 0 0 5 Operator s M a n u a l Table of Contents Section Page Safety.....................................................2 Warranty...................................................3
IMPORTANT CO2/ HPA AIR TANK SAFETY INSTRUCTION AND GUIDELINES. Tank valves must be installed or removed by qualified personnel.
 !WARNING! IMPORTANT SAFETY INSTRUCTION AND GUIDELINS!WARNING! IMPORTANT CO2/ HPA AIR TANK SAFETY INSTRUCTION AND GUIDELINES GETTING STARTED This Paintball Marker is NOT A TOY. Misuse can cause serious
O p e r a t o r s M a n u a l A - B o m b D a r k R i p p e r 2 R i p p e r ivera R obert R by esign D & Photography
 O p e r a t o r s M a n u a l A-Bomb Dark Ripper 2 Ripper 2.5 Photography & Design by Robert Rivera - 305.819.1009 Table of Contents Section Page Safety.....................................................2
TABLE OF CONTENTS Section Page Safety Warranty
 GEN4 I N T I M I D A T O R A L E G E N D R E B O R N TABLE OF CONTENTS Section Page Safety..............................................................................2 Warranty............................................................................3
CAUTION: READ ALL WARNINGS BEFORE USING OR ATTEMPTING ANY WORK ON YOUR MARKER. SHOULD YOU BE UNSURE AT ANY POINT, STOP AND SEEK PROFESSIONAL SUPPORT.
 Intimidator Bob Long Technologies G6R Bob Long Technologies 209-293-4440 www.boblongdirect.com 2 Table of Contents Warning...3 Warranty...3 Introducing the G6R...4 Ready for the Field...4 Trigger Adjustment
CAUTION: READ ALL WARNINGS BEFORE USING OR ATTEMPTING ANY WORK ON YOUR MARKER. SHOULD YOU BE UNSURE AT ANY POINT, STOP AND SEEK PROFESSIONAL SUPPORT.
 Insight NG Bob Long Technologies 209-293- 4440 www.boblongdirect.com 2 Table of Contents Warning... 3 Warranty... 3 Introducing the Insight NG... 4 Ready for the Field... 4 Maintenance Intervals... 5 Quick
USERS MANUAL. Manufactured by MacDev Paintball - Australia macdev.net
 USERS MANUAL Manufactured by MacDev Paintball - Australia macdev.net Tactical Drone Users Manual Copyright Mac Developments Pty. Ltd. 2009 All rights reserved No part of this document may be copied or
Proto Paintball USA EUROPE ASIA
 Proto Paintball USA 10637 Scripps Summit Ct. San Diego, CA 92131 P 858-536-5183 F 858-536-5191 EUROPE Unit 1, ZK Park, 23 Commerce Way Croydon, Surrey CRO 4ZS United Kingdom P +44 (0) 20-8649-6330 F +44
WARNING OLED & BASIC MENU QUICK START
 Getting Started QUICK START WARNING The VANGUARD MARKER is not a toy. Careless or improper use, including failure to follow instructions and warnings within this Operator Manual and attached to the VANGUARD
Synergy Owners Manual
 Synergy Owners Manual Table of Contents Safety Guidelines...2 Quickstart Guide...3 Owners Manual...7 Field Strip Guide...11 Do s & Don ts...12 Diagrams...13 Troubleshooting Guide...15 Warranty Info...16
Shocker Sport TM Manual. Includes: Shocker Sport 4X4 TM and Shocker Sport Turbo TM
 Shocker Sport TM Manual Includes: Shocker Sport 4X4 TM and Shocker Sport Turbo TM WARNING! The Shocker Sport TM Paintball Marker is not a toy. Misuse or careless use may cause serious injury or death.
CAUTION: READ ALL WARNINGS BEFORE USING OR ATTEMPTING ANY WORK ON YOUR MARKER. SHOULD YOU BE UNSURE AT ANY POINT, STOP AND SEEK PROFESSIONAL SUPPORT.
 Marq Victory Pump Bob Long Technologies MVP Bob Long Technologies 09-93-4440 www.boblongdirect.com Table of Contents Warning... 3 Warranty... 3 Introducing the MVP... 4 Ready for the Field... 4 Quick Start...
Proto Paintball USA EUROPE ASIA
 Proto Paintball USA 10637 Scripps Summit Ct. San Diego, CA 92131 P 858-536-5183 F 858-536-5191 EUROPE Dye House, 7-8 Commerce Way Croydon, Surrey, CR0 4XA, United Kingdom P +44 (0) 20-8649-6330 F +44 (0)
CONTENTS. Read this entire manual before loading, or installing an air cylinder, or in any way attempting to operate the marker
 OWNER S MANUAL CONTENTS 1. Rules for Safe Marker Handling 2. Introduction and Specifications 3. Battery Replacement and Life Indicator 4. Basic Operation 5. Compressed Air/Nitrogen Supply 6. Installing
TABLE OF CONTENTS DM4 OWNER S MANUAL QUICK REFERENCE...PAGE 02 IMPORTANT SAFETY INSTRUCTIONS AND GUIDELINES...PAGE 03
 < < S P E C S > > WEIGHT [.3 LBS] WIDTH [.37 ] LENGTH [9.7 ] HEIGHT [8. ] EFFICIENCY [,00 SHOTS OFF 68CU 400PSI] BATTERY LIFE [40,000 SHOTS] OPERATING PRESSURE [7PSI] CYCLE PRESSURE [7PSI] MAX RATE OF
TABLE OF CONTENTS IMPORTANT SAFETY INSTRUCTIONS AND GUIDELINES... PAGE 02 QUICK REFERENCE... PAGE 04 BOARD SETTINGS AND FUNCTIONS...
 D M 9 O W N E R S M A N U A L TABLE OF CONTENTS IMPORTANT SAFETY INSTRUCTIONS AND GUIDELINES......................... PAGE 02 QUICK REFERENCE........................................................ PAGE
VIBE. Quick Start Manual
 VIBE Quick Start Manual STATISTICS PLEASE READ CAREFULLY VITAL STATISTICS LENGTH/HEIGHT/WEIGHT: OPERATING PRESSURE: PAINTBALLS: POWER SOURCE: PROPELLANT: RATE OF FIRE: OPERATION: MODES OF FIRE: ANTI CHOP
TABLE OF CONTENT IMPORTANT HPA AIR TANK SAFETY INSTRUCTIONS AND GUIDELINES RYSE ON/OFF ASA GETTING STARTED O-RING LIST SCREW LIST MICRO SQ BOARD
 TABLE OF CONTENT 4 IMPORTANT HPA AIR TANK SAFETY INSTRUCTIONS AND GUIDELINES 22 RYSE ON/OFF ASA 6 GETTING STARTED 23 O-RING LIST 8 MICRO SQ BOARD 25 SCREW LIST 6 TRIGGER ADJUSTMENT 28 INTERNAL PARTS 7
ProMaster Troubleshooting Guide
 ProMaster Troubleshooting Guide Always read your owner's manual before operating or doing maintenance on your ProMaster marker. The manual contains in-depth maintenance and setup information. Always remove
O W N E R S M A N U A L E M P I R E P A I N T B A L L. C O M
 OWNER S MANUAL CONTENTS 1. Rules for Safe Marker Handling...1 2. Introduction and Specifications...1 3. Battery Replacement and Life Indicator...2 4. Compressed Air/Nitrogen Supply...2 5. Basic Operation...3
MAYHEM MAYHEM OWNERS MANUAL. Paintball Guns International. Manufactured by
 MAYHEM MAYHEM OWNERS MANUAL Manufactured by Paintball Guns International Table of Contents Specifications...................... 2 Parts diagram and Listing............. 3 Description of Marker Operation.......
Proto Matrix Musashi 3 Upgrade Manual
 Proto Matrix Musashi 3 Upgrade Manual Musashi 3 Upgrade Instructions for Proto Matrix FEATURES...3 LED INDICATOR...3 SOLID GREEN...3 SOLID RED...3 SLOW BLINKING GREEN...3 SLOW BLINKING RED...3 POWER OPERATION...3
Bob Long Intimidator Dragon. Ripper
 Bob Long Intimidator 2002. Dragon. Ripper Owners Manual August 2002 Section TABLE OF CONTENTS Page Safety... 2 Warranty... 3 History (theory of operation)... 3 General Description... 4 Specifications...
FIRESTORM. Assembly Instructions. Electric Upgrade Kit for the Autococker. Designed & Manufactured by PGI
 FIRESTORM Electric Upgrade Kit for the Autococker Assembly Instructions Designed & Manufactured by PGI Table of Contents Introduction 1 Safety 1 Parts Diagram 2 Parts Diagram Listing 2 Getting Started
Yakuza OLED Series Droid & Cyborg 07 Board
 Yakuza OLED Series Droid & Cyborg 07 Board 1. Features 2. Installation 3. Board Operation 4. OLED Diagrams 5. Menu System 6. Settings 7. Recommendations FEATURES Fully functional in the MacDev Droid and
Cover.qxd 1/10/05 10:30 AM Page 2. user manual. diablopaintball.com
 Cover.qxd 1/10/05 10:30 AM Page 2 user manual Cover.qxd 1/10/05 10:30 AM Page 3 Table Of Contents: Page Topic(s) 1 Warning and Rules Safe Marker Handling 2 Warranty Information 3 Welcome 4 Battery Installation
WARNING TABLE OF CONTENTS:
 WARNING WARNING: This is not a toy. Misuse may cause serious injury or death. Eye protection designed specifically for paintball must be worn by the user and persons within range. Recommend 18 years of
O P E R A T O R S M A N U A L
 OPERATOR S MANUAL WARNING! This is not a toy. Misuse may cause serious injury or death. Eye protection designed specifically for paintball must be worn by the user and persons within range. Must be 18
DM8 manual.qx6 10/8/07 5:14 PM Page 1
 DM8 manual.qx6 10/8/07 5:14 PM Page 1 DYE Precision, Inc. USA 10637 Scripps Summit Ct. San Diego, CA 92131 P 858-536-5183 F 858-536-5191 EUROPE Unit 1, ZK Park, 23 Commerce Way Croydon, Surrey CRO 4ZS
PM8 manual-final.qx6 10/4/07 1:06 PM Page 1
 PM8 manual-final.qx6 10/4/07 1:06 PM Page 1 Proto Paintball USA 10637 Scripps Summit Ct. San Diego, CA 92131 P 858-536-5183 F 858-536-5191 EUROPE Unit 1, ZK Park, 23 Commerce Way Croydon, Surrey CRO 4ZS
E-MAG TM Instruction Manual
 E-MAG TM Instruction Manual SAFETY THIS PAINTBALL MARKER IS NOT A TOY! This paintball marker should be treated as a dangerous instrument and should always be treated with respect. Never point a paintball
This Manual was downloaded from the Paintball Gun Service Manuals list.
 This Manual was downloaded from the Paintball Gun Service Manuals list. Proto Paintball USA 10637 Scripps Summit Ct. San Diego, CA 92131 P 858-536-5183 F 858-536-5191 EUROPE UNITED KINGDOM Dye House, 7-8
user manual .68 CALIBER ELECTRONIC PAINTBALL MARKER Meets or exceeds ASTM standards.
 user manual TM TM TABLE OF CONTENTS: Page Topic(s) 1 Warning and Rules Safe Marker Handling 2 Warranty Information 3 Welcome 4 Initial Assembly Battery Installation 9 Attaching Propellant Source Attaching
dye Precision, Inc. USA Scripps Summit Ct. San Diego, CA P f
 O W N E R S M A N U A L dye Precision, Inc. USA 10637 Scripps Summit Ct. San Diego, CA 92131 P 858-536-5183 f 858-536-5191 GERMANY Albert Einstein Str. 2 B 77656 Offenburg, Germany P +49 (0)781 639 349
TABLE OF CONTENTS INCLUDED WITH YOUR MATRIX ADDITIONAL RECOMMENDED TOOLS QUICK REFERENCE...PAGE 02
 M A T R I X O W N E R S M A N U A L TABLE OF CONTENTS QUICK REFERENCE.....................................................................................................PAGE 02 IMPORTANT SAFETY INSTRUCTIONS
SAFETY Always wear approved safety goggles or an approved mask whenever you handle this paintball marker!
 Instruction Manual Table of Contents SAFETY... 1 COMPRESSED AIR ONLY... 2 FAST START... 3 FIRST TIME PROBLEMS... 4 PERFORMANCE... 4 LUBRICATION... 5 VELOCITY ADJUSTMENT... 5 CLEANING... 5 PAINTBALLS...
user manual .68 CALIBER ELECTRONIC PAINTBALL MARKER Meets or exceeds ASTM standards.
 user manual TM TM TABLE OF CONTENTS: Page Topic(s) 1 Warning and Rules Safe Marker Handling 2 Warranty Information 3 Welcome 4 Initial Assembly 6 Parts Key 7 Exploded Diagram 8 Battery Installation 9 Attaching
YAKUZA SERIES OLED. For the Bob Long Closer, Marq, Vice, and Protege 4C Technology by Extreme Paintball Design LLC, pat pend FEATURES
 1. Features 2. Installation 3. Board Operation 4. OLED Diagrams 5. Menu System 6. Settings 7. Recommendations YAKUZA SERIES OLED For the Bob Long Closer, Marq, Vice, and Protege 4C Technology by Extreme
TABLE OF CONTENTS SAFETY FIRST!...3 BASIC OPERATION...4 ADJUSTMENTS...5. Cocking Pressure...5. Three-Way Valve Adjustment...6
 TABLE OF CONTENTS SAFETY FIRST!...3 BASIC OPERATION...4 ADJUSTMENTS...5 Cocking Pressure...5 Three-Way Valve Adjustment...6 External Three-Way adjustment...6 In-Line Regulator...6 Ram to Cocking Block
PLEASE READ ALL OPERATING INSTRUCTIONS BEFORE USING THE LEGEND PAINTBALL MARKER
 PLEASE READ ALL OPERATING INSTRUCTIONS BEFORE USING THE LEGEND PAINTBALL MARKER TABLE OF CONTENTS WARNINGS Important Safety Instructions and Guidelines...page 1 OPERATING INSTRUCTIONS Turning your LEGEND
Paintball Marker. User s Manual. 530 South Springbrook Road Newberg, OR 97132
 Paintball Marker User s Manual 530 South Springbrook Road Newberg, OR 97132 Component Concepts, Inc., 530 South Springbrook Road, Newberg, OR 97132 Phone: (503) 554-8095 Fax: (503) 554-9370 www.phantomonline.com
DM7 OWNER S MANUAL TABLE OF CONTENTS INCLUDED WITH YOUR DM7 ADDITIONAL RECOMMENDED TOOLS QUICK REFERENCE...PAGE 02
 DM OWNER S MANUAL TABLE OF CONTENTS QUICK REFERENCE.............................................................................................................PAGE 0 IMPORTANT SAFETY INSTRUCTIONS AND
LED CONVERSION BOARD - YAKUZA SERIES EGO/GEO
 LED CONVERSION BOARD - YAKUZA SERIES EGO/GEO The LED conversion board replaces the OLED screen mini-board on your Yakuza Series board. Combined with new firmware, your board will function similarly to
Users Manual. Mac Developments - Australia. MacDev Find us on the web at:
 MacDev 2004 Find us on the web at: www.macdev.net Please post warranty cards to: Users Manual Australia/New Zealand MacDev PO Box 584 Gymea, NSW AUSTRALIA 2227 USA/Canada Paintball Kingdom 2407 Ansonville
WARNING continued: 14. Never put any body parts or foreign objects into the breech or feed tube. 15. Always use the supplied barrel cover when your
 owner s manual 1 Owner s Manual 2 WARNING: 1. The DP G5 SPEC-R is NOT A TOY. Treat it with the same respect and care you would a firearm. 2. Carelessness, Misuse, and failure to adhere to the warning and
BUSHMASTER 2000 / 2K2 (LCD) MANUAL. BushMaster 2000 Overview
 MANUAL. BushMaster 2000 Overview") BUSHMASTER 2000 / 2K2 (LCD) MANUAL BushMaster 2000 Overview The BushMaster 2000 is a quality marking instrument specially designed to meet the needs of the professional style tournament player. The BushMaster
BUSHMASTER 2000 / 2K2 (LCD) MANUAL BushMaster 2000 Overview The BushMaster 2000 is a quality marking instrument specially designed to meet the needs of the professional style tournament player. The BushMaster
 www.empirepaintball.com 1. SAFE MARKER HANDLING IMPORTANT: Never carry your marker uncased when not on a playing field. The non-playing public and law enforcement personnel may not be able to distinguish
NoX 06 Cyborg Board Instructions
 Installation: First insure that the air is off, and then refer to your markers instruction manual to put the marker in a safe, non firing condition. When removing or installing the board, user must be
DM6 OWNER S MANUAL T ABLE OF CONTENTS INCLUDED WITH YOUR DM6 ADDITIONAL RECOMMENDED TOOLS QUICK REFERENCE...PAGE 02
 DM6 OWNER S MANUAL T ABLE OF CONTENTS QUICK REFERENCE.............................................................................................................PAGE 0 IMPORTANT SAFETY INSTRUCTIONS AND
IMPORTANT CO2/ HPA AIR TANK SAFETY INSTRUCTION AND GUIDELINES. Tank valves must be installed or removed by qualified personnel.
 !WARNING! IMPORTANT SAFETY INSTRUCTION AND GUIDELINS!WARNING! IMPORTANT CO2/ HPA AIR TANK SAFETY INSTRUCTION AND GUIDELINES GETTING STARTED This Paintball Marker is NOT A TOY. Misuse can cause serious
Lasoya ProMaster Board Settings
 Default Settings Lasoya ProMaster Board Settings DIP 1 DIP 2 DIP 3 DIP 4 MODE Description Off Off Off Off Semi Auto Uncapped Semi-Auto, PDS On On On On On PSP Mode PSP Ramp, 15 BPS, PDS On Default settings
TABLE OF CONTENTS 2014 DM SERIES OWNER S MANUAL IMPORTANT SAFETY INSTRUCTIONS AND GUIDELINES... PAGE 02 QUICK REFERENCE... PAGE 04
 2014 DM SERIES OWNER S MANUAL TABLE OF CONTENTS IMPORTANT SAFETY INSTRUCTIONS AND GUIDELINES... PAGE 02 QUICK REFERENCE... PAGE 04 BOARD SETTINGS AND FUNCTIONS... PAGE 06 REACH AIRPORT... PAGE 12 INCLUDED
BT_SA-17_Manual.qxp 3/11/10 9:54 AM Page C
 BT_SA-17_Manual.qxp 3/11/10 9:54 AM Page C OWNER S MANUAL BT_SA-17_Manual.qxp 3/11/10 9:54 AM Page D CONTENTS 1. Rules for Safe Marker Handling..............................1 2. Introduction and Specifications..............................1
WARNING. Paintball Pistol. Paintball Pistol
 This lightweight assault paintball pistol is custom milled from high grade aluminum for superb balance and precision. The compact construction of this competition paintball pistol will give you a mobile
Users Manual STANDARD, SELECT, AND LCD MODELS
 Users Manual Generation E Sports STANDARD, SELECT, AND LCD MODELS Generation E Sports 956 South Second Street Ronkonkoma, NY 11779 USA (631) 580-4377 www.matrixmarker.com GENERATION E SPORTS MATRIX OPERATORS
SONIC. Users Manual. Mac Developments - Australia MacDev 2004/05
 MacDev 2004/05 SONIC Find us on the web at: www.macdev.net Please post warranty cards to: Australia/New Zealand MacDev PO Box 584 Gymea, NSW AUSTRALIA 2227 Users Manual USA Paintball Kingdom 2407 Ansonville
Paintball Marker. User s Manual. Direct Feed. SC: Stock Class. VSC: Vertical Air Stock Class. 530 South Springbrook Road Newberg, OR 97132
 Paintball Marker User s Manual Direct Feed SC: Stock Class 530 South Springbrook Road Newberg, OR 97132 VSC: Vertical Air Stock Class www.phantomonline.com Component Concepts, Inc., 530 South Springbrook
OPERATING INSTRUCTIONS V 5.3
 1 OPERATING INSTRUCTIONS V 5.3 DM 06/ 07 EGO 06/ 07 ION /SP8 MINI Proto Matrix 07 Proto Rail Shocker Seventh Element, Inc WARNING Failure to follow directions may result in damage to board. Do not pull
Remains 2006 By. Alien Warning:
 Remains 2006 By Alien Warning: This is a dangerous piece of sporting equipment. Like any air rifle or air pistol, it can cause injury or death. By purchasing this paintball marker you assume all liability.
Modular training weapon Owners manual
 Modular training weapon Owners manual MTW Basic Features Thank you for joining the Wolverine family! We hope you will enjoy your new Modular Training Weapon. Please read the Owners Manual carefully before
SHOCKER RSX OWNER S MANUAL PLEASE READ CAREFULLY 1
 SHOCKER RSX OWNER S MANUAL WWW.SHOCKERPAINTBALL.COM 1 QUICK START Velocity must be measured and adjusted to below 300 feet per second (91.4 PLEASE meters per READ second) CAREFULLY before each session
O W N E R S M A N U A L
 O W N E R S M A N U A L w w w. d a n g e r o u s p o w e r. c o m A WORD FROM our engineers and design team Our challenge was to blend the art of metal sculpture with masterful electronics in a package
PROPORTIONING VALVE. Model 150 INSTRUCTION MANUAL. March 2017 IMS Company Stafford Road
 PROPORTIONING VALVE Model 150 INSTRUCTION MANUAL March 2017 IMS Company 10373 Stafford Road Telephone: (440) 543-1615 Fax: (440) 543-1069 Email: sales@imscompany.com 1 Introduction IMS Company reserves
Pressure Dump Valve Service Kit for Series 3000 Units
 Instruction Sheet Pressure Dump Valve Service Kit for Series 000 Units. Overview The Nordson pressure dump valve is used to relieve hydraulic pressure instantly in Series 00, 400, 500, and 700 applicator
Play Safe. Safety. Instruction Manual. Warning. Rebel Specifications
 Operation Guide Instruction Manual Congratulations on your purchase of the 32 Degrees Rebel Xtreme semi-auto. Before you use this marker, please read this manual in its entirety. Please follow all safety
TABLE OF CONTENTS. AIR SOURCE : CO2/HPA ONLY (not included)
") Owner s Manual INCLUDES -.68 CALIBER CONQU3ST PAINTBALL MARKER - 10.5 ONE PIECE BARREL (AUTOCOCKER THREAD) - SPARE PARTS KIT - TOOL KIT - BARREL BLOCKING DEVICE AIR SOURCE : CO2/HPA ONLY (not included)
Owner s Manual INCLUDES -.68 CALIBER CONQU3ST PAINTBALL MARKER - 10.5 ONE PIECE BARREL (AUTOCOCKER THREAD) - SPARE PARTS KIT - TOOL KIT - BARREL BLOCKING DEVICE AIR SOURCE : CO2/HPA ONLY (not included)
Operations Manual for The
 Operations Manual for The WARNING: The paintball marker, which you have purchased, is not a toy. Misuse or carelessness may cause serious injury or death. Eye and ear protection designed specifically for
T4.1 MAGAZINE & HOPPER-FED PAINTBALL RIFLE TIBERIUS ARMS TECHNICAL MANUAL
 T4.1 MAGAZINE & HOPPER-FED PAINTBALL RIFLE TIBERIUS ARMS TECHNICAL MANUAL TECHNICAL MANUAL T4.1 MAGAZINE & HOPPER-FED PAINTBALL RIFLE TABLE OF CONTENTS Warnings...Page 1 T4.1 Rifle Diagram...Page 2 Universal
RULES FOR SAFE MARKER HANDLING
 ICD PROMASTER MANUAL-REV 6/5/05 6:00 PM Page RULES FOR SAFE MARKER HANDLING ) Treat every marker as if it were loaded. ) Never look down the barrel of a paintball marker. ) Keep your finger off the trigger
O W N E R S M A N U A L
 OWNER S MANUAL THE CHOICE OF CHAMPIONS = HYPERLINK TO MORE INFORMATION INCLUDED WITH YOUR M-2 MARKER 3 Piece barrel kit (1) 14 UL Barrel tip (1).684 UL Barrel back (1).688 UL Barrel back Dye multi tool
TIPPMANN 98 CUSTOM. Owner s Manual CO2 POWERED PAINTBALL GUN
 TIPPMANN PNEUMATICS, INC. Get Your ur Heart t Pound unding With h A Tippmann! WARNING: This paintball marker/gun is not a toy nor is it intended for unsupervised use by persons under the age of 18 years.
INSTRUCTION MANUAL Version 1.8 Indian Creek Design BushMaster series Model B2K
 INSTRUCTION MANUAL Version 1.8 Indian Creek Design BushMaster series Model B2K Copyright 1993. 2001 All Rights Reserved No part of this document may be copied or reproduced in any form or by any means
Pilot JAVA 9.6V RECHARGEABLE BATTERY & CHARGER INCLUDED. Kingman Group Live Oak Avenue, Baldwin Park, CA 91706, U.S.A. Toll-free 888.
 Pilot Kingman Group 14010 Live Oak Avenue, Baldwin Park, CA 91706, U.S.A. Toll-free 888.KINGMAN www.kingman.com JAVA 9.6V RECHARGEABLE BATTERY & CHARGER INCLUDED 14010 Live Oak Avenue, Baldwin Park, CA
Pressure Dump Valve Service Kit for Series 2300 Units
 Instruction Sheet Pressure Dump Valve Service Kit for Series 00 Units. Overview The Nordson pressure dump valve is used to relieve hydraulic pressure instantly in Series 00 applicator tanks when the unit
EPIPHAN Y CONVERSION. Instructions and Guidelines for upgrading an Ion or SP-8 to Epiphany Performance
 EPIPHAN Y CONVERSION Instructions and Guidelines for upgrading an Ion or SP-8 to Epiphany Performance INTRODUCTION It may be tempting to think of the Epiphany as simply an Ion with some new accessories,
tel: UK +44 (0) tel: USA web:
 tel: USA web:") > MANUFACTURED IN ENGLAND BY PLANET ECLIPSE < tel: UK +44 (0)161 872 5572 tel: USA 401 247 9061 e-mail: info@planeteclipse.com web: www.planeteclipse.com Operating Manual Introduction About this Manual
> MANUFACTURED IN ENGLAND BY PLANET ECLIPSE < tel: UK +44 (0)161 872 5572 tel: USA 401 247 9061 e-mail: info@planeteclipse.com web: www.planeteclipse.com Operating Manual Introduction About this Manual
SPECIFICATIONS Type: Twin stack, single phase Tank: 4 gallon Air Output: PSI; PSI Max PSI: 125 PSI HP: 1.
 2 GALLON TWIN STACK AIR COMPRESSOR Model: 9526 DO NOT RETURN TO STORE. Please CALL 800-348-5004 for parts and service. CALIFORNIA PROPOSITION 65 WARNING: You can create dust when you cut, sand, drill or
IMPULSE. Operation and adjustment instructions IPS136 - SOLENOID CLAMP PIN IPS105P - IMPULSE SOLENOID CLAMP SOL4SHKNRV - SOLENOID VALVE
 IMPULSE Operation and adjustment instructions CKET CUPPED SCREW IPS136 - SOLENOID CLAMP PIN S S IPS105P - IMPULSE SOLENOID CLAMP SOL4SHKNRV - SOLENOID VALVE PS153 - HEAT SHRINK TUBE ORN0201070B ORN0401070BU
WARNING OWNER S MANUAL WARSENSOR WSP PAINTBALL PISTOL
 WARSENSOR WSP PAINTBALL PISTOL OWNER S MANUAL WARNING WARSENSOR PAINTBALL MARKERS ARE NOT A TOY. ANY MISUSE MAY CAUSE SERIOUS INJURY OR DEATH. THE USER AND ANY PERSON WITHIN RANGE MUST WEAR EYE PROTECTION
Welker Sampler. Model GSS-1. Installation, Operation, and Maintenance Manual
 Installation, Operation, and Maintenance Manual Welker Sampler Model GSS-1 The information in this manual has been carefully checked for accuracy and is intended to be used as a guide to operations. Correct
2 GALLON TWIN STACK AIR COMPRESSOR W/ HOSE REEL
 2 GALLON TWIN STACK AIR COMPRESSOR W/ HOSE REEL Model: 52024 CALIFORNIA PROPOSITION 65 WARNING: You can create dust when you cut, sand, drill or grind materials such as wood, paint, metal, concrete, cement,
EOS. Operation and adjustment instructions
 EOS Operation and adjustment instructions 2 3 4 21 6 16 17 22 15 13 12 QUICK START PLEASE READ CAREFULLY 01 02 03 BATTERY BARREL BLOCKER FILL TANK The EOS is powered by a standard 9-volt battery. To verify
IMPORTANT SAFETY GUIDELINES !CAUTION!
 USERS MANUAL TABLE OF CONTENTS IMPORTANT SAFETY GUIDELINES 1 OPERATION GUIDE / START UP 2 CO2 / COMPRESSED AIR TANK 3-4 ELECTRONICS & SETTINGS 5-6 BATTERY CHARGING 7-8 VELOCITY ADJUSTMENT 9 SHOULDER STOCK
SAFETY WARNING MUST READ
 Airgun Designs Inc. Table of Contents SAFETY...1-2 COMPRESSED AIR ONLY... 2 FAST START... 3 LvL 10 ANTI-CHOP SYSTEM... 4 LOADER...4 PERFORMANCE... 4 LUBRICATION... 4 VELOCITY ADJUSTMENT... 5 BLOW-OFF VALVE...
ARIAKON. Thank you for choosing ARIAKON. ARE YOU A PLAYER?
 Page 20 Page 1 Thank you for choosing ARIAKON. ARIAKON www.ariakon.com 2794 LOKER AVE WEST SUITE 107 CARLSBAD CA 92008 Phone: 1-877-4-ARIAKON 760-268-0735 FAX: 760-268-0736 Email: sales@ariakon.com ARE
SERVICE MANUAL SALAMANDER BROILERS RADIANT AND INFRARED 36RB 36IRB VULCAN C36RB C36IRB WOLF
 SERVICE MANUAL SALAMANDER BROILERS RADIANT AND INFRARED VULCAN 36RB 36IRB WOLF C36RB C36IRB This Manual is prepared for the use of trained Vulcan Service Technicians and should not be used by those not
SHOCKER NXT. Operation and adjustment instructions
 SHOCKER NXT Operation and adjustment instructions QUICK START The SHOCKER NXT can be damaged by liquid CO2. Thoroughly read and understand the Gasses Section of the manual before using CO2 to avoid damage.
O W N E R S M A N U A L
 2017 OWNER S MANUAL THE CHOICE OF CHAMPIONS = HYPERLINK TO MORE INFORMATION INCLUDED WITH YOUR M-2 MARKER 3 Piece barrel kit (1) 14 UL Barrel tip (1).684 UL Barrel back (1).688 UL Barrel back Dye multi
MODEL 1410 OWNER S MANUAL
 2111 S. 8th, Rogers, Ar 72758 U.S.A. (501) 636-1200 Fax (501)636-0573 http://www.brasseagle.com THIS BOOKLET CONTAINS: Safety Information Warranty Registration Annotated Diagram Operating Instructions
INDEX. About this Manual. Section 1 - Orientation. Section 2 - Installation. Section 3 - Quick Set-up.
 OPERATING MANUAL About this Manual This manual contains the installation and operating instructions for the Eclipseblade E2 Electronic grip frame. IMPORTANT: If you are installing the Eclipseblade E2 electronic
Autococker Marker Manual
 Autococker Marker Manual Autococker Trilogy Select-Fire Manual WORR GAME PRODUCTS, LLC. TRILOGY AUTOCOCKER OWNERS MANUAL WARNING: This Always is not wear a toy. paintball Misuse approved may cause eye
200 PSI COMPRESSORS - MODEL NUMBERS
 200 PSI COMPRESSORS - MODEL NUMBERS 380C AIR COMPRESSOR KIT PART NO. 38033 480C AIR COMPRESSOR KIT PART NO. 48043 380C 480C IMPORTANT: It is essential that you and any other operator of this product read
MANUAL-PDS 6/3/04 10:39 AM Page 1 B2K PDS. paintball detection system USER S MANUAL
 MANUAL-PDS 6/3/04 10:39 AM Page 1 paintball detection system USER S MANUAL MANUAL-PDS 6/3/04 10:39 AM Page 3 INSTRUCTION MANUAL Version 2.1 Indian Creek Design BushMaster series Model Copyright 1993. 2004
SCUBAPRO Repair Guide. S600-S550 Second Stages
 SCUBAPRO Repair Guide S600-S550 Second Stages S600 Configuration A S600 Configuration B USE THIS GUIDE AS A REFERENCE WHEN SERVICING THE S600 AND S550 SECOND STAGES S550 P/N 41-047-000 FOR REPAIR OF S600-S550
Thank you for purchasing your new Empire Reloader B Sound-Activated 3-Speed Paintball Hopper!
 Thank you for purchasing your new Empire Reloader B Sound-Activated 3-Speed Paintball Hopper! Should you require any technical assistance on the use of this product, or if your product needs servicing,