CHEMICAL HYGIENE PLAN
|
|
|
- Eugene Summers
- 6 years ago
- Views:
Transcription

1 CHEMICAL HYGIENE PLAN ENVIRONMENTAL, HEALTH, AND SAFETY COMMITTEE PREPARED BY: CAS DBCPS & COP COLLEGE OF ARTS & SCIENCES: DEPARTMENT OF BIOLOGICAL, CHEMICAL, & PHYSICAL SCIENCES; COLLEGE OF PHARMACY EDITORS: JOHN DAMASCUS, TASNEEM ISLAM, VICKY MCKINLEY, ROBERT SEISER, KRISTEN LECKRONE, SHARA COMPTON, ERIKA SZOTEK, RUTH ADEWUYA, GABRIEL VIDRINE LAST EDITED: September 29, 2017
2 Emergency Contact Information Emergencies include: Injuries Fires Chemical exposures Floods Power outage Chemical spills Equipment alarms Psychological distress Department of Biological, Chemical, and Physical Sciences Department Chair : Cornelius Watson Ph (cell) : Chicago Chemical Hygiene Officer : Oluseye Kenny Onajole Ph (work) : (Chicago office) Schaumburg office N/A Ph (cell) : Biology Safety Officer: Vicky McKinley Ph (work) : (Sch. office) (Chicago office) Ph (cell) : Laboratory Manager: Gabriel Vidrine Ph (work) : Ph (cell) : Ph (work) : (Schaumburg) (Chicago) Schaumburg Chemical Hygiene Officer : Dan Jamieson Ph (work) : (Sch. office) (Chicago office) Ph (cell): Biology Safety Officer : Robert Seiser Ph (work) : (Sch. office) (Chicago office) Ph (cell) : Laboratory Manager: Erika Szotek Ph (work) : Ph (cell) : College of Pharmacy (Schaumburg) Research and Scholarly Endeavors Chair : Larry Potempa Ph (cell) : Ph (work) : Pharm Hygiene Officer : Ravikiran Panakanti Ph (work) : Ph (cell) : Pharmaceutics: Sinni Moozhayil Ph (work): Ph (cell): Pharmacy Research Laboratory: Ibraheem Rajab Ph (work): Ph (cell): Clinical Skills Laboratory: Cara Brock Ph (work): Ph (cell):
3 After 5 PM the above contacts may not be on campus, so contact Security for emergencies Security (Chicago) : x2020 from campus phone Security (Schaumburg) : x8989 from campus phone Emergency : from a campus phone; 911 from a cell phone Table of Contents Part I: CHEMICAL HYGIENE PLAN INTRODUCTION... 9 A. Plan Definitions... 9 B. Plan Organization Part II: RU ENVIRONMENT, HEALTH & SAFETY COMMITTEE ROLES AND RESPONSIBILITIES A. Department Chair B. Chemical Hygiene Officers (CHO) C. Environment, Health & Safety Coordinator D. Environment, Health & Safety Committee E. Laboratory Managers F. Faculty, Staff, and Students G. Visitors, Minors, and Tour Participants H. Environment, Health & Safety Emergency Contact Information Part III: THE LABORATORY FACILITIES A. Laboratory Layout B. Furniture and Fixtures C. Signs and Labels D. Emergency Equipment E. Ventilation F. Housekeeping, Maintenance, and Inspection G. Maintenance and Validation of Safety Equipment Fume Hood Monitoring Eyewash and Safety Shower Inspection and Testing Fire Extinguisher Inspection Other Safety Equipment Inspection Reports Part IV: CHEMICAL HYGIENE PLAN A. Laboratory Standard Operating Procedures (SOPs)
4 1. Pre-Laboratory Considerations Personal Behavior Transporting Chemicals Safety Procedures for Conducting Chemical Reactions a. Working Alone...31 b. Working with Scaled-Up Reactions...31 c. Unattended Experiments...32 B. Identifying Hazardous Materials Federal Regulations of Communications about Hazardous Materials a. Chemical Labeling...33 b. Material Safety Data Sheets (MSDS)...35 c. Hazard Determination...35 d. Written Implementation Program...35 e. Employee Training...35 f. Trade Secrets Classification of Hazardous Materials a. Corrosive Materials...36 b. Fire Hazards...37 c. Explosion Hazards...40 d. Toxic Substances and Poisons...42 e. Broken Glass and Thermometers...43 C. Labeling of Hazardous Materials Health Hazards (blue) Flammability (red) Chemical Reactivity (yellow) NFPA Hazard Diamond HMIG Labeling System D. Transport of Hazardous Materials E. Procurement and Distribution of Chemicals Laboratory and Chemical Security Delivery of Chemicals to the Science Laboratories Purchase of Large Chemical Quantities Ordering Chemicals F. Storage of Chemicals General Considerations
5 2. Finding Chemicals in the Roosevelt University Inventory System Segregation of Chemicals and Incompatibility Storage of Flammable and Combustible Materials Storage of Corrosive Materials Storage of Unstable Chemicals Storage of Poisonous Substances Storage of Compressed Gases G. Handling of Hazardous Materials Handling Corrosive Materials a. Corrosive Liquids...63 b. Corrosive Gases and Vapors...63 c. Corrosive Solids Handling Ignitable and Explosive Materials a. Flammable and Combustible Liquids...64 b. Fire Extinguishers...65 c. Flammable Aerosols...67 d. Flammable and Combustible Solids...67 e. Flammable Oxidizers...68 f. Catalyst Ignition...68 g. Explosion Hazards Handling Poisonous Substances H. Hazardous Material Waste Disposal and Removal General Considerations Choosing and Labeling a Hazardous Waste Container Waste Containment Protocols Categorizing and Separating Hazardous Material Waste a. Liquid Chemical Waste...74 b. Solid Chemical Waste...75 c. Special Chemical Waste...75 d. Biological Hazardous Waste...76 e. Broken Glass...77 f. Mercury Spills from Broken Thermometers...77 g. Sharps...77 h. Silica Gel...78 i. Molecular Sieves and Desiccant Disposal
6 j. Used Oil Disposal...78 k. Empty Gas Lecture Bottles...79 l. Unidentified Hazardous Waste Disposal of Empty Chemical Containers Contracting the Removal of Stored Hazardous Material Waste I. Environment Monitoring and Surveillance J. Personal Protective Equipment (PPE) Lab Coats Eye Protection Gloves Footwear Clothing K. Exposure Assessment and Monitoring L. Medical Consultations and Examination M. Medical Records N. Spills and Accidents Preventing Spills Chemical Spills Developing a Spill Response Plan Recommended Spill Control Material Inventory O. Emergency Response General Emergencies Fire Emergencies Medical Emergencies Leaking Compressed Gas Responding to Emergencies not Involving students, staff, faculty Other Emergencies on campus 91 P. Accident Reports Q. Training Requirements and Information Part V: BIOSAFETY GUIDELINES A. Biosafety Introduction B. Administration of Biological Safety C. Biosafety Definitions D. Biosafety Training E. Biohazardous Materials
7 F. Safety Equipment: Primary Barriers G. Routes, Infection, and Exposures H. Classifications of Biological Risks I. Standard Biosafety Practices J. Recombinant DNA (rdna) K. General Biological Laboratory Practices L. Disposal Procedures M. Spills of Biohazardous Materials Procedures Part VI: SAFETY RECOMMENDATIONS A. Electrically-Powered Laboratory Apparatuses B. Low Temperature Procedures C. High Temperature Procedures D. Pressurized and Vacuum Operations Compressed Gases a. General Considerations b. Handling Precautions c. Storage of Compressed Gas Cylinders d. Using Compressed Gas Cylinders e. Assembly of Equipment and Piping f. Leaking Cylinders g. Empty Cylinders h. Flammable Gases i. Highly Toxic Gases High Pressure Air Compressor Vacuum Apparatus a. Vacuum Pumps b. Vacuum Trapping c. Cold Traps d. Glass Vessels e. Dewar Flasks Rotovaps Part VII: MATERIAL SAFETY DATA SHEETS APPENDIX A..155 Student Safety Contract
8 Part I: CHEMICAL HYGIENE PLAN INTRODUCTION A. Plan Definitions Purpose This document constitutes the Chemical Hygiene Plan (CHP) required by the United States Occupational Safety and Health Act (OSHA) of 1970 and regulations of the United States Department of Labor including 29 CFR This set of regulations, entitled Occupational Exposure to Hazardous Chemicals in the Laboratories is often referred to as the "Laboratory Safety Standard." The purpose of the CHP is to describe the proper use and handling practices and procedures to be followed by employees, students, visitors, and other personnel working in each laboratory of Roosevelt University (RU). Such practices are necessary to protect all people working throughout the science laboratories from potential health and physical hazards presented by chemicals used in the workplace, and to keep chemical exposures below specified limits. Roosevelt University s Environmental, Health, and Safety (EHS) committee established this Chemical Hygiene Plan to be implemented and sustained at both of its campuses. Roosevelt University's CHP describes work practices to promote safety in the laboratory. However, each individual has the first responsibility for ensuring that good health and safety practices are implemented in the laboratory. While such individual responsibility promotes personal well-being and the safety of others, it also upholds Roosevelt University's commitment to the advancement of scientific research, human safety, and environmental health. Policy and Scope It is the policy of Roosevelt University and the Environmental, Health and Safety Committee (EHS) to provide a safe and healthy workplace in compliance with OSHA regulations included in Occupational Exposure to Hazardous Chemicals in the Laboratories. Roosevelt University's Chemical Hygiene Plan (CHP) applies to all laboratories on both the Chicago and Schaumburg campuses. A hard copy of the CHP may be obtained from Schaumburg Campus rooms 551 and 560; Auditorium Building rooms 546 and 611, and Wabash Building rooms 712, 812, and 912. Campus Security offices at all locations also have a hard copy of the CHP. The CHP may also be accessed online at the RU web page at the web address below. 9
9 B. Plan Organization Part I: Chemical Hygiene Plan Introduction contains the basic information needed by all people working throughout the RU laboratories who will be handling chemicals. The "Purpose" section explains all of the terminology used throughout this CHP. The "Policy and Scope" section will direct all people working in the laboratories to the relevant information they should have before beginning laboratory work. Part II: RU Environmental, Health and Safety Committee Roles & Responsibilities contains information about the current members of EHS at Roosevelt University. The roles and duties of all EHS members are described. Responsibilities for all staff, students, and visitors working with chemicals are outlined. Phone and address information is given for each member for contact in the case of emergency. Part III: The Laboratory Facilities contains information about the layout of Roosevelt University laboratories, furniture and fixtures, emergency equipment, and ventilation. Information about conducting exposure assessment, fume hood monitoring, and other facility inspections are described here. Part IV: Chemical Hygiene Plan describes the minimum required precautions and Standard Operating Procedures (SOPs) for working with laboratory chemicals as enforced through the RU EHS. Chemical hazards and risk assessment information can be gathered here. Safe chemical management procedures used to label, store, dispose of, and ship chemicals are included in this section. Personal Protective Equipment (PPE) requirements employed throughout RU laboratories are described. Contact information for all records regarding legislative compliance and training records is found here. The EHS members have the duty to review and update the CHP as deemed necessary to included new contact information and any improvements upon the safety protocol of the university. Part V: Biosafety Guidelines describes the minimum required precautions and Standard Operating Procedures for working in biology laboratories as enforced through the RU EHS. Biological hazards and risk assessment information can be gathered here. Personal Protective Equipment (PPE) requirements employed throughout RU biology laboratories are described. Part VI: Additional Safety Recommendations contains precautions regarding equipment and instrumentation found throughout Roosevelt University laboratories. Procedures for dealing with low and high temperatures, vacuum, and corrosive agents are described here. Part VII: Material Safety Data Sheets contains information regarding the location of material safety data sheets throughout Roosevelt University laboratories. 10
10 Part II: RU ENVIRONMENTAL, HEALTH & SAFETY COMMITTEE ROLES AND RESPONSIBILITIES This section of the Chemical Hygiene Program clearly articulates and describes the roles and responsibilities of all EHS members as well as all non-ehs members who work throughout RU laboratories. Defining such roles within this section establishes accountability, expedites safety processes, enhances laboratory safety, and answers questions about the implementation of Roosevelt University's Chemical Hygiene Plan. A. Department Chair of BCPS, BPS and CAS The Chair of the Department of BCPS, the Chair of the Department of BPS and the Chair of the Department of CAS have the following roles: 1. Ensure the CHP is written and updated once per year, or as often as necessary. 2. Appoint the Chemical Hygiene Officers, Biology Safety Officers and Pharmacy Safety Officer. The selected Chemical and Biological Officers must be qualified by training or experience such that he or she is able to provide technical guidance in the development and implementation of the CHP. This individual should have authority necessary to implement the CHP. 3. Obtain administrative and financial support, as needed, for implementing and maintaining the CHP. 4. Lead the annual EHS committee meeting, or call the EHS committee into meeting as often as needed. B. Chemical Hygiene Officers, Biology Safety Officers and Pharmacy Safety Officer The Chemical Hygiene Officers, Biology Safety Officers and Pharmacy Safety Officer have the following roles: 1. Determine the requirements of the OSHA standard regulations entitled Occupational Exposure to Hazardous Chemicals in the Laboratories (29 CFR ) and apply them to Roosevelt University's Chemical Hygiene Plan. 2. Oversee the implementation of the Chemical Hygiene Plan throughout all science and pharmacy laboratories at RU. 3. Ensure that the CHP is made available to all individuals who work in the science and pharmacy laboratories. 4. Seek ways to improve the CHP. 5. Perform regular inspections throughout the science laboratories. 6. Audit abnormal laboratory activities and submit reports of such findings to the Environment, Health & Safety Committee. 7. Participate with investigations of serious accidents involving hazardous chemicals, acting as a liaison with the EHS committee. 8. Assist new faculty with implementation of the CHP within their teaching laboratories. 9. Assist Laboratory Managers with obtaining services, supplies, or equipment needed to correct any chemical hygiene issues. 11
11 10. Assist faculty in reviewing proposed experiments for significant environmental, health, and safety issues. 11. Attend the annual EHS committee meeting, or any EHS meetings that occur as needed. C. Environmental, Health & Safety Coordinator The EHS Coordinator has the following roles: 1. Provide assistance to the Chemical Hygiene Officers with developing, implementing, and enhancing the Chemical Hygiene Plan. 2. Be familiar with the CHP. 3. Plan routine inspections in the laboratory areas to be conducted by the Chemical Hygiene Officers and follow up with the Department Chair about these inspections. 4. Participate in biannual inspections. 5. Ensure that proper training of chemical handling is performed, and that such training is documented. 6. Ensure documents of local training and inspection records are collected and maintained. 7. Review and update the CHP annually, or as directed by Environment, Health & Safety Committee. D. Environmental, Health & Safety Committee The Roosevelt University Environmental, Health, and Safety committee has the following roles: 1. Oversee the annual update of the Chemical Hygiene Plan. 2. Provide General Chemical Hygiene and Waste Management training for classrooms, staff, and website. 3. Ensure that all training documents and inspection records are maintained systematically. 4. Conduct an annual meeting of the committee with all members to discuss necessary policy changes, or when needed. 5. Participate with inspection of laboratory operations at least once per year. 6. Provide guidance regarding selection and use of personal protective equipment. When respirators are required, provide training to ensure proper use of the respirators. 7. Assist with investigations of chemical exposure incidents or serious accidents requiring medical assessment. E. Laboratory Managers The Laboratory Managers have the following roles: 1. Ensure that Roosevelt University complies with TSCA requirements outlined in the EPA Toxic Substances Control Act of Be familiar with the Chemical Hygiene Plan and contact the Chemical Hygiene Officer (CHO) for assistance with implementation of this CHP. 3. Ensure measures are established for safe use, storage, and disposal of all chemicals within the laboratory. 4. Prepare Standard Operating Procedures for experimental use of hazardous chemicals, when needed. 5. Provide Personal Protective Equipment needed for safe handling of chemicals. 6. Provide proper containers, waste containment, and cabinetry for safe storage of materials. 12
12 7. Define the location where particularly hazardous substances will be used and the processes for their use. Label these areas and maintain a list of these hazardous substances. 8. Minimize the amount of hazardous chemicals purchased and used experimentally. 9. Plan for accidents and ensure that the necessary supplies are in place. Maintain updated emergency procedures for responding to an accident, including cleanup of chemicals spills. 10. Ensure that all employees working in the laboratories have received the required training for work with chemicals. Document and maintain records of training. 11. Monitor the safety performance of the staff. 12. Arrange for calibration and inspection of fume hoods. 13. Ensure laboratory inspections are conducted routinely, and take action to correct any problems identified during these inspections. 14. Ensure employees who suspect they may have received an excessive exposure to a hazardous chemical through ingestion or inhalation report to the nearest medical center for assessment. 15. Report to the Environmental, Health & Safety Committee and the CHO all accidents involving exposure of any individual(s) to a hazardous chemical or any chemical spill that could result in environmental contamination. 16. Investigate all chemical accidents and take corrective action to prevent further accidents. Contact the CHO for assistance and evaluation in such matters. 17. Ensure all chemical wastes are properly disposed of according to RU, state, and federal procedures. 18. Assist the EHS and the CHO as needed. 19. Act as a liaison to the Physical Plant and the Building Engineers to address concerns regarding safe laboratory space. F. Faculty, Staff, and Students Faculty, staff, and students working in the laboratories shall: 1. Read and understand the general safety rules followed in laboratories and implemented with this Chemical Hygiene Plan. 2. Understand the hazards of the chemicals they will come in contact with, and know the signs and symptoms of excessive exposure. 3. Understand and follow all Standard Operating Procedures and received training. 4. Understand the proper use of Personal Protective Equipment and wear all mandated PPE. 5. Report to the Laboratory Manager and the faculty instructor any laboratory problems that might lead to an accident. All accidents resulting in exposure to hazardous chemicals should be reported to the Laboratory Manager and the faculty instructor. 6. If an emergency occurs in the laboratory, provide all information to the emergency response personnel, Roosevelt University Security, and any other investigators. G. Visitors, Minors, and Tour Participants Visitors, Minors, and Tour participants working in or moving through the laboratories shall: 1. Sign a release form prior to work in the laboratory. 13
13 2. Pay attention to any laboratory rules as instructed to them by laboratory personnel. 3. Understand the proper use of Personal Protective Equipment and wear all mandated PPE. 4. Report to the Laboratory Manager any laboratory problems that might lead to an accident. All accidents resulting in exposure to hazardous chemicals should be reported to the Laboratory Manager. 5. If an emergency occurs in the laboratory, provide as much information as possible to the emergency response personnel, Roosevelt University Security, and any other investigators. 6. Any visitors, minors or tour participants touring the Clinical Skills Laboratory will have prior permission from the Director of Professional Labs and be accompanies by a licensed pharmacist at all times. H. Environmental, Health & Safety Emergency Contact Information Biological, Chemical, and Physicals Sciences (BCPS) Contacts Department Chair Cornelius Watson Offices: WB 816E; SCH 600R Chicago Office Phone: Schaumburg Office Phone: Cell Phone: Assistant Chair Joshua Telser Offices: WB 716C or AUD 604; SCH 600 Chicago Office Phone: Schaumburg Office Phone: Cell Phone: Chemical Hygiene Officers Chicago Campus Schaumburg Campus Oluseye Kenny Onajole Dan Jamieson Office: WB 716H Office: SCH 600P Office Phone: Office Phone: Cell Phone: Home Phone: Laboratory Managers Chicago Campus Schaumburg Campus Gabriel Vidrine Erika Szotek Office: WB 816F Office: SCH 522 Office Phone: Office Phone: Cell Phone: Cell Phone: College of Pharmacy (COP) Contacts 14
14 Department Chair of Research and Scholarly Endeavors Larry Potempa Office: SCH 242 Office Phone: Cell Phone: Pharmacy Safety Officer Ravikiran Panakanti Pharmaceutics Laboratory Sinni Moozhayil Office: SCH 250 Office: SCH 433 Office Phone: Cell Phone: Office Phone: Cell Phone: Pharmacy Research Laboratory Ibraheem Rajab Office: SCH 433 Office Phone: Cell Phone: Clinical Skills Laboratory Cara Brock Office: SCH 245 Office Phone: Cell Phone: Part III: THE LABORATORY FACILITIES Department of BCPS Facilities: Locations and Addresses Auditorium Building 430 S. Michigan Ave Chicago, IL Wabash Building 425 S. Wabash Ave Chicago, IL Schaumburg Campus 1400 N. Roosevelt Blvd Schaumburg, IL Auditorium Building laboratory facilities Room # Laboratory Use Room # Laboratory Use 503A Autoclave room 548 Biology live specimens laboratory 506 Ecology research laboratory 603A Chemical storage room 511 Biology teaching laboratory 609 Organic chemistry teaching lab 513 Biology research laboratory 611 Chemistry preparation laboratory 542 Environmental biology lab 613 General chemistry teaching lab 546 Laboratory staff support center Wabash Building laboratory facilities Room # Laboratory Use Room # Laboratory Use 15
15 709 Chemistry stock room 812 Biology preparation laboratory 710 Chemical waste storage room 813 Laboratory staff support center 711 Organic chemistry teaching lab 815 Advanced biology teaching lab 712A Chemistry preparation lab 910 Physics teaching laboratory 712B Chemistry instrument room 912 Biology research laboratory 713 General chem teaching lab 912A Microscope darkroom 715 Chemistry research laboratory 912B Animal room 715A Laser research laboratory 912C Live insect culturing laboratory 809 Biology student research lab 912D Research preparation laboratory 810 Biology anatomy laboratory 912E Tissue culture laboratory 811 General biology teaching lab 813 Laboratory staff support center Schaumburg Campus laboratory facilities Room Number Laboratory Use 505 Instrument room 507 Research Laboratory 507A Tissue culture laboratory 526 Microscope Lab 527 Plant Lab 550 Biology teaching laboratory 550A Live insect culturing laboratory 551 Chemical storage and preparation room 552 Chemistry teaching laboratory 554 Physics teaching laboratory 557 Pharmaceutical preparation and storage room 558 Biology teaching laboratory College of Pharmacy Facilities: Locations and Addresses Schaumburg Campus 1400 N. Roosevelt Blvd Schaumburg, IL Schaumburg Campus laboratory facilities Room Number Laboratory Use 260 Clinical skills laboratory 528 Zebrafish Lab 532 Manufacturing laboratory 555 Pharmaceutics Compounding & Pharmacology laboratory 557 Pharmaceutical preparation and Storage 560 Pharmaceutics Compounding & Pharmacology laboratory 561 Pharmaceutics & Translational Laboratory 561A Tissue Culture Room 16
16 563 Biochemistry, Medicinal Chemistry, & Pharmacology Laboratory A. Laboratory Layout 1. Laboratory space should be physically separate from personal desk space, meeting space and eating areas. Workers should not have to go through a laboratory space where hazardous materials are used in order to exit from non-laboratory areas. 2. Entryways should have provisions for mounting emergency information posters and other warning signage immediately outside the laboratory above the door. 3. Laboratory areas with autoclaves should have adequate room to allow access to the autoclave and clearance behind it for maintenance. There should also be adequate room for temporary storage of materials before and after processing. Autoclave drainage should be designed to prevent or minimize flooding and damage to the floor. 4. Table of Laboratory Layout Considerations: Chemical and Biological Material Use Material Use General Flammable Liquids Acids/Corrosives and Oxidizers Poisons Perchloric Acid Biological Agents Consideration All laboratories are floored with non-porous tiles Some chemicals are stored in ventilated cabinets Solid, sturdy shelving is found throughout the laboratories for non-chemical storage and storage of aqueous buffer and dye solutions that do not need to be stored in special cabinets Laboratories have areas for chemical waste storage Laboratories have plumbed, conspicuously labeled eyewash and safety shower within 100 feet or 10 second traveling distance All cabinets meet OSHA and NFPA Code 30 Specifications More than 10 gallons in a lab needs flammable liquid storage cabinet Fire extinguishers are mounted near the entrances of all laboratories and conspicuously labeled. All cabinets housing such chemicals are constructed from wood or polymer and have no metal components Cabinets housing such chemicals are as close to the floor as possible and the chemicals stored on low shelves Highly poisonous compounds are stored in cabinets with sturdy, continuous piano hinges and extra-thick walls to prevent air circulation which could circulate poisonous vapors A stainless steel hood is used for such acids Handwashing sinks and antibacterial soap are available in all biology laboratories All laboratories have space for biohazardous waste storage Equipment Type Equipment Type Consideration 17
17 Autoclave Fume Hood Cryogenic Liquid Tanks Lasers Vacuum lines Prep areas have adequate space for autoclave use, maintenance and sterilized/unsterilized materials storage Autoclaves have adequate drainage to minimize flooding Hoods are located to minimize cross-drafts and turbulence Hoods have face velocity of linear feet per minute Hoods have a continuous monitoring device Hoods have no fire dampers in exhaust ducts Hoods have a debris screen Hoods have a single vertical sash Controls are secured or located to prevent accidental opening Cryogenic liquids are not below grade and tanks are not near glass doors or windows High-power lasers are kept near ground-fault circuit interrupters and water-cooling systems Researchers working with high-power lasers should consider the use of a chilled water loop Carbon dioxide fire extinguishers, rather than dry chemical extinguishers, are on hand in case of laser fires Laboratories housing lasers are equipped with emergency cut-off switches at the entrance Local pumps are preferred over central vacuum systems Vacuum lines are equipped with cold traps or filters to prevent contamination B. Furniture and Fixtures 1. Work surfaces should be chemical resistant, smooth, and readily cleanable, such as chemical-grade Formica. 2. Handwashing sinks for particularly hazardous chemicals or biological agents should remain uncluttered and clean. Proper tubs and cleaning agents should be readily available for glassware cleaning. 3. Wet chemical laboratories should have solvent-resistant flooring rather than tile, particularly in areas where fume hoods are located. C. Signs and Labels The main entrance to each laboratory in which chemical, biological or radiological materials are used or stored must be posted with the following: 1. Names and phone numbers of the laboratory managers and other responsible parties to be contacted in the event of a fire, accident or spill. 2. Special hazards that may be encountered in the laboratory (e.g. laser in use, cylinders, biohazardous material, etc.) 3. Safety instructions for persons entering the laboratory such as: required protective equipment, access restrictions, etc. 18
18 4. Prohibitions (e.g., No Food or Drink Allowed) The interior of the laboratory must be posted with the following: 1. Emergency Action Plans near the exit. 2. Hazardous Waste Accumulation Area sign marking location where unwanted laboratory materials will be accumulated for collection by waste management contractor 3. Signs identifying location of safety equipment (e.g., fire extinguisher, safety shower, eyewash fountain, etc.). 4. Signs, labels and/or warning/caution tape identifying designated use and storage areas for materials or equipment requiring special procedures. All chemical or biological material containers in the laboratory must be labeled in order to ensure hazard information is readily available to employees, visitors, and emergency response personnel. Containers must be labeled with: 1. Proper chemical or common name of contents in English. Chemical formulas, symbols or acronyms are not acceptable. Mixtures or solutions must include a list of constituents and their concentrations. 2. Signal words (e.g., danger, warning, caution, etc.) and/or associated hazard(s), (e.g., eye irritant, corrosive, biohazardous, etc.) Appropriate warning signs and/or labels shall be affixed to equipment or means of egress where the potential of a significant injury exists if certain procedures are not followed. 1. If warning signs and/or labels are needed, they shall be conspicuously posted. 2. Warning signs and/or labels shall be easily read and of contrasting colors. D. Emergency Equipment 1. Fire Extinguishers BCPS fire extinguishers are located at the front of each lab on the wall next to the eye wash station except in the Schaumburg campus research lab (507) and instrumentation lab (505). The extinguishers are located near the main door off the general hallway in both labs. It is important that fire extinguishers are never concealed from general view or blocked by any object. BPS fire extinguishers are located on the wall next to the fume hoods. You should only attempt to put out a fire yourself if the fire is small and is not spreading and you have had adequate training. If you have any doubt, you or the instructor should activate the alarm, call 911, and assist your students in evacuating the building. 19
19 2. Eyewash Stations If an individual receives a chemical splash to their eyes, he or she should be immediately brought over to the eyewash. Turn on the eyewash and flood the eyes, directing the water from the corner of the eye to the outside, for at least 15 minutes to make sure that there is no residue of the corrosive substance. Afterwards, make the necessary arrangements for further medical care; it is always better to be safe than sorry, as serious damage may have already taken place or the damage may not be immediately apparent. 3. Safety Showers All lab assistants should be familiar with the location and use of the safety showers. Safety showers are designed to flood the entire body in the event of a clothing fire or a major spill of a chemical. If this happens, bring the student over to the shower and turn on the shower while they are under it. Flood the affected area for a minimum of 15 minutes - even if the individual becomes cold or indicates that they feel fine. In the case of a corrosive liquid spill, or when in doubt, the individual should remove the affected portion of clothing while under the shower to reduce potential contact. Please remind your students during your safety discussion that every precaution will be taken to preserve their privacy (such as having the rest of the class move away from the shower and by holding up the fire blanket like a curtain), but that their health and safety are the first priority. It is better to be embarrassed for a single moment than have a lifetime of health problems or scars. Report any safety shower usage as soon as possible to the instructor and lab manager so that the proper accident reports can be filed. 4. Fire Blankets BCPS fire blankets, which are located at the front of each lab, are only appropriate to smother clothing that is on fire. In this event, you should bring the blanket to the individual; having them come to the blanket only feeds the fire and will make it worse. They should lie down on the blanket, then roll the blanket around them, using your hands to smother the fire. BPS fire blankets are located next to the fire extinguishers are only appropriate to smother clothing that is on fire. E. Ventilation 1. Fume Hood Fume hoods are located throughout biology and chemistry labs on both Chicago and Schaumburg campuses. Each campus is also equipped with a NuAire Tissue Culture Hood. A list of these hoods on both campuses is shown below: Chicago Fume Hoods Room number Number of hoods 20
20 AUD AUD AUD AUD AUD AUD AUD AUD 628A 1 WB WB WB WB WB WB WB WB WB WB Total hoods 36 Schaumburg Fume Hoods Room number Number of hoods SCH SCH SCH SCH Total hoods 9 Pharmacy Fume Hoods Room number Number of hoods SCH SCH SCH SCH Total hoods 4 NuAire Tissue Culture Hoods Room number Number of hoods SCH 507A 1 SCH 561A 1 AUD
21 WB 912E 1 Fume hood exhaust systems must receive periodic preventive maintenance to minimize equipment failure and emergency shutdowns. Fume hood exhaust fans must be turned off to perform this periodic maintenance. Turning off fume hood exhaust systems presents a potential chemical exposure hazard for both lab occupants and any maintenance personnel who might be on the roof. Fume hoods are one means of working safely with volatile hazardous or odorous chemicals such as gases, vapors, dusts, mists, and fumes. Fume hoods function in the following manner: a. The exhaust air creates a capture velocity at the face of the fume hood that prevents hazardous or odorous chemicals from escaping into the lab. b. Airflow through the exhaust system dilutes hazardous or odorous chemicals. c. The exhaust discharge stack on the roof disperses and further dilutes hazardous or odorous chemicals into the atmosphere. Extra care must be taken throughout the laboratories during times when fume hood exhaust systems are not operational. When fume hood exhaust systems are turned off, laboratory and maintenance personnel should be aware of the following conditions: a. The fume hood capture velocity is not sufficient to contain volatile hazardous or odorous chemicals. Laboratory personnel can be exposed to the chemicals if in use. b. The positive pressure of the building (caused by the building's operational air supply) pushes volatile hazardous chemicals out the roof stacks at low velocity. Thus, dilution of hazardous chemicals in the exhaust is significantly lessened and there are higher hazardous chemical concentrations in the exhaust. c. In addition, lower velocity exhaust stack discharge means less dilution in the atmosphere and higher hazardous chemical concentrations at the roof where maintenance personnel may be working. F. Housekeeping, Maintenance, and Inspection 1. Housekeeping Laboratory personnel are responsible for cleaning laboratory benches, equipment and any area that may require specialized technical knowledge. Additional housekeeping concerns include: a. Access to emergency equipment, safety showers, eyewash fountains and exits must never be blocked. b. All aisles, hallways, and stairs (egress paths) must be kept clear of obstruction and chemical storage, as required by fire codes enforced by the State Fire Marshall s Office. c. Attention must be paid to electrical safety, especially as it relates to the use of extension cords, proper grounding of equipment, overloading of electrical circuits and electrical hazards related to wet work. 22
22 d. Original labels on containers must be protected so that the identity of the contents and the hazards are known. e. Containers into which chemicals have been transferred from an original container must be labeled according to Section IV of this CHP. f. All chemicals must be replaced in their assigned storage area prior to leaving the area at the end of each workday/schedule. g. All working areas and floors must be cleaned regularly, kept dry and free of tripping hazards. h. DO NOT use laboratory floors and bench tops for storage of equipment and materials. i. Secure all gas cylinders properly. j. Never use fume hoods for storage of chemicals or other materials. k. Maintain laboratories free of excess, unused and old chemicals. 2. Maintenance Maintaining laboratory facilities in a safe and operable condition requires all laboratory personnel to become and remain proactive rather than reactive. Most equipment and devices used in teaching and research facilities are required, by the manufacturer, to be serviced, calibrated or cleaned at specified intervals. Failure to follow these guidelines invariably results in failure of the equipment and emergency situations. The Physical Resources Department is responsible for completion of work orders for repairs and correction of facilities maintenance concerns arising in laboratories; however you must initiate the process by reporting unsafe conditions. 3. Laboratory Inspections Laboratory safety inspections are conducted by EHS and/or the Physical Resources Department to help assure a safe environment is maintained for employees and students. Each laboratory is inspected at least every eight weeks and uses the Laboratory Safety Inspection Checklist to review. Inspection Checklist Inspection items include: general housekeeping, proper ventilation, compressed gases storage, Right-to-Know compliance procedures, hazardous waste management practices, chemical storage, proper use of signage, access to means of egress, electrical safety. Safety violations found during routine inspections are recorded on the Laboratory Safety Inspection Checklist and reported to the Laboratory Manager for corrective action. The results of the inspections are shared with the EHS members to ensure compliance and corrective actions, if necessary. All equipment used in the laboratory must function properly and safely. To ensure this, laboratories must maintain equipment according to manufacturer s specifications or established guidelines. Perform routine inspections for common problems like: damaged electrical cords, corrosion, worn parts, excessive contamination, leaks, etc. In addition, ensure that alarms, guards, interlocks or other safety devices have not been disconnected or defeated. 23
23 The following equipment will be inspected annually by Physical Resources. An inspection tag/card/sticker should be attached to the equipment with a record of inspection dates. Safety showers Fire Extinguishers Fume hoods When no longer needed, working and non-working laboratory equipment must be free of contamination and inspected by EHS. G. Maintenance and Validation of Safety Equipment If the fume hood, fume hood alarm, emergency eyewash, safety shower, and fire extinguisher in the laboratory area have not been inspected in accordance with the above-mentioned schedule, call the laboratory manager to submit a work order. 1. Fume Hood Monitoring Fume hoods must be inspected and tested by Physical Resources at least annually. This inspection and testing shall include calibration and maintenance of fume hood alarms, if present. Fume hood exhaust systems also receive quarterly preventive maintenance to minimize equipment failure and emergency shutdowns. Fume hood exhaust fans are turned off to perform this periodic maintenance activity. Turning off fume hood exhaust systems presents a potential chemical exposure hazard for both lab occupants and any maintenance personnel who might be on the roof. Physical Resources personnel must notify laboratory personnel about preventive maintenance shutdowns of fume hood exhaust systems. Laboratory personnel must not use fume hoods during fume hood shutdowns. The procedures that should be followed during the shutdowns of fume hood exhaust systems are as follows: a. Establish Maintenance Schedule Physical Resources management must establish an agreed upon annual routine maintenance schedule with the laboratory managers. This will provide a consistent date for subsequent years so that Physical Resources management can schedule work in advance and laboratory managers can plan all lab activity around the schedule. b. Notification of Upcoming Work 24
24 Physical Resources must provide a written notification of planned work on the fume hood exhaust systems to all relevant personnel. This includes the laboratory managers as well as any maintenance personnel with work scheduled on the roof. This notification should occur prior to the scheduled maintenance. The notification should provide adequate time to allow laboratory managers to reschedule any planned activities that require fume hood use. Following notification, the laboratory managers should conduct the following steps: Shutdown all processes and discontinue all activities in the fume hoods. Contain or remove all hazardous materials prior to the maintenance. Do not use the fume hoods during the maintenance period. c. Maintenance On the day of the work, Physical Resources personnel must placard the fume hoods with red outof-service signs indicating DANGER Fume Hoods Shutdown, Do Not Use. The placards should include the time and date of the scheduled shutdown. Some hoods will also have the sashes locked down. Physical Resources personnel will verify that all chemicals are either capped or removed and that the hoods are not in use. Maintenance will not proceed unless this is the case. Physical Resources personnel must ensure that all necessary items needed for maintenance are available and on hand before beginning work on the fume hoods, which will minimize fume hood down time. d. Notification of Completion Physical Resources personnel must notify the laboratory managers when work is complete and the exhaust systems are operating normally. The red placards may be removed and locked sashes may be unlocked. Lab occupants must not use the hoods until cleared by the laboratory manager. Data on annual fume hood monitoring is kept by Physical Resources. Fume hood monitoring data are considered maintenance records, and as such the full data will be kept for one year and summary data for five years. 2. Eyewash and Safety Shower Inspection and Testing Emergency eyewashes and safety showers must be inspected and tested by laboratory personnel at the beginning of spring, summer, and fall semesters. Laboratory supervisors are required to inspect and test these devices. At the time of the inspection and testing, these devices shall receive a sticker or tag indicating the date last inspected and tested as well as the name of the inspector and tester. Eyewash tags for sink-mounted eyewashes are available from the Laboratory Manager. Any device that does not pass inspection and testing shall receive a sticker or tag indicating that it is not functioning properly and must not be used until it has been repaired or modified. Activities requiring such devices shall cease until these repairs or modifications occur. 3. Fire Extinguisher Inspection 25
25 Fire extinguishers must be inspected and tested by the city fire marshal annually. At the time of the inspection and testing, these devices shall receive a sticker or tag indicating when last inspected and tested and by whom. Any device that does not pass inspection and testing shall receive a sticker or tag indicating that it is not functioning properly and must not be used until it has been repaired or replaced. Activities requiring such devices shall cease until these repairs or modifications occur. 4. Other Safety Equipment Supervisors or their appointed designees must ensure that safety equipment other than that mentioned above is inspected and maintained by the user at a frequency which is recommended by the manufacturer and/or a frequency which will ensure their proper and safe functioning. 5. Inspection Reports Once per semester a local fire marshal inspects the laboratories for infractions of Chicago or Schaumburg fire codes. The university is fined for any violations of fire code. The documents of these inspections are maintained by the Roosevelt University Department of Campus Safety and Transportation. 6. Emergency Contingency Plan In the event of a large scale Emergency such that there is a catastrophic loss of facilities and/or personnel, an Emergency Contingency Plan will be in effect. This plan will account for use of alternate facilities, recovery of data and the covering (short or long term) of lost academic and administrative personnel. In addition, if there is an incident that warrants a greater response than those listed previously for Emergency Responses, the university s Campus Safety has established an Emergency Notification procedure through the Emergency Operation Plan which outlines who is involved with the Emergency Management Group and Emergency Response Group and the responsibilities that lie therein: Purpose Statement: Emergency Notification refers to the guidelines and policies of Roosevelt University to announce warnings, provide direction for evacuation, or communicate other immediate actions during an emergency. The purpose of an emergency notification is to provide timely warning to persons at risk or to provide accurate information to those who are responsible for emergency operations. Annex Activation: Unless otherwise authorized, a senior administrator or staff member who is part of the Emergency Management Group (EMG) or the Emergency Response Group (ERG) or Campus Safety Officer who 26
26 becomes aware of an emergency incident has the authority to activate the emergency notification system and contact appropriate law enforcement, fire, and emergency medical service providers. The target audience for emergency notification and relative priority will necessarily be situation specific but will generally occur in the following phases: 1. The persons directly affected or in imminent danger. 2. The Authority Having Jurisdiction (AHJ) or first responder agency. 3. The area of the campus where the risk will affect the greatest numbers of people. 4. The vicinity/area of the campus that has the greatest potential to be impacted by the event. 5. The RU Emergency Management Group (EMG). 6. The remainder of the campus population. Initial Communications, Authority and Responsibility: The Campus Safety Officer receiving the initial report and on the scene of the emergency will be designated as Incident Commander until replaced. The Incident Commander has the responsibility to initiate this annex, the Emergency Notifications/Emergency Communications Annex (Annex C). Definitions Emergency Management Group (EMG) The group of senior administrators charged with the overall responsibility to plan for long-term response and recovery in major emergencies and disasters. The Group includes: Provost and Executive Vice President of Academic Affairs Vice President of Finance and Administration and Chief Financial Officer Assistant Vice President of Public Relations Vice President of Human Resources and Chief Human Resources Officer Vice President of Institutional Advancement and Chief Development Officer Vice President of Enrollment Management and Student Affairs Associate Vice President of Campus Planning and Operations Vice President of Technology Systems and Chief Information Officer Chief Executive Officer of Auditorium Theater of Roosevelt University Other members identified by the Provost and Executive Vice President of Academic Affairs 27
27 Emergency Response Group (ERG) First responder group i.e., Campus Safety that immediately responds to an emergency and the Emergency Response Group: Director of Campus Safety Assistant Director of Campus Safety Chief Engineer Chicago Chief Engineer Schaumburg Director of Public Relations Associate Vice President of Finance Associate Vice President of Human Resources Vice President of Technology Infrastructure/Operations Assistant Vice President of Student Affairs and Dean of Students Associate Vice President of Student Affairs and Dean of Students Assistant Dean of Housing and Community Standards Chief of Staff Chief Operating Officer of Auditorium Theater of Roosevelt University Assistant Vice President of Government Relations and Community Engagement Director of Athletics Dean - Chicago College of Performing Arts Dean College of Arts and Sciences Dean Heller College of Business Dean College of Education Dean College of Pharmacy Part IV: CHEMICAL HYGIENE PLAN 28
28 A. Laboratory Standard Operating Procedures (SOPs) 1. Pre-Laboratory Considerations Every laboratory worker should adequately prepare him- or herself for work in the Roosevelt University Laboratories. Before conducting any experimental work, consider the following: Know all potential hazards and appropriate safety precautions before beginning work. Make sure you can answer the following questions: o What are the hazards associated with my experiment? o What are the worst things that might happen? o What do I need to do to be prepared? o What work practices, facilities, or personal protective equipment are needed to minimize the risk? Know the location and how to use emergency equipment, including safety showers and eyewash stations. Keep aisles clear of all tripping hazards, and do not block safety equipment or doors. Familiarize yourself with all emergency response procedures, facility alarms, and building evacuation routes prior to beginning your experimental work. Know the types of personal protective equipment available and how to use them for each procedure. Be alert to unsafe conditions and actions and bring them to the attention of the lab manager immediately so that corrections can be made. The lab manager may need to clear out or evacuate an area of the laboratory should any danger be present. Help to prevent pollution by following waste disposal procedures. Chemical reactions may require traps or scrubbing devices, which could help to prevent the release of toxic substances into the laboratory or into the environment. Position and clamp reaction all apparatuses thoughtfully in order to permit manipulation without the need to disturb the apparatus until the entire reaction is completed. Follow these general rules of thumb: o Add reagents to the reaction in the appropriate order. o Avoid adding solids to hot liquids. o Do not add water to acids. Instead, add acid slowly to water. This prevents excessive exothermic release of heat. Because there is more water than acid, any splashing will be more dilute than if water were added to acid. o Avoid exposing glassware to excessive temperature changes. For example, heated glassware should not be put directly into an icebath without first cooling to room temperature. Conversely, cooled glassware should not be heated with a heat plate or mantle without first warming to room temperature. 2. Personal Behavior Professional standards of personal behavior are required in all Roosevelt University laboratories: Never startle or distract other laboratory workers. 29
29 No horseplay in the laboratories. Do not speak on your cell phone while in the laboratory or place cell phones on the benchtops. Step out into the hall to use your cell phone, so as not to distract other laboratory workers. Use laboratory equipment only for its designated purpose. If you move any laboratory equipment, make sure you clean it and put it back in the proper place. Do not allow visitors, including children and pets, in laboratories. This is particularly important during times when hazardous activities are in progress and in spaces where hazardous substances are stored. Food and beverages are not allowed in any Roosevelt University laboratory. This includes both storage and consumption of food and beverages. Do not smoke in any Roosevelt University laboratory. Be aware that tobacco products in opened packages can absorb chemical vapors. Do not apply cosmetics when in the laboratory. This includes lip balm and hand lotions. Never wear or bring lab coats into areas where food is consumed. Tie back long hair and avoid wearing loose clothing in the laboratory. Shoes must be worn at all times. Open-toed shoes or sandals are not appropriate. No skin should be exposed while working in laboratories. Never mouth-pipette chemicals to start a siphon. Use a pipette bulb or a mechanical pipetting device to produce a vacuum. Do not block access to exits, emergency equipment, controls, or electrical panels. Never work alone. Keep work areas clean and free from obstruction. Clean up all spills immediately. If water is spilled on the floor, mop it up and put a plastic Caution Wet Floor sign adjacent to the affected area. If unsure of how to clean up a spill, consult a safety officer or laboratory manager. Wash your hands with soap and water before leaving the laboratory. Do not use solvents for washing skin. 3. Transporting Chemicals Spills and chemical exposure can occur if chemicals are transported incorrectly. Accidents may occur even when moving chemicals from one part of the laboratory to another. To avoid such type of accidents, consider the following: Use a bottle carrier, cart, or other secondary container when transporting all chemicals in breakable containers, especially 250 ml or more, between laboratories. Secondary containers are made of rubber, metal, or plastic, and have one or more carrying handle. Such containers are large enough to hold the entire contents of the chemical containers in the event of breakage. When moving in the laboratory, be aware of other laboratory workers and conscious of the space. If you should stumble or fall while carrying glassware or chemicals, try to project them away from yourself and others. All individuals should be knowledgeable about the hazards associated with any transported chemicals and should know how to handle a spill of the material. 30
30 When transporting compressed gas cylinders, the cylinder should always be strapped to a cylinder cart and the valve protected with a cover cap. Do not attempt to carry or roll cylinders from one area to another. Transport chemicals in freight elevators rather than passenger elevators, if available. Keep chemicals in their original packing when transporting, if possible. 4. Safety Procedures for Conducting Chemical Reactions a. Working Alone The laboratory supervisor or PI is responsible for determining whether the work requires special precautions, such as having two people in the same room for particular experiments. Individuals conducting chemical reactions should not work alone. Hazardous chemicals should not be handled alone by any laboratory worker. Another individual capable of coming to the aid of the worker should be within visual or audio contact. If working alone is absolutely necessary, the worker should have a phone immediately available and should be in regular contact with another person who is aware of the situation. If no one from the laboratory is available, the worker should coordinate with another person in the building to check in on them periodically. If the research or operation is particularly hazardous such that a researcher could be severely injured or overcome by the process, a capable person must supervise them at all times to contact Security (Chicago: x2020, Schaumburg x8989) in the event of an emergency. Any student who needs to work in the lab(s) after 5:00pm on a weekday or at any time on the weekend when their supervising instructor/research advisor will not be present must notify their supervising instructor and the department laboratory manager in writing 24 hours ahead of time ( will suffice). The must include the rooms/labs that will be used. If any hazardous chemicals or biologicals are to be used, the student must have already been trained in their use and have successfully performed the protocols under supervision in the past. The student must already have an approved research protocol or teaching lab protocol on file with the supervisor. The student must also sign in with Campus Security, including the room number of the lab and the name and phone number of their supervisor. All students working in labs must have completed the RU Laboratory Safety Training in the current academic year. Students (especially students that are new to the lab) are encouraged to coordinate their after-hours lab work with other research students or teaching assistants so that, if possible no one is working alone in the lab. Upon completing their work in the lab, the student must sign out with Campus Security. The sign in sheet for both the Department of Biology, Chemistry and Physical Sciences and the College of Pharmacy is located in Room 102 in Schaumburg and Room 113 in the Auditorium Building. b. Working with Scaled-Up Reactions Scale-up of reactions from those producing a few milligrams or grams to those producing more than 100g of a product may represent several orders of magnitude of added risk. The attitudes, procedures and controls applicable to large-scale laboratory reactions are fundamentally the 31
31 same as those for smaller-scale procedures. However, differences in heat transfer, stirring effects, times for dissolution, and effects of concentration and the fact that substantial amounts of materials are being used introduce the need for special vigilance for scaled-up work. Careful planning and consultation with experienced workers to prepare for any eventuality are essential for large-scale laboratory work. Although it is not always possible to predict whether a scaled-up reaction has increased risk, hazards should be evaluated if the following conditions exist: The starting material and/or intermediates contain functional groups that have a history of being explosive (such as N N, N O, N halogen, O O, and O halogen bonds) or that could explode to give a large increase in pressure. A reactant or product is unstable near the reaction or work-up temperature. A preliminary test consists of heating a small sample in a melting point tube. A reaction is delayed; that is, an induction period is required. Gaseous by-products are formed. A reaction is exothermic. Consider what can be done to provide cooling if the reaction begins to run away. A reaction requires a long reflux period. Consider what could happen if solvent is lost owing to poor condenser cooling. A reaction requires temperatures below 0 o C. Consider what could happen if the reaction warms to room temperature. In addition, thermal phenomena that produce significant effects on a larger scale may not have been detected in smaller-scale reactions and therefore could be less obvious than toxic and/or environmental hazards. Thermal analytical techniques should be used to determine whether any process modifications are necessary. c. Unattended Experiments Laboratory operations involving hazardous substances are sometimes carried out continuously or overnight with no one present. It is the responsibility of the worker to design these experiments so as to prevent the release of hazardous substances in the event of interruptions in utility services such as electricity, cooling water, and inert gas. When leaving an experiment unattended for any period of time, follow these general rules: Laboratory lights should be left on, and signs should be posted identifying the nature of the experiment and the hazardous substances in use. Leave your contact information (name and phone number), the time and date, and the chemicals in your experiment. If appropriate, arrangements should be made for other workers to periodically inspect the operation. Carefully examine how chemicals and apparatus are stored, considering the possibility for fire, explosion or unintended reactions. 32
32 B. Identifying Hazardous Materials Roosevelt stocks over two thousand chemicals that are stored in various locations throughout the laboratories. Most bottles are clearly marked with hazard symbols and other special handling instructions. If you find a bottle that is not clearly marked, you may refer to a Material Safety Data Sheet (MSDS). Other things, such as broken glassware or thermometers, may pose danger to anyone working throughout the laboratories. 1. Federal Regulations of Communications about Hazardous Materials The US Department of Labor established the Occupational Safety and Health Act of This marked the establishment of the Occupational Safety and Health Administration (OSHA), which by the early 1980 s implemented a Hazard Communication Standard (HCS). This HCS, which became effective in 1986, states that employers must provide information about all hazardous materials to which employees might be exposed. The premise is that all employees who may be exposed to hazardous materials in the workplace have a right to know about the dangers of all materials and how to protect themselves. This HCS is part of the Code of Federal Regulations (CFR), which is a collection of permanent rules published in the Federal Register by the executive departments and agencies of the United States Federal Government. Specifically, the HCS of 1986 is known as 29 CFR CFR sets forth guidelines and requirements for all university laboratories that are based on the following six areas: Chemical Labeling Safety Data Sheets (SDS), previously Material Safety Data Sheets (MSDS) Hazard Determination Written Implementation Program Employee Training Trade Secrets Each of these six areas will be discussed in more detail starting on the next page. a. Chemical Labeling 29 CFR (f) requires that all chemicals in the workplace be labeled. Before such regulations about chemicals can be implemented, there must be commonly accepted definitions of dangerous goods and hazardous materials. Globally Harmonized System (GHS) of labeling went into effect June 2015 in accordance with OSHA and UN regulations. GHS has been adopted by Roosevelt University and will be the primary way which chemical labelling will be fulfilled. However, previously common models, such as, the NFPA hazard diamond and the HMIG labeling system will still be recognized to accommodate chemicals acquired prior to GHS. While there are important differences among these models, they are both based on four categories regarding each chemical: heath hazards 33
33 flammability chemical reactivity special precautions and required protective gear GHS symbology constitutes nine pictograms for each hazard class exhibited by the chemical. In section 704 of the National Fire Code, the National Fire Protection Agency (NFPA) specifies a system for identifying the hazards associated with materials which utilizes a color-coded array of four numbers or letters arranged in a diamond shape. Such an example of this system is shown below: The Hazardous Material Identification Guide (HMIG) is a labeling system developed and sold through Lab Safety Supply Inc. This system uses three numbers in blue, red, and yellow bars, and a white bar on the bottom with a letter. Such an example of this system is shown below: 34
34 These two models are discussed in more detail in the next section: C. Labeling of Hazardous Materials. b. Safety Data Sheets (SDS), Previously Material Safety Data Sheets (MSDS) 29 CFR (f) requires that all information about chemicals in the workplace is readily available to all people working with these chemicals. A SDS is a document that gives detailed information about a material, including any hazards associated with the material. Material Safety Data Sheets must be immediately available to employees at locations where hazardous materials are used and stored. Electronic copies of the SDS may be found through the electronic chemical inventory system, Chimera, that is accessible through c. Hazard Determination 29 CFR (d) mandates that employers must identify and maintain a list of all hazardous chemicals stored and used in the workplace. d. Written Implementation Program 29 CFR (e) requires that all employers develop a written plan detailing how the requirements of the Hazard Communication Standard are implemented by the employer. Such a written plan is called a Chemical Hygiene Plan or Hazard Communication Program. The Roosevelt University CHP may be accessed at e. Employee Training 29 CFR (h) requires that all employers provide training which covers the handling of hazardous materials, use and interpretation of both SDS and the chemical labeling system in place, and information about the federal Hazard Communication Standard. f. Trade Secrets 29 CFR (i) sets forth the conditions under which the manufacturer of a chemical product may withhold information about a material. It also describes conditions under which such information must be divulged to health care providers. 35
35 2. Classification of Hazardous Materials a. Corrosive Materials Many chemicals commonly used in the laboratory are corrosive or irritating to body tissue. They present a hazard to the eyes and skin by direct contact, the tissue under the skin, to the respiratory tract by inhalation, and to the gastrointestinal system by ingestion. A corrosive substance is one that will destroy or irreversibly damage another surface or substance with which it comes into contact. The action of corrosive substances on living tissue is based on acid-base catalysis of ester and amide hydrolysis. Corrosive agents may be in any physical state. Corrosive Liquids By definition, liquids and aqueous solutions which are corrosive: have a ph of less than or equal to 2 or greater than or equal to 12.5 will corrode steel at a rate greater than inches per year at 55 degrees Celsius Corrosive liquids such as mineral acids, alkali solutions, and some oxidizers represent a very significant hazard because skin or eye contact can readily occur from splashes. Their effect on human tissue generally takes place very rapidly. Bromine, sodium hydroxide, sulfuric acid and hydrogen peroxide are examples of highly corrosive liquids. Corrosive Gases and Vapors Corrosive gases and vapors are hazardous to all parts of the body; certain organs, such as the eyes and the respiratory tract, are particularly sensitive. The magnitude of the effect is related to the solubility of the material in the body fluids. Highly soluble gases such as ammonia and hydrogen chloride cause severe nose and throat irritation, while substances of lower solubility such as nitrogen dioxide, phosgene, and sulfur dioxide can penetrate deep into the lungs. Corrosive Solids Corrosive solids, such as sodium hydroxide and phenol, can cause burns to the skin and eyes. Dust from corrosive solids can be inhaled and cause irritation or burns to the respiratory tract. Many corrosive solids, such as potassium hydroxide and sodium hydroxide, can produce considerable heat when dissolved in water. Strong Acids and Bases Both corrosive acids and corrosive bases are able to defat skin by catalyzing the hydrolysis of fats, which are chemically esters. Proteins can also be hydrolyzed by acid-base catalysis. Strong acids and bases are corrosive because they denature proteins and also become hydrated easily. 36
36 Hydration removes water from the tissue and is significantly exothermic. concentrated sulfuric acid causes thermal burns in addition to chemical burns. For example, Strong Oxidizers Strong oxidizers such as concentrated hydrogen peroxide can also be corrosive to tissues and other materials, even when the ph is close to neutral. Nitric acid is an example of a strong acid that is also a strong oxidizer, making it significantly more corrosive than one would expect from its pk a alone. b. Fire Hazards There are many types of solids, liquids, and gases that are ignitable, which means that they have the potential to catch fire and burn over time. There are two general categories of compounds that are ignitable and will sustain fire once ignited: flammable materials and combustible materials. Four ingredients must be present to sustain a fire: a fuel an oxidizer an ignition source a chemical reaction The fuel may be any type of compound or material which can burn over a period of time, including certain metals and many hydrocarbons. Many of the solvents used throughout laboratories act as fuels for fire. The oxidizer that is needed to sustain fire may be something as simple as oxygen in the air. Certain other chemicals such as ammonium nitrate, potassium permanganate, and potassium perchlorate can also serve as the oxidizer. The ignition source might be a nearby fire or sparks generated by friction or from static electricity. The development of static electricity is related to the humidity levels in the area. Cold, dry atmospheres are more likely to facilitate static electricity. The chemical reaction is needed for the process of fire to continue as a chain reaction. Combustion is the exothermic chemical reaction that feeds a fire more heat and allows it to continue. Example: Consider a pool of gasoline spilled on the ground. The gasoline evaporates forming vapor above the gasoline pool. The warmer the temperature, the faster the gasoline evaporates. The vapor given off forms an ignitable mixture with the air. An ignition source is necessary for a fire to occur. The process of combustion allows the chain reaction to continue and keep burning over time. 37

37 Flash Point An important characteristic of a chemical which affects its ignitability is the flash point. The flash point is the minimum temperature of a liquid at which sufficient vapor is given off to form an ignitable mixture with air and produce a flame when a source of ignition is present. The flash point may also refer to a mixture of fuels in air, but does not apply to mixtures that have been enriched with oxygen or purged with an inert gas such as nitrogen. Example: Heptane, a major component of gasoline, has a flash point of 25 o F (-4 o C) and a boiling point of 209 o F (98 o C). It is a liquid at ambient temperatures. At temperatures of 25 o F and higher, enough vapors are given off from heptane that the vapors can ignite in air. If the temperature is less than 25 o F, not enough vapors are given off for heptane to ignite in air. In order for the liquid to ignite, it would have to be heated up (for example, by heat from a nearby fire). It is the vapor given off of the evaporating liquid which burns, rather than the liquid itself. Incidentally, gasoline contains components besides heptane, some of which have much lower flash points than heptane (otherwise the fuel would not ignite in vehicles on a very cold day). Gases and solids may also have flash points. Although by definition a flash point is associated with liquids which give off vapors, one should remember that most compounds exist in the liquid state at some temperature. A fuel which is a gas at room temperature might be a liquid at a very low temperature, and that liquid can have a flash point. Similarly, any solid melted into a liquid state may have a flash point. Some solids can also give off vapors which burn. Other chemicals may decompose when heated into vapors that can form an ignitable mixture with air. Example: Butane is a colorless gas at room temperature with a boiling point of 31 o F. At temperatures below 31 o F, butane is a liquid but that liquid still has a vapor pressure. The flash point of butane is 76 o F. Naphthalene, a solid at ambient temperatures, has a melting point and flash point of around 174 o F. Mercury thiocyanate is a solid which decomposes on heating and has a flash point of about 250 o F. Flammable versus Combustible The National Fire Protection Association (NFPA) provides different definitions of flammable liquids and combustible liquids in the context of fire prevention and suppression. A flammable liquid has a flash point of 100 o F or less and a vapor pressure at or below 40 pounds per square inch at 100 o F; if the flashpoint is above 100 o F it is a combustible liquid. Solids and gases can also burn. The term flammable gas may apply to a chemical which is stored as a gas and has a flash point of less than 100 o F. The NFPA divides flammable and combustible liquids into classes based on flash point and boiling point, as shown in the table below: Table 1: NFPA Classifications of Flammable and Combustible Liquids Class Properties 38
38 I A Flammable Liquid I B Flammable Liquid I C Flammable Liquid II Combustible Liquid III A Combustible Liquid III B Combustible Liquid Flash point 73 o F or less; boiling point 100 o F or less Flash point 73 o F or less; boiling point over 100 o F Flash point over 73 o F; boiling point 100 o F or less Flash point between 100 o F and 140 o F Flash point between 140 o F and 200 o F Flash point above 200 o F The NFPA considers 73 o F (22.8 o C) to be the normal outdoor ambient temperature in all but the hottest climates. Flammable liquids ignite more readily than combustible ones. Flammable liquids also have the ability to vaporize and form flammable mixtures when exposed to air. The I A Flammable Liquid is the most dangerous of all flammable and combustible liquids. Flammable and Combustible Liquids Flammable and combustible liquids vaporize and form flammable mixtures with air when in open containers, when leaks occur, or when heated. To control these potential hazards, several properties of these materials, such as volatility, flashpoint, flammability range, and autoignition temperatures must be understood. Information on the properties of a specific liquid can be found in that liquid s material safety data sheet (MSDS), or other reference material. The following are common flammable and combustible liquids: Organic solvents (including ethers, acetone, methanol, ethanol, isopropanol, ethyl acetate, acetonitrile, hexane, petroleum ether, tetrahydrofuran (THF) and toluene) Acetic acid Flammable Gases and Aerosols In defining flammable gases and aerosols, the flammability range is important. Many examples of gases and aerosols which are flammable have mixed chemical composition. Both gases and aerosols are typically contained while stored and transported, and a rupture of the container exposes them to air and may change their flammability range. The flammability range describes the proportion of combustible gases in a mixture; within this range the mixture is flammable. The lower flammability limit (LFL) is the lowest end of the concentration range of a flammable material at a given temperature and pressure for which gas-vapor mixtures can ignite; the upper flammability range (UFL) is the highest end of the concentration range which will sustain a flame. Both LFL and UFL are typically expressed in volume percent. A flammable gas may be defined in one of two ways. A gas may be considered as flammable if its LFL is less than 13% by volume in air. Or it may be considered flammable if its UFL is more than 12% higher than its LFL (regardless of the value of the LFL). One such example of a flammable gas is butane, which has a lower flammability limit of less than 13% by volume in air. An aerosol consists of a dispersion of microscopic liquid or solid particles in gas or air. One property of such a dispersion is that it may be flammable even if the flash points of its individual components are too high to be classified as flammable liquids. A flammable aerosol may be 39
39 defined by the flame it produces when ignited. A flammable aerosol will yield either a projecting of more than 18 inches at full valve opening, or a flame extending back to the valve at any valve opening. All aerosols are mixtures. Whether a particular aerosol is flammable depends upon the chemical composition. Flammable liquids in pressurized containers may rupture and aerosolize when exposed to heat, creating a highly flammable vapor cloud. Flammable and Combustible Solids Flammable solids often encountered in the laboratory include alkali metals, magnesium metal, metallic hydrides, some organometallic compounds, and sulfur. Many flammable solids react with water and cannot be extinguished with conventional dry chemical or carbon dioxide extinguishers. Ensure that Class D extinguishers, such Met-L-X, are available where flammable solids are used or stored. Dry sand can usually be used to smother a fire involving flammable solids. Keep a container of sand near the work area. If a flammable, water-reactive solid is spilled onto skin, brush off as much as possible, then flush with copious amounts of water. NEVER use a carbon dioxide fire extinguisher for fires involving lithium aluminum hydride (LAH). LAH reacts explosively with carbon dioxide. Oxidizers Some solids compounds are oxidizers that readily transfer oxygen atoms or gain electrons in oxidation-reduction reactions. While many solid oxidizers are not themselves flammable, they may ignite due to the heat of reaction produced upon combination with reducing agents or other combustible materials. The following compounds are common oxidizers that can cause extremely violent combustion: Silver oxide (Ag 2O) Potassium permanganate (KMnO 4) Place the funnel containing moist catalyst into a water bath immediately. Catalyst Ignition Some solid hydrogenated catalysts, when recovered from hydrogenation reactions, may become saturated with hydrogen and present a fire or explosion hazard. Examples of such catalysts which may become ignitable are palladium, platinum oxide, and Raney nickel. c. Explosion Hazards Roosevelt laboratories also stock a variety of explosive chemicals, such as peroxides, strong oxidizers, hydrides, acetylides, azides, and diazonium compounds. Some compounds can form peroxides if exposed to air for extended periods, such as ethers (including tetrahydrofuran and dioxane) and olefins. Some compounds are explosive when they come in contact with water, 40
40 such as lithium aluminum hydride and metallic sodium. All of these chemicals should be handled by students and laboratory assistants under supervision. Peroxides Certain chemicals can form dangerous peroxides on exposure to air and light. Since they are sometimes packaged in an atmosphere of air, peroxides can form even though the containers have not been opened. Peroxides may detonate with extreme violence when concentrated by evaporation or distillation, when combined with other compounds, or when disturbed by unusual heat, shock or friction. Formation of peroxides in ethers is accelerated in opened and partially emptied containers. Refrigeration will not prevent peroxide formation and stabilizers will only retard formation. Peroxide formation may be detected by visual inspection for crystalline solids or viscous liquids, or by using chemical methods or specialized kits for quantitative or qualitative analysis. If you suspect that peroxides have formed, do not open the container to test since peroxides deposited on the threads of the cap could detonate. Examples of Peroxidizable Compounds Peroxide Hazard on Storage: Discard After Three Months Divinyl acetylene Potassium metal Divinyl ether Sodium amide Isopropyl ether Vinylidene chloride Peroxide Hazard on Concentration: Discard After One Year Acetal Dioxane Cumene Diethylene glycol dimethyl ether (diglyme) Cyclohexene Furan Cyclooxyene Methyl acetylene Cyclopentene Methylcyclopentane Diacetylene Methyl isobutyl ketone Dicyclopentadiene Tetrahydronaphthalene (Tetralin) Diethyl ether Tetrahydrofuran Diethylene glycol dimethyl ether (diglyme) Vinyl ethers Hazardous Due to Peroxide Initiation of Polymerization*: Discard After One Year Acrylic acid Styrene Acrylonitrile Tetrafluoroethylene Butadiene Vinyl acetylene Chloroprene Vinyl acetate Chlorotrifluoroethylene Vinyl chloride Methyl methacrylate Vinyl pyridine 41
41 * Under storage conditions in the liquid state the peroxide-forming potential increases and certain of these monomers (especially butadiene, chloroprene, and tetrafluoroethylene) should be discarded after three months. Oxidizers Some strong oxidizers such as potassium permanganate may explode when shocked, or if exposed to heat, flame, or friction. These oxidants may also act as initiation sources for dust or vapor explosions. Contact with oxidizable substances may cause extremely violent combustion. Sealed containers may rupture when heated or exposed to mechanical impact. Picric Acid Picric acid in its dry form is explosive and can be ignited at almost all ambient temperatures. Modern safety precautions recommend storing picric acid wet. Dry picric acid is relatively sensitive to shock and friction, so laboratories that use it store it in bottles under a layer of water, rendering it safe. Glass or plastic bottles are required, as picric acid can easily form metal picrate salts that are even more sensitive and hazardous than the acid itself. Industrially, picric acid is especially hazardous because it is volatile and slowly sublimes even at room temperature. The buildup of picrates on exposed metal surfaces over time can constitute a serious hazard. d. Toxic Substances and Poisons Toxic chemicals can be fast-acting or slow-acting. Keep in mind that highly reactive chemicals, such as acids and halogenated compounds, are harmful to humans. The following substances are toxic even in low amounts: cyanides, cadmium compounds, heavy metals and their salts, various organometallic substances, and many organic substances. Poisons are very different from corrosives in that corrosives are immediately dangerous to the tissues they contact, whereas poisons may have systemic toxic effects that require time to become evident. Mercury has poisonous effects that build up slowly over time, while cyanides are poisons that act very quickly to cause lethal oxygen starvation in mammalian cells. Teratogens Teratogens are chemicals that are known to cause fetal defects during pregnancy. It is important that you have students inform you if they are pregnant at the beginning of the semester or become pregnant throughout the semester, because teratogens are handled in many Roosevelt laboratory courses. When teratogens will be handled, pregnant students should not be present in the laboratory. A dry experiment can be arranged for that student, which will avoid the use of chemicals. Some common teratogens stocked in Roosevelt University laboratories: diethyl ether ethanol benzene 42
42 toluene aniline nitrobenzene phenol vinyl chloride formaldehyde dimethylformamide (DMF) dimethyl sulfoxide (DMSO) carbon disulfide e. Broken Glass and Thermometers Broken glass is a hazard that is commonly encountered in a laboratory. Broken glass may have hazardous chemicals on it; in such a case, contact the laboratory manager or safety officer for help with cleanup if you are not sure how to clean it up. Broken Mercury Thermometers Broken mercury thermometers require special cleanup kits for mercury. Students should never be asked to clean up a broken thermometer. Mercury is a metal that is in liquid phase at room temperature. In thermometers the mercury is the shiny, silver-colored liquid that is in the elemental form. When a thermometer is broken, the mercury can spill out. Because a small amount of mercury volatilizes at room temperature, mercury vapors can get into the air. It is important to be aware that the nervous system is very sensitive to all forms of mercury. Breathing mercury vapors can harm the nervous system, the lungs, and the kidneys. Mercury vapors pass easily from the lungs into the blood stream, although exposure to the mercury in an ordinary thermometer will not harm a person if it is cleaned up correctly. C. Labeling of Hazardous Materials An important provision of the US Hazard Communication Standard, 29 CFR (f), requires that all chemicals in the workplace be labeled. Although in the US there are a variety of ways in which the chemical labeling requirement may be implemented, two of the most common models that are the National Fire Protection Agency (NFPA) hazard diamond and the Hazardous Material Identification Guide (HMIG) labeling system. 43
 flammability (red) chemical reactivity (yellow)")
43 GHS Pictograms NFPA hazard diamond HMIG labeling system Roosevelt University stores chemicals that are labeled with all systems throughout its laboratories. While there are important differences among these models, they are based on four color-coded categories regarding each chemical: health hazards (blue) flammability (red) chemical reactivity (yellow) special handling precautions or required protective equipment (white) Both the NFPA hazard diamond and the HMIG labeling system use a number scale of 0-4 for the health hazard, flammability, and chemical reactivity categories. A value of zero means that the material poses essentially no hazard; a rating of four indicates extreme danger. The details of how numbers are assigned are essentially the same with both systems, and will be described in sections 1, 2 and 3 below. For the white category, the NFPA hazard diamond and the HMIG labeling system differ slightly and use different symbols or letters to denote the special handling precautions or required protective equipment. The specifics of each system will be addressed in sections 4 and 5 below. 44
44 The Number Scale for NFPA and HMIG Hazard Identification Systems 1. Health Hazards (blue) A discussion of health hazards and the terminology used to describe them is given in Appendix A of the OSHA Hazard Communication Standard (29 CFR App A) Material that on exposure under ordinary or fire conditions would offer no hazard Material that on exposure would cause irritation but only minor residual injury. Material that on intense or continued but not chronic exposure could cause temporary incapacitation or possible residual injury. Material that on short exposure could cause serious temporary or residual injury. Material that on very short exposure could cause death or major residual injury. Example: peanut oil Example: turpentine Example: NH 3 (g) (ammonia gas) Example: Cl 2 (g) (chlorine gas) Example: HCN (g) (hydrogen cyanide gas) 2. Flammability (red) Note: Inflammable means the material will burn. Think of "inflammation" -- if you have an inflamed wound, it is red and hot to the touch. As recently as about 15 years ago, trucks and containers were marked "inflammable" if they contained material that could burn, while material that won't burn was called non-inflammable. The problem was that many people assumed inflammable meant that a material would not burn -- a potentially deadly mistake. Today, the word "flammable" has replaced "inflammable" almost entirely, but be aware that sometimes the older terminology may be found on laboratory items If the material will not burn under any conditions, the number in the red section is a 0. If the material must be pre-heated before ignition can occur, the number in the red section is a 1. The material must be moderately heated or exposed to relatively high ambient temperature before ignition can occur. Liquids and solids that can be ignited under almost all ambient temperature conditions. Example: water Example: corn oil Example: diesel fuel oil Example: gasoline 45
45 4 Material that will rapidly or completely vaporize at atmospheric pressure and normal ambient temperatures, or that are readily dispersed in air and that will burn readily. Example: propane gas 3. Chemical Reactivity (yellow) Much of this chemical reactivity pertains to the susceptibility of the material to burning Material that in itself is normally stable, even under fire exposure conditions, and is not reactive with water. Material that in itself is normally stable, but which can become unstable at elevated temperatures and pressures. Material that readily undergoes violent chemical change at elevated temperatures and pressures or which reacts violently with water or which may form explosive mixtures with water. Material that in itself is capable of detonation or explosive decomposition or reaction but requires a strong initiating source or which must be heated under confinement before initiation or which reacts explosively with water. Material that in itself is readily capable of detonation or of explosive decomposition or reaction at normal temperatures and pressures. Example: liquid nitrogen Example: phosphorus (red or white) Example: calcium metal Example: F 2 (g) (fluorine gas) Example: trinitrotoluene (TNT) 4. NFPA Hazard Diamond An important distinction between the HMIG hazard diamond and the HMIG labeling system is that the numbers assigned in the NFPA system assume that a fire is present. The NFPA system was designed to alert fire fighters arriving on the scene of a fire to the hazards associated with materials present at that location. Special Handling Precautions The white section of the NFPA hazard diamond refers to special handling precautions. This field of the hazard diamond may have variable content, depending on who prepared the signal. The 1990 edition of the National Fire Codes (section 704, chapter 5) specifies only the two symbols W and OX. Additional symbols are commonly included, as shown in the table below. The field may also be left blank if no special hazards are present. W Material shows unusual reactivity with water, so avoid getting it wet. Example: magnesium metal 46
46 OX ACID ALK COR Material possesses oxidizing properties. Material is an acid. Material is a base (alkaline). Material is corrosive. Material is radioactive. Example: ammonium nitrate Example: hydrochloric acid Example: potassium hydroxide Example: hydrogen peroxide Example: thorium(iv) fluoride 5. HMIG Labeling System The Hazardous Material Identification Guide (HMIG) is a labeling system developed by Lab Safety Supply Inc. as an HCS compliance tool. The intended audience is employees who must handle hazardous chemicals in the workplace. Required Protective Equipment The white section of the HMIG labeling system refers to protective gear required while handling a chemical. These symbols indicate the type(s) of protective equipment that must be used when handling a chemical. The symbols are the letters A - K and X, with A indicating that goggles must be worn, and successive letters indicating progressively increasing amounts of protective gear. A table with all of these symbols is on the next page. Symbol Personal Protective Equipment (PPE) required Icon(s) used with symbol A Safety Glasses B Safety Glasses, Gloves C Safety Glasses, Gloves, Apron D Face Shield, Gloves, Apron E Safety Glasses, Gloves, Dust Respirator 47
47 F Safety Glasses, Gloves, Apron, Dust Respirator G Safety Glasses, Gloves, Vapor Respirator H Splash Goggles, Gloves, Apron, Vapor Respirator I Safety Glasses, Gloves, Dust and Vapor Respirator J Splash Goggles, Gloves, Apron, Dust and Vapor Respirator K Air Line Hood or Mask, Gloves, Full Suit, Boots X Ask supervisor or safety specialist for handling instructions. D. Transport of Hazardous Materials 1. Transportation to/from Campus The United Nations Economic and Social Council developed a set of regulations that is recognized internationally for the transport of dangerous goods, also known as hazardous materials (or HazMat). This set of regulations is known as the UN Recommendations on the Transport of Dangerous Goods. Although these rules are not the law in all countries outside of the United States, many countries still follow these recommendations. In trading with other countries, dangerous goods which enter and exit the United States are subject to UN Recommendations. Within all states of the US any institution or individual transporting chemicals is legally bound by the UN Recommendations. 48
48 The Federal Department of Transportation (DOT) groups chemicals into 9 classes, depending upon specific properties. Some classes are broken up into divisions to further clarify groups within each class. The 9 DOT chemical hazard classes are: DOT Hazard Class 1: Explosives DOT Hazard Class 2: Gases (Compressed, Liquefied, or Dissolved Under Pressure) DOT Hazard Class 3: Flammable and Combustible Liquids DOT Hazard Class 4: Flammable Solids DOT Hazard Class 5: Oxidizing Substances and Organic Peroxides DOT Hazard Class 6: Poisonous and Infectious Substances DOT Hazard Class 7: Radioactive Substances DOT Hazard Class 8: Corrosive Materials (Acid or Alkaline, Organic or Inorganic) DOT Hazard Class 9: Miscellaneous Regulated Hazardous Materials These 9 classes and their divisions have associated diamond-shaped labels that are used to mark chemical containers for shipment. Labels help shippers to meet the 49 CFR requirements for Performance Oriented Packaging of hazardous material shipments. This labeling must be retained on the packaging until it is sufficiently cleaned of residue and purged of vapors. Hazard class labels must be a specific size, shape, and color. The labels must also use symbols to communicate hazards. Shippers of hazardous materials are required to use labels meeting all design and durability specifications outlined in the regulations. Roosevelt University does not stock chemicals in all 9 DOT hazard classes. The tables in the following 4 pages describe DOT classes in more detail for those containing chemicals stocked by Roosevelt, and examples of chemicals at RU are given for each class. The divisions in each class are shown where they apply, and the label associated with each class or division is shown. Only two DOT Hazard Classes are not represented at Roosevelt University: Explosives (Class 1) and Radioactive Substances (Class 7). Roosevelt University stocks chemicals in all other DOT hazard classes. DOT Hazard Class 2: Gases Division Examples of Chemicals Stored at RU Transportation Label Division 2.1: Flammable Gases Propane, Acetylene, Butane, Ethylene, and Hydrogen 49


49 Division 2.2: Non-Flammable / Non-Poisonous Gases Carbon dioxide, Carbon dioxide fire extinguishers, Helium, Nitrogen, Oxygen, Nitrogen mixtures Division 2.3: Gas Poisonous by Inhalation Ammonia, Chlorine DOT Hazard Class 3: Flammable and Combustible Liquids Division Examples of Chemicals Stored at RU Transportation Label None Acetone, Alcohols, Aldehydes, Benzene, Esters, 2-Butanone, Dimethylformamide (DMF), Hexanes, Pentane, Ketones, Octane 50

50 DOT Hazard Class 4: Flammable Solids Division Examples of Chemicals Stored at RU Transportation Label Division 4.1: Flammable Solids Nitrocellulose membrane filters, sulfur, titanium powder, and naphthalene Division 4.2: Spontaneously Combustible Solids Activated carbon, n-butyl lithium and other alkyllithiums, and phosphorus Division 4.3: Solids Dangerous When Wet Alkaline earth metal alloys, aluminum powder, calcium hydride, calcium, magnesium, lithium, sodium, sodium borohydride DOT Hazard Class 5: Oxidizers and Organic Peroxides Division Examples of Chemicals Stored at RU Transportation Label Division 5.1: Oxidizers Nitrates, Chlorates, Chlorites, Hypochlorites, Perchlorates, Permanganates, and many fertilizers 51


51 Division 5.2: Organic Peroxides Hydrogen peroxide, Benzoyl peroxide DOT Hazard Class 6: Poisonous and Infectious Substances Division Examples of Chemicals Stored at RU Transportation Label Division 6.1: Poisonous / Toxic Compounds Aniline, Arsenic compounds, Dichloromethane, Barium compounds, Chloroform, Phenol, Cyanides, Mercury compounds, Vanadium compounds, Sodium azide Division 6.2: Infectious Substances Bacterial cultures and stocks that might contain an infectious substance, Patient specimens such as blood or tissue swabs, Toxins derived from animals or plants DOT Hazard Class 8: Corrosive Materials Division Examples of Chemicals Stored at RU Transportation Label None Acetic acid, Sulfuric acid, Nitric acid, Hydrochloric acid, Perchloric acid, Ferric chloride, Formaldehyde, 52

52 Chromic acid, and Sodium hydroxide DOT Hazard Class 9: Miscellaneous Regulated Hazardous Materials Division Examples of Chemicals Stored at RU Transportation Label None Dry ice, Polymeric beads, Environmentally Hazardous Substances such as carbon tetrachloride, and Metallic mercury 2. Transportation on Campus When transporting chemicals between lab, use the path with least amount of traffic so that the general population is not at risk if a spill or other accident occurs during transportation. Transportation to the chemical storage area from the dock is typically done in areas with higher traffic but, as the chemicals are still packaged according to DOT regulations, they are considered safe for transport in these areas. E. Procurement and Distribution of Chemicals 1. Laboratory and Chemical Security Security within all Roosevelt University laboratories is maintained with the following procedures: The Roosevelt University Department of Campus Safety and Transportation is responsible for keeping the doors to the laboratories locked when the laboratories are not in use. The Laboratory Manager provides the Campus Safety Officer with a list of laboratory assistants and independent research students who are allowed to work throughout the laboratories. These students are not allowed to work in the laboratories without the required orientation. Access to all hazardous chemicals is restricted. Hazardous materials, including strong acids, are kept in locked cabinets. An active inventory of all chemicals is maintained, which allows the laboratory managers to determine if any chemicals are missing. 53
53 2. Delivery of Chemicals to the Science Laboratories All packaged chemicals from vendors which arrive at the Roosevelt University loading dock are delivered to the laboratory prep area on either campus by staff of the Department of Mail Services. Once a package is delivered the laboratory manager or laboratory assistant who receives the package signs a Mail Services record which verifies receipt of the package. This signed document is kept on file in the Office of Mail Services. Upon arrival at the laboratory prep room a package is opened and its contents are logged into the BCPS Incoming Package Log. The chemicals from the package are placed into one of three Package Receiving Areas until they can be logged into the chemical inventory: Non-temperature sensitive chemicals are placed on a receiving cart in the laboratory prep room. Refrigerated temperature-sensitive chemicals are placed in a receiving tray on the bottom shelf in a 5 o C refrigerator in the laboratory prep room. Frozen temperature-sensitive chemicals are placed in a receiving tray on the bottom shelf in a -20 o C freezer in the laboratory prep room. 3. Purchase of Large Chemical Quantities The purchase of large chemical quantities is discouraged at Roosevelt University due to the cost of disposal of unused chemicals, and the fact that space for storage of bulk chemicals is limited. 4. Ordering Chemicals The lab managers are responsible for ordering all chemicals. Provide the laboratory manager with the following information for all needed chemicals: Name of vendor - for cases where you need a vendor-specific chemical. For general solvents and common compounds, the laboratory manager will determine the best vendor. Description of item, including the amount needed or other specifications CAS number Catalog number (in cases where you need a vendor-specific chemical) Quantity The date by which the item is needed It may take several days or even weeks to obtain the supplies, and so it is imperative to request the items as early as possible. Also, grouping an order from a supplier often minimizes delivery costs and helps to keep costs down. Thus, it helps to notify the lab manager of all items needed as early in the semester as possible. 54
54 If a shipment is received on the dock and is found to be broken, the first course of action is to refuse the shipment and have the delivery service return to sender. If the breakage is noticed after shipment has been received and the delivery service has left campus, the Lab Manager will be notified and the broken shipment will be placed in a secondary leakproof container and received by the lab so that it may be disposed of properly. In either case, the vendor must be notified so that a replacement may be resent. F. Storage of Chemicals Local, state, and federal governments have specific regulations that affect the handling and storage of chemicals in laboratories. This section addresses these regulations. 1. General Considerations In general, chemicals should be stored in their proper cabinets. The physical properties determining the storage location of a chemical can be found in the Material Safety Data Sheet (MSDS) for that particular compound. Non-hazardous aqueous solutions may be stored on open heavy-duty shelves. Cabinets for chemical storage should be of solid, sturdy construction. Hardwood or metal shelving is preferred. Some may require ventilation. Materials of construction should be carefully considered where corrosive materials will be stored, e.g., corrosive-resistant liners or trays on shelves, location away from copper fittings, etc. Allow space within the building for any central chemical and biological or radioactive waste storage needs. Wall shelving should have heavyduty brackets and standards and should be attached to studs or solid blocking. For office spaces, bookcases are preferable to wall-mounted shelving. The following rules of thumb are important considerations in chemical storage: Avoid storing materials and equipment on top of cabinets. If you must place things in that location, there must be a clearance of at least 18 inches from the sprinkler heads or (if no sprinkler heads are present) 24 inches from the ceiling. Be sure that the weight of the chemicals does not exceed the load capacity of the shelf or cabinet. Some incidents where shelving or a cabinet collapsed due to overload are described in Anecdotes. Wall-mounted shelving must have heavy-duty brackets and standards. This type of shelving is not recommended for chemical storage unless a 3/4inch lip is on the shelf to prevent spillover accidents. However, buffers and non-hazardous may be stored on wall-mounted shelving. Cabinets for chemical storage must be of solid, sturdy construction, preferably hardwood or metal. Do not store materials on top of high cabinets where they will be hard to see or reach. Do not store corrosive liquids above eye level. Provide a specific storage location for each type of chemical, and return the chemicals to those locations after each use. 55
55 Avoid storing chemicals in the workspace within a laboratory hood, except for those chemicals currently in use. If a chemical does not require a ventilated cabinet, store it inside a closable cabinet or on a shelf that has a lip to prevent containers from sliding off in the event of an accident or fire. Do not expose chemicals to heat or direct sunlight. Observe all precautions regarding the storage of incompatible chemicals. Use corrosion resistant storage trays or secondary containers to collect materials if the primary container breaks or leaks. Distinguish between refrigerators used for chemical storage and refrigerators used for food storage. Each refrigerator should be labeled "No Food" or "Food Only. Do not store flammable liquids in a refrigerator unless it is approved for such storage. Such refrigerators are designed with non-sparking components to avoid an explosion. Chemical storage cabinets located outside the laboratory (e.g., in hallways) should be labeled with the name of the laboratory group that owns and uses it. 2. Finding Chemicals in the Roosevelt University Inventory System When the instructor or lab assistant is preparing for an experiment and searching for chemicals, he or she should check the chemical inventory. If you cannot locate the chemical, check the chemical inventory found through the on-line system, Chimera at which is regularly updated and requires a login and password for access; see respective Lab Manager for this information. Some of the computers throughout the laboratories contain a desktop shortcut to Chimera. Note that many chemicals have more than one commonly used name, so a compound may be listed under one of various synonyms. A good place to search for chemical synonyms is the Sigma-Aldrich website. Where possible, search for a chemical by CAS number. 3. Segregation of Chemicals and Incompatibility Incompatible chemicals should not be stored together. Storing chemicals alphabetically, without regard to compatibility, can increase the risk of a hazardous reaction, especially in the event of container breakage. In addition to the Chemical Incompatibility Chart below, there are several resources available, both in print and on-line, including the National Oceanic and Atmospheric Administration (NOAA) Chemical Reactivity Worksheet (CRW). Use common sense when setting up chemical storage. Segregation that disrupts normal workflow can increase the potential for spills. There are several possible storage plans for segregation. In general, dry reagents, liquids and compressed gases should be stored separately, then by hazard class, then alphabetically (if desired). 56
56 a. Segregate dry reagents as follows: Oxidizing salts (perchlorates, permanganates, nitrates, chromates, and osmium tetroxide) Flammable solids (sodium borohydride, metallic sodium, and metallic potassium) Water-reactive solids (lithium aluminum hydride, metal carbonyls, alkyllithiums, and Grignard reagents) All other solids b. Segregate liquids as follows: Mineral acids (hydrochloric acid, hydrofluoric acid, hydrobromic acid, sulfuric acid, nitric acid, phosphoric acid, boric acid, and perchloric acid) Organic acids (picric and acetic acids) Bases (aqueous hydroxide solutions, aqueous carbonate and bicarbonate solutions) Oxidizers (hydrogen peroxide) Flammable or combustible liquids (organic solvents and acetic acid) All other liquids c. Segregate compressed gases as follows: Toxic gases Flammable gases Oxidizing and inert gases Chemical Incompatibility Chart Many chemicals are incompatible with other chemicals due to reactivity and should not be stored together. Mixing these chemicals purposely or as a result of a spill can result in heat, fire, explosion, and/or toxic gases. Here is a partial list: Chemical Incompatibility Chart Compound Acetic Acid Acetone Acetylene Alkali and Alkaline Earth Metals such as calcium, lithium, magnesium, sodium, Incompatible Compounds Chromic Acid, nitric acid, hydroxyl-containing compounds, ethylene glycol, perchloric acid, peroxides, and permanganates. Bromine, chlorine, nitric acid, sulfuric acid, and hydrogen peroxide. Bromine, chlorine, copper, mercury, fluorine, iodine, and silver. Carbon dioxide, carbon tetrachloride and other chlorinated hydrocarbons, water, bromine, chlorine, fluorine, and iodine. Do not use CO 2, water or dry chemical 57
57 potassium, powdered aluminum Aluminum and its Alloys (especially powders) Ammonia (anhydrous) Ammonium Nitrate Aniline Bromine Calcium Oxide Carbon (activated) Caustic (soda) Chlorates or Perchlorates Chlorine Chlorine Dioxide Chromic Acid Copper Cumene Hydroperoxide Cyanides Flammable Liquids Fluorine Hydrazine Hydrocarbons Hydrocyanic Acid Hydrofluoric Acid Hydrogen Peroxide (anhydrous) Hydrogen Sulfide Iodine Mercury Nitrates extinguishers. Use Class D extinguisher (e.g., Met-L-X) or dry sand. Acid or alkaline solutions, ammonium persulfate and water, chlorates, chlorinated compounds, nitrates, and organic compounds in nitrate/nitrate salt baths. Bromine, chlorine, calcium hypochlorite, hydrofluoric acid, iodine, mercury, and silver. Acids, metal powders, flammable liquids, chlorates, nitrates, sulfur and finely divided organics or other combustibles. Hydrogen peroxide or nitric acid. Acetone, acetylene, ammonia, benzene, butadiene, butane and other petroleum gases, hydrogen, finely divided metals, sodium carbide, turpentine. Water Calcium hypochlorite, all oxidizing agents. Acids (organic and inorganic). Acids, aluminum, ammonium salts, cyanides, phosphorous, metal powders, oxidizable organics or other combustibles, sugar, sulfides, and sulfur. Acetone, acetylene, ammonia, benzene, butadiene, butane and other petroleum gases, hydrogen, finely divided metals, sodium carbide, turpentine. Ammonia, methane, phosphine, hydrogen sulfide. Acetic acid, naphthalene, camphor, alcohol, glycerine, turpentine and other flammable liquids. Acetylene, hydrogen peroxide. Acids Acids Ammonium nitrate, chromic acid, hydrogen peroxide, nitric acid, sodium peroxide, bromine, chlorine, fluorine, iodine. Isolate from everything. Hydrogen peroxide, nitric acid, and other oxidizing agents. Bromine, chlorine, chromic acid, fluorine, hydrogen peroxide, and sodium peroxide. Nitric acid, alkali. Ammonia, aqueous or anhydrous. Chromium, copper, iron, most metals or their salts, aniline, any flammable liquids, combustible materials, nitromethane, and all other organic material. Fuming nitric acid, oxidizing gases. Acetylene, ammonia (aqueous or anhydrous), hydrogen. Acetylene, alkali metals, ammonia, fulminic acid, nitric acid with ethanol, hydrogen, oxalic acid. Combustible materials, esters, phosphorous, sodium acetate, stannous chloride, water, zinc powder. 58
58 Nitric acid (concentrated) Nitrites Nitroparaffins Oxalic acid Oxygen (liquid or enriched air) Perchloric Acid Peroxides (organic) Phosphorus (white) Phosphorus pentoxide Potassium Potassium Chlorate Potassium Perchlorate Potassium Permanganate Silver and silver salts Sodium Sodium Chlorate Sodium Nitrite Sodium Peroxide Sulfides Sulfur Sulfuric Acid Water Acetic acid, acetone, alcohol, aniline, chromic acid, flammable gases and liquids, hydrocyanic acid, hydrogen sulfide and nitratable substances. Potassium or sodium cyanide. Inorganic bases, amines. Silver, mercury, and their salts. Flammable gases, liquids, or solids such as acetone, acetylene, grease, hydrogen, oils, phosphorous. Acetic anhydride, alcohols, bismuth and its alloys, paper, wood, grease, oils or any organic materials and reducing agents. Acid (inorganic or organic). Also avoid friction and store cold. Air, oxygen. Alcohols, strong bases, water. Air (moisture and/or oxygen) or water, carbon tetrachloride, carbon dioxide. Sulfuric and other acids. Acids. Benzaldehyde, ethylene glycol, glycerol, sulfuric acid. Acetylene, oxalic acid, tartaric acid, fulminic acid, ammonium compounds. See Alkali Metals Acids, ammonium salts, oxidizable materials and sulfur. Ammonia compounds, ammonium nitrate, or other ammonium salts. Any oxidizable substances, such as ethanol, methanol, glacial acetic acid, acetic anhydride, benzaldehyde, carbon disulfide, glycerol, ethylene glycol, ethyl acetate, methyl acetate, furfural, etc. Acids. Any oxidizing materials. Chlorates, perchlorates, permanganates, compounds with light metals such as sodium, lithium, and potassium. Acetyl chloride, alkaline and alkaline earth metals, their hydrides and oxides, barium peroxide, carbides, chromic acid, phosphorous oxychloride, phosphorous pentachloride, phosphorous pentoxide, sulfuric acid, sulfur trioxide. 4. Storage of Flammable and Combustible Materials Flammable and combustible liquids should be stored only in approved containers. Approval for containers is based on specifications developed by the US Department of Transportation (DOT), OSHA, the National Fire Protection Agency (NFPA) and the American National Standards Institute (ANSI). Containers used by Roosevelt University for flammable and combustible liquids meet these specifications. 59
59 Flammable liquid storage needs should be defined in advance so that the laboratory may have space for a suitable number of flammable storage cabinets. Per the Uniform Fire Code, quantities greater than 10 gallons of flammable liquids must be stored in a flammable liquid storage cabinet, unless safety cans are used. No more than 25 gallons of flammable liquids in safety cans may be stored outside a flammable liquid storage cabinet. Flammable liquid storage is not allowed below grade or near a means of egress, per the Uniform Fire Code. Flammable storage cabinets should not be vented unless there is a significant odor or vapor control concern. While storing flammable liquids, the following practices should be observed: Quantities should be limited to the amount necessary for the work in progress. No more than 10 gallons of flammable and combustible liquids, combined, should be stored outside of a flammable storage cabinet. Storage of flammable liquids must not obstruct any exit. Flammable liquids should be stored separately from strong oxidizers, shielded from direct sunlight, and protected from extreme temperature changes. Flammable Liquid Storage Cabinets A flammable liquid storage cabinet is an approved cabinet that has been designed and constructed to protect the contents from external fires. Storage cabinets are usually equipped with vents, which are plugged by the cabinet manufacturer. Since venting is not required by any code or the by local municipalities and since venting may actually prevent the cabinet from protecting its contents, vents should remain plugged at all times. Storage cabinets must also be conspicuously labeled FLAMMABLE. Refrigerators Use only those refrigerators that have been designed and manufactured for flammable liquid storage for temperature-sensitive flammable materials. Standard household refrigerators must not be used for flammable storage because internal parts could spark and ignite. Refrigerators must be prominently labeled as to whether or not they are suitable for flammable liquid storage. Other Combustible Materials Common combustible materials, such as paper, wood, corrugated cardboard cartons and plastic labware, if allowed to accumulate, can create a significant fire hazard in the laboratory. Combustible materials not stored in metal cabinets should be kept to a minimum. Large quantities of such supplies should be stored in a separate room when possible. 5. Storage of Corrosive Materials 60
60 Laboratories using corrosive liquids should have ample storage space low to the floor, preferably in low cabinets, such as under fume hoods. Also, some types of acids are incompatible and should be stored separately. Mineral Acids (Inorganic Acids) A mineral acid is defined as a water-soluble acid derived from inorganic minerals by chemical reaction as opposed to organic acids such acetic acid and formic acid. Mineral acids, or inorganic acids, are all commonly found in laboratories as aqueous solutions, with the exception of boric acid. Some of the more common mineral acids are listed on the next page. Phosphoric acid (H 3PO 4) Nitric acid (HNO 3) Sulfuric acid (H 2SO 4) Hydrochloric acid (HCl) Hydrobromic acid (HBr) Perchloric acid (HClO 4) Perbromic acid (HBrO 4) Boric acid (a solid) (H 3BO 3) Chromic acid (H 2CrO 4) The liquid mineral acids should be stored in cabinets designed for corrosive acids. These nonmetallic cabinets have no internal metallic parts, acid resistant coating and a cabinet floor constructed to be able to contain spillage. These cabinets are constructed from wood, polymers, or a combination of both. Nitric acid, however, is volatile and should be stored with extra caution. Volatile acids Volatile acids such as oleum, or fuming sulfuric acid, should be stored either in an acid cabinet or in a vented cabinet, such as the fume hood base, particularly after they have been opened. Concentrated mineral acids can be very reactive, even with each other. Concentrated acids Concentrated acids readily undergo violent exothermic reactions that can produce a lot of heat. Such acids can even react vigorously with dilute solutions of the same acid if mixed together rapidly. For example, concentrated sulfuric acid mixed quickly with 1M sulfuric acid will generate a lot of heat. Differently concentrated acids should be stored apart. If stored within the same cabinet, plastic trays, tubs or buckets work well to keep different acids apart. Acetic acid Acetic acid is an organic acid and should be stored separately from mineral acids. Since it is also flammable, it is best stored with other flammable liquids. 61
61 Picric Acid Picric acid can form explosive salts with many metals, or by itself when dry. Picric acid in liquid form is the safest to store. Perchloric Acid Perchloric acid, one of the mineral acids, is an extremely powerful oxidizer and must be kept away from all organic materials, including wood. Bases Solid bases, such as hydroxide salts, are stored in special cabinets. Aqueous solutions of bases are stored in different cabinets. 6. Storage of Unstable Chemicals Ethers and some ketones and olefins may form peroxides when exposed to air or light. Since they may have been packaged in an air atmosphere, peroxides can form even if the container has not been opened. Some chemicals, such as dinitroglycerine and germane (germanium tetrahydride), are shocksensitive, meaning that they can rapidly decompose or explode when struck, vibrated or otherwise agitated. These compounds become more shock-sensitive with age. For any potentially unstable chemical: On the label, write the date the container was received and the date it was opened. Discard containers within 6 months of opening them. Discard unopened containers after one year, unless an inhibitor was added. 7. Storage of Poisonous Substances Particularly poisonous substances, including carcinogens, acutely toxic chemicals and reproductive toxins, are stored in special airtight cabinets separately from other chemicals. All cabinets storing such compounds are clearly labeled with the DOT Hazard Class 6 symbol. 8. Storage of Compressed Gases Compressed gases pose a chemical hazard due to the gases themselves and a high energy source hazard due to the great amount of pressure in the cylinder. Large cylinders may weigh 130 pounds or more and can pose a crush hazard to hands and feet. The following rules apply to all compressed gas cylinders: 62
62 All cylinders must be secured to a wall, bench or other support structure using a chain or strap. Alternatively, a cylinder stand may be used. Segregate cylinders by gas type (e.g., flammable, inert, etc.). Store cylinders away from heat sources and extreme weather conditions. See Section VI (Part D) for more information on compressed gas cylinders. G. Handling of Hazardous Materials 1. Handling Corrosive Materials a. Corrosive Liquids When handling corrosive liquids the following should be considered: The eyes are particularly vulnerable to corrosive liquids. It is therefore essential that approved eye and face protection be worn in all laboratories where corrosive chemicals are handled. Gloves and other chemically resistant protective clothing should be worn to protect against skin contact. To avoid a flash steam explosion due to the large amount of heat evolved, always add acids or bases to water (and not the reverse). Acids and bases should be segregated for storage. Liquid corrosives should be stored below eye level. Adequate quantities of spill control materials should be readily available. Specialized spill kits for acids and bases are available through most laboratory safety supply catalogs. b. Corrosive Gases and Vapors When handling corrosive gases and vapors the following should be considered: Warning properties such as odor or eye, nose or respiratory tract irritation may be inadequate with some substances. Therefore, they should not be relied upon as a warning of overexposure. Perform manipulations of materials that pose an inhalation hazard in a chemical fume hood to control exposure or wear appropriate respiratory protection. Protect all exposed skin surfaces from contact with corrosive or irritating gases and vapors. Regulators and valves should be closed when the cylinder is not in use and flushed with dry air or nitrogen after use. 63
63 When corrosive gases are to be discharged into a liquid, a trap, check valve, or vacuum break device should be employed to prevent dangerous reverse flow. c. Corrosive Solids When handling corrosive solids the following should be considered: Wear gloves and eye protection when handling corrosive solids. When mixing with water, always slowly add the corrosive solid to water, stirring continuously. Cooling may be necessary. If there is a possibility of generating a significant amount of dust, conduct work in a fume hood. 2. Handling Ignitable and Explosive Materials a. Flammable and Combustible Liquids The main objective in working safely with flammable liquids is to avoid accumulation of vapors and to control sources of ignition. Besides the more obvious ignition sources, such as open flames from Bunsen burners, matches and cigarette smoking, less obvious sources, such as electrical equipment, static electricity and gas-fired heating devices should be considered. Some electrical equipment, including switches, stirrers, motors, and relays can produce sparks that can ignite vapors. Although some newer equipment have spark-free induction motors, the on-off switches and speed controls may be able to produce a spark when they are adjusted because they have exposed contacts. One solution is to remove any switches located on the device and insert a switch on the cord near the plug end. Pouring flammable liquids can generate static electricity. The development of static electricity is related to the humidity levels in the area. Cold, dry atmospheres are more likely to facilitate static electricity. Bonding or using ground straps for metallic or non-metallic containers can prevent static generation. Control all ignition sources in areas where flammable liquids are used. Smoking, open flames and spark producing equipment should not be used. Whenever possible use plastic containers. An exhaust hood must be used whenever appreciable quantities of flammable chemicals are: transferred from one container to another; allowed to stand in open containers; heated in open containers, or handled in any other way. Use bottle carriers for transporting glass containers. 64
64 Do not heat flammable liquids with an open flame. Steam baths, salt and sand baths, oil and wax baths, heating mantles and hot air or nitrogen baths are preferable. Minimize the production of vapors and the associated risk of ignition by flashback. Vapors from flammable liquids are denser than air and tend to sink to the floor level where they can spread over a large area. Electrically bond metal containers when transferring flammable liquids from one to another. Bonding can be direct, as a wire attached to both containers, or indirect, as through a common ground system. When grounding non-metallic containers, contact must be made directly to the liquid, rather than to the container. In the rare circumstance that static cannot be avoided, proceed slowly to give the charge time to disperse or conduct the procedure in an inert atmosphere. b. Fire Extinguishers Roosevelt University has different types of fire extinguishers because not all fires are the same. Different fuels create different fires and require different types of fire extinguishing agents. There are five different classes of fire extinguishers: A, B, C, D, and K. Each class is discussed in detail below. Class A: These extinguishers are used for Class A fires, which occur when ordinary combustibles such as paper, wood, plastics, cloth, and trash become heated to their ignition point. These are the most common type of fire. Class A fires are not difficult to fight and contain. If any of the four elements causing fire (heat, oxidizer, fuel, or chemical reaction) are removed, the fire will die out. The most common way of achieving this is by applying water to remove heat. These fires can also be put out by smothering them with foams, which prevent oxygen from reacting with the fuel. Finally, ammonium phosphate can be added, which is a refrigerant that removes heat and kills the chemical reaction. Class B: These extinguishers are used for Class B fires, which involve flammable liquids and flammable gas. Class B fuels include liquids such as petroleum oil, gasoline, and paint and gases such as natural gas, propane, and butane. Cooking oils and grease do not cause Class B fires; cooking oils and grease cause Class K fires. A solid stream of water should never be used to extinguish this type of fire because it can cause the fire to scatter, which will result in a spreading of the flames. The most effective way to extinguish a fire fueled by flammable liquids or gases is to inhibit the chemical chain reaction, which is can be done with different methods. Common methods involve smothering the fire with carbon dioxide or a type of Halon. Foams can be used to smother fires caused by flammable liquids. 65
65 The various Halons have fallen out of favor because they cause ozone-depleting materials to form once reacting with the fire. The Halons are a group of alkyl halides that are used in agriculture, dry cleaning, fire suppression, and other applications. Halon 2402, which is dibromotetrafluoroethane, is one that is used in Class B fire extinguishers. A new commonly used clean agent for fire suppression is HFC-227 (heptafluoropropane), which was designed as a replacement for a Halon. This compound contains no chlorine or bromine atoms, which attribute to the ozone depleting effects of the chlorinated and brominated Halons. It also leaves no residue behind after discharge, because gaseous hydrogen fluoride, carbon monoxide, and carbon dioxide are evolved as heptafluoropropane decomposes during fire suppression. Because of the generation of these gases, global warming potential is high as a result of the use of HFC-227 in fire suppression. Purple K, which is primarily potassium bicarbonate with a violet color, is the most effective dry chemical in fighting Class B fires caused by flammable liquids. It is 4-5 times more effective against Class B fires than CO2, and more than twice that of sodium bicarbonate. Purple K works by directly inhibiting the chemical chain reaction which sustains the fire. This compound is commonly used in dry powder fire extinguishers. It is also corrosive and decomposes carbon dioxide and potassium oxide. Class C: These extinguishers are used for Class C fires, which involve energized electrical equipment. Such equipment may be transformers with overloaded electrical cables or shortcircuited motors and appliances. If the power source is removed a Class C fire becomes an ordinary combustible fire. Water and other materials that conduct electricity should never be used to suppress Class C fires. Carbon dioxide, HFC-227, baking soda, and Purple K can be used to smother Class C fires. Purple K is not ideal for Class C fires, due to its corrosive properties. Class D: These extinguishers are used for Class D fires, which involve flammable or combustible metals such as sodium, potassium, lithium, magnesium, calcium, titanium, zinc, zirconium, aluminum, uranium, hafnium, and plutonium. Magnesium and titanium fires are common fuels in Class D fires. Generally, metal fire risks exist when sawdust, machine shavings, and other metal fines are present. These fines have a large amount of oxidizable surface area. In , many laptop models were recalled because lithium batteries were spontaneously igniting. Titanium fires are common in mechanical manufacturing plants because dust from the ground metal can be easily ignited by friction from belts rubbing together, metal sliding on metal, static charges from metal sliding across plastic parts or even latex painted surfaces. Titanium fines can also be ignited with a common table match, torches, heaters, or welding operations. Titanium burns at a full-white heat. 66
66 Metal fires are a unique hazard because most people are not aware of the characteristics of Class D fires and are not properly prepared to fight them. Thus, even a small metal fire can spread and become a larger fire as it reacts with surrounding ordinary combustible materials. Water should not be used on metal fires because it can excite the fires and make them worse. Dry powder extinguishers should be used for Class D fires. Common dry powders contain sodium chloride, graphite, and copper. Two different important types of Class D extinguishers are sodium chloride-based and copperbased. Sodium chloride combustible metal fire extinguishers contain a specially blended sodium chloride-based dry powder extinguishing agent. This dry powder is suited for metal fires involving magnesium, sodium, potassium, uranium, powdered aluminum, and more. Class D copper combustible metal fire extinguishers combat fires involving lithium and lithium alloys. It is the only known lithium fire extinguishing agent that will cling to a vertical surface. Class K: These extinguishers are used for Class K fires, which involve cooking oils and grease. These cooking oils and grease may be either animal fats or vegetable fats. While these fires are similar to Class B fires caused by flammable gases and liquids, there are special characteristics of such fires that place them into a separate class. Common suppressants for Class K fires use saponification, which is a chemical process of hydrolyzing fatty acid ester groups of the oils and yields detergent-like compounds that act as foams to smother the fires. c. Flammable Aerosols Flammable liquids in pressurized containers may rupture and aerosolize when exposed to heat, creating a highly flammable vapor cloud. As with flammable liquids, any containers with aerosols should be stored in a flammable storage cabinet. d. Flammable and Combustible Solids Many flammable solids react with water and cannot be extinguished with conventional dry chemical or carbon dioxide extinguishers. Ensure that Class D extinguishers, such Met-L-X, are available where flammable metal-based solids are used or stored. Roosevelt stocks both sodium chloride-based and copper-based Class D extinguishers in the chemistry lab areas on both campuses. Dry sand can usually be used to smother a fire involving flammable solids. Keep a container of sand near the work area. If a flammable, water-reactive solid is spilled onto skin, brush off as much as possible, then flush with copious amounts of water. NEVER use a carbon dioxide fire extinguisher for fires involving lithium aluminum hydride (LAH). LAH reacts explosively with carbon dioxide. 67
67 e. Flammable Oxidizers Some solids compounds are oxidizers that readily transfer oxygen atoms or gain electrons in oxidation-reduction reactions. While many solid oxidizers are not themselves flammable, they may ignite due to the heat of reaction produced upon combination with reducing agents or other combustible materials. The following compounds are common oxidizers that can cause extremely violent combustion: Silver oxide (Ag 2O) Potassium permanganate (KMnO 4) Place the funnel containing moist catalyst into a water bath immediately. f. Catalyst Ignition Some solid hydrogenated catalysts, such as palladium, platinum oxide, and Raney nickel, when recovered from hydrogenation reactions, may become saturated with hydrogen and present a fire or explosion hazard. Carefully filter the catalyst. Do not allow the filter cake to become dry. Place the funnel containing moist catalyst into a water bath immediately. Purge gases, such as nitrogen or argon, may be used so that the catalyst can be filtered and handled in an inert atmosphere. g. Explosion Hazards Explosive/Implosive Conditions In addition to the aforementioned general guidelines regarding hazardous chemical use, the following extra guidelines apply to the use or generation of explosive chemicals or the undertaking of procedures which, because of their reaction rate or their confines, are potentially explosive or implosive: Designated Area All storage and work with these substances must be confined to a designated area. A designated area may be the entire laboratory, an area of a laboratory, or a device such as a laboratory fume hood. The designated area should be the smallest practical area for the application so that the scope of any potential accident is limited. To ensure that all persons with access are aware of the 68
68 hazardous chemicals being used or procedures being conducted and the necessary precautions, the designated area shall be conspicuously posted with warning and restricted access signs. Personal Protective Apparel and Devices When handling explosive compounds or conducting potentially explosive experiments, a lab coat, gloves, and chemical splash goggles must be worn at all times. Barriers such as shields, barricades, and guards must be used to protect personnel and equipment from injury and damage whenever reactions are in progress or whenever materials are being temporarily stored. The barrier shall completely surround the hazardous area. If at all possible, activities with these substances shall be conducted in a fume hood with the sash lowered to form a shield. If the size of the experimental arrangement does not permit it to occur in a fume hood and it must be moved out into the lab, a 0.25 inch (0.625 cm) thick acrylic shield or equivalent shield shall be used. Heavy duty, flock-lined gloves and a face shield with a throat protector must be worn whenever it is necessary to reach behind a shielded area, move shields aside, or handle or transport explosive compounds. Reaction Operations All controls for heating and stirring equipment must be operable from behind the shielded area. Vacuum pumps potentially exposed to highly reactive or explosive gases or vapors must have their oil changed at least once a month and sooner if it is known that the oil has been exposed. All pumps shall either be vented into a hood or trapped. When working with shock or friction-sensitive materials, ground glass fixtures shall be substituted with Teflon or Teflon-coated apparatus. There must be two people present in the area at all times when these operations are used. Contingency plans (i.e., a written plan of what to do if things go wrong), equipment, and materials to minimize exposures of people and property in case of accident must be available. Roosevelt laboratories also stock a variety of explosive chemicals, such as peroxides, strong oxidizers, hydrides, acetylides, azides, and diazonium compounds. Some compounds can form peroxides if exposed to air for extended periods, such as ethers (including tetrahydrofuran and dioxane) and olefins. Some compounds are explosive when they come in contact with water, such as lithium aluminum hydride and metallic sodium. All of these chemicals should be handled by students and laboratory assistants under supervision. Peroxides The following recommendations should be followed when working with peroxides: Know the properties and hazards of all chemicals you are using through adequate research and study, including reading the label and MSDS. 69
69 Inventory all chemical storage at least twice a year to detect forgotten items, leaking containers, and those that need to be discarded. Identify chemicals that form peroxides or otherwise deteriorate or become more hazardous with age or exposure to air. Label containers with the date received, the date first opened and the date for disposal as recommended by the supplier. Minimize peroxide formation in ethers by storing in tightly sealed containers placed in a cool place in the absence of light. Do not store ethers at or below the temperature at which the peroxide freezes or the solution precipitates. Choose the size container that will ensure use of the entire contents within a short period of time. Visually or chemically check for peroxides of any opened containers before use. Clean up spills immediately. The safest method is to absorb the material onto vermiculite or a similar loose absorbent. When working with peroxidizable compounds, wear impact-resistant safety eyewear and face shields. Visitor specs are intended only for slight and brief exposure, and should not be used when working with peroxidizable compounds. Do not use solutions of peroxides in volatile solvents under conditions in which the solvent might be vaporized. This could increase the concentration of peroxide in the solution. Do not use metal spatulas or magnetic stirring bars (which may leach out iron) with peroxide forming compounds, since contamination with metals can lead to explosive decomposition. Ceramic, Teflon or wooden spatulas and stirring blades are usually safe to use. Do not use glass containers with screw-top lids or glass stoppers. Polyethylene bottles with screw-top lids should be used. Detection of Peroxides If there is any suspicion that peroxide is present, do not open the container or otherwise disturb the contents. Call EHS for disposal. The container and its contents must be handled with extreme care. If solids, especially crystals, for example, are observed either in the liquid or around the cap, peroxides are most likely present. If no peroxide is suspected but the chemical is a peroxide former, the chemical can be tested by the lab to ensure no peroxide has formed. Peroxide test strips, which change color to indicate the presence of peroxides, may be purchased through most laboratory reagent distributors. For proper testing, reference the manufacturer s instruction. Do not perform a peroxide test on outdated materials that potentially have dangerous levels of peroxide formation Removal of Peroxides If peroxides are suspected, the safest route is to alert the laboratory manager or safety officer for treatment and disposal of the material. Attempting to remove peroxides may be very dangerous under some conditions. 3. Handling Poisonous Substances 70
70 Toxic chemicals can be fast-acting or slow-acting. Keep in mind that highly reactive chemicals, such as acids and halogenated compounds, are harmful to humans. The following substances are toxic even in low amounts: cyanides, cadmium compounds, heavy metals and their salts, various organometallic substances, and many organic substances. Poisons are very different from corrosives in that corrosives are immediately dangerous to the tissues they contact, whereas poisons may have systemic toxic effects that require time to become evident. Mercury has poisonous effects that build up slowly over time, while cyanides are poisons that act very quickly to cause lethal oxygen starvation in mammalian cells. Poison Storage and Designated Work Area Particularly poisonous substances, including carcinogens, acutely toxic chemicals and reproductive toxins, are stored in special airtight cabinets separately from other chemicals. These compounds must be used in a clearly marked Designated Work Area. Teratogens Teratogens are chemicals that are known to cause fetal defects during pregnancy. It is important that you have students inform you if they are pregnant at the beginning of the semester or become pregnant throughout the semester, because teratogens are handled in many Roosevelt laboratory courses. When teratogens will be handled, pregnant students should not be present in the laboratory. A dry experiment can be arranged for that student, which will avoid the use of chemicals. H. Hazardous Material Waste Disposal and Removal 1. General Considerations Roosevelt University allows space for the variety of waste collection containers needed. These include laboratory trash, broken glass, sharps, recyclable containers, chemical waste, used oil, and biohazardous waste receptacles. Laboratories using compressed gases should have recessed areas for cylinder storage and be equipped with devices to secure cylinders in place. All laboratories should have storage space for PPE supplies, boxes of gloves, spill kits and adsorbents, and all hazardous material storage cabinets. Roosevelt University laboratory stores most contained hazardous material waste in cabinets in the chemistry laboratories until a scheduled removal. Each campus has is a primary chemical waste cabinet and a secondary hazardous material waste cabinet which are used to store all waste until a scheduled removal. Incompatible wastes are separated accordingly. 71

71 In order to responsibly manage chemical waste all employees must be familiar with the following: Choosing and Labeling a Hazardous Waste Container Waste Containment Protocols Categorizing and Separating Hazardous Material Waste 2. Choosing and Labeling a Hazardous Waste Container According to the Code of Federal Regulations, hazardous materials must be properly labeled and identified. Such labeling serves two purposes: it protects employees working with hazardous materials, and it allows such materials to be properly transported to and from Roosevelt University facilities. State and federal OSHA and DOT regulations stipulate how waste generators label and contain hazardous material waste. When choosing and labeling a container for waste, consider the following: Any container used to store hazardous waste must be labeled with a Hazardous Waste" sticker as soon as accumulation begins. Date the container with the current date once it is started. A label of the type shown at the right should be put on the container. These labels are located in the primary hazardous waste storage cabinet. Be sure that the container is UN rated to ensure it is legal to transport waste in such a container. UN rated containers are DOT approved for transport of hazardous material waste. Plastic containers should be made from High Density Polyethylene (HDPE) or another similar UN rated polymer. Other plastics are reactive with certain types of chemicals waste. Be sure that the container is compatible with the chemical waste. Use containers that are made of or lined with materials which will not react with, and are otherwise compatible with, the hazardous waste to be stored. For example, do not place hydrofluoric acid in glass or acidic waste in metal containers. Often the original container is suitable. Labeling should be accurate and legible and should include the name of the generator, the name of the lab group or PI, the department, and an extension where someone who is knowledgeable about that specific waste can be reached on the day of the pickup in case questions arise during packaging for disposal. Where possible, list both reactants and products. For example, if a cyanide was used in a reaction but all of the material was oxidized to a cyanate before disposal, list both cyanide and cyanate on the label. 72
72 Use IUPAC or full chemical names (in English), no abbreviations, symbols, structural diagrams or product trade names. Be sure that containers in the waste storage area do not leak. Consider the use of secondary containment, such as a tray, larger container or basin. If a leaking container is found, immediately clean up any spilled material according to established spill cleanup procedures and transfer the waste into a container that is in good condition. If you routinely generate significant quantities of compatible solvents or other liquids, bulking of waste in five gallon carboys may be practical. Savings to the university from this practice are substantial. 3. Waste Containment Protocols Containers of hazardous waste may be stored in an area of a laboratory or facilities operation near the point of generation. This area must be controlled by the principal investigator or workers generating the waste. State and federal regulations stipulate how waste generators store chemical and other hazardous material waste. Consider the following when containing hazardous material waste: Place hazardous waste in sealable containers. Waste disposal cost is based on volume, not weight, therefore, whenever possible, containers should be filled, leaving headspace for expansion of the contents. Often the original container is perfectly acceptable. Waste containers must be closed at all times, except during transfers. Do not leave funnels in open containers with the cap off. Whenever possible, wastes from incompatible hazard classes should not be mixed. For example, never mix organic solvents with oxidizers. Certain metals also cause disposal problems when mixed with flammable liquids or other organic liquids (see special wastes). Like any chemical storage in the laboratory or work area, be sure to segregate the containers according to the type of waste. Aqueous chemicals, such as some acids and bases, can sometimes be poured down the drain after being neutralized. The ph should be tested before pouring the solution down the drain. No more than one quart of an acutely hazardous waste or 55 gallons of other hazardous wastes may be stored (per waste stream) in the waste storage area. If this threshold quantity is reached, the worker must notify the laboratory manager to arrange for pick-up by our hazardous waste management contractor within three days. The container must bear a hazardous waste label with the accumulation date marked on the container. Chemical containers that have been triple-rinsed and air-dried in a ventilated area can be placed in the trash or recycled. If the original contents were highly toxic, the container should be rinsed first with an appropriate solvent and the washings disposed of as hazardous waste. See Disposal of Empty Glass Chemical Containers for more information. Waste stored near drains (floor, sink, cup sink) should have secondary containment. If you have a sink or drain that is not in use, contact maintenance to explore possibilities for plugging or sealing the drain. Secondary containers must be compatible with the waste. 73
73 The instructor and lab assistant should inform the students of the proper disposal techniques for each item that will be disposed for each lab period. It is the responsibility of each lab assistant to find out from the instructor how to handle the wastes generated from each experiment. It may also be easier for you to have the students dispose of their waste material in one or more labeled secondary waste container (such one or more beaker) located in a central location (or under the hood if appropriate). Such secondary containers can be emptied into the larger containers in the appropriate hazardous material waste cabinet after the lab is complete. 4. Categorizing and Separating Hazardous Material Waste Hazardous material waste is categorized and separated at Roosevelt University according to the following categories. In general, liquid chemical waste is contained separately from solid chemical waste. Other categories of hazardous material waste must be contained separately from the general liquid and solid containers, because they may be part of a separate DOT Hazard Class. a. Liquid Chemical Waste Most chemical waste generated at Roosevelt University can be contained in one of the three primary types of containers as listed below. Because these three types are generated regularly in large quantities, the containers used are large UN-rated 3-5 gallon drums. Until a container is full, it is stored in the primary chemical waste storage cabinet. Once a container is full it should be labeled and moved to a nearby secondary hazardous material waste storage cabinet. Organic Non-Halogenated This liquid waste has a base of flammable solvents including methanol, toluene, ethanol, diethyl ether, petroleum ether, hexane, acetone, acetonitrile, and dimethyl sulfoxide. Other organic nonhalogenated compounds are contained as solutes, including esters, alcohols, ketones, aldehydes, alkanes, alkenes, and dienes. Organic Halogenated This liquid waste has a base of dichloromethane. Other organic compounds are contained as solutes, including alkyl halides and aryl halides. Inorganic This liquid waste has a base of water and contains dissolved cations and anions. Common metallic cations in include sodium, potassium, nickel, magnesium, calcium, and iron. Common 74
74 anions include carbonates, sulfates, sulfites, nitrates, nitrites, halogens, and phosphates. Solutions containing any of the following ions should not go into this container: Chromium Arsenic Mercury Barium Vanadium Azides Cyanides b. Solid Chemical Waste Solid waste of the three types below is collected into one of three cans lined with plastic bags. The outside of the plastic bag should be labeled with an appropriate Hazardous Material accumulation sticker. The plastic bags are then collected into large UN-rated 3-gallon plastic HDPE drums for removal. Organic This solid waste contains both halogenated and non-halogenated organic compounds. Common chemicals in this waste container are organic compounds isolated or synthesized in organic chemistry courses. Inorganic This solid waste contains inorganic salts. The general chemistry courses use many inorganic solids that may go into this waste container. Drying agents may also go into this waste container. The following salts should not go into this container: Chromium Arsenic Mercury Barium Vanadium Azides Cyanides Gloves, Paper, and Plastics This solid waste contains gloves that may have been used to clean up a chemical spill. Paper products used to clean up spills may also have appreciable amounts of chemicals on them that need to be contained, and should go into this waste container. Plastic weigh boats and other items such as pipets which have been contaminated with hazardous materials should also go into this container. c. Special Chemical Waste 75
75 Certain compounds are in special DOT Hazard Classes and thus need to be contained separately. The following salts should be contained separately, regardless of whether they are in a solid state or a liquid solution: Chromium Arsenic Mercury Barium Vanadium Azides Cyanides Put the waste into an appropriate container and put a Hazardous Waste accumulation sticker on it. Include the amount of the compound to the best of your knowledge and put your name on the sticker, should any questions arise at a later date. d. Biological Hazardous Waste Smaller biological waste Smaller biological waste includes used plastic pipettes, pipette tips, capillary tubes, dissected organs or tissue, Petri plates, electrophoresis gels, and microcentrifuge tubes. These items should be disposed of in the red Biohazard bags located at each bench. Once the lab is complete, all bags should be collected from the benches, tape each closed using autoclave tape, then autoclave them. If you are not trained in how to use the autoclave yet, place the taped bags on the floor next to the autoclave in the bin marked "To Be Autoclaved" and notify the laboratory manager. New biohazard bags should be placed back on each bench. Large Biological Waste Large biological waste includes dissected fetal pigs, cats, and other large biological tissue or organisms. Such waste should be placed in large red Biohazard bag, tied or taped closed, and autoclaved. If the Biohazard bag is too big to fit into the autoclave, see if it can be separated into two or more Biohazard bags. Autoclaved Biohazard bags should then be put into an empty specimen box (which was initially used to store the large biological specimens). This box should not be used for disposal of gloves and other non-organic material. Bring the box to the dock and dispose of it in the dumpster. Ethidium Bromide Liquid ethidium bromide solutions should be disposed of in a labeled waste disposal bottle under the fume hood in the Biology Laboratory. Most Roosevelt University laboratories now use InstaStain Ethidium Bromide overlay membranes which are manufactured by Sigma. These overlay membranes are safer for classroom use and can be disposed of in autoclave bags along with the electrophoresis gels at the end of the experiment. Other Biological Reagents and Products 76
76 Biological reagents or products containing phenol or ethanol should be disposed of in a labeled waste disposal bottle under the fume hood in the Biology Laboratory. Often these reagents or products may contain other reagents, enzymes, or buffers used throughout an experiment and may need special handling. Ethanol is highly flammable and phenol is highly toxic, so these should be properly contained and labeled accordingly. Dyes and Stains Biological dyes and stains should also be contained in their own labeled bottle, as many of these have been mixed with other reagents and enzymes. Furthermore, many of such dyes and stains contain corrosive and environmentally-harmful components. e. Broken Glass All broken glass should be disposed of in the glass disposal boxes located in the Chemistry and Biology Laboratory. Glass should not be picked up by hand. Only the Lab Assistant or Instructor should attempt to pick up any large pieces of glass, and then only after putting on a pair of disposable gloves to protect your hands from small glass particles and dust. It is best to use the dust brush and pan to pick up the rest of the debris. The dust brush and pan are typically stored on top of one the glass disposal boxes in the various laboratories. f. Mercury Spills from Broken Thermometers If mercury spills on a hard surface, while wearing gloves collect as much of the larger pieces of glass as possible, then use the mercury spill kit to collect all visible mercury beads. Look for beads that may have rolled out of the expected perimeter of the spill to make sure you have collected all them. If mercury is spilled in the sink, again collect as much of the larger pieces of glass, then collect as much mercury as possible with the spill kit. Then pour a dilute solution of chlorine bleach down the drain while running cold water for 15 minutes. Broken thermometer glass is to be collected and placed in a specially-labeled container that is stored in the secondary hazardous waste cabinet fume hood. g. Sharps Non-biohazardous Sharps Containers purchased for non-biohazardous sharps are rectangular yellow plastic boxes with a cap that can be easily removed to put in the sharps. Common sharps that may go into this type of container are razor blades and syringe tips used dispense non-biological chemicals. All syringe tips should be cleaned before putting into the sharps container. Biohazardous Sharps 77
77 Blades used to cut non-preserved specimens or syringe tips used to draw blood are biohazardous and need to be contained separately. Biohazardous sharps containers are red and have Biohazard logos on them. These are located in the biology laboratories. h. Silica Gel Used silica gel that appears free flowing and dry still may have chemical contamination significant enough to classify it as hazardous waste according to the US EPA. Used silica gel must be collected into a separate container for disposal. A large blue plastic drum is used to collect silica waste; this drum is stored in the chemistry area of the research laboratory in Schaumburg. Currently no silica waste is generated on the Chicago campus. Dispose of the container during regular hazardous waste pickups when necessary. Unused silica gel that has not been in contact with hazardous chemicals may be disposed of in the regular trash. You may also reuse the large original silica gel containers. When using these or any other large containers, please adhere to the following procedure: Label the drum with a red Hazardous Waste sticker as soon as accumulation begins. Use only the liner provided with the drum, if any. Red-colored or Biohazard bags are NOT acceptable. Do not fill the drum more than 3/4 of the drum's capacity. Never transfer silica waste from drum to drum without the proper PPE. Silica is an inhalation hazard and can get into the eyes, as it is a fine dust. All transfers should be performed under a hood if possible. When relocating from one work area to another, do not leave any chemicals behind unless specific arrangements have been made. i. Molecular Sieves and Desiccant Disposal Used molecular sieves must be disposed as hazardous waste. Molecular sieves are a DOT Hazard Class 9 material. Place the material in a labeled bag or container and dispose during the regular hazardous waste pickups. This policy applies to all used adsorbents, grossly contaminated or otherwise. Only unused molecular sieves or desiccants that have not been in contact with hazardous chemicals may be disposed of in the regular trash within a sealed container, unless the original packaging indicates otherwise. j. Used Oil Disposal 78
78 All oil waste in the laboratory should be contained in glass or appropriate metal containers for disposal. Never put oil waste into plastic containers! Vacuum pump oil from laboratories will be stored separately and collected during the hazardous waste pickups, due to the possibility of contamination with other chemicals. Containers must be labeled "USED OIL rather than "hazardous waste." Oil mixed into any other hazardous wastes will be treated as hazardous waste. Oil spills should be cleaned up immediately using absorbent materials (vermiculite) and lined 5-gallon pails. k. Empty Gas Lecture Bottles Empty lecture bottles contain small amounts of gas and should be stored in an appropriate manner until they can be removed during one of the scheduled waste removals. Empty lecture bottles should not be stored with flammable liquids or corrosive wastes. l. Unidentified Hazardous Waste Waste that cannot be identified should be labeled as unknown hazardous waste. Unknown wastes cannot be legally transported or disposed. In order to dispose of them safely and properly, our waste contractors will need to know as much about the material as possible and will then need to test the characteristics of the waste. The cost of characterization will be charged back to the department that generated the waste. If you find unknown hazardous waste, please adhere to the following guidelines: Find out as much as you can about how the waste was generated. The more we know about the waste, the better we can characterize it for disposal. Inform the laboratory supervisors and keep the material in your laboratory or work area. If you find unknown hazardous waste, NEVER: pour unknown chemicals down the sink mix unknown chemicals with any other chemicals for consolidation bring unknown chemicals to a regular waste pickup abandon unknown chemicals in the work area It is very easy to avoid generating future unknown hazardous waste by doing the following: Label all chemicals in the laboratory in a meaningful way. Dispose of spent materials and chemicals with no foreseeable use promptly. 79
79 Before moving out of a work area, go through the laboratory or work area with your supervisor to determine which chemicals need disposal and to identify anything that is ambiguously labeled. 5. Disposal of Empty Chemical Containers Chemical containers that have been emptied (generally this means drained of their contents by normal methods including pouring, pumping, aspirating, etc.) are not regulated as hazardous waste; however they should not necessarily be disposed of in the regular solid waste dumpsters. Generally, the primary container (the container that actually held the chemical, as opposed to a container that the primary chemical was packed in), must be triple rinsed with water or other suitable solvent and air-dried before disposal. For volatile organic solvents (e.g. acetone, ethanol, ethyl acetate, ethyl ether, hexane, methanol, methylene chloride, petroleum ether, toluene, xylene, etc.) not on the list of acutely hazardous wastes, the emptied container can be air-dried in a ventilated area that does not vent to the outside (e.g. a self-contained chemical fume hood) without triple rinsing. The waste generator must determine whether the washings must be collected and disposed of as hazardous waste. Generally, if the chemical is on the list of acutely hazardous wastes or if the material is known to have high acute toxicity, the washings must be collected. Glass Containers Glass containers must be triple-rinsed with water or other suitable solvent and air-dried to ensure that it is free of liquid or other visible chemical residue. Intact containers (with caps removed) meeting these criteria should be placed in glass recycling receptacles. If a suitable glass recycling receptacle is not available, place the containers in a box marked "recyclable glass" and place the box in the hallway for removal by Building Services personnel. Glass bottle receptacles, consisting of a 20-gallon rubber container with a half lid, are available from Building Services. If the glass container has visible residue and this residue is hazardous, the container should be disposed as medical waste. Labeled medical waste cardboard boxes with plastic liners are available from laboratory managers. If the residue is not hazardous, the intact container should be placed in regular lab trash. Broken glass containers that are free of chemical residue should be placed in broken glass receptacles or placed in a puncture resistant container, such as a rigid plastic container or corrugated cardboard box. The plastic container or box should be sealed and placed in regular laboratory trash. Metal Containers 80
80 Metal containers must be triple-rinsed with water or other suitable solvent and air-dried. If the container is free of hazardous chemical residues, it may be placed in the regular laboratory trash. Otherwise, it should be disposed as medical waste. Secondary Containers Containers that were used as overpack for the primary chemical container may be placed in regular trash or recyclable trash. Any packing materials, such as vermiculite, perlite, clay, styrofoam, etc., may be placed in the regular trash unless it was contaminated with the chemical as a result of container breakage or leak. Packing materials contaminated with hazardous materials should be disposed of as hazardous waste. 6. Contracting the Removal of Stored Hazardous Material Waste Laboratory managers currently arrange for three waste removal jobs per fiscal year: following spring, summer, and fall semesters. If an unusually large amount of waste is generated at any time such that both primary and secondary hazardous material storage cabinets are filled with containers, notify the laboratory manager. The laboratory manager at either campus will coordinate disposal of chemical waste with a contracted company. When chemical waste pickups are scheduled at either campus by the BCPS or Pharmacy departments, additional operations groups will be notified so that accomodations may be made for the contracted waste services company and to allow any other department on campus who may have waste for pick up to allow the opportunity to have the waste removed from campus. The additional departments include Physical Resources and Dock personnel; however, this may be amended if necessary to account for waste from other various University departments. Currently Roosevelt University has a contract with Veolia Environmental Services; 24-hour service number: The costs of waste disposal are borne by the Department of Biological, Chemical, and Physical Sciences and the College of Pharmacy, respectively. If other departments require waste pick up they will be required to handle the cost of the removal for their respective department. I. Environment Monitoring and Surveillance Air Quality The quality of air in the laboratory environment, and its potential to affect human health must be a concern to which laboratory personnel, and those who occupy spaces in proximity to research and teaching laboratories, apply great vigilance. Reliance on the sense of smell in order to determine the presence of a contaminant is not acceptable and reckless. Air Contaminants 81
81 Many factors are responsible for the effects of chemicals on our bodies; however the most important factor that determines the safeness or harmfulness of any substance is the dose (amount) the body absorbs. The amount of a chemical absorbed is function of the duration of exposure to the chemical, the concentration of the chemical, and how often exposure takes place. The effect of a chemical on the body may produce either acute or chronic toxicity. Acute toxicity results in conditions that are readily apparent. Chronic toxicity usually does not produce effects until exposure has continued for some time. A single chemical may produce both acute and toxic effects. Periodic air sampling is recommended for all laboratories that use chemicals which present inhalation hazards. J. Personal Protective Equipment (PPE) 1. Lab Coats Lab coats provide protection to clothing during lab procedures. Lab coats also serve as a protective barrier between potential lab hazards and your skin. It is department policy that all individuals in the lab must wear a lab coat. Lab staff, faculty, and students are expected to wear a lab coat when working in any Roosevelt University laboratory. The lab coat must be cloth for all student BCPS majors. Disposable Tyvek lab coats are acceptable for non-major biology courses only, and must be left behind for disposal at the end of the semester or replaced as necessary. Lab coats are not to be worn outside of the labs by faculty, staff or students. It is your responsibility as a lab assistant to make sure your students comply with this policy. Any student who shows up to lab without one is welcome to use one of the extras hanging in the front of each lab. However, these are available on a first-come-first-serve basis, and if no more are available, the student should not be allowed in the lab for that session. The rules and consequences should be explained to students during the first lab as part of your safety overview. Students should understand that they will be asked to leave the laboratory if they do not wear a lab coat. Lab coats must be fully buttoned and the sleeves should not be pushed up. If buttons are missing from the lab coat, the student must obtain a new lab coat or repair the missing button. Be aware that the lab manager or safety officer may dismiss from the laboratory any student who repeatedly breaks these rules. If you continually allow students to break these rules, you may be dismissed from your position as laboratory assistant. 2. Eye Protection The type of eye protection required throughout Roosevelt University laboratories varies by class. All chemistry experimental work requires the use of splash-protective goggles, as shown below. To be splash protective, goggles should have an inside rim that fits snuggly around the student s eye and should have side vents instead of holes. Prescription eye glasses and safety glasses 82

.")

82 are not acceptable protection in chemistry laboratories, as concentrated acids and bases are commonly used and can contact skin without the additional protection offered by goggles. Goggles: acceptable for chemistry laboratories Safety glasses: acceptable for biology laboratories but not for chemistry Many biology and physics classes do not require special eye protection, but may have experiment-specific exceptions. For example, students should be required to wear some form of eye protection when conducting experiments with that have a potential for impact injury (prescription eye glasses may be sufficient). Biology students should also wear adequate eye protection while handling hazardous chemicals. Since eye protection is a serious safety issue, it is important that you enforce the departmental policy with your students. You should also make sure you are setting a positive example yourself by always following the rules when working throughout the laboratories or assisting courses. Students must wear safety glasses or goggles as long as a single student is still conducting an experiment with potentially dangerous materials. If their glasses are ill-fitting and irritate them, have them try using a different pair. Students who will not wear proper eye protection should be asked to leave the laboratory. 3. Gloves The use of gloves, if any, required throughout RU laboratories varies by class. Students in any laboratory should wear disposable gloves while handling any potentially hazardous chemicals. All chemistry experimental work requires the use of disposable gloves. Students in biology should wear gloves whenever handling potentially hazardous chemicals or biohazardous materials. Types of Gloves at Roosevelt University with Applications Chemical Resistance Strengths Weaknesses Neoprene A soft and flexible synthetic rubber material that offers good protection against 37% HCl, 50% acetic acid, 85% Poor protection against toluene, methylene chloride, xylene, styrene, pyridine, Excellent cut and abrasion resistance, as well as excellent 83
83 Nitrile PVA TM (polyvinyl alcohol) PVC (polyvinyl chloride) Silver Shield / 4H phosphoric acid, 25% sulfuric acid, 50% nitric acid, hydroxides, and ethanol (ETOH, 50% HNO 3, and 85% H 3PO 4 for up to 8 hours). A co-polymer of acrylonitrile and butadiene which offers good protection against mercury, thallium compounds, animal and vegetable fats, petroleum products, some acids (HF for up to 2 hours, acetic acid, and H 3PO 4), ethanol for up to 4 hours, carbon tetrachloride, and hydroxides A vinyl alcohol polymer with good resistance to hydrocarbons, aromatics, chlorinated solvents, esters, and most ketones; also highly impermeable to gases A synthetic thermoplastic polymer of vinyl chloride with good protection against fats, petroleum hydrocarbons, mercury, and most acids A lightweight, flexible laminated material with good protection from over 280 different, including many toxic and hazard compounds, alcohols, aliphatics, aromatics, chlorides, ketones, and esters nitrobenzene, and petroleum products Poor protection against alkyl halides, ethanol, dichloromethane, dimethylformamide, acetone, phenol, tetrahydrofuran, toluene, nitrobenzene, 1,4- dioxane, xylene, acetaldehyde, acetic anhydride, chloroform, diethyl ether, and benzene Not resistant to water; never use with aqueous solutions unless the gloves are reinforced Poor protection against alkyl halides Does not protect from iodomethane tensile strength and heat resistance Excellent resistance to punctures, cuts, snags, and abrasion Good resistance to punctures, cuts, snags, and abrasion Good abrasion resistance, but susceptible to punctures, cuts, and snags Minimal resistance to cuts and abrasions; good secondary inner glove if mechanical damage is a risk Different types of gloves should be used when handling different types of chemicals, as few materials protect from all chemicals. Please familiarize yourself with the types of gloves shown in the table on the previous page. Also make sure you know where all types of gloves are stored throughout the laboratories. Nitrile gloves are available throughout all labs in Roosevelt, as they are the best disposable general-duty glove. 4. Footwear Students must wear socks and shoes that cover the entire foot. The heel, toes, and top of the foot should not be exposed, as chemicals and glass can spill onto the floor and harm unprotected feet. The following types of shoes are not acceptable footwear for work in Roosevelt University laboratories, regardless of whether socks are worn: 84
84 Sandals or any type of perforated shoe leaving exposed sock or skin Flip-flops Slip-on shoes that do not cover the entire heel Dress shoes that do not cover the entire top of the foot; ballet flats 5. Clothing Students must wear pants in laboratory. Shorts and short pants that do not cover all skin are not acceptable attire for Roosevelt University labs; the entire leg and ankle must be covered. Skirts and dresses are acceptable as long as they are ankle-length and do not expose unprotected skin. All clothing worn in the laboratory should not leave exposed skin. The pant leg should not be overly baggy with a torn hemline that is dragging on the floor while walking, as these dangling pieces of fabric can collect chemicals and pieces of broken of glass from the floor. Leggings that are skin tight are not allowed in the labs as they enable any spilled materials to easily come in contact with the skin. K. Exposure Assessment and Monitoring Employees who suspect they may have received an excessive exposure to a hazardous chemical through ingestion or inhalation must report the exposure to the Environmental, Health & Safety Committee and the Chemical Hygiene Officer. If initial monitoring reveals that excessive exposure has occurred, laboratory inspection and medical surveillance shall follow. The EHS and the CHO are responsible for a full investigation of this incident and notification of inspection results to all people involved. EHS will provide an exposure evaluation to any Laboratory Worker who, as a consequence of a laboratory operation, procedure, or activity, reasonably suspects or believes they have sustained an overexposure to a toxic substance. The exposure evaluation may consist of a subjective assessment based on documented odor and irritation levels or it may involve measuring or monitoring the individual's exposure. EHS shall initially measure the employee's exposure to any OSHA-regulated substance which requires monitoring if there is reason to believe that exposure levels for that substance routinely exceed the action level (or in the absence of an action level, the Permissible Exposure Limit (PEL) listed in 29 CFR ). If the initial monitoring discloses exposures over the action limit or PEL, EHS shall immediately comply with the exposure monitoring provisions of the relevant OSHA standard. EHS may terminate the monitoring in accordance with the relevant standard. EHS shall notify employees of monitoring results in writing within 15 working days after the monitoring results have been received. L. Medical Consultations and Examination 85
85 Employees shall have the opportunity to receive medical attention, including any follow-up examinations which the examining physician determines to be necessary, under the following situations: 1. Whenever an employee develops signs or symptoms associated with a hazardous chemical to which he/she may have been exposed to in the laboratory, the person shall be provided the opportunity to receive an appropriate medical examination. 2. Where exposure monitoring reveals an exposure level routinely above the action level (a regulatory exposure level that is requires some type of action) or in the absence of an action level, the Permissible Exposure Limit, for OSHA regulated substances for which there are exposure monitoring and medical surveillance requirements, medical surveillance shall be established for the affected person as prescribed by the particular OSHA standard. 3. Whenever an event takes place in the work area such as a spill, leak, explosion, or other occurrence resulting in the likelihood of a hazardous chemical exposure, the affected person shall be provided an opportunity for a medical consultation and possible medical examination. All medical examinations and consultations shall be performed by or under the direct supervision of a licensed physician and shall be provided without cost to the employee, without loss of pay and at a reasonable time and place. Funding responsibility for medical examinations performed under this section is assigned to the employee's department unless other arrangements have been made. Any accidental exposure to bloodborne pathogens resulting from a needle stick in the Clinical Skills Lab will be reported immediately to the Director of Professional Labs and protocol outlined in the Roosevelt University College of Pharmacy Exposure Control Plan will be followed. M. Medical Records Documentation is necessary and appropriate for both the enforcement of the provisions set forth in this manual and for the development of information regarding the cause and prevention of workplace injury and illness. Adequate documentation must be kept by each responsible party to demonstrate compliance with all provisions of the manual. These records shall be kept for the duration of the employment of those affected. The laboratory managers shall ensure that records of these activities are kept, transferred, and made available in accordance with 29 CFR Supervisors must take time to carefully analyze all emergency events, work-related injuries or illnesses, or accidents that could have resulted in injury, even the apparently insignificant occurrences, and ensure that accident reports are filed for each event. The results of such analysis and the recommendations for the prevention of similar occurrences shall be distributed to all who might benefit there from. N. Spills and Accidents 86
86 Pre-planning is essential. Before working with a chemical, the laboratory worker should know how to proceed with spill cleanup and should ensure that there are adequate spill control materials available. 1. Preventing Spills Most spills are preventable. The following are some tips that could help to prevent or minimize the magnitude of a spill: Place chemical containers being used in a hood or lab bench area that reduces the possibility of accidentally knocking over a container. Keep all unused reagents in their appropriate storage area and keep your work area clean of needles equipment and clutter. Plan your movements. Look where you are reaching to ensure you will not cause a spill. Avoid transporting chemicals from the stockroom during periods of high traffic in the hallways such as between classes. Transport chemical containers in a chemical carrier or cart. Place absorbent plastic backed liners on benchtops or in fume hoods where spills can be anticipated. For volumes of liquid larger than what can be absorbed by liners, use trays. All life-threatening violations or concerns must be rectified by the supervisor immediately upon realization through appropriate channels. Failure to immediately rectify the concern may result in a shutdown or curtailing of the activity. Non-serious violations or concerns must be rectified by the supervisor within 30 days. Unsafe conditions which cannot be corrected by the supervisor must be reported to the next higher level of management. Activities associated with unsafe conditions must cease until the conditions are corrected. 2. Chemical Spills In the event of a chemical spill, the individual(s) who caused the spill is responsible for prompt and proper clean-up. It is also their responsibility to have spill control and personal protective equipment appropriate for the chemicals being handled readily available. See Developing a Spill Response Plan for more information. The following are general guidelines to be followed for a chemical spill. Immediately alert area occupants and supervisor, and evacuate the area, if necessary. If there is a fire or medical attention is needed, contact Security at each campus. Attend to any people who may be contaminated. Contaminated clothing must be removed immediately and the skin flushed with water for no less than fifteen minutes. Clothing must be laundered before reuse. If a volatile, flammable material is spilled, immediately warn everyone, control sources of ignition and ventilate the area. 87
87 Don personal protective equipment, as appropriate to the hazards. Refer to the Material Safety Data Sheet or other references for information. Consider the need for respiratory protection. The use of a respirator or self-contained breathing apparatus requires specialized training and medical surveillance. Never enter a contaminated atmosphere without protection or use a respirator without training. If respiratory protection is needed and no trained personnel are available, call the laboratory managers and CHO for assistance. Using the chart below, determine the extent and type of spill. Category Size Response Treatment Materials Small up to 300 cc chemical treatment or neutralization or absorption absorption spill kit Medium 300 cc - 5 liters absorption absorption spill kit Large more than 5 liters call laboratory managers or CHO outside help Protect floor drains or other means for environmental release. Spill socks and absorbents may be placed around drains, as needed. Contain and clean-up the spill according to the table above. Loose spill control materials should be distributed over the entire spill area, working from the outside, circling to the inside. This reduces the chance of splash or spread of the spilled chemical. Bulk absorbents and many spill pillows do not work with hydrofluoric acid. POWERSORB (by 3M) products and their equivalent will handle hydrofluoric acid. Specialized hydrofluoric acid kits also are available. Many neutralizers for acids or bases have a color change indicator to show when neutralization is complete. When spilled materials have been absorbed, use brush and scoop to place materials in an appropriate container. Polyethylene bags may be used for small spills. Five gallon pails or 20 gallon drums with polyethylene liners may be appropriate for larger quantities. Complete a hazardous waste sticker, identifying the material as Spill Debris involving XYZ Chemical, and affix onto the container. Spill control materials will probably need to be disposed of as hazardous waste. Decontaminate the surface where the spill occurred using a mild detergent and water, when appropriate. Report all spills to your supervisor or the Principal Investigator. 3. Developing a Spill Response Plan 88
88 An effective spill response procedure should consider all of the items listed on the next page. The complexity and detail of the plan will, of course depend upon the physical characteristics and volume of materials being handled, their potential toxicity, and the potential for releases to the environment. The spill response plan should be discussed with all employees in the department. Review Material Safety Data Sheets (MSDSs) or other references for recommended spill cleanup methods and materials, and the need for personal protective equipment (e.g., respirator, gloves, protective clothing, etc.) Acquire sufficient quantities and types of appropriate spill control materials to contain any spills that can be reasonably anticipated. The need for equipment to disperse, collect and contain spill control materials (brushes, scoops, sealable containers) should also be reviewed. Acquire recommended personal protective equipment and training in its proper use. Place spill control materials and protective equipment in a readily accessible location within or immediately adjacent to the laboratory. Develop a spill response plan that includes: o Names and telephone numbers of individuals to be contacted in the event of a spill. o Evacuation plans for the room or building, as appropriate. o Instructions for containing the spilled material, including potential releases to the environment (e.g., protect floor drains). o Inventory of spill control materials and personal protective equipment. o Means for proper disposal of cleanup materials (in most cases, as hazardous waste) including contaminated tools and clothing. o Decontamination of the area following the cleanup. Chemicals in the Eyes Flush the eye with water for 15 minutes using the eyewash station. Hold the eye open to wash under the eyelid. Chemicals on a Surface The first step in cleaning up any spill is to consult your instructor or the laboratory manager. When a large chemical spill occurs on the floor of the lab or bench, containing the spill is important. The absorbent device located at the front of the labs should be used to prevent the spill from spreading. In the case of an acid spill, the acid must first be neutralized. This can be accomplished using a box of baking soda (located in the lab near the safety shower) or an aqueous solution of sodium bicarbonate or sodium carbonate. In the case of a base spill, a dilute acid should be used such as vinegar. Biological Spills The consequences of any spill of biological material can be minimized by performing all work on plastic-backed absorbent liner to absorb spills. A simple spill kit should be readily available and should include the following items: 89
89 chlorine bleach or some other concentrated disinfectant package or roll of paper towels autoclavable bag latex or nitrile gloves forceps for picking up broken glass Report spills to your supervisor. Contact the Biological Safety Liaison for further information. Details on Biological Spills can be found in Part V. 4. Recommended Spill Control Material Inventory The laboratory or work area should have access to sufficient quantity of absorbents or other types of materials to control any spill that can be reasonably anticipated. Personal Protective Equipment 2 pairs chemical splash goggles 2 pairs of gloves (recommend Silver Shield or 4H) 2 pairs of shoe covers 2 plastic or Tyvek aprons and/or Tyvek suits Absorption Materials 4 3M POWERSORB spill pillows (or equivalent) 1 3M POWERSORB spill sock 2 DOT pails (5 gallon) with polyethylene liners o 1 filled with loose absorbent, such as vermiculite or clay o 1 with minimum amount of loose absorbent in the bottom Neutralizing Materials Acid Neutralizer Caustic Neutralizer o commercial neutralizers, such as Neutrasorb (for acids) and Neutracit-2 (for bases) have built in color change to indicate complete neutralization Solvent Neutralizer o commercial solvent neutralizers, such as Solusorb, act to reduce vapors and raise the flashpoint of the mixture Mercury Spills Small mercury vacuum to pick up large drops (optional) 90
90 Hg Absorb Sponges - amalgamate mercury residue Hg Absorb Powder - amalgamates mercury Hg Vapor Absorbent - reduces concentration of vapor in hard to reach areas Mercury Indicator - powder identifies presence of mercury Clean-up Tools Polypropylene scoop or dust pan Broom or brush with polypropylene bristles 2 polypropylene bags sealing tape ph test papers waste stickers floor sign - DANGER Chemical Spill - Keep Away Chemical Spill Kit contains: One 5-gallon polyethylene (blue) drum with vermiculite absorbent One 5-gallon (gray) pail -PPE - with the following: o Two pair Silver Shield gloves o Several pair nitrile gloves o Two pair Tyvek shoe covers o Two pair chemical splash goggles o Two white oil-absorbent pads o One 4½-foot grey multi-absorbent pad/sock o Three Plastic disposal bags o Several waste stickers o One Dustpan/Brush o One Red Sharpie marker. o Binder with procedures, Phone List, Two CAUTION DO NOT ENTER signs, Two CAUTION CHEMICAL SPILL signs, inventory O. Emergency Response 1. General Emergencies 91
91 In the case of an emergency in a Roosevelt University laboratory, one should attempt to follow these guidelines: a. Stay calm and use common sense. b. Notify the instructor immediately. If the instructor is not in the lab, let the lab manager know. If the lab manager is not present you should call campus security (Schaumburg x 8989 or the desktop computer Panic Button; Chicago x2020) to report the incident. In the unusual event that none of these individuals are available, you should call 911. Remember, you are responsible for the safety of every individual who steps into the lab during your class period, and it is always better to be safe than sorry. You will not get in trouble for being cautious- let the health professionals in the emergency room determine if further medical treatment is necessary. c. The lab manager, campus security, and the paramedics will require the name and concentration of the reagent (chemical or biological) that was involved in the accident. The SDS sheet for the reagent will be required as well. Therefore it is again important that you have read the SDS before the lab and are able to get it quickly when needed. You may want to print a copy as part of your lab preparation and keep it in the folder with the lab procedure. d. Afterwards remember to provide the accident details to the lab manager so that the proper reports can be filed. Emergency Contact Information Emergency 911 (from a campus phone) dial 9911 Schaumburg Campus Security Office dial 8989 Lab Manager- Erika Szotek dial 8582 Chicago Campus Security Office dial 2020 Lab Manager - Gabriel Vidrine dial Fire Emergencies If you hear a fire alarm, leave the area immediately, following Roosevelt University evacuation procedures. Remain in your assembly location usually a parking lot outside the main building complex until you receive the all clear message. Each campus performs fire drills at least one time per semester, including summer session. Emergency Exit routes are posted near the doors of every lab along with an alternate route if the main route is inaccessible. If you see a fire and no alarm is sounding yet, then: 92
92 Call campus safety (x8989 from a Schaumburg campus phone or x2020 from a Chicago campus phone; from a cell phone call in Schaumburg or if downtown). State that there is a fire and describe: o o o o your location, including the building letter and room number the telephone number from which you are calling the exact location of the fire the extent of the fire (small, large, etc.) and type of fire if you can identify it (wastepaper basket, electrical, chemical, etc.). Public safety will call the fire department. A public safety officer will arrive at the scene as soon as possible. If you are on the main campus, pull a manual fire alarm. (See the emergency map for the alarm boxes nearest your location.) You may attempt to extinguish the fire if you know how to do so (however, it is more important to avoid injuring yourself or others). See the emergency map for the closest fire extinguisher. Evacuate the area, following Roosevelt University evacuation procedures. If you are in doubt or are unable to reach public safety, dial 911 from a main campus pay phone (it will be a free call) or from a campus phone. Burning Clothes Prevent the person from running and fanning the flames. Rolling the person on the floor will help extinguish the flames. If a safety shower is nearby, hold the person under the shower until the flames are extinguished and any chemicals are washed away. Do not use a fire blanket if a shower is nearby, because the blanket does not cool and smoldering will continue. Remove contaminated clothing. Wrap the person in a blanket to avoid shock. Get prompt medical attention. If you must use a fire extinguisher to put out the fire, be careful not to aim at nose and mouth of the burning person. Burning Reagents Extinguish all nearby burners and remove combustible materials and solvents. Small fires in flasks and beakers can be extinguished using a watch glass or a larger beaker to cover over the smaller container. For a larger fire, use a fire extinguisher directed at the base of the flame. Chemical or Thermal Burns on the Skin 93
93 Flush the burned area with cold water for at least 15 minutes. Resume if pain returns. Wash the chemicals off with a mild detergent and water. Do not apply neutralizing chemicals, creams, lotions or salves. If the chemicals are spilled on a person over a large area, quickly remove the contaminated clothing while the person is under the safety shower. Get prompt medical attention. 3. Medical Emergencies Cuts Prior to assisting an individual, put on a pair of disposable gloves. This will protect you and the individual. Once you have stopped the bleeding, it s a good idea to examine the object the individual cut himself or herself on. This enables you determine the potential for embedded objects still in the cut. For instance, if the student receives a cut from a capillary tube, the ability to piece the broken glass together will tell you if there may be broken glass still in the wound. Major cuts If blood is spurting from the wound place a pad from the first aid cabinet directly on the wound and apply firm pressure to stop the bleeding. Wrap the injured person with the emergency blanket to avoid shock and get immediate medical attention. NEVER use a tourniquet. Minor cuts Wash the cut, remove any foreign debris, apply pressure to stop the bleeding, and apply a bandage from the closest first-aid kit. 4. Leaking Compressed Gas Many laboratory operations require the use of compressed gases for analytical or instrument operations. Compressed gases present a unique hazard. Depending on the particular gas, there is a potential for simultaneous exposure to both mechanical and chemical hazards. If you notice a compressed gas canister that appears to be leaking, contact the instructor immediately. If the instructor is not around contact the lab manager or the physical plant. 5. Responding to Emergencies not Involving students, staff, faculty Incidents may occur when there is little or no attendance on campus; this may be due to nature (severe weather), fire, power outage, flooding, etc. When such an event occurs in a laboratory area, and the situation is under control and safe, the Lab Manager for the appropriate lab must 94
94 be called and if the lab Manager is not able to be reached then the Department Chair should be called. If the Lab Mangers and/or Department Chairs are not available than the Safety Officers would be next in call order. Depending on the incident, the Lab Manager and/or Department Chair will decide whether or not to personally inspect any damage or possibility of damage to determine if any equipment, etc. needs repair or replacement. The Roosevelt University representative who was first to respond to the event should be the person to inform the Lab Manager and/or Department Chair as the respondent is most knowledgeable about the situation. 6. Other Emergencies on Campus Other emergencies on campus may include, but are not limited to Bomb Threats, Armed Violence/Active Shooter, Earthquake, Tornado and Lockdown. While drills for these emergencies are not routinely practiced on campus, every room contains information for the appropriate responses for these emergencies on their respective campuses. If this information is not present then contact the Lab Manager so that Campus Safety may be notified and provide a replacement. The campus wide Emergency Operations Plan prepared by the office Campus Safety has prepared checklists in the event of a Lab Emergency, Shelter-in-place and Violent Behavior incident on campus. Please see Appendix for specific details on expected responses. P. Accident Reports Any accident, regardless of how small should be reported to the lab manager. In the absence of the lab manager campus security should be notified so that the appropriate accident report form can be completed. Near misses should also be reported. A Near miss is an incident that is adverted but may be used as a training session in case the incident di progress. Both Incident Report and Near Miss Report forms are located in the Appendix. Supervisors must take time to carefully analyze all emergency events, work-related injuries or illnesses, or accidents that could have resulted in injury, even the apparently insignificant occurrences, and ensure that accident reports are filed for each event. The results of such analysis and the recommendations for the prevention of similar occurrences shall be distributed to all who might benefit there from. Q. Training Requirements and Information The Environment, Health & Safety Committee (EHS) provides safety instruction for individuals working in any laboratory or area where chemical or biological hazards are present. Students, faculty, and laboratory personnel are prohibited from working in the laboratory prior to appropriate training and documentation as outlined for their specific duties. Refresher training is required on 95
95 an annual basis for individuals working in areas of potential exposure to chemical or biological hazards. Training and orientation for faculty, staff, and student lab personnel will include the following topics: Location and availability of the Chemical Hygiene Plan Contents and availability of OSHA Standard on toxic and hazardous substances (the Laboratory Safety Standard ) Hazards, safe handling, and storage guidelines for hazardous material Location and interpretation of Safety Data Sheets (SDS) Personal protective equipment Hazardous waste disposal Signs and symptoms associated with hazardous chemical exposure Chemical spill and accident response procedures Emergency response procedures, including eye wash and shower stations Supplemental safety instruction and training on potential hazards associated with specific laboratory duties are provided by the laboratory manager or supervising faculty when appropriate. Faculty instructors Following initial on-site safety orientation and training prior to initial laboratory teaching assignment, full time and adjunct faculty instructors are required to participate in safety training of laboratory assistants and research students on an annual basis. Refresher training is made available each semester either on-site or online. During training, faculty are provided with the Laboratory Training Manual and informed of the location and availability of the Chemical Hygiene Plan, as well as informed of any updates to safety guidelines and protocols. Laboratory assistants and research students Students employed as laboratory assistants or independent research assistants must attend six hours of safety orientation prior to initial work in the laboratory. Orientation sessions are conducted by the laboratory manager and faculty on both campuses at the start of each semester. All student laboratory assistants and research students are provided with the Laboratory Training Manual and informed of the location and availability of the Chemical Hygiene Plan. Refresher training and documentation is required for returning student workers on an annual basis. Student employees sign the Laboratory Assistant and Research Student Safety Contract through DocuSign prior to beginning work. Enrolled students 96
96 Students enrolled in laboratory courses are provided with general safety training by faculty instructors on the first day of instruction for each laboratory course. Students are informed of the Laboratory Safety Rules and Regulations as outlined in the Laboratory Safety Manual. Emphasis is placed on training in personal protective equipment, handling of chemical or biological hazardous material, spill response, and emergency procedure. Students sign the Student Safety Contract through DocuSign prior to beginning any lab class work. Training Records The Laboratory Manager will systematically maintain signed contracts by faculty instructors, and electronic DocuSign records for student laboratory assistants, independent research students, and all students enrolled in laboratory courses. All DocuSign records are attached to student files via Banner Document Management. The following signed documents pertaining to training are held by the Laboratory Manager: Laboratory Assistant and Research Student Safety Contract Student Safety Contract Student Safety Contract for Handling of Human Blood Part V: BIOSAFETY GUIDELINES A. Biosafety Introduction 1. Roosevelt University Policy Statement The University is committed to providing a HEALTHY and SAFE learning, teaching and research environment. The goals of the Roosevelt University's Biological Safety Program are to: protect staff, students, and community from exposure to infectious agents prevent environmental contamination secure experimental materials comply with Federal, State and Local Regulations 2. Scope and Application 97
97 This manual provides university-wide safety guidelines for working with biological hazards (biohazards). This manual outlines general policies and procedures for using and disposing of infectious or other potentially infectious agents and biohazardous materials. This manual ensures compliance with Federal, State, and Local laws, regulations and guidelines. The Biological Safety Program applies to all personnel at Roosevelt University's Chicago Campus and Schaumburg Campus, as well as any off-campus research or teaching activities. 3. Biohazard Definition The terms "Biohazard" or Biohazardous agent refers to an agent that is biological in nature, capable of self-replication, and which has the capacity to produce deleterious effects upon biological organisms. Biohazardous material means any material that contains or has been contaminated by a biohazardous agent. Biohazardous agents include, but are not limited to, bacteria; fungi; viruses; prions; rickettsiae; chlamydia; parasites; recombinant nucleic acid products; allergens; cultured human and animal cells and the potentially biohazardous agents these cells may contain; infected clinical specimens; tissue from experimental animals; plant tissues containing viruses, bacteria and fungi; toxins; and other biohazardous agents as defined in laws, regulations or guidelines. B. Administration of Biological Safety 1. Biosafety Personnel a. Deans and Department Chairs Deans and Department Chairs are responsible for the implementation of safe practices and procedures in their schools or departments, and oversee the activities of the Biological Safety Committee. b. Laboratory Instructors and Principal Investigators Biological safety practices and procedures in all University laboratories must comply with those outlined in this manual. Laboratory instructors and principal investigators are responsible for biological safety in the laboratory. They must ensure that workers know and follow biological safety rules, that protective equipment is available and in working order, and that appropriate training has been provided; provide regular, formal biological safety inspections of their facilities and equipment; know the current legal and University requirements concerning biological safety; determine the required levels of protective apparel and equipment; and ensure that facilities and training for use of any agent are adequate. 98
98 Principal investigators (PIs) are responsible for identifying potentially infectious agents and biohazards and carrying out specific control procedures within their own laboratories. This responsibility may not be shifted to inexperienced or untrained personnel. PIs are responsible for the instruction of students and staff in the potential hazards of biologically derived materials. It is the PI's responsibility to ensure that all personnel reporting to them are current in all recommended training programs. All protocols involving work with potentially infectious agents must be submitted to the Biological Safety Committee (BSC) for review and approval. Principal investigators, laboratory instructors, laboratory managers or students must contact the Biological Safety Committee (BSC) if they are uncertain how to categorize, handle, store, treat or discard any biologically derived material. Contact the Department of Biological, Chemical and Physical Sciences office ( ) for BSC contact information. c. Laboratory Staff and Students Laboratory workers are responsible for planning and conducting each operation in accordance with recognized biological safety procedures and for developing and practicing good personal hygiene habits. They must: comply with safety guidelines and procedures required for the task(s) performed. report unsafe conditions to the PI, instructor or BSC. seek guidance from their PI, instructor or BSC when they are uncertain how to handle, store or dispose of any potentially infectious agents and biohazards. d. Institutional Biological Safety Committee The Roosevelt University Biological Safety Committee (BSC) minimally consists of a Biological Safety Officer for each campus. Additional faculty members will be added to the committee as needed. The BSC fulfills the following roles: monitors compliance with University safety policies and procedures regarding potentially infectious agents and biohazards, including laboratory inspections assists instructors, PIs and laboratory personnel in the selection of safe laboratory practices, equipment and controls provides technical guidance to personnel on matters related to biological laboratory safety develops and conducts appropriate training programs to promote techniques for the safe handling and disposal of potentially infectious agents and biohazards materials approves the use of potentially infectious agents and biohazards by PIs and instructors, and sets safety criteria for the handling of those agents investigates all reported accidents which may result in personnel or environmental exposure to infectious agents or biohazards ensures the off-site treatment of infectious wastes, in conjunction with the Laboratory Managers 99
99 responds to emergencies involving infectious agents and biohazards coordinates safety trainings and other safety implementation activities with the RU Environmental, Health & Safety Committee, the EHS Coordinator and the Chemical Safety Officers. The BSC has the responsibility for reviewing and approving all proposals, activities, and experiments involving an organism or product of an organism that presents a risk to humans (see Approval of Use of Biohazardous Materials below). BSC review is conducted in accordance with the guidance and requirements of National Institutes of Health (NIH), the Centers for Disease Control (CDC), and the Roosevelt University policies specified in the RU Biological Safety Manual. All PIs have an obligation to be closely familiar with health and safety guidelines applicable to their work and to adhere to them. C. Biosafety Definitions 1. Biohazards "Biohazardous agent" means an agent that is biological in nature, capable of self-replication, and has the capacity to produce deleterious effects upon biological organisms. Biohazardous agents include, but are not limited to, bacteria; fungi; viruses; rickettsiae; chlamydia; prion, parasites; recombinant products; allergens; primary and cultured human and animal cells and the potentially biohazardous agents these cells may contain; infected clinical specimens; tissue from experimental animals; plant viruses, bacteria and fungi; toxins; and other biohazardous agents as defined in laws, regulations or guidelines. Biohazardous material means any material that contains or has been contaminated by a biohazardous agent. 2. Bloodborne Pathogens All occupational exposure to blood or other potentially infectious materials is regulated under the Occupational Safety and Health Administration (OSHA) Bloodborne Pathogens Standard, 29 CFR Occupational exposure means reasonably anticipated skin, eye, mucous membrane, or parenteral contact with blood or other potentially infectious materials that may result from the performance of an employee's duties. As defined in the standard, blood means human blood, human blood components, and products made from human blood. Other potentially infectious materials means the following human body fluids: semen, cell lines, vaginal secretions, cerebrospinal fluid, synovial fluid, pleural fluid, pericardial fluid, peritoneal fluid, amniotic fluid, saliva in dental procedures, any body fluid that is visibly contaminated with blood, and all body fluids in situations where it is difficult or impossible to differentiate between body fluids; any unfixed tissue or organ. 3. Antigens 100
100 Antigens are substances that can induce a detectable immune response. Proteins are usually the most potent antigens. In order to be immunogenic, a substance must be recognized as "foreign". This is why reactions to human environmental proteins (e.g., skin scales) are rare. Airborne antigen exposure can result in allergic rhinitis, allergic asthma, or hypersensitive pneumonitis. Contact sensitizations include conjunctivitis, dermatitis, or hives. Occupational antigens may produce tolerable or easily treatable symptoms or may not be perceived as being related to work. Allergic reactions may be induced after less than one year to several years after initial exposure. Hypersensitivity pneumonitis can occur after the inhalation of particles below the sizes of 2-3 microns. Sensitized individuals may subsequently respond to very low levels of environmental antigens. Bacteria, fungi, and protozoa can release antigens in a size range and concentration that can produce hypersensitivity pneumonitis. Intact bacteria and small fungus spores can penetrate the lower airways. In addition, soluble antigens from most organisms can become airborne when substrates on which they are growing are disturbed and cause sensitization. Examples of hypersensitivity pneumonitis include farmer's lung, furrier's lung, ventilation pneumonitis, and suberosis. Allergic rhinitis and allergic asthma are often induced after several years of low exposure to some antigens. Once sensitized, people may respond only to relatively high levels of environmental antigen. Particle size is relatively unimportant as upper airway deposition allows antigens to diffuse slowly (often causing delayed symptoms) while small particle antigens may cause immediate reaction. The most effective control measures to prevent allergies from developing in employees are to prevent or minimize exposures to potential allergens. The use of laboratory fume hoods and biological safety cabinets can serve as effective containment devices for allergens. Use of ventilation systems and filtration devices can act to keep exposures down. Good housekeeping (including wet methods), personal hygiene, and laboratory techniques can serve to keep dust from becoming airborne. Use of dust/mist/fume respirators approved by National Institute of Occupational Safety and Health (NIOSH), either single-use or with disposable filters, should be used where short, intermittent high exposures are otherwise unavoidable. There is a dose relationship that affects the rate of employees becoming sensitized, and once sensitized, the worker must essentially avoid exposure. Therefore, employing means to keep exposures low, even where no complaints have been made, can decrease the probability an employee will develop an allergic reaction in the future. 4. Recombinant DNA Recombinant DNA (rdna) is either (i) DNA constructed in vitro from separate DNA segments that can replicate and/or express a biologically active polynucleotide or polypeptide in vivo, or (ii) synthetic DNA that has the potential of generating a hazardous product in vivo. See section F below for classifications and guidelines for the use of rdna. 101
101 D. Biosafety Training A comprehensive biological safety training program will ensure that all laboratory personnel who may come in contact with biohazardous materials will be trained in their safe use and handling. 1. Documentation Biosafety Training Biosafety training will be offered to personnel who work with BSL-2 and BSL-3 organisms before they begin in the laboratory. Personnel should receive training by their primary supervisor (Lab Manager or professor) and should include, at minimum: 1. Good laboratory practices 2. Specific information on the risks, hazards, precautions, and procedures of working with the organisms being used 3. Specific information on the risks, hazards, and procedures in the BSL-2 or BSL-3 laboratory in general Training will be offered in person and online, as applicable, and must be completed annually by all personnel who work with biohazardous materials. Recommended training for working in BSL-2 or BSL-3 laboratories: 1. How to properly work in biosafety cabinets and aseptic technique, as applicable 2. Bloodborne Pathogen training if applicable 3. Immunizations if applicable 4. Research laboratory safety training 5. Proper disposal of biohazardous wastes 6. Procedures for obtaining new biohazardous materials Biosafety Cabinet Operation: Basic operation: Procedures: 1. Determine items to be used in the cabinet. Never use dangerous chemicals in the cabinet, as they are not designed to protect the operator from dangerous fumes. 2. Determine PPE necessary for work, according to BSL of organisms and the nature of the work. 3. Wash hands and don PPE accordingly (at minimum, lab coat, gloves, and eye protection should be worn). 4. Turn off UV (germicidal) light and open the sash for the cabinet. Turn the cabinet on. 5. Allow the cabinet to run for 3-5 minutes before loading. 6. Spray down the cabinet with disinfectant (determined by organisms, typically IPA or EtOH) and wipe using side-to-side, back-to-front motions. 102
102 7. Disinfect items to be loaded and place in the cabinet. Do not put items on the front grill as this will disturb air flow and could cause contamination. 8. Always work with a clean area, a working area, and a contaminated area. Always move items from clean, through working, to contaminated, never from contaminated to clean. 9. Work in the cabinet with slow, deliberate movements to disturb the air flow as little as possible. In and out motions are less disturbing than side-to-side motions. 10. Always keep items (petri dishes, plates, tubes, etc.) covered with lids to prevent contamination. Never pass hands or items over open containers. 11. Clean spills appropriately and dispose of broken glass or biohazardous waste afterwards. 12. When finished in the cabinet, allow the cabinet to run for 3-5 minutes. 13. Clean the surfaces of all items with appropriate disinfectant and unload the cabinet. Discard waste appropriately. 14. Disinfect all surfaces of the hood, including the front grill. 15. Pull the sash down and turn on the UV (germicidal) lamp. The lamp should be left on for at least 15 minutes, up to 60 minutes. 16. Wash hands. Aseptic technique by Dr. Cornelius Watson Basic technique: Aseptic techniques are practiced to ensure both your safety and to insure that the culture you are working with is not cross-contaminated. Many of these techniques are also followed when working with any biohazard in the laboratory, and therefore should become second nature to you in time. It All Starts With You- The first thing you should do when anticipating working with microorganisms is to make sure you are wearing a lab coat and that you are wearing disposable gloves. Wearing both of these will help minimize cross-contamination. Then before leaving, make sure you wash your hands with antimicrobial hand-soap. Lab Bench Disinfection- Both before you begin, and again before you leave for the day, you should disinfect your lab bench with a disinfecting solution, usually located in the middle of every lab bench at Roosevelt. To do this, clear the surface of all object, apply a generous stream of disinfectant to the work surface, then with gloved hands, wipe the entire surface of the lab bench with a paper towel. If you have used the perfect amount of disinfectant, the bench will be still damp (but not wet) after wiping it with the paper towel. Allow the work area to air dry. This procedure destroys most cells and viruses. Note, however, if your experiment requires a DNA/RNA-free environment, additional precautions may be required. Your instructor will let you know if this is the case. Sterilization of Tools- The two primary types of tools you will be using in for this class are the inoculating loop and a glass rod, referred to as a hockey stick due to the similarity in shape. Inoculating loops are used to transfer both liquid and solid cultures to liquid media and to streak solid media (Figure 1). This instrument must be sterilized before each use. In order to do this you will need to have a Bunsen burner setup before you start. 1. First, pick up you inoculating loop and place the wire portion into the tip of the center flame where it is hottest. Start with the portion nearest the handle then slowly work 103
103 your way down to the loop. You do not need to hold it in the flame for long, only until the metal glows hot. 2. As you can imagine, the inoculating loop can get very hot, so not only do you need to make sure you re careful in handling it, but you also need to make sure it cools down enough before using, otherwise you ll cook your bacteria! If you re not sure if it is cool enough, carefully touch the loop to the underside of the lid of your sterile petri dish or to a side section of your agar to transfer the heat. If it s still too hot, you will either hear it sizzle or will see it melt part of your agar. In that event, wait a few seconds before trying again. 3. In between steps, you may want to put down your loop. After you sterilize it, rest it on the connector piece of your Bunsen burner until ready for use. This will help minimize additional contamination and serve as an indicator to others that it may still be too hot to touch. Figure 1: Example of an Inoculating Loop Hockey sticks (L-shaped rods) are used to spread inoculated liquid broth cultures onto solid media (Figure 2). 1. Pipet the instructed amount of culture on your plate (usually about 1:l) 2. Dip the short end of the hockey stick into the jar of ETOH, making sure that you keep the portion you are holding in an upward position. 3. Then move the hockey stick into the flame on your Bunsen burner and remove. 4. The alcohol will ignite and burn with a nearly invisible blue flame on the hockey stick while it s still burning off the alcohol. 5. Allow rod to cool. If you re not sure, touch the rod to the underside of the petri dish as you did with the inoculating loop. Figure 2: Glass Spreading Rod (aka Hockey Stick) BE CAREFUL NOT TO HOLD THE HOCKEY STICK SO THAT THE PORTION WITH THE ALCOHOL ON IT IS HIGHER THAN YOUR HANDTHIS MAY RESULT IN THE ALCOHOL DRIPPING ON YOUR HAND OR CLOTHES, WHICH ONCE BURNING COULD CAUSE INJURY Plate Spread and Plate Streak Techniques Plate Spread Technique: Liquid Culture to Solid Media 104
104 1. Label your Petri plate on the bottom in small print around the edge of the plate with your name, the date, the type of media you are using, the name of the organism you are culturing, and the temperature that you are incubating the culture at (Figure 3). Figure 3: Sample Petri Plate Labeling Format 2. Open your culture tube by removing the Morton closure with the same hand that you will pipet with. 3. Flame the opening of the culture tube by briefly passing the opening over an open flame- this helps pull air out of the test tube momentarily, thus reducing the number of contaminants that would otherwise enter into the tube. 4. Remove 1ul of culture (or whatever quantity you have been instructed to use) with a pipette 5. Flame your test tube again and place the Morton closure back onto it 6. Pipet the 1ul of solution directly onto the media in your Petri dish. When you do this step, only remove the cover of the Petri dish as much as necessary to transfer the culture. 7. Sterilize your hockey stick and let it cool 8. Spread the culture into the media using the hockey stick. A slight amount of pressure should be used when doing this to ensure that the culture is worked into the media. You ll know when to stop when you feel a slight difference in how the hockey stick is moving over the media (it will begin to feel dryer and present a little more resistance). 9. Place the lid back onto the Petri dish and turn upside down. All plates should be stored this way to further reduce contamination and to prevent any condensation or additional liquids that may be on the lid from dropping onto your culture and watering it down. 10. Wipe pipette with disinfectant and a paper towel and place back onto its stand Plate Streak Technique: Liquid Culture to Solid Media 1. Light Bunsen Burner 2. Label your petri plate as shown in Figure Flame your inoculating loop. 105
105 4. While holding the inoculating loop with your thumb and first two fingers pick up the test tube in your left hand and remove the cap with the last two fingers on your right hand. Keep the cap in your right hand and do not allow it to touch any surface. 5. Flame the mouth of your test tube 6. Insert the inoculating loop into your test tube and twist it around a few times to ensure adequate coverage. Try not to touch the sides of the test tube when inserting or removing the inoculating loop. 7. Flame the mouth of the test tube and place the cap back on it. 8. Streak the plate using the Quadrant Streak method (Figure 4). Note- there are many different streaking techniques for now your instructor will inform you of which one is appropriate for your experiment. Also, when applying the inoculating loop to the agar, do so lightly; you only want to sweep the surface of the agar, not penetrate it. The Quadrant Streak involves streaking a few strokes of full dilution culture followed by a series of progressive dilutions. First, take your loop with the culture on it and gently streak it back and forth in one section of the plate as shown in the below diagram- this is area (a). Next, sterilize your inoculating loop and let it cool, rotate your petri plate 90E and streak second area (b), touching the inoculating loop to the first area (a) one or two times. Sterilize your loop again, rotate your plate, and streak the third area (c), this time passing your loop once through the second area (b). Repeat this process one more time for a fourth area (d), using wide strokes as illustrated. Each area should touch the previous area only once or twice. 9. Sterilize your inoculating loop and allow it to cool before returning it to you drawer. Figure 4: Quadrant Streak Method Plate Streak Technique: Solid Isolated Colony to Solid Media 106
106 1. Light Bunsen Burner 2. Label your petri plate as shown in Figure Flame your inoculating loop. 4. Open the lid of the petri dish that contains the isolated colony that you want to culture. Ideal colonies will be isolated from other colonies on the plate. These colonies are often found in section (d) of a quadrant streaked plate. For plates that were spread, the isolated colonies may be anywhere on the plate. 5. Touch the cooled inoculating loop to the target colony. 6. Streak the plate using the Quadrant Streak method (Figure 4). 7. Close the lid on the streaked petri plate and turn upside down for incubation. Sterilize your inoculating loop and allow it to cool before returning it to your drawer Disposing of Biohazardous Waste Biohazardous waste is waste containing infectious or potentially infectious substances such as blood, bacterial cultures, liquid waste from cell cultures, etc. This may include sharps, PPE, lab plastics, etc. Sharps: o Biohazardous sharps (any material capable of puncturing, abrading, and cutting the skin) should be disposed of in leak-proof, rigid, tightly-sealed, punctureresistant containers labeled with the biohazard symbol. o Should never go into the regular trash for any reason Other biohazardous waste: o Should be collected in red (orange) biohazard bags. o Full biohazard bags may await autoclaving in a labeled and leak-proof container, but must be autoclaved before final disposal. o The autoclave should be checked regularly for proper functioning. Obtaining New Biohazardous Materials Roosevelt currently only has facilities for BSL-1 and -2 work. BSL-3 is discouraged and will require changes to the facility. Lab manager approval is required for all new organisms, and safety training with the new organism is required. All training should be done by the lab manager or the instructor. 1. Check risk group and recommended biosafety level of desired organism (only Risk Group 1 and 2 are currently allowed at Roosevelt) 2. Determine if the organism is necessary and if a lower-risk organism can be substituted. 3. Submit for lab manager approval a. Lab manager will check requirements for organism b. If appropriate, organism can be ordered 4. Training will be conducted by lab manager or instructor. Students are required to have training with a new organism to ensure proper safety precautions are used. 2. Tutorials 107
107 A biological safety training PowerPoint study guide is on the RU Website: 3. Just-in-Time Training The specific health hazards related to the biohazardous agents used in the work area must be reviewed prior to beginning work with these agents. Measures employees can take to protect themselves from these hazards, including specific procedures, emergency procedures, and personal protective equipment to be used must be reviewed. Note: A Certification of Hazard Assessment should be posted in the work area identifying these hazards. This certification of hazard assessment should be reviewed at least annually and updated anytime a new task which presents a hazard is introduced into the lab. 4. Regular Training Seminars All Instructors and Teaching Assistants who will be using potentially infectious agents and biohazards must have training from the BSC, and refresh this training every two years. Biology teaching assistants must also complete the Environmental, Health and Safety Committee training annually, and review the Chemical Hygiene Plan. Documentation: Training required by the Biological Safety Program should be documented using the form at the beginning of this publication. Group training can be documented by attaching an attendance sheet to the tear-out form. Copies of either form should be kept in each work area or department. Student training should be documented in the same fashion. E. Biohazardous Materials 1. Approval for use of Biohazardous Materials The Biological Safety Committee (BSC) has the responsibility for reviewing and approving all proposals, activities, and experiments involving an organism or product of an organism that presents a risk to humans. This includes, but is not limited to, work with potential pathogens, work with human clinical samples and primary cell lines and work with DNA from pathogenic organisms. In general, the use of infectious agents in instructional laboratories is discouraged, and the use of infectious agents from Biosafety Risk Groups 3 or 4 is not allowed. Experiments involving human gene transfer, generation or crossing of transgenic animals and the use or generation of recombinant DNA (rdna, plant or animal) must be registered with, reviewed and approved by the BSC, as mandated by the National Institutes of Health Recombinant DNA Guidelines. While certain rdna protocols are exempt from the Guidelines, a determination of this 108
108 exemption may only be made by the Chair of the BSC. Additionally, the BSC reviews work with potential animal or human pathogens, oncogenic viruses, and other potentially infectious agents. The BSC convenes as a group semi-annually or more frequently as needed to fulfill its responsibilities. BSC review is conducted in accordance with the guidance and requirements of National Institutes of Health (NIH), the Centers for Disease Control (CDC), and the Roosevelt University policies specified in the RU Biological Safety Manual. All PIs and Instructors have an obligation to be closely familiar with health and safety guidelines applicable to their work and to adhere to them. All students or Teaching Assistants involved in such work must be adequately trained by the BSC and the supervising faculty member. 2. Hazard Identification a. Labels Laboratory Managers, Instructors, PIs and Supervisors must ensure labels on incoming containers of biohazardous agents are not removed or defaced. They must also ensure that laboratory containers of biohazardous agents are labeled. Laboratory containers, including bottles, flasks, sample vials, waste containers, etc., must be marked, labeled or coded in all cases. This will aid in preventing any confusion concerning agent identification. The label should be legible, dated, and should identify the owner of the agent. If codes, acronyms, formulae, or abbreviations are used, post a legend/key near the inside of the entrance to the room. Standard abbreviations and formulae should be used whenever possible. b. Laboratory, Storage and Waste Identification Laboratories in which biohazardous materials are used shall be identified by placing the standard orange or red Biohazard symbol on all entrance doors; cold rooms, refrigerators, freezers or other places where biohazardous materials are stored shall be similarly labeled. All waste containers or receptacles used for biohazardous materials shall also have the standard biohazard symbol prominently displayed. c. Hazard Disposal All biohazardous wastes must be disposed of in a safe and legal manner. In most cases this will consist of sterilization (usually by autoclaving). No biohazardous materials should go down the sinks or be placed in the trash or the glass disposal bins until they have be sterilized or appropriately decontaminated. All waste materials awaiting decontamination or sterilization must be labeled. See the Guidelines for specific materials below. 109
109 d. Containment The term "containment" is used in describing safe methods for managing biohazardous agents in the laboratory environment where they are being handled or maintained. Primary containment, i.e., the protection of personnel and the immediate laboratory environment from exposure to biohazardous agents, is provided by good microbiological technique and the use of appropriate safety equipment. The most important element of containment is strict adherence to standard microbiological practices and techniques. Persons working with infectious agents or infected materials must be aware of potential hazards, and must be trained and proficient in the practices and techniques required for handling such material safely. The Instructor, PI or laboratory supervisor is responsible for providing or arranging for appropriate training of personnel. The use of vaccines may provide an increased level of personal protection. Secondary containment, i.e., the protection of the environment external to the laboratory from exposure to biohazardous agents, is provided by a combination of facility design and operational practices. The purpose of containment is to reduce exposure of laboratory workers and other persons to, and prevent escape into the outside environment of, potentially biohazardous agents. The three elements of containment include laboratory practice and technique, safety equipment, and facility design. F. Safety Equipment: Primary Barriers 1. Personal Protective Equipment (PPE) Safety equipment also includes items for personal protection such as gloves, coats, gowns, shoe covers, boots, respirators, face shields, and safety glasses. These personal protective devices are often used in combination with biological safety cabinets and other devices which contain the agents, animals, or materials being used. In some situations in which it is impractical to work in biological safety cabinets, personal protective devices may form the primary barrier between personnel and biohazardous materials. Examples of such activities include certain animal studies, animal necropsy, production activities, and activities relating to maintenance, service, or support of the laboratory facility. Personal Protective Equipment (PPE), including gloves, must be used when using infectious agents from Biosafety Risk Group 2 or above. 2. Biological Safety Cabinets Safety equipment includes biological safety cabinets and a variety of enclosed containers. The biological safety cabinet is the principal device used to provide containment of aerosols generated by many microbiological procedures. Open-fronted Class II biological safety cabinets are partial containment cabinets that offer significant levels of protection to laboratory personnel and to the environment when used with good microbiological techniques. The gas-tight Class III biological safety cabinet provides the highest attainable level of protection to personnel and the environment. 110
110 Users of biohazardous agents must ensure fume hoods, biological safety cabinets, and other protective equipment are adjusted and functioning properly prior to initiating an activity requiring their use. Physical Facilities will ensure fume hood and biological safety cabinet performance is periodically evaluated and repairs are made when necessary. The Laboratory Manager will keep records of these tests and repairs. 3. Safety Equipment: Secondary Barriers The design of a facility is important in providing a barrier to protect those working inside and outside the laboratory and to protect people or animals in the community from infectious agents which may be accidentally released from the laboratory. Facilities must be commensurate with the laboratory's function and the recommended biosafety level for the agent being manipulated. The secondary barrier(s) needed will depend on the risk of transmission of specific agents. Roosevelt University laboratory instruction and research generally involves only Biosafety Levels 1 and 2. Secondary barriers in these laboratories include separation of the laboratory work area from public access (with lockable doors), availability of a decontamination facility (e.g., autoclave), hand washing facilities and eyewash stations. All laboratory surfaces should be easy to clean and decontaminate, without carpets. All bench tops should be impervious to water, heat-resistant and chemical-resistant. Any chair or stools in the laboratory should not contain porous surfaces in case of spills. Adequate lighting, without glare, is necessary in all work areas. G. Routes, Infection, and Exposures Exposure and subsequent infection of an individual with a biohazardous agent can occur by several routes, i.e., aerosol inhalation, splash, animal bites, sharps, and similar situations where direct contact can occur. 1. Aerosols Some of the laboratory operations which release a substantial number of droplets are almost trivial in nature, such as breaking bubbles on the surface of a culture as it is stirred, streaking a rough agar plate with a loop, a drop falling off the end of a pipette, inserting a hot loop into a culture, pulling a stopper or a cotton plug from a bottle or flask, taking a culture sample from a vaccine bottle, opening and closing a Petri dish in some applications, or opening a lyophilized culture, among many others. Most of these only take a second or so and are often repeated many times daily. Other more complicated procedures might be considered more likely to release organisms into the air, such as grinding tissue with a mortar and pestle, conducting an autopsy on a small animal, harvesting infected tissue from animals or eggs, intranasal inoculation of small animals, opening a blender too quickly, etc. The possibility of aerosol production should always be considered while working with infectious organisms. 111
111 2. Contact The control of potential exposure by the contact route requires that procedures be conducted in a manner that avoids contamination of body or work surfaces. This is accomplished through the use of gloves and other personal protective clothing, protection of work surfaces with appropriate absorbent disposable covering, use of care in the performance of procedures, and cleaning and disinfecting work surfaces. Procedures where exposure via direct contact may occur include: decanting of liquids, pipetting, removal of screw caps, vortex mixing of unsealed containers, streaking agar surfaces, and inoculation of animals. It should also be recognized that dispersal of contaminants to other surfaces can occur by their transfer on the gloves of the laboratory worker, by the placement of contaminated equipment or laboratory ware, by the improper packaging of contaminated waste, and by placement of personal property (cell phones and laptops) on the lab bench. 3. Oral Mouth pipetting is prohibited. Mechanical pipetting devices are required. Indirect oral exposures can be avoided through the use of the personal hygienic practice of regular hand washing, no eating or drinking in the work area, and by not placing any objects, including fingers and pens, into the mouth. The wearing of a N-95 dust and vapor mask or face shield will protect against the splashing of biohazardous material into the mouth. 4. Splash The wearing of a face shield, safety glasses, or goggles will protect workers against splashing biohazardous material into the eyes. 5. Sharps The single procedure that presents the greatest risk of exposure through inoculation is the use of a needle and syringe. These are used principally for the transfer of materials from diaphragmstoppered containers and for the inoculation of animals. Their use in the transfer of materials from diaphragm-stoppered containers can, in addition, result in the dispersal of biohazardous material onto surfaces and into the air. Depending upon the route of inoculation of animals, the use of a needle and syringe may also result in the contamination of the body surfaces. Because of the imminent hazard of self-inoculation, the use of the needle and syringe should be limited to those procedures where there is no alternative, and then the procedure should be conducted with the greatest of care. Inoculation can also result from animal bites and scratches. 6. Animal Exposure Both research and non-research animals have the potential to cause injury, transmit zoonotic disease, and/or cause allergic reaction to those who have contact. These animal hazards can 112
112 occur by either direct contact from handling an animal or just by being in close proximity, i.e., working or passing through an animal housing room. Understanding routes of disease transmission, disease or allergy signs and symptoms, personal protective equipment (PPE), waste handling, and emergency contacts is very important. H. Classifications of Biological Risks 1. Risk Groups Infectious agents may be classified into risk groups based on their relative hazard. The table below, which was excerpted from the NIH Recombinant DNA Guidelines, presents the "Basis for the Classification of Biohazardous Agents by Risk Group." Risk Group 1 (RG1) Risk Group 2 (RG2) Risk Group 3 (RG3) Risk Group 4 (RG4) Agents that are not associated with disease in healthy adult humans Agents that are associated with human disease which is rarely serious and for which preventive or therapeutic interventions are often available Agents that are associated with serious or lethal human disease for which preventive or therapeutic interventions may be available (high individual risk but low community risk). Work with Risk Group 3 agents is discouraged at Roosevelt University, especially in teaching laboratories. Agents that are likely to cause serious or lethal human disease for which preventive or therapeutic interventions are not usually available (high individual risk and high community risk). Work with Risk Group 4 agents is prohibited at Roosevelt University. 2. Biosafety Levels CDC describes four biosafety levels (BSLs) which consist of combinations of laboratory practices and techniques, safety equipment, and laboratory facilities. Each combination is specifically appropriate for the operations performed, the documented or suspected routes of transmission of the infectious agents, and for the laboratory function or activity. The recommended biosafety level for an organism represents the conditions under which the agent can be ordinarily handled safely. When specific information is available to suggest that virulence, pathogenicity, antibiotic resistance patterns, vaccine and treatment availability, or other factors are significantly altered, more (or less) stringent practices may be specified. Biological Safety Level 1 (BSL-1) -- is appropriate for work done with defined and characterized strains of viable microorganisms not known to cause disease in healthy adult humans. It 113
113 represents a basic level of containment that relies on standard microbiological practices with no special primary or secondary barriers recommended, other than a sink for hand washing. Biological Safety Level 2 (BSL-2) -- is applicable to work done with a broad spectrum of indigenous moderate-risk agents present in the community and associated with human disease of varying severity. Agents can be used safely on the open bench, provided the potential for producing splashes or aerosols is low. Primary hazards to personnel working with these agents relate to accidental percutaneous or mucous membrane exposures or ingestion of infectious materials. Procedures with high aerosol or splash potential must be conducted in primary containment equipment such as biosafety cabinets. Primary barriers such as splash shields, face protection, gowns and gloves should be used as appropriate. Secondary barriers such as hand washing and waste decontamination facilities must be available. Biological Safety Level 3 (BSL-3) -- is applicable to work done with indigenous or exotic agents with a potential for respiratory transmission and which may cause serious and potentially lethal infection. BSL-3 work IS DISCOURAGED at Roosevelt University, especially in teaching laboratories. Primary hazards to personnel working with these agents (i.e., Mycobacterium tuberculosis, St. Louis encephalitis virus and Coxiella burnetii) include auto-inoculation, ingestion and exposure to infectious aerosols. Greater emphasis is placed on primary and secondary barriers to protect personnel in adjoining areas, the community and the environment from exposure to infectious aerosols. For example, all laboratory manipulations should be performed in a biological safety cabinet or other enclosed equipment. Secondary barriers include controlled access to the laboratory and a specialized ventilation system that minimizes the release of infectious aerosols from the laboratory. Biological Safety Level 4 (BSL-4) -- is applicable for work with dangerous and exotic agents that pose a high individual risk of life-threatening disease, which may be transmitted via the aerosol route and for which there is no available vaccine or therapy. All BSL-4 work IS PROHIBITED at Roosevelt University. Agents with close or identical antigenic relationship to Biosafety Level 4 agents should also be handled at this level. Primary hazards to workers include respiratory exposure to infectious aerosols, mucous membrane exposure to infectious droplets and auto-inoculation. All manipulations of potentially infected materials and isolates pose a high risk of exposure and infection to personnel, the community and the environment. Isolation of aerosolized infectious materials is accomplished primarily by working in a Class III biological safety cabinet or a full-body, air-supplied positive pressure personnel suit. The facility is generally a separate building or a completely isolated zone within a complex with specialized ventilation and waste management systems to prevent release of viable agents to the environment. 3. Vertebrate Animal Biosafety Levels There are four animal biosafety levels (ABSLs), designated Animal Biosafety Level 1 through 4, for work with infectious agents in mammals. The levels are combinations of practices, safety equipment and facilities for experiments on animals infected with agents that produce or may 114
114 produce human infection. In general, the biosafety level recommended for working with an infectious agent in vivo and in vitro is comparable. Animal Biological Safety Level 1 (ABSL-1) -- is suitable for work involving well characterized agents that are not known to cause disease in healthy adult humans, and that are of minimal potential hazard to laboratory personnel and the environment. Animal Biological Safety Level 2 (ABSL-2) -- is suitable for work with those agents associated with human disease. It addresses hazards from ingestion as well as from percutaneous and mucous membrane exposure. Animal Biological Safety Level 3 (ABSL-3) -- is suitable for work with animals infected with indigenous or exotic agents that present the potential of aerosol transmission and of causing serious or potentially lethal disease. ABSL-3 work IS DISCOURAGED at Roosevelt University, especially in teaching laboratories. Animal Biological Safety Level 4 (ABSL-4) -- is suitable for addressing dangerous and exotic agents that pose high risk of like threatening disease, aerosol transmission, or related agents with unknown risk of transmission. All ABSL-4 work IS PROHIBITED at Roosevelt University. Complete descriptions of all Biosafety Levels and Animal Biosafety Levels are outlined in the 4th edition of Biosafety in Microbiological and Biomedical Laboratories published by the U. S. Department of Health and Human Services (CDC/NIH). 4. Risk Assessment It is the responsibility of the principal investigator or laboratory director to conduct a risk assessment to determine the proper work practices and containment requirements for work with biohazardous material. The risk assessment process should identify features of microorganisms as well as host and environmental factors that influence the potential for workers to have a biohazard exposure. This responsibility cannot be shifted to inexperienced or untrained personnel. The principal investigator or laboratory director should consult with a Biological Safety Officers to ensure that the laboratory is in compliance with established guidelines and regulations. When performing a risk assessment, it is advisable to take a conservative approach if there is incomplete information available. Factors to consider when evaluating risk include the following: Pathogenicity The more severe the potentially acquired disease, the higher the risk. Salmonella, a Risk Group 2 agent, can cause diarrhea, septicemia if ingested. Treatment is available. Viruses such as 115
115 Ebola, Marburg, and Lassa fever cause diseases with high mortality rates. There are no vaccines or treatment available. These agents belong to Risk Group 4. Route of transmission Agents that can be transmitted by the aerosol route have been known to cause the most laboratory-acquired infections. The greater the aerosol potential, the higher the risk of infection. Work with Mycobacterium tuberculosis is performed at Biosafety Level 3 because disease is acquired via the aerosol route. Agent stability The greater the potential for an agent to survive in the environment, the higher the risk of potential infection. Consider factors such as desiccation, exposure to sunlight or ultraviolet light, or exposure to chemical disinfections when looking at the stability of an agent. Infectious dose Consider the amount of an infectious agent needed to cause infection in a normal person. An infectious dose can vary from one to hundreds of thousands of organisms or infectious units. An individual s immune status can also influence the infectious dose. Concentration Consider whether the organisms are in solid tissue, viscous blood, sputum, etc., the volume of the material and the laboratory work planned (amplification of the material, sonication, centrifugation, etc.). In most instances, the risk increases as the concentration of microorganisms increases. Origin This may refer to the geographic location (domestic or foreign), host (infected or uninfected human or animal), or nature of the source (potential zoonotic or associated with a disease outbreak). Availability of data from animal studies If human data is not available, information on the pathogenicity, infectivity, and route of exposure from animal studies may be valuable. Use caution when translating infectivity data from one species to another. Availability of an effective prophylaxis or therapeutic intervention 116
116 Effective vaccines, if available, should be offered to laboratory personnel in advance of their handling of infectious material. However, immunization does not replace engineering controls, proper practices and procedures and the use of personal protective equipment (PPE). The availability of post-exposure prophylaxis should also be considered. Medical surveillance Medical surveillance programs may include monitoring employee health status, participating in post-exposure management, employee counseling prior to offering vaccination, and annual physicals. Experience and skill level of at-risk personnel Laboratory workers must become proficient in specific tasks prior to working with microorganisms. Laboratory workers may have to work with non-infectious materials to ensure they have the appropriate skill level prior to working with biohazardous materials. Laboratory workers may have to go through additional training (e.g., HIV training, BSL-3 training, etc.) before they are allowed to work with materials or in a designated facility. Refer to the following resources to assist in your risk assessment: NIH Recombinant DNA Guidelines WHO Biosafety Manual Biosafety in Microbiological & Biomedical Laboratories, 5th ed. (CDC/NIH) I. Standard Biosafety Practices Biosafety Level 1 Biosafety Level 1 is suitable for experiments involving agents of no known or minimal potential hazard to laboratory personnel and the environment. The laboratory is not separated from the general traffic patterns of the building. Work is generally conducted on open bench tops. Special containment equipment is not required or generally used. Laboratory personnel have specific training in the procedures conducted in the laboratory and are supervised by a scientist with general training in microbiology or a related science. The following standard and special practices apply to agents assigned to Biosafety Level 1: a. Standard Microbiological Practices Laboratory doors are kept closed when experiments are in progress. Work surfaces are decontaminated daily and after any spill of biohazardous material. 117
117 All contaminated liquid or solid wastes are decontaminated before being disposed of or otherwise handled. Mechanical pipetting devices are used; mouth pipetting is prohibited. Eating, drinking, smoking, storing of food, and applying cosmetics are not permitted in the work area. Persons wash their hands after they handle biohazardous materials and animals and when they leave the laboratory. All procedures must be carefully performed to minimize the creation of aerosols. The wearing of laboratory coats, gowns, or uniforms is recommended. b. Special Practices Contaminated materials are to be decontaminated away from the laboratory and placed in a durable leak-proof container that is covered before being removed from the laboratory. An insect and rodent control program is in effect. c. Containment Equipment Special containment equipment is generally not required for manipulations of agents assigned to Biosafety Level 1. d. Laboratory Facilities The laboratory should be designed so that it is easily cleaned. Bench tops should be resistant to water, acids, alkalis, organic solvents, and moderate heat. Laboratory furniture should be sturdy and spaces between benches, cabinets, and equipment should be accessible for cleaning. Each laboratory should contain a hand washing sink. If the laboratory has windows that open, they should be fitted with fly screens. An autoclave for decontamination of infectious laboratory wastes should be available in the same building as the laboratory. Biosafety Level 2 Biosafety Level 2 is similar to Level 1 and is suitable for work involving agents that represent a moderate hazard for personnel and the environment. It differs in that: Laboratory personnel have specific training in handling pathogenic agents and are directed by the principle investigator; Access to the laboratory is limited when work is being conducted; and Certain procedures in which biohazardous aerosols are created need to be conducted in biological safety cabinets or other physical containment equipment. The following standard and special practices, safety equipment, and facilities apply to agents assigned to Biosafety Level 2: 118
118 a. Standard Microbiological Practices Access to the laboratory is limited or restricted by the supervisor when work with biohazardous agents is in progress. Laboratory doors are kept closed when experiments are in progress. Work surfaces are decontaminated at least once a day and after any spill of biohazardous material. All contaminated liquid or solid waste is decontaminated before being disposed or otherwise handled. Mechanical pipetting devices are used; mouth pipetting is prohibited. Eating, drinking, smoking, and applying cosmetics are not permitted in the work area. Food must be stored in cabinets or refrigerators solely intended for this purpose. Food storage cabinets and refrigerators should be located outside the work area. Persons wash their hands after handling biohazardous agents and animals, and when leaving the laboratory. All procedures are performed carefully to minimize the creation of aerosols. Laboratory coats, gowns, gloves, or uniforms must be worn in the laboratory. Laboratory clothing or gloves must not be worn in non-laboratory areas. Serological procedures with inactivated antigens known or shown to be free of residual infectivity can be performed on the open bench. b. Special Practices Contaminated materials to be decontaminated away from the laboratory are placed in a durable, leak-proof and properly labeled container, which is closed before being removed from the laboratory. Access to the laboratory is limited by the laboratory supervisor when experiments are being conducted. In general, persons who are at increased risk of acquiring infection or for whom infection may be unusually hazardous are not allowed in the laboratory or animal rooms. Persons at increased risk may include children, pregnant women, and individuals who are immunodeficient or immunosuppressed. The supervisor has the final responsibility for assessing each individual circumstance and determining who may enter or work in the area. The laboratory supervisor will assure that only persons who have been advised of the potential hazard and who meet any specific entry requirements (e.g., immunizations) enter the laboratory or animal rooms. When biohazardous materials or infected animals are present in the laboratory or animal rooms, a hazard warning sign incorporating the universal biohazard symbol is posted on all laboratory and animal room access doors and on such other items (i.e., equipment, containers, materials) as appropriate to indicate the presence of biohazardous agents. The hazard warning sign should identify the agent, list the name of the laboratory supervisor or other responsible person(s), and indicate any special requirements for entering the area (immunization, respirators, etc.). An insect and rodent control program is in effect. Animals not involved in the experiment being performed are not permitted in the laboratory. 119
119 All wastes from laboratories and animal rooms must be appropriately decontaminated before being disposed. The use of hypodermic needles and syringes is restricted to gavage, parenteral injection, and aspiration of fluids from laboratory animals and diaphragm vaccine bottles. Hypodermic needles and syringes are not used as a substitute for automatic pipetting devices in the manipulation of biohazardous fluids. Serial dilutions of biohazardous agents should not be done in diaphragm bottles with needles and syringes because of the hazards of autoinoculation and of aerosol exposure. Cannulas should be used instead of sharp needles whenever possible. If activities of lesser biohazard potential are conducted in the laboratory concurrently with activities requiring Biosafety Level 2, all activities will be conducted at Biosafety Level 2. Gloves will be worn for all procedures requiring the handling of biohazardous materials or infected animals. If feasible, hold small laboratory mammals with restraint devices when they are receiving injections or otherwise being handled to provide additional protection. Serological procedures with inactivated antigens shown to be free of residual infectivity can be performed on the open bench. All spills, accidents, and overt or potential exposures to biohazardous materials must be immediately reported to the laboratory supervisor. A written record must be prepared and maintained. Appropriate medical evaluation, surveillance, and treatment must be provided. When appropriate, considering the agent(s) handled, baseline serum samples are collected from and stored for all laboratory and other at-risk personnel. Additional serum specimens may be collected periodically depending on the agents handled or the function of the facility. A safety or operations manual identifying known and potential hazards and specifying practices and procedures to minimize or eliminate such risks should be prepared or adopted. Personnel should be advised of special hazards and are required to follow standard practices and procedures. c. Containment equipment Biological safety cabinets (Class II) or other appropriate personal protective or physical containment devices are used whenever: Procedures with a high potential for creating biohazardous aerosols are conducted. These may include centrifuging, grinding, blending, vigorous shaking or mixing, sonic disruption, opening containers of biohazardous materials whose internal pressures may be different from ambient pressures, inoculating animals intranasally, and harvesting infected tissues from animals or eggs. High concentrations or large volumes of biohazardous agents are used. Such materials may be centrifuged in the open laboratory if sealed heads or centrifuge safety cups are used and if they are opened only in a biological safety cabinet. d. Laboratory facilities The laboratory should be kept clean. 120
120 Bench tops should be impervious to water and resistant to acids, alkalis, organic solvents, and moderate heat. The use of plastic-backed absorbent toweling over work surfaces facilitates clean up and minimizes aerosols from spills. Laboratory furniture should be sturdy, and spaces between benches, cabinets, and equipment should be accessible for cleaning. Each laboratory should contain a hand washing sink, preferably foot or elbow operated. If the laboratory has windows that open, they should be fitted with fly screens. An autoclave for decontamination of biohazardous laboratory wastes should be available in the same building with the laboratory. Biosafety Level 3 Biosafety Level 3 is suitable for experiments involving agents of high potential risk to personnel and the environment. BSL-3 work is discouraged at Roosevelt University, especially in teaching laboratories. Laboratory personnel must have specific training in handling pathogenic and potentially lethal agents and must be supervised by competent scientists who are experienced in working with these agents. Access to the laboratory is controlled by the supervisor. The laboratory must have special engineering and design features and physical containment equipment and devices. All procedures involving the manipulation of biohazardous material are conducted within biological safety cabinets or other physical containment devices or by personnel wearing appropriate personal protective clothing and devices. The following standard and special practices apply to agents assigned to Biosafety Level 3: a. Standard microbiological practices Laboratory doors are kept closed when experiments are in progress. Work surfaces are decontaminated at least once a day and after any spill of biohazardous material. All contaminated liquid or solid wastes are decontaminated before disposal or handling. Mechanical pipetting devices are used; mouth pipetting is prohibited. Eating, drinking, smoking, storing food, and applying cosmetics are not permitted in the work area. Persons wash their hands when they leave the laboratory. All procedures are conducted carefully to minimize the creation of aerosols. b. Special practices Access to the laboratory is controlled by the laboratory supervisor and is restricted to persons whose presence is required for program or support needs. Persons who are at increased risk of acquiring infection or for whom infection may be unusually hazardous are not allowed in the laboratory or animal rooms. Persons at increased risk may include children, pregnant women, and individuals who are immunodeficient or immunosuppressed. The supervisor has the final responsibility for assessing each individual circumstance and determining who may enter or work in the area. 121
121 The laboratory supervisor will assure that only persons who have been advised of the potential biohazard, meet any specific entry requirements (e.g., immunization, if available), and comply with all entry and exit procedures may enter the laboratory or animal rooms. When biohazardous materials or infected animals are present in the laboratory or animal rooms, a hazard warning sign incorporating the universal biohazard symbol is posted on all laboratory and animal-room access doors and on such other items (i.e., equipment, containers, materials) as appropriate to indicate the presence of biohazardous agents. The hazard warning sign should identify the agent, list the name of the laboratory supervisor or other responsible person(s), and indicate any special conditions of entry into the area (immunizations, respirators, etc). All activities involving biohazardous materials are conducted in biological safety cabinets or other physical containment devices. No work in open vessels is conducted on the open bench. The work surfaces of biological safety cabinets and other containment equipment are decontaminated when an experiment is finished. The use of plastic-backed paper toweling on non-perforated work surfaces within biological safety cabinets facilitates clean-up following the completion of activities. An insect and rodent control program is in effect. Laboratory clothing that protects street clothing (e.g., solid-front or wrap-around gowns, scrub suits, coveralls, etc.) is worn in the laboratory. Front-button laboratory coats are unsuitable. Laboratory clothing is not worn outside the laboratory and is decontaminated before being laundered. Gloves are worn when handling biohazardous materials or animals. Gloves should be removed aseptically and autoclaved with other laboratory wastes before being disposed of. Molded surgical masks or respirators are worn in rooms containing infected animals. Animals and plants not related to the experiment being conducted are not permitted in the laboratory. All laboratory and animal room waste is decontaminated before being disposed of or reused. Vacuum lines are protected with high-efficiency particulate air (HEPA) filters and liquid traps. The use of hypodermic needles and syringes is restricted to gavage, parenteral injection, and aspiration of fluids from laboratory animals and diaphragm vaccine bottles. Hypodermic needles and syringes are not used as a substitute for automatic pipetting devices in the manipulation of biohazardous fluids. Serial dilutions of biohazardous agents should not be done in diaphragm bottles with needles and syringes because of the hazards of autoinoculation and of aerosol exposure. Cannulas should be used instead of sharp needles. If activities of lesser biohazard potential are conducted in the laboratory concurrently with activities requiring Biosafety Level 3, all work will be conducted at Biosafety Level 3. Serologic procedures with inactivated antigens shown to be free of residual infectivity can be performed on the open bench. All spills, accidents, and overt or potential exposures to biohazardous materials must be immediately reported to the laboratory supervisor. A written report must be prepared and maintained. Appropriate medical evaluation, surveillance and treatment must be provided. Baseline serum samples should be collected and stored for all laboratory and other at-risk 122
122 personnel. Additional serum specimens may be collected periodically depending on the agents handled or the function of the laboratory. A safety or operations manual which identifies known and potential hazards and which specifies practices and procedures to minimize or eliminate such risks should be prepared or adopted. Personnel should be advised of special hazards and must read and follow required practices and procedures. c. Biosafety equipment Biological safety cabinets (Class II or III) or other physical containment devices are used for all procedures and manipulations involving biohazardous material. Activities requiring Biosafety Level 3 physical containment can be conducted in Biosafety Level 2 laboratories if: o o o All standard and special practices specified for the Biosafety Level 3 are followed, and All operations and procedures are contained in Class III biological safety cabinets, and Materials are removed from these cabinets only through an attached autoclave or in a non-breakable, sealed container that is passed through an attached disinfectant dunk tank or fumigation chamber. d. Laboratory facilities The laboratory is separated from areas that are open to unrestricted traffic flow within the building. Separation is provided by either a double-door change room and shower or an airlock or other access facility that requires passage through two sets of doors to enter the laboratory. Access to other laboratory area is designed to prevent entrance of free-living arthropods. The surfaces of walls, floors and ceilings are water resistant and can be easily cleaned. Openings in these surfaces are sealed or capable of being sealed to facilitate decontaminating the area. Bench tops are impervious to water and resistant to acids, alkalis, organic solvents, and moderate heat. Laboratory furniture is of simple, sturdy construction. A foot- or elbow-operated hand washing sink is provided near each laboratory exit door. Windows in the laboratory are closed and sealed. Access doors to the laboratory are self-closing and self- locking. An autoclave for decontamination of laboratory wastes is available preferably within the laboratory. Biohazardous wastes which must be removed to another area in the same building for decontamination must be held and transported in a covered, leak proof container. 123
123 An exhaust air ventilation system is provided. This system creates directional airflow that draws air into the laboratory through the entry area. The building exhaust system can be used for this purpose if the exhaust air is not recirculated to any other area of the building. Personnel must verify that proper directional airflow (into the laboratory) is achieved. However, air within the laboratory can be recirculated. The exhaust air from the laboratory is discharged directly to the outside or through the building exhaust system so that it is dispersed away from occupied buildings and air intakes. The exhaust air from the laboratory that does not come from the biological safety cabinet can be discharged to the outside without being treated. In laboratories that have supply air systems, the supply air and exhaust air systems are interlocked to assure inward (or zero) airflow at all times. The HEPA-filtered exhaust air from Class II biological safety cabinets or other primary containment devices is discharged directly to the outside or through the building's exhaust system. Exhaust air from these primary containment devices may be recirculated within the animal room if the cabinet is tested and certified at least every 12 months. If the HEPA-filtered exhaust air from Class II biological safety cabinets is discharged to the outside through the building exhaust system, it is connected to this system in a manner (e.g., thimble-unit connection) that avoids any interference with the air balance of the cabinets or building exhaust system. Animal Biosafety Level 1 a. Standard practices Doors to animal rooms are self-closing and are kept closed when experiments are in progress. Work surfaces are decontaminated following use or spills of biohazardous materials. Eating, drinking, smoking, and storing food are not permitted in animal rooms. Personnel wash their hands after handling viable cultures and animals and before leaving the animal room. All procedures are carefully conducted to minimize the creation of aerosols. An insect and rodent control program is in effect. b. Special practice Bedding materials from cages used for animals infected with agents transmissible to humans are decontaminated (preferably by autoclaving) before being discarded. Cages used for animals infected with agents transmissible to humans are washed and/or rinsed with water heated to at least 180 o F for at least 20 minutes. The wearing of laboratory coats, gloves, gowns or a uniform in the animal room is recommended. Coats and gloves worn in the animal room are not worn in the laboratory or in other animal housing areas. c. Biosafety equipment 124
124 Special containment equipment is generally not required for animals infected with agents assigned to Biosafety Level 1. d. Animal facilities The animal facility should be designed and constructed to facilitate cleaning and housekeeping. A hand washing sink is available in the animal facility. If the animal facility has windows that open, they are fitted with fly screens. It is recommended, but not required, that the animal facility be provided with inward directional airflow and that exhaust air be discharged to the outside without being recirculated to other rooms. Animal Safety Level 2 a. Standard practices Doors to animal rooms are self-closing and are kept closed when infected animals are present. Work surfaces are decontaminated after use or spills of biohazardous materials. Eating, drinking, smoking, and storing of food for human use are not permitted in animal rooms. Personnel wash their hands after handling cultures and animals and before leaving the animal room. All procedures are carefully performed to minimize the creation of aerosols. An insect and rodent control program is in effect. b. Special practices Cages are decontaminated, preferably by autoclaving, before being cleaned and washed. Surgical-type masks are worn by all personnel entering animal rooms housing non-human primates. Laboratory coats, gowns, or uniforms are worn while in the animal room. Protective clothing is not worn elsewhere. Access to the animal room is restricted by the laboratory or animal facility supervisor to personnel who have been advised of the potential hazard and whose presence is required when experiments are in progress. In general, persons who may be at increased risk of acquiring infection or for whom infection might be unusually hazardous are not allowed in the animal room. Persons at increased risk may include children, pregnant women, and individuals who are immunodeficient or immunosuppressed. The supervisor has the final responsibility for assessing individual circumstances and determining who may enter or work in the animal room. 125
125 The laboratory supervisor will assure that only persons who have been advised of the potential hazard and meet any specific requirements (e.g., immunization, if available) enter the animal room. Hazard warning signs incorporating the universal biohazard warning symbol are posted on access doors to animal rooms when materials containing or animals infected with agents assigned to Biosafety Level 2 or higher are present. The hazard warning sign should identify the agent(s) in use, list the name of the animal room supervisor or other responsible person(s) and indicate any special conditions of entry into the animal room (e.g., immunizations, respirators). Special care is taken to avoid contaminating skin with biohazardous material; gloves are worn when handling infected animals and when skin contact with biohazardous materials is unavoidable. All wastes from the animal room are appropriately decontaminated (preferably by autoclaving) before being disposed of. Infected animal carcasses are incinerated after being transported from the animal room in leak-proof, sealed containers. Hypodermic needles and syringes are used only for the parenteral injection or aspiration of fluids from laboratory animals and diaphragm bottles. Only needlelocking syringes or disposable syringe-needle units (i.e., the needle is integral to the syringe) are used for the injection or aspiration of biohazardous materials. Needles are not bent, sheared, replaced in the sheath or guard, or removed from the syringe following use. The needle and syringe are promptly placed in a puncture-resistant container and decontaminated, preferably by autoclaving, before being discarded or reused. If floor drains are provided, the drain traps are always filled with water. When appropriate, considering the agents handled, baseline serum samples from animal-care and other at-risk personnel are collected and stored. Additional serum samples may be collected periodically, depending on the agents handled or the function of the facility. c. Containment equipment Biological safety cabinets (Class II), other physical-containment devices, and/or personal protection devices (e.g., respirators, face shields) are used when procedures with a high potential for creating aerosols are conducted. These include necropsy of infected animals, harvesting of infected tissues or fluid from animals or eggs, intranasal inoculation of animals, and manipulation of high concentrations or large volumes of biohazardous materials. d. Animal facilities The animal facility is designed and constructed to facilitate cleaning and housekeeping. A hand washing sink is available in the room where infected animals are housed. If the animal facility has windows that open, they are fitted with fly screens. It is recommended, but not required, that the direction of airflow in the animal facility be inward and that exhaust air be discharged to the outside without being recirculated to other rooms. 126
126 An autoclave to decontaminate biohazardous laboratory waste is available in the same building that contains the animal facility. Animal Safety Level 3 ABSL-3 work is discouraged at Roosevelt University, especially in teaching laboratories. a. Standard practices Doors to animal rooms are self-closing and self-locking and are kept closed when work with infected animals is in progress. Work surfaces are decontaminated at least once a day or after spills of biohazardous materials. Eating, drinking, smoking, and the storing of food for human use are not permitted in the animal room. Personnel wash their hands after handling cultures or animals and before leaving the laboratory. All procedures are carefully performed to minimize the creation of aerosols. An insect and rodent control program is in effect. b. Special practices Cages are autoclaved before bedding is removed and before they are cleaned and washed. NIOSH approved respiratory protection devices are worn by personnel entering rooms that house animals infected with agents assigned to Biosafety Level 3. Wrap-around or solid-front gowns or uniforms are worn by personnel entering the animal room. Front-button laboratory coats are unsuitable. Protective gowns must remain in the animal room and must be decontaminated before being laundered. The supervisor or other responsible person limits access to the animal room only to personnel who have been advised of the potential hazard and who need to enter the room for program service purposes when infected animals are present. In general, persons who may be at increased risk of acquiring infection or for whom infection might be unusually hazardous are not allowed in the animal room. The laboratory supervisor or other responsible person will assure that only persons who have been advised of the potential hazard and meet any specific requirements (e.g., immunization, if available) may enter the animal room. Hazard warning signs incorporating the universal biohazard warning symbol are posted on access doors to animal rooms containing animals infected with or materials containing agents assigned to Biosafety Level 3. The hazard warning sign should identify the agent(s) in use, list the name and telephone number of the supervisor or other responsible person(s), and indicate any special conditions of entry into the animal room (e.g., the need for immunizations or respirators). 127
127 Personnel wear gloves when handling infected animals or biohazardous agents. Gloves are removed aseptically and autoclaved with other animal room waste before being disposed of or reused. All wastes from the animal room are autoclaved before being disposed. All animal carcasses are incinerated. Carcasses are transported from the animal room to the incinerator in leakproof, sealed containers. If floor drains are provided, the drain traps are always filled with water or a suitable disinfectant. Hypodermic needles and syringes are used only for gavage or parenteral injection or aspiration of fluids from laboratory animals and diaphragm bottles. Only needle-locking syringes or disposable syringe-needle units (i.e., the needle is integral to the syringe) are used. A needle should not be bent, sheared, replaced in the sheath or guard, or removed from the syringe following use. The needle and syringe should be promptly placed in a punctureresistant container and decontaminated, preferably by autoclaving, before being discarded or reused. When possible, cannulas should be used instead of sharp needles (e.g., gavage). If vacuum lines are provided, they are protected with HEPA filters and liquid traps. Boots, shoe covers, or other protective footwear, and disinfectant footbaths are available and used when indicated. c. Containment equipment Personal protective clothing and equipment and/or other physical containment devices are used for all procedures and manipulations of biohazardous materials or infected animals. Animals are housed in partial-containment caging systems, such as open cages placed in ventilated enclosures (e.g., laminar-flow cabinets), solid wall and bottom cages covered by filter bonnets or other equivalent primary containment systems. d. Animal facilities The animal facility is designed and constructed to facilitate cleaning and housekeeping and is separated from areas that are open to unrestricted personnel traffic within the building. Passage through two sets of doors is the basic requirement for entry into the animal room from access corridors or other contiguous areas. Physical separation of the animal room from access corridors or from other activities may also be provided by a double-door change room (showers may be included), airlock, or other access facility that requires passage through two sets of doors before entering the animal room. The interior surfaces of walls, floors, and ceilings are water resistant and easily cleaned. Penetrations in these surfaces are sealed or capable of being sealed to facilitate fumigation or space decontamination. A foot, elbow, or automatically operated sink for hand washing is provided near each animalroom exit door. Windows in the animal room are closed and sealed. 128
128 Animal room doors are self-closing and self-locking and are kept closed when infected animals are present. An autoclave for decontaminating wastes is available, preferably within the animal facility. Materials to be autoclaved outside the animal room are transported in a covered, leak-proof container. An exhaust-air ventilation system is provided. The system creates inward directional airflow that draws air into the animal room through the entry area. The building exhaust can be used for this purpose if the exhaust air is not recirculated to any other area of the building, is discharged to the outside, and is dispersed away from occupied areas and air intakes. Personnel must verify that the direction of the airflow is proper (i.e., into the animal room). The exhaust air from the animal room that does not pass through biological safety cabinets or other primary containment equipment can be discharged to the outside without being filtered or otherwise treated. The HEPA-filtered exhaust air from Class II biological safety cabinets or other primary containment devices is discharged directly to the outside or through the building's exhaust system. Exhaust air from these primary containment devices may be recirculated within the animal room if the cabinet is tested and certified at least every 12 months. If the HEPA-filtered exhaust air from Class II biological safety cabinets is discharged to the outside through the building exhaust system, it is connected to this system in a manner (e.g., thimble-unit connection) that avoids any interference with the air balance of the cabinets or building exhaust system. J. Recombinant DNA (rdna) Biosafety containment mechanisms applicable to organisms carrying recombinant DNA include: (i) a set of standard practices that are generally used in microbiological laboratories; and (ii) special procedures, equipment, and laboratory installations that provide physical barriers that are applied in varying degrees according to the estimated biohazard. In addition, experiments involving recombinant DNA lend themselves to a third containment mechanism, namely, the application of highly specific biological barriers. These include natural barriers that limit either the infectivity of a vector or vehicle (plasmid or virus) for specific hosts, or its dissemination and survival in the environment. Vectors, which provide the means for recombinant DNA and/or host cell replication, can be genetically designed to decrease, by many orders of magnitude, the probability of dissemination of recombinant DNA outside the laboratory. The first principle of containment is strict adherence to good microbiological practices. Consequently, all personnel directly or indirectly involved in experiments using recombinant DNA shall receive adequate instruction. At a minimum, these instructions include training in aseptic techniques and in the biology of the organisms used in the experiments so that the potential biohazards can be understood and appreciated. Any research group working with agents that are known or potential biohazards shall have an emergency plan that describes the procedures to be followed if an accident contaminates personnel or the environment. The Principal Investigator 129
129 shall ensure that everyone in the laboratory is familiar with both the potential hazards of the work and the emergency plan. Guidelines for the use of recombinant DNA in teaching and research applications are defined by the National Institutes of Health ( The NIH Guidelines ). The NIH OBA (Office of Biotechnology Activities) is an administrative arm responsible for carrying out the orders of the NIH Director with regard to recombinant DNA, genetic testing and xenotransplantation. An advisory committee is involved in establishing policies for each of these fields. For recombinant DNA the committee is called the Recombinant DNA Advisory Committee or "RAC". The NIH Guidelines classify uses of recombinant DNA according to the same risk assessment system used for other biohazards, namely four Risk Groups and four Biosafety Levels. The use of protective equipment, laboratory techniques and materials disposal and handling will be consistent with these Biosafety Levels. The full NIH Guidelines may be found at: Classification of Experiments Involving Recombinant DNA The NIH requires all labs working with recombinant DNA register with the Institutional Biosafety Committee (IBC). The guidelines distinguish among five kinds of registrations. The type depends on the potential hazard of the work. More hazardous means more approvals are needed. The five types are: Work that cannot begin until there is NIH and IBC approval. This is the most dangerous level and it is [TABOO] Work that cannot begin until there is IBC approval and RAC review. This tends to be sensitive and potentially dangerous. [WAIT AND WAIT]. Human Gene Transfer Studies are in this category. Work that cannot begin until there is IBC approval, there is usually a [WAIT]. Human Xenotransplantation Studies are in this category (this requirement comes from the FDA). Work can begin when IBC is notified [NO WAITING]. Work that is Exempt from NIH guidelines. No approval is needed but the work should be registered with IBC. [NO WAITING PLUS]. In the laboratories at Roosevelt University, most use of recombinant DNA will be exempt from the NIH Guidelines. The sections below, all excerpted from these guidelines, describe the last three categories in detail. WAIT (IBC approval needed before starting work with rdna) Studies in this category must be examined by IBC with an eye to recommending safe procedures and containment. The NIH Guidelines lists a number of rdna types according to their Risk Group. In general, the Risk Group determines the Biosafety Level needed: for instance a Risk Group 2 130
130 agent is usually studied in a BL2 or BL3-N (animal) lab. rdna work above BL1 can only be conducted at Roosevelt University with approval by the IBC. Some examples of work with recombinant DNA and organisms requiring IBC review include: Recombinant organisms cultured in volumes greater than 10 liters Pathogen hosts Pathogen DNA sources in non-pathogen hosts Animal virus DNA source into tissue culture Transgenic animal hosts Modified microorganisms into animals rdna into animals Whole plant studies involving exotic pathogens Genes coding for vertebrate toxins NO WAITING (investigators should notify IBC before work starts) Notification is necessary because must register all recombinant DNA studies must be registered with IBC and adhere to standards of containment. This category includes work conducted with LOW HAZARD rdna: Non-pathogenic prokaryotes or non-pathogenic lower eukaryotes (use BL1) Recombinant DNA with less than 1/2 of a eukaryotic viral genome (and no helper) used exclusively in tissue culture (BL1 recommended) Some host plants carrying recombinant DNA. NO WAITING PLUS (exempt rdna work in registered labs) Exempt from NIH guidelines means that work with these constructs need not be approved by IBC. However, the Roosevelt University IBC will keep records of all laboratory use of rdna, both exempt and non-exempt. Thus it is university policy to insist that instructors and researchers using any recombinant DNA register with IBC. This work can be done at BL1. Some exempt classes of DNA include: DNA vaccines encoding epitopes from microbiological sources are generally exempt from the NIH Guidelines, even in human studies. This unusual exemption is found in Appendix VI-A. Recombinant DNA outside of living or viral organisms Recombinant DNA that cannot replicate or express in vivo DNA from a single nonchromosomal or viral source The DNA source organism and the host organism are the same organism The DNA source organism and the host organism normally exchange DNA (organisms that normally exchange are listed in Appendix A) 131
131 The DNA that does not present a significant risk to health or the environment... The recombinant DNA is used exclusively in tissue culture and has < ½ eukaryotic viral genome. There are exceptions to this rule (Appendix C-I-A). Check with the Biosafety Officers Experiments using an E. coli host vector system in which the host does not contain conjugation proficient plasmids. There are some restrictions on the vectors used (Appendix C-II). BL1 containment is suggested Experiments with Saccharomyces host-vector systems. There are some restrictions (Appendix C-III). BL1 containment is suggested Experiments with Bacillus subtilis or licheniformis host-vector systems and in which reversion to spore formation is < There are some other restrictions (Appendix C-IV). BL1 containment is suggested. K. General Biological Laboratory Practices 1. Housekeeping Good housekeeping in laboratories is essential to reduce risks and protect the integrity of biological experiments. Routine housekeeping must be relied upon to provide work areas free of significant sources of contamination. Housekeeping procedures should be based on the highest degree of risk to which personnel and experimental integrity may be subjected. Laboratory personnel are responsible for cleaning laboratory benches, equipment and areas that require specialized technical knowledge. Additional laboratory housekeeping concerns include: Keeping the laboratory neat and free of clutter - surfaces should be clean and free of infrequently used chemicals, glassware and equipment. Access to sinks, eyewash stations, emergency showers and exits, and fire extinguishers must not be blocked. Proper disposal of chemicals and wastes - old and unused chemicals should be disposed of promptly and properly. Refer to OSU s Waste Disposal Guide for more information. Providing a workplace that is free of physical hazards - aisles and corridors should be free of tripping hazards. Attention should be paid to electrical safety, especially as it relates to the use of extension cords, proper grounding of equipment, avoidance of the creation of electrical hazards in wet areas. Remaining in compliance with RU s Chemical Hygiene Plan. All laboratory equipment needs to be cleaned and certified of being free of hazards before being released for repair or maintenance. 2. Pipets and Pipet Aids 132
132 Mouth pipetting is strictly prohibited. Mechanical pipetting aids must be used. Confine pipetting of biohazardous or toxic fluids to a biosafety cabinet if possible. If pipetting is done on the open bench, use absorbent pads or paper on the bench. Use the precautions on the next page. Always use cotton-plugged pipettes when pipetting biohazardous or toxic fluids. Never prepare any kind of biohazardous mixtures by suction and expulsion through a pipette. Biohazardous materials should not be forcibly discharged from pipettes. Use to deliver pipettes rather than those requiring blowout. Do not discharge biohazardous material from a pipette at a height. Whenever possible allow the discharge to run down the container wall. Place contaminated, reusable pipettes horizontally in a pan containing enough liquid disinfectant to completely cover them. Autoclave the pan and pipettes as a unit before processing them for reuse. Discard contaminated Pasteur pipettes in an appropriate size sharps container. When work is performed inside a biosafety cabinet, all pans or sharps containers for contaminated glassware should be placed inside the cabinet as well while in use. 3. Syringes and Needles Syringes and hypodermic needles are dangerous objects that need to be handled with extreme caution to avoid accidental injection and aerosol generation. Generally, the use of syringes and needles should be restricted to procedures for which there is no alternative. Do not use a syringe and needle as a substitute for a pipette. Use needle locking syringes or disposable syringeneedle units in which the needle is an integral part of the syringe. When using syringes and needles with biohazardous or potentially infectious agents: Work in a biosafety cabinet whenever possible. Wear gloves. Fill the syringe carefully to minimize air bubbles. Expel air, liquid and bubbles from the syringe vertically into a cotton pad moistened with a disinfectant. Needles should not be bent, sheared, replaced in the sheath or guard (capped), or removed from the syringe following use. If it is essential that a contaminated needle be recapped or removed from a syringe, the use of a mechanical device or the one-handed scoop method must be used. Always dispose of needle and syringe unit promptly into an approved sharps container. Do not fill sharps containers more than 2/3 full. Contact the Laboratory Manager for pick-up. 4. Loop Sterilizers and Bunsen Burners Sterilization of inoculating loops or needles in an open flame generates small particle aerosols which may contain viable microorganisms. The use of a shielded electric incinerator or hot bead 133
133 sterilizers minimizes aerosol production during loop sterilization. Alternatively, disposable plastic loops and needles may be used for culture work where electric incinerators or gas flames are not available or recommended. 5. Centrifuge Equipment Hazards associated with centrifuging include mechanical failure and the creation of aerosols. To minimize the risk of mechanical failure, centrifuges must be maintained and used according to the manufacturer s instructions. Users should be properly trained and operating instructions including safety precautions should be prominently posted on the unit. Aerosols are created by practices such as filling centrifuge tubes, removing supernatant, and suspending sediment pellets. The greatest aerosol hazard is created if a tube breaks during centrifugation. To minimize the generation of aerosols when centrifuging biohazardous material, the following procedures should be followed: Use sealed tubes and safety buckets that seal with O-rings. Before use, inspect tubes, O- rings and buckets for cracks, chips, erosions, bits of broken glass, etc. Do not use aluminum foil to cap centrifuge tubes because it may detach or rupture during centrifugation. Fill and open centrifuge tubes, rotors and accessories in a BSC. Avoid overfilling of centrifuge tubes so that closures do not become wet. After tubes are filled and sealed, wipe them down with disinfectant. Add disinfectant to the space between the tube and the bucket to disinfect material in the event of breakage during centrifugation. Always balance buckets, tubes and rotors properly before centrifugation. Do not decant or pour off supernatant. Use a vacuum system with appropriate in-line reservoirs and filters. (For more information, call EH&S) Work in a Biological Safety Cabinet when suspending sediment material. Use a swirling rotary motion rather than shaking. If shaking is necessary, wait a few minutes to permit the aerosol to settle before opening the tube. Small low - speed centrifuges may be placed in a Biological Safety Cabinet during use to reduce the aerosol escape. High-speed centrifuges pose additional hazards. Precautions should be taken to filter the exhaust air from vacuum lines, to avoid metal fatiguing resulting in disintegration of rotors and to use proper cleaning techniques and centrifuge components. Manufacturer s recommendations must be meticulously followed to avoid metal fatigue, distortion and corrosion. Avoid the use of celluloid (cellulose nitrate) tubes with biohazardous materials. Celluloid centrifuge tubes are highly flammable and prone to shrinkage with age. They distort on boiling and can be highly explosive in an autoclave. If celluloid tubes must be used, appropriate chemical disinfectants are necessary for decontamination. 6. Blenders, Ultrasonic Disrupters, Grinders and Lyophilizers 134
134 The use of any of these devices results in considerable aerosol production. Blending, celldisrupting and grinding equipment should be used in a BSC when working with biohazardous materials. Safety blenders, although expensive, are designed to prevent leakage from the bottom of the blender jar, provide a cooling jacket to avoid biological inactivation, and to withstand sterilization by autoclaving. If blender rotors are not leak-proof, they should be tested with sterile saline or dye solution prior to use with biohazardous material. The use of glass blender jars is not recommended because of the breakage potential. If they must be used, glass jars should be covered with a polypropylene jar to prevent spraying of glass and contents in the event the blender jar breaks. A towel moistened with disinfectant should be placed over the top of the blender during use. Before opening the blender jar, allow the unit to rest for at least one minute to allow the aerosol to settle. The device should be decontaminated promptly after use. 7. Lyophilizers and Ampoules Depending on lyophilizer design, aerosol production may occur when material is loaded or removed from the lyophilizer unit. If possible, sample material should be loaded in a BSC. The vacuum pump exhaust should be filtered to remove any hazardous agents or, alternatively, the pump can be vented into a Biological Safety Cabinet. After lyophilization is completed, all surfaces of the unit that have been exposed to the agent should be disinfected. If the lyophilizer is equipped with a removable chamber, it should be closed off and moved to a Biological Safety Cabinet for unloading and decontamination. Handling of cultures should be minimized and vapor traps should be used wherever possible. Opening ampoules containing liquid or lyophilized infectious culture material should be performed in a BSC to control the aerosol produced. Gloves must be worn. To open, nick the neck of the ampoule with a file, wrap it in disinfectant soaked towel, hold the ampoule upright and snap it open at the nick. Reconstitute the contents of the ampoule by slowly adding liquid to avoid making an aerosol of the dried material. Mix the container. Discard the towel and ampoule top and bottom as biohazardous waste. Ampoules used to store biohazardous material in liquid nitrogen have exploded causing eye injuries and exposure to the infectious agent. The use of polypropylene tubes eliminates this hazard. These tubes are available dust free or pre-sterilized and are fitted with polyethylene caps with silicone washers. Heat seal able polypropylene tubes are also available. 8. Laundry All personal protective clothing should be either discarded in the lab or laundered by the University at no cost to employees. Apparel contaminated with human blood or other potentially infectious materials should be handled as little as possible and needs to be collected in biohazard bags. Appropriate PPE must be worn by employees who handle contaminated laundry. 9. Decontamination and Disposal 135
135 All biohazardous materials and all contaminated equipment or apparatus should be sterilized before being washed and stored or discarded. Autoclaving is the preferred method. Each individual working with a biohazardous material is be responsible for its sterilization before disposal. Biohazardous materials should not be placed in autoclaves overnight in anticipation of autoclaving the next day. To minimize hazard to emergency response personnel, all biohazardous materials should be placed in an appropriately marked refrigerator or incubator, sterilized, or otherwise confined at the close of each workday. Special precautions should be taken to prevent accidental removal of material from an autoclave before it has been sterilized or the simultaneous opening of both doors on a double door autoclave. Dry hypochlorites, or any other strong oxidizing material, must not be autoclaved with organic materials such as paper, cloth, or oil: OXIDIZER + ORGANIC MATERIAL + HEAT = AN EXPLOSION All laboratory rooms containing biohazardous materials should designate two separate areas or containers labeled: BIOHAZARDOUS - TO BE AUTOCLAVED Or NON-INFECTIOUS - TO BE CLEANED All floors, laboratory benches, and other surfaces in buildings where biohazardous materials are handled should be disinfected as often as deemed necessary by the supervisor. After completion of operations involving plating, pipetting, centrifuging, and similar procedures with biohazardous materials, the surroundings should be disinfected. Floor drains should be flooded with water or disinfectant at least once each week to prevent dry traps and the release of sewer gases. Floors should be swept with push brooms only. The use of sweeping compound is recommended because of its effectiveness in limiting the generation of airborne organisms. Vacuum cleaners equipped with HEPA filtration may be used. In all infectious units, water used to mop floors should contain a disinfectant. Stock solutions of suitable disinfectants should be maintained in each laboratory for disinfection purposes. 10. Sterilization Procedure General criteria for sterilization of typical materials are presented below. It is advisable to review the type of materials being handled and to establish standard conditions for sterilization. 136
136 Treatment conditions to achieve sterility will vary in relation to the volume of material treated, its contamination level, the moisture content, and other factors. An autoclave that uses saturated steam under pressure has over the years become the generallyaccepted method for inactivation of all microbes. Operational standards require that the autoclave reach a temperature of not less than 121 C (250 F) for 30 minutes at 15 pounds per square inch pressure; or in accordance with manufacturer s directions. A variety of factors can affect the efficiency of an autoclave, therefore, when treating biohazardous wastes, it is recommended that 115 C be reached and maintained for a minimum of 20 minutes within the waste itself. Biohazard waste that has been autoclaved within these standards is considered to be no longer biohazardous and is considered solid waste for disposal purposes. It is the responsibility of the principal investigator for each lab that uses an autoclave to develop lab specific procedures for each material and autoclave/steam sterilizer for which they are responsible. The procedure must address each of the following: Time Temperature Pressure Type of waste Type of container(s) Closure on container(s) Pattern of loading Water content Maximum load quantity This standard operating procedure (SOP) outlines the elements that should be considered and included as appropriate in lab specific autoclave procedures. This lab procedure should also include a means to ensure that training, recordkeeping, and testing is conducted for each autoclave in their labs or used by their lab personnel. All personnel using autoclaves must be adequately trained by their PI or lab manager. Never allow untrained personnel to operate an autoclave. Each individual working with biohazardous materials is responsible for its proper disposition. a. Steam Autoclave Glassware: 121 o C (250 o F) for 30 min. Liquids: 121 o C (add minutes for crowded items): o Less than 500 milliliters (ml): 30 minutes o 500 ml 1 L: 40 minutes o 2 4 liters: 55 minutes o More than 4 liters: 60 minutes Trash: 121 o C for 1 hour Laundry: 121 o C for 30 minutes 137
137 Animals: 121 o C for 8 hours Bedding: 121 o C for 8 hours b. Recommended standard practices for using an autoclave are: Review the operator s manual for instructions prior to operating the unit. Different makes and models have unique characteristics. Never exceed the maximum operating temperature and pressure of the autoclave. Wear the appropriate personal protective equipment (safety glasses, lab coat and heatresistant gloves) when loading and unloading the autoclave. Be especially careful not to stand too close when opening an autoclave; often a pulse of hot steam escapes when the hatch is opened. Place glassware and test tube racks in an autoclave pan. Never place a sealed vessel in the autoclave. Loosen all screw caps. Vessels containing liquids should not be more than half full. Make sure your plastic container is suitable for autoclaving. Not all plastics can be autoclaved. Plastic types can be identified by looking for initials imprinted on the container bottom. In autoclave use: o Polypropylene (PP, recycle #5) o Polycarbonate (PC, no recycle number assigned) Do not use: o Polyethylene (PE, recycle #1) o High-density polyethylene (HDPE, recycle #2) If you're unsure about a new container, place it in an autoclave-safe container the first time. All waste and Petri plates should go in autoclave bags. Place autoclavable bags containing waste in a secondary containment vessel (autoclavable pan) to retain any leakage that might occur; never place autoclave bags directly on the autoclave chamber floor. The secondary containment vessel must be constructed of material that will not melt or distort during the autoclave process. (Polypropylene is a plastic capable of withstanding autoclaving but is resistant to heat transfer. Materials contained in a polypropylene pan will take longer to autoclave than the same material in a stainless steel pan). Do not fill autoclave bags more than ⅔ full, and make sure they are not packed tightly. Use heat-sensitive tape or another device to visually check that optimal temperatures have been achieved on each container that is processed. If biohazardous or medical waste is being processed, the biological indicator Bacillus stearothermophilus (e.g. the Prospore Self- Contained Biological Indicator, Raven Biological Laboratories, available through Fisher Scientific, Cat. # ) should be placed at the center of a load processed under standard operating conditions, at least monthly, to confirm the attainment of adequate sterilization conditions (see Autoclave Quality Assurance Program). Position autoclave bags with the neck of the bag taped loosely and leave space between items in the autoclave bag to allow steam penetration. Never place sealed bags or containers in the autoclave. Polypropylene bags are impermeable to steam and should not be twisted and taped shut. 138
138 To operate the autoclave: o Select the appropriate cycle: liquid cycle (slow exhaust) for fluids to prevent boiling over, dry cycle (fast exhaust) for glassware, fast and dry cycle for wrapped items. After the cycle is complete, allow liquid materials inside the autoclave to cool down for minutes prior to their removal to prevent boiling over. o Autoclaving items containing solvents, volatile or corrosive chemicals is prohibited. o Ensure that the pressure of the autoclave chamber is at zero before opening the door. Stand behind the autoclave door and slowly open it to allow the steam to gradually escape from the autoclave chamber after cycle completion. o Never leave an autoclave in operation unattended (do not start a cycle prior to leaving for the evening). o If operational problems occur they should be reported to the Lab Manager so that requests for repairs can be initiated. o Obtaining warranties and preventative maintenance plans are strongly recommended. Position autoclave bags with the neck of the bag taped loosely and leave space between items in the autoclave bag to allow steam penetration. Never place sealed bags or containers in the autoclave. Polypropylene bags are impermeable to steam and should not be twisted and taped shut. Recordkeeping is best maintained by the individual users of the autoclave. A user log should be attached to, or near, the autoclave and must be completed by operators for each sterilizing cycle. Date, time, temperature, pressure, contact time and operator must be recorded. This log must be kept by the Lab Manager for a period of not less than one year. Operators and the Lab Manager must maintain records and procedures specified for temperature monitoring and biological indicator monitoring. These records are also kept for a period of not less than one (1) year. c. Gas Sterilants Ethylene oxide gas- Sixteen-hour exposure to a concentration of 750 mg/liter at 30 to 60% relative humidity and at ambient temperatures (>70F). Paraformaldehyde- Sixteen-hour exposure to a concentration of 1.0 mg/liter at 40 to 60% relative humidity and at ambient temperatures (>70 F). d. Disinfectants Mercurials - Not recommended for general use; they have poor activity against vegetative bacteria and are useless as sporicides. Although the mercurials exhibit good activity against viruses (1:500 to 1:1000 concentration), they are toxic and therefore are not recommended. Quaternary Ammonium Compounds - These are acceptable as general use disinfectants to control vegetative bacteria and non-lipid-containing viruses. However, they are not active against bacterial spores at the usual concentrations (1:750). 139
139 Phenolic Compounds - These are recommended for the killing of vegetative bacteria including mycobacterium tuberculosis, fungi and lipid-containing viruses ( %). They are less effective against spores and non-lipid-containing viruses. Chlorine Compounds - These are recommended for certain disinfecting procedures provided the available chlorine needed is considered. Low concentrations of available chlorine ( ppm) are active against vegetative bacteria and most viruses. For bacterial spores, concentrations of approximately 2500 ppm are needed. The corrosive nature of these compounds, their decay rates and lack of residuals is such that they are recommended only in special situations. Iodophors - Although these show poor activity against bacterial spores, they are recommended for general use ( ppm). They are effective against vegetative bacteria and viruses. Their advantages are: Iodophors possess a wide spectrum of anti-microbial and antiviral activity. o Iodophors have a built-in indicator. If the solution is brown or yellow, it is still active. o Iodophors are relatively harmless to man. o Iodophors can be readily inactivated and iodophor stains can be readily removed with solutions of Na2S2O3 (sodium thiosulfate). Alcohols - In concentrations of 70 to 95%, alcoholic solutions are good general-use disinfectants but they exhibit no activity against bacterial spores. Formaldehyde Solutions - At concentrations of 8%, formalin exhibits good activity against vegetative bacteria, spores, and viruses. Activated Gluteraldehyde - Two percent solutions exhibit good activity against vegetative bacteria, spores, and viruses. Its use, however, must be limited and controlled because of toxic properties and damage to eyes. Formaldehyde-Alcohol - Solutions of 8% formalin in 70% alcohol are considered very good for disinfection purposes because of their effectiveness against vegetative bacteria, spores, and viruses. For many applications this is the disinfectant of choice. L. Disposal Procedures Biohazardous waste disposal must be handled in accordance with procedures established by the BSC. Contact the Laboratory Manager for specific information on disposal procedures. These procedures include Universal Precautions, sterilization and disinfection, containment, storage, training, and record keeping. 1. Sharps Handling Procedures Sharps are items that are capable of puncturing, cutting, or abrading the skin, i.e., broken plastic or broken glassware, glass or plastic pipettes, scalpels, razor blades, needles, hypodermic needles, etc. a. Do not place any sharps into the regular trash. b. Needles and razor blades must be disposed of in puncture proof plastic containers. 140
140 c. Clean broken glass should be collected in a cardboard box or other strong, secure disposable container. When you want the box removed, tape it shut and label it SHARP OBJECTS/GLASS - DISCARD. It is prudent to affix a safe for disposal sticker to the box as well. d. Sharps and/or materials contaminated with human blood or blood products, or with any agent capable of being infectious to humans, must be treated and disposed of as category 1 infectious waste. This includes: o Proper processing (disinfection and disposal) in accordance with the procedures issued by the BSC. Note: Disinfection is accomplished by either chemical means (bleach) or by autoclave. o Storage in a secure area that restricts access to the general public and is protected from the environment and vermin. o Placement in leak proof, rigid, puncture-resistant containers that are tightly sealed to prevent expulsion. o Labeling with the biohazard symbol. Category 2 items have the general appearance of infectious or medical waste, but do not otherwise fit the category 1 description. These are also known as look-alike infectious waste, and will be removed by the Laboratory Manager along with the infectious waste. e. Chemically contaminated sharps must be decontaminated with a suitable cleaning agent. If You Are Injured From a Sharp: o Wash the area with soap and water o Report to Urgent Care for medical care o Contact your supervisor and the Laboratory Manger M. Spills of Biohazardous Materials Procedures Plan in advance for an emergency. For example, what supplies and equipment should you maintain in your area to assist you in the event of an accidental spill, e.g., personal protective equipment, disinfecting solutions, spill control materials? What training do you need to handle an emergency in your area? What information can be made available to an emergency response team? A minimally biohazardous material that is spilled without generating significant aerosols may be cleaned up with a paper towel soaked in an effective decontaminating agent. A spill of a large volume of biohazardous material with the generation of aerosols will require cleanup personnel wearing protective clothing and respiratory protection. With M. tuberculosis, for example, the risk of exposure from the spill of a small quantity might be many times that of a much larger spill of E. 141
141 coli. Therefore, if the agent is known, the recommended procedure and protective equipment should be used. 1. Basic Biological Spill Kit Disinfectant (e.g., bleach 1:10 dilution, prepared fresh, or other suitable disinfectant) Absorbent Material (e.g., paper towels, spill pillows) Waste Container (e.g., biohazard bags, sharps containers) Personal Protective Equipment (e.g., lab coat, gloves, eye and face protection) Mechanical Tools (e.g., forceps, dustpan and broom) 2. Spill Cleanup Procedures a. Spilled agents requiring Biosafety Level 1 Notify others working in the area of the spill. Wear gloves to clean up the spill. Surround the spill with disinfectant. For small spills, add disinfectant to the spill, then clean up with paper towels. Larger spills may require absorbent spill pillows. Re-apply disinfectant to the surface and clean again after 10 minutes. Place contaminated paper towels or spill pillows in a red biohazard bag and autoclave. Wash hands with germicidal soap. b. Spilled agents requiring Biosafety Level 2 or higher Evacuate the room immediately, close doors, remove all contaminated clothing, and decontaminate body surfaces. Allow enough time (at least 30 minutes) for droplets to settle and aerosols to be reduced by the ventilation system before entering. Don protective clothing and approved respiratory protective equipment. Decontaminate the spill with an appropriate disinfectant (e.g., 1:10 solution of household bleach in water), being careful to avoid creating aerosols. After at least 10 minutes of contact time with the disinfectant, mop up spill with absorbant paper towels or spill pillows and dispose of contaminated items in a biohazard bag. Pick up broken glass or sharps with forceps or tweezers and dispose of in autoclavable sharps container. 142
142 Re-apply disinfectant to the surface and clean again after 10 minutes. Following cleanup, responders should wash or shower with a germicidal soap. Note: the BSC or the Laboratory Manager should be consulted before cleanup is started to ensure that proper techniques will be employed. 3. Biohazardous Material Spills in a Biological Safety Cabinet a. Initiate cleanup at once, while the cabinet continues to operate, using an appropriate disinfectant. Avoid the use of organic solvents (alcohols). b. Prevent the generation and escape of aerosols and contaminants from the cabinet during decontamination. c. Formaldehyde gas decontamination can be used for final decontamination. Part VI: PHARMACY FACILITIES Please refer to page 25 of this document. Addendum as follows: A. GENERAL RULES FOR THE COMPOUNDING LABORATORY 1. At the beginning of the term, each student will be assigned a complete set of apparatus in a locked cabinet to which a personal key will be issued. The student will carefully check all items against the apparatus list. The list must be properly signed and returned during the first assigned laboratory session. The signature attests that each item on the list was received in good condition. 2. At the end of the academic school year, each student will be expected to turn in a complete set of the assigned apparatus, with each item being clean and free from chips, cracks, or other damage. The student will be expected to purchase a replacement for any item in unacceptable condition or for any item missing. 3. Each student is responsible for the neat, clean appearance of the assigned locker and equipment during and at the end of the laboratory period. 4. Containers from one workstation must not be mixed with containers from another workstation. 5. Careful cleaning of counters and sinks is necessary. Insoluble waste material (oils, solids, and semi-solids such as waxes and creams, etc.) must be thrown in the waste containers provided not in the sink! 6. Cleaning aids. a. Paper towels are provided for gross wiping and cleaning. b. Bottle brushes. c. Liquid detergent, Fisherbrand Multi-purpose cleaner are provided. 7. Pharmaceutical materials and containers are EXPENSIVE. Use only what is needed. Do not waste. Do not store extra containers or weighing paper in your locker. Return anything unused to its proper place. 143
143 8. Areas, equipment and shared supplies, such as stock ingredients, containers, labels, computers, printers, and books must be kept clean and orderly at all times. Their appearance is the responsibility of each student who uses them. 9. The laboratory must be quiet and orderly. Each student must share the responsibiity for keeping it so. 10. Finished preparations may be taken home byt the student at the end of each laboratory session unless 1. The student desires to leave them at his/her locker. Or 2. The preparation is required to be left in the laboratory. 11. No student may leave the laboratory at the end of the period until checked out by his/her instructor. 12. Smoking and/or the consumption of food or beverages are not permitted in the laboratory. 13. Saftey rules must be followed. 14. Be familiar with the emergency exit procedures. B. GENERAL COMPOUNDING GUIDELINES 1. Read the label three times: a. When you remove the container from the shelf, b. When you weigh/measure the required quantity, c. When you return the container to its proper place on the shelf, clean and with the lid placed on tightly. 2. When removing ingredients from stock containers or bulk dispensers: a. Remove small protions at a time for weighing or measuring. Ingredients removed from stock containers must not be returned if not needed. b. Always hold the label of a stock bottle toward the palm of the hand when removing contents, especially stock containers of liquids. This procedure should eliminate drips or spillage which would otherwise mar the label. c. Using a clean tissue, remove any liquid, especially syrups or semisolid material, such as ointments, from the necks and lips of stock containers before replacing the lid. 3. When weighing or measuring follow these steps: a. All weighed-out or measured ingredients, not yet added to the compounded mixture, must be identified to avoid mix-up. This may be accomplised by labeling them, or placing them in immediate proximity to parent containers. b. Double check your weight as ingredients are removed from the balance. c. As ingredients are added to the compounded mixture, be observant of their physical properties in order to learn these properties and to help avoid errors. 4. Labels must contain accurate information and be appropriately affixed to the container. Include auxiliary labels on your preparations as required. 5. The compounding of medications must be performed sanitarily. Examples of appropriate sanitrary procedures include: a. Washing the hands often, b. Minimizing the touching of the preparation with the hands, c. Using clean utensils, d. Not using items retrieved from the floor until they have been washed, 144
144 e. Properly tasting your preparation as you flavor or sweeten it: 1. Dip the stirring rod in the preparation, 2. Place a drop on your finger, and 3. Touch your finger to your tongue. 6. Your area and balance should be clean and supplies put away before you ask an instructor to check you out. 2. Classification of Hazardous Materials Addendum to pg. 31 Pharmaceutical Excipients Excipients are components of a finished drug product other than the active pharmaceutical ingredient (API) and are added during formulation for a specific purpose. Although listed as inactive ingredients by FDA, excipients generally have well-defined functions in a drug product. As with active ingredients, they may be Small Molecule or complex and may vary in terms of degree of characterization. They may be chemically synthesized or may be either natural source or biotechnology-derived (recombinant). In contrast to active ingredients, minor components of an excipient may have significant impact on its pharmaceutical performance. Depending on the intended use, an excipient in a drug product may be an active ingredient in another drug product. They are classified by the functions they perform in a pharmaceutical dosage form. Principal excipient classifications (functions) are the following: Emulsifying Agents Ointment Base Buffering agents Lubricants & Glidants (flow enhancers) Perfumes Thickening Agents Other Important Excipients used in Pharmaceutical Preparations are given below Compression aids Colors Sweeteners Preservatives Film formers/coatings Flavors Printing inks Binders Disintegrants 145
145 Part VII: SAFETY RECOMMENDATIONS A. Electrically-Powered Laboratory Apparatuses Electrically powered equipment, such as hot plates, stirrers, vacuum pumps, electrophoresis apparatuses, lasers, heating mantles, ultrasonicators, power supplies, and microwave ovens are essential elements of many labs. These devices can pose a significant hazard to laboratory workers, particularly when mishandled or not maintained. Many laboratory electrical devices have high voltage or high power requirements, carrying even more risk. Large capacitors found in many laser flash lamps and other systems are capable of storing lethal amounts of electrical energy and pose a serious danger even if the power source has been disconnected. Electrical Hazards The major hazards associated with electricity are electrical shock and fire. Electrical shock occurs when the body becomes part of the electric circuit, either when an individual comes in contact with both wires of an electrical circuit, one wire of an energized circuit and the ground, or a metallic part that has become energized by contact with an electrical conductor. The severity and effects of an electrical shock depend on a number of factors, such as the pathway through the body, the amount of current, the length of time of the exposure, and whether the skin is wet or dry. Water is a great conductor of electricity, allowing current to flow more easily in wet conditions and through wet skin. The effect of the shock may range from a slight tingle to severe burns to cardiac arrest. The chart below shows the general relationship between the degree of injury and amount of current for a 60-cycle hand-to-foot path of one second's duration of shock. While reading this chart, keep in mind that most electrical circuits can provide, under normal conditions, up to 20,000 milliamperes of current flow. Current (ma) Reaction 1 Perception level 5 Slight shock felt; not painful but disturbing 6-30 Painful shock; "let-go" range Extreme pain, respiratory arrest, severe muscular contraction ,300 Ventricular fibrillation 10,000+ Cardiac arrest, severe burns and probable death In addition to the electrical shock hazards, sparks from electrical equipment can serve as an ignition source for flammable or explosive vapors or combustible materials. Power Loss Loss of electrical power can create hazardous situations. Flammable or toxic vapors may be released as a chemical warms when a refrigerator or freezer fails. Fume hoods may cease to 146
146 operate, allowing vapors to be released into the laboratory. If magnetic or mechanical stirrers fail to operate, safe mixing of reagents may be compromised. In the event of a power outage, the Office of Campus Safety has provided a checklist of appropriate responses for the Emergency Operations Plan that is attached in the Appendix. Preventing Electrical Hazards There are various ways of protecting people from the hazards caused by electricity, including insulation, guarding, grounding, and electrical protective devices. Laboratory workers can significantly reduce electrical hazards by following some basic precautions: Inspect wiring of equipment before each use. Replace damaged or frayed electrical cords immediately. Use safe work practices every time electrical equipment is used. Know the location and how to operate shut-off switches and/or circuit breaker panels. Use these devices to shut off equipment in the event of a fire or electrocution. Limit the use of extension cords. Use only for temporary operations and then only for short periods of time. In all other cases, request installation of a new electrical outlet. Multi-plug adapters must have circuit breakers or fuses. Place exposed electrical conductors (such as those sometimes used with electrophoresis devices) behind shields. Minimize the potential for water or chemical spills on or near electrical equipment. Insulation All electrical cords should have sufficient insulation to prevent direct contact with wires. In a laboratory, it is particularly important to check all cords before each use, since corrosive chemicals or solvents may erode the insulation. Damaged cords should be repaired or taken out of service immediately, especially in wet environments such as cold rooms and near water baths. Guarding Live parts of electric equipment operating at 50 volts or more, such as electrophoresis devices, must be guarded against accidental contact. Plexiglas shields may be used to protect against exposed live parts. Grounding Only equipment with three-prong plugs should be used in the laboratory. The third prong provides a path to ground for internal electrical short circuits, thereby protecting the user from a potential electrical shock. 147
147 Circuit Protection Devices Circuit protection devices are designed to automatically limit or shut off the flow of electricity in the event of a ground-fault, overload or short circuit in the wiring system. Ground-fault circuit interrupters, circuit breakers and fuses are three well-known examples of such devices. Fuses and circuit breakers prevent over-heating of wires and components that might otherwise create fire hazards. They disconnect the circuit when it becomes overloaded. This overload protection is very useful for equipment that is left on for extended periods of time, such as stirrers, vacuum pumps, drying ovens, Variacs and other electrical equipment. The ground-fault circuit interrupter (GFCI) is designed to shutoff electric power if a ground fault is detected, protecting the user from a potential electrical shock. The GFCI is particularly useful near sinks and wet locations. Since GFCIs can cause equipment to shutdown unexpectedly, they may not be appropriate for certain apparatus. Portable GFCI adapters (available in most safety supply catalogs) may be used with a non-gfci outlet. Motors In laboratories where volatile flammable materials are used, motor-driven electrical equipment should be equipped with non-sparking induction motors or air motors. These motors must meet National Electric Safety Code (US DOC, 1993) Class 1, Division 2, Group C-D explosion resistance specifications. Many stirrers, Variacs, outlet strips, ovens, heat tape, hot plates and heat guns do not conform to these code requirements. Avoid series-wound motors, such as those generally found in some vacuum pumps, rotary evaporators and stirrers. Series-wound motors are also usually found in household appliances such as blenders, mixers, vacuum cleaners and power drills. These appliances should not be used unless flammable vapors are adequately controlled. Although some newer equipment have spark-free induction motors, the on-off switches and speed controls may be able to produce a spark when they are adjusted because they have exposed contacts. One solution is to remove any switches located on the device and insert a switch on the cord near the plug end. Safe Work Practices The following practices may reduce risk of injury or fire when working with electrical equipment: Avoid contact with energized electrical circuits. Use guarding around exposed circuits and sources of live electricity. 148
148 Disconnect the power source before servicing or repairing electrical equipment. When it is necessary to handle equipment that is plugged in, be sure hands are dry and, when possible, wear nonconductive gloves and shoes with insulated soles. If it is safe to do so, work with only one hand, keeping the other hand at your side or in your pocket, away from all conductive material. This precaution reduces the likelihood of accidents that result in current passing through the chest cavity. Minimize the use of electrical equipment in cold rooms or other areas where condensation is likely. If equipment must be used in such areas, mount the equipment on a wall or vertical panel. If water or a chemical is spilled onto equipment, shut off power at the main switch or circuit breaker and unplug the equipment. If an individual comes in contact with a live electrical conductor, do not touch the equipment, cord or person. Disconnect the power source from the circuit breaker or pull out the plug using a leather belt. High Voltage or Current Repairs of high voltage or high current equipment should be performed only by trained electricians. Altering Building Wiring and Utilities Any modifications to existing electrical service in a laboratory or building must be completed or approved by either the building facility manager, an engineer from the Facilities department or the building's Special Facilities staff. All modifications must meet both safety standards and Facilities Engineering design requirements. Any unapproved laboratory facilities modifications discovered during laboratory surveys or other activities are reviewed by EHS and facility staff to determine whether they meet design specifications. Stirring and Mixing Devices The stirring and mixing devices commonly found in laboratories include stirring motors, magnetic stirrers, shakers, small pumps for fluids and rotary evaporators for solvent removal. These devices are typically used in laboratory operations that are performed in a hood, and it is important that they be operated in a way that precludes the generation of electrical sparks. Only spark-free induction motors should be used in power stirring and mixing devices or any other rotating equipment used for laboratory operations. While the motors in most of the currently marketed stirring and mixing devices meet this criterion, their on-off switches and rheostat-type speed controls can produce an electrical spark because they have exposed electrical conductors. The speed of an induction motor operating under a load should not be controlled by a variable autotransformer. 149
149 Because stirring and mixing devices, especially stirring motors and magnetic stirrers, are often operated for fairly long periods without constant attention, the consequences of stirrer failure, electrical overload or blockage of the motion of the stirring impeller should be considered. Ultrasonicators Human exposure to ultrasound with frequencies between 16 and 100 kilohertz (khz) can be divided into three distinct categories: airborne conduction, direct contact through a liquid coupling medium, and direct contact with a vibrating solid. Ultrasound through airborne conduction does not appear to pose a significant health hazard to humans. However, exposure to the associated high volumes of audible sound can produce a variety of effects, including fatigue, headaches, nausea and tinnitus. When ultrasonic equipment is operated in the laboratory, the apparatus must be enclosed in a 2-cm thick wooden box or in a box lined with acoustically absorbing foam or tiles to substantially reduce acoustic emissions (most of which are inaudible). Direct contact of the body with liquids or solids subjected to high-intensity ultrasound of the sort used to promote chemical reactions should be avoided. Under sonochemical conditions, cavitation is created in liquids, and it can induce high-energy chemistry in liquids and tissues. Cell death from membrane disruption can occur even at relatively low acoustic intensities. Exposure to ultrasonically vibrating solids, such as an acoustic horn, can lead to rapid frictional heating and potentially severe burns. Centrifuges Centrifuges should be properly installed and must be operated only by trained personnel. It is important that the load is balanced each time the centrifuge is used and that the lid is closed while the rotor is in motion. The disconnect switch must be working properly to shut off the equipment when the top is opened, and the manufacturer s instructions for safe operating speeds must be followed. For flammable and/or hazardous materials, the centrifuge should be under negative pressure to a suitable exhaust system. Electrophoresis Devices Precautions to prevent electric shock must be followed when conducting procedures involving electrophoresis. Lethal electric shock can result when operating at high voltages such as in DNA sequencing or low voltages such as in agarose gel electrophoresis (e.g., 100 volts at 25 milliamps).these general guidelines should be followed: 150
150 Turn the power off before connecting the electrical leads Connect one lead at a time, using one hand only Ensure that hands are dry while connecting leads Keep the apparatus away from sinks or other water sources Turn off power before opening lid or reaching inside chamber Do not override safety devices Do not run electrophoresis equipment unattended. If using acrylamide, purchase premixed solutions or pre-weighed quantities whenever possible If using ethidium bromide, have a hand-held UV light source available in the laboratory. Check working surfaces after each use. Mix all stock solutions in a chemical fume hood. Provide spill containment by mixing gels on a plastic tray Decontaminate surfaces with ethanol. Dispose of all cleanup materials as hazardous waste. B. Low Temperature Procedures Cryogenic liquids have boiling points less than -73ºC (-100ºF). Liquid nitrogen, liquid oxygen and carbon dioxide are the most common cryogenic materials used in the laboratory. Hazards may include fire, explosion, embrittlement, pressure buildup, frostbite and asphyxiation. Many of the safety precautions observed for compressed gases also apply to cryogenic liquids. Two additional hazards are created from the unique properties of cryogenic liquids: Extremely Low Temperatures The cold boil-off vapor of cryogenic liquids rapidly freezes human tissue. Most metals become stronger upon exposure to cold temperatures, but materials such as carbon steel, plastics and rubber become brittle or even fracture under stress at these temperatures. Proper material selection is important. Cold burns and frostbite caused by cryogenic liquids can result in extensive tissue damage. Vaporization All cryogenic liquids produce large volumes of gas when they vaporize. Liquid nitrogen will expand 696 times as it vaporizes. The expansion ratio of argon is 847:1, hydrogen is 851:1 and oxygen is 862:1. If these liquids vaporize in a sealed container, they can produce enormous pressures that could rupture the vessel. For this reason, pressurized cryogenic containers are usually protected with multiple pressure relief devices. Vaporization of cryogenic liquids (except oxygen) in an enclosed area can cause asphyxiation. Vaporization of liquid oxygen can produce an oxygen-rich atmosphere, which will support and 151
151 accelerate the combustion of other materials. Vaporization of liquid hydrogen can form an extremely flammable mixture with air. Handling Cryogenic Liquids Most cryogenic liquids are odorless, colorless, and tasteless when vaporized. When cryogenic liquids are exposed to the atmosphere, the cold boil-off gases condense the moisture in the air, creating a highly visible fog. Always handle these liquids carefully to avoid skin burns and frostbite. Exposure that may be too brief to affect the skin of the face or hands may damage delicate tissues, such as the eyes. Boiling and splashing always occur when charging or filling a warm container with cryogenic liquid or when inserting objects into these liquids. Perform these tasks slowly to minimize boiling and splashing. Use tongs to withdraw objects immersed in a cryogenic liquid. Never touch uninsulated pipes or vessels containing cryogenic liquids. Flesh will stick to extremely cold materials. Even nonmetallic materials are dangerous to touch at low temperatures. Use wooden or rubber tongs to remove small items from cryogenic liquid baths. Cryogenic gloves are for indirect or splash protection only, they are not designed to protect against immersion into cryogenic liquids. Cylinders and dewars should not be filled to more than 80% of capacity, since expansion of gases during warming may cause excessive pressure buildup. Check cold baths frequently to ensure they are not plugged with frozen material. Protective Clothing Face shields worn with safety glasses or chemical splash goggles are recommended during transfer and handling of cryogenic liquids. Wear loose fitting, dry, insulated cryogenic gloves when handling objects that come into contact with cryogenic liquids and vapor. Trousers should be worn on the outside of boots or work shoes. Cooling Baths and Dry Ice Neither liquid nitrogen nor liquid air should be used to cool a flammable mixture in the presence of air, because oxygen can condense from the air, leading to an explosion hazard. Wear insulated, dry gloves and a face shield when handling dry ice. Add dry ice slowly to the liquid portion of the cooling bath to avoid foaming over. Do not lower your head into a dry ice chest, since suffocation can result from carbon dioxide buildup. 152
152 Liquid Nitrogen Cooled Traps Traps that open to the atmosphere condense liquid air rapidly. If you close the system, pressure builds up with enough force to shatter glass equipment. Therefore, only sealed or evacuated equipment should use liquid nitrogen cooled traps. C. High Temperature Procedures Most labs use at least one type of heating device, such as ovens, hot plates, heating mantles and tapes, oil baths, salt baths, sand baths, air baths, hot-tube furnaces, hot-air guns and microwave ovens. Steam-heated devices are generally preferred whenever temperatures of 100 o C or less are required because they do not present shock or spark risks and can be left unattended with assurance that their temperature will never exceed 100 o C. Ensure the supply of water for steam generation is sufficient prior to leaving the reaction for any extended period of time. A number of general precautions need to be taken when working with heating devices in the laboratory. When working with heating devices, consider the following: The actual heating element in any laboratory heating device should be enclosed in such a fashion as to prevent a laboratory worker or any metallic conductor from accidentally touching the wire carrying the electric current. Heating device becomes so worn or damaged that its heating element is exposed, the device should be either discarded or repaired before it is used again. Laboratory heating devices should be used with a variable autotransformer to control the input voltage by supplying some fraction of the total line voltage, typically 110 V. The external cases of all variable autotransformers have perforations for cooling by ventilation and, therefore, should be located where water and other chemicals cannot be spilled onto them and where they will not be exposed to flammable liquids or vapors. Fail-safe devices can prevent fires or explosions that may arise if the temperature of a reaction increases significantly because of a change in line voltage, the accidental loss of reaction solvent or loss of cooling. Some devices will turn off the electric power if the temperature of the heating device exceeds some preset limit or if the flow of cooling water through a condenser is stopped owing to the loss of water pressure or loosening of the water supply hose to a condenser. Autoclaves The use of an autoclave is a very effective way to decontaminate infectious waste. Autoclaves work by killing microbes with superheated steam. The following are recommended guidelines when using an autoclave: Do not put sharp or pointed contaminated objects into an autoclave bag. Place them in an appropriate rigid sharps disposal container. 153
153 Use caution when handling an infectious waste autoclave bag, in case sharp objects were inadvertently placed in the bag. Never lift a bag from the bottom to load it into the chamber. Handle the bag from the top. Do not overfill an autoclave bag. Steam and heat cannot penetrate as easily to the interior of a densely packed autoclave bag. Frequently the outer contents of the bag will be treated but the innermost part will be unaffected. Do not overload an autoclave. An overpacked autoclave chamber does not allow efficient steam distribution. Considerably longer sterilization times may be required to achieve decontamination if an autoclave is tightly packed. Conduct autoclave sterility testing on a regular basis using appropriate biological indicators (B. stearothermophilus spore strips) to monitor efficacy. Use indicator tape with each load to verify it has been autoclaved. Do not mix contaminated and clean items together during the same autoclave cycle. Clean items generally require shorter decontamination times (15-20 minutes) while a bag of infectious waste (24" x 36") typically requires 45 minutes to an hour to be effectively decontaminated throughout. Always wear personal protective equipment, including heat-resistant gloves, safety glasses and a lab coat when operating an autoclave. Use caution when opening the autoclave door. Allow superheated steam to exit before attempting to remove autoclave contents. Be on the alert when handling pressurized containers. Superheated liquids may spurt from closed containers. Never seal a liquid container with a cork or stopper. This could cause an explosion inside the autoclave. Agar plates will melt and the agar will become liquefied when autoclaved. Avoid contact with molten agar. Use a secondary tray to catch any potential leakage from an autoclave bag rather than allowing it to leak onto the floor of the autoclave chamber. If there is a spill inside the autoclave chamber, allow the unit to cool before attempting to clean up the spill. If glass breaks in the autoclave, use tongs, forceps or other mechanical means to recover fragments. Do not use bare or gloved hands to pick up broken glassware. Do not to leave an autoclave operating unattended for a long period of time. Always be sure someone is in the vicinity while an autoclave is cycling in case there is a problem. Autoclaves should be placed under preventive maintenance contracts to ensure they are operating properly. Ovens Electrically heated ovens are commonly used in the laboratory to remove water or other solvents from chemical samples and to dry laboratory glassware. Never use laboratory ovens for human food preparation. Laboratory ovens should be constructed such that their heating elements and their temperature controls are physically separated from their interior atmospheres. Laboratory ovens rarely have a provision for preventing the discharge of the substances volatilized in them. Connecting the oven vent directly to an exhaust system can reduce the 154
154 possibility of substances escaping into the lab or an explosive concentration developing within the oven. Ovens should not be used to dry any chemical sample that might pose a hazard because of acute or chronic toxicity unless special precautions have been taken to ensure continuous venting of the atmosphere inside the oven. To avoid explosion, glassware that has been rinsed with an organic solvent should be rinsed again with distilled water before being dried in an oven. Bimetallic strip thermometers are preferred for monitoring oven temperatures. Mercury thermometers should not be mounted through holes in the top of ovens so that the bulb hangs into the oven. Should a mercury thermometer be broken in an oven of any type, the oven should be closed and turned off immediately, and it should remain closed until cool. All mercury should be removed from the cold oven with the use of appropriate cleaning equipment and procedures in order to avoid mercury exposure. Hot Plates Laboratory hot plates are normally used for heating solutions to 100 o C or above when inherently safer steam baths cannot be used. Any newly purchased hot plates should be designed in a way that avoids electrical sparks. However, many older hot plates pose an electrical spark hazard arising from either the on-off switch located on the hot plate, the bimetallic thermostat used to regulate the temperature or both. Laboratory workers should be warned of the spark hazard associated with older hot plates. In addition to the spark hazard, old and corroded bimetallic thermostats in these devices can eventually fuse shut and deliver full, continuous current to a hot plate. Do not store volatile flammable materials near a hot plate Limit use of older hot plates for flammable materials. Check for corrosion of thermostats. Corroded bimetallic thermostats can be repaired or reconfigured to avoid spark hazards. Heating Mantles Heating mantles are commonly used for heating round-bottomed flasks, reaction kettles and related reaction vessels. These mantles enclose a heating element in a series of layers of fiberglass cloth. As long as the fiberglass coating is not worn or broken, and as long as no water or other chemicals are spilled into the mantle, heating mantles pose no shock hazard. Always use a heating mantle with a variable autotransformer to control the input voltage. Never plug them directly into a 110-V line. Be careful not to exceed the input voltage recommended by the mantle manufacturer. Higher voltages will cause it to overheat, melt the fiberglass insulation and expose the bare heating element. 155
155 If the heating mantle has an outer metal case that provides physical protection against damage to the fiberglass, it is good practice to ground the outer metal case to protect against an electric shock if the heating element inside the mantle shorts against the metal case. Some older equipment might have asbestos insulation rather than fiberglass. Contact EHS to replace the insulation and for proper disposal of the asbestos. Heat Guns Laboratory heat guns are constructed with a motor-driven fan that blows air over an electrically heated filament. They are frequently used to dry glassware or to heat the upper parts of a distillation apparatus during distillation of high-boiling materials. The heating element in a heat gun typically becomes red-hot during use and the on-off switches and fan motors are not usually spark-free. For these reasons, heat guns almost always pose a serious spark hazard. Household hair dryers may be substituted for laboratory heat guns only if they have a grounded plug or are double insulated. Any hand-held heating device of this type that will be used in a laboratory should have groundfault circuit interrupter (GFCI) protection to ensure against electric shock. Never use a heat gun near flammable materials including open containers of flammable liquids, flammable vapors or hoods used to control flammable vapors. Microwave Ovens Microwave ovens used in the laboratory may pose several different types of hazards. As with most electrical apparatus, there is the risk of generating sparks that can ignite flammable vapors. Metals placed inside the microwave oven may produce an arc that can ignite flammable materials. Materials placed inside the oven may overheat and ignite. Sealed containers, even if loosely sealed, can build pressure upon expansion during heating, creating a risk of container rupture. To minimize the risk of these hazards, Never operate microwave ovens with doors open in order to avoid exposure to microwaves. Do not place wires and other objects between the sealing surface and the door on the oven s front face. The sealing surfaces must be kept absolutely clean. Never use a microwave oven for both laboratory use and food preparation. Electrically ground the microwave. If use of an extension cord is necessary, only a three-wire cord with a rating equal to or greater than that for the oven should be used. 156
156 Do not use metal containers and metal-containing objects (e.g., stir bars) in the microwave. They can cause arcing. Do not heat sealed containers in the microwave oven. Even heating a container with a loosened cap or lid poses a significant risk since microwave ovens can heat material so quickly that the lid can seat upward against the threads and containers can explode. Remove screw caps from containers being microwaved. If the sterility of the contents must be preserved, use cotton or foam plugs. Otherwise plug the container with Kimwipes to reduce splash potential. Oil, Salt and Sand Baths Electrically heated oil baths are often used to heat small or irregularly shaped vessels or when a stable heat source that can be maintained at a constant temperature is desired. Molten salt baths, like hot oil baths, offer the advantages of good heat transfer, commonly have a higher operating range (e.g., 200 to 425 o C) and may have a high thermal stability (e.g., 540 o C).There are several precautions to take when working with these types of heating devices: Take care with hot oil baths not to generate smoke or have the oil burst into flames from overheating. Always monitor oil baths by using a thermometer or other thermal sensing devices to ensure that its temperature does not exceed the flash point of the oil being used. Fit oil baths left unattended with thermal sensing devices that will turn off the electric power if the bath overheats. Mix oil baths well to ensure that there are no hot spots around the elements that take the surrounding oil to unacceptable temperatures. Contain heated oil in a vessel that can withstand an accidental strike by a hard object. Mount baths carefully on a stable horizontal support such as a laboratory jack that can be raised or lowered without danger of the bath tipping over. Iron rings are not acceptable supports for hot baths. Clamp equipment high enough above a hot bath that if the reaction begins to overheat, the bath can be lowered immediately and replaced with a cooling bath without having to readjust the equipment setup. Provide secondary containment in the event of a spill of hot oil. Wear heat-resistant gloves when handling a hot bath. The reaction container used in a molten salt bath must be able to withstand a very rapid heatup to a temperature above the melting point of salt. Take care to keep salt baths dry since they are hygroscopic, which can cause hazardous popping and splattering if the absorbed water vaporizes during heat-up. D. Pressurized and Vacuum Operations 1. Compressed Gases 157
157 Compressed gases can be toxic, flammable, oxidizing, corrosive, inert or a combination of hazards. In addition to the chemical hazards, compressed gases may be under a great deal of pressure. The amount of energy in a compressed gas cylinder makes it a potential rocket. Appropriate care in the handling and storage of compressed gas cylinders is essential. a. General Considerations The following is an overview of the hazards to be avoided when handling and storing compressed gases: Asphyxiation: Simple asphyxiation is the primary hazard associated with inert gases. Because inert gases are colorless and odorless, they can escape into the atmosphere undetected and quickly reduce the concentration of oxygen below the level necessary to support life. The use of oxygen monitoring equipment is strongly recommended for enclosed areas where inert gases are being used. Fire and Explosion: Fire and explosion are the primary hazards associated with flammable gases, oxygen and other oxidizing gases. Flammable gases can be ignited by static electricity or by a heat source, such as a flame or a hot object. Oxygen and other oxidizing gases do not burn, but will support combustion of organic materials. Increasing the concentration of an oxidizer accelerates the rate of combustion. Materials that are nonflammable under normal conditions may burn in an oxygen-enriched atmosphere. Chemical Burns: Corrosive gases can chemically attack various materials, including fireresistant clothing. Some gases are not corrosive in their pure form, but can become extremely destructive if a small amount of moisture is added. Corrosive gases can cause rapid destruction of skin and eye tissue. Chemical Poisoning: Chemical poisoning is the primary hazard of toxic gases. Even in very small concentrations, brief exposure to these gases can result in serious poisoning injuries. Symptoms of exposure may be delayed. High Pressure: All compressed gases are potentially hazardous because of the high pressure stored inside the cylinder. A sudden release of pressure can cause injuries and property damage by propelling a cylinder or whipping a line. Cylinder Weight: A full size cylinder may weigh more than 130 pounds. Moving a cylinder manually may lead to back or muscle injury. Dropping or dragging a cylinder could cause serious injury. b. Handling Precautions Avoid dropping, dragging or sliding cylinders. Use a suitable hand truck or cart equipped with a chain or belt for securing the cylinder to the cart, even for short distances. Do not permit cylinders to strike each other violently. Cylinders should not be used as rollers for moving material or other equipment. Cylinder caps should be left on each cylinder until it has been secured against a wall or bench or placed in a cylinder stand, and is ready for installation of the regulator. Cylinder caps protect the valve on top of the cylinder from damage if knocked. 158
158 Never tamper with pressure relief devices in valves or cylinders. Use only wrenches or tools provided by the cylinder supplier to remove a cylinder cap or to open a valve. Never use a screwdriver or pliers. Keep the cylinder valve closed except when in use. Position cylinders so that the cylinder valve is accessible at all times. Use compressed gases only in a well-ventilated area. Toxic, flammable and corrosive gases should be carefully handled in a hood or gas cabinet. Proper containment systems should be used and minimum quantities of these products should be kept on-site. When discharging gas into a liquid, a trap or suitable check valve should be used to prevent liquid from getting back into the cylinder or regulator. Where more than one type of gas is in use, label gas lines. This is particularly important when the gas supply is not in the same room or area as the operation using the gases. Do not use the cylinder valve itself to control flow by adjusting the pressure. c. Storage of Compressed Gas Cylinders All cylinders must be secured to a wall, bench or fixed support using a chain or strap placed 2/3 of the way up. Cylinder stands are an alternative to straps. Cylinders should be strapped individually. Cylinders should not be stored with a regulator attached. Secure the proper gas cap to the threaded portion on the top of the cylinder to protect the valve.* Do not store full and empty cylinders together. Oxidizers and flammable gases should be stored in areas separated by at least 20 feet or by a noncombustible wall. Cylinders should not be stored near radiators or other heat sources. If storage is outdoors, protect cylinders from weather extremes and damp ground to prevent corrosion. No part of a cylinder should be subjected to a temperature higher than 125 o F. A flame should never be permitted to come in contact with any part of a compressed gas cylinder. Do not place cylinders where they may become part of an electric circuit. Keep the number of cylinders in a laboratory to a minimum to reduce the fire and toxicity hazards. Lecture bottles should always be returned to the distributor or manufacturer promptly when no longer needed or discarded if at atmospheric pressure. Ensure that the cylinder is properly and prominently labeled as to its contents. NEVER place acetylene cylinders on their side. d. Using Compressed Gas Cylinders Before using cylinders, read all label information and material safety data sheets (MSDSs) associated with the gas being used. The cylinder valve outlet connections are designed to prevent mixing of incompatible gases. The outlet threads vary in diameter; some are internal and some are external; some are right-handed and some are left-handed. Generally, right-handed threads are used for fuel gases. 159
159 To set up and use the cylinder, follow these steps: Attach the closed regulator to the cylinder. Never open the cylinder valve unless the regulator is completely closed. Regulators are specific to the gas involved. A regulator should be attached to a cylinder without forcing the threads. Ensure the threads of both the regulator and main valve are clean. If the inlet of a regulator does not fit the cylinder outlet, no effort should be made to try to force the fitting. A poor fit may indicate that the regulator is not intended for use on the gas chosen. Turn the delivery pressure adjusting screw counter-clockwise until it turns freely. This prevents unintended gas flow into the regulator. Open the cylinder slowly until the inlet gauge on the regulator registers the cylinder pressure. If the cylinder pressure reading is lower than expected, the cylinder valve may be leaking. With the flow control valve at the regulator outlet closed, turn the delivery pressure adjusting screw clockwise until the required delivery pressure is reached. Check for leaks using Snoop or soap solution. At or below freezing temperatures, use a glycerin and water solution, such as Snoop, rather than soap. Never use an open flame to detect leaks. When finished with the gas, close the cylinder valve, release the regulator pressure and replace the gas cap if it will not be used in the near future. e. Assembly of Equipment and Piping Do not force threads that do not fit exactly. Use Teflon tape or thread lubricant for assembly. Teflon tape should only be used for tapered pipe thread, not straight lines or metal-to-metal contacts. Avoid sharp bends of copper tubing. Copper tubing hardens and cracks with repeated bending. Inspect tubing frequently and replace when necessary. Tygon and plastic tubing are not appropriate for most pressure work. These materials can fail under pressure or thermal stress. Do not mix different brands and types of tube fittings. Construction parts are usually not interchangeable. Do not use oil or lubricants on equipment used with oxygen. Do not use copper piping for acetylene. Do not use cast iron piping for chlorine. f. Leaking Cylinders Most leaks occur at the valve in the top of the cylinder and may involve the valve threads valve stem, valve outlet, or pressure relief devices. Lab personnel should not attempt to repair leaking cylinders. Where action can be taken without serious exposure to lab personnel: 160
160 Move the cylinder to an isolated, well-ventilated area (away from combustible materials if the cylinder contains a flammable or oxidizing gas). Whenever a large or uncontrollable leak occurs, evacuate the area and immediately contact Security at x8989 for Schaumburg or x2020 for Chicago g. Empty Cylinders Remove the regulator and replace the cylinder cap. Mark the cylinder as "empty" and store in a designated area for return to the supplier. Do not store full and empty cylinders together. Do not have full and empty cylinders connected to the same manifold. Reverse flow can occur when an empty cylinder is attached to a pressurized system. Do not refill empty cylinders. Only the cylinder supplier should refill gases. Do not empty cylinders to a pressure below 25 psi (172 Kpa). The residual contents may become contaminated with air. Lecture bottles should always be returned to the distributor or manufacturer promptly when no longer needed. Do not purchase lecture bottles that cannot be returned. h. Flammable Gases Roosevelt University stocks many types of flammable gases. Keep sources of ignition away from the cylinders. Oxidizers and flammable gases should be stored in areas separated by at least 20 feet or by a non-combustible wall. Acetylene Acetylene presents special hazards either due to their toxicity or physical properties. Review this information before using these gases. Acetylene is highly flammable under pressure and is spontaneously combustible in air at pressures above 15 psig. Acetylene cylinders do not contain oxygen and may cause asphyxiation if released into a confined area. Since acetylene is shock-sensitive and explodes above 30 psi, cylinders of acetylene contain acetylene dissolved in acetone. Acetylene cylinders must not be placed on their sides, since the acetone and binders will become dislodged. The result may be formation of an acetylene pocket that is subject to polymerization and the possibility that liquid acetone will be released into the regulator. Shipping and Handling of Acetylene Acetylene is shipped in a cylinder packed with a porous mass material and a liquid solvent, commonly acetone. When the valve of a charged acetylene cylinder is opened, the acetylene comes out of solution and passes out in the gaseous form. It is crucial that fuse plugs in the tops and bottoms of all acetylene cylinders be thoroughly inspected whenever handled to detect 161
161 solvent loss. There should be no sources of ignition in the storage or use area. If rough handling or other occurrences should cause any fusible plug to leak, move the cylinder to an open space well away from any possible source and place a sign on the cylinder warning of "Leaking Flammable Gas". Contact laboratory managers at each campus. On-site Storage of Acetylene Do not store acetylene cylinders on their side. If an acetylene cylinder has tipped over or was stored on its side, carefully place the cylinder upright and do not use until the liquid has settled to the bottom. The rule of thumb is not to use the cylinder for as many minutes as the cylinder was on its side, up to 24 hours. Emergency Procedures for Accidents with Acetylene In case of skin contact: Skin effects are not likely. Contact with liquid acetylene may cause irritation upon repeated exposures. Wash affected area(s) with soap and warm water. If irritation develops, seek medical attention. In case of eye contact: Not a likely route of exposure, as acetylene is a gas at room temperature. Contact of liquid acetylene with the eyes may cause temporary irritation. Flush with water for at least 15 minutes. Seek medical attention as needed. In case of inhalation: Acetylene is an asphyxiant and may cause anesthetic effects at high concentrations. Victims should be assisted to an uncontaminated area with fresh. In case of ingestion: Not a likely route of exposure since acetylene is a gas at room temperature. Disposal of Acetylene Cylinders Acetylene cylinders should be returned to the compressed gas distributor when emptied or no longer used. Working with hazardous chemicals at high or low pressures requires planning and special precautions. Procedures should be implemented to protect against explosion or implosion through appropriate equipment selection and the use of safety shields. Care should be taken to select glass apparatus that can Bond and ground all cylinders, lines and equipment used with flammable compressed gases. i. Highly Toxic Gases Highly toxic gases, (such as arsine, fluorine, germane, diborane, hydrogen cyanide, boron trifluoride, ethylene oxide, phosgene, and silane) can pose a significant health risk in the event of a leak. Use of these materials requires written approval by the Principal Investigator or supervisor. The following additional precautions must be taken: 162
162 Use and store in a specially ventilated gas cabinet or fume hood. Use coaxial (double walled) tubing with nitrogen between the walls for feed lines operating above atmospheric pressure. Regulators should be equipped with an automatic shut-off to turn off gas supply in the event of sudden loss of pressure in the supply line. An alarm system should be installed to check for leaks in routinely used gases with poor warning properties. The alarm level must be set at or lower than the permissible exposure limit of the substance. 2. High Pressure Air Compressor High-pressure operations should be performed only in pressure vessels appropriately selected for the operation, properly labeled and installed, and protected by pressure-relief and necessary control devices. Vessels must be strong enough to withstand the stresses encountered at the intended operating temperatures and pressures and must not corrode or otherwise react when in contact with the materials it contains. Systems designed for use at elevated temperatures should be equipped with a positive temperature controller. Manual temperature control using a simple variable autotransformer, such as a Variac, should be avoided. The use of a back-up temperature controller capable of shutting the system down is strongly recommended. All pressure equipment should be inspected and tested at intervals determined by the severity of the equipment's usage. Visual inspections should be accomplished before each use. Hydrostatic testing should be accomplished before equipment is placed in initial service. Hydrostatic testing should be re-accomplished every ten years thereafter, after significant repair or modification, or if the vessel experiences overpressure or overtemperature. 3. Vacuum Apparatus Vacuum work can result in an implosion and the possible hazards of flying glass, splattering chemicals and fire. All vacuum operations must be set up and operated with careful consideration of the potential risks. Equipment at reduced pressure is especially prone to rapid pressure. Such conditions can force liquids through an apparatus, sometimes with undesirable consequences. Personal protective equipment, such as safety glasses or chemical goggles, face shields, and/or an explosion shield should be used to protect against the hazards of vacuum procedures, and the procedure should be carried out inside a hood. Do not allow water, solvents and corrosive gases to be drawn into vacuum systems. Protect pumps with cold traps and vent their exhaust into an exhaust hood. Assemble vacuum apparatus in a manner that avoids strain, particularly to the neck of the flask. Avoid putting pressure on a vacuum line to prevent stopcocks from popping out or glass apparatus from exploding. 163
163 Place vacuum apparatus in such a way that the possibility of being accidentally hit is minimized. If necessary, place transparent plastic around it to prevent injury from flying glass in case of an explosion. When possible, avoid using mechanical vacuum pumps for distillation or concentration operations using large quantities of volatile materials. A water aspirator or steam aspirator is preferred. This is particularly important when large quantities of volatile materials are involved. a. Vacuum Pumps Vacuum pumps are used in the lab to remove air and other vapors from a vessel or manifold. The most common usages are on rotary evaporators, drying manifolds, centrifugal concentrators ( speedvacs ), acrylamide gel dryers, freeze dryers, vacuum ovens, tissue culture filter flasks and aspirators, desiccators, filtration apparatus and filter/degassing apparatus. The critical factors in vacuum pump selection are: Application the pump will be used on Nature of the sample (air, chemical, moisture) Size of the sample(s) When using a vacuum pump on a rotary evaporator, a dry ice alcohol slurry cold trap or a refrigerated trap is recommended. A Cold Trap should be used in line with the pump when high vapor loads from drying samples will occur. Consult manufacturer for specific situations. These recommendations are based on keeping evaporating flask on rotary evaporator at 400 C. Operating at a higher temperature allows the Dry Vacuum System to strip boiling point solvents with acceptable evaporation rates. Vacuum pumps can pump vapors from air, water to toxic and corrosive materials like TFA and methylene chloride. Oil seal pumps are susceptible to excessive amounts of solvent, corrosive acids and bases and excessive water vapors. Pump oil can be contaminated quite rapidly by solvent vapors and mists. Condensed solvents will thin the oil and diminish its lubricating properties, possibly seizing the pump motor. Corrosives can create sludge by breaking down the oil and cause overheating. Excess water can coagulate the oil and promotes corrosion within the pump. Proper trapping (cold trap, acid trap) and routine oil changes greatly extend the life of an oil seal vacuum. Pump oil should be changed when it begins to turn a dark brown color. b. Vacuum Trapping When using a vacuum source, it is important to place a trap between the experimental apparatus and the vacuum source. The vacuum trap protects the pump and the piping from the potentially damaging effects of the material 164
164 protects people who must work on the vacuum lines or system, and prevents vapors and related odors from being emitted back into the laboratory or system exhaust. Proper Trapping Techniques: To prevent contamination, all lines leading from experimental apparatus to the vacuum source should be equipped with filtration or other trapping as appropriate. For particulates, use filtration capable of efficiently trapping the particles in the size range being generated For most aqueous or non-volatile liquids, a filter flask at room temperature is adequate to prevent liquids from getting to the vacuum source. For solvents and other volatile liquids, use a cold trap of sufficient size and cold enough to condense vapors generated, followed by a filter flask capable of collecting fluid that could be aspirated out of the cold trap. For highly reactive, corrosive or toxic gases, use a sorbent canister or scrubbing device capable of trapping the gas. c. Cold Traps For most volatile liquids, a cold trap containing a slush of dry ice with isopropanol or ethanol is sufficient (to -78 o C). Avoid using acetone. Ethanol and isopropanol are cheaper and less likely to foam. Liquid nitrogen may only be used with sealed or evacuated equipment, and then only with extreme caution. If the system is opened while the cooling bath is still in contact with the trap, oxygen may condense from the atmosphere and react vigorously with any organic material present. d. Glass Vessels Although glass vessels are frequently used in pressure and vacuum systems, they can explode or implode violently, either spontaneously from stress failure or from an accidental blow. Conduct pressure and vacuum operations in glass vessels behind adequate shielding. Ensure the glass vessel is designed for the intended operation. Carefully check glass vessels for star cracks, scratches or etching marks before each use. Cracks can increase the likelihood of breakage or may allow chemicals to leak into the vessel. Seal glass centrifuge tubes with rubber stoppers clamped in place. Wrap the vessel with friction tape and shield with a metal screen. Alternatively, wrap with friction tape and surround the vessel with multiple layers of loose cloth, then clamp behind a safety shield. Glass tubes with high-pressure sealers should be no more than 3/4 full. 165
165 Sealed bottles and tubes of flammable materials should be wrapped in cloth, placed behind a safety shield, then cooled slowly, first with an ice bath, then with dry ice. Never rely on corks, rubber stoppers or plastic tubing as pressure-relief devices. Glass vacuum desiccators should be made of Pyrex or similar glass and wrapped partially with friction tape to guard against flying glass. Plastic desiccators are a good alternative to glass, but still require shielding. Never carry or move an evacuated desiccator. e. Dewar Flasks Dewar flasks are under vacuum to provide insulation and can collapse from thermal shock or slight mechanical shock. Shield flasks with friction tape or enclose in a wooden or metal container to reduce the risk of flying glass. Use metal flasks if there is a significant possibility of breakage. Styrofoam buckets offer a short-term alternative to dewar flasks. 4. Rotovaps Rotovaps can implode under certain conditions. Since some Rotovaps contain components made of glass, this can be a serious hazard. Glass components of the rotary evaporator should be made of Pyrex or similar glass. Glass vessels should be either securely wrapped in electrical tape of completely enclosed in a shield to guard against flying glass should the components implode. Increase in rotation speed and application of vacuum to the flask whose solvent is to be evaporated should be gradual. Part VIII: SAFETY DATA SHEETS Safety Data Sheets provide information regarding the physical and chemical properties of a given product, and may include a description of potential hazards including health, storage, flammability, radioactivity, reactivity, prescribed emergency actions and manufacturer information. The SDS for each chemical found at Roosevelt University provides information about handling, transportation, and disposal of it in an appropriate manner. Safety Data Sheets for all chemicals purchased and stored at Roosevelt University are on file in the lab manager s office. As part of preparation for an experiment, it is good practice to look over any appropriate Material Safety Data Sheets. If an SDS for a chemical is missing from the binder in the office, please notify the laboratory manager immediately. While one may be able to find an SDS online from various sites such as the particular chemical vendor will provide an exact SDS for each purchased chemical. 166
166 LABORATORY ASSISTANT/RESEARCH STUDENT SAFETY CONTRACT DEPARTMENT OF BIOLOGICAL, CHEMICAL, & PHYSICAL SCIENCES It is essential to maintain a safe environment in teaching laboratories. Maintaining a safe environment requires constant vigilance and communication by faculty, lab assistants, and students. All people present throughout the laboratories should participate with following these rules, which are designed to protect the safety of everyone working throughout the laboratories. 1. I will not eat or drink in the laboratories. I will confine eating and drinking to the tables in the hallway or the cafeteria. Drinks brought into the labs should be capped or covered and kept in a closed backpack or other bag by the entrance to the labs. 2. I will wear the proper eye protection while working in the labs. The RU Departmental policy on eye protection is described in Roosevelt s Chemical Hygiene Plan and the Laboratory Safety Training Manual. While I am supervising students I will ensure they are wearing the proper eye protection. 3. I will wear a full-sleeve lab coat which is completely buttoned while in RU laboratories. I will not wear my lab coat outside of the laboratories, so as not to expose others to hazards. Nor will it be placed on tables, benches or chairs in the hallways but stored in a bag when not in use. 4. I will wear socks and shoes that cover the entire foot; no ballet flats. I acknowledge that sandals and ballet flats are not appropriate in the laboratory because exposed skin can be harmed by spilled chemicals. 5. I will wear pants while in laboratory; leggings that are skin tight are not allowed. I acknowledge that shorts and leggings are not appropriate. 6. I will wear gloves when handling chemicals or biohazardous materials. 7. I will tie back long hair to keep it away from flames and chemicals. Hats are inappropriate for the lab. 8. I will keep my cell phone on vibrate or turned off while in the laboratories. If I need to make an important call I will step outside of the labs so as not to distract others. I will not touch my cellphone with gloves on to prevent contamination. 9. I am familiar with the locations of: exits; fire blankets, alarms, and extinguishers; gas shutoff buttons; safety showers; eyewash stations; first-aid kits; broken glass containers; spill kits; PPE; SDS binders. 10. I understand how to respond in case of an emergency. 11. I am aware of all the safety hazards involved with every chemical I am using, as described in the SDS. I will follow all safety precautions and PPE recommended for this chemical. 12. I will report all spills and other safety hazards to the laboratory manager or a safety officer and make sure they are under control before I leave for the day. Glass spills require use of a hand broom and dustpan to prevent injury. 13. I will clearly label all solutions generated during my laboratory work. I will label solutions with the compound, concentration, date, key word, class information and my initials. 14. I will only remove as much of a chemical that is needed for the experiment or class and not returned unused chemicals to the original container; they are to disposed of as waste. 15. I will dispose of wastes in their appropriate containers, as I learned during safety training. I will not pour any chemicals down the sink or in regular trash. 16. I will properly clean up after my class or my laboratory work. This means that all dishes must be cleaned immediately. 17. I will not leave apparatuses containing chemical reactions unattended or unlabeled. If I need to leave a reaction running overnight, I will set it up in a hood and leave a note with instructions and contact information. 18. I will turn off any instruments, such as hot water baths, before leaving the labs for the day. If I need to leave something on, I will leave a note with instructions and contact information. I will also the laboratory manager with this information. I will not move heated devices or glassware until they have sufficiently cooled to prevent burns. 167
167 19. I will not bring my children into the labs while I work, as there are many hazards throughout the labs. 20. Lab assistants: I will not leave students working in the laboratory unsupervised. 21. Lab assistants: I will not allow students to come in outside of class and work on an experiment unless I am present. 22. Research students: I will not work with dangerous chemicals or instruments while alone. The laboratory manager went through the list above during laboratory safety training. As a laboratory assistant, I understand that violation of any of the above safety rules may result in termination of my employment. As a research student, I understand that I will be asked to leave the laboratories should I fail to comply with any of these rules. NAME and ID# (Print): SIGNATURE: DATE: LABORATORY SAFETY CONTRACT DEPARTMENT OF BIOPHARMACEUTICAL SCIENCES 1.Watch video: Introduction to Lab Safety Workspace 2. Take Online Quiz and upload your Certificate/ID of completion at 71_1&course_id=_318356_1 All people present throughout the laboratory sessions should participate in observing following these rules, which are designed to protect the safety of everyone working throughout the laboratories. 1. I will not eat or drink in the laboratories. I will confine eating and drinking to the tables in the hallway or the cafeteria. Drinks brought into the labs should be capped or covered and kept in a closed backpack or other bag by the entrance to the labs. 2. I will wear the proper eye protection while working in the labs. The RU Departmental policy on eye protection is described in Roosevelt s Chemical Hygiene Plan and the Laboratory Safety Training Manual. 3. I will wear a full-sleeve lab coat, which is completely buttoned while in RU laboratories. I will not wear my lab coat outside of the laboratories, so as not to expose others to hazards. Nor will it be placed on tables, benches or chairs in the hallways but stored in a bag when not in use. 4. I will wear socks and shoes that cover the entire foot; no ballet flats. I acknowledge that sandals are not appropriate in the laboratory because spilled chemicals can harm exposed skin. 5. I will wear pants while in laboratory; leggings that are skin tight are not allowed. I acknowledge that shorts and leggings are not appropriate. 6. I will wear gloves when handling chemicals or biohazardous materials. 7. I will tie back long hair to keep it away from flames and chemicals. Hats are inappropriate for the lab. 8. I will keep my cell phone on vibrate or turned off while in the laboratories. If I need to make an important call I will step outside of the labs so as not to distract others.. I will not touch my cellphone with gloves on to prevent contamination. 9. I am familiar with the locations of: exits; fire blankets, alarms, and extinguishers; gas shutoff buttons; safety showers; eyewash stations; first-aid kits; broken glass containers; spill kits; PPE; SDS binders. 168
168 10. I understand how to respond in case of an emergency. 11. I am aware of all the safety hazards involved with every chemical I am using, as described in the SDS. I will follow all safety precautions and PPE recommended for this chemical. 12. I will report all spills and other safety hazards to the laboratory manager or a safety officer and make sure they are under control before I leave for the day. Glass spills require use of a hand broom and dustpan to prevent injury. 13. I will clearly label all solutions generated during my laboratory work. I will label solutions with the compound, concentration, date, and my initials. 14. I will dispose of wastes in their appropriate containers, as I learned during safety training. 15. I will properly clean up after my class or my laboratory work. This means that all dishes must be cleaned immediately. 16. I will not leave apparatuses containing chemical reactions unattended or unlabeled. If I need to leave a reaction running overnight, I will set it up in a hood and leave a note with instructions and contact information. 17. I will turn off any instruments, such as hot water baths, before leaving the labs for the day. If I need to leave something on, I will leave a note with instructions and contact information. I will also the laboratory manager with this information. 18. I will not bring my children into the labs while I work, as there are many hazards throughout the labs. The laboratory Instructor went through the list above during laboratory safety training. As a student, I understand that I will be asked to leave the laboratories should I fail to comply with any of these rules. NAME (Print legibly): SIGNATURE: DATE: RESEARCH SAFETY CONTRACT COLLEGE OF PHARMACY LABORATORY ACTIVITIES RELEASE AND WAIVER OF LIABILITY I HAVE READ, UNDERSTAND, and INITIALED the Rules for Working in Roosevelt University Laboratories. I HAVE COMPLETED the Emergency Information Sheet with emergency contact information should I incur injury. I fully understand that there are potential risks and hazards associated with exposure to hazardous materials or substances. I AGREE TO work in Roosevelt University laboratories and freely accept and assume all associated risks and hazards. I expressly agree that I may suffer injury, illness, or even death from my activities or presence in the laboratory. I ALSO AGREE AND UNDERSTAND that my project may be suspended at any time, at the discretion of the Roosevelt University and its officers, agents, and employees, if my safety, Roosevelt University employees, students, and/or other volunteers at the Roosevelt University become a concern. I, hereby release and hold harmless the State of Illinois, the Roosevelt University Board of Trustees, and their officers, directors, employees, representatives, agents, and volunteers (collectively, the Releasees ), from any and all liability and responsibility whatsoever, however caused, for any and all damages, claims, or causes of action that I, my estate, heirs, 169
169 administrators, executors, or assigns may have for any loss, illness, personal injury, death, or property damage arising out of, connected with, or in any manner pertaining to my activities in Roosevelt University laboratories, whether caused by the negligence of Releasees or otherwise. I further hereby agree to defend, indemnify and hold harmless the Releasees from any judgment, settlement, loss, liability, damage, or costs, including court costs and attorney fees that Releasees may incur. In signing this agreement, I acknowledge and represent that I have read and understand it and that I sign it voluntarily and for full and adequate consideration, fully intending to be bound by the same. I expressly agree that this Release is intended to be as broad and inclusive as permitted by the laws of Illinois, by which it shall be governed and interpreted. I agree that in the event that any clause or provision in this Release shall be held to be invalid by any court of competent jurisdiction, the invalidity of such clause or provision shall not otherwise affect the remaining provisions of this Release, which shall continue to be enforceable. Signature Printed Name Date POTENTIAL HAZARDS IN ROOSEVELT UNIVERSITY LABORATORIES Category Definition Hazards Examples Minimum Hazard Biological Agents: hazards with which minimum biosafety precautions are required Baker s yeast, preserved biological specimens Recombinant DNA: genetically modified organisms with variations in genes within organisms E. coli bacteria transformed with plasmid DNA Carcinogens: may cause some sort of cancer with long term exposure usually many years into the future Corrosives: may cause tissue damage with contact through inhalation, eye, skin, etc. Benzene Hydrochloric acid, sodium hydroxide 170
170 classifications (e.g., flammable, toxin, & carcinogen) Flammables: may burn or explode Reactives: may react violently or explosively Acetone, ethanol Peroxides, picric acid, sodium Reproductive toxins: may affect the reproductive system of males and females Teratogens: may cause birth defects in the developing fetus Toxins: may cause illness or death upon exposure Explosion hazard: may occur if cylinder is ruptured Asphyxiant hazard: may displace oxygen if gas is vented into the workplace Tissue damage hazards Toluene, xylene, ethidium bromide Ethanol, methanol, diethyl ether Cyanides, arsenic compounds Hydrogen, oxygen Nitrogen, helium, acetylene, argon Scrapes, cuts Cold damage Heat damage Liquid nitrogen, dry ice Heating plates Initials: Date: RULES FOR WORKING IN ROOSEVELT UNIVERSITY LABORATORIES 1. Never work alone in any laboratory environment without direct, immediate adult supervision from the sponsor or someone designated by the sponsor. 2. Complete and follow safety training specific to the hazards in the laboratory. Basic training will be provided when you arrive at the laboratory. Additional training requirements may apply depending on the nature of the work that will be conducted in the laboratory. 3. Always wear the appropriate personal protective equipment (PPE) as directed and dispose of it correctly. PPE includes goggles, gloves, coats/gowns, and other face/body protection as dictated by the hazard being worked with or around. Always remove PPE when leaving the work area. 4. Always follow the instructions of the sponsor or laboratory supervisor. 171
171 5. Always report any accident (regardless of severity) immediately to the sponsor or laboratory supervisor. 6. Always keep your hands away from your face and wash them well with soap and water prior to leaving any laboratory area and after removing gloves. 7. Never eat, drink, chew gum, apply lip balm, or touch contact lenses while in any laboratory environment. 8. Always wear closed-toe shoes while in any laboratory. 9. Always tie back long hair to keep it out of all the hazards listed above. 10. Always wear clothing that reduces the amount of exposed skin. 11. Always ask questions if you don t understand the safety requirements. Initials: Date: EMERGENCY INFORMATION SHEET Please list all known allergies, including chemicals or latex: 172
172 Please list an emergency contact: Printed name of contact Phone number of contact Laboratory Safety Rules and Agreement The teaching laboratory is a classroom and your full attention is required. For both safety reasons and to avoid disrupting classroom activities you must TURN OFF all cell phones and pagers; their use is prohibited. All persons in laboratories, including students, staff, and visitors, shall wear safety glasses (prescription glasses are acceptable), goggles, or face shields at all times where potential eye hazards exist. Goggles are recommended where chemical splashes are possible. If contact lenses are to be worn, goggles should protect the eyes when potential eye hazards exist. 173
173 Eating, drinking, chewing gum, and applying cosmetics are prohibited in the Chemistry Laboratories (Rm 552 and 553). Do not store food or beverages in the same refrigerators or freezers with chemicals, biohazards, or radioactive materials. Appropriate gloves are essential when working with hazardous substances. All glove materials are not equally effective in protection from hazardous substances; consult a chemical resistance chart, a glove manufacturer, or EH&S for appropriate selection. Never conduct unauthorized experiments or engage in horseplay in a laboratory. Please immediately report any unsafe behavior to the instructor. Wear appropriate clothing. In particular, you must wear closed-toed shoes (i.e., NO sandals or flipflops!) in the laboratory. Avoid wearing your best clothes, and if you have long hair tie it back. Avoid wearing dangling jewelry. Wearing an ipod, Bluetooth, or any other device that interferes with hearing is not allowed. Never pipet anything by mouth. The work area must be kept clean and uncluttered. All chemicals should be labeled and stored properly. Never work alone in the laboratory. The hazards of chemicals used should be known (e.g., corrosiveness, flammability, reactivity, stability, and toxicity). Material Safety Dat Sheets (MSDSs) are available for all non-routine or acutely toxic chemicals used and stored in the laboratory. Always pay attention to your surroundings and be aware of what others are doing. Remove contaminated gloves before touching common use devices (door knobs, faucets, equipment); discard gloves before leaving the laboratory. Always wash hands and arms with soap and water before leaving the laboratory. No smoking! Emergency Know where to find the nearest exit in case of fire or other emergency. Know the whereabouts of the nearest fire extinguisher, fire blanket, first aid kit, eye wash equipment, shower and telephone. For on-campus emergencies call x8989 In case of fire, clear out of the laboratory first, and then call an emergency number. Hazardous equipment If appropriate, turn off equipment that isn't being used. Keep liquids and chemicals, especially flammable materials, well away from any heat source or electrical equipment. If any electrical equipment is malfunctioning, making strange noises, sparking, smoking, or smells "funny," do not attempt to shut it off or unplug it. Get an instructor immediately. It is imperative that the instructor knows of any equipment problems. Cleanup Clean spilled chemicals from equipment such as balances - they can corrode and ruin equipment. Mop any liquid spills - they are a slip hazard. 174
174 Be especially careful around the ice machine - spilled ice quickly melts, creating a slip hazard. Clean up your bench area at the end of the day, or during your session in the lab if things are too messy. Always wash your hands before leaving the laboratory. General conduct Keep coats, purses, backpacks, books, and similar materials away from your work area and out of the way of your colleagues. Please stash such items in an appropriate, perhaps designated location. We mustn't force people to step over a backpack placed in an aisle between benches, for example. Also, consider what will happen to such items if someone spills chemicals or biohazardous materials on them. The computers in the classroom are NOT for personal use. Do not surf the net or attempt to check . On occasion, special equipment, e.g., stir plates, ointment tiles, porcelain casseroles, will be used from the storeroom and this equipment should be returned complete, clean, and dry at the end of the experiment. When using equipment, be certain that you understand how to operate the device safely. Any equipment or areas you use must be cleaned after use. For example, the centrifuges should be wiped out and the rotors rinsed and allowed to drain. Do not waste materials, including disposable items and reagents. This practice is economically and ecologically important. Calculate how much you will need and take only a slightly greater amount (about 10% excess). Do not return excess reagent to the stock bottles. Discard properly at the end of lab period. Pay attention to the discussions prior to the experiment for special disposal instructions. Do not pipet directly from bottles or jugs containing buffers or reagents. Be careful to use a clean pipet tip and do not contaminate these solutions. Put the lids on stock solutions and reagents after using them. Otherwise solutions can become contaminated or just evaporate. Many solid reagents are hygroscopic and pull water out of the air. Do NOT write on plastic/glass labware; use lab TAPE. If you don't find some of the required equipment or reagents, ask the instructor or a TA for help. On the last day of lab, your tote must contain ALL the items on the list; REMOVE all labels and EMPTY all containers. 175
175 I have read and understood the above rules of safety and I agree to abide by all of these rules, follow the instructor s directions (both written and verbal) and act responsibly and safely at all times. Printed Name Signature Date LABORATORY ACTIVITIES RELEASE AND WAIVER OF LIABILITY I HAVE READ, UNDERSTAND, and INITIALED the Rules for Minors Working in Roosevelt University Laboratories. I HAVE COMPLETED the Emergency Information Sheet with emergency contact information should my minor child incur injury. I fully understand that there are potential risks and hazards associated with exposure to hazardous materials or substances, and I have carefully discussed them with my minor child. I AGREE TO ALLOW my minor child to work in Roosevelt University laboratories and freely accept and assume all associated risks and hazards. I expressly agree that my minor child may suffer injury, illness, or even death from his/her activities or presence in the laboratory. I ALSO AGREE AND UNDERSTAND that my child s project may be suspended at any time, at the discretion of the Roosevelt University and its officers, agents, and employees, if the safety of my child, Roosevelt University employees, students, and/or other volunteers at the Roosevelt University become a concern. I, for my minor child, myself and his/her and/or my estate, heirs, administrators, executors, and assigns, hereby release and hold harmless the State of Illinois, the Roosevelt University Board of Trustees, and their officers, directors, employees, representatives, agents, and volunteers (collectively, the Releasees ), from any and all liability and responsibility whatsoever, however caused, for any and all damages, claims, or causes of action that I, my minor child, his/her and/or my estate, heirs, administrators, executors, or assigns may have for any loss, illness, personal injury, death, or property damage arising out of, connected with, or in any manner pertaining to my child s activities in Roosevelt University laboratories, whether caused by the negligence of Releasees or otherwise. I further hereby agree to defend, indemnify and hold harmless the Releasees from any judgment, settlement, loss, liability, damage, or costs, including court costs and attorney fees that Releasees may incur. 176
176 In signing this agreement, I acknowledge and represent that I have read and understand it and that I sign it voluntarily and for full and adequate consideration, fully intending to be bound by the same. My minor child and I expressly agree that this Release is intended to be as broad and inclusive as permitted by the laws of Illinois, by which it shall be governed and interpreted. My minor child and I agree that in the event that any clause or provision in this Release shall be held to be invalid by any court of competent jurisdiction, the invalidity of such clause or provision shall not otherwise affect the remaining provisions of this Release, which shall continue to be enforceable. Signature of Parent/Legal Guardian Printed Name of Parent/Legal Guardian Signature of Minor Printed Name of Minor Date D.O.B. of Minor POTENTIAL HAZARDS IN ROOSEVELT UNIVERSITY LABORATORIES Category Definition Hazards Examples Minimum Hazard Biological Agents: hazards with which minimum biosafety precautions are required Baker s yeast, preserved biological specimens Recombinant DNA: genetically modified organisms with variations in genes within organisms Carcinogens: may cause some sort of cancer with long term exposure usually many years into the future Corrosives: may cause tissue damage with contact through inhalation, eye, skin, etc. Flammables: may burn or explode Reactives: may react violently or explosively E. coli bacteria transformed with plasmid DNA Benzene Hydrochloric acid, sodium hydroxide Acetone, ethanol Peroxides, picric acid, sodium 177
177 Reproductive toxins: may affect the reproductive system of males and females Teratogens: may cause birth defects in the developing fetus Toxins: may cause illness or death upon exposure Toluene, xylene, ethidium bromide Ethanol, methanol, diethyl ether Cyanides, arsenic compounds Explosion hazard: may occur if cylinder is ruptured Asphyxiant hazard: may displace oxygen if gas is vented into the workplace Hydrogen, oxygen Nitrogen, helium, acetylene, argon Tissue damage hazards Cold damage Heat damage Scrapes, cuts Liquid nitrogen, dry ice Heating plates Parent/Legal Guardian Initials: Date: Minor Initials: Date: RULES FOR MINORS WORKING IN ROOSEVELT UNIVERSITY LABORATORIES 1. Never work alone in any laboratory environment without direct, immediate adult supervision from the sponsor or someone designated by the sponsor. 2. Complete and follow safety training specific to the hazards in the laboratory. Basic training will be provided when you arrive at the laboratory. Additional training requirements may apply depending on the nature of the work that will be conducted in the laboratory. 3. Always wear the appropriate personal protective equipment (PPE) as directed and dispose of it correctly. PPE includes goggles, gloves, coats/gowns, and other face/body protection as dictated by the hazard being worked with or around. Always remove PPE when leaving the work area. 4. Always follow the instructions of the sponsor or laboratory supervisor. 5. Always report any accident (regardless of severity) immediately to the sponsor or laboratory supervisor. 178
178 6. Always keep your hands away from your face and wash them well with soap and water prior to leaving any laboratory area and after removing gloves. 7. Never eat, drink, chew gum, apply lip balm, or touch contact lenses while in any laboratory environment. 8. Always wear closed-toe shoes while in any laboratory. 9. Always tie back long hair to keep it out of all the hazards listed above. 10. Always wear clothing that reduces the amount of exposed skin. 11. Always ask questions if you don t understand the safety requirements. Parent/Legal Guardian Initials: Date: Minor Initials: Date: EMERGENCY INFORMATION SHEET Please list all known allergies of the minor, including chemicals or latex: Please list an emergency contact: Printed name of contact 179
179 Phone number of contact INTERNAL INCIDENT REPORT DEPARTMENT OF BIOLOGICAL, CHEMICAL, & PHYSICAL SCIENCES PLEASE TYPE OR PRINT ALL INFORMATION NEATLY INTO THE BLANK BOXES. CURRENT DATE: DATE AND TIME OF INCIDENT: LOCATION OF INCIDENT: IF MULTIPLE PEOPLE WERE INJURED IN THIS INCIDENT, COMPLETE A SEPARATE INTERNAL ACCIDENT REPORT FOR EACH INJURED PARTY. FILL IN THE FOLLOWING INFORMATION PERTAINING TO THE INJURED PARTY: LAST NAME: FIRST NAME: STUDENT ID #: SEX: DATE OF BIRTH: HOME ADDRESS: APT OR UNIT #: CITY: STATE: ZIP CODE: CHOOSE THE STATUS OF THE INJURED PARTY: STUDENT: EMPLOYEE: OTHER (DESCRIBE): IF INJURED PARTY IS AN EMPLOYEE, PLEASE COMPLETE THE AREAS BELOW: CAMPUS: DEPARTMENT: JOB TITLE: 180
180 WAS HUMAN RESOURCES CONTACTED? NAME OF HR CONTACT: PLEASE COMPLETE THE INFORMATION BELOW: IF THERE WAS CHEMICAL EXPOSURE, PLEASE LIST THE CHEMICAL(S) INVOLVED: WITNESS(ES) NAME(S): WITNESS(ES) PHONE NUMBER(S): PLEASE INDICATE ALL PERFORMED ACTIONS WHICH APPLY, AND PROVIDE DETAILS IN THE BOX AT THE RIGHT: 911 CALLED CAMPUS SECURITY CALLED DEPARTMENT CHAIR CALLED EMERGENCY CONTACT CALLED MSDS PROVIDED TO EMT OR STUDENT INJURED PARTY ARRANGED FOR THEIR OWN TRANSPORTATION TO EMERGENCY ROOM CALLED OWN DOCTOR S OFFICE FOR ADVICE USED ROOSEVELT UNIVERSITY S FIRST-AID KIT TO ADMINISTER CARE OTHER (PLEASE EXPLAIN) PROVIDE NARRATIVES FOR THE TWO SECTIONS BELOW. DESCRIBE THE ACTIVITY LEADING UP TO THE INCIDENT AND THE EMERGENCY RESPONSE: 181
181 DESCRIPTION OF INJURY: NAME OF REPORT PREPARER: SIGNATURE OF REPORT PREPARER: NEAR MISS REPORT DEPARTMENT OF BIOLOGICAL, CHEMICAL AND PHYSICAL SCIENCES A near miss is a potential hazard or incident that has not resulted in any personal injury. Unsafe working conditions, unsafe employee work habits, improper use of equipment, or use of malfunctioning equipment have the potential to cause work related injuries. It is everyone's responsibility to report and/or correct these potential accidents/incidents immediately. Please complete this form within 24 hours as a means to correct these near miss situations. LOCATION/ROOM NUMBER: DATE: 182
182 TIME: PLEASE CHECK ALL APPROPRIATE CONDITIONS: UNSAFE ACT UNSAFE CONDITION UNSAFE EQUIPMENT UNSAFE USE OF EQUIPMENT DESCRIPTION OF INCIDENT OR POTENTIAL HAZARD: EMPLOYEE NAME: EMPLOYEE SIGNATURE: NEAR MISS INVESTIGATION CAUSES (primary & contributing): CORRECTIVE ACTION TAKEN (removal of hazard, replace, repair, or retrain proper procedures): IF CORRECTIVE ACTION NOT TAKEN, PLEASE EXPLAIN: RESPONDENT: LAB MGR SIGNATURE: 183
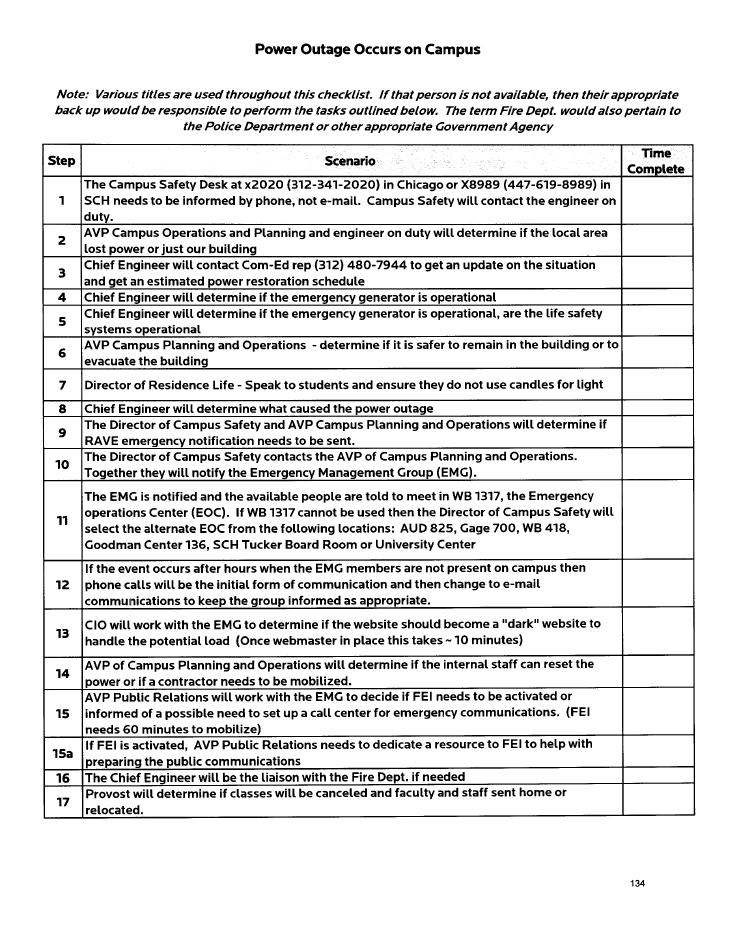
183 184
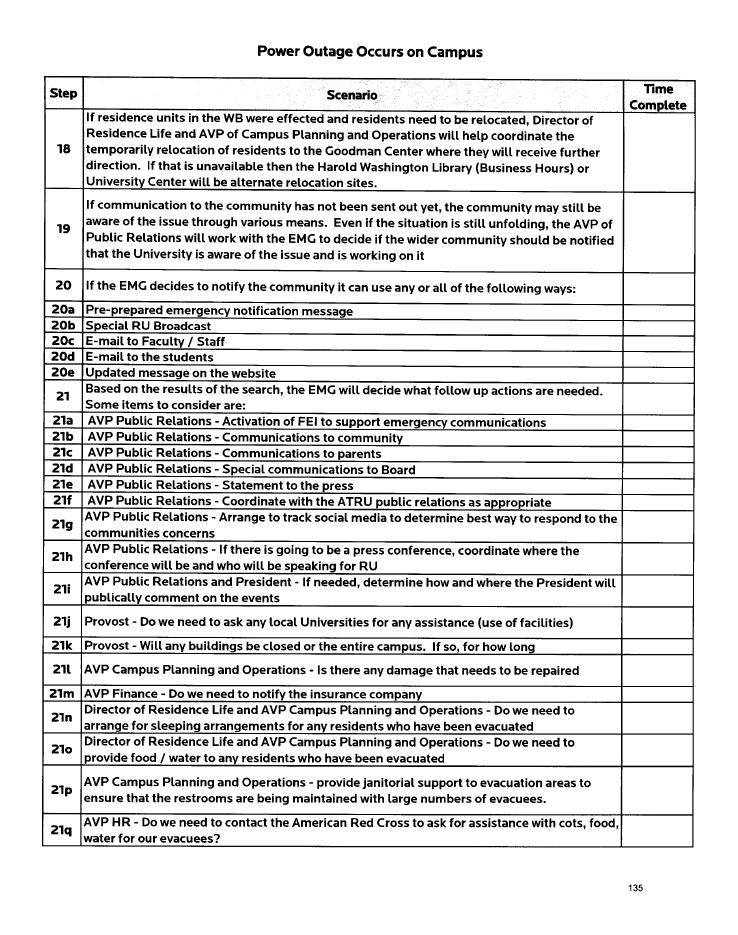
184 185
185 186
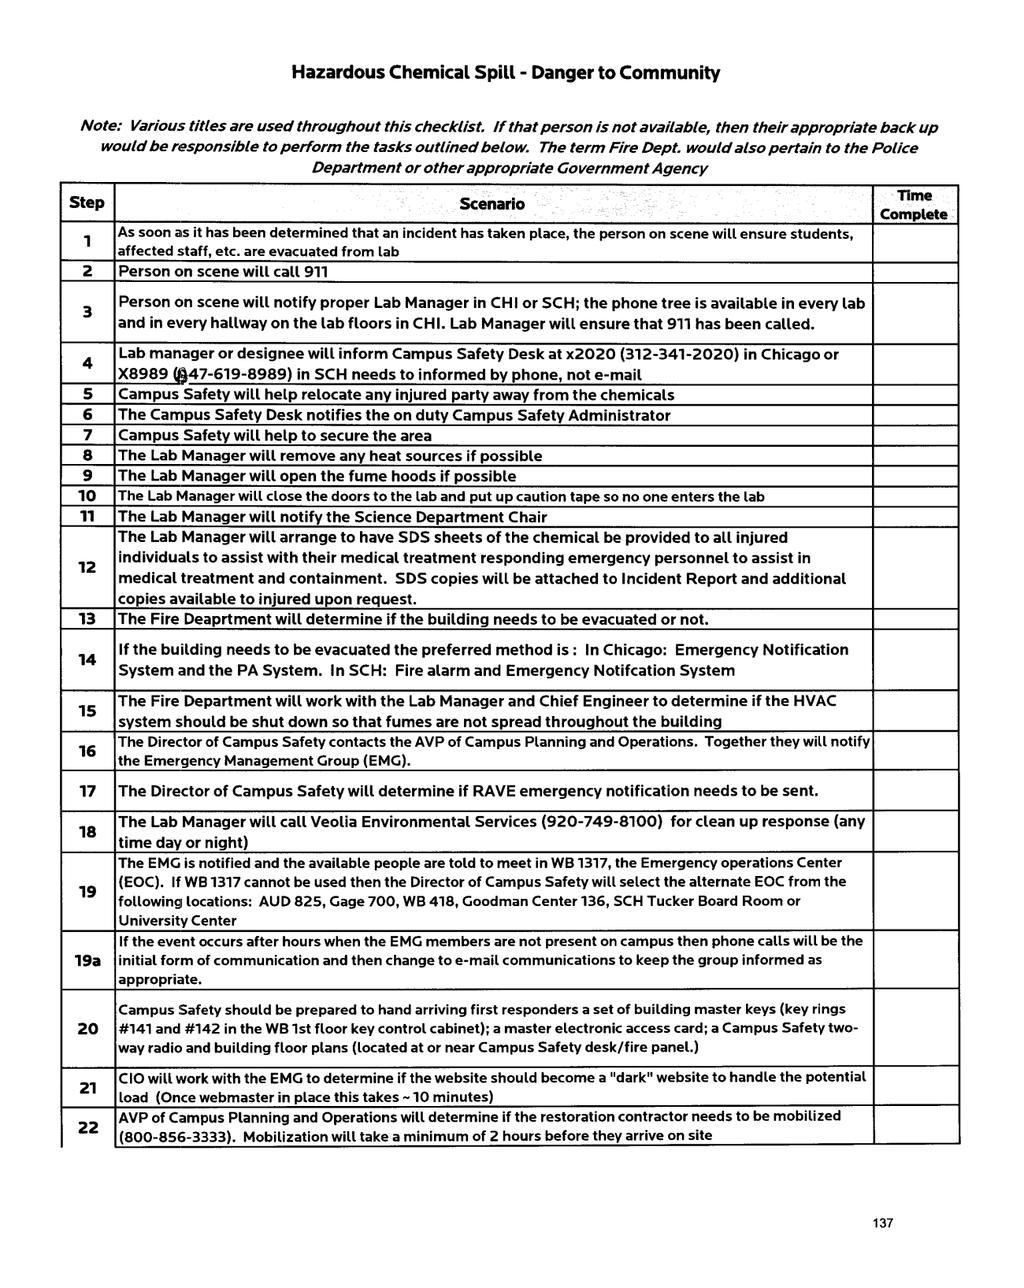
186 187
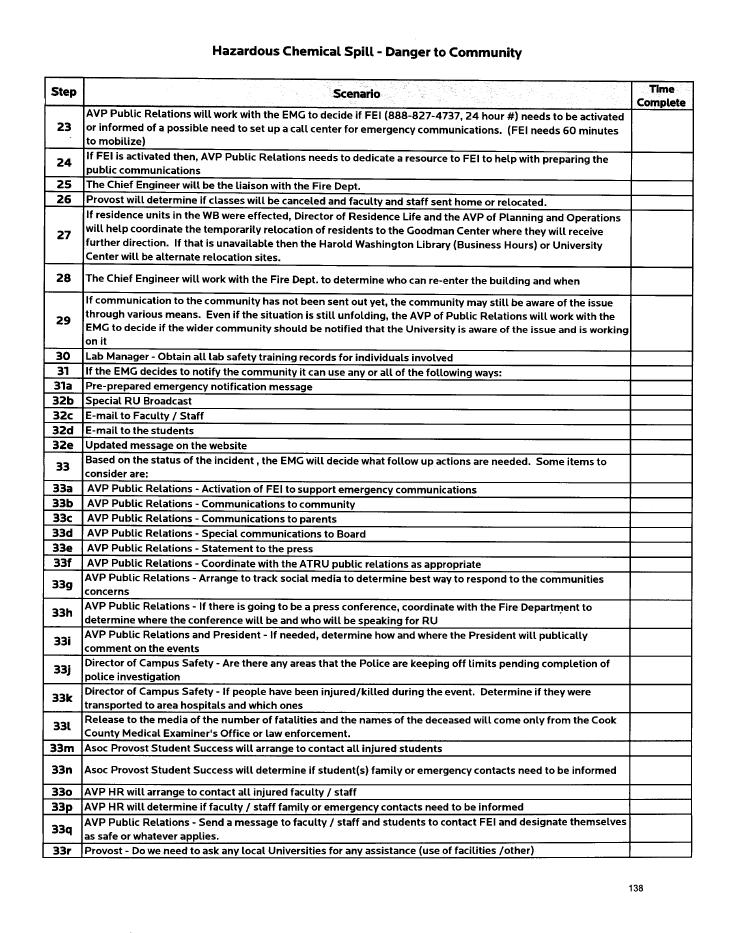
187 188
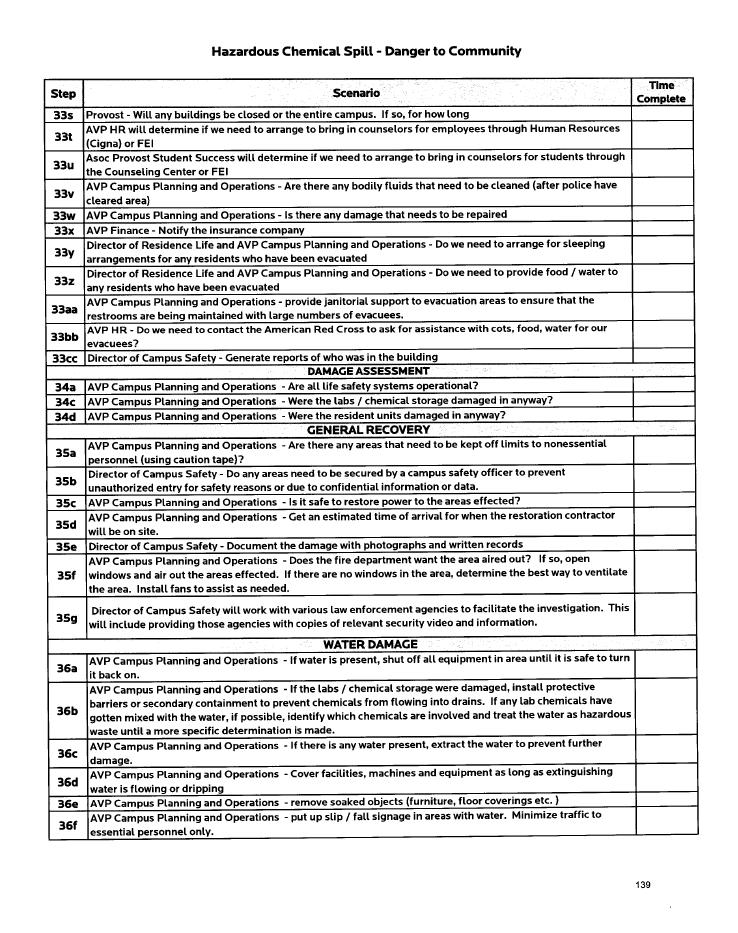
188 189
189 190

190 191
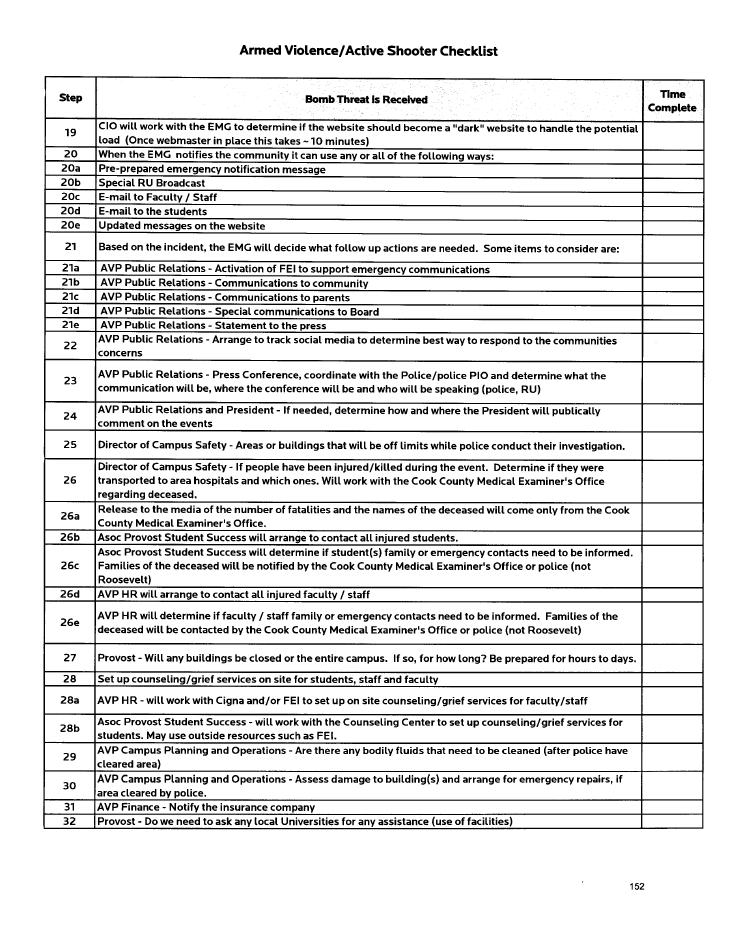
191 192
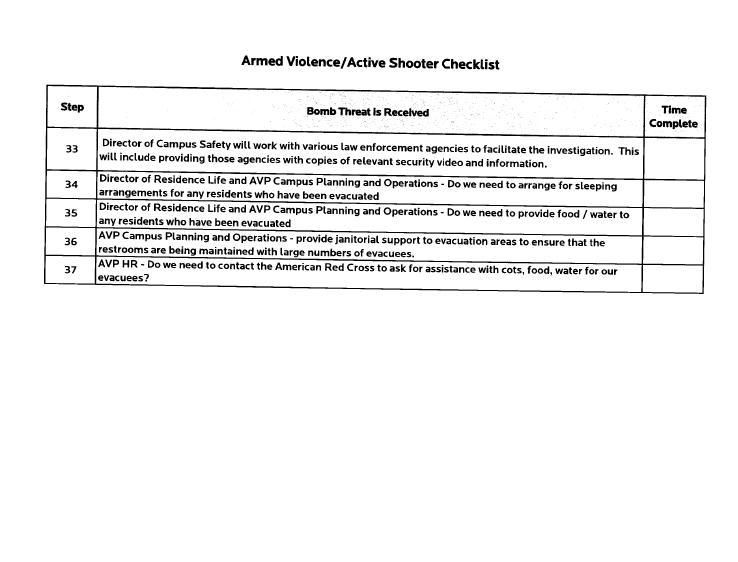
192 193
LABORATORY SAFETY INSPECTION
 LABORATORY SAFETY INSPECTION DATE: P.I./LAB MANAGER(S): PHONE(S): DEPARTMENT: BUILDING: ROOM(S) INSPECTED: INSPECTOR(S): TIME IN: TIME OUT: TOTAL TIME: LAB TYPE: DISCIPLINE: General Laboratory Safety S
LABORATORY FUME HOOD SPECIFICATION AND MAINTENANCE PROGRAM
 LABORATORY FUME HOOD SPECIFICATION AND MAINTENANCE PROGRAM Last Updated: Tuesday, January 31, 2006 1. INTRODUCTION AND SCOPE 2. RESPONSIBILITIES 3. USER GUIDELINES 4. SYSTEM DESIGN SPECIFICATIONS o The
Laboratory Inspection Checklist
 Date: Time: Inspector(s): Laboratory Information Department Principal Investigator (PI)/Laboratory Instructor PI telephone number PI e-mail address Building Laboratory room number(s) Backup Safety Contact
Laboratory Safety Review Checklist One Shields Ave Davis, CA Phone: (530) Fax: (530)
 Fax: (530)") http://safetyservices.ucdavis.edu Laboratory Safety Review Checklist One Shields Ave Davis, CA 95616 Phone: (530)752-1493 Fax: (530)752-4527 E-mail: researchsafety@ucdavis.edu U C Davis Environmental Health
http://safetyservices.ucdavis.edu Laboratory Safety Review Checklist One Shields Ave Davis, CA 95616 Phone: (530)752-1493 Fax: (530)752-4527 E-mail: researchsafety@ucdavis.edu U C Davis Environmental Health
Western Sydney University Safety Inspection Checklist - Laboratory Environments
 Western Sydney University Safety Inspection Checklist - Laboratory Environments Useful Hint: To maximise the benefits that can be gained from a workplace inspection activity read the Western Sydney University
Chapter 4: Implementing Effective Exposure Controls
 Chapter 4: Implementing Effective Exposure Controls Implementing effective controls to protect workers from health hazards requires attention and dedication. For example, equipment needs to be purchased,
Safety Manual > Safety Checklist for Labs
 Safety Manual > Safety Checklist for Labs Safety Checklist For Labs Where Infectious Agents And Recombinant DNA Research Is Performed This Checklist is to be used for research labs using infectious agents
Laboratory Safety Training. Environmental Health and Safety
 Laboratory Safety Training Environmental Health and Safety Why You Need Lab Safety Training Hazardous materials and/or equipment. You need to understand the risks and how to mitigate them. OSU requires
Environmental: Hazardous Waste: Satellite Accumulation Areas (SAA)
") https://ehs.mit.edu/site/content/inspections-level-i-level-ii Level I Guidance Documentation Environmental: Hazardous Waste: Satellite Accumulation Areas (SAA) 1. Is all hazardous waste stored in the satellite
https://ehs.mit.edu/site/content/inspections-level-i-level-ii Level I Guidance Documentation Environmental: Hazardous Waste: Satellite Accumulation Areas (SAA) 1. Is all hazardous waste stored in the satellite
TEMPLE UNIVERSITY ENVIRONMENTAL HEALTH AND RADIATION SAFETY
 Page 1 of 9 ISSUED: 5/00 REVISED: 08/06 Introduction Purpose: In accordance with applicable regulations and Temple University, this policy was developed to minimize exposure to Ethylene Oxide. Applicability
PURPOSE OF THE POLICY
 Title: Safe Storage, Handling, Use and Disposal Procedures of Compressed Gas Cylinders Effective Date: November 2005 Revision Date: March 1, 2017 Issuing Authority: Responsible Officer: VP, Capital Projects
STANDARD OPERATING PROCEDURES (SOP) FOR REPRODUCTIVE HAZARDS
 FOR REPRODUCTIVE HAZARDS") STANDARD OPERATING PROCEDURES (SOP) FOR REPRODUCTIVE HAZARDS INTRODUCTION: Standard operating procedures (SOP) are intended to provide you with general guidance on how to safely work with a specific class
STANDARD OPERATING PROCEDURES (SOP) FOR REPRODUCTIVE HAZARDS INTRODUCTION: Standard operating procedures (SOP) are intended to provide you with general guidance on how to safely work with a specific class
Laboratory Safety Review Checklist One Shields Ave Davis, CA Phone: (530) Fax: (530)
 Fax: (530)") http://safetyservices.ucdavis.edu Laboratory Safety Review Checklist One Shields Ave Davis, CA 95616 Phone: (530)752-1493 Fax: (530)752-4527 E-mail: ehsdesk@ucdavis.edu U C Davis Environmental Health and
http://safetyservices.ucdavis.edu Laboratory Safety Review Checklist One Shields Ave Davis, CA 95616 Phone: (530)752-1493 Fax: (530)752-4527 E-mail: ehsdesk@ucdavis.edu U C Davis Environmental Health and
Biosafety Level 2 (BSL2) Laboratory Safety Inspection Checklist
 Laboratory Safety Inspection Checklist") Conducted By: Date of Inspection: Location: Safety and Risk Management Office Biosafety Level 2 (BSL2) Laboratory Safety Inspection Checklist Principal Investigator/Supervisor: General Lab Housekeeping
Conducted By: Date of Inspection: Location: Safety and Risk Management Office Biosafety Level 2 (BSL2) Laboratory Safety Inspection Checklist Principal Investigator/Supervisor: General Lab Housekeeping
Research Laboratory Safety Self-Inspection: Chemical & Physical Safety Checklists
 Research Laboratory Safety Self-Inspection: Chemical & Physical Safety Checklists Principal Investigator: Lab Building: Lab Rooms: Department: Inspector Name: Inspection Date: Question Y N NA Comments
Laboratory Self Inspection Checklist LAB01
 Laboratory Self Inspection Checklist LAB01 General Chemical/Biological Laboratories Location Assessor Date This core checklist is provided by the Health and Safety Department as a template, which provides
"LABORATORY SAFETY SERIES"
 PRESENTER'S GUIDE "LABORATORY HOODS" Part of the "LABORATORY SAFETY SERIES" Quality Safety and Health Products, for Today...and Tomorrow OUTLINE OF MAJOR PROGRAM POINTS OUTLINE OF MAJOR PROGRAM POINTS
Laboratory Personal Protective Equipment & Hazard Assessment Tool
 Laboratory Personal Protective Equipment & Hazard Assessment Tool This form must be completed by the person in charge of the laboratory, with the guidance of the Chemical Hygiene Officer to conduct a laboratory
Laboratory Safety Inspection Checklist
 Conducted By: Date of Inspection: Location: Safety and Risk Management Office Laboratory Safety Inspection Checklist Principal Investigator/Supervisor: General Lab Housekeeping A M S NO NA Comments Laboratory
CHEMISTRY FACULTY LABORATORY SAFETY CONTRACT CENTRAL CAMPUS
 CHEMISTRY FACULTY LABORATORY SAFETY CONTRACT CENTRAL CAMPUS Potential hazards exist in all chemical laboratories and some can cause serious accidents. Fortunately, most accidents can be prevented if each
Hazard Communication Plan (HCP) 29 CFR
 29 CFR") Hazard Communication Plan (HCP) 29 CFR 1910.1200 METHODIST UNIVERSITY Environmental Health and Safety Office Hazard Communication Plan (HCP) 1910.1200 OSHA Hazard Communication Revision 3 May 2018 Estimated
Hazard Communication Plan (HCP) 29 CFR 1910.1200 METHODIST UNIVERSITY Environmental Health and Safety Office Hazard Communication Plan (HCP) 1910.1200 OSHA Hazard Communication Revision 3 May 2018 Estimated
(2) Review the CHP at least annually and revise the document as necessary to reflect current regulatory practice.
 Review the CHP at least annually and revise the document as necessary to reflect current regulatory practice.") Chapter 13 Chemical Hygiene Plan 13-1. General a. The Chemical Hygiene Plan (CHP) establishes the minimum regulatory requirements for safe use of hazardous chemicals in the laboratory. Chemical exposure
Chapter 13 Chemical Hygiene Plan 13-1. General a. The Chemical Hygiene Plan (CHP) establishes the minimum regulatory requirements for safe use of hazardous chemicals in the laboratory. Chemical exposure
OCCUPATIONAL SAFETY AND ENVIRONMENTAL HEALTH GUIDELINE
 OCCUPATIONAL SAFETY AND ENVIRONMENTAL HEALTH GUIDELINE Date: 04-22-2009 Revision: 02 Page: 1 of 6 SUMMARY: SCOPE: REFERENCE REGULATIONS: Employees using laboratory fume hoods shall observe all applicable
Hazard Communication Program. San José State University
 San José State University One Washington Square San José, California Facilities Development and Operations Department July 11, 2012 Page intentionally left blank SJSU_Hazard Communication Program_2012-0711.docx
Laboratory Preparedness Checklists for Advanced Planning, Preparing to Close & Safe Re-Entry
 Laboratory Preparedness Checklists for Advanced Planning, Preparing to Close & Safe Re-Entry Disruptions, utility outages, and severe weather events may require a laboratory closure. These events have
Environmental Health and Public Safety. Graduate Student Safety Training
 Environmental Health and Public Safety Graduate Student Safety Training INCIDENT AT DUKE UNIVERSITY Wednesday April 15, 1998 7.51 a.m. EDT Firefighters reported t the Gross Chemical Building after the
LABORATORY SAFETY SERIES: Laboratory Hoods
 ERI Safety Videos Videos for Safety Meetings 2956 LABORATORY SAFETY SERIES: Laboratory Hoods Leader s Guide Marcom Group Ltd. 1 INTRODUCTION TO THE PROGRAM Structure and Organization Information in this
EHS-SWP-140. Safe Work Practice. Animal Projects with Chemicals. 1.0 Hazard Description
 EHS-SWP-140 This document is to be used when completing the hazard assessment portion of an Animal Use Protocol. Safe Work Practice Animal Projects with Chemicals 1.0 Hazard Description Chemicals utilized
Environmental Health and Public Safety. Graduate Student Safety Training
 Environmental Health and Public Safety Graduate Student Safety Training Why Do We Care About Safety? >30,000 students/faculty/staff >1,000 research laboratories Chemical, Radiological, Biological Lasers,
Laboratory Standard Operating Procedure: Carcinogens
 I. THIS STANDARD OPERATING PROCEDURE (SOP) IS FOR A: Specific laboratory procedure or experiment Examples: synthesis of chemiluminescent esters, folate functionalization of polymeric micelles, etc. Generic
B&B Gas Well Services, LLC HEALTH, SAFETY AND ENVRONMENTAL MANUAL HAZARD COMMUNICATION PROGRAM
 B&B Gas Well Services, LLC HEALTH, SAFETY AND ENVRONMENTAL MANUAL HAZARD COMMUNICATION PROGRAM 1 HAZARD COMMUNICATION PROGRAM Table of Contents Topic Page 1.0 Objective 3 2.0 Scope 3 3.0 References 3 4.0
MINIMUM SAFETY REGULATIONS
 MINIMUM SAFETY REGULATIONS These rules are intended to apply to all students, postdoctoral fellows, and staff engaged in laboratory work in a working lab. A working laboratory is a room used for any purpose
Vertebrate Animal Biosafety Level 1 Criteria
 Vertebrate Animal Biosafety Level 1 Criteria Biosafety in Microbiological and Biomedical Laboratories (BMBL) 5 th Edition Section V Animal Biosafety Level 1 (ABSL-1): Animal Biosafety Level 1 is suitable
Operations: HSE. Health and Industrial Hygiene. Laboratory Safe Work Practice
 Operations: HSE Health and Industrial Hygiene Laboratory Safe Work Practice Page 2 of 8 AMENDMENT RECORD Amendment Date Revision Number Revision Number 08/11/2016 4 Authority: Health Manager Custodian:
HAZCOMM & Lab Safety College of Dental Medicine Research Safety Specialist Environmental Health and Safety
 HAZCOMM & Lab Safety College of Dental Medicine Specialist Environmental Health and Safety Purpose of Training Crucial for a safe work place Policy/procedures may vary Required by Occupational Safety &
Instructions for Completing the UW-Madison Laboratory Chemical Hygiene Plan Template
 Instructions for Completing the UW-Madison Laboratory Chemical Hygiene Plan Template This template is designed to provide an organizational framework for ensuring compliance with the OSHA Laboratory Standard.
Laboratory Chemical Hygiene Plan
 Building and Room Numbers: Laboratory Chemical Hygiene Plan Engineering Research Building 1125, 1128, and 1202 Department: Materials Science and Engineering Principal Investigator, Laboratory Manager or
Concordia College Moorhead, Minn.
 Concordia College Moorhead, Minn. Title: Employee Right-to-Know/Hazard Communication Effective: 8-20-97; 6-19-00 ; 8-1-03; 8-6-07 Purpose: Concordia College is firmly committed to providing all its employees
MINNESOTA STATE UNIVERSITY MOOHREAD CHEMICAL HYGIENE PLAN
 MINNESOTA STATE UNIVERSITY MOOHREAD CHEMICAL HYGIENE PLAN Introduction A. Purpose This Chemical Hygiene Plan (CHP) sets forth policies, procedures, equipment, and personal protective equipment and work
TEMPLE UNIVERSITY ENVIRONMENTAL HEALTH AND RADIATION SAFETY
 Purpose In accordance with applicable regulations and Temple University, this policy was developed to minimize exposure to glutaraldehyde. Applicability This policy is applicable to all Temple University
BIOSAFETY SELF AUDIT PRINCIPAL INVESTIGATOR/PERMIT HOLDER: CONTAINMENT LEVEL: 1 2 (Shaded) RISK GROUP: 1 2 AUDIT TO BE COMPLETED BY (DATE):
 RISK GROUP: 1 2 AUDIT TO BE COMPLETED BY (DATE):") Page 1 of 5 BIOSAFETY PROGRAM BIOSAFETY SELF AUDIT PRINCIPAL INVESTIGATOR/PERMIT HOLDER: SELF AUDIT COMPLETED BY: LABORATORY ROOM NUMBER: CONTAINMENT LEVEL: 1 2 (Shaded) RISK GROUP: 1 2 DATE OF AUDIT:
Page 1 of 5 BIOSAFETY PROGRAM BIOSAFETY SELF AUDIT PRINCIPAL INVESTIGATOR/PERMIT HOLDER: SELF AUDIT COMPLETED BY: LABORATORY ROOM NUMBER: CONTAINMENT LEVEL: 1 2 (Shaded) RISK GROUP: 1 2 DATE OF AUDIT:
Safe Operating Procedure
 Safe Operating Procedure (Revised 4/15) SAFETY AUDIT GUIDELINES FOR BIOSAFETY LEVEL 1 LABORATORIES Scope The content of this SOP is based on requirements established by the following standards: NIH Guidelines
TEMPLE UNIVERSITY A Commonwealth University Environmental Health & Radiation Safety (EHRS)
") Page 1 of 8 TEMPLE UNIVERSITY A Commonwealth University Environmental Health & Radiation Safety (EHRS) Standard Operating Procedure (SOP) Bromodeoxyuridine (BrdU) Principal Investigator: Room & Building
Page 1 of 8 TEMPLE UNIVERSITY A Commonwealth University Environmental Health & Radiation Safety (EHRS) Standard Operating Procedure (SOP) Bromodeoxyuridine (BrdU) Principal Investigator: Room & Building
Department of Chemistry
 [SKIDMORE COLLEGE] Department of Chemistry Laboratory Safety Handbook for Research Students and Lab Assistants Table of Contents Introduction... 1 Training and Documentation... 1 Laboratory Conduct and
Laboratory Safety Coordinator Meeting
 Laboratory Safety Coordinator Meeting SUMMER 2013 News and Updates Welcome! Welcome New LSCs! Joseph Barbercheck- Associate Director Research Safety Andrea Voehringer Research Safety Specialist Good Byes!
University of New Haven DEPARTMENT OF CHEMISTRY and CHEMICAL ENGINEERING
 University of New Haven DEPARTMENT OF CHEMISTRY and CHEMICAL ENGINEERING A. Instructions: Student: Read carefully the following laboratory rules, safety precaution, and regulations. Your laboratory conduct
SECTION 7 HAZARD COMMUNICATION PROGRAM
 SECTION 7 HAZARD COMMUNICATION PROGRAM 7.1 Hazard Communication 7.2 Hazard Communication Standards (HCS) Pictograms and Hazards 7.3 Safety Data Sheets (SDS) Revised: June 2013 Reviewed: October 2008 Date
Lab-Specific Standard Operating Procedure (LSOP)- Pyrophoric Chemicals
- Pyrophoric Chemicals") Office of the Vice President for Research Environmental Health and Safety Policies, Programs and Procedures Lab-Specific Standard Operating Procedure (LSOP)- Pyrophoric Chemicals Principal Investigator(PI):
Office of the Vice President for Research Environmental Health and Safety Policies, Programs and Procedures Lab-Specific Standard Operating Procedure (LSOP)- Pyrophoric Chemicals Principal Investigator(PI):
Hazard Communication Program
 The University of Memphis Hazard Communication Program November 2016 Table of Contents University of Memphis Hazard Communication Program Contents Purpose... 1 Scope and Application... 1 Responsibilities...
Effective Date: 24-April-2017 Version: 6 Page: 1 of 8 TITLE: SAF-370, PERSONAL PROTECTIVE EQUIPMENT GUIDELINES. Table of Contents
 24-April-2017 Version: 6 Page: 1 of 8 Table of Contents 1.0 Introduction... 2 1.1 Purpose... 2 1.2 Scope... 2 1.3 Definitions... 2 1.4 Responsibilities... 3 Environmental Health and Safety Office (EHSO),
Laboratory Ventilation. Environmental, Health, and Safety
 No.: BCF020.054 Page: 1 of 7 RECORD OF REVISIONS Date Rev # Details of Change 09/13 1 Updated job titles to reflect ICON job descriptions. Added a definition for Approved Ventilation Contractor and included
Hazardous Materials Spill Response
 Hazardous Materials Spill Response The University of Iowa Rev. 02/10 Department Lab/Room Number PI/Lab Coordinator After Hours Contact Number University Public Safety (Phone 911) Fire, Police, Ambulance
Laboratory Standard Operating Procedure: Specimen Preservatives
 I. THIS STANDARD OPERATING PROCEDURE (SOP) IS FOR A: Specific laboratory procedure or experiment Examples: Formalin, Formaldehyde, Caro-Safe, Alcohol. Generic laboratory procedure that covers several chemicals
Hydrofluoric Acid. Syracuse University Laboratory Standard Operating Procedure. I. Purpose: Physical and Chemical Properties: Potential Hazards:
 Syracuse University Laboratory Standard Operating Procedure Hydrofluoric Acid This SOP must be posted or readily available near the hydrofluoric acid use area. The Principle Investigator must ensure that
Hazard Communications Program
 Hazard Communications Program Public Safety Department Environmental, Health and Safety (EHS) Division Standard Operating Procedure (SOP) #13 Table of Contents 2.0 TABLE OF CONTENTS 1.0 Purpose 3 2.0 Scope
UNH Department of Forensic Sciences
 UNH Department of Forensic Sciences LABORATORY SAFETY RULES, PRACTICES AND AGREEMENT (Professors, Graduate Students, Research Assistants, Teaching Assistants, Students Working on Research Projects and
Standard Operating Procedure
 Standard Operating Procedure Cleaning Ni Columns Department: Date SOP was written: Date SOP was approved by PI/lab supervisor: 12/29/2012 Reviewed by: Principal Investigator: Internal Lab Safety Coordinator/Lab
HAZARDOUS INCIDENT SITE SAFETY PLAN
 HAZARDOUS INCIDENT SITE SAFETY PLAN NOTE: A site-specific Site Safety Plan must be developed and implemented for each site where investigators may potentially be exposed to hazardous substances while conducting
STANDARD OPERATING PROCEDURE (SOP): URETHANE
: URETHANE") TEMPLE UNIVERSITY A Commonwealth University Environmental Health & Radiation Safety (EHRS) STANDARD OPERATING PROCEDURE (SOP): URETHANE LABORATORY/USER INFORMATION Principal Investigator (PI): Phone #
TEMPLE UNIVERSITY A Commonwealth University Environmental Health & Radiation Safety (EHRS) STANDARD OPERATING PROCEDURE (SOP): URETHANE LABORATORY/USER INFORMATION Principal Investigator (PI): Phone #
Hazard Communication Program
 Hazard Communication Program I. Purpose, Applicability, and Scope A. Purpose: The purpose of this program is to ensure that the hazards of chemicals used in the workplace are evaluated, and those hazards
This document provides guidance to conducting health and safety inspections at the University, to ensure Hazards are identified and controlled.
 Health and Safety Guideline: HSG 10.1 Health and Safety Inspections and Testing 1. Purpose This document provides guidance to conducting health and safety inspections at the University, to ensure Hazards
Wolfson Campus Natural Science Department. Biology Laboratory. Student Safety Contract
 Wolfson Campus Natural Science Department Biology Laboratory Student Safety Contract July 2000 Wolfson Campus Student Safety Contract-Biology Laboratory Purpose The Biology laboratory is a hands-on learning
LABORATORY HAZARD AWARENESS TRAINING
 Open minds. Open doors. TM LABORATORY HAZARD AWARENESS TRAINING FOR NON LABORATORY PERSONNEL Objectives Hazard Awareness Be familiar with the hazards, warning signs and labels Protective measures PPE Training
WHS Guidelines Working with Chemicals
 WHS Guidelines Working with Chemicals 1. Scope These guidelines are applicable to all environments where are used. The purpose of this document is to detail minimum requirements for working with, to list
The primary purpose of laboratory fume hoods is to keep toxic or irritating vapors out of the general laboratory working area.
 Introduction Welcome to the Biosafety Cabinets and Fume Hoods Training Course (OHS_BIO304). This training is required for anyone that will be conducting work and/or research that requires the use of a
MANAGEMENT PROCEDURE FOR LABORATORY VENTILATION
 UNIVERSITY OF ALASKA FAIRBANKS SAFETY SYSTEM POLICY AND PROCEDURE DOCUMENT NUMBER: 508 ISSUE DATE: SEPTEMBER 1996 SUBJECT: Management Procedure for Laboratory Ventilation MANAGEMENT PROCEDURE FOR LABORATORY
HAZARD COMMUNICATION PROGRAM
 HAZARD COMMUNICATION PROGRAM Adopted: February 2014 Table of Contents Table of Contents Introduction... 1 Scope... 1 2.1 Employees Covered... 1 2.2 Research Laboratory Exemption... 1 2.3 Substances Covered...
Activated Carbon %
 MSDS for Activated Carbon Page 1 of 7 GREEN CARBON, INC. MATERIAL SAFETY DATA SHEET ACTIVATED CARBON Effective Date: 10/03/05 Product: Activated Carbon 1. Product Identification Synonyms: Washed Activated
University of Saskatchewan Department of Mechanical Engineering Standard Operating Procedure # Mat0002
 Procedure Title: General Chemical Usage Guidelines Minimum Review Requirements: Annually Creation Date: November, 2011 Date of Next Review: November, 2012 Creator of Procedure: Authorized by: Title Page
Chemical Spill Clean-up Protocol
 Protocol Department of www.rms.ubc.ca UBC-RMS-OHS-PRO 17-002 Date created: November 3, 2015 Date revised: April 28 th, 2017 Chemical Spill Clean-up Protocol Scope Laboratory-specific safe work procedures
Safety Issues in Healthcare Programs / Healthcare Employment
 Safety Issues in Healthcare Programs / Healthcare Employment Observing all safety procedures in place and recognizing the hazards that may be around you at all times will help to minimize accidents while
Hazardous Materials Management. Presented by. James E. Roughton, MS, CSP, CRSP, CHMM.
 Hazardous Materials Management Presented by. James E. Roughton, MS, CSP, CRSP, CHMM. Hazardous Waste Operations And Emergency Response (HAZWOPER) 29 CFR 1910.120 Scope Clean-up Operations At Uncontrolled
Laboratory Standard Operating Procedure: Reproductive Toxins
 I. CONTACT INFORMATION Procedure Title Procedure Author Date of Creation/Revision: April 12, 2013 Name of Responsible Person Location of Procedure Approval Signature (The PI, Lab Supervisor, or Autonomous
Contractor Control Procedures. Contractor Control Procedures. Working Together. November Borders College 24/11/2014.
 Working Together Contractor Control Procedures November 2014 Borders College 24/11/2014 1 Working Together 1. Introduction This procedure aims to control the health and safety of contractors working on
Laboratory Standard Operating Procedure: Sensitizers
 I. CONTACT INFORMATION Procedure Title Procedure Author Date of Creation/Revision: April 12, 2013 Name of Responsible Person Location of Procedure (The PI, Lab Supervisor, or Autonomous Researcher) (Building
Laboratory Standard Operating Procedure: Cryogenic Liquids
 I. THIS STANDARD OPERATING PROCEDURE (SOP) IS FOR A: Specific laboratory procedure or experiment Examples: synthesis of chemiluminescent esters, folate functionalization of polymeric micelles, etc. Generic
EHS Workplace Inspection Checklist (Ref. SOP QMS-080; EHS-010)
") (Ref. SOP QMS-080; EHS-010) Form-445 Inspected by: Date of inspection Date of Report Report # Pages Area Manager: Area Inspected: General This EHS Workplace Inspection was conducted by: Scope of the Inspection:
(Ref. SOP QMS-080; EHS-010) Form-445 Inspected by: Date of inspection Date of Report Report # Pages Area Manager: Area Inspected: General This EHS Workplace Inspection was conducted by: Scope of the Inspection:
Product Name:Heat Sink Compound 1801 Morgan Street MSDS Number:148
 Section 4 - Fire & Explosion Hazard Data Flash Point (method): Flammable Limits-LEL: Flammable Limits-UEL: Extinguishing Agents: Fire Fighting Procedures and Equipment: Decomposition Products May Include:
Safety Rules for the Science Lab
 Science 10 Safety in the Science Lab Name: Date: Block: Safety Rules for the Science Lab DRESS CODE 1. To protect your eyes from possible injury, wear safety goggles whenever you are working with chemicals,
LABORATORY FUME HOOD/CANOPY USE AND MAINTENANCE PROGRAM
 LABORATORY FUME HOOD/CANOPY USE AND MAINTENANCE PROGRAM Origination Date May 2006 Revised May 2016 West Virginia University P.O Box 6551 Morgantown WV 26506 # 304-293-3792 Fax 304-293-7257 http://ehs.wvu.edu
Laboratory Safety Plan
 Laboratory Safety Plan Introduction A laboratory safety plan is a document that describes the general rules of conduct and other information useful in helping to prevent laboratory incidents and to appropriately
Scope: This plan applies to all personnel, including contractors, who enter or work in confined spaces, or supervise such activities.
 11/13/1995 4 5/20/2013 1 of 10 Authority and Scope Regulation: 29 CFR 1910.146 Scope: This plan applies to all personnel, including contractors, who enter or work in confined spaces, or supervise such
Laboratory Standard Operating Procedure: Acutely Toxic Substances
 I. CONTACT INFORMATION Procedure Title Procedure Author Date of Creation/Revision: April 12, 2013 Name of Responsible Person Location of Procedure (The PI, Lab Supervisor, or Autonomous Researcher) (Building
BP U.S. Pipelines & Logistics (USPL) Safety Manual Page 1 of 8
 Safety Manual Page 1 of 8") Safety Manual Page 1 of 8 1. Purpose The purpose of this policy is to protect USPL employees and contractors from overexposure to benzene. 2. Scope This policy applies to all USPL employees and contractors
Safety Manual Page 1 of 8 1. Purpose The purpose of this policy is to protect USPL employees and contractors from overexposure to benzene. 2. Scope This policy applies to all USPL employees and contractors
Appendix A: Induction check list
 Appendix A: Induction check list Name This checklist is to be completed as part of inducting a new user in the Laboratory. Permission to begin work in the Laboratory will only be given once all relevant
SAFETY DATA SHEET. TRD Revision 01/30/ PRODUCT AND COMPANY IDENTIFICATION 2. HAZARDOUS IDENTIFICATION
 1. PRODUCT AND COMPANY IDENTIFICATION Product Identifier Recommended use Distributed by: Antifoam DyChem International 560 North 500 West Salt Lake City, UT 84116 (800) 453-4606 Emergency Contact # (24
Standard Operating Procedures (SOP) General Laboratory Practices. Laboratory: Cichlid (Kocher and Carleton labs) Location: Biosciences, Rm 2231 & 2239
 General Laboratory Practices. Laboratory: Cichlid (Kocher and Carleton labs) Location: Biosciences, Rm 2231 & 2239") Standard Operating Procedures (SOP) General Laboratory Practices Laboratory: Cichlid (Kocher and Carleton labs) Location: Biosciences, Rm 2231 & 2239 Prepared by: Aimee Howe Date written/last revision:
Standard Operating Procedures (SOP) General Laboratory Practices Laboratory: Cichlid (Kocher and Carleton labs) Location: Biosciences, Rm 2231 & 2239 Prepared by: Aimee Howe Date written/last revision:
Developing Safety Guidelines for Cryogenic Liquids.
 Developing Safety Guidelines for Cryogenic Liquids. Purpose: Develop a reference document that can be used by a Principle Investigator or a designee to assist in the development of Safety Operating Procedures
LABORATORY SAFETY. A general overview
 LABORATORY SAFETY A general overview INTRODUCTION Environmental protection, Occupational Safety and Health are the Responsibility of all staff, students and collaborators working at ETH. OBJECTIVES General
HAZARDOUS SUBSTANCES / DANGEROUS GOODS
 HAZARDOUS SUBSTANCES / DANGEROUS GOODS Golden Brown is committed to continuously improving the management and standards of Occupational health and Safety. This commitment extends to minimising exposure
Kansas State University Fume Hood Operation
 FUME HOODS 2009, PAGE 1 FUME HOODS Kansas State University Fume Hood Operation One of the primary safety devices in a laboratory is a chemical fume hood. A well-designed hood, when properly installed and
Guide to Safety in the Science Classroom
 ECC Health & Science Building Guide to Safety in the Science Classroom SC 1000 Laboratory Safety for Students East Central College 1964 Prairie Dell Road ~ Union, Missouri 63084 Phone: (636) 584-6500 ~
CUNY ASRC Photonics Spectroscopy Facility User Policies
 CUNY ASRC Photonics Spectroscopy Facility User Policies The Photonics Spectroscopy Facility (PSF) of CUNY Advanced Science Research Center is a multi-user facility and it is imperative that all users are
General: This procedure addresses general safety & health requirements for work in the laboratory.
 Facility: Lab Director: Polymer Reaction Engineering Laboratory Department of Chemical Engineering Kyu Yong Choi Scope: This SOP details the Personal Protective Equipment (PPE) requirements for work in
Hazardous Materials Spill Response
 Hazardous Materials Spill Response The University of Iowa Rev. 01/2019 Department: Lab/Room Number: PI/Lab Coordinator: After-hours Contact Number: University Public Safety - 911 Fire, Police, Ambulance
Town of Brunswick. Hazard Communication and Global Harmonization System (GHS) Plan
 Plan") Global Harmonization System (GHS) Plan Initial: 1999 Revised: 11/08/2005 Revised: 08/23/2006 Revised: 07/10/2007 Revised: 12/13/2010 Revised: 06/17/2013 Revised: 11/2015 Revised: 01/20/2016 Revised: 09/01/2017
Global Harmonization System (GHS) Plan Initial: 1999 Revised: 11/08/2005 Revised: 08/23/2006 Revised: 07/10/2007 Revised: 12/13/2010 Revised: 06/17/2013 Revised: 11/2015 Revised: 01/20/2016 Revised: 09/01/2017
Vision Painting Inc Safety Management System
 Abrasive Blasting 1. PURPOSE The purpose of this program is to provide training and qualification guidelines for the safe operation of Abrasive Blasting. The Safety Officer is responsible for facilitating
Laboratory Standard Operating Procedure: Irritants
 I. CONTACT INFORMATION Procedure Title Procedure Author Date of Creation/Revision: April 12, 2013 Name of Responsible Person Location of Procedure (The PI, Lab Supervisor, or Autonomous Researcher) (Building
WEBINARS. Hazard Communication
 WEBINARS Hazard Communication Teaches employees the safe use and handling of hazardous chemicals in the workplace and how to protect themselves and others from those hazards. The modified standard provides
Student Information & Laboratory Safety Contract
 Student Information & Laboratory Safety Contract Mrs. Mawhiney Student Information Last Name First Name Preferred Name Home Address (including ZIP) Home Phone student e-mail Parent/Guardian Name Relationship