PRE-PURCHASE DECISIONS... 1 BEFORE DELIVERY...
|
|
|
- Hubert Todd
- 5 years ago
- Views:
Transcription

1 iii
2 Table of Contents PRE-PURCHASE DECISIONS... 1 BEFORE DELIVERY... 1 Typical Installation Site... 1 SITE ACCESS... 2 COVER... 3 ELECTRICAL HOOK UP...3 LOAD SHARING... 3 ELECTRICAL REQUIREMENTS... 4 American/Canadian - Bay Collection... 4 American/Canadian - D1 Hot Tubs...4 American/Canadian - Aquatic Fitness Systems... 5 International Bay Collection... 6 International D1 Hot Tubs... 6 International - Aquatic Fitness Systems... 6 American/Canadian Hot Tubs... 7 International Hot Tubs... 7 HOT TUB SPECIFICATIONS... 8 iv

3 Pre-Purchase Decisions Before Delivery Before attempting to install or use your hot tub, please read these instructions thoroughly, and carefully review the owner s manual for your Dimension One hot tub! Because your hot tub is completely selfcontained, you can install it just about anywhere you wish... on a deck, patio or even indoors. Just be sure to position it above, in an area with good drainage and on a level surface that fully contacts the bottom of the hot tub. Typical Installation Site A concrete slab is best but not required. You may choose to install it on a wood deck or bricks. If you choose to install your hot tub on a raised deck or indoors, we suggest you contact a structural engineer to confirm the surface will hold a hot tub filled with water. Settlement of your deck or slab may result in damage to the hot tub, which is not covered by warranty. (See specifications in this booklet.) Wherever you plan to install your hot tub, be sure the surface is flat and solid. Locate your hot tub so that the equipment is above grade and not subject to flooding. Water should always drain away from the hot tub. If you are placing your hot tub next to an obstacle, such as a fence or wall, be sure that you place the hot tub with the topside primary control panel facing forward for easy equipment access. Locate the vents on the drawing of your particular Dimension One hot tub. This is where cool air will enter and warm air will escape during hot tub operation. Please ensure that these areas are always free of obstructions. Also, allow additional space around the hot tub for any accessories you may have purchased - for example an E-Z Lifter spa cover lift, steps, or a gazebo. Check with your dealer on these additional space requirements. Note In most cities and counties, permits are required for the installation of electrical circuits or the construction of exterior structures such as decks and gazebos. Some communities have also adopted residential barrier codes that may require fencing and/or self-closing gates on the property to prevent unsupervised access to a hot tub by young children. Note If you install the spa or hot tub indoors, the surrounding area should be waterproof or water resistant. Water may be splashed out during normal usage and when entering or exiting the spa. Dimension One Spas is not responsible for any water damage to any indoor location for any reason. Dimension One Spas are equipped with a locking cover that meets or exceeds the Standard for Safety Covers, but is not an adequate safety measure to prevent 1
4 unsupervised entry. Please check with your local Building Permit Office that can inform you on any special requirements needed for installation of your electrical, decking or required barriers. Your local dealer may also provide you with information on local building and electrical codes. Site Access Please refer to the Dimension One Spas website ( for the specifications and appropriate measurements for your hot tub model. You will need the measurements of your hot tub in order to determine the clearance needed for delivery. Caution DUE TO MANUFACTURING TOLERANCES THERE COULD BE SOME MINOR DIFFERENCES BETWEEN THE ACTUAL MEASUREMENTS OF YOUR SPA AND THE DRAWING BELOW. IF SITE PLANNING IS CRITICAL TO SUCH TOLERANCES, BE SURE TO MEASURE YOUR ACTUAL SPA. Your hot tub will probably be delivered on a dolly or cart. The additional distance from the to the dolly or cart must also be included in your measurements for vertical clearance. Also, take into consideration that if your hot tub must be transported up-hill or taken upstairs, you may need additional clearance or assistance. Be sure to remove obstacles such as gates, planters, or items attached to the house. The point of entry must be clear of air conditioning units, heating units, meters, electrical boxes, etc. It is best that your dealer pre-inspect the installation site and determine the best way to deliver your hot tub. In rare cases, a crane must be brought in to assist in an installation. Your Dimension One dealer will supervise this for you. Here is a list of some of the most common installation hazards in planning your route: Gates Fences Eaves Gutters Air Conditioners Heaters Hose Bibs Bushes Overhanging Branches Steps 90 Turns 2
. When the hot tub is not in use, it is recommended that the cover locks always be utilized to discourage unsupervised use and to minimize heat loss.")
5 Cover The cover supplied with your hot tub is constructed of the highest quality materials and is equipped with quick-release keyed buckle locks that meet standards set by American Standards for Testing and Measurement (ASTM). When the hot tub is not in use, it is recommended that the cover locks always be utilized to discourage unsupervised use and to minimize heat loss. When installing the cover on your hot tub, be sure it is facing the correct direction. When standing in front of the topside primary control panel, the center seam or hinge should run horizontally. You should be able to lift the handle of the cover and see the hot tub control panel. Allow 18 inches of extra space on the backside of the hot tub where the optional E-Z Lifter will rest in its upright, open position. Electrical Hook Up Warning Do not turn on electrical power to your hot tub until told to do so later in this manual. Have a licensed electrician run the required 120/240 Volt power line to the hot tub installation site. The power inlet connection is located in the pedestal on the left side of the hot tub, approximately 25 from the front. This connection is designed to mate with a Carlon 1 conduit body Type LB, Access Fitting E986F or any 1 female PVC conduit fitting. The manufacturer s label lists the power requirements for your hot tub. We recommend that only a licensed and bonded electrician do the initial hot tub hook-up. Warning This unit requires a GFCI (Ground Fault Circuit Interrupter). A line of sight service disconnect must be located where visible from the hot tub, not less than 5 feet from the hot tub and not to exceed 50 feet from the hot tub. This requirement may be filled with the GFCI sub-panel. All supply wire to be rated minimum 90 C. Load Sharing Computerized load sharing (available only on Dimension One Spas hot tubs) is used to allow the system to automatically recognize the temperature differential and the number of jet pumps in use, compare it with the available power, and adjust the heater to maximize heater output. If you want to be able to run the pumps at full power and still be able to generate heat at the same time, consider installing the maximum electrical service available for your spa. If you do not have enough electrical service, your pumps may shut off when heat is required. Otherwise, heat may be discontinued if you start up the pumps. 3
6 Electrical Requirements The following charts provide a listing of electrical requirement options available for Dimension One Spas Inc. Hot Tub spas. American/Canadian - Bay Collection Model Lotus Bay Sarena Bay Power Branch Circuit American/Canadian - D1 Hot Tubs Circuit Protection 50A 40A 50A 40A Wire Gauge Model Arena Aurora II Aurora HP Californian Chairman Chairman II Diplomat Power Branch Circuit Circuit Protection 40A 30A 50A 40A 30A 50A 40A 30A 50A 40A 30A 50A 40A 30A 50A 40A 30A 50A 40A 30A Wire Gauge 4
7 Model Nautilus Seville Triad II Power Branch Circuit Circuit Protection 50A 40A 30A 50A 40A 30A 40A 30A Wire Gauge American/Canadian - Aquatic Fitness Systems Model Power Branch Circuit AquaFit 16 2 wire + 2 wire + 2 wire + AquaFit 19 2 wire + Dual Temp 2 wire + 2 wire + AquaPro 19 2 wire + 2 wire + 2 wire + Wire Circuit Protection Gauge Comment 60A Minimum 60A and 50A Recommended 50A w/gas Heater Gas Heater Minimum 60A plus Minimum 30A (for spa side) 60A and 50A, plus 40A (for spa side) 50A w/gas Heater 30A/40A (for spa side) Recommended Gas Heater Minimum 60A Minimum 60A and 50A Recommended 50A w/gas Heater Gas Heater Minimum 5
8 International Bay Collection Model Power Circuit Protection Wire Gauge Model Power Circuit Protection Wire Gauge Lotus Bay 2x16 3x16 1x32 Sarena Bay 2x16 3x16 1x32 International D1 Hot Tubs Model Arena Aurora II Aurora HP Californian Chairman Power Circuit Protection 1x16 2x16 1x32 1x16 2x16 1x32 1x16 2x16 1x32 1x16 2x16 1x32 1x16 2x16 1x32 Wire Gauge Model Power Chairman II Diplomat Nautilus Seville Triad II Circuit Protection 1x16 2x16 1x32 1x16 2x16 1x32 1x16 2x16 1x32 1x16 2x16 1x32 2x16 3x16 1x32 Wire Gauge International - Aquatic Fitness Systems Model Power Circuit Protection Wire Gauge Comment AquaFit 16 60A Minimum 60A and 50A Recommended 50A w/gas Heater Gas Heater Minimum AquaFit 19 60A plus Minimum Dual Temp 30A (for spa side) 60A and 50A, plus Recommended 40A (for spa side) 50A w/gas Heater plus 30A/40A (for spa side) Gas Heater Minimum AquaPro 19 60A Minimum 60A and 50A Recommended 50A w/gas Heater Gas Heater Minimum 6
9 The power inlet connection is located in the pedestal on the left side of the hot tub, approximately 25" from the front. The front of the hot tub is the section that includes the topside, primary control panel. To assist your electrician with running power to your spa, have him/her follow these instructions: 1. Remove the screws holding the equipment access panel to the front of the hot tub cabinet and set the panel aside. 2. Loosen the four screws located on the front of the black equipment control box and remove the door from the control box to allow access to the four-wire connection terminal block. 3. Attach 1 rigid non-metallic conduit to the conduit nipple located in the pedestal base on the side of the hot tub and run required conductors through the conduit to the equipment control box. 4. Connect the wires to the equipment system terminal block (TB1) as indicated on the wiring diagram in the back of this manual. 5. Configure jumpers 1 and 2 on the upper right corner of the PC Board to match the circuit size being used for your hot tub. The proper jumper settings can be found on the wiring schematic located on the inside of the Lower Equipment Compartment cover. Use the appropriate Electrical Requirements Chart (shown above) for the proper wire size. American/Canadian Hot Tubs Model Power Branch Circuit Circuit Protection Wire Gauge Companion HP 30A Cove 120V * 40A 30A 15A #12AWG Cove HP 40A 30A Dream 30A Dream HP 40A 30A Sojourn HP *A GFCI protected cord is required (P/N ) International Hot Tubs Model Power Circuit Protection Companion HP 1x16 2x16 1x32 Cove 1x16 2x16 Cove HP Dream Dream HP 1x16 2x16 1x32 1x16 2x16 1x32 1x16 2x16 1x A 30A Wire Gauge
10 Model Power Circuit Protection Sojourn HP 1x16 2x16 1x32 Wire Gauge The power inlet connection is located in the pedestal on the left side of the hot tub, approximately 25" from the front. The front of the hot tub is the section that includes the topside, primary control panel. 1. Remove the screws holding the equipment access panel to the front of the hot tub cabinet and set the panel aside. 2. Loosen the two screws located on the front of the blue equipment control box and raise the door on the control box on its hinges to allow access to the four wire connection terminal block. 3. Attach 1 rigid non-metallic conduit to the conduit nipple located in the pedestal base on the side of the hot tub and run required conductors through the conduit to the equipment control box. 4. Connect the four/three wires to the equipment system terminal block (TB1) as indicated on the wiring diagram in the back of this manual. 5. Configure jumpers 1 and 2 on the upper right corner of the PC Board to match the circuit size being used for your hot tub. The proper jumper settings can be found on the wiring schematic located on the inside of the Lower Equipment Compartment cover. Use the appropriate Electrical Requirements Chart (shown above) for the proper wire size. Hot Tub Specifications For specifications of a particular spa, please visit our website download the information per the model and model year of interest. 8

11 9
12
13
14
15
16 Table of Contents WARNINGS AND SAFETY CONSIDERATIONS...1 IMPORTANT INSTALLATION INSTRUCTIONS...1 IMPORTANT WARNING...1 IMPORTANT SAFETY INSTRUCTIONS...1 IMPORTANT SAFETY INSTRUCTIONS (CANADA) (CSA SAFETY INFORMATION)...2 Hyperthermia...3 Safety Do s and Don ts...4 DANGER SIGN...4 SITE SELECTION AND PREPARATION...5 CONSIDERATIONS...5 INSTALLATION TYPES...5 OUTDOOR SELF-CONTAINED... 6 OUTDOOR INSTALLATION: BUILDER PACKAGE... 6 INDOOR INSTALLATION... 8 ACCESS TO SITE...10 TRUCK CRANE ELECTRICAL...11 ELECTRICAL REQUIREMENTS FOR NORTH AMERICA AFS...12 ELECTRICAL REQUIREMENTS FOR INTERNATIONAL AFS...12 ALTERNATIVE HEATER CONNECTION (GAS OPTION)...13 ALTERNATIVE HEATER CONNECTION OPTION (GAS HEATER)...13 INSTALLATION...13 TESTING THE INSTALLATION...13 CONTRACTOR INFORMATION...13 ARCHITECTURAL DRAWINGS...13 LOCAL CODE REQUIREMENTS...13 DELIVERY AND SETUP...14 DELIVERY...14 SETUP...14 TESTING...15 TROUBLESHOOTING GUIDE...16 HEATING SYSTEM...16 ELECTRICAL SYSTEM...17 WATER SYSTEM...17 APPENDIX A...18 NORTH AMERICA AFS DRAWINGS... NORTH AMERICA SITE PLAN... NORTH AMERICA CONSTRUCTION SPECIFICATIONS... NORTH AMERICA AFS VIEW... INTERNATIONAL AFS DRAWINGS... INTERNATIONAL SITE PLAN... INTERNATIONAL CONSTRUCTION SPECIFICATIONS... INTERNATIONAL AFS VIEW... SPECIFICATIONS... SWIM SPACE AND WATER LEVEL... SPECIFICATIONS: AQUATIC FITNESS SYSTEMS SPECIFICATIONS: AQUATIC FITNESS SYSTEMS SPECIFICATIONS: AQUATIC FITNESS SYSTEMS 19 DT... JUMPER SETTINGS FOR AFS PACK... NORTH AMERICA JUMPER SETTINGS... INTERNATIONAL JUMPER SETTINGS... GAS CONVERSION INSTRUCTIONS...
17 WARNINGS AND SAFETY CONSIDERATIONS IMPORTANT INSTALLATION INSTRUCTIONS READ AND FOLLOW ALL INSTRUCTIONS CAREFULLY Concrete Pad. The AFS must be fully supported over the entire base. A typical installation on soil that will support 1,000 psi load, is 6 inch (15 cm) thick concrete with # 4 rebar on 18 inch (46 cm) centers. (Ref. Doc 138 Installation Instructions)*. Conditions at the site will determine the exact support requirements. Please contact your local contractor for adequate installation. Damages caused by inadequate support will not be covered by the warranty Doc 138 in the Appendix A of this document Excess Water. Normal use of the swim spa causes large amounts of water to splash out of the unit. Depending on the specific installation, additional provisions may have to be made for proper removal of this water. Clearance Access: In order to better service your product, clearance for access to AFS must be 36 inches (92 cm) at equipment compartment and 24 inches (61 cm) around the remaining area. IMPORTANT WARNING READ AND FOLLOW ALL INSTRUCTIONS CAREFULLY An empty AFS should never be exposed to temperatures below 0ºF (-18ºC) as extreme cold can cause shell damage. This includes storage, delivery, and draining (winterizing). If your AFS can be exposed to these temperatures, keep the AFS filled and running. If you do not plan to use your AFS, you can lower the temperature setting to 61ºF (16ºC). Failure to adhere to these guidelines will void the warranty. IMPORTANT SAFETY INSTRUCTIONS READ AND FOLLOW ALL INSTRUCTIONS CAREFULLY Installation and use of this equipment requires the user to always follow safety precautions including: Risk of Accidental Drowning. Exercise extreme caution to prevent unsupervised children going near the Aquatic Fitness System. Children should not use the Aquatic Fitness System without adult supervision. Risk of Serious Injury or Death. If you need to replace the suction fitting or pump make sure that the flow rates are compatible. Never operate the Aquatic Fitness System if the suction fittings are broken or missing. Never replace a suction fitting with one rated less than the flow rate marked on the original suction fitting. Risk of Electric Shock. Install at least 5 FEET (1.5 m), from all metal surfaces. As an alternative, the Aquatic Fitness System may be installed within 5 feet of metal surfaces if each metal surface is permanently connected by a minimum No. 8 AWG (8.4 mm2) solid copper conductor attached to the wire connector on the ing lug, inside the equipment compartment on the equipment can. Risk of Electric Shock. Do not permit any electrical appliance, such as a light, telephone, radio, television, etc. within 5 feet (1.5 m) of the Aquatic Fitness System. Never operate any electrical appliances from inside the Aquatic Fitness System or when you are wet. Danger. The electrical supply for this Aquatic Fitness System must include a suitably rated switch or circuit breaker to open all uned supply conductors to comply with section of the National Electrical Code, ANSI/NFPA The disconnect must be readily accessible and visible to the Aquatic Fitness System occupant but installed at least 5 feet (1.5 m), from the Aquatic Fitness System water. Danger. A ing wire connector is provided on this Aquatic Fitness System to connect a minimum No. 8 AWG (8.4 mm2) solid copper conductor between this unit and any metal equipment, metal enclosures of electrical equipment, metal water pipe, or conduit within 5 feet (1.5 m) of the Aquatic Fitness System. Risk of Electric Shock. Do not attempt to remove the light housing cover without lowering the water level below the light housing cover. To Reduce the Risk of Injury: The water in the Aquatic Fitness System should never exceed 104 F (40 C). Water temperatures between 100 F (38 C) and 104 F (40 C) are considered safe for a healthy adult. Lower water temperatures are recommended for young children and when Aquatic Fitness System use exceeds 10 minutes. 1
.")
18 To Reduce the Risk of Injury: Since excessive water temperatures have a high potential for causing fetal damage during the early months of pregnancy, pregnant or possibly pregnant women should limit Aquatic Fitness System water temperatures to 100 F (38 C). To Reduce the Risk of Injury: Before entering the Aquatic Fitness System, the user should measure the water temperature with an accurate thermometer since the tolerance of water temperature-regulating devices may vary as much as +/- 5 F (2 C). To Reduce the Risk of Injury: The use of alcohol, drugs, or medication before or during Aquatic Fitness System use may lead to unconsciousness with the possibility of drowning. To Reduce the Risk of Injury: Pregnant women, the elderly, infants, or persons suffering from obesity or with a medical history of heart disease, low or high blood pressure, circulatory system problems, or diabetes, should consult a physician before using the Aquatic Fitness System. People with infectious diseases should not use an Aquatic Fitness System. To Reduce the Risk of Injury: Persons using medication should consult a physician before using the Aquatic Fitness System since some medication may induce drowsiness, while other medication may affect heart rate, blood pressure, and circulation. Observe a reasonable time limit when using the Aquatic Fitness System. Long exposures at high temperatures can cause high body temperature (hyperthermia, see pg. 3). Enter and exit the Aquatic Fitness System slowly. Wet surfaces can be very slippery. Proper chemical maintenance of Aquatic Fitness System water is necessary to maintain safe water and prevent possible damage to Aquatic Fitness System components. Use the cover straps and clip tie downs to secure the cover when not in use. This will help discourage unsupervised children from entering the spa and keep the spa cover secure in high wind conditions. There is no guarantee that the cover, clip tie downs, or the actual locks will prevent access to the Aquatic Fitness System. SAVE THESE INSTRUCTIONS IMPORTANT SAFETY INSTRUCTIONS (CANADA) (CSA SAFETY INFORMATION) In addition to the preceding safety instructions, Canadian owners should read and understand the following information from the Canadian Safety Association: READ AND FOLLOW ALL INSTRUCTIONS CAREFULLY A green colored terminal or a terminal marked G, GR, Ground, Grounding, or the symbol * is located inside the supply terminal box or compartment. To reduce the risk of electric shock, this terminal must be connected to the ing means provided in the electric supply service panel with a continuous copper wire equivalent in size to the circuit conductors supplying this equipment. o IEC Publication 417, Symbol At least two lugs marked BONDING LUGS are provided on the external surface or on the inside of the supply terminal box/compartment. To reduce the risk of electric shock, connect the local common bonding grid in the area of the hot tub or Aquatic Fitness System to these terminals with an insulated or bare copper conductor not smaller than No. 6 AWG. All field-installed metal components such as rails, ladders, drains or other similar hardware within 3 meters of the Aquatic Fitness System or hot tub shall be bonded to the equipment ing bus with copper conductors not smaller than No. 6 AWG. Children should not use Aquatic Fitness Systems or hot tubs without adult supervision. AVERTISSEMENT: NE PAS LAISSER LES ENFANTS UTILISER UNE CUVE DE RELAXATION SANS SURVEILLANCE. Do not use Aquatic Fitness Systems or hot tubs unless all suction guards are installed to prevent body and hair entrapment. AVERTISSEMENT: POUR ÉVITER QUE LES CHEVEUX OU UNE PARTIE DU CORPS PUISSENT TRES ASPIRÉS, NE PAS UTILISER UNE CUVE DE RELAXATION SI LES GRILLES DE PRISE D ASPIRATION NE SONT PAS TOUTES EN PLACE. People using medications and/or having adverse medical history should consult a physician before using an Aquatic Fitness System or hot tub. AVERTISSEMENT: LES PERSONNES QUI PRENNENT DES MÉDICAMENTS OU ONT DES PROBLÈMES DE SANTÉ DEVRAIENT CONSULTER UN MÉDECIN AVANT D UTILISER USE CUVE DE RELAXATION. People with infectious diseases should not use an Aquatic Fitness System or hot tub. 2
19 AVERTISSEMENT: LES PERSONNES ATTEINTES DE MALADIES INFECTIEUSES NE DEVRAIENT PAS UTILISER UNE CUVE DE RELAXATION. To avoid injury, exercise care when entering or exiting the Aquatic Fitness System or hot tub. AVERTISSEMENT: POUR ÉVITER DES BLESSURES, USER DE PRUDENCE EN ENTRANT DANS UNE CUVE DE RELAXATION ET E SORTANT. Do not use drugs or alcohol before or during the use of the Aquatic Fitness System or hot tub to avoid unconsciousness and possible drowning. AVERTISSEMENT: POUR ÉVITER L ÉVANOUISSEMENT ET LA NOYADE EVENTUELLE, NE PRENDRE NI DROGUE NI ALCOOL AVANT D UTILISER UNE CUVE DE RELAXATION NI QUAND ON S Y TROUVE. Pregnant or possibly pregnant women should consult a physician before using an Aquatic Fitness System or hot tub. AVERTISSEMENT: LES FEMMES ENCEINTES, QUE LEUR GROSSESSE SOIT CONFIRMÉE OU NON, DEVRAIENT CONSULTER UN MÉDECIN AVANT D UTILISER UNE CUVE DE RELAXATION. Water temperature in excess of 38 C may be injurious to your health. AVERTISSEMENT: IL PEUT TRES DANGEREUX POUR LA SANTÉ DE SE PLONGER DANS DE L EAU À PLUS DE 38 C. Before entering the Aquatic Fitness System or hot tub, measure the water temperature with an accurate thermometer. AVERTISSEMENT: AVANT D UTILISER UNE CUVE DE RELAXATION MESURER LA TEMPÉRATURE DE L EAU À L AIDE D UN THERMOMÈTRE PRÉCIS. Do not use an Aquatic Fitness System or hot tub immediately following strenuous exercise. AVERTISSEMENT: NE PAS UTILISER UNE CUVE DE RELAXATION IMMEDIATEMENT APRÈS UN EXERCICE FATIGANT. Prolonged immersion in an Aquatic Fitness System or hot tub may be injurious to your health. AVERTISSEMENT: L UTILISATION PROLONGÉE D UNE CUVE DE RELAXATION PEUT TRES DANGEREUSE POUR LA SANTÉ. Do not permit electric appliances (such as a light, telephone, radio, television, etc.) within 1.5m of this Aquatic Fitness System or hot tub. AVERTISSEMENT: NE PAS PLACER D APPAREIL ÉLECTRIQUE (LUMINAIRE, TÉLÉPHONE, RADIO, TÉLÉVISEUR, ETC.) À MOINS DE 1.5 M DE CETTE CUVE DE RELAXATION. Maintain water chemistry in accordance with manufacturer s instructions. ATTENTION: LA TENEUR DE L EAU EN MATIERÈS DISSOUTES DOIT TRE CONFORME AUX DIRECTIVES DU FABRICANT. The use of alcohol or drugs can greatly increase the risk of fatal hyperthermia in hot tubs and Aquatic Fitness Systems. AVERTISSEMENT: LA CONSOMMATION D ALCOOL OU DE DROGUE AUGMENTE CONSIDÈRABLEMENT LES RISQUES D HYPERTHERMIE MORTELLE DANS UNE CUVE DE RELAXATION. SAVE THESE INSTRUCTIONS Hyperthermia Prolonged immersion in hot water may induce hyperthermia. Hyperthermia occurs when the internal temperature of the body reaches a level several degrees above the normal body temperature of (98.6 F, 37 C). The symptoms of hyperthermia include dizziness, drowsiness, lethargy, and fainting. The effects of hyperthermia include: Failure to perceive heat, Failure to recognize the need to exit the spa, Unawareness of impending hazard, Fetal damage in pregnant women, Physical inability to exit spa, Unconsciousness resulting in the danger of drowning. 3

20 Safety Do s and Don ts DO DO read all operating instructions. DO read, understand and follow all Safety, Danger and Warning instructions before use. DO test water temperature with your hand before entering. DO keep the cover down when the spa or AFS remains unused. DO check on water chemistry regularly to ensure proper ph. DO NOT DO NOT block or sit on the filter recess area. DO NOT dive or jump into your AFS. DO NOT allow horseplay or unsupervised use of your AFS. DO NOT allow anyone to tamper or play with any of the safety or suction fittings of your spa or AFS system. DANGER SIGN Every AFS has a warning sign that outlines safety precautions. Read and familiarize yourself with all warnings listed on this sign. Make the sign visible and accessible to all AFS users. Replacement signs may be obtained from our service department at the following address: For North America: Service-NorthAmerican@d1spas.com For Europe: Service-Europe@d1spas.com 4
21 SITE SELECTION AND PREPARATION You have many options for installing your Aquatic Fitness System. By design, your Aquatic Fitness System is self-supporting when placed on an adequate foundation, and can be installed above, in deck, or in, allowing you to locate it almost anywhere you wish outdoors or indoors. However, think carefully about your site location, taking into consideration climate, usage, water spillage, splashing, and drainage. When your Aquatic Fitness System is in place and filled with water, it can weigh over 10 tons (20,000 lbs). It is important that a proper foundation is built that can fully support that weight. The Aquatic Fitness System must sit on a flat, level, continuous surface foundation that fully contacts the bottom of the Aquatic Fitness System. An uneven or cracked concrete pad, or the use of shims of any kind, may cause the Aquatic Fitness System to buckle, distort and/or crack, which will void the Warranty. We recommend you to follow closely the minimum foundation specifications which are provided in Appendix A summarized below: Concrete Pad. The AFS must be fully supported over the entire base. A typical installation on soil that will support 1,000 psi load, is 5 inch (13 cm) thick concrete with # 4 rebar on 18 inch (46 cm) centers. (Ref. Doc 138 Installation Instructions)*. Conditions at the site will determine the exact support requirements. Please contact your local contractor for adequate installation. Damages caused by inadequate support will not be covered by the warranty * Doc 138 in the Appendix A of this document Excess Water. Normal use of the swim spa causes large amounts of water to splash out of the unit. Depending on the specific installation, additional provisions may have to be made for proper removal of this water. Clearance Access: In order to better service your product, clearance for access to AFS must be 36 inches (92 cm) at equipment compartment and 24 inches (61 cm) around the remaining area. A correctly installed pad that meets or exceeds all specifications is very important to a successful Aquatic Fitness System installation. An uneven or cracked concrete pad, or the use of shims of any kind, may cause the Aquatic Fitness System to buckle, distort and/or crack, which will void the Warranty. CONSIDERATIONS Important consideration must be given to the type of installation desired, the type of site access available, type of power available, and a wide range of additional items that are directly dependent on each of these major choices. First, let s consider the type of installation you want. INSTALLATION TYPES Your Aquatic Fitness System can be installed outdoors or indoors. It can be installed above, below (like a swimming pool), or partially in. You can plan to have your equipment package (pumps, filters, etc.) installed under the skirt and hidden from view, or installed remotely. You should carefully consider the following items before making your final decision on the type of installation you want. Appendix A contains a list of architectural requirements, including concrete specifications for the pad, equipment diagrams, size and shape specifications for all Aquatic Fitness Systems, and a blank site plan for you to sketch in your proposed installation. Warning If installed indoors, you must provide proper ventilation. Contact an HVAC professional to ensure proper humidity control. Installation should comply with requirements as stated in HVAC application handbook (ASHRA 1999b) 5
22 OUTDOOR SELF-CONTAINED Aquatic Fitness System Aquatic Fitness System and the power and water to the site; hook up the equipment that is installed within Aquatic Fitness System Be sure to keep the following things in mind when planning the installation of your Aquatic Fitness System outdoor: Do not Aquatic Fitness System under power lines! Aquatic Fitness System Aquatic Fitness System Aquatic Fitness System Warning This unit requires a GFCI (Ground Fault Circuit Interrupter). Aquatic Fitness System Aquatic Fitness System All supply wire to be rated minimum 90 C. OUTDOOR INSTALLATION : BUILDER PACKAGE Aquatic Fitness System Aquatic Fitness System equipment Aquatic Fitness System WARNING 6


23 ABOVE GROUND This installation type is typically the easiest because it normally requires little excavation. The Aquatic Fitness System is simply placed on a qualifying pad and hooked up. BELOW GROUND In Aquatic Fitness Systems require a lot more planning, but can be very rewarding. Since your Aquatic Fitness System is completely self-supporting when placed on a proper foundation pad, backfilling with sand, gravel or earth is not recommended and will void the warranty. If you are planning to locate the equipment in a remote location, you will have to excavate a trench for the plumbing from the Aquatic Fitness System to the equipment. The depth of the trench will be dependant upon your local soil conditions and frost levels. We recommend installing the lines well below the frost line. After excavating the install a concrete foundation pad as described above. If you choose to leave the equipment attached to the Aquatic Fitness System and are installing it below grade, you must plan for complete drainage so standing water never reaches the electrical components of the spa. You must also ensure that nothing obstructs the equipment access panel, and that proper ventilation is made available to cool the equipment. Clearance Access: In order to better service your product, clearance for access to AFS must be 36 inches (92 cm) at equipment compartment and 24 inches (61 cm) around the remaining area. If you choose to heat your Aquatic Fitness System with an optional gas pool heater, the heater must be installed above and a minimum of five feet away from the Aquatic Fitness System. Check all local codes regarding the installation of gas heaters. If the equipment is left under the unit, drainage must be provided to drain off water. The equipment is not capable of being submerged in water. Also insure that whatever you surround the pool with does not create additional hazards; splashed water may create walking hazards and/or cause water damage. Check all local building, electrical, and plumbing codes to ensure that your installation is in compliance. 7


24 It is your responsibility to comply with all local codes pertaining to the installation of this product. If you back fill the Aquatic Fitness System, it voids any warranty. PARTIAL IN-GROUND This type of installation can allow you to take advantage of any special geographical features unique to your site. For example, you may choose to excavate part of a terraced lot and put one end of the Aquatic Fitness System into the excavation and wrap a -level deck around it. WARNING It is extremely important to use spreaders whenever your Aquatic Fitness Systems is being installed. INDOOR INSTALLATION This type of installation provides for everything in one place inside. You will have some special challenges and/or considerations with an indoor installation, but the result can be very rewarding. Some important things to consider are: When installed indoors, your Aquatic Fitness System has the potential to create an increased humidity condition whenever the cover is off for extended periods of time. If you install the Aquatic Fitness System in a closed room, a means of decreasing unwanted humidity must be provided; ventilation fans, high-capacity dehumidifier or multiple window openings for cross ventilation are some examples. Consult with your Authorized Aquatic Fitness System dealer for more examples or cost estimates. 8
25 If installed indoors, you must provide proper ventilation. Contact an HVAC professional to ensure proper humidity control. Installation should comply with requirements as stated in HVAC application handbook (ASHRA 1999b) Warning Although your Aquatic Fitness System is designed to give years of trouble-free operation, you must plan for the possibility that your Aquatic Fitness System will need service or replacement. Locate your Aquatic Fitness System so that nothing obstructs the equipment access panel. Be sure to allow access to the Aquatic Fitness System, for repair or removal, when designing your indoor installation. Failure to do so may significantly increase service charges in future years. Building materials for all Aquatic Fitness System indoor installations, including but not limited to floors, walls, ceilings, doors, windows, trim, must be of materials capable of withstanding humidity and direct long-term contact with water. All furnishings must meet the same requirements. By the very nature of their use, Aquatic Fitness Systems have the potential to create a very wet environment. Dependant upon the installation and the skill level of the users, varying amounts of water may be splashed out of the Aquatic Fitness System at any given time. Splashed water lying on the floor may create slip hazards and/or cause water damage. You must provide for proper drainage of any water created through use of your Aquatic Fitness System. Be certain that floor load bearing capacities are adequate to support the filled weight of the Aquatic Fitness System, room occupants and furnishings. Inspect your Aquatic Fitness System carefully for leaks after filling and from time to time during the first 48 hours of operation. Although every Aquatic Fitness System is pressure tested and water tested to the most rigid industry standards before leaving the factory, in very rare instances, rough handling during transportation from the factory or at time of installation may cause a leak. Indoor sunrooms may create unusually high ambient temperature conditions. Always keep your Aquatic Fitness System covered with a solid thermal cover when it is not in use. Carefully monitor your Aquatic Fitness System s water temperature to ensure it does not exceed 104 F. Check all local building, electrical, and plumbing codes to ensure that your installation is in compliance. A licensed and bonded tradesman should perform all electrical, structural and plumbing work. WARNING It is extremely important to use spreaders whenever your Aquatic Fitness Systems is being installed. 9
26 ACCESS TO SITE Part of your location planning must include a review of accessibility to your proposed site. TRUCK You will need to determine if a truck can access your site, or at least get close enough for a crane or large forklift to transfer your Aquatic Fitness System to your pad. CRANE Crane or 3-Ton All Terrain Forklift Because of the size and weight of the Aquatic Fitness System, it will be necessary to use a crane or 3-ton forklift to place your system on its pad. Make sure that you consider all access requirements including, but not limited to, overhead restrictions such as power lines and trees, surface weight limits, space between buildings, etc. WARNING It is extremely important to use spreaders whenever your Aquatic Fitness Systems is being installed. 10
27 ELECTRICAL DANGER RISK OF ELECTRICAL SHOCK WARNING Be sure to read all of the following information before connecting your Aquatic Fitness System to any source of electricity! It is the responsibility of the installer and the owner to install a readily accessible disconnecting means and a GFCI (Ground Fault Circuit Interrupter) during the installation of the Aquatic Fitness System. The line of sight service disconnect must be located where visible from the hot tub, not less than 5 feet ( 1.5 meters) from the Aquatic Fitness System and not to exceed 50 feet ( meters) from the Aquatic Fitness System. This requirement may be filled with the GFCI sub-panel. All supply wire to be rated minimum 90 C. READ IMPORTANT SAFETY INSTRUCTIONS OF THIS MANUAL 11
28 ELECTRICAL REQUIREMENTS FOR NORTH AMERICAN AFS The Wiring Diagram for your Aquatic Fitness System is provided in the inside cover of the Lower Equipment Compartment lid. However, for your convenience, we have also provided samples of different wiring configurations for 50A/40A, and remote heater installations for both pack configurations in the Notes and Plans section of this document. North American AFS Electrical Requirements Model Power Branch Circuit Circuit Protection American Wire Gauge Aqua Pro 19, AquaFit 16 50A And Aquafit 19 40A Dual Temp Swim side 40A w/gas Heater** AquaFit 19 40A DT Spa side 50A ** Contact your local dealer for any questions related to electrical requirements or gas heater conversion procedure. Please look at appendix A of this document for more information on gas heater conversion instructions ELECTRICAL REQUIREMENTS FOR INTERNATIONAL AFS The Wiring Diagram for your Aquatic Fitness System is provided in the inside cover of the Lower Equipment Compartment lid. However, for your convenience, we have also provided samples of different wiring configurations for 50A/40A, and remote heater installations for both pack configurations in the Notes and Plans section of this document. International AFS Electrical Requirements Model Power Branch Circuit Circuit Protection Aqua Pro 19, AquaFit 16 And Aquafit 19 Dual Temp Swim side Adapted Metric Cable 230 V 4 wire + 3 x 16 A 5G6 230 V 2 wire + 1 x 32 A 3G V 2 x 16 A* 5G6 AquaFit 19 DT Spa side 230 V 4 wire + 3 x 16 A 5G6 230 V 2 wire + 1 x 32 A 3G V 2 x 16A* 5G6 Mandatory: Connect a breaker rated for proper amperage, with 30 ma differential * Due to power limitations in this configuration, pump 1 and pump 3 cannot be operated in high speed at the same time. 12
29 ALTERNATIVE HEATER CONNECTION (GAS OPTION) ALTERNATIVE HEATER CONNECTION OPTION (GAS HEATER) Be sure to review the required specifications for your unit. For information on how to connect a gas heater to your unit, please refer to the Appendix A of this document. INSTALLATION TESTING THE INSTALLATION Be sure to inspect all electrical, gas (if installed), and plumbing connections. All connections must meet or exceed local codes. Once filled with water, turn on the power and run the motors, check filters, lights, heater, etc. to make sure that everything is correctly connected and in proper working order. Be sure to check closely for leaks that might be caused by loose connections or shipping damage. If you find any leaks that were caused by shipping damage, contact the Dimension One Spas Inc. Warranty Department immediately for assistance. CONTRACTOR INFORMATION ARCHITECTURAL DRAWINGS Architectural drawings are available in the Appendix A LOCAL CODE REQUIREMENTS Be sure to check all local code requirements before planning your installation. Some local codes are more stringent than others. Normal use of the Aquatic Fitness Systems causes large amounts of water to splash out of the unit. These foundation specifications are only for mechanical support of the Aquatic Fitness System. Depending on the specific installation, additional provisions will have to be made for proper drainage of the water around the slab. Verify with owner, location of all depressions, openings, cast in place accessories, etc. prior to construction. See Appendix A for more detailed information. As soil conditions vary, we advise you to check with a local contractor to give you guide lines that determine the thickness of the foundation pad needed. See Appendix A for more detailed information. Locate your Aquatic Fitness System so that the equipment is above grade and not susceptible to water or flooding. If you are building your Aquatic Fitness System into the and require your equipment to also be located under, you must build a watertight vault with a sump-pump for proper water evacuation. Water must always drain away from the Aquatic Fitness System. Sufficient drainage must be available to prevent the equipment from ever being submerged. Failure to provide sufficient drainage will void the Warranty. 13

30 The entire end of your Aquatic Fitness System containing the equipment access panel must remain accessible in order to allow routine maintenance of your Aquatic Fitness System equipment. It is imperative that the owner and users of this Aquatic Fitness System carefully read all instructions in this manual prior to having your Aquatic Fitness System installed at your chosen location, whether indoors or outdoors. Improper installation may result in equipment damage and will void the Warranty. DELIVERY AND SETUP DELIVERY The site will require access by a flat-bed truck and a crane or heavy-duty fork lift. An empty AFS should never be exposed to temperatures below 0ºF (-18ºC) as extreme cold can cause shell damage. This includes storage, delivery, and draining (winterizing). If your AFS can be exposed to these temperatures, keep the AFS filled and running. If you do not plan to use your AFS, you can lower the temperature setting to 61ºF (16ºC). Failure to adhere to these guidelines will void the warranty. SETUP Your Dimension One Aquatic Fitness System has a very high quality finish. Stains and dirt will generally not adhere to this surface. You may clean your AFS s surface with an approved cleaner such as Leisure Time Multi-Purpose Cleaner. Check with your dealer before using any household cleaning products on your AFS. Do not use any 409 type cleaners or any cleaners containing abrasives, as these will damage the AFS shell surface. Fill the Aquatic Fitness System with water. The Aquatic Fitness System should be filled until the water level is approximately 2 inches (5 centimeters) above the bottom of the tile line. CONNECT POWER Turn on the circuit breaker for your Aquatic Fitness System on your house panel. The main pump will start in one of the modes as described under the Aquatic Fitness System side control functions. Select jets (main pump) on high speed. Let the system run for a few minutes to bleed air out of the plumbing system. Select second pump on high speed. If the system does not prime after 2 minutes of running, turn off electrical power to the Aquatic Fitness System. RUNNING ANY PUMP DRY FOR AN EXTENDED PERIOD WILL PERMANENTLY DAMAGE THE PUMP. The air control valves on the Aquatic Fitness System labeled max and min regulate the amount of air drawn through the Aquatic Fitness System s jets. More air produces a more vigorous massage. Your Aquatic Fitness System will heat quicker with the air valves set to min. With the Aquatic Fitness System operating, gradual heating of the water takes place over 12 to 24 hours. After initial startup, the low speed pump will start running if the water temperature is below 85 F (29.4 C Monitor the temperature and adjust the setting as desired. The water temperature must never exceed 104 F. 14


31 Please read and follow the remaining instructions in this owner s manual, including instructions on water treatment. Proper water treatment is critical to the maintenance of your Aquatic Fitness System s equipment as well as your own health and satisfaction. Be sure to refer to the Water Care Guide (P/N ) in order to test and treat your water properly. TESTING TEST THE TOP SIDE CONTROL Refer to the Owner s Manual that was shipped with the Aquatic Fitness System for instructions on how to use and program the Top Side Control. Be sure to test each controllable setting. 15
32 TROUBLESHOOTING GUIDE HEATING SYSTEM Symptom Problem Corrective Action Does not heat Too hot Flashing temperature of 34 F ( 1 C)or 134 F ( 56 C) appears on the display Hot Tub Temperature erratic Display reads OVERHEAT 1. Temperature setting is too low 2. Dirty filter 2. Clean filter 3. Flow switch malfunction 1. Temperature setting too high 1. Turn up the set temperature on the control panel 3. Call your dealer for service 1. Turn down the set temperature on the control panel 2. High limit tripped 2. Call your dealer for service Possible temperature sensor failure Call your dealer for service Water level Fill hot tub to about six inches below the top of the spa or 1 (2.54 cm) to 2 (5.08 cm) above the bottom of the tile line. 1. Too much filtration 1. Reduce the number of filter cycles and/or the filter cycle duration 2. Temperature setting too high 3. High limit or sensor problem 2. Turn down the set temperature on the control panel 3. Call your dealer for service 16
33 ELECTRICAL SYSTEM Symptom Problem Corrective Action Will not turn on in any mode Turns on by itself Light is out Pump shuts down unexpectedly while in use No power Normal automatic daily filtration, or anti-freeze cycle Burned out bulb 1. Automatic timer has shut pump off 2. Motor overheated and automatic protective device has shut down pump(s) Check circuit breaker and/or GFCI No action required Replace bulb 1. Push JETS Button again to start another cycle. If desired, reprogram automatic pump timer for longer duration. 2. If pump(s) will not restart when JETS Button is pushed, call for service Make sure that the equipment panel vent area is not blocked. Vent blockage can cause serious damage to your equipment. WATER SYSTEM Symptom Problem Corrective Action Pulsing jets Water level too low Fill spa to proper water level No Jet Action, or action is poor 1. Jets turned off 1. Turn jets on by turning jet face clockwise 1. Selector Valve turned 3. Dirty Filter 3. Clean Filter 1. Turn the Selector Valve to the appropriate position 4. Air lock 4. Loosen pump union to allow air to bleed 5. Gate valve closed 5. Open gate valve 17
34 APPENDIX A NORTH AMERICA AFS DRAWINGS NORTH AMERICA SITE PLAN NORTH AMERICA CONSTRUCTION SPECIFICATIONS NORTH AMERICA AFS VIEW INTERNATIONAL AFS DRAWINGS INTERNATIONAL SITE PLAN INTERNATIONAL CONSTRUCTION SPECIFICATIONS INTERNATIONAL AFS VIEW SPECIFICATIONS SWIM SPACE AND WATER LEVEL SPECIFICATIONS: AQUATIC FITNESS SYSTEMS 16 SPECIFICATIONS: AQUATIC FITNESS SYSTEMS 19 SPECIFICATIONS: AQUATIC FITNESS SYSTEMS 19 DT JUMPER SETTINGS FOR AFS PACK NORTH AMERICA JUMPER SETTINGS INTERNATIONAL JUMPER SETTINGS GAS CONVERSION INSTRUCTIONS 18
35 NORTH AMERICA AFS DRAWINGS NORTH AMERICA SITE PLAN 19 19
36 NORTH AMERICA CONSTRUCTION SPECIFICATIONS 20 20
37 NORTH AMERICA AFS VIEW 21 21
38 INTERNATIONAL AFS DRAWINGS INTERNATIONAL SITE PLAN 22 22
39 INTERNATIONAL CONSTRUCTION SPECIFICATIONS 23 23
40 INTERNATIONAL AFS VIEW 24 24
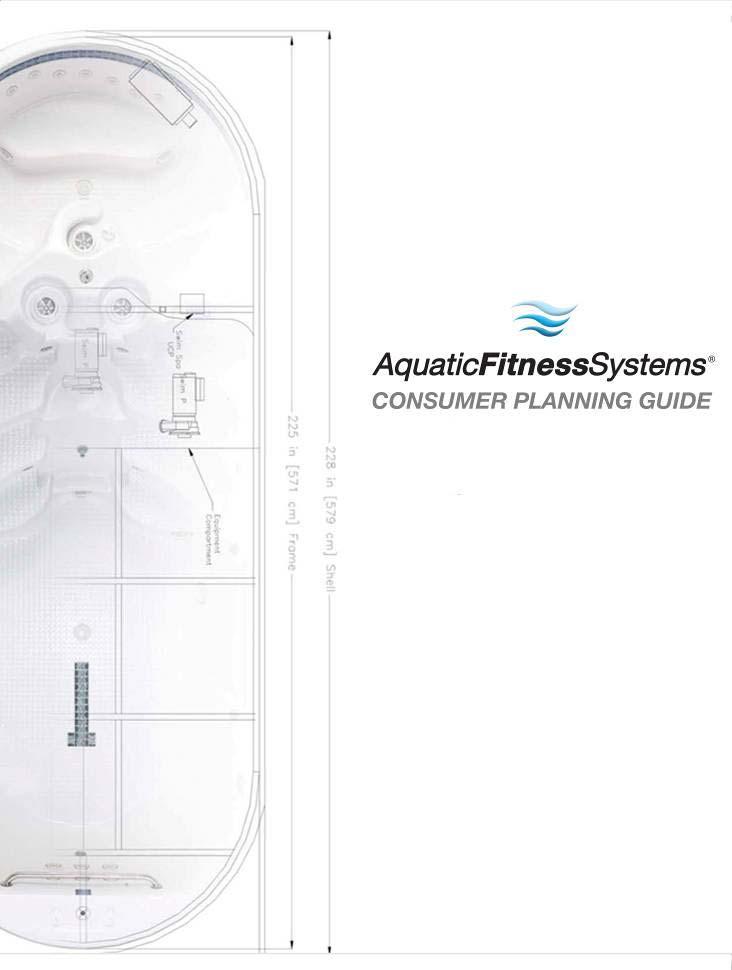
 Swim Space: 11 8 (~355 cm) AFS 16 Water Level: 42 inches (~106 cm) Swim Space: 9 9 (~297")
41 SPECIFICATIONS SWIM SPACE AND WATER LEVEL AFS 19DT Water Level: 42 inches (~106 cm) Swim Space: 7 10 (~238 cm) Aquapro 19 Water Level: 52 inches (~132 cm) Swim Space: 11 8 (~355 cm) AFS 16 Water Level: 42 inches (~106 cm) Swim Space: 9 9 (~297 cm) 25

42 SPECIFICATIONS: AQUATIC FITNESS SYSTEMS 16 26

43 SPECIFICATIONS: AQUATIC FITNESS SYSTEMS 19 27

44 SPECIFICATIONS: AQUATIC FITNESS SYSTEMS 19DT 28
45 JUMPER SETTINGS FOR AFS PACK NORTH AMERICA JUMPER SETTINGS All jumpers are read at power-up only. Jumper Number JMP-1 JMP-2 JMP-3 JMP-4 JMP-3 JMP-4 JMP-3 JMP-4 JMP-3 JMP-4 Function Position 1 (Left) Position 2 (Right) Maximum amperage draw Heat associated pump/ default set point Pump 2 not installed Pump 3 not installed Pump 2 is single speed Pump 3 not installed Pump 2 is dual speed Pump 3 not installed Pump 2 is single speed Pump 3 is single speed 50Amp Circulation Pump/100 F x X X 40Amp Pump 1/85 F JMP-5 Waterfall Installed Not Installed JMP-6 Dynamic Lighting Installed Not Installed JMP-7 Heater management Enabled (restricted) Disabled** JMP-8 Not used Default settings shown in Bold. ** If jumper 7 is set to position 2, Heater management is disabled and heat is driven between P63 and P66. X X X X X CR 4130 Doc Rev A 29
46 INTERNATIONAL JUMPER SETTINGS All jumpers are read at power-up only. Jumper Number JMP-1 JMP-2 JMP-1 JMP-2 JMP-1 JMP-2 JMP-3 JMP-4 JMP-5 JMP-4 JMP-5 JMP-4 JMP-5 JMP-4 JMP-5 Function Position 1 (Left) Position 2 (Right) Input is 2x16Amp Input is 1x32Amp Input is 3x16Amp Heat associated pump/ default set point Pump 2 not installed Pump 3 not installed Pump 2 is single speed Pump 3 not installed Pump 2 is dual speed Pump 3 not installed Pump 2 is single speed Pump 3 is single speed X X Circulation Pump/100 F X X X X X X X Pump 1/85 F JMP-6 Waterfall Installed Not Installed JMP-7 Dynamic Lighting Installed Not Installed JMP-8 Heater management Enabled (restricted) Disabled** Default settings shown in Bold. ** If jumper 8 is set to position 2, Heater management is disabled and heat is driven between P63 and P66. X X X X X CR 4130 Doc Rev. A 30

 Locate the lower control (blue box) and open it 3) Attach the relay to the black shield in the")
 Move the heater management jumper to the right position (disabled).")
47 AFS GAS HEATER CONVERSION INSTRUCTIONS Please read the following document if you want to learn how to heat up an Aquatic Fitness System with a gas heater: In order to make the conversion, you need to purchase an AFS gas heater conversion kit from an authorized D1 dealer (part # ) 1) Make sure that the GFCI is turned off 2) Locate the lower control (blue box) and open it 3) Attach the relay to the black shield in the Lower Control with two dots of silicone: one on the bottom and one on the side. 4) Move the heater management jumper to the right position (disabled). Jumper 7 for North American boards and jumper 8 for Export boards. 31
 and secure the loose ends to a nearby")

48 5) Disconnect the power wires from the electrical heater (Black, red, green and white cables) and secure the loose ends to a nearby stud. 6) Connect one wire jumper to P63 and the other wire jumper to P66. Connect the wire jumpers to the two unmarked terminals of the relay 32


49 7) Connect the wires from the gas heater safety circuit to the relay terminals marked NO and COM 8) Cut off the 2 ends caps at pump 1 output and return. Connect to the heater plumbing. 33
50
51
52
53 Manufacturer Structure Surface Plumbing Equipment Dimension One Spas Portable Spa Warranty Comparisons North America (U.S. & Canada) Page One of Two Exterior Wood/Synthetic Exclusions Home Lifetime / 7 Yrs 1 Lifetime / 7 Yrs 1 5 Years 3 Years Delivery / 3 Years D1 Bay Collection Lifetime / 7 Yrs 1 Lifetime / 7 Yrs 1 5 Years 5 Years Delivery / 2 or 5 Years 2 D1 Reflections Lifetime / 7 Yrs 1 Lifetime / 7 Yrs 1 5 Years 5 Years Delivery / 2 or 5 Years 2 Jacuzzi Brands Sundance (780, 850, 880 Models) 10 Years 7 Years 5 Years 5 Years 2 Years / 2 Years ClearZone Water Management System and escutcheon jet inserts -1 year parts. Pillows, light bulbs, filter cartridges, hose bib, spa cover and cabinet finish are excluded. Audio systems -6 months. LED lights -3 years. Ozone bulb, audio systems, and escutcheon jet inserts -1 year. Ceramic tile -5 years. LED lights and LFX packages -3 years. Ozone bulb, audio systems, and escutcheon jet inserts -1 year. Ceramic tile -5 years. LED lights and LFX packages -3 years. Color light lenses, fuses, light bulbs, filter cartridges, headrests, cabinet delivery. Filter lids, jets, valves, stereo components -2 years. delivery. Sundance (680 Model) 5 Years 3 Years 3 Years 3 Years 1 Year / 1 Year Color light lenses, fuses, light bulbs, filter cartridges, headrests, cabinet finish, and delivery. Filter lids, jets, valves, stereo components -1 year. Color light lenses, fuses, light bulbs, filter cartridges, headrests, cabinet finish Jacuzzi (J200 Model) 5 Years 3 Years 3 Years 3 Years Delivery / 1 delivery. All other factory installed components not mentioned specifically - 2 years Color light lenses, fuses, light bulbs, filter cartridges, headrests, cabinet finish Jacuzzi (J400, J Years 7 Years 5 Years 5 Years Delivery / 2 delivery. All other factory-installed components not mentioned specifically - Models) 1 year Beachcomber Lifetime 5 Years NA 2 Years NA / NA Premium guarantee that extends your 2 year equipment coverage to 5 years. Cal Spas 10 Years 10 Years 5 Years* Lifetime** NA / NA *A lifetime warranty on only the XL heat exchanger. **Sure-Flow jet system -5 Years. All other plumbing N/A Cal Cooperage 7 Years 3 Years 3 Years 3 Years NA / 2 Years Colored light lenses, fuses, light bulbs, filter delivery. Filter lids and head rests -90 days color optics, factory installed ozonator -3 years Color light lenses, fuses, light bulbs, filter delivery. Filter lids, Coleman Spas 10 Years 7 Years 5 Years 5 Years 2 Years / 3 Years head rests and jet inserts -90 Days. Side panel -2 years. Steel frame -lifetime warranty. Version 1.1; last revised on 4/23/07 1) The Ultralife spa shell (white, in color) is warranted for the life of the spa. However, after year 7, D1 will repair or replace the spa provided that the hot tub is returned at the owner's expense. Any non-ultralife spa shell (i.e., a shell which includes a color) is warranted over 7 years after the date of purchase. 2) Envirotect cabinet is warranted against cracking or delamination for 5 years. Timberlite and Stonelite cabinets are warranted for 2 years. SALES TRAINING AID: Not intended for advertising or retail sales distribution Dimension One Spas. Reproduction not permitted without written authorization. Accuracy of information is based on the best information available at time of printing. Neither Dimension One Spas nor its retailers or distributors assume any responsibility for typos, misprints or unintended inaccuracies. Specifications are subject to change without notice. Dimension One Spas, A Higher Degree of Hot Tubs and associated logos are registered trademarks of Dimension One Spas.
54 Manufacturer Structure Surface Plumbing Equipment Dimension One Spas Portable Spa Warranty Comparisons North America (U.S.& Canada) Page Two of Two Exterior Wood/Synthetic Exclusions Home Lifetime / 7 Yrs 1 Lifetime or 7 Yrs 1 5 Years 3 Years Delivery / 3 Years D1 Bays Lifetime / 7 Yrs 1 Lifetime or 7 Yrs 1 5 Years 5 Years Delivery / 2 or 5 Years 2 D1 Reflections Lifetime / 7 Yrs 1 Lifetime or 7 Yrs 1 5 Years 5 Years Delivery / 2 or 5 Years 2 Coast Spas Premium Models Lifetime 7 Years 5 Years 3 5 Years 4 2 Years / 5 Years Northwind Series 5 Years 5 Years 2 Years 2 / 3 Years 5 1 Years / 2 Years L.A. Spas 20 Years 7 Years 5 Years 3 Years Delivery / 1 Year Marquis Spas 7 Years 7 Years 7 Years 5 / 3 Years* Delivery / 7 Years ClearZone Water Management System and escutcheon jet inserts -1 year parts. Pillows, light bulbs, filter cartridges, hose bib, spa cover and cabinet finish are excluded. Audio systems -6 months. LED lights -3 years. Ozone bulb, audio systems, and escutcheon jet inserts -1 year. Ceramic tile -5 years. LED lights and LFX packages -3 years. Ozone bulb, audio systems, and escutcheon jet inserts -1 year. Ceramic tile -5 years. LED lights and LFX packages -3 years. Filter cartridges, light bulbs, fuses, filter cover and spa delivery. Ozone generator -2 year. Stereo, CD, DVD and TV -1 year. (Specifically excludes water damage) Filter cartridges, light bulbs, fuses, filter cover and spa delivery. Ozone generator -2 years. Stereo, CD, DVD and TV -1 year. (Specifically excludes water damage) Ozone generator, blower, fiber optics except bulbs and fuses), and Audio/video systems -1 year. Pillows, filter covers, filter cartridges -90 days. 3 year plumbing includes parts only. *Jet pump, pump seals, equipment pack, and no-fault heater -5 years. Drain bib, CFCI cord, gaskets, fuses, removable jet fittings, skimmer lid, light bulb, light lense, spa cover, cover locks and latches -3 years. Master Spas 10 Years 7 Years 5 Years 5 Years Delivery / 5 Years LED light system, audio/video equipment, stereo, speakers, remote, subwoofer -1 year. Ozonator -5 years. Original corona chip -2 years Watkins Caldera Spas 10 Years 7 Years 5 Years 5 Years Delivery / 3 Years Hot Spring 7 Years 7 Years 5 Years 5 Years Delivery / 5 Years SpaGlo, CD ozone system, and Aquatic Melodies sound system (stereo, speakers, amplifier, and remote control) -1 year. Filter cartridges, cover locks, fuses and delivery. Energy Pro Heater -5 year. No fault heater -5 years. Stereo system components, light assembly and cosmetic trim tile -1 year. Tiger River 7 Years 7 Years 5 Years 5 Years Delivery / 3 Years Filter cartridges, filter cover, spa pillows, DreamJet pillow and membrane, and cover delivery. LED Light and Light components -1 year Version 1.1; last revised on 4/23/07 1) The Ultralife spa shell (white, in color) is warranted for the life of the spa. However, after year 7, D1 will repair or replace the spa provided that the hot tub is returned at the owner's expense. Any non-ultralife spa shell (i.e., a shell which includes a color) after the date of purchase. 2) Envirotect cabinet is warranted against cracking or delamination for 5 years. Timberlite and Stonelite cabinets are warranted for 2 years. 3) 5 year no-leak warranty, installed plumbing against water loss due to defects in materials and worksmanship from date of purchase. 4) 5 year warranty on LED lighting, electrical components (specifically the pumps), motor failure, control system and control keypad (except stereo and television). 5) 2 year warranty on LED lighting, 3 year warranty on the electrical components (specifically the pumps), motor failure, control system and control keypad (except stereo and television). SALES TRAINING AID: Not intended for advertising or retail sales distribution Dimension One Spas. Reproduction not permitted without written authorization. Accuracy of information is based on the best information available at time of printing. Neither Dimension One Spas nor its retailers or distributors assume any responsibility for typos, misprints or unintended inaccuracies. Specifications are subject to change without notice. Dimension One Spas, A Higher Degree of Hot Tubs and associated logos are registered trademarks of Dimension One Spas.
55 DIMENSION ONE SPAS A Higher Degree of Indulgence Purchase and Delivery This section contains sample documents commonly used to close the sale, follow-up and facilitate the purchase and delivery of your customer s new spa. Section Contents: Courtesy Hold Program Site Evaluation Form Sample Lead Card Sample Post Cards Things you can add: Price List Current Inventory List Order Forms Finance Rates and Options Delivery Policies and Procedures Accessories Price List Specials Copies of your current Sale Ads
56 DIMENSION ONE SPAS A Higher Degree of Indulgence Courtesy Hold Program Dimension One Spas recognizes that purchasing the right spa for your family can be a big decision. We want you to feel comfortable with your purchase decision and still have rst choice of our available inventory so that you may select the model, color and price that are right for you! For that reason, we offer a courtesy hold program to all our customers who need a little extra time to make the right decision. Here s How it Works: Simply choose the model and color that you would like to own from our available inventory and leave us a small refundable deposit. We will put your name on the spa you select and temporarily remove it from our inventory for a period of 48 hours. If you elect to take delivery, we will then ask for the balance of our standard 25% deposit to complete a sales order and schedule the rst available delivery time that works best for you. If however you decide not to go forward with your purchase within 48 hours, we will refund 100% of your deposit. No Questions Asked. Program Bene ts: Removes your spa from our inventory so it can t be sold to another customer for 48 hours Allows you time to go home, measure and make sure your selection will work for you Your deposit is 100% refundable and completely secure Guarantees you the best available selection and delivery scheduling priority New Spa Owner: Deposit Date: Address: City: State: Zip: Model: Color: Serial Number: Deposit Amount: $ Form of Payment: Agreement Void and Deposit will be Refunded After: / / I agree to the terms of the Courtesy Hold Program and understand that my deposit is completely refundable. I also understand that this agreement is void after 48 hours from the date signed, which means my selection will be returned to available inventory and my deposit refunded. Salesperson s Signature Customer s Signature
57 DIMENSION ONE SPAS A Higher Degree of Indulgence Pre-Delivery Site Evaluation Customer Name: Address: City: State: Zip: Phone: (Home) (Work) Directions to Delivery Site: Salesperson: Estimated Delivery Date: Spa Model: Filled Weight: (add 175 pounds per bather) lbs Delivery Type: Curbside Location Required Number Delivery People: Desired Location: Inside Outside Spa to be Placed on: Concrete Pad Wood Deck Other: Height Above Ground Level: feet Number of Stairs: steps Spa to be Recessed into Deck/Flooring: Yes No How far: inches Place Equipment Side to Face: Distance from Delivery Truck to Location: feet Path to Location: Paved Un-paved Lawn Concrete Pad Through House Obstacles: Gates (s) Dimensions: W x H (2) W x H Doors (s) Dimensions: W x H (2) W x H Overhead Clearance: inches Grade: Yes No Special Instructions: Evaluation Performed by: Date:
58 DIMENSION ONE SPAS A Higher Degree of Indulgence Sample Lead Card Customer Information Card Store Location: Sample Customer Name: Mr./Mrs./Ms. Joe & Mary Jones Date: / / Address: 123 Any Street City: Anytown State: SA Postal Code: Phone: Home: ( 004 ) Work: ( 004 ) Mobile: ( 004 ) maryjones@anywho.com Sales Consultant: Bob Salesperson Referred by: Location TV Radio Phonebook Newspaper B2B Internet Event Other: X Where will the spa be placed? Indoors Outdoors Additional Information X Existing 12 x 18 Deck Is site preparation necessary? X Yes No Explain: Customer needs quote on Electrical How soon will you be ready for delivery? 2 Weeks How many persons would you like your new spa to seat? 4-6 Do you have any hydrotherapy needs? Explain: Joe: Lower Back; Mary: Neck & Shoulders What concerns might you have about purchasing your new spa? Chemical Maintenance, Cost to Operate What other brand(s) of spas have Brand: Hot Spring Model: Sovereign Price $ 6,795 you considered purchasing? Brand: Sundance Model: Price $ 7,295 Altamar Recommended Model: Aurora II Shell: UltraLife Exterior: Mayan Brown Price $ 6,995 Options: X LED Lighting SIS System iwatch Floating Remote Cover Lifter: (Type) Steps X EZ Lifter X Vision X Water Management: (Type) UltraPure X Gazebo: (Model) Chehalis 100 Price $ 1,995 X Comments: Soaked in the Sovereign; Joe did not like the seating; Jets not strong enough for him. Would like to soak in Aurora II before they buy. Salesperson Copy Front Side
59 DIMENSION ONE SPAS A Higher Degree of Indulgence Sample Lead Card FOLLOW-UP LOG: Joe & Mary Jones Customer Name: Model: Aurora II Price: $ 6, Hour Thank You Card Sent: / / X Special Event Price: Expires / / Day Contact: / / Spoke To: Mary No Answer Left Message Result: Joe & Mary coming in tonight to soak 14-Day Contact: / / Spoke To: No Answer Left Message Result: 30-Day Contact: / / Spoke To: No Answer Left Message Result: 90-Day Contact: / / Spoke To: No Answer Left Message Result: 6-Month Contact: / / Spoke To: No Answer Left Message Result: 12-Month Contact: / / Spoke To: No Answer Left Message Result: Wet Test Appt: / / Time: : 6 30 (AM/PM) X Con rmed Result: SOLD Site Insp Appt: / / Time: : (AM/PM) Con rmed Result: 2nd Store Visit: / / Time: : (AM/PM) Con rmed Result: Comments: : Called ABC Electric to give customer an estimate. Reverse Side (Hard Copy)

60 Pre-Visit Invite: Sample Post Card #1 Soon... You ll be a Member of Our Family! (Front) Dear: Thank you for your interest in Dimension One Spas. I hope you ve found the information we sent you helpful, and perhaps have already picked-out a model or two that you would like to see in person. I will be your personal consultant during your selection process and will be delighted to work with you in answering all your questions. I will be in touch in the next few days to set-up a date for you to visit our showroom. We look forward to welcoming you into the D1 family of owners! Regards, DIMENSION ONE SPAS (Back)

61 Post-Visit Follow-up: Sample Post Card #2 (Front) Dear: I just wanted to thank you for stopping by our store today to shop for your new D1 hot tub. I enjoyed the time we spent together showing you why a D1 is the very best hot tub for you. I will be in touch in the next few days to set-up a date for you to come-in and test soak the spa you liked. If there is anything else I can do for you in the meantime, please do not hesitate to call me. We look forward to welcoming you into the D1 family of owners! Regards, DIMENSION ONE SPAS (Back)

62 Post-Sale Follow-up: Sample Post Card #3 (Front) Dear: I just wanted tell you how pleased we are that you chose a D1 as your new hot tub. Our delivery manager will be in touch in the next few days to confirm a delivery date with you. If there is anything else I can do for you in the meantime, please do not hesitate to call me. Thank you so much for your business, and welcome to the D1 family of owners! Regards, DIMENSION ONE SPAS (Back)
PRE-PURCHASE DECISIONS...1 BEFORE DELIVERY...1
 Table of Contents PRE-PURCHASE DECISIONS...1 BEFORE DELIVERY...1 Typical Installation Site...1 SITE ACCESS...2 COVER...2 ELECTRICAL HOOK UP...3 LOAD SHARING...3 ELECTRICAL REQUIREMENTS...4 North American...4
2004 Consumer Planning Guide
 IV 2004 Consumer Planning Guide Table of Contents PRE-PURCHASE DECISIONS... 1 BEFORE DELIVERY... 1 Typical Installation Site...1 SITE ACCESS... 2 COVER... 2 AFS SITE SELECTION AND PREPARATION... 3 CONSIDERATIONS...
Smart JVA Module WARNING. For use with AquaLink RS systems with rev R firmware or newer.
 INstallation and OPERATION Manual Smart JVA Module For use with AquaLink RS systems with rev R firmware or newer. H0370200 Rev C FOR YOUR SAFETY - This product must be installed and serviced by a contractor
WARNING FOR YOUR SAFETY
 ! OWNER S MANUAL Power Alert AquaLink TRI Controller H0389100 REV A WARNING FOR YOUR SAFETY - This product must be installed and serviced by a licensed electrician in accordance with AS/NZ 3000-2007 and
Dimension One Spas - Aquatic Fitness System Owner s Manual
 Dimension One Spas - Aquatic Fitness System Owner s Manual Your Product Information Please gather the following important information about your Dimension One Aquatic Fitness System (AFS) and register
get into it! owner s manual
 owner s manual WELCOME TO THE SPA LIFE! Please enjoy your new Everyday Hot Tub, but think safety first. Read your Owner s Manual in its entirety before installing your spa and encourage all spa users to
Your Product Information
 i Aquatic Fitness System Owner s Manual Your Product Information Please gather the following important information about your Dimension One Aquatic Fitness System (AFS) and register your product online
AQUAFIT OWNER S GUIDE. My Swim Spa Model Name Serial Number Date Installed Dealer Name. Service Phone
 1 AQUAFIT OWNER S GUIDE My Swim Spa Model Name Serial Number Date Installed Dealer Name 2 Service Phone Contents Safety Instructions 4 Warning Labels 8 Installation 8 Fill and Start 10 Control Panel 12
V V / V 5 0 0
 Owner s Manual V 1 0 0 V 3 0 0 / V 5 0 0 2014 TABLE OF CONTENTS Important Safety Instructions 2 Personal Safety Precautions 4 Installation and Set-Up Instructions 5 Electrical Requirements (VS-300) 5 Spa
Home Hot Tubs Owner s Manual
 ii 2002 @ Home Hot Tubs Table of Contents IMPORTANT SAFETY INSTRUCTIONS...1 IMPORTANT SAFETY INSTRUCTIONS (CSA SAFETY INFORMATION)... 2 HYPERTHERMIA... 5 DO S AND DON TS... 6 WARNING SIGN... 7 HOT TUB
Owner s Manual. Copyright Four Winds Spas 2016 Specifications subject to change.
 Owner s Manual Copyright Four Winds Spas 2016 Specifications subject to change. Dear Valued Customer, Thank you for your purchase of a Four Winds Spa. We are sure you will have many years of enjoyment
2018 Owner s Manual. spatouch BP System
 2018 Owner s Manual spatouch BP System TABLE OF CONTENTS Important Safety Instructions 2 Personal Safety Precautions 4 Installation and Set-Up Instructions 5 Electrical Requirements (BP501) 5 GFCI Wiring
Step-by-Step Planning Guide
 B A C K Y A R D P L A N N I N G G U I D E Step-by-Step Planning Guide Whether you are considering purchasing a Michael Phelps Signature Swim Spa by Master Spas, or can t wait for yours to be delivered,
Spas that free your mind.
 Spas that free your mind. 110-120V 60Hz 1200W Read this manual before operating 1 IMPORTANT SAFETY INSTRUCTIONS When using this electrical equipment, basic safety precautions should always be followed,
Spas that free your mind.
 Spas that free your mind. SPECIAL CODE COLORS PMS 1235 PMS 274 PMS 300 PMS 306 110-120V 60Hz 1200W Read this manual before operating 1 IMPORTANT SAFETY INSTRUCTIONS When using this electrical equipment,
TABLE OF CONTENTS. Diverter Valves 18. Waterfalls. 19. Dynamic Jet Sequencer Start-Up Procedures 21 PH Sanitizers..
 TABLE OF CONTENTS Letter of Introduction 2 Feature Operations. 18-21 Diverter Valves 18 Spa Record keeping Information. 3 Air Controls 19 Waterfalls. 19 Important Safety Instructions. 4-5 Stereo.. 19 Dynamic
Hot Tub Pre-Delivery Guide
 Hot Tub Pre-Delivery Guide To prepare for the delivery of your hot tub, make sure the delivery path is clear and no obstructions are present. Obstacles such as overhanging tree limbs, awnings, protruding
Filling Directions Fill the Spa With Water 17 Skimmer Side Filter 18 Add Start-Up Chemicals 18
 2017 Owner s Manual TABLE OF CONTENTS Important Safety Instructions 2 Personal Safety Precautions 4 Installation and Set-Up Instructions 4 Electrical Requirements (Balboa 100, Balboa 500) 5 GFCI Wiring
1998 OWNER S MANUAL D I M E N S I O N O N E S P A S
 1998 OWNER S MANUAL D I M E N S I O N O N E S P A S TABLE OF CONTENTS Important Safety Instructions...............................1-8 Spa Features...........................................9-14 Jet System
CONGRATULATIONS! SAVE THESE INSTRUCTIONS
 CONGRATULATIONS! You are the proud owner of one of the finest spas available. Please take the time to read these instructions carefully. When the spa is properly installed and maintained, your spa will
2015 North American Owner s Manual In-Fit Exercise Pools
 2015 North American Owner s Manual In-Fit Exercise Pools TABLE OF CONTENTS LETTER OF INTRODUCTION... 3 SPA RECORD KEEPING INFORMATION... 3 IMPORTANT SAFETY INSTRUCTIONS... 4 HYPERTHERMIA INFORMATION...
Adventures In Hydrotherapy 2009 L.A. SPAS PREMIUM & MID-RANGE 120V OWNERS MANUAL
 Adventures In Hydrotherapy 2009 L.A. SPAS PREMIUM & MID-RANGE 120V OWNERS MANUAL TABLE OF CONTENTS LETTER OF INTRODUCTION... 2 SPA RECORD KEEPING INFORMATION... 3 IMPORTANT SAFETY INSTRUCTIONS... 4 HYPERTHERMIA
AMITY TWP POOL REQUIREMENTS
 AMITY TWP POOL REQUIREMENTS Construction In-ground, Above-ground and Storable pools and Spas shall be designed and constructed in conformance with International Swimming Pool & Spa Code (ISPSC) Location
2011 North American L.A. Spas Entry-Level Owner s Manual
 2011 North American L.A. Spas Entry-Level Owner s Manual TABLE OF CONTENTS LETTER OF INTRODUCTION... 2 SPA RECORD KEEPING INFORMATION... 3 IMPORTANT SAFETY INSTRUCTIONS... 4 HYPERTHERMIA INFORMATION...
Table of Contents Lincoln Parkway Fort Wayne IN Phone: Fax:
 OWNER S MANUAL Table of Contents 6927 Lincoln Parkway Fort Wayne IN 46804 Phone: 260.436.9100 Fax: 888-725-0694 www.masterspas.com Safety Instructions...2-9 Overall Design Information...10-11 Typical
2000 Owner s Hot Tubs 2611 Business Park Drive Vista, CA
 2000 Owner s Manual @Home Hot Tubs 2611 Business Park Drive Vista, CA 92083 760.727.7727 www.athomehottubs.com TABLE OF CONTENTS Important Safety Instructions.......................1-8 Instructions For
Bulletin Swimming pool, hot tub and spa installations Rules , , , , , and
 Bulletin 68-7-11 Swimming pool, hot tub and spa installations Rules 68-000, 68-056, 68-058, 68-064, 68-068, 68-302 and 68-404 Scope (1) Swimming pools - general (2) Grounding & bonding (a) Bonding for
Aquatic Fitness System 2004 International Owner s Manual
 Spa Information It is very important that you gather the following information on your spa and enter it in the blanks provided below. This information can then be used to complete your Warranty Registration,
CONGRATULATIONS! SAVE THESE INSTRUCTIONS
 CONGRATULATIONS! You are the proud owner of one of the finest spas available. Please take the time to read these instructions carefully. When properly installed and maintained, your spa will provide years
Check with local zoning official for property line distance requirements.
 RESIDENTIAL POOL PLAN SUBMITTAL GUIDELINES The following guidelines are intended to assist municipal residents with the permit acquisition process with regard to pools, spas and hot tubs for single family
2009 North American L.A. SPAS IN-FIT SWIM SPA OWNERS MANUAL
 2009 North American L.A. SPAS IN-FIT SWIM SPA OWNERS MANUAL TABLE OF CONTENTS LETTER OF INTRODUCTION... 2 SPA RECORD KEEPING INFORMATION... 3 IMPORTANT SAFETY INSTRUCTIONS... 4 HYPERTHERMIA INFORMATION...
2015 North American Owner s Manual Classic Hot Tubs
 2015 North American Owner s Manual Classic Hot Tubs TABLE OF CONTENTS LETTER OF INTRODUCTION... 3 SPA RECORD KEEPING INFORMATION... 3 IMPORTANT SAFETY INSTRUCTIONS... 4 HYPERTHERMIA INFORMATION... 6 SAFETY
LOGO INSTRUCTION MANUAL THE SYMBOL FOR QUALITY AND VALUE
 LOGO INSTRUCTION MANUAL THE SYMBOL FOR QUALITY AND VALUE CONGRATULATIONS!!! Your Nordic Hot Tub represents an innovative and unparalleled Hot Tub design, with unmatched quality, features and value. We
2005 Spa Pre-Delivery Guide
 $3.00 2005 Spa Pre-Delivery Guide The guide to making your new Cal Spa installation easy Due to continuous improvement programs, all models, operation, and/or specifications are subject to change without
TABLE OF CONTENTS. Letter of Introduction 2 Feature Operations. 17. Diverter Valves 17. Spa Record keeping Information.
 6 TABLE OF CONTENTS Letter of Introduction 2 Feature Operations. 17 Diverter Valves 17 Spa Record keeping Information. 3 Air Controls 17 Waterfalls... 17 Important Safety Instructions. 4-5 Stereo.. 17
Table of Contents Lincoln Parkway Fort Wayne IN Phone: Fax: Safety Instructions...
 MP RX OWNER S MANUAL Table of Contents 6927 Lincoln Parkway Fort Wayne IN 46804 Phone: 260.436.9100 Fax: 888-725-0694 www.masterspas.com Safety Instructions...2-9 Operation Instructions... 10 Overall
Swimming Pool Requirements
 Swimming Pool Requirements 8040 S. 6th Street Oak Creek, WI 53154 (414) 766-7000 www.oakcreekwi.org Revised: August 8. 2017 PERMITS A permit from the Inspection Department is required prior to putting
TABLE OF CONTENTS. 3. Important Safety Instructions. 6. Surface and Pad Requirements. 7. Electrical Requirements. 8. Electrical Connections
 INTRODUCTION The spa that you have purchased is one of the very best available, and incorporates features designed to assure long, enjoyable and healthful use if properly operated and maintained. The following
SPA WORLD. Pre- delivery Guide
 SPA WORLD Pre- delivery Guide HELLO! This document is designed to provide all the information you need to ensure the smooth delivery and installation of your spa or swim spa. Please read it carefully and
OWNER S MANUAL ALL 110/120 VOLT PLUG & PLAY SPAS
 OWNER S MANUAL ALL 110/120 VOLT PLUG & PLAY SPAS TABLE OF CONTENTS INTRODUCTION TITLE Page 1. Table of Contents 2 2. Owners Record 3 3. Planning a Location 4 4. A Good Foundation 5 Placing the Hot Tub
Part No B (01-00)
") Part No. 3-85-1167B (01-00) INTRODUCTION The spa that you have purchased is one of the very best available, and incorporates features designed to assure long, enjoyable and healthful use if properly operated
Part No. 3-85-1167B (01-00) INTRODUCTION The spa that you have purchased is one of the very best available, and incorporates features designed to assure long, enjoyable and healthful use if properly operated
100C Air Compressor Kit
 10010 100C Air Compressor (standard mounting bracket, CE Spec) 10014 100C Air Compressor (no leader hose or check valve, CE Spec) 10016 100C Air Compressor (with Omega Bracket, CE Spec) IMPORTANT: It is
SP & SR series. owner s manual
 SP & SR series owner s manual Quick Reference Chart To assist you with the installation and maintenance service of your new spa, please fill out the following information and keep it on hand for future
200 PSI COMPRESSORS - MODEL NUMBERS
 200 PSI COMPRESSORS - MODEL NUMBERS 380C AIR COMPRESSOR KIT PART NO. 38033 480C AIR COMPRESSOR KIT PART NO. 48043 380C 480C IMPORTANT: It is essential that you and any other operator of this product read
Pool Inspection. Your Street San Diego, California Prepared for: Your Name Prepared by: Priority Inspection Service
 Pool Inspection Your Street San Diego, California 92106 Prepared for: Your Name Prepared by: Page 1 of 10 Table of Contents Standards of Practice 2 Definitions 3 General Information 3 General Pool Information
ROTATIONAL SERIES STRONG SPAS OWNERS MANUAL SAVE THESE INSTRUCTIONS IMPORTANT SAFETY INSTRUCTIONS READ AND FOLLOW ALL INSTRUCTIONS CYPRUS ANTIGUA RIO
 STRONG SPAS OWNERS MANUAL United States & European Models ROTATIONAL SERIES ANTIGUA CYPRUS RIO To be covered under the Strong Spas Warranty you must register your product within 30 calendar days of delivery.
SWIMMING POOL REQUIREMENTS
 PERMITS A permit from the Inspection Department is required prior to putting up a permanent pool. A permit is required for permanent pools, such as the following: SWIMMING POOL REQUIREMENTS The pool is
IntelliChlor Power Center (For use with IntelliChlor model IC60, IC40 and IC20)
") IntelliChlor Power Center (For use with IntelliChlor model IC60, IC40 and IC20) Patents pending Certified to NSF/ANSI 50 Installation and User s Guide IMPORTANT SAFETY INSTRUCTIONS READ AND FOLLOW ALL
IntelliChlor Power Center (For use with IntelliChlor model IC60, IC40 and IC20) Patents pending Certified to NSF/ANSI 50 Installation and User s Guide IMPORTANT SAFETY INSTRUCTIONS READ AND FOLLOW ALL
420C AIR COMPRESSOR KIT PART NO C AIR COMPRESSOR KIT PART NO
 420C AIR COMPRESSOR KIT PART NO. 42042 460C AIR COMPRESSOR KIT PART NO. 46043 420C 460C IMPORTANT: It is essential that you and any other operator of this product read and understand the contents of this
97C COMPRESSOR KIT 12V PART NO C COMPRESSOR KIT 24V PART NO C COMPRESSOR KIT PART NO
 97C COMPRESSOR KIT 12V PART NO. 00097 97C COMPRESSOR KIT 24V PART NO. 02497 98C COMPRESSOR KIT PART NO. 00098 97C 98C IMPORTANT: It is essential that you and any other operator of this product read and
MP RX THE REVOLUTIONARY COMMERCIAL AQUATIC THERAPY & CONDITIONING SWIM SPA DESIGNED FOR AQUATIC THERAPY, CONDITIONING AND AQUATIC EXERCISE
 MP RX THE REVOLUTIONARY COMMERCIAL AQUATIC THERAPY & CONDITIONING SWIM SPA DESIGNED FOR AQUATIC THERAPY, CONDITIONING AND AQUATIC EXERCISE OWNERS MANUAL Table of Contents 6927 Lincoln Parkway Fort Wayne
Your Hot Tub Pre-Delivery Guide
 Your Hot Tub Pre-Delivery Guide live better feel better D E L U X E Service Center divinehottubsdeluxe.com Toll Free 1-877-483-1606 customerservice @ divinehottubsdeluxe.com D E LU X E S E R I E S divine
presents OWNER S MANUAL
 presents O W N E R S M A N U A L OWNER S MANUAL Welcome To Ultimate Relaxation! Thank you for choosing your new swim spa built by Master Spas. Please read the entire Owner s Manual before installing and
ARCHITECT INSTALLATION GUIDELINES FOR RESIDENTIAL TRITON INSTALLATIONS
 ARCHITECT INSTALLATION GUIDELINES FOR RESIDENTIAL TRITON INSTALLATIONS GENERAL LAYOUT Call SwimEx at 800-877-7946 to receive AutoCAD Drawings of the SwimEx Triton model that you will be installing. These
WATER TO THE EXTREME OWNER S MANUAL
 WATER TO THE EXTREME OWNER S MANUAL H2X OWNER S MANUAL Welcome To Ultimate Relaxation! Thank you for choosing your new swim spa built by Master Spas. Please read the entire Owner s Manual before installing
Residential Swimming pools
 City of Republic Community Development Department Residential Swimming pools REVISION DATE: JANUARY 2017 Swimming Pool Safety Definitions: Barrier Requirements: A) Application All swimming pools over 24
ARCHITECTURAL GUIDELINES ONE-PIECE COMMERCIAL
 ARCHITECTURAL GUIDELINES ONE-PIECE COMMERCIAL Architect Guidelines for SwimEx Installation of 500OT DW, 500OT, and 400OT General Layout Call SwimEx at 800-877-7946 to receive AutoCad Drawings of the SwimEx
perfect fit! owner s manual
 owner s manual WELCOME TO THE SPA LIFE! Please enjoy your new Hideaway Hot Tub, but think safety first. Read your Owner s Manual in its entirety before installing your spa and encourage all spa users to
The purpose of this brochure is to explain to owners and contractors the City of Burnaby s requirements for private swimming pools.
 Building Information BURNABY PLANNING & BUILDING DEPARTMENT Swimming Pools The purpose of this brochure is to explain to owners and contractors the City of Burnaby s requirements for private swimming pools.
IMPORTANT SAFETY INSTRUCTIONS
 IMPORTANT SAFETY INSTRUCTIONS CAUTION - To reduce risk of electrical shock: - Do not disassemble. Do not attempt repairs or modifications. Refer to qualified service agencies for all service and repairs.
BEACHCOMBER HOT TUB OWNER S GUIDE. Beachcomber. The Hybrid Hot Tub Company
 BEACHCOMBER HOT TUB OWNER S GUIDE Beachcomber. The Hybrid Hot Tub Company Congratulations Your hot tub is an investment in your health and happiness. This Owner s Guide is intended to give you instructions
WATER TO THE EXTREME OWNER S MANUAL
 WATER TO THE EXTREME OWNER S MANUAL H2X OWNER S MANUAL Welcome To Ultimate Relaxation! Thank you for choosing your new swim spa built by Master Spas. Please read the entire Owner s Manual before installing
DUAL SUCTION OUTLETS
 ISWG1061 Rev A DUAL SUCTION OUTLETS Contents Product Specific Warnings 2 Recommended system specifications... 5 Installation.... 6 Replacement Parts... 6 Owner s Manual Model No.: WG1061HF2PAK2 and WG1061LV2PAK2
Swimming Pool Requirements Packet
 Plot Plans shall indicate the following: Drawn to an appropriate scale with pool depths shown and dimensions to other structures Have an engineer address any surcharge loads on the pool or from the pool
MODEL NUMBER: PSI AIR SOURCE KIT 200 PSI Compressor on 2.0 Gallon 200 PSI Air Tank
 IMPORTANT SAFETY INSTRUCTIONS CAUTION - To reduce risk of electrical shock or Electrocution: MODEL NUMBER: 20008 200 PSI AIR SOURCE KIT 200 PSI Compressor on 2.0 Gallon 200 PSI Air Tank IMPORTANT: It is
City of Crystal Lake Community Development Department
 City of Crystal Lake Community Development Department 100 W. Woodstock Street Crystal Lake, IL 60014 www.crystallake.org Phone (815) 356-3605 Fax (815) 479-1647 building@crystallake.org ABOVE GROUND SWIMMING
Swimming Pools, Hot Tubs and Spas
 OLATHE FIRE DEPARTMENT BUILDING CODES 1225 S. Hamilton Circle Olathe, KS 66061 / Main: (913) 971-7900 / Fax: (913) 971-9812 Swimming Pools, Hot Tubs and Spas Definitions: Swimming Pool- Any structure intended
400C & 450C DUAL PERFORMANCE VALUE PACKS
 (Chrome) PART NO. 40013 (Silver) PART NO. 45012 (Chrome) PART NO. 45013 IMPORTANT: It is essential that you and any other operator of this product read and understand the contents of this manual before
Name of Purchaser. Date of Purchase. Address. City State Zip Code. Telephone. Spa Model/Color. Spa Serial # Pack Serial # Dealer s Name
 OWNER S MANUAL WELCOME TO THE SPA LIFE! We sincerely hope your spa life is a pleasant experience. If problems should arise, contact your authorized Marquis Spas dealer. Or contact Marquis Corp. at any
D E L U X E S E R I E S. Your Hot Tub Pre-Delivery Guide D E L U X E
 Your Hot Tub Pre-Delivery Guide live better feel better D E L U X E Service Center divinehottubsdeluxe.com Toll Free 1-877-483-1606 customerservice @ divinehottubsdeluxe.com divine hot tubs DLX pre-delivery,
42045 Heavy Duty ADA Base Model Kit: 85/105 PSI (ADA Compressor Only) Heavy Duty ADA Base Model Kit: 110/145 PSI (ADA Compressor Only)
 Heavy Duty ADA Base Model Kit: 110/145 PSI (ADA Compressor Only)") 42045 Heavy Duty ADA Base Model Kit: 85/105 PSI (ADA Compressor Only) 42047 Heavy Duty ADA Base Model Kit: 110/145 PSI (ADA Compressor Only) 45052 Constant Duty ADA Base Model Kit: 85/105 PSI (ADA Compressor
42045 Heavy Duty ADA Base Model Kit: 85/105 PSI (ADA Compressor Only) 42047 Heavy Duty ADA Base Model Kit: 110/145 PSI (ADA Compressor Only) 45052 Constant Duty ADA Base Model Kit: 85/105 PSI (ADA Compressor
WAKE COUNTY POOL PERMIT PRE-SEASON AUDIT 2014
 A DEPTH MARKINGS There are Depth Markings on and around a. On the vertical wall of the pool and on this pool that are at least 4 inches high; in contrasting color to the background; of a slip resistant
444C DUAL PERFORMANCE VALUE PACK
 (Chrome) PART NO. 44432 IMPORTANT: It is essential that you and any other operator of this product read and understand the contents of this manual before installing and using this product. SAVE THIS MANUAL
Swim Spa Pre-delivery Guide
 Swim Spa Pre-delivery Guide Hello! This document is designed to provide all the information you need to ensure the smooth delivery and installation of your spa or swim spa. Please read it carefully and
City of Lockport Above Ground Pool Regulations
 Location: City of Lockport Above Ground Pool Regulations Pool to be at least 6 feet from both rear and side lot lines, but not in any easements. If located on a corner lot, pool must be located behind
RESIDENTIAL SWIMMING POOL REQUIREMENTS
 CITY OF GRANDVIEW / BUILDING SERVICES 1200 MAIN STREET, GRANDVIEW, MO 64030 PHONE: (816) 316-4817 FAX: (816) 316-4809 WWW.GRANDVIEW.ORG RESIDENTIAL SWIMMING POOL REQUIREMENTS Community Development Department
WATER TO THE EXTREME. swimming l fitness l therapy l family fun l premium line of jetted swim spas INTERNATIONAL OWNER S MANUAL
 WATER TO THE EXTREME swimming l fitness l therapy l family fun l premium line of jetted swim spas INTERNATIONAL OWNER S MANUAL OWNER S MANUAL Welcome To Ultimate Relaxation! Thank you for choosing your
Maxxus Owner s Manual
 Maxxus Owner s Manual Table of Contents Important Hot Tub Owner Information...1 Important Safety Instructions...2 Locating Your Sundance Hot Tub...8 General Electrical Safety Instructions...9 Electrical
MODEL NUMBER: M20005 AIR SOURCE KIT. 30% Duty Compressor on. 2.0 Gallon Air Tank SAVE THIS MANUAL FOR FUTURE REFERENCE
 MODEL NUMBER: M20005 AIR SOURCE KIT 30% Duty Compressor on 2.0 Gallon Air Tank SAVE THIS MANUAL FOR FUTURE REFERENCE USER MANUAL IMPORTANT SAFETY INSTRUCTIONS CAUTION - To reduce risk of electrical shock
SWIMMING POOL & SPA DOCUMENT SUBMITTAL LIST
 SWIMMING POOL & SPA DOCUMENT SUBMITTAL LIST Completed Application for Construction or Use (Permit application). Application must include authorized signature from the property owner if it is not owner
OW N E R S M ANUAL YOUR PASSPORT TO RELAXATION
 OW N E R S M ANUAL YOUR PASSPORT TO RELAXATION MASTER SPAS OWNER S MANUAL Welcome To Ultimate Relaxation! Thank you for choosing your new spa built by Master Spas. Please read the entire Owner s Manual
ARCHITECTURAL GUIDELINES FOUR-PIECE RESIDENTIAL
 ARCHITECTURAL GUIDELINES FOUR-PIECE RESIDENTIAL Architect Installation Guidelines for Four-Piece Residential Installations GENERAL LAYOUT Call SwimEx at 800-877-7946 to receive AutoCad Drawings of the
Life Smart Spas Frequently Asked Questions
 Customer Service (888) 961-7727, ahsservice@watkinsmfg.com Life Smart Spas Frequently Asked Questions What makes Lifesmart Spas different from other spas? Lifesmart spas are rotationally molded. This manufacturing
RIVIERA SPAS RIVIERA OWNER S MANUAL
 2008 OWNER S MANUAL RIVIERA SPAS RIVIERA OWNER S MANUAL Welcome To Ultimate Relaxation! Thank you for choosing your new spa built for Riviera Spas. Please read the entire Owner s Manual before installing
ARCHITECTURAL GUIDELINES FOUR-PIECE COMMERCIAL
 ARCHITECTURAL GUIDELINES FOUR-PIECE COMMERCIAL ARCHITECT GUIDELINES FOR SWIMEX FOUR-PIECE COMMERCIAL INSTALLATION GENERAL LAYOUT Call SwimEx at 800-877-7946 to receive AutoCad Drawings of the SwimEx Model
RPS900W Redundant Power Supply. Installation Guide.
 RPS900W Redundant Power Supply Installation Guide www.edge-core.com Installation Guide RPS900W Redundant Power Supply Single DC Output Port with Dual Output Voltages RPS900W E10013-CS-R01 1500000081A
RESIDENTIAL SWIMMING POOLS AND SPAS A GUIDE FOR HOMEOWNERS
 RESIDENTIAL SWIMMING POOLS AND SPAS A GUIDE FOR HOMEOWNERS City of Redding 777 Cypress Avenue Redding CA 96001 Telephone: (530) 225-4013 FAX: (530) 225-4360 A Swimming Pool is any body of water 18 inches
400H HARDMOUNT AIR COMPRESSOR KIT PART NO H HARDMOUNT AIR COMPRESSOR KIT PART NO
 400H HARDMOUNT AIR COMPRESSOR KIT PART NO. 40042 450H HARDMOUNT AIR COMPRESSOR KIT PART NO. 45042 400H 450H IMPORTANT: It is essential that you and any other operator of this product read and understand
Blue Whale Spa :- Site Preparation and Delivery
 Pre-Delivery Instructions Please take the time to read this information carefully, as it will provide you with the information you will need to ensure the safe, secure, and timely installation of your
Life Smart Spas Frequently Asked Questions LS600DX
 Customer Service (888) 961-7727, ahsservice@watkinsmfg.com Life Smart Spas Frequently Asked Questions LS600DX What makes Lifesmart Spas different from other spas? Lifesmart spas are rotationally molded.
3 GALLON, OILLESS PANCAKE COMPRESSOR INSTRUCTIONS. Item #31289
 3 GALLON, OILLESS PANCAKE COMPRESSOR INSTRUCTIONS Item #31289 The EASTWOOD 3 GALLON, OILLESS PANCAKE COMPRESSOR, with an Integral Air Regulator, efficiently supplies all compressed air requirements for
help make your spa installation a success Commissioned by Caldera Spas
 9tips to help make your spa installation a success Commissioned by Caldera Spas Simple planning makes a better spa As spa owners ourselves we know what needs to happen to ensure a hot tub is installed
Solus Spa Solus Spa Solus Spa
 Solus Spa Spa Contents Page 3. Important Safety Instructions 4. Choosing the Right Location Outdoor Locations Special Considerations 5. Installation and Preparation Hot Tub Base Hot Water Supply Safety
MASTER SPAS OWNER S MANUAL
 OWNER S MANUAL MASTER SPAS OWNER S MANUAL Welcome To Ultimate Relaxation! Thank you for choosing your new swim spa built by Master Spas. Please read the entire Owner s Manual before installing and using
MASTER SPAS OWNER S MANUAL
 OWNER S MANUAL MASTER SPAS OWNER S MANUAL Welcome To Ultimate Relaxation! Thank you for choosing your new spa built by Master Spas. Please read the entire Owner s Manual before installing and using your
ARCHITECT GUIDELINES 1000 T
 ARCHITECT GUIDELINES 1000 T Architect Guidelines for SwimEx Installation Model 1000T General Layout Call SwimEx at 800-877-7946 to receive AutoCad Drawings of the SwimEx Model that you will be installing.
SALT GENERATOR FOR ABOVEGROUND POOLS
 SALT GENERATOR FOR ABOVEGROUND POOLS MODEL AC 50830, AC 50849 For Pool Water that Feels Silky On Your Skin! Installation and Operation Manual 7946 IMPORTANT SAFETY INSTRUCTIONS When using electrical equipment,
$ Plan Review Fee when Permit Application is submitted HOT TUBS AND SPAS BUILDING PERMIT APPLICATION. COST: $80.
 Community Development 1050 W Romeo Rd, Romeoville, IL 60446-1530 (815) 886-7200 Fax #: (815) 886-2724 Email: buildinginspections@romeoville.org HOT TUBS AND SPAS BUILDING PERMIT APPLICATION Application
presents OWNER S MANUAL
 presents OWNER S MANUAL OWNER S MANUAL Welcome To Ultimate Relaxation! Thank you for choosing your new swim spa built by Master Spas. Please read the entire Owner s Manual before installing and using