Advanced Manual for ChemiGem D10 Water Management System
|
|
|
- Gabriella Davis
- 5 years ago
- Views:
Transcription


1 Advanced Manual for ChemiGem D10 Water Management System
2
3 Contents Manufacturers Warranty 2 Introducing the Chemigem 4 How it Works 5 Initial Pool Balance 6 Installation Guide 8 Front Panel 12 Operational Buttons 13 Menu System 15 Timer Menu 16 ORP Menu 18 ph Menu 19 Advanced Settings (ADVANCED) Menu 21 Status Indicator, Warnings and Safety Shutdowns 25 Maintenance 27 Troubleshooting 28 IMPORTANT If the power cord is damaged the unit must be returned to Pool Controls for repair. Always read the instructions and warnings on chemical containers before using chemicals. Serial Number... Date of Installation... Installed by... 1
4 Manufacturer s Warranty Pool Controls products come with guarantees that cannot be excluded under the Australian Consumer Law. You are entitled to a replacement or refund for a major failure and for compensation for any other loss or damage. You are also entitled to have the goods repaired or replaced if the goods fail to be of acceptable quality and the failure does not amount to a major failure. The benefits under this warranty are in addition to other rights and remedies under a law in relation to the goods. Pool Controls warrants all components of the following products to be free from defects in material and/or workmanship for a period of 2 years from the original date of purchase or installation: CHEMIGEM D10 Water Management System CHEMIGEM SG Series of Salt Water Chlorinators CHLORTROL Chemical Dosing Units Additional Pro-rata Warranty on Multi-electrodes and Cells Pool Controls warrants the following components to be free from defects in material and/or workmanship for a period of 2 years, followed by 36 months pro-rata warranty: ChemiGem Multi-electrode (Probe) ChemiGem Electrode (Cell) WARRANTY OBLIGATIONS OF POOL CONTROLS If a defect in workmanship or materials in any Pool Controls product covered by this warranty is discovered during the term of the warranty, and provided the warranty holder follows the procedure set out below, Pool Controls will, at its option, repair or replace that item. PROCEDURE FOR CLAIMING UNDER THIS WARRANTY In order to claim under this warranty, the warranty holder must: Contact Pool Controls Service as soon as possible after the discovery of the defect and in any event, within the relevant warranty period; Provide proof of purchase and confirm date of installation; Confirm that the installation was completed by a suitably qualified technician, as set out in the installation manual; and If required, arrange for the relevant Pool Controls product to be returned to Pool Controls for repair, and the warranty holder is responsible for the cost and risk of any freight or transportation to and from Pool Controls. 2
5 CALL OUT FEES If the Pool Controls product needs to be serviced, replaced or repaired at a place other than Pool Controls premises, a call out fee will be charged to cover the cost of travel by an authorised Pool Controls technician. Please note that this call out fee will NOT be charged when the relevant Pool Controls product is returned to Pool Controls for repair. If an authorised Pool Controls technician repairs or replaces a Pool Controls Product and this warranty does NOT apply, a fee for labour and parts supplied will be charged in addition to the call out fee. If the Pool Controls product needs to be returned for repairs under this warranty, the warranty holder is responsible for the cost and risk of any freight or transportation to and from Pool Controls. WARRANTY EXCLUSIONS This warranty extends to the original owner only, beginning on the date of installation and is not enforceable by any other party without the prior written consent of Pool Controls. Pool Controls is not responsible for any cost of freight or transportation to or from its Service Department. Pool Controls is not liable under this warranty if the installation of the Pool Controls product was not carried out by a suitably qualified technician. To the extent permitted by law, Pool Controls is not liable for any incidental or consequential loss incurred in connection with the removal or replacement of the Pool Controls product under this warranty. To the extent permitted by law, Pool Controls disclaims all other warranties, either express or implied, including, but not limited to, implied warranties of merchantability and fitness for a particular purpose with regard to Pool Controls products, parts and/or any accompanying written materials. REGISTER YOUR WARRANTY NOW Go to click on the warranty registration tab and fill in your details. CONTACT POOL CONTROLS Pool Controls is based at 20 Abrams Street, Balcatta, Western Australia. We also have service technicians based in NSW, Queensland and Victoria. Service service@poolcontrols.com.au Service Phone:
: Mounting brackets; top and bottom Multi-electrode (probe) ChemiGem Power Supply and Mains")
6 Introducing the ChemiGem What s in the box? The image above shows the main parts of the ChemiGem D10 Water Management System (clockwise from top left): Mounting brackets; top and bottom Multi-electrode (probe) ChemiGem Power Supply and Mains Cable Tubing Valve bracket, valves and filters Also included in the box, but not illustrated: User Manual Injection manifold (or tapping band) Mounting hardware (raw plugs, screws and paper template) 4
7 How it works: The ChemiGem D10 continuously analyses pool water chemistry while your pool system is running. It uses the suction created by the main pool pump to feed accurate doses of liquid chlorine and acid into the pool via solenoid valves. The ChemiGem D10 can also be installed with dosing pumps (instead of valves) to feed the chlorine and acid into the pool. Dosing pump models can be useful in certain applications, such as where pool equipment is installed below the water level of the pool. The filter system should always be running when the pool is being used. Oxidation Reduction Potential The ChemiGem D10 is measures how much chlorine is in pool water by measuring the ORP of the water. ORP stands for Oxidation Reduction Potential. Chemicals like chlorine destroy pathogens (eg harmful bacteria) in water by oxidising them. The level of oxidation available in the water can be measured chemically with an ORP sensor contained in the ChemiGem s multielectrode (probe). This produces a voltage related to the ORP of the water, which is a measure of the effectiveness of chlorine in the water. Varying the ORP will affect how long it takes to destroy harmful bacteria in pool water. For example, if ORP is maintained at 650mV, E-coli type bacteria will be destroyed in around one second. However, if the ORP is lowered to 550mV, the same organisms may take up to 2 hours to be eliminated. ph Control When chlorine is added to water the ph always changes this is because chlorine is not a neutral chemical. The ph will slowly rise as chlorine is added to the water. A rise in ph greatly reduces the effectiveness of the chlorine as a sanitiser, so it is important to ensure that the ph remains in the correct range. The ph of the water can be lowered by the addition of acid and your ChemiGem does this automatically. The ChemiGem multielectrode (probe) measures the ph of the water and doses the pool with small amounts of acid to keep the ph in the correct range. 5
8 Initial pool balance Before you begin using the ChemiGem make sure your pool water is balanced as follows: Chlorine If it is a new installation, add enough chlorine (liquid or granular) to achieve a reading of 3ppm on an appropriate test kit. Stabiliser If the pool is outdoors, it is vital that stabiliser (also known as cyanurate and cyanuric acid) be added and maintained at 40ppm to 60ppm. This compound reduces chlorine destruction due to sunlight. However, too much stabiliser will reduce the effectiveness of chlorine and can result in poor quality water so ensure stabiliser does not exceed 80ppm. ph For chlorine to be effective, the ph must be within a certain range. This is usually between 6.8 (fibreglass/liner pools) or 7.2 (concrete/plaster) and 7.8. Adjust ph down with acid powder, liquid sulphuric or liquid hydrochloric. Be very careful with acid as it can be harmful and corrosive. Total Alkalinity (TA) Total alkalinity is also known as carbonate hardness or TA for short. The recommended level is between 80 and 120ppm. TA is related to ph in that it stops the ph from varying quickly with small additions of acidic or alkaline chemicals. When the TA is low it is almost impossible to control the ph. To raise the TA, buffer (sodium bicarbonate) is added. This must be done slowly as buffer will also cause the ph to rise. As an approximate rule every increase of 20ppm of TA will also cause a 0.1 rise in ph. Once buffer is added it should be left to mix in the pool for a few hours before reducing the ph. 6
9 Pool Chemical Dilutions Your ChemiGem feeds a solution of sodium hypochlorite (liquid chlorine) into your pool to maintain a safe ORP. Depending on the size of your pool or spa, you should dilute the liquid chlorine in accordance with the table below. Similarly, you may also need to dilute the acid to suit the size of your pool. Your ChemiGem can work with either hydrochloric (muriatic) acid or sulphuric (sold as low-fume or no-fume acid). Pool Controls generally recommends the low-fume sulphuric acid if available, because the fumes released by hydrochloric acid are highly corrosive and may damage pool equipment. Pool Size Liquid Chlorine Dilution Acid Dilution Large (90,000L and over) Medium (20,000L-90,000L) Average (10,000L to 20,000L Small Pools or Spas (2000L to 10,000L) Spas (less than 2000L) Full Strength Full Strength Diluted 1:1 with water Diluted 1:15 with water Diluted 1:20 with water Full strength Diluted 1:5 with water Diluted 1:10 with water Diluted 1:15 with water Diluted 1:20 with water IMPORTANT SAFETY MEASURES: Always add concentrated chemicals to water not the other way around! Don t allow chemicals to mix dangerous, highly corrosive fumes will be produced. Always wear protective clothing, footwear, gloves and eye protection when handling pool chemicals to avoid injury. If a spill occurs, wash the affected area with fresh water immediately and seek medical attention. Work in a well ventilated area and avoid inhalation of fumes. Read and follow safety instructions on chemical drums. 7
10 Installation Guide Choosing a good location The ChemiGem is manufactured from weather resistant materials and is designed for operation in full sun and rain. However, your ChemiGem will benefit if it is protected from the weather. The ChemiGem Power Supply should not be mounted in areas where chemicals are stored (eg acid and chlorine) as vapours from these chemicals are corrosive and may damage the electronic controls within the unit. Insect intrusion (particularly ants) can cause problems with all equipment. Ensure that the pool equipment area is kept free of insects as much as possible. Insect intrusion is not covered under the warranty. Installing the ChemiGem Power Supply Locate the ChemiGem Power Supply close to the filtration pump so that it may be connected easily. Connect the ChemiGem Power Supply to the mains power outlet of the pool area and make sure this outlet meets all applicable Australian Standard at the time of installation. Mount the ChemiGem Power Supply at least 1.5m above the ground and at least 3m from the pool water. A mounting template has been provided with the ChemiGem that shows you where to place screws on either a wall or post. The PUMP socket outlet in the base of the ChemiGem Power Supply is dedicated to the filtration pump only. Do not use a double adaptor to connect another pump as this will overload the system and void warranty. Your ChemiGem has two other power outlets on its base, which can be used to run lighting or other pool equipment. These outlets are also timed, so accessories can be set to come on and turn off automatically. Installing the Injection Manifold Ensure that the suction line has no air leaks. The pump suction must be between -20kPa and -70kPa. Turn off the pool pump before installing the injection manifold. The injection manifold must be installed on the inlet (suction) side of the pump and should be positioned as close to the pump as practicable. It can be plumbed in as an elbow or an in-line fitting. Ensure that the water flow is in the correct direction (as marked on the injection manifold. Installing the Probe (into the Injection Manifold) The probe supplied for use with an Injection Manifold has a bayonet fitting. To install the probe, simply insert it into the injection manifold and twist to lock the bayonet fitting. 8
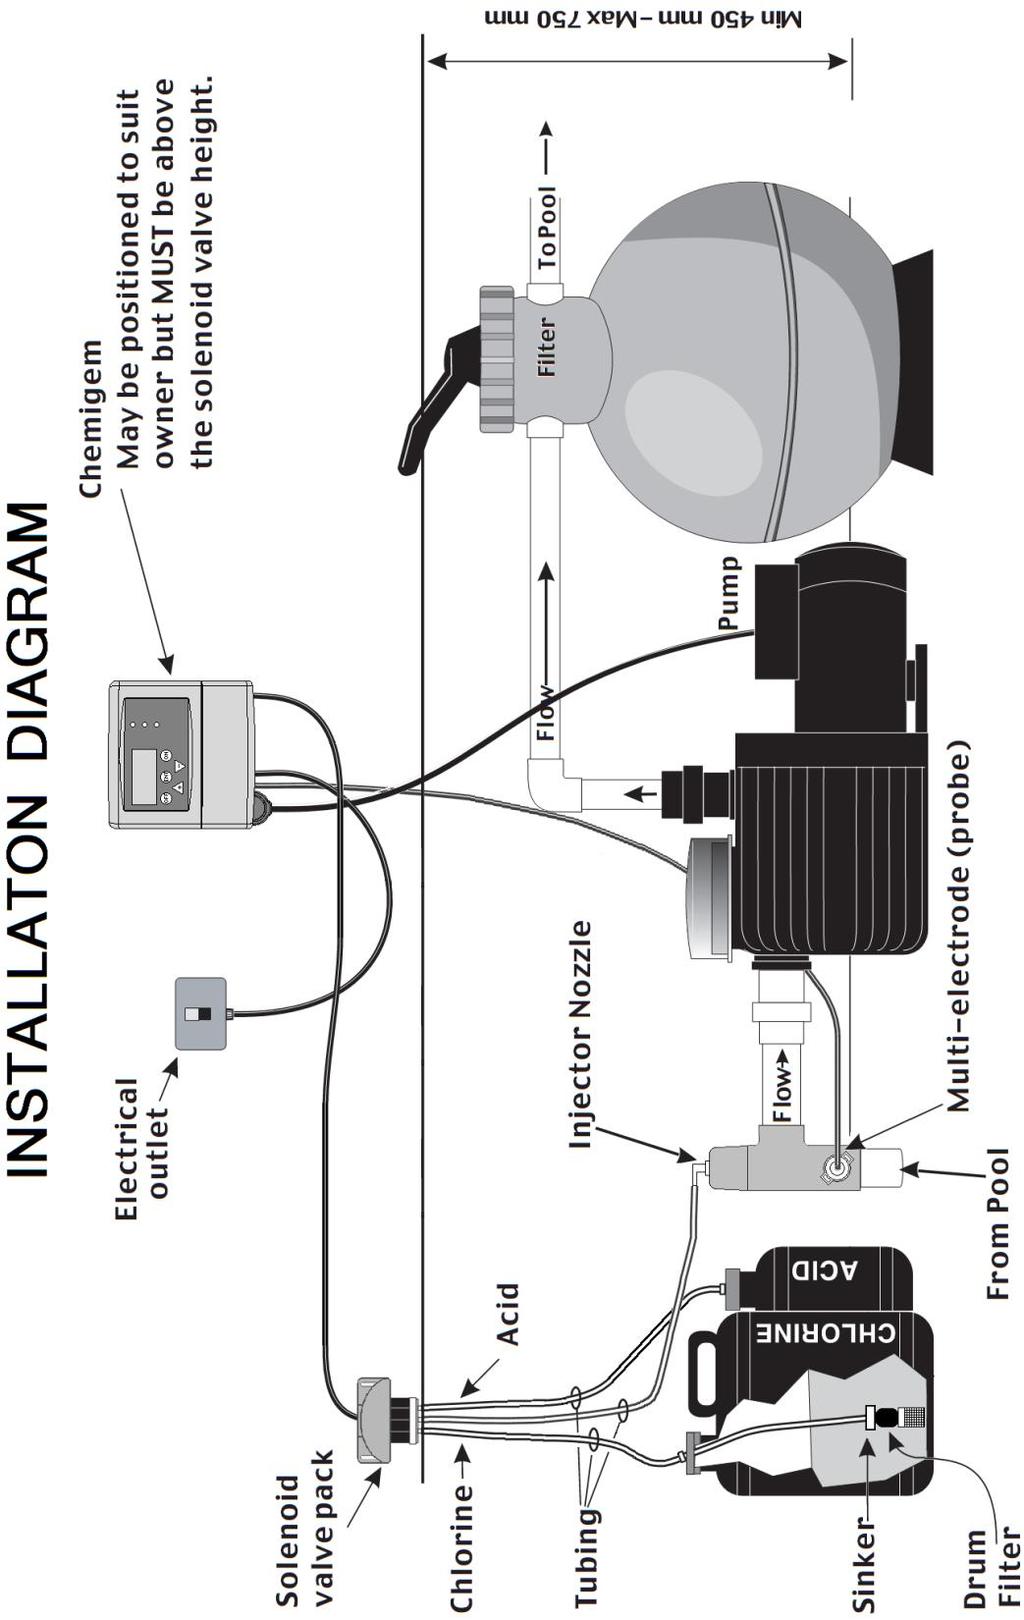
11 9
12 Installing a Tapping Band The ChemiGem may be installed with a tapping band instead of an injection manifold. This may be useful in certain applications where several pool accessories are to be installed and space is tight. Ensure that the suction line has no air leaks. The pump suction must be between -20kPa and -70kPa. Turn off the pool pump before installing the tapping band. The tapping band must be installed on the inlet (suction) side of the pump and should be positioned as close to the pump as practicable. The tapping band can be installed on either horizontal or vertical pipes, provided that the probe is fitted horizontally. The tapping band has an inner shell for use with 40mm PVC pipes. The inner shell should be removed if the tapping band is to be installed on 50mm PVC pipes. Drill a 19mm hole through both sides of the PVC pipe. Ensure that the surround to the hole where the O-ring will sit is smooth and clean. Do not use grease or sealant on this fitting. Check that the O-rings are in position and that the arrow on the tapping band is pointing towards the pump. Fit the tapping band and tighten the nuts by hand, with a final half turn with a wrench. Do not over-tighten. Installing the Probe (with tapping band) Remove the protective cap from the probe. Retain cap for possible future use you will need the cap if you have to empty your pool for any reason, or if your pool is exposed to freezing conditions. Place an O-ring on to the probe and insert the probe into the probe arm of the tapping band. Turn the probe clockwise by hand to tighten. Do not use grease or sealant on this connection. Installing Valves] The solenoid valves should be fitted as close as possible to the injection manifold or tapping band. The valves must be attached to a vertical surface above the top of the chemical drums but no more than 750mm above the base of the drums. Note: if you are installing a ChemiGem below the pool water surface level and/or if the pool is heated, a venturi system will be required see sections overleaf for more details. 10
13 Valve Tubing Use only the tubing supplied with your ChemiGem. Use of other types of tubing may damage your ChemiGem and void your warranty. Ensure tubing is clean and free from dirt or sand before fitting. Connect one end of a length of tubing to the central nipple on the base of the solenoid valves. Connect the other end to the injector nozzle on the injection manifold (or tapping band.) Chemical drums Position the chemical drums in a safe and secure location, preferably about 2 metres from the ChemiGem. Ensure you have the right chemicals for your pool and that chemicals have been diluted if necessary (See page 7 for details on how to dilute chemicals). Drill a 10mm hole in the lid of each drum and pass each length of tubing through the hole in the appropriate drum lid. Place a sinker on to each of the tubes and then attach the appropriate drum filter. Note that the drum filter incorporates a non-return valve to prevent back-flow into the chemical drums. Before placing the tubing into the drums, measure the tubing against the outside of each drum and wrap several turns of PVC tape around the tubing above the drum lid so that the drum filter will be 10-15mm above the bottom of the drum. Lower the drum filter and sinker into the drum and screw on the lid. Installing ChemiGem to a heated pool If a single pool pump is used to service a pool heating system and the ChemiGem, the pool heating system must be by-passed using a venturi system. Contact Pool Controls Service Team on to purchase and arrange installation of a venturi system. Installing ChemiGem below water surface level When the pool pump and filter are fitted below the pool water surface level, the suction line may be under positive pressure even with the pump running. An isolation valve must be fitted to enable the pump and filter to be serviced. The ChemiGem should be installed as described above, with the injection manifold (or tapping band) fitted between the isolation valve and the pool pump. Close the isolation valve sufficiently to obtain required suction (between -20kPa and -70kPa). Suction may need to be further enhanced using a venturi system. Contact Pool Controls Service Team on to purchase and arrange installation of a venturi system. 11
14 The ChemiGem Front Panel ChemiGem Display The ChemiGem uses a four line LCD display to provide the user with information. Line 1 Line 2 Line 3 Line 4 shows the current time and the mode of operation. In the example above, line 1, tells you that the time is 3:27pm and the ChemiGem is operating in Normal Automatic mode Note that the ChemiGem displays the time using a 24 hour clock. shows timer information. In the example above, line 2 tells you that the unit is turned ON and will turn OFF automatically at 21:00 (9pm) displays ORP (Chlorine) information. In the example above, line 3 tells you that the current ORP is 670mV with the unit set to provide 650mV displays ph information. In the example above, line 4 tells you that the current ph is 7.5 with the unit set to provide

15 ChemiGem Operational Buttons Your ChemiGem has 5 buttons that allow you to control the various functions available via the ChemiGem Menu system. Each button is labelled with its primary function either on the button itself, or adjacent to it. Secondary functions are labelled within a curved white outline next to the relevant button. The buttons are backlit to show which are active at any given time, although the ESC/OFF button is always available to take you back to the home screen. ON Button Turn the System On Manually Press the ON button once to switch the ChemiGem and the pool pump on manually. The ChemiGem will default back to AUTO and turn itself off automatically at the end of the next programmed FILTER CYCLE (and this time will be displayed on the LCD). Increasing Manual Run-time in Hourly Increments Press the ON button repeatedly (or hold the button down) to increase the manual run time in hourly increments. The run time is displayed on the LCD. When the desired run time has been reached, press the ENT button to confirm your selection and the system will commence operation. ESC/OFF Button Turn the System Off Manually If the ChemiGem and pool pump are running, pressing this button will turn them off manually. The ChemiGem will automatically turn on again at the start of the next FILTER CYCLE (and this will be displayed on the LCD). Return to Home Screen If you have unintentionally accessed a ChemiGem Menu that you don t actually require, pressing the ESC/OFF button allows you to return to the home screen at any time. 13
16 ENT Button Use this button to enter the ChemiGem Menu system and to access the various options in each Menu. Use the Y/UP and N/DOWN buttons to scroll through menu options and when your desired menu option is displayed on the LCD, press ENT to access that option. Y/UP Button and Optional Pool Light If you have accessed the ChemiGem Menu by pressing the ENT button, press the Y/UP button to scroll upwards through the various menu options. Some menu options will prompt a yes or no answer. If you wish to answer yes, press the Y/UP button. If your ChemiGem also controls your pool lighting (optional), you can turn the lights on or off manually by pressing the Y/UP button. For multi-coloured lights, hold the Y/UP button down to cycle through the various colours and release once the desired colour is reached. 14
17 Navigating the ChemiGem Menu System There are three aspects to the general ChemiGem Menu system the Timer Menu, the ORP (Chlorine) Menu and the ph Menu. Access the ChemiGem Menu system by pressing the ENT button and following the prompts on the LCD. If you find you have ended up in a part of the Menu system unintentionally, you can return to the Home Screen by pressing the ESC/OFF button at any time. Use the Y/UP and N/DOWN buttons to scroll through the various menu options until the desired option is displayed on the LCD. Use the ENT button to confirm that you wish to select that option. Once accessed, use the Y/UP and N/DOWN buttons to adjust operational settings up or down and confirm adjustments by pressing ENT. To cancel any adjustments, simply press ESC/OFF to return to the Home Screen. Advanced Settings Menu The Advanced Settings Menu is explained in detail on pages It can be accessed by pressing and holding the OFF button for approximately 4 seconds. 15
18 Timer Menu Setting the time Once you have installed your ChemiGem and turned it on, you will need to set the correct time on the ChemiGem s 24 hour clock. First, access the Menu System by pressing the ENT button. The LCD will display the word TIMER MENU. Select this by pressing the ENT button once more. Line 2 on the LCD will now read SET TIME. Press ENT to select this option and then press ENT once more to select the SET TIME HOURS option. Use the Y/UP and N/DOWN buttons- to adjust the hours on the LCD. Confirm the correct hours value by pressing ENT again. The LCD will now show SET TIME MINUTES. Adjust the minutes using the Y/UP and N/DOWN buttons. When complete, press ENT to return to normal operation. ADJUST CYCLES Sub-Menu Your ChemiGem has two filter cycles pre-programmed as factory defaults as follows: Filter Cycle 1: ON at 6:00 (6am) OFF at 08:00 (8am) Filter Cycle 2: ON at 18:00 (6pm) OFF at 20:00 (8pm) You can change the start and finish times of each filter cycle to meet your sanitiser requirements and to suit your lifestyle. To adjust filter cycle start and finish times, press ENT to access the ChemiGem Menu system. Press ENT again to select the TIMER menu and then scroll down using the N/DOWN button until ADJUST CYCLES is displayed on the LCD. Select this option by pressing ENT and the LCD will show the start (ON) time of the filter cycle being adjusted. Use the Y/UP and N/DOWN buttons to adjust the start time. Press ENT to confirm your selection and then the LCD will show the end (OFF) time for that filter cycle. Adjust the OFF time in the same way as the ON time and press ENT to confirm. After ON and OFF times for the first filter cycle have been adjusted, the ON time for the second filter cycle is shown on the LCD. This can be adjusted in the same way, or if you do not wish to make any changes, simply press ENT to confirm the time shown on the LCD. Follow the same process to either adjust or confirm the OFF time for the second filter cycle, and once this has been confirmed the LCD will display the home screen. Note: an additional 2 filter cycles can be enabled and programmed via the Advanced Settings Menu. For details on how to access this menu, see page
19 Running Times We recommend your system be operated for 4 hours per day and always run the system when using the pool. As sunlight destroys chlorine, it is recommended that the ChemiGem be run mostly in the evening. Chlorine is added for sanitation but the filter is needed to remove pollutant particles (dust, sand etc) and keep the water looking good. The filter must operate for a reasonable number of hours per day to remove pollutants. If there are adverse local conditions such as windborne dust and debris - the chlorine demand will be higher than normal and you will likely need to operate the system for longer periods to adequately filter the water. Optional LIGHT Timer Sub-Menu You can use your ChemiGem to turn your pool or garden lighting on and off automatically, you can set the ON and OFF times using the light timer menu. Press ENT to access the ChemiGem Menu system. Press ENT again to select the TIMER menu and then scroll down using the N/DOWN button until LIGHT MENU is displayed on the LCD. Line 2 on the LCD will now read AUTO? Y/N. To enable automatic light operation press the Y/UP-button. Line2 will read Auto ON for short period before displaying ON hh:mm. Adjust the ON time using the Y/UP and N/DOWN-buttons and confirm by pressing ENT. The LCD will now prompt you to set the OFF-time, which is accomplished using the Y/UP and N/DOWN-buttons as before. Press ENT-to confirm the new OFF-time and the LCD will return to the home screen. To disable automatic light operation, access the LIGHT menu in the way described above and when asked AUTO? Y/N - press the N/DOWN button. Line 2 will read Auto OFF for short period then the system will return to normal operation and the light can only be operated manually (see below for how to do this). Manual Light Operation If the ChemiGem is turned on, the light can be turned on or off manually by pressing the Y/UP-button. If you have multi-coloured LED lights that cycle through different colours and requiring a power pulse to change effects, you can hold down the Y/UP-button to cycle through the options and release when the desired colour or effect is achieved. 17
20 ORP (Chlorine Menu) Accessing the ORP Menu Access the ChemiGem Menu System by pressing ENT. Use the Y/UP or N/DOWN button to scroll through the main menu until ORP MENU is displayed on the LCD. Press ENT to select. Manual Feed Having accessed the ORP menu, the LCD will ask Manual Feed Y/N?. Press Y/UP to select and the display will read FEED 5 Sec/50mL. You can increase the amount of the dose by pressing the Y/UP button until the desired dose amount is displayed. (Note: the dose volume displayed is an estimate only) Superchlorination When bathers enter a pool there is a reaction between nitrogen/ammonia compounds from the bathers and the chlorine in the pool. These reactions form chloramines (also called combined chlorine) which are responsible for the chlorine odour and for some minor irritations. These compounds can be broken down by adding free chlorine to a level above 5ppm by the addition of a shock dose of chlorine also known as superchlorination. Your ChemiGem can superchlorinate you pool automatically via the SUPER CHLOR submenu. To access the SUPER CHLOR sub-menu, enter the ORP menu as described above, but when asked whether you wish to perform a manual feed, press N/DOWN and the LCD will ask SUPER CHLOR Y/N?. Press Y/UP to enter the SUPER CHLOR sub-menu. The LCD will then display USE GOOD POOL DATA! This is a reminder to make sure that your ChemiGem has been correctly set up for your particular pool. This should have been done at the time the ChemiGem was installed and is done via the POOL sub-menu, accessed via the ADVANCED menu. This information describes your pool to the ChemiGem telling it the volume and also whether it is concrete or fibreglass. If you are interested in learning more about additional functionality of your ChemiGem, call Pool Controls Service on After a few seconds, the LCD will read ADD 5ppm of CHLOR. You can increase the superchlorination dose to 10ppm by pressing the Y/UP button until the desired value is displayed. Press ENT to confirm your selection. The ChemiGem will then use the data entered in the POOL menu to calculate how much chlorine is needed and proceed to add it. The LCD will then display the amount to be dosed. (Note: the dose volume displayed is an estimate only). 18
21 Adjusting the Set Point The ORP Set Point is the value in millivolts that the ChemiGem will adjust your pool water to. You can adjust the ORP Set Point via the ORP Menu. Enter the ORP Menu as described above, and press the N/DOWN button when asked whether you wish to do a manual feed and then again when asked if you wish to do a superchlorination. The LCD will then read ADJUST SET POINT Y/N? Press Y/UP to select this option and then the LCD will display the current set point. Adjust this using the Y/UP or N/DOWN buttons. Confirm the adjusted set point by pressing ENT. The new set point will then be displayed on the right hand side of line 3 of the LCD. Adjust ORP Control On or Off To disable the ORP System (or re-enable it if it has been disabled) you need to access the ORP menu and work your way through the MANUAL FEED, SUPER CHLOR and ADJUST SET POINT questions pressing the N/DOWN button in response to each question. The LCD will then read ADJUST ORP CONTROL TURN OFF? Y/N (if the system is ON) or ADJUST ORP CONTROL TURN ON? Y/N (if the system is OFF). If you press Y/UP, the system will turn on (or off depending on its current status). If you answer N/DOWN to either question, the LCD will return to the home screen. ph Menu Accessing the ph Menu Access the ChemiGem Menu System by pressing ENT. Use the Y/UP or N/DOWN button to scroll through the main menu until ph MENU is displayed on the LCD. Press ENT to select. Manual Feed Having accessed the ph menu, the LCD will ask Manual Feed Y/N?. Press Y/UP to select and the display will read FEED 5 Sec/50mL. You can increase the amount of the dose by pressing the Y/UP button until the desired dose amount is displayed. (Note: the dose volume displayed is an estimate only) Adjusting the Set Point The ph Set Point is the ph that the ChemiGem will adjust your pool water to. You can adjust the ph Set Point via the ph Menu. Enter the ph Menu as described above, and press the N/DOWN button when asked whether you wish to do a manual feed. The LCD will then read ADJUST SET POINT Y/N? Press Y/UP to select this option and then the LCD will display the current set point. Adjust this using the Y/UP or N/DOWN 19
22 buttons. Confirm the adjusted set point by pressing ENT. The new set point will then be displayed on the right hand side of line 3 of the LCD. Calibration and Re-setting Factory Defaults If your ChemiGem consistently displays a ph reading different from that obtained by manual testing with a quality test kit, it may be necessary to re-calibrate the multi-electrode (probe). The instructions below assume the probe is measuring a ph of 7.8. Caution: do NOT re-calibrate the probe until identical ph readings have been obtained from at least three tests from around the pool. You will need to calibrate the probe to the ph value obtained from these test kit results. Enter the ph menu as described previously and press the N/DOWN button when asked whether you want to do a manual feed, and then again when asked whether you wish to adjust the set point. The LCD will then read CALIBRATE PROBE?. Press Y/UP to select this option and the LCD will read PROBE Ph = 7.8 ADJUST TO Use the Y/UP button to increase the adjusted value to the required level. Press ENT to confirm the adjustment and after a few seconds the ChemiGem will revert to normal operation and the home screen will display the new ph value. Adjust ph System On or Off To disable the ph System (or re-enable it if it has been disabled) you need to access the ph menu and work your way through the MANUAL FEED, ADJUST SET POINT and CALIBRATE PROBE questions pressing the N/DOWN button in response to each question. The LCD will then read ADJUST ph CONTROL TURN OFF? Y/N (if the system is ON) or ADJUST ph CONTROL TURN ON? Y/N (if the system is OFF). If you press Y/UP, the system will turn on (or off depending on its current status). If you answer N/DOWN to either question, the LCD will return to the home screen. Note: Turning off the supply of acid is not normally necessary and could lead to unbalanced pool water that is unsafe to swim in. Pool Controls recommends that you seek advice from a qualified professional prior to disabling the ph system or call Pool Controls Service on
23 Advanced Settings (ADVANCED) Menu To enter the ADVANCED Menu, press and hold the OFF button for approximately 4 seconds. The LCD will display the words ADVANCED MENUS press ENT to proceed. Advanced Settings comprise: POOL used to store information on pool volume and whether it is concrete or fibreglass SYSTEM DATA - shows service information FILTER CYCLES - allows for up to 4 Filter Cycles to be activated and is very useful for seasonal timer adjustments. AUX - controls timed operation of auxiliary power outlet FULL MANUAL ON or AUTO TIMER ON use when the ChemiGem is being run as a slave to another controller. The entire ChemiGem Menu system is illustrated schematically below. Please note that the depictions of the LCD screens in the diagrams that follow are illustrative only. The LCD on your ChemiGem will have a different appearance. 21
24 Pool Information (POOL) Menu From the ADVANCED MENU, use the Y/UP button to scroll up to the POOL Sub-MENU and select by pressing ENT. The LCD will then ask ADJUST POOL DATA? press Y/UP if you wish to do so. The LCD will then display POOL? Y/N. Press Y/UP if you have a pool and N/DOWN if you have a spa, and then press ENT to confirm. The LCD will then ask ADJUST VOLUME? Use the Y/UP or N/DOWN buttons to adjust the value up or down from the factory default value for the volume of your pool or spa. Confirm by pressing ENT. The LCD will then ask CONCRETE OR F/GLASS? press Y/UP to toggle between CONCRETE and F/GLASS and press ENT to select the appropriate option. Finally, the LCD will ask RESET FEED DEFAULT?. This will only be necessary if you have switched from a POOL to a SPA setting or vice versa. If you wish to reset the default feed amounts, press Y/UP or if this is unnecessary, press N/DOWN and the LCD will then revert to the home screen. 22
 Menu From the ADVANCED SETTINGS MENU, use the Y/UP button to scroll up to the FILTER CYCLES Sub-MENU and select by pressing ENT.")
25 System Data (SYSTEM DATA) Menu This part of the ChemiGem software stores information such as hours of operation and should only be accessed by authorised service technicians. Filter Cycles (FILTER CYCLES) Menu From the ADVANCED SETTINGS MENU, use the Y/UP button to scroll up to the FILTER CYCLES Sub-MENU and select by pressing ENT. The Factory Settings have two of a possible four Filter Cycles enabled. The LCD will display the number of enabled Filter Cycles in the lower right hand corner. (denoted by n in the diagram below). This number can be adjusted using the Y/UP or N/DOWN buttons, followed by the ENT button to save changes. Remember that if you wish to return to the Home Screen at any time, simply press the ESC/OFF button. The FILTER CYCLES sub menu is illustrated schematically below. 23
26 Auxiliary Outlet (AUX) Menu The auxiliary power outlet on the base of the machine is also timed and pool accessories can be programmed to turn on and off automatically. The AUX menu will only appear when an auxiliary device is attached to the ChemiGem. When it first detects such a device, the ChemiGem s LCD will ask EXTRA TIME MENUs REQUIRED? Y/N If you press the Y/UP button, you will be able to access the AUX submenu from the ADVANCED Menu. You can also access the AUX Menu by accessing the ADVANCED Menu directly and using the Y/UP button to scroll through the options until AUX appears on the LCD and you press ENT to select. The AUX Menu is illustrated Schematically below: 24
 The AUX menu can also be used to select and adjust the timing system for a power separator a device used to control the power from a separate power outlet on the base of your ChemiGem.")
27 Settings for Delta UV and ozonators can be selected from the AUX menu, as can additional lights, which will reference the settings made under the Light Timer Menu (See page 17.) The AUX menu can also be used to select and adjust the timing system for a power separator a device used to control the power from a separate power outlet on the base of your ChemiGem. Examples of how this might be used are for an auxiliary pump for an infloor cleaning system or for a pressure cleaner. The AUX system is designed to run the power separator in conjunction with main pump timing. The timing of the AUX system is tied to Filter Cycles 1 & 3 and operating times of 30, 60, 90 or 120 minutes can be selected. Filter Cycles 1 & 3 must be set to run for the same period as the power separator device (or longer). Manual Operation The power separator can be controlled from the Home Screen by a pressing N/DOWN. If the power separator is ON, then this will turn it OFF. If it is OFF, the AUX MENU is activated and the LCD will read Man ON? Y/N press Y/UP to turn it ON and select running time. This will also turn on the main pump if it is not already on. Switching from Auto Mode to Full Manual (MAN/AUTO) Menu Full Manual Mode (FMM) FMM is used when an external timer is controlling the ChemiGem. If FMM is selected, the pump system is either turned ON or OFF whenever power is supplied to the ChemiGem. The ChemiGem s timer is effectively disabled. The LCD will indicate that the ChemiGem is in manual mode with either the message Man ON or Man OFF. The MAN/AUTO Menu is illustrated schematically below. 25
28 AutoMode When running in Auto Mode, the ChemiGem has up to 4 adjustable Filter Cycles. Factory default settings have Filter Cycle 1 and Filter Cycle 2 enabled. Filter Cycle 1 is always enabled. The other 3 Filter Cycles can be enabled or disabled (in order) allowing you to increase or decrease running times quickly without adjusting the Filter Cycle ON/OFF times simply add or remove cycles. When you first turn on the ChemiGem in AutoMode, the pump will be off even if the time is in the middle of a programmed Filter Cycle. The ChemiGem will wait for the next available ON-time to start the pump and the rest of the system. If there is an extended power failure, the ChemiGem will continue to keep time for a number of days. During this time the pump ON/OFF-times will still be checked. When power is restored, the system will wake up and turn the pump ON if it is during a Filter Cycle. Automatic Operation In AutoMode, Line2 of the LCD will display whether the Pump is ON or OFF and the next OFF or ON time. Manual Operation while In AutoMode You can override the AutoMode settings manually by pressing either the ON button (to turn ON if the system is off automatically) or OFF to stop the pump if it is on automatically. The ChemiGem is still in AutoMode and will respond to the next AutoOFF/ON time. 26
29 ChemiGem Status Indicators, Warnings and Safety Features Normal Operation Green Status Indicators When the ChemiGem is operating normally and ORP and ph readings are within the correct range, a green status indicator will be illuminated and the LCD will indicate the readings. Note: it is the pool owner s responsibility to monitor the pool and periodically confirm the ChemiGem s readings with a good quality test kit. Remember that the ChemiGem is only able to balance ph and Chlorine levels but you need to ensure other factors such as stabiliser levels and total alkalinity are within the correct range (see page 6 for details). Low Chlorine If the ORP falls significantly below the set point, this indicates that the chlorine levels in the pool have fallen and dangerous pathogens in the water are not being destroyed rapidly. The ChemiGem will warn of low chlorine with a red status indicator and the word low will be displayed on the ORP line (line 3) of the LCD. Possible causes include: An empty chlorine drum Low levels of stabiliser High ph Filter requires backwashing The multi-electrode (probe) may require cleaning (see page 27 for details) If each of these factors are addressed, the ChemiGem will dose the pool with chlorine until the set level is achieved at which point the status indicator will revert to green and the warning will no longer be displayed on the LCD. High Chlorine If the ORP rises significantly above the set point, a red status indicator will be illuminated and the word High will appear on the ORP line (line 3) of the LCD. Possible causes include: Manual overdosing (superchlorination) Faulty solenoid valve The multi-electrode (probe) may require cleaning (see page 25 for details) Low ph (too much pool acid) High Total Dissolved Solids (TDS) There is no simple way to reduce high chlorine levels quickly. However, chlorine levels will eventually reduce over days (or weeks), particularly if the pool is exposed to sunlight. 27
30 Low ph (Excess Acid) If the ph of the water drops below the set point, a red status indicator will be illuminated and the words LOW ph will be displayed on the LCD. The ChemiGem will automatically prevent any further acid being added to the pool until the ph is brought back into the correct range by the addition of sodium carbonate or sodium bicarbonate. Possible causes include: Manual overdosing Excessive rainfall Faulty solenoid valve The multi-electrode (probe) may require cleaning (see page 23 for details) Low Total Alkalinity Poor pool water circulation Safety Shutdown If the ph falls below 5.8 the ChemiGem will shut down pump operation to ensure no more acid gets into the pool. High ph (Insufficient Acid) If the ph rises significantly higher than the set point, a red status indicator will be illuminated and the words HIGH ph will be displayed on the LCD. Note that a high ph can drastically reduce the ORP of the pool water, and therefore reduce the effectiveness of the sanitiser. It is important to restore the ph balance as soon as possible by adding acid to the pool. Possible causes include: The acid drum is empty The pool has been superchlorinated recently The pool has a new plaster lining (very alkaline) demanding more acid than can be supplied by the ChemiGem Faulty solenoid valve Filter requires backwashing Multi-electrode (probe) may require cleaning (see page 27 for details) Injector nozzle is blocked Venturi system (if fitted) is blocked If each of these factors are addressed, the ChemiGem will dose the pool with acid until the set level is achieved at which point the status indicator will revert to green and the warning will no longer be shown on the LCD. 28
31 Maintenance Like all equipment the ChemiGem will look better and last longer if it is maintained and operated in accordance with these instructions. The ChemiGem Power Supply The Power Supply has been design for operation in full sun and weather. However, it will benefit from being under cover. There is little maintenance required however some Do s and Don ts Don t: Do: Install it in a small sealed enclosure (so it does not overheat) Install it in a very hot unventilated shed (so it does not overheat) Allow insects to nest in the unit (because they will prevent it from functioning) Install chemical drums under or close to the unit (to prevent corrosion) Forget about the unit once installed it should be checked regularly to ensure that it is working for you Install it as per the instructions Check it regularly Make sure the pool balance is checked regularly Cleaning the Multi-electrode (Probe) If the ChemiGem is consistently giving readings different from those obtained from a test kit, it may be necessary to clean the multi-electrode. To do this: Remove the probe from the injection point by twisting the bayonet (or unscrewing the retaining nut) and remove the o-ring. Holding the cable, gently swirl the probe in a dilute solution of hydrochloric acid (pool acid) for two minutes Rinse the probe in clean water and then replace it in the injection point, making sure that the o-ring is in place. Twist bayonet to lock (or tighten nut with fingers) 29
32 Operation Following a Power Failure The ChemiGem unit comes with a timer function built into the operating software. The timer is a 24-hour type with quartz-crystal control. This Timer is backed-up by a Real-Time Clock (RTC) similar to those found in computers. During a power failure the ChemiGem will keep time and maintain AutoMode functions. If a Filter Cycle is active when power is returned the pump will be turned ON within 1 minute. The ChemiGem will keep all its settings and will not need to be re-programmed. The ChemiGem is ideal for use in systems where repeated power cuts occur, such as offpeak power circuits and Queensland s Tarriff33 system. Trouble-shooting Before requesting service, you may wish to run through the check list below but feel free to call Pool Controls Service on or log a service call via our website If there appears to be low or no Chlorine Residual: 1. Check stabiliser level is 40ppm 60ppm. Add if necessary and wait for it to dissolve. 2. Have you added any chemical additives recently? 3. Check pool for phosphates and remove if necessary 4. Is the unit turned on and operating the filter pump? 5. If the unit is not running at all, check the fuse in the bottom of the unit. 30
User Manual for Chemigem D10 Water Management System
 User Manual for Chemigem D10 Water Management System Contents Manufacturers Warranty 2 Introducing the Chemigem 4 How it Works 5 Initial Pool Balance 6 Installation Guide 8 Front Panel 12 Operational
User Manual Chemigem D10 Water Management System
 User Manual Chemigem D10 Water Management System Introductory User Manual - Chemigem D10 2014-5 Contents Manufacturers Warranty 2 Introducing the Chemigem 4 How it Works 5 Initial Pool Balance 6 Basic
Water Management System User Manual
 Water Management System User Manual Contents Manufacturers Warranty 1 Introducing the Theralux Water Management System 3 How it Works 4 Initial Pool Balance 5 Basic Requirements the Pool Owner 6 Installation
User Manual for the Gemini System
 User Manual for the Gemini System 2013-14 Contents Manufacturers Warranty 2 Introducing the Gemini Combo System 4 How it Works 5 Initial Pool Balance 6 Pool Chemical Dilutions 7 Installation Guide 8 Gemini
User Manual AquaFresh Chlorine-Free System
 User Manual AquaFresh Chlorine-Free System Contents Manufacturers Warranty 2 Introducing the AquaFresh 4 How it Works 5 Initial Pool Balance 6 Pool Chemical Safety 7 Installation Guide & Diagrams 8 Front
Advanced Settings Manual for SG Series Saltwater Chlorinators
 Advanced Settings Manual for SG Series Saltwater Chlorinators Contents Manufacturers Warranty 2 Introducing the SaltiGem 4 How it Works 5 Installation Guide 6 Initial Pool Balance 12 Front Panel 13 Operational
SG Series. User Manual for SG Series Saltwater & Mineral Chlorinators
 SG Series User Manual for SG Series Saltwater & Mineral Chlorinators Head Office: 20 Abrams Street Balcatta WA 6021 Sales/Service Ph: 1300 550 010 Web: www.poolcontrols.com.au Emails: sales@poolcontrols.com.au
User Manual. MagnaMaster and ChloroMaster Electrolytic Chlorinator.
 User Manual MagnaMaster and ChloroMaster Electrolytic Chlorinator www.directpoolsupplies.com.au Contents Introducing the MagnaMaster and ChloroMaster 1 How it Works 1 Installation Guide 1 Initial Pool
Powerline Twin. User Manual for PL Series ph/orp Controller with Saltwater Chlorinator Hayward Twin User Manual - print version inc Plus.
 Powerline Twin User Manual for PL Series ph/orp Controller with Saltwater Chlorinator 2016 Hayward Twin User Manual - print version inc Plus.docx Contents Manufacturers Warranty 2 Introducing the PL Twin
Powerline 20 & 30. User Manual for PL Series Saltwater & Mineral Chlorinators. User Manual - Hayward Powerline 2016.docx
 Powerline 20 & 30 User Manual for PL Series Saltwater & Mineral Chlorinators User Manual - Hayward Powerline 2016.docx Conditions Contents Warranty Terms 2 Introducing the PL Series 4 How it Works 5 Installation
OWNER S MANUAL NMB SERIES
 OWNER S MANUAL NMB SERIES NMB Manual V2.0.doc 1. PARTS IDENTIFICATION LIST 1. 5. 2. 4. 3. 6(a). 6(b). Figure 1.1 1. Powerpack with timer option (x1) 2. Cell (x1) 3. Cell Housing (x1) 4. O-ring (x1) 5.
OXYGEN MINERALE ABSOLUTE RANGE OWNER S MANUAL OXY MINERALE 600/1000 SERIES
 PURAPOOL OXYGEN MINERALE ABSOLUTE RANGE OWNER S MANUAL OXY MINERALE 600/1000 SERIES 1. PARTS IDENTIFICATION LIST 1. 5. 2. 4. 3. 6. 6. Figure 1.1 1. OXYGEN Minerale Power pack with timer option (x1) 2.
VX Series Salt Chlorinator S Model
 VX Series Salt Chlorinator S l OPERATING INSTRUCTIONS HURLCON Manufacturing & sales Pty. Limited. A.B.N. 97 007 284 504 www.hurlcon.com.au service@hurlcon.com.au Information and specifications subject
MAGNA-CHEM AUTOMATIC CHLORINATOR - MODEL: CSA-2P MAGNA ORP Chlorine Pump
 A. PARTS MAGNA-CHEM AUTOMATIC CHLORINATOR - MODEL: CSA-2P MAGNA ORP Chlorine Pump Assembly & Operating Instructions Parts for liquid chlorine pump head 1pc. 1/4 poly delivery tubing, 4 meters 1pc. drum
INSTALLATION AND OPERATING INSTRUCTIONS
 INSTALLATION AND OPERATING INSTRUCTIONS I INSTALLATION AND OPERATING INSTRUCTIONS Viron Series Salt Chlorinator Bolero ND Cleaner INSTALLATION AND OPERATING INSTRUCTIONS Melbourne: 03 8796 8600 Gold Coast:
VX Series Salt Chlorinator T Model
 VX Series Salt Chlorinator T Model OPERATING INSTRUCTIONS www.hurlcon.com.au email: service@hurlcon.com.au Information and specifications subject to change without notice. Melbourne: Ph: (03) 9765 9700
Product Catalogue Season. Balance Experience Innovation
 Product Catalogue 2018-19 Season Balance Experience Innovation Bringing you innovative Australian-made water management systems since 1980 Welcome to the new Pool Controls Product Catalogue for the 2018-19
Hurlcon KX Siesta Above Ground Salt Water Chlorinator by AstralPool Australia
 Hurlcon KX Siesta Above Ground Salt Water Chlorinator by AstralPool Australia OPERATING INSTRUCTIONS AstralPool Australia Pty. Limited. A.B.N. 97 007 284 504 Melbourne: Ph: (03) 8796 8600 Fax: (03) 8796
Page INDEX SAFETY INSTRUCTIONS... 2 HOW YOUR AQUASPHERE CHLORINATOR WORKS... 3 AQUASPHERE CHLORINATOR OPERATION... 4 CONTROL PANEL FUNCTIONS...
 Instruction Manual INDEX Page SAFETY INSTRUCTIONS... 2 HOW YOUR AQUASPHERE CHLORINATOR WORKS... 3 AQUASPHERE CHLORINATOR OPERATION... 4 CONTROL PANEL FUNCTIONS... 4 AUTOMATIC OPERATION... 5 INDICATOR LIGHTS:
VX-3 Series Salt Chlorinator
 VX-3 Series Salt Chlorinator OPERATING INSTRUCTIONS AstralPool Australia Pty. Limited. A.B.N. 97 007 284 504 www.astralpool.com.au email: service@astralpool.com.au Information and specifications subject
Salt Water Pool Solutions The Natural Choice for Pools & Spas. User Manual. For Models. Manufactured in Western Australia by.
 Salt Water Pool Solutions The Natural Choice for Pools & Spas User Manual For Models Manufactured in Western Australia by www.poolcontrols.com.au Page 1 IMPORTANT INSTRUCTIONS This Manual is supplied with
INSTALLATION & OPERATION MANUAL
 INSTALLATION & OPERATION MANUAL Auto Cell Cleaning Model With Timer: A15TS - A20TS - A25TS - A30TS - A35TS No Timer: A15 - A20 - A25 - A30 - A35 27/30 Mudgeeraba Road, Worongary Queensland 4213 P. 61 7
Nothing's as cool, as a freshwater pool. easychem 770 ORP and ph Controller for Pools and Spas with Timer Output for Pool Pump
 Page 1 of 6 TPS Australia - Quality hand-made instruments since 1968. Nothing's as cool, as a freshwater pool easychem 770 ORP and ph Controller for Pools and Spas with Timer Output for Pool Pump Automatic
CLEANING AUTO CELL OWNERS HANDBOOK
 OWNERS HANDBOOK AUTO CELL CLEANING Leading the way in Pool & Spa Equipment Since 1979 88 Spencer Street Nerang Qld 4211 Australia Phone: +61 (0) 7 5596 3773 Fax: +61 (0) 7 5596 1951 Email: sales@compupool.com.au
INSTALLATION AND OPERATING INSTRUCTIONS
 INSTALLATION AND OPERATING INSTRUCTIONS I INSTALLATION AND OPERATING INSTRUCTIONS Viron Salt Chlorinator With Bluetooth Bolero ND Cleaner INSTALLATION AND OPERATING INSTRUCTIONS sales@astralpool.com.au
INSTALLATION AND OPERATING INSTRUCTIONS
 INSTALLATION AND OPERATING INSTRUCTIONS I INSTALLATION AND OPERATING INSTRUCTIONS E25 & E35 Salt Chlorinator Bolero ND Cleaner INSTALLATION AND OPERATING INSTRUCTIONS Melbourne: 03 8796 8600 Gold Coast:
Jacuzzi. J-SS40 Salt System Installation and Operating Instructions
 Jacuzzi J-SS40 Salt System Installation and Operating Instructions IMPORTANT SAFETY INSTRUCTIONS WARNING: Before installing this product. Read and follow all warning notices and instructions accompanying
Operating Manual RP and SMT Models
 Operating Manual RP and SMT Models Contents THANK YOU FOR CHOOSING TO BUY A SALTMATE PRODUCT We are certain you will enjoy the hassle free pool maintenance it will provide you with, hopefully giving you
INSTALLATION AND OPERATING INSTRUCTIONS
 INSTALLATION AND OPERATING INSTRUCTIONS I INSTALLATION AND OPERATING INSTRUCTIONS Bolero ND Cleaner E25 Salt Chlorinator INSTALLATION AND OPERATING INSTRUCTIONS Melbourne: 03 8796 8600 Gold Coast: 07 5552
SPECIFICATIONS APCEPH1
 APCEPH1 ph CONTROLLER SPECIFICATIONS APCEPH1 Input voltage 120 Volts AC Maximum amperage 14.5 amps @ 120 VAC ph Accuracy +/- 0.2 ph ph Control range Adjustable 4.5 8.5 ph Weight < 1 lbs Dimensions 3" x
C Series. Instruction Manual & Warranty Card
 C Series Instruction Manual & Warranty Card MASTERING THE ELEMENTS Renowned worldwide for the quality and reliability of its products in the aeronautical and marine sectors, Zodiac has now brought its
INSTALLATION AND OPERATING INSTRUCTIONS
 INSTALLATION AND OPERATING INSTRUCTIONS I INSTALLATION AND OPERATING INSTRUCTIONS VX - 3 Series Salt Chlorinator Bolero ND Cleaner INSTALLATION AND OPERATING INSTRUCTIONS Melbourne: 03 8796 8600 Gold Coast:
Semi-Automatic Controllers
 Semi-Automatic Controllers RC-1 Semi-Automatic dosing pump for Chlorine RC-1A Semi-Automatic dosing pump for Acid RC-DPS Semi-Automatic dosing pumps for Chlorine and Acid RC-2 Automatic ORP (Chlorine)
APVMA Approval No /3/0204. Instruction Manual & Warranty Card
 APVMA Approval No. 52048/3/0204 Instruction Manual & Warranty Card MASTERING THE ELEMENTS Renowned worldwide for the quality and reliability of its products in the aeronautical and marine sectors, Zodiac
INSTALLATION AND OPERATING INSTRUCTIONS
 INSTALLATION AND OPERATING INSTRUCTIONS I INSTALLATION AND OPERATING INSTRUCTIONS Bolero RC1 Semi-Automatic ND Cleaner Controllers INSTALLATION AND OPERATING INSTRUCTIONS Melbourne: 03 8796 8600 Gold Coast:
Aquachlor. Owners Manual. Self Clean C Series II. ModelStandard and. Salt Water Chlorinator. Manufactured in Australia By
 Aquachlor Salt Water Chlorinator Owners Manual ModelStandard and Self Clean C Series II Manufactured in Australia By Monarch Pool Systems www.monarchpoolsystems.com Aquachlor Salt Chlorinator Thankyou
C Series. Instruction Manual
 C Series Instruction Manual ABN 87 002 641 965 PO BOX 7238, Wetherill Park NSW 2164 Australia Customer Care Line: 1800 688 552 Fax: 1300 781 688 www.zodiac.com.au 2004 Zodiac Group Australia Pty Ltd W170301
INSTALLATION AND OPERATING INSTRUCTIONS
 INSTALLATION AND OPERATING INSTRUCTIONS I INSTALLATION AND OPERATING INSTRUCTIONS VX - 3 Series Salt Chlorinator Bolero ND Cleaner INSTALLATION AND OPERATING INSTRUCTIONS www.astralpool.com.au sales@astralpool.com.au
PURITY INSTALLATION INSTRUCTIONS MODEL P40
 Sunshine Pool Products, LLC Manufacturer of Quality Pool & Spa Products 902 West 2010 South, Syracuse, Utah 84075 Voice: 801-825-4523 Website: www.sunshinepool.com Email: info@sunshinepool.com PURITY INSTALLATION
Chemflo ph & ORP Pool Controller
 Chemflo 25850 ph & ORP Pool Controller Chlorine & Acid controller with dosing pumps and timer for pool pump Chemflo 25850 ph & ORP Controller Manual Date : 01-Sep-2007 Version : 1.0 2 Contents Section
EcoSpa Salt Water Spa Sanitisation System
 EcoSpa Salt Water Spa Sanitisation System Installation and Operating Instructions AUSTRALIA Davey Support Centre 6 Lakeview Drive, Scoresby, Australia 3179 Ph: 1300 367 866 Fax: 1300 369 119 Website: davey.com.au
CPSC Series Saltwater Chlorine Generator Owner s Manual
 CPSC Series Saltwater Chlorine Generator Owner s Manual Compu Pool CPSC Series Manual 1 CPSC Series Saltwater Chlorine Generator Owner s Manual 1.0 INTRODUCTION... 3 2.0 GETTING STARTED... 3 3.0 SAFETY
TRi ChloRine GeneRaToR instruction Manual and WaRRanTy CaRd
 TRi Chlorine Generator Instruction Manual and Warranty Card This Kit Contains: Part: Qty: Description: a. 1 TRi Power pack b. 1 Chlorine generating cell c. 1 Power pack bracket d. 2 Reducing bushes Welcome
PRISTINE CHLORINATOR & CELL OWNER S MANUAL
 PRISTINE CHLORINATOR & CELL OWNER S MANUAL Please read this manual carefully before operating your pool chlorinator and cell. Retain for future reference. CONTENTS CHLORINATOR OWNER 3 PRISTINE OVERVIEW
Chloromatic! Owners Manual. Salt Water Pool Systems. The Natural Solution for Pools & Spas.
 Chloromatic! Salt Water Pool Systems. The Natural Solution for Pools & Spas. Owners Manual Model ESR and ESC Series www.monarchpoolsystems.com Chloromatic Salt Water Pool Systems. The Natural Solution
RAMZONICS. Saltwater Chlorinator
 RAMZONICS Manufactured Chlorinator Owner s Manual Model 1400 20A Reversing Self-Clean Model 1401 30A Reversing Self-Clean Picture shows Model 1400, 20A. 1401, 30A is specified in the rating under the brand
Countrywide Pools Northam
 Countrywide Pools Northam CountrywidePools Looking After Your New Pool... 3 Table of Contents Sanitising Your Pool... 4 Chlorine... 4 Pool Water Testing... 5 Daily Testing... 5 Weekly Testing... 5 Pool
SURECHLOR 4000 USERS MANUAL. Your Handy Guide To Your New Pool Management System
 SURECHLOR 4000 USERS MANUAL Your Handy Guide To Your New Pool Management System Index Installation 4 Surechlor 4000 Cell 4 Surechlor 4000 Power Pack 4 Mounting the Surechlor 4000 Power Pack 5 Connecting
Vessel Installation and Operating Manual
 For In-ground and Aboveground Pools Vessel Installation and Operating Manual Important Safety Information Please read this manual prior to installation. Nature 2 Express is designed to sanitize in-ground
MPULSE 3000TM. Instruction & Owner s Manual. Pool Water Treatment System. 890 W.Grant Rd., Tucson, AZ, (877) * (520) Fax
 * (520) Fax") MPULSE 3000TM Pool Water Treatment System Instruction & Owner s Manual 890 W.Grant Rd., Tucson, AZ, 85705 (877) 882-4695 * (520) 617-0005 Fax TABLE OF CONTENTS Page The Benefits 2 How It Works 3 Performance
MPULSE 3000TM Pool Water Treatment System Instruction & Owner s Manual 890 W.Grant Rd., Tucson, AZ, 85705 (877) 882-4695 * (520) 617-0005 Fax TABLE OF CONTENTS Page The Benefits 2 How It Works 3 Performance
Bolero ND Cleaner. VX - 3 Series Salt Chlorinator INSTALLATION AND OPERATING INSTRUCTIONS
 INSTALLATION AND OPERATING INSTRUCTIONS I INSTALLATION AND OPERATING INSTRUCTIONS VX - 3 Series Salt Chlorinator Bolero ND Cleaner INSTALLATION AND OPERATING INSTRUCTIONS Melbourne: 03 8796 8600 Gold Coast:
Saltwater Chlorinator. Instruction Manual & Warranty
 Saltwater Chlorinator Instruction Manual & Warranty Read this manual carefully before installing, maintaining or repairing this appliance! Warnings We take safety seriously. Always exercise caution when
Installation and Operating Manual
 Safety Instructions Important Information Please read prior to installation ATTENTION! ELECTRICAL HAZARD FOR INGROUND POOLS AND ABOVEGROUND POOLS Installation and Operating Manual IMPORTANT Pool Owner,
Titanium Edition EcoChlor Saltwater Chlorine Generator Installation and Operation Manual
 Titanium Edition EcoChlor Saltwater Chlorine Generator Installation and Operation Manual Titanium Edition EcoChlor Saltwater Chlorine Generator Installation and Operation Manual 1.0 INTRODUCTION... 4
VAC-U DRIVE Swinging float arm for Acrobat like agility 36 Fin disk with DEEP VEE Scoop
 ACROBAT Vac-U-Drive Automatic Pool Cleaner VAC-U DRIVE Swinging float arm for Acrobat like agility 36 Fin disk with DEEP VEE Scoop Proven technology:diaphragm driven strength & quietness Unique hose design
Vortex Spas User Manual
 Vortex Spas User Manual Dear Spa Buyer, Congratulations on your purchase of a new Vortex Spa. You now possess the ultimate passport to tranquility a miniature vacation at home, ready and waiting for you
Accu-Tab PowerBase 3012AT by Axiall Corporation
 Accu-Tab PowerBase 3012AT by Axiall Corporation Installation and Operating Instructions DANGER: DO NOT MIX CHEMICALS! The PowerBase 3012AT chlorinator system is designed for use with Axiall Corp. approved
UsER manual for Watersens ph -REDOX
 UsER manual for Watersens -REDOX Cl 8 1 2 6 3 3 7 7 4 4 4 4 Parts List 1 Redox Probe 1 x 2 PH Probe 1 x 5 Tube Weight 2 x 6 Connection Valve 1 x chlorine 3 Chlorine and Pumps 2 x 7 Dosing Valve 2 x 5 5
INSTALLATION AND OPERATING INSTRUCTIONS
 INSTALLATION AND OPERATING INSTRUCTIONS I INSTALLATION AND OPERATING INSTRUCTIONS Viron Bolero EQ Salt ND Chlorinator Cleaner With Bluetooth INSTALLATION AND OPERATING INSTRUCTIONS The appliance is not
Arcadia Spas User Manual
 Arcadia Spas User Manual Dear Spa Buyer, Congratulations on your purchase of a new Arcadia Spa. You now possess the ultimate passport to tranquility a miniature vacation at home, ready and waiting for
Model ES-3. Pool Sanitizing System. Installation Guide 7 SPECIFICATIONS, WARRANTY AND CONTACTS. 7.1 Standards
 7 SPECIFICATIONS, WARRANTY AND CONTACTS 7.1 Standards Type Electrical Chemical Standard AS/NZS 3136:2001 CISPR 14 APVMA Electrical Equipment for Spa and Swimming Pools Electromagnetic Compatibility Australian
Saline C 6.0 Junction Box
 ISHCSJBOX RevA Saline C 6.0 Junction Box Junction Box for Saline C 6.0 Commercial Salt Chlorine Generator Owner s Manual Contents Description...3 Installation...4 Operation...7 Maintenance...8 Parts Guide...9
INSTALLATION AND OPERATING INSTRUCTIONS
 INSTALLATION AND OPERATING INSTRUCTIONS I INSTALLATION AND OPERATING INSTRUCTIONS Viron Bolero e-quilibrium ND Cleaner Salt Chlorinator INSTALLATION AND OPERATING INSTRUCTIONS The appliance is not intended
SAFE. The ChemfloPlus s Smart LCD display shows you the condition of your pool water and what ChemfloPlus is doing about it.
 www.waterco.com Automatic Water Management ChemfloPlus continuously analyses your pool water chemistry and accurately sanitises and controls the pool s ph, keeping your pool water safe and healthy. CHEMFLO
WARNING FOR YOUR SAFETY
 ! OWNER S MANUAL Power Alert AquaLink TRI Controller H0389100 REV A WARNING FOR YOUR SAFETY - This product must be installed and serviced by a licensed electrician in accordance with AS/NZ 3000-2007 and
NIV EAU MATIC ST User Manual Made in Canada
 NIV EAU MATIC ST User Manual Made in Canada www.niveaumatic.com info@niveaumatic.com -2- Table of contents Introduction Section 1 Page 4 Installation Section 2 Pages 5 to 10 2.1 Control box 2.2 Sensor
444C DUAL PERFORMANCE VALUE PACK
 (Chrome) PART NO. 44432 IMPORTANT: It is essential that you and any other operator of this product read and understand the contents of this manual before installing and using this product. SAVE THIS MANUAL
After filling the pool with clean water in the summer, two basic factors can take place due to the exposure of water to the sun and the air.
 ENGLISH WHAT HAPPENS TO THE WATER IN YOUR POOL? This should be a question of prime consideration for all pool owners. In the past some pools did not use filtering systems, the owner was faced with the
Pool and Spa. Water Testing
 Pool and Spa Water Testing Pocket Digital Testers for Pools HI-701 Checker: Free Chlorine Hand-held Colorimeter The HI-701 is a simple, accurate and cost effective way to measure free chlorine. Free Chlorine:
200 PSI COMPRESSORS - MODEL NUMBERS
 200 PSI COMPRESSORS - MODEL NUMBERS 380C AIR COMPRESSOR KIT PART NO. 38033 480C AIR COMPRESSOR KIT PART NO. 48043 380C 480C IMPORTANT: It is essential that you and any other operator of this product read
Super-Clean SCT Series SuperClean Sand Filter. Installation Manual
 Installation Manual -1- What happens to the water in your pool? This should be a question of prime consideration for all pool owners. In the past some pools did not use filtering systems, the owner was
hth EASIFLO SYSTEM New Generation for 2015 Feeder specifications hth EASIFLO The perfect solution for treatment of commercial swimming pools
 Feeder specifications hth EASIFLO To ensure you know which feeder is best suited for your swimming pool, our dedicated team of technical account managers will recommend the correct feeder is specified.
INSTALLATION AND OPERATING INSTRUCTIONS. Chlorinator
 INSTALLATION AND OPERATING INSTRUCTIONS I INSTALLATION AND OPERATING INSTRUCTIONS Viron e- Quilibrium Salt Bolero ND Cleaner Chlorinator INSTALLATION AND OPERATING INSTRUCTIONS 11/01/2015 The appliance
ChlorMaker DO OPERATING INSTRUCTIONS DO - DRAPE OVER
 ChlorMaker DO TM DO - DRAPE OVER OPERATING INSTRUCTIONS ControlOMatic, Inc. 12659 Arbor Lane, Grass Valley, CA 95949 www.controlomatic.com Support@ControlOMatic.com 530-205-4520 Manual Version: 1/1/13
FlashGARD HP Reverse Osmosis Filtration System Model Number FSTMO75 Part Number
 3M Water Filtration Products FlashGARD HP Reverse Osmosis Filtration System Model Number FSTMO75 Part Number 56123-06 Installer: Please leave this manual with owner/operator. End User: Please retain for
INSTRUCTION BOOK. Simple, Effective ph Control System. Version 1.50a, 02-Nov Please read before you call us for advice. AUTO / OFF PROGRAM / SET
 INSTRUCTION BOOK TM TM AUTO / OFF PROGRAM / SET DOWN UP CANCEL bionizer.com.au bionizer.com Please read before you call us for advice. Version 1.50a, 02-Nov-2015 Simple, Effective ph Control System TABLE
INSTALLATION AND OPERATING INSTRUCTIONS
 INSTALLATION AND OPERATING INSTRUCTIONS I INSTALLATION AND OPERATING INSTRUCTIONS Viron Water Viron Cartridge Filter Balance Bolero ND Cleaner INSTALLATION AND OPERATING INSTRUCTIONS Melbourne: 03 8796
NB/NBR NITROGEN BOOSTER FOR AVIATION SERVICE
 NB/NBR NITROGEN BOOSTER FOR AVIATION SERVICE INSTALLATION, OPERATION & MAINTENANCE MANUAL INTERFACE DEVICES, INC. 230 Depot Road, Milford, CT 06460 Ph: (203) 878-4648, Fx: (203) 882-0885, E-mail: info@interfacedevices.com
SALT WATER CHLORINATORS INSTALLATION INSTRUCTIONS
 SALT WATER CHLORINATORS INSTALLATION INSTRUCTIONS An introduction to salt water chlorination. Salt water chlorination is the healthy alternative to chlorinating your swimming pool, the natural way. Very
HOW TO OPEN YOUR POOL
 HOW TO OPEN YOUR POOL FOLLOW THESE FIVE STEPS WHEN YOU'RE READY TO OPEN YOUR POOL FOR THE SEASON: 1. First, take a sample of your pool water to your Authorized Sustain System Dealer. To ensure an accurate
Owner s Manual. CSS20 Complete Sanitation System. Ozone/Salt Chlorinator OPERATING INSTRUCTIONS & INSTALLATION GUIDE
 CSS20 Complete Sanitation System Ozone/Salt Chlorinator Prozone Pool Products Huntsville, AL 35805 256-539-4570 www.prozoneint.com Owner s Manual OPERATING INSTRUCTIONS & INSTALLATION GUIDE Introduction...
For Establishing and Maintaining Your Spa using PROtech Spa Chemicals
 Spa Care For Establishing and Maintaining Your Spa using PROtech Spa Chemicals QUICK START Add water up to the level recommended by the manufacturer of your spa and let the pump circulate for at least
Installation and Operating Instructions
 DYNAMIC OXYGEN GENERATOR For Outdoor Residential Inground Pools up to 20,000 gallons DYNAMIC OXYGEN GENERATOR IMPORTANT! Operate During Daylight Hours Minimum 12 Hours Daily Use With Oxygen Pools Water
100C Air Compressor Kit
 10010 100C Air Compressor (standard mounting bracket, CE Spec) 10014 100C Air Compressor (no leader hose or check valve, CE Spec) 10016 100C Air Compressor (with Omega Bracket, CE Spec) IMPORTANT: It is
PoolNaturally. Pure. Simple. Genius. Installation and Product Use Instructions In ground and above ground pools
 PoolNaturally Pure. Simple. Genius. Installation and Product Use Instructions In ground and above ground pools V2.31 Installation Diagrams: (Installation can be done either before or after the pump. Shown
Installation, Operation and Maintenance Manual
 Installation, Operation and Maintenance Manual Model H2F H2Flow Anti-Scale System Chemical-Free, Salt-Free Scale Prevention Introduction The H2Flow Anti-Scale System will condition the tap water providing
450P- RV AUTOMATIC PORTABLE COMPRESSOR EXTREME SERIES
 450P- RV AUTOMATIC PORTABLE COMPRESSOR EXTREME SERIES PART NO. 45053 IMPORTANT: It is essential that you and any other operator of this product read and understand the contents of this manual before installing
C-CPP Commercial Series Saltwater Chlorine Generator Owner s Manual
 C-CPP Commercial Series Saltwater Chlorine Generator Owner s Manual Compu Pool C-CPP Commercial Series Manual 1 1.0 GENERAL PRODUCT SPECIFICATION 1.1 AC Input Power 1.1.1 Single Phase (220-240VAC), Three
Purifier for Vinyl Lined Pools
 Purifier for Vinyl Lined Pools Operating Manual READ THE LABEL AND OPERATOR S MANUAL BEFORE USING Pool owner, save this manual! Builders, leave this manual with the pool owner! We ask you to take the time
400C & 450C DUAL PERFORMANCE VALUE PACKS
 (Chrome) PART NO. 40013 (Silver) PART NO. 45012 (Chrome) PART NO. 45013 IMPORTANT: It is essential that you and any other operator of this product read and understand the contents of this manual before
Accu-Tab PowerBase 3070AT by Axiall Corporation
 Accu-Tab PowerBase 3070AT by Axiall Corporation Installation and Operating Instructions The PowerBase 3070AT Chlorinator is NSF STD 50 NSF-Listed for pool applications. ONLY Axiall Corp. Accu-Tab Blue
450P AUTOMATIC PORTABLE COMPRESSOR EXTREME SERIES
 EXTREME SERIES PART NO. 45043 IMPORTANT: It is essential that you and any other operator of this product read and understand the contents of this manual before installing and using this product. SAVE THIS
RAM Operation Manual. Worldwide Manufacturer of Gas Detection Solutions
 RAM 4021 Operation Manual Worldwide Manufacturer of Gas Detection Solutions TABLE OF CONTENTS RAM 4021 For Your Safety... 2 Description.... 2 Setup Mode.... 2 Lights/Alarms.... 3 Operation.... 4 Calibration....
AMP Oil Free Manual AMP 50-8-TC AMP 50-6-D AMP General User and Maintenance Instructions
 AMP Oil Free Manual AMP 50-8-TC AMP 50-6-D AMP 50-24 General User and Maintenance Instructions Silentaire Technology 8614 Veterans Memorial Dr. Houston, TX 77088 800-972-7668 Fax 832-327-0669 www.silentaire.com
Compu Chlor Saltwater Chlorine Generator
 Compu Chlor Saltwater Chlorine Generator Installation and Operation Manual Compu Chlor Manual AU 1 Compu Chlor Manual AU 2 Compu Chlor Saltwater Chlorine Generator Installation and Operation Manual 1.0
Owner s Manual. Pool Sanitising & Purifying System. ACTIVE CONSTITUENTS: 28.8g/kg SILVER (as metal) 16.8g/kg COPPER (as metal)
 16.8g/kg COPPER (as metal)") Pool Sanitising & Purifying System ACTIVE CONSTITUENTS: 28.8g/kg SILVER (as metal) 16.8g/kg COPPER (as metal) Owner s Manual APVMA Approval No. 59099/M/0305 MASTERING THE ELEMENTS Renowned worldwide for
Pool Sanitising & Purifying System ACTIVE CONSTITUENTS: 28.8g/kg SILVER (as metal) 16.8g/kg COPPER (as metal) Owner s Manual APVMA Approval No. 59099/M/0305 MASTERING THE ELEMENTS Renowned worldwide for
NEWS: 20% discount on service agreements signed before 1st March 2010
 Swimming Pool Maintenance Routine and charges Regular maintenance and consistent pool care is the best way to ensure a safe and healthy swimming environment. Although every pool is unique and has its own
RAM Operation Manual. Worldwide Manufacturer of Gas Detection Solutions
 RAM 4021 Operation Manual Worldwide Manufacturer of Gas Detection Solutions TABLE OF CONTENTS RAM 4021 For Your Safety... 2 Description.... 2 Setup Mode.... 2 Lights/Alarms.... 3 Operation.... 4 Calibration....
RAM 4021-PR. Operation Manual. Worldwide Manufacturer of Gas Detection Solutions
 RAM 4021-PR Operation Manual Worldwide Manufacturer of Gas Detection Solutions TABLE OF CONTENTS RAM 4021-PR For Your Safety... 2 Description.... 2 Setup Mode.... 2 Lights/Alarms.... 3 Operation.... 4
Catalina Spa-kle Installation and User Guide
 Catalina Spa-kle Installation and User Guide Computer controlled automatic bromine generator for spas, hot tubs and swimspas. 1 TABLE OF CONTENTS 1. Safety Instructions and Installer Precautions 2. Installation