|
|
|
- Clement Leonard
- 5 years ago
- Views:
Transcription
1 WALKING / K-WALKER 149K Strovolou Avenue, Strovolos, Nicosia, 2048, Cyprus T: , F: , M: info@abletools.com.cy

2
3

4
5
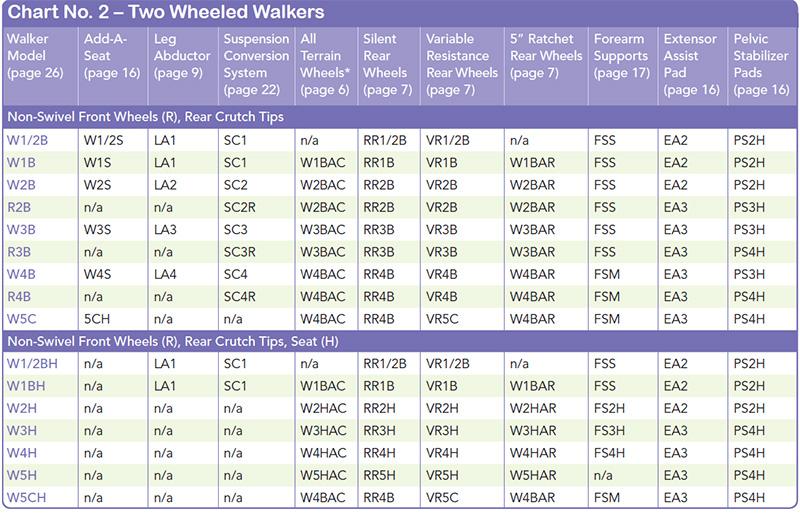
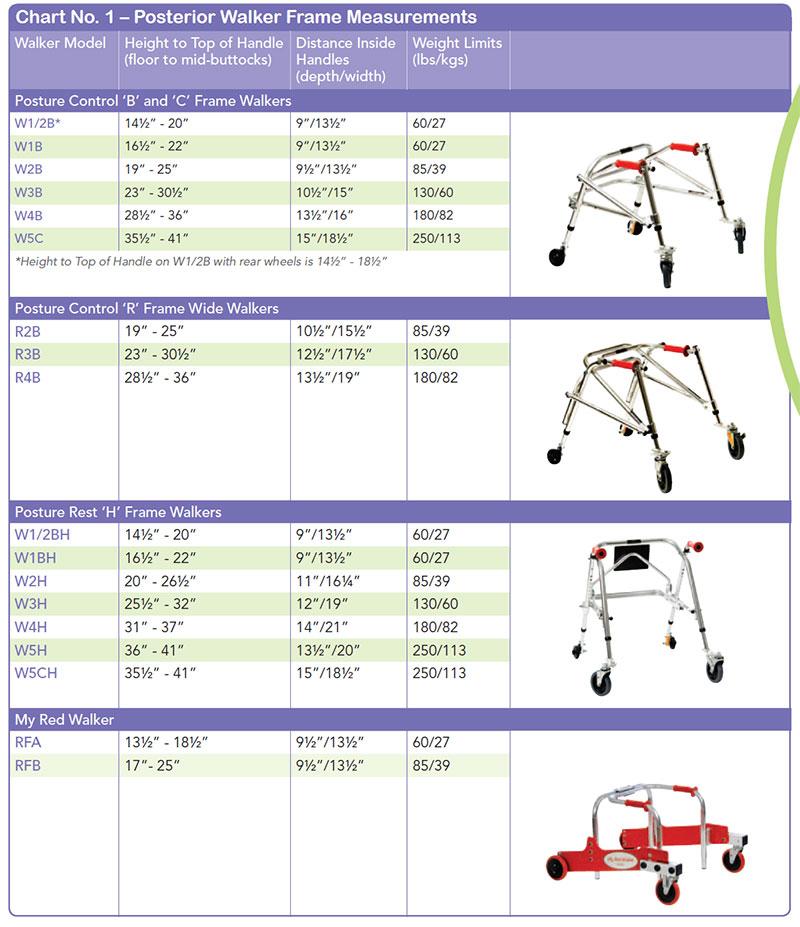
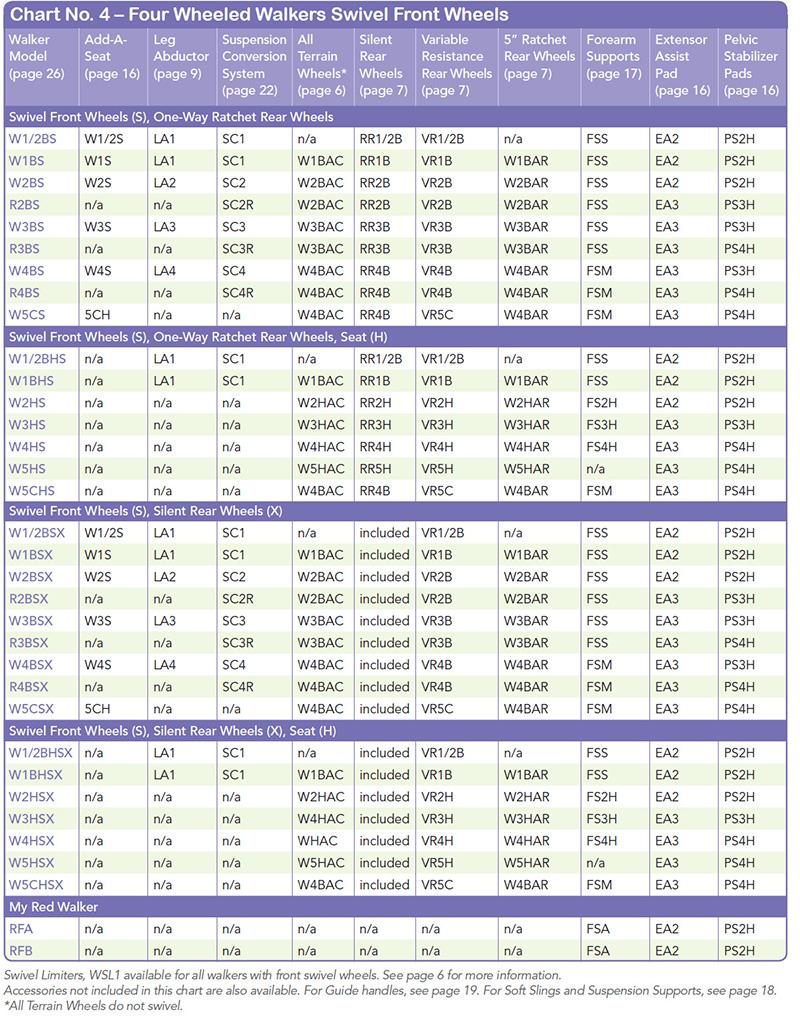
6 B SERIES KAYE POSTURE CONTROL WALKERS (effective 2/02/04) These are the user instructions for the B Series Kaye Posture Control Walkers. All persons who set-up, adjust, or use the walker should first read these entire instructions. Walkers with seats have a second set of instructions that detail the seat usage. Please store the instructions for future reference. USE The Kaye Posture Control Walker is designed as a reverse or posterior walker, where the user faces away from the rear bars and towards the open end of the walker. These walkers are designed to facilitate postural alignment, balance, and components of gait through the following means (as compared to traditional, forward walkers): 1. The support behind the user encourages a more upright posture. 2. The handgrips beside the user encourage improved upper extremity position. 3. The centering of the user within the walker and over his own feet encourages the development of balance. 4. The rear horizontal bars encourage the user to step forward as he moves the walker forward. 5. Pulling the walker helps eliminate the abnormal two-footed stance when a user must stop and move the walker further to their front. FRAME DESIGNS The W1/2B, W1B, W2B, W3B, and W4B series walkers are designed to be used as regular walking aids. The R2B, R3B, and R4B series walkers are designed with additional interior room for users who wear leg braces. WHEEL DESIGNS The two-wheeled design provides extra drag for users who cannot yet manage a walker that rolls forward as they shift their weight forward. The four-wheeled designs help improve cadence, velocity, energy use, and step and stride length. All four-wheeled walkers have locking rear wheels to prevent them from rolling backwards. The swivel front wheels allow the user to turn without having to lift and reposition the walker. WALKER IDENTIFICATION, AND SIZE AND WEIGHT LIMITS The model number is on the warning label and the yellow/orange leg label. ( H or -seat denotes a fold-down seat; R denotes four wheels; S denotes four wheels with swivel front wheels; X denotes silent rear wheels.) The following chart lists height and weight limits for each walker as follows: A = Height adjustment, in inches, from the floor to top of the grip. This should match the height from the floor to the middle of the user s buttocks. B = Height adjustment, in cms. C = Maximum weight limit, in lbs. D = Maximum weight limit, in kgs. MODELS W1/2B, W1/2BH W1/2BR,S,X W1/2BHR,S,X W1B, R, S, X W1BH,R,S,X W2B, R, S, X R2B, R, S, X W3B, R, S, X R3B, R, S, X W4B, R, S, X R4B, R, S, X A B C D (ins.) (cms.) (lbs.) (kgs.) FOLDING AND UNFOLDING To unfold the walker, pull the hand grips away from the rest of the frame, and the walker should begin to unfold. Continue to unfold the frame until the latch pushpins extend and lock as shown in Figure A. To fold the walker, face it from the open end, depress the latch push-pins, tilt the walker so that it rests on its rear legs only, and push the front legs towards the rear legs.
7 ASSEMBLY Some walkers are shipped with the legs removed. Install the legs as follows: 1. The front legs have wheels that rotate in both directions. Install the front leg with the orange sticker into the front, left side of the frame. Install the other front leg into the front, right side of the frame. 2. Install the rear legs with tips so that the bend points the tip towards the front of the walker. 3. The rear legs with wheels have wheels that rotate in only one direction. Install the rear leg with the orange sticker into the rear, left side of the frame. Install the other rear leg into the rear, right side of the frame. HEIGHT ADJUSTMENT Adjust the height of the walker so that the top, rear bar is aligned with the middle of the user's buttocks. To do this, press the pushpin on each leg and slide the leg up or down as needed. After installing or adjusting the legs, always check the following: 1. All four extensions must be adjusted to the same height. 2. The pushpins must protrude fully from the adjustment holes. 3. The wheels should face towards the outside of the walker. 4. If you have rear legs with tips, the bend should point the tip towards the front of the walker. 5. If you have swivel front wheels, the plates should be parallel with the ground and protrude from the walker as shown in Figure B. 6. If you have rear wheels, the locking mechanism on the rear wheels should prevent the walker from rolling backwards. UNLOCKING AND LOCKING THE SWIVEL WHEELS To unlock the front wheels so that they swivel, rotate each swivel latch around and down, as shown in Figure B, until it rests against the bolt that serves as an axle for the wheel. To prevent the wheels from swiveling, first point the wheel straight ahead as shown in Figure B. Then rotate each latch around and up until it is seated fully into the slot located in the plate above the wheel. ADJUSTING ALIGNMENT, SWIVEL WHEELS Adjust the alignment of the swivel wheels as follows: 1. Ensure that the swivel caster is locked as shown in Figure B. 2. Use 1/2 wrenches to loosen bolt X. 3. Point the caster assembly in the desired direction. 4. Securely tighten the bolt. ADJUSTING NON-SWIVEL WHEELS, FRONT AND REAR Use 9/16 wrenches to adjust the optional, silent rear wheels. Use 3/4 wrenches to adjust the front, all-terrain wheels. Use 1/2 wrenches to adjust all other wheels. A flat-head screwdriver may also be needed. Adjust the alignment of the non-swivel wheels, front or rear, as follows: 1. If a bolt head, which is located on the outside of the wheel, is concealed by a plastic cover, remove that cover. To do this, insert the tip of a flat-head screwdriver just under the edge of the plastic cover and gently pry the cover off of the metal flange. The bolt head should then be visible. 2. Secure the bolt head on the outside of the wheel so that it does not turn. 3. Loosen the nut that is located on the opposite side of the leg as is the wheel. 4. If you have silent rear wheels, you may also need to loosen the nut between the leg and the wheel. To do this, move that nut away from the leg. (It may be necessary to rotate the bolt head in order to loosen this nut.). 5. Adjust the alignment as desired. 6. Move the wheel up or down to ensure the walker is level. 7. Secure the bolt head that is on the outside of the wheel so that it does not turn. 8. Identify the nut that is on the opposite side of the leg as is the wheel. Securely tighten that nut into the tube. 9. If you have silent rear wheels, identify the nut that is between the wheel and the tube. Securely tighten that nut into the tube. OPTIONAL REAR LEGS WITH SILENT, ONE-WAY BEARINGS Rear leg extensions with silent, oneway bearings are available as an option for these walkers. Model RR1/2B fits W1/2B and W1/2BH frames; RR1B fits W1B and W1BH frames; RR2B fits W2B and R2B frames; RR3B fits W3B and R3B frames; and RR4B fits W4B and R4B frames. Install these legs as described under ASSEMBLY, step 3. Adjust these legs as described under ADJUSTING NON-SWIVEL WHEELS, FRONT AND REAR. However, after adjustment, both nuts must be tightened very securely against the tube, or the following difficulties may occur: 1. When rearward pressure is applied, the one-way bearing may turn the bolt. When this occurs, the wheel can become misaligned and/or become loose on the leg. To correct this, adjust the wheel as described in the previous section and B Walkers, 2/02/04, page 2
8 very securely tighten both nuts into the tube. 2. If the bolt turns, as described above, it may permit the nut between the wheel and the leg to turn. The nut may then bind against the wheel and prevent the wheel from turning. To correct this: a) Identify the nut that is between the wheel and the leg. b) Use a wrench to move that nut away from the wheel, just until the wheel can rotate forward without binding. c) Adjust the wheel as described in the previous section and very securely tighten both nuts into the tube. ANTERIOR OR FORWARD WALKERS The leg extensions can be rearranged to make the following models forward walkers: W2B, R2B, W2BR, R2BR, W3B, R3B, W3BR, R3BR, W4B, R4B, W4BR, and R4BR. The W1/2B, W1/2BH, W1/2BR, W1/2BHR, W1B, W1BH, W1BR, and W1BHR walkers can be special-ordered as forward walkers. ALL-TERRAIN WHEELS Optional leg extensions with large or all-terrain wheels are available for these walkers. The front legs have 9 dia., nonswivel wheels. The rear legs have 5 dia. wheels with external ratchet mechanisms. Model W1BAC fits W1B and W1BH frames; W2BAC fits W2B and R2B frames; W3BAC fits W3B and R3B frames; and W4BAC fits W4B and R4B frames. OTHER ACCESSORIES Walkers with fold-down seats are available. Contact Kaye Products, Inc. for more information about seated walkers. The seats will not retrofit existing walkers. Forearm supports, pelvic stabilizer side pads, and extensor assist center pads are available for these walkers. Guide handles are available for the W1/2B, W1/2BH, W1B, W1BH, W2B, and W3B series walkers. The accessories include their own user instructions. Please call Kaye Products, Inc. or consult their catalog for more details. MAINTENANCE AND CARE Inspect the walker regularly. Tighten the nuts and bolts as necessary. If a product needs service or spare parts, contact Kaye Products, Inc. or the dealer from whom you purchased the item. If a problem is discovered that may impact the product s function, immediately cease use and contact Kaye Products, Inc. The wheels and crutch tips will wear and should be replaced as needed. The ratchet or brake mechanisms on the rear wheels will wear and should be replaced, as needed, in order to maintain the rearbraking feature. Dirt, trash, or ice build-up on the ratchet mechanisms may prevent them from functioning. If your walker has the rear wheels with silent, one-way bearings, care should be taken to avoid exposing these bearings to salt or salt water. Use water and, if needed, soap to clean the walker. Avoid any undue stress to the walker while using, storing, or transporting it. LIMITED WARRANTY If an item proves defective within two years of the original purchase, we will provide you with replacement parts in order to correct that defect. Wear and tear, and the items listed under MAINTENANCE AND CARE are not covered by the warranty. Kaye Products, Inc. makes no other warranty, expressed or implied, and does not warrant the product as being fit for a particular purpose. The purchaser, owner, and user assume all risk of personal and property injury due to the use of the equipment. CAUTIONS 1. Not for elderly. 2. Each time you unfold or adjust the walker, ensure that pushpins fully extend from their corresponding holes. 3. Do not use with broken or missing parts. 4. Do not use on stairs, steep slopes, or steep ramps. 5. Do not exceed the size and weight limits. 6. Do not alter the product or use it in any way other than described herein. 7. Never leave a child unattended. 8. Always use qualified supervision. QUESTIONS? If you have any questions, please contact Kaye Products, Inc. Our authorized representative for the European Medical Device Directives is Advena, Ltd., PO Box 30, Leominster, Herefordshire, RH12 2BT, UK. B Walkers, 2/02/04, page 3
9 Figure A W 1/2 & 1 BS Models W 2, 3, & 4 BS Models FRONT OF WALKERS Correct snap button fully extended Incorrect snap button not extended Figure B Bolt X Locked Latch up & locked Unlocked INSIDE OUTSIDE BACK FRONT
USER GUIDE ROLLING WALKERS INSTRUCTIONS FOR USE JANUARY, Maximum User Weight: 170kg (Do not exceed this weight)
") USER GUIDE ROLLING WALKERS INSTRUCTIONS FOR USE JANUARY, 2013 Model Nos: BE07889T Maximum User Weight: 170kg (Do not exceed this weight) Model Nos: BE07890TB Maximum User Weight: 227kg (Do not exceed this
USER GUIDE ROLLING WALKERS INSTRUCTIONS FOR USE JANUARY, 2013 Model Nos: BE07889T Maximum User Weight: 170kg (Do not exceed this weight) Model Nos: BE07890TB Maximum User Weight: 227kg (Do not exceed this
SETTING THE HANDLE HEIGHT ON THE ROLLATOR
 Model No: Maximum User Weight: 10910C (Lightweight) 10928C (Heavy duty) 125kg (20st) (Lightweight) 170kg (27st) (Heavy duty) Height of handles: 780-915mm (30.5-36 ) (Lightweight) 790-930mm (31-36.5 ) (Heavy
Read Instructions carefully before use. Rollator is designed for indoor & outdoor use. Do NOT use as a wheelchair or as a transport chair.
 Charcoal Red Seat Height 500-10191 500-10195 19 500-10211 500-10215 21 500-10241 500-10245 24 User Manual Read Instructions carefully before use. Rollator is designed for indoor & outdoor use. Do NOT use
HoldUp Plus2. Safety Kit included: See additional instructions for installation. REAR WHEEL TRAY. BASE (1x) lock WASHER (1x) KEY (2x) SAFETY CLIP (1x)
 lock WASHER (1x) KEY (2x) SAFETY CLIP (1x)") HoldUp Plus2 InsTAll This product on 2" hitch version of the HoldUp Front WHEEL TRAY assembly (1x) REAR WHEEL TRAY assembly (1x) wrench (1x) BASE (1x) bolt (8X) Lock WASHER (8X) Washer (8x) KEY (2x) SAFETY
HoldUp Plus2 InsTAll This product on 2" hitch version of the HoldUp Front WHEEL TRAY assembly (1x) REAR WHEEL TRAY assembly (1x) wrench (1x) BASE (1x) bolt (8X) Lock WASHER (8X) Washer (8x) KEY (2x) SAFETY
L810. Owner s Operating and. Maintenance Manual. For Standard Wheelchairs
 L810 Owner s Operating and Maintenance Manual For Standard Wheelchairs Introduction Standard wheelchairs are the result of extensive engineering research, and rigid quality assurance testing. Every new
FLUX walking aid. user manual GB/US. - partnering to mobilize kids
 FLUX walking aid user manual GB/US - partnering to mobilize kids User manual for the FLUX walking aid Contend 1 Common Information 1.1 Preface 2 1.2 Application 2 1.3 Declaration of conformity 2 1.4 Terms
EZee Glider Manual. Tools needed for Assembly: Wrench (included) Philips Screwdriver (not included) Assembly Instructions
 Philips Screwdriver (not included) Assembly Instructions") EZee Glider Manual Congratulations on your purchase of the EZee Glider! Your glider is designed for years of nearly carefree use by your child. These instructions include how to set up your glider and
EZee Glider Manual Congratulations on your purchase of the EZee Glider! Your glider is designed for years of nearly carefree use by your child. These instructions include how to set up your glider and
walk with independence
 walk with independence Lightweight www.novamedicalproducts.com WARNING Failure to follow any or all safety instructions may result in serious injury or death. adjustment and usage yourself or ambulate
BABY ROCKER WITH TOY BAR
 BABY ROCKER WITH TOY BAR IMPORTANT: KEEP THIS BOOKLET IN A SAFE PLACE FOR FUTURE REFERENCE. www.britax.com.au Series AX910 WARNINGS ALWAYS FOLLOW THE MANUFACTURERS INSTRUCTIONS. READ ALL INSTRUCTIONS CAREFULLY
Santa Fe Cycles Assembly Guide Introduction
 Santa Fe Cycles Assembly Guide Introduction Congratulations on your purchase of your new Santa Fe bicycle. You have purchased a bicycle that has many features and qualities. Please take a few minutes and
600 / 600FC OWNER'S MANUAL
 PROGRESSION 600 / 600FC OWNER'S MANUAL Issue 2 / Version E - Dec. 10, 1997 Copyright 1997 GAMMA Sports - All Rights Reserved PROGRESSION 600 / 600FC OWNER'S MANUAL TABLE OF CONTENTS PAGE 1... WARRANTY
8MAY15 US RACK, Inc Falcon Drive, Madera, CA
 8MAY15 US RACK, Inc. - 2850 Falcon Drive, Madera, CA 93637-559-661-3050 INSTRUCTIONS for Bedrail-mounted MOTORCYCLE RACK, Model 2001-4TRA WARNING: Do NOT attempt to install or use this rack without following
Mini Glider Manual. Your Glider comes partially assembled. The front wheel and the handlebars require assembly.
 Mini Glider Manual Congratulations on your purchase of the Mini Glider! Your glider is designed for years of nearly carefree use by your child. These instructions include how to set up your glider and
Ladies Shopper Bike Assembly Manual 28C03
 Ladies Shopper Bike Assembly Manual 28C03 Ecosmo Ltd 1 Know your bike 1. Wheel 2. Rear Derailleur 3. Chain 4. Crank Set 5. Pedal 6. Seat Quick Lock 7. Saddle and Post 8. Frame 9. Front Light 10. Front
contents introduction
 contents 1. Contents 2. Introduction 3. Parts Description 4. Personal Safety 5. Transportation & Assembly 6. Adjustments for Comfort 7. Brake Operation 8. Care and Maintenance 9. Specification 10. Warranty
Surf All Terrain 3 Wheel Adaptor
 Surf All Terrain 3 Wheel Adaptor PLEASE KEEP THESE INSTRUCTIONS FOR FUTURE REFERENCE These instructions are important. Read these instructions carefully before use and keep them for future reference. Your
HELMETS SAVE LIVES!!! ALWAYS WEAR A PROPERLY FITTED HELMET WHEN YOU RIDE YOUR SCOOTER. DO NOT RIDE AT NIGHT. AVOID RIDING IN WET CONDITIONS.
 HELMETS SAVE CORRECT FITTING - MAKE SURE YOUR HELMET COVERS YOUR FOREHEAD. LIVES!!! ALWAYS WEAR A PROPERLY FITTED HELMET WHEN YOU RIDE YOUR SCOOTER. DO NOT RIDE AT NIGHT. AVOID RIDING IN WET CONDITIONS.
crocodile The Crocodile is a walking aid for disabled children and youngsters, who need supplementary assistance with their daily walking
 WA L K I N G /C R O CO D I L E 190 crocodile TM The Crocodile is a walking aid for disabled children and youngsters, who need supplementary assistance with their daily walking 191 Crocodile aims for harmony,
7130 Lancer Rear Drive Magnetic Commercial Indoor Cycling Bike
 7130 Lancer Rear Drive Magnetic Commercial Indoor Cycling Bike Owner s Manual Made in Taiwan INDEX IMPORTANT SAFETY INFORMATION... 1 EXPLODED DRAWING... 2 PARTS LIST... 3 ASSEMBLY INSTRUCTION... 4-9 USER
LITERIDER 2&3 IMPORTANT WARNING. 2Bike (1x) Bolt (1x) Nut (1x) Small Hex Wrench (1x)
 Bolt (1x) Nut (1x) Small Hex Wrench (1x)") LITERIDER 2&3 3 Bike (1x) Bolt (1x) Flat Washer (2x) Nut (1x) Large Hex Wrench (1x) 2Bike (1x) wrench (1x) Small Hex Wrench (1x) keys (2x) Long Strap (1x) 2-Zip Strips (6x) 3-Zip Strips (9x) Wheel strap
LITERIDER 2&3 3 Bike (1x) Bolt (1x) Flat Washer (2x) Nut (1x) Large Hex Wrench (1x) 2Bike (1x) wrench (1x) Small Hex Wrench (1x) keys (2x) Long Strap (1x) 2-Zip Strips (6x) 3-Zip Strips (9x) Wheel strap
SAVE THESE INSTRUCTIONS. NOTE: Check all parts for shipping damage. In case of damage, DO NOT use. Contact Carrier/Invacare for further instructions.
 Walking Tutor, Installation and Operating Instructions Model No. WT 200 SAVE THESE INSTRUCTIONS NOTE: Check all parts for shipping damage. In case of damage, DO NOT use. Contact Carrier/Invacare for further
New NOVUS PUSH-CHAIR USE AND MAINTENANCE HANDBOOK
 New NOVUS PUSH-CHAIR USE AND MAINTENANCE HANDBOOK INDEX INDEX...2 WARNINGS...3 LABELS AND PLATES...4 SOME EXAMPLES OF WHAT SHOULDN T BE DONE WHILE USING NewNOVUS..5 HOW TO INCLINE THE PUSH-CHAIR AND GO
INSTRUCTION MANUAL FOR USE OF BABY WALKER FLOWER
 The safety of this product and the materials used for its production is guaranteed and certified in test laboratories according to EN standards. INSTRUCTION MANUAL FOR USE OF BABY WALKER FLOWER PLEASE,
LIGHTWEIGHT TRIWALKER OWNER S HANDBOOK
 LIGHTWEIGHT TRIWALKER OWNER S HANDBOOK Triwalker Owner s Handbook (Z25987 Rev A) Page 1 of 12 CONTENTS 1. Contents 2. Introduction 3. Parts Description 4. Personal Safety 5. Adjustments for Comfort 6.
Operator s Safety Manual Sumner Max Jax / Beam Jax
 May 2013 Operator s Safety Manual Sumner Max Jax / Beam Jax www.sumner.com 7514 Alabonson Road Houston, TX 77088 U.S.A ph: 281.999.6900 fax: 281.999.6966 75 Saltsman Drive Unit 5 Cambridge, ON N3H 4R7
VERSA BIKE RACK INSTRUCTIONS
 VERSA BIKE RACK INSTRUCTIONS Models #8, 8 Important This rack is designed for use with a or. receiver hitch. The rack is designed to hold a maximum of two bicycles. Do not use it for anything other than
comfort without compromising on performance and to fit your various needs on touring,
 Congratulations on your purchase of Goal-26X. Goal-26X is made to enhance comfort without compromising on performance and to fit your various needs on touring, shopping and communicating. Let s have fun
Dual Release Walkers 6291 Series. 1 General. 1.1 Symbols WARNING
 User Manual DEALER: This manual MUST be given to the user of the product. USER: BEFORE using this product, read this manual and save for future reference. Dual Release Walkers 6291 Series EN User Manual...page
Operator s Manual. All-Terrain Wheelchair
 Operator s Manual All-Terrain Wheelchair By Brandon Calavan Ana Groff Steve Benn Dylan Rinker Sebastian Pineo Team 1 Faculty Advisor: John Enderle Teaching Assistant: Sarah Brittain Client: Melody Kettle
#59114 Rola 2-Bike Rack Carrier (Shown Assembled) (A) (C) (B)
 (A) (C) (B)") Use for Parts: #59114 Rola -Bike Rack System #59115 Rola 1-Bike Add-On TOOLS REQUIRED 10mm or 13/3 Socket & Wrench #59114 Rola -Bike Rack Carrier (Shown Assembled) Tray Attachment Hardware: (3) Plastic
Use for Parts: #59114 Rola -Bike Rack System #59115 Rola 1-Bike Add-On TOOLS REQUIRED 10mm or 13/3 Socket & Wrench #59114 Rola -Bike Rack Carrier (Shown Assembled) Tray Attachment Hardware: (3) Plastic
Assembly Guide ST200 FUNCTIONAL TRAINER
 Assembly Guide ST200 FUNCTIONAL TRAINER Assembly Guide ST200 FUNCTIONAL TRAINER To avoid possible damage to this Functional Trainer, please follow these assembly steps in the correct order. Before proceeding,
engineered products Foldable Topside Creeper Safety First VIDEO INSTRUCTIONS ARE AVAILABLE ON OUR WEBSITE AT:
 engineered products Foldable Topside Creeper Please read and understand all safety advisories and operating instruction in this manual to ensure safe and productive operation of your new Topside Creeper.
FIRST TEAM SPORTS, INC Storm Portable Series Assembly Instructions
 FIRST TEAM SPORTS, INC Storm Portable Series Assembly Instructions WARNING! WARNING! WARNING! THIS BASKETBALL SYSTEM IS SPRING LOADED AND SHIPPED UNDER TENSION. ATTEMPTING TO ASSEMBLE OR DISASSEMBLE ANY
Quattrocycle BV. Quattrocycle. User Manual. Last update February Quattrocycle BV Bremkant EJ Middelbeers. User Manual Quattrocycle 1
 Quattrocycle User Manual Last update February 2010 Quattrocycle BV Bremkant 6 5091 EJ Middelbeers User Manual Quattrocycle 1 Table of Contents Page Chapter 1: Introduction 3 Chapter 2: Instructions for
INSTALLATION INSTRUCTIONS FOR ROLLOVER PROTECTION SYSTEM (ROPS)
") INSTALLATION INSTRUCTIONS FOR ROLLOVER PROTECTION SYSTEM (ROPS) This manual contains assembly, operating, maintenance and safety instructions for your ROPS. Before Installing the ROPS or operating a machine
INSTALLATION INSTRUCTIONS FOR ROLLOVER PROTECTION SYSTEM (ROPS) This manual contains assembly, operating, maintenance and safety instructions for your ROPS. Before Installing the ROPS or operating a machine
Drive Belt Instructions
 Drive Belt Safety Do not roll, pry, twist, invert or bend the belt back on itself. Do not zip tie the belt. The acceptable temperature range for your belt drive is -53 C to 85 C. Do not lubricate the belt
Caliber Sled Wheels Assembly Instructions for PN and 13579
 Caliber Sled Wheels Assembly Instructions for PN 13576 and 13579 Caution: Read all instructions before assembling or using Sled Wheels. Follow the steps in order. Only use Sled Wheels as intended, following
Flat Fold Highchair INSTRUCTION MANUAL. Designed and manufactured to BS EN 14988: 2012 IMPORTANT:
 Flat Fold Highchair INSTRUCTION MANUAL Designed and manufactured to BS EN 14988: 2012 IMPORTANT: Thank you for choosing our product. Please read and understand these instructions before using this flat
3 Post Pressure Fit System Owner s Manual
 3 Post Pressure Fit System Owner s Manual Use and Care Trouble Shooting Warranty Information Table of Contents 3 Post Pressure Fit System Introduction... 3 Overview of the 3 Post Pressure Fit System...
X-6FC STRINGING MACHINE OWNER'S MANUAL. Issue 1 - May Copyright 2004 GAMMA Sports - All Rights Reserved
 X-6FC STRINGING MACHINE OWNER'S MANUAL Issue 1 - May 2004 Copyright 2004 GAMMA Sports - All Rights Reserved OWNER'S MANUAL GAMMA X-6FC TABLE OF CONTENTS PAGE 1... WARRANTY PAGE 2... FEATURES PAGE 3...
STAND AID 1600/ ECONOSTAND
 MAKERS OF STAND AID, POWER TOILET AID AND FREEDOM CHAIR STAND AID 600/ ECONOSTAND INSTRUCTIONS AND WARRANTY FOR STAND AID 600 STAND AID SERIAL # PO BOX 386 Sheldon, IA 50 (800) 83-8580 (7) 34-53 Fax: (7)
2012 K9100 COMPACT Worldwide Cycling Solutions Through Creative Innovations.
 Home Instruction Sheet Step-1Please check for any missing parts. Model K9100 COMPACT (Basic AirCaddy) aircaddy web page 20 04/03/12 98% (1) T3230-00 METAL WHEEL TRUCK Model K8350 (Aircraft Kit) (Optional)
Important Note: Tighten lock nuts so the support tubes still swing freely see figure 2. There must be 1 2 threads of bolt past end of lock nuts.
 Kit Contents: DESCRIPTION QTY. DESCRIPTION QTY. 2 Shank Assembly 1 Support Tube Assembly 1 Side Tube - Short 2 1-1/4 Shank 1 Center Tube - Long 1 3/8-16 x 2.0 Carriage Bolt 2 5/16-18 x 2.25 Carriage Bolt
ROLLATOR (R6 and R8) OWNER S HANDBOOK
 OWNER S HANDBOOK") C O N T E N T S The Drive Medical lightweight 4- wheeled rollator is designed to aid the user to walk and, as an option, carry items such as shopping. The R6 is ideal for indoor use, whilst the R8 is suitable
C O N T E N T S The Drive Medical lightweight 4- wheeled rollator is designed to aid the user to walk and, as an option, carry items such as shopping. The R6 is ideal for indoor use, whilst the R8 is suitable
Dual Release Walkers 6291 Series. 1 General. 1 Dual Release Walkers. 1.1 Symbols WARNING
 User Manual DEALER: This manual MUST be given to the user of the product. USER: BEFORE using this product, read this manual and save for future reference. Dual Release Walkers 6291 Series EN User Manual...page
BICYCLE TO MOTORCYCLE BICYCLE RACK
 BICYCLE TO MOTORCYCLE BICYCLE RACK Install Manual Warning: You are responsible for securing the rack to your motorcycle., checking the attachments prior to use and periodically inspecting the products
SR8 STEEL RO LLATO R O WNER S HANDBO O K
 SR8 STEEL RO LLATO R O WNER S HANDBO O K WA006SIL Owner s Handbook Page 1 of 12 P A R T S D E S C R I P T I O N WA006SIL Owner s Handbook Page 2 of 12 P E R S O N A L S A F E T Y For your health and comfort,
602 STRINGING MACHINE OWNER'S MANUAL
 PROGRESSION 602 STRINGING MACHINE OWNER'S MANUAL AL Issue 1- April 2000 Copyright 2000 GAMMA Sports - All Rights Reserved PROGRESSION 602 STRINGING MACHINE TABLE OF CONTENTS PAGE 1... WARRANTY PAGE 2...
Folding Dual Suspension MTB. Instruction Manual
 Folding Dual Suspension MTB Instruction Manual Introduction The Stowabike Folding MTB has been made to last and with proper maintenance, it will give you years of enjoyable rides and journeys. The following
DOLOMITE Legacy. Rollator User Manual
 DOLOMITE Legacy en Rollator User Manual This manual MUST be given to the user of the product. BEFORE using this product, read this manual and save for future reference. 2015 Invacare Corporation All rights
222 Schwinn Recumbent Exercise Bike Parts List Full Size Hardware Chart Product Illustration Assembly Instructions
 222 Schwinn Recumbent Exercise Bike Parts List Full Size Hardware Chart Product Illustration Assembly Instructions FITNESS SAFEGUARDS AND WARNINGS Before starting any exercise program, consult with your
SG-7R46 SG-7R45 BR-IM41-R CJ-7S40 WARNING CAUTION SERVICE INSTRUCTIONS. Inter-7 Hub. Inter-M Brake Cassette joint NOTE:
 t WARNING It is important to completely understand the operation of your bicycle's brake system. Improper use of your bicycle's brake system may result in a loss of control or an accident, which could
E-trike Li Assembly Guide
 PREPARATION 1. Read this assembly manual BEFORE commencing assembly. 2. Carefully remove all the components and packaged hardware from the shipping boxes. 3. Unpack the contents of the large double box
Operator s Manual Series 2400 Material Lift
 October 2013 Operator s Manual Series 2400 Material Lift USA 7514 Alabonson Rd. Houston, TX 77088 ph: 281-999-6900 fax: 281-999-6966 CANADA 75 Saltsman Drive, Unit 5 Cambridge, Ontario N3H 4R7 ph: 519-653-5300
C - SERIES. Height Adjustable Portable Goal Supports. Installation & Owner s Instructions C1000 C2000. Made in the USA
 C - SERIES Height Adjustable Portable Goal Supports C1000 C2000 Installation & Owner s Instructions Made in the USA This manual explains the proper installation, operation, and maintenance of your Schutt
Final Assembly Instructions Bikes with 16 Wheel Size
 Final Assembly Instructions Bikes with 16 Wheel Size Thank you for buying your new bicycle from L.L.Bean. Read these instructions carefully before beginning the final assembly. Prior to shipping, our expert
Final Assembly Instructions Bikes with Threaded Headsets
 Final Assembly Instructions Bikes with Threaded Headsets Thank you for buying your new bicycle from L.L.Bean. Read these instructions carefully before beginning the final assembly. Prior to shipping, our
Congratulations on your purchase of a JC Series Performer trike! The Performer JC Series is designed for everything from touring to commuting and
 Congratulations on your purchase of a JC Series Performer trike! The Performer JC Series is designed for everything from touring to commuting and shopping in the city. The JC Series frames are made of
IMPORTANT:KEEP THESE INSTRUCTIONS FOR FUTURE REFERENCE. ROCK A BABY BABY ROCKER WITH TOY BAR INSTRUCTION BOOK Series LX9068
 IMPORTANT:KEEP THESE INSTRUCTIONS FOR FUTURE REFERENCE ROCK A BABY BABY ROCKER WITH TOY BAR INSTRUCTION BOOK Series LX9068 WARNINGS ALWAYS FOLLOW THE MANUFACTURERS INSTRUCTIONS. READ ALL INSTRUCTIONS CAREFULLY
RO LLATO R (R6 and R8) O W NER S HANDBO O K
 O W NER S HANDBO O K") RO LLATO R (R6 and R8) O W NER S HANDBO O K R6/R8 Owner s Handbook (Z25988 Rev B) Page 1 of 12 C O N T E N T S 1. Contents 2. Introduction 3. Parts Description 4. Personal Safety 5. Adjustments for Comfort
RO LLATO R (R6 and R8) O W NER S HANDBO O K R6/R8 Owner s Handbook (Z25988 Rev B) Page 1 of 12 C O N T E N T S 1. Contents 2. Introduction 3. Parts Description 4. Personal Safety 5. Adjustments for Comfort
Parts List. 7. Handlebars 8. Grips 9. Handlebar Stem 10. Front Brake 11. Front Wheel 12. Crank 13. Chain
 Woodworm Cruise Parts List 1. Free Wheel with Rear Hub 2. Fenders 3. Fender Stay 4. Quick Release 5. Saddle 6. Seat Post 7. Handlebars 8. Grips 9. Handlebar Stem 10. Front Brake 11. Front Wheel 12. Crank
USER S MANUAL QUESTIONS? CAUTION. Model No. FMEX Serial No. Write the serial number in the space above for reference. Serial Number Decal
 Model No. FMEX81110.0 Serial No. Write the serial number in the space above for reference. USER S MANUAL Serial Number Decal QUESTIONS? If you have questions, or if parts are damaged or missing, please
Final Assembly Instructions Bikes with Quill Stems
 Final Assembly Instructions Bikes with Quill Stems Thank you for buying your new bicycle from L.L.Bean. Read these instructions carefully before beginning the final assembly. Prior to shipping, our expert
SPINNER RIDE GETTING STARTED GUIDE. Welcome to a personalized fitness experience for your members
 This addendum accompanies your equipment documentation and is additional information concerning the heart rate features for your equipment and console. Important The heart rate feature is intended for
Installation Instructions for the AlphaDeck Staging System
 Installation Instructions for the AlphaDeck Staging System Step 1 - Preparation A. Before setting up this system, determine the location of the stages and all the parts you will need. B. Read through the
Freestander USER MANUAL
 Freestander USER MANUAL The Leckey Freestander has been designed to promote weight bearing and mid line symmetry. This manual shows you how you can quickly and easily make use of all of the functions.
Shimano Di2 Installation on S5
 Installing Shimano Dura Ace Di2 Shifting Systems Note these instructions and pictures are for assembling the Shimano Dura Ace Di2 system (Internal Spec) on the Cervélo S5 frame. The Shimano Ultegra Di2
USER GUIDE TO POWER ASSISTED BIKES
 USER GUIDE TO POWER ASSISTED BIKES 1 PAGE CONTENTS Page. 3 Unpacking Page. 3-4 Easy steps to get started Page. 5 General Assembly Instructions Page. 6 Aligning H/Bars, Page. 7 Tightening pedals onto Crank
TRAILMATE METEOR ASSEMBLY MANUAL
 TRAILMATE METEOR ASSEMBLY MANUAL (DISC BRAKE VERSION) The Trailmate Meteor recumbent has been designed for easy assembly. This means more time to enjoy the smooth ride with single speed, 3 speed coaster
Item N o.: Item N am e:40cm Boys Rival Bike
 Item N o.:42272892 Item N am e:40cm Boys Rival Bike 9 bell 8 grip 30 crash pad 10 brake lever 26 wheel reflector 22 saddle 23 seat post 25 rear reflector 24 quick release 6 handle bar 7 stem 2 top tube
Foldable Magne c Exercise Bike
 ASSEMBLY INSTRUCTIONS Foldable Magne c Exercise Bike CAUTION! Please make sure the pedals are attached to the correct sides, L to left and R to right. Screw in the right pedal clockwise and the left counter-clockwise.
Lil Fun Walker ASSEMBLY INSTRUCTIONS ADULT ASSEMBLY REQUIRED Styles and colors may vary
 Lil Fun Walker ASSEMBLY INSTRUCTIONS ADULT ASSEMBLY REQUIRED Styles and colors may vary Required: Phillips Screwdriver IMPORTANT: Read all instructions before assembly and use of the Walker Keep the instructions
X-6 STRINGING MACHINE OWNER'S MANUAL. Issue 1 - May Copyright 2004 GAMMA Sports - All Rights Reserved
 X-6 STRINGING MACHINE OWNER'S MANUAL Issue 1 - May 2004 Copyright 2004 GAMMA Sports - All Rights Reserved OWNER'S MANUAL GAMMA X-6 TABLE OF CONTENTS PAGE 1... WARRANTY PAGE 2... FEATURES PAGE 3...ASSEMBLY
U.S. Patent No. 7,922,246. Patents Pending
 U.S. Patent No. 7,922,246 Patents Pending 2 Table of Contents Page General Information... 3 Warnings and Cautions... 4 Tools... 6 SmartDock Parts... 6 Initial Set-Up and Adjustment... 7 Select Valve Retaining
Instructions. Follow All Instructions Before Assembling Or Using This Product
 Instructions Follow All Instructions Before Assembling Or Using This Product IMPORTANT DO NOT RETURN THIS PRODUCT TO THE RETAIL STORE WHERE PURCHASED. CALL TOLL FREE: (800) 492-9334 WARNING: Improper use
TWO BIKE UPRIGHT ROOF MOUNT BIKE CARRIER
 TWO IKE UPRIGT ROOF OUNT IKE CRRIER NOTE: Please read instructions carefully before installation. Please refer to assembly instructions, and ensure the bike carrier is installed correctly. Please keep
P Pod Postural Support System
 P Pod Postural Support System APP-1000XS APP-2000S APP-3000M APP-4000L APP-5000XL www.inspiredbydrive.com WARNING! Read ALL instructions before using this product! IMPORTANT SAFETY RULES Determine, with
OWNER'S MANUAL. Copyright 2003 GAMMA - All Rights Reserved
 OWNER'S MANUAL AL Issue 1 - December 2003 Copyright 2003 GAMMA - All Rights Reserved OWNER'S MANUAL TABLE OF CONTENTS PAGE 1... WARRANTY PAGE 2... ASSEMBLY INSTRUCTIONS PAGE 4... MOUNTING THE RACQUET PAGE
44in Side Discharge Mower for Wheel Horse XL 440H Lawn Tractors Model No Serial No and Up
 Form No. 5-8 in Side Discharge Mower for Wheel Horse XL 0H Lawn Tractors Model No. 790 Serial No. 5000000 and Up Operator s Manual Register your product at www.toro.com Original Instructions (EN) Contents
BackCountry ebikes 2019 MULE Assembly
 BackCountry ebikes 2019 MULE Assembly Required Tools: Cutting Pliers (to cut box poly strapping and heavy bike banding) Scissors (to remove bubble wrap) Allen wrenches (3mm, 4mm, 5mm, 6mm) Wrenches (10mm,
Owner s Manual. The most comfortable upright bicycles ever made.
 Owner s Manual The most comfortable upright bicycles ever made. At Day 6, we hope you will enjoy riding our bicycles as much as we enjoy designing them. We have truly combined the best features of a recumbent
Shoreline Cantilever Lift 2500lb Capacity Models: (108" inside width) - Part # (120" inside width) - Part #
 - Part # (120 inside width) - Part #") Shoreline Cantilever Lift 2500lb Capacity Models: 25108 (108" inside width) - Part # 1017402 25120 (120" inside width) - Part # 1017403 1. 2. 3. 4. 5. CAUTION - PUT SAFETY FIRST Before attempting to install
Shoreline Cantilever Lift 2500lb Capacity Models: 25108 (108" inside width) - Part # 1017402 25120 (120" inside width) - Part # 1017403 1. 2. 3. 4. 5. CAUTION - PUT SAFETY FIRST Before attempting to install
1.0 - OPENING AND CLOSING THE DOOR
 The purpose of this manual is to provide the user with instructions on how to safely open and close, how to conduct routine maintenance, and how to install the PEI TWINLOCK Closure on a pressure vessel.
MAGNETIC INDOOR CYCLING BIKE
 MAGNETIC INDOOR CYCLING BIKE SF-B1805 USER MANUAL IMPORTANT! Please retain owner s manual for maintenance and adjustment instructions. Your satisfaction is very important to us, PLEASE DO NOT RETURN UNTIL
Tru Trak Sulky Proline Mid Size Mower Attachment
 Form No. -7 Tru Trak Sulky Proline Mid Size Mower Attachment Model No. 00 000000 and Up Operator s Manual Domestic English (EN) Contents Page Introduction................................ Safety.....................................
All Terrain Switch Board TM Instructions
 All Terrain Switch Board TM Instructions Model Number: 77207 Please keep these instructions for future reference, as they contain important information No assembly is required. Adult assistance is required
Item Name: 30CM GIRLS STAR THE UNICORN BIKE
 Item No.: 42333753 Item Name: 30CM GIRLS STAR THE UNICORN BIKE Contents 1. Parts identification 1 2. Safety precautions 2 3. Check list 6 4. Assembly 7 5. Adjustment 14 6. Repair and Service 15 7. Warranty
OWNER'S MANUAL. Copyright 1999 ATS - All Rights Reserved
 OWNER'S MANUAL AL Issue 2 - August 19, 1999 Copyright 1999 ATS - All Rights Reserved OWNER'S MANUAL TABLE OF CONTENTS PAGE 1... WARRANTY PAGE 2... ASSEMBLY INSTRUCTIONS PAGE 4... MOUNTING THE RACQUET PAGE
Operator s Manual. 2010, 2015, 2020, 2025 Material Lifts
 July 2017 Operator s Manual 2010, 2015, 2020, 2025 Material Lifts! Before operating this lift, read and understand this Operator s Manual. Become familiar with the potential hazards of this unit. Call
Operator s Manual. Series 2100 Contractor Lifts
 October 2013 Operator s Manual Series 2100 Contractor Lifts! Before operating this lift, read and understand this Operator s Manual. Become familiar with the potential hazards of this unit. Call SUMNER
SERIES 2 RAMP OWNER S MANUAL TOOLS REQUIRED: BEFORE YOU BEGIN... Read and understand these instructions before beginning a ramp setup.
 SERIES 2 RAMP OWNER S MANUAL BEFORE YOU BEGIN... Read and understand these instructions before beginning a ramp setup. Use caution and care for your back when lifting, pushing, pulling, folding or unfolding
Rev C /05
 Stair-PRO Stair Chair Operations Manual 6251 6252 EN 6252-009-001 Rev C.0 2018/05 Symbols Operating instructions/consult instructions for use CE mark European authorized representative General warning
Superstand HLT. Standing System OWNER S MANUAL. ***Note*** Read Owner s Manual before use.
 Superstand HLT Standing System OWNER S MANUAL ***Note*** Read Owner s Manual before use. Manufactured By Prime Engineering A Division of Axiom Industries, Inc. 04-15_SSHLT_OM TABLE OF CONTENTS This owner
IMPORTANT SAFETY NOTICE
 OWNER S MANUAL NOTE: Any photos of the YBIKE or decals in the owner s manual are intended to be used as a reference only, and there may be some differences to the unit you purchased. IMPORTANT SAFETY NOTICE
DIP STATION WITH SAFETY CONNECTOR SF-BH6507 USER MANUAL
 DIP STATION WITH SAFETY CONNECTOR SF-BH6507 USER MANUAL IMPORTANT: Read all instructions carefully before using this product. Retain owner s manual for future reference. For customer service, please contact:
FAILURE TO COMPLY WITH THE MANUFACTURER S INSTRUCTIONS CAN LEAD TO SERIOUS INJURY OR DEATH OF THE PASSENGER/RIDER!
 FAILURE TO COMPLY WITH THE MANUFACTURER S INSTRUCTIONS CAN LEAD TO SERIOUS INJURY OR DEATH OF THE PASSGER/RIDER! Installation instructions for the Yepp Mini The Yepp Mini is suitable for carrying children
POWER ASSISTED BICYCLES OWNERS MANUAL
 POWER ASSISTED BICYCLES OWNERS MANUAL WE HAVE INCLUDED A BICYCLE OWNER S MANUAL WHICH YOU SHOULD REFER TO FOR ALL GENERAL CYCLE MAINTENANCE. CONTENTS Page. 3 Unpacking. Page. 3-4 Easy steps to get started.
Trampoline & Enclosure Assembly Instructions
 Trampoline & Enclosure Assembly Instructions Safe user weight 250 lbs (115 kg) Version 718602 The information in this document is subject to change without notice. Copyright Springfree Trampoline Inc.
OPERATOR'S MANUAL. TOTALIFT - II LATERAL TRANSFER / TRANSPORT CHAIR Model No R02 AN
 OPERATOR'S MANUAL TOTALIFT - II LATERAL TRANSFER / TRANSPORT CHAIR Model No. 90600 5-01031-00 R02 AN 180201 WARRANTY Wy East Medical Corporation warrants to the original user that the TotaLift-II Transfer-Transport
INSTALLATION INSTRUCTIONS. Parts List. Tools Required. Before You Begin. Installation. Customer Information BICYCLE ATTACHMENT JUL.
 INSTALLATION INSTRUCTIONS JUL. 2006 Parts List Bicycle attachment Key plates (2) Tools Required Phillips screwdriver Flat-tip screwdriver Before You Begin Customer Information This Bicycle Attachment is