Aqua Jump Eclipse Bongo 20 (Models AJ150/AJ200 and Bongo 20) Anchor Harness Instruction Manual
|
|
|
- Jeffry Rich
- 5 years ago
- Views:
Transcription

1 Aqua Jump Eclipse Bongo 20 (Models AJ150/AJ200 and Bongo 20) Anchor Harness Instruction Manual Copyright All rights reserved. No part of this publication may be reproduced or transmitted in any form or by any means, electronic or mechanical, including photocopy, recording, or any information storage and retrieval system, without permission in writing from the publisher. Requests should be mailed to RAVE Sports, 3325 Labore Road, Saint Paul, Minn
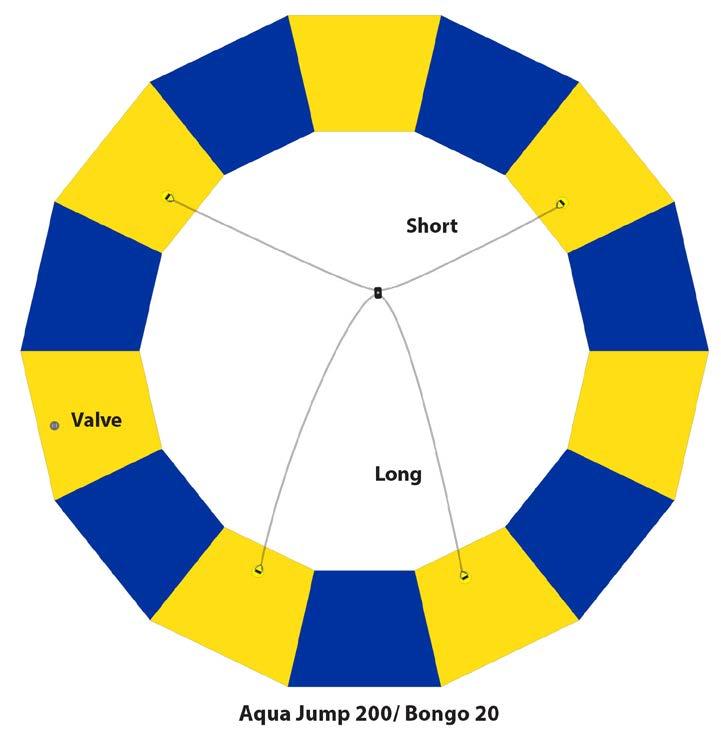
2 Preparation Lay the Aqua Jump Eclipse or Bongo 20 on a flat surface. Make sure there are no sharp objects under the product that might puncture the tube. Ensure the tube is completely opened and the top is facing up. Locate the valve and inflate the tube to about 2/3rds full (The anchor harness will be the first item to be attached. Do not attach the surface and springs to the tube at this time). While standing inside the partially inflated tube, spread the Anchor Harness out onto the ground. With the ropes completely spread out, ensure the ropes are untangled and not crossing each other. All RAVE anchor harnesses are made using an offset design with a swivel. This allows maximum holding force in high winds. The AJ150 Anchor Harness will have one long rope running THOUGH the hole in the nylon glide assembly and one shorter rope tied directly to the other side of the nylon glide. The AJ200/Bongo20 Anchor Harness has one long rope and one shorter rope but both ropes pass freely through the left/right holes of the nylon glide assembly. The glide must be free to slide along both ropes in order to maintain equal tension on all ropes, regardless of wind direction. Ensure both ropes are not tangled or crossed and that the glide is free to slide along both. Installation With the Anchor Harness evenly spread out inside the tube, identify between the long anchor harness rope, and the short rope. Identify the size of product you have to the diagrams on the next page. Connect the end of each rope to the corresponding panel of the Aqua Jump/Bongo. If you are unsure as to the size of the product you own, count the number of panels on your inflatable tube, and match the number of panels to the diagram. 1

3 2

.")
4 While looking at the appropriate diagram, locate the panel on the diagram labeled VALVE and match the diagram to the inflation valve location on your tube. This will tell you where to attach the long rope and the short rope to the appropriate locations on the tube. The harness will be attached to the triangular-shaped quick-link on each anchor plate. Ensure the triangular quick-link is completely open by rotating the nut counter-clockwise. Attach the loop end of the rope into the quicklink and close completely by rotating clockwise until tight. Repeat for all rope ends. IMPORTANT With each anchor harness end attached to the tube, ensure the nylon glide is free to slide smoothly along the rope(s). Finish assembling & inflating your product, move it to the water and attach your anchor line. Attach anchor line to the stainless steel pivoting ring. 3 Attach anchor line here
5 Recommendation For simple installation year after year, it is recommended to mark each attachment position. Under each attachment point, use a permanent marker to mark the location on the inflatable tube where each rope is clipped by marking L for long rope and S for short rope. This will assist you in attaching the harness in the future, and the marks will be hidden when the trampoline is fully assembled. Inspect the nylon glide periodically to ensure it is sliding freely along the ropes. Remove weeds, foliage, or tangles that may prevent the glide from sliding properly. This movement of the glide along the ropes is necessary to maintain equal tension on the harness ropes and helps prevent flipping of your trampoline in high winds. Also inspect the stainless steel swivel periodically to ensure it is free to rotate. This is critical to prevent twisting and damage to your anchor rope. Inspect the entire Anchor Harness each year before attaching, and replace it if necessary. The following conditions could result in potential hazards or damage to your product: Fraying or deterioration of the rope. Corrosion or debris preventing the stainless steel anchoring ring on the glide from spinning freely. Foliage or debris preventing the glide from sliding freely along the ropes. Inspect and correct, or replace as necessary, to ensure proper function and performance of your anchoring system. 4
6 Contact RAVE Customer Service with any questions. 5

7 6

8 RAVE Sports 3325 Labore Road Saint Paul, MN December
Anchor Harness Instruction Manual
 Anchor Harness Instruction Manual (For models: AJ150, AJ200 AND BONGO 20) Water Sports Equipment Preparation Lay the Aqua Jump Eclipse or Bongo 20 on a flat surface. Make sure there are no sharp objects
Aqua Attachments Owner s Manual
 Aqua Attachments Owner s Manual Introduction Thank you for purchasing a RAVE Sports Aqua Attachment. Water sports can be safe and fun for all levels of enthusiasts. This Owner s Manual is presented to
Pontoon Slide Owner s Manual
 Pontoon Slide Owner s Manual www.ravesports.com Table of Contents Introduction... 2 Safety rules and information... 3 Boat compatibility guide.5 Assembling and using your Pontoon Slide... 6 Cleaning and
Storm Owner s Manual
 Storm Owner s Manual www.ravesports.com Table of Contents Product instructions and warnings... 3 Water sports safety code... 8 Inflating instructions... 11 Troubleshooting... 12 Cleaning and storage...
Aqua Buddy Owner s Manual
 Aqua Buddy Owner s Manual www.ravesports.com Table of Contents Product instructions and warnings... 2 Instructions on how to use product...3 Water sports safety code... 5 Inflating instructions... 8 Troubleshooting...
Sea Rebel Kayak Owner s Manual
 Sea Rebel Kayak Owner s Manual www.ravesports.com Table of Contents Product instructions and warnings...2 Inflating instructions...3 Proper use.. 4 Deflating and storage.........6 Cleaning and troubleshooting...8
RAVE Inflatable Pool/Social Floats
 RAVE Inflatable Pool/Social Floats www.ravesports.com Thank you for purchasing this RAVE product. It has been designed and constructed to provide you and your family lasting memories of hours of exciting
Owner s Manual. Water Sports Equipment
 Owner s Manual Water Sports Equipment Introduction Thank you for purchasing a RAVE Sports Whoosh products. This Owner s Manual is presented to enhance your enjoyment of the sport and is intended to alert
Pontoon Slide Owner s Manual
 Pontoon Slide Owner s Manual WWW.RAVESPORTS.COM Copyright 2018 All rights reserved. No part of this publication may be reproduced or transmitted in any form or by any means, electronic or mechanical, including
Aqua Jump Eclipse Owner s Manual
 Aqua Jump Eclipse Owner s Manual Package Contents: Aqua Jump Eclipse 120: 1 Inflatable Tube 1 Safety Pad 1 Jump Surface 1 Repair Kit 70-5-1/4 Springs 1-3-Step Ladder w/stabilizer 1-Anchor connections system
EZee Glider Manual. Tools needed for Assembly: Wrench (included) Philips Screwdriver (not included) Assembly Instructions
 Philips Screwdriver (not included) Assembly Instructions") EZee Glider Manual Congratulations on your purchase of the EZee Glider! Your glider is designed for years of nearly carefree use by your child. These instructions include how to set up your glider and
EZee Glider Manual Congratulations on your purchase of the EZee Glider! Your glider is designed for years of nearly carefree use by your child. These instructions include how to set up your glider and
EZ Set Ice Rink- 200 & 400 Owner s Manual
 EZ Set Ice Rink- 200 & 400 Owner s Manual WWW.RAVESPORTS.COM Copyright 2017 All rights reserved. No part of this publication may be reproduced or transmitted in any form or by any means, electronic or
Bongo Owner s Manual. 10-FOOT MODEL (shown) 13-FOOT MODEL
 13-FOOT MODEL") Bongo Owner s Manual 10-FOOT MODEL (shown) 13-FOOT MODEL Table of Contents Introduction. 2 Safety Rules and Information.. 3 Inflating Your Bongo........ 5 Assembling and attaching the ladder......... 6
Bongo Owner s Manual 10-FOOT MODEL (shown) 13-FOOT MODEL Table of Contents Introduction. 2 Safety Rules and Information.. 3 Inflating Your Bongo........ 5 Assembling and attaching the ladder......... 6
Aqua Tower Slide Owner s Manual
 Aqua Tower Slide Owner s Manual 800-659-0790 www.ravesports.com Table of Contents Introduction......2 Safety Rules and Information......3-5 Assembling Your Slide.............5-8 Cleaning and Storage......
Palau and Hibiscus Inflatable SUP Board Owner s Manual
 Palau and Hibiscus Inflatable SUP Board Owner s Manual www.ravesports.com Table of Contents Warnings...3 Safety.. 4 Equipment. 5 Set up.. 6 How to use SUP Board. 8 Deflation.. 9 Cleaning, storage and repair....10
Fall Protection PPE Inspection
 Fall Protection PPE Inspection Fall Protection Equipment All Personal Protective Equipment (PPE) shall be inspected when issued, prior to each use and on a regular basis If found defective it should be
Mini Glider Manual. Your Glider comes partially assembled. The front wheel and the handlebars require assembly.
 Mini Glider Manual Congratulations on your purchase of the Mini Glider! Your glider is designed for years of nearly carefree use by your child. These instructions include how to set up your glider and
Portable Massage Table
 User Manual [Revision 3.0 January 2018] READ THIS MANUAL CAREFULLY BEFORE USE FAILURE TO DO SO MAY RESULT IN INJURY, PROPERTY DAMAGE AND MAY VOID WARRANTY. KEEP THIS MANUAL FOR FUTURE REFERENCE. Products
Outback Inflatable SUP Board Owner s Manual
 Outback Inflatable SUP Board Owner s Manual www.ravesports.com Table of Contents Warnings....3 Safety...4 Equipment..5 Set up...5 How to use SUP Board.6 Deflation...6 Cleaning, storage and repair...7 Limited
User Instruction Manual Fixed Beam Anchor
 User Instruction Manual Fixed Beam Anchor This manual is intended to meet the Manufacturer s Instructions as required by ANSI Z359.1 and ANSI A10.14, and should be used as part of an employee training
CBP LPU- 40 Flotation Collar User s Manual
 CBP LPU- 40 Flotation Collar User s Manual January 2015 Capewell Aerial Systems LLC 4298 JEB Stuart Hwy Meadows of Dan, VA 24120 www.aerialmachineandtool.com Phone: 276-952-2006 FAX: 276-952-2231 Table
Mambo Operator s Manual
 Mambo Operator s Manual 1-800-659-0790 www.ravesports.com Table of Contents Product Instructions and Warnings 2 Water Sports Safety Code.... 7 Inflating Instructions... 10 Towing Recommendations.... 11
Assembly Instructions. -Cantilever Boat Lifts
 Assembly Instructions -Cantilever Boat Lifts Winch Instruction Page Safety Information 1. The winch is built for the multipurpose of hauling and lifting operations. It is not to be used as a hoist for
THOR 10 HAMMER CAGE INSTRUCTIONS
 75 " 7m 78 4" m 6" 8.8m 45 ".70m 4.9deg 6 4" 6m 44 4".67m 75 " 7m 9 4" 0m 44".m 497 4".64m The 70, Thor Hammer Cage, consists of four heavy duty aluminum net poles. The unique pole structure reduces the
CATALOGUE. in US Customary Unit System BULWAGGA ANCHOR. When you really need to be sure! SOLAREKS
 CATALOGUE in US Customary Unit System When you really need to be sure! ABOUT BULWAGGA Bulwagga is the new word in the world of anchors. The concept behind the Bulwagga is fairly straightforward. Its three
LPU- 40 Flotation Collar
 105 Nutmeg Road South South Windsor, CT 06074 sales@capewell.com P: 860.610.0700 www.capewell.com LPU- 40 Flotation Collar User s Manual List of Revisions or Amendments Date Revision or Amendment 12 January
1.2 LIMITATIONS: Consider the following application limitations before using this equipment:
 User Instruction Manual Standing Seam Roof Anchor This manual is intended to meet the Manufacturer s Instructions, and should be used as part of an employee training program as required by OSHA. Figure
THE DANGERS ARE SHARP EDGES YOUR BEST DEFENCE IS NANO-LOK EDGE [WEB]
![THE DANGERS ARE SHARP EDGES YOUR BEST DEFENCE IS NANO-LOK EDGE [WEB]](/thumbs/89/100338331.jpg "THE DANGERS ARE SHARP EDGES YOUR BEST DEFENCE IS NANO-LOK EDGE [WEB]") THE DANGERS ARE SHARP EDGES YOUR BEST DEFENCE IS NANO-LOK EDGE [WEB] SHARP EDGE SAFETY. MAKE SURE WITH NANO-LOK EDGE [WEB] Sharp edges. You can t see them. You don t know where they are. But for workers
THE DANGERS ARE SHARP EDGES YOUR BEST DEFENCE IS NANO-LOK EDGE [WEB] SHARP EDGE SAFETY. MAKE SURE WITH NANO-LOK EDGE [WEB] Sharp edges. You can t see them. You don t know where they are. But for workers
Figure 1 - Parts Identification
 Instructions for the following series products: Zorbit Energy Absorber Kits (See back page for specific model numbers.) User Instruction Manual Zorbit Energy Absorber Kits for Horizontal Lifeline Systems
CATALOGUE. in Metric Unit System BULWAGGA ANCHOR. When you really need to be sure! SOLAREKS
 CATALOGUE in Metric Unit System When you really need to be sure! ABOUT BULWAGGA Bulwagga is the new word in the world of anchors. The concept behind the Bulwagga is fairly straightforward. Its three large
First Team Sports, Inc. Blast Recreational Volleyball System
 First Team Sports, Inc. Blast Recreational Volleyball System BILL OF MATERIALS A 2 Volleyball Vertical Post K 1 ½ Centerlock Nut B 3 Net Clamp L 2 Carabiner Clip C 1 Pulley Clamp M 1 ½ x 2 Hex Bolt D 4
EUROBUNGY-TRAMPOLINE
 EUROBUNGY-TRAMPOLINE Set-up instructions of the new model 2004-2010 Photos are taken with the long and short Trailer WARNING for EUROBUNGIES without hydraulic rams There is a potential risk that a pole
Wellhead Mast. Installation and Operation Guide. Nanometrics Inc. Kanata, Ontario Canada
 Installation and Operation Guide Nanometrics Inc. Kanata, Ontario Canada 2001 2005 Nanometrics Inc. All Rights Reserved. Installation and Operation Guide The information in this document has been carefully
Reliance Industries, LLC. Installation, Operation, Inspection and Maintenance Instructions for the Skyline Horizontal Lifeline System
 Reliance Industries, LLC Installation, Operation, Inspection and Maintenance Instructions for the Skyline Horizontal Lifeline System 6310 Portable Lifeline System using 3/8 7x19 Steel Wire Rope with the
Reliance Industries, LLC. Installation, Operation, Inspection and Maintenance Instructions for the Skyline Horizontal Lifeline System
 Reliance Industries, LLC Installation, Operation, Inspection and Maintenance Instructions for the Skyline Horizontal Lifeline System 6360 Portable Looped Rebar Lifeline System using 3/8 7x19 Steel Wire
Trampoline & Enclosure Assembly Instructions
 Trampoline & Enclosure Assembly Instructions Safe user weight 330 lbs (150 kg) Version 718702 The information in this document is subject to change without notice. Copyright Springfree Trampoline Inc.
ANNUAL SELF INSPECTION AND SERVICE INSTRUCTIONS
 ANNUAL SELF INSPECTION AND SERVICE INSTRUCTIONS 14-12-17 INFLATABLES PFD S ANNUAL SELF INSPECTION AND SERVICE INSTRUCTIONS It is recommended that an accredited service agent conducts a full inspection
SIDE 16 Sidemount System User Manual
 SIDE 16 Sidemount System User Manual Version 1.1, April 15, 2014 Disclaimer This document is proprietary to Scubatech Sp. z o. o. ("Scubatech") and no ownership rights are hereby transferred. No part of
QUALITY ALUMINUM BOAT LIFTS, INC. INSTRUCTIONS. Dominator Lake Lift
 INSTRUCTIONS Dominator Lake Lift PHONE:251-986-3882 * FAX:251-986-3136 QABLDOMINATORINST.2014 P a g e 1 Quality Aluminum Boat Lifts, INC. Installation Instructions: Dominator Lake Lift Thank you for your
Rapid Survival System
 Rapid Survival System Model W User Manual Emergency Floatation for Moving Water Self Rescue Version 10.02 Contents User Manual... 1 Part 1: Description and Function... 3 Part 2: Package Contents... 3 Part
LTS BCD USER GUIDE. Hollis (2014) Doc r01 (8/29/14)
 Doc r01 (8/29/14)") LTS BCD USER GUIDE Contents NOTICES...3 DANGERS, WARNINGS, CAUTIONS, & NOTES...3 WARNINGS...4 INTRODUCTION...5 CARE AND MAINTENANCE...5 INFLATOR AND DUMP VALVE USE...6 ATTACHING A TANK...7 INTEGRATED WEIGHT
LTS BCD USER GUIDE Contents NOTICES...3 DANGERS, WARNINGS, CAUTIONS, & NOTES...3 WARNINGS...4 INTRODUCTION...5 CARE AND MAINTENANCE...5 INFLATOR AND DUMP VALVE USE...6 ATTACHING A TANK...7 INTEGRATED WEIGHT
CABLES-ONLY SYSTEM PRODUCT GUIDE
 CABLES-ONLY SYSTEM PRODUCT GUIDE Phantom Indoor Batting Cage CABLES-ONLY SYSTEM This cables-only system is engineered to maximize your interior space. This guide will walk you through setting up your wall
Trampoline & Enclosure Assembly Instructions
 Trampoline & Enclosure Assembly Instructions Safe user weight 250 lbs (115 kg) Version 718602 The information in this document is subject to change without notice. Copyright Springfree Trampoline Inc.
MODEL SWH10 1,000 LB CAPACITY SWIVEL HOIST
 MODEL SWH10 1,000 LB CAPACITY SWIVEL HOIST PARTS BREAKDOWN AND OPERATING MANUAL Copyright 2007, Arcan Professional Tools Rev: 05/15/07 This operating manual contains important safety information. Read
User Instruction Manual Fixed Beam Anchor
 Instructions for the following series products: FIXED BEAM ANCHOR Model Numbers: The Ultimate in Fall Protection 2108406 2108407 2108408 2108409 2108410 2108411 User Instruction Manual Fixed Beam Anchor
Island Hopper Gator Monster Head & Tail Water Trampoline Attachments
 Island Hopper Gator Monster Head & Tail Water Trampoline Attachments Aqua Sports Technology 11859 Lakeshore North, Auburn, CA 95602 530 268-7310 www.watertrampolines.com Table of Contents Introduction.....2
inflatables pfd s ANNUAL SELF INSPECTION AND SERVICE INSTRUCTIONS
 inflatables pfd s ANNUAL SELF INSPECTION AND SERVICE INSTRUCTIONS inflatables pfd s ANNUAL SELF INSPECTION AND SERVICE INSTRUCTIONS It is recommended that an accredited service agent conducts a full inspection
12 Saturn Owner s Manual
 12 Saturn Owner s Manual Water Sports Equipment Inflation, set up and supervision must be done by a mature and knowledgeable adult! Inspect product for any unsafe conditions before use! Do not use if repair
Instruction Manual for ZY-021 Height adjustable Acrylic Backboard with Chain net
 Instruction Manual for ZY-021 Height adjustable Acrylic Backboard with Chain net WARNING: IMPROPER INSTALLATION OR SWINGING ON THE RING MAY CAUSE SERIOUS INJURY OR DEATH Notice to assemblers: All basketball
Lab # 3 -- Ropework. In this exercise the student will learn to work with rope by making a rope halter, splicing the rope, and tying common knots.
 Description: Lab # 3 -- Ropework Name In this exercise the student will learn to work with rope by making a rope halter, splicing the rope, and tying common knots. Materials: 15' -- 1/2 polypropylene rope
Figure 1 - Snap Hooks and Carabiners PART NUMBER MANUFACTURER S ID YEAR OF MANUFACTURE PART NUMBER MANUFACTURER S ID YEAR OF MANUFACTURE
 Instructions for the following series products: SNAP HOOKS AND CARABINERS (See back page for specific model numbers.) User Instruction Manual Snap Hooks and Carabiners This manual is intended to meet the
Only. Gives You the TechLock. System Advantage ASSEMBLY, DISASSEMBLY AND TROUBLESHOOTING INSTRUCTIONS FOR 3000 SERIES FONTAINE
 April 00 Only Gives You the TechLock System Advantage ASSEMBLY, DISASSEMBLY AND TROUBLESHOOTING INSTRUCTIONS FOR 000 SERIES FONTAINE C o n n e c t y o u r b u s i n e s s w i t h F O N T A I N E April
Navaro Buggy Instruction Manual INSTRUCTION BOOKLET
 INSTRUCTION BOOKLET Safety Thank you for purchasing your new Flexifoil buggy. If operated and looked after properly, your new buggy will serve you well. Before assembling and using this buggy, you must
User s Manual. Model SWTC800. CAUTION: Adult Assembly Required
 User s Manual Model SWTC800 CAUTION: Adult Assembly Required Model SWTC800...3...4...4...5...6.........8...9...10-11 Part Identification Chart... 12 Exploded Drawing and Parts List...13-14 Ordering Replacement
Fontaine Fifth Wheel Ultra LT Rebuild Procedures
 Fontaine Fifth Wheel Ultra LT Rebuild Procedures Disassembly Assembly Adjustments 800-874-9780 2010 LT-147 January 2010 Dissassembly Cover plate removed for clarity. Refer to exploded view of assembly
Inflatable Ice Rink Owner s Manual
 Inflatable Ice Rink Owner s Manual 10ft x 13ft model shown www.ravesports.com Copyright 2016 All rights reserved. No part of this publication may be reproduced or transmitted in any form or by any means,
SIGNATURE DEF REELS Models: Bare Reel Reel Reel Reel
 SERVICE BULLETIN SB2023 Rev C 7/11 SIGNATURE DEF REELS Models: 2400-006 Bare Reel 2400-007 16 Reel 2400-008 20 Reel 2400-009 30 Reel Thoroughly read and understand this manual before installing, operating
Model: 7200 Collegiate Volleyball System
 Model: 7200 Collegiate Volleyball System Installation, Operation and Maintenance Instructions Please read all instructions before attempting installation or operation of these units SAVE THESE INSTRUCTIONS
User Instructions 1789 Parapet Wall Anchor
 User Instructions 1789 Parapet Wall Anchor This manual is intended to meet the Manufacturer Instructions as required by ANSI Z359.1 and should be used as part of an employee training program as required
RIDE Inc. Rigscape Service Rig Procedures
 2016 RIDE Inc. Rigscape Service Rig Procedures Special Instructions/Conditions of Use Reading user procedure manual prior to use is essential Only persons that have been deemed competent in the operation
15000 Series Exhausting Arm - Wall Mount Models: 15076/15106/15146
 Operation and Maintenance Manual 15000 Series Exhausting Arm - Wall Mount Models: 15076/15106/15146 MONOXIVENT - SOURCE CAPTURE SYSTEMS - info@ Oct. - 2015 Receiving Assembly Information 15000 Series Exhausting
User Instructions Series Descent Device
 User Instructions - 199 Series Descent Device This document serves as the Manufacturer s Instructions, and is to be used as part of an employee training program for the system, as required by OSHA. ATTENTION:
Apex 3 Theory of Operation
 Apex 3 INSTALLATION & OVERVIEW... 2 Load Height... 2 Approach Angle... 2 Footprint... 3 Protrusion... 3 Mounting the Apex3... 4 General Torque Specs... 5 OPERATION OF BIKE RACK... 6 Loading Bikes... 6
Attaching the ball Attach the rope to the underside of the middle of the inflatable. The rope will then attach to the ball using a D-ring.
 General info 29 x29 x13 1 operator required 4 players max at one time Max weight per person 225lbs Minimum height 44 maximum height 80 2 x 1.5 hp blower WRECKING BALL Setup Unroll the inflatable onto a
Figure 1 - Cable Grip Horizontal Lifeline Termination ZORBIT ENERGY ABSORBER RELEASE TAB
 Instructions for the following series products: Cable Grip (See back pages for specific model numbers.) User Instruction Manual Cable Grip Kit for Horizontal Lifeline Systems This manual is provided as
PULLTARP INSTALLATION & OPERATORS MANUAL
 PULLTARP INSTALLATION & OPERATORS MANUAL Step 1. Mounting Positions Determine the mounting position for your truck Fig. 1 - Fig. 7. Fig. 1 Fig. 2 Fig. 3 A Mount Top Or Bottom Roll B Mount Top Or Bottom
First Team Sports, Inc. Stellar Recreational Volleyball System
 First Team Sports, Inc. Stellar Recreational Volleyball System BILL OF MATERIALS A 2 Volleyball Vertical Post K 1 ½ Centerlock Nut B 2 Height Labels L 2 Carabiner Clip C 3 Net Clamp M 1 ½ x 2 Hex Bolt
OPERATION AND INSTRUCTION MANUAL Swivel Anchor Model: SWY100N
 OPERATION AND INSTRUCTION MANUAL Swivel Anchor Model: SWY100N IMPORTANT!!! ALL PERSONS USING THIS EQUIPMENT MUST READ AND UNDERSTAND ALL INSTRUCTIONS. FAILURE TO DO SO MAY RESULT IN SERIOUS INJURY OR DEATH.
OPERATION AND INSTRUCTION MANUAL Swivel Anchor Model: HD26248
 OPERATION AND INSTRUCTION MANUAL Swivel Anchor Model: HD26248 IMPORTANT!!! ALL PERSONS USING THIS EQUIPMENT MUST READ AND UNDERSTAND ALL INSTRUCTIONS. FAILURE TO DO SO MAY RESULT IN SERIOUS INJURY OR DEATH.
68 MEGA OBSTACLE COURSE
 68 MEGA OBSTACLE COURSE General info 68 x13 x16 1-2 operator(s) required 4 passengers max at one time 2 at the start line and 2 going over big slide Max weight per person 225lbs Minimum height 36 2 x 1.0
BRONZE BUSHING REPLACEMENT PROCEDURE DN345 & NL450C
 1 BRONZE BUSHING REPLACEMENT PROCEDURE V.2 12/3/2014 DN345 & NL450C 2 Safety Instructions Removing Walking Beams 3 1. Position spreader on a flat concrete surface capable of supporting weight of spreader
Figure 1 - Parts Identification. Copyright 2002, DB Industries, Inc.
 User Instruction Manual Zorbit Energy Absorber Kits for Horizontal Lifeline Systems This manual is provided as the Maunfacturer s Instructions, and should be used as part of an employee training program
OWNER'S MANUAL FREE FALL ROPE AND CHAIN ANCHOR WINCH. 12 Volt Powered Winch Power-In / Freewheel-out operation. 36', 41' and 46' Class Anchor Winch
 OWNER'S MANUAL 36', 41' and 46' Class Anchor Winch FREE FALL ROPE AND CHAIN ANCHOR WINCH PW46101 12 Volt Powered Winch Power-In / Freewheel-out operation These instructions apply to all models listed.
Shoreline Cantilever Lift 2500lb Capacity Models: (108" inside width) - Part # (120" inside width) - Part #
 - Part # (120 inside width) - Part #") Shoreline Cantilever Lift 2500lb Capacity Models: 25108 (108" inside width) - Part # 1017402 25120 (120" inside width) - Part # 1017403 1. 2. 3. 4. 5. CAUTION - PUT SAFETY FIRST Before attempting to install
Shoreline Cantilever Lift 2500lb Capacity Models: 25108 (108" inside width) - Part # 1017402 25120 (120" inside width) - Part # 1017403 1. 2. 3. 4. 5. CAUTION - PUT SAFETY FIRST Before attempting to install
SURFACE SUPPLIED HARNESS
 SURFACE SUPPLIED HARNESS USER S MANUAL REV 4/10 2 Surface Supplied Harness User s Manual Copyright Notice This owner s manual is copyrighted, all rights reserved. It may not, in whole or in part, be copied,
Installation, Operating, Inspection and Maintenance Instructions Ladder Climber s Safety System. Warning
 OWNER'S MANUAL Installation, Operating, Inspection and Maintenance Instructions Ladder Climber s Safety System Model # s: 6000, 6001, 6010 Warning You must read and fully understand all instructions, or
GREIG FILTERS, INC. OPERATION MANUAL
 GREIG FILTERS, INC. OPERATION MANUAL MODEL DCFH 3P 15/3 100 S4 DOE/222 DUAL CARTRIDGE FILTER HOUSING TABLE OF CONTENTS I. INTRODUCTION II. CARTRIDGE FILTER HOUSING UNIT A. OPERATION B. INSTALLATION C.
Serial Number: Lot Number: Purchase Date: General Factors Accepted / Rejected Supportive Details or Comments. Accepted Rejected.
 Full Body Harness Harness Model: General Factors / Supportive Details or Comments 1.) Hardware: (includes D-rings, buckles, keepers, and back pads) Inspect for damage, distortion, sharp edges, burrs, cracks
DURAS INFLATABLE BOAT OWNER'S MANUAL
 DURAS INFLATABLE BOAT OWNER'S MANUAL Table of Contents About your new Duras Inflatable Boat Page 1 Assembly Instruction Page 3 Motor Installation Page 5 Capacities Page 5 Troubleshooting Page 6 Using
Pontoon Slide Owner s Manual
 Pontoon Slide Owner s Manual 1-800-659-0790 ravesports.com Table of Contents Introduction...2 Safety Rules and Information...3 Boat Compatibility Guide.5 Assembling and Using Your Pontoon Slide...6 Cleaning
IMPORTANT: Record the product identification information from the ID label in the inspection and maintenance log in section 9.0 of this manual.
 Instructions for the following series products: Vacuum Anchor HLL System (See back page for specific model numbers.) User Instruction Manual Vacuum Anchor Horizontal Lifeline System This manual is intended
SKYBIRD TRAP OWNER S / OPERATOR S MANUAL PARTS AND ASSEMBLY INSTRUCTIONS
 SKYBIRD TRAP PART NO. 40903 OWNER S / OPERATOR S MANUAL PARTS AND ASSEMBLY INSTRUCTIONS WARNING: THIS MACHINE CAN CAUSE SERIOUS INJURY OR DEATH! THOROUGHLY READ INSTRUCTIONS AND SAFETY INFORMATION BEFORE
CO V E R S TA R AU TO MAT I C S A F E T Y CO V E R INSTALLATION GUIDE
 CO V E R S TA R AU TO MAT I C S A F E T Y CO V E R DECKMOUNT SYSTEM INSTALLATION GUIDE SECTIONS System Parts Reference...3 Standard Top Track...4-6 Mechanism... 7-10 Cover Fabric...11-16 Home Owner & Builder
Read Before Operating!
 Read Before Operating! IMPORTANT OPERATING INSTRUCTIONS THE DEUCE PITCHING MACHINE THROWS REAL REGULATION BALLS; HOWEVER, THE ACCURACY OF THE DEUCE DEPENDS ON THE QUALITY, HARDNESS AND TYPE OF BALLS YOU
Read Before Operating!
 Read Before Operating! IMPORTANT OPERATING INSTRUCTIONS THE DEUCE PITCHING MACHINE THROWS REAL REGULATION BALLS; HOWEVER, THE ACCURACY OF THE DEUCE DEPENDS ON THE QUALITY, HARDNESS AND TYPE OF BALLS YOU
RIDE Inc. Rigscape Drilling Rig Procedures
 2016 RIDE Inc. Rigscape Drilling Rig Procedures Special Instructions/Conditions of Use Reading user procedure manual prior to use is essential Only persons that have been deemed competent in the operation
Trilogy Theory of Operation
 INSTALLATION & OVERVIEW... 2 Load Height... 2 Approach Angle... 2 Footprint... 3 Protrusion... 3 Mounting the... 4 General Torque Specs... 4 OPERATION OF BIKE RACK... 5 Loading Bikes... 5 Unloading Bikes...
For ANCHOR WINCH Model: T Big Water 45 T sw Salt Water Series Big Water 45
 INSTALLATION AND OPERATING INSTRUCTIONS ANCHOR WINCHES For ANCHOR WINCH Model: T10110-45 Big Water 45 T10103-45sw Salt Water Series Big Water 45 If you have any questions or difficulty installing this
Important Note: Tighten lock nuts so the support tubes still swing freely see figure 2. There must be 1 2 threads of bolt past end of lock nuts.
 Kit Contents: DESCRIPTION QTY. DESCRIPTION QTY. 2 Shank Assembly 1 Support Tube Assembly 1 Side Tube - Short 2 1-1/4 Shank 1 Center Tube - Long 1 3/8-16 x 2.0 Carriage Bolt 2 5/16-18 x 2.25 Carriage Bolt
PREPARING AND CLEARING THE NET (Instructions shown are for right handed throwers. Reverse for left handed)
") PREPARING AND CLEARING THE NET (Instructions shown are for right handed throwers. Reverse for left handed) First of all, begin by finding a smooth grassy area free of sticks and rocks, or better yet, an
PREPARING AND CLEARING THE NET (Instructions shown are for right handed throwers. Reverse for left handed) First of all, begin by finding a smooth grassy area free of sticks and rocks, or better yet, an
solo harness USER GUIDE
 solo harness USER GUIDE Notices LIMITED WARRANTY For details, refer to the Product Warranty section on the Hollis web site: www.hollisgear.com COPYRIGHT NOTICE This operating manual is copyrighted, all
Universal Elevator Mount Owners Manual Customer Service Center N53 W24700 South Corporate Circle Sussex, WI U.S.A.
 REQUIRED TOOLS AND MATERIALS: 2 Capable Adults Carpenter s Level 15 Tape Measure Pencil Universal Elevator Mount Owners Manual Customer Service Center N53 W2400 South Corporate Circle Sussex, WI 530 U.S.A.
OPERATION AND INSTRUCTION MANUAL
 OPERATION AND INSTRUCTION MANUAL Swivel Anchor Model: SWS100N-316-CTS Patent US # 8,424,638 WARNING: ALL PERSONS USING THIS EQUIPMENT MUST READ AND UNDERSTAND ALL INSTRUCTIONS. FAILURE TO DO SO MAY RESULT
INFLATABLE PFD S INSTRUCTIONS FOR ANNUAL SERVICE AND SELF INSPECTION
 INFLATABLE PFD S INSTRUCTIONS FOR ANNUAL SERVICE AND SELF INSPECTION Applicable for PFDs in recreational use only, for PFD's in commercial use inspections should only be performed by an accredited agent.
SERVICE MANUAL. Technical Bulletin No GEOPROBE GH40 HYDRAULIC HAMMER. PREPARED: February, REVISED: April, 2002 A DIVISION OF KEJR, INC.
 This document describes charging the GH40 Hydraulic Hammer with nitrogen gas. Text and illustrations were taken directly from the service manual shown below. GEOPROBE GH40 HYDRAULIC HAMMER SERVICE MANUAL
Assembly, Installation and operating. instructions for. Söll-Xenon anchorage device
 Assembly, Installation and operating instructions for Söll-Xenon anchorage device according to EN 795:1996 Part No: XE-... (The following must be completed by the operator in permanent waterproof ink.)
SailTrack Installation Instructions. External Track
 SailTrack Installation Instructions External Track SH-500 SS SH-401 SS SH-600 SS SH-200B SS SH-200A SS www.tidesmarine.com Before You Begin Your installation will be easier if you move the boom well off
Falcon 3 145, 170, 195 and Tandem Owner / Service Manual
 Falcon 3 145, 170, 195 and Tandem Owner / Service Manual January 2007 - Second Edition Removing The Sail From The Airframe And Short Packing The Glider Many maintenance and repair procedures will require
600 / 600FC OWNER'S MANUAL
 PROGRESSION 600 / 600FC OWNER'S MANUAL Issue 2 / Version E - Dec. 10, 1997 Copyright 1997 GAMMA Sports - All Rights Reserved PROGRESSION 600 / 600FC OWNER'S MANUAL TABLE OF CONTENTS PAGE 1... WARRANTY
Thank you for purchasing a Porta-Dock product! *Please read and follow these instructions step by step*
 PG 1 OF 9 PORTA-DOCK, INC. 74A ABL/APW 1056 & 44A FLB APW 1056 PORTA-LIFT Thank you for purchasing a Porta-Dock product! *Please read and follow these instructions step by step* STEP 1. Separate and group