User Manual. 1. Content of Shipping Carton
|
|
|
- Peter Matthews
- 5 years ago
- Views:
Transcription


1 User Manual

 6. 2X keys for frame lock and battery lock 7. Front light 8.")
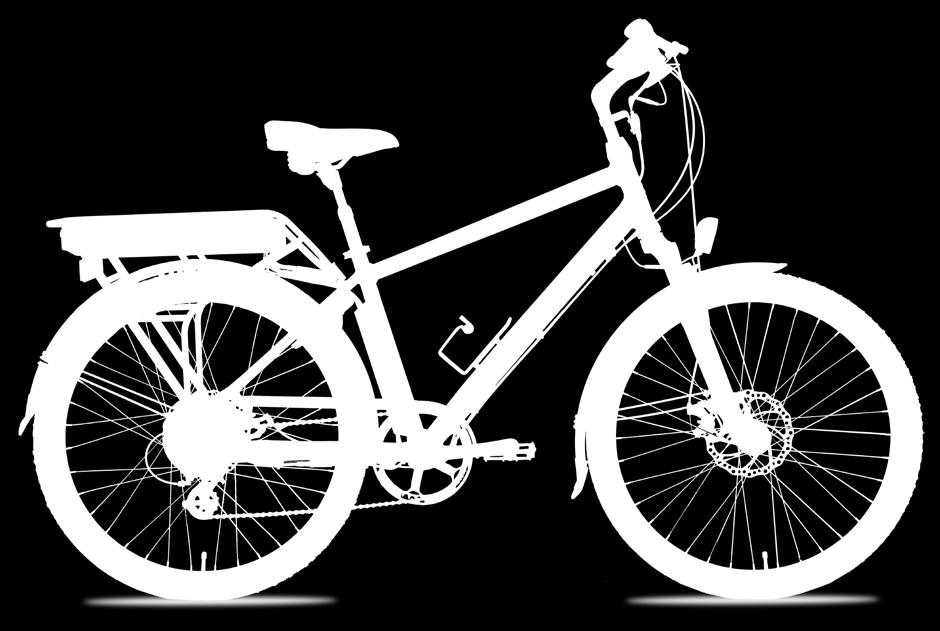
2 User Manual 1. Content of Shipping Carton Congratulations for purchasing a SmartMotion electric bicycle! Please read this guide fully BEFORE using your electric bike. Contents 1. Contents of shipping carton 2. Assembly instructions 3. Safe Riding Recommendations 4. Maintenance & Adjustment 5. Main Specifications 6. Do s and Don ts 7. Display Panel 8. Display Panel Controls 9. Frame Lock and Seat 10. Battery instructions 11. Warranty 12. Service Checklist 13. Service Record In the eurban and ecity box you will find the following items: 1. SmartMotion electric bicycle 2. Battery charger 3. Bottle cage 4. 2X Pedals 5. Tool kit (4mm, 5mm & 6mm allen key, 8mm/10mm spanner, 15mm spanner) 6. 2X keys for frame lock and battery lock 7. Front light 8. Front wheel quick release axle In the e20 box you will find the following items: 1. SmartMotion electric bicycle 2. Battery charger 3. Bottle cage 4. 2X Pedals 5. Tool kit (4mm, 5mm & 6mm allen key, 8mm/10mm spanner, 15mm spanner) 6. 2X keys for frame lock and battery lock


3 2. Assembly Instructions ecity & eurban 2. Assembly Instructions ecity & eurban Your electric bike is shipped 85% assembled. Follow these steps to get it ready and safe for you to ride. To Prepare We recommend that you familiarise yourself with the bike parts before assembling. Gather all required tools. Be sure to work in a clean, dry space with plenty of room. You might wish to lay down a tarpaulin or old blanket to protect the bike during assembly. You may find it helpful to stand the bike frame on a block or sturdy box under the battery housing to work with it in an upright position. Please watch the balance when installing wheels. 1. Unpack a. Carefully lift the electric bike out from the carton (two people recommended for this task). Cut the nylon zip ties with suitable scissors and remove the foam protection from the bike. b. Remove the front wheel and mudguard from the bike and put them aside. Carefully stand the bike upright, resting on its forks when installing wheels. 2. Fork a. Insert the handle bar stem into the steering tube, turn it to align it with the forks correctly, then fasten the centre screw using the 6mm allen key to 18-20N.M. This is a quill type stem that if set too high can cause damage to your bicycle, decrease your control and cause you to fall. Make sure the Minimum-insertion mark is within the frame. b. Loosen the handle bar angle adjusting bolt (at the pivot point of your adjustable stem) two or three turns then adjust the stem angle to the position comfortable for you. Then loosen the 2 handlebar clamp bolts and rotate the handlebar to make sure the brake lever and lcd display positions are at the correct angle, then fasten the two bolts to 17-20N.M. Finally fasten the angle adjusting bolt to 17-20N.M Do not activate the brakes until the bike is fully assembled. Squeezing brake levers while calipers have no disc rotor between them can damage the brakes.


4 2. Assembly Instructions ecity & eurban 2. Assembly Instructions ecity & eurban 3. Mudguard Install the front mudguard and front light on the fork. Take off the bolt from the front fork, put the front mudguard hanger mount on the inside or outside of the fork then put the front light bracket on. Put the bolt through the fork then fasten the bolt with a 5mm allen key and 10mm spanner. Then fasten the two mudguard stays to the forks. Finally connect the light cable to the front light. 4. Power Connection Finally connect the main cable exciting the frame near the headtube to the handlebar components cable, making sure the arrows align before pushing the connectors together. 5. Seat Release the seat post clamp lever and set the seat post height to the position which is suitable for you to comfortably reach the ground when you are sitting on the bike, then refasten the seat post clamp. The maximum height should be within the max height markings on the seatpost. 6. Pedals Attach the pedals to the cranks, paying attention to the L or R marked on the pedal axles. Note: the pedals have opposing threads screw in the left pedal counterclockwise and screw in the right pedal clockwise. Install L pedal counterclockwise and the right pedal clockwise.


5 2. Assembly Instructions ecity & eurban 2. Assembly Instructions e20 7. Front wheel Assemble the front wheel quick release axle by pushing it through the hollow hub, making sure that one spring is on each side of the hub. Then screw on the end nut several turns. Next, carefully lift the bike front forks off the ground and lower the forks onto the wheel axle, being careful the disc rotor fits correctly into the disc calipers (this job is best with 2 people). Tighten the non-rotor side nut finger tight and try to close the quick release lever. Loosen or tighten the nut until it takes the correct amount of force to close the lever. It should be hard to close, but not so hard you cannot fully close it. It must fully close (as in picture) otherwise the wheel may come loose, causing serious injury. Note: if you are not well trained in cycle assembly, this procedure must be checked by a cycle technician. The e20 electric bike is shipped folded inside the carton and 95% assembled. Follow these steps to get it ready and safe for you to ride. To Prepare We recommend that you familiarise yourself with the bike parts before assembling. Gather all required tools. Be sure to work in a clean, dry space with plenty of room. You might wish to lay down a tarpaulin or old blanket to protect the bike during assembly. You may find it helpful to stand the bike frame on a block or sturdy box under the battery housing to work with it in an upright position. Please watch the balance when installing wheels. 1. Unpack a. Carefully lift the electric bike out from the carton (two people recommended for this task). Cut the nylon zip ties with suitable scissors and remove the foam protection from the bike. b. Unfold the main frame until the hinge joint is fully closed and lock it by pushing alloy lock lever until it clamps against the frame. Then rotate the plastic secondary lock down into the alloy lock lever.


6 2. Assembly Instructions e20 2. Assembly Instructions e20 2. Handlebars a. Carefully unfold the handlebar stem post up into its vertical position, then close the alloy lock lever against the stem post. Finally rotate the plastic safety lock ring until it enters and locks the alloy lock lever closed. b. Adjust the handlebar horizontal rotation if needed by lifting up the handlebar stem quick release lever, then twist the handle bar to the correct angle and press the quick release lever down again to lock. Adjust the vertical height of handlebar using the same procedure with the quick release lever down on the mid section of the stem post. 3. Pedals Attach the foldable pedals to the cranks, paying attention to the L or R marked on the pedal axles. Install washer and screw in the L pedal counterclockwise and the right pedal clockwise. See wellgo instructions for full details. 4. Seat Release the seat post clamp lever and set the seat post height to the position which is suitable for you to comfortably reach the ground when you are sitting on the bike, then refasten the seat post clamp. The maximum height should be within the max height markings on the seatpost.
7 3. Safe Riding Recommendations 3. Safe Riding Recommendations 1. Please observe traffic regulations, and don t lend your bicycle to anyone who is unfamiliar with it. The bicycle can legally only be used on the road by a person aged 14 years or over. 2. If you are in a country where wearing a cycle helmet is not compulsory, we still strongly advise you to always wear one. If you are unfamiliar with cycling, we also advise you to attend a cycle proficiency course prior to using it, or gain advice from your local SmartMotion dealer. Your eurban is not a toy and should be considered a serious mode of transport. 3. As with all bicycles it is important that you stay within safe limits. If you feel you are traveling too quickly for the road conditions you probably are, so slow down! High speed will increase forces in the case of an accident and increase the possibility of injury. 4. Test your brakes prior to using the bike every time you use it and remember the bike will not stop as quickly in wet or icy conditions as it would on a dry road. 5. Check the tyres, rims, pedals, stem, cables, chain, etc for general condition regularly. 6. A rider is very difficult for motorists and pedestrians to see at dusk, at night, or at other times of poor visibility. If you must ride under these conditions, check and be sure you comply with all local laws about night riding; follow the rules of the road. Take the following additional precautions: make sure that your bicycle is equipped with correctly positioned and securely mounted reflectors, wear light-colored, reflective clothing and or accessories (any reflective device or light source that moves will help you get the attention of approaching motorists, pedestrians and other traffic). Make sure your clothing or anything else you are carrying on your bicycle doesn t obstruct a reflector or light. Ride slowly when conditions demand you to do so. 7. Check the front and rear rim s safety line. Replace wheel when any part of the Rim Wear Groove is not visible. It is dangerous not to do so. 8. If a rear child seat is fitted, before putting your child in, read the full safety instructions of the seat manual to check seat is installed correctly and child is fastened properly. 9. You must not leave the bike unattended or use the kickstand to stand the bike without your support when a child is in the rear seat as the bike could tip over and cause serious injury. 10. Make sure the rear suspension underside of your seat is out of reach of your child to avoid finger injury. 11. Your bicycle must be returned to your servicing dealer or bicycle/motorcycle mechanic after one month or 200km of riding (which ever comes first) to re-tension the spokes. Then every six months or 1000km (which ever comes first) for a general service and thorough inspection. Failure to do this can void your warranty due to unnecessary wear. Pre-ride Checklist Please make sure the brake lever sequence is correct for your country before riding. In UK, NZ and Australia the left brake lever is for rear brake and the right brake is for the front brake. In all other countries it is the other way: left for front, right for rear. Check the tyres for any visible damage. Check tyre pressures are 40-60psi, and adjust if necessary. Check for any loose nuts, bolts, or fixings. Check brake functions, cable tension, pad clearance, etc. Check all electronic functions are ok (functions detailed later in this manual). Check the reflectors are in place and the lights are working (detailed later in manual). Torque Settings Check bolts are tightened according to the following recommendations before you set off for the first time. a. Seat pillar clamp nut/bolt 5N.M-8N.M b. Brake cable anchor bolt 5N.M c. Brake centre bolt 11N.M d. Seat angle clamp bolt 24N.M e. Crank axle nuts R:42N.M L: 46N.M f. Gear shifter nuts 4N.M g. Rear carrier nuts 8N.M h. Mudguard bracket nuts 8N.M i. Handle bar clamp nut 17-20N.M j. Quill stem bolt 19N.M k. Seat tube clamp nut 4-7N.M l. Rear wheel axle nuts 40-45N.M m. Quick release front axle. Measured torque not typically used. Common industry practice is resistance at lever half way through swing from open to fully closed. For all other nuts, the torque depends on the nut diameter: M N.M M N.M M N.M Note: make sure axle nuts are always done up tight on both wheels as connections to the motor and the dropouts can be damaged due to the axle spinning.

8 4. Maintenance & Adjustment 4. Maintenance & Adjustment 1. Gear Adjustment 2. Lubrication 3. Cleaning your electric bike 4. Other Maintenance Adjust the cable tension Adjustment Bolt to align 1.1 Once a month lubricate all pivot points Warm soapy water and a cloth can be used to clean Your bicycle must be returned to your servicing guide pulley with the centre of the cogs (setting this on your derailleur and the derailleur pulleys with the frame of your bike, but care must be taken not dealer or bicycle/motorcycle mechanic after one in gear 3 or 4 is easiest). Low adjustment: In 1st suitable chain lube. to immerse any of the electrical components; they month or 200km of riding (which ever comes first) gear check and if necessary, turn the L adjustment 1.2 Every three months lubricate the brake are rainproof but cannot be immersed in water. The to re-tension the spokes. Then every six months screw so that the guide pulley moves to a position lever pivots, gears and chain with suitable oil. motor can be cleaned with a soapy cloth, but also or 1000km (which ever comes first) for a general directly in line with the largest (1st gear) sprocket. must not be immersed in water. The battery can be service and thorough inspection. Failure to do this High adjustment: turn the crank arm while gear cleaned with a damp cloth, then dried afterwards. can void your warranty due to unnecessary wear shifting the derailleur to move the derailleur to the Note: in salty conditions it is essential to clean and and tear. top gear position, and then check and if necessary, lube your bike regularly. turn the H adjustment screw to adjust so that the Excluding the electric drive side of things, your guide pulley is in line with the outer line of the SmartMotion bicycle is a normal bicycle, with smallest sprocket when looking from the rear. normal components. Your dealer will be able to Turn the crank arm to set the derailleur to the low explain to you the general care and maintenance of position. the normal bicycle components. You should pop your bike in for a check-up after about a month s use as new gear and brake cables will stretch, then every 6 months after that. The electric drive system is maintenance free and has self-diagnostic codes that will be displayed on the LCD console (detailed later in this user guide) L adjustment screw H adjustment screw Adjustment Bolt should anything go wrong. Again, speak to your dealer should any issues arise.
9 5. Main Specifications 5. Main Specifications ecity & eurban e20 BATTERY RACK BRAKE SECURITY GEARS FRAME HANDLE BAR FORK MUDGUARD TYRE RIM DISPLAY PANEL LIGHT SEAT CABLES WARRANTY 36v15.6ah Samsung advanced lithium ion battery for NZ conditions - superior weatherproofing. USB charge port. Heavy duty rear rack, with elastic for luggage. Tektro disc brakes, with 180mm rotors for superior stopping. Integrated frame C-lock for easy security (locks the rear wheel). Shimano 8 speed cassette gear set, with Altus derailleur & shifter. Aluminium frame. Centre-mounted adjustable kickstand. (Also available in its 24 small version). Aluminium handle bars with adjustable headset, adjust the handlebar height for different ride styles. SR Suntour alloy suspension forks. Polypropylene guards with heavy duty stays. CST Commuter tyres, Kevlar guard, 26 X Alex DP23 with eyelets. LCD console with 5 level Pedal assist and active throttle in all modes. Adjustable max speed. USB charge port. Integrated front and rear light powered from the main battery. Velo plush comfort seat. Suspension Seatpost. Marine- rated cable plugs on all components for simple and quick servicing/replacement. 2 year warranty on battery and motor, 6 years on frame, 12 months other parts. BATTERY RACK BRAKE SECURITY GEARS FRAME HANDLE BAR MUDGUARD TYRE RIM DISPLAY PANEL LIGHT SEAT CABLES WARRANTY DIMENSIONS 36v15.6ah Samsung advanced lithium ion battery for NZ conditions - superior weatherproofing. USB charge port. Heavy duty rear rack, with elastic for luggage. Tektro front and rear brakes. Integrated frame C-lock for easy security (locks the rear wheel). Shimano 8 speed cassette gear set, with Altus derailleur & shifter. Alloy folding frame and foldable pedals. Centre-mounted adjustable kickstand. Height adjustable folding handle bars for relaxed, upright ride posture. Polypropylene guards with heavy duty stays. Kenda, Kevlar guard, 20 X Alex DM24 rims. LCD console with 5 level Pedal assist and active throttle in all modes. Adjustable max speed. USB charge port. Integrated front and rear light powered from the main battery. Velo plush comfort seat. Marine- rated cable plugs on all components for simple and quick servicing/replacement. 2 year warranty on battery and motor, 6 years on frame, 12 months other parts. 90cm L x 62cm H x 43cm W (folded).
10 6. Do s and Don ts 6. Do s and Don ts Do treat your ebike like any bicycle you would want Important: Your bike will arrive with the battery Don t let others ride your ebike unless you have discharged state. to last well keep it stored somewhere secure and away from the elements. Don t treat your ebike as a dirt-bike! The motor and battery are weather proof, but not water-tight. It is ok in rain, but not to ford streams, etc! Never take your ebike on the beach as salt water and sand will drastically shorten the lifespan of many of the ebike s components (motor, gears, wiring connections, etc). Note: Your warranty is void if evidence of salt, sand, or water damage are present within the components. Important: If you live very close to the sea you must keep your bike indoors when not in use. This will save you $$$ as your components will last longer. Don t power up the throttle while the ebike is held stationary. Motor operation for more than a few seconds while the wheel is locked/stationary can damage the motor and controller. partially charged. You need to give it a full charge before ANY use. Smartmotion batteries have been precondition-cycled, so no need to do 3 full deep discharges as for some other brands. Just charge and go... then just top your battery up after each use (lithium batteries prefer shallow discharge). Then give your battery a complete discharge and full charge every 3 months or so to keep the cells well balanced. Note: The LCD battery display bars will dip under full load (on hills, etc). This is normal as running voltage drops under high load. To get an accurate battery reading, wait about 10 sec after the motor is not in use. The 8 step capacity lights on the battery will give you a more accurate idea (button on top rear of battery more info later in manual). Do take extra care on the road as you will be travelling faster than you normally do on a bike and your bike is now power-assisted, so will behave differently. properly explained safe and appropriate use to them. Don t attempt to open the motor or battery should your system malfunction. This will void the warranty. Return it to the store you purchased it from. Do make sure your charger has free air movement around it as it will get quite warm. Don t use your charger outdoors. It is for indoor use only. Do top up your battery whenever possible. Lithium batteries actually prefer shallow discharge (the exact opposite of older types of batteries that have memory effects). Keeping your battery topped up between rides will prolong the life of your battery and give you more power too, as a full battery is better on the hills. Do disconnect your battery from the charger when it is charged. Leaving it connected permanently when not in use will shorten cell life. Don t leave your battery for more than 3 months without top-up charging it. Note: A battery left for more than 3 months at a low voltage may suffer cell damage. This will not be covered under your warranty. It is to your advantage to properly look after your battery as it is the most expensive part of your ebike! Important: Though the risk of battery fire with charging Samsung or Panasonic cells is considerably lower than cheaper, unbranded cells (online data suggests about one in 40 million for the cells we use - i.e., you are more likely to get struck by lightening), it is still possible. Treat any charging lithium battery (including SmartMotion) as a potential fire risk (yes, this includes cellphones, computers too). If charging your battery while it is still docked into the bike simply make sure the bike (includes charger) is not on or leaning against a flammable surface. Same for charging battery off the bike, make sure the battery and charger is Never leave a fully discharged battery uncharged placed on a fire-rated surface (concrete floor, steel for more than a week you will shorten the lifes- bench or shelf, etc). pan of your battery the longer you leave it in a fully
11 7. Display Panel 7. Display Panel Lights When the lights are off the bike icon remains black. Power Meter Shows a scale of the amount of power your bike is consuming KM/H Speedometer Large display of your speed. Pedal Assist Displays the pedal assist level. Depending what country you are in, your throttle will have different functionalities. In EU and Australasia, It will work to 6kph unassisted, then only BMS V Power Output The battery s running voltage is displayed on the screen. The voltage will drop while the battery is under load (motor running). function above that if you are pedaling. In other countries it will be fully active whether you are pedaling or not. If the bike is turned on, always be careful when mounting the bike that you do not twist the throttle, as the bike PAS ODO KM Battery Indicator When the battery is full all five battery segments show. When the battery is very low, no segments will show and the outside edge of the battery frame will flash. can accelerate away from you and cause injury. Note: your brake levers have sensors that will automatically cut motor power when you use the brakes and restore it when you release the Odometer Displays the total distance the bike has tavelled. brake levers.
12 8. Display Panel Controls 8. Display Panel Controls Your display is easily controlled with 4 buttons located on your handlebars. Power On/Off SET Press to start the display and power up the bike. To turn off, press and hold the ON/OFF for 3 seconds Note: the display will power off after 5 minutes without use. power to the rear wheel. This is the standard or pedelec mode. To continue using the pedelec mode you must keep turning the pedals; if you stop the motor will stop and the bike will slow to a halt. If you start pedalling again after one turn the motor will start again. Depending what country you are in, your throttle will have different functionalities. In EU and Australasia, it will work to 6kph unassisted, then only function above that if you are pedalling. In other countries it will be fully active whether you are pedalling or not. If the bike is turned on, always Turning Lights On/Off With the display on, press to turn on the bicycle lights (and the lcd backlight). The light symbol also shows on screen. Press again to turn off the bicycle lights. Note: do not hold as the display will turn off. Information Display Press SET to switch the display information. The order is: Riding time, ODO,Trip Set Operations Hold Press (don t hold) options. for 3 seconds to enter setting interface. to scroll through menu Press or to adjust the parameters. Hold SET SET SET for 1 second to save and quit. Reset Trip Meter Press and hold together for 12 seconds to reset the trip meter. be careful when mounting the bike that you do not Pedal Assist Pedal Assist is controlled with the buttons. Touch to turn the assist up, and touch to turn it down. The power ranges from 0~5. You will notice that twist the throttle, as the bike can accelerate away from you and cause injury. Note: your brake levers have sensors that will automatically cut motor power when you use the brakes and restore it when you release the brake levers. Walk Mode Press and hold down for 2 seconds to enter into the mode of power assist walk. The bike will go on at a uniform speed of 6km/h and display 6km on after one turn of the pedals the motor will start the screen. working, assisting you to ride the bike by adding


13 8. Display Panel Controls 9. Frame lock and Seatpost Wheel Size Error Code Display Suspension Seatpost Select the suitable value to ensure the accuracy of If there is something wrong with the electronic The SmartMotion comes with a suspension display about speed and mileage. control system, the display will show the error code seatpost. For optimum performance you need automatically (see below for codes). Should you to set the preload so when your weight is fully receive an error code, contact your local dealer for on the seat the spring is depressed about 30- KPH and MPH Select MPH or KMH for the speed and mileage, display will be the currently selected units display. Press or to select parameter, hold SET for 1 second to save and exit. USB Output Charging Hold and SET for 2 seconds and the USB advice. 33 CURRENT ABNORMAL 34 THROTTLE ABNORMAL 35 MOTOR ABNORMAL 36 HALL ABNORMAL 37 TEMPERATURE ABNORMAL 38 CONTROLLER COMMUNICATION ERROR 39 LOW VOLTAGE Before contacting servce center check all plugs for 40%. Test the travel, then, if you need to adjust, remove the seatpost and, with a 5mm allen key, screw the shock up into the seatpost to increase spring pressure, or back down to reduce it. Your dealer can also set this up for you. The bike has been fitted with a quick release seatpost collar to facilitate changing the riding position. It is important that the nut on the collar is tightened so the post will not move in the bike frame. Frame Lock The SmartMotion eurban has been upgraded with an integrated frame lock. Your new bike will come with a set of keys for the battery lock and a set of keys for the frame lock. Make sure you keep a master key from each in a safe place so you can always get more copies made. symbol lights to detail that the user can now charge loose connections. Make this adjustment with the quick release phone, etc, via the USB output port which is on the lever in the open position. underside of the lcd, under a rubber waterproof Adjust the seat to the correct height and close plug. Make sure the plug is reinstalled after the lever. When you sit on the saddle there charging. should be no vertical movement at all in the seat post below the suspension.

 to slide it out")


14 10. Battery Instructions 10. Battery Instructions Charging your Battery You can charge the battery on or off the bike. The charge terminal is on the front of the battery. Lift the rubber cap and plug in your charger. The charge light on the charger will show red, and turn green when the battery is fully charged. Note: be careful to properly reinstall the rubber cap before re using your bike. Battery Removal To remove the battery, insert the key into the lock on the front left side of battery rack and turn the key, then pull the battery (using the underside finger groove) to slide it out the back of the rack. Note: the lock is not automatic, so key is required to reload the battery simply slide it back in until it locks, making sure you are correctly on the slide rail first. Power On/Off On the centre rear of the battery is the power on/off button. When pushed in, the led inside the button will light, indicating the battery output power is live. It is good practice to turn the battery off when leaving your bike (press the button so it clicks out, and the red led fades). This also makes your bike safer as cannot be turned on from the handlebar console. Note: if you leave the battery on, but do not use the bike, it will enter sleep mode after several hours and power down (red light will go out). To reactivate the battery, push the button to click it out, then push again to click it back in again, and the led will light up, indicating the battery is live again. Note: when charging the battery off the bike, always turn the power off before redocking to the bike (if battery power is on there will be a spark as the terminal reconnects to the bike, which causes damage to the battery socket and reduces conductivity). Connections All ebike components (throttle, brake sensors, controller, etc) on the SmartMotion bikes have isolating marine-rated plugs, so, should you damage a component, replacement is easy. Take the bike to your local dealer and they will order a replacement pair


15 10. Battery Instructions 11. Warranty Warranty USB Charging Port The SmartMotion battery has been updated with a USB 2.0 charging port. Use this to charge your phones and other USB devices. It has a 1.0 amp max output. Important: the rubber cap for the USB 2.0 terminal MUST be properly reinstalled after USB charging, otherwise moisture can get inside the battery and damage the inner components. Warranty is void if evidence of water ingress via USB port is present. Capacity You can check the capacity of your battery by pushing the capacity button on the top rear of the battery. Precondition: The power button was already turned on ( Red LED was lit as the picture shows ). Your SmartMotion bike is covered by the following extensive Warranty Battery 2 years (warranted to still supply at least 60% of rated capacity after 2 years) Motor 2 years Frame 6 years (frame structural integrity not including general wear and tear) Other Components 1 year (not including consumables; cables, tyres, hand- Important: Though the risk of battery fire with charging Samsung or Panasonic cells is considerably lower than cheaper, unbranded cells (online data suggests about one in 40 million for the cells we use - i.e., you are more likely to get struck by lightening), it is still possible. Treat any charging lithium battery (including SmartMotion) as a potential fire risk (yes, this includes cellphones, computers too). If charging your battery while it is still docked into the bike simply make sure the bike (includes charger) is not on or leaning against grips) a flammable surface. Same for charging battery Only use genuine replacement parts available through off the bike, make sure the battery and charger is your local dealer. placed on a fire-rated surface (concrete floor, steel Exceptions to Warranty 1. Damage resulting from misuse, not maintaining the bench or shelf, etc). bicycle, or not following the guidelines within this user guide. Accidental or deliberate damage. 2. Failure to meet the six-monthly service schedule. 3. Damage due to private repair or alteration by user or unauthorized service centre. 4. Failure to produce invoice or proof of purchase. 5. Failure to meet the six-monthly/1000km service schedule.
16 12. Service Checklist 13. Service Record Check for damage Adjust and Tension Model: Dealer: Frame & Fork Spokes* Serial Numbers: Purchase Date: Rims Cables & connections Lubricate Gears Seat Refectors & Lights Handlebars, Stem, Grips Brakes 6 Weeks/200km Date: Shop: Mechanic: 12 Months Date: Shop: Mechanic: Chain Derailleur Seatpost Cranks & Bottom Bracket Wheel Axles All Fasteners 6 Months Date: Shop: 24 Months Date: Shop: *Spokes to be tensioned to 130Nm Mechanic: Mechanic:
17
User Manual. 2. Assembly Instructions
 3,532 User Manual User Manual 2. Assembly Instructions Congratulations for purchasing a Smartmotion ebike! Please read this guide fully BEFORE using your electric bike. 1. Smartmotion electric bicycle
User Manual. 2. Assembly Instructions
 3,532 User Manual User Manual 2. Assembly Instructions Congratulations for purchasing a Smartmotion ebike! Please read this guide fully BEFORE using your electric bike. 1. Smartmotion electric bicycle
User Manual PanerGT user manual.indd 1 7/21/2017 3:21:19 PM
 User Manual PanerGT user manual.indd 1 7/21/2017 3:21:19 PM User Manual 1. Service Record Congratulations for purchasing a SmartMotion electric bicycle! Please read this guide fully BEFORE using your electric
Instruction Manual: VelectriX Foldaway
 Instruction Manual: VelectriX Foldaway CONTENTS Safe Riding Recommendations Page 2 Pre-Ride Checklist Page 3 Display and Controls Page 4 Quick Guide to Folding Page 6 Battery Instructions Page 7 Maintenance
Instruction Manual: VelectriX Urban 2.0+
 Instruction Manual: VelectriX Urban 2.0+ CONTENTS Safe Riding Recommendations Page 2 Pre-Ride Checklist Page 3 Display and Controls Page 4 Maintenance Page 8 Warranty Page 9 Contact Details Page 10 Service
Instruction Manual: VelectriX Ascent 29 MTB
 Instruction Manual: VelectriX Ascent 29 MTB CONTENTS Safe Riding Recommendations Page 2 Pre-Ride Checklist Page 3 Display and Controls Page 4 Maintenance Page 8 Warranty Page 9 Contact Details Page 10
Instruction Manual: VelectriX Ascent+ 29 MTB
 Instruction Manual: VelectriX Ascent+ 29 MTB CONTENTS Safe Riding Recommendations Page 2 Pre-Ride Checklist Page 3 Display and Controls Page 4 Maintenance Page 8 Warranty Page 9 Contact Details Page 10
Instruction Manual: VelectriX Urban 2.0
 Instruction Manual: VelectriX Urban 2.0 CONTENTS Safe Riding Recommendations Page 2 Pre-Ride Checklist Page 3 Display and Controls Page 4 Maintenance Page 8 Warranty Page 9 Contact Details Page 10 Service
USER GUIDE TO POWER ASSISTED BIKES
 USER GUIDE TO POWER ASSISTED BIKES 1 PAGE CONTENTS Page. 3 Unpacking Page. 3-4 Easy steps to get started Page. 5 General Assembly Instructions Page. 6 Aligning H/Bars, Page. 7 Tightening pedals onto Crank
POWER ASSISTED BICYCLES OWNERS MANUAL
 POWER ASSISTED BICYCLES OWNERS MANUAL WE HAVE INCLUDED A BICYCLE OWNER S MANUAL WHICH YOU SHOULD REFER TO FOR ALL GENERAL CYCLE MAINTENANCE. CONTENTS Page. 3 Unpacking. Page. 3-4 Easy steps to get started.
Parts List. 7. Handlebars 8. Grips 9. Handlebar Stem 10. Front Brake 11. Front Wheel 12. Crank 13. Chain
 Woodworm Cruise Parts List 1. Free Wheel with Rear Hub 2. Fenders 3. Fender Stay 4. Quick Release 5. Saddle 6. Seat Post 7. Handlebars 8. Grips 9. Handlebar Stem 10. Front Brake 11. Front Wheel 12. Crank
comfort without compromising on performance and to fit your various needs on touring,
 Congratulations on your purchase of Goal-26X. Goal-26X is made to enhance comfort without compromising on performance and to fit your various needs on touring, shopping and communicating. Let s have fun
 www.smartmotionbikes.com Smart Design, Smartmotion. Our story begins in New Zealand, where a long haired visionary saw the opportunity for electric bikes to change the transport landscape for his beautiful
BICYCLE ASSEMBLY INSTRUCTIONS. dutchcycles.com.au. Distribution Centre
 BICYCLE ASSEMBLY INSTRUCTIONS dutchcycles.com.au Distribution Centre Shed 68, 400-422 Somerville Road, Tottenham, VIC 3012 email: service@dutchcycles.com.au BICYCLE COMPONENTS KEY INTRODUCTION CONGRATULATIONS
Owner s Manual. Operation and Maintenance Instructions. Wisper 705Se. January st edition
 Owner s Manual Operation and Maintenance Instructions Wisper 705Se January 2009 1 st edition We strongly recommend that you read this entire manual before using your Wisper bike Wisper Limited - 1 - User
Ride Your City. dysonbikes.com.au
 Ride Your City dysonbikes.com.au Hard Tail Evo Stylish design and maximum impact. Our Hard Tail Evo is the perfect bike for commuting, adventures and making cycling fun again. With high quality brand
CRUZBIKE Quest 2.0 Assembly
 CRUZBIKE Quest 2.0 Assembly CRUZBIKE Quest 2.0 Assembly... 1 General notes on assembly... 2 Un box and evaluate the frame and major parts... 2 Unfold the rear swing arm and arrange the frame... 3 Rear
ASSEMBLY GUIDE: Izip & Ezip Electric Bicycles with Rack-Top Mounted Batteries ( RTMB Bicycles )
") ASSEMBLY GUIDE: Izip & Ezip Electric Bicycles with Rack-Top Mounted Batteries ( RTMB Bicycles ) Please Refer to your Owner s Manual for Detailed Setup Instructions Technical & Customer Service: 1-800-377-4532
ASSEMBLY GUIDE: Izip & Ezip Electric Bicycles with Rack-Top Mounted Batteries ( RTMB Bicycles ) Please Refer to your Owner s Manual for Detailed Setup Instructions Technical & Customer Service: 1-800-377-4532
HOME ASSEMBLY INSTRUCTIONS
 HOME ASSEMBLY INSTRUCTIONS This Papillionaire Bicycle now belongs to you. It will take you to work, wait patiently outside your local cafe, and carry your groceries home. This is the start of your long-term
Ladies Shopper Bike Assembly Manual 28C03
 Ladies Shopper Bike Assembly Manual 28C03 Ecosmo Ltd 1 Know your bike 1. Wheel 2. Rear Derailleur 3. Chain 4. Crank Set 5. Pedal 6. Seat Quick Lock 7. Saddle and Post 8. Frame 9. Front Light 10. Front
Folding Dual Suspension MTB. Instruction Manual
 Folding Dual Suspension MTB Instruction Manual Introduction The Stowabike Folding MTB has been made to last and with proper maintenance, it will give you years of enjoyable rides and journeys. The following
TABLE OF CONTENTS INTRODUCTION
 R3 DISC MANUAL TABLE OF CONTENTS Introduction... 1 Frame Features... 2 Fork Preparation... 3 Small Parts... 5 Frame Preparation... 6 Brake Housing Installation... 7 Mechanical Cable Routing... 9 Electric
This is the Quick Start Guide for the Optibike Pioneer Allroad electric bicycle. The Guide provides for basic information required to ride the
 This is the Quick Start Guide for the Optibike Pioneer Allroad electric bicycle. The Guide provides for basic information required to ride the Allroad. It is not intended to be an extensive manual. It
Final Assembly Instructions Bikes with Threaded Headsets
 Final Assembly Instructions Bikes with Threaded Headsets Thank you for buying your new bicycle from L.L.Bean. Read these instructions carefully before beginning the final assembly. Prior to shipping, our
Final Assembly Instructions Bikes with Quill Stems
 Final Assembly Instructions Bikes with Quill Stems Thank you for buying your new bicycle from L.L.Bean. Read these instructions carefully before beginning the final assembly. Prior to shipping, our expert
Assembly Tools. Assembly will take about an hour
 Assembly Guide Assembly Tools Included in your parts box: Pedals Toolkit (4+5mm combo Allen wrench, 13+15mm combo open-end wrench) Touch-up paint Spare fuses (for battery) Assembly will take about an hour
Congratulations on your purchase of a JC Series Performer trike! The Performer JC Series is designed for everything from touring to commuting and
 Congratulations on your purchase of a JC Series Performer trike! The Performer JC Series is designed for everything from touring to commuting and shopping in the city. The JC Series frames are made of
E-trike Li Assembly Guide
 PREPARATION 1. Read this assembly manual BEFORE commencing assembly. 2. Carefully remove all the components and packaged hardware from the shipping boxes. 3. Unpack the contents of the large double box
WELCOME! Thank you for choosing our electric bike!
 WELCOME! Thank you for choosing our electric bike! This manual shows how to use the bicycle when you get it. new electric bicycle and gives good advice and instructions. Your electric bicycle shall be
BackCountry ebikes 2019 MULE Assembly
 BackCountry ebikes 2019 MULE Assembly Required Tools: Cutting Pliers (to cut box poly strapping and heavy bike banding) Scissors (to remove bubble wrap) Allen wrenches (3mm, 4mm, 5mm, 6mm) Wrenches (10mm,
Have questions? Chat with us live at raleighusa.com or call us at , 8am 5pm PST
 1 2 Have questions? Chat with us live at raleighusa.com or call us at 1-800-251-8435, 8am 5pm PST The bicycle you have purchased is a complex piece of equipment that must be properly assembled and maintained
Assembly Tools. Assembly will take 1-2 hours
 Assembly Tools Included in your parts box: Pedals Quick release skewer Reflectors (if not already installed) Toolkit (4+5mm combo Allen wrench, 13+15mm combo open-end wrench) Helpful Tools: Scissors (for
ASSEMBLY GUIDE AROUND THE BLOCK - 1, 3, 7, & 21 SPEED SIXTHREEZERO
 ASSEMBLY GUIDE AROUND THE BLOCK - 1, 3, 7, & 21 SPEED SIXTHREEZERO OUR COMMITMENT We want you to love your bike as much as we do. If you run into any issues, no matter how small, let us know and we ll
TABLE OF CONTENTS FRAME FEATURES INTRODUCTION
 S3 DISC MANUAL TABLE OF CONTENTS Introduction...1 Frame Features...2 Fork Preparation...3 Small Parts...5 Frame Preparation...6 Brake Housing Installation...7 Mechanical Cable Routing...9 Electric Cable
HELMETS SAVE LIVES!!! ALWAYS WEAR A PROPERLY FITTED HELMET WHEN YOU RIDE YOUR SCOOTER. DO NOT RIDE AT NIGHT. AVOID RIDING IN WET CONDITIONS.
 HELMETS SAVE CORRECT FITTING - MAKE SURE YOUR HELMET COVERS YOUR FOREHEAD. LIVES!!! ALWAYS WEAR A PROPERLY FITTED HELMET WHEN YOU RIDE YOUR SCOOTER. DO NOT RIDE AT NIGHT. AVOID RIDING IN WET CONDITIONS.
Rio FB User Guide. Sales: Support:
 Rio FB User Guide Please read this manual. It contains important information regarding your safety, the correct use of the bike and how to avoid expensive repair fees in the future. Sales: 01702 435566
Beinn 29 Owner s manual
 Owner s manual Setting up your 4 13 8 12 1 14 15 19 16 7 5 6 5 22 20 9 10 11 21 2 3 1. Brake levers 2. Brake calipers 3. Rotors 4. Saddle 5. Seatpost 6. Seatpost clamp 7. Saddle clamp 8. Stem 9. Stem bolts
Santana CD 2018 Ed. User Guide
 Santana CD 2018 Ed. User Guide Read this manual. It contains important information regarding your safety, the correct use of the bike and how to avoid expensive repair fees in the future. Support is available
Final Assembly Instructions Bikes with Threaded Headsets
 Final Assembly Instructions Bikes with Threaded Headsets Thank you for buying your new bicycle from L.L.Bean. Read these instructions carefully before beginning the final assembly. Prior to shipping, our
MODEL: COMMUTER / ROAD BIKE
 STEP BY STEP BUILD GUIDE MODEL: COMMUTER / ROAD BIKE TABLE OF CONTENTS TOOLS 1 LET S GET STARTED 2 INSTALLING THE QUILL STEM 3 INSTALLING THE FRONT FENDER 4 INSTALLING THE QUICK RELEASE 5 INSTALLING THE
Preparation/Maintenance Manual
 Preparation/Maintenance Manual It is essential that you read this manual in its entirety before riding your bike for the first time to ensure that your bike is properly assembled and safe to ride. It is
TANDEM. When you buy a Pedego, you re investing in: ($3, to $3, ) Notes
 Notes") TANDEM ($3,295. 00 to $3,795. 00 ) The Pedego Tandem is the world s only electric bicycle built for two. Riding is twice as fun with someone you love. FRAME OPTIONS AND COLORS ONE SIZE Black Red TIRE /
TANDEM ($3,295. 00 to $3,795. 00 ) The Pedego Tandem is the world s only electric bicycle built for two. Riding is twice as fun with someone you love. FRAME OPTIONS AND COLORS ONE SIZE Black Red TIRE /
Have questions? Chat with us live at raleighusa.com or call us at , 8am 5pm PST
 1 2 Have questions? Chat with us live at raleighusa.com or call us at 1-800-251-8435, 8am 5pm PST The bicycle you have purchased is a complex piece of equipment that must be properly assembled and maintained
Nexus. Dealer's Manual. ROAD MTB Trekking. City Touring/ Comfort Bike SG-3R40 SG-3R45 SG-3R75 SG-3R75-A SG-3R75-B SG-3D55 SG-3C41
 (English) DM-SG0005-01 Dealer's Manual ROAD MTB Trekking City Touring/ Comfort Bike URBAN SPORT E-BIKE Nexus SG-3R40 SG-3R45 SG-3R75 SG-3R75-A SG-3R75-B SG-3D55 SG-3C41 SL-3S35-E SL-3S41-E SL-3S42-E SM-BC03
KMX Kompact Sports Trike
 KMX Kompact Sports Trike Assembly Instructions 1.0 Introduction Thank you for choosing KMX! When properly assembled and set up your KMX will provide many years of enjoyment. KMX Karts Ltd does its utmost
Have questions? Chat with us live at raleighusa.com or call us at , 8am 5pm PST
 1 2 Have questions? Chat with us live at raleighusa.com or call us at 1-800-251-8435, 8am 5pm PST The bicycle you have purchased is a complex piece of equipment that must be properly assembled and maintained
Bicycle Owner's Manual Easy Access Bike
 Bicycle Owner's Manual Easy Access Bike AGE: FROM 9 YEARS OLD AND UP IMPORTANT Check bike after assembly or any adjustments. Consult bicycle retailer with questions. Always wear a helmet. Children should
SG-7R46 SG-7R45 BR-IM41-R CJ-7S40 WARNING CAUTION SERVICE INSTRUCTIONS. Inter-7 Hub. Inter-M Brake Cassette joint NOTE:
 t WARNING It is important to completely understand the operation of your bicycle's brake system. Improper use of your bicycle's brake system may result in a loss of control or an accident, which could
7130 Lancer Rear Drive Magnetic Commercial Indoor Cycling Bike
 7130 Lancer Rear Drive Magnetic Commercial Indoor Cycling Bike Owner s Manual Made in Taiwan INDEX IMPORTANT SAFETY INFORMATION... 1 EXPLODED DRAWING... 2 PARTS LIST... 3 ASSEMBLY INSTRUCTION... 4-9 USER
Item N o.: Item N am e:40cm Boys Rival Bike
 Item N o.:42272892 Item N am e:40cm Boys Rival Bike 9 bell 8 grip 30 crash pad 10 brake lever 26 wheel reflector 22 saddle 23 seat post 25 rear reflector 24 quick release 6 handle bar 7 stem 2 top tube
Santa Fe Cycles Assembly Guide Introduction
 Santa Fe Cycles Assembly Guide Introduction Congratulations on your purchase of your new Santa Fe bicycle. You have purchased a bicycle that has many features and qualities. Please take a few minutes and
Rear drive motor, 48V 500W. I5-4813H, 48V 13AH, 624WH, with USB port. Samsung / Panasonic / LG Lithium Nickel Cobalt Manganese (Li-NCM)
") Cruiser Motor Brand : Battery Brand / Chemistry : Display Type / Accessories : Display Readouts : Rear drive motor, 48V 500W Das-Kit R4 I5-4813H, 48V 13AH, 624WH, with USB port Samsung / Panasonic / LG
Cruiser Motor Brand : Battery Brand / Chemistry : Display Type / Accessories : Display Readouts : Rear drive motor, 48V 500W Das-Kit R4 I5-4813H, 48V 13AH, 624WH, with USB port Samsung / Panasonic / LG
MANUAL LEKKER BIKES 2016
 MANUAL LEKKER BIKES 2016 CONTACT For your own safety, never do work on your bicycle unless you feel absolutely sure about it. If you are in doubt or if you have any questions please contact our helpdesk:
INDOOR BIKE MANUAL
 INDOOR BIKE 91022 MANUAL 91022 INSTRUCTIONS FOR USE 1) The model 91022 is designed to be used as light commercial use or home use. It has a fixed wheel driven flywheel and should be used under professional
ebike: EB01 and EB02 OPERATING MANUAL
 ebike: EB01 and EB02 OPERATING MANUAL IMPORTANT SAFEGUARDS: IMPORTANT: READ ALL INSTRUCTIONS BEFORE USE. RETAIN INSTRUCTIONS FOR FUTURE REFERENCE. WARNING: Basic safety precautions should always be observed
Mountain ebike escent
 Mountain ebike escent OPERATING MANUAL IMPORTANT SAFEGUARDS: IMPORTANT: READ ALL INSTRUCTIONS BEFORE USE. RETAIN INSTRUCTIONS FOR FUTURE REFERENCE. WARNING: Basic safety precautions should always be observed
Carried Standard: GB Owner s Manual. (Battery Type: Lithium Battery) Shanghai Leisheng Dynamics Technology Co.,Ltd.
 Shanghai Leisheng Dynamics Technology Co.,Ltd.") Carried Standard: GB17761-1999 Owner s Manual (Battery Type: Lithium Battery) Shanghai Leisheng Dynamics Technology Co.,Ltd. Address: No.5788, Huyi Road Jiading District Shanghai Phone:021-59583532 Website:
Carried Standard: GB17761-1999 Owner s Manual (Battery Type: Lithium Battery) Shanghai Leisheng Dynamics Technology Co.,Ltd. Address: No.5788, Huyi Road Jiading District Shanghai Phone:021-59583532 Website:
ASSEMBLY INSTRUCTIONS & USER GUIDE
 ASSEMBLY INSTRUCTIONS & USER GUIDE WARNING! Do not attempt to assemble or operate your bike before first reading this manual in full. This manual contains important instructions, which ensure the continued
Safety manual Beinn 20/24/26
 Safety manual Beinn 20/24/26 Thank you for buying an Islabike! Your bike has been thoroughly checked and adjusted prior to delivery but there are a few tasks to perform before the bike is ready to ride:
Warning: Please read this entire manual before riding your Simbi. Failure to do so could result in serious injury or even death.
 Warning: Please read this entire manual before riding your Simbi. Failure to do so could result in serious injury or even death. Contents 1. OVERVIEW... 3 A. Thank You... 3 B. General Warning... 3 C. Important
MAGNETIC CYCLING TRAINER SF-B0419 USER MANUAL
 MAGNETIC CYCLING TRAINER SF-B049 USER MANUAL IMPORTANT: Read all instructions carefully before using this product. Retain owner s manual for future reference. For customer service, please contact: support@sunnyhealthfitness.com
Special instruction of installation for SAINT FH-M800/RD-M800 and FH-M805/RD-M805
 Technical Service Instructions SI-5VB0E t RD-M805 / RD-M800 Rear derailleur Special instruction of installation for SAINT FH-M800/RD-M800 and FH-M805/RD-M805 A hub axle is an essential component for the
EZee Glider Manual. Tools needed for Assembly: Wrench (included) Philips Screwdriver (not included) Assembly Instructions
 Philips Screwdriver (not included) Assembly Instructions") EZee Glider Manual Congratulations on your purchase of the EZee Glider! Your glider is designed for years of nearly carefree use by your child. These instructions include how to set up your glider and
EZee Glider Manual Congratulations on your purchase of the EZee Glider! Your glider is designed for years of nearly carefree use by your child. These instructions include how to set up your glider and
Bicycle Owner s Manual
 Bicycle Owner s Manual The following manual provides assembly and maintenance instructions, as well as a guide to safe usage of your new bicycle. WARNING Read the complete Owner s Manual before starting
FRAME FEATURES TABLE OF CONTENTS INTRODUCTION. A guide to your Cervélo C Series frame.
 C SERIES MANUAL TABLE OF CONTENTS Introduction...1 Frame Features...2 Fork Preparation...3 Small Parts...5 Frame Preparation...6 Brake Housing Installation...7 Mechanical Cable Routing...9 Electric Cable
Important Information
 Owner s Manual Important Information Congratulations to your new Blix bike! We re sure you will enjoy your cycling experience in a completely new way with the purchase of your new Blix bike. Before your
Rothan Owner s manual
 Rothan Owner s manual www.islabikes.co.uk 1. Brake levers 2. Brake pads 3. Saddle 4. Seatpost 5. Seatpost clamp 6. Stem 7. Stem bolts 8. Headset 9. Headset spacers 10. Headset adjuster bolt 11. Handlebars
Bicycle Owner s Manual Children s Bicycles
 Bicycle Owner s Manual Children s Bicycles The following manual provides assembly and maintenance instructions, as well as a guide to safe usage of your new bicycle. WARNING - Read the complete Owner s
Mountain ebike escent
 Mountain ebike escent ebike: EB05 OPERATING MANUAL IMPORTANT SAFEGUARDS: IMPORTANT: READ ALL INSTRUCTIONS BEFORE USE. RETAIN INSTRUCTIONS FOR FUTURE REFERENCE. WARNING: Basic safety precautions should
DM-MARD (English) Dealer's Manual. ROAD MTB Trekking. City Touring/ Comfort Bike REAR DERAILLEUR XTR RD-M9100 RD-M9120
 Dealer's Manual. ROAD MTB Trekking. City Touring/ Comfort Bike REAR DERAILLEUR XTR RD-M9100 RD-M9120") (English) DM-MARD001-00 Dealer's Manual ROAD MTB Trekking City Touring/ Comfort Bike URBAN SPORT E-BIKE REAR DERAILLEUR XTR RD-M9100 RD-M9120 CONTENTS CONTENTS...2 IMPORTANT NOTICE...3 TO ENSURE SAFETY...4
(English) DM-MARD001-00 Dealer's Manual ROAD MTB Trekking City Touring/ Comfort Bike URBAN SPORT E-BIKE REAR DERAILLEUR XTR RD-M9100 RD-M9120 CONTENTS CONTENTS...2 IMPORTANT NOTICE...3 TO ENSURE SAFETY...4
Quattrocycle BV. Quattrocycle. User Manual. Last update February Quattrocycle BV Bremkant EJ Middelbeers. User Manual Quattrocycle 1
 Quattrocycle User Manual Last update February 2010 Quattrocycle BV Bremkant 6 5091 EJ Middelbeers User Manual Quattrocycle 1 Table of Contents Page Chapter 1: Introduction 3 Chapter 2: Instructions for
FRAME FEATURES TABLE OF CONTENTS INTRODUCTION
 R3 MANUAL TABLE OF CONTENTS Introduction...1 Frame Features...2 Fork Preparation...3 Small Parts...5 Frame Preparation...6 Mechanical Cable Routing...7 Electric Cable Routing...9 Seatpost Assembly & Installation...11
Congratulations, once again, on buying an E RIDER Model 18!!!!
 Congratulations, once again, on buying an E RIDER Model 18!!!! USER MANUAL We are sure you will be excited by the delivery of your brand new bike and you will be eager to start using your E RIDER as soon
2019 MADONE ASSEMBLY MANUAL
 2019 MADONE ASSEMBLY MANUAL 2019 MADONE Rim brakes and Di2 drivetrain Rim brakes and mechanical drivetrain Disc brakes and Di2 drivetrain Disc brakes and mechanical drivetrain TABLE OF CONTENTS Common
Helios Separable Tandem Manual
 Helios Separable Tandem Manual This manual accompanies the Helios owners manual Introduction The separable kit fitted to your Helios tandem allows for even greater flexibility in the way you can enjoy
Mini Glider Manual. Your Glider comes partially assembled. The front wheel and the handlebars require assembly.
 Mini Glider Manual Congratulations on your purchase of the Mini Glider! Your glider is designed for years of nearly carefree use by your child. These instructions include how to set up your glider and
R5 DISC MANUAL EN. Version 1 I
 R5 DISC MANUAL EN Version 1 I 30.04.2017 TABLE OF CONTENTS Introduction...1 Frame Features...2 Fork Preparation...3 Small Parts...5 Frame Preparation...6 Brake Housing Installation...7 Mechanical Cable
Lectric Cycles Mid-Drive Electric Motor Installation
 Lectric Cycles Mid-Drive Electric Motor Installation This write-up describes the installation of a Lectric Cycles electric motor. The model is the e-rad Mid-Drive 750 Watt conversion kit, installed on
Rothan Owner s manual.
 Owner s manual www.islabikes.com www.islabikes.com 1. Brake levers 2. Brake pads 3. Saddle 4. Seatpost 5. Seatpost clamp 6. Stem 7. Stem bolts 8. Headset 9. Headset spacers 10. Headset adjuster bolt 11.
Shifting Lever. RAPIDFIRE Plus 11-speed
 (English) DM-SL0005-04 Shifting Lever Dealer's Manual RAPIDFIRE Plus 11-speed MTB XTR SL-M9000 DEORE XT SL-M8000 CONTENTS IMPORTANT NOTICE... 3 TO ENSURE SAFETY... 4 LIST OF TOOLS TO BE USED... 7 INSTALLATION...
Shifting Lever. Dealer's Manual. RAPIDFIRE Plus SL-M2000 SL-M3010 SL-M4010. Thumb Shifter SL-TZ500. ROAD MTB Trekking. City Touring/ Comfort Bike
 (English) DM-MDSL001-01 Dealer's Manual ROAD MTB Trekking City Touring/ Comfort Bike URBAN SPORT E-BIKE Shifting Lever RAPIDFIRE Plus SL-M2000 SL-M3010 SL-M4010 Thumb Shifter SL-TZ500 CONTENTS IMPORTANT
The type of terrain: flat and rough-terrain
 1 2 The type of terrain: flat and rough-terrain ASSEMBLING YOUR BICYCLE 1. Gears 2. Rear Brake 3. Rear Reflector 4. Seat Post 5. Saddle 6. Front Brake Lever 7. Gear Selector 8. Handle Bars 9. Bell 10.
Thank you for purchasing a WIKE BOX BIKE!
 Thank you for purchasing a WIKE BOX BIKE! Contents Safety.....3 Front wheel.4 Kickstand..5 Handle Bar & Box 6 Seat post and Saddle 7 Final pre-ride check 8 Tools needed to assemble Bike: -High table or
SANTANA STOWAWAY TANDEM WITH AIRLINER SAFECASE AND FTS FOAM TRAY SYSTEM ASSEMBLY AND DISASSEMBLY
 SANTANA STOWAWAY TANDEM WITH AIRLINER SAFECASE AND FTS FOAM TRAY SYSTEM ASSEMBLY AND DISASSEMBLY Congratulations! You are now the proud owner of the world s most travel-ready, performance tandem. The following
BIKE TO GO - USER MANUAL - MODEL#: JBTG24
 BIKE TO GO 24 - USER MANUAL - MODEL#: JBTG24 GET ACQUAINTED WITH YOUR 24 BIKE TO GO Congratulations on your new Jetson 24 folding bicycle! The Jetson 24 Bike to Go is an innovative and fun personal transportation
Reach Trail(Offroad) Owner manual. Reach Trail(Offroad) owner manual
 Owner manual. Reach Trail(Offroad) owner manual") Reach Trail(Offroad) Owner manual Reach features The riding geometry of full sized off-road bikes The gear ratio of full sized off-road bikes 18.75~111inch Effective front and rear suspension. Rigid small
Reach Trail(Offroad) Owner manual Reach features The riding geometry of full sized off-road bikes The gear ratio of full sized off-road bikes 18.75~111inch Effective front and rear suspension. Rigid small
1 - TECHNICAL SPECIFICATIONS
 REAR DERAILLEUR - CURRENT RANGE (since 2015) (since 2017) (since 2018) This technical manual is intended for use by professional mechanics. Anyone who is not a qualified professional for bicycle assembly
Thumb Shifter Plus Thumb Shifter
 (English) DM-SL0004-01 Dealer's Manual Thumb Shifter Plus Thumb Shifter Thumb Shifter Plus SL-FT55 SL-TX50 SL-TX30 Thumb Shifter SL-TZ20 IMPORTANT NOTICE This dealer's manual is intended primarily for
KIDS SCOTT 2011 BIKE OWNERS MANUAL
 SCOTT 2011 BIKE OWNERS MANUAL B SCOTT SPORTS SA 17 RTE DU CROCHET 1762 GIVISIEZ SWITZERLAND 2009 SCOTT SPORTS SA, ALL RIGHTS RESERVED SCOTT-SPORTS.COM CONTENT Congratulations P. 004 General introduction
KIDS SCOTT 2013 BIKE OWNERS MANUAL
 SCOTT 2013 BIKE OWNERS MANUAL SCOTT SPORTS SA 17 RTE DU CROCHET 1762 GIVISIEZ SWITZERLAND 2011 SCOTT SPORTS SA, ALL RIGHTS RESERVED SCOTT-SPORTS.COM B content Congratulations... P. 004 General introduction...
R3 RIM MANUAL EN. Version 1 I
 R3 RIM MANUAL EN Version 1 I 07.02.2017 TABLE OF CONTENTS Introduction...1 Frame Features...2 Fork Preparation...3 Small Parts...5 Frame Preparation...6 Mechanical Cable Routing...7 Electric Cable Routing...9
DM-MBRD (English) Dealer's Manual. ROAD MTB Trekking. City Touring/ Comfort Bike. Rear Derailleur SLX RD-M7000 DEORE RD-M6000
 Dealer's Manual. ROAD MTB Trekking. City Touring/ Comfort Bike. Rear Derailleur SLX RD-M7000 DEORE RD-M6000") (English) DM-MBRD001-04 Dealer's Manual ROAD MTB Trekking City Touring/ Comfort Bike URBAN SPORT E-BIKE Rear Derailleur SLX RD-M7000 DEORE RD-M6000 CONTENTS IMPORTANT NOTICE... 3 TO ENSURE SAFETY... 4
(English) DM-MBRD001-04 Dealer's Manual ROAD MTB Trekking City Touring/ Comfort Bike URBAN SPORT E-BIKE Rear Derailleur SLX RD-M7000 DEORE RD-M6000 CONTENTS IMPORTANT NOTICE... 3 TO ENSURE SAFETY... 4
USER MANUAL. you pedal, something amazing happens
 TM USER MANUAL you pedal, something amazing happens THANK YOU! In our humble beginnings we ran a bike-powered smoothie booth at Northern California music festivals called The Juice Pedaler. We saw the
Rear Drive System SERVICE INSTRUCTION. Specifications SI-R670B
 - SERVICE INSTRUCTION SI-R670B t Rear Drive System Before use, read these instructions carefully, and follow them for correct use. In order to realize the best performance, we recommend that the following
Item Name: 30CM GIRLS STAR THE UNICORN BIKE
 Item No.: 42333753 Item Name: 30CM GIRLS STAR THE UNICORN BIKE Contents 1. Parts identification 1 2. Safety precautions 2 3. Check list 6 4. Assembly 7 5. Adjustment 14 6. Repair and Service 15 7. Warranty
EZ-3 USX HD Supplemental Owner s Manual
 EZ-3 USX HD Supplemental Owner s Manual Find us online at SunSeeker.Bike Revised 2/2016 CONGRATULATIONS! Congratulations and welcome to the Sun Seeker family! You have selected one of the most comfortable
UNPACKING AND ASSEMBLING YOUR DIAMONDBACK ROAD BIKE
 EMAIL SIGNUP BIKE REG SEARCH BIKES THE RIDE HEALTH FITNESS SKILLS SHOP MAINTENANCE CYCLING 101 RIDERS LIKE YOU TEAMS SUPPORT UNPACKING AND ASSEMBLING YOUR DIAMONDBACK ROAD BIKE 1. Begin by carefully cutting
DM-MBST (English) Dealer's Manual. ROAD MTB Trekking. City Touring/ Comfort Bike. Shifting lever. EZ-FIRE Plus ST-EF500 ST-EF510
 Dealer's Manual. ROAD MTB Trekking. City Touring/ Comfort Bike. Shifting lever. EZ-FIRE Plus ST-EF500 ST-EF510") (English) DM-MBST001-00 Dealer's Manual ROAD MTB Trekking City Touring/ Comfort Bike URBAN SPORT E-BIKE Shifting lever EZ-FIRE Plus ST-EF500 ST-EF510 CONTENTS IMPORTANT NOTICE... 3 TO ENSURE SAFETY...
(English) DM-MBST001-00 Dealer's Manual ROAD MTB Trekking City Touring/ Comfort Bike URBAN SPORT E-BIKE Shifting lever EZ-FIRE Plus ST-EF500 ST-EF510 CONTENTS IMPORTANT NOTICE... 3 TO ENSURE SAFETY...
Beinn Owner s manual
 Beinn Owner s manual www.islabikes.co.uk Setting up your Islabike You can view our how to set up your Beinn video guides on our website: http://www.islabikes.co.uk/info-hub/islabike-setup-video-guides
DM-RCWH (English) Dealer's Manual. ROAD MTB Trekking. City Touring/ Comfort Bike. Wheel Set. WH-RX31 SM-AX x12 SM-AX x12
 Dealer's Manual. ROAD MTB Trekking. City Touring/ Comfort Bike. Wheel Set. WH-RX31 SM-AX x12 SM-AX x12") (English) DM-RCWH001-00 Dealer's Manual ROAD MTB Trekking City Touring/ Comfort Bike URBAN SPORT E-BIKE Wheel Set WH-RX31 SM-AX720-100x12 SM-AX720-142x12 CONTENTS IMPORTANT NOTICE... 3 TO ENSURE SAFETY...
(English) DM-RCWH001-00 Dealer's Manual ROAD MTB Trekking City Touring/ Comfort Bike URBAN SPORT E-BIKE Wheel Set WH-RX31 SM-AX720-100x12 SM-AX720-142x12 CONTENTS IMPORTANT NOTICE... 3 TO ENSURE SAFETY...