National Park Service. Manual of Instruction for the Safe Use of Reproduction Breech-Loading Carbine and Rifle in Interpretive Demonstrations
|
|
|
- Louisa Harrison
- 5 years ago
- Views:
Transcription


1 National Park Service Manual of Instruction for the Safe Use of Reproduction Breech-Loading Carbine and Rifle in Interpretive Demonstrations
2
3 TABLE OF CONTENTS Page Part I: Introduction 1 Part II: Nomenclature 5 Part III: Inspection and Maintenance 7 Part IV: Drill 10 Part V: Misfire Procedures 27 Part VI: Laboratory 29 Part VII: Demonstration Critique 31
4 4
5 PART I - INTRODUCTION This manual sets forth the procedures that must be followed by persons demonstrating single-shot breechloading carbines and rifles to the public in areas administered by the National Park Service (NPS). It also provides instruction on proper maintenance, inspection, and repair procedures. This manual must be used in conjunction with the service wide standards for Historic Weapons Firing Demonstrations (NPS-6 Guidelines for Interpretation). The information below largely comes from primary sources of the period during which the weapons described were used. Several generations of NPS historic weapons personnel have modified these original texts in order to improve demonstrator and visitor safety, make the original texts more comprehensible and to incorporate knowledge gained from years of actually using these weapons in the field. The Park s Certified Historic Weapons Program Supervisor is responsible for the training and safety of the demonstrators, as well as the safety of the visitors. The following criteria will help determine when a demonstrator has been adequately trained. 1


6 THE SHARPS CARBINE This manual mainly deals with the use and care of reproduction Model 1859 and Model 1863 Sharps carbines, which were the predominant carbine used during the American Civil War and are by far the most popular reprodction cavalry arm used today. Although the Shaprs finished behind the Smith, Maynard, and Burnside carbines in trials conducted in 1860, it had a leg up on the competition at the outbreak of the Civil War beacuse the Sharps Rifle Manufacturing Company was the only carbine producer geared up for mass production at that time. The ever growing need for more cavalry wespons and improvements made in the Model 1863 version kept the Sharps in constant demand throughout the war. There were several other carbines in use during the war. The repeating Spencer carbine is described in its own manual. The other carbines pictured on the following pages fired brass cartridges. The following drill and procedures will have some relevance to other carbines, but additional research will be required for their use in National Park Service demonstrations. 2


7 OTHER PERCUSSION CARBINES The Burnside carbine was third most used weapon of its type during the Civil War. Like the Shraps, the breech block of the Burnside carbine drops down when the trigger guard is moved forward. This allowed the brass cartrdige to be placed in the block. The round goes into action when the trigger guard is pulled back. The Burnside carbine was heavily used by Union cavalry in the Western Theater. The Smith carbine was the next most used carbine after the Burnside. The action is opened by depressing a lever forward of the trigger. The cartridge is iserted directly into the bore and then the barrel raised to close the action. This weapons was the simplest and easiest to manitain of all Civil War carbines. 3


8 The barrel of the Gallagher carbine slides forward and then angles down when the trigger guard is moved forward. This design was meant to make extraction of the empty brass caes easier. Unfortunately, the main complaint against this weapon was the difficulty in removing spent casings. The Maynard carbine functions in nearly the same way as the Gallagher without the extraction problems. This weapon was considered one of the most reliable carbines used during the Civil War. 4

9 PART II - NOMENCLATURE The following list corresponds to the diagram on the next page. 5
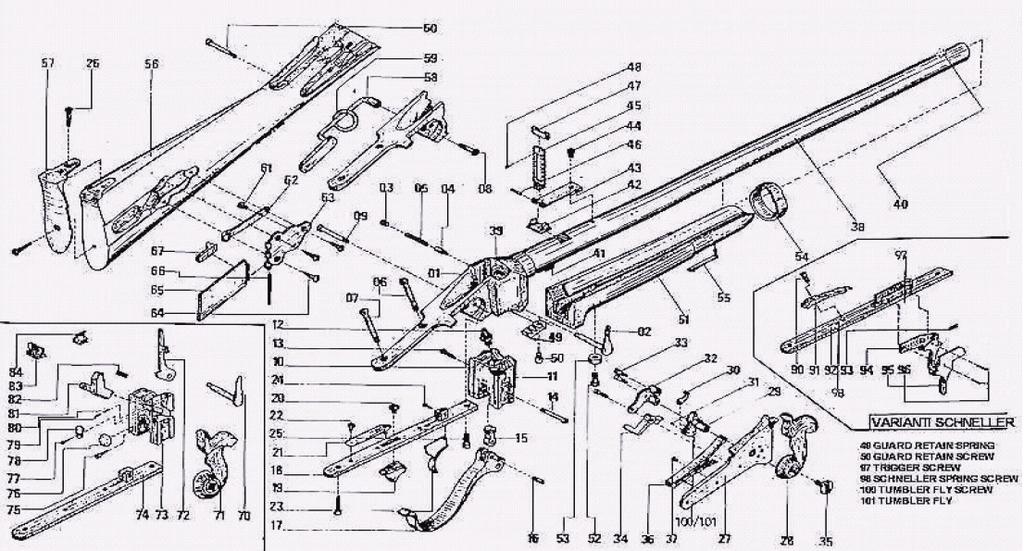
10 6
11 PART III - INSPECTION AND MAINTENANCE INSPECTIONS Frequency of Inspections All weapons shall be inspected before demonstrations and after the final cleaning on that particular day. Weapons in storage should be periodically checked for rust or other types of damage due to moisture. If a weapon does not meet safety standards for any reason, a large string tag should be tied to it detailing the specific problem. Repairs should be affected as soon as possible. Problems Encountered During Inspections 1. Overall poor cleaning. If a weapon is not cleaned immediately after use, the residue in the barrel will harden. Effective cleaning is made more difficult and there is a possibility of coke buildup in the bore. This is very dangerous, as, in subsequent firings, this coke buildup can retain a spark or smolder and ignite the fresh powder charge as soon as it drops into the barrel. Even if the primers alone are fired, they leave a corrosive residue both around the cone and in the breech area of the barrel. If this is not removed, rust will occur in these areas.there is also the possibility of a buildup of solid material around the cone which could be dislodged in subsequent firings, with the possibility of injury to the demonstrator or a visitor. 2. Weak mainspring. When cocking the piece, if there appears to be a weak mainspring, it should be replaced or taken to a competent gunsmith to be hardened. Complaints of blow-back through the vent of the cone may be the result of a weak mainspring. If the spring is weak, pressure from firing may cause gases and unfired powder to escape from the vent. 3. Weapon fires on half cock. This is probably due to wear of the half-cock notch on the tumbler. It may also be the fault of a weak or broken sear-spring. If the tumbler is at fault, it may be corrected or broken sear-spring. If the tumbler is at fault, it may be corrected by carefully deepening the half-cock notch. If the tumbler is badly worn, it should be replaced 4. Worn or damaged cone. When this occurs, the cone should be replaced. A common cause of blow-back is the vent of the cone being worn to a larger diameter, allowing excess gases to escape when the weapon is fired. 7
12 5. Bent or bulged barrel. This problem is fairly easy to see and should be noticed during any good inspection. If it is not badly bent, it can be straightened by any competent gunsmith; however, it is recommended that it be replaced. Bulged barrels are caused by firing ball ammunition ( live rounds ) without seating the mine ball all the way down on the powder charge. THIS SHOULD NEVER BE DONE. A bulged or even a burst barrel will result. If a minie ball cannot be seated firmly on the powder charge by normal pressure of the ramrod, the ball and charge should be withdrawn by use of the ball puller. Dismounting the Sharps Carbine 1. Open the action and ensure the weapon is unloaded then close the action. 2. With the action closed, pull the hammer to half-cock. 3. Locate the lever hinge pin (Part # 02) on the right side of the receiver near the rear of the forearm. Next to the lever hinge pin is a small plunger pin that acts as a lock to prevent the lever from rotating accidentally. 6. Blown skirt or cleaning patch lodged in barrel. Attempt to remove a stuck patch or suspected blown minie ball skirt by careful use of the wiper. Always turn the wiper in a clockwise direction or the wiper may unscrew itself from the cleaning rod. If this procedure doesn t work, it may be necessary to pull the breech-plug. 4. Depress the small plunger pin which will allow the lever hinge pin to be rotated approximately 180 degrees. 5. With the weapon turned upside down, rotate the lever hinge pin forward and backward slightly while pulling outward to remove it. The following checklist should be used when inspecting individual firearms. Newly purchased firearms should be inspected using this checklist prior to placing into service. 6. Slide the trigger guard/lever and breech block out of the rifle. Further disassembly of your Sharps rifle or carbine should only be attempted by a competent gunsmith. Reassembly is accomplished in reverse order. 8
13 To Clean 1. Remove the trigger guard and breech block assembly and soak in hot, soapy water. 2. Clean the barrel with hot, soapy water using a bore brush and patches. Dry thouroughly and lightly oil. 3. Thoroughly clean and dry the trigger guard/breech block assembly and lightly oil. 4. If the weapon has a gas check plate, remove it from the front face of the breech block using a knife blade to carefully loosen the joint at the breech plate. Note: The purpose of the gas check plate is to seal the rear of the chamber when the powder is ignited. If the gas check plate is not removed and cleaned regularly, it will become fouled, rendering it ineffective in sealing the breech. This leakage can permanently damage the gas check plate and possibly cause injury to the demonstrator. 5. Clean the checkplate with soapy water or solvent. 6. Put a light coating of grease on the outside of the checkplate and place back in the breech block. 9
14 PART IV - CARBINE DRILL (DISMOUNTED) The following is a manual for the proper handling and firing of a carbine on foot based on the drill Compiled from U. S. standard authorities with important notes and a military glossary, by T. Worthington, a graduate of West Point, and late Gen. 2d B. 7th D. O. M. Assisted by Maj. Sidney Burbank and Lieut. P. T. Swaine, U.S.A. Some modifications have been made to conform with National Park Service policies and standards. Under no circumstances shall firing demonstrations be given from horseback. The added safety risk involved in firing mounted cannot be justified by the potential interpretive benefit. MANUAL OF ARMS ON FOOT Position of Carried Arms. 1. The carbine is in the right hand against the hollow of the right shoulder, the barrel perpendicular, the guard to the front; the arm slightly bent, the elbow close to the body, the thumb above the guard, the forefinger extended on the stock, the remaining fingers closed and in rear, the little finger pressing against the hammer. 2. The squad being at carry arms, the instructor commands: 10
15 Order--Arms. One time and three motions. 1. At the command arms, detach the carbine with the right hand perpendicularly four inches from the shoulder, seizing it at the same time with the left hand above the band. 2. Seize the carbine with the right hand half way between the left hand and muzzle. 3. Let go of the carbine with the left hand, which is dropped by the side; extend the right arm, bringing the carbine to the ground, the toe of the butt on a line with, and two inches from, the right toe, the guard to the front, the elbow near the body, the barrel between the thumb and forefinger, the remaining fingers in rear of the barrel. 11
16 Carry--Arms One time and three motions. 1. At the command arms, raise the carbine with the right hand perpendicularly, the barrel four inches from the shoulder, and seize it with the left hand just above the band. 2. Seize the carbine with the right hand, the thumb above the guard, the forefinger extended on the stock, the remaining fingers in rear of it. 3. Carry the carbine against the right shoulder with the right hand, dropping the left hand smartly by the side. Present--Arms One time. 1. At the command arms, carry the carbine with the right hand opposite to the middle of the body, the barrel perpendicular, the guard to the front, the forearm pressed against the body; seize the carbine with the left hand, the little finger just above the right thumb, the left thumb extended along the groove between the barrel and stock, the hand as high as the elbow; reverse the position of the right hand, brining the fingers to the front, the forefinger pressing against the under part of the guard, the thumb in rear of the stock. 12
17 Carry--Arms One time. 1. At the command arms, shift the position of the right hand, bringing the thumb to the front and above the guard, carry the carbine to the right shoulder, dropping the left hand smartly by the side. Support--Arms One time and four motions. 1. At the command Arms, detach the carbine perpendicularly four inches from the shoulder, seize it at the same time just above the band with the left hand. 2. Raise the carbine with both hands, turning the barrel to the front, at the same time, changing the position of the right hand at the small of the stock, the fingers to the front, the thumb to the rear, the left hand opposite to the left shoulder, and as high as the eyes. 3. Place the left forearm under the hammer, the hand on the right breast, the fingers closed and pointing toward the right shoulder. 4. Drop the right hand briskly by the side. 13
18 Carry--Arms One time and four motions. 1. At the command Arms, seize the carbine at the small of the stock with the right hand. 2. Detach the carbine four inches from the shoulder, seizing it with the left hand just above the band, the thumb extended, the forearm pressed against the stock. 3. Bring down the carbine with both hands (changing the position of the right hand) to a position perpendicularly opposite to, and four inches from, the shoulder, the left forearm horizontal. 4. Carry the carbine against the hollow of the right shoulder, dropping the left hand briskly by the side. 14
19 Secure--Arms One time and two motions. 1. Seize the carbine with the left hand just above the band, at the same time grasping it with the right hand just above the hammer. 2. Lower the muzzle, bringing the butt under the arm, the guard resting on the hip, the barrel uppermost, the thumb resting on the sight, at the same time drop the left hand briskly by the side. Carry--Arms One time and two motions. 1. At the command Arms, throw up the carbine in a vertical position, seizing it with the left hand just above the band, shift the position of the right hand. 2. Carry the carbine to the right shoulder, and drop the left hand by the side. 15
20 Order--Arms (As prescribed above) Sling--Carbine One time and two motions. 1. At the command Carbine, raise the carbine perpendicularly with the right hand, place it in the left, which seizes it at the sight, the thumb extended along the barrel, the guard to the front; incline the muzzle to the left, that the ring may hang down, the left hand as high as, and opposite to the neck, slip the swivel to the front with the right hand, the thumb pressing on the short side to open it, insert it in the ring, and seize the carbine at the small of the stock with the right hand. 2. Let go with the left hand, which is dropped by the side, lower the muzzle, pass the carbine behind the back, push the butt to the rear, and drop the right hand by the side. 16
21 Unsling-Carbine Two times (second time in) two motions. At the command unsling, seize the carbine with the right hand at the small of the stock. 1. At the command Carbine, raise it, place it in the left hand, which seizes it at the sight, the guard to the front, the muzzle inclined to the left, the left hand as high as, and opposite to, the neck; free the swivel from the ring, and carry it to the rear with the right hand. 2. Seize the carbine half way between the point of the stock and the muzzle, bring it down, turning it at the same time, and resume the position of order arms. 17
22 Ground--Arms One time and two motions. 1. At the command Arms, turn the carbine with the right hand, bringing the swivel bar to the front, bend the body, advance the left foot eighteen inches, lay the carbine on the ground in front of the body, lock up, the toe of the butt on a line with the right toe, the right knee slightly bent, the right heel raised. 2. Rise up, bring the left foot by the side of the right, and drop the hands by the sides. Raise--Arms One time and two motions. 1. At the command Arms, bend the body, advance the left foot eighteen inches, raising the right heel, seize the carbine with the thumb and first two fingers, half way between the point of the stock and the muzzle. 2. Raise the carbine, bringing the left foot by the right, turn the carbine in the right hand, and resume the position of Order Arms, No. II. When the saber is worn, it is seized with the left hand just above the lower ring, point to the front at the same time the first motion of Nos. XII and XIII is executed. 18
23 LOADING AND FIRING Note: When demonstrating a carbine, the drill may be done with or without a sling. Loading in Four Times. The squad being at Carry Arms, the instructor commands, Load in Four Times. 1. Load One time and two motions. 1. At the command load, make a half-face to the right, turning on the left heel, bringing the toes of the left foot directly to the front; carry the right foot to the rear, the hollow of it opposite to, and three inches from, the left heel, detach the carbine perpendicularly four inches from the shoulder, raise it, and seize it with the left hand at the sight, the left forearm horizontal. 2. Lower the muzzle to the height of the eye, the left hand as high as, and opposite to, the right breast, the thumb extended along the barrel; move back the catch with the forefinger of the right hand, seize the lever with the thumb and first two fingers, and throw it open to its full extent, and carry the right hand to the cartridge box, and open it. 19
24 2. Charge--Cartridge One time and two motions. 1. At the command Cartridge, draw the cartridge, insert it (ball foremost) in the barrel, press it in with the thumb and forefinger, and seize the lever with the thumb and first two fingers. 2. Draw back the lever, move up the catch, half-cock, remove the old cap, and carry the right hand to the cap-pocket, and open it. 3. Prime One time. At the command Prime, place a cap on the cone, press it down with the thumb. Seize the carbine at the small of the stock with the right hand. 4. Carry--Arms One time and two motions. 1. At the command Arms, carry the carbine to the right shoulder, the barrel to the rear; reverse the positon of the right hand, and face to the front. 2. Drop the left hand by the side. 20
25 Firing The instructor commands: Ready One time and two motions. 1. At the command Ready, make a half-face to the right, carrying the right foot square behind the left, the hollow of it opposite to, and three inches from, the left heel; detach the carbine vertically four inches from the shoulder; seize it with the left hand a little below the band, the thumb along the stock; raise it with both hands, the left as high as the neck; place the right thumb upon the head of the hammer, the forefinger on the guard, the second finger under it, the elbow as high as the hand. (At the same time the men of the rear rank step off to the right six inches with the right foot, placing the left in front, the heel opposite to, and three inches from, the hollow of the right foot, so as to be placed opposite to the interval on the right of their respective file leaders.) 2. Cock the piece by lowering quickly the right elbow, and seize the small of the stock. 21
26 Aim One time. At the command Aim, lower the muzzle quickly, the carbine resting between the thumb and first finger, the remaining fingers closed and under the stock, the right below at the height of the shoulder; place the face against the stock, shut the left eye, direct the sight eye along the barrel to aim, and place the forefinger of the right hand on the trigger. (At the same time the men of the rear rank step off with the left foot six inches to the front, bending the left knee and leaning well forward, so as to throw the muzzle of their pieces beyond the faces of the men of the front rank.) To recover arms before firing, the instructor commands: Recover--Arms One time. At the command Arms, take the finger from the trigger, raise the carbine quickly, and resume the position of the second motion of Ready. (At the same time the men of the rear rank bring back the left foot, the heel of it three inches from, and in front of, the hollow of the right foot, but remain opposite to the interval.) 22
27 To carry arms without firing after having made ready or recovered arms, the instructor commands: Carry--Arms Two times (second time in) two motions. 1. At the command Arms, carry the carbine to the right shoulder, barrel to the rear; reverse the position of the right hand; at the same time face to the front, bringing the heels together. (At the same time the men of the rear rank place themselves in rear of their fiel leaders, by stepping six inches to the left with the left foot, bringing the right heel by the side of the left.) 2. Drop the left hand smartly by the side. Being in that position of Aim, to fire, the instructor commands: Fire One time. At the command Fire, pull the trigger and fire without lowering or turning the head, and remain in this position. 23
28 If, after firing, the instructor does not wish to load, he commands: Carry--Arms Two times (second time in) two motions. At the command Carry, bring down the carbine to the second position of load; seizing it at the small of the stock with the right hand. 1. At the command Arms, carry the carbine to the shoulder. (The rear rank men take their place behind their file leaders.) 2. Drop the left hand smartly by the side. If, after firing, the instructor wishes to load, he commands: Load One time. At the command Load, bring down the carbine to the second position of load, load at will, carry arms, and face to the front. (The men in the rear ranks place themselves behind their file leaders, after they have primed, and as their carbine is being brought to carry arms.) 24
29 Inspection of Carbine The squad being at the position of order arms, the instructor commands: Inspection--Carbine One time and three motions. 1. Raise the carbine smartly with the right hand, keeping the barrel toward the body, place it in the left hand which seizes it at te sight, the thumb extended along the stock, the hand opposite to the shoulder and as high as the chin, the elbow against the butt, carry the right hand to the catch, disengage it and spring open the lever to its full extent, drop the right hand by the side. 2. Seize the lever with the thumb and first two fingers of the right hand, shut it, move up the catch, and drop the right hand by the side. 25
30 3. Seize the carbine with the right hand half way between the point of the stock and the muzzle, let go with the left hand, which is dropped by the side, carry the carbine with the right hand to the position of order arms. Each man, as the instructor passes before him, executes the first motion of inspection carbine. The instructor takes the carbine, and, after inspecting it, returns it to the trooper, who seizes it as in the first motion of inspection carbine. As soon as the instructor has passed by two files, the trooper who has been inspected executes the second and third motions of inspection carbine. Inspection of Arms The squad being at Order Arms, the instructor commands: Inspection--Arms Each trooper, as the inspector passes before him executes the first motion of inspection carbine. As soon as the instructor has passed by two files, the trooper, who has been inspected, executes the second motion of inspection carbine, turns the muzzle to the left, and slings it, No. X, and draws sabre. As soon as the sabre is inspected, it is returned, hooked up, and the trooper unsligns carbine. 26
31 PART V - MISFIRE PROCEDURES Each park shall develop a Misfire Plan to address the action necessary to render a firearm safe in the event of a Level I or Level II Misfire. TYPES OF MISFIRES A Level I Misfire is defined as a misfire that can be cleared at the demonstration area and the demonstration can continue. Level I misfires usually are attributed to failure of percussion caps or clogged vents. A Level II Misfire is defined as a misfire that cannot be cleared at the demonstration area without disrupting the demonstration. Specialized equipment may be needed to render the firearm safe. The audience must be dismissed, and the piece cleared in a safe manner away from the public. CAUSES OF MISFIRES: --Improperly cleaned firearm: If a firearm is not properly cleaned immediately after use, the residue in the barrel will harden, rust and corrosion will form. This buildup of fouling will likely obstruct the vent. Excessive oil may pool in the breech and obstruct the vent or neutralize the powder charge. --Obstruction of the vent: The vent may become obstructed by fouling, excessive oil, or particles from the percussion cap. New firearms with reoccurring misfires should be checked to see if the vent of the cone properly aligns with the vent in the bolster. --Poor quality percussion caps: The fulminate of mercury used in the percussion cap will deteriorate if stored a damp environment, making the caps ineffective. --Improper loading procedure: The powder charge is not properly seated under the vent. LEVEL I MISFIRE PROCEDURES Should a misfire occur: 1. Remain at position of aim. Count to ten. 2. Lower the piece to the first position of prime. Half-cock the piece, remove the spent cap and visually inspect the vent of the cone. Use the cone pick if necessary to remove obstructions of the vent. 3. Repeat prime, ready, aim and fire procedure. 4. Repeat procedure two times. If the weapon still misfires, it must be removed from the visitor area, taken to a secure area, as designated in the Park Misfire plan, and the following procedure is used. 27
32 LEVEL II MISFIRE PROCEDURES LEVEL II MISFIRE CO2 DISCHARGER 1. Keep the piece pointed in a safe direction. LEVEL II MISFIRE UNLOADING THROUGH THE MUZZLE Should the CO2 discharger not be available or fail to remove the charge, the piece must be unloaded through the muzzle: 2. Half cock the piece and remove the cap. 1. Soak the powder charge with water poured down the muzzle. 3. Place the CO2 discharger with adapter over the cone evenly for a good seal. Press the discharger lever quickly and release. 4. Clean and inspect the piece before attempting to load it again. 2. Open the action and remove the charge. 3. Clean and inspect the piece before attempting to load it again. 28
33 PART VI - LABORATORY MANUFACTURING BLANK CARTRIDGES Materials Needed - Hardwood Cutting Board - Wood Ruler - Knife or Scissors - Paper (Nitrated or Cigarette Rolling Paper) - Round Ball or Marble of same caliber as weapon - Elmer s Glue - Ffg Black Powder - Former - Same diameter as the ball adn six inches long with one end slightly concave - Trapezoid Pattern Nitrated paper is simply a light weight, high rag bond paper soaked in a saturated potassium nitrate solution. A saturated solution is made by adding potassium nitrate to water until it will dissolve no more of the chemical. Best results are achieved if the water is slightly above room temperature. Place the saturated potassium nitrate solution in a flat pan. Next place the paper into the pan and allow it to become completely saturated with the solution. Remove the saturated paper from the solution and allow it to completely dry. 1. The dried paper is cut to the shape shown at right. 29
34 2. Roll the cut nitrated paper around a dowel the same diameter as the bullet you are shooting. National Park Service TABLE OF MAXIMUM LOADS - SMALL ARMS 3. Glue the paper along the edge to form a cylinder. 4. Pour a measured charge of black powder into the cylinder and fold the open end of the cylinder over, sealing it with glue. The cartridge is now ready for use. Weapon Types Caliber Maximum 18th Century Flintlock Blank Charge Brown Bess Musket grains Ffg Charleville Musket grains Ffg American Musket grains Ffg Kentucky Rifle Variable 90 grains Ffg Pistols & Horse Pistols Variable 90 grains Ffg 19th Century Percussion U.S. Rifle M / grains Ffg U.S. Musket, M grains Ffg U.S. Rifle Musket, M grains Ffg British Enfield Rifle.577/ grains Ffg U.S. Rifle, Musketoon grains Ffg Sharps Carbine/Rifle grains Ffg Revolver.36/ grains Fffg 19th Centiry Metallic Cartridge U.S. Rifle, M grains Ffg Sharps Carbine grains Ffg U.S. Rifle, M grains Ffg U.S. Carbine, M grains Ffg Henry Repeating Rifle grains Ffg Colt/S&W Revolver grains Ffg 30
35 PART VII - SMALL ARMS DEMONSTRATION CHECKLIST BEFORE ( ) The piece has been inspected, inside and out. Bore is clean of foreign material. ( ) The demonstrator approaches the demonstration area carrying the firearm in a safe and military fashion. ( ) He is not encumbered with superfluous equipment. ( ) Misfire equipment is in place at the demonstration area. ( ) Visitors have a good filed of vision of the demonstration. ( ) The interpreter has a clear view of all the visitors and down range area. ( ) Physical barriers between the visitors and the demonstration area are in place. ( ) Conditions are not too dry or windy to risk a range fire from the muzzle blast. ( ) First aid kit and emergency communications are available. DURING ( ) He is competent with the manual he is using. ( ) There is sufficient additional people for interpretation and crowd control. ( ) The demonstration area is safe for the size of the audience. ( ) The firearm is always pointed in a safe direction. ( ) At no time are there any parts of the demonstrator s body placed in a hazardous position in relation to the firearm. ( ) No firing is conducted from horseback ( ) All percussion revolvers are loaded and fired one round at a time. ( ) In the event of a misfire or other unscheduled event the demonstrator reacts properly. AFTER ( ) The demonstrator maintains military bearing and leaves the area carrying the firearm safely and in a military fashion. ( ) The demonstration area is policed for dropped cartridges, cartridge papers, etc. ( ) Any remaining cartridges are returned to storage facility ( ) The piece is cleaned, dried and oiled. The piece is returned to the storage facility. ( ) Any accessories are accounted for. ( ) Your overall impression is favorable. 31
National Park Service. Manual of Instruction for the Safe Use of Reproduction Repeating Rifles in Interpretive Demonstrations
 National Park Service Manual of Instruction for the Safe Use of Reproduction Repeating Rifles in Interpretive Demonstrations 2 TABLE OF CONTENTS Part I: Introduction 1 Page Part II: Nomenclature 2 Henry
MUSKET MANUAL OF ARMS FOR THE
 MANUAL OF ARMS FOR THE MUSKET 414. This manual differs in so many respects from that of the rifle and rifle musket that it becomes necessary to specify it for the use of infantry troops armed with the
NATIONAL PARK SERVICE MANUAL FOR THE HANDLING AND FIRING OF U.S. M1911 and M1911A1 Colt Automatic Pistol,.45 A.C.P. Caliber IN INTERPRETIVE
 NATIONAL PARK SERVICE MANUAL FOR THE HANDLING AND FIRING OF U.S. M1911 and M1911A1 Colt Automatic Pistol,.45 A.C.P. Caliber IN INTERPRETIVE DEMONSTRATIONS 1 PREFACE This manual sets forth the procedures
2990 Lorne Scots Royal Canadian Army Cadet Corps Rifle Drill
 2990 Lorne Scots Royal Canadian Army Cadet Corps Rifle Drill Page 1 of 27 TABLE OF CONTENTS PARA ITEM PAGE Section 1 BASIC RIFLE DRILL 1.1 INTRODUCTION 3 1.2 ATTENTION 5 1.3 STAND AT EASE FROM ATTENTION
STRIBOG GRAND POWER. The INSTRUCTIONS FOR USE, MAINTENANCE AND SAFETY. 1
 instructions The for use, maintenance STRIBOG and safety hestribog GRAND POWER INSTRUCTIONS FOR USE, MAINTENANCE AND SAFETY www.grandpower.eu 1 The STRIBOG Dear Customer, Thank you for purchasing a semi-automatic
MANUAL OF ARMS FOR THE RIFLE (M-1 GARAND) POSITION OF ORDER ARMS
 POSITION OF ORDER ARMS") MANUAL OF ARMS FOR THE RIFLE (M-1 GARAND) In describing the manual of arms, the term, at balance, refers to a point on the rifle just forward of the trigger housing. Whenever a position is described as
MANUAL OF ARMS FOR THE RIFLE (M-1 GARAND) In describing the manual of arms, the term, at balance, refers to a point on the rifle just forward of the trigger housing. Whenever a position is described as
2672 Hastings & Prince Edward Regiment Royal Canadian Army Cadet Corps. Lee Enfield No.4. Rifle Drill
 2672 Hastings & Prince Edward Regiment Royal Canadian Army Cadet Corps Lee Enfield No.4 Rifle Drill Extracts from A-CR-CCP-053/PT001 March 2005 TABLE OF CONTENTS PARA ITEM PAGE Section 1 BASIC RIFLE DRILL
U.S. M1892 Magazine Rifle (Krag-Jorgensen), Caliber Army
, Caliber Army") U.S. M1892 Magazine Rifle (Krag-Jorgensen), Caliber.30-40 Army The first bolt-action, magazine-fed, smokeless powder rifle adopted by the U.S. Army as a primary shoulder arm in 1892. A model manufactured
U.S. M1892 Magazine Rifle (Krag-Jorgensen), Caliber.30-40 Army The first bolt-action, magazine-fed, smokeless powder rifle adopted by the U.S. Army as a primary shoulder arm in 1892. A model manufactured
INSTRUCTION MANUAL CZ 75 TS
 INSTRUCTION MANUAL CZ 75 TS CZ 75 TS - INSTRUCTION MANUAL Before handling the pistol read this manual carefully and observe the following safety instructions. Improper and careless handling of the pistol
A Note From The Commander
 A Note From The Commander Cincinnati Compatriots... The Manual of Arms that we are practicing within the Nolan Carson Memorial Color Guard is consistent with the Von Steuben Order of Drill from 1777. However,
trigger magazine release
 Made in Germany www.umarexusa.com slide gas vent hammer barrel bushing recoil spring plug slide stop trigger safety trigger guard magazine release grip Government 1911 A1 S Cal. 9 mm P.A.K. (Blank Firing)
Key Terms. balance barrel bolt butt hand guard muzzle port arms sling stacking swivel stock trail arms trigger guard
 Lesson 7 Stationary Movements with the M-1 Rifle Chapter 5 Key Terms balance barrel bolt butt hand guard muzzle port arms sling stacking swivel stock trail arms trigger guard What You Will Learn to Do
CZ 40 P - INSTRUCTION MANUAL
 Before handling the pistol read this manual carefully and observe the following safety instructions. Improper and careless handling of the pistol could result in unintentional discharge and could cause
INSTRUCTION MANUAL CZ 92
 INSTRUCTION MANUAL CZ 92 Before handling the pistol read this manual carefully and observe the following safety instructions. Improper and careless handling of the pistol could result in unintentional
RIFLE DRILL. 1. General. Before commencing instruction in rifle drill, it is important that the cadets receive instruction in the parts of the rifle.
 RIFLE DRILL 1. General. Before commencing instruction in rifle drill, it is important that the cadets receive instruction in the parts of the rifle. 2. Rifle Movements. Unless stated otherwise, cadets
M16 R / M1600 R USER S MANUAL WARNING: READ THE INSTRUCTIONS AND SAFETY PRECAUTIONS IN THIS MANUAL CAREFULLY BEFORE USING THIS FIREARM.
 ARMSCOR M16 R / M1600 R USER S MANUAL WARNING: READ THE INSTRUCTIONS AND SAFETY PRECAUTIONS IN THIS MANUAL CAREFULLY BEFORE USING THIS FIREARM. DISCHARGING FIREARMS IN POOLY VENTILATED AREAS, CLEANING
INSTRUCTION MANUAL CZ 630/631
 INSTRUCTION MANUAL CZ 630/631 Before handling the air rifle read this manual carefully and observe the following safety instructions. Improper and careless handling of the air rifle could result in unintentional
LESSON 12: STATIONARY MOVEMENTS WITH THE M-1903 RIFLE
 LESSON 12: STATIONARY MOVEMENTS WITH THE M-1903 RIFLE PURPOSE balance barrel bolt port arms sight sling sling swivel stacking swivel This lesson introduces the procedures for executing the manual of arms
Manual of Arms for the Rifle Musket
 Manual of Arms for the Rifle Musket -ii- with Other Useful Instruction for troops portraying the Fifteenth Iowa Regiment of Infantry at 150 th Shiloh a faithful reproduction of text from U.S. Infantry
slide takedown lever magazine release
 Made in Germany www.umarexusa.com manual safety extractor slide gas vent hammer trigger lock trigger P22 S guide rod takedown lever slide stop magazine release Cal. 9 mm P.A.K. (Blank Firing) OPERATING
INSTRUCTION MANUAL CZ 75 Champion
 INSTRUCTION MANUAL CZ 75 Champion CZ 75 CHAMPION - INSTRUCTION MANUAL Before handling the pistol read this manual carefully and observe the following safety instructions. Improper and careless handling
LESSON 13: STATIONARY MOVEMENTS WITH THE M1 RIFLE
 LESSON 13: STATIONARY MOVEMENTS WITH THE M1 RIFLE PURPOSE balance fall in parade rest port arms trail arms upper band (Note: Since there are many similarities between the manual of arms for the M1 and
AAC CADET INSTRUCTOR S HANDBOOK. CEREMONIAL DRILL, SMLE.303 and 7.62 mm SLR
 AAC CADET INSTRUCTOR S HANDBOOK CEREMONIAL DRILL, SMLE.303 and 7.62 mm SLR 2010 THIS PAGE INTENTIONALLY BLANK i PREFACE Aim 1. The aim of this publication is to provide Cadets with the information to conduct
AR STYLE FIREARMS OWNER'S MANUAL: OPERATION, HANDLING, DISASSEMBLY / REASSEMBLY & SAFETY INSTRUCTIONS
 AR STYLE FIREARMS OWNER'S MANUAL: OPERATION, HANDLING, DISASSEMBLY / REASSEMBLY & SAFETY INSTRUCTIONS - DO NOT DISCARD THIS MANUAL - READ THIS MANUAL CAREFULLY, PAYING CLOSE ATTENTION TO THE INSTRUCTIONS
SAFETY RULES WARNING: READ THESE SAFETY RULES & OPERATORS MANUAL BEFORE HANDLING YOUR FIREARM
 SAFETY RULES WARNING: READ THESE SAFETY RULES & OPERATORS MANUAL BEFORE HANDLING YOUR FIREARM Never point a firearm at anyone and always keep the muzzle pointed in a safe direction. Always treat all firearms
MODEL 1400 E USER S MANUAL WARNING: READ THE INSTRUCTIONS AND SAFETY PRECAUTIONS IN THIS MANUAL CAREFULLY BEFORE USING THIS FIREARM.
 ARMSCOR MODEL 1400 E USER S MANUAL WARNING: READ THE INSTRUCTIONS AND SAFETY PRECAUTIONS IN THIS MANUAL CAREFULLY BEFORE USING THIS FIREARM. DISCHARGING FIREARMS IN POORLY VENTILATED AREAS, CLEANING FIREARMS
Armed Officer's Training Manual Nomenclature and Inspection
 Armed Officer's Training Manual Section 8: Nomenclature and Inspection Learning Goal: The student will know the components and understand the operation of the service revolver and semi-automatic pistol.
Instruction manual CZ 75
 Instruction manual CZ 75 Before handling the pistol read this manual carefully and observe the following safety instructions. Improper and careless handling of the pistol could result in unintentional
COLT AUTOMATIC PISTOL
 COLT AUTOMATIC PISTOL CALIBER.22 INSTRUCTIONS FOR ASSEMBLY - DISASSEMBLY CLEANING COLT AIUTOMATIC PISTOL IN 6 INCH OR 4}~2 INCH BARREL.22 Long Rifle, rim fire Cartridge Capacity of Magazine, 10 Shots Description
Basic Individual Drill (Co B, 71 st Pennsylvania Volunteer Infantry California Regiment)
") Basic Individual Drill (Co B, 71 st Pennsylvania Volunteer Infantry California Regiment) (Select Drill Movements from Casey s Manual) Order Arms Shoulder Arms Right Shoulder Shift Support Arms Rest Attention
Basic Individual Drill (Co B, 71 st Pennsylvania Volunteer Infantry California Regiment) (Select Drill Movements from Casey s Manual) Order Arms Shoulder Arms Right Shoulder Shift Support Arms Rest Attention
RIFLE AND INFANTRY TACTICS, Brig. Gen. W. J. HARDEE, C.S. ARMY. REVISED AND IMPROVED 150 SAILOR S CREEK
 THE ONLY COPY-RIGHT EDITION. -ii- Table of Contents RIFLE AND INFANTRY TACTICS, REVISED AND IMPROVED by Brig. Gen. W. J. HARDEE, C.S. ARMY. SUPPLEMENTED WITH OTHER CONTEMPORARY DRILL for CRUTCHFIELD S
PISTOL CALIBER AR STYLE FIREARMS
 PISTOL CALIBER AR STYLE FIREARMS OWNER'S MANUAL: OPERATION, HANDLING, DISASSEMBLY / REASSEMBLY & SAFETY INSTRUCTIONS - DO NOT DISCARD THIS MANUAL - READ THIS MANUAL CAREFULLY, PAYING CLOSE ATTENTION TO
INSTRUCTION MANUAL. Slavia 630/631
 INSTRUCTION MANUAL Slavia 630/631 Before handling the air rifle read this manual carefully and observe the following safety instructions. Improper and careless handling of the air rifle could result in
ARAK-21 OPERATOR SAFETY AND INSTRUCTION MANUAL
 ARAK-21 OPERATOR SAFETY AND INSTRUCTION MANUAL NOTICE: The ARAK-21 Upper Assembly itself is not considered a Firearm under federal law or the National Firearms Act. The ARAK-21 Upper Assembly mounted on
Muzzleloading Pistol Only
 T/C Patriot Use & Loading Supplement Suggested Black Powder & Pyrodex Loads For The T/C Patriot Note: This Model is Out of Production. For Reference Use Only. Muzzleloading Pistol Only Read and Understand
INSTRUCTION MANUAL CZ 750
 INSTRUCTION MANUAL CZ 750 Before handling the firearm read this manual carefully and observe the following safety instructions. Improper and careless handling of the firearm could result in unintentional
Major William Gilham (1859) Manual of Instruction for the Volunteers and Militia of the United States
 Manual of Instruction for the Volunteers and Militia of the United States") It is not intended, nor indeed would it be desirable, that the present work should embrace every thing which is proper to be known by our citizen soldiery ; its aim is, simply to aid the inexperienced
It is not intended, nor indeed would it be desirable, that the present work should embrace every thing which is proper to be known by our citizen soldiery ; its aim is, simply to aid the inexperienced
Before handling the pistol read this manual carefully and observe the following safety instructions. CONTENTS
 Before handling the pistol read this manual carefully and observe the following safety instructions. Improper and careless handling of the pistol could result in unintentional discharge and could cause
Cleaning rod: spring steel, stainless steel or carbon fibre cleaning rod - only use a one-piece rod. Avoid using snakes.
 Telemark Biathlon Where performance and precision come together http://telemarkbiathlon.com Rifle Cleaning Date : July 19, 2013 Anschutz Rifle Manual - Click Here Izhmash 7-3 Rifle Manual - still looking
2-1. CLEARING PROCEDURES
 CHAPTER 2 MAINTENANCE Proper maintenance contributes to weapon effectiveness as well as unit readiness. This chapter discusses the maintenance aspects of the M249 AR to include inspection; cleaning and
RIFLE. Brig. Gen. W. J. HARDEE, C.S. ARMY. CRUTCHFIELD S BRIGADE 150 TH SAILOR S CREEK. Col. Silas Tackitt, REVISED AND IMPROVED AND
 -62- THE ONLY COPY-RIGHT EDITION. CONSOLIDATED INDEX Principles of Shoulder Arms....................... p. 1 Manual of Arms. Support Arms, Present Arms, Order Arms, Rest, In Place Rest, Load in Nine Times,
CLEANING HANDGUNS TOOLS YOU WILL NEED
 CLEANING HANDGUNS CLEANING HANDGUNS If you take pride in your firearm, then you know how important it is to properly maintain your weapon. With good, consistent care, you not only make your gun look good
Table of Contents. Principles of Shoulder Arms... p. 1. Manual of Arms... p. 2. Firings... p. 28
 Table of Contents Principles of Shoulder Arms.................... p. 1 Manual of Arms............................... p. 2 Firings..................................... p. 28 Bayonet Exercise.............................
TABLE of CONTENTS. Safety 4. Introduction 6. Description 6. Storage 6. Components 7. Unloading and Inspection 8. Disassembly 10. Care and Cleaning 12
 1911 Pistol Manual 2 TABLE of CONTENTS Safety 4 Introduction 6 Description 6 Storage 6 Components 7 Unloading and Inspection 8 Disassembly 10 Care and Cleaning 12 Loading and Firing 13 Troubleshooting
KHANSHOTGUNS. Thank you for choosing KHANSHOTGUNS coachgun
 Thank you for choosing KHANSHOTGUNS coachgun Your coachgun represents a piece of rich history of quality firearms design and manufacture. During the manufacturing process, we have endeavored to incorporate
 (Mechanical Malfunctions) STOP SHOOTING IMMEDIATELY AND UNLOAD YOUR FIREARM if your firearm develops: a mechanical malfunction; binding or stoppage; spitting powder/gas; a punctured cartridge primer; a
Before handling the firearm read this manual carefully and observe the following safety instructions. CONTENTS
 Before handling the firearm read this manual carefully and observe the following safety instructions. Improper and careless handling of the firearm could result in accidental discharge and cause injury,
VR1 Owner s Manual. Vigilance Rifles, Inc Plum Lane Redlands, CA P F
 VR1 Owner s Manual Vigilance Rifles, Inc. 1653 Plum Lane Redlands, CA 92374 P 909.307.8877 F 909.307.8866 www.vigilancerifles.com INTRODUCTION: Vigilance Rifles offers a new line of Semi-Automatic Rifles
SAR-15 RIFLE OWNERS MANUAL
 SAR-15 RIFLE OWNERS MANUAL SIONICS WEAPON SYSTEMS Our mission is to manufacture quality firearms made with pride in the USA. We are able to do accomplish this by using only the best American made parts.
National Park Service. Manual of Instruction for the Safe Use of Reproduction Percussion Muskets in Interpretive Demonstrations
 National Park Service Manual of Instruction for the Safe Use of Reproduction Percussion Muskets in Interpretive Demonstrations 1 2 TABLE OF CONTENTS Page Part I: Introduction 1 Part II: Nomenclature 2
REC7 DI OPERATOR S MANUAL
 EC7 D REC7 DI OPERATOR S MANUAL TABLE OF CONTENTS 2 2 4 5 6 6 6 8 8 10 11 12 12 13 13 15 18 20 22 USE OF THIS MANUAL SAFETY GUIDELINES WARRANTY AND SERVICE NOTES FUNCTIONS AND FEATURES BREAK IN PROCEDURE
HATFIELD. Continuing the Tradition SEMI-AUTOMATIC SHOTGUN INSTRUCTION MANUAL
 HATFIELD Continuing the Tradition SEMI-AUTOMATIC SHOTGUN INSTRUCTION MANUAL READ THE INSTRUCTIONS AND WARNINGS IN THIS MANUAL CAREFULLY BEFORE USING THIS FIREARM SAFETY HANDLING RULES 1.Always keep the
ODEL 95 OPERATOR S MANUAL
 ODEL 95 MODEL 95 OPERATOR S MANUAL TABLE OF CONTENTS 2 2 3 5 6 6 6 7 7 8 8 11 11 12 12 19 20 22 24 26 MANUFACTURER S DISCLAIMER USE OF THE MANUAL SAFETY GUIDELINES WARRANTY AND SERVICE DESCRIPTION OF FIREARM
WEAPONS INSPECTION SEMI-AUTOMATIC. The instructors will inspect each shooter's weapon prior to any firing.
 WEAPONS INSPECTION SEMI-AUTOMATIC The instructors will inspect each shooter's weapon prior to any firing. a. Ensure that all weapons and magazines are cleared of rounds. Check it again. b. Check the BARREL.
CHAPTER 2 MAINTENANCE
 CHAPTER 2 MAINTENANCE This chapter addresses the proper care of the machine gun to ensure its overall effectiveness and efficient functioning. The information includes the gunner's knowledge in disassembly
Before handling the firearm read this manual carefully and observe the following safety instructions. CONTENTS
 Before handling the firearm read this manual carefully and observe the following safety instructions. Improper and careless handling of the firearm could result in accidental discharge and cause injury,
SHF R50 SHF S50 Safety Harbor Firearms, Inc. PO Box 563 Safety Harbor, FL Ph: Fax:
 SHF R50 SHF S50 Safety Harbor Firearms, Inc. PO Box 563 Safety Harbor, FL 34695-0563 Ph: 727-726-2500 Fax: 727-797-6134 www.safetyharborfirearms.com 1 ^ WARNING Risk of serious injury or death. Failure
SEMIAUTOMATIC SHOTGUN OWNER'S MANUAL
 SEMIAUTOMATIC SHOTGUN OWNER'S MANUAL ARMSAN@ARMSAN.COM TECHNICAL DATA Caliber :12 gauge / 20 gauge / 28 gauge Operation: Semi-Automatic, Gas Operated System Barrel Length: 20 (51cm), 24 (61cm), 26 (66cm),
Ultra 87 Pump Action Shotgun Instruction Manual
 Ultra 87 Pump Action Shotgun Instruction Manual Congratulations on your purchase of the Ultra 87 shotgun. With proper care and handling it will give you long, reliable service. It is important that you
N-PAP & O-PAP M70 DF SEMI-AUTO RIFLES
 Owner s Manual N-PAP & O-PAP M70 DF SEMI-AUTO RIFLES Cal. 7.62X39MM Congratulations on your purchase of the PAP M70 DF Semi-Auto Rifle. With proper care and handling, it will give you long, reliable service.
RAD MRAD BREECH CONVERSION KIT INSTRUCTIONS
 RAD MRAD BREECH CONVERSION KIT INSTRUCTIONS TABLE OF CONTENTS 2 2 4 5 5 6 USE OF THIS MANUAL SAFETY GUIDELINES WARRANTY AND SERVICE CONTENTS PURPOSE OF BREECH CONVERSION KIT INSTRUCTIONS BREECH CONVERSION
Section Five - Semi Auto Pistols
 Section Five - Semi Auto Pistols Like revolvers, semi auto pistols have parts that are unique to them. In figure 1 below we have pointed out the most common parts to the semi auto handgun and give detailed
Before handling the firearm read this manual carefully and observe the following safety instructions. CONTENTS
 Before handling the firearm read this manual carefully and observe the following safety instructions. Improper and careless handling of the firearm could result in accidental discharge and cause injury,
Basic Pistol Test Study Guide
 1. The three major components of a pistol are: a. barrel, action and grip b. frame, barrel and action c. barrel, frame and hammer d. cylinder, frame and barrel Basic Pistol Test Study Guide 2. A cylinder
Appendix 5 NRA INSTRUCTOR TRAINING PROGRAM PRE-COURSE QUALIFICATION PISTOL
 NRA TRAINING COUNSELOR GUIDE Appendix 5: NRA Instructor Training Program Pre-Course Qualification Pistol Appendix 5 NRA INSTRUCTOR TRAINING PROGRAM PRE-COURSE QUALIFICATION PISTOL The NRA Instructor Training
OWNER S MANUAL. Read the instructions and warnings in this manual carefully before using this firearm; do not discard this manual.
 OWNER S MANUAL SDP compact Read the instructions and warnings in this manual carefully before using this firearm; do not discard this manual. This instruction manual should always accompany this firearm
SHOOTERS ARMS SEMI-AUTO PISTOLS
 Owner s Manual SHOOTERS ARMS SEMI-AUTO PISTOLS Cal..45 ACP Congratulations on your purchase of a Shooters Arms Semi-Auto Pistol. With proper care and handling, it will give you long, reliable service.
OPERATOR S MANUAL FOR AR-24 SERIES PISTOLS
 OPERATOR S MANUAL FOR AR-24 SERIES PISTOLS ArmaLite Incorporated Box 299 Geneseo Illinois U.S.A. 61254 309-944-6939 ArmaLite.com 2006 ArmaLite Inc. This book provides instructions on the operation and
NOTICE FEATURES BACKGROUND
 ,/ NOTICE Claims will not be honored for damage, injury or, death resulting from the intentional or accidental discharge of this firearm, or from it's function when used for purposes or subjected to treatment
INSTRUCTION MANUAL CZ 452/453
 INSTRUCTION MANUAL CZ 452/453 Before handling the firearm read this manual carefully and observe the following safety instructions. Improper and careless handling of the firearm could result in unintentional
SINGLE-ACTION BIG-BORE REVOLVER OWNER S INSTRUCTION MANUAL
 HERITAGE ROUGH RIDER SINGLE-ACTION BIG-BORE REVOLVER OWNER S INSTRUCTION MANUAL We recommend that you seek instruction in safe fi rearm handling by a competent fi rearms instructor. Remember there is no
trigger trigger guard
 Made in Germany www.umarexusa.com gas vent hammer cylinder ejector rod cylinder release grip Smith & Wesson Chiefs Special S Cal. 9 mm R.K. (Blank Firing) OPERATING INSTRUCTIONS trigger trigger guard USA
OPERATION AND FUNCTION
 CHAPTER 3 OPERATION AND FUNCTION This chapter discusses the operation of the M249 automatic rifle. This includes loading, unloading, cycle of functioning, adjusting the sight, and using the bipod. 3-1.
Biggest Finest Revolver
 Print 11/18/03 8:29 AM Page 1 INSTRUCTION MANUAL FOR MAGNUM S BFR Biggest Finest Revolver STAINLESS STEEL SINGLE ACTION REVOLVER * Shown with optional Hogue grip. READ THE INSTRUCTIONS AND WARNINGS IN
Paintball Marker. User s Manual. 530 South Springbrook Road Newberg, OR 97132
 Paintball Marker User s Manual 530 South Springbrook Road Newberg, OR 97132 Component Concepts, Inc., 530 South Springbrook Road, Newberg, OR 97132 Phone: (503) 554-8095 Fax: (503) 554-9370 www.phantomonline.com
Owner s Manual Golani Semi-Auto Sporter Rifle, Cal. 5.56mm
 Owner s Manual Golani Semi-Auto Sporter Rifle, Cal. 5.56mm Congratulations on your purchase of a Golani Semi-Auto Sporter Rifle. With proper care and handling it will give you long, reliable service. We
Operation Manual Spring Operated Break-Barrel & Under-Lever Pellet Rifles
 WARNING: This gun can cause serious injury or death. Read and follow the instructions carefully. Do not load a pellet into the gun until you are ready to shoot. If you do load a pellet and then decide
M1600 SEMI-AUTOMATIC RIFLE USER S MANUAL WARNING: READ THE INSTRUCTIONS AND SAFETY PRECAUTIONS IN THIS MANUAL CAREFULLY BEFORE USING THE FIREARM.
 M1600 SEMI-AUTOMATIC RIFLE USER S MANUAL WARNING: READ THE INSTRUCTIONS AND SAFETY PRECAUTIONS IN THIS MANUAL CAREFULLY BEFORE USING THE FIREARM. SEPTEMBER 2016 ROCK ISLAND ARMORY USER S MANUAL M1600 SEMI-AUTOMATIC
INTRODUCTION TO THE SERVICE RIFLE AND MAINTENANCE
 INTRODUCTION TO THE SERVICE RIFLE AND MAINTENANCE 1 OVERVIEW DISASSEMBLY MAINTENANCE ASSEMBLY 2 TERMINAL LEARNING OBJECTIVE Given a service rifle, Common Combat Sling, and cleaning gear maintain a service
MARLIN Model: 882SS -22 WMR - (22 Magnum) * Now Called Model 982S
 * Now Called Model 982S") Page 1 of 16 MARLIN Model: 882SS -22 WMR - (22 Magnum) * Now Called Model 982S Bolt action rifle. 22 Win. Magnum Rim Fire; nickel-plated 7-shot clip magazine; 22" Micro-Groove barrel; stainless steel barrel,
Page 1 of 16 MARLIN Model: 882SS -22 WMR - (22 Magnum) * Now Called Model 982S Bolt action rifle. 22 Win. Magnum Rim Fire; nickel-plated 7-shot clip magazine; 22" Micro-Groove barrel; stainless steel barrel,
USER MANUAL Tisas Pistols
 USER MANUAL Tisas Pistols ZiG M45 (.45 ACP Single Action) ZiG PC1911 (.45 ACP Single Action) ZiG PCS1911 (.45 ACP Single Action) ZiG PCS9 (9 x19 Single Action) Zenith Firearms Come Shoot the Quality WARNING
GREEN STAR DRILL. Adopt the Position of Attention
 GREEN STAR DRILL Adopt the Position of Attention, Stand at Ease and Stand Easy 1.The position of attention is one of readiness for a word of command. Alertness and exactness in this position is important,
Disassembly, Assembly, and Cleaning of M16A4/M4
 Table of Contents iii Disassembly, Assembly, and Cleaning of M16A4/M4 By: George Carter Chris Talbott Jeremy Tinker Table of Contents Introduction... vii Disassembly... 3 Clearing the Magazine... 3 Retaining
Model 1911 Series Pistols SAFETY & INSTRUCTION MANUAL
 REGENT Model 1911 Series Pistols 01 SAFETY & INSTRUCTION MANUAL READ AND UNDERSTAND THE INSTRUCTIONS AND WARNINGS IN THIS MANUAL CAREFULLY, BEFORE USING THIS FIREARM. FAILURE TO READ THESE INSTRUCTIONS
Without loyalty, there can be no honor. Gilham's Infantry Tactics 5th VA Co A - 7th Batt. A.N.V.
 Page 1 of 91 Page 1 of 91 Gilham's Infantry Tactics 5th VA Co A - 7th Batt. A.N.V. www.carburetor-manual.com Would you like some Free Manuals? http://carburetor-manual.com/free-shop-manual-club-t-13.html
IMPORTANT SUPPLEMENTARY INSTRUCTIONS FOR Model1886 TAKEDOWN LEVER ACTION RIFLE
 Licensee IMPORTANT SUPPLEMENTARY INSTRUCTIONS FOR Model1886 TAKEDOWN LEVER ACTION RIFLE These are special instructions for the Winchester Model 1886 Takedown version only. These instructions must be used
AR15/ BCA 10 RIFLE OWNER S MANUAL
 AR15/ BCA 10 RIFLE OWNER S MANUAL THIS IS NOT A SAFETY MANUAL. IF YOU NEED ASSISTANCE WITH THE SAFE HANDLING OF THIS, OR ANY FIREARM, PLEASE CONTACT A CERTIFIED FIREARMS INSTRUCTOR OR SCHOOL. Fundamental
AK63D SEMI-AUTO RIFLE
 Owner s Manual AK63D SEMI-AUTO RIFLE Cal. 7.62X39MM Congratulations on your purchase of the AK63D Semi-Auto Rifle. With proper care and handling, it will give you long, reliable service. The AK63D is a
Figure 2-1. SAFE ( S ) position.
 position.") CHAPTER 2 OPERATION AND FUNCTION This chapter includes clearing, disassembly and assembly, loading, operating precautions, and cycle of operation. 2-1. CLEARING Clear the MK 19 differently in a firing
CHAPTER 2 OPERATION AND FUNCTION This chapter includes clearing, disassembly and assembly, loading, operating precautions, and cycle of operation. 2-1. CLEARING Clear the MK 19 differently in a firing
Ed Brown Products, Inc.
 Ed Brown Products, Inc. P.O. Box 492, Perry, MO 63462 - (573)-565-3261 - FAX (573)565-2791 Internet Address: www.edbrown.com email: edbrown@edbrown.com Ed Brown 1911 Owner s Manual WARNING: YOU MUST READ
Morini CM 22M. Technical Data
 Morini CM 22M Technical Data Caliber: Weight: Total Length: Total Height: Total Width: Length of Sight Line: Barrel Length: Number of Riflings: Trigger: 1 st stage weight: 2 nd stage weight: Sight: Sight
Owner s. Manual. Instruction Book for: Models 798 & 799 Bolt Action Centerfire Rifles IMPORTANT!
 Owner s Instruction Book for: Models 798 & 799 Bolt Action Centerfire Rifles Manual IMPORTANT! READ ALL INSTRUCTIONS AND WARNINGS IN THIS BOOK BEFORE USING THE FIREARM. PAGE 2...THE TEN COMMANDMENTS OF
Biggest Finest Revolver
 INSTRUCTION MANUAL FOR MAGNUM S BFR Biggest Finest Revolver STAINLESS STEEL SINGLE ACTION REVOLVER * Shown with optional Hogue grip and Millett adjustable rear sight. READ THE INSTRUCTIONS AND WARNINGS
MARINE CORPS INSTITUTE INSPECTION AND REPAIR OF THE M9 PISTOL
 MARINE CORPS INSTITUTE INSPECTION AND REPAIR OF THE M9 PISTOL MARINE BARRACKS WASHINGTON, DC Table of Contents Page Contents... Navigation Instructions... i iii Chapter 1 Disassembly and Assembly of the
SPM COACH SHOTGUN. Owner s Manual. 12 Ga., 20 Ga. &.410 Ga. IMPORTANT! READ ALL INSTRUCTIONS AND WARNINGS IN THIS BOOKLET BEFORE USING THIS FIREARM.
 Owner s Manual SPM COACH SHOTGUN 12 Ga., 20 Ga. &.410 Ga. Congratulations on your purchase of the SPM Coach Shotgun. With proper care and handling, it will give you long, reliable service. We specifically
1911 Pistol. owner s Manual
 1911 Pistol owner s Manual IMPORTANT! This manual contains operating, care, and maintenance instructions. To assure safe operation, any user of this firearm must read and understand this manual before
Smallbore rifle CZ99 PRECISION..22 Long Rifle.22 Win. Mag. R.F..17 Hornnady Mag. R.F.
 Smallbore rifle CZ99 PRECISION.22 Long Rifle.22 Win. Mag. R.F..17 Hornnady Mag. R.F. Fig. 1 22. Long Rifle, Model CZ 99 PRECISION 22 Long Rifle 22 Long Rifle for Sound Moderator 22 Win. Mag. R. F. 17
USER MANUAL TEDNA Shotguns. Over & Under Side by Side Semi-Automatic
 USER MANUAL TEDNA Shotguns Over & Under Side by Side Semi-Automatic Zenith Firearms www.zenithfirearms.com Come shoot the quality. Zenith Firearms, an American importer of high quality fi.rearms.and.accessories,.is.a.proud.distributor.of.
Before handling the firearm read this manual carefully and observe the following safety instructions. CONTENTS
 Before handling the firearm read this manual carefully and observe the following safety instructions. Improper and careless handling of the firearm could result in accidental discharge and cause injury,
OPERATION & SAFETY MANUAL
 ARMS MANUFACTURING INCORPORATED 1911 Pistols OPERATION & SAFETY MANUAL We specifically disclaim any responsibility for damage or injury whatsoever incurred as a result of the use of faulty, sub-standard