National Park Service. Manual of Instruction for the Safe Use of Reproduction Repeating Rifles in Interpretive Demonstrations
|
|
|
- Brittney Jacobs
- 5 years ago
- Views:
Transcription


1 National Park Service Manual of Instruction for the Safe Use of Reproduction Repeating Rifles in Interpretive Demonstrations
2 2
3 TABLE OF CONTENTS Part I: Introduction 1 Page Part II: Nomenclature 2 Henry Rifle 2 Spencer Rifle & Carbine 4 Part III: Inspection and Maintenance 6 Henry Rifle 7 Spencer Rifle & Carbine 11 Part IV: Drill 12 Henry Rifle 12 Spencer Rifle & Carbine 20 Part V: Misfire Procedures 43 Bibliography 44 3
4 4
. It also provides instruction on proper maintenance, inspection, and repair procedures.")

5 PART I - INTRODUCTION This manual sets forth the procedures that must be followed by persons demonstrating magazine-fed, repeating firearms to the public in areas administered by the National Park Service (NPS). It also provides instruction on proper maintenance, inspection, and repair procedures. This manual must be used in conjunction with the service wide standards for Historic Weapons Firing Demonstrations (NPS-6 Guidelines for Interpretation). The information below largely comes from primary sources of the period during which the weapons described were used. Several generations of NPS historic weapons personnel have modified these original texts in order to improve demonstrator and visitor safety, make the original texts more comprehensible and to incorporate knowledge gained from years of actually using these weapons in the field. The Park s Certified Historic Weapons Supervisor is responsible for the training and safety of the demonstrators, as well as the safety of the visitors. The following criteria will help determine when a demonstrator has been adequately trained. 1

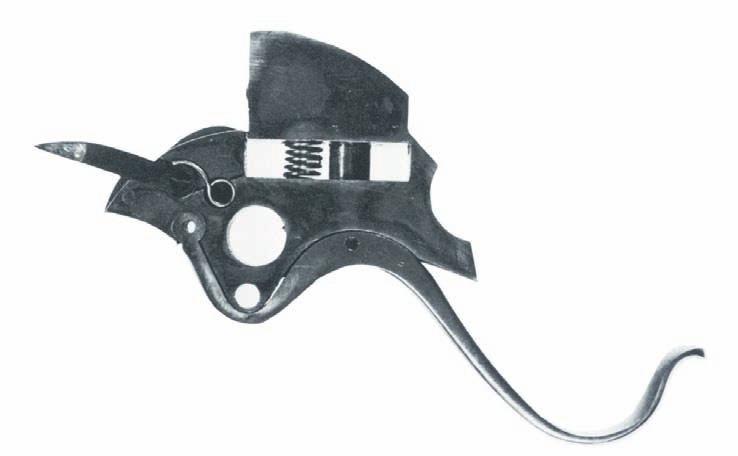
6 PART II - NOMENCLATURE (HENRY RIFLE) 2
7 3

8 NOMENCLATURE (SPENCER RIFLE & CARBINE) 4

9 5
10 PART III - INSPECTION AND MAINTENANCE INSPECTIONS Frequency of Inspections All weapons shall be inspected before demonstrations and after the final cleaning on that particular day. Weapons in storage should be periodically checked for rust or other types of damage due to moisture. If a weapon does not meet safety standards for any reason, a large string tag should be tied to it detailing the specific problem. Repairs should be affected as soon as possible. Problems Encountered During Inspections 1. Overall poor cleaning - If a weapon is not cleaned immediately after use, the residue in the barrel will harden. Effective cleaning is made more difficult and there is a possibility of coke buildup in the bore. Even if the primers alone are fired, they leave a corrosive residue, 2. Weak mainspring - When cocking the piece, if there appears to be a weak mainspring, it should be replaced or taken to a competent gunsmith to be hardened. 3. Bent or bulged barrel - This problem is fairly easy to see and should be noticed during any good inspection. If it is not badly bent, it can be straightened by any competent gunsmith; however, it is recommended that it be replaced. 4. Failure to eject or feed cartridges - Repeating firearms rely on springs to feed new cartridges into battery after the lever action has ejected the spent casing. If the ejection/feeding action is not functioning properly it may be repaired by a competent gunsmith. RECOMMENDED LIST OF INSPECTION AND MAINTENANCE TOOLS 1. Gunmithing Screwdrivers 2. Bore Brush & Cleaning Rod or Bore Snake 3. Bronze Brushes 4. Small wooden or brass head mallet. 5. A set of jewelers files. 8. A bench vise with jaws wide enough to accommodate a barrel, allowing for leaden or wood padding to protect the barrel. 9. Penetrating oil. 10. Gun oil. 11. Cotton cleaning patches. 6
11 DISMOUNTING AND CLEANING THE HENRY RIFLE Always make sure the weapon is unloaded before performing maintenance or cleaning. lightly oil the inside of the barrel. Using this oiled patch wipe down the breech bolt and breech area. FIELD CLEANING 1. Using a small rubber stopper or a finger, stop up the breech end of the barrel. 2. Pour water down the muzzle of the rifle filling the barrel about twothirds of the way. Shake back and forth several times and dump the water out. Do this as many times as are needed until the water comes out relatively clean. 5. Lightly wipe down the outside of the Henry Rifle barrel and lever with an oiled patch or rag. For a complete cleaning, emove the side plates, toggles, lever, barrel sleeve and magazine spring, carrier spring and lever spring, and carrier. Completely clean all parts, lightly oil and reassemble. This should not be done for every cleaning. Once a year should be sufficient. 3. With a damp rag wipe out the breech area including the carrier area and the carrier. Using a dry rag, wipe all surfaces dry. 4. Using a cleaning rod and dry patches, dry the inside of the barrel and chamber area. Use as many patches as need to dry the insides. The final patch should be oiled and 7


12 DISSASSEMBLY 1. Loosen, but do not remove, the carrier spring screw and the lever spring screw. This will make it easier to remove the lever screw. 3. The left and right toggle should now be free to remove by pulling them out. Be careful to note the position that they were removed. 2. Remove the side plate screw, also referred to as the lever screw, and slide the side plates up or down to remove them being careful not to cut yourself as they can be sharp. You will now have access to the inside of the Henry. 4. Remove the lever being careful not to lose the cam lever pin from the lever as it may or may not fall out. 5. Remove the carrier spring screw and the lever spring screw thus releasing the two springs. 8


13 6. Next remove the lifter arm from the carrier and then pull the carrier through the bottom of the frame. 7. To remove the stock remove the tang screw on top and the one on bottom and pull back on the stock to remove. unhooking it from the hammer stirrup. 9. The breech bolt can be removed by using a drift punch and tapping out the drift pin holding the firing pin extension to the breech bolt. With the pin removed the firing pin extension will pull out the rear of the frame and breech bolt assembly will drop down and be removed from 8. Removing the mainspring can be done by removing the mainspring screw. By holding down on the mainspring while removing the screw will protect the screw from stripping out the last few threads. The mainspring may be removed by 9


14 inside the frame. The firing pin and spring should them fall out. 10. The magazine spring and follower can be removed by loosening the screw, but not removing it, that holds the front band. Slide off the front band being careful so the barrel 11. The hammer could be removed by unscrewing the hammer pin screw. To reassemble, reverse the order used to disassembly the Henry. sleeve assembly and magazine spring do not fly off. Slide off the barrel sleeve assembly and remove the magazine spring and follower. 10
15 DISMOUNTING AND CLEANING THE SPENCER Always make sure the weapon is unloaded before performing maintenance or cleaning. 1. Bring the hammer to half-cock, and open the action, make certain the piece is unloaded. 2. Remove the magazine tube. 3. Unscrew the lever screw hinge pin. 4. Drop out the breech block carefully. To Clean 1. Black Powder weapons must be cleaned as soon as possible after firing. 2. Wet a patch with solvent or hot soapy water and run it through the bore, keep doing this replacing patches till they appear clean. 3. Run a bore brush through and back out to remove hardened residue. 4. Repeat step one till clean using as many patches as needed. 5. Make a tight fitting patch run it through the bore to remove any moisture. 6. Wipe all parts of the block with solvent till clean and then dry the block. 7. Wipe the magazine tube off. 8. Run a lightly oiled patch through the bore and back again. 9. Wipe off the magazine tube and block with the oiled patch. 10. Wipe and lightly oil inside where the block slides, do not put on a heavy coat of oil as it will attract dirt and will cause a problem with working the repeating action. 11. Wipe all external surfaces with a lightly oiled patch, till clean. 12. Reassemble the arm. 13. Wipe down the wood with a soft cloth and apply a small amount of linseed oil if necessary. 14. Check all parts carefully and work the action to insure it is all operating correctly No black powder residue should get into the lock, only remove and inspect it at the first and end of the season. 11

16 PART IV - HENRY RIFLE DRILL MANUAL OF ARMS No published manual for the Henry is known. The United States Infantry Tactics as adopted by the Secretary of War appears to have been followed with the Henry rifles. This NPS manual is adapted from the official U.S. Infantry Tactics and drawing upon the experience of George Elmore, Fort Larned National Historic Site, Kansas. Shoulder ARMS. The rifle is carried at the shoulder position of the rifle musket, tucked into the hollow of the right shoulder, with the breech cradled in the right hand. The muzzle is at about the height of the shoulder, depending upon the demonstrator s stature. The fingers of the hand can be either inside the lever or below it to support the weight of the piece, depending upon personal comfort and preference. Support ARMS. Shoulder ARMS. Right Shoulder Shift ARMS. Shoulder ARMS. Trail - ARMS. Shoulder ARMS. Arms PORT. These commands are similar to the drill with the common musket, taking into account the characteristics of the Henry Rifle, especially its length of 44 ¾ inches and barrel length of 24 inches. All these movements may be performed in like manner with the rifle, with similarity to drill with carbines. 12

17 Order ARMS. This command is slightly different from the drill with either musket (because of the shorter nature of the Henry), or Spencer Rifle or Carbine. As the tube magazine of the Henry is not exposed to dirt like that of the Spencer s butt-mounted tube, it need not be rested on the toe of the shoe at Order ARMS. The butt is placed on the ground next to the right shoe, with the heel of the butt plate even with the toe. The right hand grasps the piece at a comfortable height to support it against the body. Because the tube magazine of the Henry is liable to be fouled by dirt, care should be exercised grounding arms, and the rifle should be protected from grit when laid upon the soil: a gum blanket or ground cloth is recommended to keep dirt and moisture from the magazine. 13


18 LOADING AND FIRING Charge MAGAZINE. One time and three motions. First Motion - The rifle is brought up to the recover position on the right hip, the muzzle at eye level, and elevated at about the 45 degrees from the vertical, at the same time, half face to the right, step back with the right foot to brace body, forming T with feet, left foot forward, right foot at right angle to heel of left. Second Motion - The piece is briskly inverted on the right side, with the barrel still pointing upwards at 45 degrees, and the plunger or follower of the spring mechanism in the tube magazine exposed for loading. 14


19 Third Motion - Quitting the piece with the left hand, the plunger is seized between thumb and forefinger, and is thrust to the top of the magazine. The top portion of the magazine is hinged, twist to the left to open the tube for charging with cartridges. This will lock open the magazine for loading, with the plunger and spring compressed and locked. The piece is steadied on the right hip with the right hand. 15


20 Charge CARTRIDGE. (Number of cartridges to be charged). One time and several motions. Grasping the piece with the left hand about half-way down the barrel from the muzzle, the right hand is carried to the cartridge box and cartridges are retrieved for loading. The metallic cartridges are placed in the tube with the base and primer down, towards the butt, and the bullet or wad to the top, facing the muzzle. The rounds will slide easily into the tube. 16

21 Close MAGAZINE. One time and two motions. First Motion - Seize the plunger at the open magazine and turn the top portion of the magazine to the right, closing the tube. Slide the magazine follower to the height of the loaded cartridges. Do not allow the sping to recoil by itself, by releasing hold of the plunger. Physically lower the plunger and ease the tension on the spring until the follower or plunger rests on the cartridges. Second Motion - Turn the rifle over so that the barrel is uppermost, with the muzzle at the height of the eye. The piece is on the right hip, the barrel at a 45 degree angle from the vertical. This is approximate to the recover position. LOAD. One time and one motion. Grasp the lever with the right hand, steadying the piece with the left at the receiver. If catch is fastened, click off to release lever action. Work lever to chamber cartridge, and cock hammer. 17


22 AIM One time and three motions. First Motion - Raise rifle to firing position, sighting along barrel. Second Motion - Simultaneously, incline body slightly forward to brace against recoil of piece. stepping back with right foot to brace body. Third Motion - Place right forefinger into trigger guard, and rest lightly on trigger. FIRE. Apply steady pressure to trigger. 18
23 To load again, the piece will be brought down to recover position for cocking of lever. FIRE. Discharge all cartridges, assume position of recover, and work action, examining chamber visually to check and assure that piece is empty. Lower hammer, uncocking piece. Shoulder- ARMS. 19

24 SPENCER RIFLE DRILL The United States Infantry Tactics as adopted by the Secretary of War appears to have been followed with the Spencer rifles and carbines. The only Manual of Arms issued for the Spencer was unofficial and written in 1864 by Captain G. M. Barber of the Ohio Volunteer Sharpshooters. This NPS manual is adapted from both the official U.S. Infantry Tactics and the unofficial Barber manual with just a few minor modern safety changes. MANUAL OF ARMS Shoulder Arms 1. Place the recruit in the position of the soldier without arms, cause him to bend the right arm slightly, and place the piece in it in the following manner: 2. The piece in the right hand; the barrel nearly vertical and resting in the hollow of the shoulder; the guard lever to the front, the arm hanging nearly at its full length near the body; the thumb embracing the guard lever, the forefinger extended along the stock, the remaining fingers grasping the stock below the hammer which rests on the little finger. 3. The hand should rest lightly against the thigh, and care should be taken that the shoulder is not depressed, and that the elbows are kept near the body. 20
 With the right hand, bring the piece erect before the center of the body, the guard lever to the front,")

25 Present Arms One time and two motions. (First Motion) With the right hand, bring the piece erect before the center of the body, the guard lever to the front, seize the piece with the left hand below the lower band, the thumb extended along the barrel and against the stock, the forearm horizontal and resting against the body, the hand as high as the elbow. (Second motion) At the same time, grasp the small of the stock with the right hand below and against the guard-lever. 21
 Drop the left hand quickly by the side. Support Arms One time and three motions.")
26 Shoulder Arms One time and two motions (First motion) Bring the piece to the right shoulder, at the same time change the position of the right hand to that of shoulder arms, press the piece against the shoulder with the left hand, the fingers extended and joined, the right arms nearly straight. (Second motion) Drop the left hand quickly by the side. Support Arms One time and three motions. (First motion) Bring the piece with the right hand perpendicularly to the front and between the eyes, the barrel to the rear, seize the piece with the left hand at the lower band, raise this band as high as the chin and seize the piece at the same time four inches below the hammer. (Second motion) Turn the piece with the right hand, the barrel to the front, carry the piece to the left shoulder and pass the forearm extended on the breast between the right hand and the hammer, support the hammer against the left forearm, the left hand resting on the right breast. (Third motion) Drop the right hand quickly by the side. 22

27 When the instructor may wish to give repose in this position, he will command: Rest At this command the recruits will bring up smartly the right hand and grasp the small of the stock when they will not be required to preserve silence, or steadiness of position. When the instructor may wish the recruits to pass from this position to that of silence and steadiness, he will command: 1. Attention. 2. Squad. At the second word the recruits will resume the position of the third motion of support arms. Shoulder Arms One time and three motions (First motion) Grasp the piece with the right hand under and against the left forearm; seize it with the left hand at the lower band, the thumb extended, detach the piece slightly from the shoulder, the left forearm against the stock. (Second motion) Carry the piece vertically to the right shoulder with both hands, the stock to the front, change the position of the right hand to that of shoulder arms; press the piece against the shoulder with the left hand the fingers extended and joined, the right arm nearly straight. (Third motion) Drop the left hand quickly by the side. 23
 Turn the piece with both hands, the barrel to the front; bring it opposite the left shoulder, the butt against the hip, the left hand at the lower band, the thumb as high as the chin")
28 Secure Arms One time and three motions (First motion) The same as the first motion of support arms, except with the right hand seize the piece at the small of the stock. (Second motion) Turn the piece with both hands, the barrel to the front; bring it opposite the left shoulder, the butt against the hip, the left hand at the lower band, the thumb as high as the chin and extended on the spring of the lower band; the piece erect and detached from the shoulder, the left forearm against the piece. (Third motion) Reverse the piece, pass it under the left arm, the left hand remaining at the lower band, the little finger resting against the hip, the right hand falling at the same time by the side. Shoulder Arms. One time and three motions. (First motion) Raise the piece with the left hand and seize it with the right hand at the small of the stock. The piece erect and detached from the shoulder, the butt against the hip, the left forearm along the piece. (Second motion) The same as the second motion of shoulder arms from a support. 24
 Seize the piece with the left hand below the upper band; loosen the grasp of the right hand, lower the piece with the left, reseize the piece with the right hand below the middle band")
 Lower the piece with the right hand turning it slightly to the left, and place the butt firmly upon the boot of the right foot, at the same time drop the left hand by the side.")
29 (Third motion) The same as the third motion of shoulder arms from a support. Order Arms One time and two motions. (First motion) Seize the piece with the left hand below the upper band; loosen the grasp of the right hand, lower the piece with the left, reseize the piece with the right hand below the middle band the butt about six inches from the ground, the right hand supported against the hip. (Second motion) Lower the piece with the right hand turning it slightly to the left, and place the butt firmly upon the boot of the right foot, at the same time drop the left hand by the side. NOTE Position of order arms. The butt on the boot as high on the instep as it will rest without slipping inclined slightly to the left, resting nearly square across the boot to protect the tube from gravel and dirt. The hand as low as it can be without depressing the shoulder, the barrel between the thumb and forefinger extended along the stock, the other fingers extended and joined, the thumb resting against the thigh, the muzzle about three inches from the right breast, the barrel perpendicular. 25
 Raise the piece vertically with the right hand to the height of the right breast, and opposite the shoulder, the elbow close to the body; seize the piece with the left hand below the")
30 Shoulder Arms One time and two motions. (First Motion) Raise the piece vertically with the right hand to the height of the right breast, and opposite the shoulder, the elbow close to the body; seize the piece with the left hand below the right, and drop quickly the right hand to grasp the piece at the small of the stock, the thumb embracing the guard-lever the forefinger extended along the stock; press the piece against the shoulder with the left hand, the right arm nearly straight. (Second Motion) Drop the hand quickly by the side. Trail Arms One time and two motions. (First Motion) The same as the first motion of order arms. (Second Motion) Incline the muzzle slightly to the front, the butt to the rear and about four inches from the ground. The right hand supported at the hip will so hold the piece that the rear rank men may not touch, with their bayonets, the men in the front rank. 26


31 Fix Bayonet One time and three motions (First motion) Grasp the piece with the left hand at the height of the shoulder and detach it slightly from the shoulder with the right hand. (Second motion) Quit the piece with the right hand, lower it with the left, and place the butt on the toe of the left boot, the barrel to the right nearly perpendicular; the muzzle three inches from the body; carry the right hand to the bayonet scabbard so as to seize the bayonet by the socket and shank. (Third motion) Draw the bayonet from the scabbard, carry it to and fix it on the muzzle, turn the clasp from the body with the right thumb and seize the piece with the right hand at the middle band. 27
 Carry the right hand to the bayonet, with the thumb and forefinger turn the clasp")
 Wrest (Twist) off the bayonet, place it in the scabbard and seize the piece with the")
32 Unfix Bayonet One time and three motions (First motion) The same as the first motion of fix bayonet. (Second motion) Carry the right hand to the bayonet, with the thumb and forefinger turn the clasp toward the body to the stop and seize the bayonet at the socket and shank. (Third motion) Wrest (Twist) off the bayonet, place it in the scabbard and seize the piece with the right hand at the middle band. 28

33 Shoulder Arms Raise the piece with both hands, carry it to the right shoulder and resume the position of shoulder arms. Parade Rest Rifle only From ordered arms. Seize the piece with the left hand above the upper band, at the same time carry the right foot six inches to the rear; the left knee slightly bent; slip the right hand up against the left, and carry the muzzle opposite to and four inches from the middle of the body, and hold the piece firmly in that position. Note: There are other variations of Parade Rest that may be used as well. Attention Slip the right hand down the barrel to the middle band, at the same time bring up the right foot against the left, with the right hand, carry the barrel to the position of order arms, and drop the left hand quickly by the side. 29

34 Parade---Rest Carbine only From shoulder arms (also called carry arms). Carry the right foot three inches directly to the rear, the left knee slightly bent; clasp the hands in front of the center of the body, the left hand uppermost, the piece resting in the hollow of the right arm, the left thumb clasped by the thumb and forefinger of the right hand. Attention To return to shoulder arms. Bring both arms to the side of the body, at the same time bring up the right foot against the left. 30

35 Inspection Arms At this command, in the original manual, the soldier would fix bayonet and resume the position of order arms. However, in the NPS version, the demonstrator will not fix bayonet and will simply stay at the order arms. The instructor will then inspect in succession the piece of each recruit in passing along the front of the rank. Each as the instructor reaches him, will smartly raise his piece with the right hand, and seize it with the left below the guide sight, the lock to the front, the left hand at the height of the chin, the piece opposite the left eye; the instructor will take it with the right hand on the handle, and after inspecting it, will return it to the recruit who will receive it with the right hand and replace it in the position of order arms. The inspector should throw back the lever and partly withdraw the tube from the magazine, to see that there is no load in the barrel, and that the tube and lock are in perfect order. The lever and tube should be returned to their place before the gun is returned to the recruit. ORIGINAL MANUAL NPS VERSION 31

36 Right-shoulder Shift Arms One time and two motions (First motion) Detach the piece perpendicularly from the shoulder with the right hand and seize it with the left below the guide sight, raise the piece, the left had at the height of the shoulder and four inches from it; place at the same time the right hand on the butt, the beak between the first two fingers, the other two fingers under the butt plate. (Second motion) Quit the piece with the left hand, raise and place the piece on the right shoulder with the right hand, the lock plate upwards; let fall at the same time the left hand by the side. Shoulder Arms One time and two motions (First motion) Raise the piece perpendicularly by extending the right arm to its full length the guard-lever to the front, at the same time seize the piece with the left hand below the guide sight. (Second motion) Quit the butt with the right hand, which will immediately embrace the guard, lower the piece to the position of shoulder arms, slide up the left hand to the height of the shoulder, the fingers extended and closed. Drop the left hand quickly by the side. 32

 Rise up, bring the left foot by the side of the right, quit (turn loose) the cartridge box with the left hand and drop the")
37 Ground Arms One time and two motions (From order arms) (First motion) Turn the piece with the right hand the barrel to the left, at the same time seize the cartridge box with the left hand, bend the body, advance the left foot, the heel opposite the lower band; lay the piece on the ground with the right hand, the toe of the butt on a line with the right toe, the knees slightly bent, the heel raised. (Second motion) Rise up, bring the left foot by the side of the right, quit (turn loose) the cartridge box with the left hand and drop the hands by the side. 33

38 Raise Arms One time and two motions (First motion) Seize the cartridge box with the left hand, bend the body, advance the left foot the heel opposite the lower band, and seize the piece at the middle band with the right hand. (Second motion) Raise the piece bringing the left foot by the side of the right, turn the piece with the right hand and place it on the toe of the right boot in the position of order arms, at the same time quite the cartridge box with the left hand and drop this hand by the side. Arms Port One time and one motion (From shoulder arms) Throw the piece diagonally across the body, the lock to the front, seizing it at once with both hands, the right at the small of the stock, the left at the lower band, the two thumbs pointing toward the muzzle, the barrel sloping upward, and crossing opposite to the point of the left shoulder, the butt proportionally lowered, the palm of the right hand above, and that of the left under the piece, the nails of both hands next to the body, to which the elbows will be closed. 34


39 LOADING AND FIRING Note: The loading and firing procedure for the Spencer Rifle and Spencer Carbine are the same, except where noted in the drill. When demonstrating a carbine, the drill may be done with or without a sling. Charge Magazine One time and three motions. (First motion) Raise the piece slightly with the right hand, make a half face to the right on the left heel, carry the right foot six inches to the rear, and place it at right angles with the left, the hollow opposite to the left heel. Seize the piece with the left hand at the second band and detach it slightly from the shoulder. (Second motion) Invert the piece in front of the body, the butt passing under the right arm, and place the muzzle on the toe of the left boot. (Second motion for carbine) Invert the piece in front of the body, the butt passing under the right arm. (Third motion) Seize the piece with the left hand at the heel of the butt, press the toe of the butt against the body, the thumb resting on the handle of the tube, and carry the right hand to the side. 35


40 CHARGE MAGAZINE (CARBINE) (Third motion for carbine) Seize the piece with the left hand at the heel of the butt, press the toe of the butt against the left breast, the thumb resting on the handle of the tube, and carry the right hand to the side. Draw Tube One time and one motion. With the thumb of the left hand turn the handle of the tube at right angles with the piece, seize it with the thumb and forefinger of the right hand, withdraw it from the magazine and place it in the hollow of the left hand, the thumb clasping it against the butt of the piece, and carry the right hand to the cartridge box. 36


41 Charge Cartridge One time and two motions (First Motion) Take one cartridge at a time from the cartridge box and place it in the magazine, or if using a Blakeslee box, remove one tube from the box and pour rounds into magazine. NOTE: You may load up to seven cartridges, however, only load those needed for that demonstration, NEVER load more than the number you are going to fire. (Second Motion) With the right hand seize the handle of the tube. 37
 Replace the tube in the magazine, the handle at")

42 Return Tube One time and two motions. (First motion) Replace the tube in the magazine, the handle at right angles with the piece, with the ball of the right hand press it home and turn the handle to its place. (Second motion) Drop the right hand by the side. 38


43 Load. One time and three motions. (First motion) Seize the piece at the lock with the right hand, the thumb behind the hammer, the third and forefinger grasping the guard-lever. Carry the butt against the right arm under the right shoulder and at the same time seize the piece with the left hand at the lower band, the thumb extended along the barrel. (Second motion) Bring up the piece with both hands, the barrel upwards, the left thumb extending along the stock, the butt below the right forearm, the small of the stock against the body and two inches below the right breast, the muzzle as high as the eye the left elbow against the side, at the same time take the guard-lever between the thumb and forefinger. (Third motion) Throw forward the guard-lever as far as it will go briskly and as briskly return it against the stock and seize the piece with the right hand at the small of the stock, without deranging the position of the butt. 39
 Place the right thumb on the head of the hammer,")
 Cock and seize the piece at the small of the")
44 Ready One time and two motions. (First motion) Place the right thumb on the head of the hammer, the fingers under and against the guard-lever. (Second motion) Cock and seize the piece at the small of the stock without deranging the position of the butt. 40


45 Aim One time and two motions (First motion) Raise the piece with both hands and support the butt against the right shoulder; the left elbow down, the right as high as the shoulder; incline the head upon the butt so that the right eye may perceive quickly the notch of the hausse, the front sight and the object aimed at; the left eye closed, the right thumb extended along the stock. (Second motion) Place the forefinger on the trigger. When the men are formed in two ranks to execute the firings, the front rank men will raise a little less the right elbow, and the rear rank men will carry the right foot about eight inches to the right and toward the left heel of the man next on the right, inclining the upper part of the body forward. 41

46 Fire One time and one motion Press the forefinger against the trigger, fire without lowering or turning the head, and remain in this position. Recover Arms One time and one motion At the first part of the command, withdraw the finger from the trigger; at the word arms, retake the position of the third motion of ready. Open Chamber One time and one motion Throw forward the guard lever as far as it will go briskly and as briskly return it to the stock. (Make sure all cartridges are ejected and the magazine is empty after the demonstration, this may involve opening and closing the guard more than one time) Seize the piece with the right hand at the small of the stock, without deranging the position of the butt. Shoulder Arms One time and one motion At the command shoulder, place the thumb upon the hammer and seize the small of the stock with the right hand. At the command arms, bring up the piece briskly to the right shoulder and retake the position of shoulder arms. 42
47 PART V - MISFIRE PROCEDURES Each park shall develop a Misfire Plan to address the action necessary to render a firearm safe in the event of a Level I or Level II Misfire. TYPES OF MISFIRES A Level I Misfire is defined as a misfire that can be cleared at the demonstration area and the demonstration can continue. Level I misfires usually are attributed to failure of percussion caps or clogged vents. LEVEL I & II MISFIRE PROCEDURES Should a misfire occur: If rifle misfires, hold position of aim for 10 seconds. After pause, lower rifle to recover, and cock hammer with thumb of right hand. AIM. A Level II Misfire is defined as a misfire that cannot be cleared at the demonstration area without disrupting the demonstration. Specialized equipment is needed to render the firearm safe. The audience must be dismissed, and the piece cleared in a safe manner away from the public. CAUSES OF MISFIRES: --Improperly cleaned firearm: If a firearm is not properly cleaned immediately after use, the residue in the barrel, breechblock, and the chambers will harden, causing rust and corrosion to form. FIRE. If misfire persists, lower rifle to position of recover or LOAD, and work action with lever to eject faulty cartridge. Continue demonstration to fire remainder of cartridges. Retrieve brass casings, and if misfire occurred, make certain to collect faulty, unfired cartridge: it still contains a viable powder charge. --Malfunction of Ammun ition: Most misfires of repeating arms are caused be a failure of primer in the cartridge. 43
48 BIBLIOGRAPY Bresnan, Andrew L. (National Henry Rifle Company). The Henry Repeating Rifle Manual of Arms:A Reenactor s Guide ( McQueen, John C. Spencer: The First Effective and Widley Used Repeating Rifle and Its Use in the Western Theater of the Civil War, Communicorp, Columbus, GA, 1989 New Haven Arms Company. Henry s Repeating Rifle, T.J. Stafford, New Haven, CT, 1865 Scott, H. L., Military Dictionary, D. Van Nostrand, New York, 1864 Spencer Armory. The Spencer Reapeating Rifle, Carbines, and Sporting Rifle (reprint), Invictus, Decatur, MI U.S. Army, The Ordnance Manual for the Use of the Officers of the United States Army, 3rd edition, J. B. Lippincott and Co., Philadelphia,
MUSKET MANUAL OF ARMS FOR THE
 MANUAL OF ARMS FOR THE MUSKET 414. This manual differs in so many respects from that of the rifle and rifle musket that it becomes necessary to specify it for the use of infantry troops armed with the
NATIONAL PARK SERVICE MANUAL FOR THE HANDLING AND FIRING OF U.S. M1911 and M1911A1 Colt Automatic Pistol,.45 A.C.P. Caliber IN INTERPRETIVE
 NATIONAL PARK SERVICE MANUAL FOR THE HANDLING AND FIRING OF U.S. M1911 and M1911A1 Colt Automatic Pistol,.45 A.C.P. Caliber IN INTERPRETIVE DEMONSTRATIONS 1 PREFACE This manual sets forth the procedures
RIFLE AND INFANTRY TACTICS, Brig. Gen. W. J. HARDEE, C.S. ARMY. REVISED AND IMPROVED 150 SAILOR S CREEK
 THE ONLY COPY-RIGHT EDITION. -ii- Table of Contents RIFLE AND INFANTRY TACTICS, REVISED AND IMPROVED by Brig. Gen. W. J. HARDEE, C.S. ARMY. SUPPLEMENTED WITH OTHER CONTEMPORARY DRILL for CRUTCHFIELD S
U.S. M1892 Magazine Rifle (Krag-Jorgensen), Caliber Army
, Caliber Army") U.S. M1892 Magazine Rifle (Krag-Jorgensen), Caliber.30-40 Army The first bolt-action, magazine-fed, smokeless powder rifle adopted by the U.S. Army as a primary shoulder arm in 1892. A model manufactured
U.S. M1892 Magazine Rifle (Krag-Jorgensen), Caliber.30-40 Army The first bolt-action, magazine-fed, smokeless powder rifle adopted by the U.S. Army as a primary shoulder arm in 1892. A model manufactured
Manual of Arms for the Rifle Musket
 Manual of Arms for the Rifle Musket -ii- with Other Useful Instruction for troops portraying the Fifteenth Iowa Regiment of Infantry at 150 th Shiloh a faithful reproduction of text from U.S. Infantry
2990 Lorne Scots Royal Canadian Army Cadet Corps Rifle Drill
 2990 Lorne Scots Royal Canadian Army Cadet Corps Rifle Drill Page 1 of 27 TABLE OF CONTENTS PARA ITEM PAGE Section 1 BASIC RIFLE DRILL 1.1 INTRODUCTION 3 1.2 ATTENTION 5 1.3 STAND AT EASE FROM ATTENTION
Table of Contents. Principles of Shoulder Arms... p. 1. Manual of Arms... p. 2. Firings... p. 28
 Table of Contents Principles of Shoulder Arms.................... p. 1 Manual of Arms............................... p. 2 Firings..................................... p. 28 Bayonet Exercise.............................
RIFLE DRILL. 1. General. Before commencing instruction in rifle drill, it is important that the cadets receive instruction in the parts of the rifle.
 RIFLE DRILL 1. General. Before commencing instruction in rifle drill, it is important that the cadets receive instruction in the parts of the rifle. 2. Rifle Movements. Unless stated otherwise, cadets
Major William Gilham (1859) Manual of Instruction for the Volunteers and Militia of the United States
 Manual of Instruction for the Volunteers and Militia of the United States") It is not intended, nor indeed would it be desirable, that the present work should embrace every thing which is proper to be known by our citizen soldiery ; its aim is, simply to aid the inexperienced
It is not intended, nor indeed would it be desirable, that the present work should embrace every thing which is proper to be known by our citizen soldiery ; its aim is, simply to aid the inexperienced
2672 Hastings & Prince Edward Regiment Royal Canadian Army Cadet Corps. Lee Enfield No.4. Rifle Drill
 2672 Hastings & Prince Edward Regiment Royal Canadian Army Cadet Corps Lee Enfield No.4 Rifle Drill Extracts from A-CR-CCP-053/PT001 March 2005 TABLE OF CONTENTS PARA ITEM PAGE Section 1 BASIC RIFLE DRILL
RIFLE. Brig. Gen. W. J. HARDEE, C.S. ARMY. CRUTCHFIELD S BRIGADE 150 TH SAILOR S CREEK. Col. Silas Tackitt, REVISED AND IMPROVED AND
 -62- THE ONLY COPY-RIGHT EDITION. CONSOLIDATED INDEX Principles of Shoulder Arms....................... p. 1 Manual of Arms. Support Arms, Present Arms, Order Arms, Rest, In Place Rest, Load in Nine Times,
Key Terms. balance barrel bolt butt hand guard muzzle port arms sling stacking swivel stock trail arms trigger guard
 Lesson 7 Stationary Movements with the M-1 Rifle Chapter 5 Key Terms balance barrel bolt butt hand guard muzzle port arms sling stacking swivel stock trail arms trigger guard What You Will Learn to Do
Basic Individual Drill (Co B, 71 st Pennsylvania Volunteer Infantry California Regiment)
") Basic Individual Drill (Co B, 71 st Pennsylvania Volunteer Infantry California Regiment) (Select Drill Movements from Casey s Manual) Order Arms Shoulder Arms Right Shoulder Shift Support Arms Rest Attention
Basic Individual Drill (Co B, 71 st Pennsylvania Volunteer Infantry California Regiment) (Select Drill Movements from Casey s Manual) Order Arms Shoulder Arms Right Shoulder Shift Support Arms Rest Attention
National Park Service. Manual of Instruction for the Safe Use of Reproduction Breech-Loading Carbine and Rifle in Interpretive Demonstrations
 National Park Service Manual of Instruction for the Safe Use of Reproduction Breech-Loading Carbine and Rifle in Interpretive Demonstrations TABLE OF CONTENTS Page Part I: Introduction 1 Part II: Nomenclature
MANUAL OF ARMS FOR THE RIFLE (M-1 GARAND) POSITION OF ORDER ARMS
 POSITION OF ORDER ARMS") MANUAL OF ARMS FOR THE RIFLE (M-1 GARAND) In describing the manual of arms, the term, at balance, refers to a point on the rifle just forward of the trigger housing. Whenever a position is described as
MANUAL OF ARMS FOR THE RIFLE (M-1 GARAND) In describing the manual of arms, the term, at balance, refers to a point on the rifle just forward of the trigger housing. Whenever a position is described as
Without loyalty, there can be no honor. Gilham's Infantry Tactics 5th VA Co A - 7th Batt. A.N.V.
 Page 1 of 91 Page 1 of 91 Gilham's Infantry Tactics 5th VA Co A - 7th Batt. A.N.V. www.carburetor-manual.com Would you like some Free Manuals? http://carburetor-manual.com/free-shop-manual-club-t-13.html
LESSON 12: STATIONARY MOVEMENTS WITH THE M-1903 RIFLE
 LESSON 12: STATIONARY MOVEMENTS WITH THE M-1903 RIFLE PURPOSE balance barrel bolt port arms sight sling sling swivel stacking swivel This lesson introduces the procedures for executing the manual of arms
M16 R / M1600 R USER S MANUAL WARNING: READ THE INSTRUCTIONS AND SAFETY PRECAUTIONS IN THIS MANUAL CAREFULLY BEFORE USING THIS FIREARM.
 ARMSCOR M16 R / M1600 R USER S MANUAL WARNING: READ THE INSTRUCTIONS AND SAFETY PRECAUTIONS IN THIS MANUAL CAREFULLY BEFORE USING THIS FIREARM. DISCHARGING FIREARMS IN POOLY VENTILATED AREAS, CLEANING
SAFETY RULES WARNING: READ THESE SAFETY RULES & OPERATORS MANUAL BEFORE HANDLING YOUR FIREARM
 SAFETY RULES WARNING: READ THESE SAFETY RULES & OPERATORS MANUAL BEFORE HANDLING YOUR FIREARM Never point a firearm at anyone and always keep the muzzle pointed in a safe direction. Always treat all firearms
LESSON 13: STATIONARY MOVEMENTS WITH THE M1 RIFLE
 LESSON 13: STATIONARY MOVEMENTS WITH THE M1 RIFLE PURPOSE balance fall in parade rest port arms trail arms upper band (Note: Since there are many similarities between the manual of arms for the M1 and
AR STYLE FIREARMS OWNER'S MANUAL: OPERATION, HANDLING, DISASSEMBLY / REASSEMBLY & SAFETY INSTRUCTIONS
 AR STYLE FIREARMS OWNER'S MANUAL: OPERATION, HANDLING, DISASSEMBLY / REASSEMBLY & SAFETY INSTRUCTIONS - DO NOT DISCARD THIS MANUAL - READ THIS MANUAL CAREFULLY, PAYING CLOSE ATTENTION TO THE INSTRUCTIONS
National Park Service. Manual of Instruction for the Safe Use of Reproduction Percussion Muskets in Interpretive Demonstrations
 National Park Service Manual of Instruction for the Safe Use of Reproduction Percussion Muskets in Interpretive Demonstrations 1 2 TABLE OF CONTENTS Page Part I: Introduction 1 Part II: Nomenclature 2
INSTRUCTION MANUAL CZ 92
 INSTRUCTION MANUAL CZ 92 Before handling the pistol read this manual carefully and observe the following safety instructions. Improper and careless handling of the pistol could result in unintentional
STRIBOG GRAND POWER. The INSTRUCTIONS FOR USE, MAINTENANCE AND SAFETY. 1
 instructions The for use, maintenance STRIBOG and safety hestribog GRAND POWER INSTRUCTIONS FOR USE, MAINTENANCE AND SAFETY www.grandpower.eu 1 The STRIBOG Dear Customer, Thank you for purchasing a semi-automatic
PISTOL CALIBER AR STYLE FIREARMS
 PISTOL CALIBER AR STYLE FIREARMS OWNER'S MANUAL: OPERATION, HANDLING, DISASSEMBLY / REASSEMBLY & SAFETY INSTRUCTIONS - DO NOT DISCARD THIS MANUAL - READ THIS MANUAL CAREFULLY, PAYING CLOSE ATTENTION TO
Cleaning rod: spring steel, stainless steel or carbon fibre cleaning rod - only use a one-piece rod. Avoid using snakes.
 Telemark Biathlon Where performance and precision come together http://telemarkbiathlon.com Rifle Cleaning Date : July 19, 2013 Anschutz Rifle Manual - Click Here Izhmash 7-3 Rifle Manual - still looking
Section Five - Semi Auto Pistols
 Section Five - Semi Auto Pistols Like revolvers, semi auto pistols have parts that are unique to them. In figure 1 below we have pointed out the most common parts to the semi auto handgun and give detailed
INSTRUCTION MANUAL CZ 630/631
 INSTRUCTION MANUAL CZ 630/631 Before handling the air rifle read this manual carefully and observe the following safety instructions. Improper and careless handling of the air rifle could result in unintentional
Armed Officer's Training Manual Nomenclature and Inspection
 Armed Officer's Training Manual Section 8: Nomenclature and Inspection Learning Goal: The student will know the components and understand the operation of the service revolver and semi-automatic pistol.
MARINE CORPS INSTITUTE INSPECTION AND REPAIR OF THE M9 PISTOL
 MARINE CORPS INSTITUTE INSPECTION AND REPAIR OF THE M9 PISTOL MARINE BARRACKS WASHINGTON, DC Table of Contents Page Contents... Navigation Instructions... i iii Chapter 1 Disassembly and Assembly of the
Barrel Assembly. Field Stripping
 WARNINGS: Carry out safety check before handling the weapon. The weapon is heavily oiled for shipping. Clean and lubricate before firing. These procedures given apply only to the US Ordnance QCB version.
INSTRUCTION MANUAL CZ 75 Champion
 INSTRUCTION MANUAL CZ 75 Champion CZ 75 CHAMPION - INSTRUCTION MANUAL Before handling the pistol read this manual carefully and observe the following safety instructions. Improper and careless handling
INSTRUCTION MANUAL CZ 75 TS
 INSTRUCTION MANUAL CZ 75 TS CZ 75 TS - INSTRUCTION MANUAL Before handling the pistol read this manual carefully and observe the following safety instructions. Improper and careless handling of the pistol
AAC CADET INSTRUCTOR S HANDBOOK. CEREMONIAL DRILL, SMLE.303 and 7.62 mm SLR
 AAC CADET INSTRUCTOR S HANDBOOK CEREMONIAL DRILL, SMLE.303 and 7.62 mm SLR 2010 THIS PAGE INTENTIONALLY BLANK i PREFACE Aim 1. The aim of this publication is to provide Cadets with the information to conduct
CHAPTER 2 MAINTENANCE
 CHAPTER 2 MAINTENANCE This chapter addresses the proper care of the machine gun to ensure its overall effectiveness and efficient functioning. The information includes the gunner's knowledge in disassembly
CZ 40 P - INSTRUCTION MANUAL
 Before handling the pistol read this manual carefully and observe the following safety instructions. Improper and careless handling of the pistol could result in unintentional discharge and could cause
A Note From The Commander
 A Note From The Commander Cincinnati Compatriots... The Manual of Arms that we are practicing within the Nolan Carson Memorial Color Guard is consistent with the Von Steuben Order of Drill from 1777. However,
COLT AUTOMATIC PISTOL
 COLT AUTOMATIC PISTOL CALIBER.22 INSTRUCTIONS FOR ASSEMBLY - DISASSEMBLY CLEANING COLT AIUTOMATIC PISTOL IN 6 INCH OR 4}~2 INCH BARREL.22 Long Rifle, rim fire Cartridge Capacity of Magazine, 10 Shots Description
INSTRUCTION MANUAL. Slavia 630/631
 INSTRUCTION MANUAL Slavia 630/631 Before handling the air rifle read this manual carefully and observe the following safety instructions. Improper and careless handling of the air rifle could result in
IMPORTANT SUPPLEMENTARY INSTRUCTIONS FOR Model1886 TAKEDOWN LEVER ACTION RIFLE
 Licensee IMPORTANT SUPPLEMENTARY INSTRUCTIONS FOR Model1886 TAKEDOWN LEVER ACTION RIFLE These are special instructions for the Winchester Model 1886 Takedown version only. These instructions must be used
NOTICE FEATURES BACKGROUND
 ,/ NOTICE Claims will not be honored for damage, injury or, death resulting from the intentional or accidental discharge of this firearm, or from it's function when used for purposes or subjected to treatment
CLEANING HANDGUNS TOOLS YOU WILL NEED
 CLEANING HANDGUNS CLEANING HANDGUNS If you take pride in your firearm, then you know how important it is to properly maintain your weapon. With good, consistent care, you not only make your gun look good
CONTENTS INTRODUCTION. WARNING: This manual contains important warnings that must be understood before using this firearm.
 CONTENTS Safety Rules...............................Page 2 Operation................................Page 5 Major Components.........................Page 6 Assembly.................................Page
Operation Manual Spring Operated Break-Barrel & Under-Lever Pellet Rifles
 WARNING: This gun can cause serious injury or death. Read and follow the instructions carefully. Do not load a pellet into the gun until you are ready to shoot. If you do load a pellet and then decide
P9S Automatic Pistol Caliber.45 ACP
 P9S AUTOMATIC PISTOL Caliber.45 ACP P9S Automatic Pistol Caliber.45 ACP Instruction Manual HECKLER & KOCH, INC. 2148 Pacific Boulevard Sterling, Virginia 20166-8903 U.S.A. TEL. (703) 450-1900 TELEFAX (703)
MODEL 1400 E USER S MANUAL WARNING: READ THE INSTRUCTIONS AND SAFETY PRECAUTIONS IN THIS MANUAL CAREFULLY BEFORE USING THIS FIREARM.
 ARMSCOR MODEL 1400 E USER S MANUAL WARNING: READ THE INSTRUCTIONS AND SAFETY PRECAUTIONS IN THIS MANUAL CAREFULLY BEFORE USING THIS FIREARM. DISCHARGING FIREARMS IN POORLY VENTILATED AREAS, CLEANING FIREARMS
SEMIAUTOMATIC SHOTGUN OWNER'S MANUAL
 SEMIAUTOMATIC SHOTGUN OWNER'S MANUAL ARMSAN@ARMSAN.COM TECHNICAL DATA Caliber :12 gauge / 20 gauge / 28 gauge Operation: Semi-Automatic, Gas Operated System Barrel Length: 20 (51cm), 24 (61cm), 26 (66cm),
Written By: Marcus C
 Cleaning a Browning BPS Shotgun How to clean the Receiver and Barrel of a Browning BPS Shotgun. Written By: Marcus C ifixit CC BY-NC-SA www.ifixit.com Page 1 of 11 INTRODUCTION This guide will take you
HATFIELD. Continuing the Tradition SEMI-AUTOMATIC SHOTGUN INSTRUCTION MANUAL
 HATFIELD Continuing the Tradition SEMI-AUTOMATIC SHOTGUN INSTRUCTION MANUAL READ THE INSTRUCTIONS AND WARNINGS IN THIS MANUAL CAREFULLY BEFORE USING THIS FIREARM SAFETY HANDLING RULES 1.Always keep the
VR1 Owner s Manual. Vigilance Rifles, Inc Plum Lane Redlands, CA P F
 VR1 Owner s Manual Vigilance Rifles, Inc. 1653 Plum Lane Redlands, CA 92374 P 909.307.8877 F 909.307.8866 www.vigilancerifles.com INTRODUCTION: Vigilance Rifles offers a new line of Semi-Automatic Rifles
trigger magazine release
 Made in Germany www.umarexusa.com slide gas vent hammer barrel bushing recoil spring plug slide stop trigger safety trigger guard magazine release grip Government 1911 A1 S Cal. 9 mm P.A.K. (Blank Firing)
REC7 DI OPERATOR S MANUAL
 EC7 D REC7 DI OPERATOR S MANUAL TABLE OF CONTENTS 2 2 4 5 6 6 6 8 8 10 11 12 12 13 13 15 18 20 22 USE OF THIS MANUAL SAFETY GUIDELINES WARRANTY AND SERVICE NOTES FUNCTIONS AND FEATURES BREAK IN PROCEDURE
OPERATOR S MANUAL FOR AR-24 SERIES PISTOLS
 OPERATOR S MANUAL FOR AR-24 SERIES PISTOLS ArmaLite Incorporated Box 299 Geneseo Illinois U.S.A. 61254 309-944-6939 ArmaLite.com 2006 ArmaLite Inc. This book provides instructions on the operation and
INSTRUCTION MANUAL CZ 750
 INSTRUCTION MANUAL CZ 750 Before handling the firearm read this manual carefully and observe the following safety instructions. Improper and careless handling of the firearm could result in unintentional
 (Mechanical Malfunctions) STOP SHOOTING IMMEDIATELY AND UNLOAD YOUR FIREARM if your firearm develops: a mechanical malfunction; binding or stoppage; spitting powder/gas; a punctured cartridge primer; a
ODEL 95 OPERATOR S MANUAL
 ODEL 95 MODEL 95 OPERATOR S MANUAL TABLE OF CONTENTS 2 2 3 5 6 6 6 7 7 8 8 11 11 12 12 19 20 22 24 26 MANUFACTURER S DISCLAIMER USE OF THE MANUAL SAFETY GUIDELINES WARRANTY AND SERVICE DESCRIPTION OF FIREARM
OPERATION AND FUNCTIONING
 C1, FM 23-65 * CHAPTER 3 OPERATION AND FUNCTIONING This chapter explains the operation of the MG. It discusses the loading, unloading, and clearing procedures, and the cycle of functioning of the weapon.
TABLE of CONTENTS. Safety 4. Introduction 6. Description 6. Storage 6. Components 7. Unloading and Inspection 8. Disassembly 10. Care and Cleaning 12
 1911 Pistol Manual 2 TABLE of CONTENTS Safety 4 Introduction 6 Description 6 Storage 6 Components 7 Unloading and Inspection 8 Disassembly 10 Care and Cleaning 12 Loading and Firing 13 Troubleshooting
CHAPTER 5 RIFLE DRILL AT THE HALT AUSTEYR
 CHAPTER 5 RIFLE DRILL AT THE HALT AUSTEYR 5.1 This chapter contains Rifle Drill at the Halt (with the AUSTEYR) and is enclosed in the following lessons as listed below in Table 5 1. Reference Lesson 1
OWNER S MANUAL. Read the instructions and warnings in this manual carefully before using this firearm; do not discard this manual.
 OWNER S MANUAL SDP compact Read the instructions and warnings in this manual carefully before using this firearm; do not discard this manual. This instruction manual should always accompany this firearm
Instruction manual CZ 75
 Instruction manual CZ 75 Before handling the pistol read this manual carefully and observe the following safety instructions. Improper and careless handling of the pistol could result in unintentional
SAR-15 RIFLE OWNERS MANUAL
 SAR-15 RIFLE OWNERS MANUAL SIONICS WEAPON SYSTEMS Our mission is to manufacture quality firearms made with pride in the USA. We are able to do accomplish this by using only the best American made parts.
KEEP YOUR 1911 WORKING UNTIL 2111 THE DEFINITIVE GUN-CARE GUIDE
 KEEP YOUR 1911 WORKING UNTIL 2111 THE DEFINITIVE GUN-CARE GUIDE TABLE OF CONTENTS 2 3 4-5 INTRODUCTION MAINTENANCE SCHEDULE PRODUCTS 8-10 11-12 13 LUBRICATION MAGAZINE MAINTENANCE CONCLUSION 6-7 CLEANING
ARAK-21 OPERATOR SAFETY AND INSTRUCTION MANUAL
 ARAK-21 OPERATOR SAFETY AND INSTRUCTION MANUAL NOTICE: The ARAK-21 Upper Assembly itself is not considered a Firearm under federal law or the National Firearms Act. The ARAK-21 Upper Assembly mounted on
slide takedown lever magazine release
 Made in Germany www.umarexusa.com manual safety extractor slide gas vent hammer trigger lock trigger P22 S guide rod takedown lever slide stop magazine release Cal. 9 mm P.A.K. (Blank Firing) OPERATING
22-17 Partner. Owner s Manual. 624 Old Pacific Hwy SE Olympia, WA Tel (800) Fax (360) Available Rifle Kit
 Fax (360) Available Rifle Kit") Available Rifle Kit Complete Upper Receiver Kit 624 Old Pacific Hwy SE Olympia, WA 98513 Tel (800) 228-3471 Fax (360) 491-3447 Owner s Manual 22-17 Partner Warnings & Operation Do not attempt to fire the
Available Rifle Kit Complete Upper Receiver Kit 624 Old Pacific Hwy SE Olympia, WA 98513 Tel (800) 228-3471 Fax (360) 491-3447 Owner s Manual 22-17 Partner Warnings & Operation Do not attempt to fire the
German Drill Regulations of 1906
 German Drill Regulations of 1906 Original illustration from Eckart Von Wurmb s Major Wenzel s Dienstuntericht des Deutschen Infanteristen The Basic Position is called: Grundstellung Achtung! - Stillgestanden!
IMPORTANT SUPPLEMENTAL INSTRUCTIONS FOR WINCHESTER LEVER-ACTION RIFLE
 IMPORTANT SUPPLEMENTAL INSTRUCTIONS FOR WINCHESTER MODEL 1895 TAKEDOWN LEVER-ACTION RIFLE These are special instructions for the Winchester Model 1895 Takedown Rifle only. These instructions must be used
Before handling the firearm read this manual carefully and observe the following safety instructions. CONTENTS
 Before handling the firearm read this manual carefully and observe the following safety instructions. Improper and careless handling of the firearm could result in accidental discharge and cause injury,
BROWNING AUTOMATIC RIFLE, CALIBER.30, M1918A2 WITH BIPOD
 FM 23-15 WAR DEPARTMENT BASIC FIELD MANUAL BROWNING AUTOMATIC RIFLE, CALIBER.30, M1918A2 WITH BIPOD L -~~~~~~~~~~~~~~~~~~~~~~~~ FM 23-15 BASIC FIELD MANUAL BROWNING AUTOMATIC RIFLE CALIBER.30, M1918A2
Ultra 87 Pump Action Shotgun Instruction Manual
 Ultra 87 Pump Action Shotgun Instruction Manual Congratulations on your purchase of the Ultra 87 shotgun. With proper care and handling it will give you long, reliable service. It is important that you
-
 Operator s manual SM-95202 Brügger & Thomet AG P.O. Box 42 3608 Thun Switzerland Fon +41 33 334 67 00 Fax +41 33 334 67 01 info@brugger-thomet.ch www.brugger-thomet.ch TABLE OF CONTENTS SAFETY instructions
MARLIN Model: 882SS -22 WMR - (22 Magnum) * Now Called Model 982S
 * Now Called Model 982S") Page 1 of 16 MARLIN Model: 882SS -22 WMR - (22 Magnum) * Now Called Model 982S Bolt action rifle. 22 Win. Magnum Rim Fire; nickel-plated 7-shot clip magazine; 22" Micro-Groove barrel; stainless steel barrel,
Page 1 of 16 MARLIN Model: 882SS -22 WMR - (22 Magnum) * Now Called Model 982S Bolt action rifle. 22 Win. Magnum Rim Fire; nickel-plated 7-shot clip magazine; 22" Micro-Groove barrel; stainless steel barrel,
- SAFETY - FIRST AND FOREMOST
 - SAFETY - FIRST AND FOREMOST FIREARMS ARE DANGEROUS WEAPONS, WHICH CAN CAUSE SERIOUS INJURY OR DEATH. WHEN USING ANY FIREARM, SAFETY MUST BE YOUR FIRST AND CONSTANT CONCERN. READ AND UNDERSTAND THE FOLLOWING
Swedish Mauser Rifle Manual
 A translation from the 1977 Swedish Army Manual (SoldI Mtrl) Translated by Anders J. 1999 Note: Feel free to copy this manual and to pass it along to someone else. I only ask you to respect my copyright
SHF R50 SHF S50 Safety Harbor Firearms, Inc. PO Box 563 Safety Harbor, FL Ph: Fax:
 SHF R50 SHF S50 Safety Harbor Firearms, Inc. PO Box 563 Safety Harbor, FL 34695-0563 Ph: 727-726-2500 Fax: 727-797-6134 www.safetyharborfirearms.com 1 ^ WARNING Risk of serious injury or death. Failure
INTRODUCTION TO THE SERVICE RIFLE AND MAINTENANCE
 INTRODUCTION TO THE SERVICE RIFLE AND MAINTENANCE 1 OVERVIEW DISASSEMBLY MAINTENANCE ASSEMBLY 2 TERMINAL LEARNING OBJECTIVE Given a service rifle, Common Combat Sling, and cleaning gear maintain a service
FIRST Steps Orientation (Shotgun)
") FIRST Steps Orientation (Shotgun) Welcome & Registration Firearms Instruction, Responsibility & Safety Training Orientation Goal: To introduce the knowledge, skills and attitude necessary to safely own
FIRST Steps Orientation (Shotgun) Welcome & Registration Firearms Instruction, Responsibility & Safety Training Orientation Goal: To introduce the knowledge, skills and attitude necessary to safely own
Thank you for buying Bushmaster
 AZ 16010 Before disassembling, loading, or using this firearm, please Read, Understand, and Follow all the instructions in this manual, regarding proper handling and safe use!! Caution: If unfamiliar with
Hardee's Infantry Tactics (1855)
") Hardee's Infantry Tactics To the Civil War Virtual Archives Homepage. Hardee's Infantry Tactics (1855) TABLE OF CONTENTS. TITLE FIRST ARTICLE FIRST. Formation of a regiment in order of battle, or in line;
Hardee's Infantry Tactics To the Civil War Virtual Archives Homepage. Hardee's Infantry Tactics (1855) TABLE OF CONTENTS. TITLE FIRST ARTICLE FIRST. Formation of a regiment in order of battle, or in line;
USER MANUAL TEDNA Shotguns. Over & Under Side by Side Semi-Automatic
 USER MANUAL TEDNA Shotguns Over & Under Side by Side Semi-Automatic Zenith Firearms www.zenithfirearms.com Come shoot the quality. Zenith Firearms, an American importer of high quality fi.rearms.and.accessories,.is.a.proud.distributor.of.
Figure 2-1. SAFE ( S ) position.
 position.") CHAPTER 2 OPERATION AND FUNCTION This chapter includes clearing, disassembly and assembly, loading, operating precautions, and cycle of operation. 2-1. CLEARING Clear the MK 19 differently in a firing
CHAPTER 2 OPERATION AND FUNCTION This chapter includes clearing, disassembly and assembly, loading, operating precautions, and cycle of operation. 2-1. CLEARING Clear the MK 19 differently in a firing
S40 OVER UNDER SHOTGUN USER S MANUAL WARNING: READ THE INSTRUCTIONS AND SAFETY PRECAUTIONS IN THIS MANUAL CAREFULLY BEFORE USING THE FIREARM.
 S40 OVER UNDER SHOTGUN USER S MANUAL WARNING: READ THE INSTRUCTIONS AND SAFETY PRECAUTIONS IN THIS MANUAL CAREFULLY BEFORE USING THE FIREARM. SEPTEMBER 2016 ROCK ISLAND ARMORY USER S MANUAL S40 OVER UNDER
Owner s Manual Golani Semi-Auto Sporter Rifle, Cal. 5.56mm
 Owner s Manual Golani Semi-Auto Sporter Rifle, Cal. 5.56mm Congratulations on your purchase of a Golani Semi-Auto Sporter Rifle. With proper care and handling it will give you long, reliable service. We
Morini CM 22M. Technical Data
 Morini CM 22M Technical Data Caliber: Weight: Total Length: Total Height: Total Width: Length of Sight Line: Barrel Length: Number of Riflings: Trigger: 1 st stage weight: 2 nd stage weight: Sight: Sight
INSTRUCTION MANUAL CZ 452/453
 INSTRUCTION MANUAL CZ 452/453 Before handling the firearm read this manual carefully and observe the following safety instructions. Improper and careless handling of the firearm could result in unintentional
Before handling the pistol read this manual carefully and observe the following safety instructions. CONTENTS
 Before handling the pistol read this manual carefully and observe the following safety instructions. Improper and careless handling of the pistol could result in unintentional discharge and could cause
OPERATOR S INSTRUCTIONS for the ARMALITE AR-30 RIFLE
 P.O. Box 299 Geneseo IL 61254 Tel 309-944-6939 fax 309-944-6949 armalite@geneseo.net OPERATOR S INSTRUCTIONS for the ARMALITE AR-30 RIFLE August 10, 2002 I. INTRODUCTION Description: Figure 1, The AR-30
OWNER S MANUAL FOR OA SERIES FIREARMS
 OWNER S MANUAL FOR OA SERIES FIREARMS 620-626 Old Pacific Hwy SE Olympia, WA 98513 (360) 459-7940 WARNING To avoid accidental firing, BE SURE WEAPON IS CLEAR. Failure to do so could result in serious injury
GREEN STAR DRILL. Adopt the Position of Attention
 GREEN STAR DRILL Adopt the Position of Attention, Stand at Ease and Stand Easy 1.The position of attention is one of readiness for a word of command. Alertness and exactness in this position is important,
AR /.223, 300 BLK, 22 Nosler,.224 Valkyrie. Covers. and. rifle models INSTRUCTION MANUAL
 AR-15 5.56/.223, 300 BLK, 22 Nosler,.224 Valkyrie Covers TM, TM and, TM rifle models INSTRUCTION MANUAL WARNING: BEFORE USING THIS FIREARM, READ AND FOLLOW THESE INSTRUCTIONS Safety First Thank you for
USER'S MANUAL AZUR. Barrel lugs. Forearm. iron. Receiver
 USER'S MANUAL AZUR Barrel Hinge pin Barrel lugs Chamber Top lever Muzzle Safety Forearm lug Forearm latch Forearm Forearm iron Receiver Trigger Buttstock IT IS YOUR RESPONSABILITY FAILURE TO HEED ANY OF
KHANSHOTGUNS. Thank you for choosing KHANSHOTGUNS 20 Gauge over & under shotgun
 Thank you for choosing KHANSHOTGUNS 20 Gauge over & under shotgun Your over & under shotgun represents a piece of rich history of quality firearms design and manufacture. During the manufacturing process,
Appendix 5 NRA INSTRUCTOR TRAINING PROGRAM PRE-COURSE QUALIFICATION PISTOL
 NRA TRAINING COUNSELOR GUIDE Appendix 5: NRA Instructor Training Program Pre-Course Qualification Pistol Appendix 5 NRA INSTRUCTOR TRAINING PROGRAM PRE-COURSE QUALIFICATION PISTOL The NRA Instructor Training
FORENSIC SCIENCE PAPER No.6: Forensic Ballistics. MODULE No.5: Firing Mechanism: Manual Mechanisms
 SUBJECT Paper No. and Title Module No. and Title Module Tag FORENSIC SCIENCE PAPER No.6: Forensic Ballistics FSC_P6_M5 TABLE OF CONTENTS 1. Learning Outcomes 2. Introduction 3. Classification of Manual
If you do not understand any of the material in this manual or have any questions, contact the Product Service Center or a qualified gunsmith.
 OWNER S MANUAL 464 LEVER ACTION CENTERFIRE LEVER ACTION RIFLE IMPORTANT SAFETY WARNINGS NOTE THE SYMBOL: THESE SAFETY WARNINGS ARE FOR YOUR PROTECTION AS WELL AS THE SAFETY OF OTHERS. DISREGARDING INFORMATION
NATIONAL ARMORY LLC Manufacturing Division 1315 SW 1 st Court Pompano Beach Florida NATIONAL ARMORY LLC.
 U NATIONAL ARMORY LLC Manufacturing Division NATIONAL ARMORY LLC. WARNING BEAR AR15 Read and understand this manual before using this firearm or any firearm as your life depends on it. Make sure to follow
INTRODUCTION. Good Shooting! -1-
 INTRODUCTION Thank you for buying a Weatherby firearm, and welcome to the family. We realize that you had many products to choose from and hope you feel as we do, that you purchased the finest quality
Disassembly, Assembly, and Cleaning of M16A4/M4
 Table of Contents iii Disassembly, Assembly, and Cleaning of M16A4/M4 By: George Carter Chris Talbott Jeremy Tinker Table of Contents Introduction... vii Disassembly... 3 Clearing the Magazine... 3 Retaining
Be sure the cam pin is installed in the bolt group. If it isn t, your rifle can still fire and will explode causing injury.
 Responsibility This manual provides instructions on the operation and maintenance of the Barrett model M468 rifle. Read and understand it carefully before you try to use your rifle. Your safety, and that