The loom consists of a row of vertical posts spaced evenly apart. This is the width you require.
|
|
|
- Pierce Alexander
- 5 years ago
- Views:
Transcription
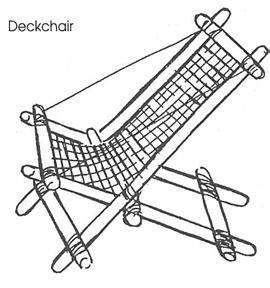
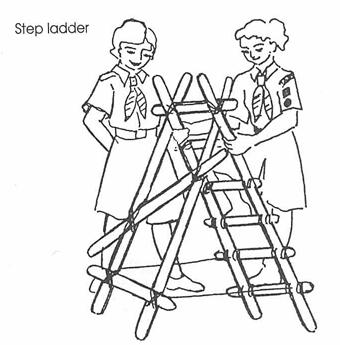
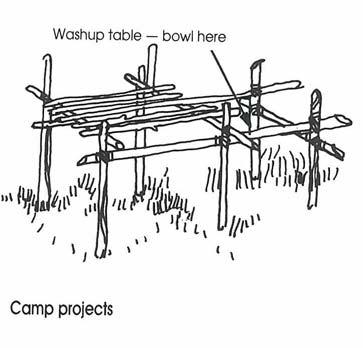
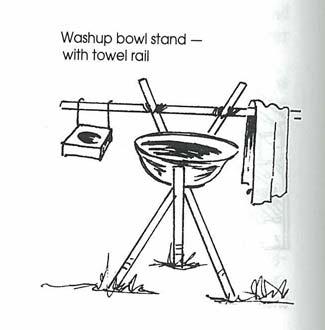
1 Chapter 19 Construction Construction Projects Camp loom This is a very useful item for camp if you wish to make table tops, walls, placemats, bedding, and so on. Your need will determine the width and length of the loom. The loom consists of a row of vertical posts spaced evenly apart. This is the width you require. A distance away (the length you require), two vertical posts are placed in the ground, and a spar is lashed between them to form the holding spar. A length of sisal, or similar material, is tied to the top of the vertical post, taken to the holding spar and fixed with an overhand knot, then taken back and attached to the weaving spar. This length of sisal is called a runner. Each vertical post is to have its own runner of sisal. To operate, lift the weaving spar up and place the material for weaving between the runners. Then take the weaving spar down below the other lines, and place more material between the runners. Each time the weaving spar is brought down, you alternate each side of the vertical posts. If you wish to make a wall, you will have to strengthen the weave by occasionally adding a strong stick to the material. You will also have to add a small spar, sharpened on one end. This can be hit into the ground to form a post when you are erecting the wall. When the loom is full or you have reached the required length, tie off the ends together, then cut the overhand knot on the holding spar and finish off the reef knot. Camp projects The step ladder requires the use of lashings - shear lashing for the legs and square lashings for the rungs. The two strings joining the feet of the ladder are essential, and a diagonal brace should be added to the legs for stability. The foot stool is also an exercise in lashing, but the hardest part is making the seat reasonably comfortable! For the deck chair, the seat can be of either string or canvas, but get the sag correct. The gate is an exercise in the use of lashings.

2
3
4
5

6 Ropeways Flying fox This is the best known and most popular of all pioneering projects. The job can be broken down into four separate parts: shear legs, anchorage, platform and fixing the rope in the tree, and bosun's chair. The shear legs must be high enough for the bosun's chair to clear the ground at the lowest point. To stop the shear legs from sliding under the rope and collapsing, brace them securely with guy lines. The anchorage should be one you can tighten, because the rope stretches with use. Do not forget sacking where the main rope is fixed to the tree and at the shear legs. The main rope should not be too tight, because a small amount of slack helps in the slowing down. However, there is a fair load in the rope, so make sure it is in good condition. Keep the pulley block oiled, otherwise it will be too hard to get it back. For best results, the runaway has to be at least 20 metres long and the angle of descent not too steep. Note: Check with your Branch for any extra regulations for the construction of flying foxes or aerial runways.
7 Simple rope bridge All that is required for this bridge is two ropes and of course, two stout trees! If the bridge is to cross a stream, you should plan a method for getting one of your Patrol members across. You may have to throw one rope into the far tree with a short stick attached so it wedges in the branches tightly, and then either swing across or go hand over hand. The most important thing is to get both ropes to the same amount of tightness. The best method of tightening would be by using a tackle. If the ropes are at all loose, the bridge will sag, and the top rope may even go out of reach! The protection around the tree is vital. To secure the ropes, make a clove hitch and two half hitches to the start, then finish by tightening with a round turn and two half hitches.
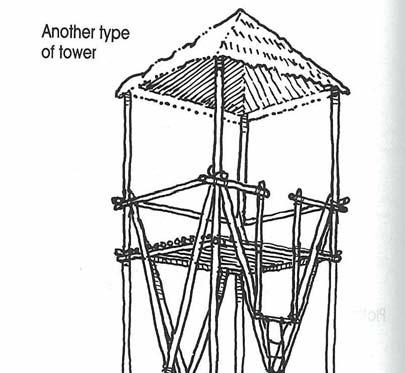
8 Towers Platform The main requirements of this structure are two long and fairly stout spars to carry the platform. The whole tower can be built on the ground and pulled erect in a way so the main legs drop into holes in the ground about 30 to 50 centimetres deep. To be successful, the lashings for both the platform supports, and also the diagonal bracings, have to be well made. The rope ladder is attached before the tower is erected, but it should be pegged to the ground so it can be climbed easily. The four main guys should be tightened evenly in order to prevent the tower from twisting.

9 Square tower This tower has many uses, and provides a rigid platform that can be up to 6 metres above the ground. It can be made as a permanent structure if the joints between the spars are bolted, or, alternatively, it can be dismantled if rope lashings are used. As in the previous tower (the platform), the actual building is best carried out on the ground and then pulled upright. You may find this part of the job is most easily carried out with the help of some auxiliary guy poles.

10 Pyramid tower The structure shown is composed of two similar three-sided pyramids, which are lashed together and held in place by short guy ropes. The easiest way of building it is to construct the two pyramids separately, the longest sides on the ground, and to join them with figure-of-eight lashings where the three main spars meet. The whole tower can then be pulled erect with long guy ropes. Make sure the rope ladder is in position before erection. Depending on the length of your spars, a tower up to about 6 metres high can be built.

11
12 Bridges Rope suspension bridge This bridge uses the same principles as those in the world's great suspension bridges such as the Golden Gate in the United States, or the Forth Road Bridge in Scotland. The loads are carried entirely by tension in the main top ropes, and the footway is simply suspended from the main ropes and lightly stretched between the trestles. The loads in the main ropes are transferred to the trestles, which require some diagonal braces in order to stop them collapsing sideways, and to the end anchorages. The latter must be perfectly secure, and allow for some tensioning adjustments in the ropes. One difficulty often encountered is that of getting the strings between the top rope and the footway exactly equal on each side of the bridge. The trestles must be securely fixed in the ground so they will not slip, and must be tall enough to give sufficient clearance over the water. Remember this bridge may sag appreciably as you walk across, but if built properly, has adequate safety.

13
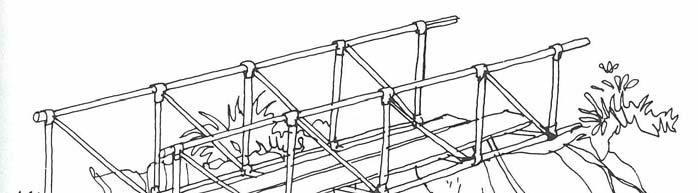
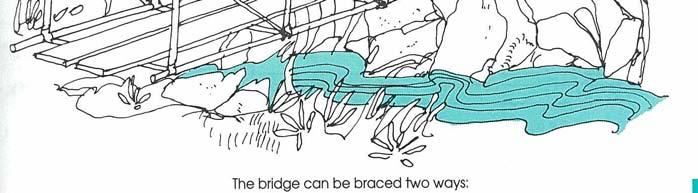
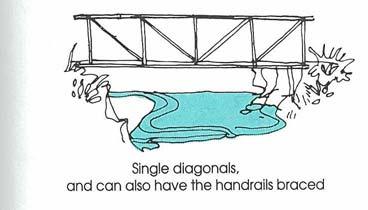
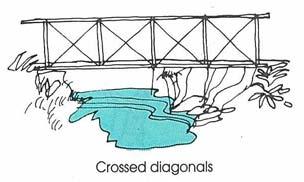
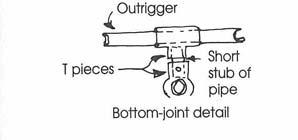
14 Lattice girder bridge This is a bridge that can be built with the traditional ropes and spars, or from steel waterpipe, or even from slotted-steel angle section. The latter materials would be ideal for longer lasting structures, although the project could also be constructed in timber with bolted joints. Using lashed joints, spans up to about 6 metres are easily achieved, and using bolted joints, much greater spans are feasible. If the bridge is to be built from waterpipe, standard clip fittings are available for the joints. In each panel the diagonals can be either single 25 mm X 3 mm steel flats, or they can be crossed between each corner from loops of fencing wire which are tightened by twisting. Notice how the handrail can be braced by outriggers at each vertical member. This is necessary in order to prevent it buckling sideways under load. You will find it easy to build this bridge on the bank of the stream and to launch it by pulling with ropes across the stream.
15

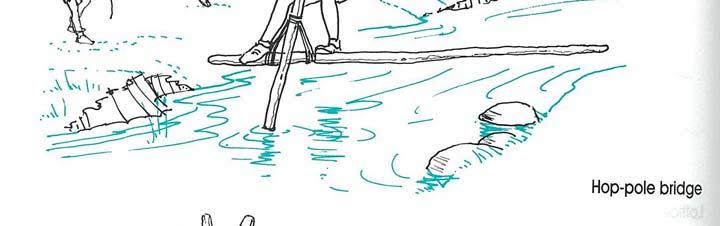
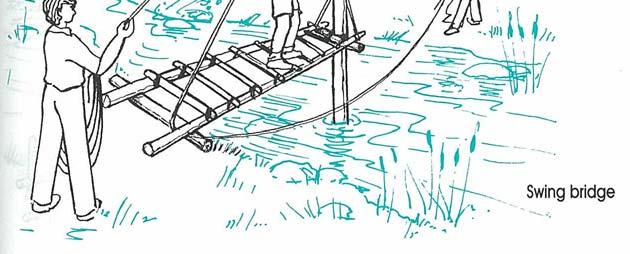
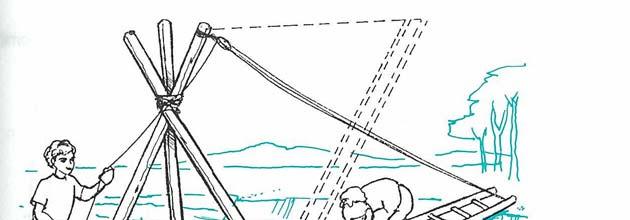
16 Some more ideas for Crossing the Creek

17
18

19


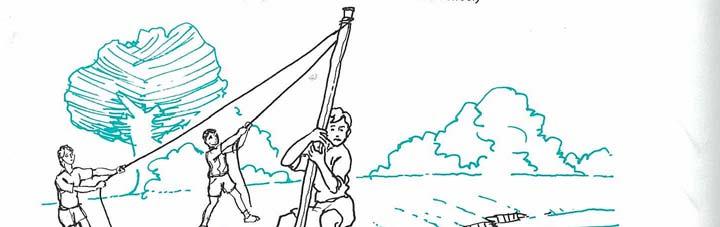
20 Flagpoles Even the simple flagpole can be a challenge of construction to your Patrol members - have your Patrol members design their own.
21
22
23 Shear legs and balistas Following are a few more ideas on things to build, from shear legs to balistas.
24
25 Hyperbolic-paraboloids For a challenge, try construction of a hyperbolic-paraboloid (HP). You will require some spars, eye screws or staples, and lots of sisal or coloured string. The first illustrations show a variety of simple two-spar layouts. The lines can be one way without cross-lines. Design 1 Follow steps 1 to 3 as follows. 1. Passing the twine, as in diagram (a). Horizontal pole: 2.5 m (an eye every 10 cm, 25 intervals). Vertical pole: 4.5 m (50 cm in the ground, an eye every 16 cm, 25 intervals). 2. The vertical pole is put in place as in diagram (b). 3. The ropes are prepared, starting at one end, as in diagram (c). It must be noted that a considerable quantity of metres of sisal is recuperated.
26 Design 2 This design is another simple layout and can be altered to give various results. Follow steps 1 to 3 as follows. 1. Pass the twine through the eyes. The number of eyes will depend on the effect you wish to achieve. You can also run a second colour twine on alternate eyes, as in diagram (a). 2. Place one spar in place, vertically or at an angle. You now have a choice. 3. Place the second spar in place, running the twine as you finalise the angle and result required. If you run the twine in line, you will have a result as in diagram (b). If you reverse the second spar then run the twine, you will have a different effect, as in diagram (c).
27 Design 3 When using more than two spars, your designs can become effective. Construct a hyperbolic-paraboloid camp gateway. You will require spars of various lengths. Follow steps 1 to 6 as follows. 1. Sisal or similar material is stretched from points spaced evenly along V - W to points along Y -X. 2. Similarly from points along W-X to V-Y. This can be a different colour. 3. The easiest place to start is to place spar X- Y in the ground. You may require a guy to steady it. 4. Now lift points V -X and fix with a lashing. 5. Now fix points W - Y and run the twine through. 6. Now lash points W-Y, as in diagram (b). You will find that Design 3 has many applications, and they do not always have to be on the ground. See diagram Design 3 (b). Some ideas for you to build on are:
28 (a) as a background to your flagpole: diagram Design 3(a) (b) as a covering for a table: diagram Design 3(b). This can also be woven with vegetation for more shade, if necessary (c) as a quiet spot for reflection: diagram Design 3(c). Note the use of some vertical lines, added to give a wall effect (d) as a base for a dining table: diagram 3(d).
29

30

31 In conclusion, the HPs are only one example of all the 'regulated surfaces', that is, surfaces composed of straight lines. If we stretch the ropes between two circles, we obtain, under certain conditions, two cones meeting at their vertex. It we stretch ropes between a straight line and a circle (always under certain conditions), we have a cone. Before actually putting this into practice, models should be made with assembly sets or elastic thread, which gives us a good opportunity to prepare the camp. Rafting Construction often includes water, not only building on dry land. We cross rivers or lakes during our activities, and one of the great fun activities in pioneering is rafting. On the following pages are a few ideas, but you must remember two most important items in rafting: 1. flotation calculations, otherwise your fun will be short-lived 2. strong construction, because the forces on your construction will be much more variable than when it is on dry land. Coracling The ancient Brits used to get about on the water in coracles, and Welsh anglers continue to use them. A coracle is a cross between a raft and a canoe and is a small craft made of wickerwork covered with canvas (or animal hide). However, you do not have to skin a cow or have a certificate in wickerwork in order to make a simple coracle! Following are two methods for making one.


32 Method 1 Follow steps 1 to 7 as follows. 1. Get some lengths of thick green vines or sticks about 1.5 centimetres thick, and soak them in water for about a day until they become pliable. 2. Stick the ends of the framework in the ground, bend over opposite pairs and lash overlaps, and interweave the crossings. Make sure the centre part is flat. You can do this by putting stones on the top, pulling the centre down to a tent peg: the professional coracle builder bends the wet strips in a steam jet from a kettle, or stands an old drainpipe upright in a saucepan of boiling water. 3. Weave other thinner pieces around the sides: these should be as long as possible but they do not have to go all the way around. 4. Temporarily lash the pieces near the ground so the coracle won't spring into a hundred fragments when you pull the main stakes out of the ground. 5. When you've got it out, turn it over and bend down the stakes, lashing them to their next door neighbours. 6. Stretch canvas, an old groundsheet or tarpaulin over the framework and the top edge and tie. 7. Put a woven stick mat or board in the bottom and make a paddle. Method 2 Follow steps 1 to 3 as follows. 1. Knock two concentric circles of stakes into the ground, the outer ring having a radius of about 60 centimetres. 2. Pack in brushwood and bind with sisal string. 3. Place on canvas, old groundsheet or tarpaulin, and tie in position; put a mat in the bottom, make a paddle and you are away!


33 'Sausage' raft The 'sausage' raft is also a fine raft, and can be made out of groundsheets. You will again require brush or wire netting. Make up 6 to 8 sausages, and bind the groundsheet well. Lay the sausages out with the opening on the top. Build a light frame from Patrol staves with a light plank in the centre, then attach the sausages to the frame. Carefully place in the water, and remember that if one sausage takes on water it will start the sinking. Always stand or step in the centre. Tarpaulin raft This is like a big box, and can carry more crew. However, you have to pad the corners well in order not to damage your tarpaulin. Again, if water comes in, you have no buoyancy. Drums and inner tubes can be used to form buoyancy, and with practice you will have a lot of fun. Remember that there are rules for water activities, and care should be taken and the rules obeyed. Check with your Branch for local policy rules.
34
Scout Meeting Schedule: Week 3 Theme: Pioneering A Date:
 Scout Meeting Schedule: Week 3 Theme: Pioneering A Date: Time Activity Program Details Leader Responsible 15 mins. Gathering Activity Chain Gang 10 mins. Opening Ceremony Details can be found in the Scout
NOTES: Information Booklet 3. Basic Pioneering. Compiled For Cambridgeshire Scouts September2013
 NOTES: Information Booklet 3 Basic Pioneering 12 Compiled For Cambridgeshire Scouts September2013 Basic Pioneering It is important that you read this before attempting any Pioneering Project. Pioneering
Square Diagonal Tripod Japanese Square Filipino Diagonal Round Shear Ladder
 Square Diagonal Tripod Japanese Square Filipino Diagonal Round Shear Ladder Square Lashing - Step by Step Used to fasten two spars or poles together. Start by crossing the two sticks or dowels at perpendicular
Start by crossing the two sticks or dowels at perpendicular or 90 degree angles.
 Square Lashing Used to fasten two spars or poles together. Start by crossing the two sticks or dowels at perpendicular or 90 degree angles. Make a Clove Hitch on the vertical stick or dowel near the point
Level Two Green Rope. Clove Hitch
 Level Two Green Rope Level Two consists of a combination of two knots (or hitches), all five lashings and the three basic splices. The lashings are essential for pioneering activities and to create camp
Try it! You ll like it!
 083016 1 Lashing is a method used to join together poles (or spars as they are often called) with rope to build camp projects like wash stands, tables, and even a camp shower! Knowing how to attach two
Ropework. Stopper knots. Overhand Knot ROPEWORK. Figure of Eight 3.
 Ropework 1 Ropework Stopper knots Stopper knots are used as a temporary method of stopping a rope from fraying or as a method of locking other knots which maybe prone to lossening. The knots are the Overhand
requirement 9 Polyester Nylon
 Page 4, requirement 9: By yourself, build an A-trestle OR X-trestle OR H- trestle using square and diagonal lashings. Explain the application of the trestle you build. Demonstrate how to tie two spars
Scout Skills Lashings
 Scout Skills Lashings 0845 300 1818 INFORMATION SHEET Lashings are used to join together poles (or spars as they are often called), most commonly for making up frameworks in pioneering projects such as
Scout It Out would like to extend its gratitude to all the sites where the following information had been gathered.
 Rope Work introduces the basic knots that all Scouts and Guides should know. Most of the knots featured here are very useful in Pioneering and should be learnt. This Section does not fully teach the exact
Ropework. Stopper Knots. Overhand Knot ROPEWORK. Figure of Eight 3.
 Ropework 157 Ropework Stopper Knots Stopper knots are used as a temporary method of stopping a rope from fraying or as a method of locking other knots which may be prone to loosening. These knots are:
Foreword. Pioneering Projects. Pioneering Projects
 Foreword This pamphlet has been compiled to provide some ideas for pioneering projects. Included are simpler projects that can be undertaken by Junior Scouts, whilst more complex tasks are also provided
Knot Masters Program
 The Knot Masters program helps Scouts to learn the knots they need for advancement, Scouters to become proficient in knot tying, and keeps knot tying skills sharp. Scouts and Scouters are encouraged to
Knots. Some points on ropes:
 Knots Knots have been created so that they may perform a certain job effectively. A good knot is easy to tie and just as easy to untie, does not slip under strain and can be relied upon. There are only
Charmborough Bells Risk Assessment and Method Statement
 Charmborough Bells Risk Assessment & Method Statement Charmborough Bells Risk Assessment and Method Statement Introduction This risk assessment and method statement has been prepared to outline the procedures
INSTRUCTIONS FOR CHAIN LINK INSTALLATION
 INSTRUCTIONS FOR CHAIN LINK INSTALLATION This guide explains how to correctly install our chain link fencing and post system. The guide provides details of which post type you will need for your fence
KNOTS. A very short guide to knotting terminology used on these pages.
 KNOTS A very short guide to knotting terminology used on these pages. This is not an exhaustive list of knotting terms; it just contains some of the more unfamiliar words that we have used. If you wish
Getting started SCOUT ENGINEERING
 Scout Engineering 1 Getting started bridge and secure your project and lastly some know how and loads of common sense. Each project should be approached in a logical way:- SCOUT ENGINEERING Pioneering
Installation and Training Manual
 AirForce1 Tower Kit Installation and Training Manual FuturEnergy Limited Ettington Park Business Centre Stratford upon Avon CV37 8BT +44 (0)1789 451070 Table of Contents Safety Notes... 3 Parts Supplied
Knots, Hitches and Bends
 Knots, Hitches and Bends It is hard to define clearly the terms knot, hitch and bend because their functions overlap. However, the terms may be generally defined as follows: Knots Hitches Bends Knots are
Scout Meeting Schedule: Week 1 Theme: Pioneering A Date:
 Scout Meeting Schedule: Week 1 Theme: Pioneering A Date: Time Activity Program Details Leader Responsible 15 mins. Gathering Activity Bowling for Bottles 10 mins. Opening Ceremony Details can be found
Xtender30. Home Batting Cage. Assembly Instructions
 Xtender30 Home Batting Cage Assembly Instructions IMPORTANT DO NOT RETURN THIS BATTING CAGE TO THE RETAIL STORE WHERE PURCHASED. CALL TOLL FREE: (800) 492-9334 IMPORTANT WARRANTY WARNING: DO NOT LEAVE
KNOTS. Overhand Knot. Page 12 of 32
 Overhand Knot KNOTS The overhand knot is useful for tying cord around a pin to end a macramé project, holding beads in place, and tying your shoes! It also makes a nice variety knot in a macramé design.
Pioneering Challenge. Pioneering Challenge. Tower. Notes: various depending on design points. Project: Walkway.
 Pioneering Challenge Project: Walkway Points: 1 000 000 points Equipment: various depending on design Time rating: long. Very long. Difficulty rating: You will find out Pioneering Challenge Project: Points:
End. Standing Part. An underhand loop is made by crossing the end under the standing part.
 Knot Board Learn to tie the four basic camping knots as illustrated as well as others you might add. Practice them until you can tie them well. Display them on a knot board made from a square of peg board
Stand-N-Fish FULL DETAIL INSTALLATION INSTRUCTIONS
 1 Stand-N-Fish FULL DETAIL INSTALLATION INSTRUCTIONS Thank you for purchasing the incredible new Stand-N-Fish Kayak Fishing System. Once installed on your kayak the Stand-N-Fish will take your kayak fishing
A Foundation Of Trust. Hanging By A Thread
 Hanging By A Thread PROPS: Rope maker (See video at DoingWorks.com/movies.) 1 spool of cord for each team [I like to use 10 lb (4 kg test, 525 feet (160 meters) sisal cord] 1 spool of cord to use for demonstration
Scout Meeting Schedule: Week 2 Theme: Pioneering A Date:
 Scout Meeting Schedule: Week 2 Theme: Pioneering A Date: Time Activity Program Details Leader Responsible 15 mins. Gathering Activity Poison Circle 10 mins. Opening Ceremony Details can be found in the
Knots /2017. Camp and Outdoor Curriculum Manual
 Knots 05-4487-01/2017 Camp and Outdoor Curriculum Manual Parts of a Rope Bight: A bend in the rope Loop: Crossing the rope over itself, creating a loop Overhand Loop: When the working end of the rope crosses
User s Manual. Model SWTC800. CAUTION: Adult Assembly Required
 User s Manual Model SWTC800 CAUTION: Adult Assembly Required Model SWTC800...3...4...4...5...6.........8...9...10-11 Part Identification Chart... 12 Exploded Drawing and Parts List...13-14 Ordering Replacement
Basket for Janice. by Beth Hester. GH Productions, Inc. The Basket Maker s Catalog
 Basket for Janice by Beth Hester GH Productions, Inc. The Basket Maker s Catalog Materials are available from your basketry supply store or contact: The Basket Maker s Catalog GH Productions, Inc. 521
Troop 226. Knot Master Program
 Troop 226 Knot Master Program Knots are a skill taught at every level of scouting. The Knot Master program is designed to provide each scout an opportunity to learn essential knots. In addition to learning
Pioneering. It s More Than Just Knots and Rope
 Pioneering It s More Than Just Knots and Rope Mark Montrose Retired Scoutmaster Troop 14, Santa Clara Venture Crew Advisor Crew 14, Santa Clara Assistant District Commissioner Pioneer District University
Thank you for purchasing a Porta-Dock product! *Please read and follow these instructions step by step*
 PG 1 OF 9 PORTA-DOCK, INC. 74A ABL/APW 1056 & 44A FLB APW 1056 PORTA-LIFT Thank you for purchasing a Porta-Dock product! *Please read and follow these instructions step by step* STEP 1. Separate and group
Nice. Nine. Need to. You
 Nine Nice You Need to Okay, it s actually six knots, one sling, one lashing and one handy tip, but who can resist the alliteration? The knots are no big secret. You ll find them in many publications and
Swing Your Partner. by Beth Hester. GH Productions, Inc. The Basket Maker's Catalog
 Swing Your Partner by Beth Hester GH Productions, Inc. The Basket Maker's Catalog Materials are available from your basketry supply store or contact: The Basket Maker's Catalog GH Productions, Inc. 521
SERIES 2 RAMP OWNER S MANUAL TOOLS REQUIRED: BEFORE YOU BEGIN... Read and understand these instructions before beginning a ramp setup.
 SERIES 2 RAMP OWNER S MANUAL BEFORE YOU BEGIN... Read and understand these instructions before beginning a ramp setup. Use caution and care for your back when lifting, pushing, pulling, folding or unfolding
ROYAL CANADIAN AIR CADETS PROFICIENCY LEVEL FOUR INSTRUCTIONAL GUIDE SECTION 3 EO M TIE KNOTS AND LASHINGS PREPARATION
 ROYAL CANADIAN AIR CADETS PROFICIENCY LEVEL FOUR INSTRUCTIONAL GUIDE SECTION 3 EO M490.03 TIE KNOTS AND LASHINGS Total Time: 60 min PREPARATION PRE-LESSON INSTRUCTIONS Resources needed for the delivery
PHONG TRÀO THIẾU NHI THÁNH THỂ VIỆT NAM TẠI HOA KỲ The Vietnamese Eucharistic Youth Movement in the USA 13 BASIC KNOTS
 PHONG TRÀO THIẾU NHI THÁNH THỂ VIỆT NAM TẠI HOA KỲ The Vietnamese Eucharistic Youth Movement in the USA 13 BASIC KNOTS 13. TAUT LINE HITCH (NÚT CHẠY) Also called a double half hitch. Used to increase
Pioneering. It s More Than Just Knots and Rope
 Pioneering It s More Than Just Knots and Rope Mark Montrose Retired Scoutmaster Troop 14, Santa Clara Venture Crew Advisor Crew 14, Santa Clara Assistant District Commissioner Pioneer District University
3/8" Safety Cable Systems
 3/8" Safety Cable Systems Ladder-Mount 3/8" Cable System (No Slider) Kits include appropriate length of aircraft cable, top and bottom support brackets, 12" tensioning turnbuckle, tension spring, and all
Knots and Hitches. To make a reef knot: Check out this video:
 Knots and Hitches Being able to work with rope efficiently and effectively is an essential camp skill. Introduce your girls to the following knots, hitches and lashings before going to camp, and have them
Building a 30 Tall Four-Legged Signal Tower
 Building a 30 Tall Four-Legged Signal Tower Revised 3/24/2017 Description: A signal tower is a fun project that appeals to Scouts natural inclination toward building big and climbing. A signal tower of
THE AMERICAN BARN DOOR KITE
 THE AMERICAN BARN DOOR KITE Oregon Kitemaker s Retreat January 2007 Rod Beamguard 4104 NW 112 th Way Vancouver, WA 98685-3578 (360) 574-8050 home (360) 750-9833 office kytfevr@wa-net.com PLANFORM BARN
Skills Night 2005 Troop 80, B.S.A.
 Skills Night 2005 Troop 80, B.S.A. Event Description Judge 1 st Rotation (7:10 8:00) 1a Pitch a Canadian Tent 2a Tripod with hanging bucket 3a Get over the electric wire 4a Challenge Station 5a Stretcher
Safety System Installation Guide for ARE Wind Poles
 Safety System Installation Guide for ARE Wind Poles V. 1 May 2011 ** Climbing pegs and ladder should be installed before the pole is erected.** A. Install climbing pegs Install climbing pegs (bolt set)
American Flagpole & Flag Co. 1(800)
") SENTRY CONCEALED HALYARD-REVOLVING TRUCK GROUND SET INSTALLATIONS INSTRUCTIONS 1. Dig foundation as detailed in SECTION A FOUNDATION SPECIFICATIONS, set sleeve in enter of hole with top 2 above grade.
SENTRY CONCEALED HALYARD-REVOLVING TRUCK GROUND SET INSTALLATIONS INSTRUCTIONS 1. Dig foundation as detailed in SECTION A FOUNDATION SPECIFICATIONS, set sleeve in enter of hole with top 2 above grade.
Revisions to the Regulations for Agility Trials
 Revisions to the Regulations for Agility Trials Effective January 2, 2018 Equipment changes may be done prior to January 2, 2018, but must be completed by January 2, 2018 This insert is issued as a supplement
TENNESSEE COMMISSION ON FIRE FIGHTING
 TENNESSEE COMMISSION ON FIRE FIGHTING FIRE FIGHTER I PRACTICAL EVALUATION 2002 Edition of NFPA 1001 Standard Department of State, Authorization No., 500 copies, April 2006. This public document was promulgated
Zip-Line Kit Instructions
 1 Zip-Lines Ireland - Zip-Line Kit Instructions DC001A Zip-Line Kit Instructions Thank you for your purchase of the ZLI Zip-line kit! This product was engineered to provide safe fun for all ages when the
RATLINER Assembly Instructions.
 Model Shipways Inc. www.modelexpo-online.com RATLINER Assembly Instructions. Patent Pending 1. Remove center stands and braces from the main rigging frame. 2. The Stands and Braces should press release
BALL STOP INSTALLTION GUIDE
 BALL STOP INSTALLTION GUIDE GROUND SLEEVE INSTALLATION: 1. Locate the exact location of the ground sleeve. NOTE: Maximum recommended pole spacing is 20 feet on center. 2. Excavate the pole footing; refer
Trampoline Installation Instructions
 Congratulations on purchasing an Oz Trampolines Product. Following are detailed setup instructions for your trampoline. Please ensure all boxes and parts are present before continuing. Setting Up Your
Assembly Instructions
 SAFETY AT THE HIGHEST LEVEL 6.6ft (2m) Window - Dec Platform System Assembly Instructions Temporary access device conforming to the test requirements of CSA Z271-10, CSA B354.5-07, CSA Z797-09, OH&S Act
On the Go Swing System Instruction Manual
 On the Go Swing System Instruction Manual WARNING READ ENTIRE MANUAL BEFORE USE. THIS SWING IS NOT A TOY. THIS SWING IS ONLY TO BE USED BY TRAINED PERSONNEL, SUCH AS AN OCCUPATIONAL THERAPIST, PHYSICAL
a WOW Lab Prep Instructions
 Pulleys and Mechanical Advantage A major step in the prep of this activity is choosing a good location. A key feature is an easily accessible top anchor. Some examples of good anchors are a solid tree
Information Booklet 5
 Do Not throw away short pieces of wood, they will come in useful as pegs, pickets, ladder rungs and short cross pieces. After all you never know what might be useful. Finally, you will need a few handy
FIX ROAD & FIX STRAP cargo securing systems Operating Instruction Manual
 FIX ROAD & FIX STRAP cargo securing systems Operating Instruction Manual NWE NETWORK ENGINEERING OY AB VAT: FI 09628099 1 Introduction Please ensure you read these instructions and understand them fully
Level Three Blue Rope
 Level Three Blue Rope Level Three consists of a combination of six fishing knots that work well in monofilament fishing line, two climbing knots and two knots used to secure heavy loads. Monofilament fishing
Shrouds, dead-eyes and ratlines
 Shrouds, dead-eyes and ratlines On a real vessel the shrouds would be put up before the running rigging and many modellers follow this sequence. On Sherbourne I attached the stays and the running rigging
Apple Basket with Swing Handle
 Apple Basket with Swing Handle GH PRODUCTIONS, INC. The Basket Maker's Catalog www.basketmakerscatalog.com Materials are available from your basketry supply store, or contact: Copyright 2000 GH Productions,
TYPICAL S/W TOWER STATIC STABILISER IMPORTANT NOTES
 IMPORTANT NOTES Towers should only be erected by competent trained personnel and records of both erection and regular inspection every seven days maintained. At working platform levels fit a standard and
Shade Sails - Installation Tips
 Shade Sails - Installation Tips Shade Sails Installation Suggestions Design and Layout: Shade Sails can be mounted in a variety of ways. Sails can be mounted flat or with high and low points. A flat sail
Wooden Canoe. Building a One-Off Wood & Canvas Canoe. Ray Arcand: A Living Link to the Past. Issue 134, April 2006 Volume 29, No.
 Wooden Canoe Issue 134, April 2006 Volume 29, No. 2 Building a One-Off Wood & Canvas Canoe Courses, Classes, Early Summer Ray Arcand: A Living Link to the Past WCHA Annual Report Building a One-Off Wood
Installation Guide Wall Mounted Angled Flagpole
 Installation Guide 1.5m - 4m Angled Flagpole Dimensions Flagpole Dimensions Wall Bracket Dimensions 2m Aluminium 76mm Glassfibre 114.3mm angle from vertical 2000mm 250mm 300mm 1715mm Backplate thickness
X-PRESS STAGE SYSTEM OWNER S MANUAL. TOOLS REQUIRED Allen Wrench (provided)
") X-PRESS STAGE SYSTEM BEFORE YOU BEGIN... Read and understand these instructions before operating. Use caution and care for your back when lifting, pushing, pulling, or folding and unfolding these units.
X-PRESS STAGE SYSTEM BEFORE YOU BEGIN... Read and understand these instructions before operating. Use caution and care for your back when lifting, pushing, pulling, or folding and unfolding these units.
Troyer s Gourd Rack 8 unit F R H O P
 B E A D I M-N L Vertical Parts F R H O P Horizontal Parts C G J Updated 11/16 Parts List A: Top of Pole B: Bottom of Pole C: 48 Ground Stake D: Top Perch rods 48 long E: Hub F: Rope Winder w/ attached
CAMPOREE COMPETITION EVENTS Cahuenga District Camporee/Cuboree 2016
 CAMPOREE COMPETITION EVENTS Cahuenga District Camporee/Cuboree 2016 Prepared for FUN! Veterans Memorial Park - April 29-May 1, 2016 1 - Emergency First Aid Troop 1 2 - Knots & Lashings Troop 18 3 - Five
Shiel e d Kite t By B y Sam & Ca C rir King Ore r g e o g n o Kite t m e aker e rs s Retr t e r a e t t2013
 Shield Kite By Sam & Cari King Oregon Kitemaker s Retreat 2013 SAIL ASSEMBLY Your pre-cut sail pieces include half-inch seam allowances. This provides enough material to complete a 1/4 inch double rolled
Knots & Their Uses. there are different knots for different purposes and all knots are not good for all purposes practice makes perfect
 Knots & Their Uses a good knot holds but is easy to open if necessary there are different knots for different purposes and all knots are not good for all purposes practice makes perfect a good knot needs
Trampoline & Enclosure Assembly Instructions
 Trampoline & Enclosure Assembly Instructions Safe user weight 250 lbs (115 kg) Version 718602 The information in this document is subject to change without notice. Copyright Springfree Trampoline Inc.
Building a coracle. Let's build a coracle roughly like this:
 Building a coracle Let's build a coracle roughly like this: Modeled loosely as Severn-Ironbridge. Width about 3 1/2' (105 cm), length about 4 1/2' (135 cm), depth about 14" (35 cm). The oval of the gunwale
SK101 : Transporting & Storing your Kayak
 SK101 : Transporting & Storing your Kayak How to start! Let s discuss : 1.Best ways to transport your kayak 2.Handling & loading tips 3. Storage solutions Let s start with Roof Rack Basics Roof Rails -
CSK013. Knots Games. 3rd Poole Sea Scouts
 3rd Poole Sea Scouts Knots Games CSK013 1) Blackout knots 2) Blind man s knot 3) Bowline /sheet-bend draw 4) Chariot race 5) Fisherman s knot 6) Knotting baseball 7) Knotting circle 8) Knotting relay 9)
SPECIAL LAUNCHING METHODS
 CHAPTER 18 SPECIAL LAUNCHING METHODS Special launching methods are needed when a restricted site prevents normal roller layout and launching by the standard skeleton launchingnose method. Space on either
On the Go Swing System Instruction Manual
 On the Go Swing System Instruction Manual WARNING READ ENTIRE MANUAL BEFORE USE. THIS SWING IS NOT A TOY. THIS SWING IS ONLY TO BE USED UNDER ADULT SUPERVISION. CONSULT WITH A CHILD S THERAPIST ON HOW
FIRST TEAM SPORTS, INC Storm Portable Series Assembly Instructions
 FIRST TEAM SPORTS, INC Storm Portable Series Assembly Instructions WARNING! WARNING! WARNING! THIS BASKETBALL SYSTEM IS SPRING LOADED AND SHIPPED UNDER TENSION. ATTEMPTING TO ASSEMBLE OR DISASSEMBLE ANY
First Team Sports, Inc. Blast Recreational Volleyball System
 First Team Sports, Inc. Blast Recreational Volleyball System BILL OF MATERIALS A 2 Volleyball Vertical Post K 1 ½ Centerlock Nut B 3 Net Clamp L 2 Carabiner Clip C 1 Pulley Clamp M 1 ½ x 2 Hex Bolt D 4
ROPE RESCUE & RIGGING
 ROPE RESCUE & RIGGING Field Guide Second Edition by Grant Prattley ROPE RESCUE & RIGGING Field Guide Second Edition 2016 Written and illustrated by Grant Prattley Copyright Over The Edge Rescue www.oterescue.com
Tying Farm Knots. Working with Heifers
 Tying Farm Knots A rope is one of the most common of tools used to restrain animals. Unfortunately, most people never learn which knots are most efficient to use in given situations. Practice tying the
cricket Premier Portable Cage Winch System Heavy Duty Parks Parks Cages Wooden Bays Stumps Netting Sundries cricket
 cricket 21 Premier Portable Cage Winch System Heavy Duty Parks Parks Cages Wooden Bays Stumps Netting Sundries cricket setting the standard - leading the field Harrod UK continue to work with consultants
Assembly Instructions. -Cantilever Boat Lifts
 Assembly Instructions -Cantilever Boat Lifts Winch Instruction Page Safety Information 1. The winch is built for the multipurpose of hauling and lifting operations. It is not to be used as a hoist for
Parts of a Rope 1. Carrick Bend 2 Fisherman s Bend 4 Hunter s/rigger s Bend 5 Sheet Bend 7
 - 1 - Contents Parts of a Rope 1 Bends Carrick Bend 2 Fisherman s Bend 4 Hunter s/rigger s Bend 5 Sheet Bend 7 Hitches Clove Hitch 8 Highwayman s Hitch 9 Italian Hitch 11 Marline Hitch 12 Round Turn and
Your kit contains the following items. Additional Items You May Need. Pre- cut parts Propeller rigging and rubber Sandpaper Covering sheet
 Your kit contains the following items Pre- cut parts Propeller rigging and rubber Sandpaper Covering sheet The SkyFox offers great glide performance in a rubber powered plane due to its built up wing.
Wooden Dummy Construction
 Wooden Dummy Construction Mook Yan Jong - (pronounced moohk yàhn jàng) literally translates "wood man post", but is usually just called a "wooden dummy" in English, or "jong" for short. The dummy consists
Laying out the Grid Laying out an accurate grid pattern in the sand is very important in order to get the columns and rows straight and true.
 Laying out the Grid Laying out an accurate grid pattern in the sand is very important in order to get the columns and rows straight and true. As of this writing, the plot is 72 feet wide by 156 feet deep
COMMAND TASK 1 - 'V' Planks
 COMMAND TASK 1 - 'V' Planks 2 x gym bench 1 x 4m rope (8mm dia.) 1 x 1.4m plank (3cm thick min.) 1 x 1.7m plank (3cm thick min.) Your unit's Land Rover has been damaged beyond repair. To get to safety,
The Forest School Training Co. OCN accredited training
 Useful Knots for Forest School The Overhand Knot 1. Cast an overhand loop. Take the working end and push it through the loop. The Figure of Eight Knot 1. Form a loop and pass the end under the standing
-- SGP (NOVA TEAM SQUARE)
") -- SGP-100 -- (NOVA TEAM SQUARE) Installation Instructions Call Jaypro Sports Equipment at 1-800-243-0533 during regular business hours for technical support. www.jaypro.com Rev-B Page 1 of 9 JAYPRO SPORTS
-- SGP-100 -- (NOVA TEAM SQUARE) Installation Instructions Call Jaypro Sports Equipment at 1-800-243-0533 during regular business hours for technical support. www.jaypro.com Rev-B Page 1 of 9 JAYPRO SPORTS
FALL PROTECTION. Leader s Guide. Marcom Group Ltd.
 1818 FALL PROTECTION Leader s Guide Marcom Group Ltd. Structure and Organization Information in this program is presented in a definite order, so that employees will see the relationships between the various
Instant Garage 20' x 12' 3" x 8' 3"
 Instant Garage 20' x 12' 3" x 8' 3" Assembly Instructions Description Model # Instant Garage 20' x 12' 3" x 8' 3" - Grey CIG 1220 3503502 Recommended Tools OR THIS IS A TEMPORARY STRUCTURE AND NOT RECOMMENDED
Information Booklet 3
 TAKING. IT FURTHER Create lessons to demonstrate and learn how to tie the following knots: Timber hitch Highwayman s hitch Sheepshank Bowline Sheet bend Groups could then build knot boards showing how
BANKSMAN / SLINGER. 1. What is the smallest size diameter of synthetic rope allowed for use as a hand held tagline?
 BANKSMAN / SLINGER 1. What is the smallest size diameter of synthetic rope allowed for use as a hand held tagline? A. 16mm B. 10mm C. 12mm 2. What is the maximum temperature that a webbing sling can be
Trampoline & Enclosure Assembly Instructions
 Trampoline & Enclosure Assembly Instructions Safe user weight 330 lbs (150 kg) Version 718702 The information in this document is subject to change without notice. Copyright Springfree Trampoline Inc.
Chapter 9 Rigging and Vehicle Recovery ROPES. Table 9-1. Wire rope characteristics and safety factors
 Chapter 9 Rigging and Vehicle Recovery ROPES Tables 9-1 and 9-2 give characteristics, safety factors, and breaking strength for different diameters of wire, manila, and sisal ropes. Table 9-1. Wire rope
"FALL PREVENTION IN THE WORKPLACE"
 MAJOR PROGRAM POINTS "FALL PREVENTION IN THE WORKPLACE" Part of the "GENERAL SAFETY SERIES" Quality Safety and Health Products, for Today...and Tomorrow Outline of Major Points Covered in the "Fall Protection"
Bowsprit Hinge on "Bumble Chugger" By Robin Whittle, Shrimper 124 (Bumble Chugger) (Winter 2003)
 (Winter 2003)") Bowsprit Hinge on "Bumble Chugger" By Robin Whittle, Shrimper 124 (Bumble Chugger) (Winter 2003) In April 2003 Practical Boat Owner (PBO) published an article which I had written on the use of the bowsprit
Bowsprit Hinge on "Bumble Chugger" By Robin Whittle, Shrimper 124 (Bumble Chugger) (Winter 2003) In April 2003 Practical Boat Owner (PBO) published an article which I had written on the use of the bowsprit
Tripod Setup Guide (M-TPx)
") Items needed: 1/2 inch wrench, mast level (M-MLA), medium size wire cutters, crescent wrench, all-purpose grease, tape measure, tie wraps, redi-mix cement (optional), shovel (optional), sledge hammer (for
Items needed: 1/2 inch wrench, mast level (M-MLA), medium size wire cutters, crescent wrench, all-purpose grease, tape measure, tie wraps, redi-mix cement (optional), shovel (optional), sledge hammer (for
Installation Instructions for the AlphaDeck Staging System
 Installation Instructions for the AlphaDeck Staging System Step 1 - Preparation A. Before setting up this system, determine the location of the stages and all the parts you will need. B. Read through the
SPM B-Net Assembly Instructions. Installation Recommendations
 SPM B-Net Assembly Instructions & Installation Recommendations WCS B-Net Installation Video SPM B-Net Study Ski Racing Safety is NO Accident! INSPECT, PLAN AND EXECUTE NO EXCUSES! 2015, World Cup Supply,