Dear Customer: Thanks again & remember to tell your friends about your product from Component Playgrounds!
|
|
|
- Anne Williamson
- 5 years ago
- Views:
Transcription
1 Dear Customer: Thank you for purchasing your equipment from Component Playgrounds!!! We are proud of our commercial grade products made for kids of all ages & sizes, and we are confident that you will enjoy your equipment for many years. Because you have purchased a top of the line commercial grade product, you will need to be aware of some specific shipping requirements that may be different from shipments you have received in the past through other delivery companies (such as UPS), and you should follow the guidelines below carefully. 1. In most cases your product will arrive via common carrier truck line directly to your home with curbside delivery only. This means the driver will facilitate the offloading of the shipment at the curb, or most reasonable place near the curb and your house. You are then responsible to have someone physically capable to help unload the product upon delivery and note the condition of the product as per below instructions. 2. Your product may arrive on a pallet and upon delivery locate the packing list (usually attached to the hardware box & orange & black in color) and verify that each piece listed is with the shipment. *** Please disregard any delivery driver stated time crunches or needs to leave quickly and inspect the product to your satisfaction = this is your product so make sure it is all there in good condition or noted properly before the driver leaves.*** 3. If there are any parts/pieces missing, note this directly on the delivery receipt BEFORE you sign and receive your copy of the receipt, with wording such as missing xyz part etc. Note: some shipments will have more than one pallet so check both before noting missing. 4. Similar to #3 above, also note the condition of the pieces and if any parts have been damaged in shipping note this directly on the delivery receipt BEFORE you sign and get your copy from the driver (in particular inspect slides for damage). 5. If your shipment appears to have damage and /or missing pieces, a freight claim must be fi led with the freight company w/in two business days. Component Playgrounds will assist you with this process if it is necessary. Contact the shipping manager toll for claims assistance. 6. Ask your driver to sign or initial the freight slip acknowledging any damage or discrepancies. 7. Get a copy of the signed delivery receipt from your delivery driver BEFORE he leaves. 8. If you are concerned or don t know what you should do with a certain situation regarding the shipment, please call the shipping manager toll before the driver leaves. All shortages and damaged items are the sole responsibility of the carrier. You are responsible to notify Component Playgrounds of any shortages or damage relating to your shipment w/in 2 business days of receipt of your equipment. After this time, any claim for shortage or loss cannot be honored. Component Playgrounds cannot be responsible for replacement of any parts, missing or damaged, that have not been properly noted on the delivery receipt. Component Playgrounds cannot be responsible for damaged or missing pieces due to the fault of, or loss by the freight company. Thanks again & remember to tell your friends about your product from Component Playgrounds!
 12 6 Horizontal Ladder 1 Triple End with Sleeve 1 2 2 3/8 x 13 11 Toprail 1 7/8 x 9 Leg 10 Total")
2 Parts Identification SS31 Swing Set (Page 1 of 2) Quantity 1 1 Description Box Containing Swing Set Parts 2 3/8 x 9 Top rail 1 Slide Upright Ladder with Sleeves (Actual Length 10 ) 12 6 Horizontal Ladder 1 Triple End with Sleeve /8 x Toprail 1 7/8 x 9 Leg 10 Total Pieces
3 Installation Instructions SS31 Required Tools Wheelbarrow Shovel Tape Measure Level Digging Bar or Pick Open End or Box Wrenches: 5/8, 9/16, Allen Wrench (Provided) Ratchet Handle & Sockets: 5/8, 9/16, 17mm Marker Pen Ladder PLEASE READ AND UNDERSTAND ALL INSTRUCTIONS BEFORE BEGINNING *Before digging, please obey local laws by notifying your local utilities marking organization* 1. Select an area in your yard that is reasonably level and meets the space requirements for your equipment. Ground Space: 15 x 28, Play Space: 19 x Please refer to the Top Rail/Out Rigger assembly sheet and assemble your top rails as instructed. 3. Using the measurements from the top view diagram, measure and mark the position of the swing hangers and ladders on each of the top rails. Set aside. 4. Place over head ladder onto the ground in the desired location. Measure and adjust as necessary to allow for the proper play space. 5. With the Horizontal ladder in its proper position in the yard, mark the location for the holes where the two vertical ladders will stand. Move the horizontal ladder and dig the holes. (See installation instructions #1 hole sizes for cementing.) 6. Lay each vertical ladder on the ground near the hole where it will eventually stand. Make a mark 15 from the top of the ladder onto each ladder rail. Move the adjustable sleeves to these marks and position them to receive the overhead ladder by turning them to point at a 90 degree angle (towards what will become the inside of the structure) away from the upright ladder. Secure the set screws. 7. Insert the 9 top rail into the top sleeve of the ladder. Secure the set screws. 8. Place the ladder into its hole. Hint: Be sure that the adjustable sleeves are prepared to receive the horizontal ladder. 9. Lay the other ladder on the ground with the bottom of the ladder just over the hole where it will eventually stand. 10. Place the outrigger about 10 away from the hole. Assemble and attach the swing hangers to the outrigger. 11. Position the outrigger upside down on the ground. Assemble the A frame legs. (See installation instructions: A frame leg assembly.) Slide the outrigger into the top sleeve of the vertical ladder.
4 12. Using two strong adults, stand the structure up and allow the ladder to fall into the hole previously dug. Check and make sure that the outrigger is still properly positioned inside of the ladder top sleeve. The out rigger can be adjusted as follows: While securely holding the ladder, take hold of the A-frame portion and push or pull as necessary. When you are satisfied that the outrigger is properly positioned inside the ladder top sleeve, secure the set screws. Note: The unit will not be level at this point. 13. Adjust the A frame legs in the play space as desired. 14. Mark the holes for the A frame legs. Move the legs out of the way and dig the holes. Hint: Keep most of the hole to the inside of the leg. 15. Place the legs into the holes. 16. Using two strong adults, lift and slide the horizontal ladder onto the adjustable sleeves at the swings side of the structure and secure the set screws. (See #4 overhead ladder to upright ladder assembly.) Hint: Do not push the overhead ladder tight against the vertical ladders. Leave a ½ - 1 gap between the vertical ladder rails and the overhead ladder. This will allow for easier adjustment of the overhead ladder in the future. 17. Bring the other vertical ladder up to the horizontal ladder and secure set screws as before. 18. Attach the swing hangers and chains onto the 9 top rail. 19. Attach the slide bracket and slide as shown on the slide assembly sheet. 20. Measure the height of the top rail to insure proper swing height. 21. Level the structure. 22. Mix concrete according to the package directions. Pour the concrete. You will use approximately 6-7, 80 pound bags in each ladder hole and 1-1/2 bags in each of the other holes. (See instructions for hole dimensions and cementing directions.) 23. Allow the concrete to cure 3-5 days before using. 24. Attach the chains and swing seats and enjoy your Component Playground.


 3/8 x 3/8 set screws into each of")
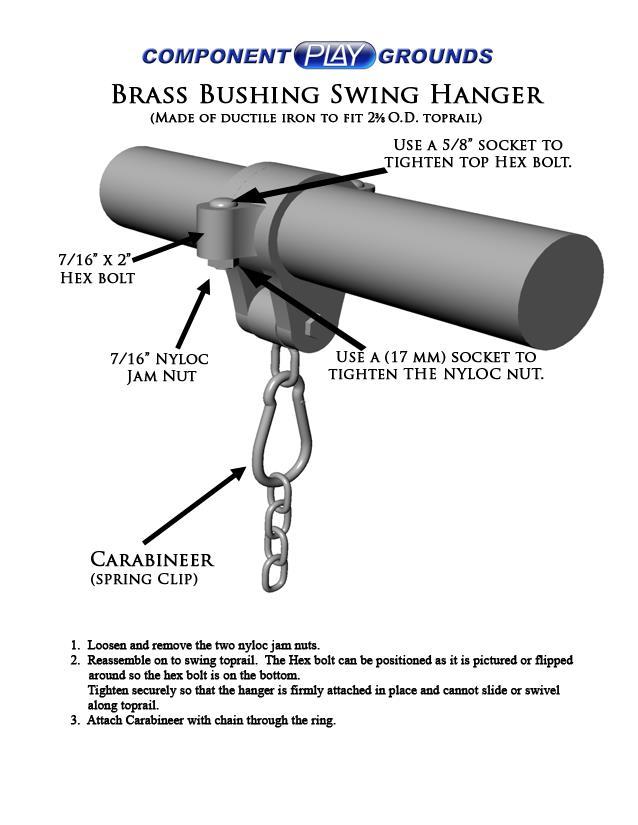
5 Top Rail Assembly Step 1: Slide the Swing Hangers and tighten onto the Top Rail during the Top Rail Assembly process. (Refer to spacing diagram and graphic found above) Step 2: Slide the ends of the 10 Top Rail as far as it will go into the Sleeve of the Triple End. Step 3: Insert and tighten (4) 3/8 x 3/8 set screws into each of the Triple End Sleeves using Allen Wrench provided. Step 2 Step 1

6 Two piece Top Rail Assembly Step 3: Step 2: Step 1: *Make sure to line up the set screws so they make a straight line as show in the graphic above.

7 INSTALLATION INSTRUCTIONS SS31 GROUND SPACE 15 X 28 MINIMUM RESIDENTIAL PLAY SPACE 19 X 37 5 Clearance Top View
 24 (B) A-Frame Legs 18 Holes 18 x 12 (Approx.")
 12 3/8 x 2 ¾ Hex Bolt with 3/8 Nyloc Nut (1 each")


8 SS31 Continued 20 (A) Upright Ladder 28 Hole 28 x 20 x 24 (Approx lb. bags of concrete mix per hole) 24 (B) A-Frame Legs 18 Holes 18 x 12 (Approx. 1 ½ 80 lb. bags concrete mix per hole) 12 3/8 x 2 ¾ Hex Bolt with 3/8 Nyloc Nut (1 each per leg) 3/8 x 3/8 Set Screw (1 each per leg) Slide in leg, bolt in place and secure with set screw. Triple End A-Frame Leg #2 A-Frame Leg Assembly #1 Hole Sizes for Cementing in the Set Slide Top Rail joint into place about 1 inch inside the Ladder Top Sleeve & secure with two 3/8 x 3/8 Set Screws Top Rail Set Screw Set Screw Set screw holes Upright Ladder #3 Ladder to Top Rail Assembly
9


10 RAVE/ROCKET SLIDE MOUNTING INSTRUCTIONS 1. Attach the slide bracket to the upright ladder by placing the carriage bolt through the ladder and through the holes in the bracket. Then secure with the flate washer, loc washer, and hex nut. AS SHOWN ON RIGHT. (It is recommended that you level both the ladder and the bracket before you tighten hex nut in place.) 3/8 x 3 Carriage Bolt Slide Bracket 3/8 Hex Nut 3/8 Loc Washer 3/8 Flat Washer 2. Attach the slide to the bracket by placing the slide in place on bracket. Then drilling with a 3/8 drill bit through the holes in the bracket into the slide. (Holes in the bracket should line up with mold for holes in the slide.) Then insert the BHS bolt through the slide holes and through the holes in the bracket. Then secure with the flat washer, loc washer, and hex nut. AS SHOWN ON RIGHT. 3/8 Flat Washer 3/8 x 1 ¼ BHS Bolts 3/8 Loc Washer 3/8 Hex Nut
11
12 Read Before Use Congratulations! You have just purchased one of the finest pieces of playground equipment available. Your family will enjoy many hours of fun with this fine equipment. Playground equipment can be most enjoyable, but there are some dangers if not used properly. You should be aware of the following: Equipment should be installed in a level area, free from obstructions, with enough space to allow for adequate clearance in all directions when equipment is in maximum use. Keep objects away from equipment that could interfere with persons using it or that could be hazardous. Misuse or abuse of this playground equipment is dangerous and can cause serious injury. This equipment should be inspected before each use and any worn, defective or missing parts should be replaced. Children should play on equipment only with adult supervision and should be duly warned of the potential hazards in this type of equipment when used improperly. Children should be instructed as to proper caution to take in its use. Equipment should NOT be used when it is wet or icy. Equipment should only be used in a well-lighted area. Do NOT use equipment when tired, under stress or emotionally upset. Do NOT overcrowd. Do NOT use equipment when under the influence of alcohol or drugs. Do NOT attempt somersaults or gymnastic stunts on or using this equipment. Know your own limitations and exercise caution at all times. Do not jump off of equipment when dismounting. It is a dangerous practice to jump on or off equipment. Do not attempt to use equipment for something other than the use for which it was designed and intended, or in a manner other than that for which it was designed and intended. While every attempt is made by Component Playgrounds to ensure the highest degree of safety in all of our equipment, we cannot guarantee freedom from injury. The user assumes all risk of injury due to use. All merchandise is sold on this condition, which no representative of the company can waive or change.
13 Maintenance of your playground We hope that you and your family will enjoy many of hours of great family fun while using your Component Playgrounds Products. We appreciate your business. Our goal is to provide safe, durable and fun products using the best materials available. Your product should be mostly maintenance free. However, you should consider the following suggestions with regard to the up keep of your new swing set. 1. Chains and Connectors: The chains are coated with the highest quality bright zinc coating and the highest quality polymer coatings available. However, over time the zinc coating may become discolored or eventually have surface rust appear. The polymer coating may also become discolored with time and may eventually crack. This depends mostly upon environmental conditions and normally will not affect the durability and safety of the product. However, these items should be inspected regularly for excessive wear and should be replaced as necessary. 2. Swing Hangers: These items are coated with a high quality galvanizing. However, swing hangers may become discolored or may eventually rust. Should this happen, a touch up using a cold galvanizing compound followed by a coat of silver aluminum spray paint will make them look new again. These items can be purchased in aerosol cans ( spray paint ) at most hardware stores and at Component Playgrounds. The brass bushings inside of the swing hanger are impregnated with lubricant and will not generally require any further lubrication. However, these should be periodically inspected for wear and replaced as necessary. Note: Twisting the chains while swinging will put extra wear on the swing hanger parts. If your children enjoy this practice, please inspect the swing hangers more frequently. 3. Tire Swing Knuckles (for sets with a tire swing): The tire swing knuckle arrives at Component Playgrounds pre-lubricated from the manufacturer. However, it is good practice to inspect the knuckle and be sure that there is adequate lubrication before it is used the first time. After that, the tire knuckles should be lubricated at least twice annually to prevent excessive wear and the eventual failure of the tire swing knuckle. 4. Welds: The heat from the welding process will damage the galvanizing that is on the pipe when it arrives to us from the manufacturer. This damage to the galvanizing is restricted to the actual weld. When your equipment is built, Component Playgrounds will repair this damage using a cold galvanizing compound spray along with a top coat of silver aluminum. This is a time tested and durable process. However, when you are inspecting your playground equipment, if you notice that some surface rust has appeared on the welds, simply apply a fresh coat of the cold galvanizing compound and the silver aluminum top coat to keep your structure looking new. (These spray products
14 can be purchased in aerosol cans ( spray paint ) at most hardware stores and at Component Playgrounds.) 5. Plastic Lumber Platforms: If you have purchased a structure which includes a platform, the plastic lumber does not need to be finished or stained. It is 100% maintenance free. However, you may need to occasionally hose it down to remove dirt and other debris that may collect after many hours of use by happy children. 6. Vinyl Canopies: If you have purchased a structure which includes a vinyl canopy, this product should be inspected occasionally for wear and will need to be replaced as necessary. Depending upon your environmental conditions, the normal life expectancy of the vinyl canopy is 3 5 years. 7. Swing Seats: These should be inspected at least twice annually and should be replaced as necessary. 8. Slides: Slides should never be lifted at the bottom. Lifting the slide at the bottom will almost always cause the slide to crack at the top where it has been attached to the platform or bracket. Cracks and wear such as is caused by this practice are easily identifiable and will not be covered under the product warranty. Slides should be inspected at least annually to ensure that the sliding surface is in good condition. Also inspect the side rails to be sure that the plastic has not been cut or gouged in any manner which would present the risk of injury while sliding. 9. Fasteners: All fasteners should be periodically inspected to make certain that they are tight and secure. Re-secure as necessary.
15 To Help Prevent Injuries from Falls & Other Hazards 1. Never attach, or allow children to attach the following items to your swing set: Ropes, jump ropes, clotheslines, pet leashes or any similar type of item to your swing set. Any item such as these may present a strangulation hazard. 2. Periodically inspect all nuts, bolts, set screws, clevis, and carabineer or S hooks. Make certain that these are functionally safe and secure. If you have any doubt as to the safety and security of any connector or fastener, replace it. 2a. You should periodically check the brass bushings in the swing hangers. Look for excessive wear in the bushing and replace as necessary. 2b. If your playground has a tire swing: The tire swing knuckle should be lubricated twice annually to prevent wear. 3. Never allow children to wear bicycle helmets when using playground equipment. 4. Remove drawstrings from hoodie s and jackets. Remove attached mittens and gloves. These can become entangled with the equipment and present the risk of strangulation or other hazards. 5. Playground surfaces can become hot in the sun. Children should be required to wear shoes and socks when using this or any playground equipment. 6. Check for and remove sharp points or edges in the playground equipment. 7. Remove tripping hazards from the playground area. Items such as exposed concrete footings, tree stumps, rocks or any item that may be present in your space that a child could trip over while playing should be removed. 8. Regularly check the play equipment and the surfacing surrounding it to be certain that both are in good condition. 9. Parental Supervision is recommended. The best ingredient for a safe playground is good parental supervision while the kids are using the equipment. 10. Remember to play safely, take turns, share with each other and have fun!
16 Residential Products Limited Lifetime Warranty Component Playgrounds works to build heavy duty products that will stand up to the heavy use of active children. You can trust Component Playgrounds because of the way we design and build our products. We make products that are simple to own, and easy to maintain. This adds up to the best value on playground products that you can count on, and that kids will play on time after time. Component Playgrounds warrants to the original purchaser/property owner that its residential grade products are free from defect in materials and workmanship. This warranty is non-transferrable and will be honored only after proper registration. This warranty is not extended to cosmetic items such as scratches, dents, fading, discoloring, paint wear, rust, weathering, or decorations. The warranty as stated is valid only if equipment is properly installed as detailed in the installation instructions provided and is used in a normal and expected manner. Excessive and or use above that which is normally expected may void the warranty. All parts are subject to normal wear for the purpose of which they were designed. When attached to the structure, plastic slides should not be lifted up from the bottom for any reason. Cracks at the top of the slide that result from lifting the bottom of the slide will not be covered under the terms of this warranty. This warranty is void should the equipment be subject to vandalism, misuse, neglect, abuse, improper installation, tampering, or accident. This equipment is not to be altered, or modified, by anyone other than Component Playgrounds or its authorized agent. This warranty does not cover damage resulting from flood, fire, catastrophe or other acts of nature. To the extent permitted by law, Component Playgrounds shall not be liable for any direct, indirect, special, incidental, or consequential damages. Should it be found that your product has parts that are defective within the warranty period, contact Component Playgrounds. Unauthorized returns will be refused and returned to sender. Defective part(s) must be photographed from a minimum of three different angles that clearly show the problem, and the installation of the defective part by its self and in relation to the rest of the structure. After speaking with a representative at Component Playgrounds: Return parts, freight prepaid, to the Component Playgrounds plant with proof of purchase for repair or replacement. Component Playgrounds will evaluate the part(s) and the photographs and decide if the part(s) in question should be repaired or replaced. This warranty does not cover costs related to removal, transportation and/or labor. This equipment is rated as commercial grade for residential use and is intended to be used in a private residential environment. This equipment may not meet all of the safety guidelines as described by the CPSC as it relates to public use/commercial playground equipment. For more information on public or commercial playgrounds, please visit Component Playgrounds sales representatives or its agents are not authorized to modify or substitute claims which are not part of this exclusive written warranty. This warranty is void if the product is in any way modified from its original state, or if it is used for purposes other than the purpose for which it was intended. *For children with special needs who may spend many hours of the day swinging, we recommend our heaviest swing set, the Arch Swing Model. This is the product for you!
17 WARRANTY REGISTRATION SHEET Note: To ensure your warranty is activated, complete and return this form within 10 days of installation. Return this form via fax to (801) , via to or via U.S. mail to: Component Playgrounds 1630 North Beck Street Salt Lake City, UT Today s Date: Sales Receipt/Invoice Number: Model(s): CUSTOMER INFORMATION Project Name: Contact Person: Address: City: State: Zip: Phone: Fax: Purchase Date: Completion Date: SALES REPRESENTATIVE/DEALER INFORMATION (If different from manufacturer) Organization: City: State: Zip: Sales Rep Name: Phone: Fax: INSTALLATION INFORMATION (If different from customer or sales representative) Installed By: Contact Person: Address: City: State: Zip: Phone: Fax:
VOLLEYBALL SPIKE TRAINER. Assembly Instructions. Owner s Manual. Model # VST-300. Club Volleyball Gear. For fixed-height Basketball Hoop Systems
 VOLLEYBALL SPIKE TRAINER Model # VST-300 For fixed-height Basketball Hoop Systems Assembly Instructions Basketball Hoop System Not Included Owner s Manual Club Volleyball Gear 18434 Technology Drive, Morgan
VOLLEYBALL SPIKE TRAINER. Assembly Instructions. Owner s Manual. Model # VST-400. Club Volleyball Gear
 VOLLEYBALL SPIKE TRAINER Model # VST-400 Wall-mount Volleyball Spike Trainer with 28 height adjustment range Assembly Instructions Owner s Manual Club Volleyball Gear 18434 Technology Drive, Morgan Hill,
VOLLEYBALL SPIKE TRAINER. Assembly Instructions. Owner s Manual. Model # VST-100. Club Volleyball Gear WARNING
 VOLLEYBALL SPIKE TRAINER Model # VST-100 Assembly Instructions Owner s Manual WARNING To ensure safety, do not attempt to assemble this system without following all instructions carefully. Check entire
This document to be used with Hurley traditional Davits
 ~ InstructIon Manual ~ This document to be used with Hurley traditional Davits WarnIngs WarnIng - Failure to install, maintain, protect, and operate the system properly can cause malfunction resulting
VOLLEYBALL SPIKE TRAINER. Assembly Instructions. Owner s Manual. Model # VST-200. Club Volleyball Gear. For height-adjustable Basketball Hoop Systems
 VOLLEYBALL SPIKE TRAINER Model # VST-200 Basketball Hoop System Not Included For height-adjustable Basketball Hoop Systems Assembly Instructions Owner s Manual Club Volleyball Gear 18434 Technology Drive,
Sunset Swings By Health in Motion, LLC
 Sunset Swings By Health in Motion, LLC Model 421 Lounge Swing Assembly and Operation Manual Record Serial Number Here www.sunsetswings.com by Health In Motion, LLC. 1/30/2013 Caution: READ! VERY IMPORTANT
COPY. **For U.S. and Canada Customers ONLY:** IF ASSISTANCE IS NEEDED,
 MODEL #73729 WARNING Failure to comply with any of the warnings in these instructions may result in serious personal injuries such as cuts, broken bones, nerve damage, paralysis, brain injury, or death.
Made in U.S.A. Narrow-U Bike Rack Heavy Duty Submittal Sheet. Materials: Finishes: Mount Options: Setbacks:
 Submittal Sheet Materials: 2 Schedule 40 Steel Pipe (2.375 OD) Finishes: Galvanized An after fabrication hot dipped galvanized finish is available Powder Coat Our powder coat finish assures a high level
Moai Bike Rack Heavy Duty Submittal Sheet. Materials: 2.0 Schedule 40 Pipe (2.375 OD) Finishes: Capacity: Mount Options: Setbacks: 2 Bikes
 Finishes: Capacity: Mount Options: Setbacks: 2 Bikes") Submittal Sheet Materials: 2.0 Schedule 40 Pipe (2.375 OD) Finishes: Galvanized An after fabrication hot dipped galvanized finish is available. Powder Coat Our powder coat finish assures a high level of
Submittal Sheet Materials: 2.0 Schedule 40 Pipe (2.375 OD) Finishes: Galvanized An after fabrication hot dipped galvanized finish is available. Powder Coat Our powder coat finish assures a high level of
Cover EX Installation Instructions
 Cover EX Installation Instructions 1. Lay out all the parts and verify that they are all present according to the Cover EX Parts and Hardware List. See Fig 1. Call 800-730-7727 for all replacement and
Duo/Trio Office Bike Owner s Manual
 Duo/Trio Office Bike Owner s Manual Welcome Congratulations on choosing to enhance your productivity and wellness with LifeSpan. You ve made a healthy decision, as the need for increased amounts of daily
RADROVER REAR RACK INSTALLATION MANUAL
 RADROVER REAR RACK INSTALLATION MANUAL WWW.RADPOWERBIKES.COM We are here to help! Please contact us at SUPPORT@RADPOWERBIKES.COM or 1-800-939-0310 if you have questions. REV022216 Welcome Thanks you for
KERSPLASH POOL CLIMBING WALL INSTALLATION INSTRUCTIONS
 TOLL FREE: 1-800-476-7366 VOICE 651-665-9131 FAX 651-665-9130 EMAIL: INFO@POOLCLIMBINGWALLS.COM EVERLAST CLIMBING 1335 MENDOTA HEIGHTS ROAD MENDOTA HEIGHTS, MN 55120 2012 EVERACTIVE BRANDS Congratulations!
Swing Set. Sheffield Model 22-PS320
 Swing Set Sheffield Model 22-PS320 Important! The owner s manual contains safety, assembly, use and maintenance instructions. The Playsafe Swing Set must be assembled by an adult who has read and understands
STYRIGGER PRODUCT MANUAL
 STYRIGGER PRODUCT MANUAL Thank you for choosing the Styrigger kayak and canoe stabilizer. A kayak or canoe equipped with a Styrigger (safety outrigger) is an excellent choice for a beginner or someone
2000 lb manual winch
 2000 lb manual winch Model 41694 Operation Instructions Due to continuing improvements, actual product may differ slightly from the product described herein. 3491 Mission Oaks Blvd., Camarillo, CA 93011
HELMETS SAVE LIVES!!! ALWAYS WEAR A PROPERLY FITTED HELMET WHEN YOU RIDE YOUR SCOOTER. DO NOT RIDE AT NIGHT. AVOID RIDING IN WET CONDITIONS.
 HELMETS SAVE CORRECT FITTING - MAKE SURE YOUR HELMET COVERS YOUR FOREHEAD. LIVES!!! ALWAYS WEAR A PROPERLY FITTED HELMET WHEN YOU RIDE YOUR SCOOTER. DO NOT RIDE AT NIGHT. AVOID RIDING IN WET CONDITIONS.
Backboard and Rim Owners Manual
 REQUIRED TOOLS AND MATERIALS: Two (2) Capable Adults Tape Measure Backboard and Rim Owners Manual Customer Service Center N53 W24700 South Corporate Circle Sussex, WI 53089 U.S.A. Step Ladder - 8ft. (2.4
IMPORTANT: RECEIVING INSTRUCTIONS:
 Instruction Sheet Sidewinder Mechanical Bender IMPORTANT: RECEIVING INSTRUCTIONS: Visually inspect all components for shipping damage. If any shipping damage is found, notify carrier at once.shipping damage
SAVE THESE INSTRUCTIONS DEALER/INSTALLER: GIVE TO HOMEOWNER OCEAN BLUE ABOVE GROUND POOL LADDERS
 SAVE THESE INSTRUCTIONS DEALER/INSTALLER: GIVE TO HOMEOWNER OCEAN BLUE ABOVE GROUND POOL LADDERS ASSEMBLY AND INSTALLATION MANUAL FOR A-FRAME AND INPOOL LADDERS A-FRAME Part No. 400100 PROUDLY MADE IN
TR5000 THE TOUGHEST TRAINING SYSTEM ON THE PLANET. MODEL NO. STRIKER TRAINER 2L Escalade Sports
 MODEL NO. TR5000 THE TOUGHEST TRAINING SYSTEM ON THE PLANET. STRIKER TRAINER TM 2L-7250-00 R Escalade Sport products may be manufactured and/or licensed under the following patents. 6419596, 6179733, 5919102,
Instructions for Assembly and Operation
 Instructions for Assembly and Operation Congratulations on the purchase of your new bike! With proper assembly and maintenance it will offer you years of enjoyable riding! IMPORTANT: Carefully read and
DISASSEMBLING & REASSEMBLING CARTRIDGE INSTALLING SEATPOST ON BIKE
 INTRODUCTION BILL OF MATERIALS SPECIFICATIONS & TOOLS PROCEDURES DISASSEMBLING & REASSEMBLING CARTRIDGE INSTALLING SEATPOST ON BIKE OPERATION OF SEATPOST GIANT LIMITED WARRANTY 1 INTRODUCTION Congratulations
INSTALLATION INSTRUCTIONS AT-SERIES ANCHOR ASSEMBLY PART NUMBER: F-04CAJP 450 LB. [204kg] MAXIMUM CAPACITY (PRO POOL LIFT)
![INSTALLATION INSTRUCTIONS AT-SERIES ANCHOR ASSEMBLY PART NUMBER: F-04CAJP 450 LB. [204kg] MAXIMUM CAPACITY (PRO POOL LIFT)](/thumbs/90/102183460.jpg "INSTALLATION INSTRUCTIONS AT-SERIES ANCHOR ASSEMBLY PART NUMBER: F-04CAJP 450 LB. [204kg] MAXIMUM CAPACITY (PRO POOL LIFT)") INSTALLATION INSTRUCTIONS AT-SERIES ANCHOR ASSEMBLY PART NUMBER: F-04CAJP 450 LB. [204kg] MAXIMUM CAPACITY (PRO POOL LIFT) - WARNING- IMPORTANT SAFETY INSTRUCTIONS 1. READ AND FOLLOW ALL INSTRUCTIONS.
INSTALLATION INSTRUCTIONS AT-SERIES ANCHOR ASSEMBLY PART NUMBER: F-04CAJP 450 LB. [204kg] MAXIMUM CAPACITY (PRO POOL LIFT) - WARNING- IMPORTANT SAFETY INSTRUCTIONS 1. READ AND FOLLOW ALL INSTRUCTIONS.
Angled Sign Light with Shade
 Angled Sign Light with Shade Owner s Manual WARNING: Read carefully and understand all ASSEMBLY AND OPERATION INSTRUCTIONS before operating. Failure to follow the safety rules and other basic safety precautions
Traditional Basketball Set. Assembly & Installation Instructions
 Traditional & Pro Style Basketball Set Assembly & Installation Instructions Traditional Basketball Set Pro Style Basketball Set 3 0 5 0 S. A L V E R N O N W A Y T U C S O N, A Z 8 5 7 1 3 5 2 0. 7 9 0.
FOOSBALL ASSEMBLY, INSTRUCTIONS AND RULES PL
 FOOSBALL ASSEMBLY, INSTRUCTIONS AND RULES 56007 PL Waterloo Valley Road / Mt. Olive, NJ 07828 / www.sportcraft.com / (800) 526-0244 / Fax: (97) 47-54 MODEL # 56007 PL Congratulations on owning a new KT
ALTERNATOR RACKS 135, 170 & 190 INSTRUCTIONS
 Figure A Item # Description Quantity 1 Alternator Rack 1 1 3 4 11 5 10 8 2 Lower Mount Kit (see detail) 2 3 16mm M5 Swivel-Mount Bolt 2 4 M7 Washer 2 5 M6 Lock Nut 2 6 Lock Washer 2 7 Swivel Mount 2 8
Infant Swing ( )
") Infant Swing (04-0017) 1. Insert the yellow T-bar into the hole at the front of the swing. If you need to disengage the T-bar you can squeeze the 2 tabs together under the seat while pulling the T-bar
Infant Swing (04-0017) 1. Insert the yellow T-bar into the hole at the front of the swing. If you need to disengage the T-bar you can squeeze the 2 tabs together under the seat while pulling the T-bar
MAVERICK FOOSBALL TABLE
 MAVERICK FOOSBALL TABLE Replacement Parts Order direct at or call our Customer Service department at (800) 225-7593 8 am to 5 pm Central Standard Time July 2010 UPC Code 7-19265-53446-4 Staple your receipt
Gym Dandy TEETER TOTTER TT-320. Model TT-320. Retain This Manual for Reference OWNER'S MANUAL
 NOTE: Please read all instructions carefully before using this product Gym Dandy Table of Contents Safety Notice Hardware Pack TEETER TOTTER TT-320 Assembly Instruction Parts List Operation Tips Warranty
ROUND ASSEMBLY. Positioning
 ROUND ASSEMBLY Positioning To ensure maximum enjoyment and efficiency, consider the following steps when selecting the desired location of you pool. Select a location that receives maximum sunlight for
Congratulations on your purchase of a JC Series Performer trike! The Performer JC Series is designed for everything from touring to commuting and
 Congratulations on your purchase of a JC Series Performer trike! The Performer JC Series is designed for everything from touring to commuting and shopping in the city. The JC Series frames are made of
INTRODUCTION BILL OF MATERIALS SPECIFICATIONS & TOOLS PROCEDURES OPERATION OF SEATPOST GIANT LIMITED WARRANTY
 INTRODUCTION BILL OF MATERIALS SPECIFICATIONS & TOOLS PROCEDURES OPERATION OF SEATPOST GIANT LIMITED WARRANTY 1 INTRODUCTION Congratulations on the purchase of your new GIANT CONTACT SWITCH seatpost. This
40 MINI TRAMPOLINE WITH HANDRAIL
 40 MINI TRAMPOLINE WITH HANDRAIL PRODUCT MANUAL - VERSION 04.18.07LR FOR AGES: WEIGHT LIMIT: 250 Lbs 114 Kgs TO BUILD: 13+ 1 X TOOLS NEEDED: CUSTOMER SERVICE GQBrands.com CustomerService@GQBrands.com 1-866-498-5269
Revolution Gurney Attachment
 Revolution Gurney Attachment PART NUMBER: F-30RSA-S2 (2nd SERIES) WEIGHT CAPACITY: 350 POUNDS - STANDARD REVOLUTION 300 POUNDS - DEEP DRAFT REVOLUTION MANDATORY LEAVE THIS MANUAL WITH LIFT OWNER Read &
KIDS SWIVEL SEE SAW MODEL# 9307SS PRODUCT MANUAL - VERSION
 KIDS SWIVEL SEE SAW PRODUCT MANUAL - VERSION 03.16.04 FOR AGES: 4-10 WEIGHT LIMIT: 150 Lbs 68 Kgs ADULT(S) NEEDED: TOOLS NEEDED: WARNING/ADVERTENCIA CUSTOMER SERVICE Please read all the instructions before
OWNERS MANUAL. Model Shown with optional Primary Mooring Cleats. Portable Mooring System SAFETY OPERATION MAINTENANCE PARTS
 OWNERS MANUAL Model 2400 Shown with optional Primary Mooring Cleats. Portable Mooring System SAFETY OPERATION MAINTENANCE PARTS CAUTION: Before using your new Pier Tender, read rules for Safety, Operation,
GEODOME (2) Lifetime playgrounds are designed to be strong and durable. We strive to make assembly as easy as possible without compromising quality.
 Lifetime playgrounds are designed to be strong and durable. We strive to make assembly as easy as possible without compromising quality.") GEODOME Lifetime playgrounds are designed to be strong and durable. We strive to make assembly as easy as possible without compromising quality. Prepare the Area Before you start, prepare a level surface
GEODOME Lifetime playgrounds are designed to be strong and durable. We strive to make assembly as easy as possible without compromising quality. Prepare the Area Before you start, prepare a level surface
60 farm jack. Distributed exclusively by Harbor Freight Tools Mission Oaks Blvd., Camarillo, CA 93011
 60 farm jack 66183 Set up And Operating Instructions Distributed exclusively by Harbor Freight Tools. 3491 Mission Oaks Blvd., Camarillo, CA 93011 Visit our website at: http://www.harborfreight.com Read
12 Inch Barn Light. Owner s Manual
 12 Inch Barn Light Owner s Manual WARNING: Read carefully and understand all ASSEMBLY AND OPERATION INSTRUCTIONS before operating. Failure to follow the safety rules and other basic safety precautions
SASK-A-POLE OWNERS AND USERS MANUAL
 SASK-A-POLE OWNERS AND USERS MANUAL GENERAL INFORMATION The Saskatchewan Abilities Council s Sask-a-Pole accessibility and transfer aid is designed to help provide safe and easy access to chairs, beds,
InstallatIon and owner s InstrUCtIons
 InstallatIon and owner s InstrUCtIons Wall Mount Series Adjustable and Fixed Height Goal Systems table of Contents Safety Instructions... 2 Goal Specifications... 3 Frame Attachment... 4 Frame Assembly
Owner s Manual. for. NaturCut. Model CLASSIC HD
 Owner s Manual for NaturCut Model CLASSIC HD Table of Contents Welcome... 1 Warranty... 1 Use of This Product... 1 Assembly... 2 Assembly Parts... 2 Assemble Handle Section... 2 Adjust Cutting Height...
PHOENIX MMXI 7 FOOT 3 IN 1 BILLIARD TABLE
 Phoenix MMXI 3 in 1 Billiard Table PHOENIX MMXI 7 FOOT 3 IN 1 BILLIARD TABLE Replacement Parts Order direct at or call our Customer Service department at (800) 5-7593 ext. 113 8 am to 4:30 pm Central Standard
Assembly Instructions & Manual. Configuration subject to change
 Assembly Instructions & Manual Configuration subject to change O R Y X II A S S E M B L Y I N S T R U C T I O N S & M A N U A L IMPORTANT PRECAUTIONS WARNING: To reduce the risk of serious injury, read
Gym Dandy TEETER TOTTER TT-360. Model TT-360. Retain This Manual for Reference OWNER'S MANUAL
 NOTE: Please read all instructions carefully before using this product Table of Contents Safety Notice Gym Dandy TEETER TOTTER TT-360 Important Assembly Information Care and Maintenance Parts List Warranty
VL PONTOON/TRITOON DECK BRACKET 13 INSTRUCTIONS
 VL PONTOON/TRITOON DECK BRACKET 13 INSTRUCTIONS REIMANN & GEORGER CORPORATION MARINE PRODUCTS BUFFALO, NY P/N 6112--- 01/08/14 TABLE OF CONTENTS CHAPTER TITLE PAGE 1 SAFETY... 1 1.1 Introduction... 1 1.2
OWNER'S MANUAL. Copyright 1999 ATS - All Rights Reserved
 OWNER'S MANUAL AL Issue 2 - August 19, 1999 Copyright 1999 ATS - All Rights Reserved OWNER'S MANUAL TABLE OF CONTENTS PAGE 1... WARRANTY PAGE 2... ASSEMBLY INSTRUCTIONS PAGE 4... MOUNTING THE RACQUET PAGE
Import Bike Rack OEM INSTALLATION MANUAL
 Import ike Rack OEM INSTLLTION MNUL TLE OF ONTENTS System Information 2 Safety Information 2 Resources Required 3 Preparation 3 Under umper ttachment 3 Over umper ttachment 3 Installation 3 Under umper
Page 1. Single Scull Car Rack Assembly and User s Manual " "
 Page 1 Single Scull Car Rack Assembly and User s Manual Page 2 Items in the box: (2) V cradles (2) 4 rails (1) 1 3/4 X 18 rail coupler (4) 1/4-20 X 4 1/2 bolts (2) 1/4-20 X 2 1/2 bolts (12) 1/4 flat washers
OPERATING and MAINTENANCE INSTRUCTIONS MAXIS 6K Puller (M6K-M)
") OPERATING and MAINTENANCE INSTRUCTIONS MAXIS 6K Puller (M6K-M) READ AND UNDERSTAND ALL OF THE INSTRUCTIONS AND SAFETY INFORMATION IN THIS MANUAL BEFORE OPERATING OR 04/17 (M6K-M) SERVICING THIS TOOL TABLE
OPERATING and MAINTENANCE INSTRUCTIONS MAXIS 6K Puller (M6K-M) READ AND UNDERSTAND ALL OF THE INSTRUCTIONS AND SAFETY INFORMATION IN THIS MANUAL BEFORE OPERATING OR 04/17 (M6K-M) SERVICING THIS TOOL TABLE
Deluxe Gourd Racks I D E G A. Parts List. Shown above are parts for the two-level, Deluxe Gourd Rack (DGR 12V)with 12 arms for vertically hung gourds.
with 12 arms for vertically hung gourds.") Deluxe Gourd Racks H F K I D E J C G A Shown above are parts for the two-level, Deluxe Gourd Rack (DGR V)with arms for vertically hung gourds. Parts List Code Quantity A B C D E F G H I J 6, or 4 6, or
Deluxe Gourd Racks H F K I D E J C G A Shown above are parts for the two-level, Deluxe Gourd Rack (DGR V)with arms for vertically hung gourds. Parts List Code Quantity A B C D E F G H I J 6, or 4 6, or
BIKE TO GO - USER MANUAL - MODEL#: JBTG24
 BIKE TO GO 24 - USER MANUAL - MODEL#: JBTG24 GET ACQUAINTED WITH YOUR 24 BIKE TO GO Congratulations on your new Jetson 24 folding bicycle! The Jetson 24 Bike to Go is an innovative and fun personal transportation
PARK AVENUE 7' POOL TABLE WITH TABLE TENNIS & BENCHES ASSEMBLY INSTRUCTIONS
 PARK AVENUE 7' POOL TABLE WITH TABLE TENNIS & BENCHES ASSEMBLY INSTRUCTIONS NG2530PR THANK YOU! Thank you for purchasing this product. We work around the clock and around the globe to ensure that our products
C - SERIES. Height Adjustable Portable Goal Supports. Installation & Owner s Instructions C1000 C2000. Made in the USA
 C - SERIES Height Adjustable Portable Goal Supports C1000 C2000 Installation & Owner s Instructions Made in the USA This manual explains the proper installation, operation, and maintenance of your Schutt
Marine 6-Boat Free-Standing Racks SKU: Updated November 2011
 Marine 6-Boat Free-Standing Racks SKU: 30-061 Updated November 011 Contains: Marine -Boat Free-Standing Racks (SKU 1-003) Marine 3 rd Boat Expansion Racks (SKU 1-0303) Marine Back Legs (SKU -001) 3 Sets
USER MANUAL
 C Cimarron Sports 1-888-816-6517 www.cimarronsports.com Combo Pitching Machine USER MANUAL TABLE OF CONTENTS Thank you for purchasing the Cimarron Combo Pitching Machine. The Cimarron Combo Pitching Machine
BP48-1 AND SSP48-1 IN-GROUND POST INSTALLATION INSTRUCTIONS
 BP48-1 AND SSP48-1 IN-GROUND POST INSTALLATION INSTRUCTIONS WARNING: THIS IN-GROUND POST IS NOT DESIGNED FOR USE WITH AN LP GAS CYLINDER. WARNING: SEE YOUR GRILL OWNER S MANUAL FOR PROPER LOCATION, MINIMUM
MODEL #7100X A-FRAME LADDER
 SAVE THESE INSTRUCTIONS DEALER/INSTALLER: GIVE TO HOMEOWNER MODEL #7100X A-FRAME LADDER LADDER MUST BE ATTACHED TO POOL FRAME... DO NOT USE WITH INFLATABLE POOLS ASSEMBLY AND INSTALLATION MANUAL The Anti-Entrapment
OWNER'S MANUAL. Copyright 2003 GAMMA - All Rights Reserved
 OWNER'S MANUAL AL Issue 1 - December 2003 Copyright 2003 GAMMA - All Rights Reserved OWNER'S MANUAL TABLE OF CONTENTS PAGE 1... WARRANTY PAGE 2... ASSEMBLY INSTRUCTIONS PAGE 4... MOUNTING THE RACQUET PAGE
GRAVITY BIKE RACK ASSEMBLY & OPERATING INSTRUCTIONS
 GRAVITY BIKE RACK 94479 ASSEMBLY & OPERATING INSTRUCTIONS Due to continuing improvement, actual product may differ slightly from the product described herein. 3491 Mission Oaks Blvd., Camarillo, CA 93011
SKYBIRD TRAP OWNER S / OPERATOR S MANUAL PARTS AND ASSEMBLY INSTRUCTIONS
 SKYBIRD TRAP PART NO. 40903 OWNER S / OPERATOR S MANUAL PARTS AND ASSEMBLY INSTRUCTIONS WARNING: THIS MACHINE CAN CAUSE SERIOUS INJURY OR DEATH! THOROUGHLY READ INSTRUCTIONS AND SAFETY INFORMATION BEFORE
Dear Skier, Thank you for choosing GOODE! GOODE SKI TECHNOLOGIES. Dave Goode Founder/President
 Dear Skier, Congratulations on your purchase of the new PowerPlate System! This revolutionary system eliminates the need to ever drill another hole into your ski. Engineered for just about every binding
Safety System Installation Guide for ARE Wind Poles
 Safety System Installation Guide for ARE Wind Poles V. 1 May 2011 ** Climbing pegs and ladder should be installed before the pole is erected.** A. Install climbing pegs Install climbing pegs (bolt set)
SLADDA bicycle frame and belt drive. 25 Year Limited Warranty INCLUDED
 SLADDA bicycle frame and belt drive 25 Year Limited Warranty INCLUDED Everyday life at home puts high demands on bicycles. SLADDA bicycle is tested to comply with our strict standards for strength and
GEMLUX FISHING SYSTEM INSTALLATION AND USER GUIDE
 GEMLUX FISHING SYSTEM INSTALLATION AND USER GUIDE SEPTEMBER 2016 TABLE OF CONTENTS WELCOME TO THE GEMLUX FISHING SYSTEM 3 FIRST THINGS FIRST! 4 WHAT S IN THE BOX? 4 UNPACKAGING 4 WHAT ELSE DO I NEED FOR
OPERATING and MAINTENANCE INSTRUCTIONS MAXIS 3K Puller (M3K-M)
") OPERATING and MAINTENANCE INSTRUCTIONS MAXIS 3K Puller (M3K-M) 04/17 (M3K-M) READ AND UNDERSTAND ALL OF THE INSTRUCTIONS AND SAFETY INFORMATION IN THIS MANUAL BEFORE OPERATING OR SERVICING THIS TOOL TABLE
OPERATING and MAINTENANCE INSTRUCTIONS MAXIS 3K Puller (M3K-M) 04/17 (M3K-M) READ AND UNDERSTAND ALL OF THE INSTRUCTIONS AND SAFETY INFORMATION IN THIS MANUAL BEFORE OPERATING OR SERVICING THIS TOOL TABLE
INSTALLATION AND OWNER S INSTRUCTIONS
 INSTALLATION AND OWNER S INSTRUCTIONS Select Series Adjustable and Fixed Height Goal Systems Momentum 60" Momentum 72" TABLE OF CONTENTS www.ballhog.com Safety Instructions... 2 Goal Specifications...
602 STRINGING MACHINE OWNER'S MANUAL
 PROGRESSION 602 STRINGING MACHINE OWNER'S MANUAL AL Issue 1- April 2000 Copyright 2000 GAMMA Sports - All Rights Reserved PROGRESSION 602 STRINGING MACHINE TABLE OF CONTENTS PAGE 1... WARRANTY PAGE 2...
8MAY15 US RACK, Inc Falcon Drive, Madera, CA
 8MAY15 US RACK, Inc. - 2850 Falcon Drive, Madera, CA 93637-559-661-3050 INSTRUCTIONS for Bedrail-mounted MOTORCYCLE RACK, Model 2001-4TRA WARNING: Do NOT attempt to install or use this rack without following
FLANGED TWO-PIECE BALL VALVES
 INTRODUCTION This instruction manual includes installation, operation, and maintenance information for FNW flanged split-body ball valves. This manual addresses lever operated ball valves only. Please
INSTALLATION MANUAL Matheson Tri-Gas Cabinet Enclosures
 INSTALLATION MANUAL Matheson Tri-Gas Cabinet Enclosures MINT-0289-XX TABLE OF CONTENTS Limited Warranty... 3 User Responsibility... 3-4 General Service... 4 Safety Precautions.... 5 Physical Dimensions..
COMPACT METAL bender 99826
 COMPACT METAL bender 99826 Set up And Operating Instructions Distributed exclusively by Harbor Freight Tools. 3491 Mission Oaks Blvd., Camarillo, CA 93011 Visit our website at: http://www.harborfreight.com
DRAG HARROW SAFETY & OPERATING INSTRUCTIONS. Original Language. Serial No. Order No.
 DR ` DRAG HARROW SAFETY & OPERATING INSTRUCTIONS Serial No. Order No. Original Language DR Power Equipment Toll-free phone: 1-800-DR-OWNER (376-9637) Fax: 1-802-877-1213 Website: www.drpower.com Read and
Installation and. Wall Mount Series Adjustable and Fixed Height Goal Systems. table of contents GS72 GS60 GS54
 Installation and Owner s INSTRUCTIONS Wall Mount Series Adjustable and Fixed Height Goal Systems GS72 GS60 GS54 table of contents Safety Instructions... 2 Goal Specifications... 3 Frame Attachment... 4
310 SERIES TILT-TO-LOAD ROTATOR. The Specialist In Drum Handling Equipment
 OPERATOR S MANUAL FOR MORSE TILT-TO-LOAD DRUM ROTATOR SAFETY INFORMATION: While Morse Manufacturing Co. drum handling equipment is engineered for safety and efficiency, a high degree of responsibility
SANTA CRUZ BICYCLES Geometry Adjust Flip Chip
 SANTA CRUZ BICYCLES Geometry Adjust Flip Chip Copyright Santa Cruz Bicycles 2017 TABLE OF CONTENTS SAFETY INSTRUCTIONS... 3 GEOMETRY ADJUST FLIP CHIP... 3 INTRODUCTION...3 TOOLS AND SUPPLIES...3 MY18 NOMAD
ZL90-90 includes all all parts && hardware for easy assembly. Installation Instructions. With Patented FingerSafe Trolley System. ziplinefun.
 With Patented FingerSafe Trolley System ZL90-90 includes all all parts && hardware for easy assembly ziplinefun.com Ages 8+ weighing up up to to 250lbs Made in in the USA for for over over 35 35 years.
A-FRAME RESIN IN & OUT FLIP UP LADDER
 A-FRAME RESIN IN & OUT FLIP UP LADDER NE1222 NOTE FOR SAFETY PURPOSES ALL LADDERS SHOULD BE SECURED BY ATTACHING THEM TO THE TOP LEDGE OF THE POOL. (See step 13 for details) In order for the ladder to
ATD /8 x 50 Retractable Air Hose Reel Owner s Manual
 ATD-31166 3/8 x 50 Retractable Air Hose Reel Owner s Manual Features Heavy-gauge, all-steel reel assembly 8-position ratchet mechanism locks reel at desired hose length 5-position adjustable roller outlet
SAVE THESE INSTRUCTIONS
 SAVE THESE INSTRUCTIONS DEALER/INSTALLER: GIVE TO HOMEOWNER MODEL #8100X OUTSIDE SAFETY LADDER 48" TO 54" FOR USE WITH CONFER PLASTICS IN POOL STEPS LADDER MUST BE ATTACHED TO POOL FRAME... DO NOT USE
VL 2K LIFT D-L WINCH INSTRUCTIONS (Applies to P/Ns , , , , , )
") VL 2K LIFT D-L WINCH INSTRUCTIONS (Applies to P/Ns 3714022, 3714028, 3714034, 3714040, 3714043, 3714046) REIMANN & GEORGER CORPORATION MARINE PRODUCTS BUFFALO, NY P/N 6112103 04/09/18 1 SAFETY 1.1 INTRODUCTION
VL 2K LIFT D-L WINCH INSTRUCTIONS (Applies to P/Ns 3714022, 3714028, 3714034, 3714040, 3714043, 3714046) REIMANN & GEORGER CORPORATION MARINE PRODUCTS BUFFALO, NY P/N 6112103 04/09/18 1 SAFETY 1.1 INTRODUCTION
Universal Elevator Mount Owners Manual Customer Service Center N53 W24700 South Corporate Circle Sussex, WI U.S.A.
 REQUIRED TOOLS AND MATERIALS: 2 Capable Adults Carpenter s Level 15 Tape Measure Pencil Universal Elevator Mount Owners Manual Customer Service Center N53 W2400 South Corporate Circle Sussex, WI 530 U.S.A.
OPERATOR S MANUAL. Fabric Grass Catcher PART NO PRINTED 1/2011 PRINTED IN USA
 OPERATOR S MANUAL Fabric Grass Catcher Models: GC-F4 Congratulations on owning a Scag mower! This manual contains the operating instructions and safety information for your Scag mower accessory. Reading
Owner s Manual & Safety Instructions
 Owner s Manual & Safety Instructions Save Save This This Manual Manual Keep manual for the safety warnings and precautions, assembly, Keep manual for the safety warnings and precautions, assembly, operating,
Owner s Manual. The most comfortable upright bicycles ever made.
 Owner s Manual The most comfortable upright bicycles ever made. At Day 6, we hope you will enjoy riding our bicycles as much as we enjoy designing them. We have truly combined the best features of a recumbent
DO NOT use any Alien Flier Zip Line Products or Accessories until you read and understand these SAFETY WARNINGS!
 ! WARNING DO NOT use any Alien Flier Zip Line Products or Accessories until you read and understand these SAFETY WARNINGS! A zip line can be very dangerous. Do not use this kit if you do not understand
SINGLE SIDED SUR-STILT
 PARTS, ASSEMBLY AND SAFETY MANUAL SINGLE SIDED SUR-STILT PLEASE READ CAREFULLY BEFORE ASSEMBLY OR USE Ver 07.17 TABLE OF CONTENTS About... 03 Warnings and Safety Precau ons... 04 S lt Components and Assembly
T-016 ASSEMBLY MANUAL MODEL ROCK AND ROLL Main Street NE Minneapolis, MN
 MODEL T-016 ASSEMBLY MANUAL ROCK AND ROLL 5280 Main Street NE Minneapolis, MN 55421 1.877.226.7824 www.kurtkinetic.com COMPONENTS Tools Required for Assembly: 17mm Wrench or Adjustable Wrench When unpacking,
7 FOOT POOL TABLE WITH TABLE TENNIS TOP ASSEMBLY INSTRUCTIONS
 7 FOOT POOL TABLE WITH TABLE TENNIS TOP ASSEMBLY INSTRUCTIONS NG1023 THANK YOU! Thank you for your purchase of our product. We work around the clock and around the globe to ensure that our products maintain
STADIUM GLASS OWNER S MANUAL BASKETBALL GOAL SYSTEM
 STADIUM GLASS OWNER S MANUAL BASKETBALL GOAL SYSTEM MODEL NUMBER BS7200 BS6000 BS5400 BS4800 070312Stadium_Glass IMPORTANT Read this manual completely before starting to put up your pole. Then read and
EZee Glider Manual. Tools needed for Assembly: Wrench (included) Philips Screwdriver (not included) Assembly Instructions
 Philips Screwdriver (not included) Assembly Instructions") EZee Glider Manual Congratulations on your purchase of the EZee Glider! Your glider is designed for years of nearly carefree use by your child. These instructions include how to set up your glider and
EZee Glider Manual Congratulations on your purchase of the EZee Glider! Your glider is designed for years of nearly carefree use by your child. These instructions include how to set up your glider and
NICROS-GRANITPANELS INSTALLATION MANUAL
 NICROS-GRANITPANELS INSTALLATION MANUAL NICROS, INC. 845 PHALEN BLVD. ST. PAUL, MN 55106 PHONE: 651.778.1975 FAX: 651.778.8080 THANK YOU FOR YOUR PURCHASE OF THIS NICROS PRODUCT Nicros-GranitPanels are
INFERNO 20-IN-1 MULTI-GAME TABLE ASSEMBLY INSTRUCTIONS
 INFERNO 20-IN-1 MULTI-GAME TABLE ASSEMBLY INSTRUCTIONS NG1017M3 THANK YOU! Thank you for purchasing this product. We work around the clock and around the globe to ensure that our products maintain the
Owner s. product. Failure injury
 100-Ft. Hose Reel Cart Owner s Manual WARNING: Read and understand all instructions, warnings, and cautions before using this product. Failure to follow the instructions, warnings, and cautions may result
FOLD AND ROLL PLAYBACK TABLE TENNIS TABLE
 OWNER'S MANUAL FOLD AND ROLL PLAYBACK TABLE TENNIS TABLE MODEL NOs. T8268 T8168 Thank you for buying our product. We try hard to ensure that our products are of high quality and free of problems, such
Please Do Not Return This Product To The Store!
 MODEL NUMBER: GM000W - GAMEMAKER TORCH O W N E R ' S M A N U A L PLEASE READ AND FOLLOW THIS MANUAL IN ITS ENTIRETY BEFORE USE. DOING SO WILL PROVIDE HELPFUL HINTS THAT WILL AID IN GETTING MAXIMUM USE
VERTICAL SURFBOARD CARRIER READ ME! IMPORTANT WARNING!
 VERTICAL SURFBOARD CARRIER ENG RRAC09 30 min READ ME! Thank you for purchasing a Front Runner Vertical Surfboard Carrier. Before you start, take a moment to familiarize yourself with this Fitting Instruction
CROSSBOWS SAFETY INFORMATION. FIRestorm ASSEMBLY INSTRUCTIONS and OWNERS MANUAL. Outdoors. Outdoors. Please keep for future reference
 SAFETY INFORMATION FIRestorm ASSEMBLY INSTRUCTIONS and OWNERS MANUAL NOT A TOY. ADULT SUPERVISION REQUIRED l MISUSE OR CARELESS USE MAY CAUSE INJURY OR DEATH l THE RANGE OF THIS CROSSBOW COULD BE DANGEROUS