2-1. IMPORTANCE OF SKILLED TRAINERS
|
|
|
- Lewis Curtis
- 6 years ago
- Views:
Transcription
1 CHAPTER 2 TRAINING This chapter discusses the trainer s role in teaching and sustaining effective hand-to-hand combat. It also discusses unit training training areas, teaching techniques, and safety precautions that must be considered before conducting combatives training. Section I TRAIN THE TRAINER Professional instruction is the key to success in combative training. Instructors must be physically fit and highly proficient in the demonstration and practical application of the skills described in this manual. Confidence, enthusiasm, and technical expertise are essential for success in teaching hand-to-hand combat. Assistant instructors must also be properly trained to help supervise and demonstrate maneuvers. Highly trained assistant instructors under supervision may also provide supplementary combative training during off-duty hours IMPORTANCE OF SKILLED TRAINERS Diligent effort is needed to perfect the various hand-to-hand combat techniques, to apply them instinctively, and to teach others to safely master them. The following instructor responsibilities are the core of planning and executing combative training. a. Seek maximum efficiency with minimum effort. Continually strive to reduce all unnecessary explanations, movement, and activity. Streamline the training without compromising content, efficiency, or safety. b. Stress cooperation and technical mastery. Minimize hostile behavior but promote aggressiveness and power. c. Reinforce the details of each technique, and provide positive feedback when warranted. Use occasional humor to motivate soldiers, but avoid degrading or insulting them. 2-1
2 d. Ensure serviceable training aids are present to use in sufficient quantities for all soldiers being trained. Ensure training areas are well maintained and free from dangerous obstructions. e. Ensure instructors and assistant instructors are well rehearsed and prepared before all training sessions. Conduct instructor training at least five hours weekly to maintain a high skill level. f. Develop as many skilled combative instructors for each unit as possible. Instructor-to-soldier ratios should not be less than 1 instructor for 20 soldiers. Encourage after-duty training and education for instructors. g. Require strict discipline of all soldiers SAFETY PRECAUTIONS To prevent injuries, the instructor must consider the following safety precautions before conducting combative training. a. Supervise all practical work closely and constantly. Never leave a group unsupervised. b. Familiarize the soldiers with each maneuver by a complete explanation and demonstration before they try the moves. c. Do not allow the soldiers to get ahead of the instruction. d. Ensure the training partner offers no resistance, but allows the maneuver to be freely executed during the learning stages and while perfecting the techniques. e. Ensure there is adequate space between soldiers during all practical work for example, allow at least an 8-foot square for each pair of soldiers. f. Ensure that soldiers empty their pockets, and remove their jewelry, identification tags, and glasses before training. g. Stress that only simulated strikes to vital points, such as the head, neck, and groin area, are executed. Soldiers may use light blows to other vulnerable areas; however, they must exercise caution at all times. h. Establish a signal to indicate to the partner when to stop the pressure in grappling and choking techniques. Two handclaps or tapping the training partner with a free hand are examples. i. Make sure soldiers warmup and stretch properly before practical work. j. Teach and practice falls before conducting throws. k. Ensure protective eye wear is available when executing training with practice bayonets, knives, or any sharp weapons. l. Ensure that the soldier to be disarmed does not place his finger in the trigger guard during rifle and bayonet disarming. m. Make sure soldiers keep scabbards on knives and bayonets firmly attached to rifles while learning bayonet disarming methods. n. Use bayonet scabbards or rubber knives during knife disarming training. 2-2
3 0. Inspect all sandbags on retaining walls before conduct of instruction so that all bags are serviceable with at least 75 percent fill and that entire retainer wall is covered with sandbags. Any bag placed where personnel are likely to fall will be filled with the same consistency filler as the sawdust in the pit and will also provide a minimum of 6 inches of sawdust. p. Maintain a buffer zone of 6 feet from retainer wall and demonstration area during all training, especially training requiring throws and takedowns by students. q. Rake the training pit to loosen sawdust and remove all sharp objects. Properly inspect the pit so that all safety hazards are removed before instruction/demonstrations are executed. r. Perform inspections on training pits two days before use to ensure that there is at least 6 inches of sawdust throughout the training pit area. This will allow time to acquire sawdust to resurface pit area if there is not 6 inches of surface sawdust. Section II UNIT TRAINING Although combative are not likely to become part of a unit s mission-essential task list, commanders cannot overlook the importance of soldiers skills in hand-to-hand combat. Hand-to-hand fighting is a possibility in any conflict, and a basic proficiency in combative may save soldiers lives. Entry-level soldiers receive a training base in combative during basic training and in OSUT. Advanced individual training commanders should consider using hand-to-hand combat as part of the physical training program. They should review the training presented during basic training and, as time permits, expand into the more advanced techniques discussed in this field manual. Regular units must incorporate combative into an organized training program for soldiers to achieve and sustain proficiency levels. CAUTION WHEN PLANNING COMBATIVES TRAINING, INSTRUCTORS MUST TAKE PRECAUTIONS ACCORDING TO THE TIME OF DAY SEASON, AND ACCLIMATIZATION OF SOLDIERS. THEY MUST ALSO CONSIDER MODIFICATION OF THE UNIFORM, BREAK TIMES, AND OR THE AVAILABILITY OF WATER. 2-3
4 2-3. BASIC OR ONE-STATION UNIT TRAINING Combative training in the basic or one-station unit training program is based on 10 hours of available training time, divided into five periods of 2 hours each. The following is a suggested POI for introductory-level combative training. a. Period 1-2 Hours. (1) Introduction to combatives safety. (2) Combat demonstration performed by instructors or trainers to gain attention and to motivate soldiers. (3) Vital points and vulnerable points. (4) Warm-ups. (5) Stretches. (6) Stances. (7) Elbows and knees. (8) Short punches and strikes. (9) Kicks. (10) Drills. Twenty-five repetitions for each strike that is, elbows, knees, punches, and kicks-using vital and vulnerable points. (11) Combinations of strikes. b. Period 2-2 Hours. (1) Warm-ups and stretches. (2) Review of strikes. (3) Falls. (4) Throws. (5) Proficiency development of falls and throws through repetition. c. Period 3-2 Hours. (1) Warm-ups and stretches. (2) Review of falls. (3) Grappling. (4) Chokes. d. Period 4-2 Hours. (1) Warm-ups and stretches. (2) Defense and counters against weapons. Angles of attack and defenses of each angle. Knife defense. Knife attacks. Three-foot stick defense. Three-foot stick attacks. Drills. Twenty-five repetitions of defenses against each angle of attack, knife attacks, and 3-foot stick attacks. 2-4
5 e. Period 5-2 Hours. (1) Warm-ups and stretches. (2) Overall review UNIT SUSTAINMENT TRAINING PROGRAM Unit combative training is best done at company and platoon level. It is difficult for commanders to find time to conduct hand-to-hand combat training in typical training schedules. Combative training can be conducted during the times allotted for unit physical readiness training. Most units have at least one day a week when organized athletics are conducted for PT; this is a good time to train in hand-to-hand combat. a. When the unit begins combative training, it starts with the basic training/osut program. After each soldier in the unit has attained the same basic skill level, the training can then progress to more advanced techniques and drills. If conducted once a week, this program takes 10 weeks to complete. A typical progression might be as follows: Defense and counters against weapons: 3 hours Field-expedient weapons: 3 hours. Sentry removal, silent kills, and quick kills: 2 hours. Advanced knife drills: 3 hours. b. Once the unit has basic proficiency of the topics in Chapters 3 through 7, the commanders can easily plan future combative training. Unit trainers will know where emphasis should be placed in the unit s hand-to-hand training, and they can also create more advanced training exercises and drills based on soldier skill levels. Section III TRAINING AREAS An advantage of combative training is that it can be conducted almost anywhere with little preparation of the training area. (See Appendix A.) 2-5. TRAINING FORMATIONS Physical training formations may be used for combative training. (See FM ) If the extended rectangular formation is used, the first and third ranks should face the second and fourth ranks so that each soldier has a partner directly across from him. a. When practicing throws or disarming techniques, soldiers need twice the normal interval between ranks. Instructors also try to pair soldiers according to height and weight. 2-5
6 b. A large, grassy outdoor area free of obstructions is suitable for training. Each pair of soldiers should have an 8-foot square training space. Indoor areas, such as gymnasiums, are also appropriate; however, sharp or hard weapons are not used on gymnasium floors or on mats PIT CONSTRUCTION The most common area for teaching hand-to-hand combat is a sawdust pit. Figure 2-1, shows a training area for 200 soldiers with a sawdust pit surrounding an instructor and demonstrator platform. a. To construct the pit, dig out and level an area 50 meters wide and build a retaining wall at least 24 inches high. The wall can be cinder blocks, sandbags, or dirt if other materials are not available. To prevent injuries from a cinder block retaining wall, cover the wall and the top of the wall with sandbags. Place a layer of plastic sheeting on the ground to prevent the growth of grass and weeds, and place a sand base up to 12 inches deep on top of the plastic. Then, place a layer of sawdust at least 6 inches deep on top of the sand. b. Build a 14-foot square demonstration area (Figure 2-1) in the center of the pit with the same type of retaining wall described in paragraph a. This area is large enough for two demonstrators and the primary instructor BAYONET ASSAULT COURSE The bayonet assault course provides the commander a unique training opportunity. It allows his soldiers to employ rifle-bayonet fighting skills under simulated combat conditions. The course can be built and negotiated so that demands placed on the soldiers abilities and on their endurance approach those experienced under combat conditions. Realistic sights and sounds of battle fire, smoke, confusion, and pyrotechnics--can also be created to enhance realism. (See Appendix B.) The training objectives of the bayonet assault course include: Improving rifle-bayonet fighting skills. Improving physical fitness and soldier aggressiveness. Improving speed, strength, coordination, and accuracy. Providing realistic rifle-bayonet fighting under near combat conditions. Challenging the soldiers determination and stamina, which are needed in combat. Providing an opportunity for team and squad leaders to develop their leadership and control measures. 2-6
7 CAUTION SOLDIERS MUST CARRY AND USE THE PROTECTIVE MASK WHILE PARTICIPATING IN TRAINING THAT INCLUDES THE USE OF SMOKE. a. Safety. The safety of the soldiers should be a constant concern of the instructor and his assistants. The best safety aids are constant control and supervision. In addition, instructors should brief soldiers at the beginning of each class on the requirements for safety during rifle-bayonet training. Instructors use the following safety measures: 2-7
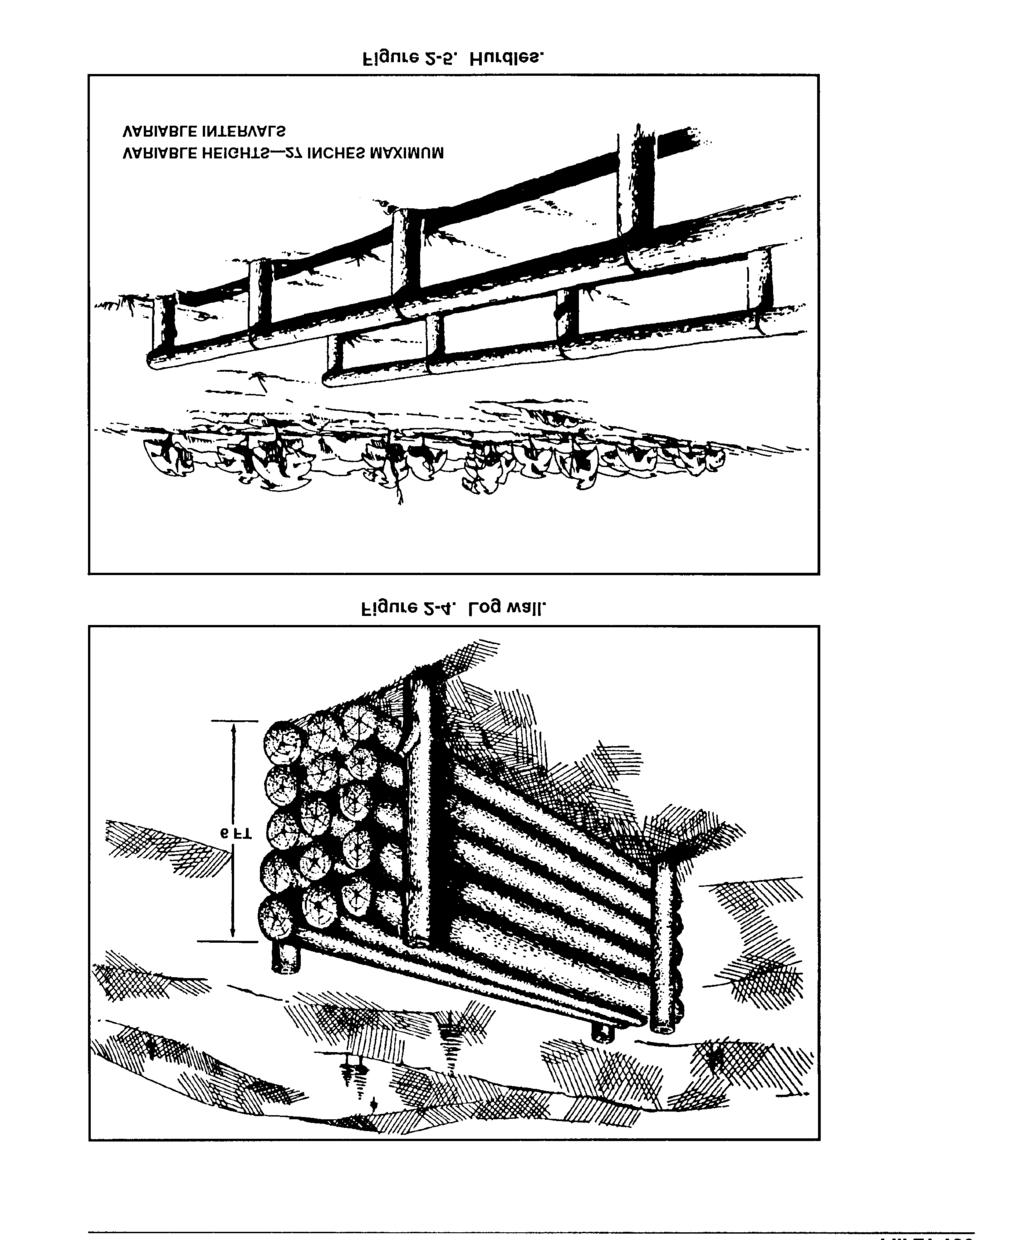
8 (1) Bayonets must be fixed and unfixed only on command. (2) Rifles should be grounded near the targets when the soldiers are ordered to move to the instructor s platform for explanations or demonstrations. (3) A level surface that does not become slippery when wet should be provided for the training court. (4) Left-handed soldiers should be positioned so that they are opposite another left-handed soldier when working against the targets. This type of arrangement prevents possible injury when executing a series of movements. (5) When using the M16 rifle against a target, the force of contact during the thrust movement may drive the hand, gripping the small of the stock, into the forward assist assembly (on the right-hand side of the weapon near the stock). To prevent injury to the hand, the soldier must maintain a firm grip on the small of the stock; gloves should be worn as part of the training uniform when weather dictates. b. Layout. The 300-meter-long course consists of a series of targets to attack and obstacles to negotiate. Lay it out over natural terrain, preferably rough and wooded areas. Include natural obstacles, such as streams, ravines, ridges, and thick vegetation. Build artificial obstacles, such as entanglements, fences, log walls, hurdles, and horizontal ladders (Figure 2-2). c. Targets. Use a variety of targets to provide experience in different attacks. The local TSC can build the targets. Those composed of old tires are appropriate as well as the ivan-type targets used by range control that is, the E-type silhouette, three-dimensional personnel target (large), FSN or the F-type silhouette, three-dimensional personnel target (small), FSN 6920-OO-T Targets should be durable but should not damage weapons. Place a sign near each target to indicate the type of attack to be used. d. Usage. An example of how to conduct the bayonet assault course is as follows: (1) Task. Negotiate the bayonet assault course. (2) Conditions. Given nine lanes on a 300-meter bayonet assault course over irregular terrain with four types of targets: thrust; parry thrust target; parry, butt stroke to the groin target; and parry, butt stroke to head target (Figure 2-3, page 2-10). The targets are marked with a sign to indicate the required attack. Given seven types of obstacles as shown in Figures 2-4 through 2-10, pages 2-11 through Given a soldier in battle dress uniform with load-carrying equipment and a rifle with a fixed bayonet. 2-8
9 2-9
10 2-10
11 2-11
12 2-12
13 2-13
14 (3) Standards. The course must be successfully negotiated by all soldiers in the class with each soldier obtaining kills on 75 percent of the total targets in his lane. The course must be negotiated in 5 minutes or less (about 30 seconds for each 50 meters and time to attack and negotiate obstacles). WARNING TO AVOID INJURY, INSTRUCTORS ENSURE THAT THE PROPER INTERVAL IS CONSTANTLY MAINTAINED. Section IV TEACHING TECHNIQUES This section discusses a variety of effective teaching techniques to use while conducting combative training. 2-14
15 2-8. WARM-UPS AND STRETCHES Before combative training, the soldier must be prepared for the upcoming physical stress. A warm-up period gradually increases the internal temperature of the body and the heart rate. Stretching prepares the ligaments, tendons, muscles, and heart for a workout, decreasing the chances of injury. a. Warm-up Exercises. To begin warm-up exercises, rotate the major joints neck, shoulders, hips, and knees. The warm-up should at least include 7 to 10 minutes of stretching, running in place or jogging around the training area, and calisthenics. Grass drills and guerrilla exercises are a good approach as a warm-up for combative training. They condition the body through motion in all ranges, accustom the soldiers to contact with the ground, and promote aggressiveness. b. Stretching Exercises. Any of the stretching exercises in FM are recommended for hand-to-hand combat training. Five other exercises that increase flexibility in areas of the body that benefit hand-to-hand combat movements are as follows: (1) Backroll stretch. (a) Position: Lay on ground on back with legs extended and arms by sides, palms down. (b) Action: Raise legs over head and roll back as far as possible, trying to place toes on the ground behind head. Keep knees locked and feet and knees together; hold for 20 seconds (Figure 2-11). Gradually, return to starting position. Repeat two or three times. 2-15
16 (2) Buddy-assisted splits (leg spreader). (a) Position: Sit on ground facing buddy with legs extended and spread as far as possible. Position feet inside ankles. (b) Action: Interlock hands with buddy and alternate pulling one toward the other, causing the buddy to bend forward over the hips until a stretch is felt (Figure 2-12). Hold this position for 20 seconds, then alternate and have him pull you into a stretch. Do sequence two or three times each. 2-16
17 (3) Buddy-assisted hamstring stretch. (a) Position: Sit on ground with right leg extended to front and foot pointing up. Bend left leg with sole touching to inside of right thigh. Have buddy kneel behind you with his hands on your shoulders (Figure 2-13). (b) Action: Slowly bend forward from hips over the right leg and reach your hands toward ankles until stretch is felt (Figure 2-l3). Hold this for 10 to 15 seconds. The buddy then applies downward pressure and allows you to adjust your stretch. Hold for 10 to 15 seconds and repeat. Alternate legs and positions after two or three sequences. 2-17
18 (4) Buddy-assisted groin (butterfly) stretch. (a) Position: Sit on ground with the soles of your feet together, close to the torso. Hold ankles with hands. Have buddy kneel behind you with his hands on your knees. (b) Action: The buddy places his hands on top of your thighs at the knees. The buddy s weight is supported by your shoulders while little weight is placed on the thighs. Then, the buddy increases downward pressure on your thighs until stretch is felt (Figure 2-14). Hold for 20 seconds, then alternate positions. 2-18
19 (5) Buddy-assisted back stretch. (a) Position: Stand back-to-back with buddy and interlock arms at your sides. (b) Action: Bend forward at the waist and pull buddy up on your back over your hips. The buddy allows his back to arch and tells you when an adequate stretch is felt (Figure 2-15). Hold this position for 20 seconds, then, change places. 2-19
20 2-9. STANCES A fighter s stance (Figure 2-16) is the position he takes in readiness for an unarmed fight. He may launch an attack or defend from this stance. a. A fighter s stance not only places his body in a good position from which to attack or defend, but it influences his mental attitude and aggressiveness. b. He holds his hands high to protect his head and face. His fists are clenched, but relaxed. His elbows are close to his body and his weight is evenly distributed on both feet, creating a stable base. He is light on his feet with his knees slightly flexed to allow quick movement in any direction FALLS A soldier must learn how to fall to the ground without getting hurt, both during training and during combat. If he loses his balance or is thrown during a fight, his use of basic fall techniques enables him to escape injury or to quickly recover to protect himself. WARNING TO HELP PREVENT ACCIDENTS DURING FALLS, IT IS IMPORTANT TO EXHALE UPON IMPACT WITH THE GROUND. THIS HELPS THE BODY ABSORB THE IMPACT a. Laying Side Fall. The laying side fall is a training exercise that teaches the basic movements for executing a side fall. To be safe, the fall is learned from the squatting position until soldiers can fall properly. From the 2-20
21 squatting position (Figure 2-17, Step 1), the soldier extends one leg across the front of the body and raises his arm on the same side across his face (Figure 2-17, Step 2). Then he rolls onto the exposed side, allowing the extended leg and side to absorb the shock of the fall. He slowly lowers his arm to stabilize his body. He raises his other hand to guard against future strikes (Figure 2-17, Step 3). 2-21
22 b. Standing Side Fall. The soldier starts the fall from the standing position (Figure 2-18, Step 1). He lowers his weight on the supporting leg and extends the other leg across the body (Figure 2-18, Step 2). He then distributes his body weight by rolling along the exposed side from the ankle of the extended leg to the back muscle. The arm on the ground is used to stabilize himself; the other hand is used to guard the body (Figure 2-l8, Step 3). 2-22

. He keeps his left leg flat on the ground, knee slightly bent.")
23 c. Forward Rolling Fall. The soldier starts the fall from the standing position (Figure 2-19, Step 1). He raises one arm to expose his entire side, places both hands on the ground, and bends both knees. He rolls forward across the body along the hand, arm, and back to the opposite hip (Figure 2-19, Step 2) and ends in a good side fall position (Figure 2-19, Step 3). He keeps his left leg flat on the ground, knee slightly bent. His right knee points upward and bends inward to help protect the groin. He keeps his right heel and sole flat on the ground behind the left leg. 2-23
24 d. Rear Fall. The soldier starts the fall from the standing position and keeps his head fonward to reduce the chance of head and neck injuries (Figure 2-20, Step 1). He then falls backward and lowers his center of gravity by bending both knees. As his buttocks touch the ground, he rolls backward to absorb the momentum of the fall (Figure 2-20, Step 2). He keeps his hands cupped and slaps his hands and arms down to help absorb the shock of impact and to stabilize his body (Figure 2-20, Step 3). He keeps his chin tucked on his chest. Then, his legs come down slowly with knees bent and make contact with the ground (Figure 2-20, Step 4). He raises his hand to protect his face from kicks or blows. The soldier can kick his opponent from this position. 2-24
25 2-11. CRAWL, WALK, AND RUN Training can be conducted using the crawl, walk, and run techniques, which may be applied on two levels. a. First Level. The instructors use these techniques during each initial training session. (1) Crawl phase. New techniques should be introduced, taught, demonstrated, and executed by the numbers. (2) Walk phase. During this phase, soldiers practice the new techniques by the numbers, but with more fluid movement and less instructor guidance. (3) Run phase. Soldiers execute the techniques at combat speed with no guidance. b. Second Level. The instructors use these techniques when developing unit combatives programs. Before conducting combatives training, the instructor considers the abilities and experience level of the soldiers to be trained. During training, those soldiers with prior martial arts experience can be a great asset; they may be used as demonstrators or as assistant instructors. The crawl, walk, run approach to unit training ensures a high skill level throughout the unit and minimizes the risk of training injuries. (1) Crawl phase. During the crawl phase, the instructor introduces combatives to the unit. Here, the basic skills that set the standards for advancement to other levels are mastered. Emphasis is placed on proper technique when executing stances, falls, and hand-and-foot strikes. Studying the new techniques in this method ensures that the movements are correctly programmed into the soldiers subconscious after a few repetitions. It also develops the flexibility of soldiers. (2) Walk phase. Once a unit has developed a sufficient proficiency level in basic skills, begin the walk phase. Instructors introduce soldiers to throws, combination strikes with body weapons, reaction drills, knife/bayonet fighting, grappling, and expedient-weapons training. (3) Run phase. In the run phase, unit soldiers engage in full sparring, advanced-weapons fighting, and sentry removal DEMONSTRATIONS A well-coordinated demonstration and professional demonstrators are crucial for successful learning by soldiers. Unrehearsed presentations or inadequately trained demonstrators can immediately destroy the credibility of the training. There are two methods appropriate for the demonstration of combative techniques to soldiers. These are based on the size of the group to be taught. a. Company-Size Formation or Larger. The instructor or demonstrator uses the talk-through method. The primary instructor talks the 2-25
26 demonstrators through the techniques by the numbers, and then the demonstrators execute at combat speed. The soldiers can see how to apply the move being taught in relation to the instructor or demonstrator. The primary instructor is free to control the rate of the demonstration and to stress key teaching points. The demonstrators must be skilled in properly applying the techniques so soldiers can adequately grasp the intended concepts. b. Platoon-Size Formation or Smaller. A good method for demonstrating to a smaller formation is for the primary instructor to apply the technique being taught to an assistant instructor. The primary instructor talks himself through the demonstration. He stresses correct body movement and key teaching points as he does them EXECUTION BY THE NUMBERS Instructors use execution by the numbers to break down techniques into step-by-step phases so soldiers can see clearly how the movements are developed from start to finish. Execution by the numbers also provides soldiers away to see the mechanics of each technique. This teaching method allows the instructor to explain in detail the sequence of each movement. For example: on the command PHASE ONE, MOVE, the attacker throws a right-hand punch to the defender s face. At the same time, the defender steps to the inside of the attacker off the line of attack and moves into position for the right-hip throw. Assistant instructors are able to move freely throughout the training formation and make on-the-spot corrections EXECUTION AT COMBAT SPEED When the instructor is confident that the soldiers being trained are skilled at executing a technique by the numbers, he is ready to have them execute it at combat speed. Executing movements at combat speed enables soldiers to see how effective a technique is. This builds the soldier s confidence in the techniques, allows him to develop a clear mental picture of the principles behind the technique, and gives him confidence in his ability to perform the technique during an actual attack. The command is, THE RIGHT-HIP THROW AT COMBAT SPEED, MOVE. The soldiers then execute this technique from start to finish DRILLS Drills are used to maintain soldiers skills in executing techniques through repetition. During these drills, techniques or phases of techniques are repeated as often as necessary to ensure programmed learning by the soldiers. Subconscious programming usually occurs after 25 repetitions of movement. 2-26
27 Technique drills help soldiers retain their skills, and they are a good tool for reviewing techniques already learned FOAM PADS Foam pads (Figure 2-21) are highly recommended to enhance training. The pads allow full-forced strikes by soldiers and protect their training partners. The pads enable soldiers to feel the effectiveness of striking techniques and to develop power in their striking. Instructors should encourage spirited aggressiveness. Pads can be tackle dummy pads or martial arts striking pads. a. The use of pads is especially recommended for knee-strike practice drills, kicking drills, and 3-foot-stick striking drills. The pad is ideally placed on the outside of the training partner s thigh, protecting the common peroneal nerve. Pads can also be held against the forearms in front of the head and face to allow practice knee/elbow strikes to this area. b. Training pads can be requisitioned through supply channels or purchased locally. 2-27
*FM CD Compilation Copyright by emilitary Manuals
 *FM 21-150 i ii iii Preface This field manual contains information and guidance pertaining to rifle-bayonet fighting and hand-to-hand combat. The hand-to-hand combat portion of this manual is divided into
FM COMBATIVES
 FM 21-150 Table of Contents RDL Homepage Document Information Download Instructions *FM 21-150 FIELD MANUAL No. 21-150 HEADQUARTERS DEPARTMENT OF THE ARMY Washington, DC, 30 September 1992 FM 21-150 COMBATIVES
FM P r e f a c e
 Preface This field manual contains information and guidance pertaining to rifle-bayonet fighting and hand-to-hand combat. The hand-to-hand combat portion of this manual is divided into basic and advanced
HEADQUARTERS DEPARTMENT OF THE ARMY
 (FM 21-150) COMBATIVES HEADQUARTERS DEPARTMENT OF THE ARMY DISTRIBUTION RESTRICTION: Approved for public release; distribution is unlimited. PREFACE This field manual contains information and guidance
2990 Lorne Scots Royal Canadian Army Cadet Corps Rifle Drill
 2990 Lorne Scots Royal Canadian Army Cadet Corps Rifle Drill Page 1 of 27 TABLE OF CONTENTS PARA ITEM PAGE Section 1 BASIC RIFLE DRILL 1.1 INTRODUCTION 3 1.2 ATTENTION 5 1.3 STAND AT EASE FROM ATTENTION
APPENDIX A PUGIL TRAINING
 APPENDIX A PUGIL TRAINING Training in pugil techniques prepares the soldier to confidently and aggressively use the rifle-bayonet. It furnishes the rifle-bayonet fighter with an opponent who can think,
CHAPTER 4 ADVANCED GROUND-FIGHTING TECHNIQUES
 (FM 21-150) CHAPTER 4 ADVANCED GROUND-FIGHTING TECHNIQUES After achieving an understanding of the basics of ground fighting, other elements of fighting on the ground are added. These techniques, however,
GROUND COMBATIVES TRAINING STEP-BY-STEP INSTRUCTION MANUAL PICTORAL ANNEX FOR EXISTING TSP S
 GROUND COMBATIVES TRAINING STEP-BY-STEP INSTRUCTION MANUAL PICTORAL ANNEX FOR EXISTING TSP S Stand Up In Base - This is the most basic technique. It allows the Student to stand up in the presence of an
RIFLE DRILL. 1. General. Before commencing instruction in rifle drill, it is important that the cadets receive instruction in the parts of the rifle.
 RIFLE DRILL 1. General. Before commencing instruction in rifle drill, it is important that the cadets receive instruction in the parts of the rifle. 2. Rifle Movements. Unless stated otherwise, cadets
The Grip: Place the shot comfortably on the base of the hand with the thumb down and the four fingers balancing the shot.
 The Javelin By Mark Mirabelli, Throwing Specialist - www.mmtrackandfield.com If I could use one word to express success in all three styles of throwing the shot put I would have to say the word drill.
Crowd Control. Course Law Enforcement II
 Course Law Enforcement II Unit XI Crowd Control Essential Question How does a police officer effectively handle a hostile crowd? TEKS 130.294(c) (11)(A)(B) Prior Student Learning Use of Force Estimated
6 th Kup - 5 th Kup (Green belt - blue tab)
") 6 th Kup - 5 th Kup (Green belt - blue tab) Long stance - Double knife-hand strike : Hammer-fist strike : Back-fist strike : Spear-Hand Punch : Back stance Single fist guarding block : Double fist guarding
6 th Kup - 5 th Kup (Green belt - blue tab) Long stance - Double knife-hand strike : Hammer-fist strike : Back-fist strike : Spear-Hand Punch : Back stance Single fist guarding block : Double fist guarding
Coaching Principles. 1. Introduce 2. Demonstrate 3. Explain 4. Organize 5. Execute 6. Correct 7. Practice
 5 Pin Bowling Drill Book Updated August 2008 Coaching Principles STEPS IN TEACHING A DRILL 1. Introduce 2. Demonstrate 3. Explain 4. Organize 5. Execute 6. Correct 7. Practice GENERAL PRINCIPLES Drills
Warm Ups. Standing Stretches
 Warm Ups Mild warm-ups are a necessity for everyone. The need for warm-ups increases with age as the body becomes less elastic over time. It is recommended that you execute the warm-up routine in this
LEVEL 1 SKILL DEVELOPMENT MANUAL
 LEVEL 1 SKILL DEVELOPMENT MANUAL Lesson Manual C A Publication Of The USA Hockey Coaching Education Program The USA Hockey Coaching Education Program is Presented By LESSON C-1 SPECIFIC OBJECTIVES 1. Refine
Spring 2010 Coaching Sessions U14
 Spring 2010 Coaching Sessions U14 Coaching Ages 13 to 14 Years This section provides you with a eight week training program for children ages 13 through 14 years. Each practice features four fun and progressive
CHAPTER 3 - FOOT DRILL. 1. During the initial stages of training in foot drill, instruction is to be given in open order.
 CHAPTER 3 - FOOT DRILL BASIC FOOT DRILL 1. During the initial stages of training in foot drill, instruction is to be given in open order. 2. Exercises are to be taught first by numbers and when proficient,
Teaching Progression and the Fine Points For Contact In The Underhand Pass (Service Reception and Defense) Step 1: Catch & Throw
 Step 1: Catch & Throw") Teaching Progression and the Fine Points For Contact In The Underhand Pass (Service Reception and Defense) Step 1: Catch & Throw - Players can be in pairs or if working individually then the coach can
Teaching Progression and the Fine Points For Contact In The Underhand Pass (Service Reception and Defense) Step 1: Catch & Throw - Players can be in pairs or if working individually then the coach can
Defending Drills and Games
 Defending Drills and Games Select from a large variety of Defending drills and games to custom design your own practice sessions. There are fun and challenging practices for every age and skill level.
AMATEUR HOCKEY ASSOCIATION ILLINOIS, INC. MITE 8 & UNDER AMERICAN DEVELOPMENT MODEL
 Mite 8 & Under American Development Model Week 1 This coach s manual is intended to provide the instructions and tools to conduct the Mite and 8 & Under Illinois Hockey - Skills Challenge. Mite
PARTNER With all partner stretches: communicate with partner and use caution!!
 - warm up prior to stretching - isolate the muscle group to be stretched - move slowly and smoothly into stretch - use proper mechanics and correct alignment - breathe normal - slowly come out of stretch
2672 Hastings & Prince Edward Regiment Royal Canadian Army Cadet Corps. Lee Enfield No.4. Rifle Drill
 2672 Hastings & Prince Edward Regiment Royal Canadian Army Cadet Corps Lee Enfield No.4 Rifle Drill Extracts from A-CR-CCP-053/PT001 March 2005 TABLE OF CONTENTS PARA ITEM PAGE Section 1 BASIC RIFLE DRILL
A Publication Of The USA Hockey Coaching Education Program The USA Hockey Coaching Education Program is Presented By
 LEVEL 1 SKILL DEVELOPMENT MANUAL Lesson Manual B A Publication Of The USA Hockey Coaching Education Program The USA Hockey Coaching Education Program is Presented By LESSON B-1 SPECIFIC OBJECTIVES 1.
Basic Quarterback Training
 Basic Quarterback Training This tip provided by Todd Kreuger, Football Tools For Active.com Repetition is the key to becoming a good quarterback. Below are some of the most important techniques a high
Coaches Handbook. Coaches Handout Page 1
 Coaches Handout 2009 Page 1 General Session 1: How to Warm-up! Players are put through basic warm-ups and exercises that they should perform each week when they come to Tball. Stretching should be the
Coaching Principles. STEPS IN TEACHING A DRILL 1. Introduce 2. Demonstrate 3. Explain 4. Organize 5. Execute 6. Correct 7. Practice GENERAL PRINCIPLES
 Alpine Skiing Drill Book Updated August 2008 STEPS IN TEACHING A DRILL 1. Introduce 2. Demonstrate 3. Explain 4. Organize 5. Execute 6. Correct 7. Practice GENERAL PRINCIPLES Coaching Principles Drills
MANUAL OF ARMS FOR THE RIFLE (M-1 GARAND) POSITION OF ORDER ARMS
 POSITION OF ORDER ARMS") MANUAL OF ARMS FOR THE RIFLE (M-1 GARAND) In describing the manual of arms, the term, at balance, refers to a point on the rifle just forward of the trigger housing. Whenever a position is described as
MANUAL OF ARMS FOR THE RIFLE (M-1 GARAND) In describing the manual of arms, the term, at balance, refers to a point on the rifle just forward of the trigger housing. Whenever a position is described as
Handout 4: Yoga Movement for Chronic Pain
 Handout 4: Yoga Movement for Chronic Pain Yoga can be an effective practice for chronic pain management. Instructions for five poses are included here: 1) Seated Lateral Stretch, 2) One-legged Butterfly,
Krav Maga Yellow Belt Curriculum
 Krav Maga Yellow Belt Curriculum Prerequisites for advancement: 50 beginner-level class hours, Yellow Belt midterm, and instructor approval Target time: approximately 4-6 months Straight Punch Straight
Weekly Practice Schedule:
 Coaching Ages 13 to 14 Years This section provides you with a twelve-week training program for children ages 13 through 14 years. Each practice features four fun and progressive drills and culminates with
Basic Combatives Course Handbook. July
 Basic Combatives Course Handbook July 2017 1 TABLE OF CONTENTS React to Contact....6 Grappling Over Weapons. 7 Post, Frame, Hook with Head Control..13 Option 3...21 Basic Stand-Up Fighting Techniques...29
S t r e t c h i n g E x e r c i s e s
 Stretches for side of neck: 1. Sit or stand with arms hanging loosely at sides 2. Turn head to one side, then the other 3. Hold for 5 seconds, each side 4. Repeat 1 to 3 times Stretches For the side of
LEVEL 1 SKILL DEVELOPMENT MANUAL
 LEVEL 1 SKILL DEVELOPMENT MANUAL Lesson Manual D A Publication Of The USA Hockey Coaching Education Program The USA Hockey Coaching Education Program is Presented By 1. Proper Stance: LESSON D-1 SPECIFIC
TACTICAL COMBATIVES COURSE STUDY GUIDE
 TACTICAL COMBATIVES COURSE STUDY GUIDE STANDING TECHNIQUES 1. ROUND KICK (All Minor Tasks) 1. Push off on the ball of your trail leg foot, and then step somewhat toward the target and laterally to the
7 Basic Skills Study Guide: (Folkstyle focus)
") 7 Basic Skills Study Guide: (Folkstyle focus) Search YouTube for USA Wrestling Seven Basic Sills or click this link https://youtu.be/sc3vxv_zi7k (Total video play time 59:14) 0:00-3:40 Highlight Clips
7 Basic Skills Study Guide: (Folkstyle focus) Search YouTube for USA Wrestling Seven Basic Sills or click this link https://youtu.be/sc3vxv_zi7k (Total video play time 59:14) 0:00-3:40 Highlight Clips
Techniques To Treat Your Pain At Home (512)
") Techniques To Treat Your Pain At Home (512) 288-5322 7010 W. TX-71 Suite 360 Austin TX, 78735 Arm Only Bird Dog Start in the quadruped position (all fours) with arms and thighs perpendicular to the floor.
Techniques To Treat Your Pain At Home (512) 288-5322 7010 W. TX-71 Suite 360 Austin TX, 78735 Arm Only Bird Dog Start in the quadruped position (all fours) with arms and thighs perpendicular to the floor.
USA BASKETBALL PLAYER DEVELOPMENT CURRICULUM INTRODUCTORY LEVEL. 40 USA Basketball Youth Development Guidebook
 USA BASKETBALL PLAYER DEVELOPMENT CURRICULUM INTRODUCTORY LEVEL 40 USA Basketball Youth Development Guidebook 41 INTRODUCTORY LEVEL BALL HANDLING & DRIBBLING GENERAL OVERVIEW: Ball-handling and dribbling
Randolph College Softball 2008 Summer Program
 Randolph College Softball 2008 Summer Program Week 1 Week 2 Endurance: 1 mile run 4x per Endurance: 1.25 mile run 4x per Core workout: 4x per Core workout: 4x per Week 3 Week 4 Endurance: 1.5 mile run
Punch Instructors Course Handout. One Day Instructor Training Workshop
 Punch Instructors Course Handout One Day Instructor Training Workshop 1 10:00 Welcome and introductions 10:15 Master Class 11:15 Break 11:30 Technique Overview Part one General Boxing Safety Straights
11 Kyu Preparatory Techniques prior to commencing study of the Fighting Techniques
 CADET 11 Kyu 11 th KYU Preparatory Techniques prior to commencing study of the Fighting Techniques STANCES: Attention Ready Left Lead Fighting Stance Right Lead Fighting Stance Straddle Stance (Horse Riding)
Coaching Principles STEPS IN TEACHING A DRILL. 1. Introduce 2. Demonstrate 3. Explain 4. Organize 5. Execute 6. Correct 7. Practice GENERAL PRINCIPLES
 Aquatics Sport Drill Book Updated August 2012 Coaching Principles STEPS IN TEACHING A DRILL 1. Introduce 2. Demonstrate 3. Explain 4. Organize 5. Execute 6. Correct 7. Practice GENERAL PRINCIPLES Drills
Basic Fundamental Skills of Volleyball and 8-Week Training Program Common Errors Causes Corrections
 Basic Fundamental Skills of Volleyball and 8-Week Training Program Common Errors Causes Corrections Knowledge of the basic fundamental skills of volleyball, common errors, and suggested corrections will
10 Rolling, leaping and landing
 YOUNGSTERS AGE: 5- Activities 0 Rolling, leaping and landing for rolling, leaping and landing Landings are an important safety issue in sports and teaching children how to fall will help prevent injuries.
2017 Grades K-3 Coaches Handbook Track and Field
 2017 Grades K-3 Track and Field Table of Contents Coaching...3 Season Schedule...4 Weather...4 Parent Volunteers Schedule...5 Skills Clinic...6 Pictures...7 Practice...8 Logistics...9 Schedule... 10 Field
Modern Army Combatives Program Competitions
 Modern Army Combatives Program Competitions Competition: The act of striving against another force for the purpose of achieving dominance or out of a biological imperative such as survival. AGENDA Why
RECRUIT SUSTAINMENT PROGRAM SOLDIER TRAINING READINESS MODULES Drill and Ceremony Overview 1 September 2012
 RECRUIT SUSTAINMENT PROGRAM SOLDIER TRAINING READINESS MODULES Drill and Ceremony Overview 1 September 2012 SECTION I. Lesson Plan Series Task(s) Taught Academic Hours References Student Study Assignments
Introduction To Boxing! The Basics. Stretching Stance Footwork Power Punches Defense Hand wrapping
 Introduction To Boxing! The Basics Stretching Stance Footwork Power Punches Defense Hand wrapping Stretching (A Boxer should always stretch 5-10 mins. Before training..) 2 Arm & Chest Stretches Elbow Pull
Black Belt KBK Kickboxing Syllabus. Line Work -Punches (Conducted With Bouncing Movement)
") Line Work -Punches (Conducted With Bouncing Movement) 1. Jab, Cross Punch 2. Backfist, Reverse Punch 3. Hook Punch (Lead Arm), Uppercut (Back Arm) 4. Step Through Jab, Cross Punch 5. Step Through Backfist,
Line Work -Punches (Conducted With Bouncing Movement) 1. Jab, Cross Punch 2. Backfist, Reverse Punch 3. Hook Punch (Lead Arm), Uppercut (Back Arm) 4. Step Through Jab, Cross Punch 5. Step Through Backfist,
Sitting. Volleyball. Skills and Systems
 Sitting Volleyball Skills and Systems Sitting Volleyball Skills Ready Positions There are two ready positions commonly used in sitting volleyball depending on the situation presented. Reception ready position
Shaolin Chuan Fa Requirements for Purple Belt
 Shaolin Chuan Fa Requirements for Purple Belt Stances The heart of any movement is the stance, because your position and balance dictates your ability to perform the desired strike or kick, or to evade
LGFA Interfirms Coaching Resource Booklet Ladies Gaelic Football
 LGFA Interfirms Coaching Resource Booklet Ladies Gaelic Football 1 Coaching Resource (Part 1) IDEAL Principle Head, Hands Feet Technique LGFA Skill Cards 2 IDEAL PRINCIPLE When coaching a technique or
Appendix 1. Strikes with the Stick and Cane
 Appendix 1. Strikes with the Stick and Cane I have always found jointlocks and takedowns with the stick and cane to be far more interesting than the strikes, most of which are obvious, even to beginners.
AUSTRALIAN BASEBALL UMPIRE S MANUAL
 AUSTRALIAN BASEBALL UMPIRE S MANUAL UMPIRE POSITIONS AND SIGNALS 2009 by Australian Baseball All rights reserved. No part of this publication may be reproduced or distributed in any form without prior
GOALKEEPER DEVELOPMENT CURRICULUM
 GOALKEEPER DEVELOPMENT CURRICULUM U6 and U8 *Using goalkeepers is not recommended for these two age groups. *In today s game, goalkeepers must be able to control the ball with their feet and pass as well
COMMON TRAINING PROFICIENCY LEVEL ONE INSTRUCTIONAL GUIDE SECTION 1 EO M ADOPT THE POSITIONS OF ATTENTION, STAND AT EASE AND STAND EASY
 COMMON TRAINING PROFICIENCY LEVEL ONE INSTRUCTIONAL GUIDE SECTION 1 EO M108.01 ADOPT THE POSITIONS OF ATTENTION, STAND AT EASE AND STAND EASY Total Time: 30 min PREPARATION PRE-LESSON INSTRUCTIONS Resources
UNITED STATES MARINE CORPS Martial Arts Center of Excellence The Basic School Marine Corps Combat Development Command Quantico, Virginia 22134
 UNITED STATES MARINE CORPS Martial Arts Center of Excellence The Basic School Marine Corps Combat Development Command Quantico, Virginia 22134 DETAILED OUTLINE KNIFE TECHNIQUES INTRODUCTION (3 MIN) 1.
Page 1 Introduction. Fast and slow twitch muscle fibres are. Page 2 The Sprint Start. Page 4 - Sprints. Page 5 - Middle Distance
 Name: Below are some terms for you to research. Once you have found out what each term means write a short paragraph explaining why you perform better in some events than you do others. Page 1 Introduction
TOPIC OF THE MONTH FOR MARCH 2010 HOW CAN KICKERS AND PUNTERS INCREASE POWER?
 TOPIC OF THE MONTH FOR MARCH 2010 HOW CAN KICKERS AND PUNTERS INCREASE POWER? Imagine yourself as the quarterback for a winning Super Bowl team. You survived the season because your eyes read opponent
BODY BALANCE. Focusing on improved lower body strength, core strength, and overall balance. Warm Up:
 BODY BALANCE Focusing on improved lower body strength, core strength, and overall balance Warm Up: Seated Forward big arm circles/backward big arm circles (10 seconds) Forward small arm circles/ backward
1. POST: Options FRAME: Options 1-3
 Name: Date: Class Number: Score: /10 GO / NO-GO UNITED STATES ARMY COMBATIVES COURSE Basic Combatives Course Technical Evaluation 1. POST: Options 1-3 Performance Steps (Must pass 5 of 7) GO NO-GO Student
to : entire team - warmup exercises (jumping jacks, leg stretches, arm circles, etc.) ( 10 minutes )
 ( 10 minutes )") Practice Plan - Minors: ( 2 hour practice) Practice #1 Date: Time: Team Roster: to : entire team - warmup exercises (jumping jacks, leg stretches, arm circles, etc.) ( 10 minutes ) to : entire team - throwing
Practice Plan - Minors: ( 2 hour practice) Practice #1 Date: Time: Team Roster: to : entire team - warmup exercises (jumping jacks, leg stretches, arm circles, etc.) ( 10 minutes ) to : entire team - throwing
Rio Rapids Durango Soccer Club U13/14 Player Standards
 Rio Rapids Durango Soccer Club U13/14 Player Standards Characteristics of the U13/14 Player -The more advanced U13/14 players are able to execute a range of skills, but most others are still developing
RJT. Pupil Task Cards: Throwing JUMP THROW RUN
 RJT s: Throwing RUN JUMP THROW s: Introduction Introduction to the s An important part of every child s cognitive development is to encourage them to explore new things and use self-guided learning to
Glencoe Youth Baseball Player Coach Developmental Series
 Glencoe Youth Baseball Player Coach Developmental Series Dynamic Warm-ups: (Tony Bastinelli) 10-15 minutes -Start with a light jog, maybe two / three gym laps, w/ gloves on. Single file, no passing and
Level 1 Conditioning and Stretching
 Base Training Exercise Techniqe/Purpose Top Training Exercise Technique/Purpose Base Stance with Overhead Press or Overhead Hold: Base stands in base stance and presses weight up and down. Base Keeps back
The Ancient Art of Chi Gong. for. Strength & Flexibility
 The Ancient Art of Chi Gong for Strength & Flexibility The Student/Athlete Educational Foundation, Inc. 12 Manison Street, Suite E Stoneham, MA 02180 781-850-4520 doc@chap.com Abdominal Butterfly (Stretches
Baseball Training Program
 Baseball Training Program Always consult your physician before beginning any exercise program. The information and advice published or made available through the Orthopaedic and Neurosurgery Specialists,
S&DMHA Player Development Program Book Four - Goaltending
 S&DMHA Player Development Program Book Four - Compiled by Wayne King to be used as reference for all minor hockey coaches Good goaltending is essential to the success of your team. For individuals to be
Topic: Passing and Receiving Objective: To improve the teams passing technique and to recognize the correct timing and opportunity to pass Technique o
 Topic: Dribbling for Possession Objective: To improve dribbling and shielding technique Technical Box: Keep the ball close All players dribbling in a defined space. Use all surfaces of the foot Players
COACHING WINDMILL PITCHERS GETTING STARTED
 COACHING WINDMILL PITCHERS GETTING STARTED INTRODUCTION Coaching pitchers in NOT difficult. All you need is some interest and a little information to understand what you're doing. The interest has to come
Aquatics Eight-Week Training Plan
 Aquatics Eight-Week Training Plan Week 1 Warm up March in place with exaggerated arms to increase the core body temperature before stretching. Shoulder rolls back, then forward. Arm Swings Standing tall
Ab Plank with Straight Leg Raise
 Ab Plank with Straight Leg Raise Position yourself face up with your knees bent at 90 degrees, feet flat on the floor. Your hands should be directly under your shoulders facing forward. While in this position
Level 1 Stroke Performance Criteria
 STROKE PERFORMANCE CHART Level 1 Stroke Performance Criteria Component Swim on Front (Combined Stroke Using Any Type of Arm or Leg Action) Swim on Back (Combined Stroke Using Any Type of Arm or Leg Action)
AYRA International League Minimum Skills
 AYRA International League Minimum Skills The International League should continue to work on all previous teachings and build upon these skills. This is a good age to start introducing more advanced skills,
Lesson 3 Part 1 of 2. Demonstrating and Describing the Forehand Drive Components. Purpose: National Tennis Academy
 Lesson 3 Part 1 of 2 Demonstrating and Describing the Forehand Drive Components Purpose: When you complete this lesson you will be able to demonstrate and describe the forehand drive components. This skill
Get Fit and Prevent a Fall!! Fun Exercises for Seniors!
 Get Fit and Prevent a Fall!! Fun Exercises for Seniors! The Idaho Department of Health and Welfare Injury Prevention Program, in conjunction with District Health Departments, offers you the Fit and Fall
THROWING SKILLS RUN JUMP THROW
 RUN JUMP THROW CHAPTER 7: KEY IDEAS Throwing activities can be divided into the following sub-groups: pushing activities which lead to shot put pulling activities which lead to javelin throw slinging activities
Grandmaster Dr. Ted Gambordella
 The Complete Book of Wrist Locks By Grandmaster Dr. Ted Gambordella Everything you need to know about Wrist Locks. By Grandmaster Dr. Ted Gambordella 1 I have always loved to do wrist locks since I first
Sprinting. Relevant Knowledge** Overall Level. Assessment Criteria. Learning Outcomes
 Sprinting 1. coordinate their limbs. 2. be familiar with the starter s order.. swing their arms in rhythm. 1. coordinate their limbs. 2. swing their arms in rhythm.. react accurately to signals.. master
ATSH-INB-D 01 November 2011
 REPLY TO ATTENTION OF DEPARTMENT OF THE ARMY UNITED STATES ARMY COMBATIVES SCHOOL DELTA COMPANY, 2 ND BATTALION, 29 TH INFANTRY REGIMENT BLDG 933, 7101 HALL STREET FORT BENNING, GEORGIA 31905-4420 ATSH-INB-D
Sun Salutation Pose #1 Mountain Pose 1
 Sun Salutation Pose #1 Mountain Pose 1 Stand upright with feet together and look straight ahead, hands alongside body and palms forward. Lift abdomen inward and upward. Activate quadriceps and evenly distribute
JUMP FOR. AIM For athletes to jump for height from one foot, landing on two feet. YOU WILL NEED Low (30cm) hurdle or cones and a stick, landing mat
 hurdle or cones and a stick, landing mat") JUMP FOR Game card: JUMPING Low (0cm) hurdle or cones and a stick, landing mat For athletes to jump for height from one foot, landing on two feet Group athletes in threes, each with a jumping area. ON
JUMP FOR Game card: JUMPING Low (0cm) hurdle or cones and a stick, landing mat For athletes to jump for height from one foot, landing on two feet Group athletes in threes, each with a jumping area. ON
4. Shooting The first types of shots to which youth players are introduced are:
 4. Shooting The first types of shots to which youth players are introduced are: Lay-Up Set Shot Foul Shot Jump Shot Other shots such as the hook shot, tear drop, runner, etc. may be a bit advanced for
LEVEL UNIT LESSON Number 1 EQUIPMENT Second Grade
 LEVEL UNIT LESSON Number 1 EQUIPMENT Second Grade Tumbling BALANCE/WEIGHT BEARING ON THREE BODY PARTS, INTRODUCE TRI-POD AND HEAD STAND Objectives 1. Have fun. 2. Play safe. 3. Demonstrate physically that
Belton High School Marching Fundamentals 2016
 Belton High School Marching Fundamentals 2016 Fundamentals of Teaching Fundamentals: 1. Say the name of the maneuver (INSTRUCT) 2. State its purpose (INSTRUCT) 3. Demonstrate it slowly, several times,
Synchronised Swimming. Skill Level 1
 1 2 3 4 5 6 7 8 9 10 11 12 Synchronised Swimming Skill Level 1 Assessors must be Basic Skill Assessors, Assessors or Advanced Skill Assessors Name. Date 2012 (updated 2.2.12) 1 Skill Level 1 Content 1.
Basic Movement Patterns Locomotor Skills 1.3
 Basic Movement Patterns Locomotor Skills 1.3 Jumping Forward & Sideways & Landing Extending Arms upward upon takeoff Arms Reach Full Extension about head height at lift off Extending the Hips, Knees, and
Synchronised Swimming. Skill Level 1
 1 2 3 4 5 6 7 8 9 10 11 12 Synchronised Swimming Skill Level 1 The must be a Basic, or Advanced Name. Date Content 1. Splits on land. Compulsory pass 2. Ballet Leg supported by 5 litre bottles 3. Stationary
Walking Tall: Mobility Drills for Seniors
 Walking Tall: Mobility Drills for Seniors What is Functional Mobility Training? Selecting exercises that improve the foundation for movement Working in multiple planes Teaching reaction time, decision
CLOSE QUARTER COMBAT B-GL /PT-001 (BILINGUAL) WARNING
 WARNING") B-GL-318-018/PT-001 CLOSE QUARTER COMBAT (BILINGUAL) WARNING Although not classified this publication, or any part of it, may be exempt from disclosure to the public under the Access to Information Act.
B-GL-318-018/PT-001 CLOSE QUARTER COMBAT (BILINGUAL) WARNING Although not classified this publication, or any part of it, may be exempt from disclosure to the public under the Access to Information Act.
Yellow Belt Requirements
 Yellow Belt Requirements Techniques 1. Capturing Paws A 2. Sharpening the Blade A, B 3. Escape of the Lamb A 4. Chopping Bamboo A 5. Evading the Samurai A 6. Grasping Honor B 7. Entering the Shrine A 8.
Instructor Worksheet
 Distance Swim 5m, 10m, 15m (Record distance each swimmer completes) Flutter Kick 15m Facility/Site Orientation Facility/Site Rules Shallow Water Entries and Exits Submerge Head and Exhale through Mouth
Sprint run Card One. State of NSW, Department of Education and Communities, Skill components
 Sprint run Card One 1 2 3 4 5 6 Skill components 1. Lands on ball of the foot. 2. Non-support knee bends at least 90 degrees during recovery phase. 3. High knee lift (thigh almost parallel to the ground).
LEVEL 1 SKILL DEVELOPMENT MANUAL
 LEVEL 1 SKILL DEVELOPMENT MANUAL Lesson Manual A A Publication Of The USA Hockey Coaching Education Program The USA Hockey Coaching Education Program is Presented By LESSON A The Beginner Where to start?
ATHLETICS OMNIBUS - TRIPLE JUMP From the Athletics Omnibus of Richard Stander, South Africa
 ATHLETICS OMNIBUS - TRIPLE JUMP From the Athletics Omnibus of Richard Stander, South Africa The objective of triple jumping is to try and jump as far as possible by stepping on a take off board, take 2
U12 Goalkeeping. *Goalkeepers should be able to consistently make saves from a ball struck with a medium pace using:
 U12 Goalkeeping *Goalkeepers should be able to consistently make saves from a ball struck with a medium pace using: *Three basic catches: Low ball scoop: Hands together, fingers pointing towards the ground
Performing the Exercises. Crunches
 Crunches EQUIPMENT: Mats, such as those used for tumbling or wrestling. TIME LIMIT: Two Minutes IMPORTANT: Competitors may rest in either in the up or down position as long as they maintain the correct
Baserunning Skills and Drills
 Baserunning Skills and Drills 1 Copyright Notice -IT IS ILLEGAL TO POST THIS DOCUMENT ONLINE 2 The material enclosed is copyrighted. You do not have resell rights or giveaway rights to the material provided
HOW TO HOLD THE SHOT
 HOW TO HOLD THE SHOT Balance the shot in his hand so it is resting at the point where the fingers are connected to the palm of the hand. Keep their fingers together and allow their thumb to gently rest
DRILL & CEREMONIAL RECRUIT
 DRILL & CEREMONIAL RECRUIT Australian Air Force Cadets Cadet / Instructor Notes Rewrite dated 20 February 2007 DRILL & CEREMONIAL RECRUIT (DCR) (11 PERIODS) DCR 1 Introduction to Drill and Ceremonial AL:B/2