Gymkhana America Software
|
|
|
- Jonah Small
- 5 years ago
- Views:
Transcription

1 Gymkhana America Software Version 5.2 Copyright by Charlie Horse Ranch Timing Systems, Inc. PO Box 697, Elverta, CA Web Site: Revised: 04/10/2018 Page 1
2 Contents What s New?... 4 Introduction... 6 Draw Methods...8 Team Events... 9 Match Racing Jackpot/Sidepot Concept Networking Considerations Combined Draw/Event Monitor Example 1 - Define Your Normal Settings and Options Example 2 - Set Up a Show Example 3 - Running Each Event Pre-Entries from FastEnter.com Internet Reporting Hints and Tips Using the System Event Definitions and Options Point Methods Set Team Criteria Change Matrix Settings Change Jackpot/Sidepot Payouts Change Jackpot/Sidepot Increments Division Definitions Divisional Age Breaks Administrative Functions Event Record Functions Rider Database Show Setup Rider Signup Team Signup Run Events, Winners List and Match Races Move Rider in Draw Manual Time Posting Direct Timer Input Time Posting Page 2
3 Match Race Settings Run a Match Race Check Writing External Posting Appendix A - Format of Extracted Show File Appendix B - Format of Extracted Rider File Appendix C - Timer Direct Input Setup Appendix D - Match Race Timer Setup Appendix E - Suggested Gymkhana Events Big T Birangle California Poles Cloverleaf Barrels Figure 8 Stake Keyhole Single Stake Skill Barrels Speed Barrels Washington Poles Page 3
4 What s New? Version Increased the number of events per show from 20 to Added support for teams, with 2, 3 or 4 team members. There are some limitations to team support. See the section titled Team Events for more details. 3. Added unofficial support for the National Saddle Club Association s O-Mok-See style of running shows and events. 4. Increased the maximum of lanes per class from 2 to A default point division can be assigned to the riders, and optionally used for all point assignments, regardless of the actual division they placed in. At a minimum, this division is used for team event points. 6. Enhancements to the Show High Point report and the YTD High Point report such that both display the total number of events entered for each rider, and the YTD report displays the number of shows the rider entered. 7. Enhancements to the Draw and Standings monitor, such that the draw monitor shows which division is in progress. 8. Build An ongoing issue with this software has been that it s too easy to overtype an existing rider s name during the signup process, because it wasn t obvious that the user had forgotten to click on one of the Add buttons. That problem has been corrected with version It uses a separate screen to allow you to select a rider from the database, type in a new name, etc. The name on the signup screen is protected. The name can still be corrected with a new option, Change This Horse/ Rider Name. This means you can change it if necessary, but it won t be easy to do it accidentally. 9. Build Added Default Point Division to the Sign Up screen so the producer doesn t have to go to the database to set it for new riders. 10. Build Added Rider History Report to the Administrative Functions screen so the producer can create a report for a rider showing the whole season s activity. Page 4
5 10. Build Added Run Order to the Division Definitions screen so the producer can select the order in which Divisions are run within an event Build Added Automatic Timer Start option to the Direct input time screen. If set, it s no longer necessary to press the Start Timer button before each run. Added current event record holder to time posting screen. 12. Build Added Move Rider in Draw option to the Draw, Run Calculate Winners Screen. Provides the ability to move riders around within their division, by specifying a value (with + or -) of the positions to move. 12. Build Added Multiple Teams OK option. Normally, a rider can only be on one team in any team event. If this option is checked, the rider can be on multiple teams, at the producer s discretion. 13. Build Added support for Thunderpaws timers. They may mixed with FarmTek timers when running multiple lanes. 14. Build Added support for dynamically changing the number of lanes for each group of riders. Version Added additional show details to the show setup screen, especially for FastEnter. Version Added address to rider database and show signup screens. 2. Added support for the new 4DRacing organization ( 3. Added support for a time limit on any event. If the rider goes faster than the specified time, they are given a No Time. 4. Removed support for GRN4D. They are no longer running events. 5. Build Added support for Match Racing. Page 5
6 Introduction Welcome to the Gymkhana America Software system. This system is copyrighted by Charlie Horse Ranch Timing Systems, Inc. and may not be reproduced or distributed without express written permission. Every attempt has been made to ensure the accuracy of these programs, but Charlie Horse Ranch Timing Systems, Inc. will not be responsible for problems arising from their use. If you find problems or errors, please report them to Charlie Horse Ranch. A corrected version of the software will be made available to you as soon as possible. Current fixes can be found at our web site, Click on Downloads to see any current fixes. The system was designed to run on a computer with Windows Vista, Windows 7, Windows 8, Windows 10 or more recent installed, and a minimum screen resolution of 1024 x 768 pixels. This software is designed especially for those Arena Operators who run Gymkhana (Performance Horse Obstacle Racing) events. Some of the highlights of the system are: 1. A rider database to avoid a lot of extra typing when signing riders up for a show. You may have up to 5000 riders on the database and/or in any given show. 2. A basic definition of the show, including the names of the events, the divisions of competition, the date of the show, and other administrative data. By judicious use of Event names and Division names, you can have up to 1200 different award categories. With age groups within Fixed Matrix events, that can be expanded to up to 4800 award categories. Any event can be a Team Event, with 2, 3 or 4 team members. 3. You can optionally define a Fixed Rating Matrix for each event, allowing you to categorize riders according to their ability, eliminating the situation where a more skilled rider competes with a beginning rider. 4. You can optionally define up to 4 Age Groups for each Fixed Matrix performance division, allowing you to categorize riders not only by ability, but also according to their age, eliminating the situation where an older rider competes with a young rider within the performance division. Page 6
7 5. You can optionally define a Dynamic Rating Matrix for each event, allowing the software to place riders relative to the fastest time of the day. Other Dynamic Divisions are based on that fastest time plus an increment. 6. You can optionally define an Age Range for each Age Group division, allowing you to categorize riders according to their age, eliminating the situation where an older rider competes with a young rider. Age Group divisions are automatically assigned, based on the rider s birth date. 7. You can optionally define Other divisions, based on how your run your shows. 8. Both the Age Group and Other division types can be further modified by using the A/B method of placing. The fastest and slowest times are thrown out, then the remaining times are added together and divided by the number of riders. The fastest time becomes the top of the A bracket, and the average time becomes the top of the B bracket. Riders are placed in either the A or B brackets, depending on their time. This doubles the award categories for these divisions. 9. The ability to generate an announcer s sheet for each event, showing the riders or teams in that event and a place to write their time. 10. The ability to input the team or rider s score or time to the computer, manually or with direct input from a FarmTek or Thunderpaws timer, and have the computer print out a winner s list by division. The software can accept timer input from one to four lanes concurrently. 11. The ability to calculate the high point awards for the day, as well as a Year-to-Date High Point report for multiple shows A financial summary of the show, showing monies received and the ability to reconcile the cash box. 13. The ability to extract show and rider database data to a.csv file, suitable for importing to popular spreadsheet systems for local reporting. 14. Any event can be run as a 1-D to 5-D Jackpot event or have a Sidepot. Team Events cannot have sidepots, but can be run as a Jackpot. 15. The ability to Match Race any single rider event. Page 7
8 Draw Methods There are 3 different methods that can be used to draw riders for an event. Method 1 - A completely random draw. Team or Rider s run order is randomized within divisions. Method 2 - Rider number draw. This method means that riders will be in order of their rider number within each division. This provides predictability for the riders in this and future shows. For team, it will use the team number. Method 3 - Entry draw. This method means that riders will be in the order in which they were signed up for each division. This provides predictability for the riders in this show only. In all cases, you can add to the draw after it has been drawn the first time. New entries will be placed at the end of their respective divisions, except in the case of Method 2, where they are inserted in rider number order within the division. Page 8
9 Team Events Any Event can be a Team Event. Teams may have 2, 3 or 4 team members. The number of members required is defined in the team event criteria. Team events are ad hoc, meaning that they are created from riders already signed up in the show. There is no database for teams and a team member cannot be signed up directly from the rider database.. Teams may have divisions for placing purposes, but the points earned in a Team Event are assigned to the individual rider s default point division, not the team s division. For example, if the team places first and 1st place gets 10 points, each member of the team will get 10 points in their default point division. Optionally, points for team events can be ignored. Times cannot be carried from or to a team event. Team events may not have Sidepots, but they can be run as Jackpots. Jackpot winnings are divided equally among the team members. For any given Team Event, a horse/rider combination may only be on one team, unless the Multiple Teams OK option is selected. Each member of a team may be in a different point division than other members of the same team. If there are restrictions as to what division a rider must be in to qualify for entry to a specific team event, the producer controls it. The software will accept any rider in the show as a member of the team. If you use FastEnter, it does not support Team Event sign ups. Team Events may only be entered at the show, or in advance by the producer, using existing show entries. Page 9
10 Match Racing Any single rider (not team) event can also be run as a Match Race. You can use your own criteria for selecting riders, or you can let the software qualify riders. To qualify riders, after an event (like Single Stake) has been run, use Match Race Qualifiers to select the fastest riders in the event. For example, if you were going to run an 8 person Match Race, you would select the top 16 qualifiers. The software will product a report with a place for each rider to initial whether or not they will run in the Match Race. When the names have all been initialed, you can use Match Race Signoff to flag those riders who are not participating. When that s done, use Match Race Draw to randomly pair the riders for the first heat and produce a diagram for the multiple elimination heats. To actually run the Match Race, you set up two courses for the same event side by side. See Appendix D for how to set up the timers. You will need one Farm- Tek Polaris Console, a PC Interface Cable, and two sets of timer heads. If you are interested in the optional light kit, please contact us for instructions. Two riders will be called into the arena and will go their respective assigned courses (lanes). After the first rider enters the arena, the announcer will say The System is On and a buzzer will sound in 15 seconds to let the riders know that the race will begin in 5 seconds. A second buzzer will sound in 5 seconds to signify the start of the race. If a rider crosses the starting line prior to the second buzzer, the timer will signal a red light start or foul and that rider will be disqualified. If you have the optional light kit, a red light will come on in that lane. If both riders have a good start, then it s a race to see who can complete the course first. The first rider to finish the course is the winner and if you have the optional light kit, a green light will come on in that lane. On the computer, it will tell you about red light starts and who won the race. This process continues through all the heats until a Champion and Reserve Champion are declared. Many organizations use Match Races as an opportunity to run a Calcutta. Page 10
11 Jackpot/Sidepot Concept Jackpotting and Sidepotting are simple concepts and are very popular with most riders. They can provide extra excitement for riders in your show. Each riders puts up a certain dollar amount and the rider with the fastest time or highest score wins the money. 4-D Jackpotting is the most popular format because more riders get payouts. It involves taking the fastest time and adding increments of time to get the 2-D, 3-D and 4-D winners. Each D gets a fixed percentage of the jackpot. For large shows, this is further refined where each D is paid to multiple places depending on the number of riders entered. In this software, you have complete control over time increments, entry fees, percentage of payouts, etc. For example, a typical Cloverleaf Barrels event uses the following format: 1-D = Fastest time 2-D = Fastest time seconds 3-D = Fastest time seconds 4-D = Fastest time seconds Payouts: 1-D = 30%, 2-D = 27%, 3-D = 23%, 4-D = 20% You establish the payout places based on the number of entered riders. As an example, let s assume that a an event with 20 or fewer riders pays 1 place, and if it s over 20 riders, it pays 2 places. In an event with 30 riders entered, jackpots would pay to 2 places in each D. Alternatively, you can have the system automatically calculate the places of payout, such that the last rider in the last D receives their jackpot or sidepot entry fee back. All other D s will pay to the same number of places. Speaking of flexibility, if you would rather run a 1-D, 2-D, 3-D or 5-D format, you can do that too, and you can use a different format for each event. Times can be carried from a Regular event to a Jackpot event, so the rider only has to ride once, but can place in both events. Jackpot Events are separate, and Side pots are within the normal event (except team events). A Jackpot event cannot also have a Sidepot. Page 11
12 Networking Considerations Networking two or more computers is not directly related to Charlie Horse software, but the software will make use of an existing network. Networking via Ethernet Cable(s) or a Wireless Network can be a daunting task, and usually is better left to professionals. Whether you are doing it yourself or having someone else do it, these are the requirements for Charlie Horse software to successfully use the network. 1. The share name MUST allow read/write authority. The default when setting up a share name is read-only. If left in place, Charlie Horse products cannot make use of the network, because the software requires read/write permissions. If not set up correctly, you will get messages like Software Improperly Installed, or messages indicating it can t find certain files and locking time-outs. All of these are caused by being unable to write to the hard drive. 2. When you map to a drive on another computer, you are required to provide a User identification, which was previously defined on the other machine. That user id must have read/write access to the folders and files you are going to use. Simplest is to give it Administrator authority. 3. To test the setup, the simplest method is to map to the other drive. If you can see the drive and it s folders and the response time is within a second, the actual network is probably OK. The next test is to locate any.txt file on the other computer and double click on it. On most computers, this will bring up the standard Microsoft Notepad utility. Make a minor change to the text of the file, then save it. If that works, then you most likely have the permissions set up correctly. 4. If you have problems with the network or with the permissions, CHRTS cannot help you. It isn t related to the CHRTS software. Each system has it s own peculiarities and in many cases, we could unintentionally give you bad advice.. You need to talk to your Administrator or whoever helps you with computer issues. Give them this paper if they have questions regarding the software. 5. On the next page there is an example from the Barrel Race America software. The icon was set up to allow secondary terminals to use the Local Terminal option. There are two views, one showing the links (using the Z drive to map to the other computer s C drive) and the other showing the permissions. In addition, Networked must be checked in the BRA options (GAS options for this product). Page 12

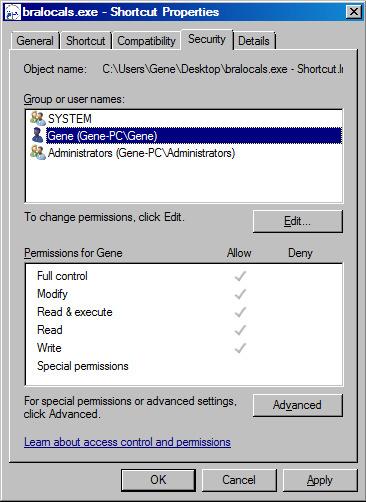
13 Page 13

14 Combined Draw/Event Monitor One of the icons on the desktop is the GAS Draw & Event Monitor. While this may be used at the main or only computer, it s primary purpose is to be used on a networked computer, where it will not interfere with signing up riders or posting times. It combines the functions of a Draw Monitor and the Event Monitor into a single screen. Half of the screen is the draw monitor and the other half is the event status monitor. A sample display is shown below. Select Event - You select the event to be monitored, and you can change it at any time. It keeps a running display of the next riders or teams in the selected event, as well as showing the standing for each division in the event. Page 14
 will recognize the performance events and some of the divisions. We re using them as examples. Step 1.")
15 Example 1 - Define Your Normal Settings and Options Here we will define the events we might run at any show, the method of placing for each event and the divisions of competition. Those of you familiar with the California Gymkhana organizations (CGA and CSHA) will recognize the performance events and some of the divisions. We re using them as examples. Step 1. Define the Events Page 15
16 Step 2. Define the Fixed Matrix for each event In this example, we re defining the fixed matrix for the Birangle event. Page 16
17 Step 3. Define the Dynamic Matrix for each event In this example, we re defining the dynamic matrix for the Keyhole event. The method here is that the fastest time is Division 1, and the other division s top time is calculated as the top time + the increment (the high value). In this example, if the fastest ride was 8.1, then the top of Division 2 would be 8.6 ( ). The top of Division 3 would be 9.1 ( ). Page 17
18 Step 4. Define the Jackpot/Sidepot Time Breaks. For those events that get Jackpotted or Sidepotted in a D format, these are the time breaks that established the top of each D. Like Dynamic Divisions, the fastest time is the 1-D and the other division s top time is calculated as the top time + the increment (the high value). In this example for the Barrels event, if the fastest ride was 8.1, then the top of the 2-D would be 8.6 ( ). The top of the 3-D would be 9.1 ( ), etc. Page 18

19 Step 5. Define the Jackpot/Sidepot Payout Method. For those events that get Jackpotted or Sidepotted in a D format, this table is used to calculate the payouts for each placing. See Jackpot/Sidepot Payout Method for details. This single table is used for all jackpotted or sidepotted events. Page 19

20 Step 6. Define the Divisions. Using the Divisions and Points button, we define the names of the Divisions, the point structure for high point awards, the age ranges for each age division (if needed), and other information for each division. Page 20
21 Step 7. Define the Fixed Performance Age Divisions. Using the Divisions and Points -> Divisional Age Breaks button, we define the subdivision of ages for each fixed performance division. In this example, for the 3 fastest divisions (AAA+, AAA and AA), we have 3 age categories (1-11, 12-24, and 25-99_. For the two slower divisions (which have more riders), we broke it into 4 categories (1-5, 6-11, and 25-99). Page 21

22 Example 2 - Set Up a Show Here we will set up a show for January 1, 2012 with Fixed Matrix Barrels, Jackpot Barrels, Fixed Matrix Birangle and Figure 8 Stake, Dynamic Division Keyhole and California Poles. In addition, we ll have Kids Barrels and Kids Single Stake with age divisions. Times from the Fixed Matrix Barrels can be carried over to the Jackpot Barrels. Step 1. Set the Date and Choose the Events. Using the Show Setup button, we set the date of the show and select the events to be run on that date with the entry fees and added money as appropriate. Page 22

23 Step 2. Sign up the riders. Using the Rider Signup button, we sign up each rider and select the events in which they are they are riding. Note that you don t have to put riders on the database before you sign them up. You can put them directly into the show, and they are automatically added to the database. In this case, the rider will ride in the Regular Barrels event, and his time from that ride will also be used for the Jackpot Barrels event (carried). After sign ups are complete, you run each event, print the reports, and go on to the next event. See Example 3 for running events. Page 23

24 Example 3 - Running Each Event In this section, we will use the prior example, and run the Barrels event. After the event is completed, we will produce the winner s list. When all events are completed, we can create the High Point and Financial reports. Step 1. Draw for the event. Using the Draw Ride Order button, and the Barrels event,we will do a draw of the riders in this event to establish the ride order. Step 2. Draw Event and Create Announcer s list. Using the Print Announcer s List button and the Barrels event, we will print the riders in this event in their ride order. The list has a place to write their times for backup purposes. Give this list to your announcer and you re ready to run the event. Page 24
 or watch the computer do it for you (Timer). You can also enter penalty points (5 seconds for a downed barrel, etc.")
25 Step 3. Run the event. Using either the Use Direct Timer Input or the Post Times Manually button and the Barrels event, we will run the event. As each rider goes, either fill in the time (manual) or watch the computer do it for you (Timer). You can also enter penalty points (5 seconds for a downed barrel, etc.), but don t change the raw time. If the rider is disqualified, enter the letter d for disqualification or ( n for No Time ), and the time will show as 0.001, which the software recognizes as a disqualification. When all riders have completed the event, use the Exit button to return to the Main Menu. Page 25
26 Step 4. Print the Event results. Using the Print Winner List button, we will create the winner s list. Hang this up so the riders can see where they placed. Step 5. Change the current event and start over. Go Back to step 1, change the current event to the next event (California Poles, Keyhole, etc.) and repeat this process. Step 6. Finish up. All the events have been run, so now you re ready to close out the show. Go to the Main Menu. Using the High Point button, create this reports as needed. Using the Financial Report button, create your financial report to get an accurate accounting of your cash box. Using the Rider Summary buttons, create the report that you can give to the riders, showing the events, placings and times. Lastly, using Administrative Functions, make a backup of this show and your rider database. Page 26
27 Pre-Entries from FastEnter.com Charlie Horse Ranch Timing Systems on-line adjunct, FastEnter.com, is an easy way for your contestants to sign up for your shows on-line and pay with a credit card. Best of all, the cost to you is very little or nothing (credit card fees). The steps to do this are: One time: 1. Establish a producer account with FastEnter.com. To do this, go to and follow the instructions you find there. 2. Notify your contestants that pre-entry sign up can be done at FastEnter.com. If you have a web site, add a link to 3. Set up the FastEnter User ID and Password. For each show: 1. Do your show setup normally. When you re done, click on the Send Show to FastEnter.com button. The show and all of its characteristics (except Team Events) will be sent to FastEnter.com. 2. Periodically, go to the Rider Signup function, and click on the Get Entries from FastEnter.com button. All of the contestants who have signed up at FastEnter.com will be automatically added to your show, with no additional work by you. 3. After the show is over, go to Administrative Functions and select the button Show Results to Web. This will send the winners list to FastEnter.com where it is available immediately for your contestants to see. That s it. You re done... Page 27
28 Internet Reporting Many show producers would like to post their show results on their web site. This software makes it easy to do. Simply select the Make HTML file button on any report, and it will create an HTML file of that report. All you need to do is FTP the file(s) to your site, and set up links to each report. Assuming you named the file Birangle.html, a sample report is shown below, and a typical link would look like this: <P>Results for Birangle on the January 1st show. <B><FONT COLOR=blue><A HREF=./birangle.html TARGET= report >Birangle</FONT></B></A><BR> The report looks like this: Page 28
29 Hints and Tips Q. I have already done the draw and the event is running. How can I add a rider to the draw? A. Actually, it s pretty simple. Without External Posting, use the Show Signup button to add the rider, then use the Add to Draw button. The rider will be added to the appropriate place in the draw. Then use the Refresh button on the Post Times menu and the rider will automatically be in the event. With External Posting, follow the same procedure up through Add to Draw. Then use the Create External Posting File function to create a new flash drive, go to the external computer, insert the flash drive, exit the time posting, then use the External Posting Add Additional Riders from Main function to add the additional riders. After that, you just start the time posting function again and it will pick up where you left off. Q. Now that you mention it, what s external posting? A. In a large show, you may be running an event while you re trying to sign up riders for another event. This can be pretty inconvenient if you are only using one computer, even though they are in separate windows and can be accessed concurrently. The external posting function allows you to extract an event to a flash drive, and take the flash drive to another computer to run the event. When the event is complete, you update the flash drive at that computer, then bring it back to the Main computer to merge it back into the show. This feature could also used when you are running different events in multiple arenas. Q. What happens with ties? A. Let s say that two riders had exactly the same time, and it was the fastest time of the event. The points for 1st and 2nd are combined, then divided evenly between the two riders. 2nd place is skipped and the next rider would get points for 3rd. Q. I have a rider on two horses. They need time to change tack, but they drew too close together. How can I run one of them out of order? Page 29
30 A. This one s pretty easy, too. On the Post Times screen, use the option to select an individual rider. Select the rider and they will be the next to run. When their ride is complete, use the same function to go back to the rider you left off with, and you re back in order. The software will skip this rider when they come up in the normal flow. Q. We run Age divisions instead of Performance divisions. How can I make sure the riders are in the proper division? A. When defining the events, check the Age Groups box for that event. It means that you want the software to automatically calculate which division the rider should be in, based on their birthday and an as of date that you set. When the rider is signed up, the division will be set automatically so long as you have the rider s birth date. Q. I have a lot of riders on my database or in my show. When I get the drop-down list of riders, it takes a while to scroll to the right one. Is there an easier way to do this? A. Yes. When you have that screen, there is a box that says Search for. Type the first letter of the rider s last name and the list will be positioned to the first entry that matches that letter, and you can do a short scroll from there. If the list is still too long, type the second character of the last name, etc., until you get close to the entry, then double click or highlight it and click Select. Q. I m running a 3 day show (Saturday, Sunday and Monday) with 6 events and AAA+, AAA, AA, A and FC divisions. Do I have to defi ne 3 shows and sign the riders up 3 different times (once for each day)? A. No. Because there are 60 available events, you can set up a event definitions like this: Barrels Saturday, Barrels Sunday, Barrels Monday. Birangle Saturday, Birangle Sunday, Birangle Monday. Figure 8 Flags Saturday, Figure 8 Flags Sunday, Figure 8 Flags Monday. Figure 8 Stake Saturday, Figure 8 Stake Sunday, Figure 8 Stake Monday. Hurry Scurry Saturday, Hurry Scurry Sunday, Hurry Scurry Monday. Keyhole Saturday, Keyhole Sunday, Keyhole Monday. This totals 18 events. Since 60 events are available, you can do it all as one show, and there s still room for plenty of other events. Page 30
31 Q. I have a lot of riders on my database and would like to eliminate those who haven t ridden recently. How can I clean off my database and only have active riders? A. In the Rider Database screen, there is an option to purge riders, based on the fact they haven t ridden since a date that you provide. Once you supply the date, it will automatically remove all riders who haven t ridden since that date. Q. This software looks pretty good. What other software do I need to buy to support the databases and/or spreadsheets? A. None. This software is completely self-contained and no other supporting software is needed. Page 31

32 Using the System When you start the system, you will see the Main Menu. After that, you select the various functions to define and run your show. See the following pages for the description of each button. Page 32
33 Generally, you would use these buttons in the following order: 1. Event Definitions and Options: Use this button to define your organization s events, draw type, matrix definitions and ground fees. Once set, this is not normally required again. 2. Divisions and Points: Use this button to define your organization s event fees, divisions, rating criteria, default division, age ranges, and high point structure. Once set, this is not normally required again. 3. Administrative Functions: Use this button to back up and restore show files, rate riders, delete old shows from the hard drive, maintain event/arena records, send results to your or FastEnter s Web page, and extract show and rider database data. 4. Rider Database: Use this button to make changes to your rider database, print mailing labels and purge old entries. 5. Show Setup: Use this button to set up the show you are about to run, selecting the events and optionally sending the show to FastEnter. 6. Rider Signup: Use this button to sign up riders in the show you are about to run, selecting the events for each rider and optionally downloading the entries from FastEnter. 7. Team Signup: Use this button to sign up team in the show you are about to run. Team Signup is done by individual event. 8. Draw, Run, Calculate Winners - All Events: Use this button to draw run order, create announcer s lists, run events, and create winners lists 9. Show Statistics: Use this button to get a short report showing the number of riders and each event, the number of riders in each division within each event, and the total number of riders in the show. 10. Show High Point Report: Use this button to print the High Point Report for this Show. 11. YTD High Point Report: Use this button to print the Year-to-Date High Point Report. Page 33
34 12. Individual Rider Summary Reports: Use this button to print selected rider summary reports. 13. All Rider Summary Reports: Use this button to print rider summary reports for all riders in the show. 14. Financial Reports: Use this button to print a financial summary for the show. 15. License Key: Use this button to provide licensing information to CHRTS. 16. Unlicense: Use this button to unlicense the software on this machine after moving the software to another machine. Do NOT use unless instructed to do so. You will be locked out of the software. Page 34

35 Event Definitions and Options This is where you define the events you are going to run and the default values for things like ground fees, rider order and FastEnter controls. The screen looks like this: Page 35
36 Timer Ports 1, 2, 3 and 4: If you are using the direct timer input option, these are the COMM port(s) on your computer where the timer cable is plugged in. Ground Fee: If you charge a ground fee, this is the amount. It will be automatically applied to each rider s entry. Club Membership Fee: The price for the club Individual membership. It will be automatically applied to each rider s entry that signs up for a local club membership at a show. Club Year-End: The price for the club Year-End Awards program. It will be automatically applied to each rider s entry that signs up for local year-end awards at a show. Member Discount Pct: This is the percentage that will be deducted from the rider s entry fee if they are a mamber. It s expressed as a percentage. For example, a $5.00 entry fee less.10 (10%) will be $ = $4.50. The discount does not apply to Jackpot events, Point Only entry fees, or All Day fees. Sidepot: The price to enter a Sidepot in any event. Placings: This option controls the number of placings printed for winner s lists and high point reports. Random, Entry or Rider Number: This option controls the draw for each event. You can select Random, which means a completely random draw of rider order within division. You can select Rider Number, which means riders will run in rider number order within each division. You can select Entry, which means riders will run in the order in which they were entered in the show within each division. 3-Up Labels: Normally, labels are in a 2-up format. If this box is checked, labels will be printed in a 3-up format. Place Below Rating: If you are using a rating matrix, this field controls what to do with a rider who rides a time slower than their divisional matrix. If this button is not selected, the rider will not place at all. If this button is selected, the rider will place in their sign up division, even though they didn t ride within the matrix time frames. Combine Checks: If you are paying by check and are limited to the number of checks you write per month, use this button to combine all Jackpot payouts into one check for each rider. Page 36
37 Address on Checks: If you have to mail checks because riders leave early, this option will print the rider s address on the check. Then you can just put it in a # 10 window envelope for mailing. 3-Up Checks: If your checks are in 3-up format, use this button. If you are using Voucher checks (check on top), uncheck this button. Round Payouts: If you are paying in cash, use this button to round Jackpot payouts to whole dollars. Sign Checks: If you are paying by check and want the software to sign the checks, too, check this box. You must also supply a file called signature.bmp containing an image of your signature. Propagate Divisions: If you are using a fixed rating matrix and all riders are required to run in their rated division for all events, check this button. When you change the division in the signup screen, all other fixed rating divisions will be changed automatically. This can also be used any time a rider must stay in the same division for the whole show. Changing one division will cause all of the others to be changed. Use CGA Settings: One of the more popular Gymkhana formats in California is the one used by the California Gymkhana Association. Many clubs use their divisions and rating matrix as a guide for their own shows, even though they aren t associated with CGA. This button will automatically plug in the events, divisions and rating methods used by CGA for horses. It will not do the pony divisions separately. You can then adjust the settings for your own shows. This information was derived from CGA s web page ( If they make any changes that you want, you will have to make the same changes here. Use O-Mok-See Settings: Another popular Gymkhana format in the West is the one used by the National Saddle Clubs Association. It s called O-Mok-See. This button will automatically plug in the events and divisions used by O-Mok-See, based in their 2013 Rule Book. It is not an official implementation of O-Mok-See, it s just a sample. You can then adjust the settings for your own shows. This information was derived from O-Mok-See s web page ( If they make any changes that you want, you will have to make the same changes here. Page 37
38 Event: These are the events you run on a regular basis. When you set up the show, you will select which events you are running that day. These descriptions will appear on all reports. Fixed Matrix: If this button is selected, the matrix you have defined will be used to place riders in this event. Use Change Matrix Settings to define the ranges. Dynamic Matrix: If this button is selected, the riders will be placed based on the fastest time of the day + an increment that you define for each division. Use Change Matrix Settings to define the increments. Age Groups: If this button is selected, the rider s division will be calculated automatically, based on their birthday and an as of date you define. Use Divisions and Points to define the age ranges for each division. Other Types: If this button is selected, the divisions are user-defined and no automatic functions will be applied. Jackpot: If this button is selected, this is an x-d jackpot race, similar to 4-D Jackpot Barrel Racing. The number of D s and the time increments are set by clicking Change Jackpot Increments. The payout rules are set by clicking Change Jackpot Payouts Sidepot: If this button is selected, this race has a separate sidepot, similar to a Jackpot event. The difference is that this is still a divisional event, the sidepot is optional and only the riders who enter the sidepot are considered for payouts. Change Matrix Settings: Use this button to define the rating matrix for each Fixed or Dynamic Matrix event, as well as defining bump up rules for each Fixed Matrix division. Set Team Criteria: Use this button to define which events are Team Event and to define the number of riders on a team for each event. Jackpot Times Carried: If set, Jackpot times are always carried from the primary (EID) event. The jackpot event is not actually run. High Point by Rider Only: If Checked, High Point Reporting is by Rider only If a rider is on multiple horses, the points will be combined. If not checked, High Points are reported by Horse/Rider combination. Page 38
39 Using FastEnter: If you are using FastEnter to allow signups on-line, check this box. User ID: is your FastEnter User Identification. Password: is your FastEnter password. It will show here as a line of asterisks for security reasons. Edit Rules: Click this box to edit a file containing information for the riders that you want to appear on the FastEnter Web page. When you send the show to FastEnter, this information will be sent as well, and will appear on your signup screen. Edit Release: Click this box to edit a file containing Release of Liability wording that you want added to the standard Release of Liability that FastEnter presents when checking out. When you send the show to FastEnter, this information will be sent as well, and will appear on your checkout screen. Point Method: This is the method used for your point system. 0 means to use the one supplied by this software. 1-5 means to use one of the point methods defined by you. Clicking on Change Point Methods allows you to define a variety of point systems. See the section Point Methods for more details. Networked: If checked, it means you will be networking this software (allowing access from multiple computers). See the section on Networking Considerations for more details. The software will take extra steps internally to prevent file corruption caused by concurrent access. No Points for Jackpots: If checked, it means jackpot events do not earn points for the riders. No Points for Team Events: If checked, it means team events do not earn points for the riders. All Points to Default Division: If checked, it means that all points earned will be earned in the default point division defined for the rider, regardless of the division in which they placed. YTD Points from Signup Date: If checked, it means that points earned prior the date the rider signed up for year-end awards will not count. If not checked, all points for the season will count, regardless of the signup date. Page 39
40 User 1 Title: A field meaningful only to the user. This title will show up in various reports. It is character format, and can be used for most anything. User 2 Title: A field meaningful only to the user. This title will show up on the signup screen in the financial section and on the financial report. It is designed to be a userdefined category of income (like exhibitions runs). Multiple Teams OK: By default, this software will only allow a rider to be on one team in any team event. If this box is checked, that test is bypassed and the rider can be on any number of teams. Check for Thunderpaws Timer: If checked, when you start direct input timing, the software will ask if you are using a Thunderpaws timer and will adjust accordingly. Recalculate Year-End Points: If checked, Year-End point calculations will exclude those riders who are not signed up, and will readjust the placings for each event. For example, if rider1 placed first and is signed up for Year-End, rider2 placed second and is not signed up for year end, and rider3 placed 3rd and is signed up for Year-End, rider2 is tossed and rider 3 moves up to 2nd for points purposes. Points Awarded in Sign Up Division Only: If checked, a rider may only earn points in the division in which they are signed up. If they place in another division, they will get the placing and awards, but no points. If not checked, a rider may earn points in any division. Page 40
41 Point Methods This software uses a default point method that provides equal opportunity for all competitors, regardless of whether they place in a big division or a small one. 5 other point methods are available. We start with a basic point system that says the following: 1st = 20 points 2nd = 15 points 3rd = 12 points 4th = 9 points 5th = 6 points 7th = 4 points 8th = 3 points 9th = 2 points 10th = 1 point. We also have a multiplier, which is.5 (1/2 point for each percentage point). Within the division (like ages or AAA as examples), you get points for the placing and you get points for the percentage your time is when compared to the fast time in your division. For example, in AAA single stake, the fastest rider is a 9.5 and they get first. The second fastest rider is a 10.1 and they get second. The third fastest rider is a 10.3 and they get third. In the above example 1st place would get 20 points + 50 points. The calculation is: 20 points for 1st + her time was 100% of the fastest time (9.5 / 9.5 = 1.00), so we multiply 100 x.5 = 50; her total is 70 points. Second would get 15 points + 47 points. The calculation is: 15 points for second + her time was 94% of the fastest time (9.5 \ 10.1 =.94), so we multiply 94 x.5 = 47; her total is 62 points. Third would get 12 points + 46 points. The calculation is: 12 points for third + her time was 92% of the fastest time (9.5 / 10.3 =.92), so we multiply 92 x.5 = 46; her total is 58 points. Page 41
42 This rewards riders who come close to the fastest time, even if they didn t place first. It awards points up to the last rider who placed. Small classes or large classes don t matter. It all depends on how close you came to the fastest time and you get a bonus for your placing. There are 5 other point methods. When you click on Change Point Methods in the Event Definitions and Options Screen, you will see a where you define the point structure used for each event. In each example, if Participation Point is checked, each rider will receive 1 point for being in the class, in addition to any other points earned. Likewise, if Min. Points is set to a value greater than 0, then any rider who doesn t get disqualified will receive at least that number of points (like participation points), up to the Max. Rider count. If Always Add is checked, they will receive the Min. Points points in addition to any other points earned. The screens looks like this: In this example (Method 1), we are using a Flat Point structure, where the same number of points are given regardless of the number of riders in the division and all riders get at least 1 point. Page 42

43 In this example (Method 2), we are using a Graduated Point structure, where there is a base number of points (the minimum) and an increment. The increment is applied based on the number of riders who placed in the division, where the point total assigned is equal to the (base points + (the increment * the (number of riders in the division - placing)). For example, if the Keyhole event had 32 riders who placed in the open division, the first place rider would get points ( ((32-1) * 2.9 = 89.9) = 237.8). The 2nd place rider would get points ( ((32-2) * 2.4) = 72) = 196.8). This provides a LOT of flexibility in the way you assign points. It can be as simple or as complicated as you want it to be. Page 43
44 In this example (Method 3), we are using a Calculated Point structure, where the base number of points (the minimum) is calculated as (number of riders * multiplier). Note, number of riders is the actual number of riders who placed in the division up to the Max Riders Value. Then each placing gets a percentage (incr) of the total points which is calculated at (base * incr). In this example, if there are 10 riders who placed in the division, the base points is 100 (10 * 10). 1st place would get 23 points (100 *.23), 2nd place would get 20 points (100 *.20), 3rd place would get 17 points (100 *.17), etc., up to 8th place. Page 44
45 In this example (Method 4), we are also using a Graduated Point structure, where there is a base number of points (the minimum) and an increment. The increment is applied based on the number of riders who placed in the division, where the point total assigned is equal to the (base points + (the increment * the (number of riders in the division - placing)). The difference here is that we will only consider up to 10 riders (Maximum Riders). Another way of saying it is that if there are 10 or more riders who placed in the Open division, the first place rider would get 11 points ( ) = 11). The 2nd place rider would get 10 points ( ) = 10. The 3rd place rider would get 9 points ( ) = 9. This continues to the 10th place rider who would get 2 points ( ) = 2. Page 45

46 Set Team Criteria This is where you define which events are team event and how many riders each event has on a team. The screen looks like this: Team Event: If checked, this event is a Team Event. Team Members: The number of riders on a team for this event. Page 46

47 Change Matrix Settings This is where you define the rating matrix for each event as well as defining the bump up rules for each division. NOTE: For Fixed Matrix divisions, it is VERY important to define your divisions in fastest-slowest order. See Divisions and Points. The screen looks like this: Event Name: This shows the names of predefined events. Edit Matrix: This button selects the event that we are editing the matrix for. If the event isn t a Fixed or Dynamic Matrix event, it just shows the division for that event. In this example, we are editing the matrix for Birangle. Division Name: These are the divisions you have defined. Note that for those divisions included in the rating matrix, they must be in fastest to slowest order. In this example, we have defined 5 divisions that will be in the matrix, AAA+, AAA, AA, A and FC (Future Champion). Page 47
48 Low: For Fixed Matrix events, this is the fastest time within the matrix for that division. It is a calculated value for all but the fastest division, and is 1/1000th of a second slower than the High field of the next highest division. It not used for other event types. High: For Fixed Matrix events, this is the slowest time within the matrix for that division. Note that for the last division in the matrix group, it must be a value of For Dynamic Matrix Events, it is the increment that will be added to the fastest time to place the rider in this division. Bump: For Fixed Matrix Events, this button controls what happens when a rider rides faster than their divisional matrix. For example, an A division rider rides a Birangle time of , which is an AA time. We can do one of two things when calculating the winner s list. 1. We can place the rider at the top of the signup division (first in A). This is what will happen if Bump Up is not checked. 2. We can bump the rider up to the appropriate division for this event only. In that case the rider would be placed with the AA division riders. This is what will happen if Bump Up is checked. Setting Bump Up for the highest division has no effect. Print Matrix: Selecting this tab will print the current matrix for each event. Save and Refresh Display: Selecting this tab will recalculate the low values based on any changes to high values, and refresh the screen display. Page 48
49 Change Jackpot/Sidepot Payouts This is where you change the payout percentages for D and each place for jackpotting and sidepotting. The screen looks like this: Page 49
50 This allows you to set your own default values for payouts, both for each D and for the places within each D. Be sure to use the Refresh and Check button to make sure your percentages add up to 100 before you save your changes. Producer Jackpot Percentage: This is the percentage of the jackpot entry fees kept by the show producer. For example, if the producer was keeping 30%, and the entry fee was $10.00, the producer would get $3.00 and $7.00 would go into the jackpot pool. Producer Sidepot Percentage: This is the percentage of the Sidepot entry fees kept by the show producer. For example, if the producer was keeping 20%, and the entry fee was $5.00, the producer would get $1.00 and $4.00 would go into the jackpot pool. Automatically Calculate Depth: If checked, the system will automatically calculate how many places to pay, based on entry fees, producer percentage, the number of riders and any added money. The last rider to be paid (the last paid rider in the lowest D ) will get at least their jackpot or Sidepot entry fee back. All other D s will pay to the same place as that one. Ride Count: This is the number of riders that will cause jackpots or side pots to be paid to multiple places if you are not using the automatic calculation. In the above example, if there are 10 or fewer riders in an event, that event will only pay to 1 place in each D. If there are riders, it will pay to 2 places in each D, if there are riders, it will pay to 3 places, etc. Page 50

51 Change Jackpot/Sidepot Increments This is where you change the time increment for D jackpotting and other settings. Page 51
52 2-D, 3-D, 4-D and 5-D: These are the increments to use for jackpotting. 1-D will be the fastest time, and these increments are added to the fastest time to establish the 2-D, 3-D, 4-D and 5-D times. Pay Places: Instead of using the Payout Table to figure the number of places to pay, a value other that zero (0) in this field means that you will pay that number of places. It overrides the payout calculator. For example, a 3 in this field means you will pay 3 places in each D. D s: This is the number of D s that this event will be divided into. For example, a 4-D event would have a 4 in this field. Page 52

53 Division Definitions This is where you define the divisions of competition you are going to run, the rating criteria, the age range if necessary, and the type of division. The screen looks like this: Page 53
54 Def Div: If checked, this is the default division for this division type (Fixed, Dynamic, Age Group, or Other) Division Name: The name of the division. Note that when running events, the riders will be presented in division order, where the first division will run first, then the next division, etc. If you run your fastest riders first, then use the first division for them. If you are using a Fixed or Dynamic Rating Matrix, you MUST define the divisions in fastest-slowest order. Rating Rides: For Fixed Matrix divisions, the number of rides at any level the rider must have to be rated in this event. Note that rides in faster divisions count as rides in lower division for rating purposes. Rating Events: For Fixed Matrix divisions, the number of events the rider must have to be rated at this level. Low Age: The youngest age for this division if you are using age groups. Note, this value MUST be 0 for a division that is not part of the Age groups. High Age: The upper age limit for this division if you are using age groups. Age As Of Date: The base date for calculating a rider s age. Generally, this date should be the start date of your show season. Note, it s in mm/dd/yyyy format. Div Type: The type of division. Valid values are: F - Fixed Matrix Division. D - Dynamic Matrix Division. A = Age Group Division O = Other type of Division U = Unused - This Division is not used in any events. A/B Place: If checked, both the Age Group and Other division types can be further modified by using the A/B method of placing. The fastest and slowest times are thrown out, then the remaining times are added together and divided by the number of riders. The fastest time is the top of the A bracket, and the average time becomes the top of the B bracket. Riders are placed in either the A or B brackets, depending on their time. This doubles the award categories for these divisions. Run Order: Sets the order in which divisions are run for each Event within that division type. Page 54
55 No Points: If checked, the riders who place in this division will not earn any points. Used for qualifying runs and training runs. Could also be used as a non-member divison. Divisional Age Breaks: Selecting this button takes you to a new screen that allows you to set age divisions within performance divisions, effectively allowing you to have up to 4 awards categories for each performance division. See the next page, Divisional Age Breaks for details. Page 55
56 Divisional Age Breaks This is where you define the age ranges of some performance divisions, effectively dividing a single performance division into multiple award divisions. The screen looks like this: Only divisions that are Fixed Matrix based may have age groups included in them. Division Name: Is the name of the division. Range 1 (2, 3, 4): The age range that is to be considered an award category for that performance division. In this example: Page 56
57 The AAA+, AA and AA divisions have 3 age ranges (1-11, and 25-98) The A and FC divisions have 4 age ranges (1-5, 6-11, and 25-99) The other divisions have no age ranges because they are not Fixed Matrix Divisions. Page 57

58 Administrative Functions This is where you perform basic housekeeping functions, like backing up files and deleting old shows, as well as extracting data for local reporting. The screen looks like this: Drive: The address of the flash drive on this computer. Back Up Files: Use this button to back up show and administrative data to a flash drive. Restore Files: Use this button to restore show and administrative data from a flash drive. Delete Old Shows: Use this button to delete old show files from the hard drive. Rate all riders: Use this button to recalculate the rating levels of all riders on your database, based on prior show results. Page 58
59 Event Records: Use this button to update and print event/arena records. Export Show File: This function creates a file named Smmddyy.csv (where mmddyy is the date of the show) in the current directory. It is a comma-delimited file suitable for importing into many popular spreadsheet and database programs. It allows you to export show data and do your own local reporting. The format of the file is defined in Appendix A. Export Rider Database: This function creates a file named Members.csv in the current directory. It is a comma-delimited file suitable for importing into many popular spreadsheet and database programs. It allows you to export rider data and do your own local reporting. The format of the file is defined in Appendix B. Show Results to Web: This function creates a file named Show_Results.html in the current directory. It is in standard html format and can be send directly to your web page. Add a link, and you have the results on-line. If you are using FastEnter, this function will send the show results to FastEnter for on-line viewing. Rider History Report: This function creates a report for an individual rider showing what they did in all selected shows. It is esssentially a YTD Summary Report. Page 59

60 Event Record Functions This is where you can change and print current event/arena records. The screen looks like this: Page 60
61 Time: This is the fastest time so far in this event. Event Name: This is the name of this event. Date: This is the date the record was set. First Name, Last Name, Mount: This is the rider/horse combination that holds the record in this event. If it was a team event, all riders on the team are listed. Print Records: Selecting this tab will print a report showing the current event records. Events xx-xx - Indicates which group of 5 events are being displayed. Page 61
 are self-explanatory. Note that the birthday is in mm/dd/yyyy format.")
62 Rider Database This is where you keep definitions of each rider. If you separate riders by different horses, each one can have a different entry. The screen looks like this: Data Elements: The data elements (first name, last name, etc.) are self-explanatory. Note that the birthday is in mm/dd/yyyy format. Local Awards Date: This is the date the rider signed up for local year-end awards. Local Membership Date: This is the date the rider signed up for Local membership. Last Show Date: This is the last date the rider rode in one of your shows. Page 62
63 Merge Show and Database: This function merges the current show into the riders database. Any new riders you added during the show are automatically added to the database, so you have their basic information, making sign up at the next show much easier. Normally, this is unnecessary, since the riders are added as you sign them up for the show. Update This Record: Select this button any time you have made a change to any of the data elements to save the changes. Add New Rider: Select this button to create a new entry on the database. It will assign a new rider number and present you with a screen to fill in. Once you have typed in the information, use Update This Record to save your changes. Select a Rider: Select this button to get a screen of all riders on the database. When you highlight a rider in the list and press Select, that rider will appear on this screen. You can then modify or delete the record. Delete This Record: Select this button to delete the current rider on the screen. Print Database: Select this button to print a report showing all riders on the database. Short Database Print: Select this button to print a report showing all riders on the database in abbreviated format. Reset Award Dates: Select this button to reset all year-end awards signups. Normally this is done at the beginning of a new show season, after the last season s awards have been given out. Purge Old Riders: This function deletes riders who have not ridden in your shows since a given date. You fill in the Mail or Purge Date field, then select the Purge Old Riders tab to eliminate old riders. Mailing Labels: Select this button to create a set of mailing labels from your rider database. This is useful when you want to mail out flyers of upcoming shows. The labels are pre formatted for 1 x 4 labels (2-up), unless you have chosen the 3-up label option, in which case they are pre formatted for 1 x 2 5/8 labels (3-up). If you fill in the Mail or Purge Date field, it will only print labels for those riders who have ridden since that date. Page 63
64 Merge 2 Rider Entries: It occasionally happens that a horse/rider combination is defined twice, and you need to merge them into one entry. This button allows you to select the base rider/horse (The good entry) and the other ( bad ) entry and merge them together into a single horse/rider. In addition, all shows on the hard drive are adjusted to reflect the change. Fixed Matrix Div.: When signing a rider up from the rider database, this is the default division that will be used for Fixed Matrix events. Other Division: When signing a rider up from the rider database, this is the default division that will be used for Other events. Points Division: This is the default division for the rider s points. It is used for team events and may optionally be used for all events, regardless of what division the rider places in. Page 64

65 Show Setup This is where you set the show date and the events you are going to run in today s show. The screen looks like this: Page 65
66 Show Date: This is the date of the show you are about to define. For a new show, you must click on New Show Date to change this field first before defining events to run. If you select a prior show, it will show the events you ran that day. For each show event, you can use the drop-down box to select from the set of events you defined in the options, You can even run the same event more than once. Entry Fee: The Entry Fee for this event for points and awards. P/O Fee: The Entry Fee for this event for points only. That mean the rider will still earn points, but doesn t want day awards. This saves the club money and part of the savings are passed along to the rider. Added Money: For Jackpot Events, the Added Money, if any. EID: If a rider is allowed to carry his or her time from one event to this event, this identifies where the time comes from. EID stands for Event Identifier. In this example, the Jackpot Barrels Event (event 3) can get times carried from the Regular Barrels event (event 1). Consequently, it has an EID of 1 (get times from Event 1). This only establishes that it s possible. You must also check the C (Carry) flag on event 3 when signing up the rider. Otherwise, it s assumed the rider will ride in this event instead of carrying the time. New Show Date: Use this button to get a calendar, from which you can select a new show date. Select Existing Show: Use this button to get a list of prior show dates and select one of them as the current show. Active: Each box allows you to chose from the events you defined during the event definition process, indicating that event will be run at this show. All Day (Regular): A single fee that is less than the sum of the individual event fees if the rider signed up for all of them for awards (not including Jackpot events and side pots). Allows you to give the rider a discount for signing up for all events. All Day (Points): A single fee that is less than the sum of the individual event fees if the rider signed up for all of them for points only (not including Jackpot events and side pots). Allows you to give the rider a discount for signing up for all events. Page 66
67 Deadline: The last date that entries will be accepted from FastEnter for this show. Fixed Matrix: If this button is selected, This is a Fixed Matrix Event. Dynamic Matrix: If this button is selected, This is a Dynamic Matrix Event. Age Groups: If this button is selected, this is an Age Group Event. Other Types: If this button is selected, the divisions are used-defined and no automatic functions will be applied. Jackpot: If this button is selected, this is an x-d jackpot race, similar to 4-D Jackpot Barrel Racing. Sidepot: If this button is selected, this race has an internal Sidepot that is optional to the riders and pays like a Jackpot. Time Limit: If this button is selected, this race has a limit on how fast riders can go. If they equal or go faster than the time suplied, they are given a No Time. The time limit is supplied by the operator at the start of time posting for the event. Intended for Novice events. Events xx-xx - Indicates which group of 15 events is being displayed. Show Specific Information: Allows you to define information about the show, primarily to show on the FastEnter site. Things you can define include the title of the show (New Year s Bash, Wednesday Gymkhana, etc.), the address of the show, the arena name, and who to contact. Use FastEnter Express: If checked, it means that the riders can enter the show online without paying the entry fees (they will pay them when they arrive at the show). They will pay the FastEnter convenience fee only at signup time. Note, once the show has been submitted, this option cannot be changed for this show. Send Show to FastEnter: Clicking this button submits the show to FastEnter, making it available to your riders and allowing them to enter the show online. Page 67

68 Rider Signup This is where you sign up riders in individual events who are going to ride in today s show. The screen looks like this: Page 68
69 Sign Up Rider: Select this button to get a screen of all riders on the rider database. You may choose one of those entries or create a new entry. When you have chosen a rider, he or she will appear on this screen. You can then modify the record and select the events. Correct This Horse/Rider Name: Select this button to make spelling or other corrections to this rider s name or horse name. Do not use this button to sign up a different rider. If will overlay the original rider s database entry. Default Points Division: This is the default division for the rider s points. It is used for team events and may optionally be used for all events, regardless of what division the rider places in. Other Fees: These are amounts paid by the rider for other things than event entries, awards or memberships (like Stall Fees). There is another special category of fees defined by the user (shown as Exhibition Runs here). Update Show Entries from Database: Selecting this button will match all current show signups to the database to pick up any late updates. Used primarily to get birth dates, etc. Note, where necessary, if the birthday changed, divisions that are dependent on age will be re-assigned. Update Existing Rider in Show: Select this button to get a screen of all riders already signed up for the show. When you highlight a rider in the list and double click or press Select, that rider will appear on this screen. You can then modify the record and select the events. Copy a Rider (new horse): Select this button to get a screen of all riders in the database When you highlight a rider in the list and double click or press Select, that rider will appear on this screen with a new rider number and a blank horse name. You can then modify the record and select the events. Delete a Rider: Select this button to get a screen of all riders already signed up for the show. When you highlight a rider in the list and double click or press Select, that rider will appear on this screen. It will then confirm that you want to delete this rider. Recalculate All Age Divisions: Select this tab to recalculate which age divisions riders should be in. Useful when you set a new effective date or change several birthdays. Page 69
70 Get From FE: Select this tab to get the latest group of signups from the FastEnter web page. Print Riders: Select this tab to print a report showing all riders in this show. Credits: These are amounts credited to the rider (multiple horse discount, waiver of ground fee, etc.). Selecting (R) will add the rider to the event as a Regular rider (wants ribbons and awards). Fees are automatically updated. Selecting (P) will add the rider to the event as a Points Only rider (doesn t want ribbons and awards, but does want points). Fees are automatically updated. Selecting (C) will carry the time from another event to this event instead of the rider actually riding in this event. Selecting (S) will enter this rider into the Sidepot. Fees are automatically updated. Selecting All Day Regular will add the rider to all of the events as a regular rider (wants day awards) and charge the flat rate All Day (Regular) fee.. Selecting All Day Points will add the rider to all of the events as a Point Only rider (does not want day awards) and charge the flat rate All Day (Points) fee.. Selecting Local Club Membership indicates the rider has signed up for a membership in the local club. Selecting Local Club Year End Awards indicates the rider has signed up for local club year-end awards at this show. Selecting Rider is a Member indicates the rider is a club member and is entitled to discounts. This is different from Local Club Membership in that you re just indicating the rider is a member without collecting membership fees. Page 70

71 Team Signup This is where you sign up riders for team events. Riders must already be in the show. The screen looks like this: Page 71
72 Add New Team: Select this button to get a screen of all riders in the show. When you highlight a rider in the list and double click or press Select, that rider will be added to this team. This process continues until the correct number of team members are defined. Select Existing Team: Select this button to get a screen of all teams in this event. When you highlight a rider in the list and double click or press Select, that rider will appear on the screen. You can then make changes to the team. Delete A Team: Select this button to get a screen of all teams in this event. When you highlight a rider in the list and double click or press Select, that rider will appear on the screen and you will be asked to confirm the team deletion. Print Teams: Select this button to get an alphabetical list of teams, sorted by Team Name. The Team name is assigned when the team is created, but you can change it at any time. Update Team Entries from Rider Entries: Selecting this button will match all current team members to the show entries to pick up any late updates. Used primarily to get name corrections and update point divisions Replace Rider x : Select this button to get a screen of all riders already signed up for the show. When you highlight a rider in the list and double click or press Select, that rider will replace the rider identified by x on this team. Event Name: The name of this event. Team Division: The division for this team for placing purposes. Points will be given to each rider individually based on the rider s division. Riders per Team: the number of riders allowed on a team in this event. Total Fees: The Total Fees owed by this team. Page 72

73 Run Events, Winners List and Match Races This is where you actually run events, create announcer s lists, winners lists, high point, rider summary, match race lists and financial reports. The screen looks like this: Page 73
74 Drive Letter: The address of the flash drive on this computer. Select Action: Drawing for an event, creating announcer s list, winner s lists and running events is a two part process. First you select the action, then you select the event. For each action, various things will happen: Draw Ride Order: Selecting this button will do the draw for the event. Add to Draw: Selecting this button will add any additional riders or teams (late signups) to the current draw. Except for the Rider Number order option, new riders or teams will be added to the end of the division. With the Rider Number order option, riders or teams are inserted in rider number order within the division. Move Rider in Draw: Selecting this button provides the ability to move riders around within their division, by specifying a value (with + or -) of the positions to move. Note: You cannot move a rider out of their division/age group. Print Announcers List: Selecting this button will use the existing draw and print an announcer s list for the selected event. Create External Posting File: Selecting this button will create an external posting file to the flash drive for posting at another computer. Merge External Posting File: Selecting this button will copy the results from external posting back into the show file. Print Winner List: Selecting this button will print a winners list for the selected event. You will be asked if you want page breaks on each division. Jackpot Checks: Selecting this button will print jackpot checks and a check register for the selected event. Post Times Manually: Selecting this button allows you to type in the times for each rider or team as they run the event. Use Direct Timer Input: Selecting this button allows you to directly input the times from the timer(s) for each rider or team as they run the event. Recalculate Placings and Jackpots for All Events: There are times when you need to recalculate all of the placings and points for all of the events in the show. Instead of doing them individually, you can do them all at once with this button. Page 74
75 Match Race Qualifiers: If you are running Match Races after the normal events are over, this report lists the top (fastest) riders in the selected event. It can be used as a sign-off sheet for the riders to say whether or not they will compete in the Match Race. Match Race Signoff: If you are running Match Races after the normal events are over, this button allows you to update each qualified rider in the selected event with a flag saying they will or will not participate in the Match Race. Match Race Draw: If you are running Match Races after the normal events are over, this button allows you to draw the heat and lane assignments for the first heat in the selected event. It also creates a diagram showing the advancement from each heat. Run Match Race: If you are running Match Races after the normal events are over, this button allows you to run a Match Race (see the section on Match Racing). Page 75
: This shows the number of places you want the rider shifted.")
76 Move Rider in Draw This is where you a can move a rider to a different draw position within his or her division. Cannot be used for Team Events. The screen looks like this: Select Rider: Selecting this button allows you to specify which rider is to be moved. Places to Move (+ or -): This shows the number of places you want the rider shifted. Preceeding the number with a + means you want the rider moved down (later in the draw) that many positons. Preceeding the number with a - means you want the rider moved up (earlier in the draw) that many positions. Move This Rider: Selecting this button actually performs the move based on the parameters you supplied. Note: If you try to move a rider outside of their division/age group, the rider will be placed at the beginning of that division/age group (-) or at the end of that division/age group (+). Moving riders means that all other riders are shifted as well. Print a new announcer s list when you re done moving them around. Page 76

77 The screen looks like this: Manual Time Posting Time: This is where you type in the rider s time team s time for the event for each lane. If the rider or team is disqualified, enter the letter d or n. This will result in a time of 0.001, which the software recognizes as a disqualification. Pressing the enter key or selecting Next Rider will advance the screen to the next rider. Do not add penalty points (if any) to the time posted. The software will add them together when needed. If you are running two or more lanes, post all times before advancing. Penalty: Enter any penalty seconds associated with this ride. Do not adjust the raw time. The software will do that when needed. Next Rider: Selecting this button will advance the screen to the next rider or riders. Page 77
78 Select Rider: Select this button to get a screen of all riders or teams in this event. When you highlight a rider or team in the list and press Select, that rider will appear as the Lane 1 rider on this screen. This is how you run a rider or team out of order or rerun a rider a team. After the ride is complete, use Select Rider again to go back to the rider or team who was next on the list. Refresh Rider List: Select this button to reload the list of riders or teams in this event. This is used when you have added to the event after the draw and the event is running. Prior Rider: Select this button to back up to the rider or team who ran before this one. This is useful to check a time, rerun that rider, or enter a forgotten penalty. Print Posted Times: Select this button to get a report showing the times posted so far. This is useful to verify times posted against the hand written copy. One Lane, Two Lanes, Three Lanes, Four Lanes: These buttons allow you to dynamically change the number of lanes for the current Go. For example, if you were running 4 lanes and had 5 riders left, you might want to run them as 3 lanes, then 2 lanes to have a better competition. You might also want to use these buttons to control division breaks. Page 78
79 Direct Timer Input Time Posting The screen looks like this: Automatic Timer Start: Setting this button means that whenever you advance to the next rider or riders, you want the timer to start automatically. This overrides the Start Timer button below. It isn t necessary to use that button. Start Timer: Selecting this button will start the timer. It will wait for the rider or riders, if running multiple lanes, to run the event and then post the time. If you fail to press this button prior to each ride, no time will be recorded for the rider(s). Page 79
80 Test Timer: Selecting this button will test the timer. This is used to test the timer(s) before the riders start running. Follow the prompts on the screen to run the test. Stop Timer: Selecting this button will stop the timer. This is only used if the rider did not complete the event for some reason or there was a timer malfunction (dead battery, etc.). No time will be recorded for the rider. Time: This is where the timer fills in the rider s or team s time for the event. If the rider or team is disqualified, enter the letter d. This will result in a time of 0.001, which the software recognizes as a disqualification. If the rider or team has scratched, press the letter s. This removes the rider or team from the event entirely, so that they don t get any points. Pressing the enter key or selecting Next Rider will advance the screen to the next rider or team. Select Rider: Select this button to get a screen of all riders or teams in this event. When you highlight a rider or team in the list and press Select, that rider will appear as the Lane 1 rider on this screen. This is how you run a rider or team out of order or rerun a rider a team. After the ride is complete, use Select Rider again to go back to the rider or team who was next on the list. Refresh Rider List: Select this button to reload the list of riders or teams in this event. This is used when you have added to the event after the draw and the event is running. Prior Rider: Select this button to back up to the rider or team who ran before this one. This is useful to check a time, rerun that rider, or enter a forgotten penalty. Print Posted Times: Select this button to get a report showing the times posted so far. This is useful to verify times posted against the hand written copy. One Lane, Two Lanes, Three Lanes, Four Lanes: These buttons allow you to dynamically change the number of lanes for the current Go. For example, if you were running 4 lanes and had 5 riders left, you might want to run them as 3 lanes, then 2 lanes to have a better competition. You might also want to use these buttons to control division breaks. Page 80

81 Match Race Settings First you ll get a screen like this: Timer Port: The USB port where the timer console is plugged in. No Lights: If checked, no light kit is in use. Light Port: The USB port where the optional light kit is plugged in. Sound System Delay: This value is in seconds. The default value is 1. It s an attempt to compensate for the sound delay found in most PA systems. Some experimentation will find the correct value, but the objective is to sound the buzzer at the exact time it is legal to cross the timing line. When the settings are complete, go to the next page to run the Match Race. Page 81

82 You ll get a screen like this: Run a Match Race Page 82
83 Start Match Race Regular Event: This starts the system and the 15 second clock for a regular match race (beam is broken at the start and finish). Start Match Race Split Time Event: This starts the system and the 15 second clock for a split time match race (beam is broken at the start, intermediate crossover and finish). Test Lights and Reset Timers: Clicking this box resets the timer and optionally tests the light kit if it s installed. Stop Timers: (Malfunction) This button is used when there is some sort of malfunction in the timers or a problem in the arena and you have to restart the heat. No times are preserved. Diagnostic Display: Used by CHR to diagnose a problem. Display some internal settings. Page 83
.")
84 The screen looks like this: Check Writing Event: This is the name of the Jackpot event for which you are printing checks. Starting Check #: This is number of the first check you are printing. Write Payout Checks: Do this at the end of each Jackpot event, so that you write one check for each rider. It will only print checks for the current event (as defined on the main menu). Make sure you set the Starting Check number first. It will print 1-up (voucher) or 3-up checks, depending on the option you have set. Print One Check: There are times when you need to reprint a check. Selecting this tab will allow you to select a rider and print just the check for that rider. Print Check Register: Do this at the end of each Jackpot event to print a check register. Make sure you set the Starting Check number first. You can use this report to hand write your checks and/or for later entry into QuickBooks or other financial software. It can also be a handy sign-off sheet when paying in cash. Page 84

85 External Posting This icon is used at a secondary computer to run an event. The Main computer creates a flash drive and announcer s list. Both are brought to the secondary computer, the flash drive is restored, and the event is run there. When the event is complete, the flash drive is updated and returned to the Main computer, where it is merged back into the show file. The screen looks like this: Flash Drive Address: The address of the flash drive on this computer. Copy Flash Drive from Main: This function copies the flash drive from the Main computer to the hard drive on this computer. Post Times - Direct Input: This is the same function used on the Main computer to post times with direct timer input. Post Times - Manual Input: This is the same function used on the Main computer to post times with manual time input. Create Flash Drive for Main: This function updates the flash drive with the event results from this computer. It is then returned to the Main computer and merged back into the show. After that, winner and jackpot listings can be printed. Add Additional Riders from Main: This button adds additional riders to the draw on an external computer. After the secondary draw is done on the main computer, the Create External Posting File button is run and the flash drive is brought to this computer. Time posting is stopped briefly, this button is selected, and the additional riders are added to the show file on this computer. Then time posting is restarted. When time posting is restarted, it picks up where it left off. Page 85
86 Appendix A - Format of Extracted Show File Under Administrative Functions, there is the ability to create an extract of the show file for local reporting. The extracted file is in comma-delimited format, which is a standard format used by most spreadsheet and database programs to import and export data. The first record of the extracted file contains the data column headings, explaining what each field is. Appendix B - Format of Extracted Rider File Under Administrative Functions, there is the ability to create an extract of the Rider Database for local reporting. The extracted file is in comma-delimited format, which is a standard format used by most spreadsheet and database programs to import and export data. The first record of the extracted file contains the data column headings, explaining what each field is. Page 86
87 Appendix C - Timer Direct Input Setup The Gymkhana America software is compatible with all FarmTek Timers and the Thunderpaws Sport 3000 timer. To use the Timer direct input option, you must first get a PC interface cable (available from FarmTek) or a USB Interface (available from Thunderpaws). Installation Steps: 1. FarmTek only - If you have a serial port on your computer (9-pin), this is normally the COMM1 port. You will not need to install any of the FarmTek drivers. Simply plug the PC Interface cable into that port and to the Output port on the console. Then go to step 3. The COMM port number for step 3 will be If you do not have a serial port on your computer (most new laptops don t), you will need to install the Serial to USB interface drivers from FarmTek or the USB driver from Thunderpaws. Install them and make note of which Serial Port it will use (normally 3, 4 or 5). If you need to find out which port it is after installation, use the Start button to go to Settings->Control Panel->System->Hardware->Device Manager. You will see several categories of devices. Fine the one that says Ports. If there is a plus sign (+) in front of it, click on the plus sign (+) to expand the list of devices. Find the one that says Serial to USB (or similar wording) and make note of the COMM port number(s). Then go to step In the Gymkhana America Software, go to Definitions and Options. Find the value for each Timer Port and replace it with the appropriate COMM port number you found in step 1 or 2 (above). 4. In the Gymkhana America Software, go to Use Direct Timer Input Click on the Start Timer button, then break the timer beams. The Time field should agree with the time on the Timer Console. Page 87
88 Appendix D - Match Race Timer Setup The Gymkhana America Match Race software is compatible with the FarmTek Polaris Timers. You must get a PC interface cable (available from FarmTek). Installation Steps: 1. Follow FarmTek s instructions to set up Eye # 1 and Eye # 2. Make sure the eyes are labeled for Lane 1 and Lane Put the Polaris Console in TimeStamp Mode. 3. Make sure the indicators show both eyes are aligned correctly. 4. Make sure you follow the instructions to determine the correct port number for the timer. Page 88
89 Appendix E - Suggested Gymkhana Events Course Measurements and Patterns. This section provides Suggestions, Course Layouts and Patterns for 10 popular Gymkhana Events. They are only suggestions. There are literally hundreds of Gymkhana events. They are also known as Gaming Events and Play Day Events. In the following pages, certain symbols are used. Their meanings are: Materials. You will need the following materials to set up these courses poles and bases metal or plastic 55 gallon barrels 3. 2 timing cones or poles. 4. Chalk for marking the courses. 5. At least one 300 measuring tape. 6. Electronic or Stopwatch Timing System. Other References. There are several good Gymkhana and Gaming organizations that can be used for reference, rules and other course patterns. Some of them are: 1. California State Horsemen s Association California Gymkhana Association Western Horsemen of Oregon Patterned Speed Horse Association (Wash.) O-Mok-See - (National Saddle Clubs Association) - There are many more. Page 89
90 Big T Course Measurements and Standard Setup Dimensions may be adjusted to fit the arena. Course Pattern The rider may start with a left weave or a right weave. The diagram below shows the rider starting with a right weave. Page 90
91 Birangle Course Measurements and Standard Setup Dimensions may be adjusted to fit the arena. The first measurement (145 6 and 125 ) are CSHA course size. The second measurement (150 and 45 ) are CGA course size. Course Pattern The rider may start with a left weave or a right weave. The diagram below shows the rider starting with a right weave. Page 91
92 California Poles Sometimes known as Poles 1 Course Measurements and Standard Setup Dimensions may be adjusted to fit the arena. Course Pattern The rider may start with a left weave or a right weave. The diagram below shows the rider starting with a right weave. Page 92
93 Cloverleaf Barrels Course Measurements and Standard Setup Dimensions may be adjusted to fit the arena. Course Pattern The rider may start with the right or left barrel. The diagram below shows the rider starting with the right barrel. Page 93
94 Figure 8 Stake Course Measurements and Standard Setup Dimensions may be adjusted to fit the arena. Course Pattern The rider may start with a right turn or a left turn. The diagram below shows the rider starting with a right turn. Page 94

95 Keyhole Course Measurements and Standard Setup Dimensions may be adjusted to fit the arena. Note, the 100 measurement is to the center of the circle. Course Pattern The rider may turn right or left inside the circle. The diagram below shows the rider making a right turn. Page 95
Jackpot Rodeo Software
 Jackpot Rodeo Software Version 8.1 Copyright 2003-2017 by Charlie Horse Ranch Timing Systems, Inc. PO Box 697 Elverta, CA 95626 916-275-3277 Email: chrtsi@aol.com Web Site: www.charhorseranch.com Revised:
Team Rope America. Version 6.0
 Team Rope America Version 6.0 Copyright 2006-2017 by Charlie Horse Ranch Timing Systems, Inc. PO Box 697 Elverta, CA 95626 916-275-3277 Email: chrtsi@aol.com Web Site: www.charhorseranch.com Revised: 12/20/17
Barrel Race America Version 12.7
 Barrel Race America Version 12.7 Copyright 2004-2017 by Charlie Horse Ranch Timing Systems, Inc. PO Box 697 Elverta, CA 95626 916-275-3277 Email: chrtsi@aol.com Web Site: www.charhorseranch.com Revised:
Jackpot Rodeo - A Tutorial
 Jackpot Rodeo - A Tutorial The JRO software has a lot of options and variations, and can seem complicated to the first time user. Here is a fairly typical example of setting up and running a show that
Step 1. Set up the Defaults for your shows.
 In this Tutorial, we will set up a Rodeo for December 17, 2011 with Barrels, Bareback, Saddle Bronc, Bull Riding and Calf Roping events. Each event will be a 1-Go Only, and the contestants can indicate
XC2 Client/Server Installation & Configuration
 XC2 Client/Server Installation & Configuration File downloads Server Installation Backup Configuration Services Client Installation Backup Recovery Troubleshooting Aug 12 2014 XC2 Software, LLC Page 1
Fencing Time Version 4.3
 Fencing Time Version 4.3 Upgrading your Fencing Time Server October 2017 Copyright 2017 by Fencing Time, LLC. All rights reserved. Overview Periodically, a new version of Fencing Time is released. In most
SWIM MEET MANAGER 5.0 NEW FEATURES
 SWIM MEET MANAGER 5.0 NEW FEATURES Updated January 24, 2014 1 ABOUT SWIMMING MEET MANAGER 5.0 MEET MANAGER 5.0 for ming (SWMM) is HY-TEK's 6th generation of Meet Management software. Provides the very
USA Jump Rope Tournament Software User Guide 2014 Edition
 USA Jump Rope Tournament Software User Guide www.usajumprope.org Table of Contents Contents System Requirements... 3 System Conventions... 4 Phase 1 Tournament Pre registration Preparation... 5 Name Your
Integrated Sports Systems (ISS) Inc. Meet Management Suite
 Inc. Meet Management Suite") November 2010 Integrated Sports Systems (ISS) Inc. Meet Management Suite User Guide and Technical Document Version 2.0 Table of Contents Table of Contents... 2 General Concepts... 3 Installation Meet Management
November 2010 Integrated Sports Systems (ISS) Inc. Meet Management Suite User Guide and Technical Document Version 2.0 Table of Contents Table of Contents... 2 General Concepts... 3 Installation Meet Management
Online League Management lta.tournamentsoftware.com. User Manual. Further support is available online at
 Online League Management lta.tournamentsoftware.com User Manual Further support is available online at www.lta.org.uk/leagueplanner Contents Welcome... 3 Using this guide... 3 Further support?... 3 Publishing
Microsoft Windows Software Manual for FITstep Stream Version 4
 Thank you for purchasing this product from Gopher. If you are not satisfied with any Gopher purchase for any reason at any time, contact us and we will replace the product, credit your account, or refund
Software for electronic scorekeeping of volleyball matches, developed and distributed by:
 Software for electronic scorekeeping of volleyball matches, developed and distributed by: Developed for the rules of USports 2017-18 As adopted by Ontario University Athletics for Men s & Women s Volleyball
Dive Sheets & Running Events Meet Management Software Tutorial for EZMeet Version 3.1 revised 2/4/2006
 Dive Sheets & Running Events Meet Management Software Tutorial for EZMeet Version 3.1 revised 2/4/2006 Once you have events created in your meet you are ready to enter dive sheets and run your event. INCLUDED
Full-Time People and Registrations Version 5.0
 Full-Time People and Registrations Version 5.0 Full-Time People and Registrations Page 1 1.0 People 1.1 How to Add New League Administrators 3 1.2 How to Add Other New Administrators 4 1.3 How to Change
Division Data Coordinator Tasks
 Overall Responsibilities The division data coordinators have two major responsibilities. The first is to process and post scores and meet results following dual meets and the division relay carnival. The
GolfLogix: Golf GPS. User Guide for: iphone 3G & 3GS. Version 1.0. Software Release 1.0
 GolfLogix: Golf GPS User Guide for: iphone 3G & 3GS Version 1.0 Software Release 1.0 1 Table of Contents Topic Page Topic Page Getting Started Statistics Downloading the GolfLogix Application 4 Statistic
Software Manual for FITstep Pro Version 2
 Thank you for purchasing this product from Gopher. If you are not satisfied with any Gopher purchase for any reason at any time, contact us and we will replace the product, credit your account, or refund
Quick Start Guide. For Gold and Silver Editions
 Quick Start Guide For Gold and Silver Editions Table of Content Introduction... 3 Prerequisites... 3 Installation and Setup... 4 Download and Install QQEvolution 2... 4 Create Users... 8 Create Agent/CSR/Producer...
Horse Farm Management s Report Writer. User Guide Version 1.1.xx
 Horse Farm Management s Report Writer User Guide Version 1.1.xx August 30, 2001 Before you start 3 Using the Report Writer 4 General Concepts 4 Running the report writer 6 Creating a new Report 7 Opening
BVIS Beach Volleyball Information System
 BVIS Beach Volleyball Information System Developments in computer science over the past few years, together with technological innovation, has in turn stimulated the development of tailored software solutions
GolfLogix: Golf GPS. User Guide for: BlackBerry Curve. Version 1.0. Software Release , 8330, 8350i, 8800, 8820, 8830, 8900
 GolfLogix: Golf GPS User Guide for: BlackBerry Curve 8310, 8330, 8350i, 8800, 8820, 8830, 8900 Version 1.0 Software Release 1.0 1 Table of Contents Topic Page Topic Page Getting Started Statistics Downloading
Using the Sailwave Results Programme April 2016
 Using the Sailwave Results Programme April 2016 Background In 2016 the club decide to move their results service to a programme called Sailwave. This is a very simple little piece of free software (you
Team Manager's Manual
 Introduction: Team Managers Duties: Overview Team Manager's Manual Team Manager's Tasks Get your ScoreBook ID and Password from your League Administrator. Enter Your "Team Administration" Page Setting
How to Setup and Score a Tournament. May 2018
 How to Setup and Score a Tournament May 2018 What s new for 2018 As the rules change, the programmers must adjust the scoring program as well. Feedback from scorers also assist in providing ways to make
Club s Homepage Use this feature to return the club s website.
 The first time the golfer logs into the Internet Golf Reservation System, the member # is the club assigned golfer number, the default password is 1234. The golfer will automatically be transferred to
Mac Software Manual for FITstep Pro Version 2
 Thank you for purchasing this product from Gopher. If you are not satisfied with any Gopher purchase for any reason at any time, contact us and we will replace the product, credit your account, or refund
Setting up the Ingenico isc250 Pinpad via USB in Windows 8
 One Blue Hill Plaza, 16 th Floor, PO Box 1546 Pearl River, NY 10965 1-800-PC-AMERICA, 1-800-722-6374 (Voice) 845-920-0800 (Fax) 845-920-0880 Setting up the Ingenico isc250 Pinpad via USB in Windows 8 The
GN21 Frequently Asked Questions For Golfers
 Posting Scores (My Score Center) 1. Click on the Enter Score button to enter an adjusted gross score or click on the Enter Hole-By-Hole Score button to enter your score hole-by-hole. NOTE: to use the Game
Wickets Administrator
 Wickets Administrator Software For Managing Stored Value Wickets 01/08/2008 Product Details And Operating Instructions Overview This page describes each major function of Wickets Administrator in detail.
NVSL Divisional Relay Carnival procedures using Hy-Tek
 NVSL Divisional Relay Carnival procedures using Hy-Tek This document provides a basic guide for running Divisional Relay Carnival. All the teams in the Division must have already loaded their swimmers
For clarification or assistance with TDM-web or any USTA web-based application,
 TD # 1 Tournament Set Up Guidelines: Follow These Steps and TDM Q&A s - April 2014 Batch enter players & process entries on the sanction form. Then use TDM to enter tournament information. For clarification
RUNNING A MEET WITH HY-TEK MEET MANAGER
 SETTING UP THE MEET 1. A database setup for the current season can be found on the CCAA website www.ccaaswim.org this will have the events and other information for the meet setup already in place. 2.
Club s Homepage Welcome Club Calendar Logout Add a Request Play Date Requested Time Hole Selection # of Tee Times Break Link
 The first time the golfer logs into the Internet Golf Reservation System, the member # is the club assigned golfer number plus 1 for male and 2 for female, the default password is 1234. The golfer will
Setting Up the Ingenico isc250 Pinpad via USB
 One Blue Hill Plaza, 16 th Floor, PO Box 1546 Pearl River, NY 10965 1-800-PC-AMERICA, 1-800-722-6374 (Voice) 845-920-0800 (Fax) 845-920-0880 Setting Up the Ingenico isc250 Pinpad via USB The following
CONTENTS... 2 CONFIGURATION... 3 VENUE MANAGEMENT SETTING UP COMPETITIONS TEAM MANAGEMENT FIXTURING PUBLICATION...
 Contents CONTENTS... 2 CONFIGURATION... 3 VENUE MANAGEMENT... 12 SETTING UP COMPETITIONS... 14 TEAM MANAGEMENT... 19 FIXTURING... 20 PUBLICATION... 26 RESULTS... 27 REPORTING... 31 2 P a g e Configuration
ISS MMS Artistic Swimming
 ISS MMS Artistic Swimming Title page 1 Use this page to introduce the product by Integrated Sports Systems ()SS) Inc. This is "Title Page 1" - you may use this page to introduce your product, show title,
MyCricket User Manual
 MyCricket User Manual Club Tasks V 2.0, Last Updated: June 10 th 2009 Contents Page ADMINISTRATION TASKS... 3 1. Manage Your Association Details... 3 1.1. First Time Login... 3 1.2. Navigating the Administration
uemis CONNECT: Synchronisation of the SDA with myuemis
 uemis CONNECT: Synchronisation of the SDA with myuemis 1 What is myuemis? In myuemis, your private area on the Internet portal www.uemis.com, you can visualise your dives, manage your database and transfer
Competition Management
 Competition Management User Guide for the Basketball Network 2016 version 1.3 Table of Contents CONFIGURATION 4 Passport 4 Access via User Management 4 Club and Team Field Settings 5 Manage Competition
ALGE DIVE! ALGE. ALGE-TIMING GmbH & Co
 ALGE ALGE DIVE! ALGE-TIMING GmbH & Co Rotkreuzstrasse 39 A-6890 Lustenau Telephone: +43 5577-85969 Fax: +43 5577-85969 e-mail: office@alge-timing.com Internet: www.alge-timing.com Table of contents 1.
TRAP MOM FUN SHOOT 2011
 TRAP MOM FUN SHOOT 2011 Program Manual 2011 - Trap Mom Software - CYSSA Fun Shoot - Build 8 REQUIRED TO RUN THIS PROGRAM APPLE USERS: 1. OS X Mac Computer (Intel Preferred) 2. Printer (Laser recommended)
Steltronic StelPad User Guide
 StelPad User Guide Steltronic StelPad User Guide Contents Contents... 1 About StelPad and its Features... 3 StelPad System Elements... 3 StelPad Computer Integration with Focus... 4 Enable Custom Graphic
Use Backnine Bookie as the center of a charity event. Not only is it great fun, but its also a great way to help raise those much-needed funds.
 Backnine Bookie by MicroFest, Inc. Overview Backnine Bookie Overview Backnine Bookie is the perfect tool for running your golf club s tournament wagering. Save hours of time over manual methods! Open up
SIDRA INTERSECTION 6.1 UPDATE HISTORY
 Akcelik & Associates Pty Ltd PO Box 1075G, Greythorn, Vic 3104 AUSTRALIA ABN 79 088 889 687 For all technical support, sales support and general enquiries: support.sidrasolutions.com SIDRA INTERSECTION
For running only the scoresheet application without any video features only some very basic hardware / software requirements have to be fulfilled:
 Digital Scoresheet user manual Requirements For running only the scoresheet application without any video features only some very basic hardware / software requirements have to be fulfilled: Laptop, preferably
Group walks & events manager: Getting Started for Contributors
 2017 Group walks & events manager: Getting Started for Contributors Contact for further information and support: volunteersupport@ramblers.zendesk.com [Type text] Ramblers Charity England & Wales No: 1093577
Full-Time Cup Competitions Version 5.0
 Full-Time Cup Competitions Version 5.0 Full-Time Cup Competitions Page 1 1.0 Cup Competitions 1.1 How to Create a Cup Competition 3 1.2 How to Edit a Cup Competition (Name, Hide or Sequence) 7 1.3 How
The ICC Duckworth-Lewis-Stern calculator. DLS Edition 2016
 The ICC Duckworth-Lewis-Stern calculator DLS Edition 2016 (DLS2-2016) Installation and operating instructions Queries about program operation should be sent to: Steven.Stern@qut.edu.au 2016 International
[CROSS COUNTRY SCORING]
![[CROSS COUNTRY SCORING]](/thumbs/89/99405973.jpg "[CROSS COUNTRY SCORING]") 2018 The Race Director Guide [CROSS COUNTRY SCORING] This document describes the setup and scoring processes employed when scoring a cross country race with Race Director. Contents Intro... 3 Division
2018 The Race Director Guide [CROSS COUNTRY SCORING] This document describes the setup and scoring processes employed when scoring a cross country race with Race Director. Contents Intro... 3 Division
FireHawk M7 Interface Module Software Instructions OPERATION AND INSTRUCTIONS
 FireHawk M7 Interface Module Software Instructions OPERATION AND INSTRUCTIONS WARNING THE WARRANTIES MADE BY MSA WITH RESPECT TO THE PRODUCT ARE VOIDED IF THE PRODUCT IS NOT USED AND MAINTAINED IN ACCORDANCE
McKnight Hockey Association
 McKnight Hockey Association Electronic Evaluation Tool Manual 2013-2014 Table of Contents Introduction...3 Evaluation Tool...3 Login to OneClickIce...3 Evaluations...4 PROCESS...4 Evaluation Procedure...5
Diver-Office. Getting Started Guide. 2007, Schlumberger Water Services
 Diver-Office Getting Started Guide 2007, Schlumberger Water Services Copyright Information 2007 Schlumberger Water Services. All rights reserved. No portion of the contents of this publication may be reproduced
The Race Director. Race Director Go [RACE DIRECTOR GO] This document describes the implementation of Race Director Go with a beginning to end example.
![The Race Director. Race Director Go [RACE DIRECTOR GO] This document describes the implementation of Race Director Go with a beginning to end example.](/thumbs/80/81747710.jpg "The Race Director. Race Director Go [RACE DIRECTOR GO] This document describes the implementation of Race Director Go with a beginning to end example.") 2018 The Race Director [RACE DIRECTOR GO] This document describes the implementation of with a beginning to end example. Contents Intro... 3 1 Setup... 3 Combining Race Director Divisions... 3 Creating
2018 The Race Director [RACE DIRECTOR GO] This document describes the implementation of with a beginning to end example. Contents Intro... 3 1 Setup... 3 Combining Race Director Divisions... 3 Creating
[CROSS COUNTRY SCORING]
![[CROSS COUNTRY SCORING]](/thumbs/84/89721527.jpg "[CROSS COUNTRY SCORING]") 2015 The Race Director Guide [CROSS COUNTRY SCORING] This document describes the setup and scoring processes employed when scoring a cross country race with Race Director. Contents Intro... 3 Division
2015 The Race Director Guide [CROSS COUNTRY SCORING] This document describes the setup and scoring processes employed when scoring a cross country race with Race Director. Contents Intro... 3 Division
Golf Genius Software
 CARSON VALLEY WOMEN S GOLF CLUB Golf Genius Software On-Line User Manual Kathy Belvel 6/3/2018 User step by step instructions for accessing and using the full array of capabilities available in the Golf
Sanctioning Events with USA Triathlon
 Welcome to USA Triathlon s new sanction system. Please read below for instructions on how to sanction a new event with USA Triathlon, copy events, and other important updates. Race Directors will use their
ELIMINATOR COMPETITION DRAG RACE Program Manual Firm Ver 4.11
 ELIMINATOR COMPETITION DRAG RACE Program Manual Firm Ver 4.11 The Portatree Eliminator Super 2000 Competition Track Timer can be used with an IBM Compatible Personal Computer connected through Com Port
STAT-O-MATIC FOOTBALL
 Version 2 STAT-O-MATIC FOOTBALL Version 2 TABLE OF CONTENTS 1. GETTING STARTED...2. 2. ENTERING, EDITING, IMPORTING ROSTERS, SWAP #...3. 3. SETTING UP / LOADING A GAME FILE... 7. 4. STARTING A GAME...
Quintic Automatic Putting Report
 Quintic Automatic Putting Report Tutorial www.quintic.com Introduction The Quintic Automatic Putting Report is designed to work as an add on to our premier Quintic Biomechanics analysis software. Auto
CONSUMER MODEL INSTALLATION GUIDE
 CONSUMER MODEL INSTALLATION GUIDE System requirements Windows System Requirements To use your TOMI and its software, your system should have: A Microsoft Windows compatible PC with a Pentium IV processor
szen Eighteen Full Manual 2010 szen Corp
 szen Eighteen Full Manual I Full Eighteen Manual Table of Contents Part I Introduction 1 Part II Tee Sheet Operation 1 1 Using the... Tee Sheet 1 Booking Reservations... 2 Booking Reservations... for Mem
Hot Springs Village Member Portal User Guide
 HOW TO USE THE MEMBER PORTAL: CHECK YOUR ACCOUNT BALANCE, MAKE ACCOUNT PAYMENTS, BOOK GOLF OR TENNIS RESERVATIONS, REPORT VISITORS TO THE EAST AND WEST GATES AND MUCH MORE. Table of Contents Portal Options...
FIRST Tech Challenge Scorekeeper Manual Part II: Scoring System Guide (For Non-League Event Types)
") 2017-2018 FIRST Tech Challenge Scorekeeper Manual Part II: Scoring System Guide (For Non-League Event Types) 2 FIRST Tech Challenge Scoring System Guide (Non-League Events) Sponsor Thank You Thank you
2017-2018 FIRST Tech Challenge Scorekeeper Manual Part II: Scoring System Guide (For Non-League Event Types) 2 FIRST Tech Challenge Scoring System Guide (Non-League Events) Sponsor Thank You Thank you
PRODUCT MANUAL. Diver-Mobile for Android
 PRODUCT MANUAL Diver-Mobile for Android Contact details: Van Essen Instruments B.V. Van Essen Instruments - Canada Delftechpark 20 630 Riverbend Drive, Suite 100 2628 XH Delft Kitchener, ON, The Netherlands
STRIDES USER GUIDE Version September 2014
 STRIDES USER GUIDE Version 3.0 - September 2014 NEW YORK ROAD RUNNERS YOUTH AND COMMUNITY SERVICES 156 W. 56 th Street, New York, NY 10019 youngrunners@nyrr.org 646-758-9651 Copyright 2014 by New York
Ranch Sorting National Championships Producer Information Packet
 Ranch Sorting National Championships Producer Information Packet Ranch Sorting National Championships PO Box 1 Wellington, CO 80549 Phone: 970-897-2901 Fax: 970-897-2921 Email: Info@RSNC.US Web Site: www.ranchsorting.com
Laybotpro Automated Betfair Bot. LayBotPro User Manual
 LayBotPro User Manual LayBotPro Automated Betfair Bot 1 Contents Legal Stuff...3 Introduction...4 Pre-Requisites...4 Quick Start...5 Getting Started...6 LayBotPro Settings...9 UK Wallet... 10 Exposure...
Registering for ICC Competitions
 What s in this guide 1. Registering on the system 2. Adding athletes 3. Adding teams 4. Entering a competition 5. Liability forms 6. Spectator tickets & coaches passes 7. FAQs 1. Registering on the system
Race Screen: Figure 2: Race Screen. Figure 3: Race Screen with Top Bulb Lock
 Eliminator Competition Stand Alone Mode - Instruction Manual Main Menu: After startup, the Eliminator Competition will enter the Main Menu. Press the right/left arrow buttons to move through the menu.
USER MANUAL April 2016
 USER MANUAL April 2016 Introduction TIEBREAK is a program for real time volleyball game data entry and statistical analysis. Extremely easy to use, TIEBREAK makes it possible to reliably and quickly enter
How to run a club night
 How to run a club night utilising TM and MM Swimming NSW wishes to acknowledge the author of this document Ms. Jo Wazny [This document is meant to get you started running your club night, it assumes some
FOOTBALL WEST. Sports TG User Guide. Club Administrators
 FOOTBALL WEST Sports TG User Guide Club Administrators CONTENTS What is Sports TG 3 New Users 4 Current Sports TG Users 5 User Management 8 Give Team Level Access 9 Deleting a User 11 Team Entry 13 Navigating
REMOTE CLIENT MANAGER HELP VERSION 1.0.2
 VERSION 1.0.2 MERCHANT SALES: 800-637-8268 New Merchant Accounts PARTNER PROGRAMS: 800-637-8268 New and existing partnerships CUSTOMER CARE: 800-338-6614 Existing merchant account support Statements and
ScoreKeeper tm. ~ Software for Golf ~ for Microsoft Windows 98 through Windows 7. User's Guide
 ScoreKeeper tm ~ Software for Golf ~ for Microsoft Windows 98 through Windows 7 User's Guide March, 2011 Copyright Mark II Systems. Long Valley, N.J., USA 908-850-5252 www.scorekeeper.com Installation
MIDWEST BARREL RACING ASSOCIATION RULES AND REGULATIONS 2015
 NAME: The name of the organization will be Midwest Barrel Racing Association. Also known as, and herein after referred to, as the MBRA. PURPOSE: The purpose of the MBRA is to promote equine activity in
Swing Labs Training Guide
 Swing Labs Training Guide How to perform a fitting using FlightScope and Swing Labs Upload Manager 3 v0 20080116 ii Swing labs Table of Contents 1 Installing & Set-up of Upload Manager 3 (UM3) 1 Installation.................................
Hot Springs Village Member Portal User Guide
 Contents Portal Options... 2 Portal Display:... 2 MAIN Options:... 2 E-COMMERCE Options... 2 Annual Registrations... 2 Pets... 2 Boats... 3 Carts... 3 Vehicles... 3 GHIN... 4 Annual Passes... 4 My Transactions...
DIVE MEET SCORING INSTRUCTIONS. Day before meet
 DIVE MEET SCORING INSTRUCTIONS Day before meet Physical set up Set up registration/scoring table #1 on 1 meter side and scoring table #2 on 3 meter side of diving well, judges chairs, and award stand as
3. Select a colour and then use the Rectangle drawing tool to draw a rectangle like the one below.
 Pong Game Creating the Bat 1. Delete the cat sprite. 2. Click the Paint new sprite button. 3. Select a colour and then use the Rectangle drawing tool to draw a rectangle like the one below. 4. Click the
Table of Content IMPORTANT NOTE: Before using this guide, please make sure you have already set up your settings in
 Quick Start Guide Table of Content Introduction... 3 Prerequisites... 3 How to Open QQEvolution 2... 4 How to do Carrier Downloads... 5 Locating a Client in QQEvolution 2... 7 Adding a New Client... 8
Apple Device Instruction Guide- High School Game Center (HSGC) Football Statware
 Football Statware") Apple Device Instruction Guide- High School Game Center (HSGC) Football Statware Getting Started 1. Download the app on your Apple device a. Open the app store b. Search for Digital Scout, Inc. c. Locate
Apple Device Instruction Guide- High School Game Center (HSGC) Football Statware Getting Started 1. Download the app on your Apple device a. Open the app store b. Search for Digital Scout, Inc. c. Locate
Summer Session 2014 Match Results Entry and Verification Instruction Manual
 Summer Session 2014 Match Results Entry and Verification Instruction Manual Welcome to the Summer 2014 season of the New Haven Dart League! As was mentioned in the welcome letter, the League uses yourleaguestats
Greater Portland City League Tennis FAQ. Table of Contents
 Greater Portland City League Tennis FAQ Table of Contents CAPTAIN'S PAGE... 2 Where is the Captain's page?... 2 Where do I enter scores?... 2 Where are the team statistics?... 2 Where is the substitution
User Help. Fabasoft Scrum
 User Help Fabasoft Scrum Copyright Fabasoft R&D GmbH, Linz, Austria, 2018. All rights reserved. All hardware and software names used are registered trade names and/or registered trademarks of the respective
Access will be via the same Player Registration tab via the Player Registrations Officer role section.
 The process for registering a player via the Whole Game System Portal requires input from the club, player, league, and in some instances the County FA. Once the league has confirmed the set-up process
GN21 Frequently Asked Questions For Golfers
 Customer Support We are dedicated to offering you the best customer support possible. Our goal is to respond to your requests within 24hrs. 1. On the www.ngn.com homepage there is link labeled Help which
USA Wrestling Membership System. User Guide
 USA Wrestling Membership System User Guide September 2017 Table of Contents Introduction... 2 Creating An Account... 3 Why do I need an account?... 4 What happened to my data from the old system?... 4
INSTRUCTIONS FOR USING HMS 2016 Scoring (v1)
") INSTRUCTIONS FOR USING HMS 2016 Scoring (v1) HMS 2016 Scoring (v1).xlsm is an Excel Workbook saved as a Read Only file. Intended for scoring multi-heat events run under HMS 2016, it can also be used for
INSTRUCTIONS FOR USING HMS 2016 Scoring (v1) HMS 2016 Scoring (v1).xlsm is an Excel Workbook saved as a Read Only file. Intended for scoring multi-heat events run under HMS 2016, it can also be used for
WEST POINT GOLF CLUB USING THE GOLFSOFTWARE PROGRAM FOR THE DRAW AND SCORING
 USING THE GOLFSOFTWARE PROGRAM FOR THE DRAW AND SCORING The new software is made up of 3 modules - Handicap, Tournament and Player Portal. Note that the Handicap module and the Tournament module have separate
Tournament Manager: Running a VEX IQ Event - Beginner
 Tournament Manager: Running a VEX IQ Event - Beginner Indiana IQ Event Partner Workshop Agenda 1. Main Window a. Once i. The Main Window has a standard menu bar. ii. A series of tabbed pages filling the
2017 NRHA Futurity Conditions
 Page 1 of 18 2017 NRHA Futurity Conditions 1. To be held November 23-December 2, 2017 in Oklahoma City, OK State Fair Arena. 2. For three (3) year-old horses Open to all breeds Entry must be named and
Version 3.1.0: New Features/Improvements: Improved Bluetooth connection on Windows 10
 Version 3.1.0: Improved Bluetooth connection on Windows 10 ***Important notice for Mac Users: Upgrading from Shearwater Desktop 3.0.8 to 3.1.0 will not cause issues. Upgrading from any 2.X.X to any 3.X.X
TOURNAMENT TEAM REGISTRATION INSTRUCTIONS:
 TOURNAMENT TEAM REGISTRATION INSTRUCTIONS: A Tournament Team is registered and rostered by Maryland State Youth Soccer Association (MSYSA) for the sole purpose of participation in a tournament. The tournament
Hydrocephalus Association WALKs Frequently Asked Questions about registering to participate, WALK participant web pages, WALK teams and more!
 Hydrocephalus Association WALKs Frequently Asked Questions about registering to participate, WALK participant web pages, WALK teams and more! I. Basic Information about HA WALKS A. Is there a fundraising
SEC. 1.0 GENERAL RULES...3 SEC. 2.0 RATING EVENTS...3
 GYMKHANA COURSES SEC. 1.0 GENERAL RULES...3 SEC. 2.0 RATING EVENTS...3 2.1 Big T...3 2.2 Birangle...4 2.3 Cloverleaf Barrels (table 1)...4 2.4 Skill Barrels...5 SEC. 3.0 NON RATING EVENTS...5 3.1 Cloverleaf
GYMKHANA COURSES GC 1
 GYMKHANA COURSES SEC. 1.0 GENERAL RULES... 3 SEC. 2.0 RATING EVENTS... 3 2.1 Big T... 3 2.2 Birangle... 4 2.3 Cloverleaf Barrels (table 1)... 4 2.4 Skill Barrels... 5 SEC. 3.0 NON RATING EVENTS... 5 3.1
2017/2018 Club Director Club Administrator Instructions
 2017/2018 Club Director Club Administrator Instructions These instructions will help you build the teams in your club for the current season. Before you are granted Club Administration access, you must
League Registration for New Leagues
 League Registration for New Leagues Congratulations and thank you for joining Slo-Pitch Ontario for the upcoming season! This Guide has been designed to help guide you through our online registration process
The Complete 100 Day Dash Guide Updated May 7, 2013
 The Complete 100 Day Dash Guide Updated May 7, 2013 This guide covers the following topics (click the links to read more): Official Rules Frequently Asked Questions (FAQs) How to Register for the Dash