JAMESTOWN-YORKTOWN FOUNDATION Jamestown Settlement Maritime Program. Crew Training Manual
|
|
|
- Beverly Douglas
- 5 years ago
- Views:
Transcription


1 JAMESTOWN-YORKTOWN FOUNDATION Jamestown Settlement Maritime Program Crew Training Manual
2 JAMESTOWN-YORKTOWN FOUNDATION Crew Training Manual Written by: Capt. Eric A. Speth with assistance from: Todd Egnor Gene Bjerke Ron Lippert Ken Hill Final Revisions MARCH 22, 2006 Second Revision December 2006 Jamestown-Yorktown Foundation P.O. Box 1607 Williamsburg, Virginia Phone Fax
3
4 Table of Contents CHAPTER 1 Masts, Yards, Rigging, and Sails Introduction 1 Standing Rigging.. 2 Shouds Stays Backstays Sails and Running Rigging...3 Belaying Plan CHAPTER 2 Basic Seamanship Safety Precautions With Rope..6 Belaying Coiling and Stowing...11 Flaking A Line For nning...12 Knots Overhand Knot Round Turn and Two Half Hitches Single or Double Sheet Bend. 13 CHAPTER 3 Setting and Handling Sail Working Aloft Safety Procedures For Working Aloft..16 Loosing Sail Making Sail.17 To Set a Course...17 To Set a Topsail To Set the Mitzzen. 19 To Dip the Mizzen To Set the Spritsail.. 20 Taking In Sail To Take In a Course To Take In a Topsail...21 To Take In the Mizzen To Take In the Spritsail...22 To Furl a Course Spritsail and Mizzen To Furl a Topsail Bowline Gasket Knot. 14 Gasket Coil Hitch. 14
5 CHAPTER 4 Sail Maneuvers General Priciples of Working a Ship 25 Bracing and Trimming the Yards. 26 Common Sail Handling Commands 26 Points of Sail...28 Tacking...28 Wearing.. 29 CHAPTER 6 Anchoring and Docking Anchoring.. 37 Letting Go the Anchor Weighing Anchor Mooring. 40 Orders For Crew Working Mooring Lines..41 CHAPTER 5 Emergency Procedures Station Bill.. 31 Firefighting Procedures Collision, Holes in the Hull.. 32 Ship Abandonment and Hypothermia..33 Man Overboard CHAPTER 7 Ship Operations Lowering and Hoisting the Boat Serving as Lookout. 44 Steering Steering Commands Aids to Navigation.. 47 Emergency Station Bill. 34 Appendix A: Dictionary of Sea Terms...49 Appendix B: History and Interpretation...69 Appendix C: What To Bring On A Voyage

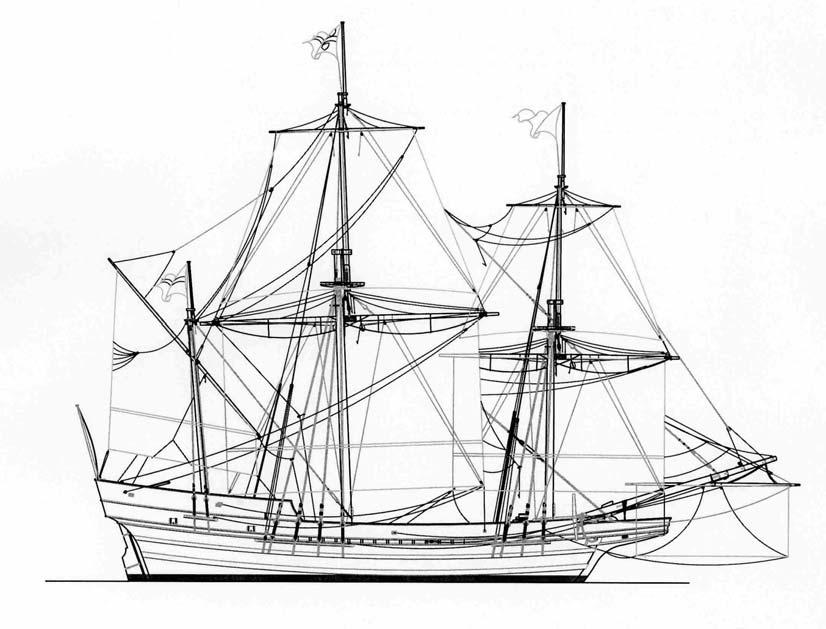
6 CHAPTER 1. MASTS, YARDS, RIGGINING, AND SAILS Chapter 1 Masts, Yards, Rigging, and Sails Learning Objects: Name Parts of Masts and Yards, Sails, Standing Rigging, and Running Rigging Name Sails Understand Layout of Decks Locate Running Rigging Belaying Plan Introduction E arly seventeenth century English merchant ships displayed elements of sailing ships from throughout Europe. In the Mediterranean, medieval European sailors adopted a type of sail developed by the Arabs. This was a triangular sail that was laced to spars along the bottom and the leading edge. Such a sail allows a ship to sail fairly close to the wind and to maneuver well. The English named this sail lateen after its Latin origin. Medieval ships from northern Europe, like those of the Vikings, had square sails that provided forward motion downwind, but did not lend themselves to sailing close to the wind or maneuvering. To allow square sails to work more efficiently closer to the wind, sailors rigged bowlines. These are lines attached to the leech, or vertical edge, of a square sail and lead forward. Hauling the weather bowline tight allowed square-rigged ships to sail closer to the wind. Susan Constant and Godspeed are three-masted ships setting square sails on the bowsprit and fore and main masts and a fore-and-aft rigged lateen sail on the mizzen mast. This sail plan is known as a bark rig. The lower masts, topmasts, bowsprit and yards are solid wood and are all categorized as spars. The 1
7 CHAPTER 1. MASTS, YARDS, RIGGINING, AND SAILS three masts differ in size, the main mast being the largest and tallest reaching nearly 100 feet off the water. Yards and sails are named for their respective masts; for example: Fore mast fore yard, fore course. Main topmast main topsail yard, main topsail. The spritsail is a small square sail set on a yard beneath the bowsprit. It serves as a balancing sail to the lateen mizzen, which is normally set at the after end of the ship. The spritsail counteracts the ship s tendency to turn into the wind and is important when sailing close to the wind. The triangular jib eventually superseded this sail. The foremast sets two sails. The lower sail is the fore course and the upper sail is the fore topsail. (Note: Discovery has no foremast.) Due to their forward position and turning effect, sails on the foremast can cause the bow to fall off the wind. The fore sails are especially useful in tacking and wearing maneuvers. The main mast also sets two sails: a course and a topsail. These sails are close to the ship s center of rotation and do not substantially affect maneuvering with all sail set. The mizzen mast sets the lateen sail. The lateen, a narrow, three-sided sail, sets fore and aft on a long yard. This sail acts to balance the force of the sails set on the fore mast and bowsprit. Like the spritsail forward, the lateen s distance from the center of rotation makes this a useful steering sail. Acting like a weathervane, the lateen helps to bring the bow into the wind when desired. As a fore and aft sail, this sail is set on the leeward side of the mast to prevent chafe on the sail and mast. Standing Rigging In a sailing vessel there are two types of rigging: 2
8 CHAPTER 1. MASTS, YARDS, RIGGINING, AND SAILS Standing rigging supports the masts Running rigging is used to control the yards and sails. Once set up, standing rigging is only subject to minor adjustment while running rigging is constantly in use when making sail, trimming, and taking in sail. Pieces of standing rigging are named for the respective spars they serve: main mast main shrouds; fore topmast fore topmast stay, etc. There are three types of standing rigging: shrouds, stays, and backstays. Shrouds A mast is supported in an athwartship direction (to the sides) by shrouds which run from near the top, called the hounds, of the mast to chain plates on the outside of the hull opposite the mast. The lower ends of shrouds have blocks of wood called deadeyes turned-in which allows for tensioning by means of lanyards passed through the deadeyes. Several shrouds are used, spaced about two feet apart, to take the heavy strain on the masts exerted by large sails. Futtock shrouds provide support for the topmast shrouds by transferring the strain to the lower shrouds around the edge of the tops. Climbing over the futtock shrouds is one of the most challenging tasks when working aloft on the topsails. Ratlines are light lines tied across the shrouds to create a rope ladder to allow access aloft for work in the rigging and on the yards. Stays Stays are used to provide support for the mast in a fore-and-aft direction. The stays are led from the masthead forward to the mast ahead of it or to the bowsprit or longhead. They provide nearly all of the support for the masts when the sails are aback. Deadeyes are turned in to stays to allow for tensioning. Backstays Backstays are fitted to the topmasts to provide support against the pressure exerted by the sail when sailing downwind. Backstays are leds from the topmasts to the deck and are adjusted by a block purchase. Sails and Running Rigging The sails are manufactured from an extremely durable woven Dacron cloth similar in look and feel to canvas. 3
9 CHAPTER 1. MASTS, YARDS, RIGGINING, AND SAILS The parts of a sail are: Head: Top of the sail. It is attached to the yard with light lines known as robands. Earring: Upper corners used to fasten the sail to the yardarm, or end of the yard. Leech: The side edges of the sail. Foot: The bottom of the sail. Clew: The lower corners of the sail. Bunt: The middle section of a square sail. The sails are controlled by means of running rigging. All rigging that reeves through blocks and is used in hoisting, lowering or trimming sails or yards is known as running rigging. Running rigging gear can be grouped by function and is located at pin rails and masts in an orderly fashion. As with the standing rigging, individual pieces of rigging take the name of the mast or sail they serve (e.g., fore course fore course clew garnet; main topsail main topsail halyard, etc.). The major pieces of running rigging used to control the sails are: The halyard is a line or tackle used for hoisting and lowering yards and sails. The heavy course yards are also hoisted by the jeer. The tack is used on the course and mizzen. On a square sail it is the line used to haul the weather clew forward and down. On the lateen mizzen, the tack hauls down the lower forward corner of the sail. The sheets attach to the clews of the sails and sheet the sails home, i.e. they haul the clews of a course, spritsail or mizzen down and aft toward the deck, and the topsail clews down to the yardarm below it. The bowline is a line that leads forward from a bridle on the leech of the course or topsail. 4


10 CHAPTER 1. MASTS, YARDS, RIGGINING, AND SAILS When hauled in hard, bowlines keep the weather edge of the sail taut and steady when the ship is sailing close-hauled to the wind. On the mizzen yard, the bowline is used to trim the sail by adjusting the angle of the yard to make the most of the wind. The clew line also attaches to the clew of the sail, but it opposes the downward pull of the sheet. The clew garnet is the clew line of a course. Clew lines lead up to the yard and are hauled when taking in sail. The buntline is secured to the foot of the sail and is used for hauling up the body of the sail when taking in sail. The martnet attaches to a bridle in the middle of the leech. It hauls the leech of the courses up to the yard for furling. Similar to the martnet, the leech line leads from the middle of the leech and hauls the leech of the topsail up to the yard for furling. The foot brail hauls the foot of the mizzen sail up to the yard. are: The remaining pieces of running rigging are used primarily to control the yards. The major pieces Braces attach to the ends of the yards and brace, or swing the yards at different angles to the fore and aft line of the ship to make the most of the direction of the wind in relation to the ships course. The lifts are lines leading from the yardarms to the mast head. Lifts support and move the ends of the yard in an up and down direction. When the yard is not adjusted to the horizon, it is said to be cockbilled. 5
11 CHAPTER 1. MASTS, YARDS, RIGGINING, AND SAILS Belaying Plan Susan Constant has nearly 100 lines, Godspeed has about 60, and Discovery has almost 40. All these lines have a purpose in the operation of the ship and the new sailor must learn the location of each. Knowing the location of lines allows for the safe operation of the ship. Tending the wrong line can cause damage to the ship or injury to others. Study the pin rail diagram until you feel confident that you can correctly identify any line on the ship and go to it when asked. The accompanying pin rail diagrams will provide you with the location of the pins or cleats for each of the lines. Belaying Plan for Discovery 6

12 CHAPTER 1. MASTS, YARDS, RIGGINING, AND SAILS Belaying Plan for Godspeed 7

13 CHAPTER 1. MASTS, YARDS, RIGGINING, AND SAILS Belaying Plan for Susan Constant 8
14 CHAPTER 2. BASIC SEAMANSHIP Chapter 2 Basic Seamanship Learning Objectives: Belay a line to a belaying pin, cleat and kevel Establish a proper lead for belaying Coil and stow lines Flake a line ready for running Understand safety precautions with rope Tie the following knots: Overhand knot Figure-eight knot Rolling hitch Double sheet bend Bowline Timber hitch Gasket coil hitch Round turn and two half hitches Safety Precautions With Rope Never stand in the bight of a line. Coil right-hand-lay line clockwise. When surging around bitts cleats or capstan, take off enough turns so the line will not jerk but pay out smoothly. Do not drag line over sharp or rough objects. Use chafe gear where the line passes over rough, hard surfaces; or anywhere it might rub. Be sure loads are within safety parameters; then apply the load slowly and carefully. Since snap-back action is inevitable when a line parts under tension, never stand in the direct line of pull. 9


15 CHAPTER 2. BASIC SEAMANSHIP Keep fingers and hands at least one foot away from blocks and pins to prevent injury. Never take a turn around your hand, wrist or other body part to help pull on a line. You may need to let go of a line quickly and this may prevent you from protecting yourself. Ask for help with heavy line loads. Belaying A few basic elements are required for belaying: A fair lead Control Security Ease of casting off Ability to surge When a line is led to a belaying pin or cleat, it should be led with a fair lead. A fair lead allows the line to approach the pin or cleat in such a way that it does not cross over itself when applying the figureeight turns to secure the line. A foul lead may cause the line to jam, making it difficult to untie. After a fair lead has been established, belay, or secure, a line by taking a turn under the pin or around the end of the cleat opposite to the direction of pull. Then take a turn around the other end of the pin or cleat from the same side as the line comes off the first end. Continue by taking a total of three figure-eight turns around the pin or cleat for security. All the turns will be made from the same side of the pin or cleat. To prevent the turns from coming loose, make a half hitch in the last turn. In a properly made half hitch, the running part of the line will lie under the last wrap and alongside the next-to-last wrap. Lines belayed or made fast to kevel cleats do not receive a hitch. This is especially important for lines such as sheets and dock lines. Other lines that do not receive a hitch are lines that are not under load when sails are set: 10

16 CHAPTER 2. Clewlines Leechlines BASIC SEAMANSHIP Buntlines Martnets Brails When slacking away a line under load, do not just flip off the turns. Keep a little tension on the part of the line you are holding as you undo the figure-eight turns to maintain control of the force on the line. Leave the last turn on the pin or cleat to maintain control and be able to surge the line if necessary. For your personal safety, always keep hands and fingers well clear of pins and cleats when surging a line that is under load. Coiling and Stowing Most of the line used aboard ship is three-strand rope. All of the three-strand line used in the running rigging is right-hand-laid line. This means the strands, the three parts that make up the line, spiral to the right. This is important to know when making a coil. Right-hand-laid line is coiled with the sun, or clockwise. If it is coiled counterclockwise, the lay of the strands tightens when the line is uncoiled. This results in kinks and twists that may damage the line. Most of the line used aboard ship is heavy enough or long enough that it is not comfortable to coil in your hand and must be coiled on deck before hanging on a pin. Begin coiling near where the line has been belayed, coiling clockwise toward the end of the line. Make the loops large enough so that there will be the fewest total turns in the coil, but small enough that the line won t drag on deck when the coil is hung on a pin. The hung coil should allow a deck brush to pass under it. To hang a coil on a pin, pick up the coil and reach through the center of the coil near the top to grab a bight of line near where it is belayed. Pull the bight of line through the coil, give the bight a counterclockwise twist or two and hang the twisted bight over the top of the belaying pin or horn of a cleat. At times it is acceptable to forego the security of this method for hanging up a coil. Times when you may simply coil the line over the top of the pin may be when sails are set and we are short tacking or constantly maneuvering. The mast captain will provide guidance on the method to use. When preparing to use a coil of line, lay it on deck with the standing part, or part closest to where the line is belayed, face up. Check to make sure that the bitter end is not twisted within the coil (it is helpful to have the end sticking out from under the coil) and that there are no snarls in the loops of the coil. If the line is under load, follow the instructions for maintaining control of a line in the section on belaying, above. 11


17 CHAPTER 2. BASIC SEAMANSHIP Flaking A Line For Running Flaking a line is laying it down on deck so it is ready for running. The line is laid down in the same manner as for coiling, except that it is laid out in long flat bights, one alongside the other, instead of in round coils. The loop forming the turn at the end of each bight is laid so that the part that will run out first is on top. This allows the line to run off easily with little chance of fouling or kinking on itself. Knots Many different knots have evolved for use in different situations. However, a knot that is good in one situation may not be appropriate when used for a different purpose. Given this, it is in your best interest to have a range of knots to choose from and be able to match the knot, bend, or hitch to the particular circumstance. A knot in its broadest sense includes all complications in a rope except snarls and kinks. A bend unites two rope ends. A hitch makes a rope fast to another object. Since many of the knots you tie will secure sails, parts of the rig, or the ship to the dock, be sure the knot is formed properly and drawn up tightly to ensure the security of the sails, rig, fellow crew, and the ship. For tying knots, there are three parts of the line: The standing part is the part that does not move. The working part, or running part, is the section used for tying the knot. The bitter end is the end of the rope (i.e. the part that would be made fast to the bitts). Overhand Knot The overhand knot is the basis for many knots. It is simple to tie and difficult to untie after being placed under strain. It has its place only in the formation of other knots and generally should not be used by itself. To tie, make a loop in a line and pass the running end through the loop The figure-8 knot is a bulky knot used as a stopper to prevent the end of a line from running out of a block. It is preferred to the simpler overhand knot because it is larger and easier to untie. To tie, make an overhand loop (the running part passing above the standing part) in the end of a line. Pass the end behind the standing part, and then back down through the loop from above. 12


18 CHAPTER 2. BASIC SEAMANSHIP Round Turn and Two Half Hitches The combination of the round turn with two half hitches may be used in a ring or around a spar or sheer pole. The round turn distributes strain and chafe across a greater number of rope fibers than a single turn would. The two half hitches provide jam-resistant security. Rolling Hitch The rolling hitch is one of the most useful and most important hitches used on deck. It can be tied close to an object instead of half hitches or it can be made around rings, spars, other ropes or even tied back on itself. The rolling hitch is always used for passing a stopper. It is suited to either perpendicular or lengthwise pull and will hold as long as there is a strain. It is easy to adjust if the strain is eased. To tie, make two turns in the direction of the strain, and then tie a half hitch on the side of the turns away from the strain. If the material is slippery, tie a midshipman s hitch. This is a variation made by jamming the second turn over the first. It has a tighter grip but is more difficult to adjust. Either variation can have a slippery hitch substituted for the last half hitch used to finish off this knot. Single or Double Sheet Bend A bend is a way to tie two pieces of line together. The origin of the sheet bend is presumably from the original use of bending the sheet to the clew of a sail. The formation of the sheet bend is very similar to the bowline. To tie a sheet bend; bend one line into a U shape, take the end of the second line and pass it up through the U, then around behind both parts of the U, then back around the front and under the part that comes up from beneath (the standing part ). To double the sheet bend, take the running part around behind again and under the standing part beside and below the first pass. Bowline The bowline is the knot used for putting a loop in the end of the line. It can neither slip nor jam, yet it will untie easily. To tie a bowline, make an overhand loop (the running part on top of the standing part) in a line and pass the end up through the loop. Then pass the end around behind the standing part and back down through the loop ( the rat comes out of the hatch, sees the cat and runs around the mast, then jumps down the hatch again ). Pull everything up smoothly. 13


.")
19 CHAPTER 2. BASIC SEAMANSHIP Gasket Knot When furling sail, the end of the gasket is secured in a variation on the timber hitch. To tie, pass the running end under the nearest standing part and pull up. Then pass the running end around the standing part again in the same direction, and pull up against the first passing. You have now made a complete wrap around the standing part. Put on two more wraps and the knot is finished. It is easiest to pass the running part under the standing part if you do it in the space created between the furled sail and the spar; then pull the wraps up so that they are pinched against the spar (or the sail). Gasket Coil Hitch The gasket coil hitch is used to secure furling gaskets while the sails are set. To make a neat coil, start about a foot-and-a-half or two feet from the yard and coil the gasket (clockwise). Then turn the coil and roll it up the standing part to wrap some of the gasket around the coil. Finally, reach through the coil above the wrapping and grasp the middle of the standing part; pull a bight through the coil, then slip it over the top of the coil and pull it down to the wrapping. Let the coiled gasket hang down on the front side of the sail. 14
20 CHAPTER 3 SETTING AND HANDLING SAIL Chapter 3 Setting and Handling Sail Learning Objectives Work aloft safely demonstrating procedures for: personal safety; use of a safety harness; communication between crew on the yards and between topmen and the deck. Loose, Furl, Set, and Take-in Sail Working Aloft Working aloft presents one of the highest risks to your personal safety aboard the ship. No amount of care and skill can make working aloft absolutely safe, so every precautionary measure is justified. Working in the rig may not be for everyone. Going aloft is a personal decision based on your interest and physical ability to participate in this aspect of ship operation. If you choose not to go aloft, remember there are miles of rigging to be tended on deck while the top men and yonkers work overhead. All crew who choose to go aloft must first demonstrate sufficient upper body strength. Once you have passed this physical test, one of the mates will provide you with required training. After successful training, the mate will provide you with approval to work aloft. Before going aloft you must first have the permission of the captain or one of the mates. After returning to the deck you must report that you are out of the rig. Everything you take aloft must be tied to you with a lanyard. It is also advisable to empty your pockets of things that may fall out. We once had a crewmember lose a wallet from the main yard while underway. This unfortunate loss from aloft was turned into a man overboard drill and thanks to quick action by the crew the victim was recovered minus a few ATM receipts. If this wallet had fallen within the deck area, it may have struck someone with enough force causing injury and a real victim. When preparing to go aloft you must put on a safety harness. It is available aboard, or you may bring one that is approved by the mate. A safety harness increases but does not guarantee your safety. The harness will not prevent you from falling but it may prevent serious injury or even death. A safety harness must be used when you stop to work anywhere aloft, for example, on the shrouds, top platform, or on the yards. 15

21 CHAPTER 3 SETTING AND HANDLING SAIL Safety Procedures For Working Aloft Always use a safety harness. Examine the harness before use to ensure that it is not defective. Adjust the harness for a snug fit. Clip in once you are in a position to work. Attach the lanyard to a secure member of the standing rigging, mast, or jackstay on the yard. Always ascend and descend on the windward shrouds, unless ordered otherwise. The wind will tend to blow you toward the shrouds. Windward shrouds are tensioned by the pressure of the wind on masts, rigging, and sails. If the yards are braced up sharp it is very difficult to get around the yard on the leeward side. When you climb the ratlines, always hold onto the shrouds, not the ratline itself, in case the seizing lets go or a ratline breaks. Take your time as you climb, keeping three points of contact with the rig. Before standing on a footrope with other crew already on it, always call out laying on port (or starboard). This will alert other crew to your action. Do not move onto the footrope until you have been acknowledged. As additional crew lay on the footropes, the footropes will move and the distance between your feet and the yard will change a potentially dangerous situation. If you are the one on the footrope, respond to the person and tell him or her whether the proposed move is okay. Once your work is complete, always call out laying off on port (or starboard). This will again alert other crew to your action. Wait for a response before stepping off. The footrope will move just as it did when you stepped on it and may present a dangerous surprise for those you were just working with. Maintain one hand for yourself and one hand for the ship whether you are clipped in or not. Loosing Sail Before sails can be set, they must be unfurled or loose. In preparing to set sail, the sailing master will give the command to lay aloft and loose all or a given sail. Before laying aloft, the mate will check the braces and lifts to ensure that the yard is secure and that the radar is on standby. To loose a sail, lay out on the yard and cast off the gaskets beginning at the outermost and working back in toward the mast. If working on only one yardarm at a time, cast off the gaskets on the lee side first. When the gaskets are cast off from both yardarms, let go the bunt gasket. In loosing a topsail, let go the gaskets on the yardarms, and then let go the gasket around the bunt of the sail. As you loosen the gaskets stow them using a gasket coil hitch. (see Chapter 2 page 2-15 for the gasket coil hitch). 16

22 CHAPTER 3 SETTING AND HANDLING SAIL Making Sail Organization of the crew and working as part of the team are essential elements to the safe and efficient operation of the ship. Throwing off the wrong line or failure to ease a line at the proper time can cause damage to the ship or injure crew. Correctly handling lines for the ordered maneuver virtually guarantees the success of the ship s operation. Nearly all pieces of running rigging will be used when making and taking sail. The order of setting and taking-in sail is determined by the strength and direction of the wind in relation to the ship s course. In light winds all sail may be set whereas in a fresh breeze the courses may be the only sail set. With a trained crew it is possible to quickly set sail and respond to changes in the weather by setting more sail or taking-in sail as required. To Set a Course Loose the sail. On deck, remove the coils for the appropriate running rigging from the pin/cleat and lay down on the deck with the working end on top ready to run. This includes: Tacks Sheets Martnets Buntlines Clew garnets Bowlines On the command to set the course: Cast off the martnets, buntlines, clew garnets, and bowlines Haul down on the tacks and sheets to position the sail immediately below the yard. If the ship is close hauled: Ease off the lee brace. Slack the weather lift. Slack the clew garnet. Get the tack well down. 17
23 CHAPTER 3 SETTING AND HANDLING SAIL If it is blowing fresh, you may need to take the tack to the capstan or windlass. When the tack is well down: Sharpen the yard up again by the brace. Haul out the weather bowline Haul the lee sheet aft. If the wind is on the quarter, the main course is carried with the weather clew hauled up and the sheet taken aft. This is known as goosewinging the main. With the wind directly aft and the yards squared, the mainsail is usually not carried, but the foresail may be carried to advantage. To Set a Topsail Loose the sail. Remove the coils for the appropriate running rigging from the pin/cleat and lay down on the deck with the working end on top ready to run. This includes: Sheets Clewlines Leechlines Bowlines Halyard Braces One crew member will stay in the top to overhaul the leechlines and clewlines as they are cast off and to push the bunt of the sail clear of the forward side of the top. Cast off the: Clewlines, leechlines, and bowlines Haul home the sheets. If the wind is fresh, set the weather sheet first, then the lee sheet. Raise the yard with the halyard. Slack the braces, particularly the weather brace, as the yard goes up, taking a turn on the pin/cleat if the wind is fresh. Tend the leechlines and clewlines. Hoist on the halyard until the leeches are taut. Trim the yard parallel with the lower yard. Haul out the weather bowline. 18
24 CHAPTER 3 SETTING AND HANDLING SAIL To Set the Mizzen Lower the yard with the halyard and topping lift as you tend the: Parrel Brails Martinets Bowlines Tack, when the bonnet is laced on. Sheet Loose the sail. Hoist the halyard and topping lift until the yard is at the proper height and angle. As the yard is hoisted, tend the: Parrel Brails Martnets Bowlines Tack, when the bonnet is laced on. Sheet Cast off the foot brails and martinets. Haul down on the sheet and board the tack when the bonnet is laced on. Trim the yard with the bowlines. To dip the mizzen Cast off the tack and sheet. Brail up the sail by the foot brail and martnets. Peak up the yard by hauling in on the topping lift while easing the bowlines and the sheet. When the yard is nearly vertical, untoggle the bowlines. Shift the yard around the aft side of the mast. Toggle the bowlines into the pendant. Trim the yard with topping lift and bowlines. 19
25 CHAPTER 3 SETTING AND HANDLING SAIL To re-set the sail tend the: Brails Martnets Tack Sheet To Set the Spritsail Lower the yard into the beakhead by easing the halyard as you tend the: Clewlines Braces Lifts Buntlines Sheet Loose the sail. Haul on the halyard to hoist the yard until it is near the fore stay collar. Tend the: Clewlines Braces Lifts Buntlines Sheet Haul the sheets to position the sail below the yard. If on the wind, create a leading edge for the sail by hauling the leeward brace and tending the leeward lift and windward brace and lift. This will cant the yard to raise the leeward yardarm. If running downwind, set the yard horizontal as with other square sail yards. 20
26 CHAPTER 3 SETTING AND HANDLING SAIL Taking In Sail The procedure for taking in sail is usually the reverse of setting. The lines which were hauled upon are now eased; the lines which were eased are now hauled upon. To Take In a Course: If the wind is light- Cast off the: Tack Sheet Bowline Haul up on the: Clew garnet Buntlines Martnets The clew garnets must lead the martnets and buntlines as the sail is hauled up. If the wind is fresh: First ease off the sheet and haul up on the: Lee clew Martinets Buntlines Then cast off the bowline, ease off the tack, and haul up the: Weather clew Martnets Buntlines To Take In a Topsail The first command is clew down. Ease away the halyard, square the yard with the braces as it comes down, and haul in on the clewlines. When the yard is in its lifts, the second command is clew up. 21
27 CHAPTER 3 SETTING AND HANDLING SAIL Ease away the sheets, and haul on the clewline and leechlines. If the wind is fresh- First clew down as above. Then clew up the weather side followed by the leeward side. To Take In the Mizzen Douse the sail with foot brails and martnets. Tend the sheet as the sail is taken in. As the yard is lowered to horizontal with the halyard and topping lift, tend the: Parrel Brails Martnets Bowlines Tack (if used) Sheet To Take In the Spritsail Cast off the sheets and haul up on the clewlines and buntline. the: Lower the yard into the beakhead by easing the halyard and hauling in the clewlines while tending Braces Lifts Buntline Sheets To Furl a Course Before laying out on the yard make sure that the yard is steadied by tight lifts and braces. Both clews should be hauled up two-blocks and the foot of the sail should be brought up parallel with the yard. If not, call down to the officer of the deck to have this done. Lay out on the yards and uncoil the gaskets tossing them over the aft side of the yard. 22
28 CHAPTER 3 SETTING AND HANDLING SAIL To furl sail: First get hold of the foot rope on the sail and lay it on the yard. Then take up an arm s length bight of the body of the sail and lay it on the yard, one bight on top of the other. When all sail is on the yard, make a skin from the last few feet of the upper part of the body of the sail large enough to cover all other bights of the sail. Lift the skin up and let the bights on top of the yard fall into the skin. Smooth the skin around the sail in a bundle now located under the yard. Make fast the gaskets around the sail and yard being careful not to pass a gasket around another piece of running rigging, such as the topsail sheets. Pass the gaskets around the yard and sail several times spiraling from aft, under, forward and over the yard. At each turn, tension the gasket by pulling up toward you on the forward side of the yard. Secure the gasket back on itself with a gasket knot (see Chapter 5 for knot descriptions). Spritsail and Mizzen The description of furling given above applies, in principal, to the spritsail and mizzen except these sails are furled from the deck without the need to lay out on footropes. To Furl a Topsail Topsails are furled while working in the tops. Since the topsail has a broad foot, tall hoist and short head, it must be furled differently. Make sure the yard is down on the cap, steadied by tight lifts and braces. Furl the sail attached to the yardarms as described above, leaving the body of the sail drooping down alongside the masthead. Form a skin from the center of the sail and bundle the body of the sail behind the skin compressing all into a tight roll, up and down the foot of the topmast. Leave the clews out of the roll forming back-to-back J shapes. To secure the sail, pass gaskets around the body of the sail and the mast. 23
29 CHAPTER 3 SETTING AND HANDLING SAIL NOTES 24
30 CHAPTER 4 SAIL MANUVERS Chapter 4 Sail Maneuvers Learning Objectives Understand the general principles of working a ship Brace and trim yards Name points of sail Tack and wear ship General Principles of Working a Ship A ship is acted upon principally by the rudder and sails. When the rudder is fore-and-aft or in line with the keel, water passes by having no effect on the ship s direction. When the rudder is shifted to one side or the other, water strikes against it forcing the stern in the opposite direction. For example, if the tiller is put over to port, the rudder moves to starboard which sends the stern to port. The ship turns around her center of rotation and the bow goes in the opposite direction, to starboard. If a vessel is going astern and the rudder is turned, water striking the back of the blade pushes the stern in the same direction the rudder was turned. For example, with sternway, the tiller is put to port, the rudder turns to starboard and the stern goes in the same direction while the bow falls off to port. In addition to turning the ship, moving the rudder from a fore-and-aft position has the effect of slowing the ship s forward motion due to the turbulence created by rudder movement. Therefore, it is beneficial to carry as little rudder as possible. To do this, a balanced sail plan is necessary and is usually achieved through trimming individual sails. The principle of the wind acting upon the sails and the water upon the rudder is the basis of the science of working a ship. In a large vessel like Susan Constant, there are numerous sails, but they may be reduced to three classes: head sails, or those which are forward of the center of rotation and have a tendency to blow the ship s bow off the wind; after sails, or those abaft the center of rotation which have the tendency to blow the stern off the wind and the bow into the wind; and the center sails which act equally on each side of the center of rotation and do not turn the ship off course 25
31 CHAPTER 4 SAIL MANUVERS one way or the other. The further a sail is from the center of rotation, the greater force it will apply in turning the ship. The center of rotation is generally found around the main mast on three-masted ships like Susan Constant. It can be shifted fore-and-aft by changing the trim or draft. Changing the trim and center of rotation will have an effect on how the vessel steers and responds to sail trim. To show how the sails act upon a ship, suppose a ship is rigged with three sails--one in the forward part, one at the center and the third at the after part. The wind is blowing on the port beam or at a right angle to the keel. If only the forward sail were set, the effect would be that the wind would move the vessel ahead and blow the bow off the wind to starboard. If only the after sail were set, the vessel would move ahead while the stern would move off to starboard as the bow would come up into the wind like a weathervane. If only the center sail were set, the effect would be the same as all three sails set and the vessel would move ahead in a straight line. If all three sails were set aback, they would tend to stop the headway and send the ship astern. As in the example above, if only the forward, center or after sail was set, the ship would be turned off course in the same direction as when set full. Bracing and Trimming the Yards Since the ships are dependent on the wind for propulsion, proper trimming of the sails is important to make the best speed through the water. Square sails are trimmed primarily by braces, followed by tacks and sheets. When bracing the yards, there are many lines affected. Buntlines, clewlines, martnets, bowlines, sheets and tacks need to be properly handled when they become taut on the side of the yard being braced forward or slack on the side being braced aft. The lifts on the course yards are adjustable. As the yard is braced forward, the lift on the side which is being braced forward is eased to keep the yard horizontal and hauled on the opposite side. Due to differences in the purchases of braces and length of the yards, the topsail will come around faster than the lower yard. Once the yards are in position, all slack must be taken out of the braces when belaying to prevent the yards from slamming back and forth. With sail set, the wind usually strikes the sail at such an angle that the weather braces have a greater strain than the lee side braces. For this reason, more crew will be needed to haul the weather braces. However, those easing the braces must not lose control of the yard or it may slam into the shrouds or stays possibly causing damage. It is also important to have a proper number of crew assigned to the tacks and sheets. Common Sail Handling Commands Avast An order to stop whatever you are doing. As, Avast heaving! Belay or Make Fast Secure a line to a belaying pin, cleat, bitt, etc. Board the Tack To haul the tack of the weather clew on the main or fore course forward and down toward the rail. Used when sailing close-hauled. Brace In The yards are hauled closer to square. Used when trimming the yards somewhere between sharp up and square. The opposite of bracing up. 26
32 CHAPTER 4 SAIL MANUVERS Brace Up Means to haul on the braces to bring the yards closer to fore-and-aft. May be used to trim the yards to sail the ship closer to the wind. Cast Off or Throw Off Take a line completely off a pin or bitt and allow it to run freely. Clew Down To haul on the topsail clewlines while holding the sheets in order to lower the yard and sail from its hoisted position. Clew Up Once the yard is in its lowered position, bring the sail up in its gear by slacking the sheets and hauling on the clewlines, buntlines, and leechlines. Ease Pay out slowly and with care. Used to check stoppers or give slack to halyards, sheets, etc. Haul To pull on a line, usually a rapid hand over hand on the halyards, sheets, or braces. halyard, haul away This is the command to hoist the yard by hauling on the halyard. Clewlines, buntlines, braces, etc. are tended as the yard goes up. Heave Around Turn the capstan or windlass around for heavy tasks such as weighing anchor or sending up a topmast. Let Go and Haul To swing the yards of the foremast to the opposite tack when maneuvering under sail. Loose Cast off the gaskets securing the furled sail. Man the Lay down the coil, clear for running. Take off the hitch, but keep a turn on the pin. Wait for the next order. Mainsail Haul To swing the yards of the mainmast to the opposite tack when maneuvering under sail. Rise Tacks and Sheets To clew up the main course when maneuvering under sail. If short handed or in a fresh breeze, it may be desirable to reduce sail and the number of lines to be handled. After the evolution, the sail is re-set. Set This is a command of delegation from the captain or mate on watch to whomever is acting as mast captain, who will then proceed to give the line-by-line orders for accomplishing sail setting. Sheet Home When setting square topsails, ease clewlines, leechlines and bowlines, and haul on the sheets until the clew in the sail is nearly two blocks at the yardarm. Slack Pay out a line rapidly and carefully, keeping it under control. Square the Yards Brace the yards square to the fore-and-aft line. Stand By An order to be prepared to handle the ordered line or sail. Take In This is a command of delegation from the captain or mate on watch. The mast captain will then proceed to give all further orders for lowering sails. 27
33 CHAPTER 4 SAIL MANUVERS Take Up Take a strain on a line by pulling in a small amount usually under a heavy strain such as in working mooring lines. That s Well Used to indicate a line has been hauled enough. A milder form of avast. Usually precedes an order to belay. Up Behind or Come Up Drop the line, tossing slack toward the person belaying. Points of Sail Modern sailing vessels are designed to sail to windward or to work into the wind. Square-rigged sailing vessels are designed to sail with the wind. Ships like Susan Constant cannot point more than six points or about 65 degrees to the wind compared to four points or 45 degrees for a contemporary fore-and-aft rig. Tacking and Wearing Whenever the ships destination lies farther upwind than she can sail in a straight line, it is necessary to work to windward by zigzagging back and forth. There are two basic methods we use to change direction while working upwind: Tacking, where the bow is brought through the wind. Wearing, where the stern passes through the wind. Tacking is usually the preferred method as it is quicker than wearing and the ship gains some ground to windward. In wearing, the ship turns away from the wind losing ground to windward. Wearing is resorted to in situations when the ship should not tack. For example, when tacking, the foremast square sails are taken aback against the mast where they act as a brake and force the bow off on the new tack. In high winds with a heavy sea it is dangerous to put the square sails aback. The only support on the forward side of the mast is the stay. If the stay were to part, the mast might collapse. Tacking To successfully tack, careful coordination is required among the crew, helmsman and officers. The crew must handle the correct lines at the proper time. If a line, like the weather main topsail bowline, were not cast off, the yard would not be able to swing around and the sail could tear. This action could cause the ship to miss stays. In handling the helm, the steersman must put the whipstaff over slowly, gradually working toward full rudder so the ship will sail up into the wind. If the rudder is put over too quickly, it will act as a brake. 28
34 CHAPTER 4 SAIL MANUVERS On the quarterdeck, the sailing master must synchronize the movement of the ship and its sails and communicate the sequence of commands to the crew to allow the ship to pass through the wind without being caught in irons. The tacking evolution proceeds as follows: Ready About! With the ship sailing along full and by or as close to the wind as possible without pinching, the crew are sent to their stations to man the tacks, sheets, braces, etc. Helm s-a-lee! With all ready, the helm is eased down gradually. Clew up spritsail and cast off main and fore bowlines. Rise tacks and sheets! At this point, the main course may be brought up into its gear. As the ship continues to turn, the sails will begin to come aback. As soon as the ship s head is within a point of the wind: Mainsail Haul! The main course and topsail yards are now braced around to the new tack. As the bow comes through the wind and begins to pay off, the spritsail yard is shifted and set on the new tack and the mizzen yard is shifted and set on the new leeward side of the mast. When the main topsail begins to draw, set the main course. Wearing Let go and haul! The fore yards are braced around quickly to the new tack and the spritsail is set. All sails are trimmed to their best advantage. Wearing consists of turning the stern of the ship through the wind. It proceeds as follows: Stand By To Wear Ship! With the ship on the desired point of sail, the crew are sent to their stations to man tacks, sheets, braces, etc. Wear Ho! The helm is put up and as the ship goes off the wind, the mizzen is taken in to accelerate the turning effect of the forward sails. As the ship continues to turn away from the wind the yards are braced perpendicular to the wind and are kept square to the wind until they are sharp on the new tack. As the stern passes through the wind, the mizzen is set on the new tack and all sails are trimmed to advantage. 29
35 CHAPTER 4 SAIL MANUVERS The above evolutions of tacking and wearing have been described in their simplest form. Rarely are these maneuvers this simple. Careful coordination and teamwork while handling the gear as quickly as possible are key elements to successful maneuvering under sail. NOTES 30
36 CHAPTER 5 EMERGENCY PROCEDURES Chapter 5 Emergency Procedures Station Bill The ship and crew must be ready and able to meet and control any emergency or dangerous situation that may arise. Every member of the crew is expected to be alert to detect and prevent emergencies, but handling and controlling emergencies is the specific mission of various emergency parties. The station bill sets forth the special duties and duty station of each member of the ship's company for various emergencies. Emergencies included in the station bill assignments are fire, general emergency, man overboard and abandon ship. The emergency alarm signal will be sounded to alert all crew. The signal for fire and emergency is a continuous blast of the ship's whistle for a period of not less than ten seconds supplemented by a rapid ringing of the bell for a period of at least ten seconds. The signal for abandon ship is more than six short blasts and one long blast on the whistle supplemented by a rapid ringing of the bell for more than ten seconds. Dismissal from fire and emergency stations is three short blasts of the whistle and three short rings of the bell. The station bill will be posted in a conspicuous location in the hold, forecastle and aft cabin. The following emergency procedures provide basic information. A more detailed description will be given with onboard training and drills. Firefighting Procedures Fire is one of the ultimate disasters onboard any ship. By being prepared, we have a chance to contain a fire and extinguish it. Three components are required to start and sustain a fire: fuel, heat, and oxygen. A fire can be extinguished by breaking the chain reaction that supports the three components. If one element is removed or missing, fire cannot occur or exist. By removing the fuel, oxygen or heat, the fire will die out. 31
37 CHAPTER 5 EMERGENCY PROCEDURES The extinguishing agents most commonly used aboard are: Water to remove the heat from a wood fire Carbon dioxide to remove the oxygen and smother the fire. Dry chemicals and Halon to break the chain reaction. Fuel can also be removed to extinguish a fire by turning off the fuel supply such as in diesel fuel for the engines or propane for the stove. There are four categories of fire: Class A fires involve solid fuels such as wood, paper and cloth. Class B fires involve liquid fuel such as gasoline, diesel, paint or oil. Class C fires are electrical in origin and occur in wiring, electronics and switches. Class D fires include pyrotechnics or metals such as magnesium. It is far simpler to prevent a fire than extinguish it. If you must fight a fire, portable fire extinguishers are located throughout the ship for immediate use. Most portable extinguishers are of the ABC type. The engine room has a fixed Halon system installed. In addition, the ship is equipped with a fire hose on the main deck. In the event of or suspicion of a fire, pass the word rapidly to the officer of the deck. Speed is essential. Report the location and type of fire. Make all crew in the fire area aware of the fire so they will be able to evacuate or assist. If the fire is small, go to it with a portable fire extinguisher and put it out. If the fire is large, those members of the crew chosen to work with the fire team will assume their duties working to put out the fire. All other crew will stand by on deck to assist as necessary. In addition to using extinguishers and the fire hose, other firefighting actions we may take include: Shutting off the fuel to the engines and stove. Closing hatches and doors. Maneuvering the ship to place the fire downwind to slow its spread and blow the smoke away. Sending a distress call. Collision, Holes in the Hull Holes in the hull may result from collision with objects in the water. When discovered, pass the word rapidly to the officer of the deck. Speed is essential. Report the location and size of the hole. Make all crew in the area aware so they will be able to evacuate or assist. Temporary repairs can be made by driving plugs or wedges in small holes. Larger holes through which water is pouring are difficult to control. They can be stuffed with a pillow or mattress to attempt to slow the flow of water. Alternately, a collision mat or thick piece of canvas can be maneuvered over the hole from outside the hull to slow the entry of water. 32
38 CHAPTER 5 EMERGENCY PROCEDURES Ship Abandonment and Hypothermia If fire or damage to the hull cannot be controlled and loss of the ship is imminent, the ship must be abandoned by the crew. If the master authorizes the abandonment of the ship, the abandon ship signal of more than six short blasts and one long blast will be sounded to alert all crew. On the sounding of the alarm, those assigned to stations must move quickly and don a personal flotation device. Susan Constant is equipped with three inflatable life rafts and one inflatable rescue boat. The rescue boat is already inflated and launched from davits on the stern. Life rafts are not inflated on deck. First the painter is tied onto a substantial part of the ship and then the life raft is thrown into the water. Once in the water, the painter is pulled, if necessary, to inflate the life raft. It may be necessary to jump into the water from the side of the ship. If so, the closest point to the water should be chosen to minimize the risk of injury. When jumping from the side of the ship, you should keep your elbows at your side; cover your nose and mouth with one hand while holding the wrist or elbow firmly with the other hand. Once in the water, orient yourself, locate the life rafts and climb aboard the life rafts and rescue boat in an orderly fashion. If the crew were unprepared to abandon ship before going in the water or it is not possible for you to board a life raft, do not swim unless it is to reach a nearby craft, a fellow survivor or a floating object on which you can hold on to. Unnecessary swimming will pump out any warm water between your body and layers of clothing, thereby increasing the rate of body heat loss. In addition, unnecessary movements of your arms and legs sends warm blood from the inner core to the outer layer of the body resulting in very rapid heat loss. When in the water for extended periods of time assume the "HELP" position. This is the Heat Escape Lessening Position. Float as still as possible with legs together, elbows close to your side and arms folded across the front of your life jacket. This position minimizes the exposure of the body surface to cold water. Try to keep your head and neck out of the water. Another heat conserving position is to huddle closely to one or more persons afloat, making as much body contact as possible. A life jacket must be worn to be able to hold these positions in the water. Finally, keep a positive attitude about your survival and rescue. This will improve your chance of extending your survival time. Your will to live does make a difference. Man Overboard A man falling overboard is one of the most hazardous situations a crew member can be subjected to at sea and is preventable by keeping the possibility in mind at all times. It must be realized that the danger of falling overboard is always there in calm and rough weather. By taking certain precautions, one can guard against the risk of falling into the sea. As discussed earlier, the use of a safety harness is required aloft and is useful on deck in rough conditions. Also, keeping your feet firmly on deck and not sitting on the caprail will ensure you don't fall off the ship. 33
39 CHAPTER 5 EMERGENCY PROCEDURES When someone falls overboard: The man overboard signal is a loud shout by the person who saw the victim fall: "Man Overboard, port (or starboard) side!" The person who saw the victim go overboard should keep the person in sight while others heave the man overboard pole and personal flotation devices in the water. The lookout should not take his eyes off the victim until he is recovered. The lookout should point at the victim with the arm extended because the eye tends to follow the wave action and be led off target. Simultaneous with the call of man overboard there are several actions, which are taken immediately: The MOB button on the G.P.S. is engaged to assist in tracking the victim. The emergency signal is sounded to alert the crew. Sails are taken in. The main engines are started and the ship is maneuvered back to the victim; the rescue boat is manned and launched with a hand held VHF aboard to assist in communicating the direction of the victim to the boat crew. The pilot ladder is rigged for the victim to climb back aboard, or a tackle may need to be rigged from the main yard if the victim is injured and unable to climb back aboard himself. The person in the water should swim to a life jacket and put it on. Remove your boots or shoes to help you swim. Do not remove clothing or foul weather gear. Both provide insulation and buoyancy. Heat conservation is extremely important to someone in the water. Emergency Station Bill Form on page
40 CHAPTER 5 EMERGENCY PROCEDURES EMERGENCY STATION BILL FIRE AND EMERGENCY ABANDON SHIP MAN OVERBOARD DISMISSAL Continuous blast on the ship s whistle and general alarm bell for a period of at least ten seconds. More than six short blasts and one long blast on the whistle and a rapid ringing of the bell for more than ten seconds. Hail and pass the word Man overboard to the bridge. From fire and emergency stations and boats stations is three short blasts on the whistle. NAME FIRE & EMERGENCY MOB ABANDON SHIP COMMAND AFT SAME SAME COMMAND EMERGENCY TEAM SAME LAUNCHES RAFT #2 FIX POSITION, RADIO USCG SAME SAME MAN HOSE RESCUE BOAT LAUNCHES RAFT #4 MEDICAL ASSISTANCE SAME LAUNCHES RAFT #1 HELM HELM LAUCHES RAFT #3 HELM HELM FLARES & SIGNALS EXTINGUISHER RESCUE BOAT DISTRIBUTES PFD S RESCUE BOAT STARTS PUMP STARTS ENGINES RIGS LADDER RIGS LADDER EXTINGUISHER DISTRIBUTES PFD S BINOCULARS BINOCULARS HHVHF TO BOAT DISTRIBUTES PFD S GPS & HHVHF TO RAFT ALL OTHERS STBD PORT ASSIST AS NECESSARY ON DECK ASSIST AS NECESSARY, EMERGENCY TEAM 35
41 CHAPTER 5 EMERGENCY PROCEDURES NOTES 36
42 CHAPTER 6, ANCHORING AND DOCKING Chapter 6 Anchoring and Docking Learning Objectives Crew will be able to: Understand anchoring procedures: coming to anchor, flaking cable, using capstan, weighing anchor Understand docking procedures: name mooring lines, use heaving lines, flake lines, handle lines, make lines fast Anchoring NOTE: Using Susan Constant as an example. Godspeed and Discovery are similar. Susan Constant has five anchors. The sheet anchor is the largest weighing roughly 700 pounds. The two bower anchors are the next largest weighing roughly 600 pounds. The smallest anchors are the stream and kedge anchors weighing roughly 200 pounds and 125 pounds respectively. The shape and proportions of wooden stock anchors changed little over the centuries. The main section of the anchor is the shank. At the top of the shank is the ring where the anchor cable is attached. The curved arms cross the bottom of the shank and terminate in the triangular flukes. The point where the arms and the shank meet is known as the crown. The wooden stock was attached to the shank just below the ring, at a right angle to the arms. Letting Go the Anchor The anchor is usually stowed with the shank and fluke secured to the fore channel. Before the anchor can be hung from the stopper, the shank and flukes are lowered off the channel. The anchor is ready to let go once it is free of the channel, hanging vertically from the cathead off the bow by a heavy line known as the stopper. The stopper is fastened to the outer end of the cathead, passed through the ring and secured to a cleat on top of the cathead. 37

43 CHAPTER 6, ANCHORING AND DOCKING As the ship approaches an anchorage, the cable is ranged, ready for running on the tween deck. A sufficient length of cable to range out usually equals up to ten times the expected depth of water in the anchorage. The cable is flaked, that is, laid down on deck in long bights, one alongside the other, starting outboard and working inboard. The loop formed at the end of each bight is slipped under the preceding loop to allow the cable to run out freely without fouling. Once the desired length is on deck the cable is made fast to the bitts. With the order to Let go the port (or starboard) anchor, the stopper is let go by hand which allows the anchor to fall freely to the bottom. Crew must be careful to stand clear of the stopper, which may whip back. Also keep clear of the cable in the tween deck as it races out. Once the anchor is on the bottom, the pull of the cable causes a fluke to bury into the bottom. As the ship falls back, the cable runs out and is veered away until nearly at the desired length. At this point, the cable is checked and veered alternately until it is determined the anchor is set. The cable is then secured on the riding bitts in the forward end of the tween deck. 38

44 CHAPTER 6, ANCHORING AND DOCKING Weighing Anchor Weighing anchor is the reverse of setting the anchor. The capstan is prepared by inserting the bars. Once the cable is brought to the capstan and all is ready, the command is given, Heave round the capstan. To heave up the anchor, up to twelve crew can work simultaneously rotating the capstan. When heaving on the capstan, do not push the bars with your hands; if your hands slip you could be injured. Instead, lay your chest across the bar and hook your elbows behind it. If it is desired to stop turning for some reason, engage the pawl, a steel bar on the deck. This prevents the capstan from turning backwards while there is a strain on the line. As the anchor is being heaved in, the mate on the fore deck will indicate which direction the anchor is tending. Once the anchor cable is straight up and down, the weight of the anchor is broken free and lifted from the bottom. As soon as the anchor breaks free of the bottom the report is made, Anchor aweigh. When the anchor stock clears the surface of the water, the command will come, Avast heaving. Next comes the order to, Cat the Anchor. The anchor is catted by hooking the ring with the cat tackle and hauling the anchor up to the cathead. Once the anchor is at the cathead, the stopper is passed again. With the anchor catted, it is then fished. The fish tackle is hooked on one fluke of the anchor to haul the shank near horizontal allowing the anchor to be stowed on the channel. To prepare for sea, the anchor is securely lashed down. 39
45 CHAPTER 6, ANCHORING AND DOCKING Mooring A ship is moored when it is made fast alongside a pier. In preparing for mooring the ship, crew will be assigned to various lines that are used to control the ship when maneuvering alongside, and to secure the ship to the pier. The line that runs forward from the eyes of the ship is called the bow line. At the other end of the ship, the line that leads aft is the stern line. These lines usually lead well up and down the pier. Lines leading forward away from amidships at an angle are forward springs. The lines leading aft are aft springs. The bow line and forward springs prevent the ship from moving astern. The stern line and after springs prevent the ship from moving ahead. Breast lines are usually run from the bow and stern. They run at right angles to the keel and prevent the ship from moving away from the pier. Prior to coming alongside a pier, the required lines should be flaked, ready for running and led to the proper location. Heaving lines (lighter lines with a weighted end that are easier to throw) should be tied onto the mooring lines near the splice or bowline and not in the end of the bight, where they will be jammed when the eye is placed over a bollard, cleat or piling. As soon as the ship is close enough, the captain will order deckhands to pass heaving lines to the pier. After the lines are secure on the pier, they will be used to assist in maneuvering and securing the ship alongside. Using the spring lines in conjunction with the bow and stern lines works effectively to bring the ship close to the pier especially in situations where the wind or current is blowing or running at right angles away from the pier. Once the ship is close to the pier and is in its intended location, the breast lines are passed and secured to the pier. With so many different cases of wind, current and docking situation possible, specific examples will not be discussed here. Training and onboard advance planning and communication with the crew will provide you with information on methods for coming alongside and leaving a pier. 40


46 CHAPTER 6, ANCHORING AND DOCKING If the eyes of two lines need to be placed over the same bollard, cleat or piling, the second one must be dipped, or led up through the eye of the first, and then placed over the bollard, cleat or piling. This makes it possible for either to be cast off independently of the other. Orders For Crew Working Mooring Lines Stand by your lines Pass the Slack the Take a strain on the Take in slack on the Ease the Avast heaving Check the Hold the Make fast Double up the Single up Take in the Cast off the Man the lines ready to cast off or moor. Send the line ordered line to the pier. Place the eye over a bollard, cleat or piling but do not take a strain. Pay out line being careful to keep it out of the water. Put the ordered line under tension. Heave in on the ordered line. Pay out line enough to remove most of the tension. Stop heaving. Hold a strain on the ordered line but not to the breaking point. Allow it to slip as necessary. Take enough turns on the cleat or bitt to prevent the line from slipping. An order to secure the ordered line or all working lines to cleats or bitts on the ship. Run another line parallel to the ordered line to make the mooring more secure. Take in all extra lines, leaving the six primary lines in place. Slack, cast off and pull back aboard the ordered line A command to those tending lines on the pier to throw the line off the bollard, cleat or piling. 41

47 CHAPTER 6, ANCHORING AND DOCKING 42
48 CHAPTER 7 SHIP OPERATIONS Chapter 7 Ship Operations Learning Objectives Lower and hoist the boat Serve as lookout Serve as helmsman Be ready for life aboard: Crew duties Watch system Ship systems Lowering and Hoisting the Boat NOTE: using Susan Constant as an example. Susan Constant is equipped with a small, rigid-bottom inflatable boat with an outboard motor. It is used as a rescue boat for man overboard or abandon ship and as a tugboat to assist in maneuvering the ship when alongside piers. The boat is stored, as if on davits, under the gallery in the stern. It is usually manned by one crewmember for maneuvering and by two crew members for man overboard retrieval. Crew in the boat always wear Type V inflatable life jackets with harnesses. They maintain communications with the ship through use of a hand held VHF radio. When launching or retrieving a boat at sea, certain precautions must be observed in order to prevent damage to the boat and injury to the crew. With personnel in the boat, it is essential for their safety to maintain complete control of the tackles while launching or retrieving the boat. The task of handling the boat falls at the cleats is usually the responsibility of experienced crewmen. Launching and retrieval is usually under command of the mate. To launch the boat: The crew climb in and prepare to be lowered. The ship is slowed to bare steerage way and the tackles are eased away at the command Lower away together to lower the boat into the water. The boat should be lowered into the water on an even keel. As soon as the boat is waterborne, the engine is started and the tackles are cast off from the lifting bridles in the boat. 43
49 CHAPTER 7 SHIP OPERATIONS After the mission is complete, the process is reversed to hoist the boat back aboard. Once the tackles are hooked to the bridles and everything is ready, at the command Heave round together the boat is hoisted from the water. If one end of the boat is hoisted faster than the other, the command is given, Avast heaving port (or starboard). When the boat is again level, crew heave around together until the tackles are two blocked. After the boat crew has safely come back aboard, normal ship operations are resumed. Serving as Lookout While the ship is underway, a lookout is posted at all times during fair weather or foul, daylight and darkness. As lookout you will: Have no other duties. Usually be stationed on the foredeck. You may be assisted by another lookout stationed on the stern at certain times of low visibility. Be responsible for quickly reporting sightings through 360 degrees of the horizon. Be constantly alert and vigilant. On lookout, you will spend most of your time looking and listening. Never assume the officer of the deck has already seen what you saw and that you do not need to report it. You are responsible for sighting and reporting: Lighthouses Buoys Other ships or boats Other navigational aids Possible dangers or obstructions in the water Hearing something can frequently be of value if sighting an object is difficult, as in fog. You may be able to hear foghorns, buoys and ships that you may not be able to see. It is possible in fog or darkness to tell by sounds whether a ship is close or distant and in what direction it bears. 44

50 CHAPTER 7 SHIP OPERATIONS When reporting an object you have sighted, describe: What it is The bearing The estimated distance Use the point system in the accompanying illustration when reporting the bearing of the object. Estimate the distance in nautical miles. On a clear day you can see about five miles to the horizon from the forecastle deck on Susan Constant. Objects that project up from the horizon allow you to see them farther away if the visibility is clear enough. For example: A four-second, green light; bearing two points forward of the starboard beam; range two miles. Or a small, white-hull fishing boat; bearing broad on the port bow; range three miles. Steering Steering is the ability to change and to hold a course. The usual method of changing course is to shift the rudder from side to side. The action of the water on the rudder forces the stern of the vessel sideways and the vessel changes course. Susan Constant s rudder is controlled by a whipstaff. Godspeed and Discovery are steered by a tiller. The whipstaff consists of two main parts. The staff is a wooden lever held and moved by the helmsman. The staff is vertical when the helm is amidships. The whipstaff passes and slides through the pivoting rowle that is mounted in the deck. To complete the steering system, the whipstaff is attached to the forward end of the tiller by means of a metal gooseneck fitting. This allows the whipstaff to be disconnected from the tiller when necessary, so the ship can be steered by means of relieving tackle in heavy weather. Steering is usually assigned to an experienced member of the crew who has a good feel for this challenging job. A good helmsman is able to keep the ship on course using the least amount of rudder movement possible. There are two main methods of guiding the ship while steering. If under sail and on a close reach, the ship can be sailed full and by e.g., keep the sails full and steer as close by the wind as possible without pinching or stalling. With this method, steering a precise compass course is not required nor at times desirable if trying to work changes in the wind direction while working upwind. The other method is steering by the compass. In steering by the compass, it is extremely important to steer the course given especially within the confines of a narrow channel. Steering Commands Hard Right (Left) This is the largest amount of rudder that can be applied. In the case of Susan Constant it is less than fifteen degrees limited by the throw of the whipstaff. In comparison, a modern vessel has at least thirty-five degrees of rudder throw. 45

51 CHAPTER 7 SHIP OPERATIONS Come Right (Left) to Is called to swing the ships head in the direction indicated and steady her on the course given. Steer Is usually given for a minor change in course. Steady on Is normally ordered while swinging to indicate the course the ship should be steadied on. Rudder Amidships Means to put the rudder on the centerline. Mind Your Helm Means to steer more carefully. Nothing To The Right (Left) Is called when the presence of some object on one side or the other would make a set in that direction dangerous. Communication between the helm and the officer of the deck is very important. The helmsman must repeat every command received in order to ensure that the conning officer knows you understood correctly. When you have completed the given order say, for example, Rudder is hard right or Steady on one-three-five. When making a turn, occasionally report the compass course so the conning officer may know how far the ship has gone through the turn. When relieving the helm, find out what the course is and how the ship is handling. The helmsman being relieved should report to the officer that there is a new helmsman. The Mariner s Compass of 32 points (after a design by Williams, 1724). The North point was often designated by a Fleur-de-lys, and up to the present century some card makers also embellished the East point, which pointed towards the Holy Land. 46

52 CHAPTER 7 SHIP OPERATIONS Aids to Navigation 47

53 CHAPTER 7 SHIP OPERATIONS 48
You will be shown how to put on your safety harness, and told what to do and what not to do based on the following.
 WORKING ALOFT Working at height is potentially dangerous but risks can be reduced. The Ship s Executive insists that work aloft be carried out safely. There is an obligation on crew to look out for themselves
Serenity Houseboat. Standard Operating Procedures for:
 Serenity Houseboat Standard Operating Procedures for: Docking I. Safety a. Never get between the houseboat and the dock or other larger object. b. Always wear PFDs during docking. c. Always wear snug fitting,
National Maritime Center
 National Maritime Center Providing Credentials to Mariners (Sample Examination) Page 1 of 8 Choose the best answer to the following Multiple Choice Questions. 1. In illustration D001SL, what is the edge
T 10 Tacking Ver
 T 10 Tacking Assume sailing upwind in moderate conditions Ensure Jib sheets are clear both in the cockpit and forward. Ensure new course is clear of other boats, shipping, and navigation hazards. Ensure
Melges 24 Sailing Guide
 RACING GUIDES www.ullmansails.com Upwind Sailing Melges 24 Sailing Guide The Melges is most efficient when sailed as flat as possible. Excessive heel causes leeway which is slow. The skipper must work
J/22 Dave Perry. Based on sailing the POW in the Ft Worth Boat Club (TX) boats in 2006 We sailed with three in the boat
 boats in 2006 We sailed with three in the boat") J/22 Dave Perry Based on sailing the POW in the Ft Worth Boat Club (TX) boats in 2006 We sailed with three in the boat GENERAL Boats spin fast! Boats go fast sideways when downspeed Use weight to help
J/22 Dave Perry Based on sailing the POW in the Ft Worth Boat Club (TX) boats in 2006 We sailed with three in the boat GENERAL Boats spin fast! Boats go fast sideways when downspeed Use weight to help
OPERATIONAL CHECK LIST
 www.spinnakersailing.com (650) 363-1390 OPERATIONAL CHECK LIST https://twitter.com/#!/spinnakersailin http://www.facebook.com/spinnakersailingrwc http://www.spinnakersailing.com/newsletter.html Dear Sailor,
KNOTS. A very short guide to knotting terminology used on these pages.
 KNOTS A very short guide to knotting terminology used on these pages. This is not an exhaustive list of knotting terms; it just contains some of the more unfamiliar words that we have used. If you wish
Troop 226. Knot Master Program
 Troop 226 Knot Master Program Knots are a skill taught at every level of scouting. The Knot Master program is designed to provide each scout an opportunity to learn essential knots. In addition to learning
Basic Cruising Standard
 Basic Cruising Standard OBJECTIVE To be able to cruise safely in familiar waters as both skipper and crew of a sloop rigged keelboat of 6 to 10 meters in moderate wind and sea conditions by day. PREREQUISITES
Basic Keelboat Sailing Standard (ASA 101)
") Basic Keelboat Sailing Standard (ASA 101) Prerequisites: None General Description: Description: Demonstrated ability to skipper a sloop-rigged keelboat of approximately 20 to 27 feet in length by day in
Basic Keelboat Sailing Standard (ASA 101) Prerequisites: None General Description: Description: Demonstrated ability to skipper a sloop-rigged keelboat of approximately 20 to 27 feet in length by day in
Sailing Upwind. Section 14. Close-hauled. Starboard Tack. Port Tack Figure 14 1 Port Versus Starboard Tack. 14 Sailing Upwind 111
 14 ing Upwind 111 Section 14 ing Upwind Close-hauled. ing as close to the wind, or as directly into the wind, as possible. Also, on-the-wind or by-the-wind, beating. Cunningham (Rig). An arrangement of
Knots, Hitches and Bends
 Knots, Hitches and Bends It is hard to define clearly the terms knot, hitch and bend because their functions overlap. However, the terms may be generally defined as follows: Knots Hitches Bends Knots are
2018 Osprey Yacht Club
 Page 1 2018 Osprey Yacht Club Optimist Sailboat Youth Training Manual Or How to have a lot of fun on a small sailboat! Revision Date: August 19, 2017 Page 2 Table of Contents Table of Contents... 2 What
Table 4. Key to parts shown on the plans of the pinas (see plan drawings 1 5 following table).
.") Table 4. Key to parts shown on the plans of the pinas (see plan drawings 1 5 following table). Ship compartments: A hold B forepeak C protective bulwark for the pumps D powder room E cheese and bread room
Table 4. Key to parts shown on the plans of the pinas (see plan drawings 1 5 following table). Ship compartments: A hold B forepeak C protective bulwark for the pumps D powder room E cheese and bread room
Scout It Out would like to extend its gratitude to all the sites where the following information had been gathered.
 Rope Work introduces the basic knots that all Scouts and Guides should know. Most of the knots featured here are very useful in Pioneering and should be learnt. This Section does not fully teach the exact
STUDENT STUDY GUIDE ASA 103 BASIC COASTAL CRUISING
 STUDENT STUDY GUIDE ASA 103 BASIC COASTAL CRUISING Traverse City, Michigan (231) 941-0535 GreatLakesSailingCo.com Solstice Sailing, Inc. Basic Coastal Cruising Standard (ASA 103) Prerequisites: Basic Keelboat
Taming the Kite! Wineglasses. Wineglasses occur when the top half of the kite fills before the bottom with a twist in the middle.
 Taming the Kite! What goes wrong? Wineglass when launching can happen in light or heavy weather Broaching on a reach usually in heavy weather Death rolls usually in heavy weather Gybing disasters worse
End. Standing Part. An underhand loop is made by crossing the end under the standing part.
 Knot Board Learn to tie the four basic camping knots as illustrated as well as others you might add. Practice them until you can tie them well. Display them on a knot board made from a square of peg board
Wysiwig - Wayfarer Rigging Guide
 Wysiwig - Wayfarer 8767 - Rigging Guide GENERAL NOTES Before you go afloat, make sure that the self-bailer is closed. It is operated through the cut-out in the starboard floorboard. If you do not close
ACCIDENTS TO SPARS, &c.
 103 SECTION XXI. ACCIDENTS TO SPARS, &c. Braces are parted and spars sprung, as a rule, when the vessel is scending heavily. A sudden heavy scend puts a strain on gear all in a moment, and it is usually
Section V Sailing off the wind
 Section V Sailing off the wind 1 Sail shapes and flow patterns - off the wind a) Principles When reaching, it is maximum thrust which is important, and here the leech ribbons come into their own. Fig.43a
North Sails Seattle Thunderbird Tuning Guide
 Page 1 of 6 North Sails Seattle Thunderbird Tuning Guide Introduction The following tuning guide is meant as a good starting point in setting up your boat. Since not all Thunderbirds are exactly alike
SAIL WELL, STAY WELL. Sydney Flying Squadron ACN Sydney Flying Squadron. SAILING A SKIFF a guide
 Historic 18 foot Myra Too Sydney Flying Squadron ACN 000 487 230 76 McDougall Street Milsons Point. 2061 SAIL WELL, STAY WELL SAILING A SKIFF a guide PO Box 577 Milsons Point 2061 T: 9955 8350 Web: sydneyflyingsquadron.com.au
TUNE YOUR SAILS SPEED. Optimist Tuning Guide. Photo Wavelength
 TUNE YOUR SAILS FOR OUTRIGHT SPEED Photo Wavelength PEAK / HEAD THROAT TACK CLEW THANK YOU for choosing North Sails for your Optimist. Whether you are just starting out in an Optimist you are an experienced
Place a rope coil here
 1 2 3 4 The anchor buoys were made from Sculpey. You could however, carve them from wood but I wanted to continue my experimentation with this material. A buoy from this time period would have ranged from
by Rebecca Manthey and David Manthey original written May 2004, last update 26 August Copyright 2004 by Rebecca Manthey and David Manthey.
 Bateau Commands by Rebecca Manthey and David Manthey original written May 2004, last update 26 August 2004. Copyright 2004 by Rebecca Manthey and David Manthey. This is a list of commands used in rowing
Start by crossing the two sticks or dowels at perpendicular or 90 degree angles.
 Square Lashing Used to fasten two spars or poles together. Start by crossing the two sticks or dowels at perpendicular or 90 degree angles. Make a Clove Hitch on the vertical stick or dowel near the point
OASIS SAILING CLUB. A&E Review Form Sailing/CQM Rev 11/9/2015. Name: Level
 OASIS SAILING CLUB A&E Review Form Sailing/CQM Rev 11/9/2015 Name: Level Vessel: A&E Reviews are designed to improve general competence and safe sailing of OSC vessels. The written multiple-choice tests
ASA 103: Basic Coastal Cruising Curriculum
 ASA 103: Basic Coastal Cruising Curriculum Pre-study is vital to the success of your course. There will be two tests for this course, one written and one performance. Upon successful completion of this
ASA 103: Basic Coastal Cruising Curriculum
 ASA 103: Basic Coastal Cruising Curriculum This course will teach you to cruise a sailboat in moderate winds and sea conditions as both skipper and crew. Review all aspects of level one of instruction,
TUNE YOUR SAILS SPEED
 TUNE YOUR SAILS FOR OUTRIGHT SPEED Rev R05 Important Notes l We recommend not exceeding 350lbs total crew weight as this puts excess stress on the mast and the boat. l When sailing, the boat performs best
Most sail with 5 or 6 in the boat. Here are the names I will use for the various positons (from the back forward):
:") Racing the Oakcliff Sailing Match 40 s Dave Perry notes May 17, 2016 There are many ways to do things. Here are some notes on how we do things on the Match 40 s at Oakcliff. Most sail with 5 or 6 in the
Racing the Oakcliff Sailing Match 40 s Dave Perry notes May 17, 2016 There are many ways to do things. Here are some notes on how we do things on the Match 40 s at Oakcliff. Most sail with 5 or 6 in the
CSC Learn to Sail Class
 CSC Learn to Sail Class JUNE 2014 Pedram Leilabady LNYC Nomenclature Sailors Lingo! Direc@ons Ahead Astern 1 6/3/14 Main Parts Mainsail Jib Sails / Spars Head Mast Head Leech Luff Leech Luff Mainsail Clew
Sonar Tuning Guide. Jud Smith Tomas Hornos Send order forms to:
 Sonar Tuning Guide Jud Smith jsmith@doylesails Tomas Hornos tomas@doylesails.com Send order forms to: onedesign@doylesails..com Rig Tune We recommend checking your shroud tuning before going sailing. Start
Roles: Presentation Questions:
 DECKHAND CREW Instructions: (mates read aloud) This crew packet contains important information for you to know aboard the Balclutha, and it will help you complete your project. First, read the part about
Deckhand Duties Questions
 Deckhand Duties Questions Ropework - Deck Gear - Moor and anchor -Lookout -Maintenance - Hygiene/safety Ropework A monkey fist is the terminal to a heaving line. Question 2 (1 Mark) Seawater acts as a
ISA Dinghy Sailing Pre Entry Assessment
 ISA Dinghy Sailing Pre Entry Assessment Notes for organising ISA Sailing instructor Pre-Entry Assessment 1. Plan ahead, becoming a dingy instructor takes time and planning. 2. Book a trainer. The trainer
National Maritime Center
 National Maritime Center Providing Credentials to Mariners (Sample Examination) Page 1 of 7 Choose the best answer to the following Multiple Choice Questions. 1. On a small boat, which knot is best suited
Ropework. Stopper Knots. Overhand Knot ROPEWORK. Figure of Eight 3.
 Ropework 157 Ropework Stopper Knots Stopper knots are used as a temporary method of stopping a rope from fraying or as a method of locking other knots which may be prone to loosening. These knots are:
F-27 RIGGING GUIDE EXTRACTED FROM ORIGINAL F-27 SAILING MANUAL
 F-27 RIGGING GUIDE EXTRACTED FROM ORIGINAL F-27 SAILING MANUAL By Ian Farrier not be possible if the towing vehicle is a van. When trailering, allow extra distance for stopping. Watch also for low bridges,
Docking & Harbor Handling Guidelines
 TOP 5 THINGS TO REMEMBER 1. Take your time a. There is never a hurry to leave the dock or return to the dock. When departing, you can sit at the dock for as long as you like until everything is in place
Square Diagonal Tripod Japanese Square Filipino Diagonal Round Shear Ladder
 Square Diagonal Tripod Japanese Square Filipino Diagonal Round Shear Ladder Square Lashing - Step by Step Used to fasten two spars or poles together. Start by crossing the two sticks or dowels at perpendicular
Parts of the Ship. Terms you should already know
 Parts of the Ship Toronto Brigantine Terms you should already know After-peak Fore-peak Bow Stern Fairlead Scupper Freeing port Hull Deck Lifeline Hatch Skylight Cleat Pin-rail Fife-rail Spider-band Block
TUNE YOUR SAILS SPEED
 TUNE YOUR SAILS FOR OUTRIGHT SPEED J/70 Tuning Guide Rev. R02 After countless hours sailing, testing and competing in the J/70 One Design, North Sails has updated our tuning notes and tips in an effort
Follow these easy steps to properly assemble your new Zim 420
 Thank you for buying a Zim 420 and welcome to the Zim Sailing family. We are extremely proud of the quality of our boats and the race results are proven. Many of the top sailors are choosing Zim over other
Shrouds, dead-eyes and ratlines
 Shrouds, dead-eyes and ratlines On a real vessel the shrouds would be put up before the running rigging and many modellers follow this sequence. On Sherbourne I attached the stays and the running rigging
Index 1. Trampoline 2. Main Foils 3. Spinnaker Pole 4. Mast Setup 5. Mast Rigging 6. Rig Tension 7. Trapeze Lines 8. Rudders 9. Boom 10. Main Sheet an
 By User Manual Index 1. Trampoline 2. Main Foils 3. Spinnaker Pole 4. Mast Setup 5. Mast Rigging 6. Rig Tension 7. Trapeze Lines 8. Rudders 9. Boom 10. Main Sheet and Traveler 11. Main Sail 12. Downhaul
The Basics of Victory Sailing II
 The Basics of Victory Sailing II Torrey Pines Sailing Club Sailing from Island Palms Marina on Shelter Island San Diego, CA Visit us at our web site 1 Boating Safety Safety First Life jacket Suntan lotion
Dolly wheels in slot #8 for Boat #10.
 Rigging: Laser SAIL SELECTION: The International Laser Class has three different official rigs. Each sail is designed for sailors of different weights. The Standard Rig was designed for sailors weighing
Your new Quantum asymmetrical. is designed and engineered to be. easy to set and trim. Fundamental. principals of asymmetrical trim are
 Asymmetrical Trim Guide Your new Quantum asymmetrical is designed and engineered to be easy to set and trim. Fundamental principals of asymmetrical trim are outlined in this guide. For more detailed information,
Docking & Harbor Handling Techniques
 TOP 5 THINGS TO REMEMBER 1. Take your time a. There is never a hurry to leave the dock or return to the dock. When departing, you can sit at the dock for as long as you like until everything is in place
TECHNICAL DESCRIPTION MASTHEAD SLOOP:
 NEW SAILOR TECHNICAL DESCRIPTION MASTHEAD SLOOP: What is a masthead sloop?.page 2 Parts and function of the masthead sloop sail... Page3 Parts and function of the masthead sloop rigging Page 4 Parts and
CII Rigging suggestions
 CII Rigging suggestions This mini-manual uses photographs of the final prototype sail and the final pre-production mast. Where changes occurred between these and the production units, they are described
Ropework. Stopper knots. Overhand Knot ROPEWORK. Figure of Eight 3.
 Ropework 1 Ropework Stopper knots Stopper knots are used as a temporary method of stopping a rope from fraying or as a method of locking other knots which maybe prone to lossening. The knots are the Overhand
ASSEMBLY MANUAL HOBIE CATSY
 ASSEMBLY MANUAL HOBIE CATSY HOBIE CAT EUROPE ZI Toulon Est, BP 50 8078 Toulon cedex 9, France Tel : + (0)9 08 78 78 - Fax : + (0)9 08 99 Email : hobiecat@hobie-cat.net - http://www.hobie-cat.net ASSEMBLY
SEA SCOUT BASE ~ Sandvlei ~ Seamanship Manual B. Sailing Pages 28-43
 SEA SCOUT BASE ~ Sandvlei ~ Seamanship Manual B. Sailing Pages 28-43 Watermanship 28 SEA SCOUT BASE SANDVLEI Telephone / Fax : 021 788 7581 7950 NAME : P.O. Box 280, Muizenberg GROUP : Course Hours Required
Now we get to the really fun part of cat sailing, but first you need to know about apparent wind.
 Shelley Sailing Club Inc. Notes for informal catamaran training course, Alec Duncan, 14/3/2015 Part 4: Reaching and running Now we get to the really fun part of cat sailing, but first you need to know
E Scow Racing and Rigging Manual
 E Scow Racing and Rigging Manual Written by Mark Ehlers Editing and content revisions by Andrew Bartling Aspects of Sailing E Scows Crew weight should never exceed 675lbs. The target weight for 4 people
Basic Keelboat Sailing Standard (ASA 101)
") Basic Keelboat Sailing Standard (ASA 101) Prerequisites: None General Description: Description: Demonstrated ability to skipper a sloop-rigged keelboat of approximately 20 to 27 feet in length by day in
Basic Keelboat Sailing Standard (ASA 101) Prerequisites: None General Description: Description: Demonstrated ability to skipper a sloop-rigged keelboat of approximately 20 to 27 feet in length by day in
Rhodes 19 Tuning Guide
 Rhodes 19 Tuning Guide Jud Smith jsmith@doylesails Tomas Hornos tomas@doylesails.com Send order forms to: onedesign@doylesails..com SETTING UP YOUR RHODES 19 FOR DOYLE SAILS BEFORE STEPPING THE MAST 1.
TUNE YOUR SAILS SPEED. J/80 Tuning Guide. Rev R12a
 TUNE YOUR SAILS FOR OUTRIGHT SPEED J/80 Tuning Guide Rev R12a This Tuning Guide was written to help you get the most performance out of your J/80. North Sails has been sailing J/80s since they were first
10 (Racing) TIPS FOR PATIN SAILORS
 TIPS FOR PATIN SAILORS") 10 (Racing) TIPS FOR PATIN SAILORS 05 AUG 2007 NORTH SEA PATIN SAILORS BEACHCLUB DE WINDHAAN 1 1/ Course or Speed Scheme: (Figure 1) Correlation between wind direction, course and speed Example with a
10 (Racing) TIPS FOR PATIN SAILORS 05 AUG 2007 NORTH SEA PATIN SAILORS BEACHCLUB DE WINDHAAN 1 1/ Course or Speed Scheme: (Figure 1) Correlation between wind direction, course and speed Example with a
Deckhand Crew. Deckhand Crew Responsibilities
 Deckhand Crew Responsibilities Deckhand Crew Deckhands must be thorough seamen, for they are responsible for many types of tasks. Deckhands, along with the Bosuns, are in charge of most tasks done "on
Optimist Tuning Guide
 Optimist Tuning Guide Sail Care: To help you re new racing sail stay in top condition as long as possible here is some tips - Try not to crease your sail, some creases can cause MIT tears in your sail
Tying Farm Knots. Working with Heifers
 Tying Farm Knots A rope is one of the most common of tools used to restrain animals. Unfortunately, most people never learn which knots are most efficient to use in given situations. Practice tying the
Sails. Sails: extract from 'Super-detailing the Cutter Sherbourne' page 1 George Bandurek
 Sails There are many arguments for adding or omitting the sails on a model ship. There is no right answer and I decided to have a combination of set and furled sails on my model of HM cutter Sherbourne
J/70 Tuning Guide. onedesign.com Follow North Sails on... For any question you may have on tuning your J/70 for speed, contact our experts:
 Photo Paul Todd/OUTSIDE IMAGES For any question you may have on tuning your J/70 for speed, contact our experts: Ruairidh Scott 01329 443 430 ruairidh.scott@northsails.com Tim Healy 401-683-7997 tim.healy@northsails.com
Sailboat Rigging and Tuning
 Sailboat Rigging and Tuning February 13, 2006 The following texts are compiled from three main sources, Bob Sterne (www.crya.ca), Greg Fisher (www.modelyacht.org), and the Soling 1M website (www.solingonemeter.org).
Sail On The Water Teaching Aid Guide
 The purpose of this guide is to outline, for Course Instructors and Assistants, their preparation to help students experience various aspects of the Sail curriculum on the water. The Sail course lends
Tacking (sailing on port, tacking to starboard)
") 1. 2. Tactics 3. Main. Pit. 4. Genoa Port Tack. Guy. 5. Genoa Stbd Tack. Sewer. 6. Spinnaker Sheet. 7. Mast. 8. Bow. RS EB CC CM MK SA JS SK Tacking (sailing on port, tacking to starboard) Goto low-side
1. 2. Tactics 3. Main. Pit. 4. Genoa Port Tack. Guy. 5. Genoa Stbd Tack. Sewer. 6. Spinnaker Sheet. 7. Mast. 8. Bow. RS EB CC CM MK SA JS SK Tacking (sailing on port, tacking to starboard) Goto low-side
In Part 6 of this series, we completed building and painting the hull and rigged the bowsprit. Now, we re ready to make up the masts and spars.
 In Part 6 of this series, we completed building and painting the hull and rigged the bowsprit. Now, we re ready to make up the masts and spars. Making the Spars I prefer to make up all the spars before
12.9 Gennaker. February Setting up and sailing with the 12.9 Gennaker
 12.9 Gennaker Setting up and sailing with the 12.9 Gennaker February 2013 The 12.9 Gennaker is a new bigger gennaker for the Weta. The standard gennaker is 8 sqm and the 12.9 gennaker is 12.9 sqm. The
HOW TO RIG A CORMORANT
 HOW TO RIG A CORMORANT Page 1 of 6 Instructions adapted from Cormorant Owner s Handbook 1 Ensure that peak halyard, throat halyard and topping lift are attached to the mast as shown in Fig. 1. 2 Set-up
Weta Basic Rigging Guide
 Weta Basic Rigging Guide A quick reference guide of how to rig your Weta, with some tips to make rigging quick and easy! For a more indepth guide see our Weta Manual under Weta Owners on the website. 1.
Hansa 2.3 Rigging Guide
 Hansa 2.3 Rigging Guide Manufactured by Hansa Sailing Systems Pty Ltd ABN 56 079 318 031 4/4 Cumberland Avenue SOUTH NOWRA NSW 2541 AUSTRALIA Postal: PO Box 5048 NOWRA DC NSW 2541 Telephone: +61 2 4403
A Guide to Yacht Racing
 Guide to Yacht Racing Congratulations on choosing to go racing with Equinox Sailing. Yacht racing is one of the most exciting team sports around, requiring skill and team work. One-design yacht racing
Wind Light Moderate Heavy Speed 0-8 mph 9-17 mph 18 + mph
 Hobie 20 Racing Setting - Compiled by Bob Mimlitch, Fleet 23, Dallas, TX Most of the information is from Bob Curry's articles in Catamaran Sailor published by Mary Wells. Wind Light Moderate Heavy Speed
Lesson II: Salty Vocabulary
 Lesson II: Salty Vocabulary Purpose: The language used aboard a ship can feel foreign at first. We use the nautical terminology precisely and accurately not only for authenticity, but also to promote safety.
RIGGING INSTRUCTIONS Let's assume that you have your boat on a trailer when you take delivery from your dealer.
 This is the original owner's manual, written about 1972, and applicable for boats manufactured through 1978. Starting in 1979 a few changes were made in the roller furling jib and forestay arrangement.
Rocky Captain Users Manual
 Rocky Captain Users Manual 5/13/14 rev 3 pg Table of Contents LEROY (INFLATABLE DINGHY) 3 FLOAT PLAN 3 AIR 3 YAMAHA ENGINE 5 GASOLINE 5 CONTROLS FOR OPERATING ENGINE 6 TIE- OFF 10 MAINTENANCE 11 ROCKY
J/70 Tuning Guide. For any question you may have on tuning your J/70 for speed, contact our experts:
 Photo Paul Todd/OUTSIDE IMAGES For any question you may have on tuning your J/70 for speed, contact our experts: Tim Healy 401-683-7997 tim.healy@northsails.com Will Welles 401-683-7997 will.welles@northsails.com
UPWIND Light wind: <8 knots Sail Setting
 UPWIND Since the Laser is a strictly one designed class with very few controls, upwind sailing becomes very physical and technical. Big efforts will only result in little gains in your upwind speed. However,
Topaz OMEGA Rigging Instructions
 Topaz OMEGA Rigging Instructions www.toppersailboats.com TOPAZ OMEGA RIGGING INSTRUCTIONS CONTENTS 02. Introduction 02. Manufacturers Details 03. Maintenance 04. Raising the Mast 05. Attaching the Boom
The Main Gaff... Main Gaff completed. Bearing block
 Once the boom has been placed on the model, the topping lift needs to be rigged. It will be belayed to the port side cap rail. Use the eye bolt aft of the tackle we set up for the backstay. The topping
1 Tuning Platform Reseating Beam Pads Rudder alignment Noisy Foils Rig Tension...
 Contents 1 Tuning... 2 1.1 Platform... 2 1.2 Reseating Beam Pads... 2 1.3 Rudder alignment... 3 1.4 Noisy Foils... 3 1.5 Rig Tension... 4 1.6 Mast rake... 4 1.7 Spreader rake... 5 1.8 Diamond tension...
MSC-132: Introduction, Plain Whipping, Loops, Turns & Hitches
 MSC-132: Introduction, Plain Whipping, Loops, Turns & Hitches This presentation is designed to be used as a study companion to lectures, labs and handouts given in Fishing Gear Technology I. Advance each
Intermediate Cruising Standard (ASA 104)
") Intermediate Cruising Standard (ASA 104) Prerequisites: Basic Keelboat Sailing (ASA 101) and Basic Coastal Cruising (103) Certification General Description: Demonstrated ability to skipper a sloop-rigged,
Intermediate Cruising Standard (ASA 104) Prerequisites: Basic Keelboat Sailing (ASA 101) and Basic Coastal Cruising (103) Certification General Description: Demonstrated ability to skipper a sloop-rigged,
Preparing for the ISA Advanced dinghy sailing Instructor course Notes for organising ISA Advanced Sailing instructor course
 Preparing for the ISA Advanced dinghy sailing Instructor course Notes for organising ISA Advanced Sailing instructor course 1. Plan ahead, becoming an advanced dingy instructor takes time and planning.
LOOP KNOTS: A loop knot, like a hitch, fastens a rope to another object. A loop knot may be tied in the hand and then placed over the object, while a
 LOOP KNOTS: A loop knot, like a hitch, fastens a rope to another object. A loop knot may be tied in the hand and then placed over the object, while a hitch is tied directly to the object. However, since
Sheffield Sea Cadet SEAMANSHIP SM05 CONSOLIDATION SM01 SM04
 SEAMANSHIP CONSOLIDATION SM01 SM04 Reference Material SM01 SM02 SM03 SM04 PowerPoint presentation, laptop, projector, screen Model (optional) or pictures Quiz sheets as necessary Rope and spars to tie
Rigging Stages, Bosun s Chair, and Rope Ladders
 Contents Rigging Stages, Bosun s Chair, and Rope Ladders 3 Introduction 3 Rigging a stage 4 Rigging a Bosun s chair 5 Portable ladders 7 Gangways 8 Nautical Knowledge Ladders and Stages 1 2 Nautical Knowledge
LEARN TO SAIL HANDBOOK
 ENGLEWOOD SAILING ASSOCIATION, INC. ESTABLISHED 2002 LEARN TO SAIL HANDBOOK An Introduction to Small Boat Sailing www.englewoodsailing.org info@englewoodsailing.org 941-681-8190 W elcome to the sailing
TUNE YOUR SAILS SPEED. J/70 Tuning Guide Rev. Q10a. Photo Chris Howell
 TUNE SAILS FOR OUTRIGHT SPEED J/70 Tuning Guide Rev. Q10a Photo Chris Howell After countless hours sailing, testing and competing in the J/70 One Design, North Sails has updated our tuning notes and tips
The Matthew was the ship on which explorer John Cabot sailed to the New World in John Cabot s Ship THE MATTHEW
 The Matthew was the ship on which explorer John Cabot sailed to the New World in 1497. Although a little later than Christopher Columbus' initial voyage, it is widely debated among the scholars that John
Pelagic Sailing Club Membership Application
 Pelagic Sailing Club Membership Application For club use only Ck# Amt $ Date Crew Boat Owner Skipper Last Name First Name Spouse s name: Mailing Address City State Zip Phones: Home Work: Ext Cell: E-Mail
Pico rigging manual 2007.doc Page 1 of 28
 Pico rigging manual 2007.doc Page 1 of 28 Pico Rigging Instructions The Pico rigging instructions are a guide to rigging your boat. Due to production supplies certain parts may be slightly modified from
GYBE TALKING: A guide to sloop talk
 GYBE TALKING: A guide to sloop talk Before coming aboard for your sail, learn some basic vocabulary in sailor language. This will help you connect with your experience! Here s a list of some terms and
Marlinespike Seamanship
 20 Marlinespike Seamanship 157 Section 20 Marlinespike Seamanship Becket. An eye in the end of a block used for securing an end of a line; an eye in the end of a rope. Bend. To make fast a sail to a spar
MAST RAISING AND LOWERING
 MAST RAISING AND LOWERING If you are the owner of a sailing boat, there will come a time when the mast has to be lowered and raised whether for maintenance or to adhere to hard standing rules. There is