Summary / Conclusion. Annexes including: Technical data Lift diagrams Suspension chart and diagrams Technical specifications
|
|
|
- Camilla Webb
- 5 years ago
- Views:
Transcription

1
2 User Manual 1.1 Introduction 1.2 About This Manual Much More Than Just a Manual 1.3 P ilot proficiency level 2 About your wing Paramania 2.1 The design and technology of your ROKIT and how to use it 2.2 Reflex 2.3 Building your wing 2.4 With what is delivered your new wing 3 Flight 3.1 Implementation and controls pre flight checks 3.2 Flight Preparation Takeoff 3.2a back to sailing, wind zero 3.2.b face Takeoff is sailing, no wind 3.2.c The altitude taken after takeoff. 3.2.d The maneuverability in flight 3.2e The use of elevators and accelerator bar 3.3 Landing 3.3.a landing without engine 3.3.b Landing with engine 3.3.c Advanced maneuvers 3.5 The golden rules!! Summary / Conclusion Annexes including: Technical data Lift diagrams Suspension chart and diagrams Technical specifications
3 1.1 Introduction Since the invention of the wing of origin Reflex, the Reflex MK1 in 1994, Paramania has progressively favored the improvement of the level of safety, the speed, the performance, and the ease of maneuverability in the sport of the paramotor. Paramania is the only manufacturer to focus 100% on wings for motorized flight using Reflex technology: wings that we call "Paramotor Wings". Our constant evolution of Reflex technology for soft wings is reflected in our designer, Mike Campbell Jones. Wing model: The Reflex MK The Reflex MK The Action 2002 The Revolution 2005 The Action GT 2006 The GoFly 2007 The Fusion 2008 The Taxi 2008 The Revolution The GTR 2011 The GTX 2012 The GTS 2014 The Rokit 2014 Mike's experience gives the Paramania team a step ahead the ability and insight to design wings that always create new, avant garde technologies. 1.2 About this manual This manual is not intended for use in pilot training and must be carried out by qualified instructors. It is your safety to fly only after receiving training by an instructor or a vocational school This manual is there to help you understand your wing, please read it carefully and regularly! The flight information in this manual is intended for motorized flights rather than free flight. Most of the described flight operations are highlighted in the videos on the Paramania website. It must be understood that flight can be a dangerous activity, unless it is undertaken by persons properly trained in flight in a responsible and disciplined manner. As the owner of a Paramania wing, you have chosen to fly on one of the safest aircraft. However, as every aircraft is as safe as it is you, the pilot, is responsible for ensuring that You have the required training (see Paramania website) and experience to make your own informed judgments about how, where and when you are flying.
4 The paramotor (paraglider with motor) is a relatively new activity that is still evolving. If you have doubts about the suitability of your wing for the type of flight you wish to practice, or if you wish to extend your flight by other means, we recommend that you ask for additional information from your instructor or Ask directly from Paramania. Do not try to imitate maneuvers you may see on videos or during demonstrations without proper training from a qualified instructor. In order to achieve satisfactory performance, it is essential to match your Rokit with the appropriate harness, engine and propeller. Although we can make recommendations, the choice and suitability of the harnesses or motor remains outside our control and responsibility. *** Note * All of these tips are available from our network of dealers and other professional training centers. Paramania, can not be held responsible for any misuse of the wings. 1.3 Pilot Proficiency Level The Rokit can adapt to the flight conditions and the type of flight desired by the pilot. You have chosen a wing that will accompany you for a long time, which will allow you to progress and develop your skills in complete safety. If you have any concern about your skill level just contact a Paramania reseller or school and perfect yourself. 2. About your Rokit Its design, the technology used in the wing, what it offers you, the driver, and how to get the most out of it. The Rokit has its own style, completely different from what's on the market. The design was made so that it can travel great distances in a straight line while being playful. Using the great experience of our designer Mike C J in the field of soft wing, Paramania pushed the design of the paramotor wings to a whole new level. With a relatively high fineness, the large surface of the wing tips adds a new definition to roll. Tilted in a corner with a good knowledge of the use of the brakes, the accuracy and radius of turns can be tight and fun! Take altitude, release the trims to fully benefit from the 100% Reflex profile, cross the turbulence without any worries. Use the throttle bar to get maximum speed in a straight line.
5 2.1 Design Your Rokit was designed by Mike Campbell Jones. Its history in the development of Paramotor Wings that exclusively use Reflex wing profiles, coupled with its experience in the design of ULM and glider aircraft, means that your wings are the fruit of knowledge that spans over 30 years, Until the first days of hang gliding. ULMs were initially developed as motorized deltaplanes and over time promoted more powerful engines with smaller wings, therefore more stable. It quickly became apparent that the faster your wing, the more often you can use it! Paramania's innovations in wings for the paramotor allow the pilot to spend less time and effort flying actively to counter turbulence. The pilot is thus free to concentrate on navigation, move from A to B easily, or perform other tasks, such as photography, observation or more generally to please The Reflex Revolution Although your Rokit has been designed to fly like a conventional paraglider, it has a Reflex wing profile it is a specific wing type that has a tail integrated in its profile that makes the wing Self stable. These profiles were originally developed for aircraft without tails (neither fuselages nor empennages). When they are introduced into a wing of the paraglider type this gives satisfactory pitch characteristics. The load under the wing is no longer its sole source of stability. The wing maintains its attitude as well as the angle of incidence, rising and falling through thermal and turbulence, while remaining stable above the pilot's head, which requires use of controls Minimal on the part of the pilot. As a result, more than 50% of the wings used for the paramotor are now wings with a Reflex profile. About Reflex Technology The history of Paramania design and the pioneering developments of Reflex technology (since 1994) has given us the experience to design wing profiles and lift systems that allow the pilot to safely pass through From a traditional paraglider to a paramotor wing, changing the shape of the wing and thus meeting the requirements of paramotor flight. Many wing makers entering the paramotor market offer different versions of Reflex technology. For Paramania the essential characteristic of a wing with a Reflex profile is that it has a positive pitching torque: the wing will tilt forward at the inlet and backwards at the exit of a thermal. A normal paraglider wing pitch backwards at the entrance and forward at the exit of the thermal. This phenomenon is visible when passing through turbulent air or thermal activity and requires more action from the pilot than with a wing with a Reflex profile.
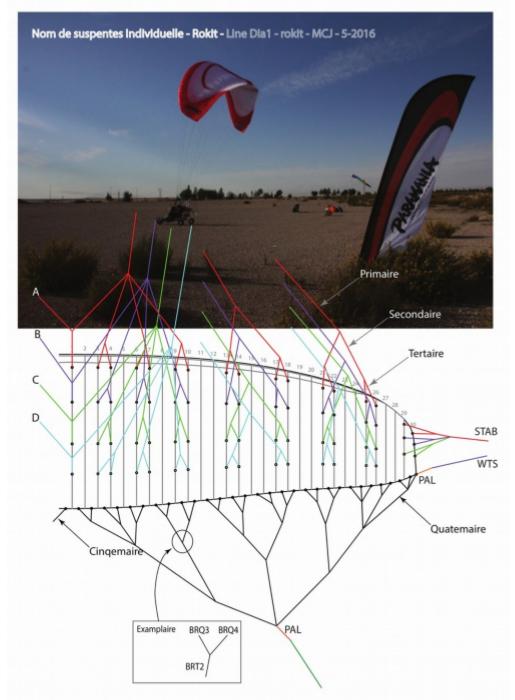
6 It became clear that without the introduction of Reflex technology into the wing profiles, we would have seen many accidents because the necessary skills of pilots to fly normal paragliders with low level engines under turbulent conditions are extremely High. In fact Reflex technology has allowed our sport to evolve, and to fly safely. Load Distribution Diagram: Paramania calculations made using only A, B and wing tips. (The distribution of in flight loads with the SLR wings is advanced towards the leading edge relative to the traditional profile wings.) The line positions shown below are used to calculate loads, C, D and Lines are not taken into account. Legend of color: dark (heavy load) to clear (low load)
: The word \"composite\" describes two or more elements that combine to create a new material with new properties.")
7 About the CLE (composite leading edge) system Our new technology, the leading edge composite. (Composite Leading Edge): The word "composite" describes two or more elements that combine to create a new material with new properties. Our latest composite, Dacron with Nylon66, is strategically placed to work in compression. The result is unidirectional stiffness, which keeps the air inlets open and creates a very smooth leading edge, while maintaining the flexibility to reduce the risk of ties. Take off is a whole new experience with this system. Why bigger central cells (fuselage)? There are 3 main reasons. 1. Structurally In general, when paragliders are constructed with a higher elongation, the central chord of the wing becomes narrower, hence less rigid. Increasing the volume and depth at the center of the wing allows us to produce a wing with a higher elongation while maintaining the same stiffness levels as a low elongation wing. 2. Aerodynamics Larger center cells can behave like a "wing strake" or a barrier. This helps to control the air flow to the trailing edge and the wing tips. This reduces drag induced and gives better directional stability. Note: All birds and most aircraft have a central fuselage! 3. A large central cell also provides a structure for connecting the lines on both sides, giving an acceleration in the inflation of the sail and therefore an improvement in take off as the weight of the pilot is transferred on two sides at a time. It is the same as the diagonal structures on a paraglider harness, on the other hand, system is integrated in the wing.
8 Why the "Keel Lines Center"? Both sides of the wing are connected by "Center Keel Lines" lines, which allow a controlled weight movement on each side. The pilot is therefore able to transfer the weight without deformation of the center of the wing. The two parts being linked, this improves the closing recovery dramatically, as the pilot's weight is always loaded on more than half of the wing. Here we see the wing with a minimum of deformation in the center. 2.3 Construction Our wings are produced by Aero dynamics in Sri Lanka, precision and quality is clearly visible in all our wings. Wing strength and durability have been achieved through an innovative design and a judicious choice of the best materials of the moment. All the materials from which your wing is manufactured are bundled and all stages of its manufacture can be traced. The external and internal surfaces are manufactured from the usual Porcher Marine NCV 100%, 44g and 37g. The wing tips, leading edge, and trailing edge are reinforced with a mixture of Mylar strips. The semi closed leading edge improves aerodynamics while stabilizing lateral movement between surfaces, giving it a stronger or stiffer feel once in the air.

9 The structural ribs These have been designed with inclined oval openings that allow the air to circulate where the internal pressure of the wing needed. They open like valves to widen their passage during inflation when the cells are not yet loaded, once under pressure, the forces are distributed efficiently from the points of fixation of the lines in the upper surface, this Minimizes the distortions that would have been created by conventional openings. The hangers are reinforced in 3 dimensions: vertically with the main rib, at an angle with the diagonal ribs, and 90 degrees with the lateral band on the bottom surface. The ribs are strongly reinforced by Mylar where the loads are the most important. Around attachments "A" and "B". The special line configuration Unlike conventional structures whose strength depends on the weakest element, a paraglider has a structure close to that of a tree where the outer branches are less critical, the structure can remain functional and coherent, even without the external parts. Your Rokit maximizes the safety of this structure by having many extra lines to the wingtips, these lines act like a net, which considerably reduces the possibility of ties (for an explanation of ties see paragraph 3.4). All the angles of suspension are calculated individually to act as a system of collection of fabric. Thus the wing can actually change its shape, much like a bird and its feathers! The configuration of the lines and the structure of the diagonal ribs have similar angles throughout the wing, which further improves the distribution of the load, we have found that this allows a much more rapid inflation of the Rokit. All the lines are made from the latest suspended technology, Paramania uses a blend of the best qualities of hangers that are available, which are both solid and flexible, remain stable at temperature and are less prone to shrinkage when the load Of the wing is light.
10 The links that connect the lines to the elevators are made of polished stainless steel. This avoids corrosion and gives excellent strength and durability. The lifting straps are made of polyester. The main fixing points are reinforced in Cordura, to protect against the wear of carabiners. Your Rokit was built for paramotor use as new it has a safety factor of about 50% beyond its maximum load. It has been designed to maintain its specifications for approximately 600 hours. WARNING: Moisture and / or UV exposure will greatly reduce the life of your kite. Always store your kite in dry, dark conditions. (Consult your care and maintenance manual) A complete list of all the materials used to make your wing is in the manual of your technical wing. 2.4 What is delivered with your new wing Rokit wing User manual (USB key or web site) Paramania Ruck bag Hi tech Multibag Inside bag and compression strap Basic repair kit, including a primary "A" replacement these being most often damaged and most important. Complete backpack kit complete (High range kit) Miscellaneous Accessories Paramania Your Rokit is an aircraft As such, it was fully inspected, first by the factory, and also by your local Paramania dealer. If you are not completely satisfied with your Paramania wing, please contact your dealer directly. (And if you are happy with the wing, contact him too!) 3. Flight The following applies to motorized flight. For free flight, we recommend to all pilots, to contact a school of paragliding near your home, to improve your skills we encourage to practice free flight. The correct combination of the wing, harness, engine, and pilot is vital. Here are some tips on this. See the "Recommended" table in your specific wing technical manual. Paramania can not be held responsible for the multitude of possible combinations, but if you wish to contact us for advice, do not hesitate. NOTE: Pre flight inspection of the wing, harness and engine is essential before any take off.
11 3.1 Set up of controls and controls pre flight checks Static Test / Suspended Pilot It is best to perform this test with the help of an experienced instructor or pilot. Before your first flight with a motor, Paramania recommends a static test with the engine and the elevators. Put your paramotor on the back, then hang it under a suitable structure (swing gantry for example) by the wing links using a rope or angles. Sit in the harness in flight configuration, get help from an assistant and rescue the elevators stretched upwards in front of the hang points. The objective is to verify that the pilot is able to catch the brake controls in flight. Make this check for all trim positions and simulate a free loose handle. All new wings leave the factory set for low hooking points. It is best to seek advice from a professional, assistance from Paramania or a qualified representative. The brake line lengths The brakes are clearly marked in two places, because the elevators have a lower secondary pulley system, especially for paramotors with high hook points (some models are now equipped with a sliding pulley system Only up or down for this positioning). Make sure your pulley is in the correct position. These line marking positions are fixed and do not require any adjustment. For your safety, stay in the marking areas of the lines, for your safety! A useful method to check the length of the brakes if the markings are worn or erased: Choose a constant laminar wind of about 10km / h. Inflate over your head, with an ordinary harness or your engine on the back. When the wing is well stabilized, check that, when the brake handles are in place, the trailing edge of the wing is not pulled down. While you are pulling gently on the brakes, you should have a few inches of movement before starting to pull on trailing edge. Make sure it's the same length on both sides. First flights To get used to your new Rokit your first flights should be made using the trims in take off position. That is to say the one that is marked between the "full slow" and "neutral" positions. Try to fly with a small amount of brake just a small pull until a slight tension is felt at the controls. When you're more confident with your wing, test with faster elevator settings, apply fifth wheel brackets, use the throttle bar, enjoy the extra speed and safety your Paramania wing offers you Flight Preparation
12 3.2a Wind to sail take off The hardest thing for any pilot is take off back to the sail with no wind! Particular attention has been given to this area: due to its Reflex profile, your wing has been designed to be extremely simple to take off, it is placed above you, it will rarely overtake you and has excellent directional stability. It is very rare that the wind is completely zero, it is essential for this type of aircraft to take off in front of the wind and to remain there until reaching a height of safety (in relation to the terrain and its environment). This reduces the risk of loss of speed during the initial climb. Special attention must be paid to trees, power lines and other obstacles that can generate turbulence. Preparing Your Rokit Unfolding the Rokit, facing the wind, the lines are fully extended as if they were attached to the engine, then lay the elevators on the ground ready to attach to the engine. Adjust the elevators to the take off position (faster settings may be desirable under higher wind conditions). Make sure that during the engine warm up you put it in the opposite direction of your wing, to prevent the wind from pushing the wing towards the propeller. Perform the following checks to ensure that everything is properly equipped and secured: Pre flight checks Pilot prepared safely, hoofs closed, no loose clothing? Port of the helmet and attached? Links correctly connected to the elevators (no twist) and the nuts well secured? Lifts adjusted to the correct position? Nothing likely to get entangled in the propeller? Accelerator bar properly set up, free access and out of reach of the propeller? Secure, free and not twisted brakes? Wing Tip Steering, in place, secured and adjusted correctly? Wing secure and well tethered? Hot engine and can reach full power? Clear and free air space for take off? From now on, you can start the momentum run. If the tension in the lines is weak and you turn over, they can reach the propeller. Falling back on your engine is both dangerous and expensive and should be avoided at all costs. When taking off, if the pressure on each of your brakes is balanced, go ahead, opening the throttle control gradually to full power while peeling, leaning back against the thrust so that the engine Pushes you horizontally rather than towards the ground.
13 ATTENTION paragliding pilots! Paraglider pilots who are not used to using a motor often lean too far forward. This can lead to lines in the helix or worse, the hand can get dangerously close to the propeller, especially if the cage is not very rigid. It is best to try not to control the brakes, and let the wing come. If it begins to go on one side, move laterally under the center of the wing. If possible, try to keep the direction of your take off. If the wing begins to fall backwards, increase the pressure on the two fronts "A" to help it return to the top. When you increase power, try to maintain a constant angle with the engine and operate the power control smoothly. Sudden course changes will alter your course due to the powerful gyroscopic and torque effects. As the wing rises, the resistance decreases. Before this happens, it is best to stay in motion forward and looking in the direction of takeoff, while feeling the pressure of the wing. Normally, it will stabilize above your head without you passing by. When you feel resistance decrease it is the right time to visually control your wing, making sure it is well inflated and that there are no objects hanging in the lines and that they are not Not mingled. But this must be done while continuing to advance and without turning. Take the time to accelerate, feel the pressure on the brakes, correct the course if necessary until the lift is sufficient to take off. If the wing is off to the side or behind it can not be recovered, turn off the engine, stop take off and prepare for take off again. Many pilots try to watch the wing as it rises, it generates asymmetrical parasitic movements, affects the course and generates gyroscopic effects that are detrimental to a good take off. Points to note: If your propeller cage is fragile, the pressure of the lines during take off can distort it to the point of touching the propeller. If this is the case, make sure the lines have passed the cage before applying ka full power. All actions from the driver on the controls must be smooth and gradual. Do not attempt to take off if the wing is not above you. Dangerous swings can occur if you apply full power with the wing too far to one side. Keep your feet down running until you are certain to fly! With the trims in the fast position, the wing will need more brake to take off. Make sure that your lines are not tangled with the throttle bar. 3.2.b Take off in front of the sail in a strong wind Paramania recommends this method of take off. Due to the ease of inflation of the Rokit, it is very much to perform a "face sail" inflation with both elevators and a brake in one hand, the opposite brake and the gas handle in the other. It is also possible to take off with only the brakes in hand without pulling the "A". If the wind is sustained, it is the best method to take off, but if the wind is low and changing, it is not easy to retreat with the engine running, in which case the "sail" inflation is more appropriate. It is wise not to spread your Rokit while it may be blown away by the wind as long as you are not
14 ready to take off, especially if the elevators are already connected to the chassis. (It could fly by itself!) Place the folded wing on the extrados with the trailing edge facing the wind. Unfold enough to Locate the lines "before", dewist the elevators and verify that no line goes under the leading edge. Extend the elevators to the wind and separate the left one from the one on the right. We suggest turning the elevators one on top of the other according to the turning direction that suits you when you turn to take off. Indeed, once connected to the chassis, it is virtually impossible to turn around unattended. Keep the "D" all the time in order to ensure that the wing does not take off in the strong wind. Perform your usual pre flight checks now. After starting and preheating your engine to the wind of the wing, connect the risers to the chassis links by facing the wing. By pulling on the "A" and holding the elevator "D" at the same time, the wing stands like a wall, facing the wind and ready to inflate. Pulling on the "A" makes it possible to scoop and return the air in the boxes, the traction on the "D" makes it possible to keep the wing on the ground. On sloping terrain, the leading edge must be horizontal. We recommend pre inflation to visually check that all lines are bile detangled. Holding the elevators, brakes and gas control as above, gently pulls the "front" elevators until the wing is over your head, it is unlikely that the wing will overtake you Especially if it is deformed. This may seem contrary to what happens with a free flying wing, with a "fast" setting (trims to neutral), the Rokit's profile stabilizes it by itself and prevents any pitching movement forward. A slight action on the brakes also makes it possible to stop the wing. When the wing is stable above your head, make your U turn and take off. As in sail take off, the right combination of trims / brakes / power must be found to have the best ratio of climb / speed ratio. Experienced pilot tips the U turn will be easier if you incline the wing slightly in the direction of the U turn. If you are not satisfied with your inflation, it is easy to abort it by resting the wing on the ground by pulling the "D" train long on the ground in order to master this technique perfectly. regular practice of ground exercises is highly recommended, your school or a local club can be a valuable help. all actions must be soft and progressive. do not attempt to take off if the wing is not stabilized well above your head. Dangerous swings can occur if you apply full engine power while the wing is tilted to one side. Keep your legs on the ground until you are sure you have completely taken off the more "detoured" you are, the more you will need to apply the brake to take off. WARNING: Many pilots, especially if they are paragliders, usually use the brakes to slide or control the wing in windy conditions, experience has shown that sooner or later they may put their hands In the propeller. It is best to use the rear or the "D"
15 3.2. C The initial climb The Rokit is more like a fixed wing aircraft than a paraglider. As long as there is no obstacle in the take off direction, it is safer to carry out an acceleration bearing at ground level after take off in order to gain speed and then to convert this speed into height using the brakes, then "slightly hand" by releasing them slightly. The other reason for which it is recommended to proceed in this way is in the event of loss of engine power the risk of stalling or of starting in spin is attenuated. The Rokit does not tend to remain behind the pilot with a low speed and a high angle of incidence, this limits the risk of stall in case of sudden loss of power. Perform your approaches carefully. Do not put yourself in difficult situations, always keep a sufficient speed, and keep control during low flying phases. Once assembled, combine the engine thrust and the action with the brakes to obtain the desired rate of climb. Depending on your attachment system and their adjustment, you will have a more or less important torque effect. It may be necessary to counteract this effect to maintain your course. If you experience a strong torque effect while riding at full power, be careful, as there may be a risk of stalling. By simply reducing the gases, it reduces the effects. Due to the large distance between the engine thrust axis and the wing, applying heavy force suddenly can have serious consequences. Be careful, especially during initial climbing or near the ground. Do not attempt to climb too much by excessively pulling the brakes to increase the riding rate, this will add an additional drag that combined with a large thrust increases the risk of stalling or spinning. 3.2.d Flight Handling Like any new aircraft, we recommend you take the time to uncover your wing without precipitation. Be gentle at the controls and make sure that when you start a turn you finish it properly. Try to imagine your flight paths before you realize them. Power of Induced Oscillations Some combinations of propeller weight, power and size can cause oscillation, torque effects or gyroscopic effect, which can cause the pilot to lift on one side. This usually occurs in uphill rather than level flight. The saddle support is the best solution to counter these effects. These oscillations appear mainly at high engine power, high power and a large helix favor these parasitic oscillations. It may happen that the actions of the driver amplify these effects (on piloting). The simplest in this case is to decrease the engine power and release the brakes completely. It is quite common even for experienced pilots to be too busy on the controls and to inadvertently induce oscillations, in which case it is usually enough to stop moving the hands by putting them against the elevators for example. To counter this: make sure to make your turns by gentle actions adjust the engine power adjust the adjustment of the anti torque strap if there is one privilege the saddle supports may use the adjustment Possible on TST to counteract torque effects.
16 Flight level Once at a safe height after take off, if you want to make a distance flight, set the trims to the fast position and release the brakes completely. If you are a paraglider pilot, you will need a little time to have sufficient confidence in your wing, but you will eventually discover another way to fly! If the conditions are very turbulent you can keep your hands on the brakes, but the Reflex profile wings are even more stable at high speeds, we suggest you release the brakes and enjoy the flight. If the wing tip controls (WTS) are mounted, they can be used to hold the bearing. The WTS really help to maintain your steering in particular when you cross a thermal with only one side of the wing. WARNING : All paramotors should have a net capable of preventing the brake controls from entering the propeller, check yours! This happens especially during the flight when moving the weight. If possible, do a static test by hanging to check. If you have an alti / vario, this one can help you find the best speed / drag compromise by maintaining the plateau (zero climb rate), it depends on your own configuration. With a good understanding of wind conditions at different altitudes, use of thermal activity, dynamic ascents, it is possible to save fuel and greatly extend your flight capabilities. The engine can help you get to the right place at the right time to make the most of the conditions. Do not be afraid to exploit the heat to gain height and save fuel, the Rokit is particularly effective in thermal flight. The use of trims in "slow" position will allow you to climb faster. 3.2.e Use of Trims, WST and Accelerator Bar Trims Once you have a bit of experience, start by using different setting positions of the trims, we recommend you familiarize yourself with these settings during static floor checks. It is important to operate the trims by pulling them down in the axis of the elevators. 1. it will use the trim strap less quickly 2. the maneuver is easier The big trim race available, requires a little habit, but once you have mastered them, you will realize all the possibilities offered by Performance and pleasure. WST The WST system is easily maneuvered with a hand movement in an arc of circle first by moving away from the pilot and then downwards. Indeed, the pulley system works better this way. If you pull only downwards, the effort required is greater because the pulley does not use the entire available stroke.
17 Accelerator bar The accelerator bar can only be used with a load close to the minimum (135 kg), beyond which the force to be applied by the pilot becomes too great. Nevertheless, in the trolley, it is possible to use the rod connection hooks as "A assist" to facilitate inflation of the wing. With the bar, the wing better traverses the turbulence. However, if they become very strong, we recommend releasing the bar and returning to the normal flight configuration. The bar is initially designed for straight flight in level, but experienced pilots can also use it in turn, slowly releasing the bar in turn is equivalent to pulling the handle on a conventional 3 axle aircraft. This improves maneuverability. You can also use the bar to "surf" the thermals, gradually push the bar in the ascendancy to convert it to speed, and release the bar at the exit of ancestry to reconvert the speed and energy stored In bearing. The bar is a safety element, when it becomes difficult to advance against the wind. This situation can be encountered on the seashore, for example, when the earth breeze rises and pushes you towards the sea. The bar can be used safely over the trim range. 3.3 Landing Points to note: Remember, the trims and the bar are orders, so there are additional items to check during the pre flight visit! If the trim settings are asymmetrical, the wing will only fly "crab". If the trims are not properly positioned before take off or if they have slipped asymmetrically during take off, it is preferable to interrupt the take off and start again. There are two options: with the engine running or not. 3.3.a Landing without engine Practice to pose without motor, it is an excellent training! Cut the engine about 50m and glide like a paraglider. This minimizes the risk of damaging your propeller but you only have one test. The Rokit has a good finesse, so a well constructed approach is necessary. During the "flare" during landing, the tension at the brakes, initially low, becomes progressively harder and this, over a great stroke, which prevents the stall. With the trims in the "slow" position, the landing is very easy. As speed is a safety feature, a long "flare" converts speed into until the moment of posing. With the trims in faster position, this phase will be longer and will require more time and increased distance traveled. In this case, a large amount of energy must be dissipated, which can make you go up if you are not soft to the controls. Nevertheless, the brakes are very effective, and allow in the end of the race to stop the wing and to slow you down immediately. You will quickly learn to take confidence to fly with stronger than normal wind, but be very careful when you are near the ground. After landing in strong wind, slide the wing firmly by pulling the rear elevators or "D", or better, by pulling
18 the brake on one side which allows to see its wing descend on the side which avoids Any risk of encountering the lines with the propeller. 3.3.b Landing with engine With the engine idling, take a low descent plan as you approach the ground, perform a "flare" to decrease the speed before landing. Turn off the engine when the wheels touch the ground. This method allows at any time to repeat a lap if the approach is not good. On the other hand, the engine must be switched off at the right time to prevent the lines from being caught in the propeller. Points to note: If possible, define your landing area before taking off, especially for trolleys. Check the wind direction before landing and potential sources of turbulence (rotor). Landing without a motor usually requires less track length. If in doubt, train at landings until you are certain you can land safely. Never count on your engine always be ready for an emergency landing, Train you to make precise landings. 3.3.c Advanced maneuvers It is essential that pilots take appropriate training before attempting acrobatics. We suggest that you seek advice from experienced instructors or pilots before performing these maneuvers or before flying in extreme conditions, and you should also equip yourself with a rescue parachute if undertaking this type of flight. 3.5 THE GOLDEN RULES of Paramania! Wing + engine + pilot = paramotor. These 3 primary elements are a whole. This list of rules will help you stay safe. If you spot a problem, no matter how important, treat it NOW! Never rush anything, take your time, stay calm. Study the theory of flight take the time to do it. 75% of the accidents are due to the propeller, paramotor on the ground. Keep people away from your propeller and make sure they are in safe areas. Before starting the engine get into the habit of shouting "MOTOR" to remind you of the necessary safety precautions. Do not be too shy or too proud to ask advice from local paramotorists especially experienced pilots.
19 Interested in the weather. Always carry out pre flight checks before taking off. Check, check and recheck the fuel system for leaks. Make sure you have enough fuel to get to your destination. Better to have too much than not enough. Check any objects that could get through or fall into the propeller in flight and secure them securely. Wear a flight suit in which everything can be stored. Never place your engine wind in the back relative to your kite. Always wear a helmet and tie it down before attaching yourself to the harness. Never trust the engine it can break down at any time. Always fly thinking of the wing NOT the engine. Analyze the sky at any time know where others are at any time! Do not put yourself in danger by flying, when flying over water or trees, an engine failure can happen at any time. If you see pylons or poles, there are surely electric lines. Locate them before flying low. They are one of our greatest dangers! Avoid flying wind in the back at low altitude this greatly reduces your options! Try not to fly in the wake turbulence of your own propeller or that of others, especially at low altitude. It is imprudent to fly without the brakes below about 100m above the ground. If there is an engine failure, it will be necessary to have the controls in hand very quickly to prepare the landing. Monitor your mechanics, a suspicious sound or an abnormal vibration may be the sign of a more serious problem, in this case land immediately and find the source. Study your navigation and respect the aviation regulations, consult the aeronautical charts and respect the local rules. Remember, the sound of your engine can disturb some people.
20 Precautions must be taken during overflight near livestock farming (especially on pig and horse farms) and other sensitive areas such as nature parks. Respect landowners and farmers. ABSTRACT We would like to reiterate the points raised in section 1 of this manual: It must be understood that flight can be a dangerous activity, unless undertaken by properly trained people and flying in a responsible and disciplined manner. As the owner of a Paramania wing, you have chosen to fly with one of the safest aircraft of this type. Nevertheless, it is you, the pilot, who are responsible for ensuring that you have the training and experience to make your own judgments about how, where, and when you are flying. Although this is not a training manual, it is a collection of experiences of several years of flying and useful tips that will help you fly well. Please see the attached pages for more information about your Paramania Rokit Do not hesitate to contact us and give us your comments and suggestions. The team wishes you many hours of fun under your Paramania wing. The Paramania Team info@paramania.com

21 Annexes:
22

23


24
25
Aerodynamic Terms. Angle of attack is the angle between the relative wind and the wing chord line. [Figure 2-2] Leading edge. Upper camber.
![Aerodynamic Terms. Angle of attack is the angle between the relative wind and the wing chord line. [Figure 2-2] Leading edge. Upper camber.](/thumbs/82/86661300.jpg "Aerodynamic Terms. Angle of attack is the angle between the relative wind and the wing chord line. [Figure 2-2] Leading edge. Upper camber.") Chapters 2 and 3 of the Pilot s Handbook of Aeronautical Knowledge (FAA-H-8083-25) apply to powered parachutes and are a prerequisite to reading this book. This chapter will focus on the aerodynamic fundamentals
Chapters 2 and 3 of the Pilot s Handbook of Aeronautical Knowledge (FAA-H-8083-25) apply to powered parachutes and are a prerequisite to reading this book. This chapter will focus on the aerodynamic fundamentals
Aerodyne Flight Recommendations
 Aerodyne Flight Recommendations In this essay we present you with some recommendations, in order to assist you in learning more about your canopy, and how to use it in a better way, so that you can become
XI.C. Power-Off Stalls
 References: FAA-H-8083-3; POH/AFM Objectives Key Elements Elements Schedule Equipment IP s Actions SP s Actions Completion Standards The student should develop knowledge of stalls regarding aerodynamics,
CHAPTER 9 PROPELLERS
 CHAPTER 9 CHAPTER 9 PROPELLERS CONTENTS PAGE How Lift is Generated 02 Helix Angle 04 Blade Angle of Attack and Helix Angle Changes 06 Variable Blade Angle Mechanism 08 Blade Angles 10 Blade Twist 12 PROPELLERS
THE AIRCRAFT IN FLIGHT Issue /07/12
 1 INTRODUCTION This series of tutorials for the CIX VFR Club are based on real world training. Each document focuses on a small part only of the necessary skills required to fly a light aircraft, and by
! USPPA PPG1 Written Test Revised 2/23/ Formating & Clarity
 1) You should complete an inspection of your engine, harness, lines, and glider a. Before each flight. b. After 10 hours of operation. c. It is only necessary if you suspect there is damage caused by a
XI.B. Power-On Stalls
 XI.B. Power-On Stalls References: AC 61-67; FAA-H-8083-3; POH/AFM Objectives Key Elements Elements Schedule Equipment IP s Actions SP s Actions Completion Standards The student should develop knowledge
Ottawa Remote Control Club Wings Program
 + Ottawa Remote Control Club Wings Program Guide line By Shahram Ghorashi Chief Flying Instructor Table of Contents Rule and regulation Quiz 3 Purpose of the program 4 Theory of flight Thrust 4 Drag 4
CIVIL AIR PATROL United States Air Force Auxiliary Cadet Program Directorate. Cessna 172 Maneuvers and Procedures
 CIVIL AIR PATROL United States Air Force Auxiliary Cadet Program Directorate Cessna 172 Maneuvers and Procedures This study guide is designed for the National Flight Academy Ground School. The information
PERFORMANCE MANEUVERS
 Ch 09.qxd 5/7/04 8:14 AM Page 9-1 PERFORMANCE MANEUVERS Performance maneuvers are used to develop a high degree of pilot skill. They aid the pilot in analyzing the forces acting on the airplane and in
Aerodynamics Principles
 Aerodynamics Principles Stage 1 Ground Lesson 3 Chapter 3 / Pages 2-18 3:00 Hrs Harold E. Calderon AGI, CFI, CFII, and MEI Lesson Objectives Become familiar with the four forces of flight, aerodynamic
Winnipeg Headingley Aero Modellers. Things About Airplanes.
 Winnipeg Headingley Aero Modellers Things About Airplanes. Table of Contents Introduction...2 The Airplane...2 How the Airplane is Controlled...3 How the Airplane Flies...6 Lift...6 Weight...8 Thrust...9
PRINCIPLES OF FLIGHT
 CHAPTER 3 PRINCIPLES OF FLIGHT INTRODUCTION Man has always wanted to fly. Legends from the very earliest times bear witness to this wish. Perhaps the most famous of these legends is the Greek myth about
Stability and Flight Controls
 Stability and Flight Controls Three Axes of Flight Longitudinal (green) Nose to tail Lateral (blue) Wing tip to Wing tip Vertical (red) Top to bottom Arm Moment Force Controls The Flight Controls Pitch
II.E. Airplane Flight Controls
 References: FAA-H-8083-3; FAA-8083-3-25 Objectives Key Elements Elements Schedule Equipment IP s Actions SP s Actions Completion Standards The student should develop knowledge of the elements related to
AIRCRAFT PRIMARY CONTROLS A I R C R A F T G E N E R A L K N O W L E D G E
 1.02.02 AIRCRAFT PRIMARY CONTROLS 1. 0 2 A I R C R A F T G E N E R A L K N O W L E D G E CONTROLLING AIRCRAFT AIRCRAFT CONTROL SYSTEM In general, we use control inputs of the following devices in cabin:
Lesson: Airspeed Control
 11/20/2018 Airspeed Control Page 1 Lesson: Airspeed Control Objectives: o Knowledge o An understanding of the aerodynamics related to airspeed control o Skill o The ability to establish and maintain a
XI.D. Crossed-Control Stalls
 References: FAA-H-8083-3; POH/AFM Objectives Key Elements Elements Schedule Equipment IP s Actions SP s Actions Completion Standards The student should understand the dynamics of a crossed-control stall
Lesson: Pitch Trim. Materials / Equipment Publications o Flight Training Manual for Gliders (Holtz) Lesson 4.4 Using the Trim Control.
 Lesson 4.4 Using the Trim Control.") 11/18/2015 Pitch Trim Page 1 Lesson: Pitch Trim Objectives: o Knowledge o An understanding of the aerodynamics related to longitudinal (pitch) stability o Skill o Use of the pitch trim system to control
11/18/2015 Pitch Trim Page 1 Lesson: Pitch Trim Objectives: o Knowledge o An understanding of the aerodynamics related to longitudinal (pitch) stability o Skill o Use of the pitch trim system to control
POWERED FLIGHT HOVERING FLIGHT
 Once a helicopter leaves the ground, it is acted upon by the four aerodynamic forces. In this chapter, we will examine these forces as they relate to flight maneuvers. POWERED FLIGHT In powered flight
Building Instructions ME 163 B 1a M 1:5 Turbine
 Building Instructions ME 163 B 1a M 1:5 Turbine Thank you for choosing our kit of the Me-163B. We ask you to read the instruction once in advance before building this kit in order to avoid mistakes. Make
Principles of glider flight
 Principles of glider flight [ Lecture 2: Control and stability ] Richard Lancaster Email: Richard@RJPLancaster.net Twitter: @RJPLancaster ASK-21 illustrations Copyright 1983 Alexander Schleicher GmbH &
Semi Freddo Snow kite [Ram Air]
![Semi Freddo Snow kite [Ram Air]](/thumbs/89/97639710.jpg "Semi Freddo Snow kite [Ram Air]") User manual Semi Freddo Snow kite [Ram Air] This manual gives you detailed instructions on how to use your new Semi Freddo kite. We recommend you take your time to read the instructions. In case you have
User manual Semi Freddo Snow kite [Ram Air] This manual gives you detailed instructions on how to use your new Semi Freddo kite. We recommend you take your time to read the instructions. In case you have
PROCEDURES GUIDE CESSNA 172N SKYHAWK
 PROCEDURES GUIDE CESSNA 172N SKYHAWK THESE PROCEDURES ARE DESIGNED TO PROVIDE STANDARDIZED METHODS UNDER NORMAL CONDITIONS. AS CONDITIONS CHANGE, THE PROCEDURES WILL NEED TO BE ADJUSTED. PASSENGER BRIEFING
The canard. Why such a configuration? Credit : Jean-François Edange
 The canard Why such a configuration? Credit : Jean-François Edange N obody doubtless knows that a great majority of light or heavy planes share a common design. Schematically, we find a fuselage, wings
Visualized Flight Maneuvers Handbook
 Visualized Flight Maneuvers Handbook For High Wing Aircraft Third Edition For Instructors and Students Aviation Supplies & Academics, Inc. Newcastle, Washington Visualized Flight Maneuvers Handbook for
Climbs, descents, turns, and stalls These are some of the maneuvers you'll practice, and practice, and practice By David Montoya
 Climbs, descents, turns, and stalls These are some of the maneuvers you'll practice, and practice, and practice By David Montoya Air work stalls, steep turns, climbs, descents, slow flight is the one element
Cessna 152 Standardization Manual
 Cessna 152 Standardization Manual This manual is to be utilized in conjunction with the manufacturers approved POH/ AFM and the Airplane Flying Handbook (FAA-H-8083-3A). This manual should be used as a
NORMAL TAKEOFF AND CLIMB
 NORMAL TAKEOFF AND CLIMB CROSSWIND TAKEOFF AND CLIMB The normal takeoff is one in which the airplane is headed directly into the wind or the wind is very light, and the takeoff surface is firm with no
Homework Exercise to prepare for Class #2.
 Homework Exercise to prepare for Class #2. Answer these on notebook paper then correct or improve your answers (using another color) by referring to the answer sheet. 1. Identify the major components depicted
ultimate All-round Performance
 ultimate All-round Performance During the development of the R1 V2 we experienced the overall enhancement in performance achieved from a lighter weight kite. The Chrono V2 UltraLight combines our high
4-Line and 5-Line modes
 ozone // Håkon Mæland a n e w I NS P I RED NAT U RE / / e r a D RI V EN T HE ELEMEN TS The Hyperlink V1 is also available in an Ultra Light version. This is the same design produced with high quality lightweight
TECHNIQUES FOR OFF AIRPORT OPERATIONS
 Off Airport Ops Guide TECHNIQUES FOR OFF AIRPORT OPERATIONS Note: This document suggests techniques and procedures to improve the safety of off-airport operations. It assumes that pilots have received
Congratulations on purchasing a Peter Lynn Arc, the new form of traction kite technology for kitesurfing and kitesailing, but also very useful for
 Congratulations on purchasing a Peter Lynn Arc, the new form of traction kite technology for kitesurfing and kitesailing, but also very useful for buggying and other power kiting activities. Their basic
Front Cover Picture Mark Rasmussen - Fotolia.com
 Flight Maneuvers And Stick and Rudder Skills A complete learn to fly handbook by one of aviation s most knowledgeable and experienced flight instructors Front Cover Picture Mark Rasmussen - Fotolia.com
GOLFBOARD NEW USER ONBOARDING PROCEDURES
 GOLFBOARD NEW USER ONBOARDING PROCEDURES OVERVIEW Playing golf with a GolfBoard is new. It's fun, easy, and with just some simple instructions most anyone can quickly learn how to properly operate a GolfBoard.
Accessible Performance is True Performance
 Accessible Performance is True Performance I N S P I R E D B Y N AT U RE / / D RI V EN B Y T HE EL EMENT S Our understanding of True Performance is not just raw power or speed - it s the combination of
Northern Rocky Mountain Division
 Northern Rocky Mountain Division Adaptive Snowboard Level 1 Riding Requirements Riding Skills Work with your trainer(s) on the following riding demonstrations and tasks, any item listed may be used for
airplaine kite Model assembly & Operating Instructions Important: If damage is caused due to a crash; your warranty is void.
 airplaine kite Model 95081 assembly & Operating Instructions Important: If damage is caused due to a crash; your warranty is void. Visit our website at: http://www.harborfreight.com Read this material
The Academy of Model Aeronautics ALPHA: Potential Energy Background Information for the Teacher
 The Academy of Model Aeronautics ALPHA: Potential Energy Background Information for the Teacher When the rubber motor of a model plane is wound it becomes a form of stored potential energy. As the rubber
Cessna 172S Skyhawk Standardization Manual
 Cessna 172S Skyhawk Standardization Manual This manual is to be utilized in conjunction with the manufacturers approved POH/ AFM and the Airplane Flying Handbook (FAA-H-8083-3A). This manual should be
Contents. Technical Data. Permittable load. Suspension height. 45 cm, incl. carabiner. Speed System. Weight (without rescue system) 7 kg (size L)
 7 kg (size L)") Manual/Service 13 Contents Technical Data Fundamentals of the RANGE Technical Data Intended Use Permittable load Suspension height Glider Harness 120 kg 45 cm, incl. carabiner Speed System Rescue System
Manual/Service 13 Contents Technical Data Fundamentals of the RANGE Technical Data Intended Use Permittable load Suspension height Glider Harness 120 kg 45 cm, incl. carabiner Speed System Rescue System
Chapter 6: The Magician's Tools: High Performance Tuning
 Chapter 6: The Magician's Tools: High Performance Tuning How your kite is tuned determines how it flies. You can leave it set on the regular performance marks provided by the factory and probably have
UNIVERSAL HIGH LEVEL FOIL KITE
 UNIV ER SAL I NS P I RED NAT U RE / / D RI V EN H IGH T HE E LEMEN TS LEVEL FOIL KIT E UNIVERSAL HIGH LEVEL FOIL KITE The Chrono V3 is also available in an Ultra Light version. This is the same design
Technical Data. Flying with the range2. Maintenance and Repair
 Manual/Service 1 Contents Technical Data Fundamentals of the range2 Speed System Rescue System Rescue System Installation adjustment Possibilities Cross Bracing Ballast Container Pockets Towing Operation
5200 Lawrence Place Hyattsville, Maryland 20781, USA Toll Free: Phone: Fax:
 5200 Lawrence Place Hyattsville, Maryland 20781, USA Toll Free: 1-888-416-0174 Phone: 301-277-3888 Fax: 301-277-3323 www.premierkites.com Congratulations on your purchase of the Osprey sport kite. The
The Definite Guide to Optimist Trim
 The Definite Guide to Optimist Trim by Martin Gahmberg & the WB-Sails team The purpose of this tuning guide is to help you trim your WB sail optimally by learning the effects of the controls: How to change
Single Engine Complex Training Supplement PA28R-201 Piper Arrow III (Spring 2016 Revision)
") Single Engine Complex Training Supplement PA28R-201 Piper Arrow III (Spring 2016 Revision) V-speed Quick Reference V-Speed KIAS Description Airspeed Indicator Marking VSO 55 Stall speed in landing configuration
Single Engine Complex Training Supplement PA28R-201 Piper Arrow III (Spring 2016 Revision) V-speed Quick Reference V-Speed KIAS Description Airspeed Indicator Marking VSO 55 Stall speed in landing configuration
STUDY OF LANDING TECHNIQUE DURING VISUAL APPROACH
 24 TH INTERNATIONAL CONGRESS OF THE AERONAUTICAL SCIENCES STUDY OF LANDING TECHNIQUE DURING VISUAL APPROACH Hiroshi TAKAHARA*, Takashi KONDO*, Shinji SUZUKI** *All Nippon Airways Co., LTD., **University
VIII.A. Straight and Level Flight
 VIII.A. Straight and Level Flight References: FAA-H-8083-3; FAA-H-8083-25 Objectives Key Elements Elements Schedule Equipment IP s Actions SP s Actions Completion Standards The student should develop the
Test Glides Before Landing
 Test Glides Before Landing As soon as you achieve some comfort in the air, start preparing for the landing while you still have plenty of battery. Before attempting a landing, you should get acquainted
PARA-BADMINTON WHEELCHAIR DEVELOPMENT
 PARA-BADMINTON WHEELCHAIR DEVELOPMENT Para-Badminton Wheelchair Development Introduction The use of the arms for both movement and hitting technique are the main challenges in the wheelchair sports class.
GT-4130 STUNT PLANE. 3 Channel 2.4GHz RC Aeroplane Modelled after the famous Cessna 182 Skylane SKYLARK (GT-4130) Contents & Accessories
 Contents & Accessories") GT-4130 STUNT PLANE 3 Channel 2.4GHz RC Aeroplane Modelled after the famous Cessna 182 Skylane SKYLARK (GT-4130) Contents & Accessories Remote Control Remote Control Setup BATTERY & POWER SPECIFICATION
GT-4130 STUNT PLANE 3 Channel 2.4GHz RC Aeroplane Modelled after the famous Cessna 182 Skylane SKYLARK (GT-4130) Contents & Accessories Remote Control Remote Control Setup BATTERY & POWER SPECIFICATION
First Flight Glossary
 First Flight Glossary (for secondary grades) aeronautics The study of flight and the science of building and operating an aircraft. aircraft A machine used for flying. Airplanes, helicopters, blimps and
Maneuver Descriptions
 2017-2018 Senior Pattern Association Section III Maneuver Descriptions NOTE: MANEUVER DESCRIPTIONS THAT FOLLOW ARE TAKEN VERBATIM FROM THE APPROPRIATE AMA RULE BOOKS FROM WHICH THE MANEUVERS WERE TAKEN.
Figure 1 Figure 1 shows the involved forces that must be taken into consideration for rudder design. Among the most widely known profiles, the most su
 THE RUDDER starting from the requirements supplied by the customer, the designer must obtain the rudder's characteristics that satisfy such requirements. Subsequently, from such characteristics he must
The only thing. is everything
 p u r e I NS P I RED B Y NAT U RE / / D RI V EN B Y T HE E LEMEN TS p e r f o r m a n c e The only thing that s changed is everything Race performance at it s best yet the all-new R1 V2. Taking a completely
5200 Lawrence Place Hyattsville, Maryland 20781, USA Toll Free: Phone: Fax:
 5200 Lawrence Place Hyattsville, Maryland 20781, USA Toll Free: 1-888-416-0174 Phone: 301-277-3888 Fax: 301-277-3323 www.premierkites.com Congratulations on your purchase of the Wolf NG sport kite. The
Medium, Climbing and Descending Turns
 Basic Concepts Medium, Climbing and Descending Turns A medium turn is defined as a turn using up to 30 degrees angle of bank. Climbing and descending turns are combined with medium turns within this briefing,
VIII.A. Straight and Level Flight
 VIII.A. Straight and Level Flight References: FAA-H-8083-3; FAA-H-8083-25 Objectives Key Elements Elements Schedule Equipment IP s Actions SP s Actions Completion Standards The student should develop the
TAILWHEEL AIRPLANES LANDING GEAR TAXIING
 Ch 13.qxd 5/7/04 10:04 AM Page 13-1 TAILWHEEL AIRPLANES Tailwheel airplanes are often referred to as conventional gear airplanes. Due to their design and structure, tailwheel airplanes exhibit operational
It isn t hard to imagine where some of these hot tricks and techniques came from.
 Chapter 8: Magical Illusions and Hot Tricks It isn t hard to imagine where some of these hot tricks and techniques came from. A flier jerks on the line to try and relaunch a downed kite. The kite rolls
International Free Flying Magazine THE HEART OF THE MATTER. By Sasha Serebrennikova. June 2016
 June 2016 International Free Flying Magazine 170 THE HEART OF THE MATTER By Sasha Serebrennikova REVIEWS APCO LIFT EZ (PPG) Marcus King flies the latest leisure reflex paramotor wing from Apco EASY TO
Civil Air Patrol Auxiliary of the United States Air Force
 Mountain Flying Qualification Course Civil Air Patrol Auxiliary of the United States Air Force Mountain Flying Flying in Mountain Winds Determine direction and velocity of steady winds by observing dust,
April 4, Eye of Experience #12: Understanding the Stall
 April 4, 1999 Eye of Experience #12: Understanding the Stall Stall entry and recovery is one of the most discussed and cussed portions of a flight training syllabus. Yet, AVweb's Howard Fried believes
Flying High. HHJS Science Week Background Information. Forces and Flight
 Flying High HHJS Science Week 2013 Background Information Forces and Flight Flight Background Information Flying is defined as controlled movement through the air. Many things can become airborne but this
C-130 Reduction in Directional Stability at Low Dynamic Pressure and High Power Settings
 C-130 Reduction in Directional Stability at Low Dynamic Pressure and High Power Settings The C-130 experiences a marked reduction of directional stability at low dynamic pressures, high power settings,
Straight and Level. Basic Concepts. Figure 1
 Basic Concepts Straight and Level This lesson should start with you asking the student what they did in the last lesson, what do they remember, and determining if they have remembered correctly. We must
Tiger Moth basic handling notes
 Tiger Moth basic handling notes by David Phillips To move the aeroplane, lift the tail by the tailplane strut, gripping as close as possible to the fuselage. The aeroplane will be neutrally balanced when
OPERATION, INSTALLATION AND WARNING RELATING TO THE SUP'AIR "PERMANENT AIRBAG" PROTECTION SYSTEM BEFORE FLYING, CHECK: WARNING
 Thank you for choosing one of our products; we hope you will have long, pleasant flights in your harness. When we design our products, we pay particular attention to all aspects of comfort, durability
A103 AERODYNAMIC PRINCIPLES
 A103 AERODYNAMIC PRINCIPLES References: FAA-H-8083-25A, Pilot s Handbook of Aeronautical Knowledge, Chapter 3 (pgs 4-10) and Chapter 4 (pgs 1-39) OBJECTIVE: Students will understand the fundamental aerodynamic
Chapter 1: A Magical Repertoire: The Techniques of High Performance Flying
 Chapter 1: A Magical Repertoire: The Techniques of High Performance Flying If you are a good sport kite flier, we can help you be a better one. There are certain basic skills that are used in all types
South African Powered Paragliding Theoretical Knowledge Test
 South African Powered Paragliding Theoretical Knowledge Test Last Updated 5 February 2002 Question 1: (PTE) Explain what you understand about the Propeller Torque Effect, including its causes and effects
Basics of Speed to Fly for Paragliding Pilots
 Page 1 of 10 San Francisco and Northern California's Premier Paragliding School Up is GOOD!!! Basics of Speed to Fly for Paragliding Pilots The expression Speed to Fly represents the adjustments to a Paraglider's
BlueArrow. Venus DLG. Construction and Flight Manual. Note: Read this manual carefully before construction and flight!
 BlueArrow Venus DLG Construction and Flight Manual Note: Read this manual carefully before construction and flight! 1 1. Introduction Thank you for choosing this fantastic Venus DLG brought to you by BlueArrow
Basic Maneuvers Basic Loop Round Loop Basic Roll Horizontal Roll Consecutive Rolls Basic 4-Point Roll Horizontal 4-Point Roll
 DS Basic Maneuvers Basic Loop Round Loop Basic Roll Horizontal Roll Consecutive Rolls Basic 4-Point Roll Horizontal 4-Point Roll B-40 DS Rapid Learning One Step at a Time Correctly flown, all aerobatic
VII.H. Go-Around/Rejected Landing
 VII.H. Go-Around/Rejected Landing References: FAA-H-8083-3; POH/AFM Objectives Key Elements Elements Schedule Equipment IP s Actions SP s Actions Completion Standards The student should develop knowledge
Логотип. Hangglider PHANTOM. Manual
 Логотип Hangglider PHANTOM Manual Kiev, Ukraine 2005 TABLE OF CONTENTS Section 1. General information 1.1. Introduction 1.2. Main data 1.3. Operation limitations 1.4. Flying tests Section 2. Set up procedure
PRIMARY FLIGHT CONTROLS. AILERONS Ailerons control roll about the longitudinal axis. The ailerons are attached to the outboard trailing edge of
 Aircraft flight control systems are classified as primary and secondary. The primary control systems consist of those that are required to safely control an airplane during flight. These include the ailerons,
CESSNA 172-SP PRIVATE & COMMERCIAL COURSE
 CESSNA 172-SP PRIVATE & COMMERCIAL COURSE University of Dubuque INTENTIONALLY LEFT BLANK Revision 1 Standard Operating Procedures 1 CALLOUTS CONDITION Parking Brake Released After Takeoff Power has been
WHAT IS GLIDER? A light engineless aircraft designed to glide after being towed aloft or launched from a catapult.
 GLIDER BASICS WHAT IS GLIDER? A light engineless aircraft designed to glide after being towed aloft or launched from a catapult. 2 PARTS OF GLIDER A glider can be divided into three main parts: a)fuselage
Model Aeronautics Association of Canada. Wings Program
 Model Aeronautics Association of Canada Wings Program Table of Contents Purpose of the Program... 1 Flying Proficiency Levels.....1 General Rules and Conditions... 1 "A" Level Control.....2 "B" Level Control...
TEST PROTOCOL VERIFICATION OF THE BEHAVIOUR OF A MECHANICAL COMPRESSION COUPLING DURING SETTLEMENT
 TEST PROTOCOL VERIFICATION OF THE BEHAVIOUR OF A MECHANICAL COMPRESSION COUPLING DURING SETTLEMENT Nova Siria factory, Roletto, April 6, 2011 Introduction Mechanical steel compression couplings (CC) are
Low Flying Introduction
 Advanced Manoeuvres Low Flying Introduction Commonly, low flying refers to any flight at or below 500 feet agl that may be practised only in designated low flying zones. By maintaining good situational
3D Torque Roll Introduction
 3D Torque Roll Introduction The awe inspiring torque roll consists of rolling to the left while hovering. There are two methods pilots use to effect torque rolls. The first is to establish a stable hover
Innovation is often inspired by being in the right place, at the right time, with all the right connections coming together allowing the genesis of a
 a n e w Innovation is often inspired by being in the right place, at the right time, with all the right connections coming together allowing the genesis of a new vision or era. The Hyperlink is our vision
Designing a Model Rocket
 Designing a Model Rocket Design Components In the following pages we are going to look at the design requirements for a stable single stage model rocket. From the diagram here you can see that the rocket
TAKEOFF & LANDING IN ICING CONDITIONS
 Original idea from Captain A. Wagner T TAKEOFF & LANDING IN ICING CONDITIONS here have been a number of accidents related to take-off in conditions in which snow and/or other forms of freezing precipitation
Gleim Private Pilot Flight Maneuvers Seventh Edition, 1st Printing Updates February 2018
 Page 1 of 11 Gleim Private Pilot Flight Maneuvers Seventh Edition, 1st Printing Updates February 2018 If you are tested on any content not represented in our materials or this update, please share this
Things to remember when flying N102RE or any Taildragger
 Page 1 of 8 Things to remember when flying N102RE or any Taildragger 1. The Center of Gravity (CG) is behind the main between a taildragger (i.e. conventional gear airplane) and a tricycle gear airplane
Piper PA Seminole 1. Standardization Manual
 Piper PA-44-180 Seminole Standardization Manual This manual is to be utilized in conjunction with the manufacturers approved POH/AFM and the Airplane Flying Handbook (FAA-H-8083-3A). This manual should
 GET THE COMPLETE LEARN-TO-RIDE EXPERIENCE When balance and steering are mastered, transitioning to a bicycle with pedals or a motorcycle is easy. A child needs to experience the feel of leaning and how
Emergency Bailout Procedures for Pilots Presented by Allen Silver Sean Tucker 5April 2006
 Emergency Bailout Procedures for Pilots Presented by Allen Silver Sean Tucker 5April 2006 Allen services all types of emergency parachutes and specializes in bailout training. He has been serving aerobatic
PRE-TEST Module 2 The Principles of Flight Units /60 points
 PRE-TEST Module 2 The Principles of Flight Units 1-2-3.../60 points 1 Answer the following questions. (20 p.) moving the plane (4) upward / forward. Opposed to that is 1. What are the names of the four
WATER ROCK. Lawndart The rocket goes straight up and comes down nose first at high speed. Disadvantages
 Water Rocket Recovery Index What is a recovery system? A recovery system is a feature of a rocket that allows it to come back to Earth with minimal damage. Introduction This guide is intended to serve
Aviation Merit Badge Knowledge Check
 Aviation Merit Badge Knowledge Check Name: Troop: Location: Test Score: Total: Each question is worth 2.5 points. 70% is passing Dan Beard Council Aviation Knowledge Check 1 Question 1: The upward acting
Aerodynamics: The Wing Is the Thing
 Page B1 Chapter Two Chapter Two Aerodynamics: The Wing Is the Thing The Wing Is the Thing May the Four Forces Be With You 1. [B1/3/2] The four forces acting on an airplane in flight are A. lift, weight,
Jackrabbit Level 3 Lesson#1
 Jackrabbit Level 3 Lesson#1 Activity Description/ Location Time Warm Up Mirror the coach-skiers are spread out facing the coach they copy the coach as if they are looking in a mirror (coach steps right
OFFICE HOURS Monday through Friday, 7:30 a.m. to 4:30 p.m., Pacific Time. Lunch hour is 11:30 a.m. to 12:30 p.m.
 Robinson Helicopter Company Phone: (310) 539-0508 2901 Airport Drive Fax: (310) 539-5198 Torrance, California 90505-6115 Web: www.robinsonheli.com United States of America OFFICE HOURS Monday through Friday,
- From 2005 year model, replacing with RM250 with 2-stroke engine, RM-Z450 with 4-stroke engine was introduced in the market. - From 2008 year model,
 1 - From 2005 year model, replacing with RM250 with 2-stroke engine, RM-Z450 with 4-stroke engine was introduced in the market. - From 2008 year model, fuel injection system was introduced instead of carburetor