INSTRUCTIONS FOR USE
|
|
|
- Antony Owens
- 5 years ago
- Views:
Transcription

1 INSTRUCTIONS FOR USE
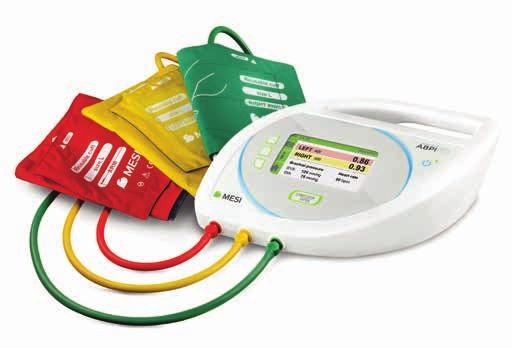
2 1-minute Ankle-Brachial Pressure Index Automated Ankle-Brachial Pressure Index measuring device (MESI ABPI MD) brings fast, accurate and objective screening for Peripheral Arterial Disease (PAD) to every doctor s office. In addition to the simultaneous measurement of Ankle-Brachial Index, it also enables measurement of brachial blood pressure and heart rate. It is intended for professional use in primary healthcare and specialist clinics as a screening method for the detection of PAD.
3 Contents SAFETY AND LEGAL RECOMMENDATIONS 4 1 ADVANTAGES 6 2 TECHNICAL SPECIFICATIONS 7 3 QUICK GUIDE Ankle-Brachial Pressure Index measurement Upper arm blood pressure measurement 11 4 PRODUCT DESCRIPTION Contents of the package Device description Interface description Graphic symbols 16 5 DETAILED INSTRUCTIONS First time use Device setup AC/DC power supply and battery Cuff setup Choosing the appropriate cuff Arm cuff Left ankle cuff Right ankle cuff Ankle-Brachial Pressure Index measurement Upper arm blood pressure measurement Measurement history Changing device settings Error messages 35 6 GENERAL WARNINGS AND PRECAUTIONARY MEASURES Important labels Standard compliance 40 7 MAINTENANCE Charging the battery Cleaning instructions Recommendations for servicing and maintenance intervals Product life and storage Protecting the cuffs 41 8 TROUBLESHOOTING 42 9 WARRANTY INFORMATION MESI ABPI MD STAND Stand assembly Using the stand 45
4 Safety and legal recommendations All rights reserved 2017, MESI Ltd. All rights reserved. This publication may not be reproduced, copied or stored in a memory device. Furthermore, this publication may not be used for any purpose other than as the instructions for the use of the Automated Ankle-Brachial Pressure Index measuring device (MESI ABPI MD). This publication may not be translated into other languages or converted into other formats in any way without the prior written permission of MESI Ltd. The contents of the instructions for use may be altered without notice. The latest version of the instructions for use is available at Safety recommendations To avoid personal injury and/or damaging the device or accessories, follow the safety recommendations given below. 1. Setup and technical personnel The device must be set up by authorized personnel with adequate professional training and experience who are aware of all the dangers in relation to the setup of the device and its use and who will take adequate risk prevention measures for themselves, users, other personnel and devices. 2. Access to the device Only authorized personnel may be given access. 3. Safety measures It is required to comply with the local safety requirements, if so required by the regulations. In addition to the local safety regulations, it is also required to follow the safety instructions in this document. Should there be any conflict between the safety recommendations in this document and the recommendations stipulated by local regulations, the local regulations take precedence. 4. Information for technical personnel The technical personnel must be given adequate technical instructions for the use and maintenance of the device. 4 Safety and legal recommendations
5 Trademark The MESI Simplifying diagnostics TM, MESI ABPI MD, MESIcare TM and MESIresults TM trademarks are the property of MESI Ltd. Contact information Department Address Telephone Website Sales and marketing MESI, development of medical devices, Ltd. Letališka cesta 3C SI-1000 Ljubljana Slovenia, European Union +386 (0) English Trademark 5
6 1 Advantages Objective and accurate measurement Simultaneous measurement of Ankle- Brachial Pressure Index and blood pressure 2 in 1 Measurement can be carried out in 1 minute Battery powered 1 min Measurement results can be printed using the MESIresults computer application Easy to use Portable Accessories + 6 Advantages
7 Technical specifications 3 2 Dimensions Display Power supply and battery Width: 25.00cm, height: 7.30cm, depth: 20.00cm, weight: 0.60kg 4.3 colour LCD screen with 16-bit colour depth Resolution: pixels AC/DC power supply: FRIWO FW8001M/5 Input: V AC/50-60Hz/350mA, output: 5V DC/3.0A Battery type: rechargeable lithium polymer Capacity: 2300mAh, number of measurements per charge: 50 Electrical specifications: V AC, 50-60Hz, 3A Type of protection against electric shock: Class II Protection type Compliant with standards: EN :2007 General requirements for basic safety and essential performance EN :2008 Electromagnetic compatibility Requirements and tests EN :2010 Particular requirements for the basic safety and essential performance of automated non-invasive sphygmomanometers Flammable anesthetics: WARNING! Not suitable for use with flammable anesthetics. Measurement types Measurement range Limit values of measurement errors Ankle-Brachial Pressure Index using oscillometry and volume plethysmography, Systolic blood presure using oscillometry and volume plethysmography Diastolic blood pressure using oscillometry and volume plethysmography Heart rate using oscillometry and volume plethysmography Pressure: 0 to 299mmHg Heart rate: 30 to 199 beats per minute Pressure: ± 3mmHg Heart rate: ± 5% of value Ankle-Brachial Pressure Index: ± 0.1 Cuff inflation and deflation Temperature and humidity range Automatic inflation using an air pump and deflation using an electromagnetic valve. Working environment: 10 to 40 C, 30 to 85% relative air humidity, IPX0 protection, transport and storage: 0 to 60 C, up to 85% relative air humidity. English Technical specifications 7
8 3 3 Quick guide Before using the device for the first time, read the instructions for use carefully and follow the recommendations and suggestions. This chapter only includes short instructions for the use of the MESI ABPI MD. For detailed descriptions of individual functions of the device, see chapter 5, Detailed instructions. Please keep for future reference. When using the device for taking the Ankle-Brachial Pressure Index measurement the patient must lie down and remain still. When using the device for measuring the upper arm blood pressure the patient must sit upright, keeping a straight back. The MESI ABPI MD is intended for use in medical institutions, where measurements must be carried out by adequately trained medical personnel. The MESI ABPI MD is not intended for home use. The MESI ABPI MD may be used on pregnant women. The MESI ABPI MD is not intended for use on newborns or children under the age of 10 years. In case of the presence of intravenous cannulas or arteriovenous (AV) fistulas, the cuffs and measurement can cause injury to the limb. The MESI ABPI MD has two modes of operation: The primary mode is for the measurement of the Ankle-Brachial Pressure Index, where you place the cuffs on the arm and the left and right ankles. The results of the 8 Quick guide
9 measurement are the left Ankle-Brachial Pressure Index (LEFT ABI), the right Ankle- Brachial Pressure Index (RIGHT ABI) and the upper arm blood pressure (SYS, DIA). The additional mode is for the independent measurement of the upper arm blood pressure. In this mode, you will only measure the upper arm blood pressure, so only place a cuff on the upper arm. The result of the measurement is the upper arm blood pressure (SYS, DIA). Step 1 Connect the MESI ABPI MD to the mains electricity using the AC/DC power supply. The power socket is located at the back of the device and is labelled 5V DC. Connect the cuffs to the device by inserting the tube of each cuff into the connector of the same colour on the device. Step 2 Turn the device on using the ON/OFF button. The display will show the home screen. It is not necessary to change any settings for the basic functioning of the device. START/STOP ENTER If you are using the MESI ABPI MD device for the first time, the language, time and date menu will appear. To correctly set the menu, see section 5.1. Ankle-Brachial Pressure Index measurement Step The patient must lie down and remain still. Place the cuffs on the upper arm (cuff labeled ARM ), the lower left leg (cuff labeled LEFT ANKLE ) and the lower right leg (cuff labeled RIGHT ANKLE ). Observe the following colour markings: RED > left or right upper arm YELLOW > lower left leg GREEN > lower right leg English Ankle-Brachial Pressure Index measurement 9
10 Place the cuffs so that there is a finger s width of room between the limb and the cuff. The cuff on the upper arm must be placed so that the artery label (ARTERY) points towards the elbow. When placing the cuff, observe the image below. The cuff tube should point towards the fingers. The ankle cuffs must be placed so that the ankle label (MEDIAL ANKLE) points towards the inner side of the ankle. When placing the cuff, observe the image below. Step 4 The patient must lie still in the supine position. When you are ready, push the START button. The measurement process will begin. The patient must not move during the measurement process. The entire process takes approximately 1 minute. START/STOP ENTER During the measurement process, the screen will display the current arterial pressures and the arterial pressures waveforms. 10 Quick guide Ankle-Brachial Pressure Index measurement

11 Step 5 When the measurement process is completed, the screen will display the results. The Ankle-Brachial Pressure Index is displayed in green, yellow or red, depending on the value. The colour scale is taken from the Guidelines for the Management of Patients With Peripheral Artery Disease published by the Journal of the American College of Cardiology. Step 6 Below 0.89 red From 0.90 to 0.99 yellow From 1.00 to 1.40 green Above 1.41 red Return to the home screen using the HOME button. From here, you can view the measurement history and change the settings. For an additional description of the specifications of the MESI ABPI MD and detailed instructions for its use, see the remaining chapters of the instructions for use. Upper arm blood pressure measurement 3.2 Step 3 The patient must sit comfortably on a chair. They must sit upright, keeping a straight back. Only place the red upper arm cuff (cuff labeled ARM ) on the patient). In this mode of operation, the green and yellow cuffs are not placed on the patient s limbs. English Upper arm blood pressure measurement 11

12 Place the cuffs so that there is a finger s width of room between the limb and the cuff. The cuff on the upper arm must be placed so that the artery label (ARTERY) points towards the elbow. When placing the cuff, observe the image below. The cuff tube should point towards the fingers. The lower arm should lie freely on a flat surface. The cuff should be level with the patient s heart. Step 4 Push the BLOOD PRESSURE MEASUREMENT button to change the mode to independent blood pressure measurement. When you are ready, push the START button. The measurement process will begin. The patient must not move during the measurement process. The entire process takes approximately 1 minute. During the measurement process, the screen will display the current arterial pressure and the arterial pressure waveform. Step 5 When the measurement process is completed, the screen will display the results of the upper arm blood pressure measurement. 12 Quick guide Upper arm blood pressure measurement
13 START/STOP ENTER Product description 3 4 Contents of the package 4.1 Model Description ABPIMDD Automated Ankle- Brachial Index measuring device MESI ABPI MD ABPIMDAAC AC/DC power supply ABPIMDAUSB Device USB cable Model Description ABPIMDACFFSM MESI ABPI MD Cuff Set M Computer software MESIresults Find latest version at: ACCESSORIES Model Description ABPIMDACFFSL MESI ABPI MD Cuff Set L ABPIMDAST MESI ABPI MD Stand ABPIMDABAG MESI ABPI MD Carry Bag Contact your local distributor for more information. English Product description Contents of the package 13
14 4.2 Device description Power socket USB port LCD screen Multi-function buttons START/STOP ENTER ON/OFF button START button Cuff connectors 14 Product description Device description
15 Interface description 4.3 The display screen is divided into three sections: title bar, multi-function buttons, active menu. Title bar The title bar displays the current location within the menu structure. In addition to the location within the menu structure, it also displays the time and a battery status indicator. Multi-function buttons The column on the left side of the screen is divided into three sections. They display the current functions of the three multi-function buttons located on the left of the screen. When a button is pushed, its display section turns grey. Active menu Most of the screen is used to display instructions, measurement results, history and other menus. The slider on the right denotes the current position of the selected element in the menu. A pop-up window may appear in the active menu with current information, such as the battery status, errors and measurement warnings. Indicator/ Battery status indicator 14:24 Time Menu address Settings Language settings Warning settings Time settings Date settings Deleting history Non selected object Multi-function buttons Selected object Slider English Interface description 15
16 4.4 Graphic symbols This chapter describes the graphic symbols. Navigation is based on a system of two fixed-function buttons and three multi-function buttons whose function changes. The current function of each of the three buttons is denoted by the icons on the left side of the screen. Fixed-function buttons START/STOP ENTER START/STOP ENTER ON/OFF Starts or stops the measurement process. If you are inside the menu structure, push this button to go down a level or confirm a change in the settings. Turns the device on or off. Multi-function buttons HOME UP/DOWN BACK SETTINGS DETAILS HISTORY BLOOD PRESSURE MEASUREMENT PULSE WAVEFORM Returns to the home screen. Navigation through the elements of individual menus. Go back up a level in the menu hierarchy. Enter the settings menu. Display extra details about the measurement results. Display the history. Independent blood pressure measurement mode. Graphical interpretation of pulse waves. Indicators CHARGING INDICATOR BATTERY STATUS INDICATOR It is displayed if the AC/DC power supply is connected. 0% 50% 100% battery charge 16 Product description Graphic symbols
17 Detailed instructions 3 5 This chapter contains all the information required by users of the device for safe, correct and accurate measurement. This chapter includes a detailed and complete description of all the functions of the device, the safety instructions and all the information required to understand the operation of the device. First time use 5.1 When using the MESI ABPI MD device for the first time it s necessary to set language, time and date. It is mandatory to set the exact time and date because of the effect of warnings and reminders which ensure the proper conduct or calibration of the MESI ABPI MD device. Turn the device on using the ON/OFF button. The display will show the initial screen with a greeting. To continue press any key. Language settings Use the UP and DOWN buttons to select the language. Confirm your selection using the ENTER button. The device language will be changed and the time setting menu will appear. If you wish to return to the previous menu without confirming the changes, push the BACK button. English Detailed instructions First time use 17


18 5.1.2 Time settings Use the UP and DOWN buttons to navigate through the hour and minute settings. Confirm your selection using the ENTER button. The selected field will begin to flash. Use the UP and DOWN buttons to set a new value and confirm it using the BACK button. If necessary, repeat the process for the other fields. When you are finished setting the time, use the UP and DOWN buttons to move to the Confirm field and confirm your selection using the ENTER button. If you do not wish to apply your settings, return to the previous menu by pushing the BACK button. The device time will be configured and the date setting menu will be displayed Date settings Use the UP and DOWN buttons to navigate through the day, month and year settings. Confirm your selection using the ENTER button. The selected field will begin to flash. Use the UP and DOWN buttons to set a new value and confirm it using the BACK button. If necessary, repeat the process for the other fields. When you are finished setting the date, use the UP and DOWN buttons to move to the Confirm field and confirm your selection using the ENTER button. Before confirming, double-check the accuracy of the date because the settings will be saved after confirming and you won t be able to return to the previous menu. 18 Detailed instructions First time use

19 The display will show a thank you note. If the incorrect date was confirmed press the ON/OFF button. To continue to the main menu, press any key. Device setup 5.2 To ensure that the measurement accuracy is according to specifications, measurements must be carried out in an appropriate working environment. Place the device on a flat and stable surface. We recommend you to use the ABPI MD stand. During operation, the device must not be exposed to any mechanical stress or vibrations. Such disturbances can affect the measurement results, rendering the results invalid (if you set the device down on the patient s bed, you cannot ensure the validity of the results). The device can be used at temperatures raging between +10 C and +40 C and at a relative air humidity between 30% and 85%. AC/DC power supply and battery 5.3 The MESI ABPI MD uses the following two power sources: the mains electricity using an AC/DC power supply, battery power. Connect the AC/DC power supply to a wall socket with a mains voltage of V at 50-60Hz and to the connector at the back of the device. The device is now ready for use. Only use the AC/DC power supply included with the device; FRIWO FW8001M/5. Do not use other AC/DC power supplies. Using other AC/DC power supplies can cause serious injuries to the user and/or the patient and potential damage to the device and other equipment. The MESI ABPI MD can also function without the AC/DC power supply. When the device is not connected to the mains electricity, it is powered by a battery. The required power is provided by a high-performance lithium polymer battery. The battery is not replaceable. English Device setup 19
20 The battery inside a completely new device is most likely not completely empty and can provide enough power to start the device up. Nonetheless, connect the device to the mains electricity using the AC/DC power supply. The battery charging system works automatically. The battery begins to charge when the AC/DC power supply is connected, which is indicated by the battery status indicator. When the battery is charged, the charging process stops and the title bar displays the battery status indicator and the charging indicator. The battery status indicator is displayed in the upper left corner of the screen: Battery empty Battery at 50% Battery at 100% The battery capacity is sufficient for approximately 50 measurements. Power indicator light Power indicator is a small LED positioned next to the ON/OFF button (see p.14). It indicates the power status of the MESI ABPI MD device. Possible statuses are shown in the table below. Power indicator status The MESI ABPI MD device is turned off + The battery is not charging The MESI ABPI MD device is turned off + The battery is charging The MESI ABPI MD device is turned on + The battery is not charging (It means that the device is fully charged or the device operates on battery) The MESI ABPI MD device is turned on + The battery is charging Power indicator light color No light Red light Green light Orange light 5.4 Cuff setup When the MESI ABPI MD is positioned correctly, i.e. on flat surface, you can connect the cuffs and begin the measurement. The cuffs, tubes and connectors are of different colours to enable the correct placement and connection of the cuffs. For a successful and correct measurement, all three cuffs must be connected and placed correctly on all three limbs in accordance with the instructions for use. 20 Detailed instructions Cuff setup
21 START/STOP ENTER Colour markings on individual cuffs: RED > left or right upper arm YELLOW > lower left leg GREEN > lower right leg The proper placement of the cuffs is of vital importance to ensure valid measurement results. Use moderate force to attach and remove the cuffs. When you connect the tubes of the cuffs, make sure that the air flow is not obstructed in any way. Obstructing the air flow is as easy as accidentally placing an object on the tube. Before using the cuffs, check the following: the inflatable pocket must be fitted in the cuff correctly; the inflatable pocket is not twisted or turned the wrong way; the tube of the cuff is not twisted or otherwise inappropriately bent. Connect each cuff to the device by connecting the plug on the tube to the corresponding socket. Remove it by pulling it out of the device be careful to pull it by the plug, and not by the tube. Choosing the appropriate cuff 5.5 The basic package includes three different cuffs for placement on the upper arm and the lower left and right legs. Model Description Limb circumference ABPIMDACFFSM MESI ABPI MD Cuff Set M cm Additional cuffs are also available for measurement on limbs with a larger circumference. They are available only together in a set. It is possible to choose between different cuff model numbers. English Choosing the appropriate cuff 21
22 Model Description Limb circumference ABPIMDACFFSL MESI ABPI MD Cuff Set L cm Check the markings on the cuffs to choose the correct cuff size. The cuff will fit the limb if the INDEX mark is within the area delineated by the arrows. If the cuff size is incorrect, choose a more appropriate size from the list above. Each cuff is intended for placement on a specific limb. By placing a cuff on the wrong limb, you can affect the accuracy of the measurement results. 5.6 Arm cuff Ensure that the cuff fits by choosing the appropriate cuff size according to the circumference of the patient s arm. Use the table in Chapter 5.5 Choosing the appropriate cuff. Choose a cuff labelled ARM CUFF of the appropriate size. Check that you have chosen the correct size using the INDEX marking and the OK area on the cuff. Place the cuff on the upper left or right arm. Make sure that the arrowshaped artery marking is in line with the brachial artery. The cuff tube should point towards the fingers. Wrap the cuff around the arm and fasten it. Make sure that the lower edge of the cuff is approximately 2 to 3 cm above the elbow. The cuff must not be obstructed by clothing. When fastening the cuff, make sure that there is a finger s width of room between the cuff and the arm. 22 Detailed instructions Arm cuff
23 Left ankle cuff 5.7 Ensure that the cuff fits by choosing the appropriate cuff size according to the circumference of the patient s lower left leg. Use the table in Chapter 5.5 Choosing the appropriate cuff. Choose a cuff labeled LEFT ANKLE CUFF of the appropriate size. Check that you have chosen the correct size using the INDEX marking and the OK area on the cuff. Place the cuff on the lower left leg. Make sure that the arrow-shaped MEDIAL ANKLE marking points towards the inner side of the ankle. The cuff tube should point towards the knee. Wrap the cuff around the ankle and fasten it. Make sure that the lower edge of the cuff is approximately 2 to 3 cm above the ankle. The cuff must not be obstructed by clothing. When fastening the cuff, make sure that there is a finger s width of room between the cuff and the leg. Right ankle cuff 5.8 Ensure that the cuff fits by choosing the appropriate cuff size according to the circumference of the patient s lower right leg. Use the table in Chapter 5.5 Choosing the appropriate cuff. Choose a cuff labelled RIGHT ANKLE CUFF of the appropriate size. Check that you have chosen the correct size using the INDEX marking and the OK area on the cuff. English Left ankle cuff 23
24 Place the cuff on the lower right leg. Make sure that the arrow-shaped MEDIAL ANKLE marking points towards the inner side of the ankle. The cuff tube should point towards the knee. Wrap the cuff around the ankle and fasten it. Make sure that the lower edge of the cuff is approximately 2 to 3 cm above the ankle. The cuff must not be obstructed by clothing. When fastening the cuff, make sure that there is a finger s width of room between the cuff and the leg. 5.9 Ankle-Brachial Pressure Index measurement It is recommended for the patient to lie still for at least 5 minutes before starting the measurement process. During measurement, the patient must lie completely flat, must be relaxed and must not talk. They must not cross their legs. The person carrying out the measurement should remain by the patient s side at all times and closely monitor the measurement process. The measurement of the Ankle-Brachial Pressure Index can be affected by the placement of the cuffs, the position of the patient and their physical condition. The functioning of the device can also be affected by high temperatures, humidity and altitudes. If the results of the Ankle-Brachial Pressure Index measurement are very unusual, repeat the measurement three times. 24 Detailed instructions Ankle-Brachial Pressure Index measurement

, push the START/STOP button immediately.")
25 You can begin measuring the Ankle-Brachial Pressure Index when the cuffs are correctly positioned on the patient lying down and when the connections have been checked and any potential air flow obstructions in the tubes have been eliminated. Turn the device on. The display will show the home menu. If the home menu is not displayed or if another menu is displayed, push the BACK or the HOME button until you get to the Start menu (right image). To begin the measurement process, push the START button. If the measurement process must be interrupted for any reason (e.g. the patient is not feeling well), push the START/STOP button immediately. The measurement process will be stopped and the cuffs will be deflated. If the cuffs are not deflated despite the process being stopped, immediately disconnect the cuffs tubes from the device. During measurement, the screen displays the current pressure in the cuff for each limb separately and the pressure waveforms on which the red curve shows the oscillation of pressure in the upper arm, the green curve shows the oscillation of the right ankle and the yellow curve shows the oscillation of the left ankle. The left side of the screen displays a bar with a timer which displays the remaining measurement time. The device will determine the upper limit pressure for cuff inflation on the basis of the monitoring of the pressure dynamics during inflation. As pressure data is actively captured while the cuffs are deflated, the patient must remain still. The measurement result processing begins when the cuffs are deflated, i.e. when the screen displays the corresponding message (right image). English Ankle-Brachial Pressure Index measurement 25


26 During measurement or when the results are displayed, a warning can be displayed on the screen. If an error occurs during the measurement process, a warning will be displayed in a blue box and the measurement will stop automatically. The box will display the name of the warning or error with a short description. For detailed descriptions of warnings and errors, see Chapter 5.13 Error messages. You may now remove the cuffs. The patient may move freely now. The calculation of the measurement results takes a couple of seconds, while the entire measurement process including the calculation process takes approximately a minute. After the calculation is completed, the device displays the results on the screen: the left and the right Ankle-Brachial Pressure Index, the upper arm pressure and the heart rate. To prepare the device for further measurement, push the HOME button, or push the START button to immediately start a new measurement. The device stores the measurement data in its memory, and you can see it using the HISTORY menu. In case of Abnormally weak pulse result, or in case of a calculation error, a warning will be displayed along with the measurement results. For a detailed description of the detection of severe PAD or incompressible arteries (medial calcinosis), please see chapter Detection of severe PAD and incompressible arteries on page 27. For a detailed description of warnings and errors, see Chapter 5.13 Error messages. For additional information on the measurement results, push the DETAILS button. To display the pulse waveforms, push the PULSE WAVEFORM button. 26 Detailed instructions Ankle-Brachial Pressure Index measurement
 or incompressible arteries (Medial")


27 Detection of severe PAD and incompressible arteries When the result Abnormally weak pulse is displayed, there is a high probability of severe Peripheral Arterial Disease (PAD) or incompressible arteries (Medial Calcinosis). The majority of the Abnormally weak pulse results describe the patients with ABPI around or lower than 0,5. If an Abnormally weak pulse message is displayed, it is recommended to repeat the measurement with the device connected to the computer using MESIresults software (see page 13). Such use will allow for an interpretation of full pulse waveforms (See example below). In case of Medial Calcinosis, the arteries cannot be compressed due to stiff arterial walls. The measurement of Blood Pressure with cuffs is not possible, and therefore the ABPI cannot be reliable. The patient should be referred for a Toe Brachial Index measurement. Pulse waveform example: 1. Normal pulse waveform example: 2. Severe PAD pulse waveform example: Ankle-Brachial Pressure Index measurement 27 English
28 3. Incompressible arteries pulse waveform example: Simultaneous measurement MESI ABPI MD utilizes a unique simultaneous measurement, where the cuffs are positioned on three limbs at the same time. The cuffs inflate and deflate simultaneously, in order to capture the blood pressure in all extremities in a specific moment. Simultaneous measurement with four cuffs instead of three would increase the risk for cardiac overload. (It not advisable to obstruct all four extremities at the same time.) Three-cuff measurement is provided to allow safe simultaneous measurement of Ankle-Brachial Pressure Index. Simultaneous measurement is essential for the accuracy of the ABPI, because it eliminates the measurement error due to the natural change in human blood pressure. For general population, performing a three-cuff measurement is sufficient. When a difference in the arm blood pressures is suspected, it is advised to place the arm cuff on the other arm and repeat the measurement. The result considered should be the lowest ABPI of the two. It is advised to perform the measurement on the right arm, due to lower incidence of subclavian stenosis. 28 Detailed instructions Ankle-Brachial Pressure Index measurement
29 Upper arm blood pressure measurement 5.10 It is recommended that the patient sit still for at least 5 minutes before starting the measurement process. The person carrying out the measurement should remain by the patient s side at all times and closely monitor the measurement process. The measurement of the upper arm blood pressure can be affected by the placement of the cuff, the position of the patient and their physical condition. The functioning of the device can also be affected by high temperatures, humidity and altitudes. If the results of the upper arm blood pressure measurement is not as expected, repeat the measurement three times. Before attaching the cuff, remove any tight-fitting clothes or tightly rolled up sleeves on the upper arm. Do not place the cuff on top of thick clothing. You can begin measuring the upper blood pressure when the cuff is correctly positioned on the sitting patient and when the connections have been checked and any potential air flow obstructions in the tubes have been eliminated. During the measurement, the patient must be correctly seated so that: They are sitting on a chair with their feet resting flat on the floor. They are sitting upright, keeping a straight back. The cuff must be level with the patient s heart. For details on the placement of the cuff, see Chapter 5.6 Arm cuff. In the independent blood pressure measurement mode, only place the arm cuff on the patient. The other cuffs must not be attached. English Upper arm blood pressure measurement 29


30 Turn the device on. The display will show the home menu. For upper arm blood pressure measurement, change the operating mode by pushing the BLOOD PRESSURE MEASUREMENT button. A menu will be displayed as in the image below. To begin the measurement process, push the START button. During measurement, the screen displays the current pressure in the cuff and the pressure waveform graph. The left side of the screen displays a bar with a timer which displays the remaining measurement time. The device will determine the upper limit pressure for cuff inflation on the basis of the monitoring of the pressure dynamics during inflation. As pressure data is actively captured while the cuff is deflated, the patient must remain still. The measurement result processing begins when the cuff is deflated, i.e. when the screen displays the corresponding message. You may now remove the cuffs. The patient may move freely now. The calculation of the measurement results takes a couple of seconds, while the entire measurement process including the calculation process takes approximately a minute. After the calculation is completed, the device displays the upper arm blood pressure and heart rate on the screen. For additional information on the measurement results, press the DETAILS button. To display the pulse waveforms, press the PULSE WAVEFORM button. 30 Detailed instructions Upper arm blood pressure measurement

31 If the measurement process must be interrupted for any reason (e.g. the patient is not feeling well), push the START button immediately. The measurement process will be stopped and the cuff will be deflated. If the cuffs are not deflated despite the process being stopped, immediately disconnect the cuff tubes from the device. Measurement history 5.11 In the History menu, you can view the last measurements. To view the measurement history, push the HISTORY button. Use the UP and DOWN buttons to navigate through the measurement history and choose the measurement you wish to view. Push the ENTER button for details on the selected measurement. Push the BACK button to return to the history selection menu and the HOME button to return to the home screen. The History menu stores the Ankle- Brachial Index and upper arm blood pressure measurements: L: 1.06 R: ankle brachial pressure index measurements; BP: 137/101 - upper arm blood pressure measurements. The Measurement History memory can store approximately 30 measurements. The oldest measurements are automatically deleted for each additional measurement. English Measurement history 31

32 5.12 Changing device settings You can access the Settings menu the home menu. from To change the settings of the device, push the SETTINGS button. The settings menu will be displayed. Use the UP and DOWN buttons to select a setting. The selected settings menu will turn green. Push the ENTER button to enter the selected menu. For descriptions of individual settings, see the chapters below. To change the settings of the device, push the SETTINGS button. The settings menu will be displayed. To return to the home screen, push the HOME button Amputation Settings If the patient has an amputated leg or is not compliant for ABPI measurement due to a presence of severe and/or painful wounds, the ABPI can be measured only on patient s left or right leg. Use the UP and DOWN buttons to select the amputation settings. Confirm your selection using the ENTER button. Select the leg that you will not be placing the cuff on. Confirm your selection using the ENTER button. If you wish to return to the previous menu without confirming the changes, push the BACK button. Only one of the leg cuffs (either green - right, or yellow - left) should be used, when the amputation setting is selected. 32 Detailed instructions Changing device settings


33 Language settings Use the UP and DOWN buttons to select the language. Confirm your selection using the ENTER button. The device language will be changed and you will return to the previous menu. If you wish to return to the previous menu without confirming the changes, push the BACK button. Time settings Use the UP and DOWN buttons to navigate through the hour and minute settings. Confirm your selection using the START button. If you do not wish to apply your settings, return to the previous menu by pushing the BACK button. The selected field will begin to flash. Use the UP and DOWN buttons to set a new value and confirm it using the BACK button. If necessary, repeat the process for the other fields. When you are finished setting the time, use the UP and DOWN buttons to move to the Confirm field and confirm your selection using the ENTER button. Date settings Use the UP and DOWN buttons to navigate through the day, month and year settings. Confirm your selection using the ENTER button. If you do not wish to apply your settings, return to the previous menu by pushing the BACK button. The selected field will begin to flash. Use the UP and DOWN buttons to set a new value and confirm it using the BACK button. If necessary, repeat the process for the other fields. When you are finished setting the date, use the UP and DOWN buttons to move to the Confirm field and confirm your selection using the ENTER button. English Changing device settings 33


34 Notification settings Push the ENTER button to turn the calibration reminder on or off. When you are finished changing the setting, use the UP and DOWN buttons to move to the Confirm field and confirm your selection using the ENTER button. If you do not wish to apply your settings, return to the previous menu by pushing the BACK button. Calibration reminder appears one year after first use. If date is not correctly set, reminder may not appear correctly Deleting history Use the UP and DOWN buttons to move to the Delete History entry. To delete the entire measurement history, push the ENTER button Device information Use the UP and DOWN buttons to move to the Device Information entry and confirm your selection by pushing the ENTER button. To return to the home screen, push the HOME button. You can view information about the device (Description, Model, REF, SN), information on the software version (Software), the date of the last device calibration (Calibrated) and the issue date of the device (Issue), which denotes the date of manufacture of the device. 34 Detailed instructions Changing device settings
 and calculation errors (a warning is")

35 Error messages 5.13 During measurement, the device can identify two types of errors: measurement errors (a warning is displayed during measurement and the measurement is stopped) and calculation errors (a warning is displayed along with the measurement results). Measurement errors A warning is displayed in the form of a blue pop-up window during the inflation and deflation of the cuffs. The measurement is automatically stopped. To return to the home screen, push the ENTER button. Error Description Solution ERROR 6 Inflation error. Check the placement of the cuffs and repeat the measurement. ERROR 7 Deflation too fast. The cuff is not attached or is not attached correctly. Attach the cuff correctly and repeat the measurement. If an ERROR message is displayed, it is recommended to repeat the measurement with the device connected to the computer using MESIresults software (See page 13). Such use will allow for an interpretation of full pulse waveforms. Calculation errors A warning appears in a separate window when the measurement results are displayed. To view the measurement results, push the BACK button. The error identification number is displayed instead of the measurement results. English Error messages 35
36 Error Description Solution ERROR 2 ERROR 3 An anomaly has been detected. The patient may have moved during the measurement process. The cuff was insuficiently inflated. Remind the patient to remain still during measurement, and repeat the measurement. Check the placement of the cuffs and repeat the measurement. ERROR 4 ERROR 5 ERROR 8 ERROR 9 ERROR 10 ERROR 11 An error occurred during heart rate calculation. An error occurred during Ankle-Brachial Pressure Index calculation. An error occurred during systolic pressure calculation. An error occurred during diastolic pressure calculation. An error occurred during mean pressure calculation. A large pressure fluctuation was detected. The patient may have moved. Repeat the measurement. If the error is repeated, the measured value is outside the measurement range of the device. Repeat the measurement. If the error is repeated, the measured value is outside the measurement range of the device. Repeat the measurement. If the error is repeated, the measured value is outside the measurement range of the device. Repeat the measurement. If the error is repeated, the measured value is outside the measurement range of the device. Repeat the measurement. If the error is repeated, the measured value is outside the measurement range of the device. The results may be incorrect. Repeat the measurement. For Abnormally weak pulse message, please see chapter on page Detailed instructions Error messages
37 General warnings and precautionary measures 3 6 WARNING! Before using the device for the first time, read the instructions for use carefully and follow the recommendations. WARNING! The MESI ABPI MD device users must be adequately trained to use the device. Before the first use of the device, users must read the entire instructions for use carefully and follow the instructions for the use of the connected equipment. WARNING! It is mandatory to have the device calibrated once per year to ensure the correct functioning and accuracy. Contact your dealer or the manufacturer about calibrating the device. WARNING! If the device is used or stored outside the specified temperature range and air humidity, the accuracy specified within the technical specifications of the device is not guaranteed. WARNING! Do not use the device when it is wet. After cleaning the device with a damp cloth, wait for it to dry. Only use the device when it is completely dry. WARNING! Do not dispose of the device as unsorted municipal waste. Prepare it for recycling or separate waste collection in accordance with Directive 2002/96/ EC on scrap electrical and electronic equipment (WEEE). WARNING! To prevent electric shock hazard due to leakage current, only use AC/ DC power supplies which are compliant with the technical specifications of the device. WARNING! Only use non-aggressive cleaning agents to clean the device. The device may be wiped with a damp cloth. WARNING! Make sure that the device does not come into contact with an electrical current while it is being cleaned. English General warnings and precautionary measures 37
38 WARNING! The device may only be used by professional medical personnel. The device is class A equipment and can cause radio interference or even cause nearby devices to cease to function. It may be necessary to reposition the MESI ABPI MD or protect the room containing the device from electromagnetic radiation. WARNING! Do not open the device. The device does not contain any parts which can be replaced by a user. Do not alter or adapt the device. WARNING! Protect the device from moisture and liquids and extremely high/low temperatures. Also protect the device from mechanical stress and do not expose it to direct sunlight, as this can cause the device to not function properly. WARNING! A twisted or bent tube can cause high pressure in the cuff, which may result in injury to the patient. WARNING! Consecutively carrying out too many measurements may result in injury to the patient. WARNING! Do not place the cuffs on wounds, as this may cause additional injury. Only place the cuffs on the upper arms and lower legs. WARNING! Be carefull when folding the cuffs and tubes. Do not fold them too tightly. WARNING! In case of the presence of intravenous cannulas or arteriovenous (AV) fistulas in the limbs, the cuffs and measurement can cause injury to the limb. WARNING! If the patient has had breast surgery, do not place the arm cuff on the side which has been operated on. WARNING! Do not use the device on a patient while they are connected to a vital sign monitor. WARNING! Never carry out repairs of any kind yourself. If a defect occurs, consult your dealer or distributor. WARNING! When moving the MESI ABPI MD stand, be sure to push the rack and not the device. WARNING! Check the pressure in the cuff several times during measurement. If the cuff puts pressure on the limb for too long, it can impair the blood flow. WARNING! The MESI ABPI MD is not intended for use in conjunction with highfrequency surgical equipment. 38 General warnings and precautionary measures
39 WARNING! The MESI ABPI MD is intended for Ankle-Brachial Pressure Index measurement. Upper arm blood pressure measurements are for informational purposes only. WARNING! The AC/DC power supply must be connected to an easily accessible socket (the AC/DC power supply also serves for galvanic isolation). WARNING! The MESI ABPI MD must not be used in an oxygen-rich environment. WARNING! When repeating the Ankle-Brachial Pressure Index measurement or Blood Pressure measurement for several times a slight pain may appear at the measurement location. Other effects are excluded. WARNING! The cables and accessories may negatively affect the EMC performance. The device while operated should not be stacked closer than cm from another medical device. WARNING! Important information on electromagnetic compatibility (EMC). As the number of electronic devices such as computers and mobile phones in the room increases, medical devices can become sensitive to the electromagnetic influences of other devices. Electromagnetic interference can cause medical devices to malfunction, which can potentially lead to dangerous situations. Furthermore, medical devices must not interfere with other devices. The IEC/EN standard was introduced due to the necessity to establish electromagnetic compatibility (EMC) requirements for the prevention of dangerous situations in the use of medical devices. The standard defines the level of resistance to electromagnetic interference for medical devices. This medical device is compliant with the IEC/EN standard in terms of resistance to electromagnetic interference and electromagnetic emissions. Nevertheless, do not use mobile phones and similar devices which create strong electromagnetic fields in the vicinity of the device. This can cause the device to malfunction, which can potentially cause a dangerous situation. Important labels 6.1 The symbols on the labels on the bottom of the device, the packaging and the instructions provide important information about the device. The symbols are described below. REF MANUFACTURER REFERENCE NUMBER SERIAL NUMBER SEE THE INSTRUCTIONS FOR USE TYPE BF APPLIED PART CE MARKING WARNING English Important labels 39
40 6.2 Standard compliance The provisions of the Council Directive 93/42/EEC concerning medical devices were complied with. The standards in the table below were complied with. Reference mark (ID:year) EN :2006 EN :2007 EN :2010 EN :2010 EN :2000 EN :1995+A2:2009 EN :1997+A2:2009 EN :2004 EN ISO 14971:2012 EN ISO :2009 ISO :2012 EN ISO 13485:2012 Description Electrical medical equipment Part 1: General requirements for basic safety and essential performance (IEC EN :2005) Electrical medical equipment Part 1-2: General requirements for basic safety and essential performance Collateral standard: Electromagnetic compatibility Requirements and tests (IEC :2007, modified) Medical electrical equipment - Part 1-6: General requirements for basic safety and essential performance - Collateral standard: Usability Electrical medical equipment Part 2-30: Particular requirements for the basic safety and essential performance of automated non-invasive sphygmomanometers (IEC :2009, including January 2010 corrigendum) Electrical medical equipment Part 2-30: Particular requirements for the safety, including essential performance, of automatic cycling non-invasive blood pressure monitoring equipment Non-invasive sphygmomanometers. Part 1: General requirements Non-invasive sphygmomanometers Part 3: Supplementary requirements for electromechanical blood pressure measuring systems Non-invasive sphygmomanometers Part 4: Test procedures to determine the overall system accuracy of automated noninvasive sphygmomanometers Medical devices Application of risk management to medical devices Biological evaluation of medical devices Part 1: Evaluation and testing within a risk management process Symbols for medical devices Medical devices Quality management systems Requirements for regulatory purposes 40 General warnings and precautionary measures Standard compliance
41 Maintenance Charging the battery If you wish to use the device on battery power, you must ensure that the battery is charged regularly. One battery charge is sufficient for approximately 50 measurements. Recommendations for service and maintenance intervals It is mandatory to calibrate the device once per year. Contact your dealer or the manufacturer about calibrating the device If the capacity of the battery is significantly decreased after a certain period of intensive use, the battery is most likely spent and you should replace it. As the device does not contain any parts which can be replaced by a user, you should contact your dealer or the manufacturer about replacing the battery. Cleaning instructions It s recommended to clean the device regularly with a soft, dry or damp cloth. Do not use aggresive cleaning agents, volatile liquids or excessive force when cleaning the device. Do not wash the cuffs or immerse it in water. Also do not use petrol, thinners or similar solvents to clean the cuffs. To adequately clean the cuffs use a soft, moistened cloth and soap. Product life and storage If correctly used, maintained and regularly calibrated, the device will have a minimum service life of 5 years. You can store the device in suitable conditions for a maximum of 5 years. When using the device after storage, we recommend you to subject the device to a thorough maintenance check and calibrate it. Protecting the cuffs In case of open wounds, protect the wounds with adequate impermeable dressing prior to applying the cuffs. Use of protective sleeves is recommended ! Do not wash the cuffs in a washing machine or iron them.! In the event of mechanical stress, the device must be calibrated!! In the event of contact with infected body fluids, the device should be cleaned with non-aggressive cleaning agents and the cuffs should be immediately replaced with new. To avoid replacing the cuffs, use the cuff protection paper.! It is mandatory to have the device calibrated once per year to ensure the correct functioning and accuracy. Contact your dealer or the manufacturer about calibrating the device. English Maintenance Charging the battery 41
Model UB-328. Wrist Digital Blood Pressure Monitor. Instruction Manual. Manuel d instructions. Manual de Instrucciones. Manuale di Istruzioni
 Wrist Digital Blood Pressure Monitor Model UB-328 Instruction Manual Manuel d instructions Manual de Instrucciones Manuale di Istruzioni WM+PD4000913 ENGLISH Dear Customers Congratulations. You have purchased
6833_INSTRUCTIONS MANUAL DIGITAL WIRST BLOOD PRESSURE
 6833_INSTRUCTIONS MANUAL DIGITAL WIRST BLOOD PRESSURE PURCHASE ACKNOWLEDGEMENT JOCCA thanks you for the trust placed in the purchase of our product and we are certain that you will always be satisfied
INSTRUCTION MANUAL. Automatic Blood Pressure Monitor with Fit Cuff. =Fit Cuff=!"#$% IA1B. Model
 IA1B INSTRUCTION MANUAL Automatic Blood Pressure Monitor with Fit Cuff =Fit Cuff=!"#$% Model IA1B Contents Introduction... 2 Notes on Safety... 3 Know Your Unit... 5 Quick Reference Guide... 7 Initial
CONTENTS SPECIFICATIONS GENERAL INFORMATION RECOMMENDED USE OPERATING PRINCIPLE TIPS ON TAKING YOUR BLOOD PRESSURE 3-4 BATTERY INSTALLATION
 IFU SBPMON107 CONTENTS SPECIFICATIONS GENERAL INFORMATION RECOMMENDED USE OPERATING PRINCIPLE TIPS ON TAKING YOUR BLOOD PRESSURE BATTERY INSTALLATION CORRECT POSITION FOR MEASUREMENT POSITIONING THE CUFF
Digital Blood Pressure Monitor. Model UA-787
 Digital Blood Pressure Monitor Model UA-787 Instruction Manual Manuel d instructions Manual de Instrucciones Manuale di Istruzioni UA-787EX-C WM:PD4000287 Preliminary Remarks This device conforms to the
Model AUTOMATIC UPPER ARM Blood Pressure Monitor
 AUTOMATIC UPPER ARM Blood Pressure Monitor Model 1130 Real Fuzzy t e c h n o log y Features: Real Fuzzy Technology Automatic 60 sets of memory One-Touch Operation Easy-to-read Display Table of Contents:
VER: A00. Model No:BA2010
 VER: A00 Model No:BA2010 Before Using the Monitor Introduction...1 Symbols Use...2 Important Safety Notes...3 Konw Your Unit...45 IHB Introduction...6 Before Taking A Measurement...7 Quick Reference Guide...8
MANUAL BLOOD PRESSURE MONITOR BPM 168B Contents Blood Pressure Monitor Intended Use What is blood pressure?
 MANUAL BLOOD PRESSURE MONITOR BPM 168B Contents 01... Blood Pressure Monitor Intended Use 02... 1. What is blood pressure? 02... 2. Why is it useful measure blood pressure at home?... A. WHO blood pressure
SBC 21. Electromagnetic Compatibility Information
 SBC 21 D Blutdruckmessgerät : Gebrauchsanweisung...2 11 G Blood pressure monitor Instructions for use... 12 20 F Tensiomètre Mode d emploi...21 30 I Misuratore di pressione Istruzioni per l uso...31 40
Instruction Manual. Auto Inflate Blood Pressure Monitor
 TM Auto Inflate Blood Pressure Monitor Instruction Manual Features: Fuzzy Logic Technology Auto memory for up to 90 readings One-Touch Operation Easy-to-read Display Date and Time indications AC Adapter
Contents. Safety Notice. Wrist Type
 Wrist Type Contents 1 Safety Notice 2 Safety Notice... 02 Unit Illustration... 05 Important Testing Guidelines... 07 Quick Start... 08 Unit Operation... 10 Battery Installation... 10 Thank you for purchasing
Check following components!
 English Manufacturer OMRON HEALTHCARE Co., Ltd. 53, Kunotsubo, Terado-cho, Muko, Kyoto 617-0002 JAPAN Check following components! EU-representative OMRON HEALTHCARE EUROPE B.V. Scorpius 33, 2132 LR Hoofddorp
Digital Blood Pressure Monitor for the Upper Arm INSTRUCTION MANUAL
 Digital Blood Pressure Monitor for the Upper Arm INSTRUCTION MANUAL GT-6630 Contents Information You Should Know Before Operating the Unit... 25 About the Unit... 28 Function Descriptions... 28 Explanation
Instruction Manual for Configura Cushionair Portable Pump
 Instruction Manual for Configura Cushionair Portable Pump Fitted with battery powered pump, suitable for Configura Portable chairs V E R S I O N O N E M A Y 2 0 1 6 Contents Introduction 3 Set up of Cushionair
Digital Blood Pressure Monitor. Model UA-705. Instruction Manual. Manuel d instructions. Manual de Instrucciones. Manuale di Istruzioni 1WMPD B
 Digital Blood Pressure Monitor Model UA-705 Instruction Manual Manuel d instructions Manual de Instrucciones Manuale di Istruzioni 1WMPD4000988B ENGLISH Contents Dear Customers... 2 Preliminary Remarks...
INSTRUCTION MANUAL MANUAL INFLATION BLOOD PRESSURE MONITOR
 INSTRUCTION MANUAL MANUAL INFLATION BLOOD PRESSURE MONITOR Model HEM-412C TABLE OF CONTENTS Introduction 3 Know Your Unit 4 Quick Reference Guide 5 Battery Installation/Replacement 6 How To Apply The Arm
User Manual. Hopkins IMPACT Digital Wrist BP RELATED ITEMS. Item #526014
 RELATED ITEMS User Manual Hopkins IMPACT Digital Wrist BP Hopkins Flex Temp Thermometer #579420 Hopkins Wave t m Pulse Oximeter #594029 Item #526014 Hopkins IMPACT Digital Wrist BP 6850 Southbelt Dr Caledonia,
Semi-Automatic Blood Pressure Monitor with Memory
 INSTRUCTION MANUAL Semi-Automatic Blood Pressure Monitor with Memory 61-268-001 (Adult size cuff) Please read this instruction manual completely before operating this unit. English Spanish Limited Five
VIDEO TUTORIAL: greatergoods.com/0605
 WRIST BLOOD PRESSURE MONITOR MANUAL VIDEO TUTORIAL: greatergoods.com/0605 Model 0605 Email: info@greatergoods.com Phone: (866) 991-8494 TABLE OF CONTENTS 1 MONITOR COMPONENTS / INSTALLING BATTERIES p.
TD-3140 Blood Pressure Monitor. Owner s Manual
 TD-3140 Blood Pressure Monitor Owner s Manual Dear TD-3140 System Owner: Thank you for choosing TD-3140 Blood Pressure Monitoring System. This manual provides important information to help you operate
REF CH-302B IDENTIFICATION OF PARTS
 English TM INSTRUCTION MANUAL FOR DIGITAL BLOOD PRESSURE MONITOR REF CH-302B IDENTIFICATION OF PARTS Exhaust button Air-release system Bulb Systolic blood pressure display section Diastolic blood pressure/pulse
3.1.3 Weight. Frequency. Weight is obtained at the baseline examination and annually. Equipment
 The excerpt from the SPRINT Manual of Procedures (MOP) below, dated November 1, 2010, includes instructions about blood pressure measurement. Recruitment for the SPRINT trial began on November 8, 2010;
Talking Wrist TypeBlood Pressure Monitor. Talking Wrist Type Blood Pressure Monitor Model: BPW810. User Manual
 Talking Wrist TypeBlood Pressure Monitor Talking Wrist Type Blood Pressure Monitor Model: BPW810 User Manual TALKING WRIST TYPE BLOOD PRESSURE MONITOR CONTENTS Model: BPW810 USER MANUAL Deleting the Latest
TD-3140 Blood Pressure Monitor. Owner s Manual
 TD-3140 Blood Pressure Monitor Owner s Manual Dear TD-3140 System Owner: Thank you for choosing TD-3140 Blood Pressure Monitoring System. This manual provides important information to help you operate
Oregon Scientific Wrist Blood Pressure Monitor (BPW211)
") Oregon Scientific Wrist Blood Pressure Monitor (BPW211) User Manual TABLE OF CONTENTS Introduction... 2 Key features... 2 Main unit... 2 Plastic storage container... 2 LCD display symbols... 3 Safety and
Oregon Scientific Wrist Blood Pressure Monitor (BPW211) User Manual TABLE OF CONTENTS Introduction... 2 Key features... 2 Main unit... 2 Plastic storage container... 2 LCD display symbols... 3 Safety and
Wrist Type Blood Pressure Monitor
 Wrist Type Blood Pressure Monitor Model Number MD 13400 INSTRUCTION MANUAL Contents 06 Welcome Section 07 Symbols and key words used in these instructions 09 Information and Safety Instructions 14 Scope
Introduction. Table of Contents. Automatic Wrist Blood Pressure Monitor With Voice-Guided Operation. Model No.: BP5K
 Automatic Wrist Blood Monitor With Voice-Guided Operation Ozeri Customer Service Customer service: 1-877-299-1296 or Email: support@ozeri.com Model No.: BP5K Thank you for choosing an Ozeri Blood Monitor.
REF CH-602B IDENTIFICATION OF PARTS
 English TM INSTRUCTION MANUAL FOR DIGITAL BLOOD PRESSURE MONITOR REF CH-602B IDENTIFICATION OF PARTS Systolic blood pressure display section Battery cover Diastolic blood pressure / Pulse display section
Auto Arm Blood Pressure Monitor
 Now you know ys Auto Arm Blood Pressure Monitor Featuring: One-touch operation 85 memories Instruction Manual Table of Contents Important information................... 3 Fuzzy Logic technology.................
Instructions for use. 3year. Wrist MOBIL BASIS. The monitor for first users To be used on the wrist. Also suitable for: WARRANTY. Clinically validated
 Instructions for use Wrist MOBIL BASIS The monitor for first users To be used on the wrist Arrhythmia detection Clinically validated 3year WARRANTY Also suitable for: Messgenauigkeit klinisch validiert
DYNAMIC COMPRESSION THERAPY
 PULSE PRESS DYNAMIC COMPRESSION THERAPY MULTITEC 12 User Manual May 2011 0120 CONTENTS:- SAFETY INSTRUCTIONS ELECTROMAGNETIC INTERFERENCE DESCRIPTION OF CONTROLS MODE SELECTION OPERATING INSTRUCTIONS CARE
Sports Wrist Digital Blood Pressure Monitor Item #
 Instruction Manual Sports Wrist Digital Blood Pressure Monitor Item # 04-885-001 Please read this guidebook completely before operating this unit. Limited Five-Year Warranty The warrantor guarantees that
MODEL CH-432B INSTRUCTION MANUAL FOR DIGITAL BLOOD PRESSURE MONITOR. - Eng 1 - English Español Português Deutch. Italiano Français CH-432B
 English Español Português Deutch INSTRUCTION MANUAL FOR DIGITAL BLOOD PRESSURE MONITOR MODEL CH-432B CH-432B POWER START Italiano Français - Eng 1 - CLEANING METHOD OF CUFF After cleaning the cuff with
Fully Automatic ihealth Track Connected Arm Blood Pressure Monitor USER MANUAL
 EN Fully Automatic ihealth Track Connected Arm Blood Pressure Monitor USER MANUAL 1 Note: This is a shortened practical version of the user manual. For the full version of this user manual, please visit
WARNING: EXPLOSION HAZARD
 Section 1 Safety 1.1 Instructions for the Safe Operation and Use of the Pulse Oximeter Do not attempt to service the Pulse Oximeter yourself. Only qualified service personnel should attempt any necessary
User manual. PG132 Rev01 Editi Compressive Limbs Therapy System DVT-7700
 User manual PG132 Rev01 Editi 220114 Compressive Limbs Therapy System DVT-7700 I.A.C.E.R. Srl Via S. Pertini 24/A 30030 Martellago (VE) ITALY Tel. 041.5401356 Fax 041.5402684 e-mail: iacer@iacer.it http://www.itechmedicaldivision.com
5 series Blood Pressure Monitor
 INSTRUCTION MANUAL 5 series Blood Pressure Monitor Model BP742 ENGLISH ESPAÑOL table TABLE of OF contents CONTENTS Before using the Monitor Introduction... 3 Safety Information...4 Operating the Device...4
POWERPRESS UNIT. User Manual. Gradient Pneumatic Sequential Compressor. Neomedic
 TIMER (MIN) POWERPRESS UNIT 40 70 40 80 90 10 60 100 MIN MAX PRESSURE (mmhg) User Manual Neomedic 9601 Owens mouth Ave. #8 Chatsworth, CA 91311 Toll Free: 866-990-1168 Tel: 818-998-1023 Fax: 818-998-0277
Digital Blood Pressure Monitor Model UA-621 Instruction Manual
 Digital Blood Pressure Monitor Model UA-621 Instruction Manual 1WMPD4001898E Contents Dear Customers... 1 Preliminary Remarks... 2 Precautions... 2 Parts Identification... 3 Symbols... 4 Operation Mode...
User Manual DMD1001. Arm Type. Digital Blood Pressure Monitor. version:1.0
 User Manual Digital Blood Pressure Monitor version:1.0 DMD1001 Arm Type Thank you very much for selecting VIVE Digital Blood Pressure Monitor DMD1001 WWW.VIVEHEALTH.COM Contact us 24/7 at www.vivehealth.com
Blood Pressure Monitor
 Upper Arm Blood Pressure Monitor Model Number MD 12450 BBlood Pressure Pass Contents 5 Warranty Details 6 Welcome Section 7 Symbols and key words used in these instructions 8 Proper use 9 Safety instructions
Talking Wrist Style Blood Pressure Monitor Model INS-LAB-RevB08
 Talking Wrist Style Blood Pressure Monitor Model 1145 1145-INS-LAB-RevB08 Contents Introduction...2 Key Features... 2 Front View... 2 Rear View... 3 LCD Symbols... 3 Safety and Care Instructions... 4 Safety
MEDICARE 60. Semi-automatic upper arm blood pressure monitor. Instruction manual
 MEDICARE 60 Semi-automatic upper arm blood pressure monitor Instruction manual closing date: april 2002 by ibp innovative business promotion gmbh, Germany table of contents 1 introduction... 2 2 preliminary
Fully Fuzzy Auto Digital Wrist Blood Pressure Monitor. tensio control. INSTRUCTION MANUAL Model GP-6220
 Fully Fuzzy Auto Digital Wrist Blood Pressure Monitor tensio control INSTRUCTION MANUAL Model GP-6220 Manufactured by: Geratherm Medical AG Fahrenheitstraße 1 98716 Geschwenda Germany Phone: +49 (0) 36205
User manual. MNPG 102 Rev. 04 Edition 04/02/16. Pressotherapy model. Power-Q1000 Premium
 User manual MNPG 102 Rev. 04 Edition 04/02/16 Pressotherapy model Power-Q1000 Premium I.A.C.E.R. Srl Via S. Pertini 24/A 30030 Martellago (VE) ITALY Tel. 041.5401356 Fax 041.5402684 e-mail: iacer@iacer.it
User Manual DMD1001 1
 User Manual DMD1001 1 TABLE OF CONTENTS PRODUCT DESCRIPTION... WHAT S INCLUDED... PARTS LIST... POWER SUPPLY... REPLACING BATTERIES... MEASUREMENT PRINCIPLE... OPERATING INSTRUCTIONS - SETTING DATE, TIME,
Contents. Helpline No. UK/Northern Ireland , Rep. Ireland Web Support Model Number:
 Upper arm blood pressure monitor Upper arm blood pressure monitor Upper arm blood pressure monitor Fault Description MD 12450 / MSN 5003 5417 11/10 In order to deal with your enquiry as quickly and efficiently
English Español Português Italiano Deutch Français INSTRUCTION MANUAL FOR DIGITAL BLOOD PRESSURE MONITOR MODEL CH-656C. - Eng 1 -
 English Español Português Italiano Deutch Français INSTRUCTION MANUAL FOR DIGITAL BLOOD PRESSURE MONITOR MODEL CH-656C M - Eng 1 - CLEANING METHOD OF CUFF After cleaning the cuff with a neutral detergent,
User Manual DMD1001. Arm Type. Digital Blood Pressure Monitor. version:1.0
 User Manual Digital Blood Pressure Monitor version:1.0 DMD1001 Arm Type WWW.VIVEHEALTH.COM Contact us 24/7 at www.vivehealth.com Thank you very much for selecting VIVE Digital Blood Pressure Monitor DMD1001
ProSeries 2. Blood Pressure Monitor. Quick Start Guide. A complete user guide is available at vitasigns.com
 ProSeries 2 Blood Pressure Monitor Quick Start Guide A complete user guide is available at vitasigns.com VS47129-0200 Welcome to Our mission is to empower you to live a healthy life. We re passionate about
User Manual PTW-DensiX. D / Di/Zi
 User Manual PTW-DensiX D148.131.0/3 2005-05 Di/Zi General Information General Information The product bears the CE-mark "CE-0124" in accordance with the Council Directive 93/42/EEC about Medical Devices
SkillGuide. User Guide. English
 SkillGuide User Guide English SkillGuide SkillGuide is a feedback device designed to provide real-time and summative feedback on CPR performance. www.laerdal.com Items included SkillGuide and User Guide.
STANDARD OPERATING PROCEDURES DIVISION OF COMPARATIVE MEDICINE UNIVERSITY OF SOUTH FLORIDA
 STANDARD OPERATING PROCEDURES DIVISION OF COMPARATIVE MEDICINE UNIVERSITY OF SOUTH FLORIDA SOP#: 1157.1 Date Issued: 05/14 Date Revised: 5/15 Page 1 of 6 TITLE: SCOPE: RESPONSIBILITY: PURPOSE: SurgiVet
Instruction Manual Mode d emploi Gebrauchsanweisung Manuale di istruzioni Manual de instrucciones Gebruiksaanwijzing РУКОВОДСТВО ПО ЭКСПЛУАТАЦИИ
 Digital Automatic Blood Pressure Monitor Model M2 Basic Instruction Manual Mode d emploi Gebrauchsanweisung Manuale di istruzioni Manual de instrucciones Gebruiksaanwijzing РУКОВОДСТВО ПО ЭКСПЛУАТАЦИИ
WELCOME TO THE REVOLUTION
 USER GUIDE WELCOME TO THE REVOLUTION THANK YOU FOR CHOOSING THE GCQUAD We listened to what you wanted - and created the most accurate, versatile and game-enhancing ball and club analysis solution available
Blood Pressure Monitor
 Blood Pressure Monitor egotest Users Instructions Contents of the kit 1 blood pressure instrument with cuff 1 set of instructions for use 1 case Symbols on the blood pressure monitor Symbol 0124 Function/meaning
Blood Pressure Monitor Instruction Manual
 Blood Pressure Monitor Instruction Manual BMP-2244BT Manual Ver.: 1.0 Issuing Date: 2016/09/22 2016. All rights reserved. Thank you for selecting iprovén arm type Blood Pressure Monitor BPM-2244BT. The
Instruction Manual. S&S Tradings
 Lead a Healthy Life... Instruction Manual Fully Automatic Upper Arm Style Digital Blood Pressure Monitor Model No.: BP101U 0197 S&S Tradings Distributed by: S&S Tradings, Australia PO BOX 3364, Sunnybank
Model M3 Intellisense
 IM-HEM-7051-E-02-08/08 1647554-2B Digital Automatic Blood Pressure Monitor Model M3 Intellisense Instruction Manual Mode d emploi Gebrauchsanweisung Manuale di istruzioni Manual de instrucciones Gebruiksaanwijzing
TECHNICAL CHARACTERISTIC CT 071
 MADE IN FRANCE Regulatory information CE Marking Index of classification Notified body CE 0459 Im G-MED PHTALATES LATEX Sphygmomanometer hand-held type with aneroid membrane, very light. This precision
premium wrist blood pressure monitor
 LIFESTYLE premium wrist blood pressure monitor instruction manual Model: MD 1010 WBPM10 Series / MD 13400 Contents Introduction... 5 Safety Information... 6 General...6 Safe handling of batteries...7 Service
Model MIT Elite Plus
 Digital Automatic Blood Pressure Monitor Model MIT Elite Plus Instruction Manual Mode d emploi Gebrauchsanweisung Manuale di istruzioni Manual de instrucciones Gebruiksaanwijzing РУКОВОДСТВО ПО ЭКСПЛУАТАЦИИ
Pedometer with PC download. Model: FB322 OVERVIEW FRONT VIEW INDEX
 OVERVIEW FRONT VIEW Pedometer with PC download INDEX Model: FB322 Introduction...1 Overview...1 Front view...1 Back view battery compartment...1 LCD screen...1 Getting started...2 Setting the device...2
SpotArm Type Blood Pressure Monitor. Model i-q142
 IM-HEM-1040-E-06-05/2012 1665009-3F SpotArm Type Blood Pressure Monitor Model i-q142 Instruction Manual Mode d emploi Gebrauchsanweisung Manuale di istruzioni Manual de instrucciones Gebruiksaanwijzing
Instruction Manual Mode d emploi Gebrauchsanweisung Manuale di istruzioni Manual de instrucciones Gebruiksaanwijzing
 Digital Automatic Blood Pressure Monitor Model M2 Instruction Manual Mode d emploi Gebrauchsanweisung Manuale di istruzioni Manual de instrucciones Gebruiksaanwijzing FR DE IT ES NL RU AR IM-HEM-7119-E(V)-01-08/2011
ORB-400 BUBBLE/HAZE MACHINE. Item ref: UK User Manual
 ORB-400 BUBBLE/HAZE MACHINE Item ref: 160.462UK User Manual Caution: Please read this manual carefully before operating Damage caused by misuse is not covered by the warranty Introduction Thank you for
AIR PRESSURE MASSAGER #Unwind
 AIR PRESSURE MASSAGER #Unwind Marketed by: ADJUSTABLE LEG WRAPS 2 MODES THERAPEUTIC RELIEF EASY CLEANING 1year 2 11 Cleaning Make sure to cut off the power when you clean machine. 1. Please wipe the dirty
Fully Automatic Blood Pressure Monitor
 Fully Automatic Blood Pressure Monitor User Manual BPM1KTL Series Content Introduction 2 Parts 3 Setting up your Blood Pressure Monitor Loading Battery 4-6 4 Connecting the Cuff 4 Clock and Date Adjustment
WatchBP Office Central
 WatchBP Office Central WatchBP Office Central Cardiovascular Screening Solution for: -Central blood pressure measurement -Ankle Brachial Index assessment -Atrial fibrillation detection -Simultaneous assessment
Module No GETTING ACQUAINTED GENERAL GUIDE TIMEKEEPING
 Module No. 2196 2196-1 GETTING ACQUAINTED Congratulations upon your selection of this CASIO Pressure Monitor Watch (BP-1B, Module No. 2196). To get the most out of your purchase, be sure to carefully read
Model UA-705. Digital Blood Pressure Monitor 使用手冊翻譯. Instruction Manual. Manuel d instructions. Manual de Instrucciones. Manuale di Istruzioni
 Digital Blood Pressure Monitor Model UA-705 1WMPD4000988D Instruction Manual Original Manuel d instructions Traduction Manual de Instrucciones Traducción Manuale di Istruzioni Traduzione 使用手冊翻譯 Contents
Intermittent Pneumatic Compression System
 User Manual Intermittent Pneumatic Compression System To ensure safe use of this device, it is essential that you read and fully understand the information contained within this manual. Mechanical prophylaxis
MAGICFX CONFETTIPISTOL USER AND INSTALLATION MANUAL
 English MAGICFX CONFETTIPISTOL USER AND INSTALLATION MANUAL CONFETTI FX / STREAMER FX Manual trigger PART01129 rev 01-00 DISCLAIMER WARNING Read this manual carefully before installing and/or using this
KERN EG/EW Version /02
 E KERN EG/EW Version 1.5 07/02 Operating Instructions Electronic Precision Balances Contents 1 TECHNICAL DATA... 20 2 UNPACKING AND STANDARD ACCESSORIES... 23 3 SETTING UP THE BALANCE... 23 4 EXTERNAL
LD6. Digital Blood Pressure Monitor Instruction Manual
 LD6 Digital Blood Pressure Monitor Instruction Manual Ciśnieniomierz elektroniczny automatyczny do pomiaru ciśnienia tętniczego krwi i pulsu Instrukcja obsługi POL TABLE OF CONTENTS PARTS AND COMPONENTS.............................................
OxyScan Graphic. Operating Instructions. UMS Micro-oxygen sensor 501. Microprocessor instrument
 OxyScan Graphic Operating Instructions UMS Micro-oxygen sensor 501 Microprocessor instrument Introduction Thank you for choosing the UMS Micro Oxygen Sensor 501 - a highly advanced product! Please read
WatchBP Office Central
 WatchBP Office Central WatchBP Office Central Cardiovascular Screening Solution for: -Central blood pressure measurement -Ankle Brachial Index assessment -Atrial fibrillation detection -Simultaneous assessment
SC505 Sof Care Inflator. Operating Instructions and Service Manual
 SC505 Sof Care Inflator Gaymar Industries, Inc. 10 Centre Drive Orchard Park, NY 14127 Toll Free +1 800.828.7341 + 1 716.662.2551 Fax +1 800.993.7890 Outside USA +1 716.662.8636 Outside USA Fax +1 716.662.0730
Med Aire Alternating Pressure Pump and Pad System
 User Manual Med Aire Alternating Pressure Pump and Pad System 14002E 14001E Symbols & Statements NOTE Indicates some tips or some information users should be aware of. CAUTION Indicates correct operating
Digital Melting Point Apparatus
 Digital Melting Point Apparatus Heating Plateau Ramping Start/Stop Plateau set Ramp stop Hold User Guide Version 1.1 Heating Viewing tube Sample Chamber IEC power inlet socket Power on/off Temperature
User manual. PG89 Rev 01 Editi Pressotherapy model. LymphoPress 4
 User manual PG89 Rev 01 Editi 040515 Pressotherapy model LymphoPress 4 I.A.C.E.R. Srl Via S. Pertini 24/A 30030 Martellago (VE) ITALY Tel. 041.5401356 Fax 041.5402684 e-mail: iacer@iacer.it http://www.itechmedicaldivision.com
Blood Pressure Monitor
 EXTRA LARGE ARM Blood Pressure Monitor Trilingual Instruction Guide MODEL UA-789 Please read this important information before using your monitor. Please remember that only a medical practitioner is qualified
Model UA Digital Blood Pressure Monitor 使用手冊翻譯. Instruction Manual. Manuel d instructions. Manual de Instrucciones. Manuale di Istruzioni
 Digital Blood Pressure Monitor Model UA-1030 1WMPD4002225C Instruction Manual Original Manuel d instructions Traduction Manual de Instrucciones Traducción Manuale di Istruzioni Traduzione 使用手冊翻譯 Contents
Blood Pressure Monitor
 Dual Memory Auto-Inflate Blood Pressure Monitor Instruction Guide UA-774 IMPORTANT INFORMATION Please read this important information before using your monitor. Please remember that only a medical practitioner
Instruction Manual Mode d emploi Gebrauchsanweisung Manuale di istruzioni Manual de instrucciones Gebruiksaanwijzing
 Digital Automatic Blood Pressure Monitor Model M6 Comfort Instruction Manual Mode d emploi Gebrauchsanweisung Manuale di istruzioni Manual de instrucciones Gebruiksaanwijzing EN FR DE IT ES NL RU IM-HEM-7000-E(V)-01-08/08
AIR/OXYGEN BLENDER INSTRUCTION MANUAL
 BIO-MED DEVICES AIR/OXYGEN BLENDER INSTRUCTION MANUAL CATALOG #2120 REV 042203 BIO-MED DEVICES INC. 1445 BOSTON POST ROAD, GUILFORD, CT 06437 (203) 458-0202 FAX (203) 458-0440 www.biomeddevices.com TABLE
Blood Pressure Monitor
 IMPORTANT INFORMATION Dual Memory Auto-Inflate Blood Pressure Monitor Please read this important information before using your monitor. Please remember that only a medical practitioner is qualified to
INSTRUCTION MANUAL MANUAL INFLATION BLOOD PRESSURE MONITOR
 TM TM INSTRUCTION MANUAL MANUAL INFLATION BLOOD PRESSURE MONITOR Model HEM-412CREL TABLE OF CONTENTS Introduction 3 Important Safety Notes 4 Know Your Unit 5 Quick Reference Guide 6 A Few Words About Blood
Owner s Manual & Safety Instructions
 Owner s Manual & Safety Instructions Save This Manual Keep this manual for the safety warnings and precautions, assembly, operating, inspection, maintenance and cleaning procedures. Write the product s
ASE SOLVENT CONTROLLER INSTALLATION INSTRUCTIONS Dionex Corporation
 ASE SOLVENT CONTROLLER INSTALLATION INSTRUCTIONS 2000 Dionex Corporation Document No. 031277 Revision 03 April 2000 2000 Dionex Corporation All rights reserved worldwide. Printed in the United States of
OPERATOR S MANUAL. Pediatric/Infant cap-one Mask YG-232T/YG-242T A. General. Safety Information WARNING WARNING WARNING. Components WARNING
 OPERATOR S MANUAL 0614-905493A First Edition: 12 Dec 2011 Second Edition: 12 Feb 2015 Printed: Pediatric/Infant cap-one Mask YG-232T/YG-242T Symbol Description Attention, consult operator s manual Date
CONSOLE-320 ENGLISH. 230A: CONSOLE-320 with cable data output Item 230B: CONSOLE-320 with cable + wireless radio data output
 CONSOLE-320 Item 230A: CONSOLE-320 with cable data output Item 230B: CONSOLE-320 with cable + wireless radio data output Table of contents 1. INTRODUCTION...2 1.1 Power supply...2 1.2 Connections...2 1.3
Sensor for Air Bubble Detection at Liquid Filled Tubes. SONOCHECK Type ABD06.xx. Operating Manual
 Sensor for Air Bubble Detection at Liquid Filled Tubes SONOCHECK Type ABD06.xx Operating Manual Manufacturer: Model: Type: SONOTEC Ultraschallsensorik Halle GmbH Air Bubble Detector ABD06.xx SONOTEC Ultraschallsensorik
1 METRON MANIPULATION TABLES - WARRANTY STATEMENT
 1 METRON MANIPULATION TABLES - WARRANTY STATEMENT Metron Medical Australia Pty Ltd. will warrant this table, for parts only against defects in manufacture for a period of two (2) years for structural integrity,
Bante820 Portable Dissolved Oxygen Meter Instruction Manual
 Bante820 Portable Dissolved Oxygen Meter Instruction Manual BANTE INSTRUMENTS CO., LTD Bante820 Portable Dissolved Oxygen Meter 1 Introduction Thank you for selecting the Bante820 portable dissolved oxygen
Instruction Manual. Wrist Blood Pressure Monitor with Advanced Positioning Sensor (APS ) Model HEM-650 ESPAÑOL ENGLISH
 Model HEM-650 ESPAÑOL ENGLISH") Instruction Manual Wrist Blood Pressure Monitor with Advanced Positioning Sensor (APS ) Model HEM-650 650 ENGLISH ESPAÑOL TABLE OF CONTENTS Before Using the Monitor Introduction.................................................3
Instruction Manual Wrist Blood Pressure Monitor with Advanced Positioning Sensor (APS ) Model HEM-650 650 ENGLISH ESPAÑOL TABLE OF CONTENTS Before Using the Monitor Introduction.................................................3
INSTRUCTION MANUAL DIGITAL BLOOD PRESSURE MONITOR
 INSTRUCTION MANUAL FOR DIGITAL BLOOD PRESSURE MONITOR REF CH-437C - Eng 1- - Eng 1 - English Español Português Deutsch GENERAL REMARKS General remarks on blood pressure and blood pressure measurement 1.
Operating Instructions Part No
 DIGITAL AUTOMATIC TYRE INFLATOR Operating Instructions Part No. 11.0545 Thank you for selecting this Jamec Pem Automatic Tyre Inflator. Please read this manual before carrying out any installation or service
Instruction Manual. Gebrauchsanweisung Manuale di istruzioni Manual de instrucciones Gebruiksaanwijzing РУКОВОДСТВО ПО ЭКСПЛУАТАЦИИ
 Wrist Blood Pressure Monitor Model R3-I Plus Instruction Manual Mode d emploi Gebrauchsanweisung Manuale di istruzioni Manual de instrucciones Gebruiksaanwijzing РУКОВОДСТВО ПО ЭКСПЛУАТАЦИИ EN FR DE IT
Fingertip Pulse Oximeter
 Instruction Manual Fingertip Pulse Oximeter Item # 40-810-000 Item # 40-811-000 Item # 40-812-000 Item # 40-813-000 Please read this guidebook completely before operating this unit. Limited Two-Year Warranty