WI GS Harness/Container System
|
|
|
- Johnathan Simmons
- 5 years ago
- Views:
Transcription


1 WI GS Harness/Container System OW ERS MA UAL Sunrise Manufacturing International, Inc./SMI Inc Fort King Road Zephyrhills, Florida tel: fax: OTE: READ BACK COVER FIRST
2 Text and Copyright 1998 by Sunrise Manufacturing International, Inc./SMI, inc. All rights reserved. No part of this publication may be reproduced, stored in a retrieval system, or transmitted, in any form, or by any means, electronic, mechanical, photocopying, recording, or otherwise, without prior written permission of SMI, Inc. page 2
3 TABLE OF CO TE TS Introduction 4 FAA Correspondence 5 Wings Components 6 Donning Your Wings 7 Before Skydiving with Your Wings 9 Deploying Your Main 11 Malfunctions and Deploying Your Reserve 12 RSL System 16 3-Ring Release System 17 Installation of Cypres 22 Reserve Assembly and Packing 23 Main Assembly and Packing 33 Maintenance 50 Notes Back Cover page 3
4 I TRODUCTIO Congratulations on the purchase of your Wings harness/container system (Wings). Your Wings is a modern, state of the art parachute harness/container system employing advanced reserve deployment technology. Only the finest quality construction techniques and materials available in the industry were used in your Wings harness/container system. If you have never jumped the Wings before, or if you are transitioning from other types of gear, be sure to receive instruction on its use from a certified instructor. This instruction should consist of a practice session in a suspended harness or on the ground where you practice both routine and Emergency procedures. This manual is not a course of instruction on how to make a parachute jump. Nor does it contain the various regulations that govern sport parachuting and related activities. It is the responsibility of the user to ensure that his/her Wings is properly assembled, maintained, packed, worn and used. It is the user s responsibility to seek out and obtain proper training before use of the Wings harness/container system. The information and specifications in this manual are in effect at the time of printing. Sunrise Manufacturing International, Inc., however, reserves the right to change the Wings at any time without notice and without incurring any obligation. Please read this manual thoroughly, cover to cover, before attempting to pack or use this equipment in any way. If after you have read this manual, you find you do not understand any element, please consult a qualified rigger or a qualified instructor for operational assistance. The Wings harness/container system is approved under FAA TSO C 23 D. This assembly is limited to use by persons up to 115 kg (254 lbs.) fully equipped, and up to 150 knots. page 4

5 WI GS owner s manual page 5
6 WI GS COMPO E TS Your Wings harness/container system is shipped from the factory with a collection of components, depending on the instruction methods used and the configurations desired by the customer. These components may include: Harness/Container Reserve Static Line Reserve Closing Loop Release Handle Reserve Ripcord Reserve Pilot Chute Reserve Pilot Chute Top Plate Reserve Free Bag and Bridle Bridle for Round Reserve Reserve Control Toggles Main Risers and Control Toggles Main Deployment Bag Main Throw out Pilot Chute and Bridle Main Spring-Loaded Pilot Chute with Bridle Main Closing Loops (2) Closing Loop Elastics for Leg and Chest Straps (3) Rubber Bands for Main Deployment Bag Reserve Packing Data Card Setup for Cypres AAD AFF Left Side Jumpmaster s Handle Main Ripcord Main Static Line Main Static Line Pilot Chute Assist Velcro Assembly page 6
7 DO I G YOUR WI GS The Wings is custom built in a variety of container sizes, lengths, and widths. These configurations along with options make sizing of the harness and container system to the individual jumper vital to the safe operation of the system. If the system does not fit properly, the handles may be either inaccessible or may shift in free fall or under canopy, therefore causing problems that may result in injury or death. The Wings is designed to fit snugly, yet comfortably, when properly adjusted. A harness that is either too small or too large for the jumper s body size can affect safety and comfort during a parachute jump. To adjust your Wings: 1. Put the rig on and loosely thread the leg straps. Check the leg straps for twists before threading them. 2. Tighten the leg straps so they are snug, but not so tight that they would restrict mobility in a relaxed arch or turning motion. 3. Make sure the left and right straps are evenly adjusted. Slide the excess strap through the elastic keepers and stow in the pockets on the leg pads so they won t flop around in the air. 4. Thread the chest strap as follows: enter the adjuster from behind (next to the jumper s chest), go around the sliding bar, and go back through between the bar and the end of the adjuster. Make sure that the folded edge of the chest strap is completely threaded so that it cannot unthread itself. (See Fig. 2) page 7


8 5. Adjust the chest strap so the main lift webs are parallel when the chest strap tightened. The chest strap should not restrict mobility in a relaxed arch. CAUTIO : An improperly threaded chest strap will not hold the jumper in the harness. CORRECT ROUTI G OF: LEG STRAP CHEST STRAP page 8
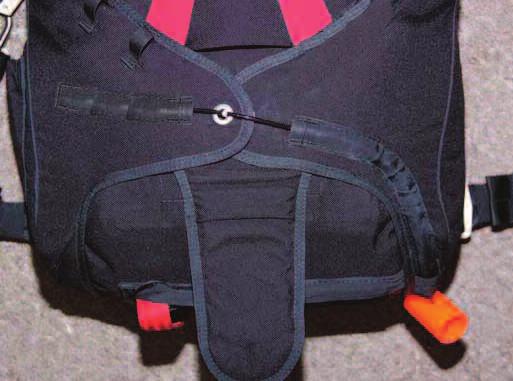
9 BEFORE SKYDIVI G WITH YOUR WI GS Every jumper should do a thorough equipment check before every skydive, no matter how experienced the jumper is. Your pre-jump equipment check should follow a logical order. A thorough pre-jump equipment check includes the following checks: 1. Check the reserve pin and cable. The reserve pin should be straight and seated deep into the locking loop with the end of the pin covered by the pin protection pocket. Slide the reserve ripcord cable back and forth in its housing to ensure that it moves freely. This is especially important in sub-freezing temperatures. 2. Lift the main container pin-protector flap and check the locking pin. It must be at least halfway through the locking loop. 3. Ensure that the bridle is routed correctly, from the locking pin into the pilot chute pouch. A misrouted bridle will cause a pilot chute-in-tow malfunction. 4. Make sure both the reserve and main pin protector flaps are tucked in. 5. If your Wings comes with an AAD installed, calibrate it according to the manufacturer s instructions. 6. If your Wings comes with a RSL System, make sure it is hooked up correctly. 7. Make sure the 3-Ring release system is assembled properly and is free of dirt or other foreign matter. page 9
10 8. Check the position of the reserve ripcord handle. Do not remove it from the pocket unless you suspect a problem. Make sure that the handle is securely velcroed in the pocket to minimize the chance of it floating or dangling during free fall. 9. Check the 3-Ring release (cutaway) handle. It should be mated to the Velcro on the harness, and no more than 1/2 inch of yellow cable should be visible between the cutaway handle and the cable housing. 10. Ensure that the chest strap is threaded properly, and that it is not threaded through the reserve ripcord handle. 11. Ensure that the leg straps are threaded properly, and that the main lift web is not twisted. The free ends of the leg straps should be tucked in the leg pads. Wings has features that require a certain level of experience and training in order to be safely utilized. Before you jump your Wings, be sure to receive instruction on its use from a knowledgeable instructor. This instruction should include practicing both routine procedures and emergency procedures in a suspended harness or on the ground. It is the responsibility of the jumper to seek out and obtain proper training before flying with the Wings harness/container system. It is the responsibility of the user to ensure that the Wings is properly assembled, maintained, packed, worn, and used. This manual does not provide instruction on how to make a parachute jump; nor does it contain the regulations that govern sport parachuting and related activities. page 10
11 DEPLOYI G YOUR MAI Before you use your Wings harness/container system for the first time, you should practice the procedures on the ground under supervision of a knowledgeable instructor. To deploy the main parachute: 1. While falling in a stable position, if possible, find your pilot chute handle. 2. Firmly grasp the handle with your right hand, while compensating for stability with your left. 3. Pull the handle from its pouch and act according to the needs of the particular deployment system you are currently jumping. page 11
12 MALFU CTIO S A D DEPLOYI G YOUR RESERVE This section discusses the causes of some total and partial malfunctions and deploying your reserve. This section does not provide detailed instructions on coping with emergencies. It is meant only to explain the function of your Wings harness/container system. Learning the proper procedures and deciding when or if to use them is the responsibility of the user. OTE: The following procedures for dealing with malfunctions do not consider the dependency on an AAD or RSL. Since these are back-up systems, the jumper should react as if these were not there. Total Malfunctions A total malfunction exists when the main canopy is still in its container after some effort has been made to deploy the main pilot chute. The pilot chute may or may not be trailing behind you. A total malfunction may result from a variety of factors, most of which can be prevented by proper packing, maintenance, and use of your Wings. Because you are descending at a high rate of speed, you have little time to attempt to correct a total malfunction. You should pull the reserve ripcord using a look, reach, pull procedure, grasping the reserve ripcord with both hands and pulling until your arms are completely extended. Because the main canopy is not out of the bag, it is not normally necessary to cutaway the main risers before pulling your reserve. Doing so wastes the limited time and altitude. page 12
13 Pilot Chute-in-Tow The pilot chute is out behind the jumper, but does not extract the main canopy from the container RESPO SE: Assume a flat and stable position and immediately pull the reserve ripcord. It is highly unlikely that you will be able to identify or correct the cause of a pilot chute-in-tow before impact. Pilot Chute Hesitation The pilot chute may become trapped in the turbulent air over your back and simply hover in the burble. RESPO SE: Roll over on your side momentarily. This should blow the pilot chute off your back or out of the turbulent air. While maintaining altitude awareness, you should try all possible methods of getting the pilot chute into clean air, because simultaneous deployment of the main and reserve canopies can occur in this situation. If the pilot chute does not get clean air and extract the main within a safe opening altitude, you should assume a flat and stable position and pull the reserve ripcord. Lost or Stuck Deployment Handle You may not be able to locate the deployment handle on the pilot chute, or if you do locate it, you may not be able to extract the pilot chute. RESPO SE: You should look at the deployment handle. If you cannot see it or feel it, you should assume a flat and stable position and pull the reserve. If you can locate it, but two hard pulls will not extract the pilot chute from its pouch, you should assume a flat and stable position and pull the reserve. page 13
14 Partial Malfunctions A partial malfunction results when the main canopy comes out of the container and extends above your head but does not open correctly. Most partial malfunctions result from incorrect packing, poor body position upon deployment, or problems with the main canopy itself. Some partial malfunctions can be corrected in the air, may not require pulling the reserve, and can be landed safely. Identifying and dealing with such situations is your responsibility. It is important to clear your air before pulling your reserve. However, in some situations, waiting too long between cutting away and pulling your reserve can result in serious injury or death; and cutting away and pulling your reserve simultaneously or in rapid succession may result in an entanglement and result in serious injury or death. Experience thus far has shown that a two-step method is most effective. When presented with a partial malfunction that requires the use of your reserve, you should arch your back and tuck your legs behind you as best you can given the malfunction. You should look down at the cutaway and reserve handles. Grasp the cutaway handle and peel it away from the main lift web.. Look at the reserve ripcord handle, pull the cutaway handle to full arm extension and throw it away, and immediately grasp the reserve ripcord handle with both hands and pull to full arm extension. AAD Deployment You will find yourself under your reserve if you descend below the preset altitude at a high rate of speed, or if your AAD was improperly calibrated. If the main container is still closed, you should land. under the reserve canopy. If the main container is open but the main is not inflated, you should cutaway the main. If both the reserve and main canopy are inflated, you should respond as you were trained by your instructor for your particular canopy. page 14
15 Other Emergencies You may be faced with any number of emergencies not discussed here, including those in the aircraft, during climb-out or exit, in free fall, under canopy, and during landing. As stated previously, training for any and all emergencies must be provided by a currently rated instructor, and it is user s responsibility to maintain current training on all aspects of using Wings Harness/ Container System. page 15


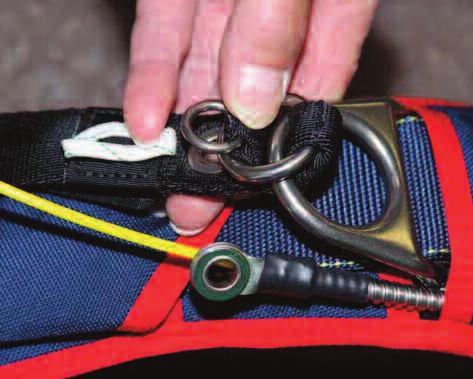
16 THE RSL SYSTEM The main concept of the Reserve Static Line Lanyard (RSL) system is that a lanyard is attached from the left main riser to a ring through which the reserve ripcord is routed. Upon cutting away a malfunction, the lanyard automatically pulls the pin of the reserve ripcord, which results in a minimum loss of altitude before the reserve is deployed. The RSL system is used primarily during the student and post-student phase, particularly during the transition to more advanced equipment. NOTE: The RSL is only a backup to manually pulling the reserve after a cutaway. As with any AAD, do not rely on an RSL to pull the reserve. page 16
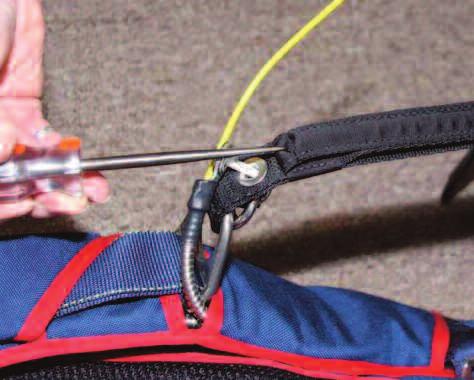
17 THE 3-RI G RELEASE SYSTEM The 3-Ring Release System was invented by the Relative Workshop in It was the first release that allowed parachutists to jettison their main canopies in one motion by simply pulling a single handle. Not only is the 3-Ring easier to operate than previous canopy release systems, it is also more reliable. The great reliability of the 3-Ring system results from the proper functioning of every one of its individual components. Therefore, the owner should not modify the system in any way. Knowing how the 3-Ring release works will help you assemble and inspect it properly. Begin by peeling, the release handle from the velcro on the harness. Peeling, rather than pulling, makes it easier to separate the handle from the webbing. Look behind the risers near the harness and observe the movement of the yellow cable as you pull the handle. When the cable clears the white loop, the release is disengaged. Now slowly pull one of the risers off the harness. As you pull, you ll notice that the white loop gets pulled through the grommet by the action of the smallest ring. Because of the mechanical advantage provided by the 3-Ring design, only a force of approximately a pound on the top ring keeps the release together. It is also important to understand one of the properties of the nylon components of the system. When nylon stays in the same position for a long time, it begins to conform to that position, or take a set. If the 3-Ring release system stays assembled for too long, the nylon can become so stiff that the low drag from a malfunction (such as a streamer) will not pull the riser off the ring. The 3-Ring release system must be disassembled, flexed and inspected every month. Procedures for this are listed in the care and maintenance chapter of this section. Generally, it is NOT recommended that the risers be attached to the harness when new and forgotten. Like all skydiving gear, the 3-Ring Release should be carefully inspected and operated on a regular basis. page 17
18 The procedures below should be done at least every month. This is especially important if the rig has not been used for a month or more, such as during the winter. Immediate inspection is required if it has been subjected to some abuse such as a drag across the runway, a water landing or exposure to a lot of dust or sand. It s important to maintain the system even more frequently in humid, muddy or freezing conditions. If your Wings becomes immersed in mud or muddy water, clean the 3-Ring release system with a mild solution of soap and water. Any rusted components must be replaced. 1. Every month operate the 3-Ring release system on the ground. Extract the cable completely from the housing and disconnect the risers. 2. While the system is disassembled, closely inspect it for wear. Check the white locking loops (the ones that pass over the smallest ring and through the grommet) to be sure they are not frayed. 3. Check the velcro on the breakaway handle and main lift web to be sure it is clean and adequately holds the handle. 4. Check the cable ends for a smooth finish. The ends are finished at the factory to have a smooth, tapered surface. This prevents the cable from hanging up in the loop. Check the cable ends and consult a rigger or the manufacturer if a burr or hook is present. 5. Check the stitching, including that which holds the large rings to the harness. 6. Check the 3-Ring release housings for solid hand-tacking and proper stretch. The housing ends lay at the chest strap area, pull downward on these housing ends and check that they do not move downwards more than 1/2 inch. Pull the housings from the free end and expect 1-2 inches of movement. 7. Take each riser and vigorously twist and flex the webbing near where it passes through each ring. The idea is to remove any set or deformation in the webbing. Do the same thing to the white loop. page 18
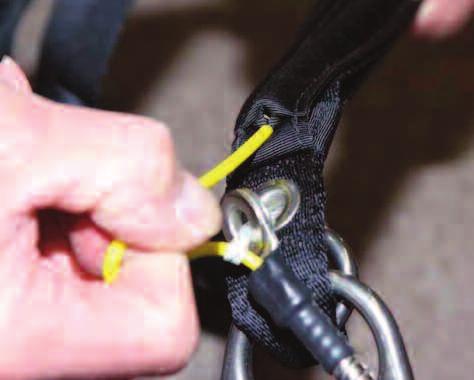
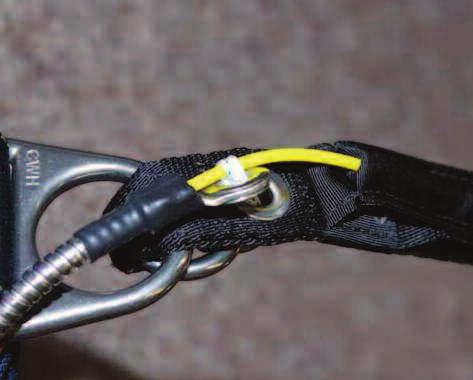
19 8. Check the housings for dents or other obstructions. Use the cable to do this. 9. Clean and lubricate the release cable with a light oil such as 3- in-1 brand or silicon. Put a few drops on a paper towel and firmly wipe the cable a few times. A thin, invisible film should remain too much will attract grit and dirt, or the oil will require more force to extract the cable during a breakaway. 10. Inspect the fittings at the end of each housing. If one of these fittings were to come off the housing, a riser might release prematurely. 11. If any wear is found, consult a rigger before using your Wings. 12. Reassemble the system. Double check it. Make sure the risers aren t reversed. Assembly Before assembling the 3-Ring release, make sure the risers are not twisted or reversed. Lay your Wings face down, as you would to pack it. 1. Thread each cable into its housing and stick the handle to the harness. The handle should be positioned as close to the ends of the housings as possible so that no cable is exposed. 2. With the rings of the riser facing toward the floor, pass the middle ring on the end of the riser through the large harness ring from above. Fold it back toward the canopy and risers. 3. Thread the smallest ring through the middle ring in the same way, but make sure it does not pass through the large ring. 4. Bring the white loop over the small ring only and then through the riser grommet so it pokes out the back of the riser. Continue threading the white loop through the grommet on the end of the cable housing. The flat side of the cable housing grommet should be against the riser. page 19


20 5. Thread the yellow cable through the white loop, making sure the loop is not twisted. Be careful with the cable so you do not bend it too sharply or kink it. Insert the free end in the channel on the back of the riser. Pre-jump Inspection Before jumping your Wings, check the 3-Ring release system for the following. 1. Each ring passes through only one other ring. 2. The white loop passes through only the small ring. 3. The white loop passes through the grommet on the end of the cable housing without twisting. 4. Nothing passes through the white loop except the yellow cable. 5. The 3-Ring handle is securely stuck to the harness, and no more than 1/2 of the cable is visible between the handle and the cable housings. If your release handle has a tendency to hide itself under your main lift web, undo the velcro and twist the handle in a clock-wise rotation (when wearing rig) so the handle will stick-out and slightly forward for a better grip. page 20
21 page 21

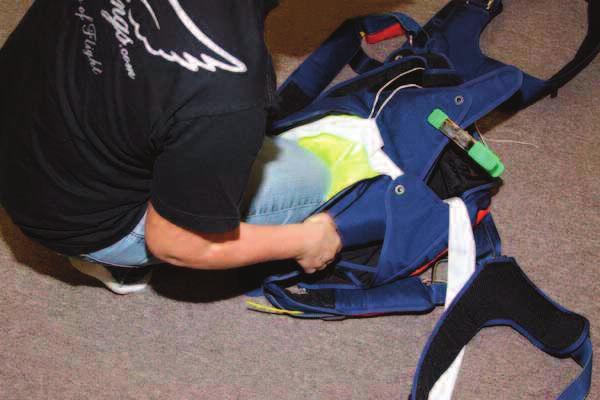
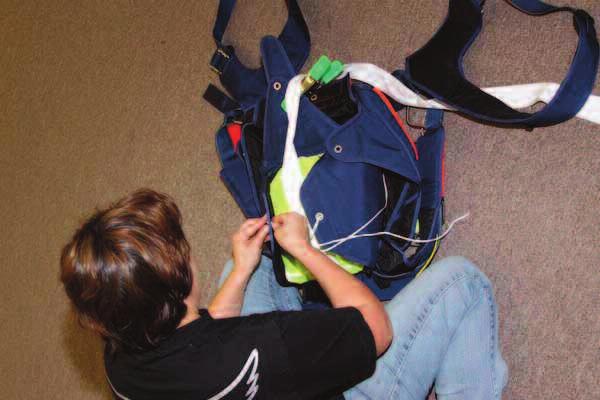
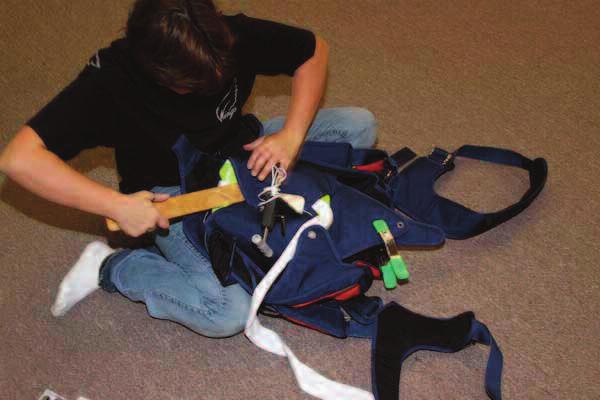
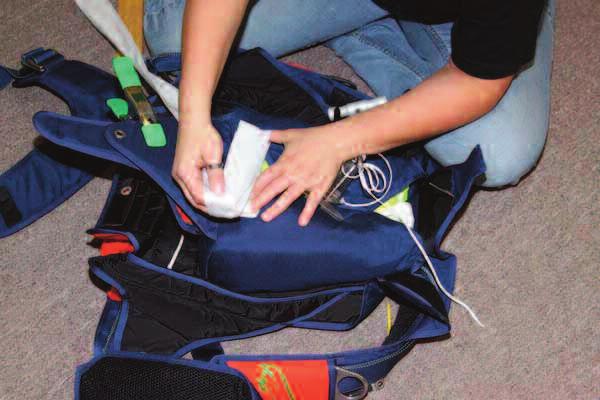
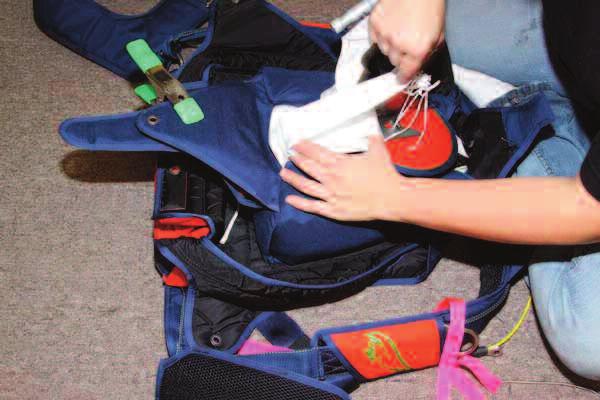
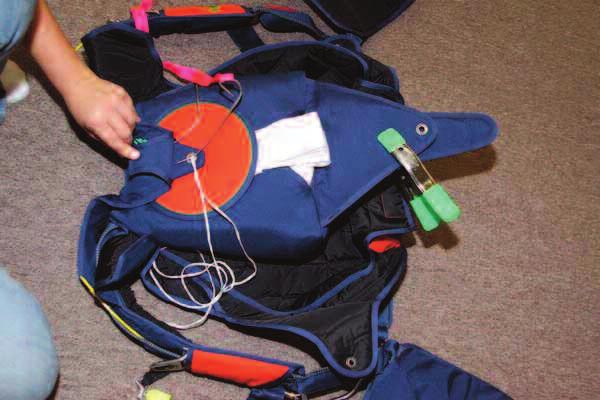
22 I STALLATIO OF CYPRES Read the Cypres owner s manual and become familiar with the different components of the Cypres unit. Insert the processing unit into the spandex pocket provided on the bottom wall of the reserve. Route the release unit through the pocket on the reserve floor plate, out the slot and through the elastic housing. Stow excess cable in the Cypres pouch. Route the control unit through the channel and out the top. Insert the control unit into the slot at the top of the reserve so that the display is visible through the window on the backpad. Stow the excess cable in the Cypres pouch. Installation is complete. page 22
23 RESERVE ASSEMBLY A D PACKI G This chapter deals with the procedures for assembling and packing a ram-air reserve canopy into your Wings Harness/Container System. Assembly and packing of the reserve must be accomplished by an FAA certified Senior Rigger or Master Rigger, or by the manufacturer of the harness/container system. Only Wings Freebags, Reserve Pilot Chutes, and Reserve Control Toggles may be used with the Wings Harness/Container System. PLEASE REFER TO ILLUSTRATIO S AT E D OF CHAPTER FOR THE FOLLOWI G I STRUCTIO S. REQUIRED TOOLS: One temporary pin One pull up cord One packing paddle.22 caliber rifle cleaning rod 1. Make a thorough inspection of all components of the reserve parachute. a. Reserve pilot chute b. Reserve bridle c. Free-bag d. Reserve canopy, lines, slider, connector links e. Harness/container system page 23
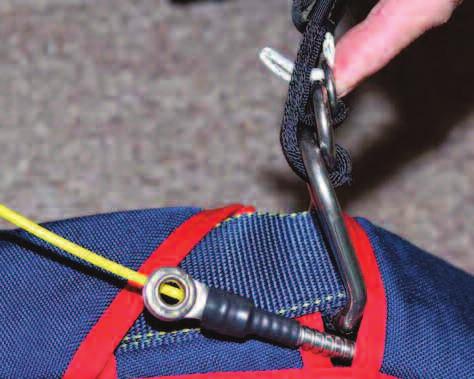
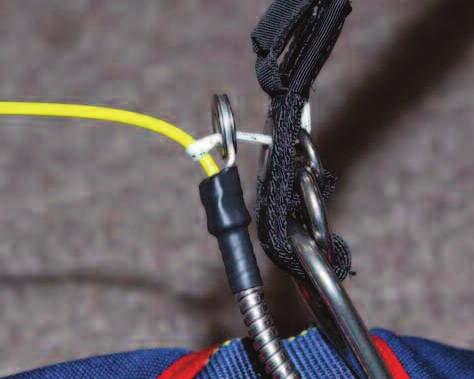
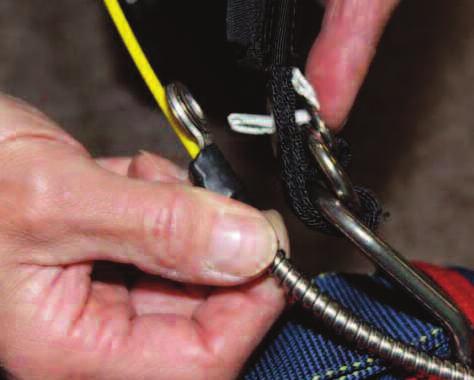
24 2. Follow the canopy manufacturer s directions for the inspection, attachment to risers, routing of control lines, attachment of control toggles, and for flaking and folding the reserve canopy. 3. Setting the brakes: Your Wings harness is equipped with a unique toggle system that facilitates complete stowage of excess steering line. Pull the control line down until the brake loop just passes through the guide ring. Insert the toggle through the brake loop. Fold the excess control line and insert it under the Velcro flaps. Insert the toggle into the lower pocket. 4. After following the manufacturer s instructions for your particular canopy, fold the bottom of the folded reserve back and on top of itself making approximately a 6 inch S-fold. Kneeling on this fold, carefully part the canopy into two halves, forming two equal ears. 5. While maintaining control of the folded canopy, place it directly over the open mouth of the freebag. Fold each canopy ear in half and stuff into its respective side of the freebag. Close the split halves of the freebag by routing the safety loop through its respective grommet. Close and lock the mouth of the bag by making two stows with the suspension lines through the safety stow. 6. After the two locking stows are made, stow the remainder of the suspension lines (to within 6 to 12 of the connector links) in the line-stow pouch on the back of the pouch. Your Wings freebag is equipped with a Velcro safe line stow pouch. To close the pouch, insert the pile Velcro into the hook velcro pocket under the data label. The lines must enter and exit the line stow pouch in the center. 7. At this point, make sure the ripcord handle is stowed in its pocket and the cable is routed properly through the housing, the RSL ring (if equipped) and the guide ring located at the top of the reserve container. page 24
25 Insert both the ripcord and the top reserve flap through the sleeve on the pin cover flap. 8. Lay the reserve risers in the container so that the connector links are in the lower corners of the container. If there is a Cypres installed, pass the closing loop up through the release unit ( Cutter ). Pass the pull-up cord through the closing loop, then thread it through the grommet in the bag. Lay the bag in the container with the line-stow pouch on the under side, and route the bridle out the bottom left of the container. 9. Close the right and left side flaps and secure with the temporary pin. 10. S fold the entire bridle approximately 4 in length and place it underneath the two side flaps at the bottom center of the container, filling the space between the area under the midflap. Leave approximately 36 (1 meter) of the bridle out of these folds. 11. Your Wings reserve pilot chute is equipped with a removable top plate ( cap ). At this point, verify that it is attached securely. The 2 snap straps on the pilot chute must pass through the holding tape on the cap before securing the snaps. 12. Pass the pull-up cord up through the pilot chute and out through the top plate. (This is easily accomplished with the.22 caliber rifle cleaning rod mentioned in the list of required tools.) Seat the lower end of the pilot chute on top of the side flaps, and keeping the pull-up cord tight, gather all of the pilot chute fabric between the coils of the spring and compress the spring. Lock with the temporary pin_ At this point check the length of the closing loop. If the pilot chute top plate can rock back and forth or from side to side, the loop is too long. Shorten the loop so that when the pilot chute is compressed and locked with the temporary pin, the top plate will be firmly seated in the nest formed by the molar shape of the bag and the side flaps. page 25
26 13.Then fold the excess bridle over the two side flaps perpendicular to the last folds and tuck it under the top plate ( cap ). 14. Verify that the top flap passes through the sleeve on the pin cover flap. Close the top flap and secure with the temporary pin. 15. Close the bottom flap and secure with the ripcord pin, making sure the temporary pin has been removed. Slide the end of the pin under the protective cover on the bottom flap. 16. Seal the reserve container and log the work done on the packing data card and in your rigger s logbook. Place the completed data card in the pocket provided on the backside of the left Main lift web. Secure the pin cover flap by inserting it into the bottom flap protective cover. 17. COU T YOUR TOOLS. page 26


27 RESERVE TOGGLE ASSEMBLY page 27


28 RESERVE PACKI G Follow the manufacturer s instructions for your particular canopy, fold the bottom of the folded reserve back and on top of itself making approximately a 6 inch S-fold. page 28


29 page 29
30 page 30


31 page 31


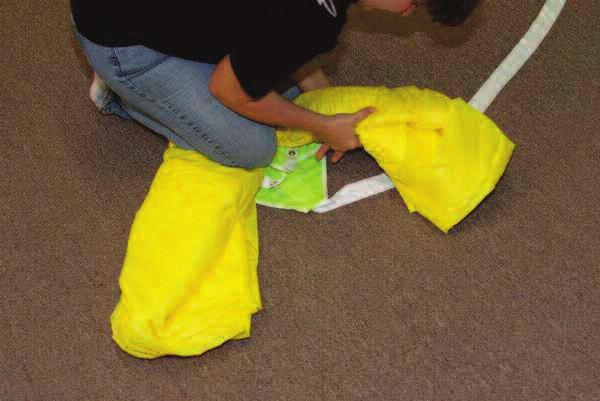
32 TIPS FOR RESERVE PACKI G Make sure the ears are filled and firm. Freebag should be seated all the way to the bottom of the container. Create a valley pushing the ears on the side. In this way you will create room for the spring of the pilot chute Push your knee and your hand to create the valley. Use your weight to compress the pilot chute by kneeling on it. page 32
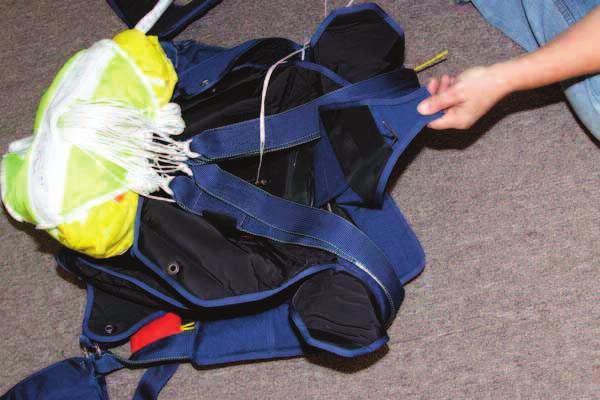
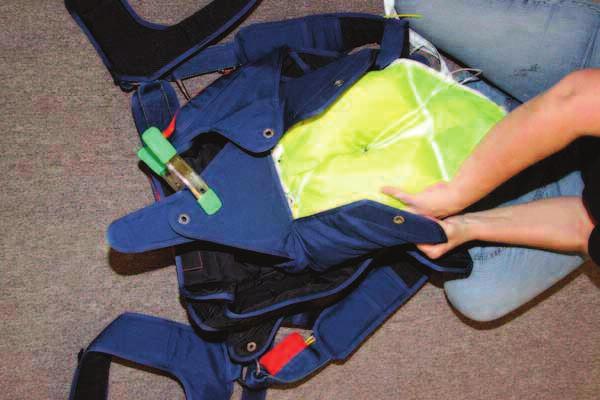
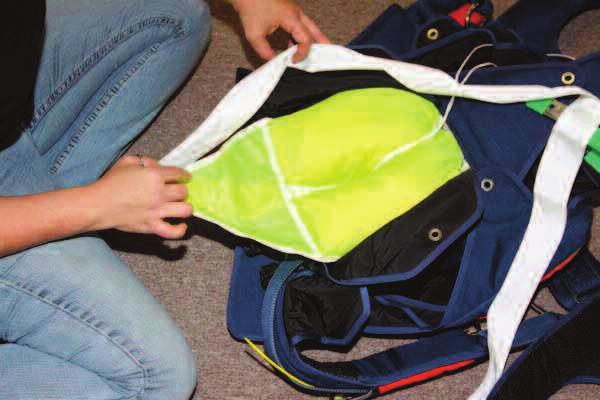
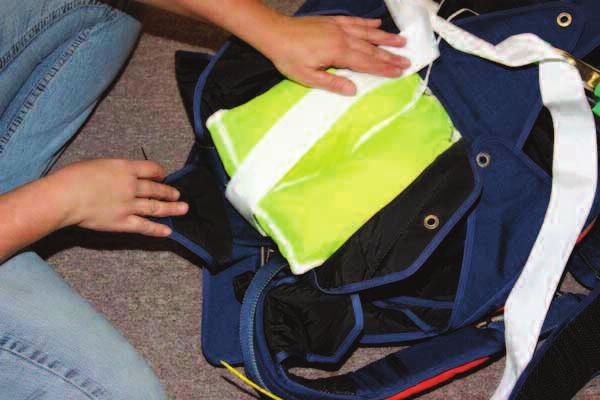
33 MAI ASSEMBLY A D PACKI G This chapter deals with the procedures for assembling and packing the main canopy into your Wings harness/ container system. Assembly and packing of the main must be done by an FAA certified rigger or by the person making the jump. PLEASE REFER TO ILLUSTRATIO S AT E D OF CHAPTER FOR THE FOLLOWI G I STRUCTIO S. 1. Follow the canopy manufacturer s instructions for the inspection, attachment to risers, installation of slider bumpers, routing of control lines, and attachment of control toggles. 2. Pass the pilot chute bridle down through the grommet in the top of the deployment bag and attach it to the top of the main canopy. Be sure that the stop-ring/ block on the bridle is between the bag and the pilot chute. 3. Setting the brakes: Your Wings harness is equipped with a unique velcro-less toggle system which facilitates complete stowage of excess steering line. Pull the control line down until the brake loop just passes through the guide ring. Insert the toggle through the brake loop and into the upper stow pocket on the riser. Fold the excess control line and insert it into the lower toggle pocket. Insert the toggle into the lower pocket on top of the excess control line. 4. At this point, refer to the canopy manufacturer s instructions. 5. Stack the canopy in S folds keeping the slider up against the canopy and keeping the slack out of the lines. The stacked canopy should be slightly wider than the bag. 6. Pull the bag over the canopy. Try to fill the corners and sides of the bag to distribute the bulk evenly and avoid forming a lump in the middle. If you have a split bag, close the split flaps with the locking stows. page 33
34 7. Make the locking stows with the suspension lines to close the mouth of the bag. ote: Always make sure that the rubber bands used for the locking stows and line stows are strong and in good condition. 8. Pull the bridle out the top of the bag until the metal ring of the canopy is seated against the grommet of the bag. Be sure there is no canopy fabric between the ring and the grommet. Now stow the remainder of suspension lines across the bottom of the bag in the rubber bands at each end. Leave 12 to 15 of lines unstowed between the bag and the connector links. 9. Lay the risers in the trough between the sides of the reserve container and the riser covers, and place the connector links in the lower corners. Set the bag on top of the main container. Close the tuck flaps on the riser covers, making sure the risers lay on top of the yoke flap. 10. Placing the bag in the container: There are two different ways the bag may be placed in the container. a. Conventional method: Place the bag in the container so that the mouth of the bag is facing the bottom. This method is preferred for wider containers that are thin. b. Optional method: Place the bag in the container so that the mouth is facing the backpad with the line stows up against the reserve container. This method is preferred for narrow rigs where the main container is short and thick. Use whichever method suits your container size and packing style. 11. Kneel on the bag and pull up the main container side flaps until the bag fills the container. page 34
35 FOR CO TI UED I STRUCTIO, CHOOSE THE APPROPRIATE DEPLOYME T FOR YOUR RESPECTIVE CO TAI ER FROM THE FOLLOWI G: THROW OUT PILOT CHUTE - BOC (page 38) - ROL (page 41) PULL OUT PILOT CHUTE (page 42) SPRING LOADED PILOT CHUTE (page 43) STATIC LINE (page 45) STATIC LINE/PILOT CHUTE ASSIST (page 47) page 35


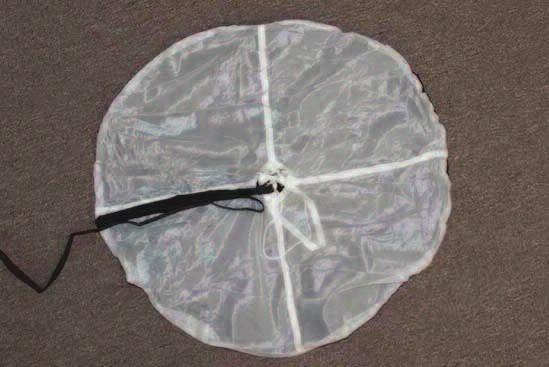
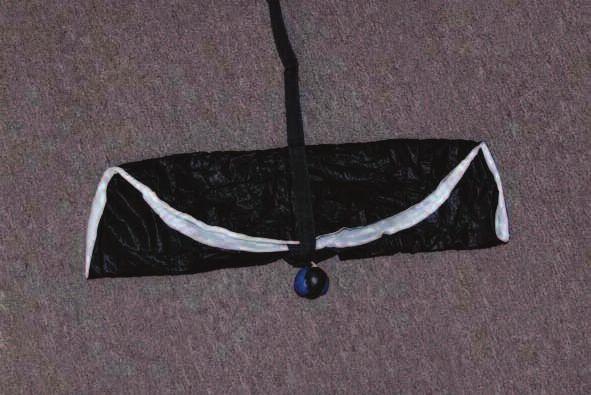
36 COLLAPSIBLE PILOT CHUTE Connect the Rapide link to the center ring of the main canopy. Make sure that the security line and kill-line are straight, not tangled, and attached to the Rapide link. Tighten the Rapide link. This picture represents the inside of the deployment bag. The Rapide link should be on this side. This picture represents the outside of the deployment bag. You should never see the link outside the bag. page 36


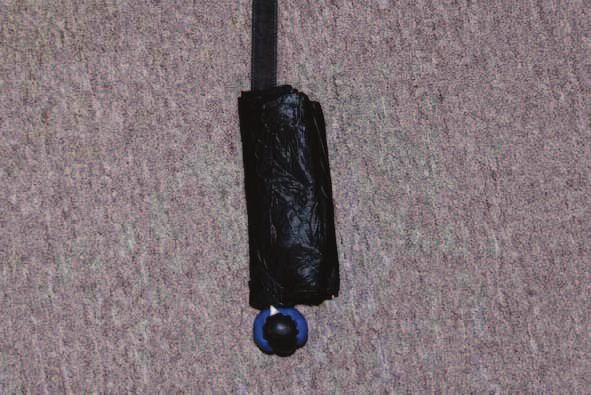
37 Cock the system before placing the canopy into the bag. Pull the pilot chute handle until you see the mark in the window and the line is taut. ow follow the procedures for your deployment system. page 37
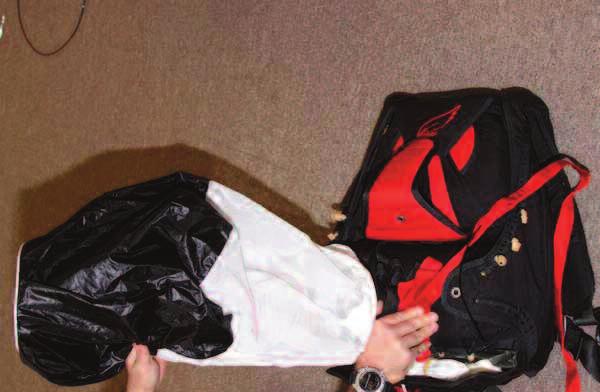
38 THROW OUT PILOT CHUTE DEPLOYME T MAI CO TAI ER PACKI G B.O.C. Pilot Chute 1. The bridle should be routed towards right top corner of the container. 2. Thread the pull-up cord through the closing loop. Close the bottom flap, then the top flap, then the right side flap, and then the left side flap. Insert the curved pin through the closing loop and remove the pull-up cord. 3. Ensure that there is at least 3-4 inches of slack bridle between the pin and the point of exit from the side flap. Stuff this slack under the right side flap. 4. Lay the pilot chute out flat with the mesh side up. S - fold the bridle on top of the mesh so that approximately 2 feet remains between the pin and the pilot chute. Fold the pilot chute in half over the bridle. Now fold the curved side up to a point just under the handle. 5. Fold one side into the center, making the folds as wide as the handle. Fold the other side in the same manner. 6. Insert the folded pilot chute into the B.O.C. pouch. 7. If you have a freestyle handle, tuck the handle s tab securely into place under the right side flap. Stow any excess bridle and close the main pin cover flap. page 38


39 page 39


40 AFF left side jumpmaster setup for throw out P/C Wings Student container can be equipped with an AFF left side jumpmaster setup for throw-out P/C. The handle is velcroed to the bottom of the container and the left side of the pouch. The cable of the handle closes the pouch on the top side. AFF left side jumpmaster setup for spring loaded P/C Wings Student container can be equipped with an AFF left side jumpmaster setup for spring loaded P/C. The handle is velcroed and snapped to the left side flap. The cable of the student handle is routed through the eye of the jump master handle. page 40
41 MAI CO TAI ER CLOSI G FOR THROW-OUT PILOT CHUTE DEPLOYME T R.O.L. Pilot Chute 1. The bridle should be routed towards the right top corner of the container. 2. Thread the pull-up cord through the closing loop. Close the bottom flap, then the top flap, then the right side flap, and then the left side flap. Insert the curved pin through the closing loop and remove the pull-up cord. 3. Ensure that there is at least 3-4 inches of slack bridle between the pin and the point of exit from the side flap. Stuff this slack under the right side flap. 4. Lay the pilot chute out flat with the mesh side up. S-fold the bridle on top of the mesh so that approximately 2 feet remains between the pin and the pilot chute. Fold the pilot chute in half over the bridle. Now fold the curved side up to a point just under the handle. 5. Fold one side into the center, making the folds as wide as the handle. Fold the other side in the same manner. 6. Insert the folded pilot chute into the pouch on the leg pad. 7. Mate the bridle Velcro with the Velcro on the harness/container. Be very careful that the bridle does not go under or around any part of the harness. Stuff the excess bridle under the right side flap. Close the main pin cover flap. 8. Dress up the riser covers and tuck flaps, if needed. page 41
42 MAI CO TAI ER CLOSI G FOR PULL-OUT PILOT CHUTE DEPLOYME T 1. Thread the pull-up cord through the closing loop. Arrange the bridle in folds six to eight inches long, and lay the folded bridle across the upper part of the bag. Be sure NOT to tuck these folds down between the bag and the bottom of the reserve container. To do so may retard the action of the pilot chute. Using your pull-up cord, close the bottom flap. 2. Loosely fold the pilot chute and lay it across the bag. IMPORTANT!!! THE HANDLE AND PIN MUST EXIT THE CONTAINER AT THE LOWER RIGHT SIDE! 3. Close the top flap keeping the handle and pin outside the container at the lower right. Tuck the handle securely into place under the right side flap. 4. Close the right side flap, then the left side flap. Secure with the straight pin and remove the pull-up cord. 5. Tuck the slack in the tape under the right side flap. 6. Close the main cover pin flap. 7. Dress up the riser covers and tuck flaps, if needed. page 42
43 MAI CO TAI ER CLOSI G FOR SPRI G LOADED PILOT CHUTE DEPLOYME T 1. Before starting to close your main container insert your main ripcord handle. 2. S-fold the bridle left to right on top of the main D-bag. 3. Place main pilot chute on top of the folds and compress the pilot chute and simultaneously gather all the pilot chute. 4. Your closing loop should be placed towards the bottom flap of your main container. Pull your closing loop through the top flap of the main container with your pull-up cord and close bottom and top flap. 5. For the ease of packing keep using your knee to hold down the pilot chute and use your pull-up cord to close right side flap of the main container. 6. Use your pull-up cord to close the left side flap and insert your ripcord cable through the closing loop. Remove your pull-up cord and close the main pin cover flap by tucking it under the center flap slot. 7. Dress up your container for the next skydive. page 43
44 page 44
45 MAI CO TAI ER CLOSI G FOR DIRECT BAG STATIC LI E DEPLOYME T When using a static line deployment, you may close the main container by using either the loop in the position between the reserve and main container or the loop attached to the main bottom flap. 1. Route your static line out of the container towards right top corner of the container, using your pull-up cord close the bottom and top flap of the container. 2. Using your pull-up cord close the right side flap of the main container. 3. Using your pull-up cord close the left side flap of the main container. 4. Insert the black cable, which is attached to static line, through the closing loop and remove your pull-up cord. 5. When starting the static line folds, make sure that the first rubber band is snug and keeps the pin from falling out during the climb out. Fold the static line to the left - right - left manner and stow in rubber bands. 6. Use double or even triple folds on the static line to make sure that all the static line will get stowed away for the safe use of the static line. Tuck the tip of the static line hook into the pocket on the side flap and close the pin cover flap. 7. Dress up your container for the next skydive. page 45
46 page 46
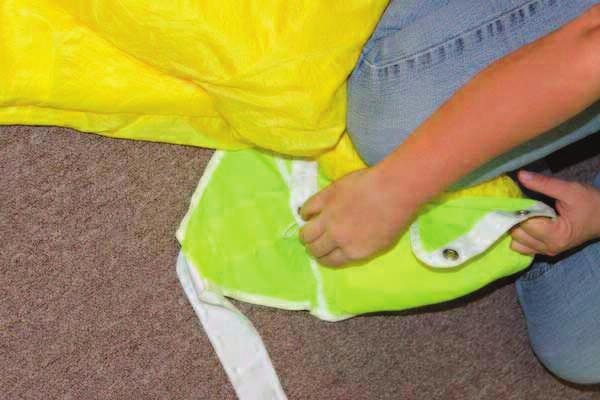
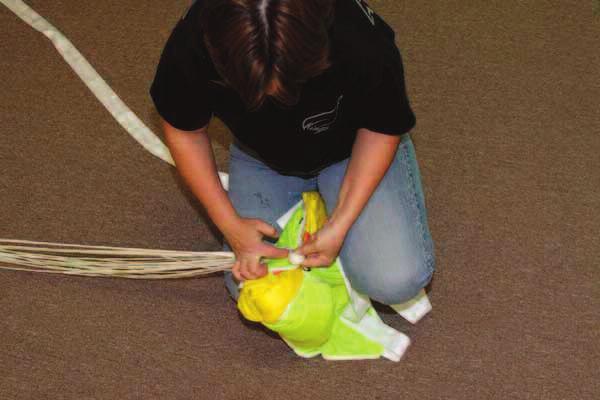
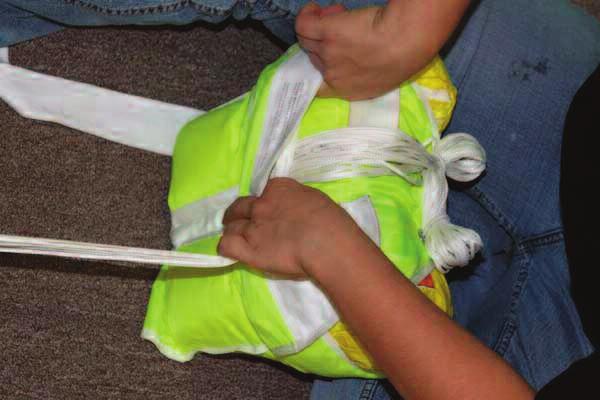
47 MAI CO TAI ER CLOSI G FOR STATIC LI E PILOT CHUTE ASSIST When closing the main container by using pilot chute assist you have to use the closing loop at the bottom flap of the container and you have to use the velcro assembly designed to use for this application. The webbing loop with pile velcro should be attached to the bottom of the pilot chute and the webbing loop with hook velcro should be attached to the end of the static line. Before you start closing your container, mate the two velcros. 1. S-fold the pilot chute bridle on top of the main bag and place the velcroed attachment on top of the S-folds. 2. Place main pilot chute on top of the folds and compress the pilot chute and simultaneously gather all the pilot chute material in between the coil of the pilot chute spring. 3. For the ease of packing use your knee to hold down the pilot chute. Pull your closing loop through the top flap of the main container with your pull-up cord and close bottom and top flap. 4. For the ease of packing keep using your knee to hold down the pilot chute and use your pull-up cord to close right side flap of the main container. 5. Use your pull-up cord to close the left side flap and insert the black cable attached to the static line through your closing loop. Remove your pull-up cord. 6. When starting the static line folds, make sure that the first rubber band is snug and keeps the pin from falling out during the plane ride and climb out. Fold the static line left-right-left manner and stow in rubber bands. page 47
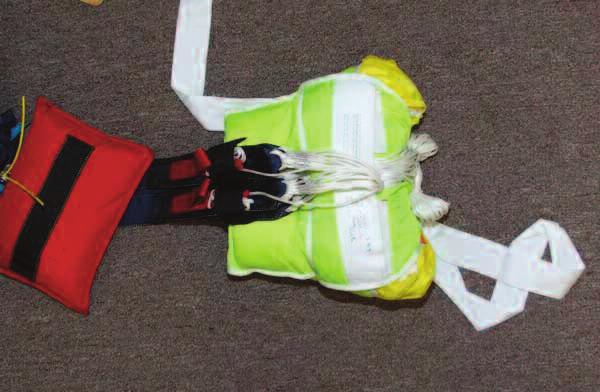
48 7. Use double or even triple folds on the static line to make sure that all of the static line will get stowed away for the safe use of the static line. Tuck the tip of the static line hook into the pocket on the side flap and close the pin cover flap. When not in use, always keep the static line hook in the closed position to prevent the hook from snagging any part of the container. 8. Dress up your container for the next skydive. page 48
49 page 49
50 MAI TE A CE A D CARE Your Wings will last longer, look better and function correctly if it is well maintained. Your Wings actually requires very little maintenance unless it is subjected to unusual conditions such as jumps into salt water or a muddy landing. The best approach in maintaining your rig is to periodically spend a few minutes examining every detail on it. This inspection should be done at least every month. If any wear or damage is found, have it fixed immediately. Putting off repairs might result in a malfunction. In addition to inspecting the rig yourself, ask your rigger to inspect the entire assembly every time the reserve is repacked. PARTICULAR ATTE TIO SHOULD BE GIVE TO THESE AREAS: Breakaway System Refer to the 3-Ring section in this chapter for detailed information on inspecting the canopy releases. Reserve System This includes the reserve ripcord, locking loop, pin, handle, housing, container and associated sewing. You should not attempt any repairs or modifications to any of these items unless you are a rigger. You can, however, spot little problems before they become major. Harness The harness should be inspected periodically for broken stitching or frayed webbing. Main Container Inspect the plastic stiffeners in the container flaps and replace any that are broken. Replace any grommets that are badly deformed or are pulling out of their setting. page 50
51 Main Pilot Chute (I)Check the center line (the length of nylon tape inside the pilot chute that extends from the handle to the base) of the main pilot chute. It must be firmly sewn at each end; there must be no broken stitches or torn fabric. (Inspect the seam that joins the pilot chute mesh to the pilot chute fabric. If the mesh is torn or badly frayed, replace the pilot chute. Locking Loop The main container is held shut with a locking loop made of nylon suspension line sheathing. This loop is subject to wear. If it wears out and breaks, the main canopy may release prematurely and a malfunction may result. Replace the loop with a duplicate if wear is noticed. Your Wings is manufactured mostly from nylon. Nylon is very durable but is susceptible to damage from several sources: Sunlight The ultraviolet rays in sunlight quickly and permanently weaken nylon. Keep your Wings out of direct sunlight as much as possible. Acids Nylon is also damaged by acids. Keep your Wings away from hangar floors, dirty car trunks and similar areas where acids may be found. If such contamination does occur, immediately and thoroughly wash the rig with plenty of warm soapy water. Until a rig can be washed, baking soda will quickly neutralize most acids. If acid damage occurs or is suspected, a rigger should thoroughly inspect your Wings Harness/Container System. Oils and Grease Most petroleum compounds do not weaken nylon. They simply stain it. Such stains should be promptly removed by a rigger using the proper petroleum solvent. Water Water will not structurally damage your Wings, but prolonged agitation in clear water weakens webbing or may cause some fabric and tape colors to run. Salt water may damage nylon and rust hardware if not promptly and thoroughly washed off with plenty of fresh water. Your rig will maintain its new appearance longer if it is kept dry. page 51
52 Soil Soil may damage your Wings Harness/ Container System. Brush off the soil after it has dried and, gently wash with warm soapy water. Be sure that the soil is not in the housings, snaps, 3-Ring release or reserve ripcord pins or loops. Consult a rigger if your rig is heavily soiled or extremely dirty. Sand Fine sand will weaken and cut webbing and fabrics of all kinds. Prolonged exposure to sand will shorten the life of the entire parachute assembly. Abrasion Nylon quickly frays if dragged over concrete or other rough surfaces. Do not drag your rig on the concrete while packing. page 52
53 WAR I G PARACHUTI G IS A HIGH RISK ACTIVITY WHICH CA CAUSE OR RESULT I SERIOUS I JURY OR DEATH. The following information must be read and understood before any use of this equipment: USER K OWS THE RISKS OF SKYDIVI G A D ACCEPTS THAT: Skydiving can cause death and serious injuries. Many of these deaths and injuries can be attributed to equipment problems or malfunction. Skydiving equipment can fail, even if all possible precautions are taken by the user, the equipment manufacturers and everyone else involved with the jump. Failure to activate the main or reserve parachute (or emergency procedures) at a safe altitude, and/or equipment failure can result in severe injury or death. IT IS THE USER S RESPO SIBILITY TO: Receive proper training before any use of all skydiving equipment. Be extremely careful and cautious. Read and understand all owners and operating manuals for all skydiving equipment. Thoroughly check all skydiving equipment and replace any defective or worn component prior to use. Review emergency procedures before each use of this and all skydiving equipment. Check equipment warnings - do not exceed equipment limitations Never violate the training and experience requirements for the specific equipment in use. DISCLAIMER - WARRA TY Because of the unavoidable dangers involved in the use of this and all parachute equipment, Sunrise Manufacturing International,Inc., (including but not limited to all owners, officers, staff and employees), hereafter referred to as SMI, makes no warranties of any kind, expressed or implied. By using this equipment or allowing it to be used by others, owner/buyer waives any liability of SMI for personal injuries or any other damages arising from such use. Any promises or representations inconsistent with or in additions to this statement of Warranty are not authorized by SMI and shall not be binding. page 53
Leg Pouch Pilot Chute System
 Leg Pouch Pilot Chute System User Manual Version 1 Sep 2008 Page 1 Disclaimer: The following information must be read and understood before any use of this equipment. The user knows the risks of skydiving
Butler Tactical Parachute Systems, LLC
 Butler Tactical Parachute Systems, LLC A division of Butler Parachute Systems Group, Inc. TT-600 TETHERED TANDEM BUNDLE DELIVERY SYSTEM PACKING MANUAL (REVISION A ) Page 1 of 62 INTRODUCTION This manual
PART 4 Steady maintenance and continuing airworthiness Regularly inspection What you should avoid
 OWNER S MANUAL Index PART 1 4 1. Warning 4 2. Manual revision history...5 3. Introduction...6 4. Operating limits...7 5. About this manual...8 6. Please read before using your harness and container system!...8
MAN-032 Rev 0. Performance Designs Zero Packing Manual
 Performance Designs Zero Packing Manual Packing your PD ZERO Before you begin packing, please first review PD s Ram-Air Parachute Owner s Manual. Pay careful attention to the warning/ discussion on pages
Butler Parachute Systems, Inc
 Butler Parachute Systems, Inc A division of Butler Parachute Systems Group, Inc. TT-600 GEN 1 & 2 TETHERED TANDEM BUNDLE DELIVERY SYSTEM ASSEMBLY MANUAL 1 JUN 2010 INTRODUCTION This manual contains all
SkyHook RSL Packing Instructions for Vector 3/Vector 3 M-Series/Micron/Sigma Plus Skyhook II Addendum
 SkyHook RSL Packing Instructions for Vector 3/Vector 3 M-Series/Micron/Sigma Plus Skyhook II Addendum Uninsured United Parachute Technologies,LLC 1645 Lexington Avenue DeLand, Fl 32724-2106 USA Telephone:
Chesley H. Judy Safety Award free download at no later than February 15 Participating Drop Zones Contact your local
 he ninth annual USPA Safety Day will take place Saturday, March 11. Patti Chernis originally developed the idea of Safety Day and brought it to USPA in 1996. USPA implemented the first Safety Day in March
9-Cell MAIN CANOPIES
 4357 D PARK DRIVE NORCROSS, GA 30093 USA Phone (770)-279-7733 FAX (770)-279-7729 MAIN CANOPY OWNER'S MANUAL and PACKING INSTRUCTIONS for all 9-Cell MAIN CANOPIES March 2007 1. TRAINING AND/OR EXPERIENCE
PRE- JUMP TRAINING (T-11 Heavy)
") THE FIVE POINTS OF PERFORMANCE: PRE- JUMP TRAINING (T-11 Heavy) The first point of performance is PROPER EXIT, CHECK BODY POSITION, AND COUNT. JUMPERS HIT IT. Upon exiting the aircraft, snap into a good
THE FIVE POINTS OF PERFORMANCE: PRE- JUMP TRAINING (T-11 Heavy) The first point of performance is PROPER EXIT, CHECK BODY POSITION, AND COUNT. JUMPERS HIT IT. Upon exiting the aircraft, snap into a good
PRE-JUMP FOR FORT BRAGG UNITS OCTOBER 2016
 The first items I will discuss are the five points of performance. The first point of performance is proper exit, check body position, and count. Jumpers hit it. Upon exiting the aircraft, snap into a
PRE- JUMP TRAINING (T-11)
") THE FIVE POINTS OF PERFORMANCE: PRE- JUMP TRAINING (T-11) The first point of performance is PROPER EXIT, CHECK BODY POSITION, AND COUNT. JUMPERS HIT IT. Upon exiting the aircraft, snap into a good tight
THE FIVE POINTS OF PERFORMANCE: PRE- JUMP TRAINING (T-11) The first point of performance is PROPER EXIT, CHECK BODY POSITION, AND COUNT. JUMPERS HIT IT. Upon exiting the aircraft, snap into a good tight
Category D Training Aid. All training to be conducted by instructors of the:
 Category D Training Aid All training to be conducted by instructors of the: Visualization: Mind Over Body Did you know that done properly, visualizing what you re about to do can be as effective as practicing
RESERVE PACKING GUIDE
 RESERVE PACKING GUIDE 1 INTRODUCTION The aim of this Guide is not to teach reserve packing (this must be done on a one to one basis) but to cover reserve packing in general. Anyone who wishes to hold a
RESERVE CANOPY OWNER S GUIDE
 RESERVE CANOPY OWNER S GUIDE BasiK Air Concept 559 chemin des Salles - 83300 Draguignan - France tel: +33 (0)494 99 12 36 - basik.fr@free.fr Edition n 1 - April 2005- revision 1 BasiK Air Concept Sarl
Rapid Survival System
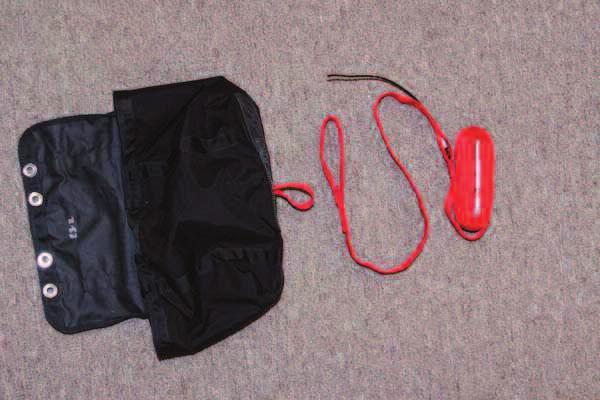
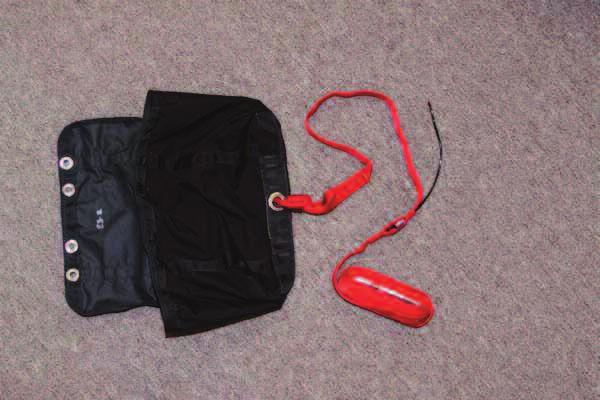
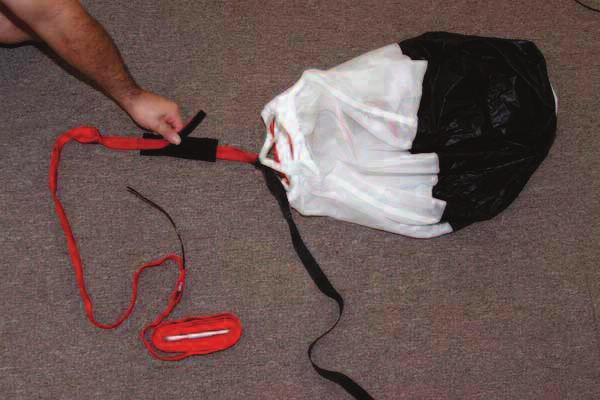
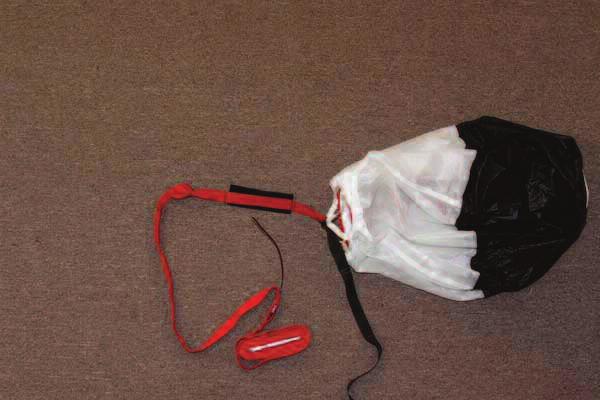
 Rapid Survival System Model W User Manual Emergency Floatation for Moving Water Self Rescue Version 10.02 Contents User Manual... 1 Part 1: Description and Function... 3 Part 2: Package Contents... 3 Part
Wingsuit Owners Manual
 Tony Uragallo flying the Apache, photo Jeff Nebelkopf Wingsuit Owners Manual Version 1 - April 2012 Dear Tony Suit Customer Thank you for your recent wingsuit purchase. Please take a few minutes to read
INSTRUCTION MANUAL NO 719 PARACHUTE ASSEMBLY GQ SECURITY TYPE 850 MK 2 MRI GQ 1284 GENERAL INFORMATION MAINTENANCE AND PACKING INSTRUCTIONS
 INSTRUCTION MANUAL NO 719 PARACHUTE ASSEMBLY GQ SECURITY TYPE 850 MK 2 MRI GQ 1284 GENERAL INFORMATION MAINTENANCE AND PACKING INSTRUCTIONS ISSUE 2 DECEMBER 2000 STATEMENT OF INITIAL CERTIFICATION This
SERIAL # RAM AIR CANOPY OWNERS MANUAL PARACHUTE LABORATORIES INC LEXINGTON AVE. SUITE 106 DELAND, FL. USA
 SERIAL # RAM AIR CANOPY OWNERS MANUAL Tandem Main & Reserve, BlackHawk Main & Reserve, NightHawk Main & Reserve AngelFire Reserve, Mentor, Basix, FireBolt PARACHUTE LABORATORIES INC. d.b.a. JUMP SHACK
ALERT SERVICE LETTER
 Citation TITLE ALERT SERVICE LETTER ASL750-35-04 OXYGEN - TRANSMITTAL OF AVOX SYSTEMS SERVICE INSTRUCTION 833-35-01 REVISION D, REPACKING PROCEDURES FOR 289 PASSENGER OXYGEN MASKS EFFECTIVITY MODEL SERIAL
User Instructions 1789 Parapet Wall Anchor
 User Instructions 1789 Parapet Wall Anchor This manual is intended to meet the Manufacturer Instructions as required by ANSI Z359.1 and should be used as part of an employee training program as required
Usage and Care Instructions
 SUPERSTAR Student Transportation Add-On Restraint Usage and Care Instructions SUPERSTAR 25-90 lbs. (11.3-40.8 kg) 52 in. (132 cm) tall or less at least 2 years of age *927360* Table Of Contents Store this
Visualization: Mind over Body
 Visualization: Mind over Body Did you know that done properly, visualizing what you are about to do can be as effective as practicing it for real? Studies show that the only part of an athlete s performance
INSTRUCTIONS FOR USE
 INSTRUCTIONS FOR USE 88004X Series D-Ring Extender 5000 lb Rated Connector Complies with ANSI Z359.1-1998, ANSI 10.14 and OSHA 1926 regulations and requirements. Reliance Industries P.O. Box 2046 Deer
Index Introduction The Main Canopy System The Container and Harness The Reserve Canopy System Student Equipment including Tandem General Topics
 Index Introduction... 1 The Main Canopy System... 2 Main pilot chute... 2 Main bridle...2 Main deployment bag... 2 Bungie selection and use... 2 Main canopy... 3 Lines... 3 Line trim... 3 The 3 Ring Riser...
USER INSTRUCTIONS LARGE HOOK & STRAP ANCHORAGE CONNECTOR ! WARNING
 ROSE MODEL NUMBER USER INSTRUCTIONS LARGE HOOK & STRAP ANCHORAGE CONNECTOR! WARNING National standards and state, provincial and federal laws require the user to be trained before using this product. Use
Step By Step How to Establish, Manage and Implement a Fall Protection Program
 Step By Step How to Establish, Manage and Implement a Fall Protection Program The following is a step by step guideline for establishing, managing and implementing a fall protection program arranged in
OPERATION, INSTALLATION AND WARNING RELATING TO THE SUP'AIR "PERMANENT AIRBAG" PROTECTION SYSTEM BEFORE FLYING, CHECK: WARNING
 Thank you for choosing one of our products; we hope you will have long, pleasant flights in your harness. When we design our products, we pay particular attention to all aspects of comfort, durability
2018 Skydiver s Information Manual Summary of Changes
 Table of Contents SECTION 2 BASIC SAFETY REQUIREMENTS AND WAIVERS 3 2-1 BASIC SAFETY REQUIREMENTS 3 C. MEDICAL REQUIREMENTS 3 E. MEMBERSHIP 3 F. ALCOHOL AND DRUGS 3 G. STUDENT SKYDIVERS 3 H. WINDS [S]
Semi Freddo Snow kite [Ram Air]
![Semi Freddo Snow kite [Ram Air]](/thumbs/89/97639710.jpg "Semi Freddo Snow kite [Ram Air]") User manual Semi Freddo Snow kite [Ram Air] This manual gives you detailed instructions on how to use your new Semi Freddo kite. We recommend you take your time to read the instructions. In case you have
User manual Semi Freddo Snow kite [Ram Air] This manual gives you detailed instructions on how to use your new Semi Freddo kite. We recommend you take your time to read the instructions. In case you have
Wing assemblyfinal Master 4/29/04 11:20 PM Page 1. Issued January 1, Sabre Aircraft. Assembly Manual. Sabre 16ss Wing
 Wing assemblyfinal Master 4/29/04 11:20 PM Page 1 Issued January 1, 2002 Sabre Aircraft Assembly Manual Sabre 16ss Wing Wing assemblyfinal Master 4/29/04 11:20 PM Page 2 1. 2. 1. Unzip the cover and remove
MANUAL. Quick Reserve
 MANUAL Quick Reserve Performance Variable, Saarlouis-Düren Airport D-66798 Wallerfangen-Düren, Germany Ph: (49) 6837-91707 - Fax: (49) 6837-91708 email: performancevariable@t-online.de web site: www.performance-variable.com
Inspection & Maintenance
 PERSONAL FALL ARREST EQUIPMENT Inspection & Maintenance This article addresses the requirements of OSHA1926.502(d)(21), which states that personal fall arrest systems shall be inspected prior to each use
Pectoral Machine. User manual E S S E N T I A L S T R E N G T H
 E L E M E N T and the cable E S S E N T I A L S T R E N G T H User manual 1 and the cable and The identification plate of and manufacturer, affixed on the back panel of the weight stack, gives the following
NATIONAL (NATO) STOCK NUMBER: NSN
 STOCK NUMBER: NSN") THE SKED RESCUE SYSTEM NATIONAL (NATO) STOCK NUMBER: NSN 6530-01-260-1227 FLOTATION INSTRUCTIONS Please Post In Your Training Area SKED RAPID DEPLOYMENT FLOATATION SYSTEM Thank you for your purchase of
THE SKED RESCUE SYSTEM NATIONAL (NATO) STOCK NUMBER: NSN 6530-01-260-1227 FLOTATION INSTRUCTIONS Please Post In Your Training Area SKED RAPID DEPLOYMENT FLOATATION SYSTEM Thank you for your purchase of
PN BuckCat Series Saddles Instructions/Warnings
 PN 16905 BuckCat Series Saddles Instructions/Warnings The BuckCat is a light weight saddle developed for the professional arborist. It is fully adjustable at the sides, waist and legs to provide ease of
Contents. Technical Data. Permittable load. Suspension height. 45 cm, incl. carabiner. Speed System. Weight (without rescue system) 7 kg (size L)
 7 kg (size L)") Manual/Service 13 Contents Technical Data Fundamentals of the RANGE Technical Data Intended Use Permittable load Suspension height Glider Harness 120 kg 45 cm, incl. carabiner Speed System Rescue System
Manual/Service 13 Contents Technical Data Fundamentals of the RANGE Technical Data Intended Use Permittable load Suspension height Glider Harness 120 kg 45 cm, incl. carabiner Speed System Rescue System
Falcon 3 145, 170, 195 and Tandem Owner / Service Manual
 Falcon 3 145, 170, 195 and Tandem Owner / Service Manual January 2007 - Second Edition Removing The Sail From The Airframe And Short Packing The Glider Many maintenance and repair procedures will require
2. Ensure that the leg strap buckles are not obstructed and operate smoothly.
 CLIMBING EQUIPMENT NOTE. This equipment is for safety purposes only. It is not to be used as a working harness to support the wearer while working aloft. The equipment has three components; 1. Harness
Technical Data. Flying with the range2. Maintenance and Repair
 Manual/Service 1 Contents Technical Data Fundamentals of the range2 Speed System Rescue System Rescue System Installation adjustment Possibilities Cross Bracing Ballast Container Pockets Towing Operation
User Instructions Series Descent Device
 User Instructions - 199 Series Descent Device This document serves as the Manufacturer s Instructions, and is to be used as part of an employee training program for the system, as required by OSHA. ATTENTION:
Instructions for The Rose Crossover Style Full Body Harness For Women
 P.O. Box 3026 Sherwood Park Alberta T8H 2T1 Phone: (780) 464-7139 Fax: (780) 464-7652 e-mail: inquiries@ safetydirect.ca Web site: www.safetydirect.ca Instructions for The Rose Crossover Style Full Body
BRITISH PARACHUTE ASSOCIATION
 BRITISH PARACHUTE ASSOCIATION 5 Wharf Way, Glen Parva, Leicester LE2 9TF Telephone: Leicester 0116 278 5271 Fax: 0116 247 7662 E mail: skydive@bpa.org.uk Website: www.bpa.org.uk RESERVE PACKING GUIDE Table
ROPV R40 E Series User Manual
 HARBIN ROPV INDUSTRY DEVELOPMENT CENTER ROPV R40 E Series User Manual For Use with the Following ROPV Pressure Vessel Models: R40 300E R40 450E Headquarters Tel:(+86)451-82267301 Fax:(+86)451-82267303
SMART RESERVE PACKING MANUAL
 SMART RESERVE PACKING MANUAL TM 159 REVISED January 10 SAMRT RESERVE PACKING MANUAL SMART RESERVE CANOPY SIZES SMART 99 SMART 110 SMART120 SMART 135 SMART 150 SMART 160 SMART 175 SMART 190 SMART 220 SMART
Underwater Housing for Canon EOS M
 Underwater Housing for Canon EOS M User Manual 1 Table of Contents 1. Introduction 2. Specifications 3. Function Controls 4. Set up Instructions 5. Use & Care of Housing 6. Service 7. Warranty 1. Introduction
WARNING! DO NOT THROW AWAY THESE INSTRUCTIONS! READ AND UNDERSTAND BEFORE USING EQUIPMENT!
 Guardian Fall Protection Kent, WA 800-466-6385 www.guardianfall.com GENERAL SYSTEM SELECTION CRITERIA: Selection of fall protection shall be made by a Competent Person. All fall protection equipment shall
SADDLES FOR ARBORISTS USE INSTRUCTIONS / WARNINGS
 SADDLES FOR ARBORISTS USE INSTRUCTIONS / WARNINGS All Arborist Saddles manufactured by Buckingham Mfg. Co. are made from the finest quality components. Buckingham offers a wide selection of Arborist Saddle
Instructions for Y Style Full Body Harness Model YH130
 P.O. Box 3026 Sherwood Park Alberta T8H 2T1 Phone: (780) 464-7139 Fax: (780) 464-7652 e-mail: inquiries@ safetydirect.ca Web site: www.safetydirect.ca Instructions for Y Style Full Body Harness Model YH130
NORTHERN DIVER PFD MANUAL
 PFD MANUAL NORTHERN DIVER PFD MANUAL Thank you for purchasing this Northern Diver PFD. To help ensure your future safety, do not use this product before reading this manual. It is important to fully understand
ExtendAire TM II. Intermediate Pressure Accessory Kit USER INSTRUCTIONS
 ExtendAire TM II Intermediate Pressure Accessory Kit USER INSTRUCTIONS THIS MANUAL MUST BE CAREFULLY READ AND FOLLOWED BY ALL PERSONS WHO HAVE OR WILL HAVE THE RESPONSIBILITY FOR USING OR SERVICING THIS
On the Go Swing System Instruction Manual
 On the Go Swing System Instruction Manual WARNING READ ENTIRE MANUAL BEFORE USE. THIS SWING IS NOT A TOY. THIS SWING IS ONLY TO BE USED BY TRAINED PERSONNEL, SUCH AS AN OCCUPATIONAL THERAPIST, PHYSICAL
Storm Owner s Manual
 Storm Owner s Manual www.ravesports.com Table of Contents Product instructions and warnings... 3 Water sports safety code... 8 Inflating instructions... 11 Troubleshooting... 12 Cleaning and storage...
INSTRUCTIONS FOR USE
 INSTRUCTIONS FOR USE 7100 Series Lanyards Complies with the current ANSI Z359.1-2007 and all applicable OSHA regulations and requirements. Reliance Industries P.O. Box 2046 Deer Park, TX 77536 Phone :
USER MANUAL PLEASE READ THIS CAREFULLY BEFORE DOING ANYTHING WITH YOUR NEW WINGSUIT CONTENTS
 USER MANUAL CONGRATULATIONS ON YOUR PURCHASE OF A SQUIRREL FUNK 3 ( PRODUCT ). BY PURCHASING THIS PRODUCT, YOU ACKNOWLEDGE THAT ENGAGING IN SKY-DIVING, BASE JUMPING, PARACHUTING, AND WINGSUITING IS AN
MODEL # 2014-C FULL BODY HARNESS COMPONENTS. Left Shoulder Strap Right Shoulder Strap. Double Chest Strap. Left Shoulder Strap Right Shoulder Strap
 MODEL # 2014-C FULL BODY HARNESS COMPONENTS Front WARNING WARNING ALWAYS read safety harness instructions before each use. Left Shoulder Strap Right Shoulder Strap Double Chest Strap Left Leg Strap Right
OPERATIONS MANUAL IMPORTANT SAFETY INFORMATION
 OPERATIONS MANUAL IMPORTANT SAFETY INFORMATION Please read, understand and follow all safety information contained in these instructions prior to the use of this tool. Retain these instructions for further
BRAKE WINCH RUP 503-[T/BT] EQUIPMENT FOR LIFTING LOADS. AT 053-[T/BT] xx
![BRAKE WINCH RUP 503-[T/BT] EQUIPMENT FOR LIFTING LOADS. AT 053-[T/BT] xx](/thumbs/88/115945274.jpg "BRAKE WINCH RUP 503-[T/BT] EQUIPMENT FOR LIFTING LOADS. AT 053-[T/BT] xx") Reference number: BRAKE WINCH RUP 503-[T/BT] EQUIPMENT FOR LIFTING LOADS DESIGNATED USE The brake winch RUP 503-[...]T series is a load lifting / lowering device. Device is equipped with safety brake for
Reference number: BRAKE WINCH RUP 503-[T/BT] EQUIPMENT FOR LIFTING LOADS DESIGNATED USE The brake winch RUP 503-[...]T series is a load lifting / lowering device. Device is equipped with safety brake for
USER MANUAL. Before you BASE, Skydive. Please read this carefully before doing anything with your new wingsuit.
 USER MANUAL CONGRATULATIONS ON YOUR PURCHASE OF A SQUIRREL FUNK ( PRODUCT ). BY PURCHASING THIS PRODUCT, YOU ACKNOWLEDGE THAT ENGAGING IN SKY-DIVING, BASE JUMPING, PARACHUTING, AND WINGSUITING IS AN INHERENTLY
On the Go Swing System Instruction Manual
 On the Go Swing System Instruction Manual WARNING READ ENTIRE MANUAL BEFORE USE. THIS SWING IS NOT A TOY. THIS SWING IS ONLY TO BE USED UNDER ADULT SUPERVISION. CONSULT WITH A CHILD S THERAPIST ON HOW
User Instruction Manual For Davit Rescue System
 Instructions for the following series products: Rescue Davit System Model numbers 8004000 and 8302500 User Instruction Manual For Davit Rescue System This manual should be used as part of an employee training
SURFACE SUPPLIED HARNESS
 SURFACE SUPPLIED HARNESS USER S MANUAL REV 4/10 2 Surface Supplied Harness User s Manual Copyright Notice This owner s manual is copyrighted, all rights reserved. It may not, in whole or in part, be copied,
Instructions for Dual Retractable Web lanyards Type 1. Instructions for E6 Energy Absorbing Y, Bypass Lanyards. For Worker Mass Range of 90 to 175 kg
 P.O. Box 3026 Sherwood Park Alberta T8H 2T1 Phone: (780) 464-7139 Fax: (780) 464-7652 e-mail: inquiries@ safetydirect.ca Web site: www.safetydirect.ca Instructions for Dual Retractable Web lanyards Type
Owner s Manual. Weingartstr Wallerfangen Tel.: +49-(0) Fax : +49-(0) Dear Customer!
 Fax : +49-(0) Dear Customer!") Weingartstr. 12 66798 Wallerfangen Tel.: +49-(0)6837-7375 Fax : +49-(0)6837-74373 www.paratec.de info@paratec.de Dear Customer! Thank you for choosing a NEXT harness/container system. This rig has been
Weingartstr. 12 66798 Wallerfangen Tel.: +49-(0)6837-7375 Fax : +49-(0)6837-74373 www.paratec.de info@paratec.de Dear Customer! Thank you for choosing a NEXT harness/container system. This rig has been
T3200 TransPlate Harness
 T3200 TransPlate Harness www.diverite.com Product Description The TransPlate Harness is designed specifically for use with hard back-plates, such as stainless steel or aluminum. The TransPlate Harness
DBI SALA Confined Space Rescue Davit System
 Instructions for the following series products: Rescue Davit System (See back page for specific model numbers.) User Instruction Manual For Davit Rescue System This manual should be used as part of an
Any tool, at the ready. 3M DBI-SALA Fall Protection for Tools Pocket Reference Guide
 Any tool, at the ready 3M DBI-SALA Fall Protection for Tools Pocket Reference Guide About 3M DBI-SALA Fall Protection for Tools Product Catalog Fall Protection for Tools Everything you need to stop the
The Birdman Suit flight manual
 The Birdman Suit flight manual (engl.orig.vers. www.bird-man.com): WARNING: 1. Parachuting and wing-flying are high risk activities which may cause or result in serious injury or death. The user of this
B.C.D. Buoyancy Compensator Device User Manual
 B.C.D. Buoyancy Compensator Device User Manual English ver 2.2 CONTENTS Important Warnings Preparation before diving - How to assemble the retaining rubber bungees - How to assemble the tank straps - How
CHAPTER 2 MAINTENANCE
 CHAPTER 2 MAINTENANCE This chapter addresses the proper care of the machine gun to ensure its overall effectiveness and efficient functioning. The information includes the gunner's knowledge in disassembly
USPA A License Checklist
 USPA A License Checklist - Atlanta Skydiving Center License Requirements The whole objective to getting your license in the USPA is to finally be self-supervised in skydiving, much like a scuba diver or
Miller Revolution Key Features
 Thank you for purchasing the Miller Revolution Harness. The Revolution is an all new and totally innovative harness engineered with seven (7) unique components and more than eleven (11) key product features.
Emergency Bailout Procedures for Pilots Presented by Allen Silver Sean Tucker 5April 2006
 Emergency Bailout Procedures for Pilots Presented by Allen Silver Sean Tucker 5April 2006 Allen services all types of emergency parachutes and specializes in bailout training. He has been serving aerobatic
Any tool, at the ready. 3M DBI-SALA Fall Protection for Tools Pocket Reference Guide
 Any tool, at the ready 3M DBI-SALA Fall Protection for Tools Pocket Reference Guide 3M DBI-SALA Fall Protection for Tools Product Catalog Fall Protection for Tools Everything you need to stop the drop.
DO NOT use any Alien Flier Zip Line Products or Accessories until you read and understand these SAFETY WARNINGS!
 ! WARNING DO NOT use any Alien Flier Zip Line Products or Accessories until you read and understand these SAFETY WARNINGS! A zip line can be very dangerous. Do not use this kit if you do not understand
Product Name: Internal Shock Lanyard
 Product Name: Internal Shock Lanyard Part #: 11200; 11201; 11202; 11203; 21215; 01295; 01296; 01297; 01298; 11211; 11212; 11213; 11260; 11261 Instruction Manual Do not throw away these instructions! Read
USER MANUAL PLEASE READ THIS CAREFULLY BEFORE DOING ANYTHING WITH YOUR NEW WINGSUIT CONTENTS
 USER MANUAL CONGRATULATIONS ON YOUR PURCHASE OF A SQUIRREL SWIFT 3 ( PRODUCT ). BY PURCHASING THIS PRODUCT, YOU ACKNOWLEDGE THAT ENGAGING IN SKYDIVING, BASE JUMPING, PARACHUTING, AND WINGSUITING IS AN
Chapter 2 Rigging. Cutting Wire Rope. Anchoring Wire Rope to Drum. Winding Wire Rope Onto Drum
 Chapter 2 Rigging Cutting Wire Rope The wire rope must be tightly seized on both sides of the point where the wire rope will be cut, as shown in Figure 2-1. Seize the wire rope with either seizing wire
CBP LPU- 40 Flotation Collar User s Manual
 CBP LPU- 40 Flotation Collar User s Manual January 2015 Capewell Aerial Systems LLC 4298 JEB Stuart Hwy Meadows of Dan, VA 24120 www.aerialmachineandtool.com Phone: 276-952-2006 FAX: 276-952-2231 Table
B. LANDING AND LANDING EMERGENCIES
 USPA COACH FINAL EXAMINATION 4. How should a student steer into an alternate clear area? Name: Please choose the BEST answer for each question. Questions are taken from Sections 2 through 6, and 9 of the
Aqua Buddy Owner s Manual
 Aqua Buddy Owner s Manual www.ravesports.com Table of Contents Product instructions and warnings... 2 Instructions on how to use product...3 Water sports safety code... 5 Inflating instructions... 8 Troubleshooting...
Butler Parachute Systems. User Guide
 Butler Parachute Systems User Guide for Butler Emergency Parachute Systems Document Number: 50-1048 Revision B January 1, 2018 Butler Personnel Parachutes P.O. Box 6098 1820 Loudon Avenue, N.W. Roanoke,
Product Name: Concrete Anchor Strap
 Product Name: Concrete Anchor Strap Part #: 10705; 10710; 10715 ; 10717; 10720 Instruction Manual Do not throw away these instructions! Read and understand these instructions before using equipment! Table
Pontoon Slide Owner s Manual
 Pontoon Slide Owner s Manual WWW.RAVESPORTS.COM Copyright 2018 All rights reserved. No part of this publication may be reproduced or transmitted in any form or by any means, electronic or mechanical, including
User Instructions 1790 Rail Anchor
 User Instructions 1790 Rail Anchor This document is intended to meet the Manufacturer s Instruction requirements as stated by ANSI Z359.1, and should be used as part of an employee training program as
MILLER REVOLUTION REVOLUTION KEY FEATURES. Miller Revolution Key Features. Stand Up D-Ring Spring loaded D-Ring simplifi es snaphook connection.
 MILLER REVOLUTION REVOLUTION KEY FEATURES Thank you for purchasing the Miller Revolution Harness. The Revolution is an all new and totally innovative harness engineered with seven (7) unique components
INSTRUCTIONS FOR USE
 Rebar Chain Assembly INSTRUCTIONS FOR USE 7260XX Rebar Chain Assembly Complies with the current ANSI Z359.1-2007 and all applicable OSHA regulations and requirements. Reliance Industries P.O. Box 2046
SETTING THE HANDLE HEIGHT ON THE ROLLATOR
 Model No: Maximum User Weight: 10910C (Lightweight) 10928C (Heavy duty) 125kg (20st) (Lightweight) 170kg (27st) (Heavy duty) Height of handles: 780-915mm (30.5-36 ) (Lightweight) 790-930mm (31-36.5 ) (Heavy
APCO Aviation Setting Future Standards. Revision: 1.0
 Revision: 1.0 APCO Aviation Setting Future Standards Factory: 7, Chalamish Street - Industrial Park - Caesarea 38900 ISRAEL H Tel: +972 4 6273727 Fax +972 4 6273728 1. Introduction 3 2. Harness Sizing
Aerodyne Flight Recommendations
 Aerodyne Flight Recommendations In this essay we present you with some recommendations, in order to assist you in learning more about your canopy, and how to use it in a better way, so that you can become
IMMERSION SUIT MAINTENANCE GUIDE IMMERSION SUIT MAINTENANCE GUIDE 1409 SERIES. SCMG003A Maintenance Guide - Immersion Suits USA ENGLISH.
 SCMG003A Maintenance Guide - Immersion Suits USA ENGLISH.indd 1 MAINTENANCE GUIDE IMMERSION SUIT 1409 SERIES IMMERSION SUIT MAINTENANCE GUIDE 6/26/2014 10:21:12 AM IMMERSION SUIT MAINTENANCE GUIDE B C
IMPORTANT: If you have questions on the use, care, application, or suitability of this equipment contact DBI/SALA.
 Model Numbers: (See back cover for model numbers) User Instruction Manual Body Belts for Personal Restraint Applications This manual ishould be used as part of an employee training program as required
Inflatable Dock Slide Owner s Manual
 Inflatable Dock Slide Owner s Manual Introduction Water sports can be safe and fun for all levels of enthusiasts. The Owner s Manual is presented to enhance your enjoyment of the sport. It is intended
PR4 Installation, Operation & Maintenance Instructions (DOT Certification Included)
") PR4 Installation, Operation & Maintenance Instructions (DOT Certification Included) March 2006 Form FVC 054 Rev. 6 KEEP THIS DOCUMENT WITH THE PRODUCT UNTIL IT REACHES THE END USER. The Passive - R4 device
PR4 Installation, Operation & Maintenance Instructions (DOT Certification Included) March 2006 Form FVC 054 Rev. 6 KEEP THIS DOCUMENT WITH THE PRODUCT UNTIL IT REACHES THE END USER. The Passive - R4 device
Tripod Series OPERATOR S MANUAL
 Tripod Series OPERATOR S MANUAL #1630 - Solo 75 2-Stage Tripod (Alloy) #1501 - Solo 75 2-Stage Tripod #2001 - Solo 75 3-Stage Tripod #1505 - Solo 100 3-Stage Tripod Features and Controls 75mm Bowl or 100mm
Product Name: Hold Me Rope Anchor
 Product Name: Hold Me Rope Anchor Part #: 01300 Instruction Manual Do not throw away these instructions! Read and understand these instructions before using equipment! Introduction 1 Applicable Safety
Flat Fold Highchair INSTRUCTION MANUAL. Designed and manufactured to BS EN 14988: 2012 IMPORTANT:
 Flat Fold Highchair INSTRUCTION MANUAL Designed and manufactured to BS EN 14988: 2012 IMPORTANT: Thank you for choosing our product. Please read and understand these instructions before using this flat
Pay special attention to information provided in warnings, cautions and notes that are accompanied by one of these symbols:
 TABLE OF CONTENTS General Information Outlaw / Rogue Components ModLock Connectors Waistband / Shoulder Strap Assembly Aircell Assembly ModLock Connector Disassembly Waistband Extender Double Cylinder
Tactical Flotation Support System (TFSS) User s Manual
 User s Manual") Tactical Flotation Support System (TFSS) User s Manual Aerial Machine and Tool Corp. 4298 JEB Stuart Hwy Meadows of Dan, VA 24120 www.aerialmachineandtool.com Phone: 276-952-2006 FAX: 276-952-2231 Table
Tactical Flotation Support System (TFSS) User s Manual Aerial Machine and Tool Corp. 4298 JEB Stuart Hwy Meadows of Dan, VA 24120 www.aerialmachineandtool.com Phone: 276-952-2006 FAX: 276-952-2231 Table
Synthetic Rope Installation Guide Premium, Ultra Performance & Zeon Winch Lines
 ORIGINAL INSTRUCTIONS SYMBOL INDEX SYMBOL EXPLANATION SYMBOL EXPLANATION Synthetic Rope Installation Guide Premium, Ultra Performance & Zeon Winch Lines Every winching situation has the potential for personal
SOLO TRIPOD SERIES Operator s Manual
 SOLO TRIPOD SERIES Operator s Manual #1630 Solo DV 75mm 2-Stage Alloy Tripod #1501 Solo DV 75mm 2-Stage Carbon Fibre Tripod #1505 Solo ENG 100mm 3-Stage Tripod Features and Controls 75mm Bowl (#1501 &