Arterial Puncture Wrist
|
|
|
- Clinton Gardner
- 5 years ago
- Views:
Transcription

1 M99 Arterial Puncture Wrist Production supervision Dr. Hiroshi Koyama, Medical Director, General Internal Medicine National Hospital Organization Kyoto Medical Center Instruction manual
2
3 Caution Do not mark on the model and other components with pen nor leave printed materials contacted on surface. Ink marks on the models cannot be removed. M99 Arterial Puncture Wrist Instruction manual Contents Introduction Manufacturer s Note DOs and DON Ts Before You Start Safety Set Includes Parts name and functions Training Preparation Preparation of simulated blood Connection of the circulation pump Setting up the wrist model and puncture unit Training After Training Discharge the simulated blood Disassembly of the hand-wrist model and puncture unit Cleaning Trouble shooting
4 Introduction Manufacturer s note DOs and DON Ts Manufacturer s note Radial artery puncture is a common approach for blood collection and arterial line placement. This innovative simulator is designed to provide training in arterial puncture with true-to-life feeling. Any use not in accordance with the enclosed instructions is strongly discouraged. Features Arterial pulsation is palpable. Realistic resistance of tissue and artery wall felt with the injection needle. Natural flashback of artificial blood into the needle can be observed. Radial arterial line placement can be simulated. No puncture trace remains on the injection site. One-touch, leak-free connections. Easy clean up. DOs and DON Ts DOs Handle the manikin and the components with care. Storage in a dark, cool space will help prevent the skin colours from fading. The manikin skin may be cleaned with a wet cloth, if neccessary, using mildly soapy water or diluted detergent. For safety reasons, always maintain an appropriate space around the circulation pump while running the system so as to allow the operator to unplug the power suppiy in case of system malfunction. DON Ts Do not let ink from pens, newspapers, product manual or other printed sources contact the manikin, as they cannot be cleaned off the manikin skin. Never use organic solvent like paint thinner to clean the skin, as this will damage the simulator. Do not keep running the system continuously for more than 2 hours. Take at least 10 minutes interval every 2 hours. The color of the tube or soft resin parts may change across the ages, but this has no effect on the simulator use.
5 Before You Start Safety precautions The safety rules below focus on the safety of the user; please read carefully before using the product. The signs below represent uses that may be dangerous or harmful. Warning Caution This sign represents dangerous use that may lead to fire hazards or electrocution. This sign represents harmful use toward the simulator or its parts that may lead to permanent damage or disfiguration. These signs below represent strongly recommended uses for safety. A circle with a cross represents actions that are strongly discouraged. This sign asks users not to attempt taking the simulator apart. This sign represents rules that we strongly encourage users to follow. Warning When the manikin or the control box becomes hot or begins to smoke, Immediately unplug the power cord. This is a major fire hazard. Please contact your local distributor or Kyoto Kagaku CO., LTD for repairs. Remove any dust that has accumulated on the power plug and insert the plug completely into the power socket. Dust and incomplete connection can lead to a major fire hazard. Unplug the power cord when the simulator is not in use. This will prevent electrocution or fire hazards that may cause burns and damgages. Keep the manikin, its machinery and power cord away from water or detergent. Wet system can lead to fire hazards and/or electrocution. Do not handle the power cord with wet hands. This is to avoid electrocution. Keep flammable materials away from the product. Such materials can lead to fire hazards and damages to the simulator. Use the designated power supply. Misuse may lead to damages and fire hazards. Do not attempt to take apart or remodel the product. This could lead to fire hazards, electrocution and injuries. Please contact your local distributor or Kyoto Kagaku CO.,LTD for repairs. When unplugging the power cord, hold by the plug and pull. Unplugging by holding the cord may lead to damages to the cord itself, fire hazards or electrocution. Do not bend, twist or damage the power cord. This is to avoid to fire hazards and electro cution.
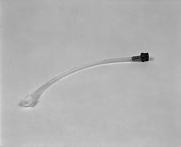
 Skin (inner) Artery tube silicon tape Radius base Hand-wrist model Simulator base Circulation pump 2")

 Quantity A set of two")
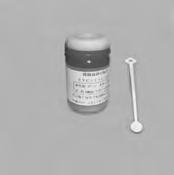
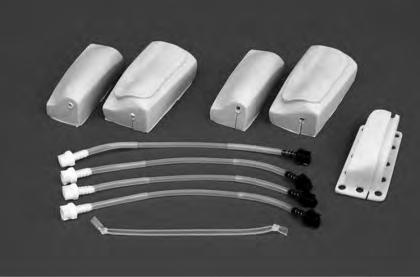
6 Before You Start Set includes Set Includes Before you start, ensure that you have all components listed below. Puncture unit Skin (outer) Skin (inner) Artery tube silicon tape Radius base Hand-wrist model Simulator base Circulation pump Blood powder Jar Spoon Syring(50mL) Tube (Irrigation: black ring) Tube (Drainage: red ring) Vinyl sheet Instruction manual Note: The needle holes on the brand new artery tubes are intentionally made to control pressure, and not a product defect. Replacement parts Parts name Skin covers Silicon tape Artery tube Blood powder (for simulated blood) Quantity A set of two (each one of outer and inner skin) A set of four A set of four A bottle (30g) Product code
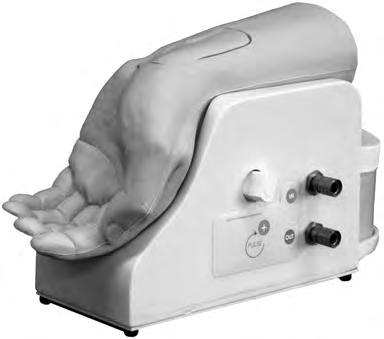
 Power switch Tube socket (In) Tube socket (Out) Tube socket (IN) Tube socket (OUT) Recommended operation environment for the")
 Working environment: Indoor Avoid exposure to the elements Altitude: 2000 meters")
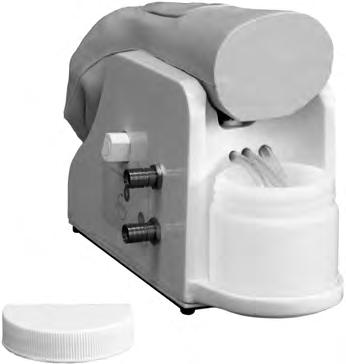
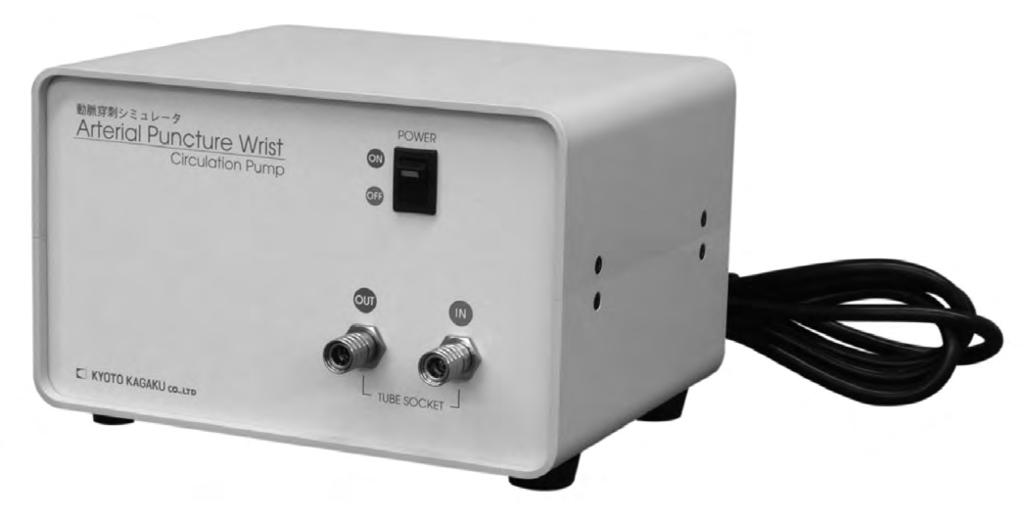
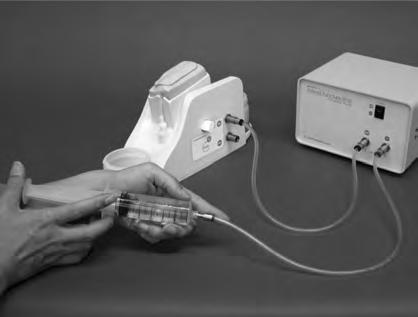
7 Before You Start Parts name and functions Parts name and functions Puncture unit Hand-wrist model Suction tube Discharge tube Drain tube Jar Jar holder Adjustment knob (pulse strength) Power switch Tube socket (In) Tube socket (Out) Tube socket (IN) Tube socket (OUT) Recommended operation environment for the circulation pump Environmental conditions: 0 degrees C degrees C Relative humidity: Less than 80 per cent (no condensation) Working environment: Indoor Avoid exposure to the elements Altitude: 2000 meters above sea-level Installation category: (2) Pollution degree: (2) Supply voltage: AC 100V-240V~ 0.16A 50/60Hz
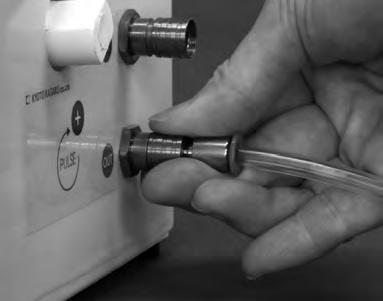
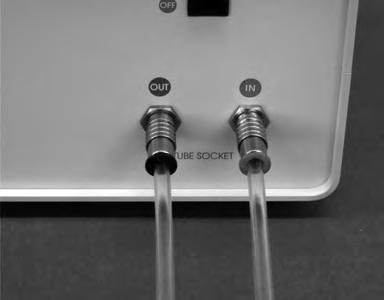
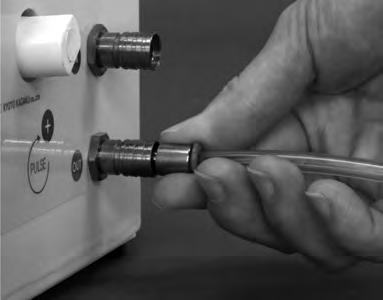
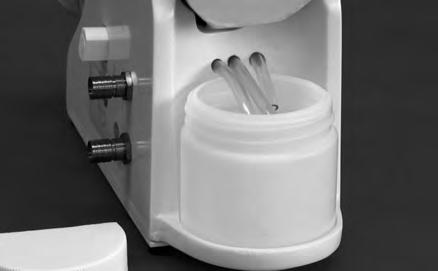
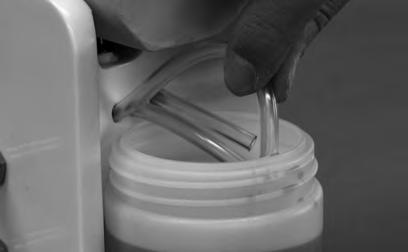
8 Preparation Preparation of simulated blood Connection of the circulation pump Please note: We recommend performing preparation and training on the included vinyl sheet. Preparation of simulated blood 1. Take 1/8 of the provided spoon of blood powder. 2. Dissolve it in 4/5 jar of water. (approx. 160cc, 0-40 degrees C) Attention The simulated blood solution is not designed for prolonged storage. Please prepare new simulated blood for each session. drain tube 3. Place the jar on the jar holder at the back side of the simulator base. 4. Insert the suction/discharge tubes into the simulated blood. Make sure the tips of the both tubes are properly placed undersurface of the fluid. The tip of the drain tube is to be above the surface. Connection of the circulation pump 1. Connect the simulator base and circulation pump with tubes. Simulator base Circulation pump Base In (black) Out (red) tubes Pump Push the tube toward the wall until click sound heard. Push the tube toward the wall until click sound heard. Out (black) In (red) Insert the ends of the tube to the tube sockets on the circulation pump and simulator base so that the sockets marked with same color sign are properly connected. Disconnection of the tubes Push Hold this part. Hold the metal sleeve on the tube socket and push it toward the pump/simulator base wall to unlock the connection. Caution Do not disconnecting the tubes while the simulator is running. Before disconnect the tubes, make sure to discharge all fluid from the pump and tubes, and switch the power off. Do not pull the tube by holding the vinyl tube. Otherwise, the tube may detach from the connector.
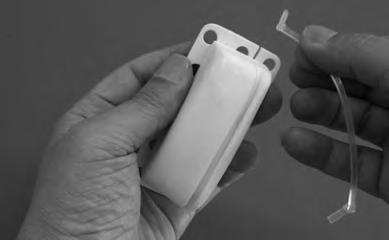
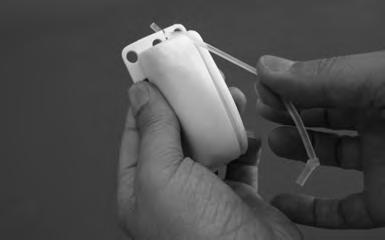
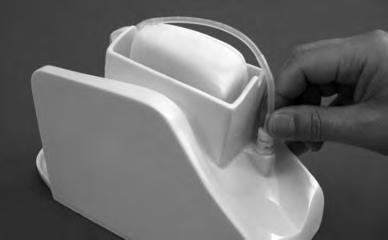
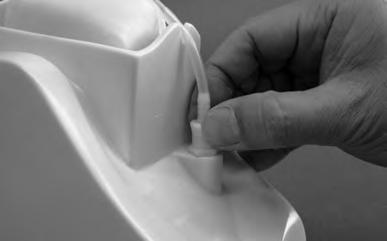
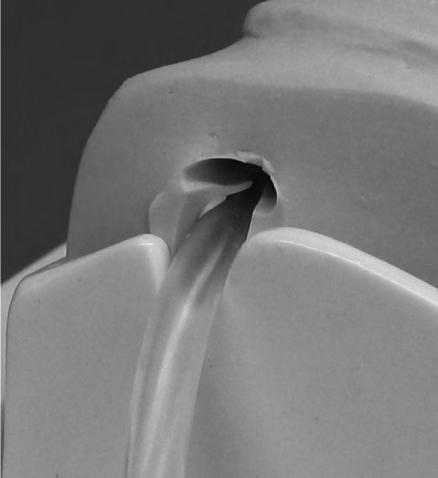
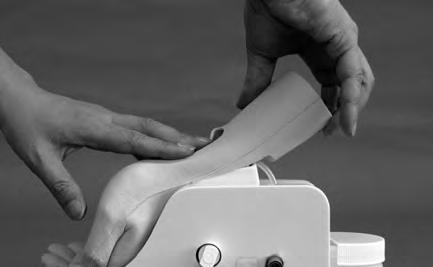
9 Preparation Setting up the wrist model and puncture unit Setting up the wrist model and puncture unit Set the silicon tape on the radius base. 1. Insert one end of the silicon tape to one of the slits on the radius base edge so that the tape is anchored by the knot. Silicon tape Radius base Knot 2. Pulling the silicon tape, place it in the gutter on the base and fix it by inserting the other end into the slit on the opposite side. Make sure not to twist the tape. 3. Put the radius base with the silicon tape to the simulator base, noting that the tape and notch on the simulator base are aligned. come on the same line Attention The silicon tape is replaceable. Set the artery tube 1. Connect the white connecter at the end of artery tube to the white socket on the simulator base. Note: The needle holes on the brand new artery tubes are intentionally made to control pressure, and not a product defect. 2. Lock each connection by turning the socket clockwise until it clicks. Attention If the lock is incomplete, the tube may come off and simulated blood may leak.
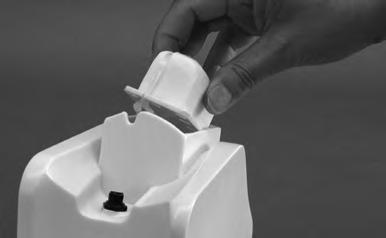
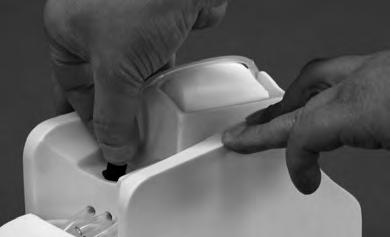
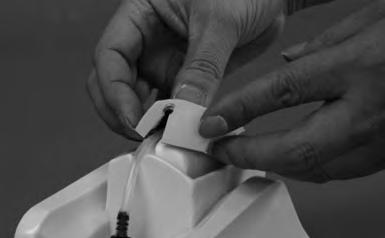
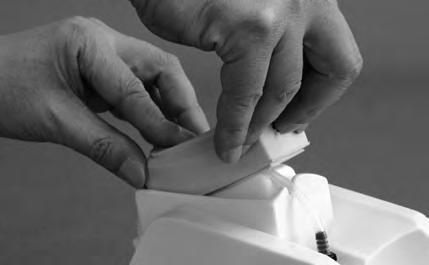
10 Preparation Setting up the wrist model and puncture unit Setting up the wrist model and puncture unit 3. Place the tube in the gutter on the radius base, connect the other end of the tube to the black socket and lock it by turning clockwise until it clicks. Attention If the lock is incomplete, the tube may come off and simulated blood may leak. Set the skin cover 1. Cover the radius base with the inner skin cover, noting the direction so that the artery tube is inserted in the slits on the walls of the skin cover. 2. Likewise, cover the puncture area with the outer skin cover. Make sure the all edges of the skin cover are placed inside of the walls of the puncture unit holder. Attention Make sure that the artery tube is properly placed in the slits on the skin cover without being flattened. Set up the hand-wrist model 1. Put the hand-wrist model on the simulator base. Be careful not to catch the artery tube in between.
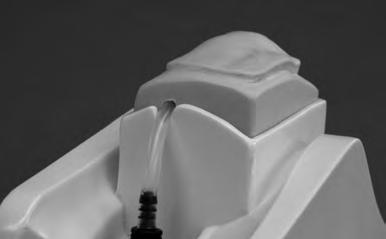
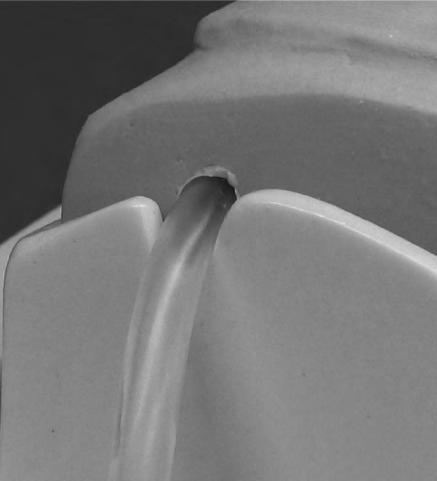
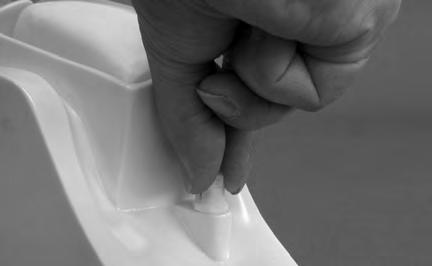
11 Training After training Training Discharge the simulated blood Training 1. Connect the power plug to a power supply. 2. Switch on the circulation pump and let the simulated blood fill the tube. Now the simulator is ready for practice. weak strong 3. Strength of the pulses can be adjusted by turning the adjustment knob on the simulator base. (Pressure is set at optimal strength by the manufacturer at the time of shipping). To make the pulse stronger, turn the knob clockwise. Caution Excessive force may cause the knob to break. Please handle it with care. 4. If the strength of the pulse does not increase with the knob adjustments, replace the artery tube with a new tube. Do not turn the knob with excessive force. Discharge the simulated blood 1. Discharge the simulated blood from the system. Lift the suction tube so that the end of the tube comes above the fluid surface and run the circulation pump until all the fluid in the tubes flows out into the jar. suction tube Caution Be careful so that the end of the tube is always inside the jar wall. 2. Replace the jar of the simulated blood with a jar of clear water. Put the tips of suction and discharge tubes into the water and run the circulation pump until the inside of the tubes are cleaned. 3. Discharge the water from the simulator following the procedure of discharging simulated blood. 4. When the hand-wrist model is stained quickly, wipe it off with cloth or wash the model with water.
12 After training Disassemble the hand-wrist model and puncture unit Disassembe the hand-wrist model and puncture unit Lift Take off the hand-wrist model 1. Holding the puncture unit with one hand, lift the back of the hand-wrist model and remove from the simulator base. Remove the skin covers 1. Remove the outer and inner skin covers one by one. Be careful not to pull them strangly, since excessive force may lead to tear(s). Disconnect the artery tube 1. Unlock each connector by turning it counterclockwise until it clicks and pull it straight off. Caution Do not pull the artery tube or any parts with force. Otherwise it may cause breakage in the simulator.
13 After training Disassembe the hand-wrist model and puncture unit Cleaning Disassemble the hand-wrist model and puncture unit Take off the radius base 1. Take off the radius base from the simulator base. Cleaning The skin covers 1. Wipe off the simulated blood inside of the skin covers with a soft cloth. The simulator base 1. Wipe off the simulated blood on the simulator base, especially around the puncture unit holder, with a piece soft cloth. Outside of the circulation pump 1. Wipe the surface of the circulation pump with a damp cloth. Inside of the circulation pump 1. Periodical cleaning of the inside of the pump is recommended. This process is to be done before disassembling the unit. 1) Stop the circulation pump. 2) Disconnect the tube connector marked 'OUT' (red) on the simulator base. 3) Fill the syringe with clear water and connect the syringe tip to the free end of the tube. 4) Inject the water to the tube until the injected water flow into the jar. (approx. 20cc.) 5) Connect the tube back to the simulator base and discharge water by following the instruction on page 8. Caution Do not use any organic solvent or alcohol on any parts of the simulator. When the simulator gets heavily stained, use soap or neutral detergent.
14 Trouble shooting Quick check-up before calling the customer service Use the table if you have problems using the system. Look in this section for a description of the problem to find a possible solution. Trouble The system cannot be powered on. (Circulation pump does not run) Circulation pump runs but simulated blood does not flow. Flash-back of the simulated blood is not seen. The simulated blood heavily leaks from around the puncture unit. Bubbles appear in the simulated blood in the tubes. Possible Reason Power plug is not properly connected to the power source. Power switch is turned off. Power does not come to the outlet. Built-in fuse is blown out. Connection of the tubes is wrong. Tube(s) between the pump and simulator base is folded. The pulse pressure is too strong (too tight). Valves or other inner parts of the pump are adhered to with extraneous matter. The artery tube is worn out. Simulated blood is not flowing. Syringe is worn or the needle is clogged. The pulse pressure is too weak. Skin covers are not set properly. The artery tube and/or skin covers are worn out. The pulse pressure is too strong. The pump is sucking the bubbles coming from the discharge tube. The artery tube is worn out. Air is collected in the circulation pump. What to Do Connect to the power source. Switch it on. Check the breaker, etc. Contact the customer service. Reset the connection following the instruction manual. Straighten the tube(s). Loosen the adjustment knob by turning it counter-clockwise. Stop the circulation pump and push in water by syringe (see page 10, #4). Replace it with a new artery tube. Check the flow. Replace them with new syringe and needle. Adjust it by turning the adjustment knob clockwise. Set the cover again following the instruction manual. Replace it/them by new one(s). Adjust it by turning the adjustment knob counter-clockwise. Make a little distance between the ends of suction and discharge tubes. Replace it with a new tube. Discharge the air by tilting the pump as shown by the illustration. Simulated blood leaks from the simulator base or pump. None of above is the case. Tube sockets are not properly locked. The end of the drain tube is contacting with the fluid in the jar. Make the pulse pressure weak (turn the knob counter-clockwise), and run the pump until the bubbles come off. Then return the pulse pressure to an appropriate strength. Check the sockets and lock them. Lift the drain tube and push it back toward the simulator base so as not to touch the fluid.
15 M99
16
17

18
19
20 +
21

22

23

24


25
26
27
28 Do not mark on the model and other components with pen or leave printed materials contacted on their surface. Ink marks on the models will be irremovable. For inquiries and service, please contact your distributor or KYOTO KAGAKU CO., LTD. 15 Kitanekoya-cho Fushimi-ku Kyoto , Japan Telephone : Facsimile : Lomita Boulevard, Torrance, CA 90505,USA Telephone : Facsimile : The contents of the instruction manual are subject to change without prior notice. No part of this instruction manual may be reproduced or transmitted in any form without permission from the manufacturer. Please contact manufacturer for extra copies of this manual which may contain important updates and revisions. Please contact manufacturer with any discrepancies in this manual or product feedback. Your cooperation is greatly appreciated.
Arterial Puncture Wrist. Instruction Manual
 Arterial Puncture Wrist Instruction Manual Production supervision Dr. Hiroshi Koyama National Hospital Organization Kyoto Medical Center ENGLISH Index Features Components Before training While training
Ultrasound Guided Thoracentesis Simulator Strap-on Type
 Caution Do not mark on the model and other components with pen nor leave printed materials contacted on surface. Ink marks on the models cannot be removed. MW4A Ultrasound Guided Thoracentesis Simulator
Ultrasound Guided Thoracentesis Simulator Strap-on Type
 Do not mark on the model and other components with pen nor leave printed materials contacted on surface. Ink marks on the models cannot be removed. MW4A Ultrasound Guided Simulator Strap-on Type Instruction
Peripheral Venous Catheter Placement Simulator
 Attention Do not let ink from pens, newspapers, this manual or other sources come in contact with the manikin, as they cannot be cleaned the manikin skin. MW9 Peripheral Venous Catheter Placement Simulator
Ultrasound Guided Thoracentesis Simulator
 Do not mark on the model and other components with pen nor leave printed materials contacted on surface. Ink marks on the models cannot be removed. MW4 Ultrasound Guided Simulator Instruction Manual Contents
M58 Newborn Vital Signs Examination Simulator. Instruction Manual
 M58 Newborn Vital Signs Examination Simulator Instruction Manual 1 Preface Training with the M58 Newborn Vital Signs Examination Simulator will advance pediatric examination skills for auscultation of
CVC Insertion Simulator
 M93UB CVC Insertion Simulator Don t mark on the model and other components with pen or leave printed materials contacted on their surface. Ink marks on the models will be irremovable. Instruction Manual
Table of Contents. Introduction. Preparation Training. After training. Maintenance. Before use P.1 Warning/ Caution. P.2-3 Included parts P.
 Table of Contents Introduction Before use P.1 Warning/ Caution P.2-3 Included parts P.4-6 Included parts Parts names and functions Training Skills Preparation Training Training skills of Simulator K Training
Difficult Airway Management Simulator
 MW13 Difficult Airway Management Simulator Training Model Caution Do not mark on the model and other components with pen nor leave printed materials contacted on surface. Ink marks on the models cannot
Ultrasound Compatible Lumbar Puncture/ Epidural Simulator
 M43E Ultrasound Compatible Lumbar Puncture/ Epidural Simulator Instruction Manual Contents Please read General information Preparation Before training Training After training P.1 P.2-6 P.7 P.8-10 It includes
Ultrasound Guided Thoracentesis / Pericardiocentesis Simulator Full set
 Do not mark on the model and other components with pen nor leave printed materials contacted on surface. Ink marks on the models cannot be removed. MW7 Ultrasound Guided Thoracentesis / Pericardiocentesis
Difficult Airway Management Simulator Assessment System
 Difficult Airway Management Simulator Assessment System Manufacturer s note The Difficult Airway Management Simulator Assessment System is the world exclusive system that offers objective feedback on intubation
AR251/AR251-B. Venepuncture and Infusion Arm. Instruction Manual
 AR251/AR251-B Venepuncture and Infusion Arm Instruction Manual Thank you for purchasing this AR251 Venepuncture and Infusion Arm. Cast from life, it shows a well developed male left arm in fine detail.
UPPER ARM INTRA-MUSCULAR INJECTION SIMULATION KIT USER MANUAL
 UPPER ARM INTRA-MUSCULAR INJECTION SIMULATION KIT USER MANUAL 1 FOREWORD Thank you very much for buying from us the Upper Arm Intra-muscular Injection Simulation Kit. This simulation kit will help you
AC1810 / AC1810-A TECHNICAL SPECIFICATIONS. Operating Pressure psi ( kgs/cm²) [AC1810] Displacement. Net Weight
![AC1810 / AC1810-A TECHNICAL SPECIFICATIONS. Operating Pressure psi ( kgs/cm²) [AC1810] Displacement. Net Weight](/thumbs/83/88369739.jpg "AC1810 / AC1810-A TECHNICAL SPECIFICATIONS. Operating Pressure psi ( kgs/cm²) [AC1810] Displacement. Net Weight") Technical Specifications Operating Instructions Maintenance Information Troubleshooting Guide Parts Diagrams AC1810 / AC1810-A THE EVOLUTION OF PERFECTION CAUTION: Before attempting to use or service this
Technical Specifications Operating Instructions Maintenance Information Troubleshooting Guide Parts Diagrams AC1810 / AC1810-A THE EVOLUTION OF PERFECTION CAUTION: Before attempting to use or service this
Parts identification:
 ARTERY PUNCTURE AND INTRAMUSCULAR TRAINING ARM Parts identification: FAST-derm replacement skin (removable) Intramuscular injection pad (removable for cleaning) Training arm (includes one FAST-derm replacement
LUBRICATOR ASSEMBLY AND OPERATING INSTRUCTIONS
 AIR FILTER, REGULATOR AND LUBRICATOR 4035 ASSEMBLY AND OPERATING INSTRUCTIONS 349 Mission Oaks Blvd., Camarillo, CA 930 Visit our Web site at http://www.harborfreight.com Copyright 004 by Harbor Freight
Med Aire Alternating Pressure Pump and Pad System
 User Manual Med Aire Alternating Pressure Pump and Pad System 14002E 14001E Symbols & Statements NOTE Indicates some tips or some information users should be aware of. CAUTION Indicates correct operating
accidents which arise due to non-observance of these instructions and the safety information herein.
 3 GALLON PANCAKE COMPRESSOR Model: 50959 CALIFORNIA PROPOSITION 65 WARNING: You can create dust when you cut, sand, drill or grind materials such as wood, paint, metal, concrete, cement, or other masonry.
12V MINI AIR COMPRESSOR
 12V MINI AIR COMPRESSOR STOCK No.65958 PART No.DA12/250A INSTRUCTIONS IMPORTANT: PLEASE READ THESE INSTRUCTIONS CAREFULLY TO ENSURE THE SAFE AND EFFECTIVE USE OF THIS TOOL. 08/2001 GENERAL INFORMATION
Adult Sternal Intraosseous Infusion Simulator LF04200U Instruction Manual
 Adult Sternal Intraosseous Infusion Simulator LF04200U Instruction Manual Products by Nasco Figure 1 Figure 2 Figure 3 Figure 4 Figure 5 About the Simulator The Life/form Adult Sternal Intraosseous Infusion
Operator s Manual. The Bullet Blender Gold BB24-AU, BB5E-AU
 Operator s Manual The Bullet Blender Gold BB24-AU, BB5E-AU Congratulations! Congratulations on your purchase of a Bullet Blender Gold by Next Advance, Inc., for lysing, disrupting, and homogenizing your
Compact Ball Valves ASAHI AV VALVES. Contents. User s Manual. (Page) (1) Be sure to read the following warranty clauses of our product 1
 (1) Be sure to read the following warranty clauses of our product 1") Serial No. H-V030-E-5 Compact Ball Valves User s Manual Contents (Page) (1) Be sure to read the following warranty clauses of our product 1 (2) General operating instructions 2 (3) General instructions
Serial No. H-V030-E-5 Compact Ball Valves User s Manual Contents (Page) (1) Be sure to read the following warranty clauses of our product 1 (2) General operating instructions 2 (3) General instructions
3 GALLON, OILLESS PANCAKE COMPRESSOR INSTRUCTIONS. Item #31289
 3 GALLON, OILLESS PANCAKE COMPRESSOR INSTRUCTIONS Item #31289 The EASTWOOD 3 GALLON, OILLESS PANCAKE COMPRESSOR, with an Integral Air Regulator, efficiently supplies all compressed air requirements for
MODEL NUMBER: PSI AIR SOURCE KIT 200 PSI Compressor on 2.0 Gallon 200 PSI Air Tank
 IMPORTANT SAFETY INSTRUCTIONS CAUTION - To reduce risk of electrical shock or Electrocution: MODEL NUMBER: 20008 200 PSI AIR SOURCE KIT 200 PSI Compressor on 2.0 Gallon 200 PSI Air Tank IMPORTANT: It is
Standard. Abdominal Aortic Aneurysm (AAA) Repair Trainer. Part No: 60610
 Repair Trainer. Part No: 60610") User Guide Abdominal Aortic Aneurysm (AAA) Repair Trainer Part No: 6060 Standard Part No: 065-088 Issue, June 005 04 Limbs & Things For more Vascular training products visit limbsandthings.com Limbs &
User Guide Abdominal Aortic Aneurysm (AAA) Repair Trainer Part No: 6060 Standard Part No: 065-088 Issue, June 005 04 Limbs & Things For more Vascular training products visit limbsandthings.com Limbs &
12V Mini Air Compressor
 INSTRUCTIONS FOR 12V Mini Air Compressor Stock No.80999 Part No.DA12/250B IMPORTANT: PLEASE READ THESE INSTRUCTIONS CAREFULLY TO ENSURE THE SAFE AND EFFECTIVE USE OF THIS PRODUCT. GENERAL INFORMATION This
limbsandthings.com Advanced Venepuncture Arm User Guide For more skills training products visit Limbs & Things Ltd.
 User Guide Advanced Venepuncture Arm Product No: 00290 (Light) Product No: 00298 (Brown) For more skills training products visit limbsandthings.com Limbs & Things Ltd. Sussex Street, St Philips Bristol,
AIR COMPRESSOR OPERATING INSTRUCTION AND PARTS LIST
 AIR COMPRESSOR OPERATING INSTRUCTION AND PARTS LIST OIL-LESS TYPE IMPORTANT: PLEASE READ CAREFULLY BEFORE STARTING OPERATIONS. THE CONTENTS ARE FOR GENERAL INFORMATION OF ALL THE SIMILAR MODELS. Record
MODEL NUMBER: M20005 AIR SOURCE KIT. 30% Duty Compressor on. 2.0 Gallon Air Tank SAVE THIS MANUAL FOR FUTURE REFERENCE
 MODEL NUMBER: M20005 AIR SOURCE KIT 30% Duty Compressor on 2.0 Gallon Air Tank SAVE THIS MANUAL FOR FUTURE REFERENCE USER MANUAL IMPORTANT SAFETY INSTRUCTIONS CAUTION - To reduce risk of electrical shock
200 PSI HIGH-FLOW AIR SOURCE KIT
 200 PSI HIGH-FLOW AIR SOURCE KIT 50% Duty Compressor on 2.0 Gallon Air Tank PART NO. 20008 IMPORTANT: It is essential that you and any other operator of this product read and understand the contents of
200 PSI FAST-FILL AIR SOURCE KIT
 200 PSI FAST-FILL AIR SOURCE KIT 55% Duty Compressor on 2.0 Gallon Air Tank PART NO. 20007 IMPORTANT: It is essential that you and any other operator of this product read and understand the contents of
Abdominal Aortic Aneurysm (AAA) Repair Trainer User Guide
 Repair Trainer User Guide") Abdominal Aortic Aneurysm (AAA) Repair Trainer User Guide Designed and manufactured by Limbs & Things Limited, Sussex Street, St. Philips, Bristol, BS 0RA, UK. Telephone: +44 (0)7 3 0500 Fax: +44 (0)7
Abdominal Aortic Aneurysm (AAA) Repair Trainer User Guide Designed and manufactured by Limbs & Things Limited, Sussex Street, St. Philips, Bristol, BS 0RA, UK. Telephone: +44 (0)7 3 0500 Fax: +44 (0)7
VERTICAL AIR COMPRESSORS
 VERTICAL AIR COMPRESSORS MODEL NO: VE11C150, VE15C150, VE18C150 PART NO: 2226005, 2226000, 2226015 OPERATION & MAINTENANCE INSTRUCTIONS LS0615 INTRODUCTION Thank you for purchasing this CLARKE Vertical
PEDIATRIC INJECTABLE TRAINING ARM SIMULATOR LF00958U INSTRUCTION MANUAL
 PEDIATRIC INJECTABLE TRAINING ARM SIMULATOR LF00958U INSTRUCTION MANUAL DO NOT REMOVE FILM FROM TUBING! THIS PRODUCT CONTAINS DRY NATURAL RUBBER! Products by NASCO About the Simulator The Life/form Pediatric
Budget Range Operators Handbook
 Budget Range Operators Handbook BAMBI AIR COMPRESSORS LTD 152 Thimble Mill Lane Heartlands Birmingham B7 5HT United Kingdom Tel: 0121 322 2299 Fax: 0121 322 2297 Email: sales@bambi-air.co.uk www.bambi-air.co.uk
Sunrise Fountain Water Wonders Assembly & Mounting Instructions
 Welcome to the Water Wonders family. A few simple steps will ensure that your Sunrise Fountain remains a soothing, enjoyable fountain that brings the sights and sounds of nature to you. Two important considerations
AIR COMPRESSOR. Failure to follow all instructions as listed below may result in electrical shock, fire, and/or serious personal injury.
 2 GALLON AIR COMPRESSOR Model: 7517 DO NOT RETURN TO STORE. Please CALL 800-348-5004 for parts and service. CALIFORNIA PROPOSITION 65 WARNING: You can create dust when you cut, sand, drill or grind materials
VERTICAL AIR COMPRESSORS
 VERTICAL AIR COMPRESSORS MODEL NO: VE15C150, VE18C150, VE25C150 PART NO: 2226010, 2226020, 2226025 OPERATION & MAINTENANCE INSTRUCTIONS LS0715 INTRODUCTION Thank you for purchasing this CLARKE Vertical
SPECIFICATIONS Type: Twin stack, single phase Tank: 4 gallon Air Output: PSI; PSI Max PSI: 125 PSI HP: 1.
 2 GALLON TWIN STACK AIR COMPRESSOR Model: 9526 DO NOT RETURN TO STORE. Please CALL 800-348-5004 for parts and service. CALIFORNIA PROPOSITION 65 WARNING: You can create dust when you cut, sand, drill or
2 GAL AIR COMPRESSOR OPERATOR S MANUAL 1/3HP/2-GALLON IMPORTANT: READ THIS OPERATOR S MANUAL BEFORE USING
 ITEM# AT01101 SKU# 207-1525 OPERATOR S MANUAL 1/3HP/2-GALLON 2 GAL AIR COMPRESSOR IMPORTANT: READ THIS OPERATOR S MANUAL BEFORE USING Toll Free Helpline: 1-888-899-0146 Versions 01 TABLE OF CONTENTS SAFETY
Newborn Nursing Skills and ALS Simulator LF01400U Instruction Manual
 Newborn Nursing Skills and ALS Simulator LF01400U Instruction Manual Products by Nasco About the Simulator Meeting your neonatal resuscitation program course curriculum, the Life/form Newborn Nursing Skills
ENGLISH FRANÇAIS ESPAÑOL DEUTSCH ITALIANO PORTUGUÊS
 ENGLISH FRANÇAIS ESPAÑOL DEUTSCH ITALIANO PORTUGUÊS CONTENTS A. BEFORE USING...2 B. SPECIAL FEATURES OF YOUR WATCH...2 C. SETTING THE WATCH...4 1. Setting the time...5 2. Setting the calendar...5 D. HOW
Operation Manual Air Saver Unit ASV5000 Series
 9IM-V066-b Operation Manual Air Saver Unit ASV5000 Series Thank you for your choice of Kuroda Pneumatics LTDs product on this time. Please read this operation manual carefully and use the product correctly.
2 GALLON TWIN STACK AIR COMPRESSOR W/ HOSE REEL
 2 GALLON TWIN STACK AIR COMPRESSOR W/ HOSE REEL Model: 52024 CALIFORNIA PROPOSITION 65 WARNING: You can create dust when you cut, sand, drill or grind materials such as wood, paint, metal, concrete, cement,
STANDARD OPERATING PROCEDURE ADVANCED INTRAVENOUS TRAINING ARM (S )
") Page 1 of 27 1. Scope This Standard Operating Procedure (SOP) applies to the staff and students using the Advanced Intravenous Training Arm in the Pharmacy Practice Resource Unit (PPRU) at the Pharmacy
Page 1 of 27 1. Scope This Standard Operating Procedure (SOP) applies to the staff and students using the Advanced Intravenous Training Arm in the Pharmacy Practice Resource Unit (PPRU) at the Pharmacy
MODEL 1329 Tank Gauge
 SERVICE INSTRUCTIONS FOR PETRO-METER 1329 GAUGE SERVICE INSTRUCTIONS MODEL 1329 Tank Gauge www.petro-meter.com Petro-Meter 1329 series Service Instructions HOW TO DETERMINE IF A PETRO-METER IS IN GOOD
24L OIL FREE AIR COMPRESSOR MODEL NO: TIGER 7/250 PART NO: OPERATION & MAINTENANCE INSTRUCTIONS LS10/13
 24L OIL FREE AIR COMPRESSOR MODEL NO: TIGER 7/250 PART NO: 2244030 OPERATION & MAINTENANCE INSTRUCTIONS LS10/13 INTRODUCTION Thank you for purchasing this product. Before attempting to use this product,
Alternating Pressure / Low Air Loss Mattress System
 750000 Alternating Pressure / Low Air Loss Mattress System User Manual Important: Do not operate the Mattress System without first reading and understanding this manual! Save this manual for future use.
Model ASSEMBLY and OPERATING INSTRUCTIONS
 QUICK CHANGE AIR BRUSH KIT Model 93506 ASSEMBLY and OPERATING INSTRUCTIONS Due to continuing improvements, actual product may differ slightly from the product described herein. 3491 Mission Oaks Blvd.,
Techcon Systems TS1254 Pressure Pot
 Techcon Systems TS1254 Pressure Pot User Guide Copyright OK International, Inc. TABLE OF CONTENT 1. SAFETY. 3 1.1 Intended Use 3 1.2 Safety Precaution 3 2. FEATURES. 5 3. SPECIFICATIONS 4 4. INSTALLATION
1 DRIVE INDUSTRIAL IMPACT WRENCH
 1 DRIVE INDUSTRIAL IMPACT WRENCH 92622 ASSEMBLY AND OPERATING INSTRUCTIONS 3491 Mission Oaks Blvd., Camarillo, CA 93011 Visit our Web site at http://www.harborfreight.com Copyright 2004 by Harbor Freight
Needle valve. Contents. User s Manual. (1) Be sure to read the following warranty clauses of our product 1. (2) General operating instructions 2
 Be sure to read the following warranty clauses of our product 1. (2) General operating instructions 2") Serial No. H-V024-E-7 Needle valve User s Manual Contents (1) Be sure to read the following warranty clauses of our product 1 (2) General operating instructions 2 (3) General instructions for transportation,
Serial No. H-V024-E-7 Needle valve User s Manual Contents (1) Be sure to read the following warranty clauses of our product 1 (2) General operating instructions 2 (3) General instructions for transportation,
120 PSI FAST-FILL AIR SOURCE KIT 25% Duty Compressor on 1.5 Gallon Air Tank
 120 PSI FAST-FILL AIR SOURCE KIT 25% Duty Compressor on 1.5 Gallon Air Tank PART NO. 20003 IMPORTANT: It is essential that you and any other operator of this product read and understand the contents of
100C Air Compressor Kit
 10010 100C Air Compressor (standard mounting bracket, CE Spec) 10014 100C Air Compressor (no leader hose or check valve, CE Spec) 10016 100C Air Compressor (with Omega Bracket, CE Spec) IMPORTANT: It is
Pressure Injection Cell Operator s Manual
 Pressure Injection Cell Operator s Manual Operator s Manual Pressure Injection Cell CONGRATULATIONS! Congratulations on your purchase of a Next Advance Pressure Injection Cell. Please read this operator
Bleeding Trauma Module Set. Directions for Use
 Bleeding Trauma Module Set Directions for Use 38 15 50 2 Laerdal TABLE OF CONTENTS Items Included 4 Skills Taught 5 Attaching Modules to Manikin 6 Set-up Procedures for Connecting Blood Bags to Modules
Check the Included Items. Introduction. When using a drum stand (MDS-50K/MDS-50KV) Owner s Manual. Watch the Quick Start Video
 Owner s Manual. Watch the Quick Start Video") Owner s Manual Introduction The KD-A22 can be installed on a 22-inch acoustic bass drum. Fully assembled view Check the Included Items After opening the package, check that all of the included items are
Owner s Manual Introduction The KD-A22 can be installed on a 22-inch acoustic bass drum. Fully assembled view Check the Included Items After opening the package, check that all of the included items are
R E D I C O N T R O L S
 R E D I C O N T R O L S Operation & Maintenance Manual Portable Service Purger for Low Pressure Chillers Model: PSP-LP-1B For Refrigerants R-11, R-113, R-114 & R-123 & Other Similar Refrigerants File Literature
Portable Oil Lube Air Compressors
 Portable Oil Lube Air Compressors 8003631 8003632 0410149 8018968 8018940 Owner s Manual Read and understand operating instructions before use Safety definitions The information listed below should be
SILENTAIRE TECHNOLOGY
 SILENTAIRE TECHNOLOGY General User and Maintenance Instructions Thank you and congratulations on the purchase of your PANTHER, the leader in the industry of portable air compressors. The PANTHER is built
ATD LB PRESSURE BLASTER INSTRUCTION MANUAL
 ATD-8402 90LB PRESSURE BLASTER INSTRUCTION MANUAL SAVE THESE INSTRUCTIONS SAFETY INSTRUCTIONS FOR SANDBLASTER 1. Before opening the tank release the air pressure on the sand tank. To do this, turn off
MODEL NUMBER: P PORTABLE COMPRESSOR
 MODEL NUMBER: 30033-300P PORTABLE COMPRESSOR IMPORTANT: It is essential that you and any other operator of the product read and understand the contents of this manual before installing and using this product.
250C-IG COMPRESSOR KIT 12V PART NO C-IG COMPRESSOR KIT 24V PART NO
 250C-IG COMPRESSOR KIT 12V PART NO. 25050 250C-IG COMPRESSOR KIT 24V PART NO. 25058 IMPORTANT: It is essential that you and any other operator of this product read and understand the contents of this manual
PRESSURISED PAINT CONTAINER
 PRESSURISED PAINT CONTAINER MODEL NO: CPP2B PART NO: 3082115 OPERATION & MAINTENANCE INSTRUCTIONS GC0913 INTRODUCTION Thank you for purchasing this CLARKE Pressurised Paint Container. Before attempting
2 Gallon Air Compressor
 Table of Contents Topic Page 2 Gallon Air Compressor Safety Guidelines-Definitions 4 Hazard Warnings 5 Air Compressor 15 Precautions 15 Basic Air Compressor Components 16 Assembling the Air Compressor
ULTRA-LIGHT DUTY ONBOARD AIR SYSTEM
 ULTRA-LIGHT DUTY ONBOARD AIR SYSTEM PART NO. 10000 IMPORTANT: It is essential that you and any other operator of this product read and understand the contents of this manual before installing and using
250C-IG COMPRESSOR KIT 12V PART NO C-IG COMPRESSOR KIT 24V PART NO
 250C-IG COMPRESSOR KIT 12V PART NO. 25050 250C-IG COMPRESSOR KIT 24V PART NO. 25058 IMPORTANT: It is essential that you and any other operator of this product read and understand the contents of this manual
Instruction Manual. Instruction Manual. Manufactured by G&G Armament 100% Made in Taiwan
 Address No.999, Zhonghua Rd., Shengang Township, Changhua County 50952,TAIWAN Instruction E-Mail Sales Department / sales@guay2.com b2b@guay2.com Technology support Department / support@guay2.com Website
Inflatable Stand Up Paddle Board Manual
 Inflatable Stand Up Paddle Board Manual V-Max AIR 12 6 Voyager AIR 11 6 Koa AIR 10 2 and 10 8 Heavy duty built in carrying handles Steel D Ring Built in Cargo Straps EVA Deck Pad High Pressure Air Valve
24L AIR COMPRESSOR OPERATION & MAINTENANCE INSTRUCTIONS MODEL NO: RANGER 7/240 PART NO: LS0913
 24L AIR COMPRESSOR MODEL NO: RANGER 7/240 PART NO: 2242000 OPERATION & MAINTENANCE INSTRUCTIONS LS0913 INTRODUCTION Thank you for purchasing this CLARKE 24L Air Compressor. Please read this manual fully
RAVE Inflatable Pool/Social Floats
 RAVE Inflatable Pool/Social Floats www.ravesports.com Thank you for purchasing this RAVE product. It has been designed and constructed to provide you and your family lasting memories of hours of exciting
GAS CONVERSION KIT Installation Instructions Range/Rangetop
 GAS CONVERSION KIT Installation Instructions Range/Rangetop FOR SERVICE PERSONNEL ONLY IMPORTANT - READ ALL INSTRUCTIONS BEFORE YOU BEGIN THE INSTRUCTIONS HEREIN MUST ONLY BE PERFORMED BY A QUALIFIED SERVICE
Natural Gas Conversion Kit
 SERIAL #: Attention: Centro recommends that a qualified gas technician perform the gas supply conversion and orifice replacement for this BBQ model. Natural Gas Conversion Kit F O R U S E W I T H M O D
Standard. Bag & Stand Advanced Venepuncture Arm. Light. Part No: Brown. Part No: Black. Part No: 00442
 Setup Guide Bag & Stand Advanced Standard Light. Part No: 00440 Brown. Part No: 0044 Black. Part No: 0044 Part No: 065-0 Issue, May 0 0 Limbs & Things For more skills training products visit limbsandthings.com
AT Kelly Torso. Directions for Use
 AT Kelly Torso Directions for Use 260-00001 2 Table of Contents Recommends 4 Items Included 5 Skills Taught 5 Preparing the Manikin for Use 6 Head 6 Lungs 6 Abdominal Thrust 6 Instructions for Use 6 Airway
Inflatable Dock Slide Owner s Manual
 Inflatable Dock Slide Owner s Manual Introduction Water sports can be safe and fun for all levels of enthusiasts. The Owner s Manual is presented to enhance your enjoyment of the sport. It is intended
200 PSI COMPRESSORS - MODEL NUMBERS
 200 PSI COMPRESSORS - MODEL NUMBERS 380C AIR COMPRESSOR KIT PART NO. 38033 480C AIR COMPRESSOR KIT PART NO. 48043 380C 480C IMPORTANT: It is essential that you and any other operator of this product read
DuPont Personal Protection Instruction Manual for Universal Pressure Test Kit No
 DuPont Personal Protection Instruction Manual for Universal Pressure Test Kit No. 990810 Effective: October 2006 BE SURE TO READ AND UNDERSTAND THESE INSTRUCTIONS BEFORE ATTEMPTING TO PERFORM AN INFLATION
INSTRUCTION MANUAL Elisa Baby-PICC
 The simulator is ideal for techniques and skills in vascular access and intravenous therapy. The newborn is made of semi-flexible and non-toxic material. It measures approximately 52cm in height and weighs
AQUARIUS. Operating Instructions for the. Type 70 Electrolytic Gas Soldering / Welding Unit. Table of Contents
 AQUARIUS Operating Instructions for the Type 70 Electrolytic Gas Soldering / Welding Unit Table of Contents 1. Important General Remarks 2 2. Safety Instructions 2 3. Description of the Soldering Unit
Lab Cock. Contents. User s Manual (1) Be sure to read the following warranty clauses of our product 1. (2) General operating instructions 2
 Be sure to read the following warranty clauses of our product 1. (2) General operating instructions 2") Serial No. H-V005-E-6 Lab Cock Contents User s Manual (1) Be sure to read the following warranty clauses of our product 1 (2) General operating instructions 2 (3) General instructions for transportation,
Serial No. H-V005-E-6 Lab Cock Contents User s Manual (1) Be sure to read the following warranty clauses of our product 1 (2) General operating instructions 2 (3) General instructions for transportation,
Techcon Systems TS1258 Pressure Pot
 Techcon Systems TS1258 Pressure Pot User Guide TABLE OF CONTENT 1. SAFETY. 3 1.1 Intended Use 3 1.2 Safety Precaution 3 2. CERTIFICATE OF COMFORMANCE 4 3. FEATURES. 5 4. SPECIFICATIONS 5 5. INSTALLATION
MODEL Maverick Heavy Duty Aerosol Compressor Operator s Manual
 MODEL 50012 Maverick Heavy Duty Aerosol Compressor Operator s Manual This page left blank intentionally CONTENTS Page No. INSPECTION... 1 GENERAL INFORMATION... 1 SAFETY PRECAUTIONS... 2 BASIC OPERATING
Everyday INFLATION STATION CORDLESS
 [ACT 050] Manual E 3/30/06 9:43 AM Page 3 Everyday INFLATION STATION CORDLESS OWNER S MANUAL MODEL NO: W03A-54 KEEP THE ORIGINAL BOX, PACKAGING AND RECEIPT. BEFORE OPERATING THIS UNIT, READ THE MANUAL
420C AIR COMPRESSOR KIT PART NO C AIR COMPRESSOR KIT PART NO
 420C AIR COMPRESSOR KIT PART NO. 42042 460C AIR COMPRESSOR KIT PART NO. 46043 420C 460C IMPORTANT: It is essential that you and any other operator of this product read and understand the contents of this
BMR 2100XL Operating Instructions Page 1 of 13
 BMR 2100XL Operating Instructions Page 1 of 13 Thank you for deciding to purchase a Swisswing BMR 2100XL (Biomechanical Stimulation Device will be referred to in these operating instructions as the BMR).
User s Manual. Digital micro pipette for liquid handling CERTIFIED ISO9001
 Digital micro pipette for liquid handling User s Manual In Vitro Medical Diagnostic Devices (98/79/EC) Annex III self-declared ISO 8655 STANDARD CERTIFIED ISO9001 Thank you very much for purchasing NICHIRYO
Port - Body in a Box User s Manual
 Port - Body in a Box - 5010 User s Manual 308 South Sequoia Parkway Canby, Oregon 97013 USA ph. 503.651.5050 fax 503.651.5052 email info@vatainc.com Thank you for purchasing VATA s Port - Body in a Box
450P- RV AUTOMATIC PORTABLE COMPRESSOR EXTREME SERIES
 450P- RV AUTOMATIC PORTABLE COMPRESSOR EXTREME SERIES PART NO. 45053 IMPORTANT: It is essential that you and any other operator of this product read and understand the contents of this manual before installing
OPERATION MANUAL ASPEN MASSAGE TABLE OR MULTI-PURPOSE LIFT TABLE. (800) (760) Fax: (760)
 (760) Fax: (760)") OPERATION MANUAL MASSAGE TABLE OR MULTI-PURPOSE LIFT TABLE (800) 358-8292 (760) 597-2155 Fax: (760) 599-7374 REV B.- 2007 OPERATION MANUAL Living Earth Crafts Your new Living Earth Crafts Aspen table is
OPERATION MANUAL MASSAGE TABLE OR MULTI-PURPOSE LIFT TABLE (800) 358-8292 (760) 597-2155 Fax: (760) 599-7374 REV B.- 2007 OPERATION MANUAL Living Earth Crafts Your new Living Earth Crafts Aspen table is
PC 1010 Electric Air Compressor
 PC 1010 Electric Air Compressor Operating Instructions Warnings for the safe use of this compressor are included in this manual. TABLE OF CONTENTS INTRODUCTION... 3 SAFETY INSTRUCTIONS...3 INSPECTION...
OPERATING AND MAINTENANCE MANUAL GOLD LINE EXTRACTION CLEANERS M14-M26
 OPERATING AND MAINTENANCE MANUAL GOLD LINE EXTRACTION CLEANERS M14-M26 Made For: Spitwater Australia Pty Ltd 953 Metry St North Albury, NSW, Australia WARNING: FAILURE TO FOLLOW OPERATING, SAFETY AND MAINTENANCE
INSTALLATION MANUAL JAPANESE ENGLISH GERMAN FRENCH ITALIAN SPANISH. Before installation. Installation INSTALLATION MANUAL: B700
 Thank you for purchasing this product. Please read this installation manual before assembling and using the product, and be sure to use the product properly. An accident or injury can result if the product
INFLATION STATION. Cordless OWNER S MANUAL MODEL NO: RCP-C65B
 [ACT 050] Manual E 4/4/06 4:34 PM Page 1 Cordless INFLATION STATION OWNER S MANUAL MODEL NO: RCP-C65B KEEP THE ORIGINAL BOX, PACKAGING AND RECEIPT. BEFORE OPERATING THIS UNIT, READ THE MANUAL THOROUGHLY
97C COMPRESSOR KIT 12V PART NO C COMPRESSOR KIT 24V PART NO C COMPRESSOR KIT PART NO
 97C COMPRESSOR KIT 12V PART NO. 00097 97C COMPRESSOR KIT 24V PART NO. 02497 98C COMPRESSOR KIT PART NO. 00098 97C 98C IMPORTANT: It is essential that you and any other operator of this product read and
444C DUAL PERFORMANCE VALUE PACK
 (Chrome) PART NO. 44432 IMPORTANT: It is essential that you and any other operator of this product read and understand the contents of this manual before installing and using this product. SAVE THIS MANUAL
ShellPa. Standard Mechanical Cell Stretch System Model No: NNMS Serial #: User Manual
 ShellPa Standard Mechanical Cell Stretch System Model No: NNMS Serial #: User Manual To operate the system properly and safely, read the manual before using ShellPa. This system is not a medical device.
IMPORTANT SAFETY INSTRUCTIONS
 IMPORTANT SAFETY INSTRUCTIONS CAUTION - To reduce risk of electrical shock: - Do not disassemble. Do not attempt repairs or modifications. Refer to qualified service agencies for all service and repairs.
Safety precautions (IMPORTANT)
") 2 Safety precautions (IMPORTANT) This manual contains instructions that should be strictly followed at all times not only for optimal use, but to prevent any injuries to yourself, other persons or property.
2 Safety precautions (IMPORTANT) This manual contains instructions that should be strictly followed at all times not only for optimal use, but to prevent any injuries to yourself, other persons or property.