T R A I N - T H E - T R A I N E R
|
|
|
- Lydia Cooper
- 6 years ago
- Views:
Transcription


1 TRAIN-THE-TRAINER
2 TABLE OF CONTENTS i. Introduction I. Before You Start II. Moldex Technical Assistance III. IV. Moldex 7000/8000/9000 Series Respirator User Instructions And Warnings Moldex Industrial (42 CFR 84) Particulate Respirators and Healthcare Particulate Respirators/Surgical Mask User Instructions and Warnings V. 7000/8000/9000 Series & Disposable Respirator Fit Testing VI Series Fitting Instructions VII Series Fitting Instructions VIII Series Fitting Instructions IX. Disposable Respirator Fitting Instructions X. Bitrex Qualitative Fit Testing XI. PortaCount Quantitative Fit Testing XII. Train-the-Trainer Certificate & Forms XIII. Qualitative Fit Test Forms XIV. Quantitative Fit Test Form, PortaCount Loan Form And Probed Cartridge Test Instruction Appendix A Probed Cartridge Kit Instructions for 7000/ Appendix B Probed Cartridge Kit Instructions for Appendix C Q-Fit Brochure & Manual Appendix D Quantifit Brochure REV G 10/13
3 i. INTRODUCTION The Moldex Train-the-Trainer Program Syllabus was developed to certify a designated Moldex user as qualified to fit test and train others in the proper use and maintenance of Moldex Reusable and disposable respirators. Certification for Moldex 7000 Series Respirators requires completion of chapters I, II, III (pages 8-13), V, VI, (X or XI) (whichever is appropriate), XII and, XIII or XIV (whichever is appropriate). Certification for Moldex 8000 Series Respirators requires completion of chapters I, II, III (pages 8-10 and 14-16), V, VII, (X or XI) (whichever is appropriate), XII and, XIII or XIV (whichever is appropriate). Certification for Moldex 9000 Series Respirators requires completion of chapters I, II, III (pages 8-10 and 17-19), V, VIII, (X or XI) (whichever is appropriate), XII and, XIII or XIV (whichever is appropriate). Certification for Moldex Disposable Respirators requires completion of chapters I, II, IV, IX, (X or XI) (whichever is appropriate), XII and, XIII or XIV (whichever is appropriate). Any questions about the syllabus, certification requirements or training should be directed to the Moldex Technical Help Line, +1 (310) or +1 (800) , ext. 512/550. WARNING In order to fit test and train respirator users in the proper use of Moldex respirators, the trainer must be qualified to train others in proper respiratory use in accordance with applicable safety and health standards. For any questions call Moldex Technical Services. Moldex has a Train-the-Trainer Program where a Moldex Representative can assist you with training. 2
4 SUPPLEMENTAL HAZARD WARNINGS FOR MOLDEX PARTICULATE RESPIRATORS These are Warnings and Limitations that all users must be made aware of in addition to all warnings and other information on the outside of the Moldex respirator packaging or other published related information. You must read and comply with these Warnings and Limitations at all times and if your employer has determined that it is appropriate to use this respirator. Proper use of this respirator may reduce but will not eliminate the risk of illness or death from exposure to some Chemical, Biological, Radiological, or Nuclear (CBRN) hazards. CBRN hazards include, but are not limited to, bacteria, toxins, and viruses that can cause death, serious bodily injury or disfigurement. The long-range and short-range risks of CBRN hazards and the amount and manner of exposure that may produce such risks remain to a great extent unknown. Use of this respirator must be in accordance with the Centers for Disease Control (CDC) Health Advisories or any other Local, State or Federal recommendations for use of respirators against specific CBRN hazards. This respirator should not be used for many CBRN hazards. There are more efficient models of respirators with a higher level of protection available from Moldex and other manufacturers. It is up to the employer, and not Moldex, to determine if a respirator should be worn and if so, which type, size, level of protection, and model. BACKGROUND The National Institute for Occupational Safety and Health (NIOSH), a branch of the CDC and a U.S. Government agency, is responsible for testing and certifying respirators for protection against hazardous industrial contaminants. Procedures for selecting and using proper respiratory protection are regulated by various governmental agencies, such as the Occupational Safety and Health Administration (OSHA). NIOSH tests and certifies certain respirators for use against chemical warfare agents, biological warfare agents or biohazards and provides advisory information for some biohazards, but OSHA and other government agencies have not set any exposure standards for these agents or biohazards, in general. Moldex does not make recommendations for any type of respirator to be used against CBRN hazards for workers or the general public. You should know that there may be no obvious warnings of the presence or release of CBRN hazards. WARNINGS FOR ALL USERS This respirator must only be used for substances having Permissible Exposure Limits (PELs) and only where deemed appropriate by your employer. This respirator must be fit tested. If you cannot obtain a proper fit, do not use the respirator and do not enter the risk area. This respirator is not for use with beards or other facial hair that prevents direct contact between the face and sealing surface of the respirator. 3
5 Moldex respirators, when properly fitted and used as part of a comprehensive respiratory protection program, may reduce wearer exposure to some airborne hazards, but not all. In the event of a sudden or unexpected CBRN hazard release, you may use this respirator for escape only if you have not been provided with a more appropriate respirator for this type of situation. Do not remove the mask from the face until you have left the contaminated area. Do not reuse or store for reuse or hang around neck unless your employer specifically authorizes reuse. Dispose of respirator as a hazardous waste in accordance with your employer s directions. Use other personal protective equipment, as directed by your employer. Where appropriate use protective gloves when handling or removing respirator and dispose of respirator and then gloves in accordance with your employer s directions. If CDC or other Local, State or Federal agency issues new or revised guidelines for respirator use against specific hazards, users must strictly comply. WARNINGS FOR USE OF PARTICULATE RESPIRATORS AGAINST TB OSHA and CDC have recommended the use of any of the particulate respirators approved under 42CFR84 as a means of providing help in complying with a program designed to reduce occupational exposure to tuberculosis. The level of effectiveness of respiratory protection from tuberculosis cannot be determined with currently available data. However, proper use of appropriate Moldex respirators in conjunction with a comprehensive respiratory protection program may reduce, but will not eliminate, risk of infection. Be sure to read the Limitations outlined below and strictly follow all Warnings set forth under the WARNINGS FOR ALL USERS. When using any Moldex respirator, filter replacement and/or disposal must be handled in accordance with your Healthcare Facility s comprehensive respiratory protection program. If disinfectants are used to sanitize reusable facepieces, you must consult with your Healthcare Facility and run tests to ensure the compatibility of any disinfectant with Moldex reusable facepiece materials. Use of disinfectants could impair the efficiency of the respirator and result in a loss of protection. 4
6 LIMITATIONS Respirators may reduce but do not eliminate wearer exposure to airborne hazards or the risk of contracting any disease or infection. Only use this respirator as part of a comprehensive respiratory protection program. You will receive no respiratory protection if this respirator is not properly fitted and worn. Additionally, potentially hazardous particles, including infectious agents, smaller than the particle sizes used in NIOSH certifications are likely to exist in certain environments. Some published data indicates that these smaller particles may not be filtered out as effectively as the particle sizes used by NIOSH [N Series Count Median Diameter (CMD) ±.02µm Geometric Standard Deviation 1.86 (GSD) and R & P Series CMD ±.02µm 1.6 (GSD)] when certifying respirators. It is imperative that you determine the size and potential hazards of the particles that may be present in the environment before selecting appropriate respiratory protection, and that you refer to CDC guidelines when selecting and using any respirator, particularly in environments where smaller types of particles, such as those referenced above, may be present. If the respirator comes in contact with blood or fluids, including body fluids, leave contaminated area as soon as possible and discard and replace the respirator. Moldex respirators must not be used on children. For further information on use of respirators contact Moldex at +1 (800) or +1 (310) ext. 512/550, your Employer, or CDC at or +1 (800) or +1 (404) CBRN-807 REV B 12/10 5
7 I. BEFORE YOU START A. Training aids and materials required for the Train-the-Trainer Program are available through Moldex. B. Collect training aids and materials and have them ready for use before the start of the training session. 1. Moldex 7000/8000/9000 Series Respirator recommended training materials. a. Moldex 7000/8000/9000 Series Respirator with gas/vapor cartridges, filters, disks and appropriate retainers, holders or piggyback adapters. b. Moldex Chemical Selection Guide. c. Moldex 7000/8000/9000 Series Respirator Instruction Manual and current literature. d. Moldex 7000/8000/9000 Packaging. e. Moldex Fit Posters. f. Fit test kits such as Moldex BITREX, and PortaCount, whichever one is appropriate. g. Moldex Powerpoint Training for 8000 series only (online at h. Training Videos (7000/9000 only) 2. Moldex Disposable Respirators recommended training materials. a. Moldex disposable respirator to be used. b. Moldex Chemical Selection Guide. c. Moldex disposable respirator packaging for the model which is to be used. d.moldex BITREX Fit Test Kit, or PortaCount Plus with Companion. e. Moldex Fit Posters. f. Moldex Powerpoint Training CD. 6
8 II. MOLDEX TECHNICAL ASSISTANCE A. MOLDEX TECHNICAL HELP LINE 1. The Moldex Technical Help Line is available to answer questions about Moldex respirators, contaminants, respirator programs, fit testing, OSHA regulations, and NIOSH approvals. 2. If calling about a particular Moldex respirator, have the model number and lot number available, if appropriate. 3. The Moldex Technical Help Line can be reached by calling +1 (310) or +1 (800) , ext. 512/550 or by ing your question to tech@moldex.com. 4. Information can also be obtained by visiting B. THE MOLDEX CHEMICAL SELECTION GUIDE 1. Use the Moldex Chemical Selection Guide to help select the correct respirator and/or cartridges and/or filters for the contaminant in your work area. The Chemical Selection Guide is available in a printed booklet or online at WARNING: MAKE SURE THAT YOU HAVE THE MOST UP-TO-DATE EDITION. 2. This guide contains the names of over 200 contaminants, with synonyms and CAS numbers, for which Moldex respirators may be suggested. The information may be used to assist in the selection of appropriate respiratory protection. 3. Conditions at the actual worksite will vary considerably and a comprehensive evaluation must be made to assure the selection of appropriate respiratory protection. 4. Only qualified individuals, familiar with the actual working conditions and knowledgeable in the benefits and limitations of respiratory equipment, should make the final respirator selection. 5. Once a respirator has been selected, it is important to continually monitor its effectiveness, as well as the dynamic situation in the workplace. 6. Check with your supervisor to determine if you have the correct protection. 7
9 III. MOLDEX 7000/8000/9000 SERIES RESPIRATOR USER INSTRUCTIONS AND WARNINGS (Also see instruction manuals included with each respirator and located in back binder pocket) A. APPLICATIONS 1. USE AGAINST a. Contaminants specified on NIOSH approval label or bag or cartridges or filters. b. Contaminants with good warning properties, i.e. smell, taste or irritation. 2. DO NOT USE AGAINST a. Concentrations of contaminants which are unknown, or are immediately dangerous to life or health. b. Concentrations of contaminants which exceed the maximum use concentration or 10 times the OSHA Permissible Exposure Limit, whichever is lower for half mask respirators. For the 9000, concentrations of contaminants which exceed the maximum use concentration, or 10 times the OSHA Permisable Exposure Limit, whichever is lower when it has been qualitatively fit tested. For the 9000, concentrations of contaminants which exceed the maximum use concentration, or 50 times the OSHA Permisable Exposure Limit, whichever is lower when it has been quantitatively fit tested. c. Gases or vapors with poor warning properties or those which generate high heats of reaction or paint sprays containing isocynates, or sandblasting. d. Oil-based mists with N filters. 3. WARNING TO USER a. Follow all instructions and warnings on the use of these respirators and wear during all times of exposure. Failure to do so will reduce respirator effectiveness, wearer protection, and may result in sickness or death. b. The user must first be trained by a person qualified to train others in proper respirator use, in accordance with applicable safety and health standards, for the contaminant and exposure level in the assigned work area. If you have any questions call Moldex Technical Service. c. The vapors, gases, dusts, mists, fumes, and other contaminants which can be dangerous to your health include those which you cannot see, taste, or smell. d. Check with your supervisor for the appropriate cartridges and/or filters for the contaminants in your work area. 8
10 4. RESTRICTIONS B. APPROVALS a. This respirator does not supply oxygen and must not be used in atmospheres containing less than 19.5% oxygen. b. Do not remain in contaminated area if any physical distress occurs, for example breathing difficulty, dizziness or nausea. c. Leave contaminated area and replace respirator and/or cartridge or filter if it is damaged, distorted, a proper fit cannot be obtained, you taste, smell or become irritated by contaminants, or breathing becomes difficult. d. Do not alter, modify, or abuse this respirator. e. Store respirator in sealed bag in a clean, dry, non-contaminated area. f. Dispose of facepiece, and/or cartridges and disks/filters according to your employer s policy and local regulations. g. Filters are required for particulates. h. Where oil mists are present, either alone or in combination with solid particulates, do not use the R or P filters for longer than one eight-hour work shift. Dispose no later than eight hours after first use. Do not exceed 10X PEL (50x the PEL for the 9000 when it has been quantitatively fit tested.) or a total of 200 mg loading per respirator, whichever is lower. It is the user s responsibility to know the PEL and concentration of the contaminant, the maximum work rate of the employee, and any other work site-specific information to calculate the loading of the filter. Where oil mists are present do not use N filters. i. Dispose of all cartridges, N, R, P filters no later than thirty days after a) first use, and/or b) removing from sealed bag. j. Use cartridges, filters, and facepieces before the use by expiration date printed on box or bag. k. If used for welding, wear appropriate eye and face protection. 1. Review NIOSH labels on appropriate approval matrix. C. FIT TEST POLICY A qualitative or quantitative fit test must be performed before a respirator is assigned. Refer to current OSHA and/or NIOSH regulations, current ANSI Standards, and all other applicable regulations for complete details. Qualitative fit testing can be performed using BITREX with appropriate cartridges or filters. Quantitative fit testing can be performed with cartridges fitted with probes. (This will be covered in Chapters X & XI.) 9
11 1. OSHA requires that a respirator must be fit tested before it can be issued to a user in accordance with 29 CFR (f). 2. Fit testing ensures that a respirator fits each individual wearer and is not the same as a user seal check. 3. A new fit test must be conducted any time the user changes respirator models or sizes. 4. See appropriate Chapter (VI, VII or VIII as appropriate) and 7000/8000/9000 Instruction Manual for proper fitting instructions. 5. The test subject must be clean-shaven. Do not test a subject with a beard or other facial hair, which prevents contact between the face and the edge of the respirator. 6. Users must follow the instructions each time the respirator is worn. 7. If you cannot obtain a proper fit, do not enter the contaminated area and see your supervisor. D. CARTRIDGES 1. CHEMICAL CARTRIDGE SERVICE LIFE Leave contaminated area, and replace cartridges, if you smell, taste, or feel any irritation, in your nose or throat. Consult your supervisor. Replace according to your changeout schedule per OSHA , or no more than eight hours after first use, or sooner if breakthrough occurs. Dispose of all cartridges no later than thirty days after first use. E. INFORMATION FOR USE AGAINST TB GENERAL INFORMATION OSHA and CDC have recommended the use of any of the particulate respirators approved under 42CFR84 as a means of providing help in complying with a program designed to reduce occupational exposure to tuberculosis. The level of effectiveness of respiratory protection from tuberculosis cannot be determined with currently available data. However, proper use of appropriate Moldex respirators in conjunction with a comprehensive respiratory protection program should reduce, but not necessarily eliminate risk of infection. FILTER REPLACEMENT Filter replacement and disposal should be in accordance with each healthcare facility s comprehensive respiratory program. DISINFECTION If specific substances must be used to kill TB, consultation with the healthcare facility and tests must be run to ensure the compatibility of the disinfectants with the facepiece material. 10
12 7000 SERIES 1. CARTRIDGE/FILTER DISK ASSEMBLY First inspect the facepiece to cartridge or filter disk sealing surfaces to make sure it s clean and undamaged. Only use cartridges or filter disks from sealed bags. To attach the cartridge or filter disk to the facepiece, align the three cartridge or filter disk notches with the three bayonets protruding from the facepiece and firmly turn clockwise until the cartridge or filter disk is locked into position and is unable to turn any further. Check to see that it is seated and flush against the facepiece. Then check the inhalation diaphragms for dirt or damage and see that they are seated properly. FILTER DISKS 1. FILTER DISK WITH PIGGYBACK ADAPTER/CARTRIDGE ASSEMBLY Before assembling filter disk #7940 to the piggyback adapter #7920, inspect the sealing surface, to make sure it is clean and undamaged and the gasket is in place. Push the piggyback adapter onto the cartridge until it snaps into place all around the cartridge. To attach the cartridge to the facepiece, align the three cartridge notches with the three bayonets protruding from the facepiece and firmly turn clockwise until the cartridge is locked into position and is unable to turn any further. Check to see that it is seated properly, both on the inside and outside and flush against the facepiece. Inspect the piggyback adapter, sealing ring and gasket each time the filter disk is changed. If seal gasket is broken, cracked or damaged replace gasket or entire piggyback adapter. Insert filter disk into the piggyback adapter and turn clockwise until the filter disk is locked into position and is unable to turn any further and until both surfaces are tightly sealed together at all points. Check the inhalation diaphragms for dirt or damage and see that they are properly seated. Warning: Only use #7920 piggyback adapter with the #7940 filter disks. Failure to do so may result in sickness or death. 2. FILTER DISK SPLASH/SPARK PROTECTION #8020 Retainer can be used with #7940 and #7960 filter disks. Push #8020 over filter disk until it snaps into place. 3. FILTER AND DISK SERVICE LIFE Leave contaminated area and replace filters, disks or cartridges, if they become damaged, soiled, torn, or if you experience increased breathing resistance. 11
13 Use Restrictions: a. Where oil mists are present, either alone or in combination with solid particulates, do not use the R or P filters for longer than one eight-hour work shift. Dispose no later than eight hours after first use. Do not exceed 10X PEL or a total of 200 mg loading per respirator, whichever is lower. It is the user s responsibility to know the PEL and concentration of the contaminant, the maximum work rate of the employee, and any other work site-specific information to calculate the loading of the filter. Where oil mists are present do not use N filters. b.dispose of all cartridges and N filters no later than thirty days after a) first use, and/or b) removing from sealed bag. c. Use cartridges, filters, and facepieces before the use by expiration date printed on box or bag. 4. FILTER/DISK REPLACEMENT To remove the used #7940 filter disk, gently turn the filter disk counter clockwise and then remove it from the #7920 piggyback adapter. Discard used filter disk. Then gently pull off the piggyback adapter. Inspect and clean the piggyback adapter each time the filter disk is changed. If seal gasket is worn, cracked or damaged, then replace gasket. If the piggyback adapter or sealing ring is worn or damaged, then entire adapter must be replaced. To remove the cartridge or filter disk, gently turn counter clockwise and remove from facepiece. Before replacing with a new cartridge or filter disk, inspect the facepiece to cartridge sealing surface, to make sure it is clean and undamaged. Only use replacement cartridges/filter disks from sealed bags. FILTERS 1. FILTER ASSEMBLY Before assembling cartridges, inspect the facepiece sealing surface to make sure it is clean and undamaged. To attach the cartridge to the facepiece, align the three cartridge notches with the three bayonets protruding from the facepiece and firmly turn clockwise until the cartridge is locked into position and is unable to turn any further. Check to see that it is seated properly, both on the inside and outside and flush against the facepiece. Insert filter into the #7020 retainer so that the side indicated is away from face. Check to see that filters are properly seated then push the retainer onto the cartridge until it snaps into place. Check the inhalation and exhalation diaphragms for dirt or damage and see that they are properly seated. 2. FILTER REPLACEMENT To remove the old filter, gently pull off the filter retainer. Remove the old filter and place a new filter inside the retainer so that the side indicated is away from face. Inspect cartridge lid to be sure it is clean and undamaged. Replace the retainer. 12

14 Warning: Use the #7020 filter holder retainer with the #8910 or #8970 filters only. Failure to do so may result in sickness or death. MAINTENANCE 1. FACEPIECE SERVICE LIFE The effective life of the facepiece will be influenced by the use conditions and contaminants to which it is exposed. This includes concentration of the contaminants (e.g. ketones and aromatic solvents will increase the rate of deterioration), duration of exposure, ambient temperature, etc. Do not use solvents to wipe or clean the facepiece as these will reduce the life of the respirator and pose a health hazard to the user. If the material shows any signs of cracking, wrinkling, or aging, then discard the facepiece immediately. Do not expose to high ambient temperatures (above 160 F) as this will distort the facepiece, and may affect fit. 2. REPLACEMENT PARTS Use only Moldex replacement parts for Moldex respirators. 3. INHALATION & EXHALATION DIAPHRAGMS INSPECTION/CLEANING Remove all three diaphragms to inspect. Two inhale diaphragms are located inside the facepiece and the exhale diaphragm is located under the valve cover. Open the valve cover by pulling up on the latch then remove the diaphragm. Clean and check the diaphragms for dirt, leaks, distortion, or any other damage. After washing and/or inspection, replace all three diaphragms and check to see that they are properly seated. 4. CLEANING FACEPIECE Cleaning is recommended after each day s use or more frequently if necessary. Remove all filters, cartridges, inhalation & exhalation diaphragms from the facepiece. Push down and rotate counter clockwise the valve cover/head harness assembly including the straps and buckles to remove it from the mask completely. Wash facepiece in warm soapy water, rinse with clean water and air dry. Do not clean with solvents or expose to high temperatures. Inspect components, then reassemble and replace the exhalation diaphragm last. Replace entire respirator if worn, damaged or deformed. 13


15 8000 SERIES 1. CARTRIDGE REPLACEMENT First inspect the facepiece to cartridge sealing surface to make sure it s clean and undamaged. Only use cartridges from sealed bags. To attach cartridge to facepiece, press firmly into opening until both surfaces are tightly sealed together at all points. Check to see that it is seated properly, both on the inside and outside and flush against the facepiece. Check the inhalation diaphragms for dirt or damage and see that they are seated properly. To remove cartridge, pull and lever out of the facepiece. DISKS/FILTERS 1. DISK/FILTER HOLDER ASSEMBLY Before assembling disk filter holder, inspect the facepiece sealing surface, to make sure it is clean and undamaged. To attach holder to facepiece, press firmly into opening until both surfaces are tightly sealed together at all points. Check to see that the holder is properly sealed, both on the inside and the outside, and flush against the facepiece. Insert disk or filter into retainer ring, so that the side indicated is away from face. Check to see that disks or filters are properly seated. Check the inhalation diaphragms for dirt or damage and see that they are properly seated. Warning: Only use 8900 filter/disk holders with 8900 filter/disk series or Only use 8920 disk piggyback adapter with 8940 filter/disk. Failure to do so may result in sickness or death. 2. FILTER AND DISK SERVICE LIFE Leave contaminated area and replace filters, disks or cartridges, if they become damaged, soiled, torn, or if you experience increased breathing resistance. Use Restrictions: a. Where oil mists are present, either alone or in combination with solid particulates, do not use the R or P filters for longer than one eight-hour work shift. Dispose no later than eight hours after first use. Do not exceed 10X PEL or a total of 200 mg loading per respirator, whichever is lower. It is the user s responsibility to know the PEL and concentration of the contaminant, the maximum work rate of the employee, and any other work site-specific information to calculate the loading of the filter. Where oil mists are present do not use N filters. b.dispose of all cartridges and N filters no later than thirty days after a) first use, and/or b) removing from sealed bag. c. Use cartridges, filters, and facepieces before the use by expiration date printed on box or bag. 14


16 3. FILTER REPLACEMENT (8020 FILTER HOLDER RETAINER) To remove the old filter, gently pull off the filter retainer. Place a new filter inside the retainer so that the side indicated is away from face. Replace the retainer. Warning: Use the 8020 filter holder retainer with the 8910 or 8970 filters only. Failure to do so may result in sickness or death. 4. FILTER/DISK REPLACEMENT To remove the old filter or disk, gently pull off the filter/ disk retainer ring. Discard old filter or disk. Inspect and clean the retainer ring and the holder sealing ring each time disk is changed. If seal is worn, cracked or damaged the disk holder must be replaced. Place a new filter or disk inside the retainer ring so that the side indicated is away from face. Replace retainer ring. Make a careful visual inspection of retainer ring seal to holder to ensure it is fully sealed. Warning: Only use 8900 filter/disk holder with 8900 filter/disk series or with 8755 mini pleat N95 filter. Failure to do so may result in sickness or death. 5. PIGGYBACK REPLACEMENT To remove the old disk, gently pull off the disk retainer ring. Discard old disk. Then gently pull off disk piggyback adapter. Inspect and clean the piggyback adapter and retainer ring each time the disk is changed. If seal is worn, cracked or damaged the piggyback adapter must be replaced. To remove the cartridge, gently pull and lever out of the facepiece. Before replacing with a new cartridge, inspect the facepiece to cartridge sealing surface, to make sure it is clean and undamaged. Only use replacement cartridges from sealed bags. To attach cartridge to facepiece, press firmly into opening until both surfaces are tightly sealed together at all points. Check to see that it is seated properly, both on the inside and the outside and flush against the facepiece. Check the inhalation diaphragms for dirt or damage and see that they are seated properly. Replace the piggyback adapter on the new cartridge. Place a new disk inside the retainer ring so that the side indicated is away from face. Replace the retainer ring. Make a careful inspection of retainer ring seal to piggyback adapter to ensure it is fully sealed. Warning: Only use 8920 disk piggyback adapter with 8940 disk/filters. Failure to do so may result in sickness or death. 15
, duration of exposure, ambient temperature, etc.")


17 MAINTENANCE 1. FACEPIECE SERVICE LIFE The effective life of the facepiece will be influenced by the use conditions and contaminants to which it is exposed. This includes concentration of the contaminants (e.g. ketones and aromatic solvents will increase the rate of deterioration), duration of exposure, ambient temperature, etc. Do not use solvents to wipe or clean the facepiece as these will reduce the life of the respirator and pose a health hazard to the user. If the material shows any signs of cracking, wrinkling, or aging, then discard the facepiece immediately. Do not expose to high ambient temperatures (above 160 F) as this will distort the facepiece, and may affect fit. 2. REPLACEMENT PARTS Use only Moldex replacement parts for Moldex respirators. 3. EXHALATION VALVE INSPECTION Pull out plastic diaphragm holder from the inside of the facepiece. Clean and check the diaphragm for dirt, leaks, distortion, or any other damage. To wash the exhalation valve diaphragm, remove from the holder. After washing and/or inspection, replace diaphragm inside holder and check to see that it is fully seated. Diaphragm holder must be inserted as indicated by arrows. When holder is correctly inserted guidepins will face up toward you. If the exhalation valve does not function properly, or cannot be properly maintained, then replace immediately. 4. CLEANING Your respirator should be cleaned after each day s use, or more frequently if necessary. Remove the filters, cartridges, exhalation valve cover, and headstrap from the facepiece. Gently scrub the facepiece and exhalation diaphragm with a soft brush in a mild germicidal detergent. Rinse in fresh water and air dry. Inspect components and reassemble, or replace respirator if worn, damaged or deformed. Use only warm water for machine washing. 16
18 9000 SERIES 1. CARTRIDGE/FILTER DISK ASSEMBLY First inspect the facepiece, cartridge or filter disk sealing surfaces to make sure it s clean and undamaged. Check to see that cartridge retainer gasket is in place and is clean and undamaged. DO NOT ATTACH CARTRIDGE OR filter disk WITHOUT A GASKET. SEE YOUR SUPERVISOR. Only use cartridges or filter disks from sealed bags. To attach the cartridge or filter disk to the facepiece, align the three cartridge or filter disk notches with the three bayonets protruding from the facepiece and firmly turn clockwise until the cartridge or filter disk is locked into position and is unable to turn any further. Check to see that it is seated and flush against the facepiece gasket. Then check the inhalation diaphragms for dirt and/or damage and see that they are seated properly. FILTER DISKS 1. FILTER DISK/PIGGYBACK ADAPTER/CARTRIDGE ASSEMBLY Before assembling filter disk #7940 to the piggyback adapter #7920, inspect the sealing surface, to make sure it is clean and undamaged and the gasket is in place. Push the piggyback adapter onto the cartridge until it snaps into place all around the cartridge. First check that the cartridge retainer gasket is in place and undamaged, then attach the cartridge to the facepiece, align the three cartridge notches with the three bayonets protruding from the facepiece and firmly turn clockwise until the cartridge is locked into position and is unable to turn any further. Check to see that it is seated properly, both on the inside and outside and flush against the facepiece. Inspect the piggyback adapter, sealing ring and gasket each time the filter disk is changed. If gasket is broken, cracked or damaged replace gasket or entire piggyback adapter. Insert filter disk into the piggyback adapter and turn clockwise until the filter disk is locked into position and is unable to turn any further and until both surfaces are tightly sealed together at all points. Check the inhalation diaphragms for dirt or damage and see that they are properly seated. Warning: Only use #7920 disk piggyback adapter with the #7940 filter disks. Failure to do so may result in sickness or death. 2. FILTER DISK SPLASH/SPARK PROTECTION #8020 Retainer can be used with #7940 and #7960 filter disks. Push #8020 over filter disk until it snaps into place. 3. FILTER AND DISK SERVICE LIFE Leave contaminated area and replace filters, disks or cartridges, if they become damaged, soiled, torn, or if you experience increased breathing resistance. 17
19 Use Restrictions: a. Where oil mists are present, either alone or in combination with solid particulates, do not use the R or P filters for longer than one eight-hour work shift. Dispose no later than eight hours after first use. Do not exceed 10X or 50X PEL depending on whether the user was quantitatively or qualitatively fit tested (see Do Not Use Against, item 2) and 200 mg loading per respirator. It is the user s responsibility to know the PEL and concentration of the contaminant, the maximum work rate of the employee, and any other work site-specific information to calculate the loading of the filter. Where oil mists are present do not use N filters. b.dispose of all cartridges and N, R and P filters no later than thirty days after a) first use, and/or b) removing from sealed bag. c. Use cartridges, filters, and facepieces before the use by expiration date printed on box or bag. 4. FILTER DISK REPLACEMENT To remove the used filter disk, gently turn the filter disk counter clockwise and then remove it from the #7920 piggyback adapter. Discard used filter disk. Then gently pull off the #7920 piggyback adapter. Inspect and clean the piggyback adapter each time the filter disk is changed. If gasket is worn, cracked or damaged, then replace gasket. If the piggyback adapter or sealing ring is worn or damaged, then entire adapter must be replaced. To remove the cartridge or filter disk, gently turn counter clockwise and remove from facepiece. Before replacing with a new cartridge or filter disk, inspect the facepiece to cartridge sealing surface, to make sure it is clean and undamaged. Only use replacement cartridges/filter disks from sealed bags. FILTERS 1. FILTER ASSEMBLY Before assembling cartridges, inspect the facepiece sealing surface to make sure it is clean and undamaged. To attach the cartridge to the facepiece, align the three cartridge notches with the three bayonets protruding from the facepiece and firmly turn clockwise until the cartridge is locked into position and is unable to turn any further. Check to see that it is seated properly, both on the inside and outside and flush against the facepiece. Insert filter into the #7020 retainer so that the side indicated is away from face. Check to see that filters are properly seated then push the retainer onto the cartridge until it snaps into place. Check the inhalation and exhalation diaphragms for dirt or damage and see that they are properly seated. 2. FILTER REPLACEMENT To remove the old filter, gently pull off the filter retainer. Remove the old filter and place a new filter inside the retainer so that the side indicated is away from face. Inspect cartridge lid to be sure it is clean and undamaged. Replace the retainer. 18

20 Warning: Use the #7020 filter retainer with the #8910 or #8970 filters only. Failure to do so may result in sickness or death. MAINTENANCE 1. FACEPIECE SERVICE LIFE The effective life of the facepiece will be influenced by the use conditions and contaminants to which it is exposed. This includes concentration of the contaminants (e.g. ketones and aromatic solvents will increase the rate of deterioration), duration of exposure, ambient temperature, etc. Do not use solvents to wipe or clean the facepiece as these will reduce the life of the respirator and pose a health hazard to the user. If the material shows any signs of cracking, wrinkling, or aging, then discard the facepiece immediately. Do not expose to high ambient temperatures (above 160 F) as this will distort the facepiece, and may affect fit. 2. REPLACEMENT PARTS Use only Moldex replacement parts for Moldex respirators. 3. EXHALATION VALVE INSPECTION Two inhale diaphragms are located inside the nose cup and two for each of the cartridge retainers. The exhale diaphragm is located under the valve cover. Open the valve cover by pulling on the latch then remove the diaphragm. Clean and check the diaphragms for dirt, leaks, distortion, or any other damage. After washing and/or inspection, replace all five diaphragms and check to see that they are properly seated. 4. CLEANING FACEPIECE Cleaning is recommended after each day s use or more frequently if necessary. Remove all filters, cartridges, gaskets, inhalation & exhalation diaphragms, and head harness and nose cup from the facepiece. Wash facepiece in warm soapy water, rinse with clean water and air dry. Do not clean with solvents or expose to high temperatures. Inspect components and reassemble, or replace respirator if worn, damaged or deformed. 19
21 IV. MOLDEX INDUSTRIAL 42 CFR 84 DISPOSABLE RESPIRATOR USER INSTRUCTIONS Each specific model may contain additional warnings and instructions. Refer to the packaging for specific instructions. A. APPLICATIONS 1. WARNING TO USER a. Follow all instructions and warnings on the use of this respirator and wear during all times of exposure. Failure to do so will reduce respirator effectiveness, wearer protection and may result in sickness or death. b. Before use, the user must first be trained by the employer in proper respirator use, in accordance with applicable safety and health standards, for the contaminant and exposure level in the assigned work area. c. The particulates and other contaminants which can be dangerous to your health include those which you cannot see, taste, or smell. d. This product has not been sold with warnings or use instructions for personnel involved in healthcare or related situations, where there may be the possibility of contact with disease or biological hazards. If you are considering such uses, first call the Moldex Technical Service Dept., +1 (310) or +1 (800) ext. 512/ RESTRICTIONS a. This respirator does not supply oxygen and must not be used in atmospheres containing less than 19.5% oxygen. b. Do not remain in contaminated area if any physical distress occurs, for example breathing difficulty, dizziness or nausea. c. Leave contaminated area and replace respirator if it is damaged, distorted, a proper fit can not be obtained or breathing becomes difficult. d. Prior to each use, carefully inspect the entire respirator, including filter media and strap/weld attachment area for tears and damage. Staple or strap/weld attachment perforations do not affect respirator performance. e. Do not alter, modify, or abuse this respirator. f. Store unused respirators in box/bag in a clean, dry, non-contaminated area. g. Where oil mists are present dispose no later than 8 hours after first use (for R or P class respirators). Where non-oil particulates only are present, dispose no later than 30 days after first use. 20
22 h. Dispose of respirator according to your employer s policy and local regulations. i. Dispose no later than thirty days after first use. j. Use respirator before the use by expiration date printed on box/bag. k. If used for welding, wear appropriate eye and face protection. For technical assistance call Moldex Technical Service Department, +1 (310) or +1 (800) ext. 512/ USE AGAINST a. Particulate aerosols free of oil for N series products. R or P series products may be used for protection against oil mists only within the restrictions (refer to 2g above). *Please also see the appropriate Moldex product box or bag for specific uses against either, Nuisance levels (less than OSHA Permissible Exposure Limits) of Organic Vapor Odors and/or Ozone or Nuisance levels (less than OSHA Permissible Exposure Limits) of Acid Gas Irritants. 4. DO NOT USE AGAINST a. Concentrations of contaminants which are unknown or are immediately dangerous to life or health. b. Concentrations of dust and mist particulates which exceed the maximum use concentration or 10 times the OSHA Permissible Exposure Limit, whichever is lower. c. Gases, vapors, asbestos, paint spray, sandblasting, or particulate materials which generate harmful vapors. d. Oil-based mists for N Series products. e. When using an R or P respirator against oil-based mists do not use for longer than one eight-hour shift. f. Always refer to the most current version of the Moldex Chemical Selection Guide. 2210GN95-XS Sample Label 21
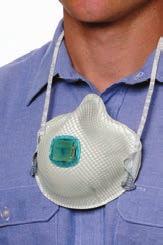
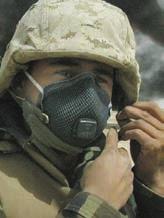
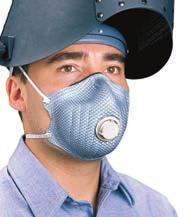
23 B. APPROVALS 1. Review NIOSH/DHHS label in approvals section of disposable respirator box or bag. MOLDEX HEALTHCARE PARTICULATE RESPIRATORS/ SURGICAL MASK USER INSTRUCTIONS Each specific model may contain additional warnings and instructions. Refer to the packaging for specific instructions. A. APPLICATIONS 1. WARNING TO USER a. Non-latex straps are used in the headbands of these respirators. However, individuals highly sensitive to natural rubber latex may have an allergic reaction. b. This product does not eliminate the risk of contracting any disease or infection. Change immediately if the respirator comes in contact with blood or fluids, including body fluids. c. OSHA has not set a permissible exposure level for airborne biohazards. d. This product has not been sold with warning or use instructions for personnel involved in industrial or related situations. If you are considering such uses, first contact the Moldex Technical Services Department at +1 (800) or +1 (310) , ext. 512/ RESTRICTIONS a. Before use, a written respiratory protection program in accordance with 29 CFR must be implemented. b. This respirator does not supply oxygen and must not be used in atmospheres containing less than 19.5% oxygen. c. Prior to each use, carefully inspect the entire respirator, including filter media and strap attachment area for tears and damage. Staple or strap attachment perforations do not effect NIOSH approval. d. If respirator is damaged, distorted, a proper fit cannot be obtained or breathing becomes difficult, leave contaminated area as soon as possible and replace respirator. e. If the respirator comes in contact with blood or fluids, including body fluids, leave contaminated area as soon as possible and discard and replace the respirator. f. Do not alter, modify or abuse this respirator. g. Store unused respirators in box/bag in a clean, dry, non-contaminated area. h. Dispose of respirator according to your employer s policy and local regulations. i. Do not reuse or store for reuse or hang around neck unless your employer specifically authorizes reuse. 22
24 j. When used for surgical procedures, discard after every use. k. Use respirator before the use by expiration date printed on box/bag. For technical assistance call Moldex Technical Service Department, +1 (800) or +1 (310) , ext. 512/ INTENDED USE The various models of Moldex Type N95 Healthcare Particulate Respirators and Surgical Masks meet CDC Guidelines for TB Exposure Control within healthcare facilities. These devices are also intended to be worn by healthcare personnel during surgical procedures to protect both the patient and healthcare personnel from the transfer of microorganisms, body fluids and particulate material. 4. CONTRAINDICATIONS a. Not for use with beards, or other facial hair that prevents direct contact between the face and sealing surface of the respirator. b. Eyewear must not prevent direct contact between the face and sealing surface of the respirator. c. Not to be used on children. 5. DESCRIPTION The Moldex Healthcare Series N95 Particulate Respirator and Surgical Mask is designed to help provide respiratory protection for the wearer. This product has been tested 1 and certified by NIOSH as an N95 respirator and as having a filter efficiency level of 95% or greater against particulate aerosols free of oil. It is fluid resistant, 2 disposable and may be worn in surgery or throughout the hospital. 1 Tested in accordance with NIOSH 42 CFR Passed ASTM F mm Hg. B. APPROVALS 1. Review NIOSH/DHHS label in approvals section of disposable respirator box or bag. Sample Label 23
25 V. 7000/8000/9000 SERIES AND DISPOSABLE RESPIRATOR FIT TESTING General A great amount of care goes into the design and manufacture of all respirators to provide the greatest amount of protection possible. It is just as important to ensure that the respirator fits properly on the user. This requires that the face to facepiece seal be properly checked. There are two basic fit test methods for evaluating the face to facepiece seal. These methods are qualitative and quantitative fit tests. Test agents are used to detect whether the wearer is getting the proper face to facepiece seal with the chosen respirator. A qualitative or quantitative fit test must be performed before a respirator is assigned. Refer to current OSHA and/or NIOSH regulations, current ANSI Standards and all other applicable regulations for complete details. The qualitative test relies on the subject s voluntary or involuntary response, i.e., taste, smell or irritation to the test agent. If the subject detects the test agent at any time during the test, the respirator does not fit properly. The test agents now approved by OSHA are irritant smoke, isoamyl acetate (banana oil), saccharin, and BITREX (Denatonium Benzoate). The qualitative method used by Moldex is BITREX. BITREX can be used to fit test any of our respirators. It is a harmless bitter aerosol which is very noticeable if it penetrates the seal of the respirator. The quantitative test measures the concentration of a test agent within the respirator facepiece and does not depend on a subject s voluntary or involuntary response to the challenge agent. The quantitative tests approved by OSHA are Portacount, and Controlled Negative Pressure (CNP). The quantitative method used by Moldex is the PortaCount. The PortaCount with the proper accessories can be used to fit test any of our respirators. Warning: The user must ensure compliance with the necessary elements of a comprehensive respiratory protection program including OSHA and/or state or local regulations as appropriate, prior to fit testing. This includes but is not limited to proper testing and medical surveillance. A. FIT TEST POLICY 1. OSHA requires that a respirator must be fit tested before it can be issued to a user in accordance with 29 CFR (f). 2. Fit testing ensures that a respirator fits each individual wearer and is not the same as a user seal check. 3. A new fit test must be conducted any time the user changes respirator models or sizes. 4. The test subject must be clean-shaven. Do not test a subject with a beard or other facial hair, which prevents contact between the face and the edge of the respirator. 5. Users must follow the instructions each time the respirator is worn. 6. If you cannot obtain a proper fit do not enter the contaminated area and see your supervisor. 7. Eyewear must not interfere with face to facepiece seal. B. TEST FREQUENCY AND TYPE 1. Quantitative or Qualitative fit tests will be performed at the time of initial fitting and at least every 12 months, or more frequently if required by a substance specific OSHA regulation or other regulation, for each employee who wears a negative pressure respirator. 24
26 2210GN95-XS C. STANDARD REQUIREMENTS 1. The test administrator will explain the test procedures in detail to the test subject before any testing takes place. 2. The test subject will wear the respirator for at least 5 minutes before starting the fit test. 3. This procedure should only be PART of the employee s total respiratory training. The employee must be properly trained on how to put on the respirator prior to the application of this testing procedure. Before performing a Fit Test, instruct the user how to properly fit the respirator and to perform a user seal check. Instructions are provided for both Moldex disposables and the 7000/8000/9000 Series Reusable Respirators. D. USER SEAL CHECK 1. A seal check is required each time the respirator is donned and prior to entering a contaminated area. 2. A seal check is performed by the wearer to determine if it has properly sealed before entering a contaminated area. 3. The seal check does not take the place of fit testing. E. USER SEAL CHECK INSTRUCTIONS Refer to appropriate chapter for 7000 Series (VI), 8000 Series (VII), 9000 Series (VIII) or (IX) for Disposable Respirators. WARNING: If you cannot obtain a proper fit, do not enter the contaminated area and see your supervisor. Entry into a contaminated area with an improper fit may result in sickness or death. F. APPROVALS 1. Review NIOSH/DHHS label in approval section of disposable respirator box or bag. Sample Label 25
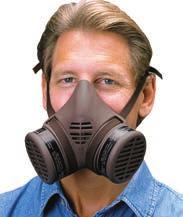
27 VI SERIES FITTING INSTRUCTIONS (Also see instructions on bag, 7000 Series Respirator Instruction Manual and 7000 User Training Video.) 1. Read instructions on respirator bag or see fit poster for proper fitting. 2. Users must follow instructions each time respirator is worn. 3. OSHA regulation 29 CFR (f) requires that the user be fit tested. 4. Do not wear with any facial hair, such as beards, or any other facial features which may prevent a proper fit. 5. If you cannot obtain a proper fit, do not enter the contaminated area and see your supervisor. The Moldex 7000 Series respirator can be worn in two different configurations, standard and drop down mode. A. STANDARD LOCK DOWN MODE To lock the straps in position, open the valve cover by pulling up on the latch. Position straps underneath the tabs of the strap channel. Close and snap shut the valve cover. Adjust the head cradle size so that it rests comfortably on crown as needed. Place respirator under the chin and pull the cradle to the top of the head so it rests on the crown. Attach the bottom straps directly against the back of the neck. 26
28 Tighten top straps first then the lower neck straps until you have a very snug and leak-tight fit. Facepiece should not be loose or slide up or down nose. Tighten by pulling on ends or loosen by pushing out on buckle tab. Do not overtighten. Further tighten top straps if necessary. B. DROP DOWN MODE Open valve cover by pulling up on the latch. Pull the straps out from underneath the tabs of the strap channel. Close and snap shut the valve cover. Adjust the head cradle size so that it will rest comfortably on the crown as needed. Attach the bottom straps directly against the back of your neck. Then position the pre-adjusted head cradle on the crown. 27
29 Tighten top straps first then the lower neck straps until you have a very snug and leak-tight fit. Facepiece should not be loose or slide up or down nose. Tighten by pulling on ends or loosen by pushing out on buckle tab. Do not overtighten. Further tighten top straps if necessary. C. USER SEAL CHECK 1. A seal check is required each time the respirator is donned and prior to entering a contaminated area. 2. A seal check is performed by the wearer to determine if it has properly sealed before entering a contaminated area. 3. The seal check does not take the place of fit testing. D. USER SEAL CHECK INSTRUCTIONS Read instructions on respirator bag or see fit poster for seal check procedures. Positive Pressure Seal Check: Cover the exhalation valve vent without pressing too hard against face, and exhale gently to create a slight positive pressure. If air leakage is detected, re-adjust the position of the facepiece and the tension of bothheadstraps and repeat the seal check until leakage is eliminated. Negative Pressure Seal Check: Cover both cartridges without pressing too hard against face, and gently inhale and hold your breath. The facepiece should slightly collapse. If air leakage is detected, re-adjust the position of the facepiece and the tension of both headstraps and repeat the seal check until leakage is eliminated. WARNING: If you cannot obtain a proper fit, do not enter the contaminated area and see your supervisor. Entry into a contaminated area with an improper fit may result in sickness or death. 28


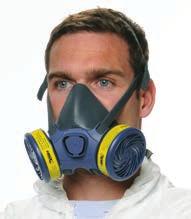
30 VII SERIES FITTING INSTRUCTIONS (Also see instructions on bag and in 8000 Series Respirator Instruction Manual.) 1. Read instructions on respirator bag or see fit poster for proper fitting. 2. Users must follow instructions each time respirator is worn. 3. OSHA regulation (f) requires that the user be fit tested. 4. Do not wear with any facial hair, such as beards, which may prevent a proper fit. 5. If you cannot obtain a proper fit, do not enter the contaminated area and see your supervisor. Place respirator under the chin and pull the cradle to the top of the head so it rests on the crown. Attach the bottom straps behind the neck. Adjust both straps to obtain a secure and comfortable fit. Tighten by pulling on ends, or loosen by pushing out on buckle tab. Seal check your respirator each time you enter a contaminated area. 29


31 A. USER SEAL CHECK 1. A seal check is required each time the respirator is donned and prior to entering a contaminated area. 2. A seal check is performed by the wearer to determine if it has properly sealed before entering a contaminated area. 3. The seal check does not take the place of fit testing. B. USER SEAL CHECK INSTRUCTIONS Read instructions on respirator bag or see fit poster for seal check procedures. Positive Pressure Seal Check: Cover the exhalation valve vents, and exhale gently to create a slight positive pressure. If air leakage is detected, readjust the position of the facepiece, and the tension of both headstraps, and repeat the seal check until leakage is eliminated. Negative Pressure Seal Check: Cover both cartridges, and gently inhale and hold your breath. The facepiece should slightly collapse. If air leakage is detected, readjust the position of the facepiece, and tension of both headstraps, and repeat the seal check until leakage is eliminated. WARNING: If you cannot obtain a proper fit, do not enter the contaminated area and see your supervisor. Entry into a contaminated area with an improper fit may result in sickness or death. 30
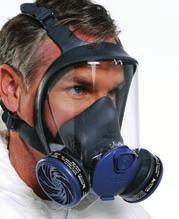
32 VIII SERIES FITTING INSTRUCTIONS (Also see instructions on bag, 9000 Series Respirator Instruction Manual and 9000 User Training Video) 1. Read instructions on respirator bag or see fit poster for proper fitting. 2. Users must follow instructions each time respirator is worn. 3. OSHA regulation 29 CFR (f) requires that the user be fit tested. 4. Do not wear with any facial hair, such as beards, or any other facial features which may prevent a proper fit. 5. If you cannot obtain a proper fit, do not enter the contaminated area and see your supervisor. Grab lower lengths of head harness with each hand, just above each adjustment buckle, and while positioning chin in flange, pull harness over the head. Push facepiece onto face and chin with one hand and position for most comfortable and secure seal while pulling and tightening neck tab of harness with other hand. Repeat for other neck tab. For easiest, most secure and best fit always adjust neck harness tabs first before tightening top harness tabs. All four harness tabs must be adjusted so that the pressure of the face seal on the face is distributed evenly. Head harness must lay flat on head. Adjust both lower and top harness tabs evenly for most comfortable and leak-tight fit of the face flange. A. USER SEAL CHECK 1. A seal check is required each time the respirator is donned and prior to entering a contaminated area. 2. A seal check is performed by the wearer to determine if it has properly sealed before entering a contaminated area. 3. The seal check does not take the place of fit testing. 31
33 B. USER SEAL CHECK INSTRUCTIONS Note: You should perform both a positive and negative fit check before entering contaminated areas. Read instructions on respirator bag or see fit poster for seal check procedures. Positive Pressure Seal Check: Cover the exhalation valve vent without pressing too hard against face, then exhale gently to create a slight positive pressure. If air leakage is detected, re-adjust the position of the facepiece and the tension of head harness and repeat the seal check until leakage is eliminated. Negative Pressure Seal Check: Cover both cartridges without pressing too hard against face, then gently inhale and hold your breath. The facepiece should slightly collapse. If air leakage is detected, re-adjust the position of the facepiece and the tension of head harness and repeat the seal check until leakage is eliminated. WARNING: If you cannot obtain a proper fit, do not enter the contaminated area and see your supervisor. Entry into a contaminated area with an improper fit may result in sickness or death. 32
 Note: Also see instructions on bag or box of specific respirator to be used.")
 at finger tips, allowing headstraps to fall below hand. 2. Place respirator under chin with molded nose contour (narrow end) up.")
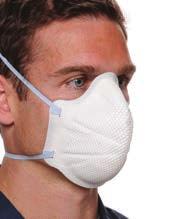
34 IX. DISPOSABLE RESIPIRATOR FITTING INSTRUCTIONS A. 2-Strap Disposable Respirators (Including Fast-Fit Flat Fold and Surgical N95 Respirators) Note: Also see instructions on bag or box of specific respirator to be used. Review all instructions and warnings. Demonstrate all fit instructions on box or bag. 1. Hold respirator in hand with molded nose contour (narrow end) at finger tips, allowing headstraps to fall below hand. 2. Place respirator under chin with molded nose contour (narrow end) up. Nose cushion must be uncreased inside respirator. Raise top strap to top back of head. Pull shorter bottom strap over head, below ears, to around neck. Do not wear with only one strap. When changing from any model/ size to another respirator, you must fit test. 3. Adjust respirator for comfortable fit. 4. Each time user enters contaminated area seal should be seal checked. Cover front of respirator by cupping both hands. INHALE SHARPLY. A negative pressure should be felt inside respirator. If any leakage is detected at respirator edges, adjust straps by pulling back along the sides and/or reposition respirator. Repeat until sealed properly, otherwise see your supervisor. Entry into a contaminated area with an improper fit may result in sickness or death. * For proper removal & disposal of surgical N95 respirators or any respiratory protection used in a healthcare environment/setting consult your Infection Control Coordinator and review Moldex Supplemental Hazard Warnings. 33
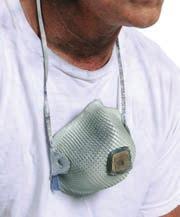
35 B. HandyStrap Respirators Note: Also see instructions on bag or box of specific respirator to be used. Review all instructions and warnings. Demonstrate all fit instructions on box or bag. 1. Attach buckle behind neck with shell against chest. 2. a) Fit mask to face and pull top of strap to crown of head. Nose cushion must not be folded inside respirator. b) Always use top and bottom part of strap. Adjust tension for a comfortable fit.when changing from any model/size to another respirator, you must fit test. 3. Each time user enters contaminated area respirator must be seal checked. Cover front of respirator by cupping both hands. INHALE SHARPLY. A negative pressure should be felt inside respirator. If any leakage is detected at respirator edges, adjust strap by pulling back along the sides and/or reposition respirator. Repeat until sealed properly, otherwise see your supervisor. Entry into a contaminated area with an improper fit may result in sickness or death. 4. To hang around neck: a) Undo buckle. b) Allow strap to fall around neck. c) Pull mask down to chest. CAUTION: If used against biohazards discard immediately after removing from face and do not hang around neck. 34
36 C. EZ-ON Series Respirators Note: Also see instructions on bag or box of specific respirator to be used. Review all instructions and warnings. Demonstrate all fit instructions on box or bag. 1. Hold respirator in hand with molded nose contour (narrow end) at finger tips, allowing head harness to fall below hand. 2. Place respirator under chin with molded nose contour (narrow end) up. Cushion must be uncreased inside respirator. Pull head harness to top of head so it rests at the crown. 3. Adjust tension by pulling on strap within the head harness to provide a tight and comfortable seal. 4. Each time before entering a contaminated area, perform a user seal check. Cover front of respirator by cuping both hands. INHALE SHARPLY. A negative pressure should be felt inside respirator. If any leakage is detected at respirator edges, adjust strap by pulling back (on head harness) and/or reposition respirator. Repeat until sealed properly, otherwise see your supervisor. Entry into a contaminated area with an improper fit may result in sickness or death. 35
37 D Series Respirators (Moldex Healthcare N95 Single Strap Series with non-adjustable straps) Review all instructions and warnings. Demonstrate all fit instructions on box. 1. Hold respirator in hand with molded nose contour (narrow end) at finger tips, allowing head strap/halo to fall below hand. 2. Place respirator under chin with molded nose contour (narrow end) up. Nose cushion must be not be folded inside respirator. Pull head strap/ halo to top of head so it rests at the crown. Note: 3200 series head strap/halo is not adjustable 3. Adjust head strap/halo on crown of head to provide a comfortable secure fit. 4. Each time before entering a contaminated area, perform a user seal check. Cover front of respirator by cupping both hands. INHALE SHARPLY. A negative pressure should be felt inside respirator. If any leakage is detected at respirator edges, reposition respirator and/or select another size. Repeat until sealed properly, otherwise see your supervisor. Entry into a contaminated area with an improper fit may result in sickness or death. * For proper removal & disposal of surgical N95 respirators or any respiratory protection used in a healthcare environment/setting consult your Infection Control Coordinator and review Moldex Supplemental Hazard Warnings. 36
38 E. Adjustable Strap Respirators Note: Also see instructions on bag or box of specific respirator to be used. Review all instructions and warnings. Demonstrate all fit instructions on box or bag. 1. Untwist straps. Thread bottom strap through bottom buckle and repeat for top strap. Hold respirator in hand with nose contour (narrow end) at finger tips, allowing headstraps to fall below hand. 2. Place respirator under chin with molded nose contour (narrow end) up. Nose cushion must not be folded inside respirator. Raise top strap to top back of head. Pull shorter bottom strap over head, below ears, to around neck. Do not wear with only one strap. 3. Adjust tension on both top and bottom straps to provide a tight and comfortable seal. To tighten, pull ends of straps. To loosen, push open hinge of buckle with thumb and pull on strap. 4. Each time user enters work area, the respirator must be seal checked. Cover front of respirator by cupping both hands. INHALE SHARPLY. A negative pressure should be felt inside respirator. If any leakage is detected at respirator edges, adjust straps by pulling back along the sides and/or reposition the respirator. Repeat until sealed properly, otherwise do not enter work area and see your supervisor. Entry into a contaminated area with an improper fit may result in sickness or death. 37
39 F. SmartStrap Respirators Note: Also see instructions on bag or box of specific respirator to be used. Review all instructions and warnings. Demonstrate all fit instructions on box or bag. 1. Pull adjustment clip and strap fully below the bottom of the mask. 2. Place strap around neck so outside of shell is against chest. 3. a) Fit mask to face and pull top of strap to crown of head. Nose cushion must not be creased inside of respirator. b) Always use both top and bottom straps. 4. To tighten pull both strap tabs. To loosen, grasp both sides of neck strap and pull. 38
40 5. Each time user enters contaminated area respirator must be seal checked. Cover front of respirator by cupping both hands. INHALE SHARPLY. A negative pressure should be felt inside respirator. If any leakage is detected at respirator edges, tighten or adjust strap by pulling back along the sides and/or reposition respirator. Repeat until sealed properly, otherwise see your supervisor. Entry into a contaminated area with an improper fit may result in sickness or death. 6. To hang around neck, pull top strap away from head, then pull mask down. 39
41 G. PRE-INSPECTION 1. Inspect your respirator before and after wearing. Do not wear and return to your supervisor if: a. Headstraps are torn, cut, or have lost elasticity. b. Buckles or head cradle are missing, damaged or broken. c. Facepiece is cracked, torn, distorted, dirty, or has holes. d. Inhalation/Exhalation valves are missing, torn, damaged, or not properly seated. H. FITTING INSTRUCTIONS 1. Read instructions on respirator box/bag and see fit poster for proper fitting. 2. Users must follow instructions each time respirator is worn. 3. OSHA regulation (f) requires that the user be fit tested before being assigned a respirator. 4. Do not wear with any facial hair, such as beards, which may prevent a proper fit. 5. If you cannot obtain a proper fit, do not enter the contaminated area and see your supervisor. 6. User must be clean shaven. Any facial hair, such as beards or long sideburns, may prevent the respirator from fitting properly. 7. Eyewear must not interfere with face to facepiece seal. 40
42 X. BITREX QUALITATIVE FIT TESTING General BITREX is a method to be used to perform qualitative fit testing. A Qualitative Fit Test is a pass/fail fit test to assess the adequacy of respirator fit that relies on the individual s responses to the test agent. The BITREX fit test can be used to test the fit of any of our respirators. It is not only a tool that can be used to help our customers perform fit testing on our products, but can also be used as a sales tool to convert customers to Moldex products. When performing the fit test you must use some type of N95 efficiency filter, as a minimum. For example, if you are testing someone who will be using the a vapor cartridge in the field, you must install either an N95, R95 or P100 on top of the vapor cartridges to perform the test. You must perform the fit test in this configuration even though the user may not be using any prefilter in the field. This is accepted practice since you are only testing the face to facepiece seal, and not the efficacy of the filtration. Filtration has already been validated through the NIOSH approval. Naturally, if the employee were going to use a filter or prefilter in the field, then you would test in the configuration actually to be used. If you are using the BITREX fit test to test any of our disposables, you can use the respirator that the employee will actually be using in the field. On the following page, you will find instructions for the use of the BITREX Fit Test Kit. Go through the instructions and perform a few fit tests before actually performing any fit tests for our customers. Forms for Qualitative Fit Testing can be found in Chapter XIII. 41
 6. BITREX Sensitivity Solution Applicator Tube (#0503) 7. Appropriate Moldex Respirators* *Use with any Moldex N, R or P class disposable respirator.")
 2.")
 4. Replace the top half of nebulizer and remove plug from nebulizer exhaust port.")
43 A. EQUIPMENT REQUIRED 1. Hood 2. Nebulizer #1 (BITREX Sensitivity Solution) 3. Nebulizer #2 (BITREX Fit Test Solution) 4. Two sets Replacement Nebulizer Inserts 5. BITREX Fit Test Solution Applicator Tube (#0504) 6. BITREX Sensitivity Solution Applicator Tube (#0503) 7. Appropriate Moldex Respirators* *Use with any Moldex N, R or P class disposable respirator. This fit test kit may also be used with any Moldex half mask respirator by using any N, R or P class filter. B. NEBULIZER PRE-INSPECTION AND PREPARATION 1. Remove the top half of the nebulizer by unthreading it from the bottom half. (Repeat for each nebulizer) 2. Using your index finger lightly push down on the Atomizer to ensure that it is pushed down all the way onto the bottom half of the nebulizer. *See Figure 1 (Repeat for each nebulizer). 3. Inspect and ensure that the black O-ring is properly seated. (Repeat for each nebulizer) 4. Replace the top half of nebulizer and remove plug from nebulizer exhaust port. (Repeat for each nebulizer) 5. Use rubber or other protective gloves prior to next step. 6. Get one Sensitivity Solution applicator tube from box of (6) part #0503 and hold upright and squeeze several times until glass ampoule is crushed. Insert applicator tip into the Exhaust Port of the nebulizer labeled Sensitivity Solution and squeeze the applicator until drained. Use the foam cushion insert in the Fit Test kit to hold the nebulizer(s) upright. See Figure 2 Figure 1 Figure Get one Fit Test Solution applicator tube from box of (6) part #0504 and hold upright and squeeze several times until glass ampoule is crushed. Insert applicator tip into the Exhaust Port of the nebulizer labeled Test Solution and squeeze the applicator until drained. 8. Ensure that each nebulizer is able to produce solution mist via the exhaust port by removing plug from Breather Vent and squeeze bulb 4 5 times. If solution mist is not visible or seems very weak, carefully (so not to spill the solution) remove the top half of the nebulizer by unthreading it from the bottom half and repeat #2 above. (Repeat for each nebulizer) C. TASTE SENSITIVITY SCREENING Purpose: This test is done to ensure that the person being fit tested can detect the taste of BITREX at sufficiently low levels to make the fit test valid. 1. Ensure that the test subject does not eat, drink, smoke or chew gum for 15 minutes before the test. 2. Explain the screening and fit testing procedures to the subject. 3. Instruct subject to put on the hood without a respirator. 4. Position the hood forward so there is about six inches between the subject s face and the window. This is especially important for the fit test. It allows free movement of the head when the subject is wearing a respirator and helps ensure even dispersion of the aerosol around the face seal area. 5. Instruct the test subject to breathe with their mouth slightly open and tongue extended. 6. Using the nebulizer labeled BITREX Sensitivity Solution, inject the aerosol into the hood through the hole in front of the enclosure. Inject ten (10) squeezes of the bulb, fully collapsing and fully expanding the bulb on each squeeze. 7. Ask the subject if he can detect the bitter taste of BITREX. 8. If the subject does not detect bitter taste, inject an additional ten squeezes into the hood. 9. If the subject still does not detect bitter taste, inject an additional ten squeezes, for a total of 30 squeezes. 10. If 30 squeezes were inadequate to elicit a response from the subject, this subject cannot be fit tested with the BITREX test. Another fit test method must be used. 11. If the subject could detect bitter taste, the number of squeezes required to produce a taste response should be noted, i.e., 10, 20 or 30 squeezes, even if subject tasted the BITREX on a number of squeezes other than multiples of ten. 12. Remove the hood. Wait a few minutes, to give the subject time to clear the taste from his mouth, before proceeding to the fit test. A drink of water during this time will aid in removing the bitter taste. Use a paper towel to wipe the subject s mouth of any residue (also wipe mustaches).
44 D. FIT TEST 1. Use any Moldex disposable N, R or P series class disposable respirator or any Moldex half mask respirator with any N, R or P series filter. Have the test subject put on and adjust the respirator per the instructions provided with the respirator. Have the subject select the size respirator that provides the best fit. The subject may find a mirror useful in the adjustment process. The subject should wear the respirator at least five (5) minutes before starting the test. 2. Instruct the subject to put on and position the hood as before and breathe with their mouth slightly open and tongue extended. 3. Using the nebulizer labeled BITREX Fit Test Solution, inject the fit test aerosol into the hood. The same number of squeezes is required as was necessary to elicit a response in the threshold sensitivity screening test, i.e., 10, 20 or 30 squeezes. 4. To maintain an adequate concentration of aerosol during the test, one half of the initial number of squeezes should be injected again every 30 seconds (i.e., 5, 10, or 15) throughout the test. 5. After injecting the aerosol initially, ask the test subject to perform the following exercises for 60 seconds each: (a) Normal breathing. (b) Deep breathing. (c) Turning head from side to side, stopping at each end of travel for one or two breaths. (d) Moving head up and down, stopping at each end of travel for one or two breaths. (e) Talking, reciting the alphabet, or reading a prepared text (the Rainbow Passage is recommended, see below). (f) Jogging in place. (g) Normal breathing. 6. Instruct the subject to indicate if they detect the bitter taste at any time during the test. RAINBOW PASSAGE When the sunlight strikes raindrops in the air, they act like a prism and form a rainbow. The rainbow is a division of white light into many beautiful colors. These take the shape of a long arch, with its path high above, and its two ends apparently beyond the horizon. There is, according to legend, a boiling pot of gold at one end. People look, but no one ever finds it. When a man looks for something beyond his reach, his friends say he is looking for the pot of gold at the end of the rainbow. 7. If the entire test is completed without the subject detecting the bitter taste of the aerosol, the test is passed and the respirator s fit on that individual is judged adequate. 8. At any time during the test, if the subject detects the bitter taste of the aerosol the test is stopped at this point. When this occurs, the fit of the respirator on the subject is judged inadequate. 9. If the test is failed, before retesting the subject, a 15-minute waiting period must be observed and the taste sensitivity screening test must be performed again. Test again with same Moldex model. 10. If the second test fails, repeat tests with another size and/or model Moldex respirator. 11. Document results of fit tests for each employee. OSHA This fit test meets the performance criteria for fit testing half mask respirators under current OSHA Standards. OSHA regulation (f) requires that the user be fit tested before being assigned a respirator. CLEANING Immediately after completing the test, discard any unused solutions. Rinse the nebulizers with warm water to prevent clogging. Wipe inside of the hood with a damp cloth or paper towel to remove any deposited Test Solution. FOR TECHNICAL ASSISTANCE CALL MOLDEX TECHNICAL SERVICE DEPARTMENT +1 (800) ext. 512/550, or +1 (310) ext. 512/550. LIMITED WARRANTY IMPORTANT NOTICE TO PURCHASER This limited warranty is made in lieu of the warranties of merchantability, fitness for particular purposes and all other warranties, express or implied. There are no other warranties which extend beyond the description on the face hereof. The physical standards and specifications of Moldex will be met by products sold. Exclusive Remedies: damages for the breach of this limited warranty are limited to the replacement of such quantity of Moldex, products proved to be defectively manufactured. Except as provided above, Moldex shall not be liable or responsible for any loss, damage, or liability, direct, indirect, incidental, special, or consequential, arising out of sale, use, or misuse, or the inability to use products by the user. DISTRIBUTED BY: MOLDEX-METRIC, INC W. Jefferson Blvd. Culver City, CA (800) or +1(310) FAX +1 (310) sales@moldex.com CANADIAN CUSTOMER SERVICE TEL: +1 (310) , Ext. 517 Fax: +1 (310) Made in the U.S.A REV H 07/08 Moldex is a registered trademark and the mesh design is a trademark of Moldex-Metric, Inc. U.S. Patents #D285,374 and #4,850,374 43
45 XI. PORTACOUNT QUANTITATIVE FIT TESTING General The PortaCount is an instrument to be used to perform quantitative fit testing. A quantitative Fit Test is an assessment of the adequacy of respirator fit by numerically measuring the amount of leakage into the respirator. The PortaCount can be used to fit test the 7000/ 8000/9000 series or N99, R99, N100 or P100 disposables. When used in conjunction with the PortaCount Companion it can be used to quantitatively fit test N95 filtering facepieces (disposables) such as the 2200N series, 2300N series, etc. It is not only a tool that can be used to help our customers perform fit testing on our products, but can also be used as a sales tool to convert customers to Moldex products. When used to fit test the 7000/8000/9000 series or 99% efficiency level disposable respirators, you will be using the PortaCount without the Companion. For 8000 Series, use 8006 and for 7000/9000 use 7006 (you must use the correct probed cartridge for each model. They are promenantly marked). A probed cartridge with P100 filter will be attached to one side of the 7000/8000/9000 facepiece; the other side will have a regular P100 filter (see Appendix A for 7006 Instructions and B for 8006 Instructions). You must perform the fit test in this configuration even though the user will be using other cartridges in the field. This is accepted practice since you are only testing the face to facepiece seal, and not the efficacy of the filtration. Filtration has already been validated through the NIOSH approval. Once a facepiece is chosen for a particular employee, they can take the facepiece they were tested on to be used in the field, if appropriate. All they will need to do is attach the appropriate cartridges to the facepiece. To perform a fit test on Moldex disposables, you will have to probe the appropriate respirator. You should perform the fit test on the same model and size that the employee intends to use in the field. After each test, the respirator should be discarded and a new one used for the next employee. These probed respirators may not be used in the work environment. Although this will result in some added cost for the employer, it generally only needs to be done once per year. Following, you will find instructions for the use of the PortaCount Plus and PortaCount Companion. The complete instructions are included with the PortaCount when you order it through our Loan Program. The instructions included here are not the complete instructions that accompany the PortaCount, but they will provide you with information on the parts, how to use the PortaCount, and how to use the PortaCount Companion. We have added some of our own notes to the instructions where we thought it was appropriate. When you wish to use the PortaCount and you will be ordering it from Moldex Technical Services, +1 (800) , ext. 512/550. We suggest that you order it to arrive a few days in advance of when you will actually perform fit testing so that you can go through all the instructions and work with the unit, we suggest that you perform fit testing on yourself or someone else with the 7000/8000/9000 and a few models of Moldex disposables to become very familiar with the instruments before you actually use them in the field. If you will be using the the PortaCount to test any Moldex filtering facepiece, you must refer to the PortaCount Companion instructions to properly probe those respirators. Forms for Quantitative Fit Tests can be found in Chapter XIV. 44

46 PORTACOUNT PARTS This section goes through the parts of the PortaCount. Go through it page by page to become familiar with the instrument. IDENTIFYING THE PARTS Use the numbered paragraphs with the correspondingly numbered arrows to identify the various parts of the PORTACOUNT Plus and its accessories. It will be necessary for you to be familiar with the terminology of the PORTACOUNT Plus in order to follow the instructions in this manual. Keypad Keypad refers to all the keys on the front panel as a group. 1. ON/OFF KEY The ON/OFF key turns the instrument ON if it is OFF or OFF if it is ON. 2. FIT TEST KEY Pressing the FIT TEST key puts the PORTACOUNT Plus into Fit Test Mode. The indicator light on the FIT TEST key will be on when in Fit Test Mode. 3. COUNT KEY Pressing the COUNT key puts the PORTACOUNT Plus into COUNT Mode. The indicator light on the COUNT key will be on when in Count Mode. 4. EXTERNAL CONTROL INDICATOR When the indicator light next to EXTERNAL CONTROL is on, the PORTACOUNT Plus is being controlled through the Data Port by an external computer. All Keypad controls except the ON/OFF key will be disabled. 5. TEST START/STOP KEY In Fit Test Mode, the TEST START/STOP key is used to start a fit test and also to terminate a fit test early (a fit test will automatically stop when the preset number of exercises is completed). In Count Mode, the TEST START/STOP key is used to toggle between 1-Second Count Mode and 15-Second Count Mode. 6. PASS LEVEL KEY Use the PASS LEVEL key to view and change the fit factor pass level. Press the key momentarily to check the fit factor pass level without changing it. Press and hold the key down to scroll through the available fit factor pass level values. Release the key to set the level at the value shown on the display. 7. NO. OF EXER KEY Use the NO. OF EXER key to view and change the number of exercises to be used in the fit test protocol. Press the key momentarily to check the number of exercises without changing it. Press and hold the key down to scroll through the available values. Release the key to set the number of exercises at the value shown on the display. 45

47 Display The Display is a liquid crystal display (LCD) used to present numeric data and status information to the user. The elements of the Display are: 8. Numeric Values Numeric values for fit factor, overall fit factor and particle concentration are displayed as full digit numbers truncated to 3 significant digits. Fit factor pass levels are displayed as integers. The units associated with the numeric value are displayed to the right of the number. The units that can be displayed are: FIT FACTOR OVERALL FIT FACTOR PARTICLE/cm 3 FIT FACTOR PASS LEVEL 9. Exercise Number The exercise number display is used to check or set the number of exercises needed for a complete fit test and to display the exercise number in progress during a fit test. During a fit test, the IN PROGRESS message will appear next to the exercise number and will flash on and off. 10. PASS/FAIL Message A PASS or FAIL message will appear in the lower right-hand corner of the Display every time a fit factor or an overall fit factor is displayed. PASS will appear if the displayed fit factor is equal to or greater than the fit factor pass level and FAIL will appear if the displayed fit factor is less than the fit factor pass level. The fit factor pass level is set with the PASS LEVEL key. Status Messages There are 3 warning indicators that can be displayed by the PORTACOUNT Plus. They are: 11. SERVICE When the message: SERVICE is displayed, the PORTACOUNT Plus is usually low on alcohol. However, there can be other reasons. Consult the section on warning messages in the complete PORTACOUNT instruction manual. 46

48 12. LOW BATTERY Warning The flashing message: LOW BATTERY warns you that there is about 15 minutes remaining before the PORTACOUNT Plus turns itself off due to lack of sufficient battery power. Finish the fit test in progress and then install a fresh battery, or plug in the AC adapter. 13. LOW PARTICLE The LOW PARTICLE message indicates that the PORTACOUNT Plus has measured a particle concentration during the ambient sample that is below the pre-programmed cut off of 1000 particles/cm3. This message can only appear during operation in Fit Test Mode. Sampling Ports There are 3 ports that permit air to flow into and out of the PORTACOUNT Plus. They are: 14. Sample Port The Sample Port is the inlet used by the PORTACOUNT Plus when sampling air from a respirator during a fit test in Fit Test Mode and at all times while in Count Mode. The clear tube marked SAMPLE of the Twin Tube Assembly connects here. The Sample Port fitting is silver colored and marked with the letter S. 15. Ambient Port The Ambient Port is used to sample ambient air during a fit test in Fit Test Mode. It is never used in Count Mode. The blue tube marked AMBIENT of the Twin Tube Assembly connects here. The Ambient Port fitting is colored blue and marked with the letter A. 16. Exhaust Port The Exhaust Port is where all sampled air exits the PORTACOUNT Plus. 17. Twin Tube Assembly The Twin Tube Assembly consists of a pair of tubes. The Sample Tube is clear in color, has the word SAMPLE marked on it in several places along its length, and connects to the silver colored Sample Port. The Ambient Tube is blue in color, has the word AMBIENT marked on it, and connects to the blue colored Ambient Port. The Twin Tube Assembly is about 5.5 feet (165cm) long and must never be lengthened for fit testing. The Sample Tube is 1.5 inches (40mm) longer than the Ambient Tube. 47


49 Electrical Connections 18. Battery Cover & Battery Cover Latch The battery compartment is located underneath the PORTACOUNT Plus behind the Battery Cover. Slide your finger under the Battery Cover Latch and lift to remove the cover. Tools are not required. 19. Battery Connector The Battery Connector is located inside the battery compartment. The connector is polarized (one pin is larger than the other is) so that it cannot be plugged into a battery pack backwards. A TSI Model 8903 Rechargeable Battery Pack must be used for battery operation of the PORTACOUNT Plus. If the AC Adapter is used, a battery pack need not be installed and the connector can be loose inside the battery compartment. 20. Data Port The Data Port allows RS-232C serial communication with the PORTACOUNT Plus. It is used to transmit data to a printer like the TSI Model 8925 Portable Printer or for communications with a microcomputer. The Data Port uses a standard RJ-45 modular connector. 21. External Power Connector The External Power Connector is on the back of the PORTACOUNT Plus. The round metal connector is marked POWER just above it. The voltage requirement and polarity are also marked. Many instruments on the market use similar connectors. Always be certain that you are connecting the AC Adapter that was supplied with the PORTA- COUNT Plus. 22. AC Adapter The AC Adapter that is supplied with the PORTACOUNT Plus plugs into the External Power Connector. Both 115V AC and 220V AC Adapters are available. Make sure yours has the proper voltage rating. 48

50 23. Computer Interface Cable with 9/25 Pin Adapter The Computer Interface Cable (Model 8927) is used to connect the PORTACOUNT Plus to an IBM-PC compatible computer. It is needed whenever the FitPlus Fit Test Software is used with the PORTACOUNT Plus. The cable has an RJ-45 connector on the PORTACOUNT Plus end and a 25-pin D connector on the other. The 9/25 Pin Adapter is used when the computer is equipped with a 9-pin serial connector instead of a 25-pin serial connector. Alcohol Related Parts 24. Alcohol Cartridge The Alcohol Cartridge holds alcohol that is used by the PORTACOUNT Plus. There is a porous wick inside that is soaked with alcohol. 25. Cartridge Cavity The Cartridge Cavity is where the Alcohol Cartridge is inserted during use. It is very important to make certain that dirt and lint do not enter the Cartridge Cavity. Cover the Cartridge Cavity with the Storage Cap when the PORTACOUNT Plus is not being used. 26. Storage Cap The Storage Cap is used to cover the Cartridge Cavity of the PORTACOUNT Plus or to cover the Alcohol Fill Capsule, whichever does not currently hold the Alcohol Cartridge. 27. Spare Alcohol Wicks Two spare Alcohol Wicks are included with the PORTACOUNT Plus. They can be used to replace the wick inside the Alcohol Cartridge. 28. Alcohol Fill Capsule The Alcohol Fill Capsule is used to store and fill the Alcohol Cartridge. 29. Alcohol Supplies The PORTACOUNT Plus is shipped with 16 bottles of isopropyl alcohol. Each bottle contains 30ml. The PORTACOUNT Plus consumes alcohol at the approximate rate of one ml per hour. 49


51 Miscellaneous Internal Filters The PORTACOUNT Plus has two internal filters accessible from underneath. Both filters prolong the life of the pump by protecting it from long-term particle accumulation. It is unlikely that either filter will need to be replaced except during factory service. 30. Excess Filter The Excess Filter cleans the air that goes through the internal bypass, before it reaches the pump. 31. Sensor Filter The Sensor Filter cleans air that has passed through the internal sensor, before it reaches the pump. 32. Tube Adapters There are two Tube Adapters shipped with each PORTACOUNT Plus. The adapters are used to connect the Sample Tube to a respirator sample fitting (or probe) that is larger than the 1/8 inch (3mm) inside diameter of the Sample tube. One of the Tube Adapters fits 3/16 inch (5mm) fittings and the other fit 1/4-inch (6mm) fittings. An adapter is not needed for respirators equipped with a 1/8-inch (3mm) fitting. 33. HEPA Filter for Zero Checking The HEPA Filter is provided for the purpose of performing a Zero Check and Max FF Check on the PORTACOUNT Plus to make sure it is working properly. 34. PORTACOUNT PLUS Operation & Service Manual 50

52 35. PORTACOUNT Plus Fit Test Software Manual This manual covers all aspects concerning the use of FitPlus Fit Test Software with the PORTACOUNT Plus. It is intended to be a supplement to the Operation & Service Manual and does not duplicate the instructions contained in the Operation & Service Manual. 36. Diskette Storage Case The diskettes that contain the Fit Test Software are located in this convenient storage case. 37. Carrying Case The Carrying Case is a rugged case that provides protection and convenience. The case is designed to hold the PORTACOUNT Plus and standard accessories as well as the optional Model 8925 Portable Printer and Model 8021 Battery Kit. SETTING UP THE PORTACOUNT FOR FIT TESTING WITH 7000/8000/9000 SERIES RESPIRATORS ON ANY 99% OR 100% DISPOSABLE RESPIRATOR This section goes through the set up of the PORTACOUNT and actually performing a fit test. Go through it page by page to become familiar with the procedure. The last five pages of this section are the references for performing the Daily Checks and adding alcohol to the unit. QUICK START This chapter provides the minimum information needed to perform respirator fit testing with the PORTACOUNT Plus. It is intended for those persons who are already familiar with respirator fit testing. If you are not familiar with fit testing or respiratory protection in general, you should read Chapter 4: Conducting a Typical Fit Test in the PORTACOUNT Instruction Manual instead of this chapter. Chapter 4 provides a more thorough explanation of respirator fit testing including some fundamental concepts. Set-up the PORTACOUNT Plus Follow the steps below to set-up the PORTACOUNT Plus for fit testing. These set-up instructions should be followed at the beginning of the fit test session. They do not need to be done before each fit test. 1. Connect the optional Model 8925 Portable Printer if you intend to use it. Use the cable that came with the printer. 2. Turn the PORTACOUNT Plus on and let the 60-second warm-up cycle elapse. 51
53 3. Turn the printer on (if used). 4. Check the number of exercises set by momentarily pressing the NO OF EXER key. In this example we will use eight exercises. If the number of exercises is not on 8, press and hold the NO.OF EXER key. Release the key as soon as the number 8 appears on the display. Press the key again momentarily to make sure the setting is on Check the fit factor pass level by momentarily pressing the PASS LEVEL key. In this example we will use 100 for the fit factor pass level. If the setting is not at 100, press and hold the PASS LEVEL key. Release the key as soon as the number 100 appears on the display. Press the key again momentarily to make sure the setting is on 100. a. MOLDEX NOTE: Fit factor for half facemask, including disposables, (when using the companion) is 100. Full Face respirator is Add alcohol. Follow the instructions under Adding Alcohol on page 44 of the PORTACOUNT manual. 7. Do a Zero Check using the HEPA filter. See page 47 of the PORTACOUNT manual for instructions. 8. Do a Max FF Check using the HEPA filter. See page 47 of the PORTACOUNT manual for instructions. #7006 Probed Cartridge Kit for 7000 & 9000 Series Reusable Respirators Note: There are different probed cartridges designed for the 7000 and 9000 facepieces. The correct one must be used for the specific facepiece. DO NOT MIX THEM, but see Moldex note below. Conducting the Fit Test Before conducting a quantitative fit test, the #7000 or #9000 Series Respirator Facepiece must be assembled with the appropriate #7006 probed cartridge and the #7940P100 Filter Disk together with a #7920 Piggyback Adapter on one side, and a #7940P100 Filter Disk on the other side. Assembly is as follows: Before attaching the appropriate #7006 probed cartridge, inspect the facepiece to cartridge sealing surface. Make sure it is clean and undamaged. 52
. a.")
. Figure A Figure B 2.")
. a.")

54 1. Insert tube from cartridge into the cartridge retainer opening in the facepiece that is closest to the dot (see figure A). a. MOLDEX NOTE: When used with the #9000 full face respirator you must also insert the longer tubed cartridge into the inhale opening in the nosecup, and past the rubber diaphragm (see figure B). Figure A Figure B 2. Align the triangle icons on both the facepiece and #7006 cartridge, then rotate the cartridge clockwise to install (see figure C for #7000, Figure D for #9000). a. CAUTION: Make sure that the tube is not kinked or obstructed in any way. Figure C Figure D 3. Check to see that the probed #7006 cartridge is seated properly, both inside and outside the facepiece. Check the inhalation diaphragms for dirt or damage and check that they are seated properly. 4. Attach the #7920 Piggyback Adapter onto the #7006 Probed Cartridge. 53

 Figure E Figure F 6.")


55 5. Attach a new #7940P100 Filter Disk onto the #7920 Piggyback Adapter, making sure that the #7920 gasket is not dirty or damaged and is in place. If it is not, then replace with a new one and do not attach without a gasket. (see figure E for #7000, Figure F for #9000) Figure E Figure F 6. Make a careful inspection of the #7920 and #7940P100 to ensure they are fully sealed. 7. Attach a #7940P100 onto the facepiece and check to see it is properly sealed. (see figure G for #7000, Figure H for #9000) Check the inhalation diaphragm for dirt or damage and see that it is properly seated. Figure E Figure F 8. Attach the tube to the Quantitative Fit Tester and follow the instructions from the Fit Tester Manufacturer. 54

 You should consult any regulations or standards that pertain to your industry for exact details on the protocol you are required to follow. 1.")

56 #8006 Probed Cartridge Kit for 8000 Series Reusable Respirators Conducting the Fit Test The following instructions illustrate a typical fit test using exercises and a fit factor pass level of 100. These instructions are for using the PORTACOUNT Plus by itself or with an optional printer. (If you intend to use the Fit Test Software supplied with the PORTACOUNT Plus, refer to the Fit Test Software Manual.) You should consult any regulations or standards that pertain to your industry for exact details on the protocol you are required to follow. 1. Instruct the person to be tested to don the respirator several minutes before the fit test starts. This purges the particles inside the respirator and permits the wearer to make certain the respirator is comfortable. This individual should have already been trained on how to wear the respirator properly. Make sure he/she does a positive and negative fit check. a. MOLDEX NOTE: Do not fit test anyone who has smoked 30 minutes before the test, as it will lower the fit factor. 2. Attach the clear Sample Tube to the respirator. Use one of the Tube Adapters if necessary. a. MOLDEX NOTE: Re-adjust the respirator to assure that it is properly sealed. Refer to pages Press the TEST START/STOP key to start the fit test and instruct the individual to begin the first exercise. Have the individual begin the next exercise each time you hear the PORTACOUNT Plus beep. As shipped new, the PORTACOUNT Plus will use 80- second exercise durations. The exercises used for this example are: a. Normal breathing In a normal standing position, without talking, the subject shall breathe normally. b. Deep breathing In a normal standing position, the subject shall breathe slowly and deeply, taking caution so as not to hyperventilate. c. Turning head side to side Standing in place, the subject shall slowly turn his/her head from side to side between the extreme positions on each side. The head shall be held at each extreme momentarily so the subject can inhale at each side. 55
57 d. Moving head up and down Standing in place, the subject shall slowly move his/her head up and down. The subject shall be instructed to inhale in the up position (i.e., when looking toward the ceiling). e. Talking The subject shall talk out loud slowly and loud enough so as to be heard clearly by the test conductor. The subject can read from a prepared text such as the Rainbow Passage, count backward from 100, or recite a memorized poem or song. Rainbow Passage When the sunlight strikes raindrops in the air, they act like a prism and form a rainbow. The rainbow is a division of white light into many beautiful colors. These take the shape of a long round arch, with its path high above, and its two ends apparently beyond the horizon. There is, according to legend, a boiling pot of gold at one end. People look, but no one ever finds it. When a man looks for something beyond reach, his friends say he is looking for the pot of gold at the end of the rainbow. f. Grimace The test subject shall grimace by smiling or frowning. When using the portacount without any computer software you will have to grimace for 15 seconds and do normal breathing for the remainder of the exercise. If a computer is used, the grimace should be done for 60 seconds while PortaCount is placed in pause mode, where it is not reading protection factors for that minute. (This applies only to QNFT testing; it is not performed for QLFT.) g. Bending over The test subject shall bend at the waist as if he/she were to touch his/her toes. Jogging in place shall be substituted for this exercise in those test environments such as shroud type QNFT or QLFT units that do not permit bending over at the waist. h. Normal breathing Same as exercise number one. 4. At this point the PORTACOUNT Plus will automatically stop and calculate the overall fit factor for the entire set of exercises. The overall fit factor is what counts. The PASS or FAIL message will indicate whether or not the test was successful. If the test was a PASS, the fit test is over. a. MOLDEX NOTE: If a fail message is indicated after one of the exercises continue the test. As this does not mean the test subject will not achieve a pass on the overall fit factor. 5. Assuming the fit test was successful, you will need to keep a record of the test on file. If you used the optional printer, you can attach the printout to a larger sheet of paper that contains the individual s identification and information describing the make, model and size respirator used, test date, etc. TSI recommends that the HEPA filter be left attached to the sample line whenever the PORTACOUNT Plus is turned on but not in use. This prevents lint and debris from being drawn into the instrument and blocking the airflow. 56
58 Common Problems Resulting in Low Fit Factors Here is a list of the most common problems that result in lower than expected fit factors. Assuming the PORTACOUNT Plus passes the Zero Check and Max FF Check, explore the following possibilities. 1. Not using high-efficiency filters. If you are not using high-efficiency (100 or 99 rated) filters on the respirator, you will never get a high fit factor. Only high-efficiency filters can stop ambient air particles from getting into the respirator and being measured as leakage. 2. Cartridges not tight or gasket is missing. Make sure the cartridges are tight and all gaskets are in position. MOLDEX NOTE: Use P100 filters which are considered HEPA filters. You can also use 99% efficiency filters with the PortaCount. 3. Sample tubes too long. You must not extend the sample lines more than the few inches needed to add a Tube Adapter. Longer sample tubes prevent proper purging between the ambient and mask sample. 4. Leaking respirator probe. Make certain that the respirator probe (if used) does not leak around the outside. 5. Hair interfering with face seal. Make sure there is no hair between the respirator face seal and the individual s skin. 6. Hair or foreign material in exhalation valve. Make sure the exhalation valve is clear. A single hair can make a big difference. 7. Cigarette smoker. Do not allow the individual to smoke within 30 minutes of the fit test. See the explanation on page 21 of the PORTACOUNT manual. THE MEASUREMENT PROVIDED BY THIS INSTRUMENT IS AN ASSESSMENT OF RESPIRATOR FIT DURING A FIT TEST ONLY. RESPIRATOR FIT AT OTHER TIMES WILL VARY. THE FIT FACTOR VALUE IS NOT INTENDED FOR USE IN CALCULATING AN INDIVIDUAL S ACTUAL EXPOSURE TO HAZARDOUS SUBSTANCES. The isopropyl alcohol that is required to properly operate the PORTACOUNT Plus must be very high purity reagent grade alcohol. Isopropyl alcohol that is available from pharmacies, drug stores or other consumer outlets is low purity and usually contains significant percentages of water and other substances that can damage the PORTACOUNT Plus. DO NOT USE ISOPROPYL ALCOHOL FROM ANY SOURCE OTHER THAN TSI OR A TSI APPROVED SUPPLIER. PROBLEMS CAUSED BY THE USE OF UNAPPROVED ALCOHOL ARE NOT COVERED UNDER WARRANTY. 57

59 MAINTAINING AN ADEQUATE ALCOHOL SUPPLY INSIDE THE PORTACOUNT PLUS IS CRITICAL TO ITS OPERATION AND REQUIRES STRICT ADHERENCE TO THE DIRECTIONS THAT FOLLOW. To add alcohol to the PORTACOUNT Plus you must first identify and locate the alcohol related components and accessories that are included with the instrument. You will need the following items: Isopropyl Alcohol Alcohol Fill Capsule Storage Cap Alcohol Cartridge Isopropyl alcohol is supplied by TSI in 30-ml plastic bottles. The Alcohol Fill Capsule is located in the PORTACOUNT Plus carrying case. The Storage Cap should be either sealing the Alcohol Fill Capsule or inserted into the PORTACOUNT Plus Cartridge Cavity or in the Alcohol Fill Capsule, whichever one is NOT holding the Storage Cap. ADDING ALCOHOL TO THE PORTA COUNT 1. Turn the PORTACOUNT Plus off. 2. Open the Alcohol Fill Capsule by twisting the Storage Cap (or Alcohol Cartridge) 1/8 turn. SET THE STORAGE CAP (OR ALCOHOL CARTRIDGE) DOWN ON A CLEAN SURFACE WITH THE END STANDING UP AS SHOWN BELOW. 58


60 3. Open a bottle of alcohol. Invert the bottle and insert the nozzle end into the Alcohol Fill Capsule as far as possible to make certain that you cannot inadvertently spray alcohol anywhere except down into the Capsule. 4. Squeeze alcohol into the Alcohol Fill Capsule until the black sponge at the bottom is completely saturated and the liquid level is even with the scribed fill-line near the base. RECAP THE ALCOHOL BOTTLE. 5. MAKE CERTAIN THAT THE ALCOHOL CARTRIDGE IS CLEAN. Insert the Alcohol Cartridge into the Alcohol Fill Capsule by aligning the groove with the pin and turning 1/8 turn until it locks into place. Notice that the Alcohol Cartridge compresses the sponge. 59


61 6. Set the Alcohol Fill Capsule down and wait at least 2 minutes while the Alcohol Wick inside the Alcohol Cartridge soaks up alcohol. 7. Remove the Alcohol Cartridge from the Capsule and gently shake it to allow excess alcohol to drain back into the Alcohol Fill Capsule. Stop when excess alcohol is no longer dripping. It is not necessary to wait until the outside surface of the Alcohol Cartridge is dry. Insert the Alcohol Cartridge into the Cartridge Cavity of the PORTACOUNT Plus located just above the Cartridge Cavity. As you approach full insertion, firmly twist the Alcohol Cartridge clockwise about 1/ 8 turn. It should snap into position. RECAP THE ALCOHOL FILL CAPSULE WITH THE STORAGE CAP. Slide the other end of the wick (rough end) into the Alcohol Cartridge until the threads engage and tighten the Wick Retainer Cap. The threads are left-handed so you will have to turn it in the opposite direction than you would normally expect. With the black end of the Alcohol Cartridge pointed towards you, the Wick Retainer Cap will tighten by turning it counter-clockwise. DO NOT OVERTIGHTEN. Stop turning as soon as the two halves meet. 60

62 Drying the Alcohol Wick An Alcohol Wick that is in good condition can be reused after it dries out. Place it on a clean surface in a well-ventilated area and allow it to dry for at least two days. Discard wicks that are severely discolored or physically damaged. Some light brownish-yellow discoloration of the wick is normal. Daily Checks There are two maintenance checks that should be performed each day the PORTACOUNT Plus is used. The Zero Check is the most important and should be performed each time the PORTACOUNT Plus is turned on. The Max FF Check (Maximum Fit Factor Check) should be done once a day. Zero Checking The HEPA filter is supplied with the instrument for the purpose of making certain that there are no leaks in the PORTACOUNT Plus. This procedure is called Zero Checking and should be done at least once per day or preferably, each time the PORTACOUNT Plus is turned on. A Zero Check would also be performed whenever a question arises as to whether or not the PORTACOUNT Plus is functioning properly. To perform a Zero Check, follow these steps: 1. Turn the PORTACOUNT Plus on and put it into Count Mode. Make sure that you can measure a reasonable ambient particle concentration. This will normally be a value between 3000 and 50,000 but could be higher or lower in some cases. 2. Attach the supplied HEPA filter to the Sample Tube and observe the particle concentration on the display. It should drop quickly to zero (0.00) in less than 30 seconds. An occasional value of 0.60 or 1.20 is acceptable, but it should read 0.00 most of the time. If the PORTACOUNT Plus will not Zero Check, consult the Chapter 7 of the PORTACOUNT Manual. If the PORTACOUNT Plus will not Zero Check, any fit tests you conduct will result in lower fit factors than would be measured otherwise. The risk is that you may fail people who actually have good fits, thereby wasting time and effort. There is no possibility that failure to Zero Check could result in overstated fit factors. This is because any particles leaking into the PORTACOUNT Plus will be interpreted as mask leakage, resulting in lower fit factors. 61
63 Max FF Check Fit Test Mode can be used along with the supplied HEPA filter to determine if the PORTA- COUNT Plus is functioning properly. This process is called a Maximum Fit Factor Check or Max FF Check and should be done once a day or whenever a question arises as to whether or not the PORTACOUNT Plus is functioning properly. To perform a Max FF Check, follow these steps: 1. Perform a Zero Check as described earlier in this chapter. The Max FF Check cannot be performed if the Zero Check fails. 2. Put the PORTACOUNT Plus into Fit Test Mode. 3. Attach the supplied HEPA filter to the Sample Tube and wait 30 seconds. 4. Initiate a fit test by pressing the TEST START/STOP key. 5. At the completion of one test cycle (exercise) a fit factor of at least 50,000 should be displayed. If the fit factor is below this number, allow the test to continue for another cycle. If the fit factor remains too low, consult Chapter V. 6. Press the TEST START/STOP key to end the test. 7. Troubleshooting. 62


64 PORTACOUNT COMPANION PARTS This section goes through the PortaCount Companion Parts, which is used in conjunction with the PortaCount Plus. 63

65 Figure I-9: Salt Tablets SETTING UP THE PORTACOUNT COMPANION This section goes through the set up of the PORTACOUNT Companion and probing any disposable respirators to be used with it. The Companion must be used for fit testing any disposable 95% filtering facepiece. Go through this page by page to become familiar with the procedure. Setting Up the Model 8095 N95-COMPANION Introduction Before you can begin fit testing with the PORTACOUNT Plus and N95-COMPANION, you must: Select a fit testing location Set up the particle generator Set up the instrument Insert the probe into the type of mask you wish to test You also must have the Model 8020 PORTACOUNT Plus with the Revision A modification to use the N95-COMPANION. Look for 8020A on serial number tag. Refer to the following instructions to complete the set-up procedures. Selecting a Fit Testing Location To obtain valid results using the N95-COMPANION with the PORTACOUNT Plus for fit testing, you must conduct the fit tests in a suitable location while running the supplied Model 8020 Practice Generator. The N95-COMPANION uses a small portion of the room aerosol for fit testing. To obtain consistent and repeatable fit tests, TSI recommends that you operate the particle generator to supplement the naturally occurring room aerosol. For the generator to function properly, you must conduct the fit tests in an enclosed area. A medium-sized room is normally a suitable location. The particle generator does not function efficiently in an open area or a very large room. 64
66 Setting up the Model 8026 Particle Generator The purpose of the particle generator is to supplement the naturally occurring particles in the room environment. The N95-COMPANION requires a minimum count of 70 particles/cc to operate. The target is 100 to 150 particles/cc for optimal performance. Follow the steps below to set up the particle generator: 1. Fill the reservoir with clean tap water to the fill line. You may use hot water to help the salt tablet dissolve more quickly. 2. Drop one salt tablet into the reservoir. Each tablet contains 1.7 grams of salt. Break the tablet before dropping it into the water to dissolve it more quickly. 3. Place the temporary cover tightly on the reservoir and shake it gently to dissolve the salt tablet. 4. Once the tablet is dissolved, remove the temporary cover and screw the reservoir into the particle generator. 5. Place the particle generator at least five feet away from the N95- COMPANION and PORTACOUNT Plus. Make sure the ventilation louvers on the back and bottom of the generator are not obstructed, as this could cause the instrument to overheat. Caution: Do not place the particle generator on the table. The internal vibrations in the generator will cause it to move and eventually fall off the table. 6. Plug the female end of the power cord into the receptacle on the back of the particle generator. Plug the male end into a grounded wall outlet and turn on the power to the generator. The power switch is located next to the power cord receptacle. You must run the particle generator in the testing room, with the door closed, for at least 15 minutes before you begin fit testing to allow the particle count to stabilize. You must operate the generator in an upright position at all times, and leave it running until all fit tests for the day are complete. One reservoir full of salt solution will last form 8 to 16 hours, depending on the generator setting. Refer to the Model 8026 Particle Generator Operations Manual for information on changing the output setting. You can save and re-use the solution if you wish. However, do not mix old solution with fresh solution. If you need to mix new solution, first discard whatever remains in the reservoir. If you wish to re-use solution, be sure to detach the reservoir from the generator, cover it tightly with the temporary cover, and store it in its designated space inside the carrying case. Never attempt to store the particle generator in the carrying case with a full or partially filled reservoir attached, as the solution will leak out and damage the generator. 65


. 4. Attach the pendant interconnect tube to the sampling pendant. 5.")
67 Setting up the N95-Companion 1. If this is the first time you are setting up the instrument, remove the rubber plugs from the left and right sides of the PORTACOUNT Plus to allow it to lock into place on top of the N95-Companion. 2. Place the PORTACOUNT Plus on top of the N95-COMPANION case. When properly positioned, the PORTACOUNT Plus will lock into place as the spring clips on the cover of the N95-COMPANION connect with the base of the PORTACOUNT Plus. 3. Attach the pendant sample tube, using the ends of the tube that are of equal lengths, to the sampling pendant. The tube barbs are color coded to the tubing colors (blue-toblue clear-to-clear). 4. Attach the pendant interconnect tube to the sampling pendant. 5. Attach the water trap, using the supplied short tubing, to the N95-COMPANION sampling port. This is the left-most barbed fitting on the front of the N95-COMPANION. 66
 and the PORTACOUNT Plus sample input (marked S")
68 6. Attach the loose end of the pendant interconnect tube to the water trap. 7. Attach the cable connector to the N95-COMPANION. 8. Connect the N95-COMPANION to PORTACOUNT Plus interconnect tube between the N95-COMPANION output (the right-most barbed fitting on the front of the unit) and the PORTACOUNT Plus sample input (marked S on the front of the PORTACOUNT Plus). 9. Connect the N95-COMPANION interconnect cable from the accessory port on the back of the N95-COMPANION. The cable is the same on both ends. Note: The black port on the back of the N95-COMPANION is used for factory calibration only. 67


69 Installing the Probe 1. Select your test subject and the mask you wish to test. 2. Slide the sampling probe onto the piercing tool. As the pointed end of the piercing tool is very sharp, be extremely careful when handling it! 3. Choose a location on the mask that is in front of the person s nose/mouth region. Avoid seams and folds in the mask. 4. Pierce the mask at the selected location, using the piercing tool with the loaded sampling probe. Be sure to pierce the mask from the inside! Push out positioned on anvil tool Sample probe pushed through mask 5. Push the sampling probe through the mask until the end of the tool point is visible from the outside of the mask. Leave a few millimeters of the tool point visible. 6. Place the push nut on the anvil tool with the dished side up. A magnet prevents the push nut from falling off. 7. Position the anvil tool, with the loaded push nut, over the protruding point. The mask should now be pinched between the two tools. 68


70 8. Press the two tools firmly together to force the push nut as far as possible onto the probe. The mask material should be tightly pinched and the mask, sampling probe, and push nut should be joined together as illustrated. Push the tools together to fasten the probes 9. Inspect the sampling probe to be sure it is not plugged. Try to rotate the probe with your fingers. If it moves freely, use the probe insertion tool kit to press the push nut firmly onto the sampling probe and pinch the mask material more tightly. Correctly positioned sampling probe Note: Once you install a sampling probe into a disposable mask, the mask cannot be used for respiratory protection. Probed masks are to be used for quantitative fit testing only. Discard each probed disposable mask after a fit test is completed. 69


71 Switching the Hardware Configuration from the N95-COMPANION to the PORTACOUNT Plus The following steps describe how to convert from N95-COMPANION fit testing mode to PORTACOUNT Plus fit testing mode. 1. Disconnect the N95-COMPANION interconnect cable from the back connector on the PORTACOUNT Plus. Note: If the PORTACOUNT is turned on when the cable is disconnected, the PORTACOUNT screen will go blank for several seconds, and then turn back on. This is normal. The PORTACOUNT detects that the N95-COMPANION is no longer connected and resets itself with new timing parameters. 2. Disconnect the pendant interconnect tube on the front of the N95-COMPANION. 70


72 3. Disconnect the N95-COMPANION interconnect tube. 4. If desired, detach the PORTACOUNT from the N95-COMPANION. Using your thumbs, pull outward on the two spring clips located on the base of the PORTACOUNT, while gently lifting the PORTACOUNT up. 5. Attach the standard PORTACOUNT twin-tube assembly to the blue and clear ports on the front of the PORTACOUNT. The PORTACOUNT is now ready for fit testing respirators with class 99 or class 100 filters. Maintenance Overview The N95-COMPANION and PORTACOUNT Plus both require daily and periodic maintenance. Refer to the PORTACOUNT Plus Operation and Service Manual for PORTACOUNT Plus maintenance information. The N95-COMPANION maintenance information appears below. 71

73 Daily Checks The daily checks are designed to determine if the instrument is working properly. They must be done in the order specified. There are four daily checks: Particle check Classifier check Zero check Maximum fit factor check Note: FitPlus for Windows software can be used to automate the daily checks if desired. Performing the Particle Check After you set up the N95-COMPANION and PORTACOUNT Plus, and run the particle generator for at least 15 minutes, touch the count switch on the PORTACOUNT Plus. The concentration number will appear in the PORTACOUNT Plus display. You must have a particle count of at least 70 to pass this test. Note: The N95-COMPANION will not operate at concentrations below 70 particles per cc. Do not be concerned if concentrations are higher than 250 to 300 particles/cc. This may simply indicate a high concentration of naturally occurring aerosol. Also, if concentrations are this high, you may be able to operate the particle generator at a lower setting, or not at all. Refer to the Model 8026 Particle Generator Operation and Service Manual for move information. Performing the Classifier Check After you perform the particle check with the PORTACOUNT Plus still in the count mode, press and hold the zero check button on the back of the N95-COMPANION for a minimum of 15 seconds. This disables power to the particle classifier. The PORTACOUNT Plus display should gradually return to a count of 0.0. This verifies that there are no leaks in the instrument and that the calssifier is functioning properly. Note: Do not be concerned with an occasional 0.6 particle/cc reading. However if the display reads 1.2 particles/cc or higher, you may need to return the N95-COMPANION to TSI for servicing or repair. Refer to Chapter5 in the PORTACOUNT Manual, Troubleshooting, for help in diagnosing the problem before you return the instrument to TSI. 72
74 Performing the Zero Check Put the PORTACOUNT in count mode. You should see a reading greater than 70 particles/cc. Attach the small HEPA filter provided with the PORTACOUNT to the clear sample hose coming out of the sampling pendant. The particle count should drop to zero within 30 seconds to pass this test. An occasional reading of 0.6 is acceptable, but the display should read 0.0 most of the time. If a zero reading cannot be achieved, make sure all tubing is properly attached. Check for leaks where the tubing connects to a barb. Try a different filter or put two filters in-line if nothing else works. Performing the Maximum Fit Factor Check Make sure all previous checks have been completed successfully before proceeding. Put the PORTACOUNT into fit test mode. If the small HEPA filter supplied with the PORTACOUNT is not already attached to the sample hose coming out of the sampling pendant, attach it now. Do not proceed until the HEPA filter has been on the sample hose for at least 30 seconds. Start a fit test by pressing the Test Start/Stop key on the PORTACOUNT. This causes the instrument to do a fit test on the HEPA filter, thereby simulating a perfect respirator. The result should be a very high fit factor of at least 200. A fit factor of 200 is the highest number that can be displayed when N95-COMPANION is in use. A value below 10 suggests that the switching valve inside the sampling pendant is stuck on the ambient side. See the chapter on maintenance in the PORTACOUNT Manual. A Low Particle Count message indicates that the valve inside the sampling pendant is stuck on the sample (mask) side. See the chapter on maintenance in the PORTACOUNT Manual. A value between 10 and 200 indicates a leak someplace in the system. Inspect all tubing and hose connections. Periodic Maintenance The following components of the N95-COMPANION require periodic maintenance. BX (blue) filter (internal) Flexible tubing Sampling pendant switching valve Water trap Particle classifier There are no other user-serviceable components inside the N95-COMPANION. Do not attempt to adjust any components except those described in this manual or you may invalidate your warranty. 73

75 In addition to the procedures outlined below, TSI recommends annual factory service for the N95-COMPANION. Figure 1-5 identifies the parts of the Model 8026 Particle Generator. Please become familiar with these components before proceeding. Replacement Parts and Supplies The following items are sold by TSI as replacement parts and supplies for the Model 8026 Particle Generator. Table 1-5: Replacement Parts and Supplies QUANTITY ITEM DESCRIPTION SETTING UP AND OPERATING THE MODEL 8026 PARTICLE GENERATOR Introduction PART/MODEL 100 Salt tablets Storage lid for reservoir Power cord (North America) Atomizer assembly The Model 8026 Particle Generator is intended to provide a supplementary particle source when performing quantitative respirator fit tests using the TSI PORTACOUNT Plus respirator Fit Tester and the N95-Companion to the PORTACOUNT. The following setup and operating instructions presume this intended usage. This does not preclude, however, using the Model 8026 Particle Generator for other applications where the user desires to generate a moderate concentration of polydisperse particles. Some general notes on alternate uses for the Model 8026 are found at the end of this chapter. 74

76 Before setting up the Model 8026 Particle Generator, it is important to select a suitable location for fit testing. Selecting a Fit Testing Location The Model 8026 Particle Generator produces particles, which supplement the naturally occurring particles in the air. When using the N95-Companion to the PORTACOUNT, TSI requires that the user operate the Model 8026 in order to provide sufficient particle concentration. The particle generator may also be used with the PORTACOUNT Plus if the user is unable to obtain the minimum particle concentration (1000 pt/cc). For the generator to function properly, you must operate the generator and conduct the fit tests in an enclosed area. A medium-sized conference room normally is a suitable location. The particle generator does not function efficiently in an open cubicle area or a very large conference room. Setting up the Model 8026 Particle Generator The particle generator supplements the naturally occurring particles in the room environment. Follow the steps below to set up the particle generator. 1. Fill the reservoir jar with clean tap water to the fill line. It is helpful to use hot water to help the salt tablet dissolve more quickly. 2. Drop one salt tablet into the reservoir. Each tablet contains 1.7 grams of salt. Break the tablet before dropping it into the water to dissolve it more quickly. 3. Place the temporary cover tightly on the reservoir and shake it gently to dissolve the salt tablet. 4. Once the solution is mixed, remove the temporary cover and screw the reservoir onto the particle generator. See Figure Place the particle generator on the floor in a corner of the testing room. Make sure the ventilation louvers on the back and bottom of the generator are not obstructed, as this could cause the instrument to overheat. 75

77 Caution: Do not place the Particle Generator on the table or benchtop. Vibrations from the internal compressor may cause the generator to move across the table. If left unattended, the generator could fall on the floor resulting in damage to the instrument. 6. Plug the female end of the power cord into the receptacle on the back of the particle generator. Plug the male end into a grounded wall outlet and turn on the power to the generator. The power switch is located next to the power cord receptacle. See Figure 2-2. You must run the particle generator in the testing room, with the door closed, for at least 10 minutes before you begin fit testing to allow the particle count to stabilize. You must operate the generator in an upright position at all times, and leave it running until all fit tests for the day are complete. One reservoir full of salt solution will last from 8 to 16 hours, depending on the generator setting. You can save and re-use the solution if you wish. However, do not mix old solution with fresh solution. If you need to mix new solution, first discard whatever remains in the reservoir. If you wish to re-use the solution, be sure to detach the reservoir from the generator, cover it tightly with the temporary cover, and store it in its designated space inside the carrying case. Caution: Never attempt to store the particle generator in the carrying case with a full or partially-filled reservoir attached, as the solution will leak out and damage the generator and/or carrying case. Operating the Model 8026 Particle Generator The Model 8026 particle generator operates without intervention once you turn on the power. However, you can adjust the output to increase particle concentration. 76

78 Adjusting the Particle Generator Output The Model 8026 is set in the factory to a normal operating pressure. This will produce an aerosol output concentration that is appropriate for most environments. If higher counts are needed, you can increase the output by turning the output adjustment screw 1/2 turn clockwise. If necessary, you can adjust the output further by making additional turns of the output adjustment screw. See Figure 2-3. To restore the output to the factory setting, turn the screw completely counter-clockwise to shut off the aerosol flow. Then, make 2-1/2 complete clockwise turns. The screw should turn easily. Do not force it. Alternate Uses for the Particle Generator The Model 8026 Particle Generator may be used as a generalized source of poly-disperse particles in an environment. When used for other applications, the following precautions must be observed: The output of the generator may be directed to a specific location by attaching a short 1/4 ID tube to the output located on the top. The tubing creates a pressure drop, which will severely limit the generator output. The adjustment screw may be used to increase the generator output to the maximum to compensate for the particle loss. Maintenance Routine Maintenance The Model 8026 Particle Generator requires very little maintenance. Cleanliness is the single most important maintenance requirement. To ensure trouble-free operation of the generator, do the following: Use compressed air to blow out accumulated salt from inside the generator case. Blow air into the louvers located on the back of the generator to clean salt from the cooling fan. Blow air into the bottom of the generator through the cooling louvers. 77
79 Caution: This cleaning maintenance step is critical to maintaining trouble-free operation of the generator. Wipe up any salt solution spills immediately. Periodically wipe down the outside surface of the generator using a damp cloth. After each use, shut off the generator, remove the salt solution reservoir, and then switch the generator back on for 40 seconds. This will purge salt solution from the unit and reduce contamination of the carrying case. No other routine periodic maintenance is required. If you notice a decrease in output, you may need to clean the atomizer nozzle. Follow the procedure below. Cleaning the Atomizer Nozzle 1. Turn the particle generator off. Remove the salt solution reservoir. 2. Disassemble the atomizer jet assembly following the order indicated in Figure 3-1. The retainer that holds the parts of the jet together can be difficult to remove. If necessary, use a pliers to pull down on the tab with a gentle rocking motion. The jet assembly incorporates a small O-ring. Set it in a safe place. FIT TESTING WITH THE PORTACOUNT COMPANION This chapter goes through use of the PORTACOUNT Companion for fit testing N95 disposable respirators. Go through it page by page to become familiar with the procedure. Fit Testing with the N95-COMPANION and the PORTACOUNT Plus Introduction Before you begin fit testing, during the time the particle generator is stabilizing the room environment, turn on the PORTACOUNT Plus and allow it to warm up. Be sure to perform the daily checks! Refer to Chapter 4 of the complete PORTACOUNT Manual, Maintenance, for daily check instructions. 78

80 If your fit test subject is a smoker, make sure that he or she has not smoked for at least half an hour before starting the fit test. Note: The N95-COMPANION has no power supply of its own, but is powered by the PORTACOUNT Plus. Because the N95-COMPANION increases the load on the PORTACOUNT Plus, use the AC adapter whenever possible for your power supply. If you choose to use the optional battery pack, be aware that the battery life is significantly reduced when it must supply power for both instruments. A maximum fit factor of 200 can be displayed when you use the N95-COMPANION and the PORTACOUNT Plus together. If you require a higher fit factor, you must use the PORTACOUNT Plus without the N95-COMPANION. Note: Fit testing of class 95 respirators requires the use of the N95-COMPANION. Class 99 and class 100 respirators should be fit tested with the PORTACOUNT alone. Fit Test Procedure 1. Have the fit-test subject hang the N95-COMPANION sampling pendant around his or her neck, adjusting the neck strap on the assembly to a comfortable position. Make sure the TSI logo label is facing outward. The sampling pendant should be positioned high enough so that the tubing does not pull the mask off the person s face. 2. Attach the sampling tube (clear sample line from the pendant to the mask-sampling probe. Make sure you do this before the subject dons the mask. 3. Have the subject don the mask without assistance. Fit test results depend on the subject knowing how to properly don the mask. All subjects should be trained in proper mask-donning techniques before being fit tested. Do not allow the subject to adjust the mask during the exercises, as this invalidates previous results. 4. Start the FitPlus for Windows fit test process. (If you are not using FitPlus for Windows software, refer to the PORTACOUNT Plus Operation Manual for alternate procedures. Also, only the basic fit test steps are provided here. Refer to the FitPlus for Windows Software Instruction Manual for detailed information.). a. Select the test subject from the People database. Create a new record if necessary. Click NEXT. b. Select the respirator to be used from the Respirator database. Click NEXT. c. Make sure the exercise protocol displayed on the screen is correct. The software remembers which protocol was last used. Click NEXT. d. Type in the mask size, and check that the displayed pass/fail level is correct. e. Click START to begin the fit test. 79
81 5. Have the test subject follow the exercises one after another when prompted by the software. Each exercise takes approximately 90 seconds to complete. When the test is complete, the overall fit factor is displayed on the screen. 6. Review the results. a. If the fit test passed, issue that exact size and model respirator to the test subject. b. If the fit test failed, determine the reason and repeat the test. Some common reasons for failure are: incorrect mask size for test subject; cigarette smoking less than an hour before the test; incorrect mask donning technique. 7. If you are fit testing with a disposable respirator, discard it when the fit test is complete. Probed respirators are intended for fit testing only and are never to be reused. You may be able to sanitize and re-use other types of respirators. Contact the respirator manufacturer for specific information. Note: The first fit test of the day is likely to result in a conservative fit factor. This effect will disappear once the tubing is humidified by subsequent fit tests. CANADIAN LEGISLATIVE AND REGULATORY ENVIRONMENT [For specific details for Canada, refer to CAN/CSA Z Respiratory Protection] The following are significant differences that apply to Moldex Products Fit testing is required every two years in Canada as opposed to 1 year in the US. Each exercise must be carried out for at least 30 seconds. In the US, 1 minute is required. Quantitative Fit Testing does not require the grimace exercise in Canada whereas it is required in the US. Health Surveillance Questionnaire is more detailed in the US standard. Additional Notes: A safety factor of 20 is applied to quarter mask supplied air respirators, this is not applied as such in the US. Breathing gas for SCBA uses a Canadian standard. SCBAs for emergency use are not required to be inspected monthly in Canada as they are in the US. Discarding of air in SCBA cylinders is required in Canada if they have not been used in any 12 month period. This is not required in the US. 80
82 XII. TRAIN-THE-TRAINER CERTIFICATES & FORMS Certificate/Form Name Certificate Part Number BITREX Qualitative Fit Test Record REV D 02/08 QFit BITREX Qualitative Fit Test Record REV A 10/13 Wallet Cards REV E 08/09 Certificate of Respirator Training REV H 08/09 PortaCount Loan Program Request Form REV B 5/06 Probed Cartridge Kit Instructions for REV D 4/06 Probed Cartridge Kit Instructions for 7000 & REV A 11/10 PortaCount Fit Test Record REV D 08/09 Train-the-Trainer Program REV D 08/09 Authorized Distributor Trainer Certificate Train-the-Trainer Program REV D 02/11 Authorized End-User Trainer Certificate TSI QFit Loan REV B 12/12 OHD Quantitative Loan REV A 10/13 A. Fit Testing with BITREX, use: BITREX Qualitative Fit Test Record REV D 2/08 Wallet Cards REV E 08/09 Certificate of Respirator Training REV H 08/09 B. Fit Testing with PortaCount, use: Wallet Card REV E 08/09 Certificate of Respirator Training REV H 08/09 PortaCount Fit Test Record REV D 08/09 PortaCount Loan Program Request Form REV B 5/06 C. Moldex Representative training a Distributor to fit test, use: Train-the-Trainer Program REV D 08/09 Authorized Distributor Trainer Certificate Note: You are only authorized to train End-Users in fit testing.you are not authorized to train End-Users or other distributors in the Train-the-Trainer program. Please return a copy of the completed Authorized Distributor Trainer Certificate to Moldex Technical Services Department via fax to: (310) D. Moldex Representative or Distributor training an End-User to fit test, use: Train-the-Trainer Program REV D 02/11 Authorized End-User Trainer Certificate Note: You are authorized to train your employees in fit testing and the Train-the-Trainer program. Please return a copy of the completed Authorized End-User Trainer Certificate to Moldex Technical Services Department via fax to: +1 (310)
83 Authorized Distributor Trainer Train the Trainer Program This certificate acknowledges that: has successfully completed the Train the Trainer Program.This means you are allowed to fit test and train users and authorize others to fit test/train on Moldex respirators. Fit Test Training: BITREX PortaCount Other Product Training: Reusable Full Face Mask Respirator Reusable Half Mask Respirator Disposable Respirator Instructor Employer Date Please print or type. Company: Name: Address: City, State, Zip: Phone: REV D 08/09 82
84 Authorized End User Trainer Train the Trainer Program This certificate acknowledges that: has successfully completed the Train the Trainer Program.This allows you to Fit Test/Train Users on Moldex Respirators. Fit Test Training: BITREX PortaCount Other Product Training: Reusable Full Face Mask Respirator Reusable Half Mask Respirator Disposable Respirator Instructor Employer Date Please print or type. Company: Name: Address: City, State, Zip: Phone: REV D 02/11 83
85 XIII. QUALITATIVE FIT TEST FORMS Following are the forms that should be used when performing a qualitative fit test. A. Qualitative Fit Test Record 1. Fill out the top half of the form. 2. Determine the number of squeezes to sensitivity (ie 10, 20 or 30). 3. Begin performing the fit test and fill in Yes or No for each exercise. If the subject detects the BITREX during any exercise, mark Yes, terminate test and mark overall results as a Failure. 4. If subject does not detect the BITREX during each exercise, mark No and continue on to next exercise. If all of the exercises are completed without tasting the BITREX, mark overall results as a Pass. 5. The person performing the test should sign the form. 6. The employee should also sign the form once a Pass has been achieved and they have been fully instructed on the use of Moldex respirators. B. RESPIRATORY FIT TEST CARD 1. Once an employee has passed the fit test and been assigned a certain respirator fill out the Respirator Fit Test Card and issue it to the employee. 2. The employee should retain this card as proof that they have been properly fit tested. C. CERTIFICATE OF RESPIRATOR TRAINING 1. When an employee has been fit tested, trained and assigned a respirator, fill out the certificate completely with all of the appropriate information. 2. Have the employee sign the certificate. 3. Issue the certificate to the employee. 4. Keep a signed copy in the employee s record or with the company s Respiratory Program records. 84
86 Bitrex Qualitative Fit Test Record Date: Company: Employee: Respirator Used: # Of Squeezes to Sensitivity (10, 20, 30): In order to pass, the subject must not detect BITREX during any of the excercises. Exercise 1. Normal Breathing: Yes No 2. Deep Breathing: Yes No 3.Turning Head Side to Side: Yes No 4. Moving Head Up and Down: Yes No 5. Talking: Yes No 6. Jogging: Yes No 7. Normal Breathing: Yes No OVERALL RESULTS Fail: Pass: Comments: Person Conducting Test Employee: I have been instructed in the proper use of the Moldex respirator. I will follow all procedures, instructions, and warnings when wearing this type of respirator. Signature Date REV D 02/08 85
87 Bitrex TSI-QFit Qualitative Fit Test Record Date: Company: Employee: Respirator Used: Timing Protocol - Sensitivity Screening; I, II, or III* : *For details please see pages of the QFit Manual Appendix A Timing Protocol - Fit Test; I, II, or III* : *For details please see pages of the QFit Manual Appendix A In order to pass, the subject must not detect BITREX during any of the excercises. Exercise 1. Normal Breathing: Yes No 2. Deep Breathing: Yes No 3.Turning Head Side to Side: Yes No 4. Moving Head Up and Down: Yes No 5. Talking: Yes No 6. Jogging: Yes No 7. Normal Breathing: Yes No OVERALL RESULTS Fail: Pass: Comments: Person Conducting Test Employee: I have been instructed in the proper use of the Moldex respirator. I will follow all procedures, instructions, and warnings when wearing this type of respirator. Signature Date REV A 10/13 86
88 RESPIRATORY FIT TEST Quantitative (PortaCount ) BITREX Other Name: Company: Employee No: Moldex Model No: Extra Small Small Medium Medium/Large Low Profile By: Date: Fold Here FIT CHECK Respirator must be fit-checked by the wearer each time the respirator is put on. FIT TEST A fit test must be performed: 1. Whenever you change to a different respirator model. 2. Annually or sooner. MOLDEX TECHNICAL ASSISTANCE Call +1 (800) or +1 (310) REV E 08/09 RESPIRATORY FIT TEST Quantitative (PortaCount ) BITREX Other Name: Company: Employee No: Moldex Model No: Extra Small Small Medium Medium/Large Low Profile By: Date: Fold Here FIT CHECK Respirator must be fit-checked by the wearer each time the respirator is put on. FIT TEST A fit test must be performed: 1. Whenever you change to a different respirator model. 2. Annually or sooner. MOLDEX TECHNICAL ASSISTANCE Call +1 (800) or +1 (310) REV E 08/09 RESPIRATORY FIT TEST Quantitative (PortaCount ) BITREX Other Name: Company: Employee No: Moldex Model No: Extra Small Small Medium Medium/Large Low Profile By: Date: Fold Here FIT CHECK Respirator must be fit-checked by the wearer each time the respirator is put on. FIT TEST A fit test must be performed: 1. Whenever you change to a different respirator model. 2. Annually or sooner. MOLDEX TECHNICAL ASSISTANCE Call +1 (800) or +1 (310) REV E 08/09 RESPIRATORY FIT TEST Quantitative (PortaCount ) BITREX Other Name: Company: Employee No: Moldex Model No: Extra Small Small Medium Medium/Large Low Profile By: Date: Fold Here FIT CHECK Respirator must be fit-checked by the wearer each time the respirator is put on. FIT TEST A fit test must be performed: 1. Whenever you change to a different respirator model. 2. Annually or sooner. MOLDEX TECHNICAL ASSISTANCE Call +1 (800) or +1 (310) REV E 08/09 87
89 Certificate of Respirator Training This is to certify that: has been fit tested and trained in the use, limitations, and maintenance of Moldex respirators. Supervisor/Instructor Employer Date Employee Number Department/Position Respirator Model Number Size : Extra Small Small Medium Medium/Large Large Low Profile NIOSH Approval Number Respirator Fit Test Quantitative (PORTACOUNT ) Fit Factor: Pass Fail Qualitative Type: Pass Fail Other Pass Fail Comments: I acknowledge having received this Respirator Training while an employee of Company Print Employee Name X Signature Date REV H 08/09
90 XIV. QUANTITATIVE FIT TEST FORM, PORTACOUNT LOAN FORM AND PROBED CARTRIDGE TEST INSTRUCTION Following are the forms that should be used when performing a quantitative fit test or when borrowing any of the PORTACOUNT equipment. Also listed are the instructions for the Probed Cartridge Test. Please read them carefully. A. PORTACOUNT LOAN PROGRAM 1. To borrow a Moldex PORTACOUNT read the Policies and Requirements memorandum. 2. Fill out the Request Form. 3. Fax it back to Moldex Technical Services, who will process your request and then contact you via telephone. B PROBED CARTRIDGE KIT INSTRUCTION 1. To quantitatively fit test the Moldex 7000/8000/9000 Respirator follow the Probed Kit instructions. C PROBED CARTRIDGE KIT INSTRUCTIONS 1. To quantitatively fit test the Moldex 7000 or 9000 series respirators. D. PORTACOUNT FIT TEST RECORD 1. Fill out the top half of the form. 2. Begin performing the fit test and enter the fit factor for each exercise. 3. After the test record the overall fit factor. If the subject received a 100 or greater this is considered a Pass, for a half facepiece respirator. 500 or greater for full face respirator an APF at The person performing the test should sign the form. 5. The employee should also sign the form once a Pass has been achieved, and they have been fully instructed on the use of Moldex respirators. E. RESPIRATORY FIT TEST CARD 1. Once an employee has passed the fit test and been assigned a respirator, fill out the Respiratory Fit Test Card and issue it to the employee. 2. The employee should retain this card as proof that they have been properly fit tested. 89
91 F. CERTIFICATE OF RESPIRATORY TRAINING 1. When an employee has been fit tested, trained and assigned a respirator fill out the certificate completely with all of the appropriate information. 2. Have the employee sign the certificate. 3. Issue the certificate to the employee. 4. Keep a signed copy in the employee s record or with the company s Respiratory Program records. 90
92 PortaCount Fit TestRecord Date: Company: Employee: Respirator used: PortaCount used: PortaCount : PortaCount Plus: PortaCount Plus w/n95 Companion : Exercise 1. Normal Breathing Fit Factor: 2. Deep Breathing Fit Factor: 3.Turning Head Side to Side Fit Factor: 4. Moving Head Up and Down Fit Factor: 5. Talking Fit Factor: 6. Grimace (15 seconds) Fit Factor: Normal Breathing (45 seconds) 7. Bending Over or Jogging in Place Fit Factor: 8. Normal Breathing Fit Factor: Recorded Fit Factor Comments: OVERALL FIT FACTOR Pass: Fail: (For a passing mark overall Fit Factor must be at least 100 for half masks and at least 500 for full face masks) Person Conducting Test Employee: I have been instructed in the proper use of the Moldex respirator. I will follow all procedures, instructions, and warnings when wearing this type of respirator. Signature Date REV E 03/11 91
93 MOLDEX-METRIC, INC WEST JEFFERSON BOULEVARD CULVER CITY, CALIFORNIA TELEPHONE: +1 (800) OR +1 (310) Memorandum TO: Moldex Regional Managers & Sales Representatives FROM: Jeffrey S. Birkner V.P. of Technical Services DATE: Oct 2013 RE: T.S.I. PortaCount & QFit Loan Programs The Moldex PortaCount & QFit Loan Programs are an important part of our Technical Services support. In an on going effort to assist current Moldex respirator users, and as a sales tool to convert more endusers to our respirators, the following is a description of our policies. GENERAL POLICIES & REQUIREMENTS 1. A Moldex Representative or Distributor must deliver or authorize that Moldex send the POrtaCount to the Enduser. 2. The Moldex Representative should be able to provide training and or assistance if needed. 3. The Enduser may be required to pay for shipping or insurance costs or both. 4. The Enduser should purchase or have available the appropriate materials needed for the fit testing, i.e. #8006 or #7006 Probed Cartridge Kit, Different sizes of facepieces: #7001, #7002, #7003, #8001, #8002, #8003, #9001, #9002 and #9003, or the appropriate disposable respirators such as: #2200N95, #2300N95, #2310N99, etc. It is also good practice to have available other sizes if using the #2200N95 or the #2300N95 series respirators. 5. The Enduser must either be using Moldex Respirators or willing to compare and evaluate Moldex Respirators to what they are currently using. 6. The Enduser may use the PortaCount and Companion for up to 1 week before they are required to return it to Moldex or before the Moldex Representative will pick it up. Attached to this memo you will find a copy of the Porta Count Loan Request Form. Please note that these are only general guidelines and Moldex or a Moldex Regional Manager can change these procedures accordingly to accommodate the best interests of Moldex and the End User. 92
94 PortaCount Loan Program Request Form Company: Contact: Title: Phone: FAX: Ship To Address: City: State: Zip: Moldex Representative: Assistance Required: Y or N Distributor: Assistance Required: Y or N Date Needed: Estimated Date of Return: Respirators Currently Used: Number of Users: Brand #1 Brand #2 Brand #3 Brand #1 Brand #2 Brand #3 Once completed, return form via FAX to Moldex Technical Services at +1 (310) You will be contacted via telephone for verification and shipment date. For Moldex external use only Approved for Loan: Yes / No Date to be shipped: Serial Number of PortaCount: Shipment authorized by Moldex: Serial Number of Companion: Shipping Via: Tech Service Rep: Shipping Fee: Moldex / End User Insurance Fee: Moldex / End User Date: Note to Rep: : Usual shipping method/ups 3 Day, Insure for $10, REV B 5/06 93
95 TSI - Qfit Powered Nebulizer Loan Program Request Form Company: Contact: Title: Phone: FAX: Ship To Address: City: State: Zip: Moldex Representative: Assistance Required: Y or N Distributor: Assistance Required: Y or N Date Needed: Estimated Date of Return: Respirators Currently Used: Number of Users: Brand #1 Brand #2 Brand #3 Brand #1 Brand #2 Brand #3 Once completed, return form via FAX to Moldex Technical Services at +1 (310) You will be contacted via telephone for verification and shipment date. For Moldex external use only Approved for Loan: Yes / No Date to be shipped: Serial Number: Shipment authorized by Moldex: Shipping Via: Tech Service Rep: Shipping Fee: Moldex / End User Insurance Fee: Moldex / End User Date: Note to Rep: Fed-Ex 3 Day, Insure for $ REV B 12/12 94
96 OHD - Quantifit Catridge Adapter Loan Program Request Form Company: Contact: Title: Phone: FAX: Ship To Address: City: State: Zip: Moldex Representative: Assistance Required: Y or N Distributor: Assistance Required: Y or N Date Needed: Estimated Date of Return: Respirators Currently Used: Number of Users: Brand #1 Brand #2 Brand #3 Brand #1 Brand #2 Brand #3 Once completed, return form via FAX to Moldex Technical Services at +1 (310) You will be contacted via telephone for verification and shipment date. For Moldex external use only Approved for Loan: Yes / No Date to be shipped: Serial Number: Shipment authorized by Moldex: Shipping Via: Tech Service Rep: Shipping Fee: Moldex / End User Insurance Fee: Moldex / End User Date: Note to Rep:??????? REV A 10/13 95

97 APPENDIX A 96
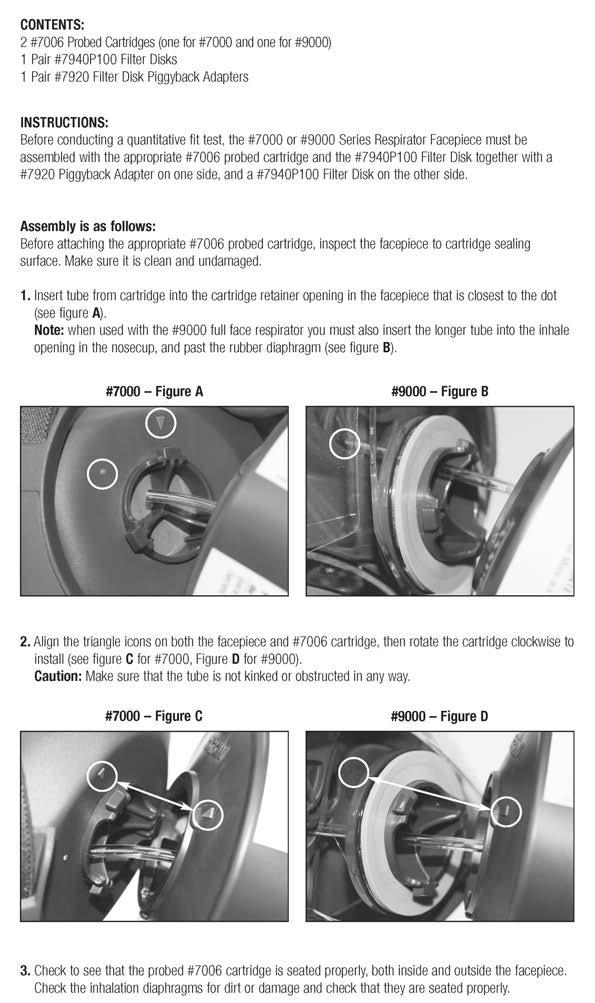
98 97
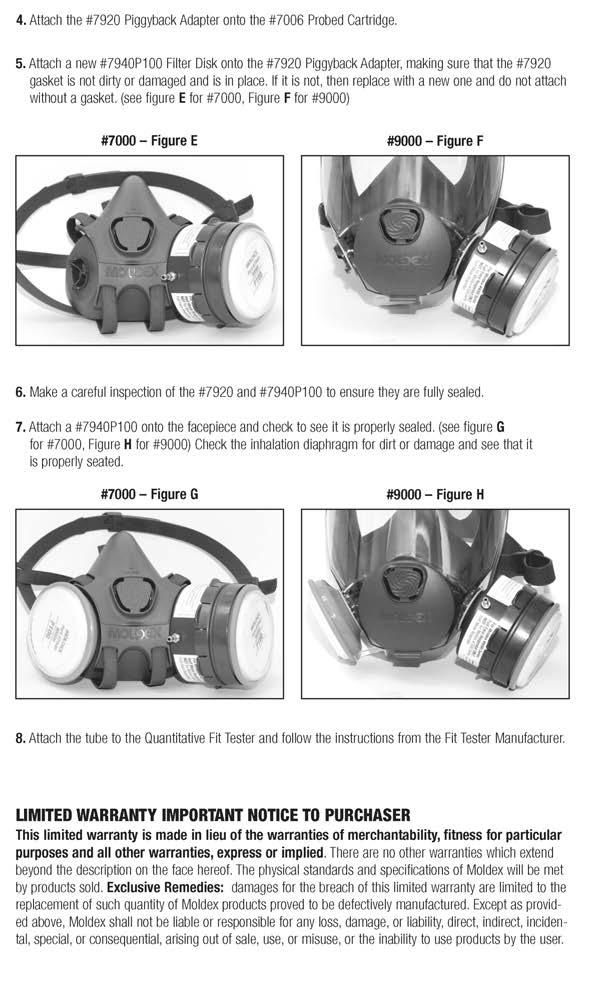
99 98
100 APPENDIX B #8006 PROBED CARTRIDGE KIT INSTRUCTIONS FOR QUANTITATIVE FIT TEST- ING WITH PORTACOUNT LIMITED WARRANTY IMPORTANT NOTICE TO PURCHASER This limited warranty is made in lieu of the warranties of merchantability, fitness for particular purposes and all other warranties, express or implied. There are no other warranties which extend beyond the description on the face hereof. The physical standards and specifications of Moldex will be met by products sold. Exclusive Remedies: damages for the breach of this limited warranty are limited to the replacement of such quantity of Moldex products proved to be defectively manufactured. Except as provided above, Moldex shall not be liable or responsible for any loss, damage, or liability, direct, indirect, incidental, special, or consequential, arising out of sale, use, or misuse, or the inability to use products by the user. #8000 SERIES RESPIRATOR 99 MOLDEX-METRIC, INC W. Jefferson Blvd. Culver City, CA (800) (310) FAX +1 (310) sales@moldex.com REV D 4/06


101 WARNING The #8006 Probed cartridge is for use in quantitative fit testing in conjunction with a PortaCount or equivalent test instrument. The cartridge does not contain filter media and therefore provides no protection. CONTENTS: PROBED CARTRIDGE 1 PAIR 8940 P100 FILTER DISKS 1 PAIR 8900 FILTER/DISK HOLDERS 1 PAIR 8920 FILTER/DISK PIGGYBACK ADAPTER Note: 8900 Holder is interchangeable with 8800 Holder 8920 Adapter is interchangeable with 8820 Adapter INSTRUCTIONS Before conducting a quantitative fit test, the 7000/8000/9000 Series Respirator facepiece must be assembled with a probed cartridge and 8940 P100 Filter Disk together with an 8920 Piggyback Adapter on one side and an 8940 P100 Filter disk with 8900 Holder on the other. Following are assembly instructions: PROBED CARTRIDGE AND 8940 P100 PIGGYBACK Before inserting the probed cartridge, inspect the facepiece to cartridge sealing surface. Make sure it is clean and undamaged. Check to see that the probed cartridge is seated properly, both inside and outside, and that it s flush against the facepiece. Check the inhalation diaphragms for dirt or damage and see that they are seated properly. Place the 8920 Piggyback Adapter on the 8006 Probed Cartridge. Place a new 8940 P100 Filter disk inside the retainer ring so that the side indicated is away from face. Replace the retainer ring. Make a careful inspection of retainer ring seal to piggyback adapter to ensure it is fully sealed P100 FILTER DISK Press the 8900 Disk Holder channel into the snap-on mount of the facepiece. Check to see that the holder is properly sealed, both inside and outside, and flush against the facepiece. Insert 8940 P100 Filter disk into retainer ring so that the side indicated is away from face. Check to see that disks are properly sealed. Check the inhalation diaphragms for dirt or damage and see that they are properly seated. 100 Press the probed cartridge channel into the snap-on mount of the facepiece. The inside probe tube must point below exhalation valve, see picture. EXHALATION VALVE PROBE TUBE
A. APPLICATIONS 1. WARNING TO USER
 IV. MOLDEX INDUSTRIAL 42 CFR 84 DISPOSABLE RESPIRATOR USER INSTRUCTIONS Each specific model may contain additional warnings and instructions. You MUST refer to the packaging for specific instructions.
Half Facepiece Respirator Assembly 5000 Series, Dual Cartridge, Organic Vapor/P95, Disposable
 Half Facepiece Respirator Assembly 5000 Series, Dual Cartridge, Organic Vapor/P95, Disposable User Instructions for 3M Organic Vapor Respirator, P95 Assembly 51P71/52P71/53P71 Important: Keep these User
Half Facepiece Respirator Assembly 5000 Series, Dual Cartridge, Disposable
 Half Facepiece Respirator Assembly 5000 Series, Dual Cartridge, Disposable User Instructions for 3M Organic Vapor Respirator Assembly 5101/5201/5301; 3M Organic Vapor/Acid Gas Respirator Assembly 5103/5203/5303;
Particulate Respirator N95
 Particulate Respirator N95 9210+/*37192, 9211+/37193* User Instructions IMPORTANT: Keep User Instructions for reference *37192 and 37193 are catalog numbers only. NIOSH approved as 3M Particulate Respirator
8200/07023 Particulate Respirator N95
 8200/07023 Particulate Respirator N95 User Instructions (Keep these User Instructions for reference) 07023 is a catalog number only. NIOSH approved as 3M TM 8200 Particulate Respirator N95. See insert
NIOSH CERTIFIED FEATURES DUAL APPLICATIONS SUITABLE FOR WELDING APPLICATIONS
 NIOSH CERTIFIED N95 Particulate Filter Disk is NIOSH certified to have a filter efficiency level of 95% or greater against non-oil based particulate aerosols up to 10x PEL. Plus relief from nuisance levels
Respirator Fit Testing DEPARTMENT OF LABOR Information on the Requirements Types of Respirators & Filters
 UNITED STATES Respirator Fit Testing DEPARTMENT OF LABOR Information on the Requirements Types of Respirators & Filters This information is about the respirator fit testing requirements for any worker
Phalanx Alpha Phalanx Beta and Ultra Elite
 Phalanx Alpha Phalanx Beta and Ultra Elite riot control agent gas masks instructions parts list NIOSH approved for respiratory protection in atmospheres containing CN and CS and particulates under the
UltraFilter. respirator. with Ultravue or Ultra Elite Facepiece. instructions for use and care
 818188_b.qxd 2/20/01 7:38 AM Page 1 UltraFilter respirator with Ultravue or Ultra Elite Facepiece instructions for use and care This booklet, including the warnings and cautions inside, must be read and
VFlex 9105/9105S Particulate Respirator N95
 VFlex 9105/9105S Particulate Respirator N95 User Instructions IMPORTANT: Keep these User Instructions for reference 3M and VFlex are trademarks of 3M Company, used under license in Canada 98-0060-0156-8/2
3M recommended for the aluminum industry and nuisance level acid gas relief* in non-oil environments User Instructions (Keep insert for reference)
") 8516 Respirator N95 Particulate 3M recommended for the aluminum industry and nuisance level acid gas relief* in non-oil environments User Instructions (Keep insert for reference) *3M recommended for relief
8516 Respirator N95 Particulate 3M recommended for the aluminum industry and nuisance level acid gas relief* in non-oil environments User Instructions (Keep insert for reference) *3M recommended for relief
8210Plus/8210/07048/8110S Particulate Respirator 3M recommended for sanding, grinding, sawing, sweeping and insulating
 8210Plus/8210/07048/8110S Particulate Respirator 3M recommended for sanding, grinding, sawing, sweeping and insulating User Instructions (Keep these instructions for reference) 1 This respirator helps
8515/07189 Respirator. N95 Particulate 3M recommended for welding, brazing, metal pouring and cutting User Instructions (Keep insert for reference)
") 8515/07189 Respirator N95 Particulate 3M recommended for welding, brazing, metal pouring and cutting User Instructions (Keep insert for reference) 07189 is a catalog number only. NIOSH approved as 3MTM
8515/07189 Respirator N95 Particulate 3M recommended for welding, brazing, metal pouring and cutting User Instructions (Keep insert for reference) 07189 is a catalog number only. NIOSH approved as 3MTM
E3628 THE RESPIRATORY PROTECTION PROGRAM: EMPLOYEE TRAINING. Leader s Guide ERI Safety Videos EMPLOYEE TRAINING
 E3628 THE RESPIRATORY PROTECTION PROGRAM: EMPLOYEE TRAINING Leader s Guide 2007 ERI Safety Videos THE RESPIRATORY PROTECTION PROGRAM: EMPLOYEE TRAINING This easy-to-use Leader s Guide is provided to assist
Nuisance level organic vapor relief* User Instructions (Keep insert for reference)
") 8577 Respirator P95 Particulate Nuisance level organic vapor relief* User Instructions (Keep insert for reference) *3M recommended for relief against nuisance levels of organic vapor. (Nuisance level organic
8577 Respirator P95 Particulate Nuisance level organic vapor relief* User Instructions (Keep insert for reference) *3M recommended for relief against nuisance levels of organic vapor. (Nuisance level organic
8214/8514/07187 Respirator N95 Particulate
 8214/8514/07187 Respirator N95 Particulate 3M recommended for welding on stainless steel, aluminum, galvanized steel, and other applications where ozone and nuisance organic vapors* may be present. User
3 8210Plus/8210/8110S Particulate Respirator User Instructions (Keep these instructions for reference)
") DO-IT-YOURSELF / HOMEOWNER USER INSTRUCTIONS 3 8210Plus/8210/8110S Particulate Respirator User Instructions (Keep these instructions for reference) This respirator contains no components made from natural
DO-IT-YOURSELF / HOMEOWNER USER INSTRUCTIONS 3 8210Plus/8210/8110S Particulate Respirator User Instructions (Keep these instructions for reference) This respirator contains no components made from natural
9210/37021, 9211/37022* Particulate Respirator N95
 9210/37021, 9211/37022* Particulate Respirator N95 User Instructions (Keep insert for reference) *37021 and 37022 are catalog numbers only. NIOSH approved as 3M 9210 N95 Particulate Respirator and 3M 9211
Filter cartridge protection class A2 Organic vapours, with boiling point above 65 C, to 50X OEL or 1000 ppm, whichever is the lower.
 1 Star Mask paint spray respirator CHARACTERISTICS Star Mask is a respirator with exchangeable pre-filters and gas-filters. Star Mask protects against mist of paint, lacquer, enamel, pesticide, organic
RESPIRATORY PROTECTION PROGRAM
 A P P E N D I X 14 RESPIRATORY PROTECTION PROGRAM AP14.1. Purpose. AP14.2. Policy. To establish a written Respiratory Protection Program for CBP. The purpose of an effective respirator program is to provide
A. Evaluation of the written program
 A. Evaluation of the written program Begin your audit with an evaluation of the written respiratory protection program. In addition to the operating procedures describing respirator selection and use in
Respiratory Protection
 Respiratory Protection Everything You Wanted to Know About Respiratory Protection and Probably a Bit More. Instructor: Mary Schlagel Northern Illinois University Environmental Health & Safety Dept. 815-753-0404
University of Alabama Office of Environmental Health and Safety. Respirator Protection Training
 University of Alabama Office of Environmental Health and Safety Respirator Protection Training Medical Reasons That Could Prohibit the Use of a Respirator A history of pulmonary or lung problems such as:
Cabinet. 1.0 POLICY It is the policy of Calvin College to comply with the MIOSHA Respiratory Protection Standard Part 451.
 Calvin College Respiratory Protection Program Prepared by: Date: Heather Chapman 10/7/10 Approved by: Cabinet Revision 2 Date: 1.0 POLICY It is the policy of Calvin College to comply with the MIOSHA Respiratory
Respiratory Protection Program 29CFR
 Respiratory Protection Program 29CFR1910.134 Program Objectives OSHA requires employers to establish and implement procedures for the proper use of respirators by doing the following: Verify the need for
ALBUQUERQUE PUBLIC SCHOOLS RESPIRATORY PROTECTION PROGRAM
 ALBUQUERQUE PUBLIC SCHOOLS RESPIRATORY PROTECTION PROGRAM Risk Management Department August, 2008 ALBUQUERQUE PUBLIC SCHOOLS RISK MANAGEMENT DEPARTMENT RESPIRATORY PROTECTION PROGRAM TABLE OF CONTENTS
8000 SERIES FACEPIECE ASSEMBLY FACEPIECE REPLACEMENT CARTRIDGES 1 ORGANIC VAPORS ACID GASES ORGANIC VAPORS/ ACID GASES AMMONIA/METHYLAMINE
 8000 REPIRATOR EECTION GUIDE 8000 ERIE FACEPIECE AEBY DECRIPTION PACKAGING ODE # IZE FACEPIECE Includes head strap assembly and exhale valve assembly. Facepiece/Bag 2 Bags/Case 800 8002 8003 REPACEENT
Respiratory Protection. Program
 Respiratory Protection Program Respiratory Protection Program Table of Contents A. General B. Selection of Respirators C. Medical Screening D. Fit Testing E. Respirator Use Instructions F. Respirator Inspection
3 Choosing the Right Respirator
 3 By: Jeanne Bidwell 3M Occupational Health and Environmental Safety Division Originally published February, 1997 for Plant Engineering Magazine Selecting respirators to help protect workers from airborne
Don t Forget About Fit What You Need to Know About Respirator Fit-testing
 Session No. 667 Don t Forget About Fit What You Need to Know About Respirator Fit-testing Scott Larson, BS, MS, CSP, CIH 3M Personal Safety Division St. Paul, MN Megan Torgrude, BS, MPH, CIH 3M Personal
"RESPIRATORY PROTECTION AND SAFETY"
 PRESENTER'S GUIDE "RESPIRATORY PROTECTION AND SAFETY" Training for the OSHA RESPIRATORY PROTECTION STANDARD Quality Safety and Health Products, for Today...and Tomorrow OUTLINE OF MAJOR PROGRAM POINTS
BREATHE SAFELY: The Proper Use of Respiratory Protection
 BREATHE SAFELY: The Proper Use of Respiratory Protection This easy-to-use Leader s Guide is provided to assist in conducting a successful presentation. Featured are: INTRODUCTION: A brief description of
Entry to these spaces must be rigorously controlled to prevent serious injury or death.
 Chapter 6 - Confined Spaces Chapter 6 Confined Spaces Definitions A confined space is defined as any structure that must be entered and that has or may contain dangerous concentrations of hazardous gases
Protective device that covers the nose and mouth or the entire face or head to guard the wearer against hazardous atmospheres
 Protective device that covers the nose and mouth or the entire face or head to guard the wearer against hazardous atmospheres Working in an area with insufficient oxygen Situations where harmful dusts,
Maintenance Made Simple Fewer replacement parts and super-simple disassembly make cleaning and maintaining the 7000 Series easy.
 Easy to Wear The 7000 Series half mask respirator is specifically designed to comfortably conform to facial contours and with a modern look that increases worker acceptance. The curved neck buckle and
San Mateo County Health System Environmental Health Services Division. Respirator Use
 1.0 PURPOSE This document describes the requirements for the use of respiratory protection and constitutes a written Respiratory Protection Program. Its purpose is to ensure that employees adhere to the
West Clinton Fire District
 1 2 3 4 5 6 7 8 9 10 11 12 13 14 15 16 17 18 19 20 21 22 23 24 25 26 27 28 29 30 31 32 33 34 35 36 37 38 39 40 41 42 43 44 45 West Clinton Fire District Best Practice Respiratory Protection Program Best
FACILITIES MANAGEMENT OFFICE OF ENVIRONMENTAL HEALTH AND SAFETY Respiratory Protection Policy 03/20/15 Last Revision
 FACILITIES MANAGEMENT OFFICE OF ENVIRONMENTAL HEALTH AND SAFETY Respiratory Protection Policy 03/20/15 Last Revision 1.0 Intent: 2.0 Scope: It is the intention of the University at Albany to provide a
Standards of Practice Respiratory Protection: Appendix C
 Document Authority: EHS Coordinator Standards of Practice Respiratory Protection: Appendix C Document Custodian: EH&S Coordinator Effective Date: 09.01.15 Issuing Dept: College of Agriculture EH&S Next
USE INSTRUCTIONS SCOTT HEALTH AND SAFETY PROMASK 25 FULL FACEPIECE RESPIRATOR USE INSTRUCTIONS
 USE INSTRUCTIONS SCOTT HEALTH AND SAFETY PROMASK 25 FULL FACEPIECE RESPIRATOR USE INSTRUCTIONS TABLE OF CONTENTS DESCRIPTION... 1 GENERAL LIMITATIONS ON USE... 2 FACEPIECE FITTING... 5 USE OF THE RESPIRATOR...
Texas Department of Insurance. Respiratory Protection. Provided by. Workers Health & Safety HS01-027B (1-06)
") Texas Department of Insurance Respiratory Protection Provided by Workers Health & Safety HS01-027B (1-06) Contents Introduction... 3 Definitions... 3 Approved Respirators... 3-4 New Respirator Selection
Texas Department of Insurance Respiratory Protection Provided by Workers Health & Safety HS01-027B (1-06) Contents Introduction... 3 Definitions... 3 Approved Respirators... 3-4 New Respirator Selection
EP30g, Respiratory Protection.pdf
 Respiratory Protection University of California Irvine Medical Center Environmental Health and Safety Procedures Section: Safety Reviewed/Revised: 05/10 1. Introduction Good health depends on breathing
Respiratory Protection Training
 Respiratory Protection Training Disclaimer IMPORTANT NOTICE: This risk control training program provided by PMA Companies is intended to help support your loss prevention efforts. It is not intended to
Respiratory Protection
 Respiratory Protection Purpose The purpose is to establish a set of guidelines for the selection of respiratory protection equipment, situations for its use, and training in the use of the respirator required.
RESPIRATORY PROTECTION PROGRAM OSHA Respiratory Protection
 RESPIRATORY PROTECTION PROGRAM 1910.134 OSHA Respiratory Protection Table of Contents Introduction... 3 Scope... 3 Definitions... 3 Responsibilities... 5 Voluntary Use... 6 Use Requirements... 6 Program
Respiratory Protection
 Respiratory Protection University of Tennessee Safety Program IH-003 Document Contact: EHS-General Safety Date effective: January 1, 2006 Revision Date: March 1, 2014 Purpose It shall be the policy of
Respiratory Protection Self Inspection Checklist
 Optional Information Name of School: Date of Inspection: Vocational Program/Course/Room: Signature of Inspector: Respiratory Protection Self Inspection Checklist Guidelines: This checklist covers some
Respiratory Protection Program
 Policy 707 Respiratory Protection Program 707.1 PURPOSE AND SCOPE The is committed to preventing injury and illness in the workplace and makes every effort to protect our employees from harmful airborne
RESPIRATORS & FIT TESTING
 RESPIRATORS & FIT TESTING Presented By: Jamie Papian Licensed Lead & Asbestos Inspector Licensed Lead & Asbestos Abatement Supervisor HUD Housing Quality Standards Inspector State of Iowa, Illinois and
Respiratory Protection Program
 California State University, Chico Department of Environmental Health and Safety Table of Contents Section 1.0 Introduction... 1-1 2.0 Responsibilities... 2-1 2.1 Environmental Health and Safety Responsibilities...
Maintenance Made Simple Fewer replacement parts and super-simple disassembly make cleaning and maintaining the 7000 Series easy.
 Easy to Wear The 7000 Series half mask respirator is specifically designed to comfortably conform to facial contours and with a modern look that increases worker acceptance. The curved neck buckle and
low maintenance respirator
 low maintenance respirator instructions This booklet, including the warnings and cautions inside, must be read and followed carefully by all persons who use or maintain this product, including those who
COLUMBUS STATE COMMUNITY COLLEGE EMPLOYEE SAFETY MANUAL
 COLUMBUS STATE COMMUNITY COLLEGE EMPLOYEE SAFETY MANUAL (Hand, Eye, Face, Head, Foot, and Respiratory) Effective October 15, 1995 Page 1 of 15 Updated September 2010 A. At the request of the College Safety
In addition to the responsibility for managing the elements of the respiratory protection program, he/she will be responsible for:
 EBBE (1 of 7) EBBE RESPIRATORY PROTECTION POLICY The Muskogee School District is acknowledged as the employer, and as outlined under current Federal regulations, is assigned the responsibility to provide
RESPIRATORY PROTECTION PROGRAM
 RESPIRATORY PROTECTION PROGRAM A. Introduction: Due to the potential risks involved from exposure to hazardous substances and atmospheres, UNE has developed a Respiratory Protection Program to protect
Head Cover BE-12 Series
 Head Cover BE-12 Series User Instructions for 3M Head Covers BE-12, BE-12L, BE-12B and BE-12LB (Keep these User Instructions for reference) This product helps protect against certain airborne contaminants.
University of Dayton Respiratory Protection Program 29 CFR
 University of Dayton Respiratory Protection Program 29 CFR 1910.134 What to expect from this training: Employees who are required to use respirators must be trained such that they can demonstrate knowledge
RESPIRATORY PROTECTION
 RESPIRATORY PROTECTION OSHA 29 CFR 1910.134 PPT-042-01 1 Respiratory Protection Respirators shall be provided when necessary to protect the health of employees from breathable hazards (should be used as
Respiratory Protection Self-Inspection Checklist
 Respiratory Protection Self-Inspection Checklist Guidelines: This checklist applies to the use of either atmosphere-supplying or air-purifying respirators being worn, voluntarily or otherwise, for comfort
Respiratory Protection
 Respiratory Protection The 3M Four-Step Method What issues do we need to consider to get the correct respiratory protection? 1.Identify Respiratory Hazards 2.Understand the Contaminants Effect on Workers
How to Comply With the 2015 Revised Worker Protection Standard For Agricultural Pesticides. What Owners and Employers Need To Know
 How to Comply With the 2015 Revised Worker Protection Standard For Agricultural Pesticides What Owners and Employers Need To Know ADDITIONAL HANDLER EMPLOYER REQUIREMENTS Medical evaluation 40 CFR 170.507(b)(10)(iii)
9000 SERIES FULL FACE RESPIRATORS
 Easy To Wear At less than 13 ounces, the 9000 Series respirator is ultra-lightweight. Workers will appreciate the comfort and longer wearability and employers will benefit from increased user acceptance.
Respiratory Protection for Producers
 March 2005 Agdex 086-8 Respiratory Protection for Producers Dust and harmful gases can cause immediate and long-term respiratory problems. Wearing protective equipment is vitally important when working
RESPIRATORY PROTECTIVE EQUIPMENT ADVICE FOR WORKERS
 H E A LT H & S A F E T Y AT WO R K HSWA AC T FACT SHEET RESPIRATORY PROTECTIVE EQUIPMENT ADVICE FOR WORKERS Respiratory protective equipment (RPE) is a type of personal protective equipment (PPE) that
Fire Escape Hood OPERATION AND INSTRUCTIONS
 TM Fire Escape Hood OPERATION AND INSTRUCTIONS THIS MANUAL MUST BE CAREFULLY READ AND FOLLOWED BY ALL PERSONS WHO HAVE, OR WILL HAVE, THE RESPONSIBILITY FOR USING THE S-CAP FIRE ESCAPE HOOD. THESE ESCAPE
ANSI / ASSE Z88.2 American National Standard Practices for Respiratory Protection (1992 rev. versus 2015 rev.)
") ANSI / ASSE Z88.2 BACKGROUND: A substantial body of research has been published since the 1992 revision of Z88.2. This information related to the proper use and performance of respiratory protection in
ANSI / ASSE Z88.2 BACKGROUND: A substantial body of research has been published since the 1992 revision of Z88.2. This information related to the proper use and performance of respiratory protection in
City of Kalispell RESPIRATOR PROTECTION POLICY October 12, 2015
 A. Executive Summary and Introduction City of Kalispell RESPIRATOR PROTECTION POLICY October 12, 2015 1. Annual fit test is required for all employees who will be required to wear a respirator as a part
BGC HOLDINGS LTD RESPIRATORY PROTECTIVE EQUIPMENT (RPE) POLICY
 POLICY") BGC HOLDINGS LTD RESPIRATORY PROTECTIVE EQUIPMENT (RPE) POLICY Introduction This document sets out the Health & Safety arrangements we have established for BGC Holdings Ltd, and all subsidiary and associated
BGC HOLDINGS LTD RESPIRATORY PROTECTIVE EQUIPMENT (RPE) POLICY Introduction This document sets out the Health & Safety arrangements we have established for BGC Holdings Ltd, and all subsidiary and associated
HAZWOPER 8-Hr Refresher Aug. 20, 2012
 Institute for Tribal Environmental Professionals Tribal Lands and Environment: A National Forum on Solid Waste, Emergency Response, Contaminated Sites and USTs August 20-23, 2012 Coos Bay, Oregon HAZWOPER
Respiratory Protection Program
 Respiratory Protection Program Program Administrator: Garrett Godsey, MPH Environmental Health and Safety Division Industrial Hygiene and Safety Office 1405 Goss Lane, CI-1001 Augusta, Georgia 30912 Phone:
Using a Filtering Facepiece Respirator
 Using a Filtering Facepiece Respirator What s a filtering facepiece respirator? A device that is worn to protect your lungs from airborne particles. For example, they may be used for exposures to some
RESPIRATORY PROTECTION PROCEDURE
 RESPIRATORY PROTECTION PROCEDURE 1. PURPOSE The purpose of this procedure is to protect the health and safety of University faculty and staff who work in areas that may have irritating or hazardous atmospheres.
Respirator with Ultra-Twin, Ultravue, Ultra Elite, or Duo-Twin TM Facepiece
 Respirator with Ultra-Twin, Ultravue, Ultra Elite, or Duo-Twin TM Facepiece instructions for use and care This manual, including the warnings and cautions inside, must be read and followed carefully by
3M Occupational Health and Environmental Safety Division. Options
 3M Occupational Health and Environmental Safety Division 3M Respiratory Options During times of global and/or localized influenza outbreaks, available supplies of certain respirators can become constrained.
Breathe easily. Weld safely. 3M Disposable and Reusable Respirators for Welding
 3M Disposable and Reusable Respirators for Welding Breathe easily. Weld safely. Comfortable, low-profile disposable and reusable respirators compatible with 3M Speedglas welding helmets.* * Since head
RESPIRATORY PROTECTIVE EQUIPMENT ADVICE FOR PERSONS CONDUCTING A BUSINESS OR UNDERTAKING
 H E A LT H & S A F E T Y AT WO R K HSWA AC T FACT SHEET RESPIRATORY PROTECTIVE EQUIPMENT ADVICE FOR PERSONS CONDUCTING A BUSINESS OR UNDERTAKING This fact sheet is for persons conducting a business or
Ontario Operations PMP - Daily Safety Message. Respirator Safety
 Ontario Operations 2017 PMP - Daily Safety Message Respirator Safety Context: Respirators only work when they are selected, maintained, and used properly. Respirator Types, Fit and Maintenance: There are
Respiratory Protection Basics
 Michigan Safety Conference Respiratory Protection Basics Date: April 17, 2018 0 16 April 3M 2018. All Rights Reserved. Presenter Don Rust, CIH, CSP Technical Service Specialist 3M Personal Safety Division
Qualitative Fit Testing Instructions for. KleenGuard* Particulate Respirators
 Qualitative Fit Testing Instructions for KleenGuard* Particulate Respirators The Worry-Free Choice Respiratory Protection Program OSHA requires Fit Testing for all employees who are required to wear tight-fitting
East Brunswick Fire District #1
 Old Bridge Volunteer Fire Company East Brunswick Fire District #1 Standard Operating Guidelines Title: Respiratory Protection Act Function: Procedure Number: Implementation Date: 12/01/2016 Page Number:
The Following information is based on material prepared by the American Lung Association
 The Following information is based on material prepared by the American Lung Association RESPIRATORY PROTECTION FROM INHALATION HAZARDS The inhalation of harmful dusts, toxic gases and vapors at fire and
Checklist for care of Respirators
 Checklist for care of Respirators Inspect the respirator before and after each use and during cleaning. Inspect equipment designated for "emergency use" at least monthly, and after each use. Replace all
TAMPA ELECTRIC COMPANY ENERGY SUPPLY RESPIRATORY PROTECTION PROGRAM
 TABLE OF CONTENTS TITLE PAGE # PURPOSE / INTRODUCTION 1 RESPONSIBILITY 2 EMPLOYEE TRAINING 2 HAZARD EVALUATION / RESPIRATOR SELECTION & USE 3 VOLUNTARY RESPIRATOR USE 4 MEDICAL EVALUATION 5 FIT TESTING
Respiratory Protection Written Program
 Respiratory Protection Written Program Month/Year Started *This document has been modified to conform with the amended respiratory protection regulations that will take affect January 1, 2008. Major changes
DREW UNIVERSITY RESPIRATORY PROTECTION PROGRAM DRAFT 06/11
 PURPOSE This policy provides requirements on the selection, use, care, and maintenance of respiratory protection. Also included is information and guidelines on training, medical evaluations, recordkeeping
Respiratory Protective Equipment Program Appendix A - Definitions and Key Terms
 Definitions include those from OSHA Sec. 1910.134(b), NIOSH, and ANSI ACGIH Aerosol Air-Purifying Respirator (APR) American National Standards Institute (ANSI) Approved Assigned Protection Factor (APF)
RMM 311 Respiratory Protection Program Page 2 March 2013
 RMM 311 Respiratory Protection Program Page 2 Z180.1-00 Compressed Breathing Air and Systems. 3.3 NIOSH Standard 42 CFR 84 (1995) for Non Powered Particulate Filtering Respirators 3.4 McMaster University
6A.004 SCBA MAINTENANCE. Policy Number. Page 1 of 5 SCOPE
 SCBA MAINTENANCE SCOPE Stoney Point Fire Department Self-contained breathing apparatus provides respiratory protection under conditions of oxygen deficiency or in concentrations of toxic gases immediately
Barry Sanders has the following disclosures to make:
 Overview to Mask Fit Testing Barry Sanders June 20, 2018 Mask Fit Testing June 20, 2018 San Antonio, TX EXCELLENCE EXPERTISE INNOVATION Barry Sanders has the following disclosures to make: He is an employee
OSHA s Respiratory Protection Standard 29 CFR
 OSHA s Respiratory Protection Standard 29 CFR 1910.134 This program is intended to be a resource for instructors of occupational safety and health and is not a substitute for any of the provisions of the
Personnel Protective Equipment
 Personal Protective Equipment For Law Enforcement Personnel Protective Equipment Course Objectives 1. The participant will be able to choose which respiratory protection should be used for a given hazard.
3M Select Software United Kingdom and Ireland
 3M Select Software United Kingdom and Ireland Introduction to Select and Service Life Software 3M Select Software is designed to help you choose the appropriate 3M respirator for your work environment.
X. PERSONAL PROTECTIVE EQUIPMENT
 X. PERSONAL PROTECTIVE EQUIPMENT 1.0 Personal Protective Equipment Defined 1.1 Personal Protective Equipment (PPE) includes all clothing and work accessories designed to protect employees from workplace
Differentiation in a me-too marketplace.
 Head Harness for secure positioning. Adjustable strap for custom fit. Differentiation in a me-too marketplace. Flexwing design for comfortable one strap fit. Moldex respiratory and hearing protection products
Respirator with Ultra-Twin, Ultravue, Ultra Elite, or Duo-Twin TM Facepiece
 Respirator with Ultra-Twin, Ultravue, Ultra Elite, or Duo-Twin TM Facepiece instructions for use and care This manual, including the warnings and cautions inside, must be read and followed carefully by
RESPIRATORY PROTECTION PROGRAM
 RESPIRATORY PROTECTION PROGRAM Compliant to 29 CFR 1910.134 NEW MEXICO STATE UNIVERSITY Las Cruces, New Mexico Environmental, Health & Safety (EH&S) 505-646-3327 http://safety.nmsu.edu NMSU Respiratory
OSHA s Respiratory Protection Standard 29 CFR
 OSHA s Respiratory Protection Standard 29 CFR 1910.134 This program is intended to be a resource for instructors of occupational safety and health and is not a substitute for any of the provisions of the
Safety Best Practices Manual
 CHAPTER 16 Respiratory Protection Program POLICY The Flight Department is committed to protect employees from the harmful effects of exposure to occupational respiratory hazards. The Respiratory Protection
"RESPIRATORY PROTECTION AND SAFETY"
 MAJOR PROGRAM POINTS "RESPIRATORY PROTECTION AND SAFETY" Training for the OSHA RESPIRATORY PROTECTION STANDARD Quality Safety and Health Products, for Today...and Tomorrow OUTLINE OF MAJOR PROGRAM POINTS
RESPIRATORY PROTECTION PROGRAM QUALITATIVE FIT TEST INSTRUCTIONS
 RESPIRATORY PROTECTION PROGRAM QUALITATIVE FIT TEST INSTRUCTIONS OSHA requires fit testing for all employees who are required to wear tight-fitting facepiece respirators. To ensure that HALYARD * N95 Particulate