Agilent Intuvo 9000 Gas Chromatograph
|
|
|
- Douglas Holmes
- 6 years ago
- Views:
Transcription
1 Agilent Intuvo 9000 Gas Chromatograph Installation and First Startup Agilent Technologies
2 Notices Agilent Technologies, Inc No part of this manual may be reproduced in any form or by any means (including electronic storage and retrieval or translation into a foreign language) without prior agreement and written consent from Agilent Technologies, Inc. as governed by United States and international copyright laws. Manual Part Number G Edition First edition, September 2016 Printed in USA Agilent Technologies, Inc Centerville Road Wilmington, DE USA 安捷伦科技 ( 上海 ) 有限公司上海市浦东新区外高桥保税区英伦路 412 号联系电话 :(800) Warranty The material contained in this document is provided as is, and is subject to being changed, without notice, in future editions. Further, to the maximum extent permitted by applicable law, Agilent disclaims all warranties, either express or implied, with regard to this manual and any information contained herein, including but not limited to the implied warranties of merchantability and fitness for a particular purpose. Agilent shall not be liable for errors or for incidental or consequential damages in connection with the furnishing, use, or performance of this document or of any information contained herein. Should Agilent and the user have a separate written agreement with warranty terms covering the material in this document that conflict with these terms, the warranty terms in the separate agreement shall control. Safety Notices WARNING A WARNING notice denotes a hazard. It calls attention to an operating procedure, practice, or the like that, if not correctly performed or adhered to, could result in personal injury or death. Do not proceed beyond a WARNING notice until the indicated conditions are fully understood and met. CAUTION A CAUTION notice denotes a hazard. It calls attention to an operating procedure, practice, or the like that, if not correctly performed or adhered to, could result in damage to the product or loss of important data. Do not proceed beyond a CAUTION notice until the indicated conditions are fully understood and met.
3 Contents 1 Installing the GC Overview of Installation 8 Purpose of this procedure 8 Customer responsibilities 8 About Agilent s installation service 8 Tools and additional parts required 9 Performing checkout 9 System installation 9 The Intuvo 9000 GC 11 Unpacking 12 Step 1 Place the GC on the bench. 13 Step 2 Verify line voltage and power cord. 15 Power consumption 15 Power cords available 16 Grounding 18 Step 3 Prepare the GC. 19 Step 4 Connect the power cord and LAN cable. 22 Step 5 Turn on the GC. 23 Step 6 View the feature tour. 24 Step 7 Follow the prompts on the System Setup wizard. 25 Step 8 Configure the GC IP address. 26 Configure the 5977B MS 27 Step 9 Configure gases and detector specific settings. 28 Step 10 Set the system time zone, date, time, and pressure units. 29 Step 11 Connect to the GC and view the complete installation guide. 30 Step 12 Prepare gas supplies. 31 Install the gas regulators 31 Step 13 Connect tubing to gas supplies and purge. 34 Connect the tubing to the gas source 34 Step 14 Install filters and traps, then purge. 35 Install traps 35 Step 15 Connect gases to the GC. 36 Plumb to EPC flow modules 36 Step 16 Leak test all connections and set source pressures. 38 Agilent Intuvo 9000 GC Installation 3
4 Step 17 Vent hazardous gases to a fume hood. 40 Install FID vent chimney 41 Step 18 Connect cryogenic cooling (if present). 42 Connecting liquid carbon dioxide 43 Connecting liquid nitrogen 44 Connecting air to the multimode inlet 45 Step 19 Connect valve actuator air (if present). 46 Step 20 Install ALS, if ordered. 47 Step 21 Connect the external cables. 48 Back panel connectors 48 Connecting cables 51 Labeling BCD and EVENT cables 51 GC / MS / Agilent data system / ALS 52 Additional cabling configurations 52 Step 22 Install the Intuvo chips and column. 53 Step 23 Condition the column and bakeout the detector 59 Step 24 If appropriate, update firmware. 60 GC firmware 60 Step 25 Transfer the checkout sample to a screw-top sample vial. 62 Step 26 Enter the checkout method. 63 Step 27 Run one injection. 64 Step 28 Evaluate Results. 65 Prepare for the Next Analysis 66 A Making Swagelok Connections Making Swagelok Connections 68 Using a Swagelok Tee 71 B Cabling Diagrams and Remote Start/Stop Using the Remote Start/Stop Cable 74 Connecting Agilent products 74 Connecting non-agilent products 74 Multi-instrument Cabling Examples 77 GC / ALS / Non-Agilent Data System 77 GC / 3395A/3396B Integrator / ALS GC / 3396C Integrator / ALSExample: Using a Y-Cable in a setup (GC/MSD/Data System/Headspace Sampler) 78 GC / External Events (unspecified, non-agilent instrument) 79 4 Agilent Intuvo 9000 GC Installation
5 Cable Diagrams 80 Analog signal cable, general use, G Agilent analog signal cable, G Remote start/stop cable, general use, Agilent APG remote start/stop cable, Agilent APG remote start/stop cable, G Agilent remote start/stop Y-cable, G BCD cable, G BCD cable, G External event cable, G External valve cable, G Agilent Intuvo 9000 GC Installation 5
6 6 Agilent Intuvo 9000 GC Installation
7 Agilent Intuvo 9000 Gas Chromatograph Installation and First Startup 1 Installing the GC Overview of Installation 8 The Intuvo 9000 GC 11 Place the GC on the bench. 13 Verify line voltage and power cord. 15 Prepare the GC. 19 Connect the power cord and LAN cable. 22 Turn on the GC. 23 View the feature tour. 24 Follow the prompts on the System Setup wizard. 25 Configure the GC IP address. 26 Set the system time zone, date, time, and pressure units. 29 Configure gases and detector specific settings. 28 Connect to the GC and view the complete installation guide. 30 Prepare gas supplies. 31 Connect tubing to gas supplies and purge. 34 Install filters and traps, then purge. 35 Connect gases to the GC. 36 Connect cryogenic cooling (if present). 42 Connect valve actuator air (if present). 46 Install ALS, if ordered. 47 Connect the external cables. 48 Install the Intuvo chips and column. 53 Condition the column and bakeout the detector 59 If appropriate, update firmware. 60 Transfer the checkout sample to a screw-top sample vial. 62 Enter the checkout method. 63 Run one injection. 64 Evaluate Results. 65 Prepare for the Next Analysis 66 This section contains installation procedures for the Agilent Intuvo 9000 GC. Depending on the ordered options, some steps are optional, such as plumbing cryogenic cooling or valve actuator air. Instructions for connecting cables from the GC to other instruments in a typical Intuvo 9000 system are included here and in Appendix B, Cabling Diagrams and Remote Start/Stop." Agilent Technologies 7
8 1 Installing the GC Overview of Installation Purpose of this procedure Customer responsibilities This procedure ensures that instruments and systems are installed and functioning as designed. Correct installation is the first step in ensuring that instruments and systems operate reliably over their lifetimes. 1 Make sure your site meets the basic requirements, including the necessary space, electrical outlets, gases, tubing, operating supplies, consumables and other usage-dependent items required for a successful installation. Refer to the Agilent Intuvo 9000 GC, GC/MS, and ALS Site Preparation Guide. 2 If Agilent is delivering installation and familiarization services, users of the instrument should be present throughout these services; otherwise, these users will miss important operational, maintenance, and safety information. Additional information is included with the Agilent GC and GC/MS User Manuals & Tools DVDs and through the instrument s website. Once the GC is turned on, open a browser and connect to the instrument's help and information system. If your site complies with all site preparation specifications, the average installation time for the GC is about 2 hours. Allow more time for any additional products (for example, an ALS), add-ons, and software. About Agilent s installation service The installation service does not include: Network setup with other computers or to the site or building LAN. Customization of the system. Method development and testing. Analysis of customer standards or samples. Testing against the instrument performance specification. (Operational qualification and performance verification services, OQ/PV, can be purchased separately.) 8 Agilent Intuvo 9000 GC Installation
9 Installing the GC 1 If you need assistance beyond this installation service, please contact your local Agilent Technologies office. Assistance with installation and with user-specific services and applications is available and will be contracted separately. Tools and additional parts required Performing checkout System installation Installation requires the following tools, fittings, and hardware. These items are not included with the instrument. Precleaned copper tubing, 1/8-inch or 1/4-inch od. Fittings. Tubing cutter. Filters for gas supplies. 7/16-inch and 9/16-inch open-end wrenches for assembling Swagelok fittings. Carrier and other gas supplies. Pressure regulator for each gas supply. A computer, tablet, or other LAN-capable device (for accessing GC user information and for firmware updates). Any additional LAN components, such as cables and a switch or hub, for connection to the site LAN (not included in Agilent installation services). The Agilent Intuvo 9000 GC, GC/MS, and ALS Site Preparation Guide contains a listing of Agilent installation kits and a description of parts included with each. These kits contain filters, fittings, tubing, tools (wrenches, tubing cutter, drivers, and so on), and other required parts for installing a GC.) If using an Agilent data system, you can use it to perform the checkout procedure. Read these GC installation instructions and the instructions for installing the data system. If installing an ALS, the ALS can be used for checkout. Also refer to the ALS installation documentation. When installed as part of a complete system including an Agilent data system, first install the GC up to the checkout step. Configure the new GC in the data system and open an online instrument session. Use the data system to perform the Agilent Intuvo 9000 GC Installation 9
10 1 Installing the GC checkout test. When installed as part of other complete systems, for example in an Agilent GC/MSD or GC/MS system, see the installation instructions for that system. 10 Agilent Intuvo 9000 GC Installation


11 Installing the GC 1 The Intuvo 9000 GC Septum purge vent Split vent Detector Inlet Cooling intakes Touch screen display Front door handle Cooling intake Power on and status indicators Figure 1 Front of the Intuvo 9000 GC Inlet gas connection Detector gas connections Exhaust vents Signal and communications connections Power switch Power receptacle Air intake Figure 2 Back of the Intuvo 9000 GC Agilent Intuvo 9000 GC Installation 11

12 1 Installing the GC Unpacking The GC is heavy. To avoid injury use a two-person lift. 1 Inspect the shipping containers for damage. If a container is damaged or shows signs of stress, notify both the carrier and your local Agilent sales office. Keep all shipping materials for inspection by the carrier. 2 Check the items received against the packing lists. If there are discrepancies, notify your local Agilent sales office immediately. Keep the shipping containers until you have checked their contents for completeness and verified instrument performance. 12 Agilent Intuvo 9000 GC Installation


13 Installing the GC 1 Step 1 Place the GC on the bench. The GC requires a bench that can support its weight plus that of other equipment you will use with it. The area must be free of overhanging obstructions that might interfere with autosamplers, or that limit access to the top of the instrument. The area must include sufficient space behind the GC to allow for cooling. WARNING The GC is heavy. To avoid injury use a two-person lift. 1 Remove the GC from its shipping box. Lift using the handle on the back panel and the flat area beneath the GC front. Avoid lifting by the door handle or the front air intake grill. 2 Place the GC on the bench top. Make sure gas and power supplies are accessible. Place related equipment near the GC. Agilent Intuvo 9000 GC Installation 13


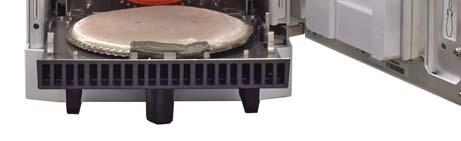
14 1 Installing the GC 3 If space is limited behind the GC, attach the optional oven exhaust deflector to the back of the GC as shown below. The oven exhaust deflector accepts a 7.62 cm (3 in.) diameter exhaust duct, and adds about 7.6 cm to the depth of the GC, but this additional depth does not increase the depth required for proper ventilation. You will only need 20.3 cm (8 in) from the GC back panel. 14 Agilent Intuvo 9000 GC Installation
15 Installing the GC 1 Step 2 Verify line voltage and power cord. 1 Verify that the power cord is correct for the voltage and location. See Power cords available on page 16. The power cord termination is determined by the country where the GC is ordered. WARNING Electrical shock hazard. To avoid injury, only a qualified person should measure line voltage. Power consumption 2 Have a qualified person measure the actual power outlet voltage and verify it meets the tolerance requirements listed in Table 1 on page 15. See also Grounding on page 18. The next sections detail the power specifications and requirements for reference. The number and type of electrical outlets required for installation depends on the size and complexity of your system. A GC system with a computer, monitor, printer, and hub requires five outlets. The GC does not require a dedicated ground, but since the GC can draw up to 12 A maximum, depending on the line voltage, you may not want other devices on the same circuit. Table 1 GC power requirements Line voltage * Frequency Current Maximum continuous power consumption (VA) 120 single phase*( 10% / +10%) 50/60 ( 5% / +5%) V single/split phase, +10 to 10% 50/60 ( 5% / +5%) 12 A A 7.7 / A * Users of 100 V power (Japan) receive the 120 V US power option with a 100 V/120 V step up transformer. Power outlet current rating Power line conditioners should not be used with the GC. Agilent Intuvo 9000 GC Installation 15
16 1 Installing the GC Power cords available Table 2 lists the power cords available for the GC. If your power cord is incorrect, order the cord appropriate for the country. Table 2 Power cords and terminations Line Amp Cable length Country Voltage Rating (m) Termination type Australia AS 3112 Plug Termination China GB 1002 Europe, Korea 220 / 230 / CEE 7/7 Type F Switzerland SEC Type 12 India, South Africa 220 / 230 / IEC 83-B1 Israel Israeli SI32 16 Agilent Intuvo 9000 GC Installation
17 Installing the GC 1 Table 2 Power cords and terminations (continued) Country Line Voltage Amp Rating Cable length (m) Termination type Japan 120 * NEMA 5-15P Plug Termination Japan NEMA L6-20P United Kingdom, Hong Kong, Singapore, Malaysia BS89/13 United States NEMA 5-15P Europe 220 / 230 / CEE 7/7 Type F Denmark / Greenland SR D1 DK2-5A Argentina Type I Agilent Intuvo 9000 GC Installation 17
18 1 Installing the GC Table 2 Power cords and terminations (continued) Country Line Voltage Amp Rating Cable length (m) Termination type Chile CEI Type L Plug Termination Brazil NBR Type N * Users of 100 V power (Japan) receive the 120 V US power option with a 100 V/120 V step up transformer. Grounding To protect users, the metal instrument panels and cabinet are grounded through the three-conductor power line cord in accordance with International Electrotechnical Commission (IEC) requirements. The three-conductor power line cord, when plugged into a properly grounded receptacle, grounds the instrument and minimizes shock hazard. A properly grounded receptacle is one that is connected to a suitable earth ground. Proper receptacle grounding should be verified. Make sure the GC is connected to a dedicated receptacle (outlet). WARNING Appliance Coupler (mains input power cord) is the power disconnect device. Do not position the instrument such that access to the coupler is impaired. 18 Agilent Intuvo 9000 GC Installation


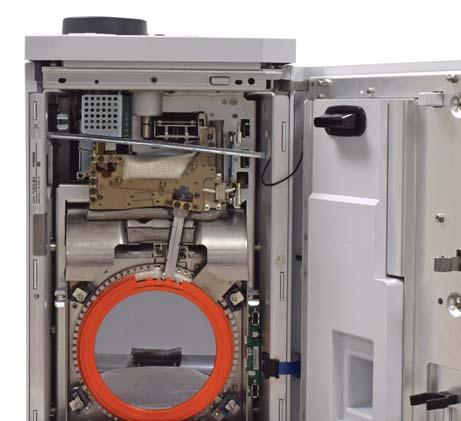
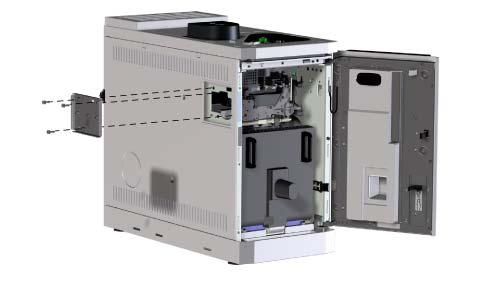
19 Installing the GC 1 Step 3 Prepare the GC. Remove protective packing used for shipment. Back panel caps Tape and detector exhaust cap Door clamp T20 Agilent Intuvo 9000 GC Installation 19

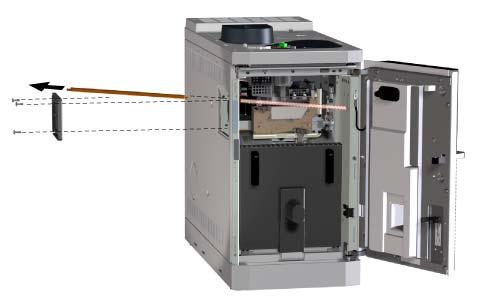
20 1 Installing the GC Oven packing 20 Agilent Intuvo 9000 GC Installation


21 Installing the GC 1 Intuvo Torque Driver Bus door Front view Agilent Intuvo 9000 GC Installation 21

22 1 Installing the GC Step 4 Connect the power cord and LAN cable. LAN ~ 22 Agilent Intuvo 9000 GC Installation

23 Installing the GC 1 Step 5 Turn on the GC. Agilent Intuvo 9000 GC Installation 23

24 1 Installing the GC Step 6 View the feature tour. The Feature Tour can be viewed from the help at any time. 24 Agilent Intuvo 9000 GC Installation


25 Installing the GC 1 Step 7 Follow the prompts on the System Setup wizard. When the Feature Tour ends, the GC next launches the system setup wizard. The next steps will follow the wizard steps and provide additional information. Agilent Intuvo 9000 GC Installation 25
26 1 Installing the GC Step 8 Configure the GC IP address. Enter the GC Host Name or IP address, Gateway, and Net Mask (subnet mask). For an isolated LAN installation, see Table 3 for typical IP addresses. LAN switch or hub LAN cable LAN cable Crossover LAN cable OR GC Computer GC Computer Figure 3 Simple supported LAN configurations: LAN switch or hub (left) and direct connection (right) Table 3 Typical IP addresses for an isolated LAN GC Computer IP address Subnet mask A single LAN communications cable is supplied with the GC. The switch (or hub) and other cables must be ordered separately, if needed. See Table 3 and Table 4 for cabling requirements for other configurations. 26 Agilent Intuvo 9000 GC Installation
27 Installing the GC 1 Table 4 Cabling requirements 9000 GC connected to: Required Cable(s) Part number Samplers 7693A Automatic Liquid Sampler Injector cable or tray cable G Automatic Liquid Sampler Injector cable G A Headspace Sampler Remote, 9-pin male/6-pin connector G G1289B/G1290B Headspace Sampler Remote, 9-pin male/6-pin connector G PAL automatic sampler Cable, 4 conductor, remote start G Mass Spectrometers and MS systems Mass Selective Detector Remote, 2-m, 9-pin male/9-pin male G Integrators 3395B/3396C Integrator Remote, 9 pin/15 pin Analog, 2 m, 6 pin G Non-Agilent Integrator General purpose analog signal cable 2 m, 6 pin G Non-Agilent data system Other devices Non-Agilent instrument, unspecified Stream selection valves Gas sampling valves (external) LAN LAN General use remote, 9-pin male/spade lugs (various lengths) External event, 8 pin/spade lugs (No label. See Labeling BCD and EVENT cables.) See documentation accompanying the valve (2 m), (5 m), (0.5 m) G External valve cable (includes green EVENT label) G Cable, networking CAT 5, 25 feet Cable, LAN, crossover Configure the 5977B MS If connected to a 5977B MS, use the GC touch screen to set the MS IP address and related settings. Touch Settings > MSD Settings. Agilent Intuvo 9000 GC Installation 27
, accept the default value for installation and checkout.")
28 1 Installing the GC Step 9 Configure gases and detector specific settings. Select the gas types that will be connected to the GC. If your GC detector includes other settings, for example a Lit Offset value for a flame ionization detector (FID), accept the default value for installation and checkout. 28 Agilent Intuvo 9000 GC Installation
29 Installing the GC 1 Step 10 Set the system time zone, date, time, and pressure units. The Current Time is based on a 24 hour clock. The time set here is important for the time and date stamps used when collecting data and recording log entries (such as maintenance tasks and errors). The GC time also controls resource conservation for connected samplers. Agilent Intuvo 9000 GC Installation 29

30 1 Installing the GC Step 11 Connect to the GC and view the complete installation guide. Open the complete installation instructions by browsing to the GC in a web browser /install Intuvo 9000 GC X 30 Agilent Intuvo 9000 GC Installation
31 Installing the GC 1 Step 12 Prepare gas supplies. Most of installation involves plumbing gas to tanks, filters, and flow modules. Swagelok fittings are used to make leak-tight connections. If you are not sure how to make a Swagelok connection, see Appendix A for instructions. WARNING Hydrogen is a flammable gas. If hydrogen or any other flammable gas is used, periodic leak tests should be performed. Be sure that the hydrogen supply is off until all connections are made. Substituting parts or performing any unauthorized modification to the instrument may result in a safety hazard. Install the gas regulators 1 Select the appropriate CGA regulator for each gas type. (In other countries, refer to local standards. See the Agilent Intuvo 9000 GC, GC/MS, and ALS Site Preparation Guide for requirements.) Table 5 Gas regulators, 1/8-inch, U.S. only * Description Part number CGA 346, 125 psig max (8.6 bar), Air CGA 350, 125 psig max (8.6 bar), H2, Ar/Me CGA 540, 125 psig max (8.6 bar), O CGA 580, 125 psig max (8.6 bar), He, Ar, N CGA 590, 125 psig max (8.6 bar), Air * For 1/4-inch tubing, purchase a 1/4-inch to 1/8-inch adapter, U.S. only. 2 Confirm that the outlet fitting of the regulator is 1/8-inch Swagelok. If not, install the appropriate adapter fitting. Wrap the fitting threads using PTFE tape. Wrap the tape in a clockwise direction so that the adapter threads do not unwrap the tape. Be careful to keep the tape away from the end of the fitting. Two to three tightly wound wraps are sufficient. Never use a liquid thread sealant. Liquid thread sealants introduce contamination into the GC plumbing Agilent Intuvo 9000 GC Installation 31


32 1 Installing the GC system. Tighten the Swagelok adapter fitting securely to the NPT pipe thread fitting. 3 Install the regulator onto the compressed gas cylinder main fitting. Check the thread type. Some regulators use left-hand thread fittings. For left-handed threads, the nut will have a groove in it. Groove indicates left-hand thread 32 Agilent Intuvo 9000 GC Installation

33 Installing the GC 1 4 Purge the air from the regulator by repeating the following procedure 5 times: a Fully close the regulator knob, then open the main tank valve. b Turn the regulator knob fully counter-clockwise to open the tank main valve, pressurizing the primary side of the regulator. c Turn OFF the tank main valve. d Slowly turn the regulator knob clockwise to release ("bleed off") the gas pressure. e Close the regulator knob. The image below illustrates a typical pressure regulator installation. In the example shown below, which uses an optional shutoff valve, open the shutoff valve and leave open during purging. Secondary gauge Shutoff valve (optional) Primary gauge Main tank valve Regulator knob Swagelok adapter Agilent Intuvo 9000 GC Installation 33
34 1 Installing the GC Step 13 Connect tubing to gas supplies and purge. Connect the tubing to the gas source NOTE If you need more than 4.5 m (15 feet) supply tubing for a gas source, use 1/4-inch tubing with appropriate hardware. See the Agilent Intuvo 9000 GC, GC/MS, and ALS Site Preparation Guide for part numbers. 1 Turn off all gases at their sources. Measure the length of tubing needed to connect the gas supply outlet to the inlet fitting on the GC. Take into account any traps or tees you will need. 2 Cut the tubing to length with a tubing cutter (Figure 4). Cutting wheel Good cut Figure 4 Typical tubing cutter 3 Connect the tubing to the gas source with a Swagelok fitting. See Appendix A, Making Swagelok Connections. 34 Agilent Intuvo 9000 GC Installation
35 Installing the GC 1 Step 14 Install filters and traps, then purge. Install traps This section describes the general installation of traps to a typical GC. Refer to the installation instructions provided with the traps for more details. 1 Determine where you will install the traps in your supply tubing line. Figure 5 shows the recommended trap order for the carrier gas and the recommended locations for On/Off valves. See also the Site Preparation Guide. Tank valve Two-stage regulator On/Off valve Gas Clean Filter system On/Off valve Gas supply Figure 5 Plumbing the gas supplies 2 Cut the tubing to length with a tubing cutter. 3 Connect the traps and tubing. On/Off valves are not essential, but are very useful when a tank or trap must be changed. (If purchasing Agilent compliance services, install an on/off valve for the inlet gas supply.) Agilent Intuvo 9000 GC Installation 35

36 1 Installing the GC Step 15 Connect gases to the GC. Plumb to EPC flow modules Detector gases Carrier gas Purge the supply lines for a few minutes before connecting them to the GC flow modules. 36 Agilent Intuvo 9000 GC Installation

37 Installing the GC 1 If sharing carrier gas between an inlet and a detector, we recommend using a Tee fitting that includes shutoff valves for performing leak tests. 60 mm = ~ 2 1/4 inches 33 mm = ~ 1 5/16 inches 33 mm = ~ 1 5/16 inches Figure 6 Example Tee with shutoff valves When two detectors use the same gases, we recommend using a Tee fitting. Shutoff valves are not required. TCD connections The carrier gas and reference gas must come from the same source. Use a Tee fitting. Agilent Intuvo 9000 GC Installation 37
38 1 Installing the GC Step 16 Leak test all connections and set source pressures. Liquid leak detectors, such as soapy water, are not recommended, especially in areas where cleanliness is very important. If there is a leak, these liquids can contaminate the plumbing and affect your analyses. If you do use leak detection fluid, immediately rinse the fitting to remove the soapy film. When checking for leaks of hydrogen or helium, Agilent recommends the G3388B leak detector, or similar. WARNING To avoid a potential shock hazard when using liquid detection fluid, turn the GC off and disconnect the main power cord. Be careful not to spill leak solution on electrical leads. Perform a pressure drop test. 1 Set the regulator pressure to 415 kpa (60 psi). 2 Fully turn the regulator pressure adjustment knob counterclockwise to shut the valve. 3 Wait 10 min. If there is a pressure loss greater than 7 kpa (1 psi), there is a leak in the external connections. Use the leak detector to check each fitting for leaks. Correct leaks by tightening the connections. Retest the connections; continue tightening until all connections are leak-free. 38 Agilent Intuvo 9000 GC Installation
39 Installing the GC 1 Set source gas pressures The pressure set at a tank regulator depends on these factors: The inlet pressure needed to achieve the highest column flow rate required by your method. The pressure/flow relationship depends on the column or device involved. The best way to address this is to begin at a moderate pressure level and adjust upward as needed. A pressure difference of about 170 kpa (25 psi) across flow controlling devices enables them to work properly. The pressure limit of the weakest part of the supply system determines the maximum supply pressure available. Swagelok fittings and copper tubing are more than adequate for the highest pressures used in gas chromatography. We recommend a maximum continuous operating pressure of 1170 kpa (170 psi) to avoid excessive wear and leaks. Traps are often the weakest part of the system. They should be labeled, either on the trap itself or in accompanying literature, with a maximum operating pressure. Source pressure must not exceed the lowest maximum operating pressure in the supply system. Table 6 suggests starting values of source pressure. Table 6 Suggested starting pressures Gas Use Source pressure Carrier Capillary columns 550 kpa (80 psi) Air for FID, FPD Detectors 550 kpa (80 psi) Hydrogen Detectors 410 kpa (60 psi) Makeup gas Detectors 410 kpa (60 psi) TCD Reference TCD 410 kpa (60 psi) Air for valve actuators Valves 345 kpa (50 psi) Agilent Intuvo 9000 GC Installation 39

40 1 Installing the GC Step 17 Vent hazardous gases to a fume hood. Hazardous sample gases or uncombusted hydrogen gas can exit the GC from ECD exhaust, split vent and septum purge exhausts, and the TCD exhaust. Such gases must be safely vented in accordance with local safety procedures and standards. If using an ECD, or if using hydrogen carrier gas that will be uncombusted, you must either safely vent the exhaust or operate the GC inside a fume hood. For example, if using hydrogen carrier gas, the GC would vent uncombusted hydrogen from a thermal conductivity detector (TCD) and from the inlet split vent and septum purge vent. The ECD exhaust vents through a coiled tube. Connect tubing from the tube fitting at the end of this tubing to an exhaust hood via a hole in the back panel. Detector exhaust vents here For a TCD, you must supply vent tubing and fittings to connect to the detector exhaust tube on the top of the detector. Route the tubing out the back of the GC, following the same path as for the ECD vent tubing. The other detectors (FID and FPD) combust any hydrogen carrier gas. 40 Agilent Intuvo 9000 GC Installation

41 Installing the GC 1 Install FID vent chimney CAUTION Combustion of methylene chloride in the FID creates corrosive gases that can damage the GC. If FID combustion will create corrosive gases, install the FID vent chimney. If FID combustion will create corrosive gases, such as the HCl produced during the combustion of methylene chloride solvent, install the FID vent chimney. Connect the exhaust to a fume hood as needed. Agilent Intuvo 9000 GC Installation 41
42 1 Installing the GC Step 18 Connect cryogenic cooling (if present). Cryogenic cooling allows you to cool the MMI inlet, including cooling to setpoints below ambient temperature. A solenoid valve controls the flow of coolant to the inlet. The inlet can use either liquid carbon dioxide (CO 2 ), liquid nitrogen (N 2 ), or compressed air as a coolant. CO 2 and N 2 coolants require different hardware on the GC. (You can use air cooling on a multimode inlet, with the N 2 solenoid valves and hardware.) Flared or AN tubing fittings are commonly used to connect the liquid supply tubing to the cryo coolant tank. Check with the supplier of the coolant before plumbing to be sure you have the correct fittings. 42 Agilent Intuvo 9000 GC Installation
43 Installing the GC 1 Connecting liquid carbon dioxide WARNING Do not use copper or thin-wall stainless steel tubing! Either presents an explosion hazard. CAUTION Do not use padded tanks for CO 2 supplies. The cryogenic valve is not designed to handle the higher pressures padded tanks generate. The tank must be equipped with an eductor tube (dip tube) that reaches to the bottom of the tank, so that liquid (rather than gaseous) CO 2 is drawn. Materials needed: 1/8-inch heavy-wall, stainless steel tubing 1 Locate the inlet for liquid CO 2 on the back of the GC. Prepare enough tubing to reach from the supply tank to this fitting. 2 Connect the supply tubing to the liquid CO 2 tank outlet with the fitting recommended by the supplier. 3 Use a Swagelok fitting to connect the supply tubing to the cryogenic valve inlet. Agilent Intuvo 9000 GC Installation 43
44 1 Installing the GC Connecting liquid nitrogen Materials needed: 1/4-inch insulated copper tubing 1 Position the nitrogen tank as close to the GC as possible to insure that liquid and not gas is delivered to the inlet. 2 Locate the inlet for coolant on the back of the GC. Prepare enough tubing to reach from the supply tank to this outlet. 3 Connect the supply tubing to the liquid N 2 tank outlet with the fitting recommended by the supplier. 4 Use a Swagelok fitting to connect the supply tubing to the cryogenic valve inlet. 44 Agilent Intuvo 9000 GC Installation
45 Installing the GC 1 Connecting air to the multimode inlet The multimode inlet can also use compressed air cooling with the liquid N 2 inlet cooling option. Requirements for compressed air cooling: The compressed air should be free of particulate material, oil, and other contaminants. These contaminants could clog the inlet's cryo valve and expansion orifice or impact the proper operation of the GC. Set the air supply pressure to 138 to 276 kpa (20 and 40 psig). While air supplied from tanks can meet these criteria, the consumption rate of air can be 80 L/min, varying based on supply pressure. Materials needed: Installation of a compressed air line to the inlet cryo coolant valve requires the hardware (and appropriate fittings) noted below: Use 1/4-inch copper or stainless steel tubing for supply tubing to the N 2 valve 1 Locate the input fitting for inlet coolant on the back of the GC. Prepare enough tubing to reach from the supply to this outlet. 2 Connect the supply tubing to the air supply outlet with the fitting recommended by the supplier. 3 Use a Swagelok fitting to connect the supply tubing to the cryogenic valve input fitting. Agilent Intuvo 9000 GC Installation 45
46 1 Installing the GC Step 19 Connect valve actuator air (if present). Valves are driven by air actuators. Valves should have a dedicated air source; they cannot share detector air supplies. CAUTION Do not share air between a detector and valves. Valves can use nitrogen as an alternate supply. In this case, the nitrogen does not have to be chromatographic grade but must be free from contaminants. Valve actuator air is supplied through 1/4-inch plastic tubing. If your GC was ordered with valves, the plastic tubing will already be attached to the actuators and will extend from the back of the GC. CAUTION Route the tubing away from the GC hot air exhausts. The hot air will melt the plastic tubing. Turn off the air supply at the source. If needed, shorten the supplied plastic tubing using a sharp knife. Connect the tubing to the air source using a 1/4-inch Swagelok nut and ferrules. 46 Agilent Intuvo 9000 GC Installation
47 Installing the GC 1 Step 20 Install ALS, if ordered. If installing an ALS, install it now. Refer to its instructions. Prepare the sampler for checkout. See the checkout procedures and information in the Operation Manual. 1 Prepare a 2-mL screw-top sample vial. 2 Prepare 4-mL waste vials and place them into the turret. 3 Prepare fresh solvent solutions as needed for the checkout sample for your detector type. Place the solvent vials into the injector turret. For details on the solvent needed, see the Operation Manual. Agilent Intuvo 9000 GC Installation 47
, connecting signal output to integrators, synchronizing the start and end of a run")
48 1 Installing the GC Step 21 Connect the external cables. Back panel connectors Additional cables may be installed for control of the GC s automatic liquid sampler (ALS), connecting signal output to integrators, synchronizing the start and end of a run between various instruments, sensing conditions external to the GC, and controlling devices external to the GC. If using Event or BCD cables, label the cables as needed to identify their intended use and appropriate connector on the GC. See Labeling BCD and EVENT cables. The figure below shows the connectors on the back panel of the GC. SIG1 SIG2 BCD LAN EVENT REMOTE ALS 1 ALS 2 See also Cable Diagrams on page 80. Sampler connectors If using an ALS, connect it to the GC using the following connectors: ALS 1 Optional. An injector or 150-position sample tray. ALS 2 Optional. An injector or 150-position sample tray. The SIG (analog output) connectors Optional. Use SIG1 and SIG2 for analog output signals. 48 Agilent Intuvo 9000 GC Installation


49 Installing the GC 1 REMOTE connector Provides a port to remotely start and stop other instruments using the APG protocol. A maximum of 10 instruments can be synchronized using this connector. See Using the Remote Start/Stop Cable on page 74 for more detail. EVENT connector This connector provides two passive contact closures and two 24-volt outputs for controlling external devices. Agilent Intuvo 9000 GC Installation 49

 connector, for communication with data systems and other")
50 1 Installing the GC BCD input connector This connector provides two control relays and a BCD input for a stream selection valve or a BCD generating device. CAUTION This connector is similar to the EVENT connector. Plugging a non-bcd cable into the BCD connector can damage the GC. LAN connector Standard Local Area Network (LAN) connector, for communication with data systems and other devices via TCP/IP. 50 Agilent Intuvo 9000 GC Installation
51 Installing the GC 1 Connecting cables Use the supplied LAN cable to connect the GC to a LAN switch or hub as shown below (see Figure 16). Other LAN configurations are possible. However Agilent typically supports only simple LAN setups. Refer to your Agilent data system documentation for details about its supported LAN configurations. Table 7 Cabling for other instruments in a 9000 GC system Instrument 1 Instrument 2 Type of cable Part number Mass Selective Detector Headspace sampler Splitter ("Y") cable for remote start/stop, 1 male and 2 female connectors G Splitter ("H") cable for APG remote, 2 male and 2 female connectors Labeling BCD and EVENT cables The BCD and EVENT connectors look similar. However, plugging an Event cable into the BCD connector can damage the GC logic board. To prevent accidental damage, the following BCD and Event cables come with labels that identify their intended use: G , External valve cable G , Pulser Module Power Supply Cable G , BCD Cable Assembly For other cables, apply an Event or BCD label to the cable: G , Caution label, BCD cable, purple G , Caution label, Events cable, green G G Agilent Intuvo 9000 GC Installation 51
52 1 Installing the GC GC / MS / Agilent data system / ALS 1. LAN cable LAN switch or hub 1. LAN cable LAN cable B MSD 2. APG Remote Cable, G GC Computer Table 8 Cables for a typical GC/MSD or GC/MS system Number Part number and description 1 G , 2-m APG remote cable, 9-pin male/9-pin male , Cable, LAN, 25 foot The communications cable used to connect a 5977B to the 9000 GC is included with the MS. Additional cabling configurations For additional cabling configurations, see Appendix B, Cabling Diagrams and Remote Start/Stop." 52 Agilent Intuvo 9000 GC Installation


53 Installing the GC 1 Step 22 Install the Intuvo chips and column. The GC ships with packing materials in the inlet base and column connection. Remove these and install the inlet chip, guard chip, and column. Each GC ships with a simple D1 detector chip installed. If the ordered configuration includes another detector, first verify the D1 performance, then install the detector chip for the other configuration and test. For an MS configuration with no other GC detector, you will need to replace the simple D1 chip with the MS chip before installing the column. A capillary column was shipped with the GC to be used to confirm proper operation. Agilent suggests that it be used only for that purpose. Guard chip Guard chip heater Guard chip compression bolt Inlet sealing screw Clips Intuvo gasket Detector chip Compression bolt Smart ID key connectors: Detector Inlet Inlet chip Intuvo gasket Figure 7 Intuvo GC bus components, split/splitless inlet and simple D1 configuration shown Agilent Intuvo 9000 GC Installation 53
54 1 Installing the GC 1 Remove the column packing plate and no-hole gasket. a Remove the Intuvo compression bolts using the torque driver. b Remove the packing plate. c Remove and discard the no-hole gasket. 2 Remove the inlet base plug. a Use a 7/16-inch open-end wrench (SS inlet) or 5/16-inch and 1/4-inch wrenches (MM inlet) to loosen the sealing screw at the inlet base. b Remove the plug from the inlet base. 3 Install the inlet chip. a Remove the inlet cover. b Slide open the guard chip cover. c Loosen the guard chip compression bolt. d Use the torque driver to open the clips that secure the inlet chip to the bus. e Orient the new inlet chip so the end with the 90 degree bend is on top, then install the bent end into the pocket at the top right of the bus. This end of the inlet chip fits into a blind hole above the guard chip. See Figure 7. f g Place the other end of the inlet chip into the right side of the column click and run fitting. Rotate the clip to hold the inlet chip in place. Insert the inlet chip Smart ID tag into the lower socket to the right of the bus. 54 Agilent Intuvo 9000 GC Installation
 the guard chip heater. Place the Intuvo Guard Chip left end into the inlet base.")
55 Installing the GC 1 4 Install the Guard Chip. The larger end of the Guard Chip inserts into the inlet base, while the smaller end inserts into the GC flow path. Figure 8 Guard Chip orientation a b c d e f g If needed, use your finger to depress (lower) the guard chip heater. Place the Intuvo Guard Chip left end into the inlet base. For an MMI guard chip, avoid touching the upright tube against the sides of the opening. Rotate the body of the Intuvo Guard Chip into the GC, lifting the Intuvo Guard Chip right end over the boss and into the pocket. Finger-tighten the compression bolt until you feel slight contact on the guard chip. Raise the guard chip heater. Finger-tighten the inlet sealing screw. Tighten the inlet sealing screw. For MMI, use two wrenches. Agilent Intuvo 9000 GC Installation 55


56 1 Installing the GC h Tighten the compression bolt using the torque driver until you hear one click. 5 Use the torque driver to open the four column clamps. 56 Agilent Intuvo 9000 GC Installation


57 Installing the GC 1 6 Install a new gasket. 7 Place the column. a b Slide the column s Intuvo Smart ID Key out of its slot in the column support ring and insert it into the lower USB connection (column 1 position) along the right side of the oven. Place the column on the bottom clamps. Agilent Intuvo 9000 GC Installation 57

58 1 Installing the GC CAUTION Hold the column assembly only by the outer ring do not press or pull on the column itself. c Tilt the column up so the click and run connectors mate into the bus fitting. d Loosely install the compression bolts. 8 Check column placement and tighten the compression bolts. a The click and run connectors should sit flat against the gasket. b Tighten the compression bolts until you hear one click. 9 Close the column clamps. 10 Install the bus door. 11 Install the inlet cover. 58 Agilent Intuvo 9000 GC Installation
59 Installing the GC 1 Step 23 Condition the column and bakeout the detector Before use, the column must be conditioned to remove any contaminants. 1 Turn on the carrier gas. 2 Perform a leak check. Touch Diagnostics and navigate to the leak check. 3 Refer to the checkout method for the detector.see the Operation Manual. Note the oven temperature, average velocity or flow, and so on. 4 Set the oven temperature and inlet flow conditions specified for conditioning the column. Touch Method, select Active method, then touch Edit to access current GC temperatures and flows. Set the column temperature to 20 C higher than the highest checkout method temperature (do not exceed the column maximum temperature). For example, for FID checkout set the column temperature to 210 C. Set the detector temperature to 20 C higher than the checkout method temperature. For example, for FID checkout set the detector temperature to 320 C. Turn the detector gases on. Light the flame, if appropriate. 5 Condition for the time given in the column s instructions. 6 Cool the oven. 7 Leave the carrier gas on. If using a flammable carrier gas (hydrogen), continue to vent the exhausts to a fume hood. Agilent Intuvo 9000 GC Installation 59

60 1 Installing the GC Step 24 If appropriate, update firmware. GC firmware Firmware maintenance is an ongoing process. Updates are posted on the Agilent web site and may be downloaded to the GC using the GC Firmware Update Tool. While the GC shipped with the latest firmware version available when it was manufactured, Agilent recommends that you check for any updates and install them if available. 1 Install the GC Firmware Update Tool. a b Place the Agilent GC and GC/MS User Manuals & Tools DVD into your PC s DVD drive. Open file <D:>/index.html, where <D:> is the name of the DVD drive. c d Click the GC Firmware Update Tool icon. (If your browser does not start the installer, browse to the DVD and run file <DVD drive letter>:\tools\gcfwupdate\setup.exe.) Read the instructions, then install the utility as described. 60 Agilent Intuvo 9000 GC Installation

61 Installing the GC 1 2 Check the GC firmware version. Touch Setup > About. 3 Check for any available firmware updates. Go to the Agilent web site at If the available firmware version is newer than the version on the GC, download it. If not, skip to the next section. 4 Verify that if a new firmware version is available, it is compatible with the current hardware and software. For example, verify that any data system is compatible with the new firmware. If the new firmware is not compatible or acceptable for any reason, skip to the next section. 5 If available, install any available firmware updates. Agilent Intuvo 9000 GC Installation 61
62 1 Installing the GC Step 25 Transfer the checkout sample to a screw-top sample vial. 1 The checkout sample is contained in sealed glass vials. Wrap a piece of cloth or a paper towel around the vial to protect your fingers and snap the top off. 2 Use a pipette to transfer the sample to a 2-mL screw-top vial. (If using an ALS, use a vial suitable for the ALS turret or tray.) 62 Agilent Intuvo 9000 GC Installation
63 Installing the GC 1 Step 26 Enter the checkout method. Find the complete checkout methods and procedures in the Operation Manual. Enter the parameters for the checkout procedure. If using an Agilent data system, use it to create a checkout method. If not using a data system, enter the setpoints using the touch screen. Agilent Intuvo 9000 GC Installation 63
64 1 Installing the GC Step 27 Run one injection. When the GC becomes Ready (Not ready light turns off), make the injection and start the run. For an ALS injection, press [?] on the GC or start the run from the data system, as appropriate. For a manual injection, inject the sample and press [?]. 64 Agilent Intuvo 9000 GC Installation
65 Installing the GC 1 Step 28 Evaluate Results. Compare the chromatogram you generated with the one in the checkout procedure. There should be a close resemblance. Agilent Intuvo 9000 GC Installation 65
66 1 Installing the GC Prepare for the Next Analysis After evaluating the GC under the checkout conditions, installation checkout is complete. The next step is to prepare the GC for your next analysis. Be sure to cool the GC before making changes. Install the appropriate inlet hardware (can include septum, liner, liner-o-ring, guard chip or jumper chip, and so on). Install the appropriate detector hardware (wavelength filter for FPD + ). Change to any alternate gas sources as needed for the new analysis. Install the desired column and condition it per the manufacturer s recommendations. Configure the GC to match any hardware or gas type changes (liners, carrier or makeup gas types, and so on). Load or create the desired method. 66 Agilent Intuvo 9000 GC Installation
67 Agilent Intuvo 9000 Gas Chromatograph Installation and First Startup A Making Swagelok Connections Making Swagelok Connections 68 Using a Swagelok Tee 71 The gas supply tubing is attached with Swagelok fittings. If you are not familiar with Swagelok connections, review the following procedures. Agilent Technologies 67
68 A Making Swagelok Connections Making Swagelok Connections Objective To make a tubing connection that does not leak and that can be taken apart without damaging the fitting. Materials needed: 1/8-inch (or 1/4-inch, if used) preconditioned copper tubing 1/8-inch (or 1/4-inch, if used) Swagelok nuts Front and back ferrules Two 7/16-inch (for 1/8-inch nuts) or 9/16-inch (for 1/4-inch nuts) wrenches 1 Place a Swagelok nut, back ferrule, and front ferrule to the tubing as shown in Figure 9. Front ferrule Back ferrule Nut Important! The narrow end of the back ferrule fits into the rear of the front ferrule. Tubing Figure 9 Swagelok nuts and ferrules 2 Clamp a stainless steel plug or similar fitting in a bench vise. CAUTION Do not Use a separate stainless steel fitting in a vise for initial tightening of the nut. Do not use an inlet or detector fitting. Strong forces are required to properly set the ferrules, and damage to an inlet or detector fitting is very costly to repair. 3 Push the tubing into the stainless steel plug (see Figure 10). 68 Agilent Intuvo 9000 GC Installation
69 Making Swagelok Connections A 4 Make sure that the front ferrule is touching the plug. Slide the Swagelok nut over the ferrule and thread it onto the plug. Nut and ferrules Plug or fitting held in vise Tubing Figure 10 Assembling the fitting 5 Push the tube fully into the plug, then withdraw it approximately 1 to 2 mm (see Figure 11). Front ferrule Nut Back ferrule Insert tubing fully Withdraw tubing 1-2 mm Tighten nut Figure 11 Insert the tubing 6 Finger-tighten the nut. Agilent Intuvo 9000 GC Installation 69
70 A Making Swagelok Connections 7 Mark the nut with a pencil line (see Figure 12). Pencil line Figure 12 Marking the fitting 8 For 1/8-inch Swagelok fittings, use a pair of wrenches to tighten the fitting 3/4 of a turn (see Figure 13). Figure 13 Final tightening 9 Remove the plug from the fitting. To connect the tubing, with nut and ferrules, to another fitting, finger-tighten the nut, then use a wrench to tighten it 3/4 (1/8-inch fittings) of a turn. 10 Both correctly- and incorrectly-swaged connections are shown in Figure 14. Note that the end of the tubing in a correctly-swaged fitting is not crushed and does not interfere with the action of the ferrules. Figure 14 Completed fitting 70 Agilent Intuvo 9000 GC Installation
71 Making Swagelok Connections A Using a Swagelok Tee To supply gas from a single source to more than one input, use a Swagelok Tee. NOTE Do not combine valve actuator air with flame ionization air. The valve action will cause major upsets in the detector signal. Materials needed: 1/8-inch preconditioned copper tubing Tubing cutter 1/8-inch Swagelok nuts and front and back ferrules 1/8-inch Swagelok Tee Two 7/16-inch wrenches 1/8-inch Swagelok cap (optional) 1 Cut the tubing where you want to install the Tee. Connect the tubing and Tee with a Swagelok fitting. See Figure 15. Cap Tee fitting Nut and ferrules Figure 15 Swagelok tee 2 Measure the distance from the Tee to the instrument fittings. Attach copper tubing to the open Tee ends with Swagelok fittings. Agilent Intuvo 9000 GC Installation 71
72 A Making Swagelok Connections 72 Agilent Intuvo 9000 GC Installation
73 Agilent Intuvo 9000 Gas Chromatograph Installation and First Startup B Cabling Diagrams and Remote Start/Stop Using the Remote Start/Stop Cable 74 Multi-instrument Cabling Examples 77 Cable Diagrams 80 This section lists cabling requirements and connection diagrams that apply to less common or specialized GC installations. Agilent Technologies 73
74 B Cabling Diagrams and Remote Start/Stop Using the Remote Start/Stop Cable Connecting Agilent products Remote start/stop is used to synchronize two or more instruments. For example, you might connect an integrator and the GC so that the [Start]/[Stop] buttons on either instrument control both of them. You can synchronize a maximum of ten instruments using Remote cables. If connecting two Agilent products with Remote cables, the sending and receiving circuits will be compatible just plug in both ends of the cable. Connecting non-agilent products If connecting to a non-agilent product, the following paragraphs contain information you will need to ensure compatibility. APG Remote signal electrical specifications The APG signals are a modified open collector type. The signal levels are generally TTL levels (low voltage is logic zero, high voltage is logic one) but the open circuit voltage will be between 2.5 and 3.7 V. The typical voltage is 3 V. A voltage over 2.2 V will be interpreted as a high logic state while a voltage below 0.4 V will be interpreted as a low logic state. These levels provide some margin over the specifications of the devices used. The pull-up resistance, connected to the open-circuit voltage, is in the range of about 1 kohms to 1.5 kohms. For a logic-low state, for a single device on the bus, the minimum current you must be able to sink is 3.3 ma. Since devices are connected in parallel, when you have multiple devices this minimum current must be multiplied by the number of devices attached on the bus. The maximum voltage for a low-input state is 0.4 V. The bus is passively pulled high. Leakage current out of a port must be less than 0.2 ma to keep the voltage from being pulled lower than 2.2 V. Higher leakage current may cause the state to be interpreted as a low. Over-voltage protection: APG Remote connections are clamped by a zener diode to 5.6 V. Exceeding this voltage will damage the circuit (GC logic board). 74 Agilent Intuvo 9000 GC Installation
75 Cabling Diagrams and Remote Start/Stop B APG Remote Suggested drive circuits A signal on the APG bus may be driven by another APG device or by one of the following circuits: A relay, with one side connected to ground, when closed will set a logic-low state. An NPN transistor, with the emitter connected to ground and the collector connected to the signal line will set a logic-low state if proper base current is supplied. An open-collector logic gate will perform this same function. A low-side drive IC will also work, but Darlington-type drivers should be avoided as they will not meet the low-side voltage requirement of less than 0.4 V APG Remote connector 1 5 Pin Function Logic 6 1 Digital ground 9 2 Prepare LOW true 3 Start LOW true (output) 4 Start relay 5 Start relay 6 Not used 7 Ready HIGH true (output) 8 Stop LOW true 9 Not used APG Remote signal descriptions Prepare (Low True) Request to prepare for analysis. Receiver is any module performing pre-analysis activities. For example, shorting pin 2 to ground will put the GC into Prep Run state. This is useful for Splitless Mode to prepare the inlet for injection or when using Gas Saver. This function is not needed by Agilent autosampler systems. Ready (High True) If the Ready line is high (> 2.2 VDC) then the system is ready for next analysis. Receiver is any sequence controller. Agilent Intuvo 9000 GC Installation 75
76 B Cabling Diagrams and Remote Start/Stop Start (Low True) Request to start run/timetable. Receiver is any module performing runtime-controlled activities. The 9000 GC requires a pulse duration of at least 500 micro-seconds to sense a start from an external device. Start Relay (Contact Closure) A 120 millisecond contact closure used as an isolated output to start another device that is not compatible or connected with APG Remote pin 3. Stop (Low True) Request to reach system ready state as soon as possible (for example, stop run, abort or finish, and stop injection). Receiver is any module performing runtime-controlled activities. Normally this line is not connected, if the GC oven program is used to control the method Stop time. APG Remote timing diagram Waiting for Ready System Ready Requeswt for Prepare Not Ready during Prep System Ready Start Requested Inject cycle started Injection/Start Run Runtime elapsed/start Postrun Waiting for Ready System Ready Prepare H L Start H L Stop H L Ready L H H H 76 Agilent Intuvo 9000 GC Installation
77 Cabling Diagrams and Remote Start/Stop B Multi-instrument Cabling Examples GC / ALS / Non-Agilent Data System GC/ALS 1. APG Remote Cable, G External event cable, 8 pin/spade lugs, G Number Part number and description 1 G , General use APG remote cable, 9-pin male/spade lug (0.5m) 2 G , External event cable, 8-pin/spade lugs G , Caution label, Events cable, green in color APG remote cable spade lug identification G External event cable spade lug identification Connector 1 9 pin (male) Signal name Connector 2 spade lugs Pin Color Signal 1 GND Black 1 Yellow 24 V Out 1 2 Prepare White 2 Black 24 V Out 2 3 Start Red 3 Red Ground 4 Shut down Green 4 White Ground 5 Reserved Brown 5 Orange Contact 1 6 Power on Blue 6 Green Contact 1 7 Ready Orange 7 Brown Contact 2 8 Stop Yellow 8 Blue Contact 2 9 Start Request Violet Agilent Intuvo 9000 GC Installation 77


78 B Cabling Diagrams and Remote Start/Stop GC / 3395A/3396B Integrator / ALS GC / 3396C Integrator / ALSExample: Using a Y-Cable in a setup (GC/MSD/Data System/Headspace Sampler) 1. LAN cable LAN switch or hub 1. LAN cable LAN cable LAN cable MSD GC/ALS HS Computer 2. APG Remote Y-Cable, G Number Part number and description 1 G , 2-m Y-cable, remote start/stop , Cable, LAN, 25 foot 78 Agilent Intuvo 9000 GC Installation
79 Cabling Diagrams and Remote Start/Stop B GC / External Events (unspecified, non-agilent instrument) GC/ALS 1. External event cable, 8 pin/spade lugs, G Number Part number and description 1 G , External events cable, 8-pin/spade lugs G , Caution label, Events cable, green in color Connector Signal name Maximum rating Wire color Corresponds to valve # 24 volt control output 1 24 volt output ma output Yellow volt output ma output Black 6 3 Ground Red 4 Ground White Relay contact closures (normally open) 5 Contact closure 1 48V AC/DC, 250 ma Orange 7 6 Contact closure 1 Green 7 7 Contact closure 2 48 V AC/DC, 250 ma Brown or violet 8 8 Contact closure 2 Blue 8 Agilent Intuvo 9000 GC Installation 79
80 B Cabling Diagrams and Remote Start/Stop Cable Diagrams Analog signal cable, general use, G Connects GC signal outputs to non-agilent products. Also used for the Analog Input Board (AIB) Connector 1 G Connector 2 The pin assignments for the general use analog out cable are listed in Table 9. Table 9 Analog cable, general use, output connections Connector 1 Connector 2, wire color Signal 1 Brown or violet Not used 2 White 0 to 1 V, 0 to 10 V ( ) 3 Red Not used 4 Black 1 V (+) 6 Blue 10 V (+) Shell Orange Ground 80 Agilent Intuvo 9000 GC Installation
81 Cabling Diagrams and Remote Start/Stop B Agilent analog signal cable, G This cable connects an Analog out port to an external data system. Both 0 to 1 volt and 0 to 10 volts are provided. Connects both GC signal outputs to Agilent 3395B/3396C integrators, and the A/D. 4 Figure 16 Analog output cable to an Agilent product Remote start/stop cable, general use, Connector 1 Connector 2 The pin assignments for the remote start/stop cable are listed in Table 10. Table 10 Remote start/stop cable connections Connector 1, 9-pin male Connector 2, wire color Signal 1 Black Digital ground 2 White Prepare (low tone) 3 Red Start (low tone) 4 Green Start relay (closed during start) Agilent Intuvo 9000 GC Installation 81
82 B Cabling Diagrams and Remote Start/Stop Table 10 Remote start/stop cable connections (continued) Connector 1, 9-pin male Connector 2, wire color Signal 5 Brown Start relay (closed during start) 6 Blue Open circuit 7 Orange Ready (high true input) 8 Yellow Stop (low tone) 9 Violet Open circuit Agilent APG remote start/stop cable, Synchronizes the GC with an Agilent integrator. Additional cables may be used to add more instruments (up to 10 total). Figure 17 Remote start/stop cable, GC to Agilent integrator 82 Agilent Intuvo 9000 GC Installation
83 Cabling Diagrams and Remote Start/Stop B Agilent APG remote start/stop cable, G Synchronizes the GC with another Agilent instrument. Additional cables may be used to add more instruments (up to 10 total) G Figure 18 Remote start/stop cable, GC to Agilent instrument Agilent remote start/stop Y-cable, G Synchronizes the GC with another 2 Agilent instruments. Figure 19 Remote start/stop cable, GC to Agilent instrument Agilent Intuvo 9000 GC Installation 83

84 B Cabling Diagrams and Remote Start/Stop BCD cable, G Apply label G The BCD cable connector has eight passive inputs that sense total binary-coded decimal levels. The pin assignments for this connector are listed in Table 11. Table 11 BCD input connections Pin Function Maximum rating 1 Relay 48 V AC/DC, 250 ma 2 Relay 48 V AC/DC, 250 ma 3 LS digit 0 4 LS digit 1 5 LS digit 2 6 LS digit 3 7 MS digit 0 8 Ground Shield Chassis ground When used for BCD input, apply label G to identify the cable for BCD use. 84 Agilent Intuvo 9000 GC Installation

85 Cabling Diagrams and Remote Start/Stop B BCD cable, G The BCD cable connector has eight passive inputs that sense total binary-coded decimal levels. The pin assignments for this connector are listed in Table 11. Table 12 BCD cable connections Connector 1 Pin Connector 2 Pin Ribbon Cable Wire Color 1 Brown 2 Red 1 3 Orange 4 Yellow 5 Green 6 Blue 7 Violet 8 Gray 9 White 2, 8 10 Black 11 Brown 6 12 Red 13 Orange 5 14 Yellow 15 Green 4 16 Blue Agilent Intuvo 9000 GC Installation 85

86 B Cabling Diagrams and Remote Start/Stop Table 12 BCD cable connections (continued) Connector 1 Pin Connector 2 Pin Ribbon Cable Wire Color 7 17 Violet 3 18 Gray 19 White 20 Black 21 Brown 22 Red 23 Orange 24 Yellow 25 Green 26 Blue External event cable, G Apply label G Wire terminations The external event cable has two passive relay contact closures with two 24-volt control outputs. Devices connected to the passive contact closures must be connected to their own power sources. The pin assignments for this cable are listed in Table Agilent Intuvo 9000 GC Installation
Agilent 7697A Headspace Sampler
 Agilent 7697A Headspace Sampler Site Preparation Agilent Technologies Notices Agilent Technologies, Inc. 2012 No part of this manual may be reproduced in any form or by any means (including electronic
6890 GC Site Preparation
 6890 GC Site Preparation (a16011) This document is believed to be accurate and up-to-date. However, Agilent Technologies, Inc. cannot assume responsibility for the use of this material. The information
Detector Carrier Gas Comments Detector anode purge or reference gas. Electron Capture Nitrogen Maximum sensitivity Nitrogen Argon/Methane
 Gas requirements Gases for packed columns The carrier gas you use depends upon the type of detector and the performance requirements. Table 520-1 lists gas recommendations for packed column use. In general,
Agilent 7667A. Mini Thermal Desorber. Site Preparation
 Agilent 7667A Mini Thermal Desorber Site Preparation Notices Agilent Technologies, Inc. 2012 No part of this manual may be reproduced in any form or by any means (including electronic storage and retrieval
28 Site Preparation. Supplying valve actuator air
 28 Site Preparation Temperature and humidity ranges Ventilation requirements Venting oven exhaust Venting toxic or noxious gases Benchtop space requirements Electrical requirements Grounding Line voltage
7820A GC Site Preparation Checklist
 Thank you for purchasing an Agilent instrument. To get you started and to assure a successful and timely installation, please refer to this specification or set of requirements. Correct site preparation
Site Preparation Specification for GCMS system. Dimensions and Weight. Agilent 7820MSD Series G3175A (G7020A), G3176A (G7021A)
, G3176A (G7021A)") Purpose of Procedure Your site must meet this specification or set of requirements to assure a successful and timely installation of your 7820MSD Series Mass Selective Detector (MSD). This checklist is
Purpose of Procedure Your site must meet this specification or set of requirements to assure a successful and timely installation of your 7820MSD Series Mass Selective Detector (MSD). This checklist is
be present throughout these services; otherwise, they will miss important operational, maintenance and safety information.
 Thank you for purchasing an Agilent Instrument. To get you started and to assure a successful and timely installation of your 9000 GC, please refer to this site prep checklist. Correct site preparation
Agilent GC, GC/MS, and ALS
 Agilent GC, GC/MS, and ALS Site Preparation Guide Agilent Technologies Notices Agilent Technologies, Inc. 2017 No part of this manual may be reproduced in any form or by any means (including electronic
Customer Responsibilities
 Thank you for purchasing an Agilent instrument. To get you started and to assure a successful and timely installation, please refer to this specification or set of requirements. Correct site preparation
Agilent G3180B Two-Way Splitter Kit
 Agilent G3180B Two-Way Splitter Kit With Makeup Gas Installation and Operation Guide Agilent Technologies Notices Agilent Technologies, Inc. 2006 No part of this manual may be reproduced in any form or
Agilent 1290 Infinity Pump Head Maintenance
 Agilent 1290 Infinity Pump Head Maintenance Technical Note Agilent Technologies Notices Agilent Technologies, Inc. 2012-2015, 2016 No part of this manual may be reproduced in any form or by any means (including
Site Preparation Specification for GCMS system. Dimensions and Weight. Agilent 5975C MSD Series G3170A, G3171A, G3172A, G3174A
 Purpose of Procedure Your site must meet this specification or set of requirements to assure a successful and timely installation of your 5975C Series Mass Selective Detector (MSD). This checklist is designed
General Specifications: Forensic. Petrochemical Environmental. Lab Quality Analyses in the Field, It Goes with you Anywhere!
 The portable Gas Chromatograph is now more versatile than ever. DPS Instruments is pleased to present the newest Portable Companion 2 Gas Chromatograph with room for 2 Detectors. The Companion 2 GC was
Agilent 7890 Series Gas Chromatograph
 Agilent 7890 Series Gas Chromatograph Advanced Operation Manual Agilent Technologies Notices Agilent Technologies, Inc. 2007-2013 No part of this manual may be reproduced in any form or by any means (including
Agilent 7697A Headspace Sampler
 Agilent 7697A Headspace Sampler Troubleshooting Agilent Technologies Notices Agilent Technologies, Inc. 2012 No part of this manual may be reproduced in any form or by any means (including electronic storage
Markes Thermal Desorption Systems Site Preparation Page 1 of 8
 Thermal Desorption Systems Site Preparation Purpose of site preparation Your site must meet this specification to assure a successful and timely installation of your Agilent thermal desorption equipment.
Agilent 7820A GC. Site Preparation Guide. Agilent Technologies
 Agilent 7820A GC Site Preparation Guide Agilent Technologies Notices Agilent Technologies, Inc. 2009 No part of this manual may be reproduced in any form or by any means (including electronic storage and
Pressure Dump Valve Service Kit for Series 2300 Units
 Instruction Sheet Pressure Dump Valve Service Kit for Series 00 Units. Overview The Nordson pressure dump valve is used to relieve hydraulic pressure instantly in Series 00 applicator tanks when the unit
Agilent Auxiliary Gas Module AGM 2. User s Guide
 Agilent Auxiliary Gas Module AGM 2 User s Guide Notices Agilent Technologies, Inc. 1992, 1996, 1999, 2010 No part of this manual may be reproduced in any form or by any means (including electronic storage
Environmental Petrochemical, Pharmaceutical, Foods & Flavors, Chemicals, Personal Care, Forensics,...and more!
 After years of development and testing, DPS Instruments is pleased to present the newest, most expandable and versatile Gas Chromatography Systems in history. The DPS 600 Series GC systems are the world
Media-Isolated Mag Plus Probe Low Pressure-ISO Kit
 Manual No: 577013-975 Revision: B Media-Isolated Mag Plus Probe Low Pressure-ISO Kit Installation Guide Notice Veeder-Root makes no warranty of any kind with regard to this publication, including, but
Instructions for Assembly, Installation, and Operation of the Gas Addition Kit Accessory with the CEM Discover Systems
 Corporation Issued: 5/09 P/N: 600104 Rev. 2 Instructions for Assembly, Installation, and Operation of the Gas Addition Kit Accessory with the CEM Discover Systems The Gas Addition Accessory permits the
Customer Responsibilities. Important Customer Information GCMS QQQ Site Preparation Checklist
 Thank you for purchasing an Agilent instrument. To get you started and to assure a successful and timely installation, please refer to this specification or set of requirements. Correct site preparation
Pressure Dump Valve Service Kit for Series 3000 Units
 Instruction Sheet Pressure Dump Valve Service Kit for Series 000 Units. Overview The Nordson pressure dump valve is used to relieve hydraulic pressure instantly in Series 00, 400, 500, and 700 applicator
RD(H)20/25 Pressure-Reducing Regulator User Manual
20/25 Pressure-Reducing Regulator User Manual") RD(H)20/25 Pressure-Reducing Regulator User Manual Read the complete manual before installing and using the regulator. 2 Safe Product Selection When selecting a product, the total system design must be
RD(H)20/25 Pressure-Reducing Regulator User Manual Read the complete manual before installing and using the regulator. 2 Safe Product Selection When selecting a product, the total system design must be
36E DSI, HSI & Proven Pilot Two-Stage Combination Gas Valve INSTALLATION INSTRUCTIONS
 INLET PRESS TAP WTE-RODGERS 36E96-314 DSI, HSI & Proven Pilot Two-Stage Combination Gas Valve INSTALLATION INSTRUCTIONS Operator: Save these instructions for future use! FAILURE TO READ AND FOLLOW ALL
INSTALLATION INSTRUCTIONS MANUAL ON/OFF SAFETY VALVE/PILOT KIT MODEL GA9050A-1 (F0235)
") P/N 126905-01 Rev. B 11/2016 INSTALLATION INSTRUCTIONS MANUAL ON/OFF SAFETY VALVE/PILOT KIT MODEL GA9050A-1 (F0235) For All Single, Dual and Triple Burner Natural and Propane/LP Gas Logs P126905-01 For
P/N 126905-01 Rev. B 11/2016 INSTALLATION INSTRUCTIONS MANUAL ON/OFF SAFETY VALVE/PILOT KIT MODEL GA9050A-1 (F0235) For All Single, Dual and Triple Burner Natural and Propane/LP Gas Logs P126905-01 For
36H SERIES Combination Gas Valve
 FAILURE TO READ AND FOLLOW ALL INSTRUCTIONS CAREFULLY BEFORE INSTALLING OR OPERATING THIS CONTROL COULD CAUSE PERSONAL INJURY AND/OR PROPERTY DAMAGE. DESCRIPTION The 36H series combination gas valve is
LRS(H)4 Pressure-Reducing Regulator User Manual
4 Pressure-Reducing Regulator User Manual") LRS(H)4 Pressure-Reducing Regulator User Manual Read the complete manual before installing and using the regulator. 2 Safe Product Selection When selecting a product, the total system design must be considered
LRS(H)4 Pressure-Reducing Regulator User Manual Read the complete manual before installing and using the regulator. 2 Safe Product Selection When selecting a product, the total system design must be considered
Best Practice for Identifying Leaks in GC and GC/MS Systems
 Best Practice for Identifying Leaks in GC and GC/MS Systems Technical Overview Maintaining a leak-free GC or GC/MS system is critical for obtaining optimal system performance with reliable, reproducible,
Agilent 7820A GC. Site Preparation Guide. Agilent Technologies
 Agilent 7820A GC Site Preparation Guide Agilent Technologies Notices Agilent Technologies, Inc. 2010-2015 No part of this manual may be reproduced in any form or by any means (including electronic storage
Gas Lines. Technical Manual. Sumitomo (SHI) Cryogenics of America, Inc Vultee Street Allentown, PA U.S.A.
 Cryogenics of America, Inc Vultee Street Allentown, PA U.S.A.") Gas Lines Technical Manual Sumitomo (SHI) Cryogenics of America, Inc. 1833 Vultee Street Allentown, PA 18103-4783 U.S.A. Revision F: April 2008 261320A TABLE OF CONTENTS Page DESCRIPTION...1 SPECIFICATIONS...2
Gas Lines Technical Manual Sumitomo (SHI) Cryogenics of America, Inc. 1833 Vultee Street Allentown, PA 18103-4783 U.S.A. Revision F: April 2008 261320A TABLE OF CONTENTS Page DESCRIPTION...1 SPECIFICATIONS...2
Agilent 7890 / 220 Ion Trap GCMS Site Preparation Checklist
 Thank you for purchasing an Agilent instrument. To get you started and to assure a successful and timely installation, please refer to this specification or set of requirements. Correct site preparation
Welker Sampler. Model GSS-1. Installation, Operation, and Maintenance Manual
 Installation, Operation, and Maintenance Manual Welker Sampler Model GSS-1 The information in this manual has been carefully checked for accuracy and is intended to be used as a guide to operations. Correct
Operator: Save these instructions for future use!
 INLET PRESS TAP WHITE-RODGERS 36E93-304 Delay-Opening Combination Gas Valve INSTALLATION INSTRUCTIONS Operator: Save these instructions for future use! FAILURE TO READ AND FOLLOW ALL INSTRUCTIONS CAREFULLY
For additional information about our solutions, please visit our web site at US/Pages/HomePage.
 Thank you for purchasing an Agilent instrument. To get you started and to assure a successful and timely installation, please refer to this specification or set of requirements. Correct site preparation
Float Operated Level Controllers
 CONTENTS Float Operated Level Controllers IM0015 Nov. 2014 PAGE Introduction 1 Scope 1 Description 1 Specification 1 Control Installation 2 INTRODUCTION Side Mount Back Mount Prior to installing, the instructions
NB/NBR NITROGEN BOOSTER FOR AVIATION SERVICE
 NB/NBR NITROGEN BOOSTER FOR AVIATION SERVICE INSTALLATION, OPERATION & MAINTENANCE MANUAL INTERFACE DEVICES, INC. 230 Depot Road, Milford, CT 06460 Ph: (203) 878-4648, Fx: (203) 882-0885, E-mail: info@interfacedevices.com
3 Flow and Pressure Control
 3 Hydrogen shutdown Column shutdown Turning gas flows on and off EPC-controlled streams NonEPC-controlled streams Electronic Pneumatic Control (EPC) Interpreting flow and pressure readings Configuration
Installing ASI Umbilical Delivery Systems
 Rev A 05 Nov 2015 Page 1 of 10 PURPOSE This guide provides an overview of tubing connections into an ASI wall-mounted Junction Box that has already been plumbed with a compressed air connection including
ACCESSORY KIT INSTALLATION INSTRUCTIONS
 ACCESSORY KIT INSTALLATION INSTRUCTIONS 1NP0680 - PROPANE CONVERSION FOR USE WITH MODELS: PM8, PC8, PM9, PC9, FL9M, FL9C, FC9M, FC9C This conversion kit is to be installed by a qualified service agency
Please refer to the Hydrogen Safety Guide which is shipped with the Instrument. 5977B Series GC/MS Systems Site Preparation Checklist
 Thank you for purchasing an Agilent instrument. To get you started and to assure a successful and timely installation, please refer to this specification or set of requirements. Correct site preparation
64 Series Pressure Reducing Regulators
 Instruction Manual Form 1245 64 Series March 2006 64 Series Pressure Reducing Regulators W1943 Figure 1. 64 Series Regulator Introduction Scope of Manual This manual provides instructions for the installation,
INSTALLATION GUIDE Gas Rangetops
 INSTALLATION GUIDE Gas Rangetops Contents Wolf Gas Rangetops........................... 3 Safety Instructions............................ 4 Gas Rangetop Specifications.................... 5 Gas Rangetop
3 GALLON, OILLESS PANCAKE COMPRESSOR INSTRUCTIONS. Item #31289
 3 GALLON, OILLESS PANCAKE COMPRESSOR INSTRUCTIONS Item #31289 The EASTWOOD 3 GALLON, OILLESS PANCAKE COMPRESSOR, with an Integral Air Regulator, efficiently supplies all compressed air requirements for
ACCESSORY KIT INSTALLATION MANUAL
 ACCESSORY KIT INSTALLATION MANUAL LP (PROPANE) CONVERSION KIT 1NP0366 FOR USE WITH MODELS: G8C & GF8 This conversion kit shall be installed by a qualified service agency in accordance with these instructions
490 Micro GC Site Preparation Checklist
 Thank you for purchasing an Agilent instrument. To get you started and to assure a successful and timely installation, please refer to this specification or set of requirements. Correct site preparation
INSTRUCTION MANUAL FOR MODEL 7360V VERTICAL CURING CHAMBER Revision E May
 INSTRUCTION MANUAL FOR MODEL 7360V VERTICAL CURING CHAMBER Revision E May 2015 98-0520 S/N 2001 N. Indianwood Ave. Tulsa, Oklahoma 74012 U.S.A. TEL: (918) 250-7200 FAX: (918) 459-0165 E-mail: chandler.sales@ametek.com
Note: You will need a full tank of CO2 for connection and leak testing! Kit Number
 Owners Manual Design Engineering Inc. CryO2 Cryogenic Tank Installation Kit To be used with CryO2 components only! Persons experienced in the installation and proper operation of Performance systems like
Installation, Operation, and Maintenance Manual
 Installation, Operation, and Maintenance Manual Welker The information in this manual has been carefully checked for accuracy and is intended to be used as a guide for the installation, operation, and
36C/36D HSI, DSI Proven Pilot Gas Valves INSTALLATION INSTRUCTIONS
 36C/36D HSI, DSI Proven Pilot Gas Valves INSTALLATION INSTRUCTIONS Operator: Save these instructions for future use! FAILURE TO READ AND FOLLOW ALL INSTRUCTIONS CAREFULLY BEFORE INSTALLING OR OPERATING
Agilent 1220 Infinity II LC Mobile Upgrade Kit
 Agilent 1220 Infinity II LC Mobile Upgrade Kit Note 1220 Infinity II LC Mobile Upgrade Kit This note describes the procedures to install an Mobile Upgrade kit to an existing Agilent 1220 Infinity II LC.
AIR COMPRESSOR. Failure to follow all instructions as listed below may result in electrical shock, fire, and/or serious personal injury.
 2 GALLON AIR COMPRESSOR Model: 7517 DO NOT RETURN TO STORE. Please CALL 800-348-5004 for parts and service. CALIFORNIA PROPOSITION 65 WARNING: You can create dust when you cut, sand, drill or grind materials
KOBOLD KSM FLOWMETER. User Instructions
 KOBOLD KSM FLOWMETER User Instructions USA 1801 Parkway View Drive Pittsburgh, PA 15205 PH 412-788-2830 Canada 9A Aviation Point Claire, QC H9R 4Z2 PH 514-428-8090 www.koboldusa.com KSM_manual_08-10 Table
Types S100K and S102K Pressure Regulators
 Instruction Manual Form 5624 Types S0K and S2K 01/01 Types S0K and S2K Pressure Regulators W7478-1 Figure 1. Types S0K and S2K Pressure Regulator Introduction Scope of Manual This manual provides instructions
36E DSI and HSI Two-Stage Combination Gas Valve INSTALLATION INSTRUCTIONS
 INLET PRESS TAP WTE-RODGERS 36E54-214 DSI and HSI Two-Stage Combination Gas Valve INSTALLATION INSTRUCTIONS Operator: Save these instructions for future use! FAILURE TO READ AND FOLLOW ALL INSTRUCTIONS
3-Way Decoking Valve Option - Installation and Operation Instructions Accessory G Background
 3-Way Decoking Valve Option - Installation and Operation Instructions Accessory G6600-60058 Background Accumulation of contaminants, such as column bleed, impurities in detector gases and even carbon from
Customer Responsibilities. Important Customer Information Series Q-TOF LC/MS Systems Site Preparation Checklist
 Thank you for purchasing an Agilent system. To get you started and to assure a successful and timely installation, please refer to this specification or set of requirements. Correct site preparation is
Glove Box Installation Manual
 Glove Box Installation Manual 1998 by M. Braun Company File: GB-UNI-INS.DOC! Edition 08-00 by M. Boutin! Subject to be changed without notice Glovebox Installation Your Glove box has been fully assembled,
Installation and Use Manual
 Installation and Use Manual EMASMB & LMASMB Surface Mount Bottle Filling Stations Model EMASMB IMPORTANT THIS IS AN INDOOR APPLICATION ONLY! ALL SERVICE TO BE PERFORMED BY AN AUTHORIZED SERVICE PERSONNEL.
Pegas 4000 MF Gas Mixer InstructionManual Columbus Instruments
 Pegas 4000 MF Gas Mixer InstructionManual Contents I Table of Contents Foreword Part I Introduction 1 2 1 System overview... 2 2 Specifications... 3 Part II Installation 4 1 Rear panel connections...
Freedom8 ShoeBox Compressor Manual
 Freedom8 ShoeBox Compressor Manual Warning!! This product is not a toy! Use or misuse can cause severe injury or death! Use only with adult supervision. This unit is only to be used with tanks, hoses and
FIREPLACE INSTALLATION
 CHECK GAS TYPE Use proper gas type for fireplace unit you are installing. If your gas supply is not correct, do not install fireplace. See retailer where you purchased fireplace for proper fireplace according
200 PSI COMPRESSORS - MODEL NUMBERS
 200 PSI COMPRESSORS - MODEL NUMBERS 380C AIR COMPRESSOR KIT PART NO. 38033 480C AIR COMPRESSOR KIT PART NO. 48043 380C 480C IMPORTANT: It is essential that you and any other operator of this product read
Oxford Instruments Plasma Technology. PlasmaPro NGP80. Installation Data Sheet. Original Instructions.
 Oxford Instruments Plasma Technology www.oxford-instruments.com About this data sheet This data sheet provides basic information about the installation of a tool. Floor and wall loadings Table 1 lists
TECHNICAL DATA MAINTENANCE AIR COMPRESSOR MODEL G-1
 Dry 131h 1. DESCRIPTION The Viking Model G-1 Maintenance Air Compressor is an electric motor-driven, aircooled, single-stage, oil-less compressor. The unit is equipped with a check valve and provides a
250C-IG COMPRESSOR KIT 12V PART NO C-IG COMPRESSOR KIT 24V PART NO
 250C-IG COMPRESSOR KIT 12V PART NO. 25050 250C-IG COMPRESSOR KIT 24V PART NO. 25058 IMPORTANT: It is essential that you and any other operator of this product read and understand the contents of this manual
Pressure Injection Cell Operator s Manual
 Pressure Injection Cell Operator s Manual Operator s Manual Pressure Injection Cell CONGRATULATIONS! Congratulations on your purchase of a Next Advance Pressure Injection Cell. Please read this operator
Operator: Save these instructions for future use!
 WHITE-RODGERS Type 36C67 Combination (24 Volt Models) INSTALLATION INSTRUCTIONS Operator: Save these instructions for future use! FAILURE TO READ AND FOLLOW ALL INSTRUCTIONS CAREFULLY BEFORE INSTALLING
Customer Responsibilities. Important Customer Information. Cary 4000/5000/6000i UV-Vis spectrophotometer Site Preparation Checklist
 Thank you for purchasing an Agilent instrument. To get you started and to assure a successful and timely installation, please refer to this specification or set of requirements. Correct site preparation
Operation Manual Piston Sensed Gas Pressure Regulators
 687 Technology Way Napa, CA 94558 Phone: (707) 259-0102 FAX: (707) 259-0117 www.aptech-online.com Operation Manual Piston Sensed Gas Pressure Regulators (Models KT9, KT10, Welded KT10, KT12) Table of Contents:
Super-Clean Gas Filters from Restek
 Super-Clean Gas Filters from Restek Chromatography Products www.restek.com 800-356-688 84-353-300 regulator instrument-grade tubing on/off valve GC carrier gas moisture trap hydrocarbon trap high-capacity
THE HF-300 SERIES. Operating and Service Manual. Series includes all variants of HF-300/301
 THE HF-300 SERIES Operating and Service Manual Series includes all variants of HF-300/301 Issue A July 2015 1 TABLE OF CONTENTS 1. Description... 3 2. Installation... 3 3. Operation... 4 3.1. Spring Loaded...
2 Sentry MCL Installation, Operation & Maintenance
 Gas Liquid & Slurry Solid & Powder Steam & Water Installation, Operation & Maintenance Manual Original Instructions Liquid Sampling Manual Low-Emission Samplers S-GA-IOM-00249-7 11-17 Sentry MCL 966 Blue
OPERATING AND MAINTENANCE MANUAL
 Series 4300 Engineered Performance TABLE OF CONTENTS 0 INTRODUCTION 1 1 Scope 1 2 Description 1 3 Specifications 1 0 INSTALLATION 1 1 Mounting 1 2 Piping 1 1 Connecting Process Pressure 2 2 Vent Connections
SPECIFICATIONS Type: Twin stack, single phase Tank: 4 gallon Air Output: PSI; PSI Max PSI: 125 PSI HP: 1.
 2 GALLON TWIN STACK AIR COMPRESSOR Model: 9526 DO NOT RETURN TO STORE. Please CALL 800-348-5004 for parts and service. CALIFORNIA PROPOSITION 65 WARNING: You can create dust when you cut, sand, drill or
TESCOM 50-4X Series Safety, Installation & Start-Up Procedures
 Operations & Service Manual TESCOM 50-4X Series Safety, Installation & Start-Up Procedures Do not attempt to select, install, use or maintain this product until you have read and fully understood this
Customer Responsibilities. Important Customer Information. Agilent Infinity II Preparative HPLC System Site Preparation Checklist
 Agilent Site Preparation Infinity II Checklist Preparative HPLC System Thank you for purchasing an Agilent instrument. To get you started and to assure a successful and timely installation, please refer
ACCUMULATOR OPERATING & MAINTENANCE INSTRUCTIONS
 ACCUMULATOR OPERATING & MAINTENANCE INSTRUCTIONS READ ALL INSTRUCTIONS PRIOR TO INSTALLATION AND OPERATION TO AVOID POSSIBLE INJURY Warning: Always consider any accumulator to contain pressure until proven
36G22, 36G23, 36G24 & 36G52 36J22, 36J23, 36J24 & 36J52 DSI and HSI Single Stage Combination Gas Valve
 Operator: Save these instructions for future use! FAILURE TO READ AND FOLLOW ALL INSTRUCTIONS CAREFULLY BEFORE INSTALLING OR OPERATING THIS CONTROL COULD CAUSE PERSONAL INJURY AND/OR PROPERTY DAMAGE. DESCRIPTION
GM Series Dual-Block Multi-Function Gas Control Valves
 Installation Sheets Manual 121 Gas Combustion Combination Controls and Systems Section G Technical Bulletin GM Issue Date 0297 GM Series Dual-Block Multi-Function Gas Control Valves Figure 1: GM Series
3/8" Dr. Air Butterfly Impact Wrench
 8192106 3/8" Dr. Air Butterfly Impact Wrench Owner s Manual Read and understand all instructions before use. Retain this manual for future reference. Specifications Construction: Polished aluminum and
Your safety and the safety of others are very important.
 NATURAL GAS TO PROPANE CONVERSION KIT ALPKT57- INSTALLATION INSTRUCTIONS PROPANE CONVERSION KIT SAFETY... INSTALLATION REQUIREMENTS... Tools and Parts... LP Gas Requirements... Table of Contents INSTALLATION
Model PSI Compressor with 3-Gallon Air Tank 12VDC
 Model 6350 150 PSI Compressor with 3-Gallon Air Tank 12VDC IMPORTANT: It is essential that you and any other operator of this product read and understandd the contents of this manual before installing
INSTRUCTIONS FOR CONVERTING CONDENSING GAS MOBILE HOME FURNACES MODEL SERIES: CMA3*, CMC1*, VMA3*, VMC1*
 INSTRUCTIONS FOR CONVERTING CONDENSING GAS MOBILE HOME FURNACES MODEL SERIES: CMA3*, CMC1*, VMA3*, VMC1* THIS KIT CONTAINS: AOPS7741 (NATURAL TO PROPANE CONVERSION PARTS FOR MODEL SIZE, 50) AOPS7742(NATURAL
IMPORTANT SAFETY INSTRUCTIONS
 IMPORTANT SAFETY INSTRUCTIONS CAUTION - To reduce risk of electrical shock: - Do not disassemble. Do not attempt repairs or modifications. Refer to qualified service agencies for all service and repairs.
100C Air Compressor Kit
 10010 100C Air Compressor (standard mounting bracket, CE Spec) 10014 100C Air Compressor (no leader hose or check valve, CE Spec) 10016 100C Air Compressor (with Omega Bracket, CE Spec) IMPORTANT: It is
Agilent Flowmeter ADM1000
 Agilent Flowmeter ADM1000 Operating Instructions Notices Agilent Technologies, Inc. 2003 No part of this manual may be reproduced in any form or by any means (including electronic storage and retrieval
Micro GC Fusion Pre-Installation Checlist
 Site Preparation Proper site preparation prior to installing is very important. Contact INFICON (www.inficon.com) with any questions regarding site preparation. Checkboxes ( ) identify hardware and actions
420C AIR COMPRESSOR KIT PART NO C AIR COMPRESSOR KIT PART NO
 420C AIR COMPRESSOR KIT PART NO. 42042 460C AIR COMPRESSOR KIT PART NO. 46043 420C 460C IMPORTANT: It is essential that you and any other operator of this product read and understand the contents of this
Type HSR Pressure Reducing Regulator for Residential, Commercial, or Industrial Applications
 Instruction Manual Form 5753 Type HSR October 2003 Type HSR Pressure Reducing Regulator for Residential, Commercial, or Industrial Applications W8648 Figure 1. Type HSR Pressure Regulator Introduction
Model Air Caddy Orig TABLE OF CONTENTS
 92-0919 Orig. 020201 Model 75-0114 Air Caddy TABLE OF CONTENTS CUSTOMER MESSAGE Inside Front Cover SAFETY PRECAUTIONS 3 GENERAL DESCRIPTION 6 SPECIFICATIONS 7 MAINTENANCE 9 INSTALLATION AND OPERATION 11
97C COMPRESSOR KIT 12V PART NO C COMPRESSOR KIT 24V PART NO C COMPRESSOR KIT PART NO
 97C COMPRESSOR KIT 12V PART NO. 00097 97C COMPRESSOR KIT 24V PART NO. 02497 98C COMPRESSOR KIT PART NO. 00098 97C 98C IMPORTANT: It is essential that you and any other operator of this product read and
444C DUAL PERFORMANCE VALUE PACK
 (Chrome) PART NO. 44432 IMPORTANT: It is essential that you and any other operator of this product read and understand the contents of this manual before installing and using this product. SAVE THIS MANUAL
GETZ EQUIPMENT INNOVATORS PART NO.: 9G59554 MODEL: MS 36 SC-R HYDROSTATIC TEST PUMP
 GETZ EQUIPMENT INNOVATORS PART NO.: 9G59554 MODEL: MS 36 SC-R HYDROSTATIC TEST PUMP LIMITED WARRANTY Getz Equipment Innovators warrants its products, and component parts of any product manufactured by
1200B2 Series Service Regulators. Instruction Manual
 00B Series Service Regulators Instruction Manual 00B Series Service Regulators 0 Elster American Meter 00B Series Service Regulators General Information The 00B Series Service Regulators are available
250C-IG COMPRESSOR KIT 12V PART NO C-IG COMPRESSOR KIT 24V PART NO
 250C-IG COMPRESSOR KIT 12V PART NO. 25050 250C-IG COMPRESSOR KIT 24V PART NO. 25058 IMPORTANT: It is essential that you and any other operator of this product read and understand the contents of this manual
Interface Devices, Inc. Hydraulic Mini Mule
 Interface Devices, Inc. Hydraulic Mini Mule INSTALLATION, OPERATION & MAINTENANCE MANUAL IMPORTANT! FILE THIS MANUAL IN A SAFE PLACE FOR FUTURE SERVICE & PARTS NEEDS ALWAYS REFERENCE THE SERIAL NUMBER
INSTALLATION, CARE & USE MANUAL. EMASMB & LMASMB Surface Mount Bottle Filling Stations
 INSTALLATION, CARE & USE MANUAL EMASMB & LMASMB Surface Mount Bottle Filling Stations IMPORTANT THIS IS AN INDOOR APPLICATION ONLY! ALL SERVICE TO BE PERFORMED BY AN AUTHORIZED SERVICE PERSONNEL. TOOLS/ITEMS