SPECIAL THANKS TO THE FOLLOWING PEOPLE FOR THEIR HELP IN THIS PROJECT!
|
|
|
- Daniella Hawkins
- 5 years ago
- Views:
Transcription

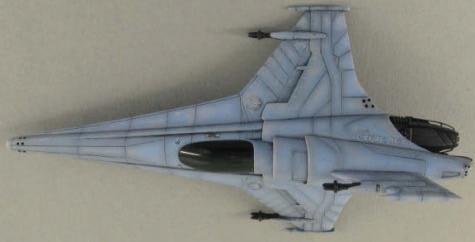
1 The Viper Mark VII is the state of the art fighter of the Colonial Fleet. It is sleeker and more modern than the Viper Mark II. The Mk7 is designed for both space and atmospheric environments and is also highly dependent on computer systems for tactical, combat, and navigation. The Viper Mark VII is an ultra-fast superiority fighter without any equal and runs hotter than any other Viper model! Length: 9.9 meters (32.5 ft.); Width: 5.6 meters (18.5 ft.); Height: 3.0 meters (9.8 ft.) Image from ZOIC. SPECIAL THANKS TO THE FOLLOWING PEOPLE FOR THEIR HELP IN THIS PROJECT! Alan Sinclair (landing gear illustration) Bobby Wong (pilot pattern Little Lee ) Coby Lorang (assembly illustration) Darren Bertrand (test kit assembly & photos) Douglas B.& Jeremy J. (landing gear pattern) Jim Botaitis (decals) Tracy Brownfield SCI-HIGH, version 1 Page 1 of 8
 soapy water and let them dry. This step is necessary to remove the mold release agent used during casting.")
2 KIT CONTENTS This kit contains 23 parts: 21 resin parts 1 clear canopy 1 sheet of color decals WORKING WITH RESIN Resin dust is harmful to your lungs so wear a protective mask when sanding. Wet sanding is recommended. Before handling resin parts wash them in warm (not hot) soapy water and let them dry. This step is necessary to remove the mold release agent used during casting. Resin must be glued with "super glue" (cyano acrylate glue) or alternatively epoxy glue. To glue parts together hold them in place and drip thin glue along the seam instead of trying to align the pieces with glue on them. If warping (distortions) occurs in some parts, use hot water or a hand held hair dryer to soften the area. Hold the piece in place and cool it with cold water. You may have to repeat this process more than once to correct the shape. Always use an appropriate primer before painting your resin model. SCI-HIGH, version 1 Page 2 of 8
3 ASSEMBLY Prepare the parts by removing flash, mold seams and imperfections. Fill any apparent holes, seams and scratches. Refer to the illustration below and to the original arts (CGIs) in this document as a guide for parts and decals positioning. SCI-HIGH, version 1 Page 3 of 8
 wing antennas at the tip of each wing and the three (3) canon barrels")
 glue the three (3) landing bay")

 on each sides of the two main engines.")


4 (1) Fuselage Glue the top engine cover to the fuselage and the fin to the cover. Glue the two (2) wing antennas at the tip of each wing and the three (3) canon barrels to the wings and the fin. If not installing landing gear (for in-flight mode) glue the three (3) landing bay panels (doors). (2) Engines Glue the top engine nozzle to the main engine bloc. Do not glue the engines subassembly to the fuselage before painting. To add even more details and realism, use stripes of styrene (plastic) or small metal rods to make the vector controls (rods) on each sides of the two main engines. (4) Landing gear Use the illustration below to position the landing gear correctly. Rear struts are very FRAGILE so handle with care. Adjust the fit of the landing gear but do not glue them before painting. Glue the rear landing gear panels to the inner edge of each bay at an angle of about 45 degrees. Cut the front panel in half (along the grooved line) and glue each part to the outer edge of the front landing gear bay. SCI-HIGH, version 1 Page 4 of 8
. Cut progressively and testfit often.")


 some material from under the seat, helmet (neck) and/or pilot body if necessary.")

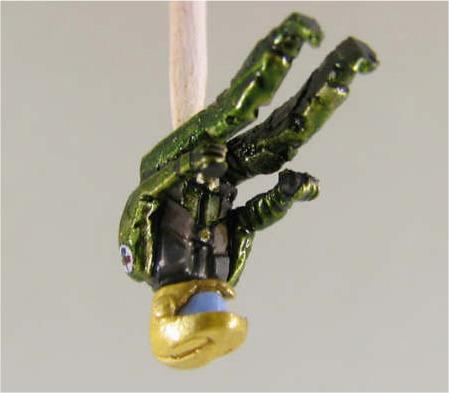
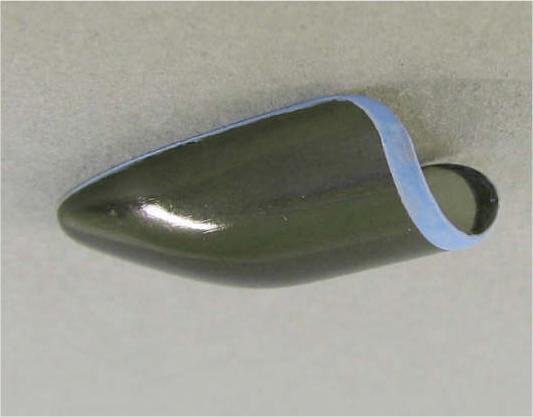
5 (3) Cockpit, canopy and pilot ( Little Lee ) Using a sharp hobby knife carefully cut the canopy directly on its molding form (resin plug). Cut progressively and testfit often. Use a sandpaper to make the final adjustments. For a great shiny look, dip the canopy in Future Floor Wax two or three times, let the excess drip off and let dry for a couple of hours. To obtain a tinted effect, airbrush the canopy with Tamiya Smoke paint before dipping in Future. The pilot fits very tightly inside the cockpit. Test-fit and adjust the pilot on its seat with the canopy in place. There should be a 1mm gap between the canopy and the helmet. Remove (sand off) some material from under the seat, helmet (neck) and/or pilot body if necessary. *See indications below. Glue the head (helmet) to the body of the pilot. For ease of painting, do not glue the seat, pilot and console yet. IMPORTANT, the pilot will have to be seated before fixing the instruments console (once everything is painted). *To get a better fit of the pilot Flatter down the back of the figures arms, by no more than 1/3mm. File down some material from under the arms. Softer the figure in hot water to get the arms to conform against the sidewalls. SCI-HIGH, version 1 Page 5 of 8
 grit sandpaper.")
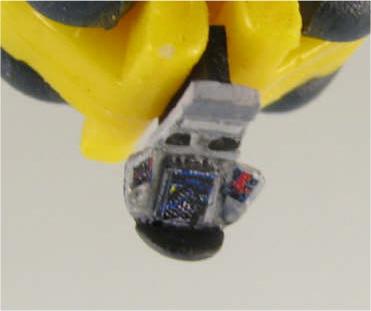
6 PAINTING & DECALS Refer to the references throughout this document for painting and decals emplacement. Before applying paint, apply a thin coat of primer and correct the imperfections that may still be visible. Apply another coat and lightly sand with 400 (or more) grit sandpaper. Test fit every subassemblies one more time to ensure that everything will fit together properly once painted. Color chart below was used to paint the test kit pictured in this document. Color chart Sections Fuselage Engines, canons, landing gear Cockpit consoles Cockpit seat, floor, rear panel Pilot suit Helmet Tinted canopy Colors (Federal Standard code) Sky Blue (FS15200) Euro Grey (FS36081) Lt. Ghost Grey (FS36375) Euro Grey (FS36081) Marine Corps Green (FS34052), Dark Drub (FS24091) Gold (FS17043) Smoke (Tamiya) Applying decals Before applying decals give your model a coat or two of gloss clear. Decals settle down much better on a glossy surface. A good and cheap gloss finish is Future Floor Wax thinned with 40% isopropyl (rubbing) alcohol. Carefully cut out each individual decal using a sharp hobby knife or scissors. Soak decal in warm water for about 10 to 15 seconds and lay the decal on your work surface for about 15 to 30 seconds. Pre-wet the surface (using a setting solution is recommended) then slide or push the decal off the paper backing into position on your model - DO NOT peel or pull. Smooth decal surface, expelling any air bubbles and blot dry with a cloth or Q-Tip. Allow decal s to dry overnight then apply a coat of flat or semi-gloss clear over the mo del to seal decals. FINISHING To enhance appearance apply a black or gray wash. Typically, mix 4 parts of thinner with 1 part of paint. Glue the remaining parts (subassemblies) together. DO NOT use super glue to fix the canopy as it might become clouded. You can enhance the weathering even further by applying pastels in some areas like nozzles, thrusters, canons and intakes. Artist s oils are also very useful to simulate damage and engine abuse. Apply a coat or two of semi gloss clear to seal the final finish. Don t forget to mask the canopy first to preserve its glossy finish. SCI-HIGH, version 1 Page 6 of 8


7 FINISHED KIT EXAMPLE SCI-HIGH, version 1 Page 7 of 8


8 REFERENCES (CGIS) Images from ZOIC. More great references can be found on ZOIC website at SCI-HIGH, version 1 Page 8 of 8
WHITE WOLF. X-ray View MID POWER MODEL ROCKET KIT BUILDING INSTRUCTIONS KIT SPECIFICATIONS:
 WHITEWOLF-38 PARTS LIST 1 - Nose Cone 1-17" Airframe 1-6" Motor Tube 3 - Aft Fins 3 - Forward Fins 2 - Centering Rings 1-15" Parachute 2 - launch lugs 1-12 Kevlar Shock Cord 1 - Motor Retention >>(screw/washer)
General Build Instructions for Mach 1 BT50 and BT55 Single Fin Kits. Needed Items for Assembly
 General Build Instructions for Mach 1 BT50 and BT55 Single Fin Kits 60-80 grit sandpaper Hobby knife Tape measure Scissors CA Super glue 30-minute epoxy 5-minute epoxy Masking tape 1/16 drill bit Needed
STUDY GUIDE A Day By Day Course Refreshment Quiz To Ensure That You Make The Most Out Of Your Rod Building Class
 DAY ONE: 1) Why would you want to build your own fishing rod? a. It s fun and rewarding b. You can customize your rod to your needs c. You can save money d. All of the Above 2) The main part of a fishing
Aliphatic Resin Wood Glue. 18" Fabric Parachute Part #PNC50 Part # Part #11700 Part #J0016. Launch Lug
 ADANCED * What you will need to build the Quest High-Q Hobby Knife * Straight Edge Pencil Aliphatic Resin Wood Sanding Sealer & Brush Spray Paint Parts and exploded view of the Quest High-Q Nose Cone 18"
Pre-Paint>Fuselage>Empennage>Fit vertical tail fin. Objectives of this task: Materials and equipment required: Fit the spar extender
 Pre-Paint>Fuselage>Empennage>Fit vertical tail fin Objectives of this task: To fit the vertical tail fin to the fuselage, including fitting the static probe, static tube, optional strobe light wiring and
Right On Replicas, LLC Step-by-Step Review * PLA (Chinese) Type 039G Submarine 1:200 Scale Hobby Boss Model Kit #82001 Review
 Type 039G Submarine 1:200 Scale Hobby Boss Model Kit #82001 Review") Right On Replicas, LLC Step-by-Step Review 20160229* PLA (Chinese) Type 039G Submarine 1:200 Scale Hobby Boss Model Kit #82001 Review Designed in 1994 for attacking both other submarines and surface ships
Right On Replicas, LLC Step-by-Step Review 20160229* PLA (Chinese) Type 039G Submarine 1:200 Scale Hobby Boss Model Kit #82001 Review Designed in 1994 for attacking both other submarines and surface ships
STEP 1 A. Lay the two Motor Mount Tubes on a flat surface with ends even and Glue them together with White Glue. Allow Glue to set before moving on.
 Prod. No. A51003 Skill Level Three QUEST AEROSPACE, INC PO Box 2409 Pagosa Springs, CO 81147 800-858-7302 Things You ll Need To Assemble this Kit: Pencil and Hobby Knife: White Glue: Aliphatic Resin glue,
Model Aero Sportster Indroduction
 1 Model Aero Sportster Indroduction We are excited to introduce the Model Aero Sportster! Inspired by classic designs of the past, the Sportster is a relaxing slow flyer, equally at home indoors or outside
1/10 th Scale 1956 Ted Jones Classic Hydroplane
 1/10 th Scale 1956 Ted Jones Classic Hydroplane Preparation These plans show outside sheeting of 3/32 balsa laminated with 1/64 birch ply. This makes a light and strong skin for this boat. Optionally you
Surfboard Repairs Chapter 7
 Surfboard Repairs Chapter 7 The Complete Surfing Guide for Coaches - Bruce "Snake" Gabrielson Repair Problems Boards continuously get bumped, hit rocks, break fins, get dropped, and many other things that
Vacuum Bagging Wings Instruction Manual Purdue University
 Vacuum Bagging Wings Instruction Manual Purdue University Note: Do not leave the vacuum pump running unattended! Revision: Original Release 10/31/15 Vacuum bagged wings are quick to build, light weight,
PH: Local: Texoma Drive, Denison, TX Page 1
 Thank you for choosing our newest, most advanced PrismJET digital print film to date, PrismJET 230 Ultra. 230 Ultra is a premium grade ultra-calendered 2.4 mil gloss white vinyl on a 90# air egress liner
Construction Chapters Index
 Construction Chapters Index 9 7 8 Chapters Index c. c. c. c. c. c. c7. c8. c9. c0. c. c. c. c. c. c. c7. Balsa Wood Skeleton Strip Planking Hull Fairing Keel Bulb Mould Lead Bulb Casting Keel Construction
We hope you ll enjoy the Drifter as much as we have! Scott DeTray Model Aero Specifications:
 We are excited to bring you the Drifter RC airboat. You re probably thinking it doesn t fly so what is Model Aero thinking??? We have always liked RC vehicles of all types and have had a fondness for airboats
AGM 33 PIKE ALL FIBERGLASS. Specifications Length: 92 Diameter 5.5 Weight: 24 lbs Motor Mount: 75mm Fins: 6-3/16 G10 CP: 68 from nose tip Parts List
 ALL FIBERGLASS AGM 33 PIKE Specifications Length: 92 Diameter 5.5 Weight: 24 lbs Motor Mount: 75mm Fins: 6-3/16 G10 CP: 68 from nose tip Parts List (1) Filament Wound Nose Cone w/ Metal Tip (1) Nose Cone
3190A NEO-ANGLE DOOR INSTALLATION INSTRUCTIONS. Series MODEL NO
 NEO-ANGLE DOOR INSTALLATION INSTRUCTIONS Series 30A Please read these instructions carefully to familiarize yourself with the required tools, materials, and installation sequences. The Exploded Diagram
Weathering tips with Laurence Farrugia
 Weathering tips with Laurence Farrugia Some notes taken during (and checked by) Laurence Farrugia weathering demonstration Disclaimer from Laurence This is not the technique, it is a technique I have used
Little Dog Dual Deploy
 Little Dog Dual Deploy John Wilke & Paul Fechtmeister September 2010 All dimensions are in inches unless specified Construction Notes: Other items you will need: One set of epoxy Motor One sheet of 120
TOURNAMENT ICE. 8Ft-Gold Standard Manual Score Home Air Hockey Game Assembly Instructions / Manual
 TOURNAMENT ICE 8Ft-Gold Standard Manual Score Home Air Hockey Game Assembly Instructions / Manual Thank you for purchasing a Gold Standard Games product. All of us at Gold Standard Games want you to be
AVA Building Instructions
 Suggested Assembly Sequence: AVA Building Instructions 1. Insert fittings in rudder and trial fit rudder on boom 2. Attach stab to v-mount and position ahead of rudder ¼, sanding the v-mount as needed.
275 RID Assembly Instructions
 75 RID Assembly Instructions Part No. 0003003 v. Lscsep0 PARTS LIST (Specifications and contents subject to change without notice) Description Part # A. RID Track...0000050 B. Capacity Plate...0053 C.
BUILDING INSTRUCTIONS
 Z I P P M A N U FA C T U R I N G A Zippkits R/C Boat BUILDING INSTRUCTIONS 2010 Zipp Manufacturing Frankfort, New York 13340 www.zippkits.com Table of Contents Introduction 1 Engine Mounting 30 S E C T
Bob's Card Models and [Resources]
![Bob's Card Models and [Resources]](/thumbs/90/103692932.jpg "Bob's Card Models and [Resources]") Bob's Card Models www.bobscardmodels.altervista.org and www.zealot.com [Resources] Robin DR400-140B Major 1:25 The Robin sport monoplane, conceived by Pierre Robin and Jean Délémontez. The Robin DR400
Bob's Card Models www.bobscardmodels.altervista.org and www.zealot.com [Resources] Robin DR400-140B Major 1:25 The Robin sport monoplane, conceived by Pierre Robin and Jean Délémontez. The Robin DR400
PAY N PAK, 1/12 th Scale, Limited Sport Hydro P Sport Hydro
 1980 82 PAY N PAK, 1/12 th Scale, Limited Sport Hydro P Sport Hydro Introduction: The 1980 turbine Pay N Pak is a good subject for a model race boat. It has a low profile, mild pickle-fork setback, long
Akcent-2 - Building Instructions
 Akcent-2 Home Pictures Building Instructions Ordering Akcent-2 - Building Instructions Note! The pictures show older kits with "diser" wings. The new kits come with nicer D-box wings. Servo locations are
Leopard-class Dropship
 Leopard-class Dropship By Dog Hair Terrain (For use with Battletech, Mechwarrior: Dark Age, or 6mm/1:285 micro armor games) Printing. This model was designed to be printed on 8 ½ x 11 paper. It should
" A " "B " F G H P PARTS LIST
 K-57 SkyDart usiness SST Concept SUSIDIRY OF DMON ESTES INDUSTRIES PENROSE COLO. 8120 Designed by Larry H. Renger "G " " " " F " R "H " SP-57 U " " "C " I M C O T T L "D " E F G H P D J "E " N K Q S 1
Panoptix PS51-TH FrontVü/LiveVü Thruhull
 Panoptix PS51-TH FrontVü/LiveVü Thruhull Transducer Installation Instructions Important Safety Information WARNING See the Important Safety and Product Information guide in the chartplotter or fishfinder
Your kit contains the following items. Additional Items You May Need. Pre- cut parts Propeller rigging and rubber Sandpaper Covering sheet
 Your kit contains the following items Pre- cut parts Propeller rigging and rubber Sandpaper Covering sheet The SkyFox offers great glide performance in a rubber powered plane due to its built up wing.
Carving a Custom Seat
 Carving a Custom Seat Seat Carving your own seat from mini-cell, high-density foam is really quite simple and has proven to be more comfortable than any commercially produced seat and often more reasonably
CARL GOLDBERG PRODUCTS, LTD. P.O. Box 818 Oakwood GA Phone # Fax #
 Superfloats 36 ARF WARNING A radio-controlled model is not a toy and is not intended for persons under 16 years old. Keep this kit out of the reach of younger children, as it contains parts that could
 www.aquaglidekayak.com WORK SPACE AND TOOLS 1. Take care to position yourself in a clean, dry area with good ventilation. For proper curing of adhesives, temperature should remain above 10 C (50 F).
Dornier Do R 4 Super-Wal
 Dornier Do R 4 Super-Wal Model Aviation Laddie Mikulasko s Dornier Do R 4 Super-Wal Build the multiengine, record-setting seaplane. Article, plans, instructions, and photos by Laddie Mikulasko. Complete
History. Both the 13 and 18 pdr guns were introduced into service in With both guns came three types of limbers.
 WDHT 04 13 / 18 pdr Limber and Ammunition Wagon Royal Horse Artillery History Both the 13 and 18 pdr guns were introduced into service in 1904. With both guns came three types of limbers. Limber carriage
Learning to Fly: The Wright Brothers Adventure EG GRC 39
 Learning to Fly: The Wright Brothers Adventure EG 2002 12 007 GRC 39 The Wright Brothers 1900 aircraft was flown repeatedly at Kitty Hawk, North Carolina, during the fall of 1900, mostly as a kite but
MICRO - DLG. This kit should only take 30 minutes to compile, very simple and quick.
 MICRO - DLG This kit should only take 30 minutes to compile, very simple and quick. You will need: Hot Glue ( small tip preferably ) Sharp razor blade Ruler a strip of strong fiber tape Thin nose Pliers
MANDATORY BULLETIN No.: SAFETY RELATED. EV a SR. Appendix 1 Bulletin Flow Chart
 Appendix 1 Bulletin Flow Chart Form No.: QS-406/F-03A Issue: Date of Issue: Page: 2 APPENDIX 2 Inspection of Nicopress Pressing Tooling: Vernier calliper or Nicopress check gauge Felt-tip pen to mark clamps
Depth transducer TH 52
 Depth transducer TH 52 performance by NEXUS NETWORK Installation Manual English DEPTH TH52 English 11-1 English DEPTH TH52 11-2 DEPTH TH52 English CONTENTS: 1 Applications...4 2 Tools and Materials Needed...4
8-GUN CORVETTE ASSEMBLY INSTRUCTIONS
 8-GUN CORVETTE ASSEMBLY INSTRUCTIONS THE HULL STEP 1 Fasten the Deck to the Hull. Find the hull. This is a large, pink, ship-shaped piece of insulating foam board. This will form the base of your model
REPAIR MANUAL. Materials
 REPAIR MANUAL Materials Balsa: Raw material for FST (Future Shape Technology series) and HELIUM rails or parabolic stringers. It is what gives our unique product its excellent performance characteristics.
FRAME FEATURES TABLE OF CONTENTS INTRODUCTION
 R3 MANUAL TABLE OF CONTENTS Introduction...1 Frame Features...2 Fork Preparation...3 Small Parts...5 Frame Preparation...6 Mechanical Cable Routing...7 Electric Cable Routing...9 Seatpost Assembly & Installation...11
Tugster. Tug Boat. Competition or Sport Tug Kit. A Zippkits R/C Boat. Building Instructions
 Z I P P M A N U FA C T U R I N G Tugster Tug Boat Competition or Sport Tug Kit A Zippkits R/C Boat Building Instructions 2016 JMP Hobby Group St. Paul, Indiana 47272 www.zippkits.com Toll Free (866) 922-ZIPP
Model Aero AT-6 Texan Introduction
 1 Model Aero AT-6 Texan Introduction We are excited to introduce the Model Aero AT-6 Texan! Originally used as an advanced trainer by the U.S. Armed Forces, the AT-6 is a relaxing slow flyer, equally at
5. Tailplane assembly
 5. Tailplane assembly Overview This section covers the fitting of your completed tailplanes to the torque tube assembly. Included is the insertion of the TP13 bushes in the inboard rib and the fitting
Handle the film very carefully. As with aluminum foil, once creased, the film will remain creased.
 RECOMMENDED TOOLS: Bottled water (not tap water) Spray bottle Squeegee or squeegee card Break-away utility knife (for cutting film) Single-edged razor blade (for cleaning glass) Ruler or tape measure Soft,
Samurai Armor Set: Step by Step
 Samurai Armor Set: Step by Step Pack 3 Stages 9-12 1 Contents Stage 9 Pages 29-31 The cuirass side and tassets Stage 10 Pages 32-37 The shoulder plate and tassets Stage 11 Pages 39-41 The shoulder plate
Max Bee. Part II: Building Max Bee Stunt News 8. lighter: the building of Max. all published.
 Max Bee Can you say Exotic? Igor s World Championship winning design has lots of interesting aerodynamics as well as interesting aesthetic design cues. I know, I know, the designing article about Max Bee
How to Weather and Ballast Track
 How to Weather and Ballast Track Presented by Jeffrey Jarr Weathering Track What is a train track comprised of? Weathering Track What does real weathered track look like? Weathering Track What does real
How Scott Builds a Fighter Kite, May 2011 Updated Sept 2018
 How Scott Builds a Fighter Kite, May 2011 Updated Sept 2018 MAKE A TEMPLATE 1. Draw half sail plan on 17x22 pad with 4x4 (1/4 inch) grid. Add ¼ inch extra on nose (for reinforcement) and plenty of extra
GLIDING NEW ZEALAND ADVISORY CIRCULAR MYLAR SEALS. This is an Uncontrolled Document. Issued September 2004
 GLIDING NEW ZEALAND ADVISORY CIRCULAR MYLAR SEALS This is an Uncontrolled Document Issued September 2004 Holder s Name: Address: COPYRIGHT 1999 GLIDING NEW ZEALAND INC. No part of this Advisory Circular
BUIDLING INSTRUCTION GLIDER MINI-RACE. MINI-Race building instruction January
 Wingspan [mm]: 950 Aspect ratio: 7,7 Wing area [dm2]: 11,7 Wing loading [g/dm²] : 16 Takeoff weight [g]: 190 Airfoil: AG03 mod BUIDLING INSTRUCTION GLIDER MINI-RACE www.pcm.at 1 CONTENTS DATA 1. Kit contents
3M DICHROIC Glass Finishes
 3M DICHROIC Glass Finishes DF-PA DF-PA Chill Chill & & DF-PA DF-PA Blaze Blaze Doc TypeInstallation Product #Guide (opt.) Revision D, April 2018 Product Description 3M DICHROIC Glass Finish DF-PA (the
R3 RIM MANUAL EN. Version 1 I
 R3 RIM MANUAL EN Version 1 I 07.02.2017 TABLE OF CONTENTS Introduction...1 Frame Features...2 Fork Preparation...3 Small Parts...5 Frame Preparation...6 Mechanical Cable Routing...7 Electric Cable Routing...9
FEATHER INLAYS. Custom Rod Builders Guild
 FEATHER INLAYS Using Multiple Feathers by Neal Hall Custom Rod Builders Guild I have been building rods for about 10 years. Five years ago I became intrigued with a feather inlay designed by Charles Reading
Application & Care Reflexite V98 Conformable Graphic Sheeting For EMS Vehicle Graphic Applications RSA2340
 Table of Contents General Information... 2 BEFORE APPLICATION... 2 STEP 1: TEMPLATING... 2 STEP 2: CUTTING... 2 STEP 3: SUBSTRATE PREPARATION... 3 STEP 4: SURFACE CLEANING... 3 STEP 5: APPLICATION TEMPERATURE...
Review of. Bell B206 Replica Torque Pedals. Manufactured by OE-XAM
 Review of Bell B206 Replica Torque Pedals Manufactured by OE-XAM Intro During my quest around flight simulation hardware I have set my focus on hardware manufactured specifically for helicopter flight
8. Carefully layout all the parts of the reservoir setup and clean any dirt, grime or dust from the parts. ( image 8 ) 8
 8") INSTRUCTIONS TO SERVICE AMADAXTREME SHOCKS 2.0 REMOTE RES AUSTRALIAN VERSION PART 1 - SERVICE THE RESERVOIR 1.Prior to cleaning the shock check for any leaks or signs of damage to the res, lines, bushes
INSTRUCTIONS TO SERVICE AMADAXTREME SHOCKS 2.0 REMOTE RES AUSTRALIAN VERSION PART 1 - SERVICE THE RESERVOIR 1.Prior to cleaning the shock check for any leaks or signs of damage to the res, lines, bushes
Whisper 1400 Glider Operation Manual
 Whisper 1400 Glider Operation Manual Specifications: Wingspan: 55 (1400mm) Length: 32.5 (825mm) Wing area: 323 sq. in. Weight: 16 oz.(453g) Ace R/C Whisper 1400 Glider R/C Sailplane (4104-F) Distributed
ROPV R40 E Series User Manual
 HARBIN ROPV INDUSTRY DEVELOPMENT CENTER ROPV R40 E Series User Manual For Use with the Following ROPV Pressure Vessel Models: R40 300E R40 450E Headquarters Tel:(+86)451-82267301 Fax:(+86)451-82267303
CHAPTER 2 MAINTENANCE
 CHAPTER 2 MAINTENANCE This chapter addresses the proper care of the machine gun to ensure its overall effectiveness and efficient functioning. The information includes the gunner's knowledge in disassembly
ANATOMY OF FUSELAGE REPAIRS
 ANATOMY OF FUSELAGE REPAIRS The first part of this file is about doing a repair on the glassed-over fuselage. The latter part covers some repairs on composite fuselages. The glassed-over fuse will stand
Building Instructions ME 163 B 1a M 1:5 Turbine
 Building Instructions ME 163 B 1a M 1:5 Turbine Thank you for choosing our kit of the Me-163B. We ask you to read the instruction once in advance before building this kit in order to avoid mistakes. Make
MODEL REVIEW A-10, Trumpeter 1:32
 MODEL REVIEW A-10, Trumpeter 1:32 Reviewed by Brian Casteel I love 1/32 scale models! I love that they are too big to put anywhere in my house, including my closet, I love that they are heavy, I love that
OWNER S MANUAL ALWAYS WEAR A GOVERNMENT APPROVED FLOATATION DEVICE WHEN FISHING. Know the limits of your ability and the limits of your equipment.
 OWNER S MANUAL ALWAYS WEAR A GOVERNMENT APPROVED FLOATATION DEVICE WHEN FISHING. Know the limits of your ability and the limits of your equipment. Changes in air temperature and elevation could cause the
ANGEL 2000 glider ARF ASSEMBLY MANUAL. Specifications: MS: 129
 WWW.SEAGULLMODELS.COM ASSEMBLY MANUAL ANGEL 2000 glider Graphics and specifications may change without notice. MS: 129 ARF Specifications: Wingspan---------------78.7 in ( 200cm). Wing area---------------582.8sq.in
How to Cut Shafts and Glue T-tops on KIALOA Stand-Up Paddles
 How to Cut Shafts and Glue T-tops on KIALOA Stand-Up Paddles Sizing: Determine the size for your paddle by adding 6-10 to your overall height. If you paddle more frequently in the surf, lean towards the
Pitts Model 12 Wing Leading edge Installation
 Pitts Model 12 Wing Leading edge Installation This procedure is used to install molded plywood leading edges included in the Pitts Model 12 kit. Nine (9) molded leading edge section are require per aircraft;
SLR Missile Thunderboat
 J M P H O B B Y G R O U P L L C SLR Missile Thunderboat Zippkits R/C Boats BUILDING INSTRUCTIONS 2017 JMP Hobby Group LLC Indiana USA 1 Introduction Thank you for purchasing this kit. We are sure that
BUILDING INSTRUCTION Glider TASER unplugged. Taser unplugged Building instruction September
 Wingspan [mm]: 2000 Takeoff weight [g]: From 400 Airfoil: AG 455ct-02f AG47ct-02f by Mark Drela BUILDING INSTRUCTION Glider TASER unplugged www.pcm.at 1 CONTENTS DATA 1. Kit contents 2. What else do you
Exxtacy. Repair and Tuning Manual. Exxtacy Construction Basics
 1 of 20 Exxtacy Repair and Tuning Manual Construction Basics D Cell Repair Rib Repair Tuning Exxtacy Construction Basics The Exxtacy is built with carbon fiber and Kevlar/Aramide honeycomb. The Exxtacy
aero naut Order No. 3009/00
 aero naut Order No. 3009/00 Introduction: The model should be assembled following the sequence of the stages of construction described in these instructions. The laser-cut components are individually numbered.
Grandpa's Homemade Rocket for About a Dollar!
 Grandpa's Homemade Rocket for About a Dollar! Grandpa and Granny Co. 2012 The most common items needed: (The number of Rocket parts from each item is before the parts name and its proportionate cost is
OWNER S MANUAL AirTop Large and AirTop Small
 It is the owner s responsibility to read and understand the material presented in this manual and to instruct all users or operators on how to use product safely. By inflating the product, you hereby agree
REFLECTIT. Reflectit Spray Application Instructions DS % Acrylic Coating Providing a Pearlescent Appearance
 REFLECTIT 100% Acrylic Coating Providing a Pearlescent Appearance Reflectit Spray Application Instructions I. General Instructions The following instructions apply to using Binks 2001 pressure pot spray
INSTRUCTION MANUAL CZ 630/631
 INSTRUCTION MANUAL CZ 630/631 Before handling the air rifle read this manual carefully and observe the following safety instructions. Improper and careless handling of the air rifle could result in unintentional
Board Glassing Chapter 6
 Board Glassing Chapter 6 The Complete Surfing Guide for Coaches - Bruce "Snake" Gabrielson Glassing Guidelines Like shaping, there is probably any number of ways to successfully glass a blank. Yet there
Aviation Teleclass Webinar!
 Name Welcome to the Supercharged Science Aviation Teleclass Webinar! You can fill out this worksheet as we go along to get the most out of time together, or you can use it as a review exercise at the end
FlyingFoam Nurf. General Assembly Instructions
 FlyingFoam Nurf General Assembly Instructions These instructions apply to the Nurf, an all EPP forward swept flying wing available from FlyingFoam.com. Building and operating a remote controlled aircraft
Aegea Assembly Notes:
 Aegea Assembly Notes: The Aegea model is a thermal Duration (TD) model made up of components from Phil Barnes 1 (bagged wing and tail group) and Terry Luckenback 2 (Pretty Mantis fuse). Due to its construction
CONSTRUCTION OF A GUNBOAT A CLASS YACHT by Brian Dill
 CONSTRUCTION OF A GUNBOAT A CLASS YACHT by Brian Dill The Gunboat design is the latest Radio A class from Graham Bantock, optimised to provide the best boat speed below 4 knots and to be as good as possible
Hip Block Installation Instructions:
 Hip Block Installation Instructions: The instructions that follow are shown for our low profile hip blocks installed in a Storm Chaser M C-1. However, the very same technique can be used for any of our
Miss Mayflower. Build Manual
 Miss Mayflower Build Manual Thank you for the purchase of the Miss Mayflower, this new exciting craft will give you fun on many types of terrain including snow, gravel, pavement, grass, water, and when
H ow To Buil d A Wa ter Rocket
 H ow To Buil d A Wa ter Rocket DESIGN AND DEVELOPMENT Brainstorm The first step in the design of a water bottle rocket is brainstorming. Brainstorming is a problem-solving technique that involves the spontaneous
Ski Tuning Information
 Ski Tuning Information Table of Contents 1) Vorlage Ski Tuning Support 2) Online Ski Tuning Information 3) Ski Tuning Cheat Sheet 4) Ski Tuning Equipment What do you need and approximate cost Vorlage Ski
TECHNICAL ASSISTANCE. Mactac Bubble Free Series Vehicle Wrap Application Instructions
 Mactac Bubble Free Series Vehicle Wrap Application Instructions Thank you for your interest in Mactac s B-Free digital media. Our micro-structured air egress technology provides the best opportunity for
V-Tail Flamingo. Included in Kit * Pre- cut balsa parts * Ballast weights * Diagram sheet * Sandpaper sheet
 V-Tail Flamingo Included in Kit * Pre- cut balsa parts * Ballast weights * Diagram sheet * Sandpaper sheet Additional Items You May Need * Wood Glue * Epoxy Glue * Sanding block * Hobby knife Overview:
Thunder Dodo. Main Parts List. Designed By Jay Gommer Skill Level 1. Revision Date: January 3, 2006
 Thunder Dodo Designed By Jay Gommer Skill Level 1 Length: Diameter: Fin Span: Weight: Revision Date: January 3, 2006 Image created with RockSim 8 and Photoshop Elements 25.34 1.64 7.05 3.08 oz Main Parts
RESINIZE FINISH APPLICATION INSTRUCTIONS
 RESINIZE FINISH APPLICATION INSTRUCTIONS Directions for Resinize Finish You just need a few things to start: fine-grain sandpaper (220 grit) foam roller and paintbrush (depending on your project - see
TABLE OF CONTENTS INTRODUCTION
 R3 DISC MANUAL TABLE OF CONTENTS Introduction... 1 Frame Features... 2 Fork Preparation... 3 Small Parts... 5 Frame Preparation... 6 Brake Housing Installation... 7 Mechanical Cable Routing... 9 Electric
Southern Eagles Soaring
 Southern Eagles Soaring N56LS Standard Cirrus Disassembly / Assembly Procedure. Version 2, 2017 You landed out so what now? First, hopefully you made arrangements with someone who has a hitch on their
Rocket Report By: Riley LeMont. Jefferson Starship. January 22, Name Nomiddlename Lastname
 Rocket Report 2015 By: Riley LeMont Jefferson Starship January 22, 2015 Name Nomiddlename Lastname Purpose: The purpose of this lab was to figure out how to create a bottle rocket out of multiple bottles
MiniTwin by Acer
 MiniTwin 250 - by Acer ASSEMBLY INSTRUCTIONS Thank you for choosing the MiniTwin 250 as your next project. This kit is easy to build and only requires a few hours to complete. Once finished, you will be
INSTRUCTIONS FOR GLUING ON THE BUMPER FOR PORT TOWNSEND WATERCRAFT S NESTING DINGIES. (Or requires a 1 surface to adhere to.)
") INSTRUCTIONS FOR GLUING ON THE BUMPER FOR PORT TOWNSEND WATERCRAFT S NESTING DINGIES. (Or requires a 1 surface to adhere to.) The PT 11 bumper is made from a high quality, non marking EPDM rubber. This
INSTRUCTIONS FOR GLUING ON THE BUMPER FOR PORT TOWNSEND WATERCRAFT S NESTING DINGIES. (Or requires a 1 surface to adhere to.) The PT 11 bumper is made from a high quality, non marking EPDM rubber. This
14. Ai le ron quick-connect system
 14. Ai le ron quick-connect system When attaching the wings to the fuselage the aileron control system is automatically coupled via angled bellcranks, two of which are mounted in the fuselage and one in
Installing ST1300 Fairing Decals
 Installing ST1300 Fairing Decals Caution: Decals are best applied when ambient air temperature is 60 degrees or higher. Do not apply in direct sunlight. Do not allow the decals to get wet while they are
Designed by Steve Shumate Adapted from the North Star design by Laddie Mikulasko. Polaris EX Introduction
 1 Model Aero Polaris Designed by Steve Shumate Adapted from the North Star design by Laddie Mikulasko Polaris EX Introduction We re excited to introduce the Polaris EX seaplane parkflyer! Based on the
Blazer Marine, Whiplash Sport 40
 Blazer Marine, Whiplash Sport 40 Thank you for choosing to build the Whiplash 40. We have spent over 12 years perfecting this design, and finally we are making it available to the world. We are excited
Main Wing Wood Parts
 Main Wing Wood Parts WR 1-11 TE LE MS1 MS2 ST MS3 Before you start the build, gather all the required main wing components. QTY o MS1 (Main Spar 1) 2 o MS2 (Main Spar 2) 2 o MS3 (Main Spar 3) 2 o ST (Servo
ACHIEVEMENT DAY REQUIREMENTS
 WELCOME Welcome to the 4-H Rocketry Project! Please read through this guide carefully, as it contains information and suggestions that are important for your project. 4-H leaders can obtain a Leader Project
Landing Skeg Installation
 2010 Landing Skeg Installation Version 1.1 Kennedy Composites 4/22/2010 Kennedy Composites What is a Landing Skeg: A landing Skeg is a plastic cleat installed into the bottom-side at the frontend of a