|
|
|
- Ashlyn Nelson
- 5 years ago
- Views:
Transcription

1
2

3

4
5

6

7

8

9
10
11

12
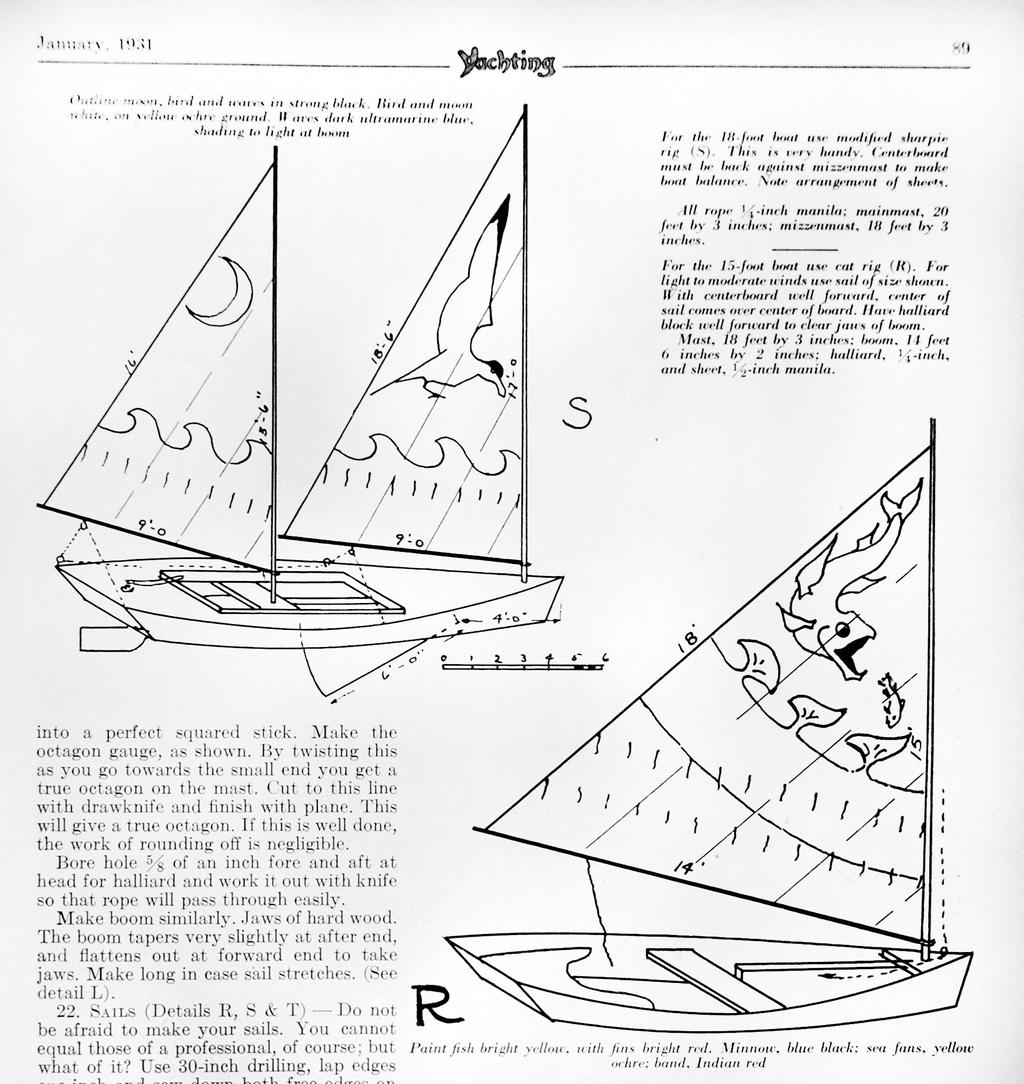
13 From the Yachting Archives: How to Build a Sharpie Sailboat By Edwin S. Parker This article from the December 1930 issue of Yachting (and Part II from January 1931) gives full plans and instructions for building The most boat for the lease cost, and so simple anyone can build her. Editor s note: The plans for a sharpie sailboat, as outlined in the December 1930 and January 1931 issues of Yachting, look to us like a great project to teach the grandkids about boatbuilding! Some materials, costs, and methods have progressed since the time of writing, so instead of asking your plumber to cut pipe to just the right length, you may now be able to go down to Home Depot to find the bolt in question. Unfortunately, we are not all rich, and we can t all build Cup defenders. But that is no reason for building a tub or staying ashore. There is always a way to beat the game, and the way to heath the boat game is to build a sharpie. You can do it for under forty dollars. A sharpie represents the most boat for the money. It is graceful, fast, and a joy to sail. It is also eminently seaworthy and stiff. Minnow, fifteen feet over all, makes just over five knots under one reef and a strong wind. I have driven her with all sail in the same wind but I was too busy to do any timing - a considerably larger boat could not catch us. A sharpie is easy to build. In general, the process is to bend two side boards around moulds, fasten them to stem and stern, screw in a chine batten, plank her crosswise, saw out the centerboard slot, and proceed with the finish (Detail J). If the pieces are carefully made, the process is really very simple. There is nothing that involves experience in boat building or special skill with tools. There are no pieces that go into place with difficulty or won t stay put. I have built two of them single-handed with success. Many times I have sailed among the big ships laid up in Oakland Estuary in my 18- footer, lying along the deck with one bare toe hooked carelessly over the tiller. With a gale it required at least two fingers - never more. She would come about like a top anywhere, any time. And one day we worked her up the Alameda Canal against a tide and sailed in San Leandro Bay when it blew in windows in Frisco. Add to this regular trips on Frisco Bay (it fairly blows your hair off there in summer) and a season on Monterey Bay, off Santa Cruz, and you have a fair idea of what an 18-footer will do. I have built three sharpies, besides five smaller craft for fishing or hunting. At the age of nineteen I built the first one along the lines of a sketch my father had of a New Haven sharpie, eighteen feet long, dating from about The type was taken to the Carolinas from Connecticut by Mr. George C. Ives, and his son, Mr. John B. Ives, of Statesville, N.C., writes the following: Father had his sharpie built in 1875 at Fair Haven, Conn., by a famous builder. She was 36 feet long, having a fore and aft mutton leg sail with boom six to eight feet on the
14 mast from the foot of the sail. This made the sail set like a board. This boat was tried out with the fastest boat then in the fleet and beat her. A club of gentlemen wanted to keep her at home and offered a bonus over cost, which father declined as he wanted the boat to pit against what North Carolina boatmen claimed for their clinker built boats which they considered superior. He brought two sharpies to North Carolina, and it was not many years till there was a big fleet of them in our waters. They built to 50 and 60 feet, the larger ones schooner rigged and decked, and this style is largely used now in the oyster dredging industry. The fishermen modified the style into deadrise skiffs, gaff sail and jib, and they carried sail like the wind and would almost go into the eye of it. The larger boats superseded the round bottom schooners in some industries, and would beat them in all weather at sea, but motor craft finally took their place. The design of a sharpie is a very particular affair. One was published around 1910 which brought down the scorn of my father. Pumpkin seed, he called it, for it was fat and flat, an it had a skeg, which would kill any real sharpie. In my first boat the side boards were sawed curved, starting from the bow. She rocked fore and aft too much and pounded in a chop. In the second one I started the curve farther aft, and it worked better, but they both dragged waves behind when going fast. When it came to Minnow I analyzed the design carefully, and I found that the best displacement curve came when the side boards were perfectly straight on both bottom and top, tapering, of course, from bow to stern. So I built her that way. She does not pound, drives to windward regardless of waves, and leaves the water nearly flat. Besides this, it makes building much simpler. So don t let any wise friend persuade you to cut a curve on the bottom edge - you will get a perfect curve from the bending on the sides on the flare. It is the experience of the author that textbooks tell you everything but how to get the monkey out of the box. It is the intent of this article to be brief, but comprehensive, covering all small points, even to nail sizes. All the following directions are important. If you follow each step in its proper order, you will be surprised how quickly the boat will go together. But do not omit any steps or take any short cuts. Remember, a boat has a habit of leaking, even under the best of circumstances. TOOLS cross-cut, rip, keyhole and hack saws drawknife spoke shave light plane hammer brace and bits 1/4 to 3/4 screw driver bit and countersink twist drills 1/8, 5/32, 3/16 plain screw driver square, metal shears
15 three clamps with 2 openings LUMBER No list of pieces is given because one usually gets what is available. A few pieces are called for on the details, and if you don t get enough lumber the first time, order again. Avoid spruce because it rots, and use regular 7/8 boards, not thinner, to finish 13/16. Never use tongue and groove boards below the water line. Planking should be 6 wide. HARDWARE Hardware should be galvanized. Use 6 penny or 7 penny nails generally, wire rather than cut, with a few 8 penny. Two gross screws 1.5 No. 10. Get some scraps of heavy galvanized sheet iron from your plumber. CAULKING Use regular stranded cotton caulking, or get balls of candle wicking from a hardware store. Cotton batting torn into strips will do in a pinch. SIZE OF BOAT A 15-foot boat will hold two men and a boy. It sails best with three boys or two men. An 18-foot boat holds four men but sails best with three. COSTS The materials for Minnow cost $45, with no attempt at economy, in A deck might add five dollars more. The 14-footer cost $20, in The 18-footer cost $35, in If you have $30, start work - you will raise the rest as you go along. Be careful of the dimes and quarters if cost is a problem. I have heard that in the Carolinas they used to build them for a dollar a foot plus materials. That, of course, could not be done now. DIRECTIONS FOR WORK In order of procedure. MAIN ASSEMBLY 1. Have your saws sharpened by an expert, and sharpen your other tools. 2. Study the plans carefully. Every word and line is on there for business. On the plans certain pieces are identified where they occur, by a number in a circle. 3. Get pieces out at mill, and order lumber (Detail A). You can chop the stem out of an oak piece but don t do it unless the mill man wants to rob you. They should be able to saw it out.get a full width side board if you can afford it; mine was redwood. Otherwise, two 12 boards joined carefully as shown (Detail E). Making tight may be a nuisance, but the joint will only be under water when sailing, and slop comes aboard then anyway. 4. Finish side boards complete but do not cut at stern (Details D & E). Saw out as shown, mark for ribs, bore 5/32 for each screw, and countersink. Be sure to make sides opposite hand. Screw ribs in place by the gauge so chine will fit. Use screw driver bit and brace. 5. Make transom, leaving a wide board at the bottom. Stem is presumably made at the mill. (See detail B.) 6. Make moulds of rough lumber (detail C).
16 7. Form the boat upside down (detail J). Nail boat side boards securely to the stern. Nail to mould No. 2 with two 10 penny nails each side not driven home. Take rope hitch on after ends of boards and cinch in. Nail in form No. 1. Cinch up by twisting rope and draw tight over transom. The battens on the inside of side boards to set transom will help a lot. Screw transom in place, screws into corner piece rather than in end grain of boards of transom. Have transom extended beyond bottom edge of side boards for bevel planking. The sides will not bend evenly. Pull the boat true with a diagonal wire or rope. Use a string down center for truing. 8. Spring chine battens into place with clamps, and screw, beginning at one end and working towards other. Screws go from outside of side boards through, as with ribs. Chine will project beyond edge of board 2/3? so both will bevel for plank. (Details F, J, and Q.) 9. Bevel edges of side boards and chine exactly to take plank. Work on both sides at once and use strip across for guide. Work down with drawknife and plane carefully. Boat is apt to leak here. Bevel the transom. Cut stem so last plank will lap onto it and finish at line of rabbet. (Details M and N.) 10. Begin at stern and lay three planks. (Details F and J.) Be sure to lay a thin stir of caulking on edges of side boards under planks. Nail plank to sides and screw to chine as shown. Cut plank long and leave trimming till later to be done all at once. Do not lay too close - you want a crack to caulk into. 11. Start keelson at middle of second plank, and let it go loose at bow at first or nail to end of stem lightly. Fit it at bow when half the planks are on (detail J). 12. Complete planking. Watch caulking carefully, and lay it between plank and keelson on each side of centerboard slot (detail F). Saw plank as close to sides as you can without marking sides, and plane true. 13. Mark centerboard slot and saw accurately with cross cut saw through from the bottom. Should be 1.75 wide to take post. 14. Turn boat right side up. Nail in spreaders to sides of ribs for open boat and 2x4 deck beams crowned for decked boat. Also seats. This holds the boat spread when the moulds are taken out, which is done now. (Details M & N.) 15. Centerboard box (detail G). Fit boards of box to keelson. They should be 1 1/8 thick, if possible but 7/8 can be used with care. It is almost impossible to drill for screw holes through from the bottom and run true into the boards of the box. It is better to drill both ways from the center, but the places must be accurately marked for the holes to meet. So drive some nails in the edges of the boards where the screws are to go, cut off the heads, and press down against the keelson. This will mark the holes, and you can bore the keelson from the inside through the plank, and into the edges of the boards. Use drill through bottom slightly smaller than shank of 4 brass screws, and a smaller hole in edges of boards to hold thread of screw. Fit posts either end of slot, set in white lead, and nail into keelson with one eight penny. Clamp box to posts or nail lightly. Turn boat over and drive screws with brace and screw-driver bit. Be sure you have a thin strip of caulking between keelson and edges of box. Turn boat back, bolt box at bow with 1/4 bolts as there is no room to drive a screw
17 (have holes already), and screw after ends to post, with 1.5 number 10 screws. This completes the work on the rough hull. In the next issue of Yachting, directions and plans for completing the sharpie will be given in a second and final article. How to Build a Sharpie Part II- The Most Boat for the least Cost By EDWIN S. PARKER In the December 1930 issue of Yachting, the plans and directions for building a 15-foot Sharpie were given that carried the work as far as planking the bottom. In the present article the directions for work are continued from that point to completion. Reference is made here to some of the sketches in the first article and it will be necessary to have them at hand for reference in reading this installment. STEPPING THE MAST (Details I & Q) For open boat, build small decking in two layers, top running lengthwise, and lower running across to prevent splitting. Saw mast hole with keyhole saw. Nail this decking securely in place with eight-penny nails. But the strain on the mast is so great that it will spread sides. So later, when the bumpers are on, bend a 3-in wide strip of galvanized sheet metal, as heavy as you can handle, across and around the bumpers, screwing it with two screws each side 2-in screws preferably - holes drilled in metal and wood. Put some extra screws through sides into bumpers just abaft this. The step is as detailed. For the decked boat, put 2 by 10 boards across and fur up for crown of deck (Details N & P). 17. DECKING - Use 2 by 4 spreaders as already mentioned, crowned as much as you want. The crown is for appearance only. Nail the coaming to this, with the 1 by 6 planking left over, and set in the other deck beams made of 7/8-inch stock, crowned likewise. The coaming supports the adjacent deck. Do not set the edge too high or it will cut one's knees- two inches will stop all the water necessary. Use narrow matched boards for the deck -old flooring would be good. Another way is to have 7/8-inch boards ripped to 1.5-inch strips and bent to the curve of the boat, laying edge pieces first and working inwards, nailing together edgewise and into deck beams as well. Paint deck a sloppy coat, lay canvas and tack to outside of side boards so that the bumper will conceal the edge of canvas. Paint canvas a sloppy coat at once. Use 8- ounce canvas if you can afford it, or anything lighter, down to unbleached sheeting. 18. BUMPERS (Details M, N & P) -In the open boat this strip strengthens the edge materially. In any case, it turns a lot of water on a rough day and takes the knocks when
18 landing. Use the hard pine battens No. 2. Taper off the forward ends to about 3/4 of an inch on the inside. In the open boat, clamp in place and screw 8 inches o.c. from the inside of the side boards, as with ribs. In the decked boat, screw through bumper from outside into side boards, countersinking deeply. In either case, bind at bow and stem with galvanized iron to prevent spreading. Make patterns of heavy paper for cutting metal. Drill for nails in metal, and clinch nails where they go through boards. 19. CENTERBOARD (Detail K) - Make either way, as shown. The board can be pinned through the case for the hinge, as is usually done, but it is very convenient in a small boat to be able to get the board out from the top. The method of hinging shown has proved a good one, and keeps the pivot low. Have a hole in the box aft to take a pin to hold board down when sailing. Make removable cover to go on when board is down (Detail K). 20. RUDDER - This is of the balance type. A very small area forward of the post will balance a large area abaft it. Set post by trial if necessary. The detail shown is very cheap and very strong. Either type of socket is good, as shown (Details H & P). The pipe is better for the decked boat, while the built-up one will serve for the open boat, and is less expensive by perhaps a dollar. But have all the seams accessible in case the soft cloth between the pieces of wood does not make tight. This cloth can be slopped with paint when laying. To cut the hole for the post, use a gouge if you have no extension bit, and, in any case, cut through each piece as you lay it and set post in place when screwing down each piece to get hole true. For the rudder post (Detail H) get a couple of feet or so of galvanized 1-inch genuine wrought iron pipe from the plumber's scrap pile, hacksaw it down the middle, working from sides alternately to keep cut true. Cut down perhaps a foot. This is easy. Do not try to flatten it out cold, as it will split. Have the blacksmith heat and spread and drill for the 1/4-inch bolts. This should cost about 25 cents. Now set the rudder and bolts in place and, with this assembled, place the socket in the boat and mark the position of the bolt which holds the shaft from dropping out, and also place where the tee shall come for the tiller. Take to the plumber, who will cut the pipe, put a long thread on it, screw on a tee which has a larger opening horizontally than vertically - they come standard if you can find them - and with this tee lined up with the rudder so that the tiller will be true, drill a 1/8-inch hole clear through tee and shaft. Through this run a wire to prevent tee from rotating on shaft. 21. SPARS (Detail L) - Choose a clear, straight 4 by 6 to cut mast from, preferably western fir. Have mill cut to 3 by 3 and 2 by 2 (Detail A). Mark mast as in diagram do not taper straight. Tack in brads at taper points, and spring the batten to get true curve. Saw to tapered square, working from both sides alternately to keep the lines, sawing perhaps 6 inches at a time on each side. Have the saw sharp. Where saw breaks out at edge, finish with plane - do no try to hew out, as the grain will tear in and leave a hollow in the mast. But work into a perfect squared stick. Make the octagon gauge, as shown. By twisting this as you go
19 towards the small end you get a true octagon on the mast. cut to this line with drawknife and finish with plane. This will give a true octagon. If this is well done, the work of rounding off is negligible. Bore hole 5/8 of an inch fore and aft at the head for halyard and work it out with knife so that rope will pass through easily. Make boom similarly. Jaws of hard wood. The boom tapers very sightly at after end, and flattens out at forward end to take jaws. Make long in case sail stretches. (See detail L). 22. SAILS (Details R, S & T) Do not be afraid to make your sails. You cannot equal those of a professional, of course; but what of it? Use 30-inch drilling, lap edges one inch and see down both free edges on a seeing mating, using number 30 thread and a long stitch and tight tension. Pin pieces together about one foot apart to be sure pieces pull alike. Lay the sail out with string on a large surface. Cut the sail to this pattern, selvage on the leach or rear edge, allowing hem at bias edges. Curve the edges you cut (at mast and boom) an inch or two out, especially on the edge next to the mast. Not too much, though, as the sail will bag. Hem bias edges, but leave selvage as is. Have at hand a piece of 1/4-inch manila rope long enough to go around the edges of sail, with some to spare. Hang it out of doors for a month or more. Sew this to edges of sail with sail twine or knitting cotton, well waxed and double, with a sail needle or any heavy needle, the needle going under one strand of the top each stitch. This is the only tricky part of the process. If the rope is not tight enough, or rather, longer than the edge, the edge will flop curiously. If it is shorter than the edge, the sail will bag. To get even tension, lay sail out and stretch sail and rope together. Catch rope to sail every foot or so, and as you sew the rope on, come out even at each catching. The luff (at the mast) and the foot will be easy, but you may have to do the leach over again, as I did. Sew on reef points of one-inch tape, 12 inches long, at each seam and two between. Make cover for sail so sun will not rot it. 23. CAULKING In making a boat tight, plan for a good seam and fill it with caulking. The planks may be too close in some cases. Make a hard wood wedge and drive it all along the seam to open the seam slightly. Take the caulking, preferably stranded cotton, and drive it into the seam with the wedge or a putty knife, or at the ends of the seams, with a screw driver. Fill the seams evenly and fairly tight. DO NOT drive caulking in seam at edges of bottom, between planking and side boards, that is, against mailings. The caulking will swell and pop off the planks. The caulking laid when planking should be sufficient. If leaks develop, fill with plenty of copper bottom paint. Making tight is not easy. The bottom seldom gives trouble, but at the rudder socket and stern, and at all unexpected places, leaks show up and cause trouble. Make tight with
20 caulking as far as possible. Then use white lead inside and out in corners, drying the boat before applying. A coat of paint does wonders, too, but all this should be done after the caulking is completed. 24. PAINTING Paint inside, thinning for first coat. Paint bottom with brown copper paint direct on the wood. giving two or three coats. Green looks better, but does not stay on as well. Paint some kind of a design on the sail (Details R & S), using one-third or one-quarter oil and the rest turpentine. Outline design in black about one-half inch wide. Two are shown, but the possibilitics are endless. 25. MODIFYING THE DESIGN- It would be doubtful policy to modify the design of the hull. From Mr. Ives' letter, it would seem that I have developed the design somewhat along the same lines us the fishermen did, namely, toward a dead rise skiff. The older sharpie had a long overhang aft, but actual analysis of the design does not favor this, and Minnow keeps going right into a sea, as the others did not. Do not put on a skeg, or change the rudder, for it is a joy to sail with the balanced rudder. The centerboard, however, may be moved forward or aft, at will, to suit any sail plan you may prefer. Personally, I like the two masts on an 18-foot boat, though I never could bring myself to move the boom up the mast and reef along the mast as the old sharpies did. On my 18- footer I had a gaff sail forward, but the gaff was a nuisance. Do not have any stays on the mast - there is a tradition to the effect that the spring of the mast helps the speed. A sloop rig should be good for the larger boats, but whatever rig is used, be sure the center of the total sail area comes over the center of the area of the centerboard. If a boat larger than 18 feet is to be built, increase the depth of the side boards as well as merely lengthening them, as shown, so there will be more freeboard aft. 26. GENERAL POINTS - It is well to have the boat decked - you can tip Without taking water over the lee rail. A cover on the centerboard box is worth having. as water shoots up in a chop. For a small boat, though, the open model is very handy for rowing. When sailing before the wind pull up the centerboard. One trial will show you why. Do not use ballast and try to carry more sail- you lose thereby. My father's plan of 1880 is said to have steered with an oar. This should help in a race but I found it a nuisance. Yachting would like to thank reader Fred Ganley for remembering this article and calling
21 it to our attention. Happy building, Fred!
Building a model of a Thames Barge
 Building a model of a Thames Barge Stage 1 : Reading the instructions The model which I purchased is of the Will Everard, a steel-hulled barge built in the 1920's, one of a range of laser-cut kits from
An Australian Classic by spectre.com
 An Australian Classic by www.go spectre.com Your Bug! Welcome to the Balain Bug experience!!!!!! The Bug kit has been designed so as to be a modern version of the Traditional Bug now you can sail like
D. N. HYLAN & ASSOCIATES, INC. BOATBUILDERS COQUINA STUDY PLANS
 D. N. HYLAN & ASSOCIATES, INC. BOATBUILDERS COQUINA STUDY PLANS LOA - 6' " BEAM - 6" DRAFT, " board up, 36" board down WEIGHT - with rig, 50 lb HULL TYPE - round bottom lapstrake CONSTRUCTION - glued lapstrake
Making Spars for the Schooner Jeanette
 Making Spars for the Schooner Jeanette..... by Byron Rosenbaum Figure 1. Byron Rosenbaum s 1:16-scale radio-controlled model of the schooner Jeanette. All photographs by the builder. The spars required
1 Tuning Platform Reseating Beam Pads Rudder alignment Noisy Foils Rig Tension...
 Contents 1 Tuning... 2 1.1 Platform... 2 1.2 Reseating Beam Pads... 2 1.3 Rudder alignment... 3 1.4 Noisy Foils... 3 1.5 Rig Tension... 4 1.6 Mast rake... 4 1.7 Spreader rake... 5 1.8 Diamond tension...
Wooden Canoe. Building a One-Off Wood & Canvas Canoe. Ray Arcand: A Living Link to the Past. Issue 134, April 2006 Volume 29, No.
 Wooden Canoe Issue 134, April 2006 Volume 29, No. 2 Building a One-Off Wood & Canvas Canoe Courses, Classes, Early Summer Ray Arcand: A Living Link to the Past WCHA Annual Report Building a One-Off Wood
Highlander Specifications
 Highlander Specifications July 22, 2012 Highlander Specifications The intent of this section is to clarify and add to what is shown in the official plans. In case of conflict between these specifications
CATBOX. A Puddle Duck Racer. By Jim Michalak
 CATBOX A Puddle Duck Racer By Jim Michalak CAT BOX HULL SPECIFICATIONS 1. Bow transom from 1/4" plywood. Top and bottom edges framed with 3/4 x 1-1/2" lumber with bevels as shown. Mark centerlines boldly.
Place a rope coil here
 1 2 3 4 The anchor buoys were made from Sculpey. You could however, carve them from wood but I wanted to continue my experimentation with this material. A buoy from this time period would have ranged from
THE CLASS RULES OF THE INTERNATIONAL 12 SQUARE METRE ONE DESIGN SHARPIE
 THE CLASS RULES OF THE INTERNATIONAL 12 SQUARE METRE ONE DESIGN SHARPIE THE CLASS RULES OF THE INTERNATIONAL 12 SQUARE METRE ONE DESIGN SHARPIE The official language of the Sharpie Class is English. In
In Part 6 of this series, we completed building and painting the hull and rigged the bowsprit. Now, we re ready to make up the masts and spars.
 In Part 6 of this series, we completed building and painting the hull and rigged the bowsprit. Now, we re ready to make up the masts and spars. Making the Spars I prefer to make up all the spars before
A white sail for Edmond Dantes
 A white sail for Edmond Dantes Making a new junk sail, then rigging and test-sailing it in the summer of 2012 Part one The construction of the sail..ed in June 2011... Edmond Dantes is a 9.47m /4-ton Mikkel
TUNE YOUR SAILS SPEED. Optimist Tuning Guide. Photo Wavelength
 TUNE YOUR SAILS FOR OUTRIGHT SPEED Photo Wavelength PEAK / HEAD THROAT TACK CLEW THANK YOU for choosing North Sails for your Optimist. Whether you are just starting out in an Optimist you are an experienced
Stevenson Projects Building the Hull Top Deck and Bulkheads
 Stevenson Projects Building the Hull 1. Print out both piece sheets. 2. Cut out one keel piece and glue it to a piece of balsa wood or dense cardboard. Cut out the second keel piece and glue it to the
Y-FLYER TUNING GUIDE ONSHORE ADJUSTMENTS
 Y-FLYER TUNING GUIDE Congratulations on your purchase of North Y-Flyer sails. We are confident you will find superior speed over all conditions. Your sails are designed to be fast, as well as easy to trim
Bladerider X8 Assembly Help Notes
 2.1 Remove All Parts & Have Some Tools Handy Remove all items from the box and identify each part as per the packing sheet and check that nothing is missing. If there is something missing, please email
Sailing Upwind. Section 14. Close-hauled. Starboard Tack. Port Tack Figure 14 1 Port Versus Starboard Tack. 14 Sailing Upwind 111
 14 ing Upwind 111 Section 14 ing Upwind Close-hauled. ing as close to the wind, or as directly into the wind, as possible. Also, on-the-wind or by-the-wind, beating. Cunningham (Rig). An arrangement of
Parts of the Ship. Terms you should already know
 Parts of the Ship Toronto Brigantine Terms you should already know After-peak Fore-peak Bow Stern Fairlead Scupper Freeing port Hull Deck Lifeline Hatch Skylight Cleat Pin-rail Fife-rail Spider-band Block
Sailboat Rigging and Tuning
 Sailboat Rigging and Tuning February 13, 2006 The following texts are compiled from three main sources, Bob Sterne (www.crya.ca), Greg Fisher (www.modelyacht.org), and the Soling 1M website (www.solingonemeter.org).
ANGEL INSTRUCTIONS ALMOST READY TO SAIL MODEL YACHT
 ANGEL INSTRUCTIONS ALMOST READY TO SAIL MODEL YACHT Long: 920mm High:1840mm Toatl sail area: 0.4 m2 1 MODEL YACHT ASSEMBLY INSTRUCTIONS & SAILING HINTS Thank you for purchasing one of our range of model
Highlander Specifications (DRAFT UNAPPROVED)
") Highlander Specifications March 26, 2014 Highlander Specifications (DRAFT UNAPPROVED) The intent of this section is to clarify and add to what is shown in the official plans. In case of conflict between
Highlander Specifications March 26, 2014 Highlander Specifications (DRAFT UNAPPROVED) The intent of this section is to clarify and add to what is shown in the official plans. In case of conflict between
Constitution Instructions
 Constitution Instructions This kit will build a 1:48 scale hull for the USS Constitution frigate. The kit contains the following parts. 1/8 deck with laser etched deck lines 1/8 railing Ribs Center keel
CONSTRUCTION OF A GUNBOAT A CLASS YACHT by Brian Dill
 CONSTRUCTION OF A GUNBOAT A CLASS YACHT by Brian Dill The Gunboat design is the latest Radio A class from Graham Bantock, optimised to provide the best boat speed below 4 knots and to be as good as possible
THE AMERICAN BARN DOOR KITE
 THE AMERICAN BARN DOOR KITE Oregon Kitemaker s Retreat January 2007 Rod Beamguard 4104 NW 112 th Way Vancouver, WA 98685-3578 (360) 574-8050 home (360) 750-9833 office kytfevr@wa-net.com PLANFORM BARN
Highlander Specifications
 Highlander Specifications March 14, 2019 Highlander Specifications The intent of this section is to clarify and add to what is shown in the official plans. In case of conflict between these specifications
THUNDER INSTRUCTIONS A LMOST READY TO SAIL MODEL YACHT
 THUNDER INSTRUCTIONS A LMOST READY TO SAIL MODEL YACHT Long: 1000mm High:1890mm Toatl sail area: 0.4 m2 1 MODEL YACHT ASSEMBLY INSTRUCTIONS & SAILING HINTS Thank you for purchasing one of our range of
North Sails Seattle Thunderbird Tuning Guide
 Page 1 of 6 North Sails Seattle Thunderbird Tuning Guide Introduction The following tuning guide is meant as a good starting point in setting up your boat. Since not all Thunderbirds are exactly alike
Tuning C420 Sails By Brian Doyle and Dave Kirkpatrick
 Tuning C420 Sails By Brian Doyle and Dave Kirkpatrick In the spring of 2003, the Club 420 Class sails were redesigned to provide a better competitive and useful lifespan. Now that several events have been
Set Up for Epsilon, Z Spar, Needlespar & Goldspar Masts
 Winning in the 470 by Ullman Sails Overview The 470 is very sensitive to wind and sea conditions. Optimizing your 470 s performance requires considerable adjustments in mast rake and tuning. This guide
Building a coracle. Let's build a coracle roughly like this:
 Building a coracle Let's build a coracle roughly like this: Modeled loosely as Severn-Ironbridge. Width about 3 1/2' (105 cm), length about 4 1/2' (135 cm), depth about 14" (35 cm). The oval of the gunwale
Chapter Twelve. Starting the rigging process
 Chapter Twelve Starting the rigging process Before I begin describing the rigging process, I must remind folks that it would be a great time to slip that traveler ring onto the bowsprit. I forgot to mention
TUNE YOUR SAILS SPEED. Viper 640 Tuning Guide. Rev. R03b
 TUNE YOUR SAILS FOR OUTRIGHT SPEED Mast Tuning Tuning Guide for the Carbon Mast SET SPREADER ANGLE Check spreader angle by placing a straightedge or string from shroud to shroud at the spreaders. Measure
8-GUN CORVETTE ASSEMBLY INSTRUCTIONS
 8-GUN CORVETTE ASSEMBLY INSTRUCTIONS THE HULL STEP 1 Fasten the Deck to the Hull. Find the hull. This is a large, pink, ship-shaped piece of insulating foam board. This will form the base of your model
Measurement Checklist for the Lido for the Championships
 This paper is intended to be a guide for rapid and easy measurement of the Lido 14 to assure painless application of the rules that, in general, govern one design performance and compliance. It is not
WILLEY CAT SHEET B. Daggerboard - 9mm x 2 Daggerboard Ballast - Lead/Epoxy - 6" diameter
 WILLEY CAT Willey Cat was designed for performance. The flexible reefing arrangement allows tailoring your sail area to wind conditions. Best with a crew of -. DESIGN FEATURES Flexible Reefing - reefs
CR 914 Class Rules. Revised July 15, 2000 See also CR-914 Class Rule Interpretations
 CR 914 Class Rules Revised July 15, 2000 See also CR-914 Class Rule Interpretations 1 GENERAL - CLASS: The CR 914 is a One-Design class. The Class objective is that the sailing skills of the skipper shall
Winners Of The Classic Boat Professional Boat Builders Trophy 1997 NORTH QUAY DAYBOATS NORTH QUAY 15, 17 & 19 GAFF RIGGED DAYBOATS
 North Quay Marine NEW TRADITIONS IN BOATBUILDING Winners Of The Classic Boat Professional Boat Builders Trophy 1997 NORTH QUAY DAYBOATS NORTH QUAY 15, 17 & 19 GAFF RIGGED DAYBOATS These are designed by
APPENDIX IV DEVELOPMENT AND MEASUREMENT RULES OF THE INTERNATIONAL TEN SQUARE METER SAILING CANOE
 APPENDIX IV Development Canoe Rules APPENDIX IV DEVELOPMENT AND MEASUREMENT RULES OF THE INTERNATIONAL TEN SQUARE METER SAILING CANOE 1 GENERAL Class and measurement rules measurement forms may be obtained
Daysailer Tuning Guide
 Daysailer Photo Deb McCaffrey For any question you may have on tuning your Daysailer for speed, contact our experts: Brian Hayes 203-783-4238 brian.hayes@northsails.com Chris Snow 619-226-1415 chris.snow@northsails.com
PT 11 trouble-shooting and maintenance.
 PT 11 trouble-shooting and maintenance. Does your rudder not stay down?...your back seat slip off?...your knobs tight and your leather pads loose? Maybe we can help. We have used our PT 11 s hard enough
QUALITY ALUMINUM BOAT LIFTS, INC. INSTRUCTIONS. Dominator Lake Lift
 INSTRUCTIONS Dominator Lake Lift PHONE:251-986-3882 * FAX:251-986-3136 QABLDOMINATORINST.2014 P a g e 1 Quality Aluminum Boat Lifts, INC. Installation Instructions: Dominator Lake Lift Thank you for your
Table of content Introduction 5 1. Part 1. Assembly Tools needed for Assembly Glossary Hulls Mounting the beams 7
 Table of content Introduction 5 1. Part 1. Assembly 6 1.1. Tools needed for Assembly 6 1.2. Glossary 6 1.3. Hulls 7 1.3.1. Mounting the beams 7 1.3.2. Fixing the mast rotation cleats 8 1.3.3. Placing the
Uncle John's Choupique Road Sulphur, LA Materials needed to build the basic boat 1/4" x 48" x 96" exterior plywood ~ 3 sheets
 Uncle John's 5229 Choupique Road Sulphur, LA 70665 Thank you for purchasing our plans. Have a safe and enjoyable experience building and using your craft. Materials needed to build the basic boat 1/4"
HIGHLANDER TUNING GUIDE
 HIGHLANDER TUNING GUIDE This document provides information on preparation, Quantum s sail tuning and technique, and other helpful tips to make sure you re ready to meet your challenge in today s competitive
TUNE YOUR SAILS SPEED. J/80 Tuning Guide. Rev R12a
 TUNE YOUR SAILS FOR OUTRIGHT SPEED J/80 Tuning Guide Rev R12a This Tuning Guide was written to help you get the most performance out of your J/80. North Sails has been sailing J/80s since they were first
TUNE YOUR SAILS FOR OUTRIGHT SPEED. Starling Tuning Guide Solutions for today s sailors
 1 TUNE YOUR SAILS FOR OUTRIGHT SPEED 1 The object of the Starling class is for all sails and masts to be identical. We pride ourselves on our ability to reproduce sails identically, so please feel free
2. Note that the ropes from the rigging board are secured in the cam cleats of the jib fairleads.
 VII 1. Place the hull, bow into wind, on its trailer, a soft surface, or a rigging board. We strongly recommend making a rigging board; it is simple and inexpensive and greatly simplifies rigging and working
SEA-BOATS, OARS AND SAILS
 SEA-BOATS, OARS AND SAILS by CONOR O BRIEN with thirteen pages of drawings by the author, photographs by Tim Cooke, and design drawings by François Vivier With a Foreword by SAM LLEWELLYN Lodestar Books
Far East Boat Optimist Rigging Instructions
 Far East Boat Optimist Rigging Instructions These instructions are written specifically for Far East Boats Championship and Racing Optimist. Parts of the Optimist PAGE 1 Sprit Wind Indicator Sail Mast
The M242 is a relatively easy boat to sail and the fleet has taken steps to make the boats as even as possible.
 Tuning Guide October 2005 Dear M242 Sailors, The M242 is a relatively easy boat to sail and the fleet has taken steps to make the boats as even as possible. This tuning guide was written as a reference
Viper 640 Tuning Guide
 Viper 640 Tuning Guide For any question you may have on tuning your Viper 640 for speed, contact our experts: Ched Proctor 203-877-7627 ched.proctor@northsails.com Zeke Horowitz 203-783-4241 zeke.horowitz@northsails.com
PAY N PAK, 1/12 th Scale, Limited Sport Hydro P Sport Hydro
 1980 82 PAY N PAK, 1/12 th Scale, Limited Sport Hydro P Sport Hydro Introduction: The 1980 turbine Pay N Pak is a good subject for a model race boat. It has a low profile, mild pickle-fork setback, long
M CLASS RATING RULES
 M CLASS RATING RULES The following are the freesail M Class building rules, originally adopted by M.Y.R.A.A. (Model Yacht Racing Association of America) on April 14, 1932 and by I.M.Y.R.U (International
Agenda. How a sailboat works What are you looking at? Modes of sailing A few boat handling tips Some resources
 Agenda How a sailboat works What are you looking at? Modes of sailing A few boat handling tips Some resources The Sail is a Wing Like a wing in principle, lift is generated by both the shape (camber) of
How to Make a Boffer Arrow
 How to Make a Boffer Arrow By Dean Hitchcox Intro: To make a boffer arrow you should have some experience making other weapons like a sword first. Bows and arrows can be dangerous if not made correctly.
Rhodes 19 Tuning Guide
 Rhodes 19 Tuning Guide Jud Smith jsmith@doylesails Tomas Hornos tomas@doylesails.com Send order forms to: onedesign@doylesails..com SETTING UP YOUR RHODES 19 FOR DOYLE SAILS BEFORE STEPPING THE MAST 1.
FDR CHRYSLER 16' CATAMARAN (MUSKETEER) The initial rigging of a sailboat is not difficult, but if the boat is strange
 The initial rigging of a sailboat is not difficult, but if the boat is strange") Page of 6 Revised 2/0/76 RIGGING INSTRUCTIONS FDR CHRYSLER 6' CATAMARAN (MUSKETEER) The initial rigging of a sailboat is not difficult, but if the boat is strange to the new owner, or the new owner is
Page of 6 Revised 2/0/76 RIGGING INSTRUCTIONS FDR CHRYSLER 6' CATAMARAN (MUSKETEER) The initial rigging of a sailboat is not difficult, but if the boat is strange to the new owner, or the new owner is
AUSTRALIAN ARROW AND ARAFURA CADET ASSOCIATION ARROW CATAMARAN RESTRICTIONS AND MEASUREMENT CERTIFICATE
 AUSTRALIAN ARROW AND ARAFURA CADET ASSOCIATION ARROW CATAMARAN RESTRICTIONS AND MEASUREMENT CERTIFICATE 1 NOTE: The object of these restrictions is to provide uniform specifications and restrictions for
The USA Canterbury J. Class Rules
 Canterbury J Class Owners Association The USA Canterbury J Class Rules 2010 As Accepted 2008 and Revised February 2010 Published March 2010 The Canterbury J Class Rules ~ 2008 Page 1 of 10 THE CANTERBURY
Sails. Sails: extract from 'Super-detailing the Cutter Sherbourne' page 1 George Bandurek
 Sails There are many arguments for adding or omitting the sails on a model ship. There is no right answer and I decided to have a combination of set and furled sails on my model of HM cutter Sherbourne
VALDIVIA BUILD LOG Dr Ron
 VALDIVIA BUILD LOG Dr Ron The Robbe kit of the two-masted schooner Valdivia was purchased in 2007, along with the fitting set and propulsion accessories, and has been staring me in the face since then
The Mirror, Rigging and Improving Performance. Series One, Basic Improvements
 The Mirror, Rigging and Improving Performance Short notes to help you towards that elusive goal of perfect performance. Series One, Basic Improvements Angus Carlisle Mirror Fleet Captain, 2005 Ripon Sailing
J/70 Tuning Guide. For any question you may have on tuning your J/70 for speed, contact our experts:
 Photo Paul Todd/OUTSIDE IMAGES For any question you may have on tuning your J/70 for speed, contact our experts: Tim Healy 401-683-7997 tim.healy@northsails.com Will Welles 401-683-7997 will.welles@northsails.com
North Sails One Design Atlantic Tuning Guide
 North Sails One Design Atlantic Tuning Guide North Sails One Design's Atlantic tuning booklet will cover mast tuning, sail care, boat preparation and sail trimming tips. If you have any questions or need
aero naut Order No. 3009/00
 aero naut Order No. 3009/00 Introduction: The model should be assembled following the sequence of the stages of construction described in these instructions. The laser-cut components are individually numbered.
OK DINGHY INTERNATIONAL ASSOCIATION. MANUAL OF MEASUREMENT Revised Apr 2009
 OK DINGHY INTERNATIONAL ASSOCIATION MANUAL OF MEASUREMENT Revised Apr 2009 1. GENERAL This manual should be read in conjunction with the racing rules of sailing 2009-2012, the current class rules and measurement
Melon-Shaped Egg Basket
 Melon-Shaped Egg Basket GH PRODUCTIONS, INC. The Basket Maker's Catalog Materials are available from your basketry supply store, or contact: GH Productions, Inc. The Basket Maker's Catalog 521 E. Walnut
MARIA HF31. SCALE: 1/72 Length: 365 mm width: 85mm height: 295 mm
 MARIA HF31 SCALE: 1/72 Length: 365 mm width: 85mm height: 295 mm HISTORY: Maria HF 31 is a fishing Ewer whose home base was Finkenwerder in northern Germany. Maria HF31 operated in the North Sea for more
2002 Tuning in a Vanguard 15
 2002 Tuning in a Vanguard 15 If you are the kind of person that likes to roll up to the regatta an hour before the start, throw the mast up, select a catch-all shroud setting, and then just focus on getting
Shoreline Cantilever Lift 2500lb Capacity Models: (108" inside width) - Part # (120" inside width) - Part #
 - Part # (120 inside width) - Part #") Shoreline Cantilever Lift 2500lb Capacity Models: 25108 (108" inside width) - Part # 1017402 25120 (120" inside width) - Part # 1017403 1. 2. 3. 4. 5. CAUTION - PUT SAFETY FIRST Before attempting to install
Shoreline Cantilever Lift 2500lb Capacity Models: 25108 (108" inside width) - Part # 1017402 25120 (120" inside width) - Part # 1017403 1. 2. 3. 4. 5. CAUTION - PUT SAFETY FIRST Before attempting to install
How Scott Builds a Fighter Kite, May 2011 Updated Sept 2018
 How Scott Builds a Fighter Kite, May 2011 Updated Sept 2018 MAKE A TEMPLATE 1. Draw half sail plan on 17x22 pad with 4x4 (1/4 inch) grid. Add ¼ inch extra on nose (for reinforcement) and plenty of extra
The Main Gaff... Main Gaff completed. Bearing block
 Once the boom has been placed on the model, the topping lift needs to be rigged. It will be belayed to the port side cap rail. Use the eye bolt aft of the tackle we set up for the backstay. The topping
CLASS RULES OF THE AUSTRALIAN 13FT SKIFF
 CLASS RULES OF THE AUSTRALIAN 13FT SKIFF TABLE OF CONTENTS 1. THE OBJECTS OF THE RULES... 2 2. RULES TO BE FOLLOWED WHEN BUILDING A SKIFF... 2 3. THE HULL... 3 4. CENTREBOARDS AND RUDDERS...3 5. WEIGHT...
Blazer Marine, Whiplash Sport 40
 Blazer Marine, Whiplash Sport 40 Thank you for choosing to build the Whiplash 40. We have spent over 12 years perfecting this design, and finally we are making it available to the world. We are excited
Square Diagonal Tripod Japanese Square Filipino Diagonal Round Shear Ladder
 Square Diagonal Tripod Japanese Square Filipino Diagonal Round Shear Ladder Square Lashing - Step by Step Used to fasten two spars or poles together. Start by crossing the two sticks or dowels at perpendicular
Wind Light Moderate Heavy Speed 0-8 mph 9-17 mph 18 + mph
 Hobie 20 Racing Setting - Compiled by Bob Mimlitch, Fleet 23, Dallas, TX Most of the information is from Bob Curry's articles in Catamaran Sailor published by Mary Wells. Wind Light Moderate Heavy Speed
Hansa COG 14 th century SCALE: 1/72 Length: 430mm Width: 210mm Height: 330mm
 Hansa COG 14 th century SCALE: 1/72 Length: 430mm Width: 210mm Height: 330mm HISTORY: The Hansa was a medieval association of German cities which engaged by in long distance business mainly in area of
Small, Lightweight, Very Portable and Low Cost. Print in Landscape Mode with ¼ inch borders.
 The 1 SHEET WEDGE Drawn 09-20-2015 Small, Lightweight, Very Portable and Low Cost Ken Simpson Designs Rev 07-31-2016 Print in Landscape Mode with ¼ inch borders It may look similar to some of my other
TECHNICAL DESCRIPTION MASTHEAD SLOOP:
 NEW SAILOR TECHNICAL DESCRIPTION MASTHEAD SLOOP: What is a masthead sloop?.page 2 Parts and function of the masthead sloop sail... Page3 Parts and function of the masthead sloop rigging Page 4 Parts and
Section V Sailing off the wind
 Section V Sailing off the wind 1 Sail shapes and flow patterns - off the wind a) Principles When reaching, it is maximum thrust which is important, and here the leech ribbons come into their own. Fig.43a
Trim Tab Wind Vane for boats with transom mounted rudders
 Trim Tab Wind Vane for boats with transom mounted rudders If your boat has a transom mounted rudder, you can build this self-steering windvane for around $150, using regular wood working tools and some
Classic Crosby Wianno Senior in excellent condition. Just launched for the 2018 season SALTWORKS is ready to go to her next owners
 http://www.yachtworld.com/brooklin Brooklin Boat Yard - John Maxwell P.O. Box 143 Brooklin, ME 04616, United States Tel: 207-359-2193 Tel: 207-387-8383 Fax: 207-359-8871 brokerage@brooklinboatyard.com
1/10 th Scale 1956 Ted Jones Classic Hydroplane
 1/10 th Scale 1956 Ted Jones Classic Hydroplane Preparation These plans show outside sheeting of 3/32 balsa laminated with 1/64 birch ply. This makes a light and strong skin for this boat. Optionally you
ASSEMBLY MANUAL HOBIE CATSY
 ASSEMBLY MANUAL HOBIE CATSY HOBIE CAT EUROPE ZI Toulon Est, BP 50 8078 Toulon cedex 9, France Tel : + (0)9 08 78 78 - Fax : + (0)9 08 99 Email : hobiecat@hobie-cat.net - http://www.hobie-cat.net ASSEMBLY
Vanguard Sailboats 300 Highpoint Avenue Portsmouth, RI For the dealer nearest you call SAIL
 Vanguard Sailboats 300 Highpoint Avenue Portsmouth, RI 02871 For the dealer nearest you call 800. 966.SAIL Unpack the major parts listed below and lay them out on a soft piece of ground free of sharp objects.
420 Rigging Guide.
 A smaller version of the olympic 470 class, the 420 was formerly a youth development class. It has a good class following, and is a good introduction to performance boats. With a PY number of 1087 it s
FISH NET REPAIR. By Alfred Carlson
 FISH NET REPAIR By Alfred Carlson 2 Contents 1. Contents 2 2. 3-Spot Repair (One Broken mesh) 3 3. V-Shaped Repair (Two Broken meshes ) 23 4. N-Shaped Repair (Three Broken meshes) 33 5. M-Shaped Repair
TUNE YOUR SAILS SPEED
 TUNE YOUR SAILS FOR OUTRIGHT SPEED J/70 Tuning Guide Rev. R02 After countless hours sailing, testing and competing in the J/70 One Design, North Sails has updated our tuning notes and tips in an effort
Shiel e d Kite t By B y Sam & Ca C rir King Ore r g e o g n o Kite t m e aker e rs s Retr t e r a e t t2013
 Shield Kite By Sam & Cari King Oregon Kitemaker s Retreat 2013 SAIL ASSEMBLY Your pre-cut sail pieces include half-inch seam allowances. This provides enough material to complete a 1/4 inch double rolled
Essential Rig Tuning Guide The Ins and Outs of tuning your mast.
 Essential Rig Tuning Guide The Ins and Outs of tuning your mast. Tuning Your Rig The main goal in tuning your mast is to achieve a spar that s straight. By doing this it will help you gain control of sail
Cub Scout Pack Rain Gutter Regatta
 Cub Scout Pack 350 2014 Rain Gutter Regatta Event Location & Date: Advance Firehouse, Saturday November 22nd 11:00am-1:00pm (racing as soon as everyone registers) 106 E Wall Street Advance, IN 46102-9407
Thistle Tuning Guide
 For any question you may have on tuning your Thistle for speed, contact our experts: Ched Proctor 203-783-4239 ched.proctor@northsails.com Brian Hayes 203-783-4238 brian.hayes@northsails.com onedesign.com
Topaz OMEGA Rigging Instructions
 Topaz OMEGA Rigging Instructions www.toppersailboats.com TOPAZ OMEGA RIGGING INSTRUCTIONS CONTENTS 02. Introduction 02. Manufacturers Details 03. Maintenance 04. Raising the Mast 05. Attaching the Boom
Melges 24 Sailing Guide
 RACING GUIDES www.ullmansails.com Upwind Sailing Melges 24 Sailing Guide The Melges is most efficient when sailed as flat as possible. Excessive heel causes leeway which is slow. The skipper must work
2,500/4,000 LB Easy Riser Vertical Cable Feighner Lift
 2,500/4,000 LB Easy Riser Vertical Cable Feighner Lift CAUTION - PUT SAFETY FIRST 1. Before attempting to install or operate this lift, study and fully understand the proper operating procedures and safety
Armed Virginia Sloop - Part 4 Deck Fittings
 Armed Virginia Sloop - Part 4 Deck Fittings With the deck planking completed, I planked the quarterdeck bulkhead and painted the inside of the bulwarks (but not the outside of the hull). Then I moved on
BASIC COROPLAST HULLS FOUR HULLS, all single occupant designs. Choose the one that suites your needs.
 BASIC COROPLAST HULLS FOUR HULLS, all single occupant designs. Choose the one that suites your needs. The build notes for one hull 5 type should 8 apply to all hull types. 1 CUT these 2 lines First 20
CONTESSA 32 CLASS ASSOCIATION TECHNICAL PAPER FITTING A GAS LOCKER
 CONTESSA 32 CLASS ASSOCIATION TECHNICAL PAPER FITTING A GAS LOCKER CONTACTS This document and the information contained therein remains the property of the Contessa 32 Class Association. The document may
APPENDIX IV DEVELOPMENT AND MEASUREMENT RULES OF THE INTERNATIONAL TEN SQUARE METRE SAILING CANOE (JANUARY 2008) 1 GENERAL
 1 GENERAL") APPENDIX IV DEVELOPMENT AND MEASUREMENT RULES OF THE INTERNATIONAL TEN SQUARE METRE SAILING CANOE (JANUARY 2008) 1 GENERAL Class and measurement rules measurement forms may be obtained from the I.C.F.
APPENDIX IV DEVELOPMENT AND MEASUREMENT RULES OF THE INTERNATIONAL TEN SQUARE METRE SAILING CANOE (JANUARY 2008) 1 GENERAL Class and measurement rules measurement forms may be obtained from the I.C.F.
U STAND INSTALLATION INSTRUCTIONS
 U STAND INSTALLATION INSTRUCTIONS Thank you for purchasing the incredible new U STAND by Stand N Fish. Once installed on your kayak the U STAND will enhance your kayak fishing enjoyment to a whole new